上传图片及存到大数据库
用纯ASP代码实现图片上传到指定文件夹并存入数据库中的代码

用纯ASP代码实现图片上传到指定文件夹并存入数据库中的代码用ASP编写网站应用程序时间长了,难免会遇到各式各样的问题,其中关于如何上传文件到服务器恐怕是遇见最多的问题了,尤其是上传图片,比如你想要在自己的社区里面实现类似网易虚拟社区提供的“每日一星”的功能,就要提供给网友上传照片的功能。
上传图片文件到服务器可以使用各种免费的文件上传组件,使用起来功能虽然很强大,但是由于很多情况下,我们只能使用免费的支持ASP的空间或者租用别人的虚拟空间,对于第一种情况,我们根本就没有可能来使用文件上传组件;至于第二种情况,我们也要付出不少的“银子”才可以。
除非你拥有自己的虚拟主机,你就可以随便的在服务器上面安装自己所需要的组件,这种情况对于大多数人来说是可望而不可及的。
那我们就没有办法了吗?呵呵,答案是肯定的(当然是肯定的了,要不然我也没法写出这篇文章啊)。
下面就让我们一起来使用纯ASP代码来实现图片的上传以及保存到数据库的功能(顺便也实现显示数据库中的图片到网页上的功能)。
首先我们先来熟悉一下将要使用的对象方法。
我们用来获取上一个页面传递过来的数据一般是使用Request对象。
同样的,我们也可以使用Request对象来获取上传上来的文件数据,使用的方法是Request.BinaryRead()。
而我们要从数据库中读出来图片的数据显示到网页上面要用到的方法是:Request.BinaryWrite()。
在我们得到了图片的数据,要保存到数据库中的时候,不可以直接使用Insert语句对数据库进行操作,而是要使用ADO的AppendChunk方法,同样的,读出数据库中的图片数据,要使用GetChunk 方法。
各个方法的具体语法如下:* Request.BinaryRead语法:variant = Request.BinaryRead(count)参数variant返回值保存着从客户端读取到数据。
count指明要从客户端读取的数据量大小,这个值小于或者等于使用方法Request.TotalBytes得到的数据量。
Express实现前端后端通信上传图片之存储数据库(mysql)傻瓜式教程(一)

Express实现前端后端通信上传图⽚之存储数据库(mysql)傻⽠式教程(⼀)在前端这个坑⾥摸爬滚打已经⼀年多了,终于下定决⼼写下⾃⼰第⼀篇博客(虽然内容原创居少,算是个整合内容),开始使⽤express的原因是因为⾃⼰想测试接收下前端上传图⽚并返回,实现图⽚上传。
后端各位⼤⼤们⼜都⽐较忙,没办法了,只能⾃⼰上了(哎,都是逼出来的)。
此教程适合没有接触过node的web前端开发,快速构建⾃⼰的框架,基于express4.x。
安装完成后,继续安装express的应⽤⾻架,⽣成默认项⽬$ npm install express-generator -g (-g表⽰全局安装,下次可以直接使⽤,不⽤再次安装) 接着在myapp⽂件夹下直接运⾏express,项⽬⽬录就直接⽣成了 然后安装所有依赖包:$ npm install 启动这个应⽤(MacOS 或 Linux 平台):$ DEBUG=myapp npm start Windows 平台使⽤如下命令:> set DEBUG=myapp & npm start 看到这个页⾯时,⼤家已经完成了基础的项⽬构建,继续往上添加⾃⼰的代码就可以了。
(到这部后⼤家可以把public ⽬录下的⽂件夹修改为⾃⼰喜欢的格式,例如:js,css,只是⼀个路径⽽已) 现在⼤家打开核⼼的app.js 下⾯咱们先不急着上传图⽚,先测试下前端发送的post和get请求。
以post请求为例,咱们把layout.jade修改成下⾯的样⼦doctype htmlhtmlheadtitle= titlelink(rel='stylesheet', href='/css/style.css')script(type="text/javascript", src="/js/jquery.js")script(type="text/javascript", src="/js/index.js")bodyblock content 在public/js下新建个index.js,加载jquery(只是为了简写的ajax)有⼈可能会问为什么会没有public路径,因为Express 内置的 express.static 可以⽅便地托管静态⽂件,例如图⽚、CSS、JavaScript ⽂件等,详细内容点这⾥,对应app.js的内容为e(express.static(path.join(__dirname, 'public')));只有这样才能读取到⽂件。
详解图片上传到数据库
详解图片上传到数据库数据库中的储存内容不是单单的数据,内容也是丰富多彩的,如今数据库可以实现将图片上传到数据库,下文中就为大家详细介绍将图片上传到数据库的知识。
下面我来汇总一下如何将图片保存到SqlServer、Oracle、Access数据库中,下文内容供大家参考学习,希望对大家能够有所帮助。
首先,我们要明白图片是以二进制的形式保存在数据库中的,那么把图片保存到数据库中的步骤大体上有这几步1.将图片转换为二进制数组(byte[]);2.把转换后的二进制数组(byte[])作为参数传递给要执行的Command;3.执行Command;首先,如何把图片转换成byte[],如果你使用的是2.0,那么你可以使用FileUpLoad控件来实现byte[] fileData = this.FileUpload1.FileBytes;如果你用的是1.1或者你在创建WinForm那么你可以使用下面的方法来把图片转换为byte[]1public byte[] getBytes(string filePath)2{3System.IO.FileStream fs = new System.IO.FileStream(filePath, System.IO.FileMode.Open);4byte[] imgData = new byte[fs.Length];5fs.Read(imgData, 0, (int)fs.Length);6return imgData;7}8接下来我们要做的就是要把已经得到的byte[]作为参数传递给Command对象1.SqlServer数据库。
SqlServer有Image字段类型,最大可以存储2G的数据。
byte[] fileData = this.FileUpload1.FileBytes;9string sql = "insert into t_img(img) values (@img)";10string strconn = System.Configuration.ConfigurationManager.ConnectionStrings["fengd ongDB"].ToString();11SqlConnection sqlConn = new SqlConnection(strconn);12SqlCommand sqlComm = new SqlCommand(sql, sqlConn);13sqlComm.Parameters.Add("@img", SqlDbType.Image);//添加参数14sqlComm.Parameters["@img"].Value = fileData;//为参数赋值1516sqlConn.Open();17sqlComm.ExecuteNonQuery();18sqlConn.Close();192.Oracle数据库。
存储图片到SQLSERVER大数据库中
如何存储图片到SQL SERVER数据库中SQL Server提供了一个特别的数据类型:image,它是一个包含binary数据的类型。
下边这个例子就向你展示了如何将文本或照片放入到数据库中的办法。
在这篇文章中我们要看到如何在SQL Server中存储和读取图片。
1、建立一个表:在SQL SERVER中建立这样结构的一个表:列名类型目的ID Integer 主键IDIMGTITLE Varchar(50) 图片的标题IMGTYPE Varchar(50) 图片类型. 要以辨认的类型IMGDATA Image 用于存储二进制数据2、存储图片到SQL SERVER数据库中为了能存储到表中,你首先要上传它们到你的WEB 服务器上,你可以开发一个web form,它用来将客户端中TextBox web control中的图片入到你的WEB服务器上来。
将你的 encType 属性设置为:myltipart/formdata.Stream imgdatastream = File1.PostedFile.InputStream;int imgdatalen = File1.PostedFile.ContentLength;string imgtype = File1.PostedFile.ContentType;string imgtitle = TextBox1.Text;byte[] imgdata = new byte[imgdatalen];int n = imgdatastream.Read(imgdata,0,imgdatalen);stringconnstr=((NameValueCollection)Context.GetConfig("appSettings"))["connstr"];SqlConnection connection = new SqlConnection(connstr);SqlCommand command = new SqlCommand("INSERT INTO ImageStore(imgtitle,imgtype,imgdata)VALUES ( @imgtitle, @imgtype,@imgdata )", connection );SqlParameter paramTitle = new SqlParameter("@imgtitle", SqlDbType.VarChar,50 );paramTitle.Value = imgtitle;command.Parameters.Add( paramTitle);SqlParameter paramData = new SqlParameter( "@imgdata", SqlDbType.Image );paramData.Value = imgdata;command.Parameters.Add( paramData );SqlParameter paramType = new SqlParameter( "@imgtype", SqlDbType.VarChar,50 ); paramType.Value = imgtype;command.Parameters.Add( paramType );connection.Open();int numRowsAffected = command.ExecuteNonQuery();connection.Close();3、从数据库中恢复读取现在让我们来从SQL Server中读取我们放入的数据吧!我们将要输出图片到你的浏览器上,你也可以将它存放到你要的位置。
php上传图片的代码并保存到数据库
php上传图⽚的代码并保存到数据库connet.php数据库⽂件<?phpmysql_connect("localhost","root",123)or die("sorry");mysql_select_db("db_user");mysql_query("set names utf8");>do_photo.php⽂件<?php//上传你的头像session_start();if(isset($_POST['update'])){include("connect.php");//限制上传照⽚的类型function photo_type($photo_file){//查找"."第⼀次出现的位置//strrpos() 函数查找字符串在另⼀个字符串中最后⼀次出现的位置。
如果成功,则返回位置,否则返回 false。
$position=strrpos($photo_file,".");//如果返回不是false//substr() ⽅法可在字符串中抽取从 start 下标开始的指定数⽬的字符。
//global $suffix;$suffix=substr($photo_file,$position+1,strlen($photo_file)-$position);return $suffix;//定义图⽚上传的⽬录名称//diretory(upload file)}//$photo_name=$_FILES['myform']['name'];$ext=photo_type($_FILES['myform']['name']);//strtolower()转换⼩写 strtoupper()转换⼤写//$ext=strtolower($ext);$upload_dir='./upload/';if($suffix!="jpg" && $suffix!="gif"){die("不⽀持这个类型的图⽚");}//转移到./upload///mova_uploaded_file()$uploadfile=$upload_dir.time().".".$suffix;if(move_uploaded_file($_FILES['myform']['tmp_name'],$uploadfile)){$sql1="update yonjian set photo='{$uploadfile}' where id='{$_SESSION['id']}'";if(mysql_query($sql1)){header("location:account.php");}}}><form name="ljklj" action="do_photo.php" method="post" enctype="multipart/form-data"> <input type="hidden" name="MAX_FILE_SIZE" value="2000000">⽂件<input name="myform" type="file" value="浏览" ><input type="submit" name="update" value="update"></form>请诸位⾼⼿多给建议,我在此多谢数据库为/*Navicat MySQL Data TransferSource Server : jiangSource Server Version : 50155Source Host : localhost:3306Source Database : db_userTarget Server Type : MYSQLTarget Server Version : 50155File Encoding : 65001Date: 2011-11-09 22:12:56*/SET FOREIGN_KEY_CHECKS=0;-- ------------------------------ Table structure for `photo`-- ----------------------------DROP TABLE IF EXISTS `photo`;CREATE TABLE `photo` (`id` int(11) NOT NULL AUTO_INCREMENT,`username` varchar(50) DEFAULT NULL,`photo` varchar(300) DEFAULT NULL,PRIMARY KEY (`id`)) ENGINE=InnoDB DEFAULT CHARSET=gbk;-- ------------------------------ Records of photo-- ----------------------------。
关于图片上传到服务器并保存到数据库然后读出显示到页面上的一系列例子
关于图片上传到服务器并保存到数据库,然后读出显示到页面上的一系列例子.cn/s/blog_4b8712eb010007zx.html(2007-02-03 09:08:23)转载▼分类:JAVA一、addImg.jsp 类似网易邮箱的多附件上传,无刷新动态添加<%@ page language="java" contentType="text/html; charset=gbk"pageEncoding="gbk"import=",,,java.util.*"%><!DOCTYPE HTML PUBLIC"-//W3C//DTD HTML 4.01Transitional//EN"><html><head><%String path = request.getContextPath();BookDAO bdao = new BookDAO();Book b = new Book();List booklist = bdao.findAll();if (booklist == null || booklist.size() == 0) { booklist = new ArrayList();}%><script>function addUploadFile(){var _table =document.getElementByIdx("uploadTable"); var rowIndex =_table.getElementsByTagName_r("tr").length -1;var _tr = _table.insertRow(rowIndex);var _td1 = _tr.insertCell(0);var _td2 = _tr.insertCell(1);var _td3 = _tr.insertCell(2);_tr.bgColor = '#E1E8F4';_tr.setAttribute("height","27");_tr.setAttribute("id",rowIndex.toString());_td1.setAttribute("width","15%");_td1.setAttribute("align","center");_td2.setAttribute("align","left");_td2.setAttribute("colspan","2");_td3.setAttribute("width","5%");var td1 = '图片';var td2 = '<input type="FILE"name="file'+rowIndex.toString()+'" size="20 " style="width:100%; font-size:12px; border:1px solid #555555;">';var td3 = '<input type="button"class="button"name="btnDel"'+rowIndex.toString()+' value="删除"onclick="delUploadFile('+rowIndex.toString( )+');">';_td1.appendChild(document.createTextNode(td1));_td2.appendChild(document.createElement(t d2));_td3.appendChild(document.createElement(t d3));}function delUploadFile(fileIndex){if (confirm('确定要删除么?')){var _table =document.getElementByIdx("uploadTable"); _table.deleteRow(document.getElementById x(fileIndex.toString()).rowIndex);}}function submitPage(){var form=document.getElementByIdx("form1");var flag=0;for(i=0;i<"input").length;i++){if("input")[i].type=="file"){if("input")[i].value==""){alert("请不要有空的上传文件框") flag=1;}}}if(flag==0){form.submit();}}</script></head><body><form name="form1" method="post" action="/TianaiSearch/UploadImage" ENCTYPE="multipart/form-data"><table width="100%" border="0" cellspacing="1" cellpadding="0"bgcolor="#869DD2"><tr><td><table id="uploadTable" width="100%" border="0" cellpadding="4" cellspacing="1" align="center" bgcolor="#ffffff"><tr><td height="40" colspan="2"><spanclass="style1 tt style1"><strong>上传文件信息</strong></span></td></tr><tr height="24" bgcolor="#EAEEF7"><td width="15%" align="center">对应文档</td><td align="left" colspan="2"><input type="text" name="file_id"size="20" style="width:100%; font-size:12px; border:1px solid #555555;"></tr><tr height="24" bgcolor="#EAEEF7"><td width="15%" align="center">来自书目</td><td align="left" colspan="2"><select name="book_id"><%for(int i=0;i<booklist.size();i++){b=(Book)booklist.get(i);%><optionvalue="<%=b.getId() %>"><%=b.getName() %></option><%}%></select></tr><tr height="24" bgcolor="#EAEEF7"><td width="15%" align="center">开始页码</td><td align="left" colspan="2"><input type="text"name="start_page_no" size="20"style="width:100%; font-size:12px; border:1px solid #555555;"></td></tr><tr height="27" bgcolor="#E1E8F4"><td width="15%" align="center">图片</td><td align="left" colspan="2"><input type="FILE"name="upload" size="20" style="width:100%;font-size:12px; border:1px solid #555555;"> </td></tr><tr bgcolor="#EAEEF7"><td colspan="4" align="center"><input type="button" class="button" name="addUpload" value="添加文件" onclick="addUploadFile();"> <input type="button" class="button" name="smtbtn" value="确认上传"onclick="submitPage();"> <input type="reset" class="button" name="bt4" value="重置"></td></tr></table></td></tr></table></form></body></html>二、UploadImage.servlet doPost方法//实例化上载beanmySmartUpload = new ;//初始化mySmartUpload.initialize(this.getServletCo nfig(),request,response);request.setCharacterEncoding("gbk");//设置上载的最大值mySmartUpload.setMaxFileSize(500 * 1024 * 1024);//上载文件try {mySmartUpload.upload();} catch (SmartUploadException e) {// TODO 自动生成catch 块e.printStackTrace();}//循环取得所有上载的文件for (int i = 0; i <mySmartUpload.getFiles().getCount(); i++) { //取得上载的文件myFile = mySmartUpload.getFiles().getFile(i);if (!myFile.isMissing()) {//取得上载的文件的文件名String myFileName =myFile.getFileName();//取得不带后缀的文件名String suffix = myFileName.substring(0, myFileName.lastIndexOf('.'));//取得后缀名String ext =mySmartUpload.getFiles().getFile(0).getFileExt();//取得文件的大小int fileSize = myFile.getSize();//保存路径String aa =getServletContext().getRealPath("/") + "jsp\\"; ;String trace = aa + myFileName;//取得别的参数// String explain = (String) mySmartUpload.getRequest()// .getParameter("text");// String send = (String) mySmartUpload.getRequest()// .getParameter("send");String sBook_id =(String)mySmartUpload.getRequest().getPara meter("book_id");"book id is "+sBook_id);int iBook_id = 0;if (sBook_id != null &&sBook_id.trim().length() != 0) {iBook_id = Integer.parseInt(sBook_id); }String sFile_id =(String)mySmartUpload.getRequest().getPara meter("file_id");"file_id is "+sFile_id);int iFile_id = 0;if (sFile_id != null &&sFile_id.trim().length() != 0) {iFile_id = Integer.parseInt(sFile_id);}String sStartPage_no =(String)mySmartUpload.getRequest().getPara meter("start_page_no");int iStartPage_no = 0;if (sStartPage_no != null && sStartPage_no.trim().length() != 0) {iStartPage_no =Integer.parseInt(sStartPage_no);}int iPage_no=0;if(iStartPage_no!=0){iPage_no=iStartPage_no+i;}//将文件保存在服务器端try {myFile.saveAs(trace, mySmartUpload.SAVE_PHYSICAL);} catch (SmartUploadException e) {e.printStackTrace();}//下面的是将上载的文件保存到数据库中//将文件读到流中file = new ;fis = newfile);;//打开数据库Image image = new Image(0, iFile_id, fis, iBook_id,iPage_no);ImageDAO idao = new ImageDAO();idao.add(image);}}}到此,图片就已经存进数据库了,接着看怎么把他显示到页面上三、showImage() servlet中使用private void ShowImage(String id, HttpServletRequest request,HttpServletResponse response) throws IOException {Connection conn = null;final String CONTENT_TYPE = "image/*"; ResultSet rs = null;Statement stmt = null;String SQLString = ""; // 定义查询语句String M_EorrMenage = ""; // 定义错误信息变量InputStream in = null; // 定义输入流int len = 10 * 1024 * 1024; // 定义字符数组长度// Initialize global variablesresponse.setContentType(CONTENT_TYP E);// PrintWriter out = response.getWriter(); try {SQLString = "select * from image where id=" + id;} catch (Exception e) {e.printStackTrace();response.setContentType("text/html; charset=gbk");M_EorrMenage = "请输入图片ID号"; M_EorrMenage = newString(M_EorrMenage.getBytes("ISO8859_1"), "GBK");// out.println("<%@ pagecontentType='text/html; charset=gbk' %>"); // out.println("<html>");//out.println("<head><title>id</title></head>"); // out.println("<body>");// out.println("<p>" + M_EorrMenage + "</p>");// out.println("</body></html>");}try {conn =DBConnection.newInstacne().getConnection( );stmt = conn.createStatement();rs = stmt.executeQuery(SQLString);} catch (SQLException ex) {"aq.executeUpdate:" + ex.getMessage());M_EorrMenage = "对不起,数据库无法完成此操作!";M_EorrMenage = newString(M_EorrMenage.getBytes("ISO8859_1 "), "GBK");response.setContentType("text/html; charset=gb2312");// out.println("<html>");//out.println("<head><title>no_database</title ></head>");// out.println("<body>");// out.println("<p>" + M_EorrMenage + "</p>");// out.println("</body></html>");}try {if (rs.next()) {in = rs.getBinaryStream("pic");response.reset(); // 返回在流中被标记过的位置response.setContentType("image/jpg"); // 或gif等// int len=in.available();//得到文件大小OutputStream toClient =response.getOutputStream();byte[] P_Buf = new byte[len];int i;while ((i = in.read(P_Buf)) != -1) {toClient.write(P_Buf, 0, i);}in.close();toClient.flush(); // 强制清出缓冲区\\rtoClient.close();} else {M_EorrMenage = "无此图片!";M_EorrMenage = newString(M_EorrMenage.getBytes("ISO8859_1 "),"GBK");response.setContentType("text/html;charset=gb2312");// out.println("<html>");// out// .println("<head><title>this photo isn\'t // have</title></head>");// out.println("<body>");// out.println("<p>" + M_EorrMenage + "</p>");// out.println("</body></html>");}rs.close();} catch (Exception e) {e.printStackTrace();M_EorrMenage = "无法读取图片!";M_EorrMenage = newString(M_EorrMenage.getBytes("ISO8859_1 "), "GBK");response.setContentType("text/html; charset=gb2312");// out// .println("<%@ pagecontentType=\'text/html; charset=gb2312\' // %>");// out.println("<html>");// out.println("<head><title>nophoto</title></head>");// out.println("<body>");// out.println("<p>" + M_EorrMenage + "</p>");// out.println("</body></html>");}try {conn.close();} catch (SQLException e) {e.printStackTrace();}}四、显示图片到页面上在任何想使用图片的页面上使用<img>标签,并把src指向显示图片用的servlet就可以PS:1.addImage 页面,form的ENCTYPE="multipart/form-data"必须这样设置才能正常使用jspSmartUpload组件进行上传,但是这样设置后,无法在下一个页面中通过request.getParameter()获取参数,只能通过mySmartUpload.getRequest().getParameter(p araName)进行参数的获取。
图片保存到mysql数据库
在我们设计和制作网站的过程中,有时把图片保存到数据库中要比存成文件的形式更加方便。
PHP和MySQL这对黄金组合可以很容易的实现上述功能。
在本文中,我们将会向读者介绍如何把图片保存到MySQL数据库中以及如何将数据库中的图片显示出来。
设置数据库我们通常在数据库中所使用的文本或整数类型的字段和需要用来保存图片的字段的不同之处就在于两者所需要保存的数据量不同。
MySQL数据库使用专门的字段来保存大容量的数据,数据类型为BLOB。
MySQL数据库为BLOB做出的定义如下:BLOB数据类型是一种大型的二进制对象,可以保存可变数量的数据。
BLOB具有四种类型,分别是TINYBLOB,BLOB, MEDIUMBLOB 和LONGBLOB,区别在于各自所能够保存的最大数据长度不同。
在介绍了所需要使用的数据类型之后,我们可以使用以下语句创建保存图象的数据表。
CREATE TABLE Images ( PicNum int NOT NULL AUTO_INCREMENT PRIMARY KEY, Image BLOB );编写上传脚本关于如何实现文件的上传,我们在这里就不再介绍了。
现在,我们主要来看一下如何接收上传文件并将其存入到MySQL数据库中。
具体的脚本代码如下,其中我们假定文件上传域的名称为Picture。
<? If($Picture != "none") { $PSize = filesize($Picture); $mysqlPicture = addslashes(fread (fopen($Picture, "r"), $PSize)); mysql_connect($host,$username,$password) or die("Unable to connect to SQL server"); @mysql_select_db($db) or die("Unable to select database"); mysql_query("INSERT INTO Images (Image) VALUES '($mysqlPicture')") or die("Can't Perform Query"); } else { echo"You did not upload any picture"; } ?>这样,我们就可以成功的把图片保存到数据库中。
将图片储存在MySQL数据库中的几种方法

将图⽚储存在MySQL数据库中的⼏种⽅法通常对⽤户上传的图⽚需要保存到数据库中。
解决⽅法⼀般有两种:1、将图⽚保存的路径存储到数据库;2、将图⽚以⼆进制数据流的形式直接写⼊数据库字段中。
以下为具体⽅法:⼀、保存图⽚的上传路径到数据库: string uppath="";//⽤于保存图⽚上传路径 //获取上传图⽚的⽂件名 string fileFullname = this.FileUpload1.FileName; //获取图⽚上传的时间,以时间作为图⽚的名字可以防⽌图⽚重名 string dataName = DateTime.Now.ToString("yyyyMMddhhmmss"); //获取图⽚的⽂件名(不含扩展名) string fileName = fileFullname.Substring(stIndexOf("\\") + 1); //获取图⽚扩展名 string type = fileFullname.Substring(stIndexOf(".") + 1); //判断是否为要求的格式 if (type == "bmp" || type == "jpg" || type == "jpeg" || type == "gif" || type == "JPG" || type == "JPEG" || type == "BMP" || type == "GIF") { //将图⽚上传到指定路径的⽂件夹 this.FileUpload1.SaveAs(Server.MapPath("~/upload") + "\\" + dataName + "." + type); //将路径保存到变量,将该变量的值保存到数据库相应字段即可 uppath = "~/upload/" + dataName + "." + type; }⼆、将图⽚以⼆进制数据流直接保存到数据库:引⽤如下命名空间:using System.Drawing; using System.IO; using System.Data.SqlClient; 设计数据库时,表中相应的字段类型为iamge 保存: //图⽚路径 string strPath = this.FileUpload1.PostedFile.FileName.ToString (); //读取图⽚ FileStream fs = new System.IO.FileStream(strPath, FileMode.Open, FileAccess.Read); BinaryReader br = new BinaryReader(fs); byte[] photo = br.ReadBytes((int)fs.Length); br.Close(); fs.Close(); //存⼊ SqlConnection myConn = new SqlConnection("Data Source=.;Initial Catalog=stumanage;User ID=sa;Password=123"); string strComm = " INSERT INTO stuInfo(stuid,stuimage) VALUES(107,@photoBinary )";//操作数据库语句根据需要修改 SqlCommand myComm = new SqlCommand(strComm, myConn); myComm.Parameters.Add("@photoBinary", SqlDbType.Binary, photo.Length); myComm.Parameters["@photoBinary"].Value = photo; myConn.Open(); if (myComm.ExecuteNonQuery() > 0) { bel1.Text = "ok"; } myConn.Close(); 读取: ...连接数据库字符串省略 mycon.Open(); SqlCommand command = new SqlCommand("select stuimage from stuInfo where stuid=107", mycon);//查询语句根据需要修改 byte[] image = (byte[])command.ExecuteScalar (); //指定从数据库读取出来的图⽚的保存路径及名字 string strPath = "~/Upload/zhangsan.JPG"; string strPhotoPath = Server.MapPath(strPath); //按上⾯的路径与名字保存图⽚⽂件 BinaryWriter bw = new BinaryWriter(File.Open(strPhotoPath,FileMode.OpenOrCreate)); bw.Write(image); bw.Close(); //显⽰图⽚ this.Image1.ImageUrl = strPath; //采⽤这两种⽅式可以根据实际需求灵活选择。
实物资产管理中的图片批量导入数据库的方法及系统

实物资产管理中的图片批量导入数据库的方法及系统在当今数字化的时代,企业对于实物资产的管理越来越依赖于信息化系统。
实物资产的管理不仅涉及到资产的基本信息,如名称、型号、价值等,还常常需要关联实物资产的图片,以便更直观、准确地进行识别和管理。
然而,如何将大量的实物资产图片批量导入数据库,成为了一个亟待解决的问题。
一、批量导入图片的重要性实物资产图片能够提供更直观、详细的资产信息。
通过图片,管理人员可以迅速了解资产的外观、状态,减少对文字描述的依赖,提高管理效率和准确性。
批量导入图片能够大大节省时间和人力成本,避免逐个处理图片的繁琐过程。
对于拥有大量实物资产的企业来说,这一点尤为重要。
二、图片批量导入数据库面临的挑战1、图片格式和大小的多样性实物资产图片可能来自不同的设备和来源,格式各异,如 JPEG、PNG 等,而且图片的大小也各不相同。
这就需要在导入过程中进行格式转换和大小调整,以适应数据库的存储要求。
2、数据准确性和一致性确保图片与对应的实物资产信息准确匹配,避免出现张冠李戴的情况。
同时,要保证所有图片的相关属性(如拍摄时间、拍摄地点等)在数据库中的记录保持一致。
3、数据库性能大量图片的同时导入可能会对数据库的性能造成影响,导致系统响应变慢甚至崩溃。
因此,需要优化导入过程,减少对数据库的压力。
4、网络传输问题如果图片需要通过网络传输到数据库服务器,网络的稳定性和带宽可能会成为限制因素,导致传输中断或延迟。
三、图片批量导入数据库的方法1、前端预处理在客户端对图片进行预处理,包括格式转换、大小调整、压缩等操作。
可以使用一些图像处理工具或库,如 ImageMagick、OpenCV 等,将图片统一转换为数据库支持的格式,并调整到合适的大小和分辨率。
同时,为每张图片生成唯一的标识符,以便与实物资产信息进行关联。
2、数据分批处理将大量的图片分成较小的批次进行导入。
这样可以避免一次性处理过多的数据导致数据库性能下降。
上传图片至数据库内功能的实现(OLE对象)
上传图片至数据库内功能的实现(OLE对象)一般的无组件上传类,其上传过程是将图片先保存到指定文件夹,与此同时将该路径保存至数据库字段的。
显示图片则是根据数据库表中的路径字段对应显示的。
当然有关图片的管理,比如删除:只删除了路径,实际的图片需要根据该路径通过FSO进行删除……那有没有这样一种情况:将图片直接作为一个字段的值保存。
对图片的操作就象是对数据字段的操作一样熟练。
答案是肯定的,只是将该字段的类型设为OLE对象知识点:OLE对象字段用来存储诸如Microsoft Word或Microsoft EXCEL文档、图片、声音的数据以及在别的程序中创建的其他类型的二进制数据。
OLE对象可以链接或嵌入到Microsoft Access表的字段中。
一、设计数据库testimg.mdb为方便调试,设计表imgurl,其中两个字段:id(自动编号、关键字)、img(OLE对象)二、连接数据库文件conn.asp三、提供上传图片的表单页面upload.html四、接受数据并添加记录页upload.asp<!--#include file="conn.asp"--><%formsize=request.totalbytesformdata=request.binaryread(formsize)bncrlf=chrB(13)&chrB(10)divider=leftB(formdata,clng(instrb(formdata,bncrlf))-1) datastart=instrb(formdata,bncrlf&bncrlf)+4dataend=instrb(datastart+1,formdata,divider)-datastart mydata=midb(formdata,datastart,dataend)set rs=server.createobject("ADODB.recordset")rs.open "SELECT * FROM imgurl",conn,3,3rs.addnewrs("img").AppendChunk myDatars.updaters.closeset rs=nothingset conn=nothingresponse.redirect "index.asp"%>五、提取数据库表中图片字段内容以做显示图片页showimg.asp六、显示图片的index.asp。
JSP上传图片到数据库的例子

现在想写个程序向数据库中插入图片路径(或则插入图片也可以)最好是插入图片的路径这样可插入任意大的图片...请高手指点一下思路..感激不尽1.通过显示层向数据库中插入图片2.在界面显示的时候是小图片(缩小过的)3.当点击查看大图片会显示图片(原来的大小)提供给你图片上传和显示的代码吧!希望对你有帮助我在程序代码里贴了向Mysql数据库写入image代码的程序,可是好多人都是Java的初学者,对于这段代码,他们无法将它转换成jsp,所以我在这在写一下用jsp怎样向数据库写入图像文件。
大家先在数据库建这样一张表,我下面的这些代码对任何数据库都通用,只要支持blob类型的只要大家将连接数据库的参数改一下就可以了。
SQL> create table image(id int,content varchar(200),image blob);如果在sqlserver2000的数据库中,可以将blob字段换为image类型,这在SqlServer2000中是新增的。
testimage.html文件内容如下:<HTML><HEAD><TITLE> Image File </TITLE><meta http-equiv= "Content-Type " content= "text/html; charset=gb2312 "></HEAD><FORM METHOD=POST ACTION= "testimage.jsp "><INPUT TYPE= "text " NAME= "content "> <BR><INPUT TYPE= "file " NAME= "image "> <BR><INPUT TYPE= "submit "> </FORM><BODY></BODY></HTML>我们在Form的action里定义了一个动作testimage.jsp,它的内容如下:<%@ page contentType= "text/html;charset=gb2312 "%><%@ page import= "java.sql.* " %><%@ page import= "java.util.* "%><%@ page import= "java.text.* "%><%@ page import= "java.io.* "%><html><%Class.forName( "org.gjt.mm.mysql.Driver ").newInstance();String url= "jdbc:mysql://localhost/mysql?user=root&password=&useUnicode=true&characterEncoding=885 9_1 ";//其中mysql为你数据库的名字,user为你连接数据库的用户,password为你连接数据库用户的密码,可自己改Connection conn= DriverManager.getConnection(url);String content=request.getParameter( "content ");String filename=request.getParameter( "image ");FileInputStream str=new FileInputStream(filename);String sql= "insert into test(id,content,image) values(1,?,?) ";PreparedStatement pstmt=dbconn.conn.prepareStatement(sql);pstmt.setString(1,content);pstmt.setBinaryStream(2,str,str.available());pstmt.execute();out.println( "Success,You Have Insert an Image Successfully ");%>下面我写一个测试image输出的例子看我们上面程序写的对不对,testimageout.jsp的内容如下:<%@ page contentType= "text/html;charset=gb2312 "%><%@ page import= "java.sql.* " %><%@ page import= "java.util.* "%><%@ page import= "java.text.* "%><%@ page import= "java.io.* "%><html><body><%Class.forName( "org.gjt.mm.mysql.Driver ").newInstance();String url= "jdbc:mysql://localhost/mysql?user=root&password=&useUnicode=true&characterEncoding=885 9_1 ";//其中mysql为你数据库的名字,user为你连接数据库的用户,password为你连接数据库用户的密码,可自己改Connection conn= DriverManager.getConnection(url);String sql = "select image from test where id =1 ";Statement stmt=null;ResultSet rs=null;try{stmt=conn.createStatement();rs=stmt.executeQuery(sql);}catch(SQLException e){}while(rs.next()) {res.setContentType( "image/jpeg ");ServletOutputStream sout = response.getOutputStream();InputStream in = rs.getBinaryStream(1);byte b[] = new byte[0x7a120];for(int i = in.read(b); i != -1;){sout.write(b);in.read(b);}sout.flush();sout.close();}}catch(Exception e){System.out.println(e);}%></body></html>你运行这个程序,你就会看到刚才你写入美丽的图片就会显示在你面前。
winform上传图片到数据库

方法一:在数据库中添加图片名字,然后把图片存在指定的文件夹中这种方法存起来简单,但是删除的时候麻烦。
存:在数据库中建一个文本字段(access)或者varchar字段(sqlserver)长度能放上一张图片即可过程:就是一般的存的insert into举个例子:sql数据库中有一个id字段自增类型一个name字段,用于存放图片名称的类型是varchar类型这winform界面中你可以拖动一个TextBox,用于存放路径,一个Button这个就不说了,还有一个openFileDialogif (this.openFileDialog1.ShowDialog() == DialogResult.OK){his.textBox1.Text = openFileDialog1.FileName;} //打开路径,必不可少的这些都是是在button单击事件里完成的if (openFileDialog1.FileName.Length > 0) // 判断openFileDialog1路径的长度{string oldName = openFileDialog1.FileName; //定义一个string类型的变量用于存放【文件路径】string[] splitName = oldName.Split('.'); //为获取文件的扩展名做准备的string ext = splitName[splitName.Length - 1]; //文件的扩展名if (ext == "jpg" || ext == "gif" || ext == "bmp" || ext == "JPG") //限制上传图片的格式{string dbName = DateTime.Now.ToString("yyyyMMddhhmmss") + "." + ext; //给上传的图片起个名字!以时间命名string newName = AppDomain.CurrentDomain.BaseDirectory + dbName; //新路径!这是个相对路径File.Copy(oldName, newName, true); //把文件从以前的路径复制到新的路径中去//下面就开始添加到数据库里面了string constring="";//数据库的连接字符串using (SqlConnection con=new SqlConnection (constring)){con.open();stirng sql="insert into shujukuname (name) values(@name)"; //因为id自增的这里只需要添加图片名称SqlCommand cmd = new SqlCommand(sql,con);cmd.Parameters.Add("@name",SqlDbType.VarChar).Value=TextBox1.Text.Trim();cmd.ExecuteNonQuery();con.Close();}}}//这样就添加完成了显示图片:这里一定要有一个PictureBox1要从数据库中取出这个nameusing (SqlConnection con=new SqlConnection (constring)){string sql="select name from shujukuname where id=' 1' ";//当id=1的时候查询的图片的名称SqlDataAdapter da = new SqlDataAdapter(sql, con);con.Open();DataTable dt=new DataTable();da.Fill(dt);string name =dt.Rows[0]["name"].ToString();con.Close(); //这样就获取出name来了,然后进行显示}string path=Application.StartupPath + "//"+ name; //一张图片的路径if(File.Exists(path)) //根据这个路劲显示有没有这张图片{PictureBox1.Image=Image.FromFile(path); //PictureBox1显示的path路径的图片}else{PictureBox1.Image=Image.FromFile(Application.StartupPath + "//" +默认图片); //PictureBox1显示的默认的的图片}winform 中往数据库中添加图片的两种方式之二:直接把图片添加在sqlserver中首先要有一个image或者binary类型的字段这种是以二进制形式插入到数据库中FileStream fs = new FileStream(pathName, System.IO.FileMode.Open, System.IO.FileAccess.Read);byte[] buffByte = new byte[fs.Length];fs.Read(buffByte, 0, (int)fs.Length);fs.Close(); //数据库字段为image类型,将图片转化为byte[],保存到数据库SqlConnection db = new SqlConnection(strConn);db.Open();string strSQL = "INSERT INTO shujuktable (name) values (@name) ";SqlCommand cmd = new SqlCommand(strSQL, db);cmd.Parameters.Add( "@name", SqlDbType.Image);cmd.Parameters[ "@name"].Value = buffByte;cmd.ExecuteNonQuery(); //保存图片的过程清理资源以上这部分是如何添加图片,下面这部分是读取图片-————————————————————————————————————————————————SqlConnection conn = new SqlConnection(strConn);DataTable dt = new DataTable();SqlDataAdapter adp = new SqlDataAdapter("select name from shujuktable where ID='1'", conn);adp.Fill(dt);byte[] buffByte = (byte[])dt.Rows[0][“name”];MemoryStream ms = new MemoryStream(buffByte);Image image = Image.FromStream(ms, true);this.pictureEdit1.Image = image;。
php实现上传图片保存到数据库的方法
php实现上传图⽚保存到数据库的⽅法php实现上传图⽚保存到数据库的⽅法。
分享给⼤家供⼤家参考。
具体分析如下:php 上传图⽚,⼀般都使⽤move_uploaded_file⽅法保存在服务器上。
但如果⼀个⽹站有多台服务器,就需要把图⽚发布到所有的服务器上才能正常使⽤(使⽤图⽚服务器的除外)如果把图⽚数据保存到数据库中,多台服务器间可以实现⽂件共享,节省空间。
⾸先图⽚⽂件是⼆进制数据,所以需要把⼆进制数据保存在mysql数据库。
mysql数据库提供了BLOB类型⽤于存储⼤量数据,BLOB是⼀个⼆进制对象,能容纳不同⼤⼩的数据。
BLOB类型有以下四种,除存储的最⼤信息量不同外,其他都是⼀样的。
可根据需要使⽤不同的类型。
TinyBlob 最⼤ 255BBlob 最⼤ 65KMediumBlob 最⼤ 16MLongBlob 最⼤ 4G数据表photo,⽤于保存图⽚数据,结构如下:复制代码代码如下:CREATE TABLE `photo` (`id` int(10) unsigned NOT NULL auto_increment,`type` varchar(100) NOT NULL,`binarydata` mediumblob NOT NULL,PRIMARY KEY (`id`)) ENGINE=MyISAM DEFAULT CHARSET=latin1 AUTO_INCREMENT=1 ;upload_image_todb.php:复制代码代码如下:<?php// 连接数据库$conn=@mysql_connect("localhost","root","") or die(mysql_error());@mysql_select_db('demo',$conn) or die(mysql_error());// 判断action$action = isset($_REQUEST['action'])? $_REQUEST['action'] : '';// 上传图⽚if($action=='add'){$image = mysql_escape_string(file_get_contents($_FILES['photo']['tmp_name']));$type = $_FILES['photo']['type'];$sqlstr = "insert into photo(type,binarydata) values('".$type."','".$image."')";@mysql_query($sqlstr) or die(mysql_error());header('location:upload_image_todb.php');exit();// 显⽰图⽚}elseif($action=='show'){$id = isset($_GET['id'])? intval($_GET['id']) : 0;$sqlstr = "select * from photo where id=$id";$query = mysql_query($sqlstr) or die(mysql_error());$thread = mysql_fetch_assoc($query);if($thread){header('content-type:'.$thread['type']);echo $thread['binarydata'];exit();}}else{// 显⽰图⽚列表及上传表单><!DOCTYPE HTML PUBLIC "-//W3C//DTD HTML 4.01 Transitional//EN" "/TR/html4/loose.dtd"><html><head><meta http-equiv="content-type" content="text/html; charset=utf-8"><title> upload image to db demo </title></head><body><form name="form1" method="post" action="upload_image_todb.php" enctype="multipart/form-data"><p>图⽚:<input type="file" name="photo"></p><p><input type="hidden" name="action" value="add"><input type="submit" name="b1" value="提交"></p> </form><?php$sqlstr = "select * from photo order by id desc";$query = mysql_query($sqlstr) or die(mysql_error());$result = array();while($thread=mysql_fetch_assoc($query)){$result[] = $thread;}foreach($result as $val){echo '<p><img src="upload_image_todb.php?action=show&id='.$val['id'].'&t='.time().'" width="150"></p>'; }></body></html><?php}>希望本⽂所述对⼤家的php程序设计有所帮助。
怎样将图片上传到数据库进行保存
这个范例共包括三个ASP文件和一个数据库(一个表),全部在同一目录下。
1、tblImage 表结构(ACCESS 2000)sn 自动编号序列号content-type 文本图片类型image OLE 对象图片数据2、SimpleImageToData.asp:上传表单及保存图片到数据库的代码部分,主要文件。
<%@ Language=VBScript %><% option explicit %><%'从一个完整路径中析出文件名称function getFileNamefromPath(strPath)getFileNamefromPath = mid(strPath,instrrev(strPath,"\")+1)end function'定义数据库连接字符串dim cnstrcnstr = "driver={Microsoft Access Driver (*.mdb)};dbq=" &server.MapPath("./upload.mdb")%><HTML><HEAD><title>单个图像保存到数据库</title><meta http-equiv="Content-Type" content="text/html; charset=gb2312"> </HEAD><body><p><a href="SimpleImageToData.asp">上传图片</a><a href="ShowImageListFromData.asp">显示图片</a><hr></p><%if request.ServerVariables("REQUEST_METHOD") = "POST" thendim sCome, sGo, binData, strDatadim posB, posE, posSB, posSEdim binCrlfdim strPath, strFileName, strContentTypebinCrlf = chrb(13)&chrb(10) '定义一个单字节的回车换行符set sCome = server.CreateObject("adodb.stream")sCome.Type = 1 '指定返回数据类型 adTypeBinary=1,adTypeText=2sCome.Mode = 3 '指定打开模式adModeRead=1,adModeWrite=2,adModeReadWrite=3sCome.OpensCome.Write request.BinaryRead(request.TotalBytes)sCome.Position = 0binData = sCome.Read'response.BinaryWrite binData '调试用:显示提交的所有数据'response.Write "<hr>" '调试用set sGo = server.CreateObject("adodb.stream")sGo.Type = 1sGo.Mode = 3sGo.OpenposB = 1posB = instrb(posB,binData,binCrlf)posE = instrb(posB+1,binData,binCrlf)'response.Write posB & " | " & posE & "<br>"sCome.Position = posB+1sCome.CopyTo sGo,posE-posB-2sGo.Position = 0sGo.Type = 2sGo.Charset = "gb2312"strData = sGo.ReadTextsGo.Close'response.Write strData & "<hr>"posSB = 1posSB = instr(posSB,strData,"filename=""") + len("filename=""")posSE = instr(posSB,strData,"""")if posSE > posSB thenstrPath = mid(strData,posSB,posSE-posSB)'response.Write "本地路径:" & strPath & "<br>"'response.Write "文件名:" & getFileNamefromPath(strPath) & "<br>"posB = posEposE = instrb(posB+1,binData,binCrlf)'response.Write posB & " | " & posE & "<br>"sGo.Type = 1sGo.Mode = 3sGo.OpensCome.Position = posBsCome.CopyTo sGo,posE-posB-1sGo.Position = 0sGo.Type = 2sGo.Charset = "gb2312"strData = sGo.ReadTextsGo.ClosestrContentType = mid(strData,16) '此处因为固定的,所以省略查找 :-) 'response.Write "图片类型:" & strContentType & "<hr>"posB = posE+2posE = instrb(posB+1,binData,binCrlf)'response.Write posB & " | " & posE & "<br>"sGo.Type = 1sGo.Mode = 3sGo.OpensCome.Position = posB+1sCome.CopyTo sGo,posE-posB-2sGo.Position = 0strData = sGo.ReadsGo.Close'response.Write lenb(strData) & "<br>"dim cn, rs, sqlset cn = server.CreateObject("adodb.connection")cn.Open cnstrset rs = server.CreateObject("adodb.recordset")sql = "select * from tblImage"rs.Open sql,cn,1,3rs.AddNewrs.Fields("content-type").Value = strContentTypers.Fields("image").AppendChunk strDatars.Updaters.Closeset rs = nothingcn.Closeset cn = nothingresponse.Write "图片保存成功!" & "<br>"elseresponse.Write "没有上传图片!" & "<br>"end ifset sGo = nothingsCome.Closeset sCome = nothingelse%><form id="frmUpload" name="frmUpload" action="SimpleImageToData.asp" method="post" target="_self" enctype="multipart/form-data"><INPUT id="filImage" type="file" name="filImage" size="40"><BR><INPUT id="btnUpload" type="submit" value="Upload" name="btnUpload"> </form><%end if%></body></HTML>3、ShowImageListFromData.asp<%@ Language=VBScript %><% option explicit %><html><head><title>显示数据库中已有图片的列表</title><meta http-equiv="Content-Type" content="text/html; charset=gb2312"> </head><body><p><a href="SimpleImageToData.asp">上传图片</a><a href="ShowImageListFromData.asp">显示图片</a><hr></p><table border=0 cellpadding=2 cellspacing=2><tr><td valign=top><%dim cnstrcnstr = "driver={Microsoft Access Driver (*.mdb)};dbq=" &server.MapPath("./upload.mdb")dim cn, sql, rsset cn = server.CreateObject("adodb.connection")cn.Open cnstrsql = "select sn,[content-type],image from tblImage"set rs = cn.Execute(sql)response.Write "<table border=1 cellspacing=2 cellpadding=5>"response.Write "<tr>"response.Write "<th>序列号</th><th>图片类型</th><th>图片</th>"response.Write "</tr>"do until rs.eofresponse.Write "<tr>"response.Write "<td>" & rs("sn") & "</td>"response.Write "<td>" & rs("content-type") & "</td>"response.Write "<td><a href='ShowImageListFromData.asp?sn=" &rs("sn") & "'>看图</a></td>"response.Write "</tr>"rs.movenextloopresponse.Write "</table>"cn.Closeset cn = nothing%></td><td valign=top><%dim snsn = request.QueryString("sn")if sn = "" thenresponse.Write "没有指定图片!"elseresponse.Write "<img border=1 src=ShowImageFromData.asp?sn=" & sn & ">"end if%></td></tr></table></body></html>4、ShowImageFromData.asp<%@ Language=VBScript %><% option explicit %><%dim snsn = request.QueryString("sn")if sn = "" then response.Enddim cnstrcnstr = "driver={Microsoft Access Driver (*.mdb)};dbq=" &server.MapPath("./upload.mdb")dim cn, sql, rsset cn = server.CreateObject("adodb.connection")cn.Open cnstrsql = "select sn,[content-type],image from tblImage where sn=" & cint(sn) set rs = cn.Execute(sql)response.ContentType = rs("content-type")response.BinaryWrite rs("image")set rs = nothingcn.Closeset cn = nothing%>。
上传图片保存到MySql数据库并显示--经验证有效
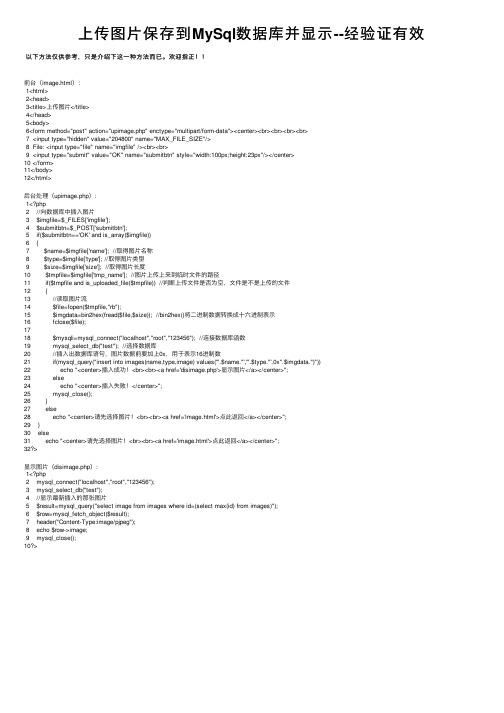
上传图⽚保存到MySql数据库并显⽰--经验证有效以下⽅法仅供参考,只是介绍下这⼀种⽅法⽽已。
欢迎指正!!前台(image.html):1<html>2<head>3<title>上传图⽚</title>4</head>5<body>6<form method="post" action="upimage.php" enctype="multipart/form-data"><center><br><br><br><br>7 <input type="hidden" value="204800" name="MAX_FILE_SIZE"/>8 File: <input type="file" name="imgfile" /><br><br>9 <input type="submit" value="OK" name="submitbtn" style="width:100px;height:23px"/></center>10 </form>11</body>12</html>后台处理(upimage.php):1<?php2 //向数据库中插⼊图⽚3 $imgfile=$_FILES['imgfile'];4 $submitbtn=$_POST['submitbtn'];5 if($submitbtn=='OK' and is_array($imgfile))6 {7 $name=$imgfile['name']; //取得图⽚名称8 $type=$imgfile['type']; //取得图⽚类型9 $size=$imgfile['size']; //取得图⽚长度10 $tmpfile=$imgfile['tmp_name']; //图⽚上传上来到临时⽂件的路径11 if($tmpfile and is_uploaded_file($tmpfile)) //判断上传⽂件是否为空,⽂件是不是上传的⽂件12 {13 //读取图⽚流14 $file=fopen($tmpfile,"rb");15 $imgdata=bin2hex(fread($file,$size)); //bin2hex()将⼆进制数据转换成⼗六进制表⽰16 fclose($file);1718 $mysqli=mysql_connect("localhost","root","123456"); //连接数据库函数19 mysql_select_db("test"); //选择数据库20 //插⼊出数据库语句,图⽚数据前要加上0x,⽤于表⽰16进制数21 if(mysql_query("insert into images(name,type,image) values('".$name."','".$type."',0x".$imgdata.")"))22 echo "<center>插⼊成功!<br><br><a href='disimage.php'>显⽰图⽚</a></center>";23 else24 echo "<center>插⼊失败!</center>";25 mysql_close();26 }27 else28 echo "<center>请先选择图⽚!<br><br><a href='image.html'>点此返回</a></center>";29 }30 else31 echo "<center>请先选择图⽚!<br><br><a href='image.html'>点此返回</a></center>";32?>显⽰图⽚(disimage.php):1<?php2 mysql_connect("localhost","root","123456");3 mysql_select_db("test");4 //显⽰最新插⼊的那张图⽚5 $result=mysql_query("select image from images where id=(select max(id) from images)");6 $row=mysql_fetch_object($result);7 header("Content-Type:image/pjpeg");8 echo $row->image;9 mysql_close();10?>。
如何将图片存入数据库
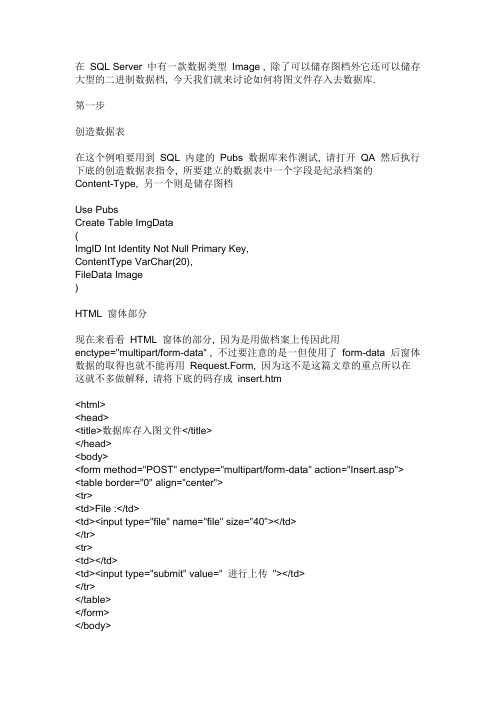
在SQL Server 中有一款数据类型Image , 除了可以储存图档外它还可以储存大型的二进制数据档, 今天我们就来讨论如何将图文件存入去数据库.第一步创造数据表在这个例咱要用到SQL 内建的Pubs 数据库来作测试, 请打开QA 然后执行下底的创造数据表指令, 所要建立的数据表中一个字段是纪录档案的Content-Type, 另一个则是储存图档Use PubsCreate Table ImgData(ImgID Int Identity Not Null Primary Key,ContentType VarChar(20),FileData Image)HTML 窗体部分现在来看看HTML 窗体的部分, 因为是用做档案上传因此用enctype="multipart/form-data" , 不过要注意的是一但使用了form-data 后窗体数据的取得也就不能再用Request.Form, 因为这不是这篇文章的重点所以在这就不多做解释, 请将下底的码存成insert.htm<html><head><title>数据库存入图文件</title></head><body><form method="POST" enctype="multipart/form-data" action="Insert.asp"><table border="0" align="center"><tr><td>File :</td><td><input type="file" name="file" size="40"></td></tr><tr><td></td><td><input type="submit" value=" 进行上传"></td></tr></table></form></body></html>程序代码搁来看麦ASP 的部分, 请将下底的码存成insert.asp<%Response.Buffer = TrueConnStr = "Provider=SQLOLEDB;" _& "Data Source=你的计算机名称;" _& "Initial Catalog=Pubs;" _& "User Id=sa;" _& "Password=你的密码"'建立oUpload 上传对象Set oUpload = Server.CreateObject("Dundas.Upload.2")'在使用oUpload 集合(Collection) 前, 要先呼叫Save 或SaveToMemory 方法oUpload.SaveToMemorySet oRs = Server.CreateObject("Adodb.Recordset")oRs.Open "ImgData", ConnStr, 2, 3oRs.AddNew'呼叫oUpload 对象的ContentType, Binary 属性, 已取得我们要的资料oRs("ContentType").Value = oUpload.Files(0).ContentTypeoRs("FileData").Value = oUpload.Files(0).BinaryoRs.UpdateoRs.CloseSet oRs = Nothing%>顶高的程序假设你只上传一个档案, 所以使用oUpload.Files(0), 如果你一次上传一个以上的档案, 你可以将程序小改为...oRs.Open ...For Each oFile In oUpload.FilesIf InStr(1,oFile.ContentType,"image") <> 0 ThenoRs.AddNewoRs("ContentType").Value = oFile.ContentTypeoRs("imgdata").Value = oFile.BinaryEnd IfNextoRs.Update...现在你可以利用浏览器开启Insert.htm 来进行上传图文件到数据库的动作, 执行完后你可以Select ImgData 数据表, 应该是出现一笔数据, 不过FileData 字段应该是能懂的吧!。
图片上传保存到access数据库

</center>
</body>
</html>
二、 图片的上传与保存程序process.asp
<%
response.buffer=true
formsize=request.totalbytes
formdata=request.binaryread(formsize)
mydata=midb(formdata,datastart,dataend)
set connGraph=server.CreateObject("ADODB.connection")
connGraph.Open "Provider=Microsoft.Jet.OLEDB.4.0;
Data Source=" & server.MapPath("images.mdb")
请输入要显示图片的序号:<input type=id name=id>
<input type=submit name=ok value="提交">
</form>
</center>
</body>
</html>
第二步、设计一个上传的表单,根据要求可简可繁。
第三步、设计后台的图片处理程序,可分为图片上传保存程序和图片读取程序。
第四步、图片显示。
下面给出程序并分别做介绍。
一、 表单程序updata.html
它的功能是为上传提供一个界面,表单的enctype属性为multipart/form-data,它是设置表单的MIME编码的,只有使用了它才能完整地传送文件的数据。
- 1、下载文档前请自行甄别文档内容的完整性,平台不提供额外的编辑、内容补充、找答案等附加服务。
- 2、"仅部分预览"的文档,不可在线预览部分如存在完整性等问题,可反馈申请退款(可完整预览的文档不适用该条件!)。
- 3、如文档侵犯您的权益,请联系客服反馈,我们会尽快为您处理(人工客服工作时间:9:00-18:30)。
实用标准文案
1.上传图片到指定的文件夹,并且把图片的路径存到数据库里面。
//判断上传是否有文件
if (FileUpload1.HasFile)
{
string filepath = FileUpload1.PostedFile.FileName.ToString();
//将图片保存到项目文件夹image里面
string fileName = System.IO.Path.GetFileName(filepath);
string savePaht = Server.MapPath("images/" + fileName); FileUpload1.SaveAs(savePaht);
string strSql = "insert into userInfo (userimage) values ('"+ filepath+"')";
// string strSql = "insert into userInfo (userimage) values (@image)";
//userInfo 是表名 userimage是图片的字段
Sqlconnection conn=new Sqlconnection(@"数据库的连接字符串");
SqlCommand cmd = new SqlCommand(strSql, conn);
conn.open();
//cmd.parameters.add("@image",sqldbtype.varchar,100).value="./image"+filepath;
cmd.ExecuteNonQuery();
}
2.遍历文件夹里面的图片,显示在datalist里面
//获取图片所在的文件夹的路径
DirectoryInfo imagesfile = new DirectoryInfo(Server.MapPath("./images"));
//绑定数据源
DataList1.DataSource = imagesfile.GetFiles("*.jpg");
DataList1.DataBind();
<asp:DataList ID="DataList1" runat="server" RepeatColumns="3">
<ItemTemplate>
<asp:image ID="Image1" runat="server" width="120"
ImageUrl='<%#"image/" +Eval("Name")%>'/>
</ItemTemplate>
</asp:DataList>
精彩文档。
