德国坦克DMX6Fire声卡中文说明书
德国坦克 声卡,DMX 6Fire USB,中文说明书

V 1.02009.04.06使用手册DMX 6Fire USB TerraTec DMX 6Fire USB 使用手册DMX 6 Fire USB设备连接介绍2前面 (2)背面 (4)模拟输出5LINE OUT 1/2, 3/4, 5/6 (背面) (5)耳机输出(前置) (5)驱动5控制面板5混音器 (6)音量 (6)信号 (6)绕送 (7)输出和设定 (7)音量 (7)频率设定 (8)设备设定 (8)场景 (9)其它 (9)TerraTec DMX 6Fire USB 使用手册DMX 6 Fire USB设备连接介绍DMX6 Fire USB 音效界面提供你连接许多专业录音外围设备和Hi-Fi 设备。
前面1. 麦克风接口(XLR-1/4" or 6.3 mm 复合式接口)这个插座接受XLR接头和需要幻象电源(通常是电容式麦克风)的专业麦克风,和”一般” 耳机插头。
这个接口与背板上Line In 1接口是同时只能择一使用,而且假如XLR or 1/4" (6.3 mm)插头插上时,会自动重新重导信号路径(自动优先选择),此时在背板的Line In 1 和Line In 2 会自动关掉。
2. 耳机的音量控制当你将耳机插入进去,先把音量转到最左边0的位置,否则可能相当大声。
你可以在插入耳机后再转大声。
3. 耳机接口如上所述:插上耳机之前将音量控制转到最低。
这个接口仅会送出Line Out1/2的信号。
4. 麦克风控制的LED指示灯。
LED灯是提供视觉上监看麦克风的录音。
蓝灯代表”有信号” ,假如看到亮红色LED,请将Gain 1控制转小。
红色LED灯亮时代表是削峰失真,造成了录音信号失真。
5. 麦克风孔的音量控制控制前置放大的信号在麦克风输入端。
同样的,麦克风插入控制在麦克风输入端的信号前级放大。
6. 48伏幻象电源:当你连接电容式麦克风时拨到”on”。
TerraTec DMX 6Fire USB 使用手册7. -20dB切换开关假如你的麦克风的录音太大声,将PAD开关切换到”on”-信号会被降低20dB。
第二章:实用计算机软硬件知识补遗(1)

声卡 作用: 作用:使计算机具备声音处理功能 各项参数: 音频处理芯片、 各项参数: 音频处理芯片、声卡声 道 内置外置 品牌厂家:Creative(创新) 品牌厂家:Creative(创新)
ห้องสมุดไป่ตู้
德国坦克 DMX 6fire 24/96 LT 火焰限量版 参数
声卡类别 音频处理芯片 声卡声道 内置外置 适用领域 音频接口 采样位数 随机附件 数字声卡 VIA ICEnsemble ENVY24 高档音效芯片,CODEC芯片采用指标极 高的AKM AK4524VF芯片,运放芯片采用JRC4580 5.1声道 内置 家用 CD SPDIF输入接口,拥有光纤数字输入输出接口 24 bit 一块主卡、一块子卡,一根连接线,一张光盘、一本说明书
华硕 A8N-SLI SE 参数 A8N适用类型 适用平台 集成芯片 主芯片组 芯片厂商 音频芯片 图形芯片 其他芯片 CPU_种类 CPU_插槽 支持CPU数 FSB(MHz) 内存类型 USB 接口 显卡插槽 台式主板 AMD平台 声卡/网卡 NVIDIA nForce4 SLI nVIDIA 集成8声道声卡 无 板载千兆网卡 Athlon 64FX/Athlon 64/Athlon 64X2 Socket 939 1 2000MHz DDR 10 个 USB 2.0接口 2个PCI-E 16X
显卡 作用: 作用:加强计算机的图形显示能力 各项参数: 显卡芯片、芯片厂商、 各项参数: 显卡芯片、芯片厂商、核 心频率、芯片位宽、制造工艺、 心频率、芯片位宽、制造工艺、显存类 显存容量(MB) 显存位宽、 (MB)、 型、显存容量(MB)、显存位宽、总线接 口 品牌厂家:Seethru(七彩虹)、盈通、 )、盈通 品牌厂家:Seethru(七彩虹)、盈通、 GALAXY(影驰)、UNIKA(双敏)、 )、UNIKA GALAXY(影驰)、UNIKA(双敏)、 Dataland(迪兰恒进)、MAXSUN( )、MAXSUN Dataland(迪兰恒进)、MAXSUN(铭 )、Sapphire 蓝宝)、ASUS( Sapphire( )、ASUS 瑄)、Sapphire(蓝宝)、ASUS(华 )、XFX讯景、MSI(微星) XFX讯景 硕)、XFX讯景、MSI(微星)
Enttec DMX Ethergate Mk3用户手册说明书

DMX ETHERGATE MK3(P N70070)Box Contents•DMX Ethergate Mk3 (pn: 70070)•Straight connect Ethernet lead (pn: 79102)•IEC power cord (country dependent plug)•This user manual•CD including NMU (pn: 79106) Features• 2 fully independent bi-directional DMX ports (5 pin Female XLR connectors).• 2 Universe Ethernet to DMX node (Output mode)• 2 Universe DMX to Ethernet (Input mode)•Can be used as either 2 input, 2 output or 1 in 1 out ports.•Easy to setup through any web browser•Supports following DMX over Ethernet protocols: ◦Art-Net◦Streaming ACN (sACN)◦ESP•Supports RDM over Art-Net (RDM Controller only)•RGB LED shows current system status•HTP Merging support : up-to 2 sources can be merged (if enabled).• 1 RJ45 Ethercon connector (10/100)•Static or Dynamic (DHCP) IP configuration (DHCP by default)•Easy firmware upgrades via any web browser•Reset button to perform factory restore•Inbuilt Auto ranging (90-260V) Mains power supply Safety•Do not expose the Ethergate Mk3to rain or moisture, doing this will void the warranty •Do not remove the cover, live voltage inside•This unit is intended for indoor use only Basic SetupRight out of the box, the Ethergate Mk3 is factory configured to be a DMX OUTPUT device, listening to the first two Art-Net Universes (starting from 0x00). It is also set as a DHCP node, so you can plug it into your existing router, and it's good to go.To make any changes to the configuration, you will need the IP address of Ethergate.ENTTEC provides a free App (available for Windows and Mac) called NMU, which will find the Ethergate on your network and display its IP address. Using the IP address one can access the built-in web-interface inside the Ethergate Mk3via any modern web-browser. The web-interface allows the settings of the unit to be changed.Once setup, any Art-Net/sACN/ESP supported software or App can be used to send DMX out of the Ethergate Mk3. For a list of recommended apps, please check the website /e3Status LEDsThe Ethergate Mk3 comes with one RGB status LED and two green network LED indicators located on the right side of the front panelRGB Status LED:•WHITE: idle, signifies that Ethergate is operating normally.•GREEN: DMX Output or Input on Port1. The led will fade from white to green. Please disable thePort1 if you don't want it to function.•YELLOW: DMX Output or Input on Port2. The led will fade from white to green. Please disable thePort2 if you don't want it to function.•RED: Error State. No DMX will be input or output in this state. Requires a firmware update or needsto be rebooted. A reset might be required, if itstays in error-mode on reboot.•PURPLE:IP Address Conflict. Please change the IP address manually or enable DHCP to getanother address from the router.Ethernet Link:This LED will be ON when there is an active Ethernet Link.Ethernet Activity: This LED blinks when there is activity on the Ethernet network.NMUNMU(Node Management Utility)is a free Windows and Mac application that is used to manage compatible ENTTEC DMX over Ethernet nodes. NMU will help you find your unit's IP address and then open a browser window to access the web-interface.Please Follow these steps:1.Download NMU from /nmu2.Ensure that your Ethergate Mk3is hooked upphysically by Ethernet cable.3.And connected to the same physical network(orrouter) as the computer on which you will run NMU.4.Open NMU.If prompted with multiple networks,select the correct network.(identified by the IPaddress of your computer on that network)5.Press the Discovery button, and wait till NMU findsall supported ENTTEC devices on your network.6.Once found, select Ethergate Mk3 and use the IPaddress to access the web-interface via your webbrowser.Web ConfigurationThe Ethergate Mk3 is configured and controlled through a web browser running on a computer system located on the same Local Area Network. Any modern web browser, such as Chrome, Firefox, Internet Explorer, Safari or Opera, running under any operating system, including Windows 7/8, Mac OS X or Linux can be used.Either click on the underlined url displayed, or type the IP address(as detected by NMU)into your web browser to access the Ethergate Web Interface.The left side menu allows all the Ethergate web pages to be accessed.The Home page displays the following:•System Information:Name,Firmware Version and Serial No.of the unit.The Serial No.is unique to this unit and can be used to identify this unit.•Current Port Settings:Configured Port Type, Protocol and Universe for each DMX Port. This serves as a quick place to check all the Port related settings.•Current Network Settings:Configured IP address and Link speed for the unit.DHCP enabled and detected, or disabled is indicated as set in settings.•Current DMX buffer:allows you to see the current DMX values for each Port. The buffer is a snapshot only, and must be refreshed manually (click to see) to see any changes.In the DMX Buffer table, you can hover the mouseover any value, and the channel number (1 to 512),for that value will be shown.To change any of the settings, you must use the Settings page.Network SettingsNode name is used to identify the Ethergate node on the network. Any meaningful name can be used.DHCP is enabled by default. When enabled, the router on your network is expected to automatically provide the IP address to the Ethergate Mk3. If no DHCP router/server is present on the network, the manual IP address will be used. If for some reason, your unit does not get an IP address via DHCP, please restart the Ethergate Mk3 with the ethernet cable connected. It will listen for DHCP on startup and wait for a few seconds, before giving up.IP Address and Netmask are only used if DHCP is disabled or is unavailable on your network. Ethergate Mk3 will warn you, if non-standard IP address or netmask is used.If ever you manage to use an IP Address that can't be connected to later, please perform the reset procedure (as described later).The reset will re-enable DHCP on the Ethergate Mk3.Input Send Mode : allows you to pick either broadcasting or a specified unicast IP address (per port). Broadcast address is based on the subnet mask shown.Both ports share the broadcast options selected here, but the unicast address can be specified as needed for each port separately.Art-Net Address: Net and Subnet can be selected here, and comply to Art-Net 3 protocol. These address are applicable to both ports, whereas the universe can be selected for each port separately.sACN CID: The current CID for Ethergate Mk3 is displayed here, and will be use in all sACN communication.Port SettingsPort Types:•Output: Ethernet to DMX Output, based on the protocol selected.•Input:DMX Input to Ethernet,sends the selected protocol on the network.•Disabled: Does not process any DMX (input or output).•RDM Enabled:Enables RDM over Art-Net support on the port. Only available when Art-Net is selected and Port Type is output. Protocol and Universe must be selected to match the settings of the remote sender or receiver connected to the LAN.Refresh RateThe rate at which Ethergate Mk3 will output the DMX from DMX port (40 Frames per second is default). It will repeat the last received LAN frame to comply with DMX standard. However, if you do not want to repeat the last frame use 0 as the refresh rate.Merging SupportMerging option is only available when port is set to Output. Any incoming DMX on the same universe, but from different IP addresses is treated as a separate DMX source. Available Merging options :•disabled: (by default) only one source should be sending to the DMX ing multiplesources will cause a conflict and the outputmight have unexpected data.•HTP Merge: Highest Takes Precedence. Channels are compared one to one and the highest value isset on the output. Merging is limited to twosources, any additional sources will be ignored byEthergate Mk3. If either one of the 2 sources of DMXstop, the failed source is held in the merge buffer for4 seconds. If, during the 4 second timeout, the failedsource returns, Merging continues.•Merging conflict: A warning will be displayed on the home-page, if more than two sources are sendingdata to Ethergate Mk3 on the same universe. Unicast optionSend DMX to a single IP address rather than broadcast. Unicast is only available when port is set to Input. Any valid IP address can be used to Unicast DMX. You must select Unicast under Network Settings to use Unicast per port. Save or ResetTo save all the changes made, please click on Save Settings and wait for Ethergate to confirm (takes up-to 5 seconds). Once confirmed you will be taken to the home-page. Reset to defaults,will put all the settings back to their default values (network & port settings). Ethergate Mk3 will be reset to Factory condition.Update FirmwareFrom this page you can update the latest firmware of the Ethergate Mk3(firmware file is available at /e3).Choose or browse the firmware file (as per your browser) and click on Update firmware to start the process.The update progress is shown in real-time, and will take a few seconds for the update to completeWhen the update is complete, the page will refresh and you will be taken to the home page – where you can verify the firmware version.If the update fails for any reason, please try the same process again.Since, Ethergate Mk3 will reboot after a firmware update, please allow a few seconds for it to be refreshed in the browser. Please wait until the update process is complete.Reset buttonThe reset button restores the network configuration of the Ethergate Mk3 to factory defaults:•DHCP is set to enabled•Static IP address is mapped to the Serial number of the unit (used if DHCP is unavailable)•Netmask is set to 255.0.0.0To successfully reset to factory defaults the Ethergate Mk3, the following procedure must be performed:•Power off the unit•Press and hold the Reset button.•While holding the Reset button, power up the unit, and keep holding the button for 3 seconds.•Release the Reset button once the status led starts blinking red.•Wait 3 seconds and cycle powerArt-Net Send TestNMU can also be used to troubleshoot the DMX output on your Ethergate Mk3.Art-Net Test can be accessed from the top menu: Art-net → Art-net TestWhen first opened, the Art-Net is set to Disabled, please set it to Enabled, and then you can use either the DMX faders to test one or more DMX channels, or use the test-patterns from the options available.Please set the Ethergate Mk3 to be output and on the same universe as being used to send Art-Net from NMU.DMX Connector pin out5pin DMX OUT/ DMX IN:•Pin 1: Ground•Pin 2: Data -•Pin 3: Data +•Pin 4: NC•Pin 5: NCAny suitable 3 to 5pin DMX adaptor can be used to connect to3pin DMX cables or fixtures.Please note the pinout, before connecting to any non-standard DMX connector.SpecificationsDue to continuous improvements and innovations of all ENTTEC products, specifications and features are subject to change without notice.Ordering InformationEthergate Mk3 and related products can be ordered from our website or through your local ENTTEC dealer using the following part numbers.ENTTEC PTY LTD ENTTEC AMERICAS17/5 Samantha Court 604A Cornerstone Ct. Knoxfield Victoria 3180Hillsborough NC27278 Australia USATel: +61 3 9763 5755 Tel-Fax: (888) 454-5922 Fax: +61 3 9763 5688email ****************。
t.c.Konnekt6中文说明解析
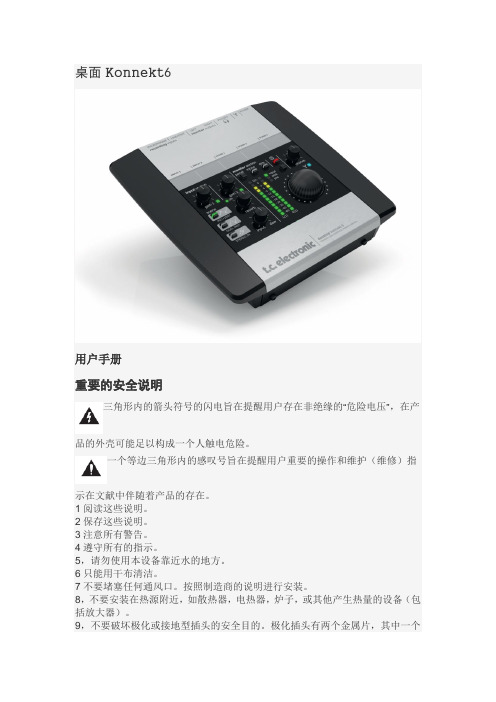
桌面Konnekt6用户手册重要的安全说明三角形内的箭头符号的闪电旨在提醒用户存在非绝缘的“危险电压”,在产品的外壳可能足以构成一个人触电危险。
一个等边三角形内的感叹号旨在提醒用户重要的操作和维护(维修)指示在文献中伴随着产品的存在。
1阅读这些说明。
2保存这些说明。
3注意所有警告。
4遵守所有的指示。
5,请勿使用本设备靠近水的地方。
6只能用干布清洁。
7不要堵塞任何通风口。
按照制造商的说明进行安装。
8,不要安装在热源附近,如散热器,电热器,炉子,或其他产生热量的设备(包括放大器)。
9,不要破坏极化或接地型插头的安全目的。
极化插头有两个金属片,其中一个比其他的更广泛。
接地型插头有两个插脚和第三个接地插脚。
较宽的叶片或第三个叉子为您提供安全。
如果提供的插头不适合您的插座,请咨询电工,更换过时的插座。
10保护电源线被踩踏或挤压,特别是在插头,插座,并从设备中退出的地步,他们。
11仅使用制造商指定的附件/配件。
12只使用制造商指定的车,架子,三脚架,支架,或桌子,或与设备一起出售。
使用手推车时,请小心移动车/设备组合,以避免受伤翻倒。
13在雷电交加的暴风雨天气或拔掉该设备未使用时,很长一段时间。
14所有的维修合格的服务人员。
维修设备时需要以任何方式,如电源线或插头损坏,液体溅入或物体掉入设备已损坏,该设备已暴露于雨水或湿气,不正常工作,或有被丢弃。
警告!•为了减少火灾或触电的危险,请勿将本设备雨淋或受潮,充满了液体,如花瓶,不应该被放在此设备上的对象。
•该设备必须接地。
•使用三线接地型线像一个随产品提供的。
•被告知不同的工作电压,需要使用不同类型的电源线和连接插头。
•检查您所在地区的电压,并使用正确的类型。
请参阅下表:该设备应安装在靠近电源插座和断开的设备应方便。
•要完全从AC电源断开,断开电源线从AC插座。
•电源供应器的电源插头应保持随时可用。
•不要安装在一个密闭的空间。
•不要打开单元- 触电里面的风险。
创新X FI系列声卡使用指南

创新X-FI系列声卡K歌调试、设置、使用指南X-Fi产品系列K歌录歌最佳配置:声卡+话筒放大器(或者调音台)+电容话筒(或者动圈话筒)Sound Blaster X-Fi是创新继SBLive!、Audigy、Audigy2、Audigy4后最新一代产品。
X-Fi是创新最新的顶级声卡平台,主芯片CA20k1,拥有5千1百万个晶体管,提供10,000MIPS,等同于24个Sound Blaster Audigy处理器的性能,高于30多个Live!处理器的处理能力。
还在高端产品Fatal1ty 和Elite Pro上加载了大容量64M X-RAM声存,提高了整体的游戏加速和音频处理性能。
获得THX 认证,通过X-Fi Xtreme Fidelity顶级的24-bit Crystalizer,MP3音乐及影视都可以升级至Xtreme Fidelity的顶级效果。
创新发布的X-Fi共四款产品,定位从高到低情况如下:X-Fi Elite Pro:定位于专业市场,拥有高达116dB的信噪比,64MB在板X-RAM专用音频内存。
X-Fi Fatal1ty FPS :专为游戏玩家打造的声卡,以著名的FPS玩家Fatal1ty作为产品名称将吸引专业玩家。
109dB SNR,在板64MB X-RAM,支持EAX? ADVANCED HD 5.0,可加速游戏运行速度。
X-Fi Platinum:适用于多用途数字娱乐体验的声卡,109dB SNR,是欣赏音乐,电影的理想选择。
X-Fi XtremeMusic:109dB SNR,音乐和MP3文件回放的理想声卡。
普及版X-FI规格介绍:HP oem Xtreme muisc的PCB为单独设计,型号为SB0670,与其他SB0460 XtremeMuisc卡区别已知为:1、卡的上侧电容排列顺序不同2、右侧少两个芯片,有空位但是为了降低成本没有焊上去3、右侧无前置面板接口针脚,pcb虽有,但是为了降低成本没有焊,无法接前置面板,无可扩展性4、右侧少了一个电容,但是该位置多了一个4针接口,疑似面板接口,具体作用待了解确切再补充5、没有前置面板,甚至连接口都没有,即使刷成Platinum的EEPROM,一点实际意义都没有,而且PCB电路和标准SB0460不同Dell oem XtremeMuisc的主卡不论PCB与芯片、零件型号,均与市场零售版XtremeMuisc一致,只是EEPROM内部识别信息不同官方市场零售版Xtrememusic的主卡与Platinum的主卡完全一样,只是少一个内置盒子(I/O面板)。
德国坦克声卡001.doc
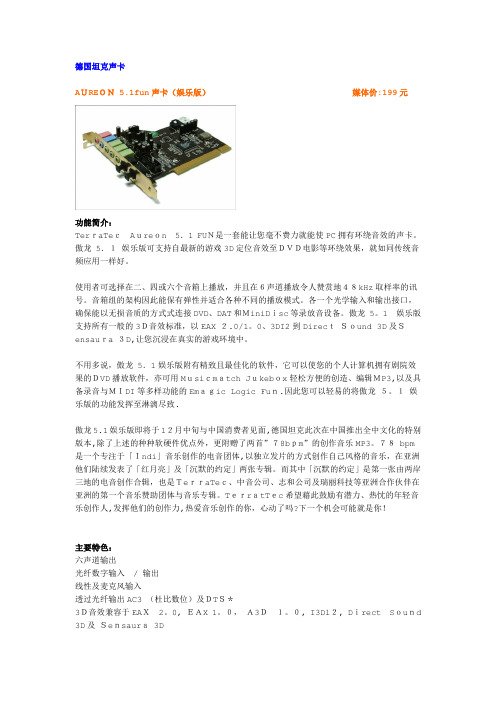
德国坦克声卡AUREON 5.1fun声卡(娱乐版)媒体价:199元功能简介:TerraTecAureon5.1 FUN是一套能让您毫不费力就能使PC拥有环绕音效的声卡。
傲龙 5.1娱乐版可支持自最新的游戏3D定位音效至DVD电影等环绕效果,就如同传统音频应用一样好。
使用者可选择在二、四或六个音箱上播放,并且在6声道播放令人赞赏地48kHz取样率的讯号。
音箱组的架构因此能保有弹性并适合各种不同的播放模式。
各一个光学输入和输出接口,确保能以无损音质的方式式连接DVD、DAT和MiniDisc等录放音设备。
傲龙 5。
1娱乐版支持所有一般的3D音效标准,以EAX 2.0/1。
0、3DI2到DirectSound 3D及Sensaura 3D,让您沉浸在真实的游戏环境中。
不用多说,傲龙 5.1娱乐版附有精致且最佳化的软件,它可以使您的个人计算机拥有剧院效果的DVD播放软件,亦可用Musicmatch Jukebox轻松方便的创造、编辑MP3,以及具备录音与MIDI等多样功能的Emagic Logic Fun.因此您可以轻易的将傲龙5。
1娱乐版的功能发挥至淋漓尽致.傲龙5.1娱乐版即将于12月中旬与中国消费者见面,德国坦克此次在中国推出全中文化的特别版本,除了上述的种种软硬件优点外,更附赠了两首”78bpm”的创作音乐MP3。
78 bpm是一个专注于「Indi」音乐创作的电音团体,以独立发片的方式创作自己风格的音乐,在亚洲他们陆续发表了「红月亮」及「沉默的约定」两张专辑。
而其中「沉默的约定」是第一张由两岸三地的电音创作合辑,也是TerraTec、中音公司、志和公司及瑞丽科技等亚洲合作伙伴在亚洲的第一个音乐赞助团体与音乐专辑。
TerratTec希望藉此鼓励有潜力、热忱的年轻音乐创作人,发挥他们的创作力,热爱音乐创作的你,心动了吗?下一个机会可能就是你!主要特色:六声道输出光纤数字输入/ 输出线性及麦克风输入透过光纤输出AC3 (杜比数位)及DTS*3D音效兼容于EAX2。
我的火线声卡说明书
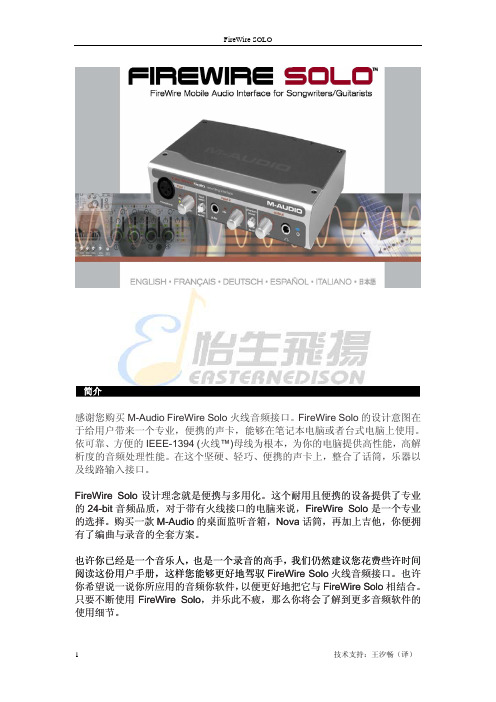
FireWire Solo 前面板上带有话筒(XLR-卡农)输入接口,乐器(1/4”TRS大三芯)输入接口;后面板上不仅带有线路输入,而且还有两个线路输出 接口。每个话筒与乐器的输入接口都带有自己的音量控制器。前面板上 带有一个前面板(话筒以及乐器)或者后面板(线路)的输入切换开关。 后面板上附带了 S/PDIF 数字输入以及输出接口,FireWire Solo 还是一 个有四路输入,四路输出的音频接口。用一根火线把它与电脑的火线接 口相连。如果你的电脑不具备火线接口的话,你需要去购买一块火线的 PCI 板卡,在各大电子市场均有销售。
个立体声输按键后立体声对将被接在一起运推拉一个会带动另外行配对的推音按键择哑音按键再次选中哑音按键可取消此时奏按键下独奏按键的时候按键变为黄色此时除此轨外的所有音轨的音频输出都会停止再按键的时候所有音轨回复输出
FireWire SOLO
简介
感谢您购买 M-Audio FireWire Solo 火线音频接口。FireWire Solo 的设计意图在 于给用户带来一个专业,便携的声卡,能够在笔记本电脑或者台式电脑上使用。 依可靠、方便的 IEEE-1394 (火线™)母线为根本,为你的电脑提供高性能,高解 析度的音频处理性能。在这个坚硬、轻巧、便携的声卡上,整合了话筒,乐器以 及线路输入接口。
3
技术支持:王汐畅(译)
前面板
FireWire SOLO
1.话筒输入:带有话筒输入平衡(卡农)接口。这个接口只在前/后面板输入切换按键(5)处于高档位的 时候才工作。这个接口对应音频软件中立体声的左声道。
2. 信号削波指示灯
3.幻想供电指示灯:当幻想供电开关(9)打开的时候,这个指示灯亮起,说明+48V 直流已经加载到话筒输 入接口上了。
DMX6fireUSB-官方中文
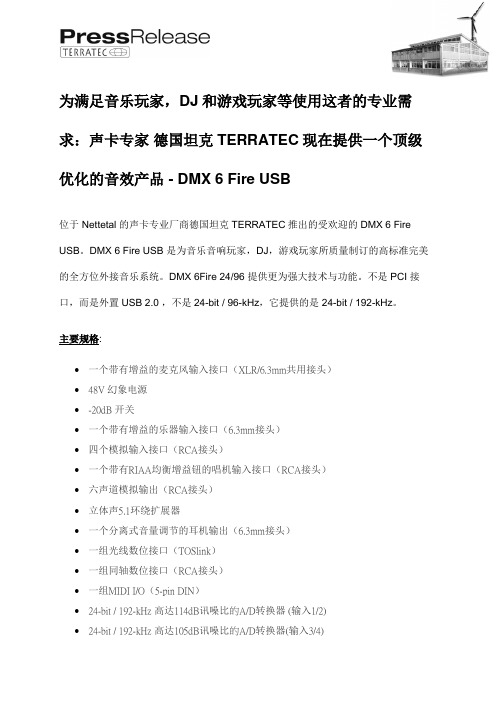
为满足音乐玩家,DJ和游戏玩家等使用这者的专业需求:声卡专家德国坦克TERRATEC现在提供一个顶级优化的音效产品 - DMX 6 Fire USB位于 Nettetal 的声卡专业厂商德国坦克TERRATEC推出的受欢迎的 DMX 6 Fire USB。
DMX 6 Fire USB 是为音乐音响玩家,DJ,游戏玩家所质量制订的高标准完美的全方位外接音乐系统。
DMX 6Fire 24/96 提供更为强大技术与功能。
不是 PCI 接口,而是外置USB 2.0 ,不是24-bit / 96-kHz,它提供的是 24-bit / 192-kHz。
主要规格:•一个带有增益的麦克风输入接口(XLR/6.3mm共用接头)•48V 幻象电源•-20dB 开关•一个带有增益的乐器输入接口(6.3mm接头)•四个模拟输入接口(RCA接头)•一个带有RIAA均衡增益钮的唱机输入接口(RCA接头)•六声道模拟输出(RCA接头)•立体声5.1环绕扩展器•一个分离式音量调节的耳机输出(6.3mm接头)•一组光线数位接口(TOSlink)•一组同轴数位接口(RCA接头)•一组MIDI I/O(5-pin DIN)•24-bit / 192-kHz 高达114dB讯噪比的A/D转换器 (输入1/2)•24-bit / 192-kHz 高达105dB讯噪比的A/D转换器(输入3/4)•24-bit / 192-kHz 高达114dB讯噪比的D/A转换器 (输出口1-6)德国坦克TERRATEC 在莱茵河地区城镇Nettetal于 1994 年成立。
如今公司已是德国数字电视,录像和声卡重要制造商及欧洲首要的多媒体企业之一。
德国坦克致力于提供从专业的计算机音响系统到电视/视讯的解决方案和高传真消费性产品。
作为技术先驱,TERRATEC 也在无线家用的娱乐多媒体产品, 网络收音机跟数字电视产品中不断的创新。
德国坦克 Aureon 傲龙 7.1 USB 声卡使用手册说明书
Copyright@2014 唐德国际有限公司 All R ights R eserved德国坦克Aureon 傲龙7.1 USB 声卡使用手册(此说明书基于Windows7,其它版本略有不同)Copyright@2014 唐德国际有限公司 All R ights R eserved 目录安全性须知 ........................................................................................................................... 1 1. 简介 (2)1.1 包装内容 ...................................................................................................................................................................... 2 1.2系统要求 ....................................................................................................................................................................... 2 1.3 规格概要 ...................................................................................................................................................................... 2 1.4 接口 .............................................................................................................................................................................. 3 1.5输出连接 .. (4)2. 软件安装和卸载 (4)2.1 软件安装 ...................................................................................................................................................................... 4 2.2 软件卸载 . (8)3. AUREON 7.1 USB 音频中心图形化用户界面 (10)3.1 打开Aureon 7.1 USB 音频中心图形化用户界面 ................................................................................................... 10 3.2 Aureon 7.1 USB 音频中心图形化用户界面功能介绍 ............................................................................................. 11 3.2.1打开Aureon 7.1 USB ........................................................................................................................................... 11 3.2.2 主设置控制界面 ................................................................................................................................................. 12 3.2.3混音器控制界面 .................................................................................................................................................. 14 3.2.4效果控制界面 ...................................................................................................................................................... 15 3.2.5信息界面介绍 ...................................................................................................................................................... 16 3.2.6信息界面介绍 ...................................................................................................................................................... 17 3.2.7托盘图标功能介绍 . (17)Copyright@2014 唐德国际有限公司 All R ights R eserved1安全性须知* 在您安装声卡以及加入硬件设备之前,请务必详加阅读本手册所提供的相关信息。
DMX中文说明书
Profusion X简明操作指导The Brief Instruction of Profusion X1)正确开关机及功放的开关顺序1.1 启动系统第一步:按一下电源开关,DMX多媒体播放中心将按程序自检启动,多媒体播放中心将自动播放预先设定的音乐节目表。
第二步:依次打开各个功能区的功放1.2 关闭系统第一步:依次关闭功放第二步:按一下电源开关,DMX多媒体播放中心将进入暂停状态;再次按一下电源开关,系统将执行关闭程序NOTE: 严禁在系统尚未正常关闭的情况下切断电源。
否则可能引起Profusion X 或其他设备损坏2)音乐风格的改变在默认状态下,播放器显示屏会显示歌曲的标题,音乐家、风格、地区、定时模式和区域的日期/时间。
按“STYLE”上下键可音乐风格并且按“*”键确定新的风格。
显示屏会相应改变。
选择“Return to Schedule”可以回到默认状态。
3)各区域音量调节(通过Profusion X及通过功放调节)1 通过功放上的音量调节旋钮调节所对应区域的音量。
2 为了最大限度提高声音逼真度,DMX MUSIC建议使用功率放大器上的音量控制开关来控制回放音量。
可以通过导航菜单来分别改变各个区域的音量。
音量改变仅会在所选区域内生效。
第一步在歌曲名称和艺术家显示屏幕中按“*”进入DMM主菜单如图所示:Back>V olume ControlMessaging ControlSet Date and TimeNetwork ControlSchedule ControlDevice Information第二步按“*”进入“VOLUME CONTROL”主菜单。
第三步按NA VIGATION UP 和 DOWN键,滚动可选区域列表。
一旦选中合适区域,按“*”确定。
BACK>Zone1Zone2Zone3Zone4Mute Zone1Mute Zone2Mute Zone3Mute Zone4第四步如果选择MUTE,LCD屏幕将会显示如下:Zone1 V olumeMUTED如果选择Zone1,LCD屏幕会有如下显示:Zone1 V olume==============可以通过NA VIGATION UP或RIGHT键来提高音量或NA VIGATION DOWN或LEFT键来降低音量。
德国坦克声卡使用手册

德国坦克声卡使用手册(适用型号:剧场版SiXPack 5.1+)前言感谢您购买使用本公司的产品,为了让您更方便与正确的安装使用,本手册提供了开於硬件及驱动程式的安装详细解说。
请您务必依照本手册之指示完成程序。
倘若仍有其他疑问或安装使用上的困难,请来电或以电子邮件将您的问题告诉我们,我们一定全力为您服务。
谢谢您!主要功能1 采用知名crystal cs4630高效能处理晶片2 420 mips高速运算的独家(cclstn)音讯处理技术3 符合ac 97 2.1、pci 2.1规范4 完全支援windows 98se/me/2000/xp作业系统相容5 完全硬体支援微软directsound、directsound3d、directlnput、以及声波合成技术6 支援最新sensaura 3d定位音效技术,支援2/4声道7 相容及支援eax 1.0、eax 2.0、a3d 1.0、i3dl2、macrofx、multidrive zoomfx、environmentfx、(dolby surround)多声道音效技术8 支援同时64个硬体声波合成发声9 内建8mb音色取样且与mpu—401/gm/yamaha xg midi规范相容10 支援midi dls技术无限制软体音色声波合成支援11 支援硬体wavetable音源子卡12 支援对netmeeting网路语音视讯软体提供aec自动回授抑制功能13 支援16bit全双工且与soundblasterpro完全相容14 符合pci电源管理规范apm 1.2和acpi 1.0版15 符合pc 98和pc 99规范要求16 s/n讯噪比达90 db以上,音质传真自然17 具备18bita/d类比/数位转换器18 具备20bit d/a数位/类比转换器19 支援利用directshow和directsound 3d输出播放20 支援立体声,4声道和6声道喇叭模式输出21 支援标准24bit s/pdif光纤数位输入(32/44.1/48khz)和输出(48kh pcm数位讯号,如ac—35.1讯号。
德国坦克声卡,DMX6FireUSB,中文使用说明
V 1.02009.04.06使用手册DMX 6Fire USB TerraTec DMX 6Fire USB 使用手册DMX 6 Fire USB设备连接介绍2前面 (2)背面 (4)模拟输出5LINE OUT 1/2, 3/4, 5/6 (背面) (5)耳机输出(前置) (5)驱动5控制面板5混音器 (6)音量 (6)信号 (6)绕送 (7)输出和设定 (7)音量 (7)频率设定 (8)设备设定 (8)场景 (9)其它 (9)TerraTec DMX 6Fire USB 使用手册DMX 6 Fire USB设备连接介绍DMX6 Fire USB 音效界面提供你连接许多专业录音外围设备和Hi-Fi设备。
前面1. 麦克风接口(XLR-1/4" or 6.3 mm 复合式接口)这个插座接受XLR接头和需要幻象电源(通常是电容式麦克风)的专业麦克风,和”一般”耳机插头。
这个接口与背板上Line In 1接口是同时只能择一使用,而且假如XLR or 1/4" (6.3 mm)插头插上时,会自动重新重导信号路径(自动优先选择),此时在背板的Line In 1 和Line In 2 会自动关掉。
2. 耳机的音量控制当你将耳机插入进去,先把音量转到最左边0的位置,否则可能相当大声。
你可以在插入耳机后再转大声。
3. 耳机接口如上所述:插上耳机之前将音量控制转到最低。
这个接口仅会送出Line Out1/2的信号。
4. 麦克风控制的LED指示灯。
LED灯是提供视觉上监看麦克风的录音。
蓝灯代表”有信号”,假如看到亮红色LED,请将Gain 1控制转小。
红色LED灯亮时代表是削峰失真,造成了录音信号失真。
5. 麦克风孔的音量控制控制前置放大的信号在麦克风输入端。
同样的,麦克风插入控制在麦克风输入端的信号前级放大。
6. 48伏幻象电源:当你连接电容式麦克风时拨到”on”。
TerraTec DMX 6Fire USB 使用手册7. -20dB切换开关假如你的麦克风的录音太大声,将PAD开关切换到”on”-信号会被降低20dB。
微机的硬件配置及各主流品牌微机性价比浅析 (1)

百度文库- 让每个人平等地提升自我!姓名:李枘桓专业班级:朝鲜语111 学号:2011 08 007【摘要】随着计算机技术的发展和网络的普及,小型、便捷的微机越来越多的走进千家万户,而微机的硬件配置也越来越为人们所了解和重视。
微机的硬件配置主要有主板,CPU,内存条,硬盘,光驱,显卡等部件,而这些硬件又因各个品牌配置的型号、功率等有所不同。
下面我们就微机的硬件配置及市场上各主流品牌微机的性价比行情做一个浅析。
【关键词】微机硬件配置品牌微机性价比一、【微机中的基本硬件配置】1、主板:微机由多个部件组成,这些部件是通过一块大的电路板连接在一起。
这块大的电路板称为主板,主板安装在机箱内,是微型计算机中基本的,也是最重要的部件之一。
主板的品种繁多,但其基本组成大同小异,主要包括:用于安装CPU、AGP显示卡、内存条、各种PCI卡、ISA卡的插槽;用于连接硬盘及光驱的IDE或SCSI接口;用于连接串行设备、并行设备、USB设备等的接口;键盘、鼠标接口等。
目前比较常见的主板有:技嘉GA-8IG1000、华硕P4PE2-X、精英ECS 915P-A等;2、CPU:这个主要取决于频率和二级缓存,频越高、二级缓存越大,速度越快,未来C PU将有三级缓存、四级缓存等,都影响响应速度。
3、内存: 内存的存取速度取决于接口、颗粒数量多少与储存大小(包括内存的接口,如:SDRAM133,DDR233,DDR2-533,D DR3-800),一般来说,内存越大,处理数据能力越强,速4、硬盘: 硬盘在日常使用中,考虑得少一些,不过也有是有一些影响的,首先,硬盘的转速(分:高速硬盘和低速硬盘,高速硬盘一般用在大型服务器中,如:10000转,1 5000转;低速硬盘用在一般电脑中,包括笔记本电脑),台式机电脑一般用7200 。
5、显卡:这项对运行超大程序软件的响应速度有着直接联系,如运行CAD2007,3DS tudio、3DMAX等图形软件。
Soundcraft Vi Dante 卡用户指南与设置指南说明书
Vi DANTE TM Card User & Setup GuideThe Soundcraft® Vi DANTE™ card is a 64 x 64 interface between a Viseries console and any Dante compatible device from Harman or other 3rd party manufacturer. The card is available in two versions: Local Rack/CSB (D21m 3U format) and Vi Stagebox (6U format). Note that the Stagebox version is an IO card only and does not allow you to connect a Stagebox to the console using Dante instead of MADI.Dante provides a digital audio network that uses standard Internet Protocols over both 100Mbps and 1 Gigabit Ethernet. Dante uses audio independent, high accuracy network synchronization standards to ensure all Dante devices are synchronized at all times. Dante runs on standard computer networking hardware, and does not require dedicated network infrastructure.The Audinate Dante Virtual Soundcard software allows connection of a PC/Mac to a Dante audio network. This system allows the computer to record from and playback to the Dante network using most common DAW packages. Dante Virtual Soundcard uses the Ethernet port on the computer to communicate with the Dante network; no special hardware is required other than installing Dante Virtual Soundcard software. One DVS license token is provided FOC with the card, this license can only be installed on one specific computer.Additional information about the DANTE system including the latest software set‐up and tools may be found on the Audinate® web site /Configuring The Dante CardIn a manner similar to CobraNet™, patching on the console makes a connection between console I/Oslot channels and up to 64 channels on the Dante card. Connections between the Dante cards are set using a tool, in this case the Dante Controller software from Audinate®. As communication across the Dante network is essentially between named cards and channels the configuration must be correctto ensure cards talk and listen to the correct/desired channels on the Dante network.This user guide summarises the process and provides a simple worked example; full setup details and configuration tools are downloadable from the Audinate web site .In addition it is necessary to set the clock status of the Dante card both within the network and inrelation to the console hardware. This is described below.Channel Count SetupThe Dante card uses 64 in and 64 out channels by default, but can be restricted to use less input or output channels if required. This may be necessary on Vi consoles in order to avoid exceeding the192in/192out channel limit of the local rack (or the 64in/64out channel limit if fitted in a Vi or Compact Stagebox). For example, if only output channels are required on the Dante card, the input channels can be set to 0, to maximise the number of input channels available for other cards.The DIP switch S1 on the Dante card main PCB is used to set the input and output channel count, in steps of 8chs from 0‐64 channels. Refer to the diagram on the next page which shows the location ofthe channel count DIP switch S1 and the factory default setup of 64 in/64 out. To create other channel count settings that are not marked on the switch, add any two or 3 switch settings together,ie to select 48chs, the 32 and 16 switches should be moved down to the selected position. Note the maximum channel count (input or output) is 64 and minimum is zero.Sync SetupThe Dante card can act as either a main clock source for the Dante network, or as a synchronised clock. If there is only one console on the network, this will generally be set as the main clock source for the network, but in cases with more than one console, or where another device acts asthe main source clock, it will be necessary to set the console's Dante card to be a synchronised clock.The Dante clock sync status is set up using Dante Controller software (see later in this guide), but in addition to the Dante clock setup, the card's clock status within the console has to be set. This is done using a DIP switch S2 on the Dante card main PCB. Refer to the diagram on the next page for the location and setting of this switch.MIX: Select this position to make the Dante module lock to the console's internal Wordclock, onlyto be used when the Dante card is set as the Preferred Master for the Dante network. This setting is the factory default.CARD: Select this position to make the console lock to the Dante network clock, to be used whenthe Dante card is synchronised to the network. Note: In this case, a BNC wordclock cable must also be connected from the Wordclock Out BNC connector on the Dante card, to the console's Wordclock IN.Note that it is also necessary to set up the clocking scheme of the Dante network correctly, to avoidaudio clicks and dropouts, please refer to the section titled Device Status and Clock Status in thefollowing pages.DIP switches S1 & S2 Location DiagramRefer to the previous page for information on the function of these switches.Setting up the Dante card for operation on the networkAs mentioned earlier, it is necessary to use a software tool connected externally to the card, in order to route audio from the card to/from another Dante‐enabled device.1.Download & install the latest software for the Vi consoles from .(Software Version must be 4.7.5.205 or later). With earlier versions of the console software, the Dante card will not be recognised by the console and will not appear in the patch.2.Download and install latest Dante Controller software from .3.Connect a Mac/PC to the Dante card, this may be via a switch/router or direct to either thePRIMARY or SECONDARY ports. The LINK indicator on the card will begin to flash indicating an active connection.NOTE: A crossover cable is not required as the network ports on the Dante card will automatically sort out the transmit and receive connections to the other device.NOTE: Ensure any firewall operating on the network port of the computer is switched off.4.Start the Dante Controller application, after a few moments a screen similar to the onebelow will appear:Using DanteThe following sections cover basic setup and use of the Vi Dante cards. For detailed information regarding Dante please refer to information on Audinate’s web site .Network ViewRouting – Matrix view of routing (click on a‘+’ symbol to expand the matrix view).Device Status – Displays information about discovered Dante devices; double click a device name to enable its configuration.Clock Status – View and edit Dante Network clock configuration.Clock Role column:Setting a single ‘Preferred Master’ will ensure that device is selected as the main clock source, if two or more devices are set for ‘Preferred Master’ the main clock source will be elected by the Dante system. NOTE: Clock Status settings apply to the clocking of the Dante network, therefore attached devices such a s c onsoles m ust b e c locked t o/from t he D ante n etwork a s a ppropriate o r required in any given system.It is suggested that in most simple cases with one console connecting to peripheral equipment (eg a computer recording device) via Dante that the console is set as preferred master, which means thatthe item ‘Sync to External Word Clock’ must also be checked’. If there are two or more consoles connected together then obviously only one should be set as preferred master.‘Sync to External Word Clock’:When checked the Dante card will clock from the console internal word clock, if not checked the console must be clocked to the Dante card or system word clock as appropriate or required in the given system. Normally this is achieved by connecting a short BNC jumper cable from the wordclock OUT of the Dante card, to the wordclock IN of the console.Note on Clock status when connecting the Dante card to a Vi3000 console’s Dante interfaceThe Vi3000 console includes a built‐in Dante interface, and as such has the capability for the consoleto automatically sync to the internal Dante card’s clock, when the Vi3000’s Dante interface is set to‘sync’ clock status (ie another device is set as Preferred Master), and the setting ‘S ync to External wordclock’ is NOT checked (ie console synchroni sed to Dante network clock). Therefore with the Vi3000, an external BNC jumper cable is not required and the console will automaticallyswitch to indicate ‘Dante’ as the clock source (viewable in the Menu‐Sync page of the Vi3000).Failure to set up the clocking scheme of the network correctly is likely to result in audio clicks during operation.Device ViewThe Device View allows viewing and editing of aselected Dante device.Receive – This tab presents information about allchannels being received, and channels availableto the current device. The tab is arranged intotwo areas:Receive Channels: Lists the Rx channels in the leftpane of the window. It shows whether or not they areconnected and, if connected, the channel they areconnected to and the status of that connection.Available Channels: On the right pane of the window, lists the Tx channels from other devices that are available for subscription by the current device. You may drag and drop Available Channels to Receive Channels.Transmit: This tab is used to view and edit thetransmit configuration of a device.Transmit Channels: The area on the left pane of thetab shows the Tx channels for the device, and anyuser‐defined channel label. It allows the user tocreate labels for transmit channels. Input to thetable is filtered to prevent illegal characters frombeing used in channel labels. To change a Txchannel label double click on the label and type in anew one. Tx channel labels must be unique on asingle device.Status: The Status tab is used to view informationabout a Dante device, this information may berequired for trouble shooting and checking software /firmware is up‐to‐date.Device Config: This tab on the device view allowsviewing and editing of the following device specificparameters.Rename Device: Allows renaming of the Dante device.Sample Rate: 48K – this is fixed and cannot be edited.Latency: Allows selection of an appropriate latency.NOTE: The 0.15 msec setting is unavailable on ViDante cards as these include an internal switch. Factory Reset: Allows remote reboot of the Dante interface and to reapply factory settings. Following a reboot it is recommended to power‐cycle the console including disconnection of the AC powercord. Factory Reset wipes the following device configuration settings:∙User‐defined device name∙User‐defined channel labels∙Clock configuration (clock master / external clock master setting)∙Static IP addresses∙Redundancy configuration∙Sample rate setting (including pull‐up/down)∙Latency setting∙Any existing audio routesNetwork Config: This tab enables viewing andediting of Dante Redundancy mode.Switched Mode ‐ When set to Switched, thesecondary Ethernet port will behave as astandard switch port, allowing daisy‐chainingthrough the device.Redundant Mode ‐ When set to Redundant,the device will duplicate Dante audio trafficto both Ethernet ports, allowing theimplementation of a redundant network viathe secondary port. In this case care must betaken to avoid accidently making anyconnection between the two parallelnetworks.Note: All devices on a Dante network MUSTbe set to the same Mode (Switched orRedundant), otherwise the network will notfunction reliably.Dante PresetsAlthough patching to and from the Dante card in the console is stored as part of a show or part of a cue the configuration and routing of the Dante cards and Dante audio streams is not.In the event a Dante card is replaced orsimilar, the ‘new’ card will requireconfiguring, this may be done manually or byloading a previously stored preset from the‘File’ menu of the Dante Controller softwareConnecting Dante DevicesThe following example illustrates two Vi1 consoles ‘House’ and ‘Monitor’.Audio inputs are sent to the monitor console, these can be connected directly to the console or via a stagebox attached via a MADI card to the monitor console.A direct output from each input of the monitor console feeds the FOH console which is patched to receive audio from the Dante option card.The FOH console mix is returned to two spare channels of the monitor console and the direct outputs of those inputs are in turn patched to the system outputs; once again these can be directly on the console or attached via a MADI card to the monitor console.The link between the Dante cards may be via a switch as shown with a solid green line or direct from card to card as shown by the dotted green line.NOTE: Once configured the PC is not required.NOTE: Dante may operate in redundant mode, this is not shown for simplicity.Alternative OptionsOnce audio is in the Dante domain the possibilities become near endless, in this alternative system: ∙All system outputs leave via a Dante enabled processor such as the BSS BLU 806∙An additional console does a live stereo mix‐down for web streaming or similar∙A laptop running the Audinate Virtual Soundcard makes a multi‐track recording。
中文说明书_DMX_6Fire_德国坦克声卡

Gpsm V1.34 TerraTec DMX 6Fire USBDMX 6Fire USB.中文使用手册2014.08.20DMX 6 Fire USB设备连接介绍声卡前面 (2)声卡背面 (5)模拟输出LINE OUT 1/2, 3/4, 5/6 (背面) (6)耳机输出(前面) (6)驱动调设音量 (7)绕送 (8)控制面板 (9)信号 (9)混音器 (9)输出和设定 (10)频率设定 (11)驱动工作模式 (12)设备设定 (14)场景 (15)其它 (15)DMX 6 Fire USB设备连接介绍声卡音效界面提供你连接许多专业录音外围设备和Hi-Fi设备。
声卡正面1. 麦克风接口(XLR 1/4或6.3mm母复合式二合一接口)这个插座接受XLR接头和需要幻象电源(通常是电容式麦克风)的专业麦克风,和“一般”耳机插头(6.3mm孔通常是接动圈麦)。
这个接口与背板上LineIn 1接口是同时只能择一使用(意思是如果麦克风和LINE IN 1同时有接入时,只能选择一个作为输入),而且假如XLR 1/4 或6.3mm 插头插上时,会自动重新重导信号路径(自动优先选择),此时在背板的Line In 1 和Line In 2 会自动关掉。
2. 耳机的音量控制当你将耳机插入进去,先把音量转到最左边0的位置,否则可能相当大声。
你可以在插入耳机后再转大声。
3. 耳机接口如上所述:插上耳机之前将音量控制转到最低。
这个接口仅会送出信号到Line Out 1/2。
4. 麦克风动态的LED监控指示灯LED灯是提供视觉上监看麦克风的录音。
“蓝灯”代表有信号,假如看到亮红色LED,请将Gain 1旋转按钮调小。
红色LED灯亮时代表是削峰失真,造成了录音信号失真。
5. 麦克风孔的音量控制控制前置放大的信号在麦克风输入端。
同样的,麦克风插入控制在麦克风输入端的信号前级放大。
6. 48伏幻象电源:当你连接电容式麦克风时拨到“ON”,如果电容麦已启用了幻想电源,不要重复开启,否则可能烧坏声卡!7.-20dB切换开关假如你的麦克风的录音太大声,嘯叫声等,请将PAD开关切换到“ON”,信号会被降低20dB,录入音量会变小。
TerraTec DMX 6fire 24_96音效卡 说明书

使用手冊(繁體㆗文版)目錄單㆒系統多重聲卡 (4)拆封及安裝 (5)簡述及摘要 (6)DMX 6fier 24/96 PCI卡接口 (7)前置模組接口 (8)安裝步驟 (9)安裝驅動程式 (11)在Windows 98SE㆘安裝 (12)在Windows ME㆘安裝 (15)在Windows 2000㆘安裝 (18)在Windows XP㆘安裝 (22)多媒體設定 (25)連接及其用法 (26)軟體 (30)驅動程式 (31)DMX驅動程式特殊內容 (32)DMX控制台 (34)WaveLab Lite 2.0 (41)41 MusicMatchjukebox ……………………………………………………Cyberlink Power DVD 3.0 – 6聲道 (41)Algorithmix Sound Laundry TerraTec Edition (42)Emagic MicroLogic Fun (42)HOTSTUFF資料夾 (43)練習 (44)再㆒次叮嚀 (46)錄完了,接㆘來呢? (47)DMX 6fire 24/96的數位介面 (48)值得注意的事項 (50)首先恭喜您以您睿智選擇了TerraTec的DMX 6fire 24/96音效卡,DMX 6fire 24/96是㆒套整合了休閒視聽、電腦遊戲、專業音樂製作的高品質電腦音頻產品,也是第㆒套「真正」在數位及類比應用領域㆗能以24bit/96KHz即時且同時錄放的整合型音效卡,不必再透過任何驅動程式的升級便可直接享受超高音質的滿足感。
本說明書旨在讓您對於本產品有更進㆒步的認識,並且減少在安裝及操作過程㆗產生不必要的問題,其㆗有㆒些較為深入的技術資料,對於㆒般的使用者而言,略過這些資料並不會造成使用㆖的麻煩,如果您有興趣,瞭解㆒㆘這些資料也是很不錯的!單㆒系統㆗多重聲卡在㆒台電腦系統㆗可安裝多套DMX 6fire 24/96 SoundSystems並同時使用,而SoundSystems也可與TerraTec AudioSystem的EWS與EWX系列產品㆒併使用,不過,在這種情況㆘無法使用EWS-Connect方式進行內部同步。
- 1、下载文档前请自行甄别文档内容的完整性,平台不提供额外的编辑、内容补充、找答案等附加服务。
- 2、"仅部分预览"的文档,不可在线预览部分如存在完整性等问题,可反馈申请退款(可完整预览的文档不适用该条件!)。
- 3、如文档侵犯您的权益,请联系客服反馈,我们会尽快为您处理(人工客服工作时间:9:00-18:30)。
kldnV 1.0
使用手册
DMX 6Fire USB
TerraTec DMX 6Fire USB 使用手册
DMX 6 Fire USB设备连接介绍 (2)
前面 (2)
背面 (4)
模拟输出
LINE OUT 1/2, 3/4, 5/6 (背面) (5)
耳机输出(前置) (5)
驱动
控制面板 5
混音器 (6)
音量 (6)
信号 (6)
绕送 (7)
输出和设定 (7)
音量 (7)
频率设定 (8)
设备设定 (8)
场景 (9)
其它 (9)
DMX 6 Fire USB设备连接介绍
DMX6 Fire USB 音效界面提供你连接许多专业录音外围设备和Hi-Fi设备。
以上为常规连接的设置
请确保你安装驱动时没被杀毒软件拦截,有这提示:
声卡前面
1. 麦克风接口(XLR-1/4 or 6.3 mm 复合式二合一接口)
这个插座接受XLR接头和需要幻象电源(通常是电容式麦克风)的专业麦克风,和“一
般”耳机插头(6.3mm孔通常是接动圈麦)。
这个接口与背板上Line In 1接口是同时只能择一使用(意思是如果麦克风和LINE IN 1同时有接入时,只能选择一个作为输入),而且假如XLR or 1/4" (6.3 mm)插头插上时,会自动重新重导信号路径(自动优先选择),此时在背板的Line In 1 和Line In 2 会自动关掉。
2. 耳机的音量控制
当你将耳机插入进去,先把音量转到最左边0的位置,否则可能相当大声。
你可以在插入耳机后再转大声。
3. 耳机接口
如上所述:插上耳机之前将音量控制转到最低。
这个接口仅会送出Line Out 1/2的信号。
4. 麦克风控制的LED指示灯。
LED灯是提供视觉上监看麦克风的录音。
“蓝灯”代表有信号,假如看到亮红色LED,请将Gain 1控制转小。
红色LED灯亮时代表是削峰失真,造成了录音信号失真。
5. 麦克风孔的音量控制
控制前置放大的信号在麦克风输入端。
同样的,麦克风插入控制在麦克风输入端的信号前级放大。
6. 48伏幻象电源:当你连接电容式麦克风时拨到“ON”,如果电容麦已启用了幻想电源,不要重复开启,否则可能烧坏声卡。
7. -20dB切换开关
假如你的麦克风的录音太大声,将PAD开关切换到“ON”,信号会被降低20dB,录入音量会变小。
8. Gain 2的LED灯显示(乐器输入)
在这里,相同的蓝色表示有信号,红色代表信号是削峰失真。
9. 乐器输入的控制增益
当有信号时,将控制按钮转小直到红色LED不再亮起。
10.吉他或贝斯接口
它可以接受所有高阻抗乐器,并进行前级放大,这个接口与背板的Line In 2同时只能择一个使用,(并不能同时使用此通道),而且假如XLR 1/4" (6.3 mm)插头插上时会自动重导信号路径(自动优先选择)。
此时,背板的Line In 1和2 会自动关闭。
11. PHONO控制的LED指示灯
这些指示从你连接到6FIRE背板PHONO IN接口的唱机送来信号。
12. PHONO IN的增益控制
控制在背板PHONO IN接口输入信号的增益值。
13. 监听信号的控制
DMX 6Fire USB有“真正”的硬件监听信道。
换言之,Input 1/2的输入信号(麦克风/ 乐器或Line In 1/2)在进行数字转换之前就分接信号直接送至模拟输出1/2。
(此通道是固定的)在那里,监听信号可以无延迟的与这些输出信号(例如:计算机播放的声音)进行混音。
14.数字光纤输入通过光纤线连接数字来源如CD播放器、数字录音机、功放或其它PC。
15.数字光纤输出通过光纤线连接这个输出口将你的PC传送数字数据到任何其它数字设备。
16.同轴数字输入通过RCA插头连接数字来源如CD播放器、数字录音机或其它PC。
17.同轴数字输出选择这个输出通过线材RCA插头由你的PC传送数字数据到任何其它数字设备。