spring注解详细介绍
SpringBootApplication注解原理及代码详解

SpringBootApplication注解原理及代码详解1、SpringBoot 启动main()@SpringBootApplicationpublic class TomcatdebugApplication {public static void main(String[] args) {SpringApplication.run(TomcatdebugApplication.class, args);}}1.1 @SpringBootApplication 注解,其实主要是@ComponentScan,@EnableAutoConfiguration,@SpringBootConfiguration三个注解@ComponentScan 注解:spring⾥有四⼤注解:@Service,@Repository,@Component,@Controller⽤来定义⼀个bean.@ComponentScan注解就是⽤来⾃动扫描被这些注解标识的类,最终⽣成ioc容器⾥的bean.可以通过设置@ComponentScan basePackages,includeFilters,excludeFilters属性来动态确定⾃动扫描范围,类型已经不扫描的类型. 默认情况下:它扫描所有类型,并且扫描范围是@ComponentScan注解所在配置类包及⼦包的类@SpringBootConfiguration 注解:@SpringBootConfiguration继承⾃@Configuration,⼆者功能也⼀致,标注当前类是配置类,并会将当前类内声明的⼀个或多个以@Bean注解标记的⽅法的实例纳⼊到spring容器中,并且实例名就是⽅法名。
demo 说明:(1)注⼊spring ioc bean@SpringBootConfigurationpublic class Config {@Beanpublic Map createMap(){Map map = new HashMap();map.put("username","gxz");map.put("age",27);return map;}}(2)调⽤:public static void main( String[] args ){//⽅式1 获取contextConfigurableApplicationContext context = SpringApplication.run(App.class, args);context.getBean(Runnable.class).run();context.getBean("createMap"); //注意这⾥直接获取到这个⽅法beanint age = (int) map.get("age");System.out.println("age=="+age);//⽅式2. 使⽤@Autowired注解,应⽤bean// @Autowired// Map createMap}@EnableAutoConfiguration 注解@EnableAutoConfiguration作⽤:从classpath中搜索所有的META-INF/spring.factories配置⽂件,然后将其中key为org.springframework.boot.autoconfigure.EnableAutoConfiguration的value加载到spring容器中。
SpringIoC公共注解详解

SpringIoC 公共注解详解前⾔本系列全部基于 Spring 5.2.2.BUILD-SNAPSHOT 版本。
因为 Spring 整个体系太过于庞⼤,所以只会进⾏关键部分的源码解析。
什么是公共注解?公共注解就是常见的Java 注解,特别是JSR-250中的注解。
例如:@Resource 、@PostConstructor 、@PreDestroy 等等,本⽂也就主要分析这三个注解在 Spring 中是如何处理的。
正⽂@Resource 注解的处理对 @Resource 注解的处理类是 CommonAnnotationBeanPostProcessor ,它通过实现 InstantiationAwareBeanPostProcessor 接⼝,重写postProcessProperties() ⽅法实现对标注了 @Resource 注解的字段或⽅法的⾃动注⼊。
InstantiationAwareBeanPostProcessor 接⼝的详细信息可以查看。
关于 CommonAnnotationBeanPostProcessor 这个后置处理器是怎么加⼊到 beanFactory 中的,我们在 ⼀⽂中介绍过主要是通过AnnotationConfigUtils#registerAnnotationConfigProcessors() 实现的。
BeanDefinition 合并后的后置处理CommonAnnotationBeanPostProcessor#postProcessMergedBeanDefinition上⾯代码中的 findAutowiringMetadata() ⽅法就是利⽤反射遍历类的所有字段和⽅法,找到标注了 @Resource 注解的,并缓存进injectionMetadataCache 中。
注意:静态字段和静态⽅法会过滤掉。
findAutowiringMetadata() ⽅法基本和 AutowiredAnnotationBeanPostProcessor 中的⼀致,只是处理的注解不同⽽已,可以查查看⼀⽂中该⽅法的详解。
Spring缓存注解@Cacheable、@CacheEvict、@CachePut使用
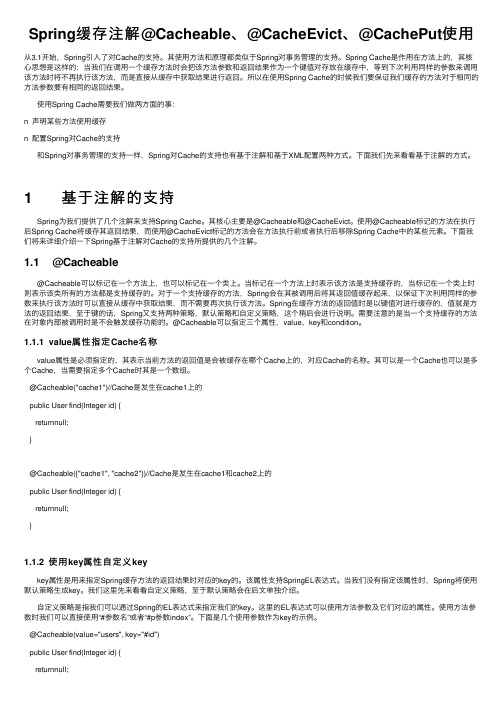
Spring缓存注解@Cacheable、@CacheEvict、@CachePut使⽤从3.1开始,Spring引⼊了对Cache的⽀持。
其使⽤⽅法和原理都类似于Spring对事务管理的⽀持。
Spring Cache是作⽤在⽅法上的,其核⼼思想是这样的:当我们在调⽤⼀个缓存⽅法时会把该⽅法参数和返回结果作为⼀个键值对存放在缓存中,等到下次利⽤同样的参数来调⽤该⽅法时将不再执⾏该⽅法,⽽是直接从缓存中获取结果进⾏返回。
所以在使⽤Spring Cache的时候我们要保证我们缓存的⽅法对于相同的⽅法参数要有相同的返回结果。
使⽤Spring Cache需要我们做两⽅⾯的事:n 声明某些⽅法使⽤缓存n 配置Spring对Cache的⽀持和Spring对事务管理的⽀持⼀样,Spring对Cache的⽀持也有基于注解和基于XML配置两种⽅式。
下⾯我们先来看看基于注解的⽅式。
1 基于注解的⽀持Spring为我们提供了⼏个注解来⽀持Spring Cache。
其核⼼主要是@Cacheable和@CacheEvict。
使⽤@Cacheable标记的⽅法在执⾏后Spring Cache将缓存其返回结果,⽽使⽤@CacheEvict标记的⽅法会在⽅法执⾏前或者执⾏后移除Spring Cache中的某些元素。
下⾯我们将来详细介绍⼀下Spring基于注解对Cache的⽀持所提供的⼏个注解。
1.1 @Cacheable@Cacheable可以标记在⼀个⽅法上,也可以标记在⼀个类上。
当标记在⼀个⽅法上时表⽰该⽅法是⽀持缓存的,当标记在⼀个类上时则表⽰该类所有的⽅法都是⽀持缓存的。
对于⼀个⽀持缓存的⽅法,Spring会在其被调⽤后将其返回值缓存起来,以保证下次利⽤同样的参数来执⾏该⽅法时可以直接从缓存中获取结果,⽽不需要再次执⾏该⽅法。
Spring在缓存⽅法的返回值时是以键值对进⾏缓存的,值就是⽅法的返回结果,⾄于键的话,Spring⼜⽀持两种策略,默认策略和⾃定义策略,这个稍后会进⾏说明。
Spring注解【非单例】
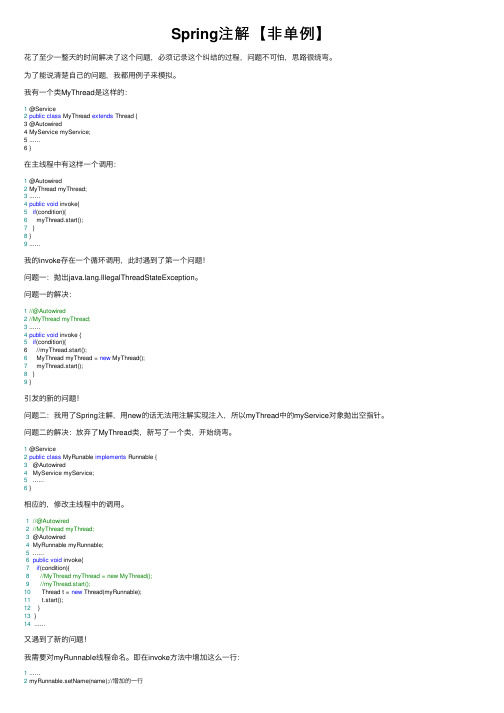
Spring注解【⾮单例】花了⾄少⼀整天的时间解决了这个问题,必须记录这个纠结的过程,问题不可怕,思路很绕弯。
为了能说清楚⾃⼰的问题,我都⽤例⼦来模拟。
我有⼀个类MyThread是这样的:1 @Service2public class MyThread extends Thread {3 @Autowired4 MyService myService;5 ......6 }在主线程中有这样⼀个调⽤:1 @Autowired2 MyThread myThread;3 ......4public void invoke{5if(condition){6 myThread.start();7 }8 }9 ......我的invoke存在⼀个循环调⽤,此时遇到了第⼀个问题!问题⼀:抛出ng.IllegalThreadStateException。
问题⼀的解决:1//@Autowired2//MyThread myThread;3 ......4public void invoke {5if(condition){6 //myThread.start();6 MyThread myThread = new MyThread();7 myThread.start();8 }9 }引发的新的问题!问题⼆:我⽤了Spring注解,⽤new的话⽆法⽤注解实现注⼊,所以myThread中的myService对象抛出空指针。
问题⼆的解决:放弃了MyThread类,新写了⼀个类,开始绕弯。
1 @Service2public class MyRunable implements Runnable {3 @Autowired4 MyService myService;5 ......6 }相应的,修改主线程中的调⽤。
1//@Autowired2//MyThread myThread;3 @Autowired4 MyRunnable myRunnable;5 ......6public void invoke{7if(condition){8//MyThread myThread = new MyThread();9//myThread.start();10 Thread t = new Thread(myRunnable);11 t.start();12 }13 }14 ......⼜遇到了新的问题!我需要对myRunnable线程命名。
【SpringFramework】Spring入门教程(三)使用注解配置
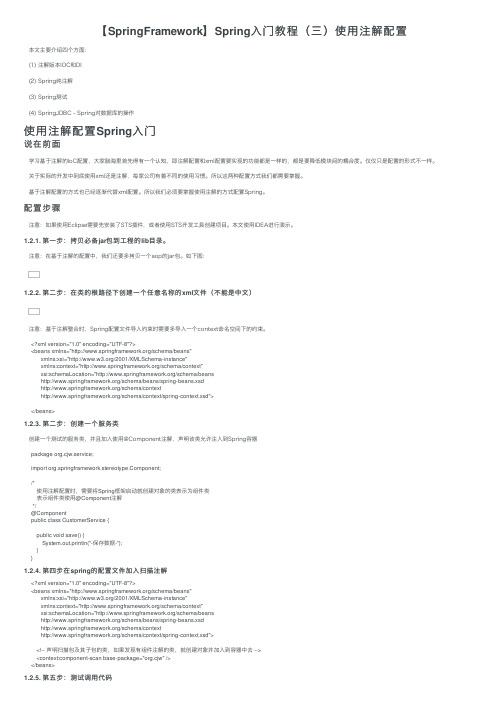
【SpringFramework】Spring⼊门教程(三)使⽤注解配置本⽂主要介绍四个⽅⾯:(1) 注解版本IOC和DI(2) Spring纯注解(3) Spring测试(4) SpringJDBC - Spring对数据库的操作使⽤注解配置Spring⼊门说在前⾯学习基于注解的IoC配置,⼤家脑海⾥⾸先得有⼀个认知,即注解配置和xml配置要实现的功能都是⼀样的,都是要降低模块间的耦合度。
仅仅只是配置的形式不⼀样。
关于实际的开发中到底使⽤xml还是注解,每家公司有着不同的使⽤习惯。
所以这两种配置⽅式我们都需要掌握。
基于注解配置的⽅式也已经逐渐代替xml配置。
所以我们必须要掌握使⽤注解的⽅式配置Spring。
配置步骤注意:如果使⽤Eclipse需要先安装了STS插件,或者使⽤STS开发⼯具创建项⽬。
本⽂使⽤IDEA进⾏演⽰。
1.2.1. 第⼀步:拷贝必备jar包到⼯程的lib⽬录。
注意:在基于注解的配置中,我们还要多拷贝⼀个aop的jar包。
如下图:1.2.2. 第⼆步:在类的根路径下创建⼀个任意名称的xml⽂件(不能是中⽂)注意:基于注解整合时,Spring配置⽂件导⼊约束时需要多导⼊⼀个context命名空间下的约束。
<?xml version="1.0" encoding="UTF-8"?><beans xmlns="/schema/beans"xmlns:xsi="/2001/XMLSchema-instance"xmlns:context="/schema/context"xsi:schemaLocation="/schema/beans/schema/beans/spring-beans.xsd/schema/context/schema/context/spring-context.xsd"></beans>1.2.3. 第⼆步:创建⼀个服务类创建⼀个测试的服务类,并且加⼊使⽤@Component注解,声明该类允许注⼊到Spring容器package org.cjw.service;import ponent;/*使⽤注解配置时,需要将Spring框架启动就创建对象的类表⽰为组件类表⽰组件类使⽤@Component注解*/@Componentpublic class CustomerService {public void save() {System.out.println("-保存数据-");}}1.2.4. 第四步在spring的配置⽂件加⼊扫描注解<?xml version="1.0" encoding="UTF-8"?><beans xmlns="/schema/beans"xmlns:xsi="/2001/XMLSchema-instance"xmlns:context="/schema/context"xsi:schemaLocation="/schema/beans/schema/beans/spring-beans.xsd/schema/context/schema/context/spring-context.xsd"><!-- 声明扫描包及其⼦包的类,如果发现有组件注解的类,就创建对象并加⼊到容器中去 --><context:component-scan base-package="org.cjw" /></beans>1.2.5. 第五步:测试调⽤代码package org.cjw.test;import org.cjw.service.CustomerService;import org.junit.Test;import org.springframework.context.ApplicationContext;import org.springframework.context.support.ClassPathXmlApplicationContext;public class CustomerServiceTest {@Testpublic void testSave() {ApplicationContext context = new ClassPathXmlApplicationContext("applicationContext.xml");CustomerService customerService = context.getBean(CustomerService.class);customerService.save();}}--测试结果,如果可以调⽤服务⽅法,测试成功。
Spring常用的一些注解说明

Spring常⽤的⼀些注解说明@Configuration从Spring3.0,@Configuration⽤于定义配置类,可替换xml配置⽂件,被注解的类内部包含有⼀个或多个被@Bean注解的⽅法。
这些⽅法将会被AnnotationConfigApplicationContext或AnnotationConfigWebApplicationContext类进⾏扫描,并⽤于构建bean定义。
@Bean@Bean注解⽤于告诉⽅法,产⽣⼀个Bean对象,然后这个Bean对象交给Spring管理。
产⽣这个Bean对象的⽅法Spring只会调⽤⼀次,随后这个Spring将会将这个Bean对象放在⾃⼰的IOC容器中。
SpringIOC 容器管理⼀个或者多个bean,这些bean都需要在@Configuration注解下进⾏创建,在⼀个⽅法上使⽤@Bean注解就表明这个⽅法需要交给Spring进⾏管理。
@Autowired、@Resource@Resource和@Autowired注解都是⽤来实现依赖注⼊的。
只是@AutoWried按by type⾃动注⼊,⽽@Resource默认按byName⾃动注⼊。
♣ @Autowired@Autowired具有强契约特征,其所标注的属性或参数必须是可装配的。
如果没有Bean可以装配到@Autowired所标注的属性或参数中,⾃动装配就会失败,抛出NoSuchBeanDefinitionException.@Autowired可以对类成员变量、⽅法及构造函数进⾏标注,让 spring 完成 bean ⾃动装配的⼯作。
@Autowired 默认是按照类去匹配,配合 @Qualifier 指定按照名称去装配 bean。
♣ @Resource@Resource是JDK提供的注解,有两个重要属性,分别是name和type。
@Resource依赖注⼊时查找bean的规则既不指定name属性,也不指定type属性,则⾃动按byName⽅式进⾏查找。
参数校验Spring的@Valid注解用法解析
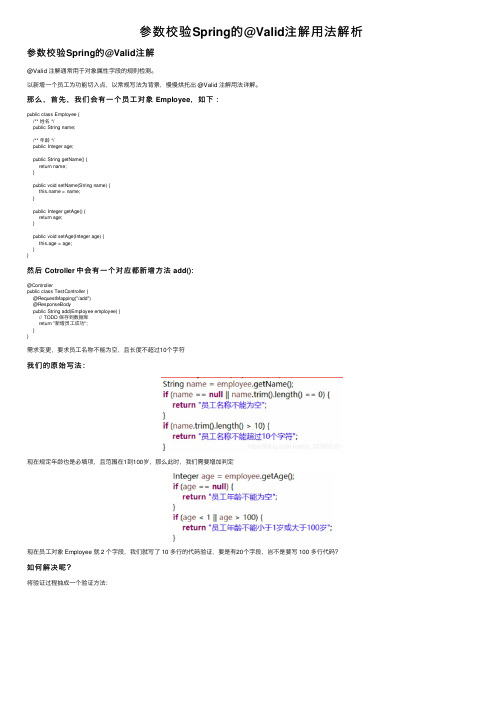
参数校验Spring的@Valid注解⽤法解析参数校验Spring的@Valid注解@Valid 注解通常⽤于对象属性字段的规则检测。
以新增⼀个员⼯为功能切⼊点,以常规写法为背景,慢慢烘托出 @Valid 注解⽤法详解。
那么,⾸先,我们会有⼀个员⼯对象 Employee,如下:public class Employee {/** 姓名 */public String name;/** 年龄 */public Integer age;public String getName() {return name;}public void setName(String name) { = name;}public Integer getAge() {return age;}public void setAge(Integer age) {this.age = age;}}然后 Cotroller 中会有⼀个对应都新增⽅法 add():@Controllerpublic class TestController {@RequestMapping("/add")@ResponseBodypublic String add(Employee employee) {// TODO 保存到数据库return "新增员⼯成功";}}需求变更,要求员⼯名称不能为空,且长度不超过10个字符我们的原始写法:现在规定年龄也是必填项,且范围在1到100岁,那么此时,我们需要增加判定现在员⼯对象 Employee 就 2 个字段,我们就写了 10 多⾏的代码验证,要是有20个字段,岂不是要写 100 多⾏代码?如何解决呢?将验证过程抽成⼀个验证⽅法:但这种⽅式只是抽了⼀个⽅法,有⼀种换汤不换药的感觉,虽然业务⽅法看起来清爽了很多,但书写代码量并没有下降,反⽽还多出了⼀个⽅法。
此时引出 Spring 的 @valid 注解即可:⾸先,我们在 Maven 配置中引⼊ @valid 的依赖:如果你是 springboot 项⽬,那么可以不⽤引⼊了,已经引⼊了,他就存在于最核⼼的 web 开发包⾥⾯。
SpringMVC中RequestParam注解的简单理解
SpringMVC中RequestParam注解的简单理解⽬录1、前⾔2、name/value属性3、required属性4、defaultValue属性总结1、前⾔作⽤:主要⽤于对前端请求的参数进⾏⼀些约束,包括参数名不匹配问题、是否必须、默认值!这个注解⾮常简单,准确的说应该是MVC中除了Controller之外最简单的注解。
@Target(ElementType.PARAMETER)@Retention(RetentionPolicy.RUNTIME)@Documentedpublic @interface RequestParam {@AliasFor("name")String value() default "";@AliasFor("value")String name() default "";boolean required() default true;String defaultValue() default ValueConstants.DEFAULT_NONE;}虽然有四个属性实际上就三个,name属性和value属性⼀个意思,相互起别名跟对⽅⼀样。
Target的元注解约束这个注解只能使⽤在参数上,Retention元注解表⽰这个注解的保存时间这⾥表⽰可以在运⾏时JVM反射加载到!2、name/value属性这两个属性是当前后端参数不匹配时进⾏前后端参数转换,即前端 - name/value - 后端参数!⼀旦加了设置name/value表⽰这个参数必须传递,否则400错误。
这种做法很鸡肋,不匹配直接照着前端改就⾏,有点画蛇添⾜。
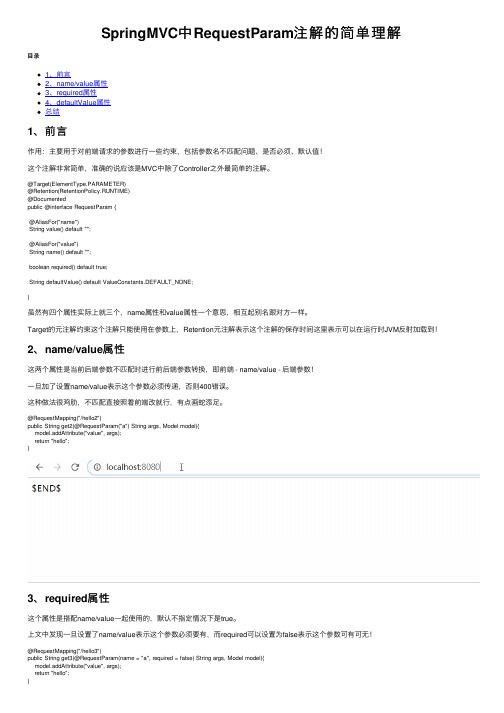
@RequestMapping("/hello2")public String get2(@RequestParam("a") String args, Model model){model.addAttribute("value", args);return "hello";}3、required属性这个属性是搭配name/value⼀起使⽤的,默认不指定情况下是true。
Spring核心注解
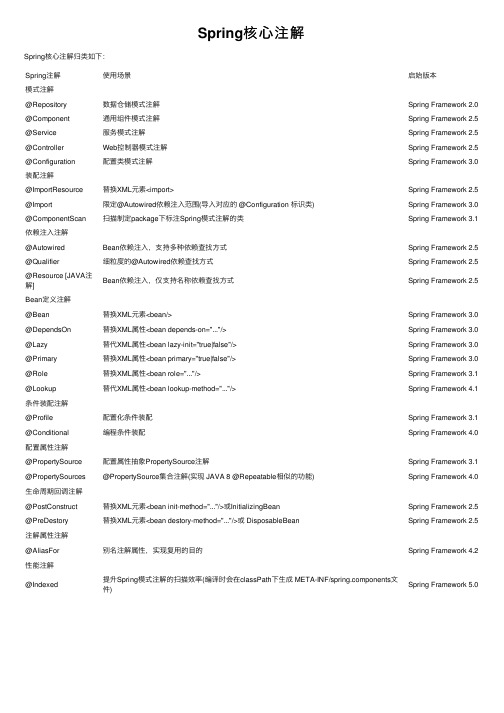
Spring注解使⽤场景启始版本模式注解@Repository数据仓储模式注解Spring Framework 2.0 @Component通⽤组件模式注解Spring Framework 2.5 @Service服务模式注解Spring Framework 2.5 @Controller Web控制器模式注解Spring Framework 2.5 @Configuration配置类模式注解Spring Framework 3.0装配注解@ImportResource替换XML元素<import>Spring Framework 2.5 @Import限定@Autowired依赖注⼊范围(导⼊对应的 @Configuration 标识类)Spring Framework 3.0 @ComponentScan扫描制定package下标注Spring模式注解的类Spring Framework 3.1依赖注⼊注解@Autowired Bean依赖注⼊,⽀持多种依赖查找⽅式Spring Framework 2.5 @Qualifier细粒度的@Autowired依赖查找⽅式Spring Framework 2.5 @Resource [JAVA注解]Bean依赖注⼊,仅⽀持名称依赖查找⽅式Spring Framework 2.5 Bean定义注解@Bean替换XML元素<bean/>Spring Framework 3.0 @DependsOn替换XML属性<bean depends-on="..."/>Spring Framework 3.0 @Lazy替代XML属性<bean lazy-init="true|false"/>Spring Framework 3.0 @Primary替换XML属性<bean primary="true|false"/>Spring Framework 3.0 @Role替换XML属性<bean role="..."/>Spring Framework 3.1 @Lookup替代XML属性<bean lookup-method="..."/>Spring Framework 4.1条件装配注解@Profile配置化条件装配Spring Framework 3.1 @Conditional编程条件装配Spring Framework 4.0配置属性注解@PropertySource配置属性抽象PropertySource注解Spring Framework 3.1 @PropertySources@PropertySource集合注解(实现 JAVA 8 @Repeatable相似的功能)Spring Framework 4.0⽣命周期回调注解@PostConstruct替换XML元素<bean init-method="..."/>或InitializingBean Spring Framework 2.5 @PreDestory替换XML元素<bean destory-method="..."/>或 DisposableBean Spring Framework 2.5注解属性注解@AliasFor别名注解属性,实现复⽤的⽬的Spring Framework 4.2性能注解@Indexed提升Spring模式注解的扫描效率(编译时会在classPath下⽣成 META-INF/ponents⽂件)Spring Framework 5.0Spring核⼼注解Spring核⼼注解归类如下:。
Spring中Bean管理的常用注解

Spring中Bean管理的常⽤注解在Spring中,主要⽤于管理bean的注解分为四⼤类:1.⽤于创建对象。
2.⽤于给对象的属性注⼊值。
3.⽤于改变作⽤的范围。
4.⽤于定义⽣命周期。
这⼏个在开发中经常接触到,也可以说每天都会遇见。
其中创建对象是重点,Spring中创建对象的有四个:分别是@Component,@Controller,@Service,@Repository。
对于@Component注解:把资源让Spring来管理,相当于xml中的配置的Bean。
属性:value:指定Bean中的id。
如果不指定value属性,默认Bean的id是当前类的类名,⾸字母⼩写。
在开发中的场景是这样的,其实是在实现类中加⼊即可:@Component("customerService")public class CustomerServiceImpl implements CustomerService{public void save() {System.out.println("顾客保存⽅法");}}⽽其它的三个注解都是针对⼀个衍⽣注解,它们的作⽤及属性都是⼀模⼀样的。
只不过提供了更加明确的语义化。
@Controller:⼀般⽤于表现层的注解。
@Service:⼀般⽤于业务层的注解。
@responsitory:⼀般⽤于持久层的注解。
⽤法与以上相同,这⾥不做过多的解释。
要理解这个三个注解就是让标注类本⾝的⽤途清晰⽽已。
接下来,聊聊⽤于给对象的属性注⼊值得问题。
Spring给我们提出了注⼊数据的注解有:@Value,@Autowired,@Qualifier,@Resource。
其中@Value:注⼊基本数据类型和String类型数据,它的属性value⽤于指定值。
@Autowired这个⽤法是⽐较重要的,它能够⾃动按照类型注⼊。
当使⽤注解注⼊属性时,set⽅法可以省略。
SpringBoot注解解析大全(非常全哦!)

SpringBoot注解解析⼤全(⾮常全哦!)使⽤注解的优势:1.采⽤纯java代码,不在需要配置繁杂的xml⽂件2.在配置中也可享受⾯向对象带来的好处3.类型安全对重构可以提供良好的⽀持4.减少复杂配置⽂件的同时亦能享受到springIoC容器提供的功能⼀、注解详解(配备了完善的释义)------(可采⽤ctrl+F 来进⾏搜索哦~~~~也可以收藏⽹页这样以后就不⽤往复查询了哦)@SpringBootApplication:申明让spring boot⾃动给程序进⾏必要的配置,这个配置等同于:@Configuration ,@EnableAutoConfiguration 和 @ComponentScan 三个配置。
@ResponseBody:表⽰该⽅法的返回结果直接写⼊HTTP response body中,⼀般在异步获取数据时使⽤,⽤于构建RESTful的api。
在使⽤@RequestMapping后,返回值通常解析为跳转路径,加上@esponsebody后返回结果不会被解析为跳转路径,⽽是直接写⼊HTTP response body中。
⽐如异步获取json数据,加上@Responsebody后,会直接返回json数据。
该注解⼀般会配合@RequestMapping⼀起使⽤。
@Controller:⽤于定义控制器类,在spring项⽬中由控制器负责将⽤户发来的URL请求转发到对应的服务接⼝(service层),⼀般这个注解在类中,通常⽅法需要配合注解@RequestMapping。
@RestController:⽤于标注控制层组件(如struts中的action),@ResponseBody和@Controller的合集。
@RequestMapping:提供路由信息,负责URL到Controller中的具体函数的映射。
@EnableAutoConfiguration:SpringBoot⾃动配置(auto-configuration):尝试根据你添加的jar依赖⾃动配置你的Spring应⽤。
Spring使用@Value注解与@PropertySource注解加载配置文件操作

Spring使⽤@Value注解与@PropertySource注解加载配置⽂件操作1、@Value注解简介Spring框架提供的@Value注解可以将外部的值动态注⼊到Bean中,@Value注解使⽤在字段、构造器参数和⽅法参数上。
@Value可以指定属性取值的表达式,⽀持通过#{}使⽤SpringEL来取值,也⽀持使⽤${}来将属性来源中(Properties⽂件、本地环境变量、系统属性等)的值注⼊到Bean的属性中。
此注解值的注⼊发⽣在AutowiredAnnotationBeanPostProcessor类中。
@Value注解实现以下⼏种情况:(1)注⼊普通字符;(2)注⼊操作系统属性;(3)注⼊表达式运算结果;(4)注⼊其他Bean的属性;(5)注⼊⽂件内容;(6)注⼊⽹址内容;(7)注⼊属性⽂件。
2、@PropertySource注解简介@PropertySource注解可以加载指定的属性⽂件(*.properties)到 Spring 的 Environment 中。
可以配合 @Value 和@ConfigurationProperties 使⽤。
语法格式如下:@PropertySource(value = "classpath:com/pjb/el/user.properties",encoding = "UTF-8")public class UserInfo{}【实例】使⽤@Value注解与@PropertySource注解加载配置⽂件。
(1)创建⽤户信息属性⽂件(user.properties)erId=1erName=pan_junbiao的博客user.blogUrl=https:///pan_junbiaouser.remark=您好,欢迎访问 pan_junbiao的博客(2)创建⽤户信息实体类(UserInfo.java)使⽤@PropertySource注解加载配置⽂件信息,然后使⽤@Value注解注⼊属性值。
Spring注解@Qualifier的详细用法你知道几种
Spring注解@Qualifier的详细⽤法你知道⼏种环境:springboot2.3.10⼀般使⽤在项⽬中使⽤@Qualifier来限定注⼊的Bean。
由于项⽬中我习惯⽤@Resource注解,所以这⾥先对@Autowired和@Resource进⾏个简单的说明。
@Autowired和@Resource区别相同点:@Autowired与@Resource都可以⽤来装配Bean。
都可以写在字段上,或写在setter⽅法上。
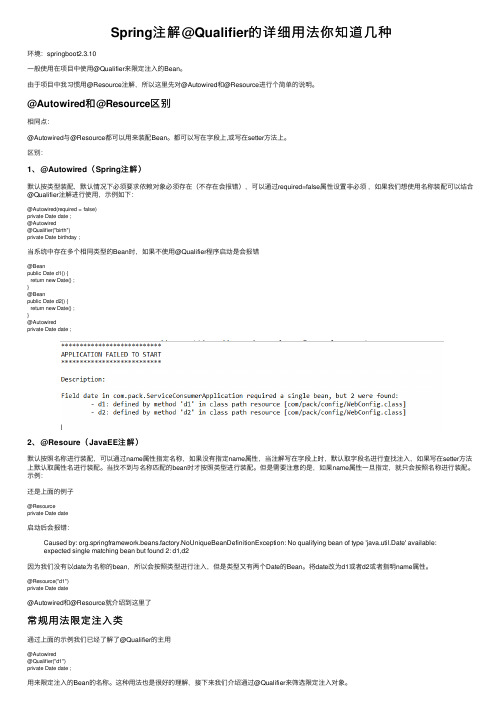
区别:1、@Autowired(Spring注解)默认按类型装配,默认情况下必须要求依赖对象必须存在(不存在会报错),可以通过required=false属性设置⾮必须,如果我们想使⽤名称装配可以结合@Qualifier注解进⾏使⽤,⽰例如下:@Autowired(required = false)private Date date ;@Autowired@Qualifier("birth")private Date birthday ;当系统中存在多个相同类型的Bean时,如果不使⽤@Qualifier程序启动是会报错@Beanpublic Date d1() {return new Date() ;}@Beanpublic Date d2() {return new Date() ;}@Autowiredprivate Date date ;2、@Resoure(JavaEE注解)默认按照名称进⾏装配,可以通过name属性指定名称,如果没有指定name属性,当注解写在字段上时,默认取字段名进⾏查找注⼊,如果写在setter⽅法上默认取属性名进⾏装配。
当找不到与名称匹配的bean时才按照类型进⾏装配。
但是需要注意的是,如果name属性⼀旦指定,就只会按照名称进⾏装配。
⽰例:还是上⾯的例⼦@Resourceprivate Date date启动后会报错:Caused by: org.springframework.beans.factory.NoUniqueBeanDefinitionException: No qualifying bean of type 'java.util.Date' available:expected single matching bean but found 2: d1,d2因为我们没有以date为名称的bean,所以会按照类型进⾏注⼊,但是类型⼜有两个Date的Bean。
Springboot常用注解及配置文件加载顺序详解
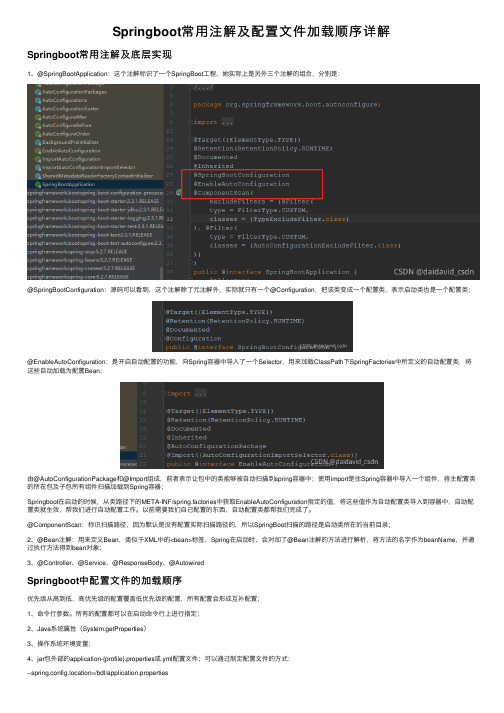
Springboot常⽤注解及配置⽂件加载顺序详解Springboot常⽤注解及底层实现1、@SpringBootApplication:这个注解标识了⼀个SpringBoot⼯程,她实际上是另外三个注解的组合,分别是:@SpringBootConfiguration:源码可以看到,这个注解除了元注解外,实际就只有⼀个@Configuration,把该类变成⼀个配置类,表⽰启动类也是⼀个配置类;@EnableAutoConfiguration:是开启⾃动配置的功能,向Spring容器中导⼊了⼀个Selector,⽤来加载ClassPath下SpringFactories中所定义的⾃动配置类,将这些⾃动加载为配置Bean;由@AutoConfigurationPackage和@Import组成,前者表⽰让包中的类能够被⾃动扫描到spring容器中;使⽤import是往Spring容器中导⼊⼀个组件,将主配置类的所在包及⼦包所有组件扫描加载到Spring容器;Springboot在启动的时候,从类路径下的META-INF/spring.factories中获取EnableAutoConfiguration指定的值,将这些值作为⾃动配置类导⼊到容器中,⾃动配置类就⽣效,帮我们进⾏⾃动配置⼯作。
以前需要我们⾃⼰配置的东西,⾃动配置类都帮我们完成了。
@ComponentScan:标识扫描路径,因为默认是没有配置实际扫描路径的,所以SpringBoot扫描的路径是启动类所在的当前⽬录;2、@Bean注解:⽤来定义Bean,类似于XML中的<bean>标签,Spring在启动时,会对加了@Bean注解的⽅法进⾏解析,将⽅法的名字作为beanName,并通过执⾏⽅法得到bean对象;3、@Controller、@Service、@ResponseBody、@AutowiredSpringboot中配置⽂件的加载顺序优先级从⾼到低,⾼优先级的配置覆盖低优先级的配置,所有配置会形成互补配置;1、命令⾏参数。
SpringBoot中常用注解及各种注解作用
SpringBoot中常⽤注解及各种注解作⽤本篇⽂章将介绍⼏种SpringBoot 中常⽤注解其中,各注解的作⽤为:@PathVaribale 获取url中的数据@RequestParam 获取请求参数的值@GetMapping 组合注解,是@RequestMapping(method = RequestMethod.GET)的缩写@RestController是@ResponseBody和@Controller的组合注解。
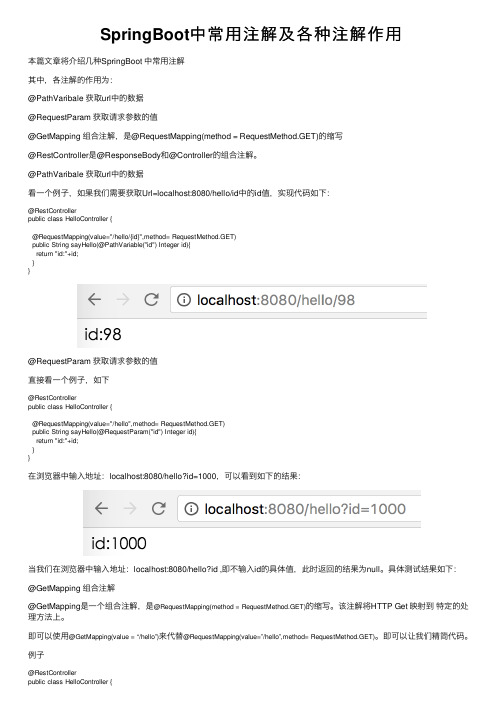
@PathVaribale 获取url中的数据看⼀个例⼦,如果我们需要获取Url=localhost:8080/hello/id中的id值,实现代码如下:@RestControllerpublic class HelloController {@RequestMapping(value="/hello/{id}",method= RequestMethod.GET)public String sayHello(@PathVariable("id") Integer id){return "id:"+id;}}@RequestParam 获取请求参数的值直接看⼀个例⼦,如下@RestControllerpublic class HelloController {@RequestMapping(value="/hello",method= RequestMethod.GET)public String sayHello(@RequestParam("id") Integer id){return "id:"+id;}}在浏览器中输⼊地址:localhost:8080/hello?id=1000,可以看到如下的结果:当我们在浏览器中输⼊地址:localhost:8080/hello?id ,即不输⼊id的具体值,此时返回的结果为null。
Spring的注解详解
Spring的注解一、 spring注解1、@Autowired注入注解@Autowired可以对成员变量、方法和构造函数进行标注,来完成自动装工作。
@Autowired的标注位置不同,它们都会在Spring在初始化这个bean时,自动装配这个属性。
@Autowired是根据类型进行自动装配的。
例如,如果当Spring上下文中存在不止一个UserDao类型的bean时,就会抛出BeanCreationException异常。
如果Spring上下文中不存在UserDao类型的bean,也会抛出BeanCreationException异常。
我们可以使用@Qualifier配合@Autowired来解决这些问题。
1.public class TestController {2.3.@Autowired4.@Qualifier(“u serDao”)5.Private UserService userService;6.7.@RequestMapping("/showView")8.public ModelAndView showView(){9.ModelAndView modelAndView = new ModelAndView();10.modelAndView.setViewName("viewName");11.modelAndView.addObject("属性名称","属性值");12.return modelAndView;13.}14.}2、@Resource注入注解JSR-250标准注解,推荐使用它来代替Spring专有的@Autowired注解。
@Resource的作用相当于@Autowired,只不过@Autowired按byType自动注入,而@Resource 默认按byName自动注入罢了。
3个SpringBoot核心注解,你知道几个?
3个SpringBoot核⼼注解,你知道⼏个?Spring Boot 核⼼注解讲解Spring Boot 最⼤的特点是⽆需 XML 配置⽂件,能⾃动扫描包路径装载并注⼊对象,并能做到根据 classpath 下的 jar 包⾃动配置。
所以 Spring Boot 最核⼼的 3 个注解就是:1、@Configurationorg.springframework.context.annotation.Configuration这是 Spring 3.0 添加的⼀个注解,⽤来代替 applicationContext.xml 配置⽂件,所有这个配置⽂件⾥⾯能做到的事情都可以通过这个注解所在类来进⾏注册。
下⾯⼏个相关注解也是⾮常重要的!@Bean⽤来代替 XML 配置⽂件⾥⾯的 <bean ...> 配置。
@ImportResource如果有些通过类的注册⽅式配置不了的,可以通过这个注解引⼊额外的 XML 配置⽂件,有些⽼的配置⽂件⽆法通过 @Configuration ⽅式配置的⾮常管⽤。
@Import⽤来引⼊额外的⼀个或者多个 @Configuration 修饰的配置⽂件类。
@SpringBootConfiguration这个注解就是 @Configuration 注解的变体,只是⽤来修饰是 Spring Boot 配置⽽已,或者可利于 Spring Boot 后续的扩展,源码如下。
@Target(ElementType.TYPE) @Retention(RetentionPolicy.RUNTIME) @Documented @Configuration public @interface SpringBootConfiguration { }2、@ComponentScanponentScan这是 Spring 3.1 添加的⼀个注解,⽤来代替配置⽂件中的 component-scan 配置,开启组件扫描,即⾃动扫描包路径下的 @Component 注解进⾏注册 bean 实例到 context 中。
Spring中的注解@Autowired实现过程全解(@Autowired背后的故事)

Spring中的注解@Autowired实现过程全解(@Autowired背后的故事)现在⾯试,基本上都是⾯试造⽕箭 ,⼯作拧螺丝 。
⽽且是喜欢问⼀些 Spring 相关的知识点,⽐如之间的区别。
魔⾼⼀丈,道⾼⼀尺。
很快不少程序员学会了背诵⾯试题,那我反过来问“Spring 中的注解 @Autowired是如何实现的?”,“说说 @Autowired 的实现原理?”等等,背诵⾯试题的就露馅了。
基于此,今天我们来说⼀说 @Autowired 背后的故事!前⾔使⽤ Spring 开发时,进⾏配置主要有两种⽅式,⼀是 xml 的⽅式,⼆是 Java config 的⽅式。
Spring 技术⾃⾝也在不断的发展和改变,从当前的⽕热程度来看,Java config 的应⽤是越来越⼴泛了,在使⽤ Java config 的过程当中,我们不可避免的会有各种各样的注解打交道,其中,我们使⽤最多的注解应该就是 @Autowired 注解了。
这个注解的功能就是为我们注⼊⼀个定义好的 bean。
那么,这个注解除了我们常⽤的属性注⼊⽅式之外还有哪些使⽤⽅式呢?它在代码层⾯⼜是怎么实现的呢?这是本篇⽂章着重想讨论的问题。
@Autowired 注解⽤法在分析这个注解的实现原理之前,我们不妨先来回顾⼀下 @Autowired 注解的⽤法。
将 @Autowired 注解应⽤于构造函数,如以下⽰例所⽰`public class MovieRecommender {``private final CustomerPreferenceDao customerPreferenceDao;``@Autowired``public MovieRecommender(CustomerPreferenceDao customerPreferenceDao) {``this.customerPreferenceDao = customerPreferenceDao;``}``// ...``}`将 @Autowired 注释应⽤于 setter ⽅法`public class SimpleMovieLister {``private MovieFinder movieFinder;``@Autowired``public void setMovieFinder(MovieFinder movieFinder) {``this.movieFinder = movieFinder;``}``// ...``}`将 @Autowired 注释应⽤于具有任意名称和多个参数的⽅法`public class MovieRecommender {``private MovieCatalog movieCatalog;``private CustomerPreferenceDao customerPreferenceDao;``@Autowired``public void prepare(MovieCatalog movieCatalog,``CustomerPreferenceDao customerPreferenceDao) {``this.movieCatalog = movieCatalog;``this.customerPreferenceDao = customerPreferenceDao;``}``// ...``}`您也可以将 @Autowired 应⽤于字段,或者将其与构造函数混合,如以下⽰例所⽰`public class MovieRecommender {``private final CustomerPreferenceDao customerPreferenceDao;``@Autowired``private MovieCatalog movieCatalog;``@Autowired``public MovieRecommender(CustomerPreferenceDao customerPreferenceDao) {``this.customerPreferenceDao = customerPreferenceDao;``}``// ...``}`直接应⽤于字段是我们使⽤的最多的⼀种⽅式,但是使⽤构造⽅法注⼊从代码层⾯却是更加好的,具体原因我就不细说了,有不懂的可以留⾔区评论。
Spring高级之注解@PropertySource的原理
Spring⾼级之注解@PropertySource的原理⽬录定义/作⽤使⽤⽅式spring4.3之前spring4.3及之后读取XML⽂件⾃定义PropertySourceFactory解析YAML⽂件定义/作⽤@PropertySource注解⽤于指定资源⽂件读取的位置,它不仅能读取properties⽂件,也能读取xml⽂件,并且通过YAML解析器,配合⾃定义PropertySourceFactory实现解析YAML⽂件。
源码://只能作⽤在类上@Target(ElementType.TYPE)@Retention(RetentionPolicy.RUNTIME)@Documented@Repeatable(PropertySources.class)public @interface PropertySource {/*** 指定资源名称,如果为空,就根据基础资源的描述⽣成。
*/String name() default "";/*** 指定资源路径。
* 可以是 classpath:/xxx/xxxx* 也可以是 file:/xxx/xxx/xx*/String[] value();/*** 是否忽略资源不存在的情况,如果不忽略,当资源不存在时就报错。
默认不忽略。
* 此属性时spring4.0以后出现的。
*/boolean ignoreResourceNotFound() default false;/*** 指定资源⽂件的编码格式。
如果不指定就使⽤⽂件默认的。
* 此注解是spring4.3以后出现的。
*/String encoding() default "";/*** 指定资源⼯⼚,如果不指定,就使⽤默认的资源⼯⼚。
*/Class<? extends PropertySourceFactory> factory() default PropertySourceFactory.class;}使⽤⽅式此注解在spring4.3之前与spring4.3及之后使⽤的⽅式不⼀样。
Spring系列之Spring常用注解总结

Spring系列之Spring常⽤注解总结Spring系列之Spring常⽤注解总结传统的Spring做法是使⽤.xml⽂件来对bean进⾏注⼊或者是配置aop、事物,这么做有两个缺点:1、如果所有的内容都配置在.xml⽂件中,那么.xml⽂件将会⼗分庞⼤;如果按需求分开.xml⽂件,那么.xml⽂件⼜会⾮常多。
总之这将导致配置⽂件的可读性与可维护性变得很低。
2、在开发中在.java⽂件和.xml⽂件之间不断切换,是⼀件⿇烦的事,同时这种思维上的不连贯也会降低开发的效率。
为了解决这两个问题,Spring引⼊了注解,通过"@XXX"的⽅式,让注解与Java Bean紧密结合,既⼤⼤减少了配置⽂件的体积,⼜增加了Java Bean的可读性与内聚性。
不使⽤注解:先看⼀个不使⽤注解的Spring⽰例,在这个⽰例的基础上,改成注解版本的,这样也能看出使⽤与不使⽤注解之间的区别,先定义⼀个⽼虎:package com.spring.model;public class Tiger {private String tigerName="TigerKing";public String toString(){return "TigerName:"+tigerName;}}再定义⼀个猴⼦:package com.spring.model;public class Monkey {private String monkeyName = "MonkeyKing";public String toString(){return "MonkeyName:" + monkeyName;}}定义⼀个动物园:package com.spring.model;public class Zoo {private Tiger tiger;private Monkey monkey;public Tiger getTiger() {return tiger;}public void setTiger(Tiger tiger) {this.tiger = tiger;}public Monkey getMonkey() {return monkey;}public void setMonkey(Monkey monkey) {this.monkey = monkey;}public String toString(){return tiger + "\n" + monkey;}}spring的配置⽂件这么写:<?xml version="1.0" encoding="UTF-8"?><beansxmlns="/schema/beans"xmlns:xsi="/2001/XMLSchema-instance"xmlns:p="/schema/p"xmlns:context="/schema/context"xsi:schemaLocation="/schema/beans/schema/beans/spring-beans-3.0.xsd/schema/context/schema/context/spring-context-3.0.xsd"><bean id="zoo" class="com.spring.model.Zoo"><property name="tiger" ref="tiger"/><property name="monkey" ref="monkey"/></bean><bean id="tiger" class="com.spring.model.Tiger"/><bean id="monkey" class="com.spring.model.Monkey"/></beans>测试⽅法:public class TestAnnotation {/*** 不使⽤注解*/@Testpublic void test(){//读取配置⽂件ApplicationContext ctx=new ClassPathXmlApplicationContext("applicationContext2.xml");Zoo zoo=(Zoo) ctx.getBean("zoo");System.out.println(zoo.toString());}}都很熟悉,权当复习⼀遍了。
- 1、下载文档前请自行甄别文档内容的完整性,平台不提供额外的编辑、内容补充、找答案等附加服务。
- 2、"仅部分预览"的文档,不可在线预览部分如存在完整性等问题,可反馈申请退款(可完整预览的文档不适用该条件!)。
- 3、如文档侵犯您的权益,请联系客服反馈,我们会尽快为您处理(人工客服工作时间:9:00-18:30)。
}
}
我们在Spring容器中将Office和Car声明为Bean,并注入到Boss Bean中:下面是使用传统XML完成这个工作的配置文件beans.xml:
清单4. beans.xml将以上三个类配置成Bean
原来我们是怎么做的
在使用注释配置之前,先来回顾一下传统上是如何配置Bean并完成Bean之间依赖关系的建立。下面是3个类,它们分别是Office、Car和Boss,这3个类需要在Spring容器中配置为Bean:
Office仅有一个属性:
清单1. Office.java
package com.baobaotao;
}
}
Boss拥有Office和Car类型的两个属性:
清单3. Boss.java
package com.baobaotao;
public class Boss {
private Car car;
private Office office;
//省略get/setter
@Override
public String toString() {
Main main = (Main) ctx.getBean("main");
System.out.println(main.getMan().sayHello());
}
public Man getMan() {
return man;
}
}
在Man接口前面标上@Autowired和@Qualifier注释使得Man接口可以被容器注入,当Man接口存在两个实现类的时候必须指定其中一个来注入,使用实现类首字母小写的字符串来注入。否则可以省略,只写@Autowired
xsi:schemaLocation="/schema/beans
/schema/beans/spring-beans-2.5.xsd">
<bean id="boss" class="com.baobaotao.Boss">
</beans>
在spring的配置文件里面只需要加上<context:annotation-config/>和<context:component-scan base-package="需要实现注入的类所在包"/>,可以使用base-package="*"表示全部的类。
编写主类测试:
@Service
Boss boss = (Boss) ctx.getBean("boss");
System.out.println(boss);
}
}
这说明Spring容器已经正确完成了Bean创建和装配的工作。
使用@Autowired注释
Spring 2.5引入了@Autowired注释,它可以对类成员变量、方法及构造函数进行标注,完成自动装配的工作。来看一下使用@Autowired进行成员变量自动注入的代码:
/schema/context
/schema/context/spring-context-2.5.xsd">
<context:annotation-config/>
<context:component-scan base-package="testspring.main"/>
<?xml version="1.0" encoding="UTF-8" ?>
<beans xmlns="/schema/beans"
xmlns:xsi="/2001/XMLSchema-instance"
package com.baobaotao;
public class Car {
private String brand;
private double price;
//省略get/setter
@Override
public String toString() {
return "brand:" + brand + "," + "price:" + price;
**********************
使用Spring 2.5注释驱动的IoC功能
注释配置相对于XML配置具有很多的优势:
它可以充分利用Java的反射机制获取类结构信息,这些信息可以有效减少配置的工作。如使用JPA注释配置ORM映射时,我们就不需要指定PO的属性名、类型等信息,如果关系表字段和PO属性名、类型都一致,您甚至无需编写任务属性映射信息——因为这些信息都可以通过Java反射机制获取。
xsi:schemaLocation="/schema/beans
/schema/beans/spring-beans-2.5.xsd">
<!--该BeanPostProcessor将自动起作用,对标注@Autowired的Bean进行自动注入-->
xmlns:context="/schema/context"
xsi:schemaLocation="/schema/beans
/schema/beans/spring-beans-2.5.xsd
清单6.使用@Autowired注释的Boss.java
package com.baobaotao;
import org.springframework.beans.factory.annotation.Autowired;
public class Boss {
@Autowired
private Car car;
public class American implements Man{
public String sayHello() {
return "I am American!";
}
}
@Service注释表示定义一个bean,自动根据bean的类名实例化一个首写字母为小写的bean,例如Chinese实例化为chinese,American实例化为american,如果需要自己改名字则:@Service("你自己改的bean名")。
public class Office {
private String officeNo =”001”;
//省略get/setter
@Override
public String toString() {
return "officeNo:" + officeNo;
}
}
Car拥有两个属性:
清单2. Car.java
@Autowired
private个BeanPostProcessor对@Autowired进行解析,所以要让@Autowired起作用必须事先在Spring容器中声明AutowiredAnnotationBeanPostProcessor Bean。
使用Spring2.5的Autowired实现注释型的IOC161641
使用Spring2.5的新特性——Autowired可以实现快速的自动注入,而无需在xml文档里面添加bean的声明,大大减少了xml文档的维护。(偶喜欢这个功能,因为偶对xml不感冒)。以下是一个例子:
先编写接口Man:
public interface Man {
</bean>
<bean id="car" class="com.baobaotao.Car" scope="singleton">
<property name="brand" value="红旗CA72"/>
<property name="price" value="2000"/>
</bean>
</beans>
当我们运行以下代码时,控制台将正确打出boss的信息:
清单5.测试类:AnnoIoCTest.java
import org.springframework.context.ApplicationContext;
import org.springframework.context.support.ClassPathXmlApplicationContext;
beans.xml
<?xml version="1.0" encoding="UTF-8"?>
<beans xmlns="/schema/beans"
xmlns:xsi="/2001/XMLSchema-instance"
public classMain{
@Autowired
@Qualifier("chinese")
private Man man;
public static void main(String[] args) {
// TODO code application logic here
ApplicationContext ctx = new ClassPathXmlApplicationContext("beans.xml");
