HPUX VPAR实施手册
EVA SAN Boot安装配置手册v10
EV A SAN boot 安装配置手册V1.0一、概述鉴于目前作为Superdome根盘的MSA30/50即将停止发售,SWD准备推出EVA SAN boot解决方案。
本手册为这一解决方案的安装配置手册。
本手册面向对象为具有HPUX11.23/11.31,EVA及Integrity Superdome 安装配置经验的HPCE和OSCE。
二、方案描述目前推出的EVA SAN Boot方案,是在新订购的Integrity Superdome中,使用EVA4400的Vdisk作为根盘,安装HPUX操作系统(11.23或11.31)。
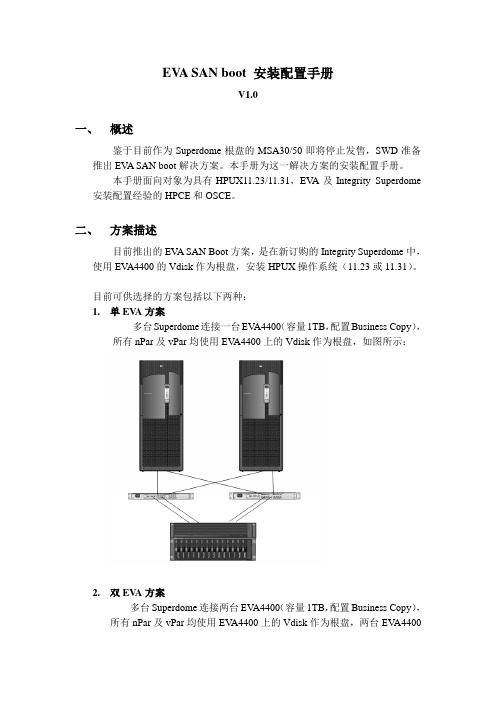
目前可供选择的方案包括以下两种:1.单EV A方案多台Superdome连接一台EVA4400(容量1TB,配置Business Copy),所有nPar及vPar均使用EVA4400上的Vdisk作为根盘,如图所示:2.双EV A方案多台Superdome连接两台EV A4400(容量1TB,配置Business Copy),所有nPar及vPar均使用EVA4400上的Vdisk作为根盘,两台EVA4400之间的Vdisk互为镜像。
如图所示:根据《HP-UX boot over SAN》白皮书,目前所有2G及4G光纤卡在Integrity Superdome上均支持SAN Boot。
见下表:(注:最新的AB378B与AB378A备件号一致,可以互换使用)三、安装步骤由于目前EVA SAN Boot方案尚不支持工厂集成,SAN连接、配置以及所有分区的操作系统安装均需现场完成。
1.连接主机和EV A1)连接EVA和Integrity Superdome,划分Zone。
连接和Zoning方案可参考附录1案例。
2)记录主机各光纤卡的WWN号(查看光纤卡标签或switchshow)3)划分Vdisk并present给相应主机。
Vdisk大小取决于操作系统规划,通常应不小于50GB。
HP VPartition介绍

hp-uxvirtual partitions (vPars) T1335AC may 2004updateordering andconfigurationguidelinestable of contents 1.0 introduction to document (3)2.0 overview of virtual partitions (3)2.1 key benefits and features of vPars (3)2.2 advantages of HP-UX Virtual Partitions offering (3)2.3 what’s newly supported with the A.03.01 release? (4)3.0 vPars ordering, licensing, and obsolescence (5)3.1 purchasing and licenses (5)3.2 software licensing (5)3.3 obsolescence (5)3.4 future releases (5)4.0 vPars configuration guidelines (6)4.1 minimum vPars requirements (6)4.2 servers supported with vPars (6)4.2.1 firmware revisions (7)4.2.2 number of virtual partitions per system or nPartition (8)4.3 i/o support (9)4.3.1 mass storage cards (9)4.3.2 mass storage devices (9)4.3.3 boot recommendations and constraints (10)4.3.4.1 networking cards (11)4.3.4.2 interconnects (11)4.4 software environment (12)4.4.1 os (12)4.4.2 patch bundles (12)4.4.2 application certification (12)4.4.3 Ignite-UX version (12)4.4.4 WLM version (12)4.4.5 iCOD version (12)4.4.9 PPU products (12)4.4.6 HP parmgr and vparmgr GUI versions (13)4.4.7 HP online diagnostics support (13)4.4.8 HP high availability and MC/ServiceGuard support (13)5.0 related information (14)1.0 introduction todocumentThe information that is provided in this document is supplemental to the documents:• Installing and Managing HP-UX Virtual Partitions (vPars) manual• Read Before Installing HP-UX Virtual Partitions CD bookletBoth of these documents can be found on the Web at:/hpux/11i/index.html#Virtual%20Partitions2.0 overview of virtual partitions HP-UX Virtual Partitions (vPars) is a powerful tool that enables customers to run multiple instances of the HP-UX 11i Operating Environment (OE) simultaneously on one server or nPartition, where each virtual partition:has its own assigned set of CPU, memory, and I/O resources (resource isolation)runs its own separate instance of HP-UX with different patch levels (O/S kernel isolation) hosts its own set of applications in a fully isolated environment (application isolation)2.1 key benefits and features of vPars The key benefits that hp-ux virtual partitions provides to customers are:Better system resource utilization (from typical 20-50% up to 80-90%)Flexible and dynamic resource adjustmentApplication isolationServer consolidationvia the following features:Flexible "carving up" of existing server or nPartition resources into multiple, independent OS instances per nodeIncreased isolation (and uptime) of applications, their OSs and assigned resources (CPU, memory and I/O), with individual reconfiguration and reboot of the individual partitions (not affecting other partitions).Dynamic movement of CPU power between virtual partitions (for variable workload requirements)1 CPU granularity per virtual partition2.2 advantages of HP-UX Virtual Partitions offering vPars offers:flexibility:o integration with nPartitions (hard partitions)o integration with iCODo dynamic creation of virtual partitions while other virtual partitions are running automated and intelligent management:o goal-based workload management across virtual partitions (cross-virtual partition integration with HP-UX Workload Manager)o easy, automated deployment through Ignite-UXintegration with the rest of the hp virtual server environment for hp-ux (Workload Manager, HP Partitioning Continuum, On Demand Solutions, Rapid Deployment)2.3 what’s newly supported with the A.03.01 release? For those customers that are using previous versions of HP-UX 11i Virtual Partitions, it is strongly recommended that you update to the latest version in order to take advantage of the new features offered with this release and get the most up-to-date, supported version of this product.vPars A.03.01 adds support for:rp8400/rp8420 SEU (Server Expansion Unit)PA-8800 processors (dual-core)rp7420 and rp8420 serversvPars, WLM & iCOD on the same system or nPartitionIPMI functionalityNo new cards are being added for this release. For a list of all the cards that are supported, please see Section 4.3 “I/O and Mass Storage Support”.Note that vPars A.01.01 is no longer supported as of the A.03.01 release. For information on the expected end of support dates for existing vPars releases, see Section 3.3 Obsolescence.3.0 vPars ordering, licensing, and obsolescence3.1 purchasing and licenses The product (Product Number T1335AC) is sold on a Per-Processor (or CPU) Licensing basis. Therefore, you purchase the same quantity of this product as the number of CPUs installed in your nPartitions (or non-nPartition-ed systems) that will be running vPars. If you later purchase additional CPUs for HP systems or Superdome nPartitions running vPars, you must also purchase the corresponding number of additional per-processor licenses of T1335AC.Note: the PA-8800 socket contains 2 processors and is seen by HP-UX and associated applications as 2 CPUs; hence, 2 vPars software licenses are required per socket.HP-UX Virtual Partition product can be ordered from HP Software Depot at:/cgi-bin/swdepot_parser.cgi/cgi/displayProductInfo.pl?productNumber=T1335ACIf you order the full HP-UX Virtual Partitions product, you will receive:HP-UX Virtual Partitions software on CD-ROMInstalling and Managing HP-UX Virtual Partitions (vPars) manual on CD-ROMRead Before Installing HP-UX Virtual Partitions CD bookletThe manuals are also available at:/hpux/11i/index.html#Virtual%20Partitions3.2 software licensing The presence of vPars on your system does not change your licensing requirements for your HP-UX 11i OEs or HP-UX layered products. In other words, if you have purchased an HP-UX 11i OEor HP-UX 11i Application Release product for a server supported with vPars (or on nPartitions onsuch a server), then you do NOT need to buy any additional OE or layered product licenses forthose same servers or nPartitions, if they then become virtual-partitioned.Note that since the HP-UX Operating Environment software, HP-UX Application software, andmost HP-UX ISV software is licensed at the nPartition level, it is recommended that the same typeof licensable software be used for the whole nPartition, even if at different versions, patch levels,or used for different purposes. Therefore, if a customer purchases an Enterprise OE for annPartition, they may run base or Enterprise OE in that nPartition but not the Mission Critical OE,unless they upgrade their Enterprise OE license to a Mission Critical OE license for thatnPartition.3.3 obsolescence Below is the expected end of support date for vPars releases:vPars Release Expected End of Support DateA.02.01 July-30-2004A.02.02 January-31-2005A.02.03 December-31-2005A.03.01 May-31-20063.4 future releases Note that the vPars release that will be supported for the IPF (Itanium) servers is notexpected to be available at the time 11.23PI is made available. Please see the 11.23PIRelease Notes for more information.4.0 vPars configuration guidelines4.1 minimum vPars requirements Each virtual partition requires a minimum of:1 CPUEnough memory to run HP-UX 11i and applications. Although the minimum requirement of memory for HP-UX is 256MB on an rp5470, and 512MB on an rp7400, Superdome or rp8400, it is generally recommended that 1GB of memory be available per each installed CPU running HP-UX.1 unique boot device (connected through SCSI or Fiber Channel card on a PCI bus or aLocal Bus Adapter (LBA) that is uniquely owned by that virtual partition)1 unique LAN card on a PCI-bus/LBA that is uniquely owned by that virtual partition[required only for networking capability]Notes:1. Each PCI bus/LBA is uniquely owned by 1 virtual partition. Therefore, the internalLAN card and storage connections (associated with each core I/O card) can only beowned by a single virtual partition. All other virtual partitions require a separate LANcard for network connection, and external storage (and associated SCSI/FCconnections to that storage for boot).2. An LBA is typically equivalent to one I/O slot, except if daisy-chained.3. The LAN and boot device, unique to a virtual partition, can be combined into 1 LBAthough a supported combination card.Each system or nPartition should have:at least 1 DVD or CD-ROM drive for loading software from media onto the systema console (for example, physical console, Secure Web Console, Central Web Console, orremote console)4.2 servers supportedwith vParsvPars supports the following low to high-end HP-UX servers:A.01.01 11/01 A.02.016/02A.02.01HWE9/02A.02.0212/02A.02.0310/03A.03.014/04rp54700/L3000, rp54051yes yes yes yes2 yes2 yes2rp7400/N4000 yes yes yes yes2 yes2 yes2rp7405, rp7410 no no no yes3 yes yes rp8400 no no yes3 yes3 yes yes rp7420 no no no no no yes4rp8420 no no no no no yes4Superdome no yes yes yes yes yes40 The carrier grade version of rp5470 is not supported1 certified 09/022 In order to run HP-UX Virtual Partitions (vPars) A.02.02 release using PA8700/8600 processors with rp5405, rp5470 (L3000) and rp7400/N4000 servers, customers must install vPars patch PHSS_28764, released at the end of April 2003. Customers can continue to use the previous vPars A.02.01 release with these servers and processors.3 vPars versions A.02.02 and earlier are not compatible with firmware version 6 or later on the rp7405, rp7410, or rp8400 servers. You must upgrade to vPars version A.02.03 or later when running firmware version 6 or later. See section 4.2.1 “firmware revisions” of this document for details.4 vPars A.03.01 or later is required when using PA-8800 and above CPUsAdditional information on these issues can be found on HPs ITRC at / and in a news bulletin posted on the HP software depot website at /RELEASES-MEDIA/4.2.1 firmwarerevisionsMinimum firmware revisions for vPars support are:A.02.01or earlierA.02.02 A.02.03 A.03.01rp5470/L3000,rp5405141.02 42.06 43.365 43.43rp7400/N4000141.02 42.06 43.225 43.43rp7405,rp741024.05.06.04 6.34rp84002 4.0 5.0 6.04 6.34rp74202N/A N/A N/A PDC20.008SYS REV 1.01rp84202N/A N/A N/A PDC20.008SYS REV 1.01Superdome3PDC 35.3 PDC 36.1 PDC 36.1 PDC 36.7Superdome w/ PA-8800s N/A N/A N/A PDC20.8Utility FW 14.221 Please refer to “Installing Firmware Patches on the rp5470/L3000 and rp7400/N4000” inthe Installing and Managing HP-UX Virtual Partitions (vPars) manual.2 This firmware is added to the system on a special scree board (1253-5394). Customersshould either download the latest version firmware on their system before installingvPars, or contact their HP Service Representative for help. For more information,please go to the HP IT Resource Center at: . The firmware isavailable at: ftp:///firmware_patches/hp/cpu/NOTE: FW version 6vPars versions A.02.02 and earlier are not compatible with firmware version 6 andlater on the rp7405, rp7410, rp7420, rp8400, or rp8420 servers. Therefore,• if you are currently running vPars A.02.02 or earlier, do not upgrade to firmware version 6. When you have vPars A.02.03 or later, you mayupgrade to vPars A.02.03or later and then upgrade to firmware version 6.• if you are using firmware version 6, do not install vPars A.02.02 or earlier;instead, install vPars A.02.03 or later.NOTE: rp8400, rp8420 SEU (Server Expansion Unit)On the rp8400 and rp8420 servers, vPars A.02.03 will not work within a nPartitionthat has cells physically connected to the rp8400/rp8420 SEU. nPartitions notrunning vPars can be connected to the SEU. Only vPars A.03.01 and later supportthe SEU.For additional information about these issues, see the HP ITRC at and news bulletin at the HP software depot website at/RELEASES-MEDIA/. For information on upgrading to orinstalling vPars A.02.03 or later, see Chapter 4 of the manual Installing and ManagingHP-UX Virtual Partitions included on the vPars CD and available at/hpux/11i/index.html#Virtual%20Partitions.3 If you are upgrading the Superdome firmware, the upgrade must be performed byHewlett-Packard qualified service personnel only. Please contact your local HPSupport Representative to schedule a convenient time for this firmware upgradeservice. Please note that all cells within the Superdome should be upgraded to thesame level.4FW 6.1,6.2 are no longer shipping. They have a problem with crash dumps. Also PDC17.006 has a problem with a TOC hang. Please see the Service Notes for theseversions of firmware. FW 6.3 has been released to replace these versions.5 When using FW 43.22 and FW 43.36 with switches, see the notes in Section 4.3.4.2interconnects.Note: Firmware upgrades are not supported from within a vPars environment.4.2.2 number of virtual partitions per system or nPartition The recommended number of virtual partitions equal up to one-half the installed CPUs in a system or nPartition in order to meet I/O and memory requirements and to allow for floating CPUs that can be used for dynamic CPU migration.The maximum number of virtual partitions per system is the number of CPUs given the following limitations:rp5470/L3000, rp5405 4 virtual partitions per systemrp7400/N4000 8 virtual partitions per system using the combination cardA5838A PCI 2-Port 100Base-T 2-Port Ultra2 SCSI for boot.7 virtual partitions when not using the combo cards.rp7405, rp7410 8 virtual partitions per systemrp7420 8 virtual partitions per nPartition, 16 total per systemrp8400 8 virtual partitions per nPartition, 16 total per system whenusing either combo cards or SEUrp8420 8 virtual partitions per nPartition, 16 total per system with noSEU and 32 total per system with SEUSuperdome 8 virtual partitions per nPartition, where the nPartition is amaximum of 8 cells; 128 total per Superdome system for the128-way Superdome systems.Note that vPars can now span multiple cabinets.Notes:• The above assumes single path to I/O; if dual path is used, as in many mission critical environments, then the recommended and maximum numbers may be half of that stated.• The number of virtual partitions can be limited by the number of available IO slots.• The number of virtual partitions can be limited by the size of the kernels. In short, the sum of the kernel sizes must be less than 2GBs. For more information, see Memory Allocation in Chapter 3 of the Installing and Managing HP-UX Virtual Partitions manual.4.3 i/o support Below are the storage and networking information for support with vPars.The Superdome IOX (I/O Expander) is supported for data and boot as of vPars A.02.01. Thismeans that vPars supports a virtual partition to be booted off a vPars-supported I/O cardconfigured in the I/O expander.The rp8400 and rp8420 SEU/IOX are supported for data and boot as of vPars A.03.01.Audio and graphics cards are not supported with vPars.Note that vPars does not support the RAID 4Si Controller:The RAID 4Si Controller (A5856A) is not supported with vPars.This is a very low-volumecard, supported on the rp54xx/L-class, rp7400/N4000, and rp8400 servers. For similarfunctionality, customers can also use VERITAS Volume Manager’s software RAID5functionality (which has been certified with vPars). You can also use the replacement for thiscard: the A7143A 4-channel RAID 160.4.3.1 mass storagecardsThe following mass storage HBAs are supported with the latest release of vPars (A.03.01):A4800A PCI FWD SCSI-2 Card for HP 9000 ServersA5149A Single Port Ultra2 SCSI HBA (PCI Bus)A5150A Dual Port Ultra2 SCSI (PCI Bus) AdapterA5158A0One Port PCI 2x Fibre Channel AdapterA5159[AB] Dual Port FWD SCSI (PCI Bus) AdapterA5838A1PCI 2-Port 100Base-T 2-Port Ultra2 SCSIA6795A0PCI 2Gb Fibre Channel AdapterA6828A PCI Ultra160 SCSI AdapterA6829A PCI Dual Channel Ultra160 SCSI AdapterA6826A2,3 PCI Dual-Port 2Gb/1Gb Fibre-ChannelA7143A2 PCI 4-Port RAID160 SA SCSI AdapterA7173A2 PCI-X 2-Port Ultra320 SCSI AdapterA9782A2 PCI-X 2Gb Fibre-Channel and GigEthernet Combo Card AdapterA9784A2 PCI-X 2Gb Fibre-Channel and GigEthernet Combo Card Adapter0 see Section 4.3.4.2 interconnects for information on supported fibre channel storage arrayconfigurations.1 support for boot as of vPars A.02.022 support for data or boot as of vPars A.02.033 if using the A6826A card with a virtual array, please upgrade the firmware on the A6826A toversion 3.02.170 or later. This eliminates the crash dump problem that occurs with earlierfirmware versions. You can check tje firmware version by using the command/opt/fcms/bin/fcdutil /dev/fcd<#>.4.3.2 mass storage devices Storage devices supported for the above PCI interface cards and otherwise supported for boot and dump within HP-UX (on servers supported with vPars), are supported for boot/dump within a vPars environment, with the exceptions noted below:EVA (Enterprise Virtual Array) and SP (Secure Path) versionsprior to SP 3.0c SP 3.0c SP 3.0d and later vPars boot/dump no no yesvPars data no yes yes4.3.3 boot recommendations and constraints Boot recommendations:After the boot of the initial virtual partition, it is recommended that the deployment tool Ignite-UX be used to boot the other virtual partitions.(Pre-A.02.03 only) PHSS_28764 provides much better boot isolation on active virtual partitions when new virtual partitions are booting.Boot constraints:1. Beyond the recommendation above, tape, CD/DVD, and lan/bootp booting(except throughIgnite-UX) of virtual partitions within a vPars environment are not supported.2. (Pre-A.02.03 only) I/O card assignment when booting from rp7410 core I/O cards:If you are plan to boot from the I/O card of the HP rp7410 server, then you need to assign one of a few specific I/O slots to the same virtual partition that owns the core I/O card.(This is due to the special capabilities of the core I/O card and how it uses memory).Since virtual partitions I/O slots are assigned by hardware path, assign at least one of these hardware paths (LBAs), assuming that particular slot is empty, to the virtual partition owning the core I/O:a) to boot from core I/O on cell 0:H/W PATH/LBA CELL & SLOT #============= ===============0/0/6 (cell 0, slot 5)0/0/4 (cell 0, slot 6)0/0/2 (cell 0, slot 7)0/0/1 (cell 0, slot 8)b) to boot from core I/O on cell 1:H/W PATH/LBA CELL & SLOT #============= ===============1/0/6 (cell 1, slot 5)1/0/4 (cell 1, slot 6)1/0/2 (cell 1, slot 7)1/0/1 (cell 1, slot 8)Networking cards that are supported on HP-UX are supported in a vPars environment.4.3.4.1 networkingcards4.3.4.2 interconnects vPars supports the HP hyperfabric products and protocols (HMP, TCP, UDP, IP).The following interconnect hubs and switches are supported with vPars:Switch or hub Firmware version(if applicable or required)FC S10 hub N/ABrocade 2400/2800 1Gb 2.6.1cBrocade 3800 1Gb/2Gb 3.1.1cBrocade 12000 4.0.2b, 4.1.2bStorageWorks Edge 2/24, McData 2/24 04.01.02 or 05.01.00-2405.02.00-13StorageWorks Director 2/64, EMC ED-64M,McData FC64, McData Director 2/64McData 2/32, McData 2/16 05.02.00-13The following interconnect storage device firmware versions are supported with vPars:versionDevice Firmware(if applicable or required)VA7110 HP18XP1024 21-03-03SC10 HP05Icicle HP62EMC 6.0 5669, 5670DS2100 N/AWhen configuring boot devices via a Brocade switch:• If using EMC disk array boot devices, the HBA connection to the Brocade switch mustbe configured as a G-port. (The "portcfggport" command does exist on 2400/2800switches even though it is not listed in the ‘help’ output.)• Improved time-to-boot has been observed with the Brocade firmware revision v3.0.2.c.• When using an rp5405, L3000/rp5470, or N4000/rp7400 that is booting a fiber channelmass storage device via a Brocade 3800 switch:Using PDC 43.22 firmware and Brocade switch firmware v3.0.2.f, configurethe HBA port in the switch as G-port.Using PDC 43.22 firmware and Brocade switch firmware v3.1.1, you mustboot the virtual partitions manually using vparload from the vPars monitorprompt or vparboot from the HP-UX shell prompt. Autobooting the virtualpartitions will not work.Using PDC 43.36 firmware and Brocade switch firmware v3.1.1, you mayexperience a very slow boot. This is not experienced with firmware v3.0.2.f.Fibre Channel Storage Arrays:The PCI Tachlite Fibre Channel Adapter cards A5158A and A6795A are currently supported forboot with the following storage arrays:• EMC Symmetrix 5.0, HP XPs, and HP Virtual ArraysOther storage arrays are supported for boot on the releases of PDC versions greater than:43.22 for the rp5405 and rp547043.22 for the rp740017.005 for the rp7410, rp7405, and rp840036.6 forSuperdomeany for all other servers4.4 software environment For a complete list of software requirements and product support and interactions, refer to the Installing and Managing HP-UX Virtual Partitions (vPars) manual on the CD or online at: /hpux/11i/index.html#Virtual%20Partitions4.4.1 os HP-UX 11i (December 2000 release or later) on PA-RISC platforms.4.4.2 patch bundles After installing HP-UX 11i, be sure to install the HP-UX 11i Quality Pack bundle(GOLDBASE11i), available from the latest Support Plus CD or online at:For more information on the Quality Pack bundle, please go to the following URL:Select "Enhancement Releases"Select "HP-UX Quality Packs"4.4.2 application certification Applications running on top of HP-UX using vPars run the same as when run on HP-UX native-mode (standalone). No changes, recompilation, or re-certification are required for applications running in virtual partitions unless otherwise noted.4.4.3 Ignite-UXversionOfficial version of Ignite-UX supported with vPars: B.3.7 or later.As of Ignite-UX B.3.7.X release, Ignite-UX is vPars-aware; a special WINSTALL file is nolonger required when using Ignite-UX with vPars.4.4.4 WLM version WLM A.02.00, available on the June 2002 Application release, supports global workloadmanagement across virtual partitions. Previous releases of WLM will work within a virtualpartition.As of vPars A.03.01, vPars, WLM, and iCOD are supported on the same system:When using vPars, WLM, and iCOD on the same system, you will need the followingversions (or later):vPars A.03.01WLM A.02.02iCOD B.06.01 for nPartition-able serversB.05.01 for non-nPartition-able serversNote that WLM does not yet support dynamic CPU migration with vPars and iCODsimultaneously. Also, migration of CPUs across virtual partitions in different nPartitions isnot supported.See the note in iCOD section below regarding iCOD version B.06.02.4.4.5 iCOD version As of vPars A.02.01 and iCOD B.05.00, vPars can work in conjunction with iCOD systems.As of vPars A.03.01, vPars, WLM, and iCOD are supported on the same system. See Section4.4.4 WLM for version information.The hang during shutdown documented on page 25 of the vPars A.03.01 RBI is fixed withiCOD B.06.02, which will be released later this year.4.4.9 PPU products As of vPars A.02.01, vPars integrates with the Pay-Per-Use agent software percent utilizationT2351AA. This PPU software is available at/cgi-bin/swdepot_parser.cgi/cgi/displayProductInfo.pl?productNumber=T2351AA.Note: this PPU tool does require a utility meter.vPars is planned to integrate with other versions of Pay-Per-Use in the future.4.4.6 HP parmgr and vparmgr GUI versions Partition Manager (parmgr) version B.11.11.01.05 or later is required for installation of the vPars product. This is true on both nPartition-able servers, as well as non-nPartition-able servers (rp7400/N4000 and rp5470/L3000). (It is normal to have this product installed but not used on non-nPartition-able servers.)A compatible version is included on the HP-UX Virtual Partition product CD and on the web at /products/PARMGRAs of vPars A.02.01, the Virtual Partition Manager (vparmgr) GUI is available, as an alternative to the command-line interface, to simplify configuration and management of vPars. This is included on the HP-UX Virtual Partition product CD and on the web at or directly at /cgi-bin/swdepot_parser.cgi/cgi/displayProductInfo.pl?productNumber=T1335ACNote: Future Discontinuance of Virtual Partition Manager (vparmgr):The vparmgr graphical user interface (GUI) will not be available in a future release.4.4.7 HP online diagnostics support OnlineDiag (HPUX 11.11 Support Tools bundle) B.11.11.09.11 or later is required to work with vPars, along with required patch PHSS_28252.You can get the latest release of the Support Tools bundle from: /4.4.8 HP high availability and MC/ServiceGuard support Both MC/ServiceGuard and hardware failover capabilities are supported in HP-UX Virtual Partitions.The ACSL web site for latest support information: /SupportNote: The individual server usage and mission criticality should be considered in the failover design. (i.e., since HP-UX Virtual Partitions does not include hardware isolation, it does not provide the same level of isolation as failovers between either 2 separate machines or nPartitions).Please see the HA vPars design white paper: ServiceGuard Cluster Configuration for Partitioned Systems, available at /hpux/ha/index.html Recommended HA versions:• MC/ServiceGuard A.11.13 and later.• ServiceGuard OPS Edition A.11.13 and later.• MetroCluster with Continuous Access XP A.03.00 and later.• MetroCluster with EMS SRDF A.03.00 and later.• HP ContinentalClusters A.03.01 and later.5.0 related information The following list of references provides useful background information on related products and topics:• Partitioning, nPartitions, vPars, WLM Information/go/partitions• vPars Systems Administrators GuideInstalling and Managing HP-UX Virtual Partitions (vPars) manual/hpux/11i/index.html#Virtual%20Partitions• Server Virtualization/go/virtualization• HP-UX 11i/go/hp-uxFor more information, contact any of our worldwide sales offices or HP Channel.For the location of the nearest sales office call: United States of America: +1 800 637 7740 Canada:Hewlett-Packard Ltd.5150 Spectrum WayMississauga, Ontario L4W 5G1+1 905 206 4725Japan:Hewlett-Packard Japan, Ltd.Japan Country H.Q.3-29-21, Takaido-Higashi, Suginami-ku,Tokyo, 160-8585 Japan+81 3 3331 6111Latin America:Hewlett-PackardLatin American Region HeadquartersWaterford Building, 9th Floor5200 Blue Lagoon DriveMiami, Florida 33126 USA+1 305 267 4220Refer to country phone numbersAustralia/New Zealand:Hewlett-Packard Australia Ltd.31-41 Joseph StreetBlackburn, Victoria 3130Australia (A.C.N. 004 394 763)+61 3 9272 2895Asia Pacific:Hewlett-Packard Asia Pacific Ltd.17-21/F, Shell TowerTimes Square1 Matheson StreetCauseway BayHong Kong+8522 599 7777Europe/Africa/Middle East:Hewlett-Packard S.A.150, Route du Nant-d’AvrilCH-1217 Meyrin 2Geneva, Switzerland+41 22 780 81 11European Multicountry: +41 22 780 81 11Middle East and Africa: +41 22 780 71 11 European Headquarters: +41 22 780 81 81Refer to country phone numbers For direct country contact call:Argentina: +541 787 7145Austria: +43 1 25 000 0Belgium and Luxembourg: +32 2 778 31 11 Brazil: +5511 7296 8000Chile: +562 203 3233Colombia: +571 629 5030Denmark: +45 45 99 10 00East Central Europe, CIS, and Yugoslavia:+43 1 25 000 0Finland: +358 9 887 21France: +33 1 69 82 60 60Germany: +49 7031 140Greece: +30 1 689 644Hungary: +36 1 252 7300Iceland: High Performance Systems hf.+354 1 67 10 00Ireland: +353 1 615 8200Israel: Computation and Measurement Systems (CMS) Ltd. +972 3 5380 333Italy: +39 2 92122770Mexico: +525 326 4600Netherlands: +31 20 547 6911Norway: +47 22 7356 00Poland: +48 22 608 77 00Portugal: +351 1301 7343Russia and the CIS, excl. Ukraine:+7 095 923 5001Slovenia: +38 61 55 84 72Spain: +34 1 631 1600Sweden: +46 8 444 2000Switzerland: +411 735 7111South Africa: Hewlett-Packard South Africa (Pty) Ltd.+27 11 806 1000Turkey: +90 212 224 5925United Kingdom: +44 1344 369231 Venezuela: +582 239 4133Full information on HP products is available at 。
HP 3PAR HP-UX 实施指南

在 HP 3PAR Storage System 上创建存储....................................................................................16 创建虚拟卷.......................................................................................................................16 创建精简配置的虚拟卷.......................................................................................................17
HP 部件号:QL226-96424 出版日期:2012 年 3 月
© 版权所有 2012 Hewlett-Packard Development Company, L.P. 机密计算机软件。拥有、使用或复制本软件须获得 HP 颁发的有效许可证。遵守 FAR 12.211 和 12.212 的商业计算机软件、计算机软件文档以 及商业物品的技术数据,将根据供应商标准商业许可证授权于美国政府。 此处包含的信息如有更改,恕不另行通知。HP 产品与服务仅有的担保已在这类产品与服务附带的明确担保声明中阐明。此处任何信息均不构成额 外的保修条款。对于本文包含的技术或编辑上的错误或遗漏,HP 概不负责。 声明
HP 3PAR HP-UX 实施指南
适用于 HP-UX 的 HP Systems Insight Manager 6.0 安装与配置指南
HPUX系统安全加固手册

系统安全加固手册1帐户安全配置要求1.1创建/etc/shadow影子口令文件1.2建立多帐户组,将用户账号分配到相应的帐户组1.3删除或锁定可能无用的帐户1.4删除可能无用的用户组1.5检查是否存在空密码的帐户1.6设置口令策略满足复杂度要求1.7设置帐户口令生存周期1.8设定密码历史,不能重复使用最近5次(含5次)内已使用的口令1.9限制root用户远程登录1.10 检查passwd、group文件权限设置1.11系统umask设置2访问、认证安全配置要求2.1远程登录取消telnet采用ssh2.2限制系统帐户FTP登录2.3配置允许访问inetd服务的IP范围或主机名2.4禁止除root外帐户使用at/cron2.5设定连续认证失败次数超过6次(不含6次)锁定该账号3文件系统安全配置要求3.2检查没有所有者的文件或目录4网络服务安全配置要求4.1禁止NIS/NIS+服务以守护方式运行4.2禁用打印服务以守护方式运行4.3禁用SENDMAIL服务以守护方式运行4.4禁用不必要的标准启动服务1执行备份:使用cp命令备份需要修改的文件2、设置参数:执行下列命令,禁用SNAplus2服务#ch_rc -a -p START_SNAPLUS=O -p START_SNANODE=0 -pSTART_SNAINETD=O /etc/rc.co nfig.d/s naplus2执行下列命令,禁用多播路由服务#ch_rc -a -p MROUTED=0 -p RWHOD=0 -p DDFA=0 -pSTART_RBOOTD=0 /etc/rc.co nfig.d/netdaemo ns执行下列命令,禁用DFS分布式文件系统服务#ch_rc -a -p DCE_KRPC=0 -p DFS_CORE=0 -p DFS_CLIENT=0 -p DFS_SERVER=0 -pDFS_EPISODE=0 -p EPIINIT=0 -p DFSEXPORT=0 -p BOSSERVER=0 -p DFSBIND=0 -p FXD=0 -p MEMCACHE=0 -p DFSGWD=0 -p DISKCACHEFORDFS=0 /etc/rc.co nfig.d/dfs执行下列命令,禁用逆地址解析服务操作步骤#ch_rc -a -p RARPD=0 -p RDPD=0 /etc/rc.co nfig.d/netc onf 执行下列命令,禁用响应PTY (伪终端)请求守护进程#ch_rc -a -p PTYDAEMON_START=0 /etc/rc.co nfig.d/ptydaem on 执行下列命令,禁用响应VT (通过LAN登录其他系统)请求守护进程#ch rc -a -p VTDAEMON START=0 /etc/rc.config.d/vt 执行下列命令,禁用域名守护进程#ch_rc -a -p NAMED=0 /etc/rc.co nfig.d/namesvrs执行下列命令,禁用SNMP代理进程#ch_rc -a -p PEER_SNMPD_START=0 /etc/rc.co nfig.d/peer.s nmpd 执行下列命令,禁用授权管理守护进程#ch_rc -a -p START_I4LMD=0 /etc/rc.co nfig.d/i4lmd执行下列命令,禁用X字体服务#ch_rc -a -p RUN_X_FONT_SERVER=0 /etc/rc.co nfig.d/xfs 执行下列命令,禁用语音服务#ch_rc -a -p AUDIO_SERVER=0 /etc/rc.c on fig.d/audio 执行下列命令,禁用SLSD(Single-Logical-Screen-Daemon)服务#ch_rc -a -p SLSD_DAEMON=0 /etc/rc.co nfig.d/slsd 执行下列命令,禁用SAMBA服务4.5禁用不必要的inetd服务5 IP协议安全配置要求5.1关闭IP转发5.2关闭转发源路由包5.3增大最大半连接数防范SYN攻击5.4关闭ICMP重定向5.5关闭响应echo广播5.6关闭响应地址掩码和时间戳广播防止探测6日志安全配置要求6.1非日志服务器禁止接收syslog6.2启用inetd日志记录6.3 配置SYSLOG6.4检查系统日志文件权限7其他安全配置要求7.1字符交互界面帐户超时自动退出7.2图形界面设置默认自动锁屏时间为10分钟。
HP交换机简明使用手册

HP交换机简明使用手册HP5400/5300及HP26002006/10目录HP交换机简明使用手册 (1)第一章交换机的初始配置 (4)1.1使用CONSOLE口进行交换机的配置 (4)1.2使用TELNET或者WEB方式对交换机进行配置 (6)1.2.1使用TELNET方式对交换机进行配置 (6)1.2.2通过WEB方式对交换机进行配置 (6)1.3 设置用户名及密码 (7)1.4 配置SNMP相关信息 (8)1.5 LLDP配置 (9)1.6密码恢复方法 (11)1.7 交换机映像更新及配置文件备份与恢复 (11)1.将配置文件备份到TFTP服务器上 (11)2.将从TFTP服务器上的配置文件恢复到交换机 (12)3.升级交换机的映象文件 (12)第二章二层相关协议设置 (13)2.1端口的命名方式 (13)2.2端口物理参数配置 (13)1.设置端口的工作模式 (14)2.对端口的流量进行限制 (14)2.3 802.1qVLAN的基本概念 (15)2.4基于端口的VLAN划分方法 (15)2.5 GVRP的配置 (16)2.6 TRUNKING(LAG)的配置 (17)2.7 生成树的基本概念(STP/RSTP)及配置方法 (17)2.7.1.生成树的基本概念 (17)2.7.2.生成树的配置方法 (19)2.8 实验 (20)一、演示设备架构 (20)二、基本操作命令 (21)三、演示配置 (22)1、5304xl (22)2、2626_1 (23)3、2626_2 (24)4、测试结果 (24)第三章第三层相关设置 (25)3.1 VLAN间路由的配置 (25)3.2 静态路由的配置 (25)3.3 RIP路由协议基本概念 (26)3.4 RIP的配置 (26)3.5 OSPF路由协议的基本概念 (29)3.6 OSPF的配置 (30)3.7路由重分发 (31)3.8 VRRP/XRRP配置 (32)3.9 DHCP Relay 的配置 (34)第四章安全与认证 (36)4.1端口安全性(MAC绑定) (36)4.2访问控制表 (37)4.2.1标准访问控制列表 (37)4.2.2扩展访问控制表 (37)4.4 802.1X认证(OPEN VLAN) (37)4.5 WEB认证 (39)4.6 MAC认证 (40)4.7病毒抑制的原理与配置 (40)第五章组播协议 (42)5.1组播基本概念 (42)5.2 IGMP的配置 (42)5.3 PIM的配置 (42)附件A:5400交换机的许可证安装与删除 (44)第一章 交换机的初始配置1.1使用CONSOLE口进行交换机的配置1.超级终端配置如下:开始-附件-通讯-超级终端,在COM口属性的窗口中选择还原默认值。
HP-UX 系统管理员手册

HP-UX系统管理员手册二零零九年HP-UX系统管理员手册第一章系统管理简介目标完成这一章,你能够做以下事情:明确系统管理员的责任1.1 系统管理员的角色系统管理员的职责就是设置和维护系统。
系统管理员不仅必须了解硬件和软件,而且必须了解用户组的需求。
由于与这些职责相关的命令不是让每个人都可以使用的,系统管理员需要对系统有特殊的权限,这种权限就叫做超级用户或者叫root存取。
1.2 硬件方面的职责硬件的职责建立并且维护系统硬件检验并正确安装外部设备并且对其进行测试。
监控硬件的性能。
在硬件设备出现故障的时候安排进行修复系统管理员的职责中有配置和管理系统硬件设备。
系统管理员可以不是实际安装这些硬件的人员,通常硬件厂商的工程师会给你安装硬件。
一旦系统开始运行,系统管理员就必须监视系统中不同硬件的性能,如果硬件发生故障,系统管理员应该试图尽可能隔离这些故障,然后让硬件工程师来进行必要的修理。
系统管理员必须知道一些基本的系统硬件如何工作的知识。
1.3 软件方面的职责安装和配置操作系统创建文件系统保证文件系统的一致性监控系统资源的使用计划和实施备份和恢复。
配置和维护打印缓冲系统软件安装和维护网络通信软件升级操作系统的版本安装和升级应用程序如果你的系统没有预装操作系统,你可能需要安装操作系统。
操作系统的媒介可能有多种形式,软件分发可能是一系列的磁带或者是CD-ROM。
分发的介质有:压缩的磁盘:只读的磁盘(CD-ROM)数字数据存贮磁带(DDS),4英寸的盒式磁带(QLC),(只用于服务器)系统管理员必须将系统软件安装到硬盘上。
一旦系统安装完成,就必须配置软件,方法是修改某些值或参数。
这样做的目的是让操作系统能识别附加的设备或增强系统的效率。
操作系统利用文件系统来组织数据。
由于所有的系统和用户的数据都是存储在文件系统中,所以保证文件系统的一致性十分重要,系统管理员应该执行一些操作来检查文件系统中的错误,如果发现错误就必须进行一些改错的操作。
HPUX操作系统安装说明详解
HP-UX操作系统安装说明1 设置显示输出新出厂的hp rx2660机器输出默认定义到串行口,需要修改为正确的显卡,设置完保存以后不用再次设置。
1.1连接计算机所有电缆,加电,显示引导管理界面,选择‘Boot Configuration’选项。
1.2选择‘Console Configuration’选项。
1.2选择正确的显示卡输出,在其前设置“P”,其它的输出设备设置为“NC”。
一般情况主板上集成的显卡设备是“VGA Acpi(HWP0002,PNP0A03,0)/PCI(3|0)”,外加的显卡设备是“VGA Acpi(HWP0002,PNP0A03,300)/PCI(1|0)”。
设置完成后保存设置。
2 做SAS卡磁盘镜像(此步可选)如果不做镜像此步可以略高。
如果HP rx2660小机配置多块硬盘,并且没有配置raid卡,两块硬盘做镜像可以通过主板上的SAS卡进行配置。
2.1从引导菜单中选择EFI Shell (Built In)2.2回车进入shell界面,键入drvcfg –s命令。
2.3选择做镜像的SAS卡2.4选择“RAID Properties”2.4选择“RAID Properties”2.5默认“RAID DISK”为“NO”,用空格键将其改为“Yes”,键入“c”创建镜像盘,保存配置。
3做RAID卡磁盘镜像(此步可选)如果机器配置了RAID卡,用RAID卡做磁盘RAID 1或RAID 5。
3.1 在机器启动期间看屏幕提示按“F8”键,进入设置界面,根据屏幕提示操作。
3 操作系统安装3.1 准备HP-UX操作系统光盘(两张DVD),版本2007年12月份以后(HP-UX 11i V2B.11.23)。
3.2 连接计算机所有电缆,加电,把可引导的第一张DVD光盘放入光驱3.3 系统开始引导,(如果系统没有自动引导)它会转到引导菜单。
这是一个限时菜单,按任意键可以使计时器停止运行。
3.4 可以按下列步骤从EFI shell 手动进行安装。
HP-UX11使用手册_中文

HP-UX上ORACLE8.1.6 Cluster安装使用手册

HP UNIX 数据库服务器安装使用手册一.HP-UX上Oracle 8.1.6 Cluster安装1. HP-UX操作系统初始安装1.1 HP-UX 11.0系统安装(两台主机均需进行)假定:两台主机名分别为scdbsrv1和scdbsrv2术语:物理盘physical driver逻辑盘logical driver物理卷physical volume卷组volume group逻辑卷logical volume文件系统file system1.1.1.将HP-UX安装光盘(标记为:HP-UX 11.0 install/update/recovery)插入DVD驱动器,重新启动服务器,当其显示“To discontinue, press any key within 10 seconds”时,按任意键中断缺省的启动,出现命令提示符。
在命令提示下键入:co1.1.2.接着键入fastboot命令使快速启动开启。
1.1.3.键入sea命令查找设备,记下光驱对应的设备路径(如P2)。
1.1.4.键入bo p2命令使机器从光盘引导,这里p2是用sea命令查看到的DVD驱动器对应的设备。
1.1.5.出现Interact with IPL时,键入n。
从光盘启动后,当出现安装画面时,选择InstallHP-UX,回车进入安装过程。
1.1.6.在随后的屏幕中选择Media only installation和Advanced Installation两项。
1.1.7.当出现系统配置时,主要设置System页和File System页的内容。
设置System中的Hostname、IP、Time以及Time Zone。
其中Time Zone时,在Locations中选择Asia,然后在Time Zone中选择China(EAT-8)。
注意:此时只配置一块网卡(lan0)即可,最好不要对其他的网卡进行配置。
设置File System页时,各文件系统按如下大小规划:(其中size项都选Fixed MB)/ 140M/stand 150M/tmp 200M/home 200M/opt 1024M/usr 1024M/var 1500M/oracle 5000M(其中Vsage项选取VxFS格式。
HPUX 小型机的VPAR安装手册
RP系列小型机的VPAR安装手册!看到某些人以VPAR安装技术为要挟,令我很生气,现在将我写的一份基于RP系列小型机的VPAR安装手册拿出来与大家共享,决不让某些人以此挣钱!一、安装操作系统、Ignite-UX和vPars相关的应用软件:1、通过光盘安装基本操作系统(略);2、通过光盘或软件仓库(Software Depot:一般是从网上下载的最新版本),安装Ignite-UX:硬件需求:至少5GB的系统可用空间;Ignite-UX安装在/opt/ignite目录下,而Ignite-UX创建的数据文件放置在/var/opt/ignite目录下。
/var/opt/ignite目录的大小至少为1GB。
如果通过图形显示环境配置Ignite-UX服务器,可以通过DISPLAY变量,将显示内容重定向到其他图形终端:Export DISPLAY=system_name:0.0Ignite-UX服务器和客户端应该在同一个子网中。
软件安装:通过swinstall命令安装软件:# mount /dev/dsk/cntndn /cdrom# swinstall –s /cdrom Ignite-UX-1x-xx或者:# swinstall –s /Directory B5725AA# umount /cdrom注:B5725AA为Ignite-UX的最新版本,可以从:/en/IUX网站获得。
确定软件版本:通过swlist命令确定软件的版本:# swlist –l bundle |grep Ignite注:如果系统显示的软件版本为:Ignite-UX C.x.x,则表示Ignite-UX支持在一个软件仓库中使用基于Itanium 或PA-RISC 两种体系结构的各种HP-UX版本。
如果系统显示的软件版本为:B.3.4.xx、B.3.5.xx或 B.3.6.xx,则需要通过WINSTALL_script脚本替换/opt/ignite/boot/WINSTALL文件。
【系统】hp小型机hpux操作系统安装配置手册v10

目录第1章RP8420/RP4440硬件结构1.1RP8420服务器简介及结构HP 9000 rp8420-32服务器基于标准化、模块化的技术、强大的PA-8900双处理器和惠普虚拟服务器环境,能够降低平台成本、提升性能,提供更大的可扩展性和灵活性,以及更高的投资回报,帮助您成功迈向动成长企业。
HP 9000 rp8420-32服务器的特性:●强大的PA-8900处理器和HP Super-Scalable Chipset(超级可扩展芯片组)sx1000●UNIX®卓越的高可用性、安全性和品质●基于单元板的架构,提供业界领先的高可用性特性和解决方案●机箱内升级至英特尔安腾处理器通过HP-UX 11i虚拟服务器环境—它包括虚拟分区(vPars)、硬分区(nPars)以及HP Workload Manager (WLM)功能,该服务器在应用和服务器整合方面的灵活性得到了提升,从而使您可以通过自动分配资源和充分利用系统资源来保持服务级别。
rp8420-32服务器是大型企业技术与商业计算的理想选择,可以运行各种计算与数据密集型业务应用,如企业资源规划(ERP)、供应链管理和业务智能等,同时提供一流性能,并能有效降低成本和复杂性。
rp8420-32服务器具有领先的64 位处理能力,无论何种配置都能提供出众的性价比。
具体特性如下:1.1.1Rp8420服务器配置HP 9000 rp8420可单独作为数据库服务器,或两台rp8420分别安装HP高可用集群软件MC/ServiceGuard 集群软件,互为备份,通过全光纤通道连接共享磁盘阵列,实现双机高可用群集。
•每台rp8420配置: 8颗双核PA-RISC 1.1GHz CPU、32GB内存,两个分区(或6颗双核PA-RISC1.1GHz CPU、24GB内存)。
•每台rp8420安装MirrorDisk/UX,实现内置磁盘镜像、支持磁盘热插拔,保证系统数据的可用性。
HPUXVPAR实施手册

Virtual Partition实施手册(make_net_recovery方式)1. 概述大家都知道:使用make_tape_recovery命令可以将操作系统备份到磁带里,然后再使用磁带恢复OS。
当两台机器的配置相同或基本相同的时候,使用第一台备份的磁带可以恢复第二台的OS。
和make_tape_recovery命令类似的另一命令:make_net_recovery命令,大家使用的并不多。
其实两个命令的作用是一样的,都是备份OS,以便以后可以导入恢复OS。
但是make_net_recovery的一个优点是不需要磁带机,只需要网卡,通过网络进行操作,也可以在另外的机器上恢复OS。
基于此,我们可以使用make_net_recovery方式来进行vpar的安装。
我们知道,vpar安装的时候,除了第一个vpar,其他vpar最初都没有操作系统的,需要重新安装操作系统。
标准的安装方式是将操作系统的安装光盘做成depot包,通过Ignite Server分发到其他各个vpar进行安装。
这样的方法很费时,而且容易碰到问题。
而使用make_net_recovery方式安装vpar就可以提高效率,基本思路是:第一个vpar 划分出来后,是有操作系统的,在装好必要的软件之后,使用make_net_recovery将其备份出来;然后使用这个备份,通过网络方式恢复其他几个vpar,这样就为其他的vpar安装了OS,同时必要的软件在其他的vpar也都装好了。
2.安装过程2.1系统环境下面使用一个例子来说明安装过程。
主机:rp7420;两个Cell,分别各有4个CPU,16G内存;有两块根盘:左上和右上(1/0/0/3/0.6.0 1/0/1/1/0/1/1.6.0)IO Chassis 0和IO Chassis 1各1块双口网卡,1块双口SCSI卡和1块光纤卡,IO Chassis 1有Core IO卡,IO Chassis 0无Core IO卡Rad –q的输出如下:rp7420[/]rad -qDriver(s)Slot Path Bus Max Spd Pwr Occu Susp Capable Max ModeNum Spd Mode0-0-0-1 0/0/8/1 64 133 133 On Yes No Yes PCI-X PCI-X0-0-0-2 0/0/10/1 80 133 133 On Yes No Yes PCI-X PCI-X0-0-0-3 0/0/12/1 96 133 133 On Yes No Yes PCI-X PCI-X0-0-0-4 0/0/14/1 112 133 66 Off No N/A N/A PCI-X PCI0-0-0-5 0/0/6/1 48 133 66 Off No N/A N/A PCI-X PCI0-0-0-6 0/0/4/1 32 133 66 Off No N/A N/A PCI-X PCI0-0-0-7 0/0/2/1 16 133 66 Off No N/A N/A PCI-X PCI0-0-0-8 0/0/1/1 8 133 66 Off No N/A N/A PCI-X PCI0-0-1-1 1/0/8/1 64 133 66 Off No N/A N/A PCI-X PCI0-0-1-2 1/0/10/1 80 133 66 Off No N/A N/A PCI-X PCI0-0-1-3 1/0/12/1 96 133 66 Off No N/A N/A PCI-X PCI0-0-1-4 1/0/14/1 112 133 66 Off No N/A N/A PCI-X PCI0-0-1-5 1/0/6/1 48 133 133 On Yes No Yes PCI-X PCI-X0-0-1-6 1/0/4/1 32 133 133 On Yes No Yes PCI-X PCI-X0-0-1-7 1/0/2/1 16 133 133 On Yes No Yes PCI-X PCI-X0-0-1-8 1/0/1/1 8 133 66 On Yes No Yes PCI-X PCIlanscan输出如下:# lanscanHardware Station Crd Hdw Net-Interface NM MAC HP-DLPI DLPIPath Address In# State NamePPA ID Type Support Mjr#1/0/1/1/0/4/0 0x0017A47608EC 2 UP lan2 snap2 1 ETHER Yes 1191/0/2/1/0 0x00156004F860 3 UP lan3 snap3 2 ETHER Yes 1191/0/2/1/1 0x00156004F861 4 UP lan4 snap4 3 ETHER Yes 1190/0/8/1/0 0x00156004FA64 0 UP lan0 snap0 4 ETHER Yes 1190/0/8/1/1 0x00156004FA65 1 UP lan1 snap1 5 ETHER Yes 119ioscan –fnCdisk输出如下:rp7420[/]ioscan -fnCdisk|moreClass I H/W Path Driver S/W State H/W Type Description==========================================================================disk 0 1/0/0/3/0.6.0 sdisk CLAIMED DEVICE HP 146 GST3146707LC/dev/dsk/c2t6d0 /dev/rdsk/c2t6d0disk 1 1/0/0/3/1.2.0 sdisk CLAIMED DEVICE _NEC DVD_RW ND-3550A/dev/dsk/c3t2d0 /dev/rdsk/c3t2d0disk 2 1/0/1/1/0/1/1.6.0 sdisk CLAIMED DEVICE HP 146 GST3146707LC/dev/dsk/c5t6d0 /dev/rdsk/c5t6d0disk 3 1/0/6/1/0.0.0 sdisk CLAIMED DEVICE COMPAQ BD1468A4C5/dev/dsk/c6t0d0 /dev/rdsk/c6t0d0disk 4 1/0/6/1/0.1.0 sdisk CLAIMED DEVICE COMPAQ BD1468A4C5/dev/dsk/c6t1d0 /dev/rdsk/c6t1d0disk 5 1/0/6/1/0.2.0 sdisk CLAIMED DEVICE COMPAQ BD1468A4C5/dev/dsk/c6t2d0 /dev/rdsk/c6t2d0disk 6 1/0/6/1/0.3.0 sdisk CLAIMED DEVICE COMPAQ BD1468A4C5/dev/dsk/c6t3d0 /dev/rdsk/c6t3d0disk 7 1/0/6/1/0.4.0 sdisk CLAIMED DEVICE COMPAQ BD1468A4C5/dev/dsk/c6t4d0 /dev/rdsk/c6t4d0disk 8 1/0/6/1/0.5.0 sdisk CLAIMED DEVICE COMPAQ BD1468A4C5/dev/dsk/c6t5d0 /dev/rdsk/c6t5d02.2安装前准备安装前,首先规划一下Npar和vpar的划分。
HPUX系统操作
HP小型机操作系统安装配置指导书操作系统, 小型机, 指导在HP Integrity Server开机后,可能屏幕没有任何显示,请使用串口线登陆系统的MP,进行管理。
下面将分为MP的管理、HP-UX的安装、HP的卷组操作和MC/Service Guard四章来说明。
HP Integrity Server MP在HP Integrity Server中有一块MP卡,该卡负责对系统的状态进行监视和控制。
该卡在系统插上电源后即被激活,无论操作系统是否启动,系统是否开机。
该卡提供了串行和网络两种接口可供访问。
1、连接串口连接方式:对于RX2600类型的机器,在后面板上有一个25针的接口,该接口在写着MP Management的一个框中,使用随机带的1对3接口(一边25针接口,另一边3个九针的接口),把串口线一边接到3个九针接口中写着“console”的接口上(串口线的线序为1-1,2-3,3-2,4-6,5-5,6-4,7-8,8-7,9-9),另一边接到笔记本上的串口上,然后可以使用Windows 自带的超级终端程序对系统进行访问。
对于RX4600类型的机器,可能没有25针接口,而有三个九针的串口,其中之一为Local Console,则把串口线的一端接到Local Console口即可。
网络连接方式机器在出厂之日,处于安全的考虑,给MP上的网卡设置的IP为127.0.0.1,所以在使用串口连接去修改MP网络的配置之前,不能使用网络连接方式。
对于网络的配置,请参见本文后面的内容。
使用超级终端和串口连接系统在Window系统中启动超级终端程序,选择COM1口连接,其中配置为Bits per second 9600Data bits 8Parity NoneStop bits 1Flow Control None然后连接系统,则连接上以后可以输入“Enter”或者“Ctrl+B”,看是否有字符出现,如果有,则表示连接正确,否则请检查串口线及连接的情况。
Oracle_For_AIX安装手册
Oracle_For_AIX安装手册第一篇:Oracle_For_AIX安装手册文档编号:Oracle/WAS For AIX安装部署手册2010年8月厦门中软海晟信息技术有限公司系统集成安装手册1.oracle数据库安装本章节主要讲述AIX环境下ORACLE 10g的安装和升级过程。
1.1.安装前的检查和准备工作1.1.1.介质准备准备安装文件(cpio、tar等格式),升级补丁等软件介质,FTP 上传安装文件到小机目录,也可以制作成光盘。
1.1.2.检查操作系统版本#oslevel-r 6100-03 1.1.3.检查必须的软件包安装情况主要是Java、X11、xlC等软件包的版本#lslpp-l X11.apps.rte X11.apps.xterm X11.base.rte X11.motif.lib X11.motif.mwmFilesetLevel StateDescription--------------Path: /usr/lib/objreposX11.apps.rte6.1.3.0 COMMITTED AIXwindows RuntimeConfiguration ApplicationsX11.apps.xterm6.1.3.1 COMMITTED AIXwindows xterm ApplicationX11.base.rte6.1.3.1 COMMITTED AIXwindows Runtime EnvironmentX11.motif.lib6.1.3.0 COMMITTED AIXwindows Motif Libraries系统集成安装手册X11.motif.mwm6.1.3.0 COMMITTED AIXwindows Motif WindowManagerPath: /etc/objreposX11.apps.rte6.1.3.0 COMMITTED AIXwindows RuntimeConfiguration ApplicationsX11.base.rte6.1.3.0 COMMITTED AIXwindows Runtime Environment#lslpp-l.proctools bos.adt.prof bos.cifs_fs.rteroot@fjly-yydb:/>lslpp-l bos.adt.prof bos.cifs_fs.rte xlC.aix50.rte xlC.rteFilesetLevel StateDescription--------------Path: /usr/lib/objreposbos.adt.prof6.1.3.0 COMMITTED Base Profiling Supportbos.cifs_fs.rte6.1.3.0 COMMITTED Runtime for SMBFSxlC.rte10.1.0.2 COMMITTED XL C/C++ RuntimePath: /etc/objreposbos.cifs_fs.rte6.1.3.0 COMMITTED Runtime for SMBFS#lslpp-l | grep javaJava14.ext.java3d1.4.2.0 COMMITTED Java SDK 32-bit Java3DJava14.ext.javahelp1.4.2.0 COMMITTED Java SDK 32-bit JavaHelpJava14_64.ext.javahelp1.4.2.0 COMMITTED Java SDK 64-bit JavaHelpJava5.ext.java3d5.0.0.175 COMMITTED Java SDK 32-bit Java3D cluster.adt.es.java.demo.monitormqm.java.rte6.0.0.0 COMMITTED WebSphere MQ Java Client, JMS #lslpp-l | grep xlCroot@fjly-yydb:/>lslpp-l | grep xlCxlC.aix61.rte10.1.0.2 COMMITTED XL C/C++ Runtime for AIX 6.1 xlC.cpp9.0.0.0 COMMITTED C for AIX PreprocessorxlC.msg.en_US.cpp9.0.0.0 COMMITTED C for AIX Preprocessor系统集成安装手册xlC.msg.en_US.rte10.1.0.2 COMMITTED XL C/C++ RuntimexlC.rte10.1.0.2 COMMITTED XL C/C++ RuntimexlC.sup.aix50.rte9.0.0.1 COMMITTED XL C/C++ Runtime for AIX 5.2 1.1.4.检查文件系统情况是否有足够空间安装oracleroot@fjly-yydb:/>df-g FilesystemGB blocksFree %UsedIused %Iused Mounted on /dev/hd4 10.009.803%144641% / /dev/hd210.007.3527%547214% /usr /dev/hd9var10.009.634%75271% /var /dev/hd310.008.8612%21011% /tmp /dev/hd110.009.991%1% /home /dev/hd11admin0.500.501%1% /admin /proc-/proc /dev/hd10opt30.0025.2816%301281% /opt /dev/livedump0.500.501%1% /var/adm/ras/livedump /dev/lv_ftp40.0017.7856%73551% /ftp /dev/lv_hsmis300.00197.0635%1% /hsmis1.1.5.检查换页空间root@fjly-yydb:/>lsps-a Page Space Physical Volume Volume Group Size %Used Active Auto Type Chksum hd6 hdisk0rootvg10240MByesyeslv0 1.1.6.更改系统参数smitty chgsys系统集成安装手册Maximum number of PROCESSES allowed per user >= 2048 smitty aio AIX parameters:--only applicable to file system based configs minservers=100 maxservers=100 maxreqs=163841.1.7.设置内存参数vmo-p-o lru_file_repage=0 vmo-p-o minperm%=5 vmo-p-o maxclient%=12 vmo-p-o maxperm%=15 vmo-p-o strict_maxperm=0 vmo-p-o strict_maxclient=11.2.UXIX环境下的安装步骤1.2.1.创建用户和用户组用户oracle 用户组:oinstall/dba Oracle用户同时加入这两个用户组(oracle如果没有加入dba组,安装后oracle用户使用会有问题)1.2.2.编辑oracle用户的.profile文件添加环境申明系统集成安装手册export DISPLAY=10.188.181.179:0.0 export ORACLE_HOME=/opt/oracle/product/10.2.0/db_1 export ORACLE_BASE=/opt/oracle umask 022 export PATH=$HOME/bin:$ORACLE_HOME/bin:$PATH export ORACLE_SID=yymis1.2.3.安装介质所在目录权限设置更改安装文件和升级补丁的用户和属组,同时开启执行权限chown-R oracle:oinstall /path chmod-R +x /path1.2.4.开放/opt 和 /home目录的写权限假设oracle安装在/opt目录#chmod 777 /opt #chmod 777 /home 1.2.5.安装包解压cpio-idmcv <10gr2_aix5l64_database.cpio,解压到Disk1 1.2.6.运行rootpre.sh脚本进入Disk1---rootpre目录 #./rootpre.sh系统集成安装手册./rootpre.sh output will be logged in /tmp/rootpre.out_09-11-27.14:32:33 Kernel extension /etc/pw-syscall.64bit_kernel is loaded.Unloading the existing extension: /etc/pw-syscall.64bit_kernel....Oracle Kernel Extension Loader for AIX Copyright(c)1998,1999 Oracle CorporationUnconfigured the kernel extension successfully Unloaded the kernel extension successfully Saving the original files in /etc/ora_save_09-11-27.14:32:33....Copying new kernel extension to /etc....Loading the kernel extension from /etcOracle Kernel Extension Loader for AIXCopyright(c)1998,1999 Oracle CorporationSuccessfully loaded /etc/pw-syscall.64bit_kernel with kmid: 0x4458c00 Successfully configured /etc/pw-syscall.64bit_kernel with kmid: 0x4458c00 The kernel extension was successfuly loaded.Configuring Asynchronous I/O....Asynchronous I/O is already definedConfiguring POSIX Asynchronous I/O....Posix Asynchronous I/O is already definedChecking if group services should be configured....Nothing to configure.系统集成安装手册1.2.7.使用远程虚拟终端打开Xmanager,连到小机系统集成安装手册1.2.8.进入图形化安装界面进入Disk1目录,运行runInstaller#./runInstaller 此时Xmanager会出现图形化安装界面,安装过程与pc机类似,注意环境检测界面所有都要 PASS!选择Enterprise Edition(3.40GB),点击next。
HP-UX 虚拟化技术IVM4.1 实施参考
HP-UX 虚拟化技术IVM4.1 实施参考最近配合CMSZ进行HP虚拟化技术VM进行测试,在客户现场搭建了一套VM环境,在配置及使用的过程中一些经验共享给大家,让未实施过VM环境的同事可以很快上手进行实际操作。
HPUX IVM(Integrity VM)这个软件在VSE-OE和DC-OE 里面自带,有兴趣的兄弟可以装着测试,也可以从HP的网站下载。
实施环境:HP-UX 11.31 VSE-OE,安装IVM4.1(现在应该有更新的版本了),硬件环境是HPRX7640 ,CPU及内存较多。
安装篇1.安装Integrity VM4.1的阻止因素Ø必须在hpux11iv3的系统上才能安装IVM4.1;ØIVM只能安装在物理主机或Npar分区;ØIVM不支持(HFS) 文件系统。
安装Integrity VM 之前必须删除所有条目。
请使用以下命令检查这些条目:# grep -i hfs /etc/fstabØIVM与HP System Insight Manager (HP SIM) 服务器软件包不兼容,不能将IVM与SIM安装在同一系统。
请使用以下命令检查此产品:# swlist | grep HPSIM-HP-UXØIVM与Vpar不兼容,VPAR 的机器上不能安装HP-IVM。
请使用以下命令检查此产品:# swlist -l bundle | grep "VirtualPartition"2.软件包名称ØIntegrity VM 发行版包含以下软件:• T2767CC — B.04.10 Integrity VM• T8718AC — B.04.10 Integrity VM 联机迁移软件包,作为一个单独产品在ApplicationSoftware(AR) DVD 中提供。
• VMGuestLib — B.04.10 Integrity VM Guest Support Libraries,作为HP-UX VSE-OE 的一部分安装,它是Integrity VM 必需的软件。
HP-UX系统管理员手册(ppt文档)

HP-UX 基本命令
# uname -a
列出系统ID 号,OS版本及用户权限等信息。
# hostname
列出系统网络名称。
# ioscan -fn
列出各I/O卡及设备的所有相关信息:如逻辑单元 号,硬件地址及设备文件名等。
# ps -ef
列出正在运行的所有进程的各种信息:如进程号 及进程名等
find
find命令是功能最强的命令之一,但同时也是命令行 结构最难以掌握的命令之一。
#find / -print | wc -l 显示系统中所有文件和目录的数目
# find / -user $LOGNAME -print 显示系统中该用户所有文件和目录。
# find . -exec chown $LOGNAME {} \; 修改当前目录下的所有文件的用户所属。
# find / -xdev -size +100 -print / -name core -exec rm {} \; 查找并删除core文件
HP-UX 基本命令
# cron
cron(chronography,计时),每分钟苏醒一次, 查看控制文件以确定当时是否存在应运行的作业,存 在则运行该作业。 # crontab filename ; 创建一个 cron # crontab -r ; 把cron从crontab去掉
然后划分逻辑卷: # lvcreate -L size vg0X 辑卷大小
# find . -type d -exec chmod 770 {} \; 修改当前目录下的所有目录的权限。
HP-UX 基本命令
find
#find / -size 100 -print 显示文件大小为100 blocks
HP-UX安全手册

HP-UX安全手册快速查看HP-UX磁盘信息#iosacn –funCdisk#ioscan -funCtape#ioscan –funCprinter1、 cd命令的使用返回上一次的目录(cd -)2、 Esc键的使用在命令行中可通过击两次Esc键来匹配当前目录中唯一的文件名,这样可节约击入长文件名的时间3、 col命令的使用man cp | col –b >cp.txt该命令可将cp命令的联机帮助手册输出为名为cp.txt的文本文件4、启动机器时执行的工作脚本(/etc/rc.config.d/)5、which命令的使用(查看某命令的绝对路径)which 命令名6、显示当前系统补丁安装情况(show_patches)7、中文环境的配置a、查看系统中安装的语言集(locale –a)b、显示当前语言环境变量(echo $LANG)c、如不为中文则修改(export LANG=zh_CN.hp15CN)d、 sty –istrip8、查看系统信息和运行情况a、 glanceb、 topc、 performance viewd、 /opt/ignite/bin/print_manifest/var/opt/ignite/local/manifest/manifeste、 /var/adm/syslog/syslog(系统运行日志)f、 /var/adm/shutdownlogg、 /var/adm/crash/h、 /var/opt/sna/sna.erri、 /var/adm/nettl.LOG000/usr/sbin/netfmt /var/adm/nettl.LOG000 >net.logj、/usr/contrib./bin/info_col.11k、/var/adm/btmp(历史登录信息,可用last命令查看)l、/var/adm/wtmp(比btmp更详细的信息)m、/etc/rc.log(机器启动时的信息)n、/var/adm/sw/(有关软件包安装、删除的信息)9、查看系统当前init级别(who –r)10、显示系统不成功登录的历史纪录(lastb –R)11、ftp问题(如无法用某一用户进行ftp)a、将/etc/passwd中该用户的sh路径改为/usr/bin/kshb、在/etc/shells文件中将ksh的路径加入12、在HP11i环境下两台主机rlogin、rcp和ftp速率小于10mbpsa、安装补丁(PHKL_25233、25389,PHNE_26728、27063)13、在HP11i环境下主机与路由器之间无法用大包进行ping命令a、在主机的/etc/rc.config.d/nddconf文件中增加ip_send_source_quench参数的配置b、 ndd –c14、网络配置(含网卡地址、激活状态、路由地址)可通过修改/etc/rc.config.d/netconf文件来实现。
- 1、下载文档前请自行甄别文档内容的完整性,平台不提供额外的编辑、内容补充、找答案等附加服务。
- 2、"仅部分预览"的文档,不可在线预览部分如存在完整性等问题,可反馈申请退款(可完整预览的文档不适用该条件!)。
- 3、如文档侵犯您的权益,请联系客服反馈,我们会尽快为您处理(人工客服工作时间:9:00-18:30)。
Virtual Partition实施手册(make_net_recovery方式)1. 概述大家都知道:使用make_tape_recovery命令可以将操作系统备份到磁带里,然后再使用磁带恢复OS。
当两台机器的配置相同或基本相同的时候,使用第一台备份的磁带可以恢复第二台的OS。
和make_tape_recovery命令类似的另一命令:make_net_recovery命令,大家使用的并不多。
其实两个命令的作用是一样的,都是备份OS,以便以后可以导入恢复OS。
但是make_net_recovery 的一个优点是不需要磁带机,只需要网卡,通过网络进行操作,也可以在另外的机器上恢复OS。
基于此,我们可以使用make_net_recovery方式来进行vpar的安装。
我们知道,vpar安装的时候,除了第一个vpar,其他vpar最初都没有操作系统的,需要重新安装操作系统。
标准的安装方式是将操作系统的安装光盘做成depot包,通过Ignite Server分发到其他各个vpar进行安装。
这样的方法很费时,而且容易碰到问题。
而使用make_net_recovery方式安装vpar就可以提高效率,基本思路是:第一个vpar划分出来后,是有操作系统的,在装好必要的软件之后,使用make_net_recovery将其备份出来;然后使用这个备份,通过网络方式恢复其他几个vpar,这样就为其他的vpar安装了OS,同时必要的软件在其他的vpar也都装好了。
2.安装过程2.1系统环境下面使用一个例子来说明安装过程。
主机:rp7420;两个Cell,分别各有4个CPU,16G内存;有两块根盘:左上和右上(1/0/0/3/0.6.0 1/0/1/1/0/1/1.6.0)IO Chassis 0和IO Chassis 1各1块双口网卡,1块双口SCSI卡和1块光纤卡,IO Chassis 1有Core IO卡,IO Chassis 0无Core IO卡Rad –q的输出如下:rp7420[/]rad -qDriver(s)Slot Path Bus Max Spd Pwr Occu Susp Capable Max ModeNum Spd Mode0-0-0-1 0/0/8/1 64 133 133 On Yes No Yes PCI-X PCI-X0-0-0-2 0/0/10/1 80 133 133 On Yes No Yes PCI-X PCI-X0-0-0-3 0/0/12/1 96 133 133 On Yes No Yes PCI-X PCI-X0-0-0-4 0/0/14/1 112 133 66 Off No N/A N/A PCI-X PCI0-0-0-5 0/0/6/1 48 133 66 Off No N/A N/A PCI-X PCI0-0-0-6 0/0/4/1 32 133 66 Off No N/A N/A PCI-X PCI0-0-0-7 0/0/2/1 16 133 66 Off No N/A N/A PCI-X PCI0-0-0-8 0/0/1/1 8 133 66 Off No N/A N/A PCI-X PCI0-0-1-1 1/0/8/1 64 133 66 Off No N/A N/A PCI-X PCI0-0-1-2 1/0/10/1 80 133 66 Off No N/A N/A PCI-X PCI0-0-1-3 1/0/12/1 96 133 66 Off No N/A N/A PCI-X PCI0-0-1-4 1/0/14/1 112 133 66 Off No N/A N/A PCI-X PCI0-0-1-5 1/0/6/1 48 133 133 On Yes No Yes PCI-X PCI-X0-0-1-6 1/0/4/1 32 133 133 On Yes No Yes PCI-X PCI-X0-0-1-7 1/0/2/1 16 133 133 On Yes No Yes PCI-X PCI-X0-0-1-8 1/0/1/1 8 133 66 On Yes No Yes PCI-X PCIlanscan输出如下:# lanscanHardware Station Crd Hdw Net-Interface NM MAC HP-DLPI DLPI Path Address In# State NamePPA ID Type Support Mjr#1/0/1/1/0/4/0 0x0017A47608EC 2 UP lan2 snap2 1 ETHER Yes 119 1/0/2/1/0 0x00156004F860 3 UP lan3 snap3 2 ETHER Yes 1191/0/2/1/1 0x00156004F861 4 UP lan4 snap4 3 ETHER Yes 1190/0/8/1/0 0x00156004FA64 0 UP lan0 snap0 4 ETHER Yes 1190/0/8/1/1 0x00156004FA65 1 UP lan1 snap1 5 ETHER Yes 119ioscan –fnCdisk输出如下:rp7420[/]ioscan -fnCdisk|moreClass I H/W Path Driver S/W State H/W Type Description========================================================================== disk 0 1/0/0/3/0.6.0 sdisk CLAIMED DEVICE HP 146 GST3146707L C/dev/dsk/c2t6d0 /dev/rdsk/c2t6d0disk 1 1/0/0/3/1.2.0 sdisk CLAIMED DEVICE _NEC DVD_RW ND- 3550A/dev/dsk/c3t2d0 /dev/rdsk/c3t2d0disk 2 1/0/1/1/0/1/1.6.0 sdisk CLAIMED DEVICE HP 146 GST3146707LC/dev/dsk/c5t6d0 /dev/rdsk/c5t6d0disk 3 1/0/6/1/0.0.0 sdisk CLAIMED DEVICE COMPAQ BD1468A4C5/dev/dsk/c6t0d0 /dev/rdsk/c6t0d0disk 4 1/0/6/1/0.1.0 sdisk CLAIMED DEVICE COMPAQ BD1468A4C5/dev/dsk/c6t1d0 /dev/rdsk/c6t1d0disk 5 1/0/6/1/0.2.0 sdisk CLAIMED DEVICE COMPAQ BD1468A4C5/dev/dsk/c6t2d0 /dev/rdsk/c6t2d0disk 6 1/0/6/1/0.3.0 sdisk CLAIMED DEVICE COMPAQ BD1468A4C5/dev/dsk/c6t3d0 /dev/rdsk/c6t3d0disk 7 1/0/6/1/0.4.0 sdisk CLAIMED DEVICE COMPAQ BD1468A4C5/dev/dsk/c6t4d0 /dev/rdsk/c6t4d0disk 8 1/0/6/1/0.5.0 sdisk CLAIMED DEVICE COMPAQ BD1468A4C5/dev/dsk/c6t5d0 /dev/rdsk/c6t5d02.2安装前准备安装前,首先规划一下Npar和vpar的划分。
我们这里只有1个Npar,划分成两个vpar,除了Core IO和两个根盘给vpar1,其余的CPU,DIMM和IO都是vpar1和vpar2平分。
vpar1:4个CPU,16G内存,2个根盘(1/0/0/3/0.6.0和1/0/1/1/0/1/1.6.0)使用如下IO:0-0-0-1 0/0/8/1 64 133 133 On Yes No Yes PCI-X PCI-X0-0-0-2 0/0/10/1 80 133 133 On Yes No Yes PCI-X PCI-X0-0-0-3 0/0/12/1 96 133 133 On Yes No Yes PCI-X PCI-X0-0-1-8 1/0/1/1 8 133 66 On Yes No Yes PCI-X PCI其中0-0-1-8就算Core IO,而0-0-0-1是一块双口网卡,对应上文lanscan的lan0和lan1vpar2:4个CPU,16G内存,使用如下IO:0-0-1-5 1/0/6/1 48 133 133 On Yes No Yes PCI-X PCI-X0-0-1-6 1/0/4/1 32 133 133 On Yes No Yes PCI-X PCI-X0-0-1-7 1/0/2/1 16 133 133 On Yes No Yes PCI-X PCI-X其中0-0-1-7是一块双口网卡,对应上文lanscan的lan3和lan4这里需要说明的是:由于两块根盘处在同一SCSI链路上,因此不能把它们分别划给两个vpar。
由于vpar2没有根盘,因此使用两块外接存储盘做为其根盘,其路径为:1/0/6/1/0.0.0和1/0/6/1/0.1.0。
(是由0-0-1-5这块SCSI 卡连接出来的存储盘)2.3划分vpar注意在划分vpar前,首先记录下Npar下的ioscan –fnCdisk, lanscan和rad –q的信息备用,2.1节中已经记录了。
0.使用swinstall在该Npar上安装Vpar软件,如图所示安装完毕后,使用swlist|grep –i par确认软件安装成功(出现如下两项,vpar软件版本不同可能有区别)T1335AC A.03.03.06 HP-UX Virtual PartitionsVPARMGR B.11.11.01.02 Virtual Partition Manager - HP-UX同时可以选择安装好一些在所有vpar中都需要的软件。
1.创建第一个vpar――vpar1,这个分区实际上使用Npar的根盘和OS。
#vparcreate -p vpar1 -o "-lq" -a cpu::4 -a cpu:::1:4 \-a mem::16384 \-a io:1/0/0/3/0.6.0:boot \-a io:1/0/1/1/0/1/1.6.0:altboot \-a io:0/0/8/1 \-a io:0/0/10/1 \-a io:0/0/12/1 \-a io:1/0/1/1(请按照实际所需I/O的硬件路径加入到此创建语句中。
