LINUX数据库基础环境部署操作手册_redhat6.7
RedHat LINUX安装全步骤(附图)
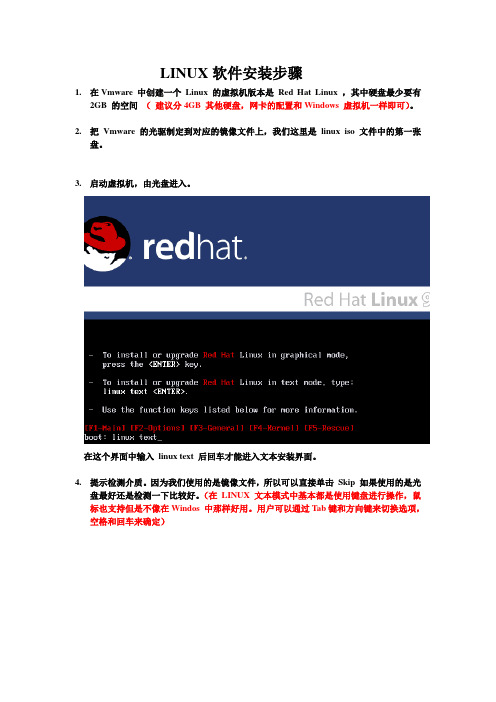
LINUX软件安装步骤1.在Vmware 中创建一个Linux 的虚拟机版本是Red Hat Linux ,其中硬盘最少要有2GB 的空间(建议分4GB 其他硬盘,网卡的配置和Windows 虚拟机一样即可)。
2.把Vmware 的光驱制定到对应的镜像文件上,我们这里是linux iso 文件中的第一张盘。
3.启动虚拟机,由光盘进入。
在这个界面中输入linux text 后回车才能进入文本安装界面。
4.提示检测介质。
因为我们使用的是镜像文件,所以可以直接单击Skip 如果使用的是光盘最好还是检测一下比较好。
(在LINUX 文本模式中基本都是使用键盘进行操作,鼠标也支持但是不像在Windos 中那样好用。
用户可以通过Tab键和方向键来切换选项,空格和回车来确定)如果上面选择的是Skip就会直接跳到第8步。
5.开始检测。
如果是使用的光盘CD 需要先插入CD 后在Test 因为我们使用的是镜像文件所以就可以直接Test6.检测完毕。
选择OK7.提示是否检测其他的盘。
如果你为了保险起见可以继续检测,但是时间可能会长一些。
8.选择语言安装过程,在这里选择英语。
(如果选择的不是英语的话,在以后的一些提示显示中会出现乱码看不懂)9.选择键盘类型,在这里选择us 即可。
10.选择鼠标类型,在Linux 这类操作系统中,经常用到三键鼠标,因此,除了选择鼠标类型外,一般还选中下面的“Emulate 3 Buttons?”,这样同时点击鼠标左右键,代表点击中键。
11.选择安装类型。
在这里我们选择第4个Custom(定制)。
12.准备分区。
在这里选择Autopartition 。
13.这里会让用户选择如何处理硬盘上的原始分区。
因为我们是新建的所以选那个都无所谓,但是如果在已经安装好Windows 的系统上进行安装,一般选择第三项。
意思就是使用硬盘当中没有使用的空间来创建相应的分区。
在下面会让用户选择。
要安装到那个硬盘中,在这里只有一个硬盘sda ,所以直接选择即可。
RedHat服务器配置教程

第一章基本要求第一节基础知识linux和uni x都是通过一系列的文本文件来进行管理。
Linux系统管理员通常不使用图形编辑器来管理这些配置文件。
各种流行的编辑器的格式例如:word、startoffice等等,linux 都无法识别。
Linux常用的文本编辑器有这么几种:vi、pico、joe、emacs。
尽管emacs 可能是linux世界最流行的编辑器,但是系统管理员仍然必须懂得vi的基本使用。
Emacs 更加灵活更加流行,vi可以帮助你恢复系统。
如果你要使用紧急引导盘来恢复一个重要的文件,vi是唯一可用的编辑器。
实际上,RHEL 3 使用增强版本的vi,即vim.它增加了颜色来对重要的文件进行区分。
所有的vi 命令都是在vim编辑器,你可以通过在vim编辑其中使用:nohl命令来去掉颜色,这并不会对你管理系统带来任何影响。
Vi的基本用法:vi filename基本命令:i 插入o 插入新行:w保存:q退出:wq!保存并强制退出:q!不保存强行退出练习1:使用vi来增加新用户1、#vi /etc/passwd,使用命令yy拷贝当前行,使用命令p复制出一新行,然后修改。
改变用户名,用户id用户组id,以及home目录。
更改完成后使用命令:wq!保存退出。
2、更改新用户的密码:passwd username3、建立用户的主目录:mkdir /home/username第二节文件系统的层次结构linux中的任何事情都可以归结为一个文件。
分区和文件系统设备节点关联,例如:/dev/hda1。
硬件组件对应于节点文件如:/dev/modem。
检测到的设备在/proc目录中存档。
FHS是用来组织linux和uni x文件的方法。
基本文件系统层次结构:/ 根目录,linux的最高级目录/bin 基本的命令行工具,不应该单独挂接。
/boot 引导目录,包含linux的启动文件,其中有linux内核。
默认大小为100M/dev 所有软硬件设备的驱动,不要将此目录单独挂接在一个分区上/etc 存放大多数的基本配置文件/home 存放大多数用户的主目录/lib 内核程序库以及各种命令行工具。
REDHAT LINUX安全配置手册

说明: RPC 协议一般经过比较简单的或不经认证就可以得到一些非常敏感的信息。并且 RPC 系列 服务都存在一些缓冲区溢出问题。 在以下情况下可以考虑关闭 RPC 端口映射服务: 服务器不是 NFS 服务器或客户端;
7
Linux 安全配置手册
服务器不是 NIS 服务器或客户端; 服务器没有运行其它依赖于 RPC 服务的第三方软件; 服务器不运行图形界面(x-windows)。 操作: chkconfig --level 345 portmap on
2
补丁
Linux 安全配置手册
【机密】
系统补丁
系统内核版本使用 uname -a 查看。 软件版本和补丁使用 rpm -qa 查看。 使用 up2date 命令自动升级或去 ftp:// 下载对应版本补丁手工单独安装。
其他应用补丁
除 RedHat 官方提供的系统补丁之外,系统也应对根据开放的服务和应用进行补丁,如 APACHE、PHP、OPENSSL、MYSQL 等应用进行补丁。 具体升级方法: 首先确认机器上安装了 gcc 及必要的库文件。 然后去应用的官方网站下载对应的源代码包,如 *.tar.gz 再解压
最小化启动服务
设置 daemon 权限 unmask
说明: 默认系统 umask 至少为 022,以防止 daemon 被其他低权限用户修改。 操作: vi 修改/etc/rc.d/init.d 文件,umask 值为 022。 同时检查/etc/rc.d/init.d 中其他启动脚本权限是否为 755。
tar zxfv *.tar.gz 再根据使用情况对编译配置进行修改,或直接采用默认配置
cd * ./configure 再进行编译和安装 make make install
Linux 安装部署手册

Linux安装部署规范文档文件修改记录表目录1安装前的准备工作 (6)1.1操作系统版本 (6)1.2操作系统的安装信息搜集 (6)2默认情况的Linux操作系统安装 (7)2.1安装语言的选择 (7)2.2分区的划分 (7)2.2.1boot分区 (13)2.2.2LVM分区 (14)2.2.3根分区 (16)2.2.4Swap空间 (17)2.3IP地址的配置 .............................................................................. 错误!未定义书签。
2.4主机名的设定............................................................................... 错误!未定义书签。
2.5时区的设定 (11)2.6密码的设定 (12)2.7软件包的定制 (17)2.7.1桌面环境 (18)2.7.2应用程序 (20)2.7.3开发环境 (20)2.7.4服务器 (18)2.7.5基础系统........................................................................... 错误!未定义书签。
2.7.6虚拟化 (19)2.7.7语言 (21)2.8安装后的设置 (22)2.8.1防火墙设置 (22)2.8.2SELinux ............................................................................. 错误!未定义书签。
2.9操作系统配置 (22)2.9.1文字界面启动 (23)2.9.2Root用户直接登陆系统 (23)2.9.3取消不用的服务 (23)2.10备份操作系统关键文件 (23)3针对Oracle数据库服务器的操作系统安装 (24)3.1安装语言的选择 (24)3.2分区的划分 (24)3.2.1boot分区 (25)3.2.2LVM分区 (25)3.2.3根分区 (25)3.2.4Swap空间 (26)3.2.5tmp分区 (26)3.2.6var分区 (27)3.2.7usr分区 (27)3.2.8u01分区 (27)3.3IP地址的配置 .............................................................................. 错误!未定义书签。
EIP7 产品多服务部署手册说明书

Linux环境EIP7产品多服务部署手册广州宏天软件股份有限公司2020年4月20日版本管理目录1总体部署图 (4)2常用linux命令 (4)3运行环境和中间件安装 (6)3.1安装JDK1.8 (6)3.2安装MySQL (8)3.3安装Redis (12)3.4安装ActiveMQ (14)3.5部署EurekaServer (15)4应用部署 (15)4.1Java应用 (15)4.2Web应用 (18)4.2.1Nginx的安装和配置 (19)4.2.2部署web端 (20)1总体部署图2常用linux命令1.使用xshell等工具远程连接到linux服务器,通过xftp可以上传下载文件,在linux中没有像windows一样分为C盘、D盘等不同的盘符,所有目录都通过/开头来访问,如下图所示2.常用的命令3.yum命令可以用来安装系统中不存在的命令,比如vim命令不存在时,可以通过yum install vim来安装。
注意在安装的过程中系统可能会跳出一些询问,输入y回车就可以继续安装了4.vim命令可以对文本文件进行修改,例如vim /etc/f可以打开mysql的配置文件,刚打开文本时为浏览模式,不能添加、删除、修改任何内容。
文本内容过多时,快捷键shift+g可以直接定位到文本的最后一行;内容过多也可以通过”/搜索内容”来快速查找,有多个匹配结果时n可以查看下一个。
按insert进入输入模式,完成编辑以后按esc按钮退出编辑模式,输入:q!放弃保存,输入:wq则保存修改。
5.防火墙配置3运行环境和中间件安装3.1安装JDK1.8使用xshell工具连接linux服务器,在命令行中输入java -version,检查JDK 是否安装以及版本是否为1.8如果JDK未安装或者版本不正确,则重新安装JDK。
1.将jdk的安装包拷贝到linux服务器(通过xftp上传上去,在/tmp目录下创建一个hotent目录,用于存放上传的文件)2.将该文件拷贝到/usr/local/java目录下,并解压3.查看解压出来的目录名4.配置jdk到环境变量,通过vim命令编辑/etc/profile,进入编辑模式后,shift+g定位到文件的最后一行,点击insert命令进入编辑模式,编辑完以后按ecs按钮,输入:wq+回车则保存文件,输入:q!则放弃保存。
Linux操作系统-实验1-环境搭建-指导书-PPT版本-V1

Linux操作系统第一章:Linux简介与系统安装实验一:实验环境搭建一台宿主机(Windows系统)加两台虚拟机(Desktop+Server)要求:(1)掌握VMware虚拟机的安装(2)利用VMware虚拟机安装Ubuntu Linux18.04桌面版操作系统(3)利用VMware虚拟机安装Ubuntu Linux18.04服务器版操作系统(4)从宿主机登录桌面环境和服务器环境(SSH登录)(5)练习涉及到的基本命令,如apt-get、ifconfig、ssh等(6)练习vim编辑文件基本操作等Tips:(1)绘制网络拓扑图(2)把遇到的问题和如何解决记录下来。
实验环境设置☐宿主机(Windows)•网络配置VMware Network Adapter(VMnet8)☐客户机•Ubuntu-Server(ubuntu-18.04.6-live-server-amd64)•Ubuntu-Desktop(ubuntu-18.04.6-desktop-amd64)虚拟机安装安装时网络类型选择NAT方式安装完成后的两台Ubuntu虚拟机宿主机:Windows记录宿主机IP地址客户机1:Ubuntu-Server命令行模式记录IP:192.168.126.130客户机2:Ubuntu-Desktop图形化操作方法记录IP:192.168.126.131NAT模式宿主机:Windows192.168.126.1192.168.126.130192.168.126.131客户机1:Ubuntu-Server客户机2:Ubuntu-DesktopSSH服务1.安装SSH服务2.启动SSH服务3.配置SSH服务(可选)4.验证SSH服务Desktop版客户机安装SSH服务Desktop版客户机安装SSH服务:sudo apt-get install openssh-serverDesktop版客户机启动SSH服务: sudo systemctl start sshDesktop版客户机启动SSH服务: sudo systemctl start sshDesktop版客户机端修改SSH配置文件:端口22修改为1022 vi /etc/ssh/sshd_configSSH验证-从宿主机连接Desktop客户机2: ********************.126.131SSH验证-从宿主机连接Server版客户机1: ***********************.126.130Desktop版客户机查看SSH状态:记录监听端口和连接情况Server版客户端1查看SSH状态Desktop版客户机安装 net-tools:sudo apt-get install net-toolsDesktop版客户机查看IP地址: ifconfigDesktop版客户机查看网络连接情况:Netstat -aServer版客户机查看网络连接情况:Netstat -a。
Red Hat Enterprise Linux 7 DM 多路径配置和管理文档说明书
Red Hat Enterprise Linux 7DM 多路径Configuring and managing Device Mapper MultipathLast Updated: 2023-03-25Red Hat Enterprise Linux 7 DM 多路径Configuring and managing Device Mapper Multipath Steven LevineRed Hat Customer Content Services******************. . . . . . . . . . . . . . . . . . . . . . . . . . . . . . . . . . . . . . . . . . . . . . . . . . . . . . . . . . . . . . . . . . . . . . . . . . . . . . . . . . . . . . . . . . . . . . . . . . . . . . . . . . . . . . . . .. . . . . . . . . . . . . . . . . . . . . . . . . . . . . . . . . . . . . . . . . . . . . . . . . . . . . . . . . . . . . . . . . . . . . . . . . . . . . . . . . . . . . . . . . . . . . . . . . . . . . . . . . . . . . . . . .. . . . . . . . . . . . . . . . . . . . . . . . . . . . . . . . . . . . . . . . . . . . . . . . . . . . . . . . . . . . . . . . . . . . . . . . . . . . . . . . . . . . . . . . . . . . . . . . . . . . . . . . . . . . . . . . .. . . . . . . . . . . . . . . . . . . . . . . . . . . . . . . . . . . . . . . . . . . . . . . . . . . . . . . . . . . . . . . . . . . . . . . . . . . . . . . . . . . . . . . . . . . . . . . . . . . . . . . . . . . . . . . . .. . . . . . . . . . . . . . . . . . . . . . . . . . . . . . . . . . . . . . . . . . . . . . . . . . . . . . . . . . . . . . . . . . . . . . . . . . . . . . . . . . . . . . . . . . . . . . . . . . . . . . . . . . . . . . . . .. . . . . . . . . . . . . . . . . . . . . . . . . . . . . . . . . . . . . . . . . . . . . . . . . . . . . . . . . . . . . . . . . . . . . . . . . . . . . . . . . . . . . . . . . . . . . . . . . . . . . . . . . . . . . . . . .. . . . . . . . . . . . . . . . . . . . . . . . . . . . . . . . . . . . . . . . . . . . . . . . . . . . . . . . . . . . . . . . . . . . . . . . . . . . . . . . . . . . . . . . . . . . . . . . . . . . . . . . . . . . . . . . .目录第 1 章 设备映射器多路径1.1. NEW AND CHANGED FEATURES 1.2. OVERVIEW OF DM MULTIPATH 1.3. 存储阵列支持1.4. DM MULTIPATH COMPONENTS1.5. DM MULTIPATH SETUP OVERVIEW 第 2 章 多路径设备2.1. 多路径设备识别器2.2. 在群集中保持多路径设备名称一致2.3. 多路径设备属性2.4. 逻辑卷中的多路径设备第 3 章 SETTING UP DM MULTIPATH 3.1. SETTING UP DM MULTIPATH 3.2. 在生成多路径设备时忽略逻辑磁盘3.3. CONFIGURING STORAGE DEVICES 3.4. SETTING UP MULTIPATHING IN THE INITRAMFS FILE SYSTEM 第 4 章 THE DM MULTIPATH CONFIGURATION FILE 4.1. 配置文件总览4.2. 配置文件黑名单4.3. 配置文件默认设置4.4. 多路径设备配置属性4.5. 配置文件设备4.6. ISCSI AND DM MULTIPATH OVERRIDES 第 5 章 DM MULTIPATH ADMINISTRATION AND TROUBLESHOOTING5.1. AUTOMATIC CONFIGURATION FILE GENERATION WITH MULTIPATH HELPER 5.2. RESIZING AN ONLINE MULTIPATH DEVICE 5.3. MOVING ROOT FILE SYSTEMS FROM A SINGLE PATH DEVICE TO A MULTIPATH DEVICE 5.4. MOVING SWAP FILE SYSTEMS FROM A SINGLE PATH DEVICE TO A MULTIPATH DEVICE 5.5. THE MULTIPATH DAEMON 5.6. ISSUES WITH QUEUE_IF_NO_PATH FEATURE 5.7. MULTIPATH COMMAND OUTPUT 5.8. MULTIPATH QUERIES WITH MULTIPATH COMMAND 5.9. MULTIPATH COMMAND OPTIONS 5.10. 使用 DMSETUP 命令确定设备映射器条目5.11. THE MULTIPATHD COMMANDS 5.12. TROUBLESHOOTING WITH THE MULTIPATHD INTERACTIVE CONSOLE 5.13. CLEANING UP MULTIPATH FILES ON PACKAGE REMOVAL 附录 A. 修订记录索引335778999101012121314151616172031364345454545474747484949505051525354目录1DM 多路径2第 1 章设备映射器多路径3DM 多路径4第 1 章设备映射器多路径5DM 多路径6第 1 章设备映射器多路径在这个配置中,可将 I/O分布到那四条路径中。
Red Hat Enterprise Linux(RHEL) 6 高可用性外挂程序隔离配置指南说明书
Red Hat Enterprise Linux(RHEL) 6隔離配置指南為 High Availability 外掛程式配置和管理隔離裝置Last Updated: 2017-10-12Red Hat Enterprise Linux(RHEL) 6 隔離配置指南為 High Availability 外掛程式配置和管理隔離裝置.. . . . . . . . . . . . . . . . . . . . . . . . . . . . . . . . . . . . . . . . . . . . . . . . . . . . . . . . . . . . . . . . . . . . . . . . . . . . . . . . . . . . . . . . . . . . . . . . . . . . . . . . . . . . . . . . . . . . . . . . . . . . . . . . . . . . . . . . . . . . . . . . . . . . . . . . . . . . . . . . . . . . . . . . . . . . . . . . . . . . . . . . . . . . . . . . . . . . . . . . . . . . . . . . . . . . . . . . . . . . . . . . . . . . . . . . . . . . . . . . . . . . . . . . . . . . . . . . . . . . . . . . . . . . . . . . . . . . . . . . . . . . . . . . . . . . . . . . . . . . . . . . . . . . . . . . . . . . . . . . . . . . . . . . . . . . . . . . . . . . . . . . . . . . . . . . . . . . . . . . . . . . . . . . . . . . . . . . . . . . . . . . . . . . . . . . . . . . . . . . . . . . . . . . . . . . . . . . . . . . . . . . . . . . . . . . . . . . . . . . . . . . . . . . 內容目錄章 1. 隔離預配置1.1. 配置 ACPI 以與整合的隔離裝置搭配使用1.1.1. 透過 chkconfig 管理來停用 ACPI Soft-Off 1.1.2. 停用 BIOS 的 ACPI Soft-Off1.1.3. 在 grub.conf 檔案中完全地停用 ACPI 章2. 透過 CCS 指令配置隔離2.1. 配置隔離裝置2.2. 列出隔離裝置與隔離裝置選項2.3. 為叢集成員配置隔離2.3.1. 為節點配置單電源的隔離裝置2.3.2. 為節點配置一個基於儲存裝置的單獨隔離裝置2.3.3. 配置備份隔離裝置2.3.4. 配置一個重複電源的節點2.3.5. 測試隔離配置2.3.6. 移除隔離方式和隔離事例章 3. 透過 CONGA 配置隔離3.1. 配置隔離 DAEMON 屬性3.2. 配置隔離裝置3.2.1. 建立隔離裝置3.2.2. 修改隔離裝置3.2.3. 刪除隔離裝置3.3. 為叢集成員配置隔離3.3.1. 為節點配置單獨隔離裝置3.3.2. 配置備份隔離裝置3.3.3. 配置一個重複電源的節點3.3.4. 測試隔離配置章 4. 隔離裝置4.1. 透過 TELNET 和 SSH 操作 APC 電源切換器4.2. 透過 SNMP 操作 APC 電源切換器4.3. BROCADE 光纖切換器4.4. CISCO MDS 4.5. CISCO UCS 4.6. DELL DRAC 54.7. EATON 網路電源切換器4.8. EGENERA BLADEFRAME 4.9. EPOWERSWITCH 4.10. FENCE KDUMP 4.11. FENCE VIRT 4.12. FUJITSU-SIEMENS REMOTEVIEW SERVICE BOARD (RSB)4.13. HEWLETT-PACKARD BLADESYSTEM 4.14. HEWLETT-PACKARD ILO 4.15. HEWLETT-PACKARD ILO MP 4.16. IBM BLADECENTER 4.17. 透過 SNMP 操作 IBM BLADECENTER 4.18. IBM IPDU4.19. IF-MIB4.20. INTEL MODULAR4.21. 透過 LAN 操作 IPMI4.22. RHEV-M REST API 4455688101111131518202022222223232424242525262830323538414346495052525455575961636770737677內容目錄1. . . . . . . . . . . . . . . . . . . . . . . . . . . . . . . . . . . . . . . . . . . . . . . . . . . . . . . . . . . . . . . . . . . . . . . . . . . . . . . . . . . . . . . . . . . . . . . . . . . . . . . . . . . . . . . . . . . . . . . . . . . . . . . . . . . . . . . . . . . . . . . . . . . . . . . . . . . . . . . . . . . . . . . . . . . . . . . . . . . . . . . . . . . . . . . . . . . . . . . . . . . . . . . . . . . . . . . . . . . . . . . . 4.23. SCSI 持續保留(PERSISTENT RESERVATION )4.24. 透過 SOAP API 操作 VMWARE4.25. WTI 電源切換器附錄 A. 修訂記錄索引7981838687隔離配置指南2內容目錄3隔離配置指南4章 1. 隔離預配置5隔離配置指南6章 1. 隔離預配置隔離配置指南章 2. 透過 CCS 指令配置隔離隔離配置指南2.2. 列出隔離裝置與隔離裝置選項您可使用ccs指令來印出可用隔離裝置的清單,並列出各個可用隔離類型的選項之清單。
linux入门教程Redhat使用指南
linux入门教程Redhat使用指南linux入门教程Redhat使用指南3.1 登录和退出系统1. 启动系统通常LILO是安装在MBR上的,计算机启动后,MBR上的程序被执行,将出现一个不是很漂亮的图形:左边是一个小红帽图像,右边列出了可以启动的操作系统,你可以使用键盘箭头切换。
刚安装好后默认值是Linux,也就是你不选择,一会儿将自己启动Linux。
如果你想默认的选择是Windows的话,那你可以在启动Linux后,用vi修改/etc目录下的lilo.conf 文件,加上default=windows,然后再执行/sbin/lilo重新生成LILO。
2. 用户登录Linux是一个真正意义上的多用户操作系统,用户要使用该系统,首先必须登录,使用完系统后,必须退出。
用户登录系统时,为了使系统能够识别该用户,必须输入用户名和密码,经系统验证无误后才可以登录系统使用。
Linux下有两种用户:1)root用户:超级权限者,系统的拥有者,在Linux系统中有且只有一个root用户,它可以在系统中任何操作。
在系统安装时所设定的密码就是root用户的密码。
2)普通用户:Linux系统可以创建许多普通用户,并为其指定相应的权限,使其有限地使用Linux 系统。
关于用户的管理,我们将在后面详细说明。
用户登录分两步进行:1)输入用户的登录名,系统根据该登录名来识别用户;2)输入用户的口令,该口令是用户自己选择的一个字符串,对其他用户完全保密,是登录系统时识别用户的唯一根据,因此每一个用户都应该保护好自己的口令!系统在建立之初,仅有root用户,其它的用户则是由root用户创建的。
由于root用户的权限太大了,所以如果root用户误操作将可能造成很大的损失。
所以建议系统管理员为自已新建一个用户,只有需要做系统维护、管理任务时才以root用户登录。
下面就是一个登录实例:(其中黑体字为输入)Red Hat Linux release 7.1 (Seawolf)Kernerl 2.4.2-2 on an i686Home login:rootPassword:在上面的例子中,我们发现在Password后面是空的,其实并不是不输入密码,而是在输入时,Linux系统不会把它显示出来,这样用来保护密码!如果登录成功的话,我们将获得Shell(Shell是用来与用户交互的程序,它就象DOS中的/doc/4711572586.html,,不过在Linux下可以有多种Shell供选择,如bash、csh、ksh等)提示符,如果以root 用户登录的话,那么获得的提示符是“#”,否则将是“$”。
RedHat Linux操作系统配置技巧
RedHat Linux操作系统配置技巧随着Linux在我国的持续升温,想学习它的人也越来越多。
但是绝大多数的人早已习惯了傻瓜式操作的Windows,要他们一下子就适应Linux的操作,确实有很大的困难。
特别是无数的Linux命令,对于那些连DOS都没有接触过的人来说,实在是不可忍受,这就为Linux在我国的推广带来了很大的局限性。
因此在绝大多数情况下,Linux都是以一种高端操作系统的姿态出现在我们面前。
好在近几年我国*的大力支持,以及世界各硬件和软件厂商在我国对Linux的大力推广,Linux已经取得了很大的成功。
而且绝大多数版本的Linux都已经支持中文。
更可喜的是它的X Windows也已经做得非常漂亮实用,这对于刚从Windows转向Linux学习的人来说,不但降低了学习的门槛,而且有助于提高他们学习Linux的积极性。
在X Windows下我们已经可以完成大多数的操作,只需用命令来完成少量的工作。
这对于Linux的学习有很大的帮助。
本文就以使用最广泛的RedHat Linux为例给大家讲一讲Linux操作系统的基本配置。
1、添加用户新安装的Linux一般只有一个用户,即根用户,也就是系统管理员。
他对系统有无限的权力,可以更改或删除任意文件,因此稍有不慎就可能破坏系统。
比如root只要输入一条简单的命令―rm –fr /‖就可以删除系统内的所有文件,其中―rm‖即删除文件命令,―-f‖参数即强制,―-r‖用于删除指定目录中的文件,―/‖就是指根目录,整条命令就是强制删除系统中所有文件,可见其破坏性之大。
还有其他的误操作也可能给系统造成严重的破坏,因此为了安全起见,平常的操作我们最好不要以―root‖身份登录,这就需要新建一个用户。
新建用户可以在shell下用命令创建,也可以像Windows一样在图形窗口中创建。
在shell下只要一条简单的命令就可以创建一个用户。
比如新建用户为text,我们只要按如下步骤操作即可:在桌面单击右键,选择―新建终端‖即进入shell,然后输入―adduser text‖按回车键后,再输入―passwd text‖回车,按提示键入密码即创建了新用户―text‖。
红帽企业Linux安装指南说明书
Accessing Red Hat Enterprise Linux installation binariesThe Cloud Paks include entitlement to Red Hat OpenShift Container Platform and Red Hat Enterprise Linux. The preferred method of accessing and installing these offerings is to follow the standard installation documentation from Red Hat and register your systems using your Red Hat Network subscription. Installation binaries, documentation, and entitlement information can all be accessed from the Red Hat Customer Portal at https://. If you are new to the Red Hat Customer Portal, click Getting Started after you have logged in (or use this link: https:///start/) to take a guided tour of the and learn how to get the most out of your Red Hat subscription.Note: The preferred installation method requires an active Red Hat Network subscription and entitlement in a sufficient quantity to for the systems where you are installing, and connectivity to the internet or to a local Red Hat Satellite Server. It is also possible to install Red Hat OpenShift Container Platform before your subscription has been activated in the Red Hat Customer Portal by accessing the installation binaries from IBM Passport Advantage and performing a manual offline installation.Preferred method: using the Red Hat Customer PortalAccessing installation binaries through the Red Hat Customer PortalAfter your Cloud Pak order has been processed, you will receive an email from Red Hat at the address associated with your order indicating that the entitlement quantities for your Red Hat OpenShift Container Platform and subscription has been updated.To verify that the entitlement quantities have been added to your account, log in to the Red Hat Customer Portal and click Subscriptions. Red Hat Open Shift entitlements will be displayed in the table titled OPENSHIFT.Installing Red Hat Enterprise LinuxInstalling OpenShift Container Platform 3.11 requires Red Hat Enterprise Linux 7.6 to be installed on the host systems or virtual machines where OpenShift Container Platform will be installed. Entitlement to Red Hat Enterprise Linux is included with your Cloud Pak entitlement. If you do not already have Red Hat Enterprise Linux installed, use the following documentation to complete the installation of Red Hat Enterprise Linux.Red Hat Enterprise Linux 7.6 installation media can be accessed through the Red Hat Customer portal at https:///downloads/content/69/ver=/rhel---7/7.6/x86_64/product-softwareInstructions for downloading and installing Red Hat Enterprise Linux 7.6, including registering your installation using Subscription Manager, can be found in the Red Hat Customer Portal at:https:///documentation/en-us/red_hat_enterprise_linux/7/html/installation_guide/chap-getting-startedInstalling Red Hat OpenShift Container PlatformOnce you have successfully provisioned hosts or virtual machines with Red Hat Enterprise Linux 7.6 installed and registered, proceed to install OpenShift Container Platform3.11 by following the documentation provided in the Red Hat Customer Portal:https:///documentation/en-us/openshift_container_platform/3.11/html/getting_started/getting-started-index Alternate Method: using IBM Passport AdvantageAccessing binaries for manual installation from IBM Passport AdvantageIf you require the ability to install the Cloud Pak before your entitlements have been updated in the Red Hat Customer Portal, all of the binary files necessary to perform a manual installation are available for download from IBM Passport Advantage or the public internet. Installation images and RPMs for Red Hat Enterprise Linux can be downloaded from IBM Passport Advantage (Part number CC3KEEN , which is part of your Cloud Pak eAssembly.) This file has the description “IBM Red Hat OpenShift 3.11 English only eImage” in IBM Passport Advantage. It contains the Red Hat Enterprise Linux installation binaries, including the files that enable you to install Red Hat OpenShift Container Platform 3.11 over the internet. This installation should be registered and associated with your Red Hat Network ID at a later time.The download is approximately 60GB in size, and additional storage will be required when extracting the files.This manual installation process requires the creation of a local HTTP server to host the RPM files that are provided in the above download package. These steps are not required when using the preferred installation method described above, since that scenario enables access to the necessary files through Red Hat Network.To perform a manual installation, follow the procedure outlined below:1.Download the Red Hat Enterprise Linux installation files from Passport Advantage (if youdon’t already have Red Hat Enterprise Linux installed)2.Provision a web server to host a Yum repository3.Copy the downloaded files to the web server4.Install Red Hat Enterprise Linux on the master and worker nodes5.Prepare the worker nodes6.Prepare the master node7.Install OpenShift Container PlatformDownload the Red Hat Enterprise Linux installation files from Passport AdvantageLog into IBM Passport Advantage and download “IBM Red Hat OpenShift 3.11 English only eImage” (part number CC3KEEN) which is associated with the Cloud Pak eAssembly. This will download a file named IBM_RED_HAT_OPENSHIFT_3.11_ENGLISH.tgz. Despite the description and filename, this package contains the files needed to install Red Hat Enterprise Linux.Provision a web server to host a Yum repositoryProvision a physical host or virtual machine with an HTTP server to support the local installation. You can use the web server of your choice as the repository.If you do not have a web server available, you can install and configure the Apache web server on a Red Hat Enterprise Linux system using the documentation provided by Red Hat under the heading “Prepare and populate the repository server”: https:///container-platform/3.11/install/disconnected_install.html#disconnected-repo-serverCopy the downloaded files to the web serverCopy IBM_RED_HAT_OPENSHIFT_3.11_ENGLISH.tgz to the web server and extract it into a subdirectory named “repos” under your web server’s document root (/var/www/html/repos if you have created a web server using the documentation above.)Ensure that the repository files can be read by any user (chmod -R +r /var/www/html/repos) Install Red Hat Enterprise Linux on the master and worker nodesOpenShift Container Platform 3.11 requires Red Hat Enterprise Linux 7.6 to be installed on the host systems or virtual machines where OpenShift Container Platform will be installed. Entitlement to Red Hat Enterprise Linux is included with your Cloud Pak entitlement. If you do not already have Red Hat Enterprise Linux installed, use the following documentation to complete the installation of Red Hat Enterprise Linux.If you don’t already have Red Hat Enterprise Linux installed, provision the hosts or VMs that will be used for the master and worker nodes for the OpenShift Container Platform cluster where you will install the Cloud Pak, and install Red Hat Enterprise Linux using the ISO downloaded from IBM Passport Advantage.Complete instructions for downloading and installing Red Hat Enterprise Linux 7.6, including prerequisites and host preparation, can be found in the Red Hat Customer Portal at:https:///documentation/en-us/red_hat_enterprise_linux/7/html/installation_guide/chap-getting-started An ISO image of the installation media (rhel-server-7.6-x86_64-dvd.iso) can be found in the directory where you extracted the file downloaded from IBM Passport Advantageabove. Use these files in place of steps in Chapter 2 of the Red Hat Enterprise Linuxinstallation guide that describe downloading Red Hat Enterprise Linux from the Red Hat Customer Portal. If you are creating virtual machines to provision your nodes, this image can be used directly.If you are installing Red Hat Enterprise Linux on a physical host, refer to Chapter 3 of the Red Hat Enterprise Linux installation guide for information on creating physicalinstallation media or accessing installation media over a network:https:///documentation/en-us/red_hat_enterprise_linux/7/html/installation_guide/chap-making-mediaPrepare the worker nodesEnsure that each of the worker nodes has been prepared to meet the requirements described under “Preparing your hosts”: https:///container-platform/3.11/install/host_preparation.html#install-config-install-host-preparationUpdate /etc/yum.repos.d/ose.repo on the master and worker nodes to use the local repository for installing RPMs, by updating the “baseurl” in each collection with the hostname or IP address of the local repository server. In the example shown below, the repository’s hostname is “myserver” – use your own hostname or IP address instead.Sample ose.repo file:[rhel-7-server-rpms]name=rhel-7-server-rpmsbaseurl=http://myserver/repos/rhel-7-server-rpmsenabled=1gpgcheck=0[rhel-7-server-extras-rpms]name=rhel-7-server-extras-rpmsbaseurl=http://myserver/repos/rhel-7-server-extras-rpmsenabled=1gpgcheck=0[rhel-7-server-ansible-2.6-rpms]name=rhel-7-server-ansible-2.6-rpmsbaseurl=http://myseerver/repos/rhel-7-server-ansible-2.6-rpmsenabled=1gpgcheck=0[rhel-7-server-ose-3.11-rpms]name=rhel-7-server-ose-3.11-rpmsbaseurl=http://myserver/repos/rhel-7-server-ose-3.11-rpmsenabled=1gpgcheck=0Refer to the section “Preparing cluster hosts” in the Red Hat OpenShift Container Platform documentation if you require additional information: https:///container-platform/3.11/install/disconnected_install.html#disconnected-openshift-systemsPrepare the master nodeEnsure that the master node has been prepared to meet the requirements described under “Preparing your hosts”: https:///container-platform/3.11/install/host_preparation.html#install-config-install-host-preparation Customize an inventory file on your master node to describe the details of your cluster and set as the registry for installation. Refer to “Customizing inventory files” (https:///container-platform/3.11/install/configuring_inventory_file.html#configuring-ansible) for more information and to review example inventory files.You must set the variable “oreg_url” to “/openshift3/ose-${component}:${version}” in your inventory file exactly as shown below:oreg_url=/openshift3/ose-${component}:${version}Install Red Hat OpenShift Container PlatformFollow the documentation provided by Red Hat to install OpenShift Container Platform 3.11 in the section titled “Installing OpenShift Container Platform”:https:///container-platform/3.11/install/running_install.html#install-running-installation-playbooks。
redhat6安装手册
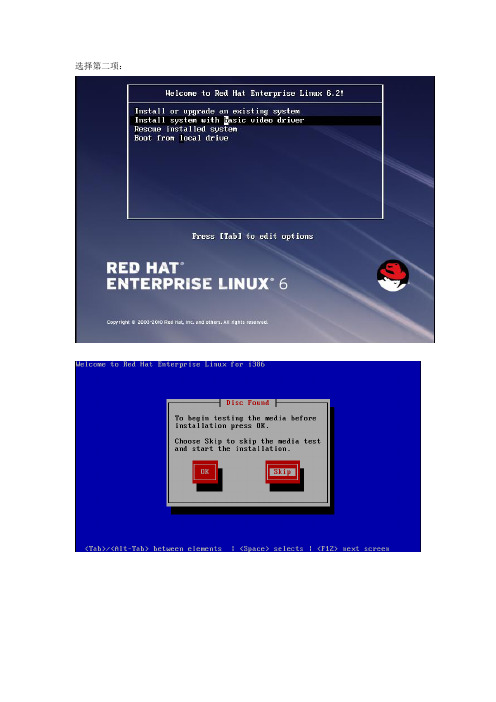
选择第二项:按Next 进入下一步如下:选简体中文后按Next 进入下一步:选美国英语式后按Next 进入下一步:主机名可不设置,直接按下一步:不勾选系统时间使用UTC时间,下一步:设置根密码为redhat,弹出框选无论如何使用,点下一步:选自定义分区,进入下一步,点创建:选择标准分区,点创建,弹出添加分区对话框,首先创建boot分区:创建swap分区:内存mem≤2G,swap=2*mem,否则,内存为6~8G即可然后把剩余的磁盘空间都分配到根分区:完成后分区如下(swap和根分区的磁盘空间大小可能与下图不一样)点下一步,选择“write changes to disk”:格式化完毕后,如下:点下一步,等待获取安装信息后:选安装类型为桌面,点选左下角的现在定制,下一步进入定制界面:选择“基本系统”,不选中右边的“Java平台”,其他默认选中的项保持不变:选择“服务器”,选中右边的“FTP服务器”、“服务器平台”、“系统管理工具”:选择“Web服务”,右边都不选:选择“数据库”,右边选中“MySQL数据库客户端”和“MySQL数据库服务器”:选择“系统管理”,选中右边的“系统管理”:选择“虚拟化”,右边都不选中:选择“桌面”,右边选择如下图:选择“应用程序”,右边选择“互联网浏览器”:选择“开发”,勾选右侧的“开发工具”,点可选软件包:选中红色框中的三个,其他默认选中的保持不变:点“关闭”,选中“附加开发”,点“可选软件包”:找到openjdk,不选中它,如下图所示:找到libcurl,选中它,如下图所示:找到mysql-devel,选中它,如下图:其它默认选中的项保持不变,点“关闭”。
选择“语言支持”,右边选中中文和英国英语:然后点下一步开始安装,等待安装完成:此时已弹出光盘,取出光盘,点选重新引导,重启后,界面如下:点前进按钮进入下一步:选同意许可协议,前进到下一步:默认,点前进按钮进入下一步:创建用户,进入下一步:设置时间,默认,按前进按钮,进入下一步,如果弹出“没有足够的内存配置kdump”,直接点确定,忽略。
Redhat6.6双机安装手册
Redhat双机安装手册安装前的准备和规划硬件准备服务器要求能够支持RedHat 6版本的安装。
通常服务器厂商会提供所支持操作系统的列表,通过查询该列表或直接咨询服务器厂商,即可确认该服务器是否支持该操作系统。
软件准备网络准备两台服务器上安装RHCS双机,每台服务器节点上跑一个资源包(为mysql,在一个共享外接存储上),当一节点有问题时,资源包自动切换到另一节点以确保服务可用。
双机工作时以浮动IP地址对外提供服务,所以网络环境准备时需要像用户方索要三个IP地址,分别应用于为主机,备机和浮动IP规划(后边主机名对应/etc/hosts中的配置)fence设备IP:172.52.37.166 ipmi1 172.52.37.167 ipmi2 业务IP:172.52.37.66 node1 172.52.37.67 node2 应用浮动IP:172.52.37.68服务器fence ip配置RHCS提供的fence device有两种,一种是内部fence设备。
常见的有:IBM服务器提供的RSAII卡HP服务器提供的iLO卡DELL服务器提供的DRAC卡智能平台管理接口IPMI()常见的外部fence设备有:UPS、SAN SWITCH、NETWORK SWITCH,另外如果共享存储是通过GNBD Server实现的,那么还可以使用GNBD的fence功能。
x3650标配就带了IMM卡,在rhcs中可以配置fence类型为IPMI。
X3650 M5 IMM配置如下:在UEFI中修改IMM的IP地址,开机时根据提示按F1进入BIOS1.选择System Setting->Integrated Management Module(IMM)->Network configuration2.在输入需要修改的IP地址后,选择Save Network Settings3.在IE中输:地址,即可访问IMM管理界面这是就弹出来带有Lenovo标志的登录页面,默认状态下用户名和密码如下用户名:USERID(注意,全部大写)密码:PASSW0RD(注意,中间的是数字0)输入用户名和密码后就进入到IMM2主界面了,画面显示我们的IMM2登录的是System x3650 M5服务器,可以直接在最下面看到服务器各组件的状态,散热、电源等系统都处于正常状态操作系统安装略主机名及网卡设置➢主机名设置:本测试环境,两台主机名称分别为node1和node2➢网卡设置eth0设置为对外提供服务的IP地址IMM口为Fence地址。
RedHatLinux6操作系统安装实施手册.
RedHat Linux 6 操作系统安装实施手册部门:SADBA组版本号: V1.0发布日期:2015-12-10目录1系统安装前的准备工作 (4)1.1硬件安装 (4)1.2配置信息准备 (4)2操作系统安装 (5)2.1操作系统安装 (5)2.2安装附加软件包 (27)2.3注意事项 (27)2.4设定运行级别 (27)2.5修改系统默认语言 (28)3系统资源配置 (28)3.1网络配置 (28)3.1.1网卡参数调整 (28)3.1.2主机名及默认网关和路由 (28)3.1.3IP设置 (29)3.1.4路由设置 (31)3.2多路径软件安装配置 (31)3.2.1安装多路径软件 (32)3.2.2磁盘识别 (32)3.2.3多路径配置 (33)3.2.4启动多路径软件 (34)3.2.5多路径映射变动的更新 (34)3.2.6磁盘的动态添加和删除 (36)3.3卷组及文件系统 (39)3.3.1创建卷组及逻辑卷 (39)3.3.2创建文件系统 (39)3.3.3创建用户组和用户 (40)3.4时间同步 (40)4系统参数调整 (42)5系统服务 (49)5.1系统开机自启动服务 (49)5.2服务的关闭和开启 (50)5.3配置SeLinux (51)6单用户及救援模式 (52)6.1单用户模式 (52)6.1.1GRUB引导 (52)6.1.2编辑Linux菜单 (53)6.1.3引导进入单用户模式 (54)6.1.4修改口令并重启 (55)6.2救援模式 (56)1系统安装前的准备工作F2 进入到系统设置,将系统改成光盘引导,F10将系统BISO选择对应版本1.1硬件安装为了保证操作系统安装工作的正常进行,在安装之前需要作以下准备工作:1、确保您的硬件,包括所有的外接设备的安装都已完成,如:图形终端、键盘、鼠标、光驱、硬盘、PCI/PCIE部件、磁带机等硬件设备;2、检测所有硬件的电源是否符合要求(包括图形终端、主机),并连接正确;3、如果需要连接存储,那么在操作系统安装期间,需要暂时断开与存储的连接;4、所有磁盘已经完成Raid配置。
Red Hat Enterprise Linux 7 虚拟化入门指南说明书
Red Hat Enterprise Linux 7虚拟化入门指南RHEL 提供的虚拟化技术简介Last Updated: 2023-06-24Red Hat Enterprise Linux 7 虚拟化入门指南RHEL 提供的虚拟化技术简介Jiri HerrmannRed Hat Customer Content Services*******************Yehuda ZimmermanRed Hat Customer Content Services*******************Dayle ParkerRed Hat Customer Content ServicesLaura NovichRed Hat Customer Content ServicesJacquelynn EastRed Hat Customer Content ServicesScott RadvanRed Hat Customer Content Services法律通告Copyright © 2019 Red Hat, Inc.The text of and illustrations in this document are licensed by Red Hat under a Creative Commons Attribution–Share Alike 3.0 Unported license ("CC-BY-SA"). An explanation of CC-BY-SA is available at/licenses/by-sa/3.0/. In accordance with CC-BY-SA, if you distribute this document or an adaptation of it, you must provide the URL for the original version.Red Hat, as the licensor of this document, waives the right to enforce, and agrees not to assert, Section 4d of CC-BY-SA to the fullest extent permitted by applicable law.Red Hat, Red Hat Enterprise Linux, the Shadowman logo, the Red Hat logo, JBoss, OpenShift, Fedora, the Infinity logo, and RHCE are trademarks of Red Hat, Inc., registered in the United States and other countries.Linux ® is the registered trademark of Linus Torvalds in the United States and other countries. Java ® is a registered trademark of Oracle and/or its affiliates.XFS ® is a trademark of Silicon Graphics International Corp. or its subsidiaries in the United States and/or other countries.MySQL ® is a registered trademark of MySQL AB in the United States, the European Union and other countries.Node.js ® is an official trademark of Joyent. Red Hat is not formally related to or endorsed by the official Joyent Node.js open source or commercial project.The OpenStack ® Word Mark and OpenStack logo are either registered trademarks/service marks or trademarks/service marks of the OpenStack Foundation, in the United States and other countries and are used with the OpenStack Foundation's permission. We are not affiliated with, endorsed or sponsored by the OpenStack Foundation, or the OpenStack community.All other trademarks are the property of their respective owners.摘要Red Hat Enterprise Linux 虚拟化入门指南介绍了虚拟化的基础知识以及 Red Hat Enterprise Linux 提供的虚拟化产品和技术。
Red Hat Enterprise Linux(RHEL)6电源管理指南说明书
Red Hat Enterprise Linux(RHEL) 6電源管理指南管理 Red Hat Enterprise Linux 6 的電源消耗量Last Updated: 2017-10-12Red Hat Enterprise Linux(RHEL) 6 電源管理指南管理 Red Hat Enterprise Linux 6 的電源消耗量Don DomingoRed Hat 工程部出版中心Rüdiger LandmannRed Hat 工程部出版中心Jack ReedRed Hat 工程部出版中心****************Red Hat Inc.. . . . . . . . . . . . . . . . . . . . . . . . . . . . . . . . . . . . . . . . . . . . . . . . . . . . . . . . . . . . . . . . . . . . . . . . . . . . . . . . . . . . . . . . . . . . . . . . . . . . . . . . . . . . . . . . . . . . . . . . . . . . . . . . . . . . . . . . . . . . . . . . . . . . . . . . . . . . . . . . . . . . . . . . . . . . . . . . . . . . . . . . . . . . . . . . . . . . . . . . . . . . . . . . . . . . . . . . . . . . . . . . . . . . . . . . . . . . . . . . . . . . . . . . . . . . . . . . . . . . . . . . . . . . . . . . . . . . . . . . . . . . . . . . . . . . . . . . . . . . . . . . . . . . . . . . . . . . . . . . . . . . . . . . . . . . . . . . . . . . . . . . . . . . . . . . . . . . . . . . . . . . . . . . . . . . . . . . . . . . . . . . . . . . . . . . . . . . . . . . . . . . . . . . . . . . . . . . . . . . . . . . . . . . . . . . . . . . . . . . . . . . . . . . . . . . . . . . . . . . . . . . . . . . . . . . . . . . . . . . . . . . . . . . . . . . . . . . . . . . . . . . . . . . . . . . . . . . . . . . . . . . . . . . . . . . . . . . . . . . . . . . . . . . . . . . . . . . . . . . . . . . . . . . . . . . . . . . . . . . . . . . . . . . . . . . . . . . . . . . . . . . . . . . . . . . . . . . . . . . . . . . . . . . . . . . . . . . . . . . . . . . . . . . . . . . . . . . . . . . . . . . . . . . . . . . 內容目錄章 1. 總覽1.1. 電源管理的重要性1.2. 電源管理的基本概念章 2. 電源管理的稽核與分析2.1. 稽核與分析概要2.2. POWERTOP 2.3. DISKDEVSTAT 與 NETDEVSTAT2.4. 電池壽命工具組2.5. TUNED 與 KTUNE2.5.1. tuned.conf 檔案2.5.2. Tuned-adm2.6. DEVICEKIT-POWER 與 DEVKIT-POWER2.7. GNOME 電源管理程式2.8. 其它稽核方式章3. 核心架構與機制3.1. CPU 的閒置狀態3.2. 使用 CPUFREQ 調速程式3.2.1. CPUfreq 調速程式的類型3.2.2. 設定 CPUfreq 3.2.3. 微調 CPUfreq 政策與速度3.3. CPU 監控3.4. CPU 的省電政策3.5. SUSPEND (暫停)與 RESUME (重新開始)3.6. 無計時 KERNEL3.7. 主動狀態電源管理3.8. 積極性連結電源管理3.9. RELATIME 磁碟存取最佳化3.10. 用電控制3.11. 加強的圖形電源管理3.12. RFKILL3.13. 使用者空間的最佳化章4. 使用的範例4.1. 範例 — 伺服器4.2. 範例 — 筆記型電腦附錄 A. 給程式設計師的提示A.1. 使用執行續A.2. 喚醒功能A.3. FSYNC 附錄 B. 修訂記錄33466681213141618191920202020212223232424242526262727283030303333333436內容目錄1電源管理指南2章 1. 總覽3電源管理指南4章 1. 總覽5電源管理指南章 2. 電源管理的稽核與分析2.1. 稽核與分析概要在單系統上詳盡地手動稽核、分析與微調,通常是良好電源管理的例外情況,因為所花費的時間與成本會多過系統微調所帶來的好處。
linux服务器系统部署搭建手册
服务器系统部署搭建手册在搭建环境之前先需要安装相关工具插件编译工具cmake-3.3解压软件rarlinux- 5.4.0插件编译PHP的时候需要libmcrypt、pcre-8.37、libmcrypt-devel-2.5(后续的插件会在下面说明)一、搭建Mysql-5.6准备安装包:我们先要准备mysql的linux的安装包如果是上传的则需要对包的权限进行修改chmod 755安装依赖包:安装所需的插件和依赖包: yum -y install ncurses-developenssl-devel bison-devel。
在安装完毕后则可以对mysql文件进行解压。
用户组:要进行配置mysql了,首先需要配置用户以及用户组,创建mysql用户,且不允许mysql用户登录系统,seradd -s /sbin/nologin mysql。
创建mysql数据库存放目录:mkdir -p /data/mysql。
设置msql的目录权限:chown -R mysql:mysql /data/mysqlmkdir -p /usr/local/mysql #创建mysql安装目录chown -R mysql:mysql /usr/local/mysql #设置目cmake . -DCMAKE_INSTALL_PREFIX=/usr/local/mysql \安装mysql:make && make install修改系统mysql配置:cd /usr/local/mysqlcp support-files/f /etc/f 初始化数据库:./scripts/mysql_install_db --user=mysql --datadir=/data/mysql复制启动文件到开机自动启动:cp ./support-files/mysql.server /etc/rc.d/init.d/mysqlchmod 755 /etc/init.d/mysql #增加执行权限chkconfig --add mysql #添加到启动服务里chkconfig mysql on #加入开机启动chkconfig --list mysqlvi /etc/rc.d/init.d/mysql #编辑启动文件加入下面两行basedir = /usr/local/mysql #mysql程序安装路径datadir = /data/mysql #Mysql数据库存启动服务:service mysql startmysql服务到系统环境变量:vim /etc/profileexport PATH=$PATH:/usr/local/mysql/bin (加在最后一行)mysql库文件链接到系统默认位置可以方便php不用指定路径:ln -s /usr/local/mysql/lib/mysql /usr/lib/mysqlln -s /usr/local/mysql/include/mysql /usr/include/mysql结束后讲服务器重启:shutdown -r now完毕之后设置mysql账号:mysql_secure_installation 根据提示输入两次密码或者直接修改密码:/usr/local/mysql/bin/mysqladmin -u root -p password "123456"。
- 1、下载文档前请自行甄别文档内容的完整性,平台不提供额外的编辑、内容补充、找答案等附加服务。
- 2、"仅部分预览"的文档,不可在线预览部分如存在完整性等问题,可反馈申请退款(可完整预览的文档不适用该条件!)。
- 3、如文档侵犯您的权益,请联系客服反馈,我们会尽快为您处理(人工客服工作时间:9:00-18:30)。
数据库基础环境部署操作手册(redhat 6.7 oracle11.2.0.4)中国人寿2016年5月文档信息文档维护记录目录1目的 (4)2适用范围 (4)3操作系统环境调整 (4)3.1操作系统模板说明 (4)3.2基础环境冗余性测试 (4)3.3磁盘配置(UDEV) (5)3.4修改HOSTS文件 (5)4数据库服务器GI和DB安装 (5)4.1下载安装介质 (5)4.2配置SSH (6)4.3验证GI安装环境 (6)4.4安装磁盘补丁 (6)4.5GI和数据库安装 (7)4.5.1 GI软件安装 (7)4.5.2 DB软件安装 (7)4.5.3 下载补丁 (7)4.5.4 安装GI补丁 (7)4.5.5 安装DB补丁 (7)4.5.6 DG创建 (8)4.5.7 数据库实例创建 (8)4.5.8 监听器创建 (8)5数据库调整 (8)5.1SQL环境变量调整 (8)5.2表空间调整(ORACLE用户执行) (8)5.3REDO调整(ORACLE用户执行) (9)5.4修改LOCAL_LISTENER(ORACLE用户执行) (10)5.5数据库安全配置相关 (10)5.5.1 安全基线和日志缺省目录(DB,oracle用户执行) (10)5.5.2 修改监听器配置 (11)5.5.3 审计日志处理 (11)5.5.4 安装自动审计脚本 (12)5.6调整SNAPSHOT (13)1目的规范数据库基础环境的部署。
2适用范围在数据中心redhat 6.7模板上进行oracle 11.2.0.4数据库物理机rac环境部署。
3操作系统环境调整硬件环境要求:4块物理网卡3块2G的外部共享存储盘N块72G的外部共享存储盘(N=(80+业务数据量G)/72)3.1操作系统模板说明操作系统请安装redhat6.7 数据库模板,该模板中已经完成操作系统参数,用户,目录等基本设置,具体可以参见附件1. oracle对linux的系统要求_redhat6.7.docx。
附件1:oracle对linux的系统要求_redhat6.d3.2基础环境冗余性测试双网卡链路冗余性测试:测试宕掉任一块网卡,网络正常可参考附件2.网卡双链路有效性测试附件2:网卡双链路有效性测试.docx磁盘双链路冗余性测试:测试任一链路断开,磁盘读写正常可参考附件3.存储双链路有效性测试附件3:存储多路径有效性测试.docx3.3磁盘配置(udev)可参考附件4.使用udev进行asm磁盘管理附件4:使用udev进行asm 磁盘管理.docx3.4修改hosts文件修改/etc/hosts,增加如下:#Public IP address10.20.28.1 maesdb01plk10.20.28.2 maesdb02plk#Virtual IP address10.20.28.3 maesdb01plk-vip10.20.28.4 maesdb02plk-vip#Private IP address192.168.28.1 maesdb01plk-pri192.168.28.2 maesdb02plk-pri#Scan IP address10.20.28.5 masdb-sip4数据库服务器GI和DB安装4.1下载安装介质ftp 10.21.33.30: /app/software/oracle/oracle_for_linux/数据库11.2.0.4.0/oracle/p1*******_112040_Linux-x86-64_1of7.zip11.2.0.4.0/oracle/p1*******_112040_Linux-x86-64_2of7.zipGI11.2.0.4.0/grid/p1*******_112040_Linux-x86-64_3of7.zipopatch11.2.0.4.0/oracle_opatch_11.2.0.3.12/p6880880_112000_Linux-x86-64.zip4.2配置ssh./sshUserSetup.sh -user grid -hosts "maesdb01plkmaesdb02plk"cdtar -cvf ssh.tar .sshscp ssh.tar maesdb02plk:/home/grid/ssh maesdb02plkrm -rf .sshtar -xvf ssh.tar./sshUserSetup.sh -user oracle -hosts "maesdb01plk maesdb02plk"cdtar -cvf ssh.tar .sshscp ssh.tar maesdb02plk:/home/oracle/ssh maesdb02plkrm -rf .sshtar -xvf ssh.tar修改用户密码为永不过期:/usr/bin/chage -E -1 -M -1 grid/usr/bin/chage -E -1 -M -1 oracle4.3验证GI安装环境./runcluvfy.sh stage -pre crsinst -n maesdb01plk,maesdb02plk -fixup -verbose 输出结果最后一行必须为:Pre-check for cluster services setup was successful.如果是unsuccessful字样,必须修正所有failed项。
4.4安装磁盘补丁补丁在解压后的软件介质中/oracle/software/grid/rpm安装cvuqdisk-1.0.9-1.rpm[root@oracletest01 rpm]# lltotal 12-rw-r--r-- 1 grid oinstall 8288 Aug 26 2013 cvuqdisk-1.0.9-1.rpm[root@oracletest01 rpm]# rpm -ivh cvuqdisk-1.0.9-1.rpm4.5GI和数据库安装4.5.1GI软件安装gi安装.docx附件5:4.5.2DB软件安装db安装.docx附件6:4.5.3下载补丁补丁放置路径:ftp 10.21.33.30: /app/software/oracle/oracle_for_linux/ 11.2.0.4.160419/combo_ojvm_gi/ p2*******_112040_Linux-x86-64.zip2016年4月的combo补丁4.5.4安装GI补丁附件7:4.5.5安装DB补丁附件8:4.5.6DG创建dg创建.docx附件9:4.5.7数据库实例创建数据库创建.docx附件10:4.5.8监听器创建监听创建.docx附件11:5数据库调整5.1SQL环境变量调整在$ORACLE_HOME/sqlplus/admin/glogin.sql文件末尾,添加如下行:set linesize 200 pagesize 1000set sqlprompt "_user'@'_connect_identifier> "set timing ondefine_editor=vi5.2表空间调整(oracle用户执行)调整system,sysaux ,undo ,users,temp等表空间大小#vi chtbs.shfor i in ubdoexport ORACLE_SID=$i'abps1'sqlplus -S /nolog<<EOFset heading off;set feedback off;set verify off;set echo off;set linesize 200;set timing off;spool /home/oracle/shell/altertbs.sqlselect 'alter database datafile '''||file_name||''' resize 2G;' from dba_data_files where file_name like '%system%';select 'alter database datafile '''||file_name||''' resize 5G;' from dba_data_files where file_name like '%sysaux%';select 'alter database datafile '''||file_name||''' resize 6G;' from dba_data_files where file_name like '%undotbs1%';select 'alter database datafile '''||file_name||''' resize 6G;' from dba_data_files where file_name like '%undotbs2%';select 'alter database datafile '''||file_name||''' resize 512M;' from dba_data_files where file_name like '%users%';select 'alter database tempfile '''||file_name||''' resize 4G;' from dba_temp_files where file_name like '%temp%';spool off;@/home/oracle/shell/altertbs.sqlexit;EOFDone建议将临时表空间修改为表空间组。
附件12:临时表空间组创建.docx5.3REDO调整(oracle用户执行)在archivelog 模式下运行#vi chredo.shfor i in ubdoexport ORACLE_SID=$i'abps1'up=`echo $i | tr "[:lower:]" "[:upper:]"`NAME1='+ABPS01DG'NAME2='+ABPS01FRADG'echo $NAME1 $NAME2sqlplus -S /nolog<<EOFalter database add logfile thread 1 group 10 ('$NAME1','$NAME2') SIZE 512M;alter database add logfile thread 1 group 11 ('$NAME1','$NAME2') SIZE 512M;alter database add logfile thread 1 group 12 ('$NAME1','$NAME2') SIZE 512M;alter database add logfile thread 1 group 13 ('$NAME1','$NAME2') SIZE 512M;alter database add logfile thread 1 group 14 ('$NAME1','$NAME2') SIZE 512M;alter database add logfile thread 2 group 20 ('$NAME1','$NAME2') SIZE 512M;alter database add logfile thread 2 group 21 ('$NAME1','$NAME2') SIZE 512M;alter database add logfile thread 2 group 22 ('$NAME1','$NAME2') SIZE 512M;alter database add logfile thread 2 group 23 ('$NAME1','$NAME2') SIZE 512M;alter database add logfile thread 2 group 24 ('$NAME1','$NAME2') SIZE 512M;alter system switch logfile;alter system switch logfile;alter system switch logfile;alter system checkpoint;alter system checkpoint;alter system checkpoint;alter database drop logfile group 1;alter database drop logfile group 2;alter database drop logfile group 3;alter database drop logfile group 4;exit;EOFDone5.4修改LOCAL_LISTENER(oracle用户执行)alter system set local_listener='(DESCRIPTION=(ADDRESS_LIST=(ADDRESS=(PROTOCOL=TCP)(HOST=10.20.9.153)( PORT=10029))))' scope=both sid='ubabps1';alter system set local_listener='(DESCRIPTION=(ADDRESS_LIST=(ADDRESS=(PROTOCOL=TCP)(HOST=10.20.9.154)( PORT=10029))))' scope=both sid='ubabps2';alter system set remote_listener='' scope=both;5.5数据库安全配置相关5.5.1安全基线和日志缺省目录(DB,oracle用户执行)#vi chaudit.shfor i in ubdoexport ORACLE_SID=$i'abps1'sqlplus -S /nolog<<EOFconnect / as sysdba;@?/rdbms/admin/utlpwdmg.sqlCREATE PROFILE sec_profile LIMITFAILED_LOGIN_ATTEMPTS 10PASSWORD_LIFE_TIME 90PASSWORD_REUSE_TIME 300PASSWORD_REUSE_MAX 10PASSWORD_LOCK_TIME 1PASSWORD_GRACE_TIME 7PASSWORD_VERIFY_FUNCTION verify_function_11g;alter profile default limit PASSWORD_LIFE_TIME unlimited; alter system set audit_sys_operations=TRUE scope=spfile; alter system set audit_trail=OS scope=spfile;alter system set diagnostic_dest='/$i/oracle';alter system set audit_file_dest='/$i/oracle/audit' scope=spfile; exit;EOFDone5.5.2修改监听器配置修改$ORACLE_HOME/network/admin/listener.ora文件,添加ADMIN_RESTRICTIONS_SDABPS=ONADMIN_RESTRICTIONS_UZABPS=ONADMIN_RESTRICTIONS_AXABPS=ONADMIN_RESTRICTIONS_XZABPS=ONADMIN_RESTRICTIONS_UBABPS=ONADMIN_RESTRICTIONS_SHABPS=ONADMIN_RESTRICTIONS_XJABPS=ONADMIN_RESTRICTIONS_SXABPS=ONADMIN_RESTRICTIONS_SZABPS=ON5.5.3审计日志处理oracle审计日志打包压缩# vi /oracle/shell/comaud.shecho `date +%Y-%m-%d` >> /home/oracle/comaud.logfor i in sd ub xj sx ax sh uz sz xzdoSID=$i"abps"AUDPATH=/$i/oracle/auditcd $AUDPATHfind . -name "*.aud" -mtime +0 -print|cpio -covB > $AUDPATH/$SID.aud.`date +%Y%m%d`.cpiofind . -name "*.aud" -mtime +0 -exec rm -rf {} \;gzip $AUDPATH/*.cpiochown oracle:oinstall $AUDPATH/*.cpio.Zdonegrid审计日志打包压缩# vi /oracle/shell/comaud_grid.shecho `date +%Y-%m-%d` >> /home/grid/comaud.logAUDPATH=/gridiag/auditcd $AUDPATHfind . -name "*.aud" -mtime +0 -print|cpio -covB > $AUDPATH/audgrid.`date +%Y%m%d`.cpio find . -name "*.aud" -mtime +0 -exec rm -rf {} \;gzip $AUDPATH/*.cpiochown oracle:oinstall $AUDPATH/*.cpio.Z设置定时作业crontab -e#oracle audit file archvie00 02 * * * sh /oracle/shell/comaud.sh >/dev/null 2>&100 03 * * * sh /oracle/shell/comaud_grid.sh >/dev/null 2>&15.5.4安装自动审计脚本使用root用户操作scp 10.20.9.151:/audit_clic/audit.tar /audit_clic/密码BjKu8FF3cd /audit_clictar –xvf /audit_clic/audit.tar配置定时作业crontab -e#audit every month00 19 24 * * sh /audit_clic/blch >/dev/null 2>&100 20 24 * * sh /audit_clic/blchdb151 >/dev/null 2>&1(数据库审计的脚本只需在一个节点设置)5.6调整snapshotvi snapshot.shfor i in andoexport ORACLE_SID=$i'abps1'echo $ORACLE_SIDINS=$i'abps'SNAP='snapcf_'$i'abps.f'rman target /<<EOFshow snapshot controlfile name;configure snapshot controlfile name to '+abps02dg/$INS/$SNAP'; show snapshot controlfile name;exit;EOFdone。
