Windows窗体界面设计【精选】
第5章 窗体
使用自动窗体功能
使用向导功能 使用设计视图
需告知窗体上数据的来源(数据源)。 数据源形式:表、基于表的查询 字段通常以文本框控件的形式出现在窗体上
5.2.1使用自动窗体创建窗体
【例5.1】使用自动窗体方式创建“教师信 息表”的纵栏式窗体。
说明: 窗体与“教师信息表” 相连, 窗体上的文本框等控件 又与“教师信息表”表中相
3. 移动控件 选择一个或多个要移动的控件;选择“编辑”|“剪切”命令, 或单击工具栏上的“剪切”按钮;将鼠标移动到要复制的节 位置处,单击鼠标左键;选择“编辑”|“粘贴”命令,或单 击工具栏上“粘贴”按钮,即可完成移动控件的操作。 使用鼠标拖动移动控件的操作步骤:选择一个或多个要移动 的控件;将鼠标移动到选中控件的边框处,当鼠标指针变为 手掌形状时,按下鼠标左键,将控件拖动到所需位置即可。 4. 删除控件 选择一个或多个要删除的控件,选择“编辑”|“删除”命令 或按Del键。 5. 对齐控件 选择多个要对齐的控件,选择“格式”|“对齐”命令项,在 子命令项中选择“靠左”、“靠右”、“靠上”、“靠下” 和“对齐网格”中的一项,来完成对齐控件的操作。
【说明】单击选中姓名文本框,则姓名文本框 及其左侧系统自动添加的姓名标签会一同被选 定(图5.47)。移动鼠标,当鼠标箭头变成手 掌形状时,按住鼠标左键可同时移动该文本框 及其附加标签;若点击文本框/附加标签左上角 的黑色实心方框,按住鼠标左键即可单独移动 文本框/附加标签。
补充 文本框
[例] (1)设计窗体
3. 方法(Method) 方法是对象能够执行的动作或完成的操作,它是附属于对 象的行为和动作,也可以将其理解成指示对象动作的命令。 如立即窗口对象具有Print方法。 调用方法的语法格式: [对象名].方法名 方法是面向对象的,所以方法的调用一般要指明对象。 4. 事件(Event) 事件是能被对象识别和响应的动作,有用户事件和系统事 件。一个对象可以识别和响应一个或多个事件。事件过程 是某个对象事件发生时,系统响应后执行代码序列的过程。 如果没有编写事件过程,则当相应事件发生时,系统不做 任何响应。 窗体和窗体上的控件都是对象,其中窗体的标题、大小、前 景色和背景颜色等都是窗体对象的属性;Access中的事件 主要有键盘事件、鼠标事件、对象事件、窗口事件和操作 事件等。
C#2010 Windows窗体界面技术
C#2010 Windows窗体界面技术
在.NET Framework开发中,Windows窗体是一种特殊的类,其本身可以像普通类一样使用。
典型的Windows窗体包括标准SDI窗体(单文档窗体)、MDI(多文档窗体)、对话框以及图形窗口等,这些窗体的创建和添加、窗体的大小和比例、窗体外观等形状,事实上都是Windows窗体类的属性。
Windows窗体提供执行许多功能的控件和组件,绝大多数Windows窗体控件都是派生于System.Windows.Forms.Control类,该类定义了控件的基本功能,因此为众多Windows窗体控件所继承。
在Windows窗体控件中,许多类本身都是其他控件的基类,但每组控件都有一组属性、方法和事件,用于特定的目的。
当设计和修改Windows窗体应用程序的用户界面时,需要对控件进行添加、对齐和定位等操作。
控件是包含在窗体对象内的实例,每种类型的控件都具有自己一些特定的属性集、方法和事件,从而实现与其他控件的区别。
在使用Windows窗体控件时,开发者既可以在设计器界面中操作控件,也可以在编写代码时动态地添加控件。
简单的说,控件是一种特殊的对象,是显示数据和接受数据输入的相对独立的用户界面元素。
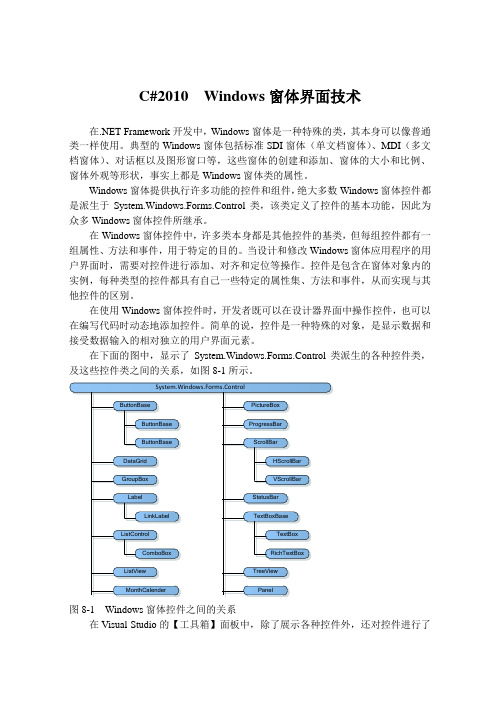
在下面的图中,显示了System.Windows.Forms.Control类派生的各种控件类,及这些控件类之间的关系,如图8-1所示。
图8-1 Windows窗体控件之间的关系
在Visual Studio的【工具箱】面板中,除了展示各种控件外,还对控件进行了
分类处理,将控件分为以下几种类型,如表8-1所示。
表8-1 Windows窗体控件分类。
windows11窗体圆角阴影实现原理

windows11窗体圆角阴影实现原理Windows 11窗体圆角阴影实现原理Windows 11的设计中,窗体的圆角和阴影效果给人一种更加现代、柔和的视觉感受。
这种设计元素的实现,需要一些技术原理的支持。
本文将介绍Windows 11窗体圆角阴影的实现原理。
让我们先来了解一下什么是窗体的圆角和阴影效果。
所谓圆角,就是窗体的边角不再是直角,而是圆滑的曲线。
而阴影效果,则是指窗体周围有一层模糊的阴影,给人一种窗体浮起来的感觉。
这样的设计风格可以使窗体看起来更加立体、真实。
实现窗体的圆角和阴影效果,一般需要借助图形处理技术和硬件加速等技术手段。
具体来说,主要有以下几个步骤:1. 窗体的圆角效果实现在Windows 11中,窗体的圆角效果是通过对窗体的边界进行裁剪来实现的。
具体来说,当窗体创建完成后,系统会根据窗体的位置和大小等信息计算出窗体的边界,然后使用图形处理技术将窗体的边界进行裁剪,使得窗体的边角变得圆滑。
2. 窗体的阴影效果实现窗体的阴影效果是通过在窗体周围添加一个图层来实现的。
这个图层的形状和窗体的形状是一致的,但是比窗体的尺寸要稍微大一些。
然后,在这个图层上应用模糊效果,使得图层的边缘变得模糊,形成阴影效果。
最后,将这个图层放置在窗体的下方,使得窗体的阴影在底部显示出来。
3. 硬件加速的支持为了能够在实时操作下实现窗体的圆角和阴影效果,Windows 11使用了硬件加速技术来提高性能。
通过利用现代显卡的图形处理能力,可以更快地进行图形绘制和处理,从而实现窗体的圆角和阴影效果。
总结一下,Windows 11窗体的圆角和阴影效果是通过裁剪窗体边界和添加模糊图层来实现的。
这种设计风格使得窗体看起来更加现代、柔和,给用户带来更好的视觉体验。
同时,利用硬件加速技术可以提高性能,使得圆角和阴影效果可以在实时操作下得到保持。
通过这样的设计,Windows 11打造了一个更加美观、流畅的操作界面,提升了用户的使用体验。
C_Winform程序设计1Windows窗体介绍

创建窗体 为窗体添加控件 创建继承窗体 组织窗体上的控件 窗体的用途:自定义窗口 窗体的用途:创建多文档界面应用程序
Windows 窗体和 Web 窗体
创建窗体 设置窗体属性 窗体生命周期 处理窗体事件 Windows 窗体设计器生成的代码
特点
部署 图形
平台 编程模型 安全性
在其代码访问安全性实现中使用 通过验证请求者的凭据, 粒度权限,以保护计算机资源和 按URL控制获得访问Web应用 敏感信息 程序资源的授权
创建一个新的项目的同 时也创建了一个窗体
创建一个新窗体
1.
在解决方案资源管理 器中右键点击 “项 目”
单击“添加” 单击“添加Windows 窗体”
Windows窗体
可不必改注册表运行 GDI+
Web窗体
不需要下载和安装 交互或动态图形的更新需 要往返于服务器
响应
为需要交互的应用程序提供最快 可以利用浏览器的动态 的响应速度 HTML(DHTML)功能来创建丰 富的用户界面(UI)
要求在客户计算机上运行 .NET Framework 基于客户端Win32消息模式 只需浏览器 通过HTTP调用应用程序组 件
SDI
MDI
只有一个文档是可见的 打开一个文档之前,你必须关 闭另一个
同时显示多个文档 每个文档显示在它自己的窗口 中
• 创建一个父窗体
– 创建一个新项目 – 设置IsMdiContainer属性为True – 添加一个菜单项,来触发子窗体
• 创建一个子窗体
– 向项目添加一个新的窗体
• 从父窗体调用子窗体
2. 3.
窗体名:项目中窗体的名称
第10课《WINDOWS桌面及窗口》(共16张PPT)

注意:与打开对话框 不同的是,文件名可以直接输入到文件名框里;在确定了存放位置、文件名、文件类型以后单击“保存”按钮。
(3)带标签对话框。
一个标签代表对话框的一个表现形式说明: 带标签对话框相当于是把多个相关对话框放在了一起,使一个对话框能表示更多的信息。
标签
课堂小结
1、知识点快捷方式:表示一个程序。任务栏:位于桌面最下方的区域。任务栏组成:开始按钮、快速启动区、打开窗口按钮、指示区。
小结任务一(续)
2、操作结果双击快捷方式 单击快速启动区 打开输入法菜单鼠标指向时间/日期 右击桌面上任何对象 单击任务栏打开窗口按钮
打开对应的程序窗口
打开对应程序的窗口
文件类型框
显示文件类型
单击箭头,再单击列表对象选择文件类型
打开按钮
打开文件
单击按钮
任务三
在“画图”窗口中打开“我的文档”文件夹中的“Blue hills”图片,文件类型为.JPG。然后完成下边连线。
步骤
操作方法
操作说明
(1)
单击“打开”按钮
选择文件位置
(2)
单击箭头按钮,在列表中单击“我的文档”
显示日期
单击输入法按钮
打开快捷菜单
任务二
从桌面打开”我的电脑”和”回收站”观察任务栏里的变化。用鼠标单击任务栏里的“我的电脑”和“回收站”图标,会出现什么结果?并记录结果。
二、窗口的菜单操作
1、认识菜单,并介绍菜单命令类型:窗口的菜单栏列出的各项菜单项:菜单里的每一项
命令类型
菜单项
3、对话框的操作
(1)“打开”对话框
小提示:对话框是一种特殊的窗口
查找范围框
列表框
window配色方案

window配色方案随着科技的快速发展,计算机已经成为了我们生活中必不可少的一部分。
每个人都有自己喜欢的计算机操作系统和软件,其中Windows操作系统无疑是最为广泛使用的之一。
而在Windows系统中,配色方案是用户个人化设置的一项重要功能。
配色方案可以改变计算机界面的外观和颜色,使得用户在使用计算机时感到更加舒适和愉悦。
一个好的配色方案能够提升用户的使用体验,让他们更加喜欢使用Windows系统。
在这篇文章中,我们将讨论一些常见的Windows配色方案以及如何选择适合自己的配色方案。
首先,我们来看一些经典的Windows配色方案。
Windows系统提供了多个预设的配色方案供用户选择。
其中,"蓝天白云"配色方案是最为经典的之一。
它将窗口的背景颜色设置为浅蓝色,文字颜色为纯白色,使得整个界面呈现出明亮清爽的感觉。
这种配色方案适合喜欢简洁和轻松感的用户。
除了"蓝天白云",Windows系统还提供了其他几种经典配色方案,如"银色之间"和"黑色追随者"等。
这些配色方案以其独特的色调和风格吸引了一大批用户。
比如,"银色之间"将窗口背景颜色设置为银灰色,与白色的文本形成鲜明对比,给人一种时尚而高贵的感觉。
而"黑色追随者"则将窗口背景颜色设置为深黑色,适合那些喜欢神秘和低调的用户。
然而,仅仅依赖预设的配色方案是不够的。
每个人的审美观和使用习惯不同,因此选择一个适合自己的配色方案是非常重要的。
在Windows系统中,用户可以自定义配色方案,根据自己的喜好和需求来调整窗口颜色、文字颜色和窗口特效等。
自定义的配色方案可以让用户的计算机界面独一无二,体现个人品味和独特性。
那么,如何选择适合自己的配色方案呢?首先,要考虑自己的喜好和审美观。
每个人对颜色的偏好是不同的,有的人喜欢明亮、活泼的颜色,而有的人则更喜欢柔和、温暖的颜色。
c#Windows窗体应用程序设计

一个Windows应用程序可以包含多个窗体。
窗体类型 在C#中,窗体分为如下两种类型: (1)普通窗体,也称为单文档窗体(SDI),前面所有创建的窗体均为普
通窗体。普通窗体又分为如下两种: ● 模式窗体。这类窗体在屏幕上显示后用户必须响应,只有在它关闭后才
Program.cs文件 :
using System; using System.Collections.Generic; using System.Windows.Forms; namespace Proj8_1 { static class Program
{ /// <summary> /// 应用程序的主入口点。 /// </summary> [STAThread] static void Main() { Application.EnableVisualStyles(); Application.SetCompatibleTextRenderingDefault(false); Application.Run(new Form1()); //启动窗体为Form1 }
///否则为false。</param>
protected override void Dispose(bool disposing) //重写基类Dispose()方法
{ if (disposing && (components != null))
{
components.Dispose();
} base.Dispose(disposing); //调用基类的Dispose()方法
第8章 Windows窗体

8.6 单选按钮和复选框
单选按钮和复选框就是RadioButton和CheckBox控件,实际上RadioButton 和CheckBox控件与按钮控件有相同的基类,只是它们的外观和用法大不相同。 传统上,单选按钮显示为一个标签,左边是一个圆点,该点可以是选中或未选 中分在要给用户提供几个互斥选项时,就可以使用单选按钮。例如,询问用户的 性别。 把单选按钮组合在一起,给它们创建一个逻辑单元,此时必须使用GroupBox 控件。首先在窗林上拖放一个该组框,再把需要的RadioButton按钮放在组框的 边界之内,RadioButton就会知道如何改变自己的状态,以反映组框中惟一被选 中的选项。如果不把它们放在组框中,则在任意时刻,窗体不会只有一个 RadioButton被选中。 传统上,CheckBox显示为一个标签,左边是一个带有标记的小方框。在希望 用户可以选择一个或多个选项时,就应使用复选框。例如询问用户要使用的操作 系统(如Windows 2000,Windows XP, Linux等)
8.1 Windows窗体简介
删除窗体的方法非常简单,只需要在要删除的窗体名称上单击鼠标右键, 再弹出的快捷菜单中选择“删除”命令,即可将窗体删除,如图8-9所示。
8.1 Windows窗体简介
8.1.3 设置启动窗体属性 一个完整的Windows应用程序是由多个窗体组成的,比如一个图书管理系统,就 有登录窗口、主窗口、查询窗口等多个窗口。多个窗口的建立是向项目中添加多个窗 体,具体添加方法可以参照在8.1.2窗体的创建与删除。 当向项目中添加了多个窗体以后,如果要调试运行程序,必须要设置先运行的窗 体。这样就需要设置项目的第一个启动窗体。项目的启动窗体时在Program.cs文件中 设置,在Program.cs文件中改变Run方法的参数,即可实现设置启动窗体。 Program.cs中主要的代码片断如下: [STAThread] static void Main() { Application.EnableVisualStyles(); Application.SetCompatibleTextRenderingDefault(false); Application.Run(new Form1()); }
winform ui界面设计例程

winform ui界面设计例程WinForms 是一个用于创建 Windows 应用程序的桌面应用程序框架,它提供了丰富的用户界面设计功能。
在 WinForms 中,你可以使用 Visual Studio 或者其他集成开发环境来创建 UI 界面。
下面我将从创建新项目、设计界面、添加控件和事件处理等方面来介绍 WinForms UI 界面设计的例程。
首先,你可以打开 Visual Studio,并选择创建一个新的WinForms 项目。
在创建项目的过程中,你可以选择项目的名称和保存位置等信息。
创建完成后,你会看到一个空白的窗体(Form)出现在你的项目中。
接下来,你可以开始设计界面。
在窗体上拖放控件,比如按钮、文本框、标签等,来构建你的界面布局。
你可以使用属性窗格来调整控件的属性,比如大小、位置、颜色等。
你还可以使用布局管理器来帮助你更好地管理控件的布局。
除了基本的控件外,你还可以使用自定义控件或者第三方控件来丰富你的界面设计。
这些控件可以帮助你实现更复杂的功能和更美观的界面效果。
在界面设计完成后,你可以添加事件处理程序来响应用户的操作。
比如,当用户点击按钮时,你可以编写代码来处理按钮的点击事件,执行相应的操作。
除了界面设计,你还可以在 WinForms 中实现数据绑定、图形绘制、动画效果等功能。
这些功能可以帮助你实现更丰富的用户界面交互体验。
总的来说,WinForms 提供了丰富的工具和功能来帮助你设计和实现 Windows 应用程序的用户界面。
通过合理的布局和控件选择,结合事件处理和其他功能,你可以创建出功能丰富、美观的 UI 界面来满足用户需求。
希望这些信息能对你有所帮助。
visual studio 窗体设计案例参考
Visual Studio 窗体设计案例参考
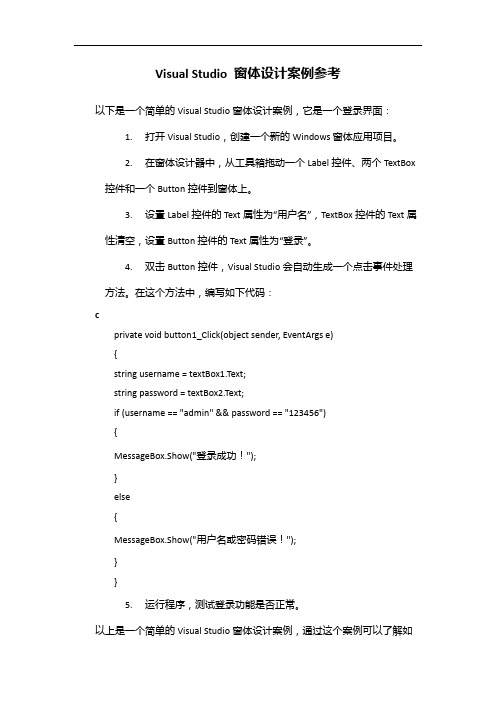
以下是一个简单的Visual Studio窗体设计案例,它是一个登录界面:
1.打开Visual Studio,创建一个新的Windows窗体应用项目。
2.在窗体设计器中,从工具箱拖动一个Label控件、两个TextBox 控件和一个Button控件到窗体上。
3.设置Label控件的Text属性为“用户名”,TextBox控件的Text属性清空,设置Button控件的Text属性为“登录”。
4.双击Button控件,Visual Studio会自动生成一个点击事件处理方法。
在这个方法中,编写如下代码:
c
private void button1_Click(object sender, EventArgs e)
{
string username = textBox1.Text;
string password = textBox2.Text;
if (username == "admin" && password == "123456")
{
MessageBox.Show("登录成功!");
}
else
{
MessageBox.Show("用户名或密码错误!");
}
}
5.运行程序,测试登录功能是否正常。
以上是一个简单的Visual Studio窗体设计案例,通过这个案例可以了解如
何使用Visual Studio设计窗体界面和添加控件,以及如何编写事件处理方法。
当然,实际应用中窗体设计会更加复杂,需要更多的控件和事件处理方法来完成功能。
C#程序设计_教学设计_单元5_Windows窗体
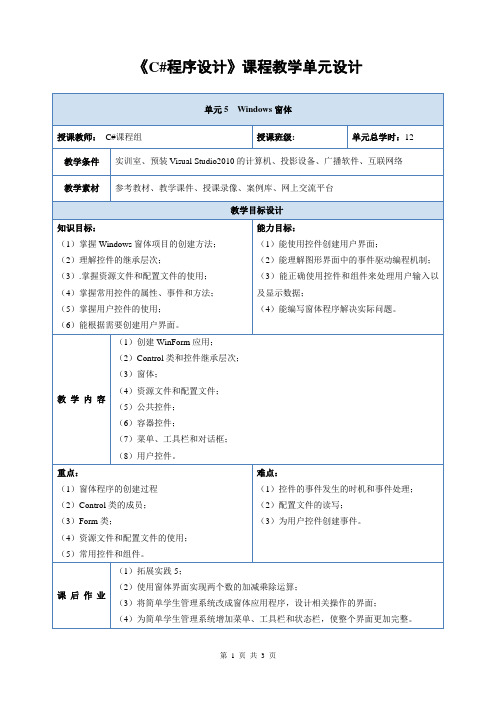
难点:
(1)控件的事件发生的时机和事件处理;
(2)配置文件的读写;
(3)为用户控件创建事件。
课后作业
(1)拓展实践5;
(2)使用窗体界Βιβλιοθήκη 实现两个数的加减乘除运算;(3)将简单学生管理系统改成窗体应用程序,设计相关操作的界面;
(4)为简单学生管理系统增加菜单、工具栏和状态栏,使整个界面更加完整。
引例演示
启发引入
多媒体
软件演示
教师:操作演示
学生:观察思考
知识
讲解
知识点1:菜单、工具栏、状态栏;
知识点2:对话框;
知识点3:自定义对话框
知识点4:多文档窗体。
启发讲解
操作演示
分组讨论
多媒体
软件演示
教师:启发讲授
操作演示
学生:交流互动
分组讨论
整理笔记
实践
训练
为“简单记事本”增加功能:1.实现查找和替换;2.实现选项功能,保存用于设置和保存记事本默认的背景色、前景色、字体等信息。
知识点5:资源文件和配置文件。
启发讲解
操作演示
分组讨论
多媒体
软件演示
教师:启发讲授
操作演示
学生:交流互动
分组讨论
整理笔记
实践
训练
实现图形界面的“猜数字”游戏。
讲练结合
一体化
学生:实践操作
教师:巡视指导
归纳
总结
1.实践训练完成情况。
2.实践训练存在的问题。
3.知识要点:
(1)窗体程序及控件的特点
(2)控件的继承和共有属性、方法和事件;
讲练结合
一体化
学生:实践操作
常用WINDOWS窗体控件

§4.5 单项选择按钮控件
单项选择按钮(RadioButton)控件是让顾客在 一组选项中选定一项且只能选中一项。若窗体内仅有 一组RadioButton控件,则可将它们简朴旳放置在窗 体内,但假如在同一窗体中有多组RadioButton时, 则需要将其放置到框架(GroupBox)控件中。
§4.6 复选框控件
MultiLIne:控制选项卡是否能够以多行旳形式显示。
Alignment:控制选项卡旳排列方式,可选值有Left、 Right、Top和Bottom四个。
§4.11 计时器控件
也被称为时钟(Timer)控件,它旳作用是按照原则 时间间隔引发计时器事件旳组件。
计时器常用属性有两个: Enabled: 设置计时器控件是否可用,可选值为True或 False
案例讲解
【案例4-2】基本控件旳使用。制作一种包括两页 选项卡旳Windows应用程序,其中一页包括进度 条和滚动条控件,另一页包括列表框和下拉框控 件。
作业:
1、掌握本章基础概念 2、掌握本章案例
Interval: 设置时间间隔值。Interval旳值须介于 1~65535之间。每单位为1ms。
计时器只有一个Tick事件,若启用Timer控件,则 每个Interval间隔就会引发一次Tick事件。
§4.12 滚动条控件
滚动条控件又可分为水平滚动条(HScrollBar) 和垂直滚动条(VScrollBar)两类。能够在应用程序 旳窗体或控件容器中水平或垂直滚动,以便查阅大 篇幅旳信息。
§4.3 命令按钮控件
命令按钮(Button)控件也是应用程序经常用 到旳控件之一,它主要接受鼠标单击或双击事件。单 击命令按钮就会触发该按钮旳Click事件,从而程序 就会进入到写好旳事件过程下。
windows窗体应用程序设计实验报告

windows窗体应用程序设计实验报告Windows窗体应用程序设计实验报告一、实验目的本次实验的主要目的是让学生掌握Windows窗体应用程序的设计方法和技巧,了解Windows窗体应用程序的基本结构和运行原理,能够熟练使用Visual Studio等开发工具进行程序设计和调试。
二、实验内容本次实验的主要内容包括以下几个方面:1. 熟悉Windows窗体应用程序的基本结构和运行原理。
2. 学习使用Visual Studio等开发工具进行程序设计和调试。
3. 设计一个简单的Windows窗体应用程序,实现基本的界面设计和功能实现。
三、实验步骤1. 熟悉Windows窗体应用程序的基本结构和运行原理。
Windows窗体应用程序是一种基于Windows操作系统的图形用户界面应用程序,它采用了Windows窗体技术,可以实现丰富的用户界面和交互功能。
Windows窗体应用程序的基本结构包括窗体、控件、事件等,其中窗体是应用程序的主界面,控件是窗体中的各种元素,事件是控件与用户交互的响应动作。
Windows窗体应用程序的运行原理是通过.NET Framework提供的Windows Forms 类库实现的,它可以在Windows操作系统上运行,并且可以与其他.NET应用程序进行交互。
2. 学习使用Visual Studio等开发工具进行程序设计和调试。
Visual Studio是一款强大的集成开发环境,可以支持多种编程语言和应用程序类型的开发。
在本次实验中,我们使用Visual Studio 进行Windows窗体应用程序的设计和调试。
具体步骤如下:(1)打开Visual Studio,选择“新建项目”,选择“Windows 窗体应用程序”,命名为“HelloWorld”。
(2)在窗体中添加一个标签控件,设置其文本为“Hello World!”。
(3)在窗体中添加一个按钮控件,设置其文本为“点击我”。
(4)在按钮的Click事件中添加代码,使得点击按钮时标签的文本发生变化。
第9章Windows程序的界面设计
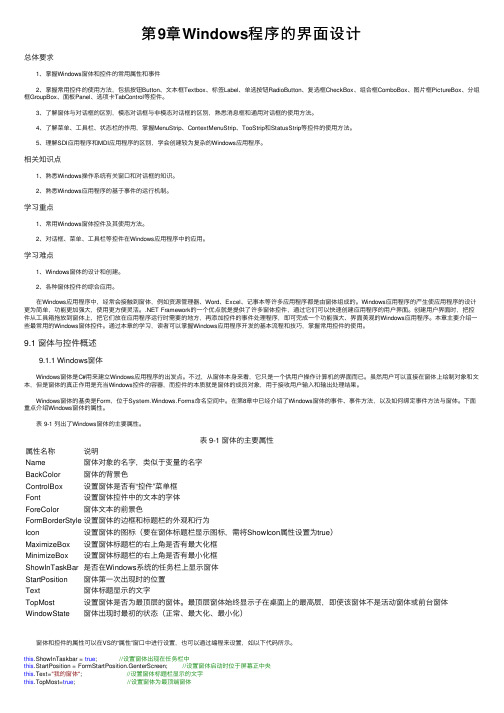
第9章Windows程序的界⾯设计总体要求 1、掌握Windows窗体和控件的常⽤属性和事件 2、掌握常⽤控件的使⽤⽅法,包括按钮Button、⽂本框Textbox、标签Label、单选按钮RadioButton、复选框CheckBox、组合框ComboBox、图⽚框PictureBox、分组框GroupBox、⾯板Panel、选项卡TabControl等控件。
3、了解窗体与对话框的区别,模态对话框与⾮模态对话框的区别,熟悉消息框和通⽤对话框的使⽤⽅法。
4、了解菜单、⼯具栏、状态栏的作⽤,掌握MenuStrip、ContextMenuStrip、TooStrip和StatusStrip等控件的使⽤⽅法。
5、理解SDI应⽤程序和MDI应⽤程序的区别,学会创建较为复杂的Windows应⽤程序。
相关知识点 1、熟悉Windows操作系统有关窗⼝和对话框的知识。
2、熟悉Windows应⽤程序的基于事件的运⾏机制。
学习重点 1、常⽤Windows窗体控件及其使⽤⽅法。
2、对话框、菜单、⼯具栏等控件在Windows应⽤程序中的应⽤。
学习难点 1、Windows窗体的设计和创建。
2、各种窗体控件的综合应⽤。
在Windows应⽤程序中,经常会接触到窗体,例如资源管理器、Word、Excel、记事本等许多应⽤程序都是由窗体组成的。
Windows应⽤程序的产⽣使应⽤程序的设计更为简单,功能更加强⼤,使⽤更⽅便灵活。
.NET Framework的⼀个优点就是提供了许多窗体控件,通过它们可以快速创建应⽤程序的⽤户界⾯。
创建⽤户界⾯时,把控件从⼯具箱拖放到窗体上,把它们放在应⽤程序运⾏时需要的地⽅,再添加控件的事件处理程序,即可完成⼀个功能强⼤、界⾯美观的Windows应⽤程序。
本章主要介绍⼀些最常⽤的Windows窗体控件。
通过本章的学习,读者可以掌握Windows应⽤程序开发的基本流程和技巧,掌握常⽤控件的使⽤。
界面设计指南:窗体
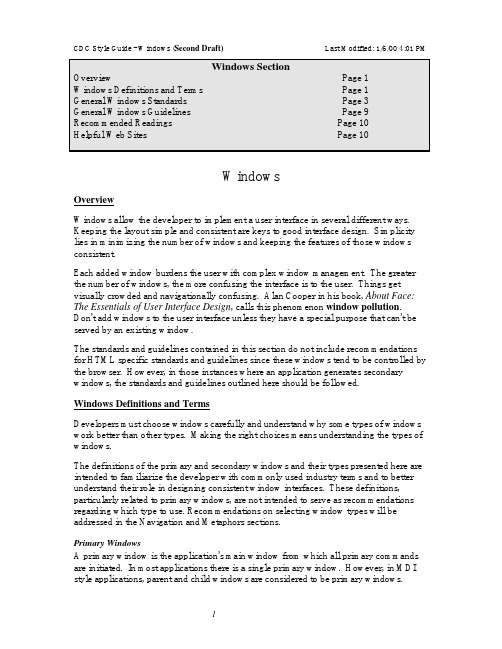
Windows Section1 Overview Page Windows Definitions and Terms Page 1General Windows Standards Page 3General Windows Guidelines Page 9Recommended Readings Page 10Helpful Web Sites Page 10WindowsOverviewWindows allow the developer to implement a user interface in several different ways.Keeping the layout simple and consistent are keys to good interface design. Simplicitylies in minimizing the number of windows and keeping the features of those windowsconsistent.Each added window burdens the user with complex window management. The greaterthe number of windows, the more confusing the interface is to the user. Things getvisually crowded and navigationally confusing. Alan Cooper in his book, About Face:The Essentials of User Interface Design, calls this phenomenon window pollution.Don't add windows to the user interface unless they have a special purpose that can't beserved by an existing window.The standards and guidelines contained in this section do not include recommendationsfor HTML specific standards and guidelines since these windows tend to be controlled bythe browser. However, in those instances where an application generates secondarywindows, the standards and guidelines outlined here should be followed.Windows Definitions and TermsDevelopers must choose windows carefully and understand why some types of windowswork better than other types. Making the right choices means understanding the types ofwindows.The definitions of the primary and secondary windows and their types presented here areintended to familiarize the developer with commonly used industry terms and to betterunderstand their role in designing consistent window interfaces. These definitions,particularly related to primary windows, are not intended to serve as recommendationsregarding which type to use. Recommendations on selecting window types will beaddressed in the Navigation and Metaphors sections.Primary WindowsA primary window is the application's main window from which all primary commandsare initiated. In most applications there is a single primary window. However, in MDIstyle applications, parent and child windows are considered to be primary windows.Single Document Interface (SDI)An SDI is a single primary window that usually contains a menu bar, toolbar andstatus bar. This provides a one-to-one relationship between the object and thewindow. Opening an SDI puts the window at the top of all other current windows and places an entry on the task bar. Examples include Microsoft Notepad andWordPad.Multiple Document Interface (MDI)An MDI is a collection of related object windows or child windows within asingle frame or parent window. The parent window almost always contains amenu bar, toolbar and status bar. MDI style applications can be used to presentmultiple views of the same data or multiple views of related data. Each childwindow shares interface elements on the parent window. This approach issuitable for large applications where users need the ability to multi-task and have the skills to manage all of the windows. Examples include Microsoft Word,Excel, and Visual Basic.Split Document Interface (split SDI or Explorer)A split SDI is a single primary window that has a window splitter, with the optionof a menu bar, toolbar, and status bar. The splitter provides for the ability to add a second view of an object or, have a tree view or list view to control the contentsthat are in each side of the window. This approach works well when the userperceives objects to be in a hierarchical order. Examples include WindowsExplorer and Outlook.Secondary WindowsA secondary window is used to provide supplemental information or interaction to a primary window. Interfaces are simpler with fewer secondary windows.Modal dialog boxesA secondary window used to collect additional information related to the primarywindow. The user must complete or dismiss the dialog before being allowed toreturn to the primary window.Modeless dialog boxesA secondary window typically used to interact with the primary window. Theuser may change focus between the secondary window and the primary window at will.Property sheetA property sheet is a modeless secondary window that displays user-accessibleproperties of some object. These properties are viewable but not necessarilyeditable. Property sheets typically have tabs to organize the property information.General Windows StandardsThe following windows standards are to be adopted across all CDC software applications. These standards should lead to a more consistent and usable interface.Windows will be designed to fit a screen resolution of 800w x 600hCDC developers will design their windows to fit within a minimum screenresolution of 800 x 600. Users, however, must maintain the ability to set theirscreen resolution to any size.CDC applcations will be maximized by default upon opening for the first time.Subsequent openings will return the primary window to the size previouslydetermined by the userThe application will “remember” the users last setting and return to it uponopening the application so as to provide the user with control over the interaction.Secondary windows will be no larger than 7380w x 6390h (twip measurement)This maximum size will keep windows from becoming too large at some screenresolutions, but still provide enough space to display the supplementalinformation. Note: A twip is defined as screen independent unit used to ensurethat placement and proportion of screen elements in the screen application are the same on all screens.Size measurements (in pixels) will be standard for the following types ofsecondary windows:About Box 390w x 264hLogin 290w x 142hSplash Screen 500w x 310hSome development tools provide wizards that can be used to develop these forms.If wizards are not provided, the 3 secondary window types will follow the sizesindicated above.All windows will follow standard rules of visual affordance as follows:Raised items can be clickedItems highlighted when mouse cursor passes over can be clickedRecessed items cannot be clickedItems with a white background and cursor placement can be editedItems with a gray background cannot be editedGray items are disabledRaised lines can be draggedAffordance relates to the ability of a user to determine how to use an object by looking at its visual clues. This concept is shown in the figure titled Visual Affordance Examples. Users understand affordance through their real world knowledge. Follow these standards to avoid conflicting with a user's real world knowledge.Figure 1 - Visual Affordance ExamplesOnly primary windows will have title bar icons, menu bars, toolbars and status barsTitle bar icons are used as a visual distinction between primary and secondary windows and therefore, should only appear on primary windows. This title bar icon and text is what appears in the taskbar. Secondary windows will not appear on the taskbar because clicking on a primary window activates any secondary window. In an MDI style application, child windows are considered to be primary windows and may have application icons to identify the name of the object being viewed. However, child windows will not have menus, toolbars or status bars.CDC application title bars will contain the following components in the order specified here:CDC System IconCDC System Name TextData Type Name (for MDI applications only)Title bars identify what the window is viewing. It also is the control point for moving and resizing the window. A primary window of an SDI style application will include the application (CDC system) icon and the name of the application asshown in the figure titled Primary Window Title Bar Example . Secondarywindows will not contain an application icon.Figure 2 - Primary Window Title Bar ExampleIf the application is an MDI style, the title bar of the parent window will followthe same format as the primary window, as shown in the figure titled MDI TitleBars Example . All child window title bars will contain an icon that represents the data that is being displayed and a description of that data. In our example, if there were multiple patients that could be displayed in this application at the same time, the data name should include the name of the patient.Figure 3 - MDI Title Bars ExampleIf the child window is maximized within the MDI parent, the child title bar ishidden and merged with the parent window as shown in the figure titled MDIMerged Title Bar Example .Data Icon Data NameFigure 4 - MDI Merged Title Bar ExampleSecondary windows cannot be resizedSecondary windows will have fixed borders and therefore may not be resized.Since the window is not resizable, the minimum and maximum buttons will not be contained in the title bar. Secondary windows will only contain a control box in the title bar.Primary windows will contain a status barAll primary windows will contain a status bar in the bottom of the window. The status bar will contain multiple panels. The left panel will be used forinstructional text or mouse/rollover text. The far right two panels will contain the system date and time as illustrated in the figure titled Status Bar Standard .Data IconData NameFigure 5 - Status Bar StandardUse common dialog box interfacesThe Windows platform provides pre-built interfaces for many commonoperations. These interfaces provide consistency and will allow users to moreeasily transfer their knowledge. The table titled Windows Dialogs lists somecommon dialog interfaces to be used by the software developer in the Windowsenvironment.Table 1 - Windows Dialogs OpenSave As COMMONFind W INDOWSReplace DIALOGSPrintPrint SetupPage SetupFont ColorStatus Bar Panels 1 2 3Controls will be spaced within the window according to CDC standards: Between controls - 7 pixels. Margins - 12.5 pixelsCDC software applications will maintain consistent margins and spacing between controls and groups of controls. All controls will have 4 dialog box units (DLU) between them, unless you want to align a set of related controls. Four DLU’s are approximately 7 pixels. Maintain a consistent margin from the edge of thewindow of 7 DLU that is approximately 12.5 pixels. The CDC standards forspacing and margins are illustrated in the figure titled Control Layout andSpacing .Figure 6 - Control Layout and Spacing Avoid horizontal scrolling windowsBreak information contained in horizontal scrolling windows into multiplewindows, or allow the user to expand or collapse to show only some informationat a time.General Windows GuidelinesThe following guidelines have been established within the Windows user interface design community and should be applied across CDC software applications.Follow a consistent arrangement of information in the windowCDC applications should conform to the Western culture way of reading in which people read from left to right and from top to bottom. Therefore, place the moreimportant information on top and to the left in the window.Use expanding dialog boxes instead of cascading dialogs when possibleExpanding dialog boxes allow the user to understand the flow of information inthe application. Complex cascades of dialog boxes, however, can be confusing to the beginning user because even visual clues, such as the disabled caption bar,may not provide enough direction to understand their modality.Avoid “Always On Top” behaviorAvoid having secondary windows appear on top of another application's primarywindow (or on top of the other application's dependent secondary windows) when the user activates a window in that application. “Always On Top” behaviorshould be a feature chosen by the user rather than a system default.Avoid using application and system modal windowsTwo types of modes, application modal and system modal, are often available todevelopers. In the application modal, users can not access any other part of theinterface until the current window is closed. Application modal should beavoided unless additional information is required to complete a command or when it is important to prevent any further interaction until satisfying a condition.System Modal, which should never be used by CDC software applications, occurs when users are not allowed to work anywhere else on the computer until thecurrent window is closed or until the application ends.Size secondary windows appropriatelySecondary windows, other than those listed in the standards, are meant tocomplement the primary window to which they belong. Make the secondarywindow only as big as is necessary to hold the supplemental information.Secondary windows should be displayed within the borders of the primarywindow, preferably center to it, unless there will be multiple cascading secondary windows.Recommended ReadingsCooper, Alan. About Face: The Essentials of User Interface Design. IDG Books Worldwide, Inc., 1995Chapter 7 - Windows-With-a-Small-wMcKay, Everett N. Developing User Interfaces for Microsoft Windows. Microsoft Press, 1999Chapter 10 - Good User Interfaces are VisibleChapter 15 - Keep it SimpleThe Windows Interface Guidelines for Software Design. Microsoft Press, 1995 Chapter 6 - WindowsChapter 8 - Secondary WindowsChapter 13 - Visual DesignHelpful Web SitesThe Microsoft Developers Network Online Library of Books, specifically the online version of The Windows Interface Guidelines for Software Design/isapi/msdnlib.idc?theURL=/library/books/winguide/PLATFR M2/D5/S115B5.HTM。
Windows程序界面设计规范
Windows程序界面设计规范Windows程序界面设计规范为了使公司的软件产品具有美观的界面,避免不必要的返工,保证产品开发质量和开发效率,特制定本界面设计规范。
本规范从易用性、规范性、帮助设施、合理性、美观与协调性、菜单位置、独特性、快捷方式的组合、安全性共九个方面对界面设计加以规范。
要求产品开发人员、测试人员都按照本设计规范进行界面设计和测试。
一、易用性:按钮、菜单名称应该易懂,用词准确,摒弃模棱两可的字眼,要与同一界面上的其他按钮易于区分,能望文知意最好。
理想的情况是用户不用查阅帮助就能知道该界面的功能并进行相关的正确操作。
易用性细则:1)完成相同或相近功能的按钮用Frame框起来,常用按钮要支持快捷方式。
2)完成同一功能或任务的元素放在集中位置,减少鼠标移动的距离。
3)按功能将界面划分局域块,用Frame框括起来,并要有功能说明或标题。
4)界面要支持键盘自动浏览按钮功能,即按Tab键的自动切换功能。
5)界面上首先应输入的和重要信息的控件在Tab顺序中应当靠前,位置也应放在窗口上较醒目的位置。
6)同一界面上的控件数最好不要太多,太多时可以考虑使用分页界面显示。
7)分页界面要支持在页面间的快捷切换,常用组合快捷键Ctrl+Tab8)默认按钮要支持Enter及选操作,即按Enter后自动执行默认按钮对应操作。
9)可写控件应作非法输入检测,非法输入检测应在点击确认按纽后统一进行,检测到非法输入后应给出说明并能自动获得焦点。
避免在可写控件焦点离开时进行非法检测。
10)Tab键的顺序与控件排列顺序要一直,总体从上到下,同时行间从左到右的方式。
11)复选框和选项框按选择几率的高底而先后排列。
12)复选框和选项框要有默认选项,并支持Tab选择。
13)选项数相同时多用选项框而不用下拉列表框。
14)界面空间较小时使用下拉框而不用选项框。
15)选项数据较少时使用选项框,相反使用下拉列表框。
16)专业性强的软件要使用相关的专业术语,通用性界面则提倡使用通用性词眼。
第9章 Windows窗体应用程序设计

DropDownWidth DropDownHeight Items SelectedItem SelectedText Sorted
DropDownStyle=Simple DropDownStyle=DropDown DropDownStyle=DropDownList
组合框的Items属性是最重要的属性,它是存放组合框 中所有项的集合,对组合框的操作实际上就是对该属性即 项集合的操作。
ShowDialog()方法以模式对话框方式显示该窗体,即新
窗体显示后,必须操作完子窗体,关闭子窗体后才能再操
作主窗体。
【例9.1】
1.
Form1窗体:
(1)设计界面 (2)事件过程:
private void button1_Click(object sender, EventArgs e) { Form myform = new Form1_1(); //定义Form1_1类对象 myform.ShowDialog(); //以模式窗体方式调用 } private void button2_Click(object sender, EventArgs e) { Form myform = new Form1_2(); //定义Form1_2类对象 myform.Show(); //以无模式窗体方式调用 }
运行界面
9.2.7
图片框控件
用于在窗体的特殊位置上放置图形信息,也可以 在其上放置多个控件,因此它可作为其他控件的容器 。 主要属性: Image:获取或设置图片框中显示的图像。在运行 时再使用Image.FromFile函数加载图像。
【例9.5】 设计一个窗体,以选择命令按钮方式显示春、 夏、秋、冬4个季节的图片。 Form5窗体: (1)设计界面 (2)事件过程:
- 1、下载文档前请自行甄别文档内容的完整性,平台不提供额外的编辑、内容补充、找答案等附加服务。
- 2、"仅部分预览"的文档,不可在线预览部分如存在完整性等问题,可反馈申请退款(可完整预览的文档不适用该条件!)。
- 3、如文档侵犯您的权益,请联系客服反馈,我们会尽快为您处理(人工客服工作时间:9:00-18:30)。
= "Form3";
fm.Show();
}
7
1.2 单文档窗体(SDI)与多文档窗体(MDI)
(5) 添加“关闭Form2”、“关闭Form3”事件: private void 关闭Form2ToolStripMenuItem_Click(……) { Form[] mdiChildren = this.MdiChildren; foreach(Form fm in mdiChildren) { if ( == "Form2") fm.Close(); } } private void 关闭Form3ToolStripMenuItem_Click(……) { Form[] mdiChildren = this.MdiChildren; foreach (Form fm in mdiChildren) { if ( == "Form3") fm.Close(); } }
3先Leabharlann 察:界面设计举例141 窗体的属性和透明显示
利用Transparent和Parent属性,可以将Label放到PictureBox上透明显 示,也可以将多个PictureBox重叠透明显示。
举例2: (1)将label1、PictureBox1和PictureBox2重叠放到一个Panel控件内 (2)设置label1、PictureBox1和PictureBox2控件的BackColor属性均
5
1.2 单文档窗体(SDI)与多文档窗体(MDI)
1.默认为单文档窗体(SDI),将窗体的IsMdiContainer属性设置为 true,即可将该窗体变为多文档窗体(MDI)。
2. MDI例子: (1)创建项目MdiExample (2)添加窗体Form2、Form3 (3)将Form1的IsMdiContainer属性设置为True,然后添加菜单: (a) 打开与关闭子窗口 子菜单:打开Form2 打开Form3 关闭Form2 关闭Form3 (b)排列子窗口(子菜单:水平平铺、垂直平铺、层叠) (c)退出
8
1.2 单文档窗体(SDI)与多文档窗体(MDI)
(6) 添加子窗体排列事件: private void 水平平铺ToolStripMenuItem_Click(……) { youtMdi(MdiLayout.TileHorizontal); } private void 垂直平铺ToolStripMenuItem_Click(……) { youtMdi(MdiLayout.TileVertical); } private void 层叠ToolStripMenuItem_Click(……) { youtMdi(MdiLayout.Cascade); }
为 Transparent (3)在构造函数中,设置label1和PictureBox2的父控件为PictureBox1:
label1.Parent = pictureBox1; pictureBox2.Parent = pictureBox1; 则label1和PictureBox2相对于PictureBox1是透明的, 而PictureBox1相对于窗体Form1是透明的。
6
1.2 单文档窗体(SDI)与多文档窗体(MDI)
(4)添加“打开Form2”、“打开Form3”事件:
private void 打开Form2ToolStripMenuItem_Click(……)
{
Form2 fm = new Form2(); fm.MdiParent = this; = "Form2";
2.1 控件中常用的属性和方法
11
2.Anchor属性用法举例
不能省略,如果不设置,将其作 为子窗体时,其Name属性默认 为空字符串(String.Empty)
fm.Show();
}
private void 打开Form3ToolStripMenuItem_Click(……)
{
Form3 fm = new Form3();
fm.MdiParent = this;
1
Windows窗体界面设计
1 窗体、属性与事件
2 Windows窗体基本控件 3 菜单与工具栏 4 其他Windows窗体控件
2
本章教学目的 介绍Windows窗体基本设计方法以及基本控件的用法。
本章教学要求 (1)掌握基本控件的属性设置方法以及常用属性; (2)掌握基本控件的常用事件处理方法; (3)掌握菜单与工具栏的用法; (4)了解其他内容。
(1)选择菜单的“视图” “输出”,以便显示调试信息 (2)利用调试信息测试执行情况。例如测试每次循环计算的结果:
int sum = 0; for (int i = 0; i < 100; i++) {
sum += i; System.Diagnostics.Debug.Print("第{0}次循环:{1}", i,sum); } 调试信息只在调试输出窗口中显示,不会在设计窗体上显示。在进行需要 大量时间的后台操作时,这种方法很有用。
2 Windows窗体基本控件
10
2.1 控件中常用的属性和方法 1.常用基本属性
除了书上讲的属性外,还要注意以下属性的用法: 1) (Name):指定控件的名称,它是控件在当前应用程序中的
唯一标识,代码通过该属性来访问控件 2) Enabled:决定控件是否可用,取值为true时可用,取值
为false时不可用 3)Anchor属性:保持控件与边框的距离不变 4)Dock属性:让控件始终紧靠边框
(7) 添加“退出”事件: private void 退出ToolStripMenuItem_Click(……) { Application.Exit(); }
(8) 运行,观察效果。
9
实验中发现的问题回答
问题:我希望知道程序是否执行到某处,但又不希望在设计窗体上显示,有 哪些方法可以做到?
答:方法1:在判断是否执行的地方设置断点。 方法2:利用调试输出窗口输出相应信息。