多功能热转印机使用说明书
GP-9025T 9026T系列热转印条码打印机用户手册说明书
User's Manual GP-9025T/9026TThermal Transfer Barcode PrinterCustomer service hotline : 400 611 3828CONTENTSThe printerOptional accessoriesThe paper sizeProduct introductionAppearanceInternalThe bottomInstallationLED indicator functionTroubleshootingMaintenanceInstallation of paperButton FunctionCommon problem1313 6.1.Printer Cleaning1515The printerIntroductionThanks for choosing GP-9025T, GP-9026T series direct thermal and thermal transfer label printer.This series printer is built with 2 sets of gear to drive motor, with capability of handling 300meters long ribbon and large label roll. Printer inner volume is fit for 5" OD (Outer Diameter) paper roll, if using external paper holder, you can install 8.4"OD industrial grade label roll.This printer is designed for real-time and batch label printing, with standard serial, parallel, USB and Ethernet connection port. Direct thermal printing and thermal transfer printing modes are all in one printer body, so you can choose various kinds of printing materials, for example: thermal paper, plain paper, coated paper, silver paper, plastic paper etc.Common 1D barcode and 2D barcode fonts are built inside printer, also it support 4 direction printing, characters can be enlarged from 1 to 10 times. Besides, it supports 5 different size bitmap fonts, OCR-A and OCR-B fonts, together with 203dpi higher print resolution, this series printer are your best choice among the same class.Declaration : This is a class A product , fit for Non Tropic regions installation . This product may cause radio interference in life environment , users may need to take adequate preven -tive measures.Application FieldManufacturing & Warehousing logistic industryHealthcareParcel PostOffice & Studio RetailProduct labeling and marking Warehouse management label Category marking labelOperation instruction marking label Distributing instruction marking labelPatients marking Medicine marking Specimen markingMailing labelPrice Label marking Product item marking Jewelry product markingProduct featuresOptional accessoriesSpecificationsExternal support optional GP-9025T, GP-9026T standard.Print specificationsThe paper sizeProduct introductionOpen and checkThis series printer is with special package to prevent damage in transportation. If there is any unexpected damage occurred, please put in clean and stable surface and carefully open the package to check, inform local distributor with damage details, and keep packing mate -rials well in case you need to mail the printer.Packing list:◆ One Label printer◆ CD ( Driver, Nice label software, User Manual )◆ Power Adapter◆ Power Cord◆ USB cable ( Parallel cable, serial cable optional)◆ Ribbon roller & Ribbon◆ Label roller & Label paper◆ External paper holder (Standard for GP-9026T)<Picture 1>Please pack equipment and materials needed for safekeeping printer for subsequent handling; if the above items, any lost or missing, please Customer Service Department of your purchase contact.Printer componentsAppearanceLED lights indicate:★ ON LINE electric lamp ★ ERROR error lamp ★ RIBBON ribbon status light<Picture 2><Picture 3>Internal<Picture 5> The bottomNote: Picture showing printer port is for GP-9026T.InstallationInstall the printer1. Please put the printer on the stable surface.2. Make sure printer power is turned off, please do not plug the power cable when the printer power is turned on.3. Connect serial or USB or Parallel or Ethernet cable to printer and PC.4. Connect power plug to power supply socket.Be careful:※※ Transmission interface in the picture will vary depending on your printerpurchased aircraft type, the actual transmission interface, please refer tothe corresponding product specificationspower line is inserted into the printer.<Picture 6>Ribbon installation1. Press two press buttons on left and right side to open printer top cover.2. Put empty paper tube into ribbon take-up hub if you buy new ribbon which one side is no contact with paper tube.After that, install ribbon take-up hub left side and right side onto printer.Remark: Factory standard ribbon two sides already fixed well on paper tube. Go ahead to step 3 instead of step 2.3. Press the Push button to open print head.Ribbon installation diagram<Picture 7> Installation of paperInstallation of paper1.Open printer top cover;Insert blue label supply hub into label rolland fix onto printer.2.Press Push button to open print head toinstall label paper same as pictureshowing.4.Close printer top cover.3.Close the print head by pressing two arrowlocations. Confirm print head two sides areclosed correctly to ensure you get printingin good quality.LED Indicator and FunctionThere’re two buttons and three LED indicators, many functions can be realized through using different button, indicator and power on/off switch.LED indicatorDirect thermal printing methodLED Indicator status DescriptionsPower indicator is on,Error indicator is off Printer is powered on and in normal printing statusPower indicator flashes every 640ms,Error indicator is off Printer is pausedPower indicator is off, Error indicator goes for 80ms, then goes off for 160ms, printer start beeping.※on Printer cover is openedPower indicator is off for 500ms, then goes off for 6s , Error indicator goes on Label gap detection errorPower indicator is off Error indicator flashes every 160ms, after two times flashing, Error indicator goes off for 320ms, printer start beeping. ※, Paper outPower indicator is off Error indicator flashes every 160ms,after three times flashing,Error indicator goes off for 320ms, printer start beeping. ※, Black mark detection errorError indicator flashes every160ms.Printer overheated protection mode is act-ivated. After 1 minute, the printer CPU will check print head temperature again. When temperature return normal, printer will work normally.※ Beeper function can be enabled through setting DIP switch.※ Beeper function can be enabled through setting DIP switch.Thermal transfer printingLED Indicator status DescriptionRibbon indicator is on Ribbon is installed successfullyRibbon indicator flashes every 300ms, beeper sounds every 2.4s ※Ribbon improperly installed: no ribbon, or ribbon end, or ribbon brokenButton FunctionFeedWhen the printer is ready (LED blue fixed), click the button, label paper into the front end of a paper label. Print job timeoutThe printer in the print, click the PAUSE button to print suspended. At this time power indicator is blue flashing. Just click the button, the print job resume normal.Start functionThe printer has six kinds of power function can be used to set or test the printer hardware. In the boot and press the button with lamp signal release key can start these functions.Six Power-up Functions:Skip AUTO.BAS program User can use TSPL2command to save a code auto--ing file (AUTO.BAS)into flash. When turn on printer, prin-ter will run the program automatically. runnIf you want to skip AUO.BAS program on power-up, then follow below steps:Press and hold PAUSE and FEED button, then turn on theprinter. When Power indicator (blue) is off and Error indi -cator(red)is on, release PAUSE and FEED button, printerwill skip running AUTO.BAS program, and then Power indicator will be on.Printer Initialization A.Turn off the printer.B.Press and hold PAUSE and FEED button, then turn on theprinter. When Power indicator(blue)is on and Error indi-cator (red) is off, release PAUSE and FEED button, all data in printer DRAM will be cleared and printer setting will be restored to factory default setting. Then power indicator will be on and printer goes to ready status.* Factory default settings do not include ribbon setting.Ribbon Detection When printer power turn on, or it is in thermal transferprinting mode, printer will automatically detect ribbonstatus, to check if ribbon installed, or ribbon end, or work normally. After ribbon detecting, printer will be set tothermal transfer printing mode or direct thermal printing mode. If no ribbon,system will go to direct thermal printing mode and close ribbon rolling motor function.The printer configuration after the initialization will revert to the default values are as follows:Parameter Default settingSpeed Density Gap Direction 4inch/sec (101.6mm/sec), 203dpi100mmONONOFFOFFONONCLEARNOT CLEARTop left corner from printing direction Printing content are placed on page from top to bottomReference SHIFT OFFSET SET TEAR SET HEAD(Cover open detect)Set PRINTKEY SET REPRINT SET KEY1(FEED)SET KEY2(PAUSE) CLEAR RAMCLEAR FLASHProblems Possible Reasons Solution and Suggestion Power indicatornot "ON”TroubleshootingCommon problemBelow the table of contents is generally the common problems and solutions; if you have been in our proposed methods of eliminating the fault, and the printer is not normal operation, so check with your purchase customer service department, so as to get more help.Plug to AC outlet and plug toprinter not well connectedCheck power connector and AC outlsetif plugs are correctly connectedPrinter power not turned on Turn on power switchPrint head not well closed Close print head by pressing whole printhead mechanism (or 2 arrow locations)Ribbon endLabel paper jamed inside printerChange new ribbonRibbon improperly installed Refer to Ribbon Installation steps in UserManual to re-install ribbonLabel paper end Change new label paperLabel paper improperly installed Refer to Paper Installation steps in UserManual to re-install paperGap sensor detection error Adjust paper specification and print againClear jamed paperNot printingSerial cable improperlyconnected1. Check if Pin configuration in cable twosides are matching each other;2. Check if baud rate setting on PC andprinter are the same, If in TPSL comma-nd mode, We suggest 9600, n, 8, 1 toensure higher reliability.3. Change a new cable.Ethernet cable improperlyconnected1.Check if RJ-45 green/orange LEDindicator is on. When printer receiveand process printing data, LED will beorange color;2.Check if printer IP is assigned inDHCP mode.3.Check if fixed IP address is correctlyset in printer property. Wait for someminutes to make sure printer is connect-ed server and printing a selftest pageto confirm printer IP address.4.Change a new ethernet cable.USB cable improperlyconnectedCheck if USB cable connected well orchange a new cableRibbon non standard Check if ribbon model andspecificationNot printing Ribbon printing side wrong installed Check and re-install ribbon to make sure printing side touch label paperPrint head not clean Clean print head and print againPrint density setting wrong Suggest density set to be 7Print head cable not well connected Re-connect print head cableStep Motor cable not well connected Re-connect step motor cableCommand setting wrong Check if there is PRINT command at the end of printing file; or if there is CRLF command at the end of every line.Not goodprinting quality Ribbon and label improperly installed Too much dust or adhesive on print head Re-install ribbon and/or labelClean print head and print againPrint head damaged Take selftest page to check if printing are completely to confirm if necessary to change new print headData miss printing in one or two sides Label paper size wrong setting Check if label size set correctly and same as your label paperRibbon wrinkle Printing not stable Printer in HEX Dump mode or RS-232 setting wrong Print head unbalanced stress;ribbon & label improperly installed; Label feeding not smoothly Reset the label print density andadjust paper width fixing stand tofit your label paper size.Restart your printer and leave Dump Mode or reset RS-232 PARAMETERMaintenance6.6.1.Printer CleaningTo ensure the printing quality, please proceed this maintenance section to keep your printer in good conditions and extend its life as well.Please use one of following material to clean the printer.★ Cotton swab★ Lint-free cloth★ Vacuum / Blower brush★ 100% ethanol2.The cleaning process is described as following:Note:※Always turn off the printer power before cleaning the printer.※ Do not touch print head by figure.※ Please use 100% ethanol, Do not use medical alcohol to aviod damage to print head.。
得力DL-925T热转印标签打印机用户手册 说明书
标签打印机DL-925T用户手册目录手册信息 (4)安全须知 (5)第1章产品简介 (8)1.1 开箱清单 (8)1.2 打印机外观及组件 (9)1.3 产品尺寸 (11)第2章产品规格 (12)第3章使用方法 (14)3.1安装介质 (14)3.1.1安装纸卷 (14)3.1.2 安装碳带 (16)3.1.3安装折叠纸 (18)3.2 电源连接 (20)3.3 接口连接 (21)3.4 标签侦测 (22)3.5 操作面板 (23)3.6 基本功能使用 (26)3.6.1 开机/关机 (26)3.6.2 走纸 (26)3.6.4 标签学习 (27)3.6.5 打印测试 (28)第4章接口 (29)4.1 USB 接口 (29)4.2 其他可选接口 (30)第5章打印机日常维护及调校 (32)5.1 清洁打印头 (32)5.2 清洁传感器、胶辊和纸张路径 (32)附录1:电子信息产品污染控制的说明 (33)DL-925T用户手册手册信息本用户手册包含产品使用、安装等基本信息。
※以下手册对各种技术问题和领域有更为详细的介绍。
安全须知在操作使用打印机之前,请仔细阅读下面的注意事项:1.安全警告标志警告:打印头为发热部件,打印过程中和打印刚结束,不要触摸打印头以及周边部件。
警告:不要触摸打印头和连接插件,以免因静电损坏打印头。
2.安全注意事项警告:违反以下事项可能会导致严重的伤亡事故。
1)不要同时将几个插头插入一个多孔电源插座中。
•这会导致过热和火灾。
•如果插头潮湿或者肮脏,请在使用前烘干或者擦拭干净。
•如果插头与电源插座不配套,请不要插上电源。
•只能使用标准化的多孔电源插座。
2)您只能使用本包装中供应的适配器。
•使用其它适配器十分危险。
3)不要通过拉扯连接线的方式拔插头。
•这可能损坏连接线,造成火灾或者打印机故障。
4)不要在手潮湿的时候,插或者拔电源插头。
•这可能导致触电。
5)不要用力弯曲连接线,或者将其置于重物之下。
热转印机使用说明

热转印机使用说明
热转印机是一种常见的数字印刷设备,常用于印刷各种图案、文字、标识等。
下面为您介绍热转印机的使用说明。
1. 准备工作
首先,需要将热转印机与电脑连接并安装驱动程序。
然后,将需要印刷的图案、文字等导入电脑,并使用热转印软件进行排版和编辑。
2. 调节温度和时间
根据印刷材料的不同,需要调节热转印机的温度和时间。
一般来说,温度控制在180-200℃之间,时间控制在10-30秒之间。
3. 调节压力和速度
印刷过程中,需要将印刷材料放在热转印机的工作台上,并调节压力和速度。
一般来说,压力调节在1-5kg之间,速度调节在5-20cm/s 之间。
4. 开始印刷
当热转印机调节好参数后,可以开始进行印刷。
将印刷材料放在工作台上,按下开始键,等待热转印机工作完成。
5. 完成印刷
印刷完成后,需要及时将印刷材料从工作台上取下,并进行加工处理。
如果需要进行后续处理,可以根据需要进行切割、折叠、烫金等加工处理。
以上就是热转印机的使用说明,希望对您有所帮助。
在使用过程中,需要注意安全,避免烫伤等意外情况的发生。
SI2K EVOMAX2 热转印系统 使用指南说明书
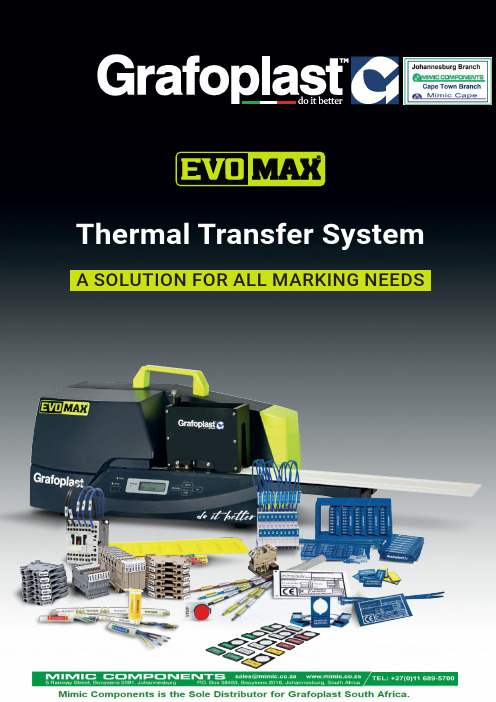
Thermal Transfer System A SOLUTION FOR ALL MARKING NEEDScreating customized plates lasting over time.system has been enriched with two very useful accessories: The new kit consisting of a laptop and a powerbank that can be connected to the printer is specifically designed to make the system operative in any situation, so marking becomes even easier!Compact s ize p rinter, e quipped w ith t he n ew h igh p recision Q C L oading t o o ptimize o perating t ime a nd with p arametric s ensors t hat a llow t he c onsumption o ptimization a nd t he m aximum e xecution a ccuracy.The c omplete r ange o f c onsumables s atisfies a ll i ndustrial i dentification n eeds, f rom c ables, T-blocks a nd equipment up to the marking of push buttons, name plates, modular strips and customized plates.QC LOADING AUTOMATIC SOFTWARESOFTWAREEVOMAX 2 RibbonsManual loading plates for tagsManual loading plates for Metal Detectable tagsWhat to markTAGSEVOPLM01PLATEST-BLOCKS (SINGLE FEEDER)CABLES IDENTIFICATIONRIGID TAGSTags in polycarbonate to mark wires,cables, sheats and components.They allow a simple and quick applicationTags in polycarbonate V0 to be inserted into the sleeves. Available in white, yellow, orange, red, green, blue and grey. HALOGEN FREE10 x 412 x 415 x 418 x 430 x 4*For printing is necessary the EVO0013NAD HALOGEN FREEEVOMAX2 | 7CABLES IDENTIFICATIONFLAT TAGSTags for wires and cables; a cheap and high quality solutionmm10 x 412 x 415 x 418 x 423 x 430 x 4 Wrap around labels for cablesTAGS FOR T- BLOCKSAUTOMATIC FEEDERThese tags in polycarbonate can be printed with automatic feederideal for big quantity10 x 8 68ABB Entrelec - Series M, D, ADO SI2KAF8010RW12 x 8 108ABB Entrelec - Series ZS SI2KAF8012SWEVOMAX2 | 11TAGS FOR T-BLOCKSSINGLE FEEDERTags in polycarbonate allow to mark quickly and easily allof the most used T-BlocksEVOMAX2 | 13TAGS AND SLEEVES WITH TIESThey can be used with ties to mark cableof big diameter or bundle of sheathsmm25 x 1060 x 1070 x 1080 x 1025 x 1560 x 1570 x 1580 x 1525 x 2560 x 25Sleeves of various dimensions compatible with ties to mark sheaths and bundles of cables.EVOMAX | 15IDENTIFICATION FOR ELECTRICAL EQUIPMENT, COMPONENTSAND CONTROL PLATESThe tags can be applied directly on to the electrical componentsby simple pressure or by adhesiveIDENTIFICATION FOR ELECTRICAL EQUIPMENTStrips for PLC SiemensThe strips can be applied on the most common Siemens PLC. They can easily replace the existing ones. Available in white, yellow and Siemens green.The tags are specially studied to mark componentsinside the electrical panelIDENTIFICATION FOR ELECTRICALEQUIPMENT, COMPONENTS AND CONTROL PLATESIDENTIFICATION FOR COMPONENTSdifferent components of electrical panel. Available in white , yellow and metal.mmWHITE 20 x 7 EVO40720W 25 x 7 EVO40725W 17 x 8 EVO40817W 17 x 9 EVO40917W 20 x 9 EVO40920W 35 x 9 EVO40935W 25 x 10EVO41025WRigid adhesive tags to mark components inside the electrical panel. Available in white, yellow, metal, orange, red, blue and green.Adhesive tags in PVC - flat surfacesmmWHITE 12 x 5 EVOFX0512W 25 x 5 EVOFX0525W 15 x 6 EVOFX0615W 10 x 7 EVOFX0710W 15 x 7 EVOFX0715W 20 x 7 EVOFX0720W 12 x 8 EVOFX0812W 17 x 8 EVOFX0817W 21 x 8 EVOFX0821W 12 x 9 EVOFX0912W EVOMAX | 19Modular strips, tags for push buttonsand customized labelsIDENTIFICATION FOR ELECTRICALEQUIPMENT, COMPONENTS AND CONTROL PLATESCONTROL PLATESPVC modular stripsAdhesive and non adhesive strips suitable for distribution panel identification. Available in different colors.mm WHITE445 x 9 SI2K409445W SI2K409445Y215 x 15 SI2K415215W SI2K415215Y430 x 15 SI2K415430W SI2K415430Y215 x 20 SI2K420215W SI2K420215Y430 x 20 SI2K420430W SI2K420430YTags for push buttons, channels and tags holdersThey can be applied with tags holders or directly thanks to the adhesive placed on the back.Ø HOLEEVO1517WEVO1527WEVO1535WEVO1550WEVO1567WEVO2727WEVOMAX | 21PLATES FOR EXTERNAL PANELYou can insert company logo,technical data and certificationsPLATES FOR EXTERNAL PANELPVC non adhesive tagsAvailable in different colors.mm WHITE METAL70 x 30 EVO3070W EVO3070M90 x 40 EVO4090W EVO4090M100 X 60 EVO60100W EVO60100M150 X 60 EVO60150W EVO60150MPVC adhesive tagsAdhesive plates suitable for external panel. High quality and long lasting resistance. Available in different colors.70 x 3040 x 4090 x 40100 x 60145 x 60EVOMAX | 23Metal detectable tags ideal to be used in the food processing industriesTags for cablesTags with holes for cables to be applied with tiesWire marking tagsThese tags are used to identify cables, compatible with sleeves and holders for cable tags.They are used to identify cables bundles or sheaths.These tags are designed to be fitted directly on the wire.mmØ EXTERNALmmIMAGE10 x 40.6 ÷ 3.2SI2KTM01U/10MD10 x 4 1.0 ÷ 3.8SI2KTM02U/10MDmmSUGGESTED TIE IMAGE54 x 11TGF14035UMD SI2K030UMDmmIMAGE10 x 4 SI2K02U/10MD 12 x 4 SI2K02U/12MD 15 x 4 SI2K02U/15MD 18 x 4 SI2K02U/18MD 30 x 4SI2K02U/30MD** for printing is necessary the EVO0013NAD adapterEVOMAX 2 25Tags for T -blockY O U K N O W T H A TThe metal filler inserted into the Metal detectable tags is corrosion resistant and allows to be reliably identified by metal detectors. The special formula of the raw material is compliant with Reg. EU 10/2011.These tags can be easily and quickly applied.SECTION 2mm PITCHmm COMPATIBILITYOUTLINE9 x 3 1,53,5Phoenix, Siemens SI2KTB3509EUMD 9 x 3 1,53,5Weidmuller, Wago SI2KTB3509LUMD 10 x 3 1,53,5Phoenix, Wago, Siemens SI2KTB3510CUMD 10 x 3 1,53,5Weidmuller, Wago SI2KTB3510LUMD 10 x 3 1,53,5Weidmuller, WagoSI2KTB3510LUKMD 10 x 5 2,55,1Weidmuller, Morsettitalia, Klemsan, WagoSI2KTB5010LUKMD 10 x 5 2,55,1Weidmuller SI2KTB5010LUMD 9 x 5 2,55,2PhoenixSI2KTB5209EUMD 10 x 5 2,55,2Phoenix, Wago, ABB, Entrelec SI2KTB5210CUMD 10 x 5 46Legrand, Wieland, Telemecanique SI2KTB6010DUMD 9 x 5 46Rockwell Automation, WoertzSI2KTB6010HUMD 10 x 5 46,5Siemens SI2KTB6510GUMD 12 x 5 46,5CaburSI2KTB6512BUMD 10 x 5 2,55Wago 280, Phoenix, Entrelec SI2KAF5010CUMD 10 x 5 2,55Weidmuller, Morsettitalia, Klemsan, WagoSI2KAF5010LUKMD 10 x 5 2,55,2Wago Top JobSI2KAF5210NUMD 10 x 62,55,5CaburSI2KAF6010BUMD26 | EVOMAX 2Tags for external panel and push buttonsTiesTags holder and tags holder for push buttonsThe marked tag is inserted by simple pressure.Suitable for external panel, adhesive and non adhesive.mmSUGGESTED HOLDERADHESIVE NON ADHESIVE 70 x 30EVOMD301U EVOMD301UX -90 x 40EVOMD401U EVOMD401UX -100 x 60EVOMD601U EVOMD601UX -27 x 15EVOMD01U EVOMD01UX SIT0A06UMD / SIT0B05UMDSIT0B07UMD50 x 15EVOMD02U EVOMD02UX SIT0A07UMD 67 x 15EVOMD03UEVOMD03UXSIT0A08UMDmmTO BE USEDWITHTO BE USEDWITHADHESIVE NON ADHESIVE30 x 17SIT0A06UMD EVOMD01UX SIT0A06XUMD EVOMD01UX 52 x 17SIT0A07UMD EVOMD02UX SIT0A07XUMD EVOMD02UX 70 x 17SIT0A08UMD EVOMD03UX SIT0A08XUMD EVOMD03UX Ø hole 22,5SIT0B05UMD EVOMD01UX SIT0B05XUMD EVOMD01UX Ø ZB4SIT0B07UMDEVOMD01UXSIT0B07XUMDEVOMD01UXmmØ EXTERNAL140 x 3,534TGF14035UMD 250 x 4,570TGF25045UMDEVOMAX 2 27The new series of consumables absorb energy from UV light becoming retro-enlightenedmm10 x 4 SI2K02W/10N 12 x 4 SI2K02W/12N 15 x 4 SI2K02W/15N 18 x 4 SI2K02W/18N 30 x 4SI2K02W/30**For printing is necessary the EVO0013NAD adaptermmCOMPATIBILITY20 x 7ABB, SIEMENSSI2KAF35GWTags for contactorsTags for cablesmmHOLEmm 27 x 15-EVO01W 50 x 15-EVO02W 67 x 15-EVO03W 70 x 30Ø 3EVO301W 90 x 40Ø 3EVO401W 100 x 60Ø 3EVO601WTags in polycarbonateADHESIVETags in polycarbonateNON ADHESIVEmmHOLEmm 27 x 15-EVO01W X 50 x 15-EVO02WX 67 x 15-EVO03W X 70 x 30Ø 3EVO301W X 90 x 40Ø 3EVO401W X 100 x 60Ø 3EVO601W XYOU KNOW THATThe Labelux Series is made withpolycarbonate mixed with fluorescent pigments, which glow under UV lightEVOMAX 2 | 29These consumables contain phosphorescent pigments that make the marking visible also in absence of lightFlat tags with holes for cablesmm60 x 10 EVOCT1060PH 70 x 10EVOCT1070PH 80 x 10 EVOCT1080PH 60 x 15 EVOCT1560PH 70 x 15EVOCT1570PH 80 x 15 EVOCT1580PH 60 x 25 EVOCT2560PH 70 x 25 EVOCT2570PH 80 x 25EVOCT2580PHTags for push buttonsADHESIVEmmHOLEmm 40 x 3022.5EVO4404PH 50 x 5024.5EVO4408PH 50 x 5030.5EVO4412PHmmHOLEmm 40 x 3022.5EVO404PH 50 x 5024.5EVO408PH 50 x 5030.5EVO412PHNON ADHESIVETags for push buttons, channels and electrical componentsmm40 x 40 EVO44040PH 70 x 30 EVO43070PH 90 x 40 EVO44090PH 100 x 60 EVO460100PH 145 x 60 EVO460145PH 150 x 60 EVO460150PH 500 x 80EVO480500PHPVC PlatesADHESIVENameplatesRECTANGULAR WITH HOLEYOU KNOW THATThe Labelphos Series is made with phosphorescent pigments which, absorb light and then slowly releases it by lighting in the dark.up to 12 hours.mmØ HOLEmm 38 x 198EVOCTR1938PH 50 x 255EVOCTR2550PH 100 x 405EVOCTR40100PH 100 x 605EVOCTR60100PHmmSUGGESTED HOLDER17 x 15 EVO1517PH Channel SIT0B15/27 x 15 EVO1527PH SIT0A06 - SIT0B05 35 x 15 EVO1535PH SIT0004X05050 x 15 EVO1550PH SIT0A0767 x 15EVO1567PHSIT0A08EVOMAX 2 | 31Mimic Components G rafoplast So uth Africa Distributor 5 Ra msay Street, Booysens Johannesburg, South Africa Tel + 27(0)11-689-5700• www.mimiccomponents.co.za。
各种热转印机器使用介绍
一、烤杯机烤杯过程1、PS处理图像,20cmx8.5cm(11oz马克杯),A4的纸可以做三张2、抹掉外面的灰尘,打印出来的镜像图反贴在马克杯上(图像的一面朝内),用高温胶带固定3、把马克杯放进烤杯垫里,调节至适当压力4、打开电源开关,设定烤杯机温度180度,印制时间10秒;数码烤杯机设为起始温度230华氏度,最高温度330华氏度印制时间40秒5、听到印制完成音乐响起后,拿出杯子,掀掉热转印纸二、烤盘机烤盘过程1、PS处理图像,直径11cm(一般8寸盘子)裁剪时留0.5cm空白2、抹掉盘子外面的灰尘,打印出来的镜像图反贴在盘子上(图像的一面朝内),用高温胶带固定3、盘子放到烤盘垫里,调节压力4、打开电源开关,设定烤盘机温度180度,印制时间220-260秒;数码烤盘机设为起始温度230华氏度,最高温度330华氏度印制时间40秒5、听到印制完成音乐响起后,拿出盘子,掀掉热转印纸三、平板机印瓷板印制过程1、PS处理图像,根据瓷板实际尺寸调整图像大小2、抹掉瓷板、珠光板外面的灰尘,打印出来的镜像图反贴在瓷板上(图像面朝内),高温胶带固定3、瓷板印制时有图案一边朝硅胶板(反烤方式);4、打开电源开关,设定平板机温度180度,印制时间420秒;数码烤盘机设为起始温度230华氏度,最高温度345华氏度印制时间50秒5、听到印制完成音乐响起后,拿出瓷板,掀掉热转印纸四、平板机印石板画印制过程1、PS处理图像,根据石板画实际尺寸调整图像大小2、抹掉石板画外面的灰尘,打印出来的镜像图反贴石板画上(图像面朝内),高温胶带固定3、石板画印制时有图案一边朝硅胶板(反烤方式);4、数码烤盘机设为起始温度230华氏度,最高温度345华氏度印制时间600秒5、听到印制完成音乐响起后,拿出瓷板,掀掉热转印纸五、平板机印金属板材印制过程1、PS处理图像,根据金属板材实际尺寸调整图像大小2、撕掉金属板材表层的保护膜,将打印出来的镜像图反贴金属板材上,高温胶带固定3、将金属板材放置平板机上4、打开电源开关,设定平板机温度180度,印制时间120-150秒;数码烤盘机设为起始温度230华氏度,最高温度345华氏度印制时间50秒5、听到印制完成音乐响起后,拿出瓷板,掀掉热转印纸。
易飞多功能热转印机说明书
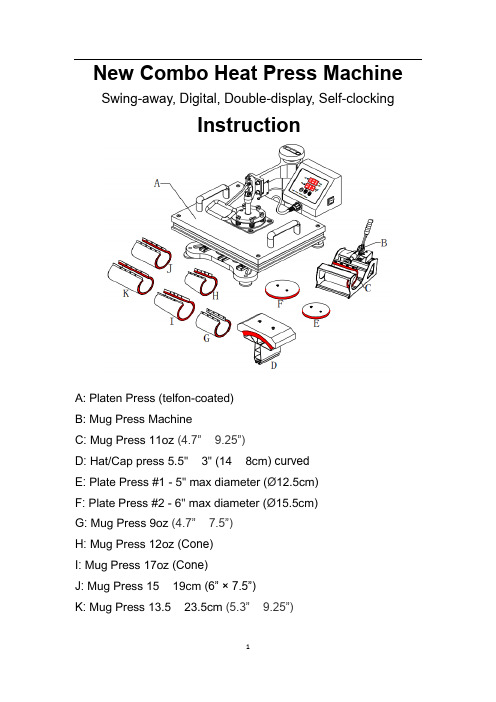
New Combo Heat Press Machine Swing-away, Digital, Double-display, Self-clockingInstructionA: Platen Press (telfon-coated)B: Mug Press MachineC: Mug Press 11oz (4.7” × 9.25”)D: Hat/Cap press 5.5" × 3" (14 × 8cm) curvedE: Plate Press #1 - 5" max diameter (Ø12.5cm)F: Plate Press #2 - 6" max diameter (Ø15.5cm)G: Mug Press 9oz (4.7” × 7.5”)H: Mug Press 12oz (Cone)I: Mug Press 17oz (Cone)J: Mug Press 15 × 19cm (6” × 7.5”)K: Mug Press 13.5 × 23.5cm (5.3” × 9.25”)Respectable users, thanks for purchasing Yifei multi-functional heat press machine. It is the unique combo heat press with perfect slideway in the world, which have got the patented technology protection.This machine adopts microprocessor program control, featuring high precision inparameter memory and control and unique touch button control panel in China. The advanced design philosophy and independent control unit structure provides convenience for combination and upgrading of machines and after-sale service.With slideway, it is faster and more convenient to replace thermal transfer components. In addition, the design of the machine is very nice and luxurious, and machine takes very small room, so it is good for the selling and operating of the shops.Ⅰ. Features1.Brand new slideway design, so it is easy and fast to replace parts.2.Add automatic count down button and self-clocking alarm.3.Digital double control the controller uses microprocessor program, parameter memory, so the control accuracy is much higher.4.For the controlling heating chip, it uses the new degree Celsius, so the power is more stable, and the circuit board will not break down when the voltage is not steady.5.Heating thermocouple: adopting new generation “K” updated version heating thermocouple .with double lines merged ,it is safer and not easily broken down.(The glass tube is adopted for traditional ordinary machinery to pack thermistor .once in case of unstable voltage, it will be easily broken down ,burn out or crashed into pieces due to the uneven pressure!)6.The aluminum plates are all upgraded and thickened, the quality becomes more secure and the phenomena of uneven base board and carrying capacity are avoided. The upgrading of quality, material and technology further guarantees the quality!7.Can be lifted, lowered and rotated by 360 degrees and convenient to retrieve articles and transfer of alien articles.8.Adding one heat-resisting foaming silicon on the baseboard, which can stand 400 centigrade degrees and will not deform.Ⅱ. Technical parametersSpecification:Main Heating plate size: 12” × 15” (29 × 38CM)Power: 1050WVoltage: 110v, 60Hz, 10ATemperature range: 0 - 250℃(0 - 482℉)Timer control: 0 - 999 secondsPacking Size: 20.3” × 20.3” × 17.5” (51.5 × 51.5 × 44.5CM)Ⅲ. Operation guide1. ConnectionConnection Method for Each Part of the Heat Press Machine and the Control BoxAs shown as the image:"A", "B" and "C" are respectively responsible for different functions."A" is the high-power plug for the heating plate of the main engine."B" is the plug for printing cups, plates and hats."C" is the plug for timer switch.Due to different specifications and shapes, these three socket heat and socket aperture don’t cross each other. Each set of socket heat and socket aperture has a directional or sequential guidance groove. Please align the orientation groove when plugging it, as shown in the red dotted line below:The red dashed line indicates that the bumps and grooves are properly connected Since the fourwires on the plug carrydifferent functions, theymust be connected in thecorrect way. The force inthe other direction can’t be inserted by 50 kg after testing, but it can be easily done if some shapes are slightly deformed.Also need pay attention to is that when you use the hot plate , “A" and "B" cannot be used at the same time , at the same time use will lead to connect to the "B" on the part after rising to the setting temperature and hot plate temperature cannot reach the set temperature, resulting in the hot plate can’t be used normally. When "A" is connected to the control box, "B" must be unplugged. When "B" is connected to the control box, "A" must be unplugged .2. Controller introduction :OUT: heatingWORK: count down introduction lightSET :function setting▲:increasing▼:decreasing /count down by manual: LED temperature display PV/SVTEMP3. Parameter setting guide (Celsius showing):Temperature or Time settingPress “SET”, the upper display will show “SP”, and the lower of display will showing the temperature of last setting, then enter temperature setting option, press ▲ or▼ (increase or decrease) to set the needed temperature. After setting well, Press “SET” again, LED will show “St”, then enter the time setting, press ▲ or▼ (increase or decrease) to set the needed time. (Normally the time is 180 seconds for mugs and 15-20 seconds for T-shirt printing)4. Advanced parameters setting:Long press “SET “ button for 5 seconds,and then enter into advanced setting(Attention !!!Please don‘t use this advanced setting if you are not professional, In the course of using, the " " displayed on the display screen is "t")Warm Tip: Because of the use of high-temperature silica gel pad with bubbles, when used for the first time, the air inside the silica gel will expand and emit odor after heating. Please ensure indoor air circulation. Ten minutes later, the odor will disappear and there will be no odor in the future.A、Celsius and Fahrenheit settingLong Press “SET” again,the controller display will showing C-F,the bottom of display will showing “C” or “F”,please press ▲ or▼ to adjust C(Celsius)or F(Fahrenheit)according to your demands.B、T emperature adjust:long press “SET“ button for 5 seconds,and press “SET ” one more time,the upper of display will showing “SC”,then enter into temperature adjust,press ▲ to decrease,or press ▼ to increase the temperature.When the actual platen measurement temperature not in accordance with the display temperature, please set again as following:Press ▲ to decrease the temperature when the actual measurement temperature is lower the display temperature.Press ▼ to increase the temperature when the actual measurement temperature is higher the display temperature.C、Overshoot setting:Long press “SET” button for 5 seconds and press “SET” 2 times again, the upper display will show “P” and the bottom of display show “1”.Press ▲ or▼ to adjust. When turn on the machine, the temperature will raise up and over the setting temperature, and calm down to the set temperature, press ▲ button to increase “1”, when turn on the machine the temperature is raising very slow and cannot reach on the set temperature, press ▼ button to decrease “1”. The specific data of increase or decrease will be going well after several trying.D、Constant temperature setting: long press “SET” for 5 seconds,and press “SET” 3 times again, the upper display will showing “I”, the bottom of display showing “25”, press ▲ or▼ to adjust. When power on the machine, the temperature raising up and reached the setting temperature, but the display showing not accurate, always higher or lower the actual temperature, please use this function to adjust. When the display showing temperature is higher the actual temperature, press ▲ button to adjust “25” become higher; when the display showing temperature is lower the setting, press ▼ to adjust “25” become smaller, until the display showing correctly.E、Heating period: long press “SET” button for 5 seconds, and press “SET”4 times again, the upper display will showing “t“, and the bottom display will shoeing “8”, press ▲ or▼ to adjust.The principle of this function is that when the temperature raising up and reached the setting temperature, the temperature controller will control the relay (SSR), every 8 seconds will power on and then power off after 8 seconds in order to control the constant temperature heating. If the platen heating up and reached the temperature, and the temperature not stable, always higher and lower, it says 8 seconds frequency is too low, press ▼ to adjust till it stable. If the temperature is stable, please do not use this function. since if use too much, will short the life of relay.Ⅳ.Replacement of accessoriesThe counterdie of the heat press equipment is slide rail design. It is only necessary to plug it out and replace accessories easily and conveniently.1. Adjustable matFor uneven work surface, adjust the height and direction of the mat will be ok.A、Adjust the height of the mat roughly, in order to achieve the basic flat.B、Adjust the direction of the mat finely, in order to achieve the completely flat. installation for each heating accessories:Platen press (for t-shirt): plug out other heating pad and put this flat into the sliding rails and fix it.Plate press parts installation: maintain the bottom flat-panel, and push “E” or “F” (Plate Press) into the hole and fixed with a screwdriver.Mug press parts installation: put foaming rubber pad fixed in mag shelves (push the long screws into the both side holes of the steel mug shelves directly, without disassembly of the screws). Mug press parts installation: the mug press you ordered (C、G、H、I、J or K) fixed on the Mug press machine”B”, the cup pad (directly to the cup mat sheet steel on both sides of the long screw on both ends of the Mug press machine “B” directly into the corresponding hole location can, without the mounting screws), put the mug press mat thermocouple plug and mug press machine countdown on switch plug to control box outlet can printing the corresponding size mugs.Cap press parts installation: push one part along the slide rails and push the other part into the hole and fixed with a screwdriver. Push the below part of the “D” (Hat/Cap press) along the slide rails, the above part (Hat/Cap pad printing mat) into the hole and fixed with a screwdriver.C、Adjust pressureAdjust the right pressure before printing or after rep; ace different accessories.Turn the pressure regulator to adjust appropriate pressure, then turn the back side to lock the screw cap.D、Install control box to heating plate and connecting limit switch.Ⅴ. Kindly prompts:To print and make individualized DIY products, it is also necessary for you to prepare the following equipment and materials.1. Ink jet printer / six colors printer (For example: Epson R-230 / R270 / R290 / T50)2. CISS (Continuous ink supply system)Different models of Ink jet Printer will need different CISS3. Sublimation ink / Heat transfer ink4. High-temperature resistant tape5. Sublimation paper / Heat transfer paper (for Ceramic and fabric)6. Paper cutter7. Press mug / cup and plate: Normal mug and plate will can’t use for press, only sublimation mug and plate can be use.Ⅵ. Warranty & ServiceAll machine can enjoy three months free warranty since the sale date. Please contact us, if have any quality problems.More than warranty period we still provide long-term technical support and maintenance instruction, only charge the accessories costs.11。
热转印机操作规程
热转印机操作规程一、引言热转印机是一种用热压技术将色彩图案转移到各种不同材料上的设备。
它在纺织、陶瓷、金属、塑料等行业中得到广泛应用。
为了确保安全和高效操作,本文将介绍热转印机的操作规程。
二、设备准备1. 安全检查- 检查电源线、插座等电气设施是否完好无损。
- 确保热转印机周围通风良好,防止过热导致安全事故。
- 确保工作区域整洁,防止杂物堆积影响运作。
2. 材料准备- 准备所需转印纸、热转印膜、保护膜等材料,并确认其质量良好。
- 检查材料的尺寸和数量是否与需求相符,避免浪费和重复操作。
三、操作步骤1. 打开热转印机电源开关,待其自检完毕后,调整温度和时间参数至所需数值。
2. 将待转印物放置在转印工作台上,调整其位置以确保转印效果准确。
注意不要堆积过多物体,以免影响压力均匀度。
3. 将所需色彩图案印刷在转印纸上,确保图案清晰、无模糊或变形。
4. 将印刷好的转印纸放置在待转印物的表面,并确认图案位置与对齐标记一致。
5. 关闭热转印机的扣紧装置,让工作台与加热板紧密贴合。
6. 启动热转印机,开始转印过程。
根据所用材料和转印图案的不同,时间和温度参数需做适度调整。
7. 转印完成后,关闭热转印机的电源,并等待冷却。
注意,切勿过早触摸已转印物,以免烫伤。
8. 检查转印效果,确保图案的清晰、色彩的饱满与准确。
如有质量问题,可根据具体情况进行调整和重新操作。
四、设备维护1. 常规清洁- 关闭热转印机电源后,用干净布清除工作台面、压板等表面的残余材料。
- 定期清洁热转印机内部,避免灰尘等杂物积累影响设备寿命和工作效率。
2. 保养检查- 定期检查热转印机的热敏头、传动系统等关键部件,如有损坏或磨损情况,及时更换。
- 注意设备润滑,保持传动系统的顺畅运作。
五、安全注意事项1. 在操作热转印机时,应全程佩戴防护手套,以防烫伤或损伤皮肤。
2. 使用优质和符合标准的材料,以确保转印效果和产品质量。
3. 不得随意调整热转印机的温度和时间参数,以免引起设备故障或损坏。
东芝 热转印打印机 B-SA4TM 系列 说明书
□使用杀虫剂和其他化学药剂时的注意事项:
不要将设备与杀虫剂或者其他挥发性溶剂直接接触,以免腐蚀机箱和机内其他部件, 或引起掉漆。
iii
目录
1. 产品概述.......................................................................E1- 1
警告
下列的图示表示,如果对此设备作不恰当的与提示相违背的操作,
将可能引起严重伤害或者有死亡的危险。
禁止使用非指定的电压
˙禁止使用与机器铭牌 上标注不符的电压,否 则会引起火灾或者电击。
禁止
˙禁止用湿的手插拔 电源线,否则会受到 电击。
禁止
˙如果此设备和其他大 耗电量的设备使用同一 个插座,则在使用这些 设备的时候将会引起电 流的大幅度波动。一定 要给此设备提供一个单 独的插座,否则会引起 Ր㦞҃ऀ电击ɻ
˙如果有外物(如金属 碎片、水、液体等)进 入设备,首先关掉开关 并且将电源线和插销拔 掉,然后与授权的东芝 泰格代理商取得联系获 得帮助。如果在这样的 状态下继续使用本设备 会引起火灾或者电击。
与地线相连
˙保证本设备安全接好 地线。扩展电缆线也应 该接地。如果接地的方 式不恰当会引起火灾或 者电击。
拔掉电源插头
˙˙拔Ռ出设电备源ෆ线৻的㣸时མ候҃, ֎注壳意损一毁定ɼ要请握፝住ᎃ插电头ݯ部 ᎎ分头拔ɼ出વ。如果त握权住త线东部 ࣳ分T拔EC拽会ཧ使里औ面ಘ的联金ܥ属 获线ಘ扯㢦断ॿ或ɻ者ࡏ暴这露种出来ႎ而 Լ引ɼ起ए火န灾继或续者电༻击ձ。Ҿ ىՐ㦞҃ऀ
禁止拆卸机箱
˙不要擅自打开机箱, 修或者改装设备。设备 的高电压,很热的部件 者锐利的边沿都可能使 受伤。
Brother CP-2140L 热转印标签机手册说明书
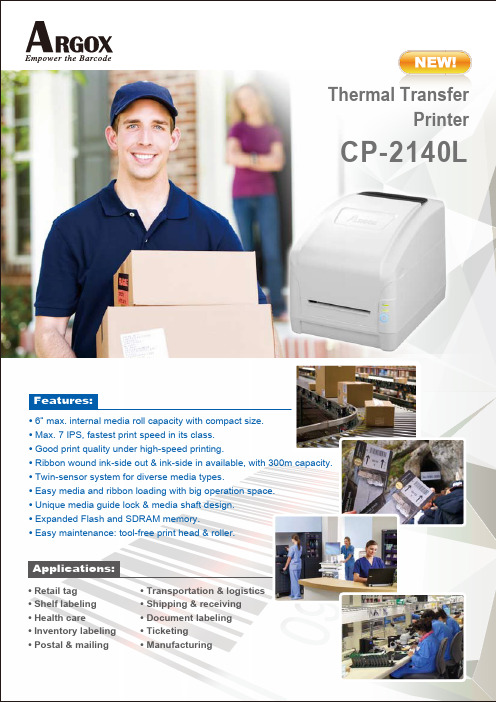
Operation Interface Communication Interface
Programming Language
CP-2140L Direct Thermal & Thermal Transfer
203 dpi (8 dots/mm) Max. 7ips
Max 100”(2540 mm) Max 4.1” (104 mm) 16 MB SDRAM, 8 MB Flash ROM 32 bit RISC microprocessor Media Reflective sensor x 1 (movable) & Media Transmissive sensor x 1 (Centrally fixed) / Head open switch / Ribbon end sensor LED indicator x 2, Button x 1 USB, RS-232, Parallel
Argox Information Co., Ltd.
7F., No.126, Ln.235, Baoqiao Rd., Xindian Dist., New Taipei City 231, Taiwan (R.O.C.) Tel:+886-2-8912-1121 Fax:+886-2-8912-1124
Applications:
• Retail tag • Shelf labeling • Health care • Inventory labeling • Postal & mailing
• Transportation & logistics • Shipping & receiving • Document labeling • Ticketing • Manufacturing
研捷热转印打码机说明书
研捷热转印打码机说明书一、产品简介研捷热转印打码机是一种高效、稳定的打码设备,适用于各种材质的打码需求。
该打码机采用热转印技术,能够在各种塑料、金属、玻璃等材质上打印清晰、持久的字迹信息。
广泛应用于电子、食品、医药、化妆品等行业。
二、设备外观研捷热转印打码机外观简洁大方,采用优质不锈钢材质,整机线条流畅,质感十足。
机身尺寸为450mm x 500mm x 200mm,重量适中,方便携带和移动。
打码机的前面板上设有操作按键和显示屏,方便用户操作。
三、结构特点研捷热转印打码机采用先进的热转印技术,其主要结构包括以下几个部分:1. 打印头:采用高温高压热敏打印头,可打印各种字体和图案。
2. 热转印装置:包括热敏纸卷和色带,能够在各种材质上打印出高质量的字迹。
3. 切纸装置:自动切纸刀,能够准确切断打印完成的热敏纸。
4. 操作面板:方便用户设置打印内容和参数。
5. 电源开关:控制打码机的开关。
四、技术参数1. 打印速度:最大可达120mm/s。
2. 打印精度:最高可达600dpi。
3. 打印宽度:最大可达120mm。
4. 热敏纸卷直径:最大可达100mm。
5. 电源:AC 110-240V,50/60Hz。
6. 功率:约30W。
五、操作说明1. 开机操作:打开电源开关,等待设备自检完成,显示欢迎界面后即可开始操作。
2. 设置参数:在操作面板上选择打印内容、字体、大小等参数,根据需要调整打印速度和精度。
3. 上纸操作:将热敏纸卷安装在纸卷轴上,并将纸头穿过打印头通道,固定在后端的夹纸上。
4. 开始打印:确认打印设置无误后,按下操作面板上的“打印”按钮,开始打印。
5. 切纸操作:打印完成后,按下操作面板上的“切纸”按钮,自动切纸刀会将打印完成的热敏纸切割成单张纸。
6. 关闭设备:使用完毕后,关闭电源开关,清理设备周边卫生。
六、故障排除1. 打印机无法开机:检查电源开关是否打开,检查电源线是否接触良好。
2. 打印速度缓慢:检查打印设置中的速度是否过慢,适当调快速度。
TOSHIBA B-SX5T系列热转印打印机 说明书
目录
1. 产品概览-------------------------------------------------------------------------------------------------------------------E1-1
1.1 介绍 ......................................................................................................................................E1-1 1.2 特点 ......................................................................................................................................E1-1 1.3 拆箱 ......................................................................................................................................E1-1 1.4 附件 ......................................................................................................................................E1-2 1.5 外观 ......................................................................................................................................E1-2
TEC 热转印打印机 B-452-TS 说明书
TEC 热转印打印机B-452-TS警告!此为A级产品,在生活环境中,该产品可能会造成无线电干扰。
在这种情况下,可能需要用户对其干扰采取切实可行的措施。
注意:不可接触机器的运动部件。
当手指、珠宝饰物、衣服等进入运动部件后为减少发生的危险,请将开关拨到“OFF”位置以停止运动。
注意:1、本手册在没有经过东芝泰格公司的同意不准全部或部分进行复制。
2、本手册有可能不经通知而有所改动。
3、如果对本手册有任何问题,请联系当地的负责服务的代理商。
特别要警告的内容在符号中左边的符号表示一般的提醒注意禁止接入任何与规定交流电压不符的电源禁止预防措施B-452-TS用户手册目录1. 引言-------------------------------------------------------------------------------------------11.1应用型号----------------------------------------------------------------------------------------------11.2附件-----------------------------------------------------------------------------------------------------12. 规格-------------------------------------------------------------------------------------------22.1一般规格---------------------------------------------------------------------------------------------22.2打印机规格-----------------------------------------------------------------------------------------------22.3打印纸(标签)规格----------------------------------------------------------------------------------32.4碳带规格---------------------------------------------------------------------------------------------32.5选件-----------------------------------------------------------------------------------------------33. 外观-------------------------------------------------------------------------------------------43.1前后视图---------------------------------------------------------------------------------------------43.2操作面板----------------------------------------------------------------------------------------------44. 双列式(DIP)开关功能--------------------------------------------------------------------55. 建立过程-------------------------------------------------------------------------------------65.1操作要求---------------------------------------------------------------------------------------------65.2设置打印机-------------------------------------------------------------------------------------------66. 安装过程-------------------------------------------------------------------------------------76.1安装供纸架单元-------------------------------------------------------------------------------------76.2连接电源线和电缆----------------------------------------------------------------------------------77. 装入碳带-------------------------------------------------------------------------------------88. 装纸------------------------------------------------------------------------------------------109. 阈值的设置------------------------------------------------------------------------------------1410. 纸和碳带的保护和处理-----------------------------------------------------------------1511. 一般维护-----------------------------------------------------------------------------------1611.1清洗-------------------------------------------------------------------------------------------------1611.2外壳-------------------------------------------------------------------------------------------------1711.3塞纸的处理----------------------------------------------------------------------------------------1812. 故障诊断-----------------------------------------------------------------------------------20附录----------------------------------------------------------------------------------------------22感谢您选择了东芝TEC B-452系列热敏/热转印打印机,这新一代高性能高质量打印机装备了最新的硬件,包括最新发展的高分辨率(11.8点/mm, 300点/英寸)打印头,它允许在最大可达101.6mm/秒(4英寸/秒)的速度下进行非常清晰的打印,其它的标准特性包括含有一个外部送纸器。
热转印条幅机的使用方法
热转印条幅机的使用方法
一、打开空气开关,按下总电源按钮,红指示灯亮,打开加热开关,温控仪绿灯亮,本机开始加温。
二、温度设定
1、把温控仪下方拨码器数字拨在250°C,小绿灯亮开始自动控温。
2、当温度显示达到250°C左右时,红灯亮表示工作温度已到即可转印。
3、如果转印时,温度太低,设定温度适当调高些,反之调低些。
4、每次开机前都要先检查遍拨码设定,防止人设定过高而烧坏毛毯。
5、打开电机开关,将其拨到正转上,把调速旋纽从左向右慢慢转动,到合适的速度即可。
三、如何转印
阳版:把刻好的字,有颜色一面放在布上一同送进毛毯即可正常转印。
阴版:把刻好的白纸(或牛皮纸)正放在布上,上面覆一层色纸,一同送进毛毯即可正常转印。
四、断电处理
为了确保转印成品,断电后请转动电机皮带盘,此时仍可转印,效果一样(注意速度要一致)。
五、为了确保转印毛毯使用寿命,请每次转印结束后,将拨码器调到
95°C以下,机器继续转动,直至显示温度降至100°C以下,即可停机。
本文由中国标识网收集整理,更多信息请访问标识商学院。
HT-08AK自动转印机使用说明书
HT-08AK转印机使用说明书中国网印特印网目录一、概述………………………………………………二、规格与技术参数…………………………………三、主机结构说明……………………………………。
四、工作台……………………………………………。
五、控制面板操作……………………………………。
六、操作程序…………………………………………。
七、使用烫金机的有关事项…………………………。
八、日常维护、检查…………………………………。
九、常见烫印图案陷原因分析………………………。
十、气压传动系统图………………………………。
十一、电、气接线图…………………………………。
十二、烫印故障处理……………………………………。
附件:温控器操作说明一、概述热转印机是将预先印刷好的花箔通过热烫头加热、加压转印到各类承印物上的一种新印刷机械。
其生产效力高、经济效益显著,是表面加工行业的理想设备。
它广泛用于文教用品、化妆品、玩具、家庭日用生活品、家电产品、标牌等行业的产品以及包装物的印刷装璜上。
经热转印的产品,色彩艳丽,色层厚实,富有立体感,而且附着力强。
能提高产品档次,增加产品附加价值。
本机因转印时胶辊以直线与加工面接触,转印时可避免转印纸与加工物之间含空气之缺点,能获得均匀美观的图案及文字。
该机可烫印平面、圆柱形物体。
二、主要技术参数1、型号表示250mm2、技术参数三、结构说明本机由机架、立柱、升降结构、烫头、收、放膜结构、工作台、电气控制系统组成。
1、机架部分:机架为钢结构焊接件。
用于承装整机所有各部件,四只底脚螺丝用于调整机台平稳。
2、立柱部分:立柱为铸铁件。
它与升降调节丝杆、升降手手轮组成一套部件。
转动升降手手轮可以调节滚烫头的高度,以调整烫头和承印物表面之间距离。
特别注意:转动升降手轮时,务必先松开立柱后面紧固板上的三个M14螺栓(只需稍松即可)。
待定位后再锁紧,避免工作时晃动下滑。
3、升降机构:由滑动座上的悬臂、行程气缸、法兰盘、滑动块、滑块垫片、锁紧块、上下连接板、限位杆等组成。
热转印TTO打印机25Xli使用说明书
热转印TTO打印机25Xli使用说明书热转印TTO打印机25Xli使用说明书目录一、TTO简介二、TTO系统结构图三、TTO的使用一、TTO简介热转印打码机又名TTO,和普通墨轮打码机对比,没有固定字粒,打码机有集成块(打印头)。
热转印打码机的适用范围:可以在软薄材质的包装标签或光滑的卡片表面在线打印;需要打条形码的(任何)场合;要打印实时信息的场合可以精确到出产时间。
热转印打码机分连续式和间歇式两种,连续式需配备同步器,而间歇式需要硅胶垫。
热转印打码机的耗材是热转印色带。
色带分为三种类型,蜡基Wax、树脂Resin、蜡和树脂的混合基Wax/Resin Blend.热转印打码机的工作原理:每个打印头都有一排加热元件;这些元件以釉(一种玻璃质薄层)做为保护层,并在适当的时间按被驱动和加热;这些元件所产生的热量将色带上的墨融化,同时由于气压的压力把墨转移到衬底上。
只有热转印打码机的字不是独立打的,可以行打印。
世界上最快的打码机可以每秒600MM。
热转印打码机性能1、300 dpi分辨率热转印打码给予喷头加热和色带加热。
喷头包含一个陶瓷-玻璃组件,每毫米12个加热喷印点。
可以提供高达300 dpi分辨率的打印质量. 打印信息在加热喷头中准备,单独喷印点也需要加热。
铝箔上的彩色颜料被加热打印于需要的区域。
2、运行成本经济,可打印多种信息热转印智能打码机(TTO)可以自由编程并为每项标识作业生成各种数据。
高分辨率喷头能够打印出文字、图形、批号、实时日期和条形码。
借助已经成熟的热转印打码技术,可以直接在包装材料上打码。
因此不再需要标签,成本也随之显著降低。
3、为包装行业提供最就经济的解决方案采用了最先进的热转印打码技术,色带消耗量极小,这使得热转印打码机在软包装行业中极具经济优势。
这种设备可以在小包装袋、外层金属箔、包装薄膜、连续膜等包装品上标识,也可以用于填充封口机械的标识。
4、间歇式打印用于间歇式运作的(静止/启动)生产线的间歇打印,即在静止期间完成打印作业。
热转印机安全操作规程
仅供参考[整理] 安全管理文书热转印机安全操作规程日期:__________________单位:__________________第1 页共3 页仅供参考[整理]热转印机安全操作规程1、开机时首先打开气阀开关,检查气压是否0.6Mpa。
2、打开设备总电源,此时操作面板电源指示灯(power)亮起。
把电源开关从OFF处切换到ON处,此时操作面板电源指示灯(MAIN)亮起。
再打开加热开关。
3、为了防止胶辊加温时受热不均而爆裂,胶辊每次加温50℃,每次加温的间隔时间10分钟。
(例如:所要加热的温度值是150℃,第一次加温加到50℃,第二次加温是要等到所加温得温度升到了50℃间隔10分钟之后才能再加温到100℃,第三次加温是要等到所加温得温度升到了100℃间隔10分钟之后才能再加温到150℃。
)特别注意:此设备的最高的加热温度不能超过160℃。
4、当温度到达所设定的温度值后,将张紧开关、加料开关、转印膜感应器开关和传送带开关打开。
5、关机时首先按下停止按钮,将三位切换开关切换到手动处,并关闭加热开关、张紧开关、加料开关、转印膜感应器开关和传送带开关。
再关闭电源开关,最后关闭设备总电源。
注意事项:1、转印时不能将手伸入胶辊下作业,防止烫伤。
2、不可用手触摸胶辊和转轴(严禁戴手套)。
3、设备上的各个旋转部位不可触摸(严禁戴手套去触碰)。
4、确认温度50℃之后才能关闭设备电源。
第 2 页共 3 页仅供参考[整理] 安全管理文书整理范文,仅供参考!日期:__________________单位:__________________第3 页共3 页。
- 1、下载文档前请自行甄别文档内容的完整性,平台不提供额外的编辑、内容补充、找答案等附加服务。
- 2、"仅部分预览"的文档,不可在线预览部分如存在完整性等问题,可反馈申请退款(可完整预览的文档不适用该条件!)。
- 3、如文档侵犯您的权益,请联系客服反馈,我们会尽快为您处理(人工客服工作时间:9:00-18:30)。
“印像王-PK”多功能数码转印机
《使用必读》
1.在使用本机前,请先检查机器的核定电压是否与电网供电电压相符合,是否有可靠的接地保护连接。
2.更换烤印发热部件时,必需先关机并拔去总电源插头。
在更换仍处在高温状态下的烤印头时,请戴好隔热手套。
3.使用过程中避免发热部件的长时间空烧,如不切断电源,请放置一件专门用来防空烧的类似烤印物件(报废品即可,可反复使用)。
注意勿让烤印物件的尖锐部分对各加热部件造成损伤。
4.使用过程中避免人体触及发热部件,防止灼伤。
5.使用过程中避免人体触及压力弹簧,防止对人体可能的损伤。
6.手把下压时,如感觉压力过大难以下压,请调节升降调接手轮抬高机头,减少压力弹簧压缩量。
否则会损害机器的机械强度。
7.升降机头时,须先将机头锁紧手柄旋松。
另外,到下降极限时会感到升降调节手轮上有明显的阻力,不要继续作无谓操作。
8.锁定机头时,机头锁紧手柄不需过度旋紧,手感有明显阻力即可。
9.不要让未成年人在无人监护的条件下触及机器,即使在不使用机器时!!!
10.严禁使用烤盘垫烤制其它物品,烤盘垫仅限用于烤制瓷盘
操作说明
1.检查烤印头连接插头是否已与电控箱连接插座可靠连接。
2.插上电源,打开电源开关。
(本机额定电压220V,最大输入功率1250W)
3.设定操作程序:(本设备温度显示为华氏度)
起始温度:按模式设定键一次,此时设定指示灯亮,按加法键或减法键设定起始温度。
最高温度:按模式设定键第二次,此时温度指示灯亮,按加法键或减法键设定最高温度。
最高温烘烤时间:按模式设定键第三次,此时时间指示灯亮,按加法键或减法键设定最高温烘烤时间。
待执行状态:按模式设定键第四次,机器进入待执行状态。
注:起始温设定范围200~380度,最高温设定范围200~430度
最高温烘烤时间设定范围0~999秒。
本机带有温度设定自锁功能,即如起始温度设为340度,机器将自动限定最
高温设定范围为340~430度。
反之,如先设定最高温度为250度,则机器将
自动限定起始温设定范围为200~250度。
4.烤印:
慢烤:将所需烤印的物件安放好,压下压力手把,打开电源开关,温度开始升高。
当温度升至起始温时,蜂鸣器发出短鸣声,按执行键一次,直至蜂鸣器发出长音,再按执行键一次,结束烤印。
取出物件,温度将自动逐渐回归至起始温度,处于速烤待命状态。
速烤:在起始温度状态下,安放好物件,压下压力手把,按执行键一次,直至蜂鸣器发出长音,再按执行键一次,烫印结束。
取出物件,温度将自动逐渐回归至起始温度,再次处于速烤待命状态。
*在低于起始温的温度下,不等温度升高至起始温就按执行键一样能完成整
个烤印过程,只是在温度上升经过起始温度值时不再停顿并鸣叫。
5.烤印图案不良问题提示:
A.色彩偏淡:温度太低或压力不均或时间过短。
B.图案模糊:时间过长导致油墨扩散。
C.图案表面无光泽:压力过大或温度过高。
D.图案局部模糊:烤印区域热量分布不均。
E.图案有疤痕:烤印时间过长。
F.图案色彩深浅不一:压力不均或物件转印涂层不均。
G.粘纸:温度太高或物件转印涂层不良。
烤印方法推荐:(可在今后具体实践中自我修整)
瓷砖类:
参数:起始温度设定为230度,最高温设定为330度,
最高温烘烤时间,设定为40秒。
烤印:用绒布擦干净磁砖表面,将转印纸贴合在磁砖正面,用高温胶带
粘贴固定,瓷砖正面朝上,放于底座发泡硅胶板正中,压下压力手柄,
如压力过大或过小,可调整机头高度。
按键操作见第4项详细过程。
金属板:
参数:起始温度设定为230度,最高温设定为300度,
最高温烘烤时间,设定为40秒。
烤印:装上平面加热板,压下压力手柄(平面加热板压合在发泡硅胶板上)后开始升温。
撕去金属板表面贴膜,将转印纸贴合在金属板正面,用高温胶带粘贴固定。
待温度升至起始温后抬起压力手柄,金属板置于底座发泡硅胶板正中,压下压力手柄,按执行键开始烤印。
如压力过大或过小,可调整机头高度。
按键操作见第4项详细过程。
马克杯:
参数:起始温度设定为230度,最高温设定为330度,
最高温烘烤时间,设定为40秒。
如需连续印制,可在第一个印制完毕后将起始温调整为325度,最高温不变,最高温烘烤时间,设定为120秒。
杯子放如杯机内即按执行键。
烤印:用绒布擦干净马克杯表面,将转印纸缠包马克杯,用高温胶带粘贴固定,放于烤杯机模腔内,推动压力手柄,如压力过大或过小,可调整推杆行程,按键操作见第4项详细过程。
布艺:
参数:起始温度设定为355度,最高温设定为355度,最高温烘烤时间:
(纯化纤或含化纤布料用热升华纸30~50秒,纯棉用T恤转印纸10~20秒)
烤印:装上平面加热板,压下压力手柄(平面加热板压合在发泡硅胶板上)后开始升温。
将转印纸贴合在T恤转印位置,用高温胶带粘贴固定,待温度升至起始温后抬起压力手柄,将T恤放置于底座发泡硅胶板正中,压下压力手柄,按执行键开始烤印。
如压力过大或过小,可调整机头高度。
按键操作见第4项详细过程。
瓷盘:
参数:起始温度设定为355度,最高温设定也为355度,最高温烘烤时间,设定为150秒。
烤印:装上烤盘垫,压下压力手柄(烤盘垫压合在发泡硅胶板上)后开始升温。
用绒布擦干净瓷盘表面,将转印纸贴合在瓷盘正中,用高温胶带粘贴固定,待温度升至起始温后抬起压力手柄,将瓷盘放于底座发泡硅胶板正中,压下压力手柄,按执行键开始烤印。
如压力过大或过小,可调整机头高度。
按键操作见第4项详细过程。
