1998年日产千里马Maxima原厂维修手册(英文版)-LC
1998年日产千里马Maxima原厂维修手册(英文版)-CL

CLUTCHSECTION CLGo to Table of ContentsGo to Quick Reference IndexSBR500Precautions¼Recommended fluid is brake fluid“DOT3”.¼Never reuse drained brake fluid.¼Be careful not to splash brake fluid on painted areas.¼When removing and installing clutch piping,use Tool.¼Use new brake fluid to clean or wash all parts of master cylinder,operating cylinder and clutch damper.¼Never use mineral oils such as gasoline or kerosene.It will ruin the rubber parts of the hydraulic system. WARNING:After cleaning clutch disc,wipe it with a dust collector.Do not use compressed air.Special Service ToolsThe actual shapes of Kent-Moore tools may differ from those of special service tools illustrated here.Tool number(Kent-Moore No.)Tool nameDescriptionGG94310000(—)Flare nut torquewrenchNT406Removing and installing clutch pipinga:10mm(0.39in)KV30101000(J33213) Clutch aligningbarNT440Installing clutch cover and clutch disca:12mm(0.47in)dia.b:15.7mm(0.618in)dia.c:22.8mm(0.898in)dia.d:21mm(0.83in)e:22mm(0.87in)ST20050240(—) Diaphragm spring adjustingwrenchNT404Adjusting unevenness of diaphragm spring of clutch covera:150mm(5.91in)b:25mm(0.98in)KV32101000(J25689-A)Pin punchNT410Removing and installing spring pin a:4mm(0.16in)dia.PRECAUTIONS AND PREPARATIONSCL714k1Pedal bracketk2Clutch master cylinder k3Clutch interlock switch k4Fulcrum pink5Pink6Clutch pedalk7Operating cylinderk8Air bleeder screwk9Withdrawal leverk10Release bearingk11Clutch hosek12Clutch coverk13Clutch disck14Clevis pink15Assist springk16ASCD cancel switchk17Washerk18Clutch hose connectork19Bushingk20Stopper rubber CLUTCH SYSTEM—Hydraulic TypeSCL715Adjusting Clutch Pedal1.Adjust pedal height with ASCD cancel switch.Pedal height“H”:168-175mm(6.61-6.89in)SCL7022.Adjust pedal free play with master cylinder push rod.Thentighten lock nut.Pedal free play“A”:9-16mm(0.35-0.63in)¼Push or step on clutch pedal until resistance is felt,and check the distance the pedal moves.SCL380For U.S.A.model only3.Adjust clearance“C”shown in the figure while fully depressingclutch pedal.Clearance C:0.3-1.0mm(0.012-0.039in)SCL597Bleeding Procedure1.Bleed air from clutch operating cylinder according to the fol-lowing procedure.Carefully monitor fluid level at master cylinder during bleed-ing operation.a.Top up reservoir with recommended brake fluid.b.Connect a transparent vinyl tube to air bleeder valve.c.Slowly depress clutch pedal all the way several times.d.With clutch pedal depressed,open bleeder valve to release air.Then close bleeder valve.e.Release clutch pedal and wait for a few seconds.f.Repeat steps c through e above until brake fluid flows from airbleeder valve without air bubbles.2.Bleed air from clutch piping connector according to the abovesame procedure.3.Repeat the above bleeding procedures1and2several times.Clutch Master CylinderSCL762 DISASSEMBLY AND ASSEMBLY¼Push piston into cylinder body with screwdriver when remov-ing and installing valve stopper.INSPECTIONCheck the following items,and replace if necessary.¼Rubbing surface of cylinder and piston,for uneven wear,rust or damage¼Piston with piston cup,for wear or damage¼Return spring,for wear or damage¼Dust cover,for cracks,deformation or damage¼Reservoir,for deformation or damageOperating CylinderSCL709INSPECTIONCheck the following items,and replace if necessary.¼Rubbing surface of cylinder and piston,for uneven wear,rust or damage¼Piston with piston cup,for wear or damage¼Piston spring,for wear or damage¼Dust cover,for cracks,deformation or damageCLUTCH RELEASE MECHANISMSCL598INSPECTIONCheck the following items,and replace if necessary.¼Release bearing,to see that it rolls freely and is free from noise,cracks,pitting or wear¼Release sleeve and withdrawal lever rubbing surface,for wear, rust or damageSCL708 LUBRICATION¼Apply recommended grease to contact surface and rubbing surface.¼Too much lubricant might damage clutch disc facing.SCL599-CSCL229Clutch DiscINSPECTIONCheck the following items,and replace if necessary.¼Clutch disc,for burns,discoloration,oil or grease leakage ¼Clutch disc,for wear of facingWear limit of facing surface to rivet head:0.3mm(0.012in)SCL221¼Clutch disc,for spline backlashMaximum spline backlash(at outer edge of disc):1.0mm(0.039in)¼Clutch disc,for facing runoutRunout limit:1.0mm(0.039in)Distance of runout check point(from hub cen-ter)115mm(4.53in)INSTALLATION¼Apply recommended grease to contact surface of spline por-tion.¼Too much lubricant might damage clutch facing.CLUTCH DISC AND CLUTCH COVERSCL466Clutch Cover and FlywheelINSPECTION AND ADJUSTMENT¼Check clutch cover installed on vehicle for unevenness of dia-phragm spring toe height.Uneven limit:0.5mm(0.020in)¼If out of limit,adjust the height with Tool.AEM100FLYWHEEL INSPECTION¼Check contact surface of flywheel for slight burns or discolora-tion.Repair flywheel with emery paper.¼Check flywheel runout.Maximum allowable runout:Refer to EM section(“Inspection”,“CYLINDERBLOCK”).SCL600INSTALLATION¼Insert Tool into clutch disc hub when installing clutch cover and disc.¼Tighten bolts in numerical order.¼Be careful not to allow grease to contaminate clutch fac-ing.Firststep:General SpecificationsCLUTCH CONTROL SYSTEMType of clutch control HydraulicCLUTCH MASTER CYLINDERInner diameter mm(in)15.87(5/8)CLUTCH OPERATING CYLINDER Inner diameter mm(in)19.05(3/4)CLUTCH DISCUnit:mm(in) Model240Facing size(Outer dia.x inner dia.x thickness)240x160x3.5(9.45x6.30x0.138)Thickness of disc assemblyWith load7.6-8.0(0.299-0.315)with5,688N(580kg,1,279lb)CLUTCH COVERModel240Set load N(kg,lb)5,688(580,1,279) Inspection and AdjustmentCLUTCH PEDALUnit:mm(in) Pedal height*168-175(6.61-6.89) Pedal free play9-16(0.35-0.63) Clearance between pedal stopperrubber and clutch interlock switchthreaded end while clutch pedalis fully depressed.0.3-1.0(0.012-0.039)*:Measured from surface of dash reinforcement panel to surface of pedal pad CLUTCH DISCUnit:mm(in) Model240Wear limit of facing surface torivet head0.3(0.012)Facing runout limit 1.0(0.039) Distance of runout checkpoint(from the hub center)115(4.53)Maximum spline backlash(at outer edge of disc)1.0(0.039)CLUTCH COVERUnit:mm(in) Model240Uneven limit of diaphragm springtoe height0.5(0.020)SERVICE DATA AND SPECIFICATIONS(SDS)CL-12CLUTCHSECTION CL CONTENTSPRECAUTIONS AND PREPARATION (2)Precautions (2)Special Service Tools (2)NOISE,VIBRATION AND HARSHNESS(NVH) TROUBLESHOOTING (3)NVH Troubleshooting Chart (3)CLUTCH SYSTEM—Hydraulic Type (4)INSPECTION AND ADJUSTMENT (5)Adjusting Clutch Pedal (5)Bleeding Procedure.....................................................6HYDRAULIC CLUTCH CONTROL (7)Clutch Master Cylinder (7)Operating Cylinder (8)CLUTCH RELEASE MECHANISM (9)CLUTCH DISC AND CLUTCH COVER (10)..........................................................Clutch Disc (10)Clutch Cover and Flywheel (11)SERVICE DATA AND SPECIFICATIONS(SDS) (12)General Specifications (12)Inspection and Adjustment (12)。
2004年日产西玛(CIMA)维修手册EM
专用维修工具 ........................................................... 5 油底壳和机油集滤器 ................................................. 24
通用维修工具 ........................................................... 7
安装 .................................................................... 16
拆卸 .................................................................... 35 安装 .................................................................... 36
安装 .................................................................... 15 拆卸和安装 ............................................................. 35
更换空气滤清器滤芯 .............................................. 16 拆卸 .................................................................... 16
安装 .................................................................... 14
【大全】汽车维修手册大全好好收藏
【大全】汽车维修手册大全好好收藏【关键字】大全汽车维修手册大全下载地址:上海通用别克陆尊维修手册F50日产风雅维修手册/sort03/sort0147/down-406.htmlC11颐达维修手册中文/sort03/sort0147/down-410.html2005 凯迪拉克XLR 维修手册/sort03/sort0147/down-415.html 2005 凯迪拉克CTS 维修手册/sort03/sort0147/down-416.html 柯斯达维修手册/sort03/sort0147/down-467.html丰田花冠维修手册/sort03/sort0147/down-471.html2007别克林荫大道维修手册/sort03/sort0147/down-499.html 奥迪A4维修手册免费下载/sort03/sort0147/down-781.html 别克维修手册/sort03/sort0147/down-784.html丰田花冠维修手册下载/sort03/sort0147/down-787.html景程维修手册/sort03/sort0147/down-851.html依维柯汽车维修手册/sort03/sort0147/down-1110.html东风雪铁龙赛纳轿车维修手册/sort03/sort0147/down-1111.html别克荣誉维修手册/sort03/sort0147/down-1112.html毕加索维修手册/sort03/sort0147/down-1113.html奥迪A6维修手册-下册/sort03/sort0147/down-1114.html奥迪A6维修手册-上册/sort03/sort0147/down-1115.html爱利舍维修手册/sort03/sort0147/down-1116.htmlA6维修手册2005年/sort03/sort0147/down-1117.html2005 凯迪拉克CTS 维修手册/sort03/sort0147/down-1118.html北京JEEP维修手册/sort03/sort0147/down-1119.html奥迪C6A6维修手册/sort03/sort0147/down-1124.html2003款AUDI A8中文维修手册/sort03/sort0147/down-一汽奥迪A6L维修手册2005(C6)/sort03/sort0147/down-1234.html 新皇冠维修手册/sort03/sort0147/down-1236.html 新广本维修手册/sort03/sort0147/down-1237.html新M3维修手册/sort03/sort0147/down-1239.html维修手册_丰田亚洲龙下/sort03/sort0147/down-1240.html维修手册_丰田亚洲龙上/sort03/sort0147/down-1241.html威驰维修手册/sort03/sort0147/down-1242.html上海雪佛兰乐骋維修手冊/sort03/sort0147/down-1245.html 上海大众高尔维修手册(2003) /sort03/sort0147/down-1246.html瑞风英文维修手册/sort03/sort0147/down-1248.html瑞风第三版发动机维修手册2006 /sort03/sort0147/down-1250.html瑞风第三版底盘维修手册2006 /sort03/sort0147/down-1251.html瑞风第二版发动机维修手册2006 /sort03/sort0147/down-1252.html日产FUGA(Y50)风雅维修手册/sort03/sort0147/down-1256.html普利马维修手册/sort03/sort0147/down-1258.html克莱斯勒土星原厂手册/sort03/sort0147/down-1262.html克莱斯勒彩虹原厂维修手册/sort03/sort0147/down-1264.html 凯迪拉克XLR /sort03/sort0147/down-1265.html花冠维修手册/sort03/sort0147/down-1266.html花冠NZE12.ZZE12维修手册/sort03/sort0147/down-1267.html国产奥迪A6、帕萨特全车维修手册/sort03/sort0147/down-1270.html丰田特锐修理手册-最终版 B /sort03/sort0147/down-丰田特锐修理手册-最终版 A /sort03/sort0147/down-1275.html丰田陆地巡洋舰3400维修手册(下册)/sort03/sort0147/down-1276.html丰田陆地巡洋舰3400维修手册(上册)/sort03/sort0147/down-1277.html2002款stream时韵维修手册/sort03/sort0147/down-1324.html04MY富士森林人原厂维修手册/sort03/sort0147/down-1325.html爱利舍维修手册/sort03/sort0147/down-1329.html东风雪铁龙赛纳维修手册/sort03/sort0147/down-1336.html 福特05款领航员维修手册/sort03/sort0147/down-1337.html 雷诺RENAULT维修手册/sort03/sort0147/down-1339.html 新皇冠原厂维修手册包括电路/sort03/sort0147/down-1346.html雪铁龙赛纳维修手册(电路图部分) /sort03/sort0147/down-1347.html一汽A6L维修手册2005(C6)/sort03/sort0147/down-1348.html翼豹维修手册中文版/sort03/sort0147/down-1349.html悦达千里马维修手册/sort03/sort0147/down-1350.html福克斯维修手册/sort03/sort0147/down-1352.html双龙爱腾SUV-ACTYON维修手册/sort03/sort0147/down-1355.html奇瑞东方之子维修手册(部分) /sort03/sort0147/down-1356.html奇瑞T11维修手册(瑞虎SUV)/sort03/sort0147/down-1357.html凯美瑞原厂维修手册06 /sort03/sort0147/down-1358.html嘉年华维修资料/sort03/sort0147/down-1360.html富士森林人05、06原厂维修手册/sort03/sort0147/down-1361.html丰田特锐维修手册/sort03/sort0147/down-1362.html东风雪铁龙凯旋电器手册-原厂2006-10 /sort03/sort0147/down-1364.html东风雪铁龙毕加索轿车维修手册/sort03/sort0147/down-1365.html大捷龙中文维修手册/sort03/sort0147/down-1367.html北京现代特拉卡T erracan维修手册/sort03/sort0147/down-1368.html宝来Bora A4维修手册/sort03/sort0147/down-1370.html一汽大众速腾维修手册/sort03/sort0147/down-1438.html丰田皇冠CROWN维修手册——原厂扫描2004 /sort03/sort0147/down-1439.html东南新菱帅台湾版JT(Virage) /sort03/sort0147/down-1440.html东南凌绅维修手册/sort03/sort0147/down-1441.html东风日产(骐达颐达)维修手册/sort03/sort0147/down-1444.html东风本田CR-V维修手册/sort03/sort0147/down-1447.html2006 ODYSEEY奥德赛维修手册/sort03/sort0147/down-1450.html2005 ODYSEEY奥德赛维修手册/sort03/sort0147/down-1451.html2002 ODYSEEY奥德赛维修手册/sort03/sort0147/down-1453.html欧洲汽车自动变速器维修手册/sort03/sort0147/down-1626.html夏利2000金夏利环保夏利轿车维修手册/sort03/sort0147/down-1632.html哈飞赛马全车维修手册/sort03/sort0147/down-1643.html奥迪A4 01V型自动变速器前轮驱动和全轮驱动维修手册/sort03/sort0147/down-1649.html 雪佛兰开拓者汽车维修手册/sort03/sort0147/down-1658.html夏利2000维修手册/sort03/sort0147/down-1661.html帕萨特B5维修手册/sort03/sort0147/down-1696.html中华轿车维修手册/sort03/sort0147/down-1701.html奇瑞QQS11维修手册/sort03/sort0147/down-1712.html奇瑞QQ6维修手册/sort03/sort0147/down-1713.html奇瑞A113维修手册/sort03/sort0147/down-1715.html凯迪拉克维修手册/sort03/sort0147/down-1716.html广州飞度轿车维修手册(1.3L) /sort03/sort0147/down-1717.html大众途安维修手册(英文版) /sort03/sort0147/down-1719.html 2007款凯美瑞原厂维修手册B(英文)/sort03/sort0147/down-1724.html 2007款凯美瑞原厂维修手册A (英文)/sort03/sort0147/down-1725.html2003雅阁Accord维修手册/sort03/sort0147/down-1726.html 丰田supra维修手册/sort03/sort0147/down-1732.htmlNISSAN全系列乘用车维修保养手册/sort03/sort0147/down-1745.html羚羊世纪星轿维修手册/sort03/sort0147/down-1972.html上海雪弗兰乐驰维修手册/sort03/sort0147/down-1973.htmlAQ015变速器维修手册/sort03/sort0147/down-2111.htmlb11东方之子维修手册/sort03/sort0147/down-2112.html保时捷968维修手册/sort03/sort0147/down-2114.html东方之子的变速箱维修手册/sort03/sort0147/down-2115.html 东南菱帅维修手册/sort03/sort0147/down-2116.html比亚迪F3维修手册/sort03/sort0147/down-2123.html湖汽_长丰猎豹汽车维修手册/sort03/sort0147/down-2130.html花冠维修手册/sort03/sort0147/down-2131.html吉利自由舰维修手册/sort03/sort0147/down-2132.html凯迪拉克维修手册/sort03/sort0147/down-2133.html轩逸维修手册/sort03/sort0147/down-2140.html雪佛兰开拓者汽车维修手册/sort03/sort0147/down-2141.html 起亚电路维修手册/sort03/sort0147/down-2192.html奔驰BENZS320维修手册/sort03/sort0147/down-2211.html 《A55 江淮瑞风维修手册》/sort03/sort0147/down-2218.html 1985款丰田卡车及四轮驱动汽油机车维修手册/sort03/sort0147/down-2224.html 东风雪铁龙毕加索轿车结构与维修/sort03/sort0147/down-2225.html凌志LS400维修手册/sort03/sort0147/down-2229.html帕萨特领驭空调维修手册/sort03/sort0147/down-3240.html欧宝电路维修手册/sort03/sort0147/down-3242.html雷诺风景维修手册/sort03/sort0147/down-3243.html奔驰S600维修手册/sort03/sort0147/down-3246.html保时捷卡宴维修手册/sort03/sort0147/down-3247.html07款新猎豹CS6车间维修手册/sort03/sort0147/down-4361.html东风悦达起亚福瑞迪/sort03/sort0147/down-4362.html比亚迪F3DS15-41型变速器结构图册/sort03/sort0147/down-4616.html比亚迪F3安全气囊维修手册/sort03/sort0147/down-4617.html比亚迪F3变速器维修手册/sort03/sort0147/down-4618.html 比亚迪F3车身附件维修手册/sort03/sort0147/down-4619.html比亚迪F3车身维修手册/sort03/sort0147/down-4620.html比亚迪F3外饰维修手册/sort03/sort0147/down-4621.html比亚迪F3维修手册/sort03/sort0147/down-4622.html丰田普瑞维亚PREVIA 维修手册/sort03/sort0147/down-6655.html07款三菱LANCER EVOLUTION IX 维修手册/sort03/sort0147/down-7089.html 2005年斯巴鲁翼豹维修手册中文版/sort03/sort0147/down-7098.html2006飞度FIT维修手册增补版/sort03/sort0147/down-7099.html99年NISSAN(Y61)维修手册/sort03/sort0147/down-7104.htmlNISSAN_日产骐达电子维修手册TIIDA(DFL7160) /sort03/sort0147/down-7105.html PASSATB5维修手册/sort03/sort0147/down-7106.htmlVOLVOS80维修手册/sort03/sort0147/down-7107.html北京现代途胜使用手册/sort03/sort0147/down-7108.html北京现代雅坤特使用手册/sort03/sort0147/down-7109.html昌河铃木北斗星维修手册/sort03/sort0147/down-7111.html长安CM8原厂维修手册/sort03/sort0147/down-7112.html长安福特嘉年华维修手册/sort03/sort0147/down-7117.html长安福特蒙迪欧维修手册/sort03/sort0147/down-7118.html朝阳柴油机_4102-c3a-c3b维修手册/sort03/sort0147/down-7128.html朝阳柴油机_4102C3C至C3G系列维修手册/sort03/sort0147/down-7129.html朝阳柴油机_电控发动机常见故障的检/sort03/sort0147/down-7130.html道奇锋哲Avenger中文维修手册/sort03/sort0147/down-7131.html东风雪铁龙凯旋原厂维修手册/sort03/sort0147/down-7134.html福特蒙迪欧维修手册/sort03/sort0147/down-7167.html广州本田飞度维修手册/sort03/sort0147/down-7169.html花冠Corolla 2004维修手册/sort03/sort0147/down-7173.html 卡迪拉克英文版维修手册/sort03/sort0147/down-7174.html凌志LS430电器维修手册/sort03/sort0147/down-7175.html 羚羊世纪星轿车维修手册/sort03/sort0147/down-7176.html尼桑Y61 99-3电子维修手册/sort03/sort0147/down-7177.html尼桑Y61电子维修手册/sort03/sort0147/down-7178.html欧宝电路维修手册/sort03/sort0147/down-7179.html欧蓝德2004维修手册/sort03/sort0147/down-7181.html帕杰罗06英文版维修手册/sort03/sort0147/down-7182.html 奇瑞瑞麒2维修手册/sort03/sort0147/down-7183.html起亚电路维修手册/sort03/sort0147/down-7186.html日产俊逸维修手册/sort03/sort0147/down-7187.html日产尼桑A33电子维修保养手册/sort03/sort0147/down-7188.html日产尼桑B14电子维修保养手册/sort03/sort0147/down-7189.html日产尼桑D22电子维修保养手册01年/sort03/sort0147/down-7190.html日产尼桑D22电子维修保养手册98年/sort03/sort0147/down-7191.html日产尼桑E25电子维修保养手册/sort03/sort0147/down-7192.html日产尼桑N16电子维修保养手册/sort03/sort0147/down-7193.html日产尼桑T30电子维修保养手册/sort03/sort0147/down-日产尼桑U13电子维修保养手册/sort03/sort0147/down-7195.html日产尼桑W41电子维修保养手册/sort03/sort0147/down-7196.html日产尼桑Y61电子维修保养手册01年/sort03/sort0147/down-7197.html日产尼桑风度A32电子维修保养手册/sort03/sort0147/down-7200.html上汽荣威750维修手册【上】/sort03/sort0147/down-7203.html上汽荣威750维修手册【中】/sort03/sort0147/down-7202.html上汽荣威750维修手册【下】/sort03/sort0147/down-7201.html双龙汽车维修手册/sort03/sort0147/down-7204.html天籁电子维修手册/sort03/sort0147/down-7206.html原厂丰田凯美瑞维修手册/sort03/sort0147/down-7209.html原厂威驰维修手册/sort03/sort0147/down-7217.html丰田锐志2005原厂维修手册/sort03/sort0147/down-9082.html广州本田honda维修手册/sort03/sort0147/down-10866.html 途安维修手册(无电路图)/sort03/sort0147/down-13851.html 宝马315-323i 维修手册/sort03/sort0147/down-14412.html 本田CRV维修手册/sort03/sort0147/down-14413.html长安之星微型汽车维修手册(上) /sort03/sort0147/down-14421.html长安之星微型汽车维修手册(下) /sort03/sort0147/down-14422.html依维柯汽车与长安微型汽车维修手册/sort03/sort0147/down-北京现代酷派汽车电路维修手册(上) /sort03/sort0147/down-14440.html北京现代酷派汽车电路维修手册(中) /sort03/sort0147/down-14439.html北京现代酷派汽车电路维修手册(下) /sort03/sort0147/down-14438.html别克世纪、皇朝汽车维修手册(电控发动机)上/sort03/sort0147/down-14442.html 别克世纪、皇朝汽车维修手册(电控发动机)下/sort03/sort0147/down-14441.html 长安1.6L发动机维修手册/sort03/sort0147/down-14443.html长安MF514A01手动变速器维修手册/sort03/sort0147/down-14444.html道奇捷龙汽车维修手册/sort03/sort0147/down-14451.html菲亚特汽车维修手册/sort03/sort0147/down-14453.html广州本田飞度汽车车身电器维修手册/sort03/sort0147/down-14454.html广州本田飞度汽车空调暖风系统维修手册/sort03/sort0147/down-14455.html捷达前卫轿车维修手册/sort03/sort0147/down-14457.html奇瑞瑞虎汽车电路维修手册/sort03/sort0147/down-14458.html通用鲁米娜汽车维修手册/sort03/sort0147/down-14465.html 本田雅阁轿车悬挂系统检修手册/sort03/sort0147/down-14518.html比亚迪F6维修手册(部分)/sort03/sort0147/down-14519.html丰田霸道原厂维修手册/sort03/sort0147/down-14521.html丰田佳美2.2/3.0轿车维修手册(上) /sort03/sort0147/down-14522.html丰田佳美2.2/3.0轿车维修手册(下) /sort03/sort0147/down-14523.html2003 赛欧SGM7160 SL SC 系列中文维修手册/sort03/sort0147/down-14672.html 江铃汽车T系列汽油欧Ⅲ维修手册/sort03/sort0147/down-14684.html江淮瑞风英文维修手册/sort03/sort0147/down-14711.html上海POLO轿车维修手册/sort03/sort0147/down-14714.html 上海大众GOL(2003)维修手册(下) /sort03/sort0147/down-14781.html上海大众GOL(2003)维修手册(上) /sort03/sort0147/down-14782.html比亚迪F0电喷系统维修手册/sort03/sort0147/down-14947.html雨燕维修手册/sort03/sort0147/down-14989.html吉利金刚原厂维修手册/sort03/sort0147/down-15103.html雪弗兰科西佳轿车维修手册(上)/sort03/sort0147/down-15134.html雪弗兰科西佳轿车维修手册(下)/sort03/sort0147/down-15133.html日产汽车D22 98-10维修手册(增补2) /sort03/sort0147/down-15240.html日产汽车D22 98-10维修手册/sort03/sort0147/down-15241.html日产汽车E25维修手册/sort03/sort0147/down-15242.html日产汽车N16维修手册/sort03/sort0147/down-15243.html .14/List_feizhuliu/3387407_70_1.html二月六号后更新维修手册请进入网站下载更多汽车维修手册、维修电路图到精通维修下载站下载此文档是由网络收集并进行重新排版整理.word可编辑版本!。
2004年日产西玛(CIMA)维修手册RSU
C D RSU EES001TS F G H
I
J
K
L
M
RSU-3
噪音、振动和不平顺 (NVH)故障排除 噪音、振动和不平顺 (NVH)故障排除 NVH 故障排除表
组装 .................................................................... 10 轮罩拱高 (空载 *) ............................................... 18
悬臂 ...........................................................................11
扭力扳手 2. HT62940000
插座转接器 (1/2'') 3. HT62900000
插座转接器 (3/8'')
通用维修工具
工具名称
动力工具
准备工作
说明
PFP:00002
A
EES001TR
B
NT124
测量球节转动力矩
说明
PBIC0190E
• 拆卸车轮螺母 • 拆卸扭力杆固定螺栓 • 拆卸后悬架部件
安装 .................................................................... 16
减震器 ........................................................................ 9 后悬架横梁 ................................................................ 17
2004年日产西玛(CIMA)维修手册AV
2004年日产西玛(CIMA)维修手册ACC
拆卸和安装 ................................... 2 标准值和极限值 .......................... .....4
拆卸 ......................................... 2 紧固扭矩 ................................ .....4
安装 ......................................... 3
G
安装后的检查 ................................. 3
H
I
J
K
L
M
ACC-1
油门踏板控制系统 拆卸和安装
油门踏板控制系统
PFP:18005
EBS015RJ
1. 油门拉线 4. 油门拉线支架 7. 衬套
调整油门拉线 1. 松开锁定螺母和调节螺母。 2. 拧紧加速器调整螺母直到节气门鼓开始移动。 3. 从该位置,将调节螺母向回转 1.5 至 2 圈。 4. 以规定的扭矩拧紧锁紧螺母,以支撑调整螺母。 安装后的检查 • 检查油门踏板踩到底时节气门鼓是否全开,以及整个工作过程是否顺畅。 • 检查释放油门踏板后节气门鼓是否回到怠速位置。 • 检查 ASCD 拉线是否拉扯节气门鼓。
A ACC
C D E F G H I J K L M
ACC-3
油门踏板控制系统
维修数据和技术参数 (SDS) 标准值和极限值
转回油门拉线调整螺母
紧固扭矩
油门踏板 油门拉线支架 油门拉线锁紧螺母
PFP:00030
1.5 - 2 圈 ( 节气门鼓刚开始动作的位置 )
EBS015RL
2004年日产西玛(CIMA)维修手册LU
G
H
机油压力开关
: 12.3 -17.2 N·m (1.25 -1.75 kg-m, 9 -365.76 cm-lb)
I
更换发动机机油
警告: • 由于发动机油温度很高,小心不要被烫伤。
EBS015FA
J
•
长时间并反复接触使用过的发动机机油可能引起皮肤癌,尽量避免皮肤直接与使用过的发动机机油接触。
如果发生了接触,应尽快用肥皂或清洁剂彻底清洗。
安装后的检查 ........................................................ 9 M
LU-1
注意事项
注意事项
PFP:00001
密封胶注意事项
密封胶应用步骤
EBS015F4
1. 从油垫贴合面和对应的零件贴合面上去掉旧的油垫。
• 彻底清除密封胶使用表面、安装螺栓和螺栓孔内的密封胶。
PBIC2160E
LU-2
准备工作 专用维修工具
工具编号 工具名称 ST25051001 机油压力表
ST25052000 软管
KV10115801 机油滤清器扳手
WS39930000 管压机
通用维修工具
工具名称 深槽
动力工具
准备工作
S-NT050 S-NT559 S-NT375 S-NT052
PFP:00002
发动机油 ..................................................................... 6 维修数据和技术参数 (SDS)................................... 13 I
检查 ......................................................................... 6 标准值和极限值 ..................................................... 13
96款日产千里马(MAXIMA)轿车缺火
96款日产千里马(MAXIMA)轿车缺火车辆:1996 Nissan Maxima(千里马)发动机:VQ30DE系统:发动机电路和发动机机械症状问题:缺火。
点火线圈没有气缸斓和蚂的火花。
问题是凸轮正时差了一个齿。
背景:这种特别的车辆问题开始于更换泄漏的水泵之后。
在更换完水泵之后,点火线圈妮和仍不点火。
这种车辆的发动机安装的是无分电器点火系统(D1S),该系统有一个独立的功率晶体管,它和6个点火线圈中的每一个安装在一起。
这样以来每个气缸都有一个点火线圈和一个功率晶体管。
来自动力系控制模块(PCM)的一个独立信号发送到每个功率晶体管的基极打开和关闭功率晶体管。
功率晶体管根据据电脑的这些信号使点火线圈的负极脉冲接地。
修理技工检查出其它4个工作气缸的PCM到功率晶体管基极的信号都正常。
他在功率晶体管上发现没有信号从PCM到气缸#2和#3的功率晶体管基极。
检查电脑和这两个点火线圈的功率晶体管之间的线束是否存在开路或短路。
也检查PCM上的信号。
修理技工用新导线连接在PCM 和功率晶体管之间,也在这两个气缸上使用新点人线圈/功率晶体管,也换上了一个借用的PCM。
还是没有PCM信号到这两个功率晶体管的基极。
凸轮轴位置传感器(相位)和曲轴位置传感器(参照)信号用示波器进行检查,发现这两个信号的波形都是很好的均匀一致的正弦波,并且波幅也都正确。
因为这问题发生在水泵更换之后,我怀疑是否是凸轮轴和曲轴位置传感器信号相互之间的相位错误,因为更换水泵时必须拆掉正时链。
这种发动机上有一个主正时链和两个凸轮轴正时链。
凸轮轴正时链安装在比较小的进气和排气凸轮轴链齿轮上。
主正时链安装在曲轴链齿轮上,然后向上安装在两个比较大的凸轮轴链齿轮上,这两个比较大的链齿轮安装在进气凸轮轴的尾部(在进气凸轮轴小链齿轮的外面,小链齿轮上安装的是凸轮轴正时链。
)主正时链在更换水泵时也需要拆掉。
当我要求修理技工检查发动机机械凸轮正时时,他发现正时链错过了一个齿。
1998年品牌X产品Y型号Z的维修指南说明书
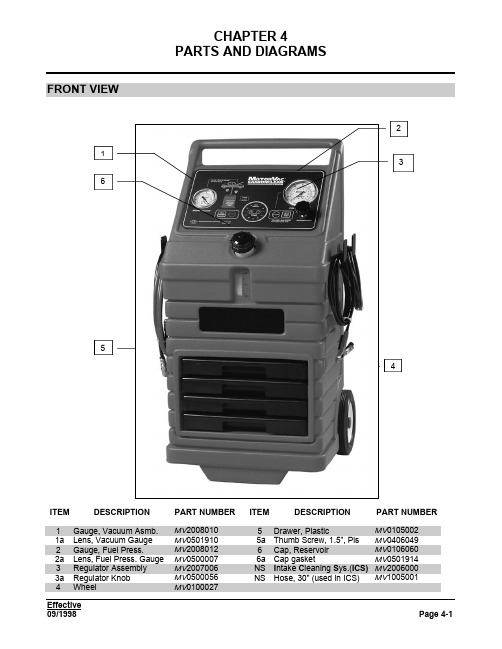
CHAPTER 4PARTS AND DIAGRAMSFRONT VIEWITEM DESCRIPTION PART NUMBER ITEM DESCRIPTION PART NUMBER 1Gauge, Vacuum Asmb.MV20080105Drawer, Plastic MV01050021a Lens, Vacuum Gauge MV0501910 5a Thumb Screw, 1.5”, Pls MV0406049 2Gauge, Fuel Press.MV20080126Cap, Reservoir MV01060602a Lens, Fuel Press. Gauge MV0500007 6a Cap gasket MV0501914 3Regulator Assembly MV2007006NS I ntake C leaning S ys.(ICS)MV20060003a Regulator Knob MV0500056NS Hose, 30” (used in ICS)MV1005001 4Wheel MV0100027CHAPTER 4 PARTS AND DIAGRAMSREAR VIEWITEM DESCRIPTION PART NUMBER ITEM DESCRIPTION PART NUMBER 1Filter, Orange (BT839-10)MV05000953Pump, Assembly MV20080311a Filter Nipple MV0303095 4a Adapter, 90° Bulkhead MV03001314b Adapter, Hex Nipple MV0303092 2Tank Asmb., Reservoir MV20086025Manifold Assemblies See Page 4-4CHAPTER 4 PARTS AND DIAGRAMS SIDE VIEWSITEM DESCRIPTION PART NUMBER ITEM DESCRIPTION PART NUMBER1Hose, Black Return MV20003004Cables, Battery MV02080432Hose, Red Out MV20004005Hanger, Black Metal MV01050043a Connector, QuickDisconnect MV08002306Hose, Vacuum(requires 12 feet)MV0700100(per foot)3b Fitting, 3/8”Cmp x ¼”MPT MV0300020CHAPTER 4 PARTS AND DIAGRAMSMANIFOLD BLOCK ASSEMBLIES and FITTINGSITEM DESCRIPTION PART NUMBER ITEM DESCRIPTION PART NUMBERMV0300015 1Valve, Relief MV05000887Elbow, 5/16”Nt x 1/8”MPT(pump)2Block, Manifold MV03001108Elbow, 5/16”Tb x 1/8”FPT(pressure gauge)MV0300011 3Valve, Solenoid (NC)MV0500018 9Elbow, 5/16”Nt x ¼”FPT(regulator)MV0303092 4Nipple, ¼”MPT x ¼”MPT MV030001410Union,1/4”MPT x ¼”MPT,Zp5Switch, Pressure MV050001611Union, 5/16”Nt x ¼”MPT MV0300017MV03000186Elbow, 5/16”Nt x ¼”MPT(block)CHAPTER 4 PARTS AND DIAGRAMS COMPLETE REPLACEMENT PARTS LISTING:ITEM LEVELS MotorVac Descriptions Qty ASMB Part NumberSUBASMB11N/A CABINET ASSEMBLY1 22MV010-0026Hub Cap2 32MV010-0027Wheel, 8" x 1.75", rubber2 42MV011-0014Hanger Bracket, Stl, painted black3 52MV010-6008Axle, 0.5" Dia., Zinc Plate1 62MV010-5600Cabinet, Red Plastic1 72MV010-5403Drawer Magnet Contact Plate, Stl (2 studs)1 82MV040-0603Snap Bushing, for Vacuum Hose1 92MV040-0604Cap Nut, 1/2"2102MV040-0607Nut, Nylock 1/4"-20, Zp, for hanger6112MV040-0610Screw, PHP 1/4"-20 x 5/8", Zp, for hanger6122MV040-6014Spacer 1/16", Zp4132MV040-6015Tinnerman Nut, #8, to secure back panel9142MV040-6016Kep Nut, 6-32, Zp, for drawer magnet contact plate2152MV040-6049Thumbscrew, 10-32 x 1-1/2", Ny, for drawer retention8A 162MV200-8036Drawer Assemblies (4)1173MV010-5002Drawer, Black plastic4A 183MV040-6024Magnet, 30lbf pull, 3/16" mount4A 193MV040-6025Pop Rivet, Blind Head, 3/16", Al, for magnet4A 203MV040-6051Tinnerman Nut, 10-32, for drawers8A 21221MV200-Return Hose Assembly, Black10300232MV030-0020Un, 3/8"Cmp x 1/4"MPT, Ni1242MV070-0020NAB Hose, 3/8"OD, Blk, Ny10ft 252MV080-0230Female Quick Disconnect, 1/4" x 1/4"FPT, Ni126Output Hose Assembly, Red1271MV200-0400282MV030-0020Un, 3/8"Cmp x 1/4"MPT, Ni1292MV070-0010NAB Hose, 3/8"OD, Red, Ny10ft 302MV080-0230Female Quick Disconnect, 1/4" x 1/4"FPT, Ni131Pump, Tank, Manifold Block,& Filter Assembly1321MV200-8601332MV010-5400Mounting Bracket for pump, tank, manifold block1342MV010-5401Mounting Bracket for filter asmb.1352MV010-5402Mounting Bracket Support, leftside1362MV010-5404Mounting Bracket Support, rightside1372MV020-5320Ferrite Bead, for solenoid wires1382MV040-0019Screw, PHP 10-32 x 3/8",Zp, for filter bracket2392MV040-0200Starwasher, Internal, #6, Zp, for manifold block mounting15402MV040-0400Starwasher, Internal, #10, Zp, for filter bracket2412MV040-0603Snap Bushing, for filter tubing into bracket2422MV040-0605Nut, Nylock 8-32, Zp, for pump mounting4432MV040-0612Allen Head Screw, 1/4"-20 x 5/8", Ss, for filter mount3442MV040-0618Screw, PHP 1/4"-20 x 1/2", Zp, for tank mounting2452MV040-0619Starwasher, Internal 1/4", Zp, for tank mounting2462MV040-0622Nylon Cable ties 4", for securing wire3CHAPTER 4 PARTS AND DIAGRAMS472MV040-1203Screw, PHP 6-32 x 3/8", Zp, for manifold block mounting15 482MV040-6032NYLON CABLE TIES 8", FOR SECURING TUBING1 492MV040-6037Cable Tie Mount, 0.75", 4-way, Ny3 502MV070-0085Tubing, 5/16"OD, Nylon9511MV200-7002Manifold Sub-Assembly #2, towards rear of cabinet1522MV020-0061Molex Connector Housing, Male, 3 pin, for solnd & prs sw2 532MV030-0014Un, 1/4"MPT x 1/4"MPT, Ny, between solnd and block1 542MV030-0017Un, 5/16"Nt x 1/4"MPT, Ny, at solenoid1 552MV030-001890°, 5/16"Nt x 1/4"MPT, Ny, at block to prs. gauge1 562MV030-0110Manifold Block, 1/4"FPT ports, Al1 572MV050-0016Pressure Switch, 1/4"MPT mount, Stl, N.O. till 4 PSI1 582MV050-0018Solenoid, 2-way, 12 VDC, Ss, normally closed1 591MV200-7009Filter Mount Assembly1602MV030-001890°, 5/16"Nt x 1/4"MPT, Ny, at top of filter mount2 612MV050-1918Filter Mount, 1/4"FPT ports, Al1621MV200-8029Manifold Sub-Assembly #1, towards front of cabinet1632MV030-0017Un, 5/16"Nt x 1/4"MPT, Ny, at block1642MV030-001890°, 5/16"Nt x 1/4"MPT, Ny, at block4652MV030-0110Manifold Block, 1/4"FPT ports, Al2662MV050-0088Pressure Relief Valve, 1/4"MPT, 115 PSI (Nominal), Ss1671MV200-8031Fuel Pump Assembly1682MV020-5320Ferrite Bead, for pump wires1692MV030-001590°, 5/16"Nt x 1/8"MPT, Ny, at pump2702MV050-0043Fuel Pump and Mounting bracket, 1/8"FPT ports, 12 VDC1711MV200-8034Fuel Tank Assembly, w/ fuel level sensor1722MV010-6002N Fuel Tank , Natural plastic1732MV030-001890°, 5/16"Nt x 1/4"MPT, Ny, top and bttm fittings274751MV200-8602Control Panel Assembly complete, with PCB1762MV010-5005Control Panel steel backing plate, for ICC PCB1B 772MV010-5100Control Panel Overlay with integrated Keypad1B 782MV020-5330Control Circuit Board (PCB) assembly1792MV040-0433Round Spacer, #6 x 0.5", Al, for PCB5802MV040-6035Kep Nut, 4-40, Zp, for PCB5811MV200-7006Pressure Regulator Valve Assembly, needlevalve1822MV030-001190°, 5/16"Nt x 1/4"FPT, Ny, regulator fittings2 832MV050-0052Regulator Valve, needle valve, 1/4"MPT ports, Ss1 841MV200-8010Vacuum Gauge Assembly, 2.5" dial1852MV030-0026Un, 0.170"Barb x 1/4"FPT, Br, for vacuum gauge1 862MV050-0006Vacuum Gauge, 0-30 in. hg., 2.5" dial, "MOTORVAC"1 871MV200-8012Pressure Gauge Assembly, 0-160 PSI, 3.5" dial1882MV030-003390°, 5/16"Nt x 1/8"FPT, Ny, pressure gauge fitting1 892MV050-0005Pressure Gauge, 0-160 PSI, 3.5" dial, MotorVac1 90911N/A Final Pull Assembly, for machine assembly N/A 922MV010-5601Rear Panel, Black plastic, for cabinet1CHAPTER 4 PARTS AND DIAGRAMS932MV010-6060Fuel Tank Cap, black plastic1942MV020-0375Strain Relief, for external power harness mount into cabinet1952MV020-5316Internal Grounding Cable, between cntrl pnl and tank brkt1C 963MV020-5315Internal Grounding Plate, connects to pressure regulator1C 972MV020-8043External Power Harness, 11Ft, with battery clips1982MV030-013190°, 3/8"COMP X 1/4"FPT, NI, FITTING CONNECTS TO HOSE ASMB2992MV030-3092Un, 1/4"MPT x 1/4"MPT, Stl, fitting connects to mnfld block2 1002MV040-6016Kep Nut, 6-32, Zp, for control panel mounting to cabinet10 1012MV040-6023Screw, PHP #8 x 3/4", SMS, Zp, for rear panel mounting8 1022MV040-6039Screw, Truss Head 6-32 x 1/2", Zp, for filter mount. plate6 1032MV050-0095Fuel Filter, spin-on, 10 micron rating, Baldwin BT839-101 1042MV070-0085Tubing, 5/16"OD, Nylon7.42ft 1052MV070-0100Vacuum Hose 5/32"ID, rubber12ft 1062MV100-8403Caution Label, for top of cabinet application1107108Notes: A > for only one drawer order 1 of each and 2 nutsand screws109 B ,C> these parts only sold together, not separate110111112113AdditionalParts1141MV200-3025Standard Adaptor Kit, fuel system connecting adaptors1 1151MV200-8400Packet including Operator manual & Quick Reference Cards1 1162MV200-8200Operator's Manual1 1172MV200-8300Quick Reference Cards: Carb, TBI, PFI, & CIS fuel systems1set 1181MV200-6000Intake Cleaning System (ICS) kit, w/ nozzles & spray tubes1119120ReplacementParts1211MV020-5329Fuse, 8 Amperes, 5mm x 20mm, fast-acting, for cntrl PCB1ea 1221MV050-0056Pressure Adjust Regulator Knob, Black plastic1ea 1231MV050-0007Pressure Gauge Replacement Lens, for 3.5" gauge1ea 1241MV050-1910Vacuum Gauge Replacement Lens, for 2.5" gauge1ea 1251MV100-5001ICS, 30" Spray Tube, with multidirectional spray pattern1ea 1261MV100-5008ICS, Bottle Neck, Black plastic, w/o air filler asmb1ea 1271MV100-5009ICS, Air Filler Assembly, includes viton valve core & gasket1ea 1281MV100-5010ICS, Viton Valve Core, for air filler assembly1ea 1291MV100-8138Solenoid Replacement Plunger, viton, Blue1ea 1301MV200-3026Deluxe Adaptor Kit, Sun/Snap-On P/N EEFS-102A1ea 1311MV200-8061ICS Service Kit, includes pickup tube w/valve,nozzle,6" tube1ea132133134Abbreviations:135AL Aluminum136ASMB Assembly137BLK Black138BRKT Bracket139BTTM Bottom140CNTRL Control141DIA Diameter142FPT Female National Pipe Thread143ID Inside Diameter144LBF Pound of Force145MNFLD Manifold146MPT Male National Pipe ThreadCHAPTER 4 PARTS AND DIAGRAMS147N/A Not Applicable or Not Available 148NAB Nylon Air Brake149Ni Nickel150N.O.Normally Open151NY Nylon152OD Outside Diameter153PCB Printed Circuit Board154PHP Pan Head Phillips155PNL Panel156PRS Pressure157PSI Pound per Square Inch158SMS Sheet Metal Screw159SOLND Solenoid160Ss Stainless Steel161STL Steel162SW Switch163UN Union fitting164VDC Voltage, Direct Current165W/With166W/O With Out167ZP Zinc Plate16890°ninety degree angled fittingCHAPTER 4 PARTS AND DIAGRAMS DIAGRAMS and SCHEMATICS:CHAPTER 4 PARTS AND DIAGRAMSCHAPTER 4 PARTS AND DIAGRAMSEffective09/1998Page 4-11CHAPTER 4 PARTS AND DIAGRAMSEffective Page 4-1209/1998。
汽车原厂维修手册
汽车原厂维修手册汽车原厂维修手册全套500G 汽车维修资料详细目录以下是资料详细目录全车系维修手册本田飞度原厂维修手册2009 本田思域原厂维修手册2009 本田新雅阁原厂维修手册2008 本田CR-V电子版维修手册单项资料版2007本田CR-V原厂维修手册2004 本田CR-V文档版维修手册本田CR-V(05款)用户手册本田款新CR-V原厂维修手册2007 本田本田CR-V原厂维修手册2001 本田奥德赛维修手册2002 本田奥德赛 ODYSEEY维修手册2006 本田本田飞度原厂维修手册2004年本田飞度原厂维修手册2009 本田飞度原厂维修手册2006 本田飞度原厂维修手册2008 本田时韵原厂维修手册2002 本田时韵原厂维修手册2004 本田思迪原厂维修手册2006 本田思迪原厂维修手册本田思域原厂维修手册2006 本田civic电子版维修手册本田CIVIC混合动力版原厂维修手册本田civic原厂维修手册(92-04款) 本田本田雅阁原厂维修手册98 本田2.3原厂维修手册本田2.0 2.4 3.0原厂维修手册2003款本田雅阁原厂维修手册2006 本田雅阁 2.0 R20A3发动机维修手册本田CD7_CD9英文维修手册新款广州雅阁维修手册本田讴歌原厂维修手册2007 本田讴歌 TL 中文原厂维修手册2009丰田威姿原厂维修手册2007 丰田雅力士原厂维修手册2008 丰田RAV4 英文原厂维修手册2006 丰田RAV4培训教材2009丰田大霸王小客车结构图解与维修规范丰田大霸王发动机彩色电路图丰田大霸王汽车故障码检修流程丰田新款大霸王培训丰田大霸王原厂维修手册2000款丰田1RZ 2RZ-E原厂维修手册丰田大霸王2AZ-FE发动机原厂维修手册丰田新大霸王原厂维修手册丰田汉兰达原厂维修手册2007 丰田汉兰达新车培训2007丰田台湾花冠原厂维修手册2001 丰田花冠AE111,EE111,SEP原厂维修手册1998丰田花冠原厂维修手册(04年英文)丰田花冠原厂维修资料扫描版丰田花冠轿车原厂维修手册丰田柯罗那发动机电路图2007 丰田1ZZ-FE.3ZZ-FE发动机(花冠)维修手册丰田威驰花冠特锐检修专辑丰田花冠NZE12.ZZE12原厂维修手册丰田新皇冠维修手册2006丰田新皇冠Crown新车型培训2010 进口丰田皇冠汽车结构图解与维修规范一汽丰田皇冠培训丰田新皇冠原厂维修手册2006 凌志LS400皇冠CROWN3.0轿车电脑控制系统结构与维修丰田新皇冠维修手册丰田卡罗拉维修手册(04年英文) 丰田新卡罗拉培训资料丰田卡罗拉原厂维修手册2007 丰田凯美瑞轿车原厂维修手册2006 丰田凯美瑞原厂维修手册混合动力2010年丰田佳美ACV30L-AEPNKW原厂维修手册丰田佳美轿车结构图解与维修规范丰田佳美原厂维修手册ACV3.MCV30 2001年丰田佳美.大霸王维修手册丰田佳美2.4原厂维修手册丰田凯美瑞原厂维修手册2006 丰田凯美瑞特性丰田凯美瑞维修手册丰田新款佳美维修手册丰田四川考斯特客车丰田酷路泽原厂维修手册丰田陆地巡洋舰检修专辑2005 丰田新霸道PRADO新车型培训2010丰田陆地巡洋舰 1FZ-FE .3RZ-F.3RZ-FE杌械,电器维修手册6654321丰田陆地巡洋舰检修专辑丰田陆地巡洋舰结构图解与维修规范丰田沙漠王子原厂维修手册丰田陆地巡洋舰原厂维修手册4500 丰田霸道4000和陆地巡洋舰4700汽车原厂维修手册丰田陆地巡洋舰3400原厂维修手册丰田陆地巡洋舰4500原厂维修手册丰田丰田普瑞斯原厂维修手册2003-04 丰田普锐斯新车型培训2010 丰田普瑞斯原厂维修手册2006 丰田普锐斯丰田混合动力丰田新锐志原厂维修手册2009 丰田REIZ新车特征 05年丰田锐志原厂维修手册2005 丰田特锐原厂维修手册丰田威驰培训丰田威驰原厂维修手册丰田威姿原厂维修手册丰田Avalon丰田亚洲龙原厂维修手册雷克萨斯1991 ES 250 原厂维修手册雷克萨斯1993 ES 300 原厂维修手册雷克萨斯1993 ES 300 原厂维修手册雷克萨斯1997 ES 300 原厂维修手册雷克萨斯2001 ES 300 原厂维修手册英文雷克萨斯2005 ES 330 原厂维修手册英文雷克萨斯2005 ES330原厂维修手册雷克萨斯ES350原厂维修手册英文07 雷克萨斯GS430.GS300原厂维修手册丰田凌志GS430-300培训资料雷克萨斯IS250原厂维修手册雷克萨斯is300 原厂维修手册2000-05 雷克萨斯IS300 原厂维修手册2004 雷克萨斯LS400原厂维修手册雷克萨斯LX470 2004雷克萨斯LS_430雷克萨斯LS600h混合动力车型培训雷克萨斯LS400皇冠CROWN3.0轿车电脑控制系统结构与维修日产阿蒂玛原厂维修手册2003日产碧莲原厂维修手册1999年日产A32风度原厂维修手册1994-1998 日产A33风度原厂维修手册2001 日產CEFIRO(A33)原厂维修手册台灣(00年)\ 日产CEFIRO、风度、蓝鸟、阳光原厂维修手册日产风度维原厂维修手册日产Y50风雅原厂维修资料2006年日产尼桑贵士原厂维修手册2005年日产 E24佳奔旅行车原厂维修手册1987 日产 E25佳奔原厂维修手册2001 日产骏逸原厂维修手册2006年日产350Z原厂维修手册英文跑车2002 日产350Z Z33原厂维修手册2006年日产蓝鸟U13原厂维修手册1992 日产风神蓝鸟轿车维修手册\日产风神蓝鸟(EQ7200-II型)原厂维修手册日产蓝鸟原厂维修手册2003 日产新蓝鸟原厂维修手册日产骊威原厂维修手册2007日产D22帕拉丁原厂维修手册1998-2003 日产郑州日产 P27原厂维修手册2005 日产郑州帕拉丁原厂维修手册2002日产郑州奥丁原厂维修手册2007日产帕拉丁原厂维修手册2003日产郑州帕拉丁原厂维修手册日产 T30奇骏原厂维修手册2001日产 T30奇骏原厂维修手册2003日产骐达颐达原厂维修手册2005日产(千里马)原厂维修手册2004日产锐骐原厂维修手册日产东风日产尼桑新天籁原厂维修手册2004~06 日产尼桑天籁原厂维修手册2005日产新天籁原厂维修手册2006日产新天籁4缸2.0原厂维修手册2007 日产尼桑天籁原厂维修手册2008年日产Y61 途乐原厂维修手册日产Q45(无限)原厂维修手册2002 日产无限QX4原厂维修手册日产西尔维亚 S14 SR20DET原厂维修手册1994 日产F50西玛原厂维修手册2004-05年日产西玛(CIMA)原厂维修手册2004 日产逍客原厂培训资料日产原厂逍客原厂维修手册日产轩逸原厂维修资料2006日产 B14阳光原厂维修手册1994-97 日产N16阳光原厂维修手册2002年日产N16阳光EQ7202原厂维修手册2003年日产阳光原厂维修手册2005款日产英菲尼迪 EX35培训手册中文原厂2008 日产英菲尼迪 EX35原厂维修手册中文原厂2008 日产英菲尼迪 Y50原厂维修手册中文原厂2009 日产御轩原厂维修手册(C24)YUMSUN系列2008 日产郑州奥丁原厂维修手册2007马自达Mazda RX-8原厂维修手册马自达2 原厂维修手册 2008 马自达M2培训手册马自达福美来原厂维修手册2003 马自达新M3原厂维修手册2006 马自达长安马自达3 M3两厢原厂维修手册2010马自达长安M3培训手册马自达海马福美来原厂维修手册进口马自达3原厂维修手册马自达5参数配置表(终版发布) 马自达M6轿车学习手册马自达M6原厂维修手册06-08款马自达M6 睿翼原厂维修手册09 马自达m6原厂维修手册一汽M6原厂维修手册一汽马自达M6原厂维修手册-07年海南马自达MPV原厂维修手册马自达MPV原厂维修手册马自达普利马原厂电路及原厂维修手册新一代普力马培训手册斯巴鲁森林人原厂维修手册2007 斯巴鲁富士力狮原厂维修手册2007年斯巴鲁森林人原厂维修手册软件版2009 斯巴鲁翼豹原厂维修手册中文版斯巴鲁富士云雀GHK7071原厂维修手册斯巴鲁MY富士森林人原厂维修手册2004 斯巴鲁MY 力狮原厂维修手册2005 斯巴鲁MY力狮原厂维修手册2006 斯巴鲁弛鹏0207 斯巴鲁富士森林人2008斯巴鲁森林人原厂维修手册( 05款 ) 斯巴鲁森林人原厂维修手册( 06款 ) 三菱新戈蓝培训手册三菱格蓝迪原厂维修手册2004三菱格蓝迪原厂维修手册2006 三菱格蓝迪原厂维修手册2010三菱格蓝迪_原厂维修手册2008 三菱格蓝迪原厂维修手册2007 三菱格蓝迪车间维修光盘2007三菱蓝瑟原厂维修手册2007三菱三菱蓝瑟翼豪陆神原厂维修手册2009年10月三菱长丰猎豹汽车CS6原厂维修手册三菱长丰猎豹汽车原厂维修手册三菱猎豹CJY6421D及CJY2030原厂维修手册三菱猎豹汽车车间维修手册三菱猎豹维修维修培训三菱新猎豹CS6原厂维修手册07款三菱长丰CS7原厂维修手册09款三菱猎豹越野车原厂维修手册三菱欧蓝德原厂维修手册2004三菱欧蓝德原厂维修手册2008三菱欧蓝德原厂维修手册2009年10月三菱欧蓝德维修手册2009三菱欧蓝德自学教材三菱PAJERO原厂维修手册2008 三菱帕杰罗英文原厂维修手册2006 三菱帕杰罗V86V93V98W原厂维修手册2009年10月三菱帕杰罗V87V97V93原厂维修手册2010 三菱Pajero Pinin原厂维修手册2000-2001 三菱帕杰罗V87V97V93原厂维修手册2010三菱帕杰罗原厂维修手册2006三菱帕杰罗原厂维修手册2002三菱帕杰罗原厂维修手册(06年英文) 三菱帕杰罗速跑原厂维修手册2002 三菱Pajero原厂维修手册1999-2000 三菱帕杰罗(速跑)原厂维修手册(02年) 三菱帕杰罗蒙太罗MONTERO V75 英文原厂维修手册三菱V73 6G72发动机电控系统检修. 三菱V73车间检修手册(发动机与变速箱机械) 三菱帕杰罗V73V75原厂维修手册三菱L200原厂维修手册1999-2001 三菱车系-Montero车型发动机针脚电压1994 三菱4G6FF发动机三菱电喷系统维修手册三菱伊柯丽斯原厂维修手册2010 三菱菱绅(原厂维修手册)三凌4G64发动机维修培训三菱Carisma原厂维修手册1997-2000 三菱MONTERO原厂维修手册V75三菱MONTERO原厂维修手册V75(04年英文 ) 三菱V73全车检修手册三菱发动机维修资料三菱伊柯丽斯原厂维修手册2009东南4G63 4G64S4 MPI维修手册\东南得利卡汽车维修手册东南富力利中文维修手册东南戈蓝原厂维修手册东南凌绅原厂维修手册东南凌帅维修手册东南菱帅原厂维修手册东南新菱绅台湾版大众CC原厂维修手册2010款大众CC培训大众宝来原厂维修手册大众宝来01年维修资料大众宝来02年维修资料大众宝来03年维修资料大众宝来04年维修资料大众宝来05-06年维修资料大众新宝来原厂维修手册2008 大众宝来培训资料2004大众宝来运动版培训教材大众宝来维修资料大众波罗1.4中文原厂维修手册2001-2003大众劲情劲取原厂维修手册2007 大众POLO 原厂维修手册大众POLO 1.6原厂维修手册大众上海波罗维修手册大众GOL原厂维修手册(2003) 大众高尔原厂维修手册大众golf-a4教案大众一汽高尔夫A6原厂维修手册2009 大众一汽高尔夫A6维修手册+3月版2010大众Golf A4 培训资料大众辉腾培训资料大众甲克虫原厂维修手册大众新甲壳虫原厂维修手册大众捷达柴油电喷发动机培训资料大众大众捷达柴油捷达配书光盘大众捷达SDI原厂维修手册大众捷达轿车包括柴油车培训一汽大众捷达柴油车原厂培训08大众捷达1.6L四缸汽油发动机(BJG)机械部分大众捷达1.6L四缸汽油发动机(BJG_BWG)自诊断大众捷达LPG 机械部分大众捷达双燃料CNG LPG 电器部分大众捷达双燃料CNG 机械部分大众捷达双燃料CNG LPG 电器部分大众捷达双燃料CNG LPG 机械部分大众捷达柴油机电子控制系统大众Jetta双燃料喷射系统大众捷达(2V)轿车发动机数据流分析大众捷达(5V)轿车发动机数据流分析大众捷达.宝来五气门发动机电控系统的维修大众捷达2V电喷车维修手册大众捷达LPG燃气原理大众捷达SDI 发动机维修诊断手册[原厂] 大众捷达电喷系列轿车维修手大众捷达都市先锋维修手册大众捷达两阀电喷轿车维修手册大众捷达前卫数据流分析大大众一汽大众开迪维修手册及培训资料大众朗逸4缸汽油发动机(1.6升4缸链式) 大众迈腾原厂维修手册2007大众迈腾警车原厂维修手册大众PASSAT领域原厂维修手册2007 大众帕萨特B5培训资料大众上海帕萨特B5轿车电系故障检测与维修大众国产帕萨特全车维修手册大众帕萨特B5 1.8T维修手册大众帕萨特使用手册大众上海大众桑塔纳3000原厂维修手册大众桑塔纳2000轿车电控与电气系统检修图解大众桑塔纳入2000原厂维修资料2004款大众桑塔纳2000原厂维修手册大众桑塔纳GLI 世纪新秀原厂维修手册大众桑塔纳2000结构与维修大众速腾原厂维修手册2006 大众速腾电气系统培训09大众途安原厂维修手册2004 大众途安原厂维修手册2005 大众途安Touran多用途乘用车产品手册大众途安Touran培训教材大众途锐自学手册长安铃木燕雨原厂维修手册铃木吉姆尼原厂维修手册铃木SOLIO(所力歐)1.3L原厂维修手册羚羊轿车原厂维修手册羚羊世纪星轿原厂维修手册铃木天语SX4原厂维修手册铃木维特拉原厂维修手册新奥拓YC5原厂维修手册长安奥拓轿车原厂维修手册长安铃木初级技术培训教材铃木羚羊CNG原厂维修手册铃木全新天语SX4维修手册五十铃UBS英文原厂维修手册江铃陆风(JX6474E)原厂维修手册江铃皮卡原厂维修手册江铃全顺4G64原厂维修手册江铃全顺客车全车电路图江铃全顺原厂维修手册江铃陆风SUV龙腾版(配VM发动机)培训教材江铃陆风风华原厂维修手册2007 江铃陆风风尚原厂维修手册2006五十铃T型皮卡REDEO9(竞技者)原厂维修手册江铃全顺欧III发动机原厂维修手册2006 江铃N系列欧III发动机原厂维修手册2007 江铃T系列欧三发动机原厂维修手册2007 江铃全顺欧III发动机原厂维修手册2007 江铃汽车09款T系列(N301)原厂维修手册2008 江铃T系列欧三原厂维修手册江铃电喷柴油T系列欧三原厂维修手册轻骑兵 Isuzu Trooper 英文原厂维修手册庆铃600P原厂维修手册五十铃N系列发动机维修说明五十菱原厂维修手册大宇蓝龙原厂维修手册大宇希望原厂维修手册大宇蓝龙新巧龙旅行家典雅轿车原厂维修手册大宇(DAEWOO)王子超级沙龙轿车电控燃油喷射系统原厂维修手册大宇Daewoo贵族希望ESPERO轿车电喷系统原厂维修手册大宇貴族原厂维修手册大宇蓝龙发动机电控系统检修起亚东风悦达福瑞迪原厂维修手册起亚嘉华骄车原厂维修手册起亚嘉华原厂原厂维修手册进口嘉华原厂维修手册起亚千里马原厂维修培训手册起亚普莱特原厂维修手册起亚锐欧G 1.4 DOHC原厂维修手册2009 起亚赛拉图汽车维修电路图起亚赛拉图原厂维修手册起亚狮跑维修手册起亚2009狮跑原厂维修手册起亚狮跑原厂维修手册起亚sorento索兰托原厂维修手册起亚威客 G3.8原厂维修手册 2006 起亚威客G3.8DOHC(VVT)原厂维修手册 2007起亚远舰原厂维修手册起亚远舰新车技术培训教材现代XG君爵XG原厂维修手册现代劳恩斯原厂维修手册2009 现代领翔NFC原厂维修手册2009 现代领翔NFC 培训手册现代美佳(FC)原厂维修手册2009 现代瑞风与风行检修专辑2005年瑞风英文原厂维修手册瑞风与风行检修专辑2005年现代新圣达V6原厂维修手册2008 现代圣达菲培训资料现代圣达菲维修手册现代索纳塔AT原厂维修手册2007 现代北京索纳塔原厂维修手册北京现代索纳塔发动机培训北京现代索纳塔原厂维修手册北京现代索纳塔专辑现代华泰现代特拉卡原厂维修手册2002 华泰现代培训现代特拉卡柴油发动机原厂维修手册现代特拉卡原厂维修手册现代途胜维修手册2009现代途胜培训教材现代途胜维修手册现代维拉克斯维修手册2008 现代雅科仕维修手册现代雅申特原厂维修手册2009 现代雅绅特维修手册现代雅尊维修资料2009 现代悦动维修手册2008 现代伊兰特维修手册2009 现代伊兰特维修手册现代NF御翔原厂维修手册2005 富豪VOLVO S80原厂维修手册 VOLVO S80检修专辑-迪威2004,12.pdf宝马X3 E83培训资料宝马X5 E53培训教材宝马X5 培训教材2003 宝马X5 培训教材2004 宝马新X5E70底盘培训宝马08新七系培训教材宝马BMWE65培训教材宝马E65-原厂2001宝马新一代发动机 N73培训教材宝马E38 E39原厂维修手册宝马E65-E66新系统原厂维修手册宝马745 E65原厂维修手册宝马E65系列保养灯归零宝马745控制系统检修专辑2004年宝马E 90 培训教材宝马E90培训教材宝马E90培训教材宝马3系培训手册宝马E60 E61培训教材宝马华晨新5系培训教材宝马MINI和E60培训教材宝马525i维修手册宝马国产维修手册华晨宝马新5系原厂中文维修手册宝马99 培训教材宝马BMW525i维修手册新宝马5系使用手册-原厂保时捷Boxster车间维修手册保时捷卡宴维修手册保时捷汽车培训与自学习保时捷 993 911 车间维修手册保时捷911维修手册保时捷968维修手册保时捷968原厂维修手册 Maybach迈巴赫车间维修手册奔驰BENZ-06BENZ奔驰培训教材奔驰SLK 171培训教材奔驰W210培训教材奔驰W211娱乐系统培训奔驰W220车间维修手册奔驰600车间维修手册奔驰w202车间维修手册奔驰W203,W210系统检修奔驰轿车维修数据(35 43 59 79奔驰车系电脑控制检修技术资料库奔驰BENZS320维修手册2006 奔驰s系使用手册奔驰车系电脑控制检修技术资料库奔驰车系维修手册标致206-406原厂维修手册标致306原厂维修手册标致307原厂维修手册标致307综合资料东风标致206原厂发动机电喷系统培训东风标致408培训标致307-607维修软件系统标致系列中文.nrg东风标致307 2004-2006 新雅途EPS维修资料捷豹Jaguar Tis 2004 捷豹JAGUAR XK8 1997电路图捷豹维修手册 XJ6 - XJ40 拉古娜英文原厂维修手册梅甘娜英文原厂维修手册雷诺新风景2英文原厂维修手册雷诺轿车维修手册(英文) 雷诺RENAULT维修手册欧宝新款欧美佳原厂维修手册欧宝赛飞利英文原厂维修手册欧宝汽车维修手册欧宝赛飞利培训欧宝威达原厂维修手册欧宝威达VECTRA-B英文原厂维修手册欧宝威达VECTRA-C英文原厂维修手册欧宝雅特英文原厂维修手册欧宝CECTRA-B原厂维修手册萨博9-3 原厂维修手册进口绅宝轿车修理手册机工2000 绅宝车系维修手册斯柯达法比亚原厂维修手册斯柯达昊锐培训教材斯柯达技术通报斯柯达新明锐培训教材PICASSO原厂维修手册2007 雪铁龙c2培训与电路图雪铁龙C2培训-原厂雪铁龙爱利舍原厂维修手册雪铁龙爱丽舍轿车雪铁龙毕加索轿车原厂维修手册雪铁龙新毕加索课堂练习图册雪铁龙毕加索萨拉改进型技术资料-美河提供雪铁龙富康电气维修资料东风雪铁龙凯旋雪铁龙凯旋维修手册雪铁龙塞纳维修手册雪铁龙世嘉培训内容1-1 雪铁龙世嘉车型介绍路虎Land Rover RAVE 原厂维修手册(英文)路虎发现者和自由人原厂维修手册路虎拦胜原厂维修手册陆虎更早陆虎览胜车间手册路虎览胜车主手册2006 英国陆虎英文原厂维修手册路虎维修手册(修理指南别克陆尊原厂维修手册别克GL8 2.5L原厂维修手册2006 别克GL8陆遵原厂维修手册2005 别克GL8原厂维修手册2001 别克昂科雷原厂维修手册别克新君威原厂维修手册2008别克君威原厂维修手册2003别克新君威2。
起亚 千里马维修手册
第一节 1.3L 发动机机械系统
一、发动机参数 1.技术参数(表 2-1-1)
技术参数
项目 类型 气缸数 缸径 冲程 排量 压缩比 点火顺序 怠速转速 怠速点火正时
配气相位
进气门 排气门
上止点前开 下止点后关 下止点前开 上止点后关
标准值 直列12气门,单顶置凸轮轴 4 71.5mm 83.5mm 1341cc 9.5 1-3-4-2 800±100r/min 上止点前9°±5°/800r/min 12° 520° 52° 12°
PSF-3
0.75~0.80L(0.79~0.85)
二、车辆的支撑点、 车辆的支撑点,见图 1-3-1。 注意:不要在指定位置点外支撑车辆,否则会给车身造成损坏。
图 1-3-1
第二章 发 动 机
ቤተ መጻሕፍቲ ባይዱ
千里马轿车装配 G4EA(1.3L 单顶置凸轮轴)和 G4ED(1.6L 双顶置凸轮轴)两种型号发动 机。
1998年日产千里马Maxima原厂维修手册(英文版)-FE
ACCELERATOR CONTROL,FUEL&EXHAUST SYSTEMSSECTION FEGo to Table of ContentsGo to Quick Reference IndexSpecial Service ToolThe actual shapes of Kent-Moore tools may differ from those of special service tools illustrated here.Tool number(Kent-Moore No.)Tool nameDescriptionKV10114400(J-38365)Heated oxygen sensorwrenchNT636Loosening or tightening front and rear heated oxygen sensorsa=22mm(0.87in)CAUTION:¼When removing accelerator wire,make a mark to indicate lock nut’s initial position.¼Check that throttle valve opens fully when accelerator pedal is fully depressed.Also check that it returns to idle position when pedal is released.¼Check accelerator control parts for improper contact with any adjacent parts.¼When connecting accelerator wire,be careful not to twist or scratch wire.SFE475ASFE248AB Adjusting Accelerator WireCAUTION:¼Make sure the ASCD wire is not pulling the throttle drum.¼Refer to“AUTOMATIC SPEED CONTROL DEVICE”in EL section for ASCD wire adjustment.1.Loosen lock nut,and tighten adjusting nut until throttle drumstarts to move.2.From that position turn back adjusting nut1.5to2turns,andfasten it with lock nut.PREPARATION/ACCELERATOR CONTROL SYSTEMFUEL SYSTEMWARNING:¼Be sure to furnish workshop with a CO2fire extinguisher.¼Do not smoke while servicing fuel system.Keep open flames and sparks away from work area. CAUTION:¼Before removing fuel line parts carry out the following procedures:a.Put drained fuel in an explosion-proof container and put the lid on securely.b.Release fuel pressure from fuel line.Refer to“Changing Fuel Filter”in MA section.c.Disconnect battery ground cable.¼Always replace O-ring and clamps with new ones.¼Do not kink or twist tubes when they are being installed.¼Do not tighten hose clamps excessively to avoid damaging hoses.¼After installing tubes,run engine and check for fuel leaks at connections.¼Use only a genuine fuel filler cap as a replacement.SFE474ASEF180ACAUTION:¼Always replace exhaust gaskets with new ones when reassembling.If gasket remains on flange surface,scrape off completely as shown at left.¼With engine running,check all tube connections for exhaust gas leaks,and entire system for unusual noises.¼Check to ensure that mounting brackets and mounting insulators are installed properly and free from undue stress.Improper installation could result in excessive noise or vibration.¼Discard any heated oxygen sensor which has been dropped from a height of more than0.5m(19.7in)onto a hard surface such as a concrete floor;use a new one.SFE473A EXHAUST SYSTEMACCELERATOR CONTROL,FUEL&EXHAUST SYSTEMSECTION FECONTENTSPREPARATION/ACCELERATOR CONTROL SYSTEM (2)Special Service Tool (2)Adjusting Accelerator Wire (2)FUEL SYSTEM (3)EXHAUST SYSTEM (4)。
1998年日产千里马Maxima原厂维修手册(英文版)-BT

BODY&TRIMSECTION BT 5For seat belt,refer to MA and RS section.5For wiring diagrams of body electrical systems,refer to EL section.Go to Table of ContentsGo to Quick Reference IndexPRECAUTIONSPrecaution¼When removing or installing various parts,place a cloth or padding onto the vehicle body to prevent scratches.¼Handle trim,molding,instruments,grille,etc.carefully during removing or installing.Be careful not to soil or damage them.¼Apply sealing compound where necessary when installing parts.¼When applying sealing compound,be careful that the sealing compound does not protrude from parts.¼When replacing any metal parts(for example body outer panel,members,etc.),be sure to take rust pre-vention measures.Supplemental Restraint System(SRS)“AIRBAG”The Supplemental Restraint System“AIR BAG”,used along with a seat belt,helps to reduce the risk or severity of injury to the driver and front passenger in a frontal collision.The Supplemental Restraint System consists of air bag modules(located in the center of the steering wheel and on the instrument panel on the passen-ger side),a diagnosis sensor unit,warning lamp,wiring harness and spiral cable.If the vehicle is equipped with side air bag as the Supplemental Restraint System,the supplemental side air bag used along with the seat belt helps to reduce the risk or severity of injury to the driver and front passen-ger in a side collision.The supplemental side air bag consists of air bag modules(located in the outer side of front seats),satellite sensor,diagnosis sensor unit(which is one of components of supplemental air bags for a frontal collision),wiring harness,warning lamp(which is one of components of supplemental air bags for a frontal collision).Information necessary to service the system safely is included in the RS section of this Service Manual.WARNING:¼To avoid rendering the SRS inoperative,which could increase the risk of personal injury or death in the event of a collision which would result in air bag inflation,all maintenance must be performed by an authorized NISSAN dealer.¼Improper maintenance,including incorrect removal and installation of the SRS,can lead to per-sonal injury caused by unintentional activation of the system.¼Do not use electrical test equipment on any circuit related to the SRS unless instructed to in this Service Manual.SRS wiring harnesses can be identified with yellow harness protector or yellow insulation tape before the harness connectors.Clip and Fastener¼Clips and fasteners in BT section correspond to the following numbers and symbols.¼Replace any clips and/or fasteners which are damaged during removal or installation.SymbolShapes Removal&Installation No.kC101SBF258G SBF708EkC205kC206SBF648B SBF649BkCF118SBF078BSBF992GBody Front End¼When removing or installing hood,place a cloth or other padding on hood.This prevents vehicle body from being scratched.¼Bumper fascia is made of plastic.Do not use excessive force and be sure to keep oil away from it.¼Hood adjustment:Adjust at hinge portion.¼Hood lock adjustment:After adjusting,check hood lock control operation.Apply a coat of grease to hood locks engaging mechanism.¼Hood opener:Do not attempt to bend cable forcibly.Doing so increases effort required to unlock hood. WARNING:¼Be careful not to scratch hood stay when installing hood.A scratched stay may cause gas leak-age.¼The contents of the hood stay are under pressure.Do not take apart,puncture,apply heat or allow fire near it.REMOVAL—Front bumper assemblyk 1Remove bolts securing engine undercover from the front side.k 3Remove clip securing grille and remove the grille.k 6Remove screws securing left and right turn signal lamps and remove the lamps.k 8Remove nuts and bolts securing headlamps.Then remove left and right headlamps.k11Remove nuts securing fascia from both bumper sides.Then pull bumper fascia out.k 13Remove nuts securing bumper reinforcement and remove the reinforcement.Body Rear End and Opener¼When removing or installing trunk lid,place a cloth or other padding on trunk lid.This prevents vehicle body from being scratched.¼Bumper fascia is made of plastic.Do not use excessive force and be sure to keep oil away from it.¼Trunk lid adjustment:Adjust at hinge-trunk lid portion for proper trunk lid fit.¼Trunk lid lock system adjustment:Adjust striker so that it is in the center of the lock.After adjustment, check trunk lid lock operation.¼After installation,make sure that trunk lid and fuel filler lid open smoothly.5For Wiring Diagram,refer to“TRUNK LID AND FUEL FILLER LID OPENER”in EL section. REMOVAL—Rear bumper assemblyk 1Remove bolts from lower side of rear bumper fascia.k 4Remove nuts from each fender side.k8Pull reinforcement out.SBT340Body Rear End and Opener(Cont’d)¼For removal of door trim,refer to“Door Trim”in“INTERIOR TRIM”,BT-19.¼After adjusting door or door lock,check door lock operation.CAUTION:¼Disconnect ground terminal from battery in advance.¼Disconnect air bag system line in advance.¼Never tamper with or force air bag lid open,as this may adversely affect air bag performance.¼Be careful not to scratch pad and other parts.REMOVAL—Instrument panel assemblyInstrument panel assembly Combination meter Audio&A/C control Console boxRemove air bag module(driver)and steering wheel.Refer to“SUPPLEMENTAL RESTRAINT SYSTEM”in RS section for details.k1Glove box assembly¼Remove upper screws and lower screws.¼Then disconnect passenger air bag module connector.k2Instrument lower panel on driver side¼Remove screws.k6Combination meter¼Remove screws then disconnect harness connectors.k7Center ventilator with switch panel¼Pull out with a miniature flat-bladed screwdriver.k9Ashtrayk10Audio&A/C control unit assembly¼Remove upper&lower screws from the instrument panel.k10-1A/C or heater controlk10-2Cluster lid Ck10-3Audiok10-4Card&coin casek11Console box¼Remove screws under the shifter cover plate and also remove rear screws.k12Front pillar garnishk14Defroster grilleSide and Floor TrimCAUTION:Wrap the tip of flat-bladed screwdriver with a cloth when removing metal clips from garnishes. REMOVAL—Body side trimk1Remove front and rear seats.Refer to“SEAT”for details,BT-27,32.k2Remove front and rear kicking plates.k3Remove dash side lower finishers.k4Remove front and rear body side welts.Refer to“Body side welt”in“EXTERIOR”for details,BT-23. k5Remove front pillar garnishes.k6Remove center pillar upper garnishes.k7Remove center pillar lower garnishes.k8Remove rear pillar garnishes.k9Remove high-mounted stop lamp.k10Remove rear parcel shelf finisher.Side and Floor Trim(Cont’d)SBT367Removal—Door trimk1Remove inside handle escutcheon.k2Remove power window switches,then disconnect the connectors.k3Remove screw securing pull handle,and then remove pull handle.k4Remove step lamp lens and screws securing step lamp,and then disconnect step lamp connector.k5Remove screws.(Front door only)k6Remove clips securing door finisher.k7Lift out door finisher.Disconnect harness connectors.SBT368REMOVAL—Headliningk1Remove front and rear seats.Refer to“SEAT”for details,BT-27,32.k2Remove front and rear seat belts.Refer to“SEAT BELTS”in RS section for details. k3Remove body side trim.Refer to“Side and Floor Trim”for details,BT-16.k4Remove sunroof switch or spot lamp switch.k5Remove inside mirror assembly.k6Remove sun visors.k7Remove interior lamp assembly.k8Remove assist grips.k9Remove metal clips securing headlining.k10Remove headlining from vehicle through front passenger side.Trunk RoomTrimINTERIOR TRIMSBT345k 1k 2Hood molding and hood frontseal SBT343k 3k 4Cowl top seal and cowl top grilleSBF341HBk 5Windshield side moldingMounted with screws.k6Windshield upper moldingSBF342HF k7Drip weatherstripSBF343HA k8Body side weltSBF454EA k9Door weatherstripSBF455EAk10Door sash moldingSBF345H k11Front door parting sealSBF346HA k12Rear door corner moldingSBF347H k13Door outside moldingSBF348Hk14Sunroof lid weatherstripSBF349HAk15Side guard moldingSBF460EAk16k17Rear window upper molding and side moldingBasically the same as windshield upper molding. Refer to k6Windshield upper molding.k18Rear window lower moldingSBF350H k19Trunk lid weatherstripSBF461EA k20MudguardSBF357Hk21Rear combination lamp¼Rear combination lamps are installed with nuts and butyl seal.SBF358H k22Rear air spoiler¼When removing,first disconnect high-mounted stop lamp connector located on the back of trunk lid,then remove air spoiler taking care the stop lamp harness does not get caught.¼When installing,make sure that there are not gaps or waves at ends of air spoiler.¼Before installing spoiler,clean and remove oil from surface where spoiler will be mounted.SBT941¼When removing or installing the seat trim,carefully handle it to keep dirt out and avoid damage. 5For Wiring Diagram,refer to“POWER SEAT”in EL section.Front SeatPOWER SEATPOWER SEAT(With SRS side air bag)CAUTION:¼Before removing the front seat,turn the ignition switch off,disconnect both battery cables and wait at least3minutes.¼When checking the power seat circuit for continuity using a circuit tester,do not confuse its con-nector with the side air bag module connector.Such an error may cause the air bag to deploy.¼Do not drop,tilt,or bump the side air bag module installed in the seat.Always handle it with care.MANUAL SEAT¼When handling seat,be extremely careful not to scratch heating unit.¼To replace heating unit,seat trim and pad should be separated.¼Do not use any organic solvent,such as thinner,benzene,alcohol,gasoline,etc.to clean trims.5For Wiring Diagram,refer to“HEATED SEAT”in EL section.Seatback heating unit removal&installationSBF424HAMBT077AAADJUSTMENTInstall motor&limit SW assembly and sunroof rail assembly in the following sequence:1.Arrange equal lengths of link and wire assemblies on both sides of sunroof opening.2.Connect sunroof connector to sunroof switch and positive(+)power supply.3.Set lid assembly to fully closed positionREMOVAL¼After any adjustment,check sunroof operation and lid alignment.¼Handle finisher plate and glass lid with care so not to cause damage.¼It is desirable for easy installation to mark each point before removal. CAUTION:Always work with a helper.Link and wire assem-bly Sunroof frameassemblyShade assembly Lid assembly Motor assemblyTilt glass lid up.k1Side trim¼Remove side trim clips.k2Sunroof lid mount nutsk3Lid assemblyk4Rear drain assemblyOperate sunroof switch to tilt glass lid down.k5Shade assemblyk8Wind deflector assemblyk9Drain hosesk10Sunroof unit bracketk11Sunroof frame assemblyk12Link and wire assembly5For Wiring Diagram,refer to“ELECTRIC SUNROOF”in EL section.SBT516Trouble DiagnosesDIAGNOSTIC TABLENOTE:For diagnosing electric problem,refer to“ELECTRIC SUNROOF”in EL section.Check items(Components)Wind deflector Adjustment Drain hoses Weatherstrip Link and wire assemblyReference page BT-37BT-38BT-39BT-39BT-40SymptomExcessive windnoise123 Water leaks123Sunroof rattles1423 Excessive opera-tion noise123The numbers in this table mean checking order.SBT331WIND DEFLECTOR1.Open lid.2.Check visually for proper installation.3.Check to ensure a proper amount of petroleum jelly has beenapplied to wind deflector connection points;apply if necessary.SBT3324.Check that wind deflector is properly retracted by hand.If it isnot,remove and visually check condition.(Refer to removal procedures,BT-34.)If wind deflector is damaged,replace with new one.If wind deflector is not damaged,re-install properly.ADJUSTMENTIf any gap or height difference between glass lid and roof is found, check glass lid fit and adjust as follows:SBT482Gap adjustment1.Open shade assembly.2.Tilt glass lid up then remove side trim.3.Loosen glass lid securing nuts(3each on left and right sides),then tilt glass lid down.4.Adjust glass lid from outside of vehicle so it resembles“A-A”as shown in the figure above.5.Tilt glass lid up and down until it is adjusted to“B-B”as shownin the figure above.6.After adjusting glass lid,tilt glass lid up and tighten nuts.7.Tilt glass lid up and down several times to check that it movessmoothly.Height difference adjustment1.Tilt glass lid up and down.2.Check height difference between roof panel and glass lid tosee if it is as“A-A”as shown in the figure above.3.If necessary,adjust it by using one of following procedures.¼Adjust by adding or removing adjustment shim(s)between glass lid and link assembly.¼If glass lid protrudes above roof panel,add shim(s)or plain washer(s)at sunroof mounting bracket or stud bolt locations to adjust sunroof installation as required.DRAIN HOSESSBT483(The figure shows only the front side.)4.Remove drain hoses and check visually for any damage,cracks,or deterioration.5.Pour water into drain hoses and find damaged portion.¼If any damaged portion is found at each step,replace thedamaged part.WEATHERSTRIP¼In the case of leakage around glass lid,close glass lid and pourwater over glass lid to find damaged or gap portion.1.Remove glass lid assembly.(Refer to removal procedures,BT-34,for details.)2.Visually check weatherstrip for proper installation.If a gapexists between glass lid and weatherstrip,check for sufficientamount of butyl seal.If required,remove weatherstrip andapply butyl seal.Refer to“EXTERIOR”,BT-22,for details.3.Check weatherstrip visually for any damage,deterioration,orflattening.¼If any damage is found,replace weatherstrip.CAUTION:Do not remove weatherstrip except when replacing,or filling up butyl seal.LINK AND WIRE ASSEMBLYNOTE:Before replacing a suspect part,carefully ensure it is the source of noise being experienced.1.Check link to determine if coating film has peeled off to suchan extent that substrate is visible.Check also to determine if link is the source of noise.If it is,replace it.2.Visually check to determine if a sufficient amount of petroleumjelly has been applied to wire or rail groove.If not,add petro-leum jelly as required.3.Check wire for any damage or deterioration.If any damage isfound,remove rear guide(refer to removal procedures,BT-34, for details),then replace wire.SBF034BREMOVALSBT472SBT473After removing moldings,remove glass using piano wire or power cutting tool and an inflatable pump bag.WARNING:When cutting the glass from the vehicle,always wear safety glasses and heavy gloves to help prevent glass splinters from entering your eyes or cutting your hands.CAUTION:¼Be careful not to scratch the glass when removing.¼Do not set or stand the glass on its edge.Small chips maydevelop into cracks.INSTALLATION¼Use a genuine Nissan Urethane Adhesive Kit or equivalent and follow the instructions furnished with it.¼While the urethane adhesive is curing,open a door win-dow.This will prevent the glass from being forced out by passenger compartment air pressure when a door is closed.¼The molding must be installed securely so that it is inposition and leaves no gap.¼Inform the customer that the vehicle should remain sta-tionary until the urethane adhesive has completely cured (preferably 24hours).Curing time varies with temperature and humidity.WARNING:¼Keep heat and open flames away as primers and adhesiveare flammable.¼The materials contained in the kit are harmful ifswallowed,and may irritate skin and eyes.Avoid contact with the skin and eyes.¼Use in an open,well ventilated location.Avoid breathingthe vapors.They can be harmful if inhaled.If affected by vapor inhalation,immediately move to an area with fresh air.¼Driving the vehicle before the urethane adhesive has com-pletely cured may affect the performance of the wind-shield in case of an accident.CAUTION:¼Do not use an adhesive which is past its usable term.Shelf life of this product is limited to six months after the date of manufacture.Carefully adhere to the expiration or manufacture date printed on the box.¼Keep primers and adhesive in a cool,dry place.Ideally,they should be stored in a refrigerator.¼Do not leave primers or adhesive cartridge unattendedwith their caps open or off.¼The vehicle should not be driven for at least 24hours oruntil the urethane adhesive has completely cured.Curing time varies depending on temperature and humidities.The curing time will increase under higher temperatures and lower humidities.Windshield and Rear WindowSBF355HAREPAIRING WATER LEAKS FOR WINDSHIELDLeaks can be repaired without removing and reinstalling glass.If water is leaking between the urethane adhesive material and body or glass,determine the extent of leakage.This can be done by applying water to the windshield area while pushing glass outward.To stop the leak,apply primer(if necessary)and then urethane adhesive to the leak point.Door MirrorCAUTION:Be careful not to scratch door rearview mirror body.5For Wiring Diagram,refer to“POWER DOOR MIRROR”in EL section.REMOVAL—Door mirror1.Remove door trim.Refer to“Door Trim”in“INTERIOR TRIM”for details,BT-19.2.Remove inner cover front corner of door.3.Disconnect door mirror harness connector.4.Remove door mirror harness clips.5.Remove bolts securing door mirror assembly.6.Remove the mirror glass.Do not insert screwdriver too far.SBF356HAk1Mirror glass k2Mirror body k3Inner cover k4Door mirror harness MIRROR¼All dimensions indicated in figures are actual ones.¼When using a tracking gauge,adjust both pointers to equal length.Then check the pointers and gauge itself to make sure there is no free play.¼When a measuring tape is used,check to be sure there is no elongation,twisting or bending.¼Measurements should be taken at the center of the mounting holes.¼An asterisk(*)following the value at the measuring point indicates that the measuring point on the other side is symmetrically the same value.¼The coordinates of the measurement points are the distances measured from the standard line of“X”,“Y”and“Z”.SBF874GBEngine CompartmentMEASUREMENTSBF390HCEngine Compartment(Cont’d)MEASUREMENT POINTSUnit:mmSBF391HAUnderbody MEASUREMENTUnderbody(Cont’d) MEASUREMENT POINTSBODY&TRIMSECTION BT CONTENTSPRECAUTIONS (2)Precaution (2)Supplemental Restraint System(SRS)“AIRBAG” (2)GENERAL SERVICING (3)Clip and Fastener (3)BODY END (6)Body Front End (6)Body Rear End and Opener (9)DOOR (11)Front Door (11)Rear Door (12)INSTRUMENT PANEL (13)INTERIOR TRIM (16)Side and Floor Trim (16)Door Trim (19)Roof Trim (20)Trunk Room Trim (21)EXTERIOR (22)SEAT (27)Front Seat (27)Heated Seat (31)Rear Seat (32)SUNROOF (33)Trouble Diagnoses (37)WINDSHIELD AND WINDOWS (41)Windshield and Rear Window (42)MIRROR (43)Door Mirror (43)BODY ALIGNMENT (44)Engine Compartment (44)Underbody (46)。
1998年日产千里马Maxima原厂维修手册(英文版)-LC
1998年⽇产千⾥马Maxima原⼚维修⼿册(英⽂版)-LC ENGINE LUBRICATION&COOLING SYSTEMSSECTION LCGo to Table of ContentsGo to Quick Reference IndexSEM164FLiquid Gasket Application ProcedureAEM080/doc/603552202.htmle a scraper to remove all traces of old liquid gasket from mating surfaces and grooves.Also,completely clean any oil from these areas.b.Apply a continuous bead of liquid gasket to mating surfaces.(Use Genuine RTV silicone sealant Part No.999MP-A7007,Three Bond TB1207D or equivalent.)c.Apply liquid gasket around the inner side of bolt holes (unless otherwise specified).d.Assembly should be done within 5minutes after coating.e.Wait at least 30minutes before refilling engine oil and engine coolant.Special Service ToolsThe actual shapes of Kent-Moore tools may differ from those of special service tools illustrated here.Tool number (Kent-Moore No.)Tool name DescriptionST25051001(J25695-1)Oil pressuregaugeNT050ST25052000(J25695-2)HoseNT051Adapting oil pressure gauge to upper oil panWS39930000(—)TubepressureNT052Pressing the tube of liquid gasketEG17650301(J33984-A)Radiator cap testeradapterNT053Adapting radiator cap tester to radiator filler neckKV99103510(—)Radiator plate pliersANT224Installing radiator upper and lower tanksKV99103520(—)Radiator plate pliersBNT225Removing radiator upper and lower tanksLubrication CircuitSLC036BSLC037BSLC930AOil Pressure CheckSLC926WARNING:Be careful not to burn yourself,as the engine and oil maybe hot.Oil pressure check should be done in “Neutral position”(M/T)or “Parking position”(A/T).1.Check oil level.2.Remove oil pressure switch.3.Install pressure gauge.4.Start engine and warm it up to normal operating temperature.5.Check oil pressure with engine running under no-load. Engine speedrpm Approximate discharge pressurekPa (kg/cm 2,psi)Idle speed 3,000More than 69(0.70,10.0)435-551(4.44-5.62,63.1-79.9)If difference is extreme,check oil passage and oil pump for oil leaks.6.Install oil pressure switch with sealant.Oil PumpREMOVAL AND INSTALLATIONCAUTION:When removing the oil pans,oil pump assembly and timing chain from engine,first remove the camshaft position sensor (PHASE)and the crankshaft position sensor (REF)/(POS)from the assembly.Be careful not to damage sensor edge.1.Drain engine oil.2.Remove drive belts.3.Remove camshaft position sensor (PHASE),and crankshaftposition sensor (REF)/(POS).4.Remove engine lower covers.5.Remove crankshaft pulley.6.Remove front exhaust tube and its support.7.Support engine at right and left side engine slingers with asuitable hoist.8.Remove engine right side mounting insulator and bracket boltsand nuts.9.Remove center member assembly.10.Remove air compressor assembly and bracket.11.Remove oil pans.(Refer to “Removal”of “OIL PAN”in EMsection.)12.Remove water pump cover.13.Remove front cover assembly.14.Remove timing chain.(Refer to “Removal”of “TIMING CHAIN”in EM section.)15.Remove oil pump assembly.16.Reinstall any parts removed in reverse order of removal.DISASSEMBLY AND ASSEMBLYSLC155BWhen installing oil pump,apply engine oilto gears.SLC932A OIL PUMP INSPECTIONUsing a feeler gauge,straightedge and micrometers,check the following clearances:Unit:mm(in) Body to outer gear radial clearance k10.114-0.200(0.0045-0.0079)Inner gear to outer gear tip clearance k2Below0.18(0.0071)Body to inner gear axial clearance k30.030-0.070(0.0012-0.0028) Body to outer gear axial clearance k40.050-0.110(0.0020-0.0043)Inner gear to brazed portion of housing clear-ance k50.045-0.091(0.0018-0.0036)2If body to gear clearances(k1,k3,k4,k5)exceed the limit, replace oil pump body assembly.SLC934AASLC959A REGULATOR VALVE INSPECTION1.Visually inspect components for wear and damage.2.Check oil pressure regulator valve sliding surface and valvespring.3.Coat regulator valve with engine oil.Check that it fallssmoothly into the valve hole by its own weight.If damaged,replace regulator valve set or oil pump body.SLC935AA 4.Check regulator valve to oil pump body clearance.Clearance:k6:0.040-0.097mm(0.0016-0.0038in) If it exceeds the limit,replace oil pump body.SLC035B OIL FILTERThe oil filter is a small,full-flow cartridge type and is provided with a relief valve.Cooling CircuitSLC936ASLC937ASystem CheckSLC755A WARNING:Never remove the radiator cap when the engine is hot;serious burns could be caused by high pressure fluid escaping from the radiator.Wrap a thick cloth around the cap and carefully remove it by turning it a quarter turn to allow built-up pressure to escape and then turn the cap all the way off.CHECKING COOLING SYSTEM HOSESCheck hoses for improper attachment,leaks,cracks,damage, loose connections,chafing and deterioration.CHECKING RADIATOR CAPTo check radiator cap,apply pressure to cap with a tester.Radiator cap relief pressure:Standard(0.8-1.0kg/cm2,11-14psi)Limit59-98kPa(0.6-1.0kg/cm2,9-14psi)SMA967B Pull the negative pressure valve to open it. Check that it closes completely when released.SLC756A CHECKING COOLING SYSTEM FOR LEAKSTo check for leakage,apply pressure to the cooling system with a tester.Testing pressure:157kPa(1.6kg/cm2,23psi)CAUTION:Higher than the specified pressure may cause radiator dam-age.Water PumpCAUTION:When removing water pump assembly,be careful not to get coolant on drive belt.Water pump cannot be disassembled and should be replaced as a unit.After installing water pump,connect hose and clamp securely,then check for leaks using radiator cap tester. SLC154BSLC939A REMOVAL1.Drain coolant from drain plugs on radiator and both sides ofcylinder block.Refer to“Changing Engine Coolant”in MA section.2.Remove right side engine mounting,mounting bracket andnuts.3.Remove drive belts and idler pulley bracket.4.Remove water pump drain plug.5.Remove chain tensioner cover and water pumpcover.6.Pushing timing chain tensioner sleeve,apply a stopper pin soit does not return.Then remove the chain tensioner assembly.SLC941A 7.Remove the3water pump fixing bolts.Secure a gap betweenwater pump gear and timing chain,by turning crankshaft pul-ley20°backwards.SLC942A 8.Put M8bolts to two M8-threaded holes out of3water pumpholes.9.Tighten M8bolts by turning half turn alternately until they reachtiming chain rear case.In order to prevent damages to water pump or timing chain rear case,do not tighten one bolt continuously.Always turn each bolt half turn each time.10.Lift up water pump and remove it.When lifting up water pump,do not allow water pump gear to hit timing chain.SLC943A INSPECTION1.Check for badly rusted or corroded body assembly.2.Check for rough operation due to excessive end play.SLC030BA INSTALLATION1.Apply engine oil and coolant to O-rings as shown in the figure.SLC031B 2.Install water pump.Do not allow cylinder block to nip O-rings when installing water pump.SLC944A 3.Before installing,remove all traces of liquid gasket from mat-ing surface of water pump cover and chain tensioner cover using a scraper.Also remove traces of liquid gasket from mating surface of frontcover.4.Apply a continuous bead of liquid gasket to mating surface ofchain tensioner cover and water pump cover.SLC156B 5.Return the crankshaft pulley to its original position by turningit20°forward.SLC961A 6.Install timing chain tensioner,then remove the stopper pin.?After installing the tensioner,race the engine at about 3,000rpm under no load to purge air from the high-pres-sure chamber.The engine may produce a rattling noise.This indicates that air still remains in the chamber and is not a matter of concern.7.Install drain plug on cylinder block.8.Reinstall any parts removed in reverse order of removal.ThermostatSLC947ACSLC962AA REMOVAL AND INSTALLATION1.Drain coolant from drain plugs on radiator and both sides ofcylinder block.2.Remove drive belts and idler pulley bracket.3.Remove water pump drain plug on pump side of cylinder block.4.Remove lower radiator hose.5.Remove water inlet and thermostat assembly.Do not disassemble water inlet and thermostat.Replace them as a unit,if necessary. SLC948A 6.Install thermostat with jiggle valve facing upward.After installation,run engine for a few minutes,and check for leaks.Be careful not to spill coolant over engine compartment.Use a rag to absorbcoolant.INSPECTION1.Check valve seating condition at ordinary room temperatures.It should seat tightly.2.Check valve opening temperature and maximum valve lift.StandardValve opening temperature°C(°F)82(180)Valve lift mm/°C(in/°F)More than8.6/95(0.339/203)3.Then check if valve closes at5°C(9°F)below valve openingRadiatorREMOVAL AND INSTALLATION1.Remove under cover.2.Drain coolant from radiator.3.Disconnect radiator upper and lower hoses.4.Remove radiator shroud.5.Remove A/T oil cooler hoses.(A/T models only)6.Disconnect reservoir tank hose.7.Remove radiator mounting bracket.8.Remove radiator.9.After repairing or replacing radiator,install any part removed inreverse order of removal.When filling radiator with coolant,refer to“Changing Engine Coolant”in MA section. SLC153Bk1Radiatork2Radiator filler cap k3Reservoir tankk4Radiator drain cock k5Lower radiator hosek6Oil cooler hoses(A/T models)k7Cooling fansk8Cooling fan motorsk9Radiator shroudk10Upper radiator hose Cooling Fan Control SystemCooling fans are controlled by ECM(ECCS control module).For details,refer to EC section(“Cooling Fan”,“TROUBLE DIAG-NOSIS FOR DTC P1900”). Radiator (Aluminumtype)SLC882ABSLC655CBPREPARATION1.Attach the spacer to the tip of the radiator plate pliers A.Spacer specification:1.5mm (0.059in)thick x 18mm (0.71in)wide x 8.5mm (0.335in)long.2.Make sure that when radiator plate pliers A are closed dimen-sion H ′′is approx.7.6mm (0.299in).3.Adjust dimension H ′′with the spacer,if necessary.SLC903-ADISASSEMBLY1.Remove tank withTool.Grip the crimped edge and bend it upwards so that Tool slips off.Do not bend excessively.SLC930?In areas where Tool cannot be used,use a screwdriver to bend the edge up.Be careful not to damage tank.SLC9312.Make sure the edge stands straight up.3.Remove oil cooler from tank.(A/T models only)SLC894ASSEMBLY1.Install oil cooler.(A/T models only)Pay attention to direction of conical washer.SLC9322.Clean contact portion oftank.3.Install sealing rubber.Push it in with fingers.Be careful not to twist sealing rubber.SLC904-A4.Caulk tank in specified sequence with Tool.SLC896 SLC897Use pliers in the locations where Tool cannot be used.SLC554A 5.Make sure that the rim is completely crimped down.Standard height“H”:8.0-8.4mm(0.315-0.331in)6.Confirm that there is no leakage.Refer toInspection.INSPECTIONApply pressure with Tool.Specified pressure value:157kPa(1.6kg/cm2,23psi)WARNING:To prevent the risk of the hose coming undone while under pressure,securely fasten it down with a hose clamp. Attach a hose to the oil cooler as well.(A/T models only)Overheating Cause Analysis Symptom Check itemsCooling sys-tem parts malfunction Poor heat transferWater pump malfunction Worn or loose drive belt—Thermostat stuck closed—Damaged finsDust contamination or papercloggingMechanical damageClogged radiator cooling tubeExcess foreign material(rust,dirt,sand,etc.)Reduced air flowCooling fan does not operate.——High resistance to fan rotation Damaged fan bladesDamaged radiator shroud——Improper coolant mixture ratio———Poor coolant quality———Insufficient coolantCoolant leaksCooling hoseLoose clampCracked hoseWater pump Poor sealingRadiator capLoosePoor sealingRadiatorO-ring for damage,deteriora-tion or improper fittingCracked radiator tankCracked radiator coreReservoir tank Cracked reservoir tank Overflowing reservoir tankExhaust gas leaks into coolingsystemCylinder head deteriorationCylinder head gasket deteriora-tionExcept cool-ing system parts malfunc-tion —Overload on engineAbusive drivingHigh engine rpm under no loadDriving in low gear for extended timeDriving at extremely high speed Powertrain system malfunction —Installed improper size wheels and tiresDragging brakesImproper ignition timing Blocked or restricted air flow Blocked bumper——Blocked radiator grille Installed car brassiereMud contamination or paper cloggingBlocked radiator—Blocked condenser—Installed large fog lamp。
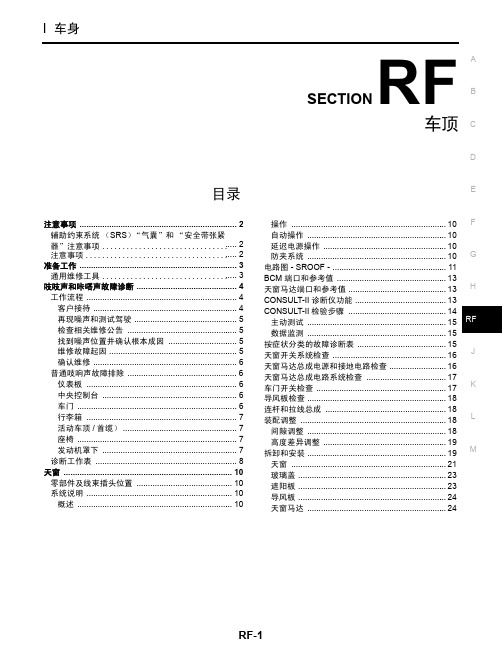
2004年日产西玛(CIMA)维修手册RF
注意事项
EIS009KP
• 预先断开两极电瓶电缆。
• 提前断开安全气囊系统的管线。
• 切勿敲击或用力将安全气囊盖打开,否则可能对安全气囊的性能产生有害的影响。
• 小心,不要划伤衬垫和其他零件。
• 拆卸或解体零件时小心不要将其损坏或变形用布保护零件。用布保护拆卸的零件。
• 当使用改锥或其他工具拆卸零件时,要使用维尼龙或胶带缠住以保护零件。
I 车身
RF A
SECTION
B
车顶 C
D
目录
E
注意事项 ..................................................................... 2 辅助约束系统 (SRS)“气囊”和 “安全带张紧 器”注意事项 .................................... 2 注意事项 ........................................ 2
• 用布保护拆卸的零件。
• 卡子如有变形或损坏应予以更换。
•。
• 将螺栓和螺母紧固至规定扭矩。
• 重新组装之后确保各零件功能正常。
• 按照以下方法擦去污渍。
水溶性污渍: 将软布浸入温水中然后用力拧干。擦去污渍之后,再用柔软的干布擦拭油渍。 油渍: 在温水中溶解合成清洁剂 (浓度为 2 到 3% 或更低),将布浸湿然后用布擦去油渍。之后将布浸入清水中并用
操作 .................................................................... 10 F 自动操作 ............................................................. 10 延迟电源操作 ...................................................... 10 防夹系统 ............................................................. 10 G 电路图 - SROOF - .................................................. 11 BCM 端口和参考值 ................................................ 13 天窗马达端口和参考值 ........................................... 13 H CONSULT-II 诊断仪功能 ........................................ 13 CONSULT-II 检验步骤 ........................................... 14 主动测试 ............................................................. 15 RF 数据监测 ............................................................. 15 按症状分类的故障诊断表 ....................................... 15 天窗开关系统检查 .................................................. 16 J 天窗马达总成电源和接地电路检查 ......................... 16 天窗马达总成电路系统检查 ................................... 17 车门开关检查 ......................................................... 17 K 导风板检查 ............................................................. 18 连杆和拉线总成 ..................................................... 18 装配调整 ................................................................ 18 L 间隙调整 ............................................................. 18 高度差异调整 ...................................................... 19 拆卸和安装 ............................................................. 19 M 天窗 .................................................................... 21 玻璃盖 ................................................................. 23 遮阳板 ................................................................. 23 导风板 ................................................................. 24 天窗马达 ............................................................. 24
日产千里马无法启动故障维修
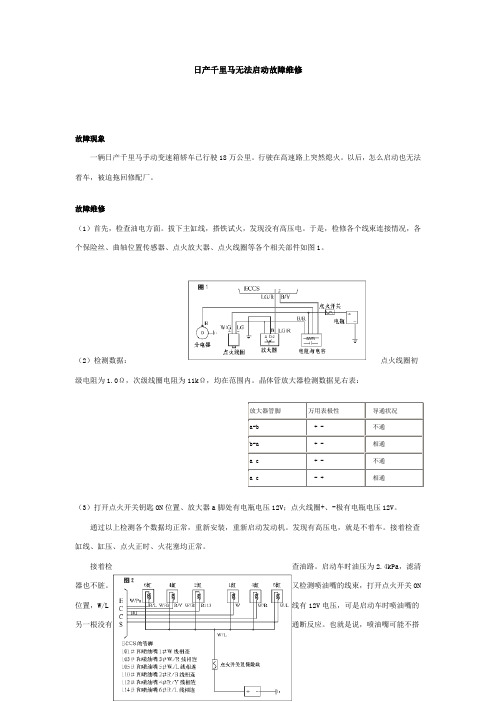
日产千里马无法启动故障维修
故障现象
一辆日产千里马手动变速箱轿车已行驶18万公里。
行驶在高速路上突然熄火。
以后,怎么启动也无法着车,被迫拖回修配厂。
故障维修
(1)首先,检查油电方面。
拔下主缸线,搭铁试火,发现没有高压电。
于是,检修各个线束连接情况,各个保险丝、曲轴位置传感器、点火放大器、点火线圈等各个相关部件如图1。
(2)检测数据:点火线圈初级电阻为1.0Ω,次级线圈电阻为11kΩ,均在范围内。
晶体管放大器检测数据见右表:
(3)打开点火开关钥匙ON位置、放大器a脚处有电瓶电压12V;点火线圈+、-极有电瓶电压12V。
通过以上检测各个数据均正常,重新安装,重新启动发动机。
发现有高压电,就是不着车。
接着检查缸线、缸压、点火正时、火花塞均正常。
接着检查油路。
启动车时油压为2.4kPa,滤清器也不脏。
又检测喷油嘴的线束,打开点火开关ON 位置,W/L线有12V电压,可是启动车时喷油嘴的另一根没有通断反应。
也就是说,喷油嘴可能不搭
铁,如图2所示:
检测ECCS搭铁线:
ECCS管脚10#、20#、107#、108#、50#、60#线束,均在发动机上搭铁。
没有发现故障,当最后打开电脑外壳时,发现有氧化、烧蚀的迹像,这说明电脑烧毁了,需更换。
最后,安装新电脑启动车一切正常。
故障消除。
日产千里马(MAXIMA)轿车怠速波动,有时甚至出现熄火

日产千里马(MAXIMA)轿车怠速波动,有时甚至出现熄火一辆日产MAXIMA轿车,在请电工检修电路后不久即出现了新故障,症状是:杆置于"P"和"N"档时,起动正常,且怠速平稳,加速也正常,而将档杆挂入"R"、"D"及其他前进档后,怠速转速剧烈下降,怠速又出现波动,有时甚至出现熄火,而且驾驶侧下方保险盒内一保险丝经常烧化,更换大电流保险丝后,有时可闻到焦糊味,根据上述症状,发动机空载正常而有负荷时便有功率不足或阻力过大的反应,极有可能是变速箱阻力过大致使发动机功率不足以拖动变速箱,于是修理工将变速箱抬下,分解、检查,并没有发现故障,装车后再试,故障依旧。
笔者在接手该车后,首先测量变速箱主系统油压,数值在正常范围内,由此排除了变速箱本身存在故障的可能性。
认为引起上述症状的原因可能是在于发动机输出功率不足所致,提取故障码为55:电控系统正常,检查电脑搭铁线,接触良好,在检查电源线时,发现主继电器线路已更改过,顺线路检查,在仪表板下方有一段导线绝缘皮已被剥开,裸露的铜导线与金属支架相碰,将导线用胶布包好后,起动发动机,将档杆置于"D"及"R"档,怠速平稳,行车过程中喘振现象消失。
故障排除。
例3:一辆丰田CROWN3.0轿车发生故障,症状是:起动发动机数秒后自行熄火,熄火后再起动,数秒后仍自行熄火,发动机在着车过程中故障灯没有点亮,提取故障码为正常码,由此排除电控系统的故障,测量燃油压力也正常,然而在发动机起动后测量燃油压力,数秒后逐渐降到零,当然发动机也会熄火。
将检测端子"FP"与"B"短接,起动发动机后则一切正常,遂用试灯检查油泵插头电压,发现在熄火前几秒灯泡熄灭,再检查油泵ECU插接件,未发现问题,测量由电脑传来的油泵控制信号,起动时为 5.0V,怠速为2.5V,信号电压正常,而且2.5V信号在发动机熄火后才消失,由此而知油泵控制信号正常,故障原因可能在于油泵ECU,于是更换另外一辆正行驶的同型号轿车油泵ECU,装好后试车,故障依旧。
汽车原厂维修手册
汽车原厂维修手册汽车原厂维修手册全套500G 汽车维修资料详细目录以下是资料详细目录全车系维修手册本田飞度原厂维修手册2009 本田思域原厂维修手册2009 本田新雅阁原厂维修手册2008 本田CR-V电子版维修手册单项资料版2007本田CR-V原厂维修手册2004 本田CR-V文档版维修手册本田CR-V(05款)用户手册本田款新CR-V原厂维修手册2007 本田本田CR-V原厂维修手册2001 本田奥德赛维修手册2002 本田奥德赛 ODYSEEY维修手册2006 本田本田飞度原厂维修手册2004年本田飞度原厂维修手册2009 本田飞度原厂维修手册2006 本田飞度原厂维修手册2008 本田时韵原厂维修手册2002 本田时韵原厂维修手册2004 本田思迪原厂维修手册2006 本田思迪原厂维修手册本田思域原厂维修手册2006 本田civic电子版维修手册本田CIVIC混合动力版原厂维修手册本田civic原厂维修手册(92-04款) 本田本田雅阁原厂维修手册98 本田2.3原厂维修手册本田2.0 2.4 3.0原厂维修手册2003款本田雅阁原厂维修手册2006 本田雅阁 2.0 R20A3发动机维修手册本田CD7_CD9英文维修手册新款广州雅阁维修手册本田讴歌原厂维修手册2007 本田讴歌 TL 中文原厂维修手册2009丰田威姿原厂维修手册2007 丰田雅力士原厂维修手册2008 丰田RAV4 英文原厂维修手册2006 丰田RAV4培训教材2009丰田大霸王小客车结构图解与维修规范丰田大霸王发动机彩色电路图丰田大霸王汽车故障码检修流程丰田新款大霸王培训丰田大霸王原厂维修手册2000款丰田1RZ 2RZ-E原厂维修手册丰田大霸王2AZ-FE发动机原厂维修手册丰田新大霸王原厂维修手册丰田汉兰达原厂维修手册2007 丰田汉兰达新车培训2007丰田台湾花冠原厂维修手册2001 丰田花冠AE111,EE111,SEP原厂维修手册1998丰田花冠原厂维修手册(04年英文)丰田花冠原厂维修资料扫描版丰田花冠轿车原厂维修手册丰田柯罗那发动机电路图2007 丰田1ZZ-FE.3ZZ-FE发动机(花冠)维修手册丰田威驰花冠特锐检修专辑丰田花冠NZE12.ZZE12原厂维修手册丰田新皇冠维修手册2006丰田新皇冠Crown新车型培训2010 进口丰田皇冠汽车结构图解与维修规范一汽丰田皇冠培训丰田新皇冠原厂维修手册2006 凌志LS400皇冠CROWN3.0轿车电脑控制系统结构与维修丰田新皇冠维修手册丰田卡罗拉维修手册(04年英文) 丰田新卡罗拉培训资料丰田卡罗拉原厂维修手册2007 丰田凯美瑞轿车原厂维修手册2006 丰田凯美瑞原厂维修手册混合动力2010年丰田佳美ACV30L-AEPNKW原厂维修手册丰田佳美轿车结构图解与维修规范丰田佳美原厂维修手册ACV3.MCV30 2001年丰田佳美.大霸王维修手册丰田佳美2.4原厂维修手册丰田凯美瑞原厂维修手册2006 丰田凯美瑞特性丰田凯美瑞维修手册丰田新款佳美维修手册丰田四川考斯特客车丰田酷路泽原厂维修手册丰田陆地巡洋舰检修专辑2005 丰田新霸道PRADO新车型培训2010丰田陆地巡洋舰 1FZ-FE .3RZ-F.3RZ-FE杌械,电器维修手册6654321丰田陆地巡洋舰检修专辑丰田陆地巡洋舰结构图解与维修规范丰田沙漠王子原厂维修手册丰田陆地巡洋舰原厂维修手册4500 丰田霸道4000和陆地巡洋舰4700汽车原厂维修手册丰田陆地巡洋舰3400原厂维修手册丰田陆地巡洋舰4500原厂维修手册丰田丰田普瑞斯原厂维修手册2003-04 丰田普锐斯新车型培训2010 丰田普瑞斯原厂维修手册2006 丰田普锐斯丰田混合动力丰田新锐志原厂维修手册2009 丰田REIZ新车特征 05年丰田锐志原厂维修手册2005 丰田特锐原厂维修手册丰田威驰培训丰田威驰原厂维修手册丰田威姿原厂维修手册丰田Avalon丰田亚洲龙原厂维修手册雷克萨斯1991 ES 250 原厂维修手册雷克萨斯1993 ES 300 原厂维修手册雷克萨斯1993 ES 300 原厂维修手册雷克萨斯1997 ES 300 原厂维修手册雷克萨斯2001 ES 300 原厂维修手册英文雷克萨斯2005 ES 330 原厂维修手册英文雷克萨斯2005 ES330原厂维修手册雷克萨斯ES350原厂维修手册英文07 雷克萨斯GS430.GS300原厂维修手册丰田凌志GS430-300培训资料雷克萨斯IS250原厂维修手册雷克萨斯is300 原厂维修手册2000-05 雷克萨斯IS300 原厂维修手册2004 雷克萨斯LS400原厂维修手册雷克萨斯LX470 2004雷克萨斯LS_430雷克萨斯LS600h混合动力车型培训雷克萨斯LS400皇冠CROWN3.0轿车电脑控制系统结构与维修日产阿蒂玛原厂维修手册2003日产碧莲原厂维修手册1999年日产A32风度原厂维修手册1994-1998 日产A33风度原厂维修手册2001 日產CEFIRO(A33)原厂维修手册台灣(00年)\ 日产CEFIRO、风度、蓝鸟、阳光原厂维修手册日产风度维原厂维修手册日产Y50风雅原厂维修资料2006年日产尼桑贵士原厂维修手册2005年日产 E24佳奔旅行车原厂维修手册1987 日产 E25佳奔原厂维修手册2001 日产骏逸原厂维修手册2006年日产350Z原厂维修手册英文跑车2002 日产350Z Z33原厂维修手册2006年日产蓝鸟U13原厂维修手册1992 日产风神蓝鸟轿车维修手册\日产风神蓝鸟(EQ7200-II型)原厂维修手册日产蓝鸟原厂维修手册2003 日产新蓝鸟原厂维修手册日产骊威原厂维修手册2007日产D22帕拉丁原厂维修手册1998-2003 日产郑州日产 P27原厂维修手册2005 日产郑州帕拉丁原厂维修手册2002日产郑州奥丁原厂维修手册2007日产帕拉丁原厂维修手册2003日产郑州帕拉丁原厂维修手册日产 T30奇骏原厂维修手册2001日产 T30奇骏原厂维修手册2003日产骐达颐达原厂维修手册2005日产(千里马)原厂维修手册2004日产锐骐原厂维修手册日产东风日产尼桑新天籁原厂维修手册2004~06 日产尼桑天籁原厂维修手册2005日产新天籁原厂维修手册2006日产新天籁4缸2.0原厂维修手册2007 日产尼桑天籁原厂维修手册2008年日产Y61 途乐原厂维修手册日产Q45(无限)原厂维修手册2002 日产无限QX4原厂维修手册日产西尔维亚 S14 SR20DET原厂维修手册1994 日产F50西玛原厂维修手册2004-05年日产西玛(CIMA)原厂维修手册2004 日产逍客原厂培训资料日产原厂逍客原厂维修手册日产轩逸原厂维修资料2006日产 B14阳光原厂维修手册1994-97 日产N16阳光原厂维修手册2002年日产N16阳光EQ7202原厂维修手册2003年日产阳光原厂维修手册2005款日产英菲尼迪 EX35培训手册中文原厂2008 日产英菲尼迪 EX35原厂维修手册中文原厂2008 日产英菲尼迪 Y50原厂维修手册中文原厂2009 日产御轩原厂维修手册(C24)YUMSUN系列2008 日产郑州奥丁原厂维修手册2007马自达Mazda RX-8原厂维修手册马自达2 原厂维修手册 2008 马自达M2培训手册马自达福美来原厂维修手册2003 马自达新M3原厂维修手册2006 马自达长安马自达3 M3两厢原厂维修手册2010马自达长安M3培训手册马自达海马福美来原厂维修手册进口马自达3原厂维修手册马自达5参数配置表(终版发布) 马自达M6轿车学习手册马自达M6原厂维修手册06-08款马自达M6 睿翼原厂维修手册09 马自达m6原厂维修手册一汽M6原厂维修手册一汽马自达M6原厂维修手册-07年海南马自达MPV原厂维修手册马自达MPV原厂维修手册马自达普利马原厂电路及原厂维修手册新一代普力马培训手册斯巴鲁森林人原厂维修手册2007 斯巴鲁富士力狮原厂维修手册2007年斯巴鲁森林人原厂维修手册软件版2009 斯巴鲁翼豹原厂维修手册中文版斯巴鲁富士云雀GHK7071原厂维修手册斯巴鲁MY富士森林人原厂维修手册2004 斯巴鲁MY 力狮原厂维修手册2005 斯巴鲁MY力狮原厂维修手册2006 斯巴鲁弛鹏0207 斯巴鲁富士森林人2008斯巴鲁森林人原厂维修手册( 05款 ) 斯巴鲁森林人原厂维修手册( 06款 ) 三菱新戈蓝培训手册三菱格蓝迪原厂维修手册2004三菱格蓝迪原厂维修手册2006 三菱格蓝迪原厂维修手册2010三菱格蓝迪_原厂维修手册2008 三菱格蓝迪原厂维修手册2007 三菱格蓝迪车间维修光盘2007三菱蓝瑟原厂维修手册2007三菱三菱蓝瑟翼豪陆神原厂维修手册2009年10月三菱长丰猎豹汽车CS6原厂维修手册三菱长丰猎豹汽车原厂维修手册三菱猎豹CJY6421D及CJY2030原厂维修手册三菱猎豹汽车车间维修手册三菱猎豹维修维修培训三菱新猎豹CS6原厂维修手册07款三菱长丰CS7原厂维修手册09款三菱猎豹越野车原厂维修手册三菱欧蓝德原厂维修手册2004三菱欧蓝德原厂维修手册2008三菱欧蓝德原厂维修手册2009年10月三菱欧蓝德维修手册2009三菱欧蓝德自学教材三菱PAJERO原厂维修手册2008 三菱帕杰罗英文原厂维修手册2006 三菱帕杰罗V86V93V98W原厂维修手册2009年10月三菱帕杰罗V87V97V93原厂维修手册2010 三菱Pajero Pinin原厂维修手册2000-2001 三菱帕杰罗V87V97V93原厂维修手册2010三菱帕杰罗原厂维修手册2006三菱帕杰罗原厂维修手册2002三菱帕杰罗原厂维修手册(06年英文) 三菱帕杰罗速跑原厂维修手册2002 三菱Pajero原厂维修手册1999-2000 三菱帕杰罗(速跑)原厂维修手册(02年) 三菱帕杰罗蒙太罗MONTERO V75 英文原厂维修手册三菱V73 6G72发动机电控系统检修. 三菱V73车间检修手册(发动机与变速箱机械) 三菱帕杰罗V73V75原厂维修手册三菱L200原厂维修手册1999-2001 三菱车系-Montero车型发动机针脚电压1994 三菱4G6FF发动机三菱电喷系统维修手册三菱伊柯丽斯原厂维修手册2010 三菱菱绅(原厂维修手册)三凌4G64发动机维修培训三菱Carisma原厂维修手册1997-2000 三菱MONTERO原厂维修手册V75三菱MONTERO原厂维修手册V75(04年英文 ) 三菱V73全车检修手册三菱发动机维修资料三菱伊柯丽斯原厂维修手册2009东南4G63 4G64S4 MPI维修手册\东南得利卡汽车维修手册东南富力利中文维修手册东南戈蓝原厂维修手册东南凌绅原厂维修手册东南凌帅维修手册东南菱帅原厂维修手册东南新菱绅台湾版大众CC原厂维修手册2010款大众CC培训大众宝来原厂维修手册大众宝来01年维修资料大众宝来02年维修资料大众宝来03年维修资料大众宝来04年维修资料大众宝来05-06年维修资料大众新宝来原厂维修手册2008 大众宝来培训资料2004大众宝来运动版培训教材大众宝来维修资料大众波罗1.4中文原厂维修手册2001-2003大众劲情劲取原厂维修手册2007 大众POLO 原厂维修手册大众POLO 1.6原厂维修手册大众上海波罗维修手册大众GOL原厂维修手册(2003) 大众高尔原厂维修手册大众golf-a4教案大众一汽高尔夫A6原厂维修手册2009 大众一汽高尔夫A6维修手册+3月版2010大众Golf A4 培训资料大众辉腾培训资料大众甲克虫原厂维修手册大众新甲壳虫原厂维修手册大众捷达柴油电喷发动机培训资料大众大众捷达柴油捷达配书光盘大众捷达SDI原厂维修手册大众捷达轿车包括柴油车培训一汽大众捷达柴油车原厂培训08大众捷达1.6L四缸汽油发动机(BJG)机械部分大众捷达1.6L四缸汽油发动机(BJG_BWG)自诊断大众捷达LPG 机械部分大众捷达双燃料CNG LPG 电器部分大众捷达双燃料CNG 机械部分大众捷达双燃料CNG LPG 电器部分大众捷达双燃料CNG LPG 机械部分大众捷达柴油机电子控制系统大众Jetta双燃料喷射系统大众捷达(2V)轿车发动机数据流分析大众捷达(5V)轿车发动机数据流分析大众捷达.宝来五气门发动机电控系统的维修大众捷达2V电喷车维修手册大众捷达LPG燃气原理大众捷达SDI 发动机维修诊断手册[原厂] 大众捷达电喷系列轿车维修手大众捷达都市先锋维修手册大众捷达两阀电喷轿车维修手册大众捷达前卫数据流分析大大众一汽大众开迪维修手册及培训资料大众朗逸4缸汽油发动机(1.6升4缸链式) 大众迈腾原厂维修手册2007大众迈腾警车原厂维修手册大众PASSAT领域原厂维修手册2007 大众帕萨特B5培训资料大众上海帕萨特B5轿车电系故障检测与维修大众国产帕萨特全车维修手册大众帕萨特B5 1.8T维修手册大众帕萨特使用手册大众上海大众桑塔纳3000原厂维修手册大众桑塔纳2000轿车电控与电气系统检修图解大众桑塔纳入2000原厂维修资料2004款大众桑塔纳2000原厂维修手册大众桑塔纳GLI 世纪新秀原厂维修手册大众桑塔纳2000结构与维修大众速腾原厂维修手册2006 大众速腾电气系统培训09大众途安原厂维修手册2004 大众途安原厂维修手册2005 大众途安Touran多用途乘用车产品手册大众途安Touran培训教材大众途锐自学手册长安铃木燕雨原厂维修手册铃木吉姆尼原厂维修手册铃木SOLIO(所力歐)1.3L原厂维修手册羚羊轿车原厂维修手册羚羊世纪星轿原厂维修手册铃木天语SX4原厂维修手册铃木维特拉原厂维修手册新奥拓YC5原厂维修手册长安奥拓轿车原厂维修手册长安铃木初级技术培训教材铃木羚羊CNG原厂维修手册铃木全新天语SX4维修手册五十铃UBS英文原厂维修手册江铃陆风(JX6474E)原厂维修手册江铃皮卡原厂维修手册江铃全顺4G64原厂维修手册江铃全顺客车全车电路图江铃全顺原厂维修手册江铃陆风SUV龙腾版(配VM发动机)培训教材江铃陆风风华原厂维修手册2007 江铃陆风风尚原厂维修手册2006五十铃T型皮卡REDEO9(竞技者)原厂维修手册江铃全顺欧III发动机原厂维修手册2006 江铃N系列欧III发动机原厂维修手册2007 江铃T系列欧三发动机原厂维修手册2007 江铃全顺欧III发动机原厂维修手册2007 江铃汽车09款T系列(N301)原厂维修手册2008 江铃T系列欧三原厂维修手册江铃电喷柴油T系列欧三原厂维修手册轻骑兵 Isuzu Trooper 英文原厂维修手册庆铃600P原厂维修手册五十铃N系列发动机维修说明五十菱原厂维修手册大宇蓝龙原厂维修手册大宇希望原厂维修手册大宇蓝龙新巧龙旅行家典雅轿车原厂维修手册大宇(DAEWOO)王子超级沙龙轿车电控燃油喷射系统原厂维修手册大宇Daewoo贵族希望ESPERO轿车电喷系统原厂维修手册大宇貴族原厂维修手册大宇蓝龙发动机电控系统检修起亚东风悦达福瑞迪原厂维修手册起亚嘉华骄车原厂维修手册起亚嘉华原厂原厂维修手册进口嘉华原厂维修手册起亚千里马原厂维修培训手册起亚普莱特原厂维修手册起亚锐欧G 1.4 DOHC原厂维修手册2009 起亚赛拉图汽车维修电路图起亚赛拉图原厂维修手册起亚狮跑维修手册起亚2009狮跑原厂维修手册起亚狮跑原厂维修手册起亚sorento索兰托原厂维修手册起亚威客 G3.8原厂维修手册 2006 起亚威客G3.8DOHC(VVT)原厂维修手册 2007起亚远舰原厂维修手册起亚远舰新车技术培训教材现代XG君爵XG原厂维修手册现代劳恩斯原厂维修手册2009 现代领翔NFC原厂维修手册2009 现代领翔NFC 培训手册现代美佳(FC)原厂维修手册2009 现代瑞风与风行检修专辑2005年瑞风英文原厂维修手册瑞风与风行检修专辑2005年现代新圣达V6原厂维修手册2008 现代圣达菲培训资料现代圣达菲维修手册现代索纳塔AT原厂维修手册2007 现代北京索纳塔原厂维修手册北京现代索纳塔发动机培训北京现代索纳塔原厂维修手册北京现代索纳塔专辑现代华泰现代特拉卡原厂维修手册2002 华泰现代培训现代特拉卡柴油发动机原厂维修手册现代特拉卡原厂维修手册现代途胜维修手册2009现代途胜培训教材现代途胜维修手册现代维拉克斯维修手册2008 现代雅科仕维修手册现代雅申特原厂维修手册2009 现代雅绅特维修手册现代雅尊维修资料2009 现代悦动维修手册2008 现代伊兰特维修手册2009 现代伊兰特维修手册现代NF御翔原厂维修手册2005 富豪VOLVO S80原厂维修手册 VOLVO S80检修专辑-迪威2004,12.pdf宝马X3 E83培训资料宝马X5 E53培训教材宝马X5 培训教材2003 宝马X5 培训教材2004 宝马新X5E70底盘培训宝马08新七系培训教材宝马BMWE65培训教材宝马E65-原厂2001宝马新一代发动机 N73培训教材宝马E38 E39原厂维修手册宝马E65-E66新系统原厂维修手册宝马745 E65原厂维修手册宝马E65系列保养灯归零宝马745控制系统检修专辑2004年宝马E 90 培训教材宝马E90培训教材宝马E90培训教材宝马3系培训手册宝马E60 E61培训教材宝马华晨新5系培训教材宝马MINI和E60培训教材宝马525i维修手册宝马国产维修手册华晨宝马新5系原厂中文维修手册宝马99 培训教材宝马BMW525i维修手册新宝马5系使用手册-原厂保时捷Boxster车间维修手册保时捷卡宴维修手册保时捷汽车培训与自学习保时捷 993 911 车间维修手册保时捷911维修手册保时捷968维修手册保时捷968原厂维修手册 Maybach迈巴赫车间维修手册奔驰BENZ-06BENZ奔驰培训教材奔驰SLK 171培训教材奔驰W210培训教材奔驰W211娱乐系统培训奔驰W220车间维修手册奔驰600车间维修手册奔驰w202车间维修手册奔驰W203,W210系统检修奔驰轿车维修数据(35 43 59 79奔驰车系电脑控制检修技术资料库奔驰BENZS320维修手册2006 奔驰s系使用手册奔驰车系电脑控制检修技术资料库奔驰车系维修手册标致206-406原厂维修手册标致306原厂维修手册标致307原厂维修手册标致307综合资料东风标致206原厂发动机电喷系统培训东风标致408培训标致307-607维修软件系统标致系列中文.nrg东风标致307 2004-2006 新雅途EPS维修资料捷豹Jaguar Tis 2004 捷豹JAGUAR XK8 1997电路图捷豹维修手册 XJ6 - XJ40 拉古娜英文原厂维修手册梅甘娜英文原厂维修手册雷诺新风景2英文原厂维修手册雷诺轿车维修手册(英文) 雷诺RENAULT维修手册欧宝新款欧美佳原厂维修手册欧宝赛飞利英文原厂维修手册欧宝汽车维修手册欧宝赛飞利培训欧宝威达原厂维修手册欧宝威达VECTRA-B英文原厂维修手册欧宝威达VECTRA-C英文原厂维修手册欧宝雅特英文原厂维修手册欧宝CECTRA-B原厂维修手册萨博9-3 原厂维修手册进口绅宝轿车修理手册机工2000 绅宝车系维修手册斯柯达法比亚原厂维修手册斯柯达昊锐培训教材斯柯达技术通报斯柯达新明锐培训教材PICASSO原厂维修手册2007 雪铁龙c2培训与电路图雪铁龙C2培训-原厂雪铁龙爱利舍原厂维修手册雪铁龙爱丽舍轿车雪铁龙毕加索轿车原厂维修手册雪铁龙新毕加索课堂练习图册雪铁龙毕加索萨拉改进型技术资料-美河提供雪铁龙富康电气维修资料东风雪铁龙凯旋雪铁龙凯旋维修手册雪铁龙塞纳维修手册雪铁龙世嘉培训内容1-1 雪铁龙世嘉车型介绍路虎Land Rover RAVE 原厂维修手册(英文)路虎发现者和自由人原厂维修手册路虎拦胜原厂维修手册陆虎更早陆虎览胜车间手册路虎览胜车主手册2006 英国陆虎英文原厂维修手册路虎维修手册(修理指南别克陆尊原厂维修手册别克GL8 2.5L原厂维修手册2006 别克GL8陆遵原厂维修手册2005 别克GL8原厂维修手册2001 别克昂科雷原厂维修手册别克新君威原厂维修手册2008别克君威原厂维修手册2003别克新君威2。
- 1、下载文档前请自行甄别文档内容的完整性,平台不提供额外的编辑、内容补充、找答案等附加服务。
- 2、"仅部分预览"的文档,不可在线预览部分如存在完整性等问题,可反馈申请退款(可完整预览的文档不适用该条件!)。
- 3、如文档侵犯您的权益,请联系客服反馈,我们会尽快为您处理(人工客服工作时间:9:00-18:30)。
ENGINE LUBRICATION&COOLING SYSTEMSSECTION LCGo to Table of ContentsGo to Quick Reference IndexSEM164FLiquid Gasket Application Procedure AEM080 e a scraper to remove all traces of old liquid gasket from mating surfaces and grooves.Also,completely clean any oil from these areas.b.Apply a continuous bead of liquid gasket to mating surfaces.(Use Genuine RTV silicone sealant Part No.999MP-A7007,Three Bond TB1207D or equivalent.)c.Apply liquid gasket around the inner side of bolt holes (unless otherwise specified).d.Assembly should be done within 5minutes after coating.e.Wait at least 30minutes before refilling engine oil and engine coolant.Special Service ToolsThe actual shapes of Kent-Moore tools may differ from those of special service tools illustrated here.Tool number(Kent-Moore No.)Tool nameDescriptionST25051001(J25695-1)Oil pressuregauge NT050ST25052000(J25695-2)Hose NT051Adapting oil pressure gauge to upper oil panWS39930000(—)Tubepressure NT052Pressing the tube of liquid gasketEG17650301(J33984-A)Radiator cap testeradapter NT053Adapting radiator cap tester to radiator filler neckKV99103510(—)Radiator plate pliersA NT224Installing radiator upper and lower tanksKV99103520(—)Radiator plate pliersB NT225Removing radiator upper and lower tanksLubrication CircuitSLC036BSLC037BSLC930AOil Pressure CheckSLC926WARNING:¼Be careful not to burn yourself,as the engine and oil may be hot.¼Oil pressure check should be done in “Neutral position”(M/T)or “Parking position”(A/T).1.Check oil level.2.Remove oil pressure switch.3.Install pressure gauge.4.Start engine and warm it up to normal operating temperature.5.Check oil pressure with engine running under no-load.Engine speedrpmApproximate discharge pressure kPa (kg/cm 2,psi)Idle speed3,000More than 69(0.70,10.0)435-551(4.44-5.62,63.1-79.9)If difference is extreme,check oil passage and oil pump for oil leaks.6.Install oil pressure switch with sealant.Oil PumpREMOVAL AND INSTALLATIONCAUTION:When removing the oil pans,oil pump assembly and timing chain from engine,first remove the camshaft position sensor (PHASE)and the crankshaft position sensor (REF)/(POS)from the assembly.Be careful not to damage sensor edge.1.Drain engine oil.2.Remove drive belts.3.Remove camshaft position sensor (PHASE),and crankshaft position sensor (REF)/(POS).4.Remove engine lower covers.5.Remove crankshaft pulley.6.Remove front exhaust tube and its support.7.Support engine at right and left side engine slingers with a suitable hoist.8.Remove engine right side mounting insulator and bracket bolts and nuts.9.Remove center member assembly.10.Remove air compressor assembly and bracket.11.Remove oil pans.(Refer to “Removal”of “OIL PAN”in EM section.)12.Remove water pump cover.13.Remove front cover assembly.14.Remove timing chain.(Refer to “Removal”of “TIMING CHAIN”in EM section.)15.Remove oil pump assembly.16.Reinstall any parts removed in reverse order of removal.DISASSEMBLY AND ASSEMBLYSLC155B ¼When installing oil pump,apply engine oil to gears.SLC932A SLC933A OIL PUMP INSPECTIONUsing a feeler gauge,straightedge and micrometers,check the following clearances:Unit:mm(in) Body to outer gear radial clearance k10.114-0.200(0.0045-0.0079)Inner gear to outer gear tip clearance k2Below0.18(0.0071)Body to inner gear axial clearance k30.030-0.070(0.0012-0.0028) Body to outer gear axial clearance k40.050-0.110(0.0020-0.0043)Inner gear to brazed portion of housing clear-ance k50.045-0.091(0.0018-0.0036)2¼If body to gear clearances(k1,k3,k4,k5)exceed the limit, replace oil pump body assembly.SLC934AASLC959A REGULATOR VALVE INSPECTION1.Visually inspect components for wear and damage.2.Check oil pressure regulator valve sliding surface and valvespring.3.Coat regulator valve with engine oil.Check that it fallssmoothly into the valve hole by its own weight.If damaged,replace regulator valve set or oil pump body.SLC935AA 4.Check regulator valve to oil pump body clearance.Clearance:k6:0.040-0.097mm(0.0016-0.0038in) If it exceeds the limit,replace oil pump body.SLC035B OIL FILTERThe oil filter is a small,full-flow cartridge type and is provided with a relief valve.Cooling CircuitSLC936ASLC937ASystem CheckSLC755A WARNING:Never remove the radiator cap when the engine is hot;serious burns could be caused by high pressure fluid escaping from the radiator.Wrap a thick cloth around the cap and carefully remove it by turning it a quarter turn to allow built-up pressure to escape and then turn the cap all the way off.CHECKING COOLING SYSTEM HOSESCheck hoses for improper attachment,leaks,cracks,damage, loose connections,chafing and deterioration.CHECKING RADIATOR CAPTo check radiator cap,apply pressure to cap with a tester.Radiator cap relief pressure:Standard78-98kPa(0.8-1.0kg/cm2,11-14psi)Limit59-98kPa(0.6-1.0kg/cm2,9-14psi)SMA967B Pull the negative pressure valve to open it. Check that it closes completely when released.SLC756A CHECKING COOLING SYSTEM FOR LEAKSTo check for leakage,apply pressure to the cooling system with a tester.Testing pressure:157kPa(1.6kg/cm2,23psi)CAUTION:Higher than the specified pressure may cause radiator dam-age.Water PumpCAUTION:¼When removing water pump assembly,be careful not to get coolant on drive belt.¼Water pump cannot be disassembled and should be replaced as a unit.¼After installing water pump,connect hose and clamp securely,then check for leaks using radiator cap tester.SLC154BSLC939A REMOVAL1.Drain coolant from drain plugs on radiator and both sides ofcylinder block.Refer to“Changing Engine Coolant”in MA section.2.Remove right side engine mounting,mounting bracket andnuts.3.Remove drive belts and idler pulley bracket.4.Remove water pump drain plug.5.Remove chain tensioner cover and water pump cover.SLC940A 6.Pushing timing chain tensioner sleeve,apply a stopper pin soit does not return.Then remove the chain tensioner assembly. Water Pump(Cont’d)SLC941A 7.Remove the3water pump fixing bolts.Secure a gap betweenwater pump gear and timing chain,by turning crankshaft pul-ley20°backwards.SLC942A 8.Put M8bolts to two M8-threaded holes out of3water pumpfixing boltholes.9.Tighten M8bolts by turning half turn alternately until they reachtiming chain rear case.¼In order to prevent damages to water pump or timing chain rear case,do not tighten one bolt continuously.Always turn each bolt half turn each time.10.Lift up water pump and remove it.¼When lifting up water pump,do not allow water pump gear to hit timing chain.SLC943A INSPECTION1.Check for badly rusted or corroded body assembly.2.Check for rough operation due to excessive end play.SLC030BA INSTALLATION1.Apply engine oil and coolant to O-rings as shown in the figure.SLC031B 2.Install water pump.¼Do not allow cylinder block to nip O-rings when installing water pump.SLC944A 3.Before installing,remove all traces of liquid gasket from mat-ing surface of water pump cover and chain tensioner cover using a scraper.Also remove traces of liquid gasket from mating surface of frontcover.4.Apply a continuous bead of liquid gasket to mating surface ofchain tensioner cover and water pump cover.SLC156B 5.Return the crankshaft pulley to its original position by turningit20°forward.SLC961A 6.Install timing chain tensioner,then remove the stopper pin.¼After installing the tensioner,race the engine at about 3,000rpm under no load to purge air from the high-pres-sure chamber.The engine may produce a rattling noise.This indicates that air still remains in the chamber and is not a matter of concern.7.Install drain plug on cylinder block.8.Reinstall any parts removed in reverse order of removal.ThermostatSLC947ACSLC962AA REMOVAL AND INSTALLATION1.Drain coolant from drain plugs on radiator and both sides ofcylinder block.2.Remove drive belts and idler pulley bracket.3.Remove water pump drain plug on pump side of cylinder block.4.Remove lower radiator hose.5.Remove water inlet and thermostat assembly.¼Do not disassemble water inlet and thermostat.Replace them as a unit,if necessary.SLC948A 6.Install thermostat with jiggle valve facing upward.¼After installation,run engine for a few minutes,and check for leaks.¼Be careful not to spill coolant over engine compartment.Use a rag to absorbcoolant.INSPECTION1.Check valve seating condition at ordinary room temperatures.It should seat tightly.2.Check valve opening temperature and maximum valve lift.StandardValve opening temperature°C(°F)82(180)Valve lift mm/°C(in/°F)More than8.6/95(0.339/203)3.Then check if valve closes at5°C(9°F)below valve openingRadiatorREMOVAL AND INSTALLATION1.Remove under cover.2.Drain coolant from radiator.3.Disconnect radiator upper and lower hoses.4.Remove radiator shroud.5.Remove A/T oil cooler hoses.(A/T models only)6.Disconnect reservoir tank hose.7.Remove radiator mounting bracket.8.Remove radiator.9.After repairing or replacing radiator,install any part removed inreverse order of removal.When filling radiator with coolant,refer to“Changing Engine Coolant”in MA section.SLC153Bk1Radiatork2Radiator filler cap k3Reservoir tankk4Radiator drain cock k5Lower radiator hosek6Oil cooler hoses(A/T models)k7Cooling fansk8Cooling fan motorsk9Radiator shroudk10Upper radiator hose Cooling Fan Control SystemCooling fans are controlled by ECM(ECCS control module).For details,refer to EC section(“Cooling Fan”,“TROUBLE DIAG-NOSIS FOR DTC P1900”).Radiator (Aluminumtype)SLC882ABSLC655CBPREPARATION1.Attach the spacer to the tip of the radiator plate pliers A.Spacer specification:1.5mm (0.059in)thick x 18mm (0.71in)wide x 8.5mm (0.335in)long.2.Make sure that when radiator plate pliers A are closed dimen-sion H ′′is approx.7.6mm (0.299in).3.Adjust dimension H ′′with the spacer,if necessary.SLC903-ADISASSEMBLY1.Remove tank withTool.¼Grip the crimped edge and bend it upwards so that Tool slips off.Do not bend excessively.SLC930¼In areas where Tool cannot be used,use a screwdriver to bend the edge up.Be careful not to damage tank.SLC9312.Make sure the edge stands straight up.3.Remove oil cooler from tank.(A/T models only)SLC894ASSEMBLY1.Install oil cooler.(A/T models only)Pay attention to direction of conical washer.SLC9322.Clean contact portion oftank.3.Install sealing rubber.Push it in with fingers.Be careful not to twist sealing rubber.SLC904-A4.Caulk tank in specified sequence with Tool.SLC896 SLC897¼Use pliers in the locations where Tool cannot be used.SLC554A 5.Make sure that the rim is completely crimped down.Standard height“H”:8.0-8.4mm(0.315-0.331in)6.Confirm that there is no leakage.Refer toInspection.INSPECTIONApply pressure with Tool.Specified pressure value:157kPa(1.6kg/cm2,23psi)WARNING:To prevent the risk of the hose coming undone while under pressure,securely fasten it down with a hose clamp.Attach a hose to the oil cooler as well.(A/T models only)Overheating Cause Analysis Symptom Check itemsCooling sys-tem parts malfunction Poor heat transferWater pump malfunction Worn or loose drive belt—Thermostat stuck closed—Damaged finsDust contamination or papercloggingMechanical damageClogged radiator cooling tubeExcess foreign material(rust,dirt,sand,etc.)Reduced air flowCooling fan does not operate.——High resistance to fan rotationDamaged fan bladesDamaged radiator shroud——Improper coolant mixture ratio———Poor coolant quality———Insufficient coolantCoolant leaksCooling hoseLoose clampCracked hoseWater pump Poor sealingRadiator capLoosePoor sealingRadiatorO-ring for damage,deteriora-tion or improper fittingCracked radiator tankCracked radiator coreReservoir tank Cracked reservoir tankOverflowing reservoir tankExhaust gas leaks into coolingsystemCylinder head deteriorationCylinder head gasket deteriora-tionExcept cool-ing system parts malfunc-tion—Overload on engineAbusive drivingHigh engine rpm under no loadDriving in low gear for extendedtimeDriving at extremely high speedPowertrain system malfunction—Installed improper size wheelsand tiresDragging brakesImproper ignition timingBlocked or restricted air flowBlocked bumper——Blocked radiator grilleInstalled car brassiereMud contamination or papercloggingBlocked radiator—Blocked condenser—Installed large fog lampEngine Lubrication System Oil pressureEngine speedrpmApproximate discharge pressure kPa(kg/cm2,psi)Idle speed More than69(0.70,10.0)3,000435-551(4.44-5.62,63.1-79.9)Regulator valveUnit:mm(in)Regulator valve to oil pump cover clearance 0.040-0.097(0.0016-0.0038)Oil pumpUnit:mm(in)Body to outer gear radial clear-ance0.114-0.200(0.0045-0.0079)Inner gear to outer gear tip clear-anceBelow0.18(0.0071)Body to inner gear axial clearance0.030-0.070(0.0012-0.0028)Body to outer gear axial clearance0.050-0.110(0.0020-0.0043)Inner gear to brazed portion ofhousing clearance0.045-0.091(0.0018-0.0036)Engine Cooling SystemThermostatValve opening temperature°C(°F)82(180)Valve lift mm/°C(in/°F)More than8.6/95(0.339/203)RadiatorUnit:kPa(kg/cm2,psi)Cap reliefpressureStandard78-98(0.8-1.0,11-14)Limit59-98(0.6-1.0,9-14)Leakage test pressure157(1.6,23)SERVICE DATA AND SPECIFICATIONS(SDS)ENGINE LUBRICATION&COOLING SYSTEMSSECTION LC CONTENTSPRECAUTIONS AND PREPARATION (2)Liquid Gasket Application Procedure (2)Special Service Tools (3)ENGINE LUBRICATION SYSTEM (4)Lubrication Circuit (4)Oil Pressure Check (5)Oil Pump (5)ENGINE COOLING SYSTEM (8)Cooling Circuit (8)System Check (9)Water Pump (9)Thermostat (14)Radiator (15)Cooling Fan Control System (15)Radiator(Aluminum type) (16)Overheating Cause Analysis (19)SERVICE DATA AND SPECIFICATIONS(SDS) (20)Engine Lubrication System (20)Engine Cooling System (20)。