BT-3说明书
B033 三折触控键盘说明书
·邸对码连接:产品功能Product features • Bluetooth pairing connectionB033三折触控键盘说明书.,, 气, 严气一"亏,,,.., I'"'\)= = = ..占匕—|注怠:正确澡作本产品,韵仔细阅读用户手册.支持系统W叩OS/Android芒1王已严扂器必刘妈接口二2、打开芦牙”进入搜索樱式.3、互到发现"Bluetooth3.0 Keyboarci"然后点击下步.4、根据蓝牙提示,汗键斋卜输入对应的密码,按E ntertj量确五霉夏”O吻++_注:配对成功以后下次便用只蓄萎打开蓝牙键霓电双及使用设备的直牙蓝牙键盘将会臼动搜索还接上次使用过的识督,1'贾亵再进行配对觅作5、提示连接配对成功,您就可以舒适地使用您的键盘了.!OS/Android WindowsFn+ 对应功能Fn+Shift 对应功能-o返回Qi!ii~仑主页、E0<`巳,o! 0. 搜索! q 搜索1 F1 1 F1@ l,l 全选@ I, 全选2 F2 2 F2# t;J 复制# "' 复制3 F3 3 F3$苍粘贴$屯粘贴4 F4 4 ,.",I,剪切%丛剪切5 FS 5 FSA ...上佃人l嘈·上曲6 FO 6 FO& .,, 暂停序肪文& .,, 暂停序驻女7 ., 7 "*中下11!1*.. ,下曲8 F8 8 ,.(' 静舌(. 脖音9 Fl 9 F9) .,音盘减小)心音量减小0 F10 0 F10-F11I 音旦唱人一F11 ,音呈增大+ a锁+ Q锁屏= F12 = F12三系统切换语言:Windows: Alt+Shift 四姐泊iOS: Ctrl+峦謹切换诺言Android :Shift+空格霓切换语言!OS/Android WindowsFn+fuonrrt isopnonding Fn+Shiftfuon『trei,oponnding-o邸um to Desk.-oHome、...、...I 0. Search ! 0. Search1 " 1 F1@ el Select @ el Select2 " 2 F2• Id Copy # Cl Copy3 F> 3 "$ ,.. Stick $ ,.. Stick4 ,. 4 F4,. 1 Cut %& Cut5 ,. 5 F5A, ...Pre-Track ^-Pre-Track6 FO 8 FB& .,, Play/Pause &�II Play/Pause7 f7 7 F7*...Next*由Next8 ,. 8 F8(. Mute I Mute.,. 9 FO) .,Volume-I哺)Volume-0 F10 0 F10一F11 • Volume+_`'Volume+-F11+`Lock + a Lock= F12 = F12T hree system switching languagesWindows: Alt+Shift switch languageiOS: Ctrl+Space key switch languageAndroid : Sh1ft+Space k可switch langua扣三l.Please turn on the power at theside of the灼board,blue lights up,press the Bluetooth connectionbutton, blue light will twinkle andinto the match mode quickly.2.0pen the tablet PC setting"Bluetooth" into searching andpairing state.3.You will find the·s1uetooth 3.0Keyboard'and click to next !lep.4.According the table PC tips to inputthe cor『eel password then click"Enter·buttonS.There have a tip for connectingsuccessfully ,you can use your知yboard comfortably知ma心A彻'"'"泌山r>g'"'""""'�"'·心rrt tiM• ,ou do,", .,., m虹h cod•. j u<t op"" 1hoSluetooth虹yboard po, 心心劝扛h and the tablet PC'Bl叩ooth.'TheBT切boordwillsea兀h寸ed ..k•• 心.如m忒,,onn配,-)c,----,-----·-_, I -T一平--·'·=· 归',"""""""�·"厂一一-., —干—_JCompatible SystemWin /10S /Android8033B lue t oo t h KeyboardUser' s ManualNote: Plea,e read the use『manual carefully before you 5ta八using this product 状态显示LE D常见问题解答技术规格l、平板灭法连接蓝牙键盎?键盘尺寸:304 5X97.95X8mm切开)贱跷汇作电流:<8.63m A .对码.ITTf明研关,蓝牙指动叨郢广壳,按下对码键,蓝灯闪烁1)谔先检查蓝牙键盘是否有进入配.然后再打开平板电脑蓝牙.充电·指示灯红色,充满叮灭;搜索设备进行连接.颐板尺寸:54.8X44.8mm 使用按键工作电流.<3mA.低电压指示当电压低于3.3V,红色指示灯闪烁2)检杳唷干键盘电至是否充足,电云不足也会导致无法连接,请将茜牙符盘平,量:197.3g 待机电流·025mA提示·为了延长电池寿命,请您在不使用键息时,关闭键盘的电瘾开关.泣盘充电后再使用.休眠电流,60µA 2、谜卿示灯在使用途中且闪烁?工作距离:<lOm故障分析键盘指示灯在使用途中直闪烁,表示电池即将没电,请尽快将键盘锤电池容云:140mA h 休朕时间11½ 并中请与售后服务人员联系充电.唤醒方式按任怠键知识产权信息3、设备显示蓝牙键盘断开连接?工作电压:3 7V蓝牙键盘在段时间内不使用,设备为了台电将自动关闭篮牙功能,未经本司的许可,禁止复制本用户手册的内容.按键盘任意鞋唤醒.蓝牙连接自动恢St.触控板功能说明安全提醒请不要打开或修理该设备,涓不要在潮湿环堁内使用设备,滑用干n'l'll;;li il;-压左键.四点击庄右键布擦拭该设备.匝保条款本设备自购买之日起,提供1年保修服务.II运上下滑动蚕直聪匮-键盘保养1、谝勿将设备暴露在液体和淜汜的环境中或使其淋雨,诘勿在浴水槽`m主顽石滑动桑拿房`游泳池或蒸汽房附近使用.m丰ili-w;n+II!!还,, '(打开Co rtan a)活动寅口切换2、涓勿将设备暴霓于过高或过低的温度下.3. 请勿长时间放置在阳光直射的地方.m至向上扫-Wlo+To卤合键”式向下扫-w;n+D组合4、消勿靠近明火,如烹任用炉、蜡烛或者壁炉.I IJ开任务浏汲留IJI键(翌示桌面)5、避免使用锋利器物刮擦产品,及时给产品进行充电以保证正常使用.注·该设备在iOS系统下触摸板无功能······ 一.一,一一.一...一一.一.---..一.--.一.一..一......一.-....一··········,保修卡用户坻写资料公司或个人全称通讯地址电话邮编所购产品名称及型号购买日期: }亘圭兰弘\, ••.••.•...••••.•.•.••••.•.••• 一一.一一一.--.一......一...一..一一.一一..一,',',.,',',',',',',',',',',',',.,','.,...,',',.,'.,',',..,',',',',',',',',',',',',',',','.----丛。
美的电子洗衣机用户手册说明书

Fh;ih4ijj40.+3)*5O 4
4 4
4 4
k"D
%&'(
`.)+==fH0C+C>1,g
`d;liha4jbiG4Bbbm 40.+3)*5H
4
4
7&89 0+V.0C+C>1,C1fH
4
4
4
n"$
%&'( 7&89
`.)+==fo0C+C>1,g 0+V.0C+C>1,C1fo
A*1EFGH>,<14A*1E I=+JC>K.40.+3)*5L MN0C5)=1)? ON,@5)=1)?>,-
)=1)? )=1)?>,-
)=1)? )=1)?>,-
P!
%&'( 7&89
Q1,.M1,41<< 4
Q1,.M1,41<< 4
Q1,.M1,41<< 4
X7_ 7&89 I1E.31<<
I1E.31<<
I1E.31<<
I1E.31<<
!"D %&'( `.)+==fM0C+C>1,g
I=+J4I+20.4 0.+3)*5M
4
4
7&89 0+V.0C+C>1,C1fM
4
4
4
#"
%&'( 7&89
BT-9300ST激光粒度仪使用手册

第三章 测试准备 ............................................................................................................................... 7 1、仪器及用品准备.......................................................................................................................... 7 2、取样与悬浮液的配置.................................................................................................................. 7
BT-3 狗吠控制电子罩说明书

Bark Control CollarPet Owner’s Notes__________________________________________________________________________________ __________________________________________________________________________________ __________________________________________________________________________________ __________________________________________________________________________________ __________________________________________________________________________________ __________________________________________________________________________________ __________________________________________________________________________________ __________________________________________________________________________________ __________________________________________________________________________________ __________________________________________________________________________________ __________________________________________________________________________________ __________________________________________________________________________________ __________________________________________________________________________________ __________________________________________________________________________________ __________________________________________________________________________________ __________________________________________________________________________________ __________________________________________________________________________________The third generation Bark Terminator – III is a completely new and ad-vanced Bark Control System with three different modes of bark or howl de-tection plus the ability to select Shock or No-Shock with each mode. This allows you to tailor your own custom training program for most any dog.NOTE : Your collar is shipped with shock correction ENABLED! This is the preferred way to start training your dog. H owever if you wish to DISABLE shock correction please follow step 3) in the Quick Reference Section . Battery Status LightTone Speaker Shock Status LightMode Symbols Mode Selection DialScrewTest Buttonof Collar Press Battery Firmly Until Flush With BackDone!Quick Reference1) E ngage the battery by squeezing into the collar until it is firmly seated and flush with the back of the collar. Consult the Installing the Battery section for more info2) W ith the collar removed from the dog, and while not touching the two shock probes, press the system TEST Button and observe the status lights.Note : Repeat this test at least once a week.Caution! When pressing the TEST Button avoid contact with the Shock Probes!3) E NABLE or DISABLE Shock Correction. Shock correction is easily toggled ON or OFF. Do this only with the collar r emoved from the dog!A. P ress the TEST Button and verify the BATT light illuminates. Alsodetermine if the SHOCK is ON or OFF . Then if you need to change it, do the following:B. P ress and hold the TEST Button for 7 seconds, until the SHOCK lighttoggles from ON to OFF , or from OFF to ON .C R epeat this step at any time to toggle to the opposite setting.4) S elect the Desired Detection Mode. Do this by turning the dial until the arrow aligns with the correct Mode Symbol as listed below.Note: If dial will not rotate, loosen the screw ½ turn, then rotate the dial. When done re-tighten the screw ½ turn. This seals the collar against rain.TEST Button I ndicationsACTION BATT Status LightSolid Red Battery is Good Blinking RedBattery is Low Replace Battery Soon None Battery is Dead (or SystemFailed )Replace Battery SHOCK Status Light Solid or Blinking Red Shock is ENABLED andcircuit is working properlyNoneShock is DISABLED orcircuit has failed5) A ttaching the Collar to Your DogWith the probes against the dog’s throat, adjust the collar strap so the probes are touching the skin with moderate p ressure, but not be so tight as to physically harm the dog’s neck or cause choking. Consult the Details Section for more specifics.How the BT-3 WorksCorrectionsWhen the collar detects a bark or howl it generates an annoying “correc-tion” which always consists of an audible tone and, if enabled, a low cur-rent shock to the dog’s throat area. The dog learns that the annoyance goes away when they stop barking or howling.Progressive CorrectionsThe number and frequency of corrections progressively increases if the dog keeps barking or howling. The first correction is just a short tone to get the dogs attention, but following corrections add shock (if enabled) and multiple pulses if the dog continues to bark or howl.Automatic Correction ReductionAs the dog’s barking slows the processor automatically reduces the fre-quency and intensity of the corrections. When there is no barking/howl-ing for 30 seconds, the correction is reduced to it’s minimum.Panic Recovery PeriodIf the dog happens to panic and bark or howl uncontrollably for more than 15 seconds, the processor disables all c orrections for a 20 second recovery period to let the dog calm down.Bark vs. NoiseDetection of a bark is relatively reliable in the BT-3 due to the internal digital processing. However any very loud sound that has the same amplitude envelope and duration of a normal dog bark can be miss-interpreted as a bark and generate an unnecessary correction. Thisis confusing to the dog. Therefore when you first start using a BT3 we recommend you avoid locations where there is chance of loud sounds triggering the collar. This includes areas such as automotive repair shops, and construction zones.The No-Bark RewardIf your dog has not barked in a long time, the first bark or loud noise will not trigger a correction. This feature prevents generation of an unneces-sary correction to a random event such as something falling and creating a loud noise. This feature is implemented in the Normal and Anti-Intruder TM modes, but not the Howl-Prevention mode.Continuous Status IndicatorsDuring normal operation, the BATT and SHOCK lights will flash in syn-chronization with every tone and shock correction respectively. This may be used to visually observe the corrections if you cannot hear the tone.Using the CollarRecommended Bark Control ProgramStep 1Start by selecting the Normal Mode, and enable SHOCK Correction. (See the Quick Reference section)With this setting the first detected bark produces only a short corrective tone to get the dog’s attention. Subsequent barks produce increasingly more frequent and longer sequential tones and shocks (if enabled) soit becomes more annoying for the dog to continue barking. If however the dog continues to bark because it is frightened or confused, the intel-ligent processing will shutoff all corrections for 20 seconds to let the dog recover.Step 2When the dog is responding well to the training, you may choose to select the Anti-Intruder Mode™. This mode allows the dog to bark when it feels threatened, without receiving a correction.Most dogs instinctively “rapid-bark” when threatened. Thisconsists of a group of three or more joined barks in onebreath. The BT-3 super intelligent Anti-Intruder™ modei gnores any rapid bark group of three or more barks, anda llows your dog to respond to an intruder without receiving acorrection.If your dog develops a habit of rapid barking when there is no danger present, go back to Step 1 to break this habit.Step 3When your dog is completely broken from the habit of barking, you may try disabling SHOCK Correction. The collar will still produce correc-tion tones when a bark is detected, and the dog by now has a strong association of the tone with a shock. So the tone should be enough to snap them out of unconscious barking. Tone-only correction is also less stressful to the dog when an external sound triggers an unnecessary correction. However if the dog ever reverts back to uncontrolled barking, re-enable SHOCK Correction.Recommended Howl Control ProgramNote: A dog’s howl is not like a bark. It has no definitive length of time or frequency, so it is much harder to distinguish between a howl and a loud noise. It is therefore important that initially you use the Howl-Prevention Mode only in a quiet environment with no loud background noise. We also recommend you disable SHOCK whenever using this mode around other dogs or young children who can trigger an unnecessary correction.Step 1Start by selecting the Howl-Prevention Mode, and disable SHOCK Correction (See the Quick Reference section). With these setting the first detected howl or bark produces only a short corrective tone to get the dog’s attention. Continued howling or subsequent barks produce increas-ingly more frequent and longer sequential tones. For some dogs the tone itself is distracting enough to reduce or even solve the problem. Observe your dog for the first day or two to make sure a correction tone is only generated when the dog is barking or howling. If unnecessary corrections are being generated then you should not proceed to the next step. Rather identify and remove what ever is producing the loud noise that triggers a correction.Step 2When you confirm there are no unnecessary corrections, enable SHOCK Correction. Now responses to a howl or bark will consist of tone and shock, starting with very short and mild pulses and progressively increasing to more frequent and intense pulses. If however the dog contin-ues to howl, bark or cry because it is frightened or confused, the intelligent processing will shutoff all corrections for 20 seconds to let the dog recover. If you ever notice the collar is generating unnecessary corrections when the dog is not howling or barking, immediately remove the collar ord isable SHOCK Correction, and go back to Step1.Step 3When your dog is completely broken from the habit of howling and bark-ing, you may try disabling SHOCK Correction. The collar will still produce correction tones, and the dog by now has a strong association between the tone and a shock. So the tone should be enough to snap them out of unconscious howling or barking. Using the tone-only correction is also less stressful to the dog when an external sound triggers an unnecessary correction. However if the dog ever reverts back to uncontrolled howling or barking, re-enable SHOCK Correction and go back to step 2.If your dog has stopped howling but frequently barks, you may want to try the Bark Control program (above) which is less sensitive to external noise.Training SuggestionsWhenever your dog is with a pack of other dogs, disable SHOCK Cor-rection. That way if another dog triggers a correction it is only an audible tone. Re-enable SHOCK when the dog is again alone.Likewise whenever your dog is going into a noisy, or banging environ-ment, disable the SHOCK. If you find over time that this environment does not trigger any correction tones, you may choose to leave SHOCK Correction enabled.Fitting the Collar to Your DogA. F or the collar to properly apply the corrective shock stimulus, it isvery important that the electrodes make good contact with the ani-mal’s skin. Fur between the electrodes and skin can greatly reduce the amount of stimulus transmitted to your dog. For this reason, we recommend that you shave the fur under your dog’s neck where the electrodes contact the skin.B. T wo sets of Shock Probes are included with the BT-3; a long setfor thick haired dogs, and a short set for short haired animals. The probes screw on to threaded studs in the bottom of the collar. Use pliers if necessary to loosen or tighten the probes. Periodically check to make sure the probes are still tight.C. P lace the collar around your dog’s neck with the housing at the bottom.D. F it the strap snugly but not so tight as to restrict breathing or causeharm to the neck.E. M ake sure both electrodes are in good contact with your dog’s skin.Use of a little skin lotion on your dog’s neck will improve contact. If necessary change to the longer Shock Probes.F. O nce you have determined the proper fit, mark the strap and cut offthe excess length.Installing / Replacing the Battery PackThe replaceable battery pack installs at the bottom of the unit, between the Shock Probes. Note that there is a small tongue on the battery pack that lines up with a groove in the collar casing. This is to ensure that the battery pack is installed correctly. Line up the tongue with the groove and push firmly. You will hear two clicks as the battery pack snaps into place. T o remove the battery pack, squeeze together the two finger tabs on each side of the battery pack and pull it out of the casing.Replacement B-3V8 battery packs are available at w . This popular battery is also used with other High Tech Pet p roducts. Battery LifeThe custom 8-cell battery pack will last two about months when few cor-rections are generated, and about two weeks d uring the initial training when a lot of corrections are generated.Battery life is extended if you disengage the battery when it is not being used. To do this squeeze together the two finger tabs on each side of the battery pack and pull it out of the casing about 3/16 inch. F riction will retain the b attery in the disengaged position as shown here.When the battery is disengaged, pressing the TEST button will produceno tone or status lights.PART 5 – IMPORTANT CAUTION NOTICESDogs are Unpredictable: Because individual dogs have unique temperaments, there is no way of knowing how your dog will react toits introduction to the training program. For your safety and your dog’s, initial training must take place using a training lead so that you keep complete control over the situation. Also realize that an aggressive animal could turn against the handler upon receiving the shock stimulus. Therefore, if you feel your dog has an aggressive behavior or has ever exhibited evidence of such behavior, we strongly suggest that you consult a certified animal behaviorist before using this product as a training aid.Skin Conditions: A small percentage of dogs may experience a skin condition called pressure necrosis, also known as contact dermatitis, caused by the pressure of the two probes against the same place on the dog’s neck for an extended period of time. This condition causesan infection, creating irritation and sores. We recommend you check your dog’s neck often to ensure that no such condition is evident. If your dog has a history of sensitive skin, eczema, skin allergies or rashes we recommend that you do not use an electronic collar. If you do observe a skin irritation, take your dog to a veterinarian who may prescribe a local ointment to clear up the condition. Bear in mind that it is not possible for the shock stimulus emitted by the collar to directly damage your pet’s skin. The electrical current output is simply too low to cause burning, or any other type of cellular, skin or organ damage. The stimulus excites nerve receptors only.Neurological Conditions: In extremely rare cases, animals may have neurological disorders such as epilepsy. You should be certain that your dog does not suffer from such a disease before using any type of sonic, or shock stimulus training collar. Also, make sure that your dog does not suffer from heart disease or any other chronic condition and be assured that your pet is in generally good health before using this product.________________________________________________________________________________ High Tech Pet Products, Inc. 11High Tech Pet ProductsThe Most Ingenious Pet Products on the Planet!See our complete line of ingenious pet products atManufactured in ChinaEngineered in the USA!High Tech Pet Products, Inc.2476 Palma Drive, Suite AVentura, CA 93003Rev. II – 5/03/2012 bt-3-manual。
温度传感器设置参数指南说明书

Cód.ParámetroU.M.TipoMín.Máx.VALOR/2Estabilidad de la medida -C 1154/3Deceleración visualización sonda-C 0150/4Sonda virtual-C 01000/5Selección °C o °F (0=°C, 1=°F)flag C 010/6Punto decimal (0=si 1=no)flag C 011/tI Visualización sobre el display -C 171/tE Visualización en terminal externo-C 060/P Selección tipo de sonda -C 020/A2Configuración de la sonda 2-C 042/A3Configuración de la sonda 3-C 040/A4Configuración de la sonda 4-C 040/A5Configuración de la sonda 5-C 040/c1Calibración de la sonda 1°C/°F C -20200/c2Calibración de la sonda 2°C/°F C -20200/c3Calibración de la sonda 3°C/°F C -20200/c4Calibración de la sonda 4°C/°F C -20200/c5Calibración de la sonda 5°C/°FC-2020St Set point (punto de consigna)°C/°F F r1r2-23rd Diferencial regulador°C/°F F 0.120 3.0rn Zona neutra°C/°F C 0604rr Diferencia inverso para control con zona neutra°C/°F C 0,1202r1SET mínimo admitido °C/°F C -50r2-23r2SET máximo admitido °C/°F C r120020TABLA DE PARÁMETROSCAREL: PUIFI0006 (MEMBRANA / ARMARIOS BT)/ PARÁMETROS SONDAr PARÁMETROS REGULADORr3Modalidad de funcionamientoflag C 020r4Variación automática del SET POINT nocturno °C/°F C -20200r5Habilitación de la monitorización de la temp.flag C 011rt Intervalo de monitorización de la temperaturahoras F 09990rH Máxima temperatura leída °C/°F F 000rLMínima temperatura leída°C/°FFc0Ret. arr. comp. y vent. en el mom. del encendido min C 0151c1Tiempo mínimo entre encendidos sucesivos min C 0151c2Tiempo mínimo de OFF del compresor min C 0150c3Tiempo mínimo de ON del compresormin C 0150c4Arranque forzado min C 01000cc Duración del ciclo continuohoras C 0150c6Tiempo exclusión de alarma después del ciclo continuohoras C 02502c7Tiempo máximo de Pump-Downs C 09000c8Retr. arr. comp. después de la ap. de la válvula PD s C 0605c9Habilitación función de autoarranque con func. en PDflag C 010c10Selección Pump-Down de tiempo o presiónflag C 010c11Retraso 2º compresorsC250d0Tipo de desescarche (0=resis. 1=gas 2=agua 3=gas a tiempo)flag C 041dI Intervalo entre dos desescarches horas F 02503dt1Temperatura fin desescarche evaporador °C/°F F -5020020dt2Temperatura fin desescarche evaporador auxiliar°C/°F F -5020020dt3Temperatura fin desescarche sonda 3°C/°F F -502004dP1Duración máx. del desescarche evaporador min F 125030dP2Duración máx. del desescarche evap. auxiliar min F 125030d3Retraso de activación del desescarche min C 02500d4Desescarche a la conexión del equipo flag C 010d5Retraso del desescarche a la conexion min C 02500d6Bloqueo del display durante el desescarche -C 021ddTiempo de goteo después del desescarcheminF154c PARÁMETROS COMPRESORd PARÁMETROS DE DESESCARCHEd8Exclusión alarmas después del desescarche horas F 02501d8d Tiempo exclusión de alarma tras puerta abierta min C 02500d9Prioridad del desescarche frente protecciones compresorflag C 010d/1Visualización de la sonda de desescarche °C/°F F 000d/2Visualización de la sonda de desescarche °C/°F F 000dC Base de los tiempos para desescarche flag C 010dC1Base de los tiempos para retardo de alarmas flag C 010d10Tiempo de funcionamiento del compresor min C 02500d11Umbral de temperatura para tiempo de funcionamiento°C/°F C -2020 1.0d12Desescarches avanzados -C 030dn Duración nominal del desescarche -C 110065dHFactor proporcional variación de ‘dI’-C10050A0Diferencial alarmas y ventiladores°C/°F C 0.120 1.0A1Tipo de umbral ‘AL’ y ‘AH’flag C 010AL Umbral de alarma de baja temperatura °C/°F F -5020010AH Umbral de alarma de alta temperatura °C/°F F -5020010Ad Retraso alarma baja y alta temperatura min F 0250120A4Configuración de la entrada digital 1-C 0120A5Configuración de la entrada digital 2-C 0120A6Bloqueo del compresor por alarma externa min C 01000A7Retraso de detección alarma externa min C 02500A8Habilitación alarmas ‘Ed1’ y ‘Ed2’ flag C 010A9Configuración salida digital 3flag C 0140Ado Configuración modo luz puerta flag C 010Ac Alarma alta temperatura del condensador °C/°F C 0.020070.0AE Difer. de la alarma de alta temp. cond.°C/°F C 0.12010Acd Retraso alarma alta temp. del condensadormin C 02500AF Tiempo apagado con sensor de luzseg C 02500ALF Umbral de alarma antihielo °C/°F C -50200-5AdFRetardo alarma antihielosegC250A PARÁMETROS DE ALARMAF0Control ventiladorflag C 022F1Temperatura encendido ventilador °C/°F F -50200 5.0F2Ventilador OFF con compresor OFFflag C 011F3Ventiladores en desescarche flag C 011Fd Ventiladores apagados después del goteo flag F 0150F4Temperatura ventilador condensador OFF°C/°F C -5020040F5Diferencial ventilador condensador°C/°FC0,1205Pw Contraseña -C 020022H0Dirección serial -C 02071H1Funcionalidad del relé 4flag C 0133H2Deshabilitación teclado/Infrared flag C 061H3Código habilitación telecomando -C 02550H4Deshabilitación zumbador flag C 010H5Funcionalidad del relé 5-C 0133H6Bloqueo teclas -C 025532H7Selección tecladoflag C 010H8Luz o salida aux conmutada con control horario-C 010H9Variación set point con control horario-C 010HPr Perfil de impresión-C 0150Hdn Num conjuntos de parámetros predeterminados disponibles-C 060Hdh Desfase de resistencia antivaho°C/°F C -502000HrL Control remoto de estado de relé de luz principal -C 010HrA Control remoto de estado de relé AUX principal -C 010HSA Control remoto de alarmas de controladores en ud principal-C 010In Tipo de unidad-C 060s_cLrH Orden baja humedad relativa-C 010s_cAUX Orden activar AUX -C 010s_cLUX Orden activar luz -C 010s_cONOFFOrden controlador ON/OFF-C1F PARÁMETROS VENTILADOR (solo para el modelo C)H OTRAS PREDISPOSICIONES。
EX-3 多功能数字功放使用说明说明书

无线话筒显示界面无作用。
4
07
EX-3 多功能数字功放
■ PC软件
提示:所需PC控制软件和产品说明书都保存在附件的光盘 一、USB数据线连接方式:
PC
设备
USB线连接方式
USB线
二、USB数据连接步骤: 1、点击安装光盘上随机附送的PC控制软件,根
据默认提示按“下一步”进行操作,直到软 件安装成功后按“完成”退出。
3、可以调整音乐,话筒,效果的音量以及限制器参数。
4、可以调整主输出,中置输出和低音输出的音量,延时,压缩器,相位功能,以及电平显示。
二、音乐处理界面
1
2
6
3
4
5
1、PEQ参量均衡曲线调节区域,通过拖动频点(小圆点)可以调整频率和增益参数,拖动小方
块可以改变低切点的频率,点击“显示所有EQ参数”可以显示所有PEQ点的频率,增益,带
5、红外发射和摇控窗口 在IR SENSOR窗口中对频(类似于我们通过遥控器选择一个电视频道),用这里去设置一 个发送频道给手持麦。同时可以使用摇控器去操作功能。
6、蓝牙状态窗口 当连接上蓝牙后,此窗口中的LED灯会点亮,断开后是熄灭状态。
7、TFT触控屏 通过触控方式可以轻松控制话筒、效果、音乐的音量,以及调用预设、输入选择、蓝牙播 放、话筒对频等功能。
将得不到质量保证。
4
■ 遥控器
1
1、静音按键:按一下为静音,再按一下取消静音。
2、音量控制键:调节音乐,效果,话筒音量大小。
3、音源选择键:音源输入选择按钮,可以选择
VOD、OPT,COAX、BT输入。
4、用户预设键:U01-U06为用户预设,你可以任
3
2
意调用当前预设。
骨传导无线耳机使用说明书
说明书我们听到的大部分声音,都是声波经过空气到达耳膜,然后声波使耳膜发生震动进而将声音传至内耳道;另一种方式是,声波通过骨头震动直接传至内耳而不经过耳膜,这也是人们听到自己声音的一种方式,这种声音的传播方式就是骨传导。
骨传导直达大脑听觉神经空气传导外耳道耳膜大脑听觉神经耳蜗内耳道佩戴说明耳膜Aerial conductionSound directly conductedto the auditory nerve ofthe brain through boneExternal auditory canalEardrumEardrumAuditory nerveof brainCochleaInternal auditory canal Principles of bone conductionMost of the sound we hear is the result of sound waves passing through our eardrum to make it vibrate so that the sound waves can be conducted to the internal au-ditory canal.The other way is that the sound waves are directly con-ducted to the internal auditory canal through the vibrat-ion of the bone instead of eardrum. This is another way of people hearing their own sound and this sound con-duction is called bone conduction.How to wearManual Instruction for Bone Conduction Headphones。
多回转电动装置使用说明书
1.概述多回转阀门电动装置,简称为Z型电装,是阀门实现开启、关闭或调节控制的驱动设备。
Z型电装适用于闸阀、截止阀、隔膜阀、柱塞阀、节流阀、水闸门等。
可用于明杆阀,也可用于暗杆阀。
本系列电装具有功能全、性能可靠、控制系统先进、体积小、重量轻、使用维护方便等特点。
可对阀门实行远控、集控和自动控制。
广泛用于电力、冶金、石油、化工、造纸、污水处理等行业。
本产品的性能符合JB/T8528-1997《普通型阀门电动装置技术条件》的规定。
隔爆型的性能符合GB3836.1-2000《爆炸性气体环境用电气设备第1部分:通用要求》,GB3836.2-2000《爆炸性气体环境用电气设备第2部分:隔爆型“d”》及JB/T8529-1997《隔爆型阀门电动装置技术条件》的规定。
多回转电动装置按防护类型分:有户外型和隔爆型;按控制方式分:有常规型、整体型和整体调节型;按连接型式分:有转矩型、电站型和推力型。
2.型号表示方法DZ —/A:带现场按钮;F:带4-20mA信号输出;S:带手动减速箱输出轴最大转圈数:阿拉伯数字表示,无数字见表1输出转速:阿拉伯数字表示,单位r/min(转/分)连接型式:T表示推力型,I表示电站型,无代号为常规转矩型额定输出转矩:阿拉伯数字表示,单位kgf·mZ:整体型;TZ:整体调节型防护类型:W表示户外型;B表示隔爆型产品型式:多回转电动装置型号示例:1.DZW30I-18/50:多回转电动装置,输出转矩300N·m(30kgf·m),电站型接口,输出转速18r/min,最大转圈数50,常规户外型。
2.DZBTZ45T-24B/S:多回转电动装置,输出转矩450N·m(45kgf·m),推力型接口,输出转速24 r/min,最大转圈数120,整体调节隔爆型,带手动减速箱。
3.DZZ120-24/240:多回转电动装置,输出转矩1200N·m (120kgf·m),转矩型接口,输出转速24 r/min,最大转圈数240圈,整体型。
ITU-R BT.1871-3 建议书说明书

ITU-R BT.1871-3 建议书(01/2022)无线麦克风、入耳式监听设备和无线多信道音频系统的用户需求BT 系列广播业务(电视)ii ITU-R BT.1871-3 建议书前言无线电通信部门的职责是确保卫星业务等所有无线电通信业务合理、平等、有效、经济地使用无线电频谱,不受频率范围限制地开展研究并在此基础上通过建议书。
无线电通信部门的规则和政策职能由世界或区域无线电通信大会以及无线电通信全会在研究组的支持下履行。
知识产权政策(IPR)ITU-R的IPR政策述于ITU-R第1号决议的中所参引的《ITU-T/ITU-R/ISO/IEC的通用专利政策》。
专利持有人用于提交专利声明和许可声明的表格可从http://www.itu.int/ITU-R/go/patents/zh获得,在此处也可获取《ITU-T/ITU-R/ISO/IEC的通用专利政策实施指南》和ITU-R专利信息数据库。
电子出版2022年,日内瓦©国际电联 2022版权所有。
未经国际电联书面许可,不得以任何手段复制本出版物的任何部分。
ITU-R BT.1871-3 建议书1ITU-R BT.1871-3建议书无线麦克风、入耳式监听设备和无线多信道音频系统的用户需求(ITU-R第121/6号课题)(2010-2015-2017-2022年)范围本建议书涉及无线麦克风、入耳式监听(IEM)设备以及集二者于一身的系统,即无线多信道音频系统(WMAS)的用户需求。
本建议书使用术语‘无线麦克风’涵盖全部三类设备。
它包含有关模拟和数字无线麦克风的典型系统参数和操作要求,主管部门和广播公司在广播、固定和移动业务分配中规划调谐范围时可能用到这些系统参数和操作要求。
关键词SAB/SAP、PMSE、ENG、IEM、WMAS、无线麦克风国际电联无线电通信全会,考虑到a)对无线麦克风的广播和非广播使用,存在单独的应用;b)对在广播中使用无线麦克风,用于新闻、体育、戏剧、轻娱乐节目、演播室和非演播室的节目制作,存在单独的使用方案;c)在无线麦克风系统中,存在这样一个要求,即为每个系统分配一系列可选的频率,以便允许频率管理和减少干扰;d)当前,在3区划分给移动业务及1和2区划分给广播业务的频段中,为无线麦克风分配了频率,并且许多主管部门正着手在陆地电视广播中实现从模拟到数字的转换;e)《无线电规则》第5.296款为无线麦克风的使用提供了一个生态系统;f)许多国家使用无线麦克风系统,在其它国家中,国家级的广播机构在电视制作中也使用无线麦克风系统;g)许多主管部门使用3区亦划分给移动业务的TV频段IV和V,作为专业无线麦克风的调谐范围;h)最好是在这些系统中尽可能消除潜在的干扰,同时尽可能减少频率管理资源需求、减少干扰、增强可选频率的全球性一致性;i)附件1表2中所列的频谱/频段仅在国家层面可供ENG/PMSE1使用,1PMSE是指节目制作和特别活动,亦称SAB/SAP。
(完整word版)BT-3说明书
BT—3型频率特性测试仪(扫频仪)使用说明B。
3。
1工作原理频率特性测试仪,俗称扫频仪(国产型号为BT—2、BT-C、BT-5等)。
它是一种用示波器直接显示被测设备频率响应曲线或滤波器的幅频特性的直观测试设备.广泛地应用于调试宽频带放大,短波通信机和雷达接收机的中频放大器,电视差转机、电视接收机图像和伴音通道,调频广播发射机、接收机高放、中频放大器以及滤波器等有源和无源四端网络。
测量频率特性的方法一般有逐点法和扫频法两种.为了说明扫频仪的工作原理,先谈谈逐点法频率特性。
图B.15测试原理图调节正弦波信号发生器的频率,逐点测量相应频率上被测设备的输出电压(注意保持被测设备的输入电压不能变)。
例如第一次调节频率f1,送入被测设备,电压表测得被测设备的输出电压为U1,第二次调节频率为f2,电压表测得为U2,这样继续做下去,到第n次调节频率为fn,测得Un.然后以频率f为横坐标,电压U为纵坐标,把各次频率及其对应测得的电压画到坐标上去,连接这些点得到一条曲线,这就是被测设备的频率特性曲线,如图B.15所示。
但是这种测法即费时又不准,而且不形象。
如果把信号发生器改为一个扫频振荡器,它的频率能自动地从f1到fn重复扫频,但扫频仪输出幅度不变,通过被测设备后,被测设备在不同频率上幅度是不同的,把电压表改成检波器,把被测设备输出的扫频信号的包络检出来,并送到示波器显示出来,我们就能直接看到被测设备的频率特性曲线,这就是扫频法测量频率特性的原理,扫频仪就是根据这个原理做成的。
根据上述原理,扫频仪主要包括三部分,如图B.16所示。
图B。
16扫频仪方框图1。
扫描信号发生器它的核心仍然是LC振荡器,其电路是设法用调制信号控制振荡电路中的电容器或电感线圈,使电容量或电感量变化,从而使振荡频率受调制信号的控制而变化,但其幅度不变.用调制信号控制电容量变化的方法是由变容二极管实现的。
用调制信号控制电感量变化的方法通常是用磁调制来实现的.其原理是用调制电流改变线圈磁芯的导磁系数,使线圈的电感量也作相应的变化,由此而实现扫频。
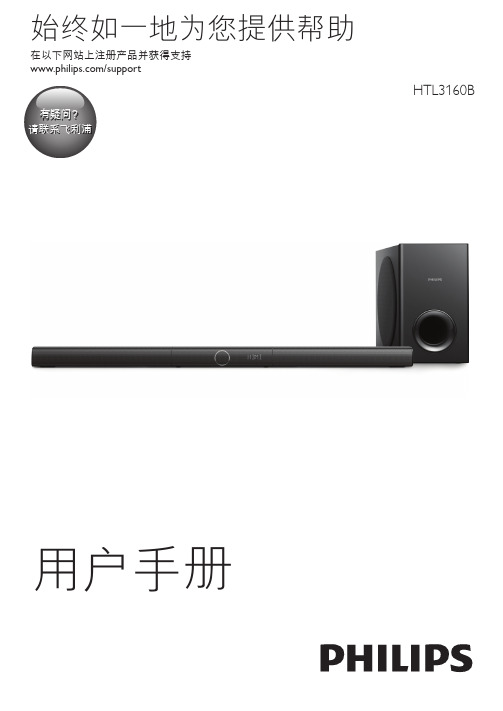
飞利浦音箱说明书
或底部的型号铭牌。 • 在将本产品连接到电源插座上之前,请
确保电源电压与产品背面或底部印刷的 电压值相匹配。如果电压不同,切勿将 产品连接到电源插座上。
小心受伤或损坏本产品! • 若要进行壁挂安装,则必须按照安装说
明将本产品稳固地安装在墙上。只能使 用随附的挂架(如果可用)。若壁挂安 装不当,则可能造成事故、人身伤害或 损坏。如果您有任何疑问,请联系您所
1 打开主装置和低音扬声器。 »» 如果与主装置的连接中断,低音 扬声器上的指示灯会呈白色缓慢 闪烁。
2 按住低音扬声器上的 CONNECT(连 接)按钮可进入配对模式。 »» 低音扬声器上的指示灯会呈白色快 速闪烁。
3 在遥控器上,在 6 秒钟内按 2 次
,然后按 1 次 BASS -,再按 1 次 TREBLE -,然后按 。
6
连接其他设备的音频
8
4 使用您的产品
9
调节音量
9
选择声音
9
通过蓝牙播放音频
9
通过 NFC 连接蓝牙
10
MP3 播放器
10
USB 存储设备
10
自动待机
11
设置显示屏亮度
11
应用出厂设置
11
5 更新软件
11
检查软件版本
11
通过 USB 设备更新软件
11
6 壁挂安装
12
7 产品规格
13
8 故障种类和处理方法
在国家/地区的客户服务。
2 ZH-CN
• 切勿将本产品或任何物体放在电源线或 其他电子设备上面。
• 如果在低于 5°C 的温度下运送了本产
品,请先拆开产品的包装并等待其温度 达到室温,再将其连接至电源插座。 • 本产品的部件可能由玻璃制造。请小心 处理,以免受到伤害或造成损坏。
(完整word版)BT-3型扫频仪使用说明书.
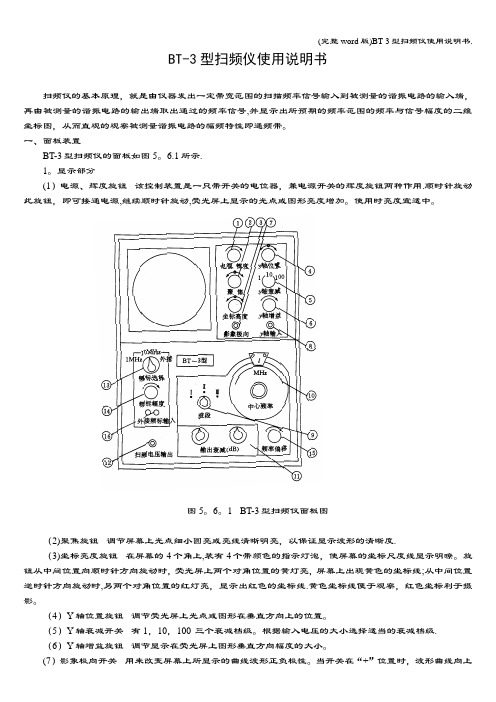
BT-3型扫频仪使用说明书扫频仪的基本原理,就是由仪器发出一定带宽范围的扫描频率信号输入到被测量的谐振电路的输入端,再由被测量的谐振电路的输出端取出通过的频率信号,并显示出所预期的频率范围的频率与信号幅度的二维坐标图,从而直观的观察被测量谐振电路的幅频特性即通频带。
一、面板装置BT-3型扫频仪的面板如图5。
6.1所示.1。
显示部分(1)电源、辉度旋钮该控制装置是一只带开关的电位器,兼电源开关的辉度旋钮两种作用.顺时针旋动此旋钮,即可接通电源,继续顺时针旋动,荧光屏上显示的光点或图形亮度增加。
使用时亮度宜适中。
图5。
6。
1 BT-3型扫频仪面板图(2)聚焦旋钮调节屏幕上光点细小圆亮或亮线清晰明亮,以保证显示波形的清晰度.(3)坐标亮度旋钮在屏幕的4个角上,装有4个带颜色的指示灯泡,使屏幕的坐标尺度线显示明暸。
旋钮从中间位置向顺时针方向旋动时,荧光屏上两个对角位置的黄灯亮,屏幕上出现黄色的坐标线;从中间位置逆时针方向旋动时,另两个对角位置的红灯亮,显示出红色的坐标线.黄色坐标线便于观察,红色坐标利于摄影。
(4)Y轴位置旋钮调节荧光屏上光点或图形在垂直方向上的位置。
(5)Y轴衰减开关有1,10,100 三个衰减档级。
根据输入电压的大小选择适当的衰减档级.(6)Y轴增益旋钮调节显示在荧光屏上图形垂直方向幅度的大小。
(7)影象极向开关用来改变屏幕上所显示的曲线波形正负极性。
当开关在“+”位置时,波形曲线向上方向变化(正极性波形);当开关在“一"位置时,波形曲线向下方向变化(负极性波形)。
当曲线波形需要正负方向同时显示时,只能将开关在“+”和“一”位置往复变动,才能观察曲线波形的全貌。
(8)Y轴输入插座由被测电路的输出端用电缆探头引接此插座,使输入信号经垂直放大器,便可显示出该信号的曲线波形.2.扫描部分(9)波段开关输出的扫频信号按中心频率划分为三个波段(第I波段1MHz~75MHz、第II波段75MHz~150MHz、第III波段150MHz~300MHz)可以根据测试需要来选择波段。
布雷德(Braun)BT5200 13 马力哥(Mach3)31所有权5000宝库拥有者使用指南说明

Beardtrimmer series 500017 settings - 0.2 mm precision Lift & trim system guides hair 60 min cordless use/1 hr charge Wet & dry useBT5200/13Effortless even trimDynamic beard guide system for an even result This trimmer with full metal blades lets you achieve exactly the 3-day stubble, short beard or long beard look you want. Our new integrated hair lift comb raises hairs for efficient one-pass, even trimming resultsEffortless trimmingLifts the hair up to the level of the blade for even resultsGuides the hairs to the cutter for effortless trimmingBlades are sharpened twice for faster trimming*Skin-friendly performanceSkin-friendly, high-performance blades for the perfect trimPerfect 3-day stubbleKeep perfect 3 day stubble by using the 0.4 mm setting dailyEasy to use17 Lock-in length settings, 0.4–10 mm with 0.2 mm precision60 minutes runtime after a 1 hour charge, or plug it inEasy but thorough cleaning2-year guarantee, worldwide voltage and no need to oilHighlightsDynamic Beard Guide SystemThe Dynamic Beard Guide system with the help of the integrated hair lift comb lifts the hairs up to the level of the blades for even trimming results and lets you achieve exactly the 3 day stubble, short beard or long beard look you want.Integrated Hair lift combTrim your stubble in one quick pass, while being gentle on your skin. Our new Integrated hair lift comb lifts and guides the hairs to the level of the blades for effortless, even trimming.Full metal bladesThis trimmer comes with twice-sharpened full metal blades that cut more hairs in every pass for faster trimming.17 lock-in length settingsSelect your preferred trim length by simplyturning the zoom wheel on the handle until the length you want is displayed from 0.4–10 mm with 0.2 mm precision. Your chosen length is now "locked in" for a perfectly even trim.Corded and cordless useCharge your beard trimmer for 1 hour to get 60minutes of cordless use. If you need more energy while trimming, you can simply plug the trimmer into the wall. This trimmer has been designed to work both cordlessly and while plugged in.100% waterproofThe 100% waterproof beard trimmer, simply rinse it under the tap for a thorough, easy clean.Skin-friendly bladesGet a perfect yet protective trim, time after time.The beard trimmer's steel blades lightly brush against one another, sharpening themselves as they trim so they stay extra sharp and effective.They also have rounded tips and combs tohelp prevent skin irritation.iF DESIGN AWARD 2016Beard trimmer series 5000iF DESIGN AWARD2016Philips Green LogoPhilips Green Products can reduce costs,energy consumption and CO2 emissions. How?They offer a significant environmentalimprovement in one or more of the Philips Green Focal Areas — Energy efficiency,Packaging, Hazardous substances, Weight,Recycling and disposal and Lifetime reliability.Red Dot Award 2016: WinnerBeard trimmer series 5000Red Dot Award 2016: WinnerSpecificationsCutting systemPrecision (size of steps): From 0.2 mm Cutting element: Stainless steel blades Non-scratch teeth: For more comfort Create the look you wantNumber of length settings: 17 integrated length settingsAccessoriesComb: Integrated hair lift comb Maintenance: Cleaning brush Ease of useCleaning: Fully washableZoom wheel: Easily adjust length settingsDisplay: Battery lightOperation: Corded and Cordless useDesignColour: BlackPowerRun time: 60 minutesCharging: 1 hour full chargeAutomatic voltage: 100-240 VService2 year guaranteeNo oil needed* Versus its Philips predecessor© 2021 Koninklijke Philips N.V.All Rights reserved.Specifications are subject to change without notice. Trademarks are the property of Koninklijke Philips N.V. or their respective owners.Issue date 2021‑12‑13 Version: 5.2.1EAN: 08 71010 37186 04 。
- 1、下载文档前请自行甄别文档内容的完整性,平台不提供额外的编辑、内容补充、找答案等附加服务。
- 2、"仅部分预览"的文档,不可在线预览部分如存在完整性等问题,可反馈申请退款(可完整预览的文档不适用该条件!)。
- 3、如文档侵犯您的权益,请联系客服反馈,我们会尽快为您处理(人工客服工作时间:9:00-18:30)。
BT-3型频率特性测试仪(扫频仪)使用说明
B.3.1工作原理
频率特性测试仪,俗称扫频仪(国产型
号为BT-2、BT-C、BT-5等)。
它是一种
用示波器直接显示被测设备频率响应
曲线或滤波器的幅频特性的直观测试
设备。
广泛地应用于调试宽频带放大,
短波通信机和雷达接收机的中频放大
器,电视差转机、电视接收机图像和伴
音通道,调频广播发射机、接收机高放、
中频放大器以及滤波器等有源和无源
四端网络。
测量频率特性的方法一般有
逐点法和扫频法两种。
为了说明扫频仪
的工作原理,先谈谈逐点法频率特性。
图B.15测试原理图调节正弦波信号发生器的频率,逐点测量相
应频率上被测设备的输出电压(注意保持被测设备的输入电压不能变)。
例如第一次调节频率f1,送入被测设备,电压表测得被测设备的输出电压为U1,第二次调节频率为f2,电压表测得为U2,这样继续做下去,到第n次调节频率为fn,测得Un。
然后以频率f为横坐标,电压U为纵坐标,把各次频率及其对应测得的电压画到坐标上去,连接这些点得到一条曲线,这就是被测设备的频率特性曲线,如图B.15所示。
但是这种测法即费时又不准,而且不形象。
如果把信号发生器改为一个扫频振荡器,它的频率能自动地从f1到fn重复扫频,但扫频仪输出幅度不变,通过被测设备后,被测设备在不同频率上幅度是不同的,把电压表改成检波器,把被测设备输出的扫频信号的包络检出来,并送到示波器显示出来,我们就能直接看到被测设备的频率特性曲线,这就是扫频法测量频率特性的原理,扫频仪就是根据这个原理做成的。
根据上述原理,扫频仪主要包括三部分,如图B.16所示。
图B.16扫频仪方框图
1.扫描信号发生器
它的核心仍然是LC振荡器,其电路是设法用调制信号控制振荡电路中的电容器或电感线圈,使电容量或电感量变化,从而使振荡频率受调制信号的控制而变化,但其幅度不变。
用调制信号控制电容量变化的方法是由变容二极管实现的。
用调制信号控制电感量变化的方法通常是用磁调制来实现的。
其原理是用调制电流改变线圈磁芯的导磁系数,使线圈的电感量也作相应的变化,由此而实现扫频。
BT-3扫频仪
就是采用这种方法。
2.频标发生器
它使得在显示的频率特性曲线上打上频率标志,可以直接读得曲线上各点所对应的频率。
3.显示部分
包括示波器和主控部分。
主控部分的作用就是使得示波器的水平扫描与扫描振荡器的扫频完全同步。
B.3.2BT-3型频率特性测试仪
1.主要技术指标
(1)中心频率:1~300MHz分三个波段(1~75MHz,75~150MHz,150~300MHz)。
(2)扫频频偏:最小频偏小于±0.5%;最大频偏大于±7.5MHz。
(3)输出扫频信号的寄生调幅系数,在最大频偏内小于±7.5%。
(4)输出扫频信号的调频非线性系数,在最大频偏内小于20%。
(5)输出扫频信号电压大于等于0.1V(有效值)。
(6)频标信号为1MHz、10MHz和外接三种。
(7)扫频信号输出阻抗为75Ω。
(8)扫频信号输出衰减:粗衰减(0~60dB)分7挡。
细衰减(0~10dB)分7挡。
2.BT-3扫频仪的组成及基本工作原理
本机组成框图及面板图可见图B.17、图B.18。
图B.17BT-3型扫频仪组成方框图
图B.18BT-3型扫频仪面板图
本机共有两个扫频振荡器,扫频振荡器I是第一波段用的振荡器,中心频率为270MHz,其输出送到混频器、与可调频率的定频振荡器(195~270MHz)的输出相混频,经差拍得到
(0~75MHz)的扫频信号。
扫频振荡器II是第二和第三波段所共用的,它的直接输出是75~
150MHz的扫频信号,供第二波段用,另外经倍频后得到第三波段的150~300MHz的扫频
信号。
频标振荡器是1MHz和10MHz晶体振荡器,经谐波发生器产生丰富的谐波分量,再
与扫频信号差拍后,经滤波器得到菱形频标信号,再加到垂直放大器,由示波管显示出来。
主控部分是由电源变压器次级取出的50Hz交流电压移相90°后送至示波管水平偏转板作扫描电压。
另外一路经可调移相后送作扫频调制电流,从而保证扫描与扫频同步。
同
时也给扫描线赋予了频率。
3.仪器的使用
1)仪器的检查
(1)调节好仪器的辉度和聚焦,使扫描基线足够亮和细。
(2)将“频标选择”开关扳向1MHz或10MHz,此时扫描基线上呈现频标信号,调节
“频标幅度”旋钮,可改变频标的幅度。
(3)将“频率偏移”旋钮旋到最大,荧光屏上呈现的频标数应满足±7.5MHz。
(4)将检波探测器的探针插入仪器输出端,并接好地线。
每一波段都在荧光屏上出现方
框,将“频标选择”旋至10MHz处,转动中心频率旋钮,检查每一波段范围是否符合要求。
(5)在输出插孔上,插入匹配输出电缆,用超高频毫伏表检查仪器的输出电压是否大于
100mV。
2)测试频率特性
(1)检查仪器正常工作后,将输出电缆的一端接“扫频电压输出”插座,另一端接被测
设备的输入端,根据被测设备选定某一频段,并适当调节频标增益,用检波探测器将被测
设备的输出电压检波送至垂直输入,在荧光屏上可见到被测设备的频率特性曲线,频标叠
加在曲线上。
(2)如果被测设备带有检波器,则不用检波探测器,而用输入电缆直接接入仪器的垂直
输入端。
(3)当需要某些非1MHz的频标时,可以将“频标选择”置“外接”,从“外接”频
标接线柱加入所需的频标信号。
(4)测试时,输出电缆和检波探测器的接地线应尽量短一些,检波探测器的探针上也不
应再加接导线。
3)频标定值法
(1)将检波探测器与仪器的扫频输出插座用带75Ω负载的75Ω电缆连接好,屏幕上应
出现方块。
(2)将频标选择开关旋向10MHz,波段开关置I时,中心频率度盘在起始位置附近时,屏
幕中心线上应出现零拍,反时针旋转中心频率度盘,通过屏幕中心线的频标数应多于7.5个。
(3)波段开关置II,中心频率度盘从起始位置逆时针旋转时,第一个经过屏幕中心频标
应为70MHz,然后依此数记,第二波段最高中心频率应大于150MHz。
(4)欲得第三波段某一频率,只需在第二波段找出三波段所需频率的二分之一频率处,
然后,将波段开关扳向II即可。
4)放大器增益的测试
(1)把扫频仪输出电缆与检波探头短接。
(2)扫频仪“输出衰减”,旋在0dB。
(3)调节“Y轴增益”,使荧光屏上显示的图形占纵坐标5格(也可以是其他数目)。
(4)保持“Y轴增益”不变,把扫频仪的输出接至放大器的输入,输入接放大器的输出,
这时荧光屏上将显示放大器的频率特性曲线,再调节扫频仪的“输出衰减”,使荧光屏上
显示的放大器曲线也占5格,这时“输出衰减”所指示的分贝数就是放大器的增益。
5)零频标的识别和0dB标准。
(1)零频标的识别。
①第I波段的扫频信号起始频标从零开始。
将“频标选择”置外接,“频标幅度”置
最大,旋动“中心频率”度盘时,在扫描基线上出现一只频标,这就是“零”频标,如图
B.19所示。
图B.19零频标
②第I波段频标的标定和读法:中心频率覆盖范围0~75MHz。
当“频标选择”开关
置10MHz时,旋转“中心频率”度盘,则“零”频标右边第一个大频标就是10MHz,第
二个为20MHz,再转动“中心频率”度盘时,可读到80MHz。
相邻两个10MHz频标之间
的小频标为5MHz,如图B.20所示。
图B.20频标
③第II波段频标的标定和读法:中心频率覆盖范围75~150MHz。
当波段开关置II,
频标置10MHz,频偏最小,旋动“中心频率”度盘,使扫描基线向右移,移到不能再移的
位置,则屏幕中心刻度线右边第一个大频标便是70MHz。
④第III波段频标的标定和读法:中心频率覆盖范围150~300MHz。
标定和读法与第
II波段识别方法相同。
在屏幕中心垂直线底部右边第一个大频标是140MHz。
(2)0dB标准。
未接被测电路时,把输出接头和检波头连在一起。
“输出衰减”旋钮置
于0dB档位,“Y轴衰减”旋钮置于I档,调节“Y轴增益”旋钮,使屏幕上显示的方
框
占有一定的高度(一般为5格)。
这个高度称为0dB的校正线。
接入被测电路后,在保持“Y
轴增益”旋钮不变的情况下进行测量。
4.扫频信号寄生调幅的检查
将检波头与75Ω扫频电压输出电缆相连,接好地线。
“输出衰减”开关置于0dB挡,。
