华为P8_用户指南(使用说明书)
荣耀V8手机到手使用指南
荣耀V8手机到手使用指导对于刚刚拿到荣耀V8的小伙伴来说,一定对心爱的手机非常爱惜,特别是第一次用华为或者荣耀的手机,肯定是还有很多不懂的地方,在这里简单分享下荣耀V8到手的使用指导。
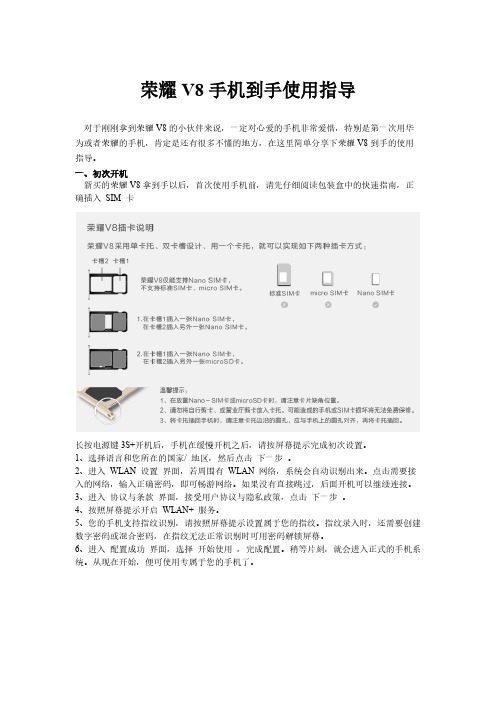
一、初次开机新买的荣耀V8拿到手以后,首次使用手机前,请先仔细阅读包装盒中的快速指南,正确插入SIM 卡长按电源键3S+开机后,手机在缓慢开机之后,请按屏幕提示完成初次设置。
1、选择语言和您所在的国家/ 地区,然后点击下一步。
2、进入WLAN 设置界面,若周围有WLAN 网络,系统会自动识别出来。
点击需要接入的网络,输入正确密码,即可畅游网络。
如果没有直接跳过,后面开机可以继续连接。
3、进入协议与条款界面,接受用户协议与隐私政策,点击下一步。
4、按照屏幕提示开启WLAN+ 服务。
5、您的手机支持指纹识别,请按照屏幕提示设置属于您的指纹。
指纹录入时,还需要创建数字密码或混合密码,在指纹无法正常识别时可用密码解锁屏幕。
6、进入配置成功界面,选择开始使用,完成配置。
稍等片刻,就会进入正式的手机系统。
从现在开始,便可使用专属于您的手机了。
二、网络连接连接WLAN 网络方法1、从状态栏处向下滑动,打开通知面板,在开关页签下,长按进入WLAN 图标WLAN 设置界面,即可连接自己的无线网。
方法2、在手机的设置—WLAN--,进入之后连接自己的无线网即可。
如果没有无线网可以去打开数据流量,联机确保您的SIM 卡已开通数据业务。
从状态栏处向下滑动,打开通知面板。
在开关页签下,点击数据业务开关,开启移动数据业务。
三、登陆华为账号华为帐号是类似苹果的Apple ID的功能,有了它仅可以用于登录华为云服务,还可以用于访问花粉俱乐部、华为商城、在线主题或音乐等等服务。
如果有华为账号直接登录,没有就要进行注册。
1、打开设置。
点击华为帐号> 注册。
2、阅读隐私政策和用户条款并勾选同意,然后点击下一步。
3、使用手机或邮箱注册华为帐号。
使用手机注册:输入手机号码,点击下一步,输入验证码,然后设置登录密码。
华为使用基本手册
华为使⽤基本⼿册实验参考第⼀章:实验参考 (1)基本实验 (5)实验⼀计算机和交换机基本设置、、、、、、、、、、、、、、、、、、、、、、、、、、、、、、、、、、、、、、、、、5 password: (5)双击⼩电脑: (6)实验⼆配置端⼝聚合、、、、、、、、、、、、、、、、、、、、、、、、、、、、、、、、、、、、、、、、、、、、、、、、、、、、、、6 对于SwitchA (6)对于SwitchB (7)聚合操作 (7)实验三基本VLAN设置、、、、、、、、、、、、、、、、、、、、、、、、、、、、、、、、、、、、、、、、、、、、、、、、、7 设置计算机的IP为 (8)再改回来,并设置trunk (8)(1) 新加⼊的SwitchC 默认状态时,测试连通性 (9)(2) 将交换机之间的连线都设置成trunk时,再测试连通性 (9)(3) 设置vtp (9)实验四配置primary VLAN和secondary VLAN 、、、、、、、、、、、、、、、、、、、、、、、、、、、、10 实验五交换机的镜像与⽣成树、、、、、、、、、、、、、、、、、、、、、、、、、、、、、、、、、、、、、、、、、、、、11(⼀) 设置镜像 (11)(⼆) ⽣成树 (11)实验六路由器BootROM升级、、、、、、、、、、、、、、、、、、、、、、、、、、、、、、、、、、、、、、、、、、、、11 实验七直联路由、、、、、、、、、、、、、、、、、、、、、、、、、、、、、、、、、、、、、、、、、、、、、、、、、、、、12 实验⼋单臂路由、、、、、、、、、、、、、、、、、、、、、、、、、、、、、、、、、、、、、、、、、、、、、、、、、、、、、、、、131.⼀个接⼝两个IP的情况 (13)2.划分两个⼦接⼝,对两个vlan的路由 (14)实验九静态路由实验、、、、、、、、、、、、、、、、、、、、、、、、、、、、、、、、、、、、、、、、、、、、、、、、、、、、14 实验⼗动态路由实验、、、、、、、、、、、、、、、、、、、、、、、、、、、、、、、、、、、、、、、、、、、、、、、、17 实验⼗⼀访问控制列表实验、、、、、、、、、、、、、、、、、、、、、、、、、、、、、、、、、、、、、、、、、、、、18 1.基本访问列表 (18)2.扩展访问控制列表 (19)实验⼗⼆地址转换配置、、、、、、、、、、、、、、、、、、、、、、、、、、、、、、、、、、、、、、、、、、、、、、、、20 第⼆章:命令提⽰、、、、、、、、、、、、、、、、、、、、、、、、、、、、、、、、、、、、、、、、、、、、、、、、、、、、、、、、21 计算机命令、、、、、、、、、、、、、、、、、、、、、、、、、、、、、、、、、、、、、、、、、、、、、、、、、、、、、、、、、、、、21 交换机命令、、、、、、、、、、、、、、、、、、、、、、、、、、、、、、、、、、、、、、、、、、、、、、、、、、、、、、、、、、、、21 路由器命令、、、、、、、、、、、、、、、、、、、、、、、、、、、、、、、、、、、、、、、、、、、、、、、、、、、、、、、、、、、、23 静态路由、、、、、、、、、、、、、、、、、、、、、、、、、、、、、、、、、、、、、、、、、、、、、、、、、、、、、、、、、、、、23 动态路由、、、、、、、、、、、、、、、、、、、、、、、、、、、、、、、、、、、、、、、、、、、、、、、、、、、、、、、、、、、、23 标准访问列表命令格式如下、、、、、、、、、、、、、、、、、、、、、、、、、、、、、、、、、、、、、、、、、、、、24 扩展访问控制列表配置命令、、、、、、、、、、、、、、、、、、、、、、、、、、、、、、、、、、、、、、、、、、、、24 扩展访问控制列表操作符的含义、、、、、、、、、、、、、、、、、、、、、、、、、、、、、、、、、、、、、、、、24 扩展访问控制列表举例 (24)地址转换配置举例、、、、、、、、、、、、、、、、、、、、、、、、、、、、、、、、、、、、、、、、、、、、、、、、、、、、25 PPP设置 (26)PPP验证、、、、、、、、、、、、、、、、、、、、、、、、、、、、、、、、、、、、、、、、、、、、、、、、、、、、、、、、、、、、、、、、26 pap被验⽅ (26)chap被验⽅ (26)帧中继监测 (27)第三章:理论学习 (27)⽹络的发展与应⽤、、、、、、、、、、、、、、、、、、、、、、、、、、、、、、、、、、、、、、、、、、、、、、、、、、、、27⼀、计算机⽹络发展的三个阶段 (27)⼆、我国计算机⽹络的三个层次、、、、、、、、、、、、、、、、、、、、、、、、、、、、、、、、、、、、、、、、28 第四章:⽹络互联基础 (29)⼀、OSI七层协议、、、、、、、、、、、、、、、、、、、、、、、、、、、、、、、、、、、、、、、、、、、、、、、、、、、、291、物理层 (29)2、链路层 (29)3、⽹络层 (29)4、传输层 (30)5、会话层 (30)6、表⽰层 (30)7、应⽤层 (30)⼆、TCP/IP 协议簇、、、、、、、、、、、、、、、、、、、、、、、、、、、、、、、、、、、、、、、、、、、、、、、、、、、、301、接⼝层 (30)2、⽹络层 (31)3、传输层 (31)4、应⽤层 (31)三、TCP连接的建⽴、、、、、、、、、、、、、、、、、、、、、、、、、、、、、、、、、、、、、、、、、、、、、、、、、、、、、321、TCP连接通过三次握⼿完成 (32)2、套接字Socket (32)四、IP地址划分、、、、、、、、、、、、、、、、、、、、、、、、、、、、、、、、、、、、、、、、、、、、、、、、、、、、、、、、321、IP地址分类 (32)2、地址区间 (32)3、特殊地址 (33)4、⼦⽹掩码 (33)第五章:交换机原理与应⽤ (33)⼀、基本以太⽹、、、、、、、、、、、、、、、、、、、、、、、、、、、、、、、、、、、、、、、、、、、、、、、、、、、、、、、、331、以太⽹标准 (33)2、接线标准 (34)3、接线⽅法 (34)⼆、交换机原理与应⽤、、、、、、、、、、、、、、、、、、、、、、、、、、、、、、、、、、、、、、、、、、、、、、、、341、冲突域和⼴播域 (34)2、交换机原理 (35)3、交换⽹络中的环 (35)4、关于VLAN (36)5、交换机和路由器的⼝令恢复: (37)三、三层交换的概念、、、、、、、、、、、、、、、、、、、、、、、、、、、、、、、、、、、、、、、、、、、、、、、、、、、、、371、交换机是链路层设备,使⽤MAC地址,完成对帧的操作 (37)2、交换机的通道技术 (37)3、端⼝协商⽅式 (38)4、通道端⼝间的负载平衡 (38)第六章:路由的基本概念、、、、、、、、、、、、、、、、、、、、、、、、、、、、、、、、、、、、、、、、、、、、、、、、、、、、381、路由类型 (38)2、路由算法 (39)3、路由交换范围 (39)4、路由表 (39)⼀、RIP路由协议、、、、、、、、、、、、、、、、、、、、、、、、、、、、、、、、、、、、、、、、、、、、、、、、、、、、391、RIP协议的认识 (39)2、路由表的维护 (40)3、路由环路: (40)4、解决路由环路的办法 (40)⼆、OSPF路由协议、、、、、、、、、、、、、、、、、、、、、、、、、、、、、、、、、、、、、、、、、、、、、、、、、、、、411、OSPF的特点 (41)2、指定路由器与路由器标识 (41)3、建⽴路由表 (41)4、单区域OSPF配置 (42)5、多区域OSPF的设置 (42)三、访问控制列表、、、、、、、、、、、、、、、、、、、、、、、、、、、、、、、、、、、、、、、、、、、、、、、、、、、、421、访问控制列表类型与作⽤ (42)2、访问控制列表的结构 (42)3、访问控制列表匹配原则 (43)4、命名⽅式的访问控制列表 (43)四、地址转换NA T 、、、、、、、、、、、、、、、、、、、、、、、、、、、、、、、、、、、、、、、、、、、、、、、、、、、、431、NAT的认识 (43)2、静态NAT (44)3、动态NAT (44)4、PAT (44)5、基于NAT的负载均衡 (44)6、基于服务的NAT (45)第七章:常⽤的⼴域⽹协议、、、、、、、、、、、、、、、、、、、、、、、、、、、、、、、、、、、、、、、、、、、、、、、、45⼀、PPP协议、、、、、、、、、、、、、、、、、、、、、、、、、、、、、、、、、、、、、、、、、、、、、、、、、、、、、、、、451、PPP协议的组成和特点 (45)2、PAP(Password Authentication Protocol)验证 (45)3、CHAP(Challenge-Handshake Authentication Protocol)验证 (46)⼆、HDLC协议、、、、、、、、、、、、、、、、、、、、、、、、、、、、、、、、、、、、、、、、、、、、、、、、、、、、、、、、、46三、帧中继、、、、、、、、、、、、、、、、、、、、、、、、、、、、、、、、、、、、、、、、、、、、、、、、、、、、、、、、、、、、、46 第⼋章:PIX防⽕墙特点与应⽤ (47)⼀、PIX防⽕墙的认识、、、、、、、、、、、、、、、、、、、、、、、、、、、、、、、、、、、、、、、、、、、、、、、、47⼆、防⽕墙的配置规则、、、、、、、、、、、、、、、、、、、、、、、、、、、、、、、、、、、、、、、、、、、、、、、、47三、PIX防⽕墙的配置模式、、、、、、、、、、、、、、、、、、、、、、、、、、、、、、、、、、、、、、、、、、、、47四、PIX基本配置命令、、、、、、、、、、、、、、、、、、、、、、、、、、、、、、、、、、、、、、、、、、、、、、、、471、nameif (47)2、interface (48)3、ip address (48)4、global (48)5、nat (49)6、route (49)7、static (49)8、conduit (50)9、访问控制列表ACL (50)10、侦听命令fixup (51)11、telnet (51)12、显⽰命令 (51)13、DHCP 服务 (51)第九章:PIX防⽕墙举例 (52)基本实验实验⼀计算机和交换机基本设置添加⼀个交换机,⼀个计算机,双击交换机,进⼊终端配置:systempassword:[Quidway]sysname S3026 ;交换机命名[S3026]super password 111 ;设置特权密码[S3026]user-interface vty 0 4 [S3026-ui-vty0-4]authentication-mode password[S3026-ui-vty0-4]set authentication-mode password simple 222[S3026-ui-vty0-4]user privilege level 3[S3026-ui-vty0-4]quit[S3026]quitsyspassword:111[S3026]display currect-config[S3026]dis curr[S3026]vlan 2[S3026-vlan2]port ethernet0/2[S3026-vlan2]port e0/4 to et0/6[S3026-vlan2]quit[S3026]dis vlan[S3026]int e0/3[S3026-Ethernet1]port access vlan 2[S3026-Ethernet1]quit[S3026]dis vlan[S3026]dis curr[S3026]interface vlan 1[S3026-Vlan-interface1]ip address 10.65.1.8 255.255.0.0[S3026-Vlan-interface1]quit[S3026]ip route-static 0.0.0.0 0.0.0.0 10.65.1.2[S3026]ip default-gateway 10.65.1.2[S3026]dis curr[S3026]save双击⼩电脑:login:rootpassword:linux[root@PCA root]#ifconfig eth0 10.65.1.1 netmask 255.255.0.0 [root@PCA root]#ifconfig[root@PCA root]#route add default gw 10.65.1.2[root@PCA root]#route[root@PCA root]#ping 10.65.1.8[root@PCA root]#telnet 10.65.1.8实验⼆配置端⼝聚合要求聚合的端⼝⼯作在全双⼯,速度⼀致,在同⼀槽⼝且连续。
华为手机初步设置指南说明书
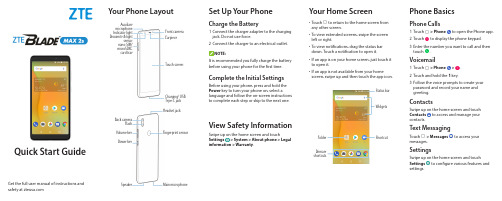
Quick Start GuideSet Up Your PhoneCharge the Battery1 Connect the charger adapter to the charging jack. Do not use force.2Connect the charger to an electrical outlet. NOTE:It is recommended you fully charge the battery before using your phone for the first time.Complete the Initial SettingsBefore using your phone, press and hold the Power key to turn your phone on, select alanguage and follow the on-screen instructions to complete each step or skip to the next one.View Safety InformationSwipe up on the home screen and touchSettings> System > About phone > Legal information > Warranty .Your Phone LayoutYour Home Screen• Touch to return to the home screen from any other screen.• To view extended screens, swipe the screen left or right.• To view notifications, drag the status bar down. Touch a notification to open it.• If an app is on your home screen, just touch it to open it.• If an app is not available from your home screen, swipe up and then touch the app icon.Get the full user manual of instructions and safety at Auxiliary microphone Indicator light Proximity & lightsensor nano-SIM/ microSDXC card trayFront camera EarpieceTouch screenCharging/ USB Type-C jack Back cameraFlash Volume key Power keyHeadset jackFingerprint sensorSpeakerMain microphoneFolderShortcutWidgetsStatus barPrimary shortcutsPhone BasicsPhone Calls1 Touch > Phoneto open the Phone app.2Touchto display the phone keypad.3 Enter the number you want to call and thentouch .Voicemail1 Touch> Phone>.2 Touch and hold the 1 key.3 Follow the voice prompts to create your password and record your name and greeting.ContactsSwipe up on the home screen and touch Contactsto access and manage your contacts.Text MessagingTouch > Messagesto access yourmessages.SettingsSwipe up on the home screen and touchSettingsto configure various features and settings.Popular ApplicationsEmail1 Swipe up on the home screen and touch Emailor Gmail .2 Follow the prompts to enter your account information.Internet BrowserSwipe up on the home screen and touchBrowser or Chrome to access websites on the go.CameraTouch >Camera to take pictures andrecord videos.Find Your Phone Number1 Swipe up on the home screen and touch Settings.2 Touch System > About phone > Status > SIM status .3 Find My phone number at the bottom.FCC RF Exposure Information (SAR)This phone is designed and manufactured not to exceed the emission limits for exposure to radio frequency (RF) energy set by the Federal Communications Commission of the United States.During SAR testing, this device was set to transmit at its highest certified power level in all tested frequency bands, and placed in positions that simulate RF exposure in usage against the head with no separation, and near the body with the separation of 15 mm. Although the SAR is determined at the highest certified power level, the actual SAR level of the device while operating can be well below the maximum value. This is because the phone is designed to operate at multiple power levels so as to use only the power required to reach the network. In general, the closer you are to a wireless base station antenna, the lower the power output.The exposure standard for wireless devices employing a unit ofmeasurement is known as the Specific Absorption Rate, or SAR. The SAR limit set by the FCC is 1.6 W/kg.This device is complied with SAR for general population/uncontrolled exposure limits in ANSI/IEEE C95.1-1992 and had been tested inaccordance with the measurement methods and procedures specified in IEEE1528.The FCC has granted an Equipment Authorization for this model phone with all reported SAR levels evaluated as in compliance with the FCC RF exposure guidelines. SAR information on this model phone is on file with the FCC and can be found under the Display Grant section of /oet/ea/fccid after searching on FCC ID: SRQ-Z6410S.For this device, the highest reported SAR value for usage against the head is 0.77 W/kg, and for usage near the body is 0.63 W/kg.While there may be differences between the SAR levels of various phones and at various positions, they all meet the government requirements.SAR compliance for body-worn operation is based on a separation distance of 15 mm between the unit and the human body. Carry this device at least 15 mm away from your body to ensure RF exposure level compliant or lower to the reported level. To support body-worn operation, choose the belt clips or holsters, which do not contain metallic components, to maintain a separation of 15 mm between this device and your body.RF exposure compliance with any body-worn accessory, which contains metal, was not tested and certified, and using such body-worn accessory should be avoided.FCC RegulationsThis device complies with part 15 of the FCC Rules. Operation is subject to the following two conditions: (1) This device may not cause harmfulinterference, and (2) this device must accept any interference received, including interference that may cause undesired operation.This equipment has been tested and found to comply with the limits for a Class B digital device, pursuant to part 15 of the FCC Rules. These limits are designed to provide reasonable protection against harmfulinterference in a residential installation. This equipment generates, uses and can radiate radio frequency energy and, if not installed and used in accordance with the instructions, may cause harmful interference to radio communications. However, there is no guarantee that interference will not occur in a particular installation. If this equipment does cause harmful interference to radio or television reception, which can be determined by turning the equipment off and on, the user is encouraged to try to correct the interference by one or more of the following measures:• Reorient or relocate the receiving antenna.• Increase the separation between the equipment and receiver.• Connect the equipment into an outlet on a circuit different from that to which the receiver is connected.• Consult the dealer or an experienced radio/TV technician for help. CAUTION:Changes or modifications not expressly approved by the manufacturer could void the user’s authority to operate the equipment.The antenna(s) used for this transmitter must not be co-located or operating in conjunction with any other antenna or transmitter.©2018 ZTE USA. All rights reserved. ZTE, BLADE, and the ZTE logos are trademarks of ZTE Corporation. Android is a trademark of Google LLC; Oreo is a trademark of Mondelez International, Inc. group. The Bluetooth® word mark and logos are registered trademarks owned by the Bluetooth SIG, Inc. and any use of such marks by ZTE Corporation is under license. The microSDXC™ logo is a trademark of SD-3C, LLC. Manufactured under license from Dolby Laboratories. Dolby, Dolby Audio, and the double-D symbol are trademarks of Dolby Laboratories. Qualcomm® andSnapdragon™ processors are products of Qualcomm Technologies, Inc. Qualcomm and Snapdragon are trademarks of Qualcomm Incorporated, registered in the United States and other countries. Used with permission. Other trademarks and trade names are those of their respective owners.For Your SafetyDon’t make or receive phone calls while driving. Never text whiledriving.Keep your phone at least 15 mm away from your body whilemaking calls.Small parts may cause choking.Your phone can produce a loudsound.Avoid contact with anythingmagnetic.Keep away from pacemakers andother electronic medical devices.Power off when asked to inhospitals and medical facilities.Power off when told to on aircraftand at airports.Power off when near explosivematerials or liquids.Don’t use at gas stations.Your phone may produce a brightor flashing light.Don’t dispose of your phone infire.To prevent possible hearing damage, do not listen at high volume levels for long periods. Exercise caution when holding your phone near your ear whilethe loudspeaker is in use.Avoid extreme temperatures.Avoid contact with liquids. Keepyour phone dry.Do not attempt to disassembleyour phone.Only use approved accessories.Don’t rely on your phone as a primary device for emergencycommunications.。
华为手机操作指南
华为手机操作指南华为手机是一款功能强大、性能稳定的智能手机品牌,拥有众多的用户。
为了帮助用户更好地使用华为手机,本文将提供一份详细的华为手机操作指南,介绍华为手机的常用功能和操作技巧,帮助用户更好地了解和使用华为手机。
一、开机与关机1. 开机:长按手机的电源键,直到屏幕亮起,并出现华为LOGO后松开电源键,手机即可开机。
2. 关机:长按手机的电源键,直到出现关机选项后,点击关机,手机即可关机。
二、解锁与锁屏1. 解锁:开机后,滑动屏幕上的解锁图标或使用指纹解锁、面部解锁等方式进行解锁。
2. 锁屏:点击手机的电源键,即可将手机锁屏。
三、主屏界面1. 主屏:华为手机主屏幕上会显示常用的应用图标,用户可以通过滑动屏幕或者点击底部导航栏的应用图标进行应用的打开和使用。
2. 文件夹:用户可以将相似的应用图标拖动到一起,形成文件夹,方便管理和使用。
四、应用的安装与卸载1. 安装应用:打开华为应用商店或其他应用市场,搜索需要安装的应用,点击下载和安装,等待应用安装完成即可。
2. 卸载应用:长按需要卸载的应用图标,出现卸载选项后,点击卸载,确认后即可将应用卸载。
五、常用功能操作1. 拍照与录像:打开相机应用,点击拍照按钮进行拍照,长按拍照按钮进行连拍;点击录像按钮进行录像,再次点击停止录像。
2. 通话与短信:打开电话应用,点击拨号盘,输入电话号码后点击拨号即可进行电话呼叫;打开短信应用,点击新建短信,输入接收方号码和内容后点击发送即可发送短信。
3. 上网与网络设置:打开浏览器应用,输入网址后点击进入即可上网;打开设置应用,点击网络与互联网,进入网络设置界面,可以进行Wi-Fi连接、移动网络设置等操作。
4. 日历与闹钟:打开日历应用,点击日期可以添加日程安排;打开闹钟应用,点击添加闹钟,设置时间和铃声后点击保存即可设置闹钟。
六、常见问题解决1. 电池续航问题:关闭不必要的后台应用、降低屏幕亮度、关闭震动和背光等可有效延长电池续航时间。
华为 手机 说明书
z
/ :字母模式,输入大写或小写字母。
z
:数字模式,输入数字。
中文输入模式
拼音模式 在拼音输入模式下,按 * 键选择拼音组合;按上下方向键进行翻页选 择;按左右方向键选择同一拼音组合下的不同汉字。 [示例]:输入汉字“汗”。
1. 切换到拼音输入模式。
2. 依次按 4、2、6 键各一次,屏幕显示“gao”、“hao”、“gan”、“han” 等多种拼音组合。
待机状态,按此键进入主菜单; 长按键直接快捷进入 Brew 的功能; 非待机状态,对应屏幕左按钮。
非待机状态,对应屏幕右按钮。
您可以按相应的数字键输入数字、字母、符号; 在带数字编号的菜单列表,按相应的数字键进入该菜单。
在待机状态下: 上方向键:新建信息; 左方向键:设置闹钟; 下方向键:进入收件箱; 右方向键:显示日历。 在通话过程中,按左/右方向键调节听筒音量。 在待机状态下,按此键进入主菜单; OK 键与左功能键功能相同。 编辑状态下,长按进入符号界面; 在英文模式下,短按切换大小写输入; 菜单或功能选项中,短按向上选择菜单; 待机下,长按可切换响铃与礼貌模式(即振动模式)。 待机时,短按可以输入:* P T。 编辑时,短按切换输入模式,长按切换数字输入模式; 菜单或功能选项中,短按此键向下选择菜单; 当开启手机锁功能后,长按此键启动手机锁。
请勿在驾驶汽车时使用手机,以免妨碍安全驾驶。
请将手机远离磁性设备,手机的辐射会抹掉磁性设备上存储 的信息。 请勿将手机及附件放置于具有强大电磁场的器具中。
请勿在高温处、有易燃气体的地方(如加油站)附近使用手 机。
登机时请关闭手机,以免无线信号干扰飞机控制信号。
请将手机及附件放在儿童触摸不到的地方,请勿让儿童在无 人监管的情况下使用手机。 在使用高精度的电子设备附近,请关闭手机,否则可能会导 致电子设备故障。 请使用本公司指定的电池和充电器,否则,可能会引起爆炸。
荣耀 NOTE8_快速入门_Edison-AL10

认识你的 Note8动手插卡快速入门© 华为技术有限公司 2016。
保留一切权利。
本资料仅供参考,不构成任何形式的承诺。
可以启动啦31507733_01 >花粉俱乐部微信华为商城华为客服Q&AQ:首次充电需要充满12小时?Q:导航栏怎么不见了?进入设置 > 指纹 > 指纹管理,根据屏幕提示,设置密码并录入指纹。
Q:如何快速截屏?Q:如何强制重启手机?长按电源键直到机身振动后松开,即可强制重启手机。
开始尽情享受 Note8 美好时光指关节双击屏幕,可快速截取当前屏幕画面。
指关节略微用力触碰屏幕,然后拖动指关节绘制一个闭合图形,可截取任意形状的局部屏幕。
指关节略微用力触碰屏幕,然后拖动指关节从屏幕左侧向右侧画横线,可启动分屏。
截取手机屏幕:••同时打开两个窗口:•不需要,随用随充即可。
注意不要等电量耗尽之后再充电!除了前面介绍的指关节截屏,还可通过以下两种方式快速截屏:可能是因为在设置 > 智能辅助 > 导航栏处设置了导航栏可隐藏。
当导航栏不见了,从屏幕底部向上滑动可以调出导航栏。
•同时按住电源键和音量减键,可快速截屏。
从屏幕顶端向下滑动,打开开关页签,点击截屏图标。
录入指纹时,请确保指纹识别器和手指干净且干燥。
从屏幕底部向上滑动,可启用分屏。
••为它充电 Q:屏幕色彩非常艳丽?可能因为屏幕色彩模式为鲜艳,您可以在设置 >显示 > 色彩模式处根据喜好调整设置。
Q:为什么护眼模式下屏幕显示偏黄?护眼模式下滤除了一部分对人眼伤害较大的蓝光成分,屏幕颜色看起来会偏黄。
长时间阅读时开启护眼模式,可缓解眼疲劳。
• 打开手机服务,您可以: > 查阅手册。
> 通过自助服务、智能问答等多种方式获取帮助, 或查询销售门店、服务网点以及服务政策。
> 访问花粉论坛参与论坛互动。
• 访问 /cn/,下载产 品用户指南。
• 拨打热线:8008308300(仅固话),4008308300获取更多帮助型号:EDI- AL10 CMIIT ID:2016CP2498型号:EDI- DL00 CMIIT ID:2016CP3110CMIIT ID 查询路径:设置 > 关于手机 > 认证信息 。
华为 手机 说明书
说明 您的手机支持发送和接收长短信,接收一条完整长短信的时间视网
络状况而定,如果发现长短信内容无法完整显示,请等待手机接收 到所有短信内容后再重新打开。长短信只能保存于手机中。 您的手机最大支持的彩信容量为 300KB,超过 300KB 的文件将无 法通过彩信发送。
待机状态下,按此键查看“通话记录”。 拨打电话或接听电话。
待机状态下,按此键进入“主菜单”。 选择屏幕左下方文字对应的菜单或操作。
菜单模式下,按此键返回上一级菜单或退出 功能表。
选择屏幕右下方文字对应的菜单或操作。
待机界面设置为“快捷模式”时,按左方向 键或右方向键移动光标至所需快捷图标。
手机密码锁可有效地防止其他人未经您的许可使用您的手机。 启用手机密码锁时,会在每次开机时要求您输入手机密码。 在主菜单界面,选择“设置 > 安全 > 手机密码”可开启手机 锁。
PIN 码和 PUK 码
PIN 码(个人识别号码),可有效的防止他人未经您的许可使用 您的 UIM 卡。PUK 码(个人解锁码),可以更改被锁定的 PIN 码。如果累计连续 3 次输错了 PIN 码,将提示输入 PUK 码。 如果累计连续 10 次输错了 PUK 码,UIM 卡将永久失效。此 时,请与您的网络运营商联系,要求更换新卡。 PIN 码、PUK 码随 UIM 卡一起提供,详情请咨询您的网络运营 商。
待机状态下,长按此键,锁定键盘。 文本输入模式下,按此键切换输入法。
待机状态下,按此键进入“音乐播放器”。
编辑状态下,按此键清除光标前一个字符, 长按清除光标前的所有字符。
删除选中的条目。
5
HUAWEI华为 P40 Pro+ 用户指南 说明书
用户指南目 录基础使用常用手势1系统导航5手机克隆6锁屏与解锁7了解桌面8控制中心17打开应用常用功能26桌面窗口小工具26更换壁纸28截屏和录屏28调整音量36输入文本38多窗口42熄屏显示50开关机和重启51充电51智慧功能智慧语音53智慧视觉61智慧识屏65智慧搜索69场景联动69智慧出行71服务中心72超级终端73手机投屏79多屏协同83华为分享93智慧打印97相机图库打开相机101拍摄照片101人像104夜景104大光圈105AI 摄影大师106变焦拍摄照片106全景拍摄107目 录黑白艺术108趣 AR108动态照片109照片添加水印110文档矫正110专业相机111录制视频114慢动作录像116延时摄影117双景录像117相机滤镜117多机位模式118相机设置121管理图库122编辑图片与视频129AI 精彩瞬间131图库智能分类133时刻134应用联系人136电话139信息146畅连150日历166时钟171备忘录172录音机179电子邮件179计算器183手电筒184指南针184AR 测量185手机管家187设置搜索设置项192登录华为帐号192WLAN194移动网络195更多连接198桌面和壁纸207显示和亮度210声音和振动213目 录通知和状态栏215生物识别和密码218应用和服务222电池222存储224安全224隐私230健康使用手机234辅助功能238用户和帐户254系统和更新255关于手机261基础使用常用手势了解手机常用手势与快捷操作了解隔空手势当您不方便触摸屏幕时,可通过隔空手势操作手机。
例如截屏、滑动屏幕、接听来电或暂停播放音视频等。
进入设置 > 辅助功能 > 智慧感知,确保隔空滑动屏幕、隔空截屏或隔空按压已开启。
若您的设备中没有隔空滑动屏幕、隔空截屏或隔空按压开关,则不支持此功能,请以实际情况为准。
全面屏导航手势进入设置 > 系统和更新 > 系统导航方式,确保选择了手势导航。
华为最新说明书
拍照实时翻译
只身异地也不用担心语言障碍。无论是用餐还是旅游景点,使用相机实时翻 译,轻松读懂陌生语言。
4
精彩功能
在使用实时翻译前,请先开启移动数据连接或将手机接入 WLAN 网络。 1. 在主屏幕,点击 相机。 2. 点击 > 。 3. 点击屏幕顶端的语言名称,选择源语言和目标语言。 4. 将镜头对准要识别的文字,并确保文字完整地置入扫描框中。相机会自动
连接 WLAN 网络
1. 从状态栏处向下滑动,打开通知面板。 2. 在开关页签下,长按 进入 WLAN 设置界面。 3. 点击 WLAN 开关,开启 WLAN。手机将搜索并列出可用的 WLAN 网络。 4. 点击要连接的 WLAN 网络。如果选择了一个加密的网络,则需要输入访问
密码后才能连接。
连接移动网络
通过指纹解锁保密柜
在文件管理中启用保密柜功能并完成保密柜密码设定后,屏幕会提示您是否需 要绑定指纹。点击关联,即可通过指纹快速访问保密柜。若跳过此步骤,也可 以通过如下设置启用该功能。 1. 在主屏幕,点击 设置。 2. 点击指纹。 3. 按照屏幕提示,输入手机解锁密码,进入指纹设置界面。
2
精彩功能
通过指纹解锁屏幕
在首次添加指纹时,手机会自动将指纹应用于解锁屏幕。若未选择解锁屏幕, 也可以通过如下设置启用该功能。 1. 在主屏幕,点击 设置。 2. 点击指纹。 3. 按照屏幕提示,输入手机解锁密码,进入指纹设置界面。 4. 点击解锁屏幕开关,开启在屏幕关闭或锁屏状态下使用指纹解锁的功能。 在屏幕关闭或锁屏状态下,在手机背面指纹识别器上输入指纹即可解锁屏幕。 当指纹输入失败或不方便输入指纹时,也可输入手机解锁密码解锁屏幕。
双卡设置
启用或禁用 SIM 卡
HUAWEI华为 nova 8 Pro 用户指南 说明书
用户指南目 录基础使用常用手势1系统导航4手机克隆5锁屏与解锁5了解桌面7控制中心16打开应用常用功能25桌面窗口小工具25更换壁纸26截屏和录屏27调整音量34输入文本36多窗口38熄屏显示46开关机和重启47充电47智慧功能智慧语音49智慧视觉57智慧识屏61智慧搜索64场景联动65服务中心67超级终端68手机投屏72多屏协同77多设备协同管理86华为分享87智慧打印91相机图库打开相机94拍摄照片94人像97夜景97大光圈98AI 美拍99变焦拍摄照片99微距拍照100目 录全景拍摄100动态照片101照片添加水印101文档矫正102专业相机102录制视频105慢动作录像106延时摄影107双景录像108微电影108多机位模式109相机设置112管理图库113编辑图片与视频120图库智能分类122时刻123应用联系人126电话129信息135畅连139日历156时钟161备忘录162录音机169电子邮件169计算器173手电筒173指南针174AR 测量174手机管家176设置搜索设置项181登录华为帐号181WLAN183移动网络184更多连接188桌面和壁纸197显示和亮度200声音和振动203通知和状态栏205生物识别和密码208目 录应用和服务212电池212存储214安全214隐私220健康使用手机224辅助功能228用户和帐户236系统和更新237关于手机243基础使用常用手势了解手机常用手势与快捷操作全面屏导航手势进入设置 > 系统和更新 > 系统导航方式,确保选择了手势导航。
返回上一级从屏幕左边缘或右边缘向内滑动返回桌面从屏幕底部边缘上滑进入最近任务从屏幕底部边缘向上滑并停顿结束单个任务查看多任务时,上滑单个任务卡片快速切换应用•沿屏幕底部边缘横向滑动使用该功能前,在系统导航方式界面中,点击更多设置,请确保底部边缘横滑切换应用开关开启。
•从屏幕底部边缘弧线滑动若您的设备中无底部边缘横滑切换应用开关,则不支持该功能,请以实际情况为准。
华为手机产品说明书
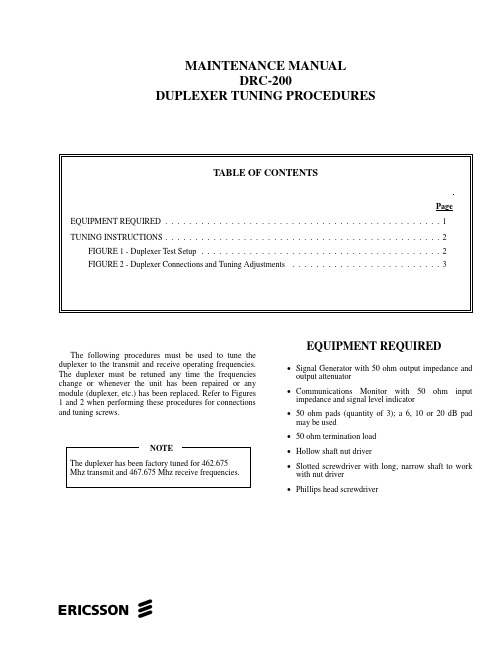
The following procedures must be used to tune the duplexer to the transmit and receive operating frequencies.The duplexer must be retuned any time the frequencies change or whenever the unit has been repaired or any module (duplexer, etc.) has been replaced. Refer to Figures 1 and 2 when performing these procedures for connections and tuning screws.EQUIPMENT REQUIRED•Signal Generator with 50 ohm output impedance and output attenuator •Communications Monitor with 50 ohm input impedance and signal level indicator •50 ohm pads (quantity of 3); a 6, 10 or 20 dB pad may be used •50 ohm termination load•Hollow shaft nut driver•Slotted screwdriver with long, narrow shaft to work with nut driver •Phillips head screwdriverMAINTENANCE MANUALDRC-200DUPLEXER TUNING PROCEDURESeTUNING INSTRUCTIONS1. Turn off the DRC-200 with the front panel POWERON/OFF switch and unplug AC power cord.2. Remove the eight (8) black Phillips head screws thatfasten the cover wrap to the chassis and slide the cover wrap off towards the rear of the unit.3. Remove the fifteen (15) screws holding the top metalshield to case.4. Remove three (3) screws on inside of case holdingfront panel to metal chassis.5. Gently pry up snaps and remove front cover to gainaccess to duplexer tuning screws.6. Remove four (4) screws holding power amplifier onthe chassis to gain access to the duplexer BNC connectors.7. Connect the signal generator output through the 50ohm pad to the ANTENNA connector on the rear panel.8.Disconnect the cable from the TX port on the duplexer and connect the communications monitor through a 50ohm pad to the TX port.9. Remove the cable from the RX port and terminate theRX port into a 50 ohm load termination pad.10. Tune the communications monitor to the receivefrequency.11. Unloosen the tuning screw shaft locking nuts(Figure 2) on all six (6) tuning screws.12. Tune the signal generator to the receive frequency andadjust for a high output.13. Adjust the three transmitter port tuning screws, one at atime, for minimum signal level on the communications monitor. It may be required that each screw be adjusted more than once to obtain a minimum signal level indication.Copyright © July 1996, Ericsson Inc.Figure 1- Duplexer Test SetupAE/LZB 119 1910 R1A214. While monitoring the signal level, tighten the tuningscrew locking nuts after final adjustment of the transmitter port. It may be necessary to readjust the tuning screws while tightening the locking nuts to retain minimum signal level obtained in Step 13.15. Disconnect the communications monitor and 50 ohmpad from the TX port.16. Disconnect the 50 ohm load termination pad from theRX port and connect the communications monitor through the 50 ohm pad to the RX port.17. Connect the 50 ohm load termination pad removed inStep 16 to the TX port.18.Tune the communications monitor to the transmitfrequency.19. Tune the signal generator to the transmit frequency andadjust for a high output.20. Adjust the three receiver port tuning screws, one at atime, for minimum signal level on the communications monitor. It may be required that each screw be adjusted more than once to obtain a minimum signal level indication.21. While monitoring the signal level, tighten the tuningscrew locking nuts after final adjustment of the receiver port. It may be necessary to readjust the tuning screws while tightening the locking nuts to retain minimum signal level obtained in Step 20.22. Disconnect the communications monitor and 50 ohmpad from the RX port and reconnect the cable to the RX port that was removed in Step 9.23. Disconnect the 50 ohm load termination pad from theTX port and reconnect the cable removed in Step 8 to the TX port.24. Disconnect the signal generator and 50 ohm pad fromthe ANTENNA connector on back panel.25. Reassemble the radio by performing Steps 6, 5, 4, 3and 2.Figure 2 - Duplexer Connections and Tuning AdjustmentsAE/LZB 119 1910 R1A3Ericsson Inc.Private Radio SystemsMountain View RoadLynchburg, Virginia 24502AE/LZB 119 1910 R1A 1-800-528-7711 (Outside USA, 804-528-7711)Printed in U.S.A.。
P810使用手册
P810使用手册感谢您选择我们的P810产品。
为了帮助您更好地使用本产品,我们为您提供了这份使用手册。
请在使用前仔细阅读,并按照说明操作,以确保产品正常使用。
开箱及配件在首次使用P810之前,请确保包装内包含以下配件:1.P810设备主体2.电源适配器3.用户手册外观及功能介绍1. 外观P810采用简约设计,机身轻薄,便于携带。
其主要按键和接口如下:•电源键:位于机身侧面,用于开关机。
•音量键:位于机身侧面,用于调整音量。
•耳机接口:位于机身顶部,用于连接耳机。
•USB接口:位于机身侧面,用于数据传输和充电。
2. 功能P810具备以下功能:•播放音乐:支持本地音乐播放和在线音乐服务。
•接听电话:支持蓝牙通话。
•跑步计步:可记录跑步步数、时间和距离。
•睡眠监测:可监测您的睡眠质量和时长。
•消息提醒:支持短信、来电和社交软件消息提醒。
设置及使用1. 开机及登录首次使用P810时,请按照以下步骤操作:1.将P810靠近手机,开启手机的蓝牙功能。
2.在手机上搜索到P810设备,点击连接。
3.进入P810设置界面,根据提示完成登录。
2. 功能设置进入P810设置界面后,您可以根据个人需求调整以下功能:•音乐播放:选择本地音乐或在线音乐服务。
•电话功能:开启或关闭蓝牙通话功能。
•运动模式:选择跑步、步行或骑行等运动模式。
•睡眠监测:开启或关闭睡眠监测功能。
•消息提醒:设置短信、来电和社交软件的消息提醒。
3. 充电及续航P810使用内置可充电锂电池,可通过电源适配器充电。
充电时,请将电源适配器插入USB接口,指示灯亮起表示正在充电。
充电完成后,指示灯熄灭。
P810的续航时间如下:•音乐播放:约12小时•通话:约4小时•运动模式:约6小时故障排除如果您在使用过程中遇到问题,可以尝试以下方法解决:1.检查设备是否已充足电量。
2.确保手机蓝牙功能已开启。
3.重新连接手机和P810设备。
4.重启P810设备。
如果问题仍无法解决,请联系我们的客服支持。
华为智能手机快速入门指南说明书
Quick Start GuideFor more informationGo to /en/ to download the user guide for your device and read the FAQ, privacy policy, and other information.Go to Settings > About phone > Legal information to read the legal information.Please visit /en/support/hotline/ for the most up-to-date contact information for your country or region.Your phone at a glanceBefore you start, let's take a look at your new phone. Press and hold the power button to turn your phone on or off.To forcibly restart your phone, press and hold the power button until your phone vibrates.Getting startedFollow the instructions in the following figures to set up your phone. Do not insert or remove a SIM card while your phone is on.Please exercise caution when using the SIM ejector pin to avoid hurting your fingers or damaging your phone. Store your pin in a safe place out of the reach of children to prevent them from swallowing it or injuringthemselves by accident.Caution Insert the SIM card into the correct card slot to ensure that it can be recognized by the phone.Dual card dual standby single passMHA-L29: Your phone supports only dual card dual standby single pass, which means you cannot use both SIM cards for calls or data services simultaneously.• When you are on a call using SIM card 1, SIM card 2 cannot be used to make or answer calls. If someone calls SIM card 2, the caller will hear a voice message similar to "The subscriber you dialed is out of the service area" or"The subscriber you dialed cannot be connected for the moment, please try again later." The actual message will vary by service provider.• When you are using SIM card 1's data service, SIM card 2's data service will be disabled.Your phone's single pass feature helps reduce power consumption and increase your phone's standby time. It is not related to your service provider's network conditions.It may be a good idea to contact your service provider and subscribe to missed call reminder and related assistance services to avoid the conflicts mentioned above.Safety InformationPlease read all of the safety information carefully before using your device to ensure its safe and proper operation and to learn how to dispose of your device properly.Viewing the safety and regulatory information For more information on safety, touch Settings > About phone > legal information > Safety information.For more information on regulation, touch Settings > About phone > Authentication info.Operation and safety• To prevent possible hearing damage, do not listen at high volume levels for long periods.• Using an unapproved or incompatible power adapter, charger, or battery may damage your device, shorten its lifespan, or cause a fire, explosion, or other hazards.• Ideal operating temperatures are 0 °C to 35 °C. Ideal storage temperatures are -20 °C to +45 °C.• Pacemaker manufacturers recommend that a minimum distance of 15 cm be maintained between a device and a pacemaker to prevent potential interference with thepacemaker. If using a pacemaker, hold the device on the side opposite the pacemaker and do not carry the device in your front pocket.• Keep the device and the battery away from excessive heat and direct sunlight. Do not place them on or inheating devices, such as microwave ovens, stoves, orradiators.• Observe local laws and regulations while using the device. To reduce the risk of accidents, do not use your wireless device while driving.• While flying in an aircraft or immediately before boarding, only use your device according to instructions provided. Use of a wireless device in an aircraft maydisrupt wireless networks, present a hazard to aircraft operation, or be illegal.• To prevent damage to your device's parts or internal circuits, do not use it in dusty, smoky, damp, or dirtyenvironments or near magnetic fields.• When charging the device, make sure the power adapter is plugged into a socket near the devices and is easilyaccessible.• Unplug the charger from electrical outlets and the device when not in use.• Do not use, store or transport the device where flammables or explosives are stored (in a gas station, oil depot, or chemical plant, for example). Using your device in these environments increases the risk of explosion or fire.• Dispose of this device, the battery, and accessories according to local regulations. They should not bedisposed of in normal household waste. Improperbattery use may lead to fire, explosion, or other hazards.• Use only the following listed AC Adapters/Power Supplies: HUAWEI: HW-050450B00, HW-050450E00,HW-050450U00, HW-050450A00.EU regulatory conformanceBody worn operationThe device complies with RF specifications when used near your ear or at a distance of 0.5 cm from your body. Ensure that the device accessories, such as a device case and device holster, are not composed of metal components. Keep the device away from your body to meet the distance requirement.MHA-L09: The highest SAR value reported for this device type when tested at the ear is 1.64 W/kg, and when properly worn on the body is 1.36 W/kg.MHA-L29: The highest SAR value reported for this device type when tested at the ear is 1.64 W/kg, and when properly worn on the body is 1.36 W/kg.StatementHereby, Huawei Technologies Co., Ltd. declares that this device is in compliance with the essential requirements and other relevant provisions of Directive 1999/5/EC and 2009/ 125/EC.The most recent, effective version of the DoC (declaration of conformity) can be viewed at/certification.The following marking is included in the product:This device may be operated in all member states of the EU. Observe national and local regulations where the device is used.This device may be restricted for use, depending on the local network.Restrictions in the 2.4 GHz band:Norway: This subsection does not apply for the geographical area within a radius of 20 km from the centre of Ny-Ålesund. Restrictions in the 5 GHz band:WLAN function of this device is restricted only to indoor use when operating in the 5150 to 5350 MHz frequency range.FCC Regulatory ComplianceBody worn operationThe device complies with RF specifications when used near your ear or at a distance of 1.5 cm from your body. Ensure that the device accessories, such as a device case and device holster, are not composed of metal components. Keep the device away from your body to meet the distance requirement.Certification information (SAR)This device is also designed to meet the requirements for exposure to radio waves established by the Federal Communications Commission (USA).The SAR limit adopted by the USA is 1.6 W/kg averaged over one gram of tissue. The highest SAR value reported to the FCC for this device type complies with this limit.MHA-L09: The highest SAR value reported to the FCC for this device type when using at the ear is 1.42 W/kg, and when properly worn on the body is 0.60 W/kg, and when using the Wi-Fi hotspot function is 1.39 W/Kg.MHA-L29: The highest SAR value reported to the FCC for this device type when using at the ear is 1.42 W/kg, and when properly worn on the body is 0.60 W/kg, and when using the Wi-Fi hotspot function is 1.39 W/Kg.FCC statementThis equipment has been tested and found to comply with the limits for a Class B digital device, pursuant to Part 15 of the FCC Rules. These limits are designed to provide reasonable protection against harmful interference in a residential installation. This equipment generates, uses and can radiate radio frequency energy and, if not installed and used in accordance with the instructions, may cause harmful interference to radio communications. However, there is no guarantee that interference will not occur in a particular installation. If this equipment does cause harmful interference to radio or television reception, which can be determined by turning the equipment off and on, the user is encouraged to try to correct the interference by one or more of the following measures:--Reorient or relocate the receiving antenna.--Increase the separation between the equipment and receiver.--Connect the equipment into an outlet on a circuit different from that to which the receiver is connected.--Consult the dealer or an experienced radio/TV technician for help.This device complies with Part 15 of the FCC Rules. Operation is subject to the following two conditions: (1) this device may not cause harmful interference, and (2) this device must accept any interference received, including interference that may cause undesired operation.Caution: Any changes or modifications to this device not expressly approved by Huawei Technologies Co., Ltd. for compliance could void the user's authority to operate the equipment.Industry Canada complianceBody worn operationThe device complies with RF specifications when used near your ear or at a distance of 1.5 cm from your body. Ensure that the device accessories, such as a device case and device holster, are not composed of metal components. Keep the device away from your body to meet the distance requirement.MHA-L09: The highest SAR value reported to the IC for this device type when using at the ear is 1.41 W/kg, and when properly worn on the body is 0.60 W/kg.MHA-L29: The highest SAR value reported to the IC for this device type when using at the ear is 1.41 W/kg, and when properly worn on the body is 0.60 W/kg.IC StatementThis device complies with CAN ICES-3 (B)/NMB-3(B).This device complies with Industry Canada licence-exempt RSS standard(s). Operation is subject to the following two conditions: (1) this device may not cause interference, and (2) this device must accept any interference, including interference that may cause undesired operation of the device.Restrictions in the 5 GHz band:Within the 5.15 to 5.25 GHz band, UNII devices will be restricted to indoor operations to reduce any potential for harmful interference to co-channel Mobile Satellite System (MSS) operations.Legal NoticeTrademarks and Permissions, , and are trademarks or registered trademarks of Huawei Technologies Co., Ltd.Android™ is a trademark of Google Inc.LTE is a trademark of ETSI.The Bluetooth® word mark and logos are registered trademarks owned by Bluetooth SIG, Inc. and any use of such marks by Huawei Technologies Co., Ltd. is under license.Wi-Fi®, the Wi-Fi CERTIFIED logo, and the Wi-Fi logo are trademarks of Wi-Fi Alliance.Privacy PolicyTo better understand how we protect your personal information, please see the privacy policy at/privacy-policy.Copyright © Huawei Technologies Co., Ltd. 2016. All rights reserved.THIS DOCUMENT IS FOR INFORMATION PURPOSE ONLY, AND DOES NOT CONSTITUTE ANY KIND OF WARRANTIES.All pictures and illustrations in this guide, including but not limited to the phone color, size, and display content, are for your reference only. The actual product may vary.Nothing in this guide constitutes a warranty of any kind, express or implied.For DTS patents, see .Manufactured under license from DTSLicensing Limited. DTS, the Symbol, & DTS andthe Symbol together are registeredtrademarks, and DTS Sound is a trademark ofDTS, Inc. © DTS, Inc. All Rights Reserved.Note: Remember the Google account your phone last logged in to.During an untrusted factory settings restoration or microSD card–based update, Google's anti-theftmechanism requires you to enter the Google account your phone last logged in to on the startupnavigation screen for identity authentication. Your phone can properly power on only after the identity authentication passes.Model: MHA-L09 MHA-L2931507907_01Please visit /en/support/hotline for recent updated hotline and email address in your country or region.The N-Mark is a trademark or registeredtrademark of NFC Forum, Inc. in the UnitedStates and in other countries.。
华为 honor8手机服务手册说明书
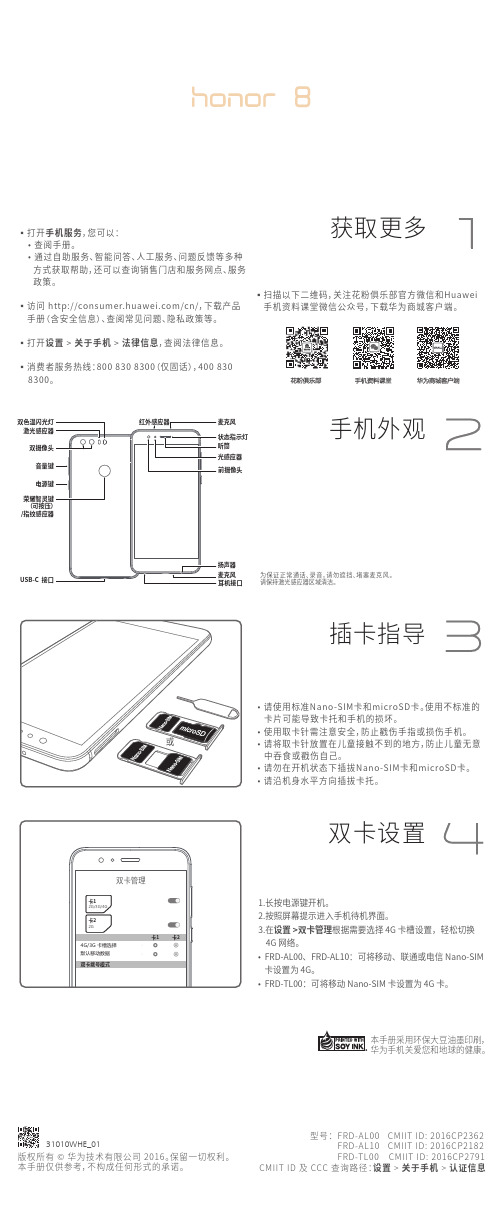
▪打开手机服务,您可以: • 查阅手册。
• 通过自助服务、智能问答、人工服务、问题反馈等多种 方式获取帮助,还可以查询销售门店和服务网点、服务 政策。
▪访问 /cn/,下载产品 手册(含安全信息)、查阅常见问题、隐私政策等。
▪打开设置 > 关于手机 > 法律信息,查阅法律信息。
▪消费者服务热线:800 830 8300(仅固话),400 830 8300。
获取更多1▪扫描以下二维码,关注花粉俱乐部官方微信和Huawei 手机资料课堂微信公众号,下载华为商城客户端。
插卡指导手机外观23双卡设置4• 请使用标准Nano-SIM卡和microSD卡。
使用不标准的卡片可能导致卡托和手机的损坏。
• 使用取卡针需注意安全,防止戳伤手指或损伤手机。
• 请将取卡针放置在儿童接触不到的地方,防止儿童无意中吞食或戳伤自己。
• 请勿在开机状态下插拔Nano-SIM卡和microSD卡。
• 请沿机身水平方向插拔卡托。
1.长按电源键开机。
2.按照屏幕提示进入手机待机界面。
3.在设置 >双卡管理根据需要选择 4G 卡槽设置,轻松切换 4G 网络。
型号:FRD-AL00 CMIIT ID: 2016CP2362FRD-AL10 CMIIT ID: 2016CP2182FRD-TL00 CMIIT ID: 2016CP2791版权所有 © 华为技术有限公司 2016。
保留一切权利。
本手册仅供参考,不构成任何形式的承诺。
本手册采用环保大豆油墨印刷,华为手机关爱您和地球的健康。
CMIIT ID 及 CCC 查询路径:设置 > 关于手机 > 认证信息31010WHE_01为保证正常通话、录音,请勿遮挡、堵塞麦克风。
请保持激光感应器区域清洁。
• FRD-AL00、FRD-AL10:可将移动、联通或电信 Nano-SIM 卡设置为 4G。
• FRD-TL00:可将移动 Nano-SIM 卡设置为 4G 卡。
华为 P20 手机用户指南说明书

All pictures in this manual are for reference only, please refer to the actual productSafety WarningsBefore using and operating this equipment, please read and observe the following precautions carefully to avoid dangerous or illegal operations.Placement1) DO NOT expose the camera to any heat source((such as electrical heater).2) Normal operating temperature is 0-40℃, normal operating humidity is 10%-90%RH.3) Do NOT place the product in dusty and humid environments in case of internal circuit fault.4) The camera is not water-proof and dust-proof, do not expose the equipment directly tothe sun, lest the equipment temperature is too high to affect the normal use of the equipment.Children Safety1) The product and accessories may contain some small-part. Please place themPower Supply1) Please use the standard cable of this product.Water Precaution1) The product is not waterproof,Please keep it dry.Maintenance1) Please contact professional service personnel for maintenance services.2) When the equipment is damaged, please do not disassemble it for repair without permission, please call customer service to report for repair. 3) Do not insert any sharp or pointed object into the device.4) Do not drop or hit the device to avoid damage to the device.USB CameraUSB Camera | User ManualStatement1) Intellectual property right statement: The hardware design and software ofthis product are covered by the patents.Anyone who reproduces this product or the content of the instruction without the authorization of the Company shall assume legal liabilities.2) This manual is for reference only, and the actual function of the final product is subject to the actual function of the product received by the customer.3) The picture is for reference only, please refer to the actual product. Thecompany reserves the right to improve and change the appearance and design of the product without notice.AccessoriesUSB cable×11.Appearance Introductiona.Indicator Lightb.Camerac.CameraB Type-CPlease be familiar with the device interface and keys before use.2.ConnectionStep 1:Please rotate the camera bracket to the direction to the back, as inthe illustration.Step 2:Please use the dedicated USB cable to connect the product with the display.d。
- 1、下载文档前请自行甄别文档内容的完整性,平台不提供额外的编辑、内容补充、找答案等附加服务。
- 2、"仅部分预览"的文档,不可在线预览部分如存在完整性等问题,可反馈申请退款(可完整预览的文档不适用该条件!)。
- 3、如文档侵犯您的权益,请联系客服反馈,我们会尽快为您处理(人工客服工作时间:9:00-18:30)。
语音唤醒
唤醒手机
说出手机唤醒词,即可拨打电话。
1 在主屏幕,点击 设置,然后切换到全部设置页签。 2 在智能辅助区域,点击更多。 3 点击语音唤醒。 4 点击唤醒,开启语音唤醒。 5 说出手机唤醒词,即可语音拨打电话。
找回手机
说出手机唤醒词,即可找到手机的位置。
1 在主屏幕,点击 设置,然后切换到全部设置页签。 2 在智能辅助区域,点击更多。 3 点击语音唤醒。 4 点击唤醒,开启语音唤醒。 5 说出手机唤醒词和 “ 你在哪儿 ”,手机铃声会响起。
7
精彩功能
4 在弹出的选项菜单中,选择要添加亲友的来源。然后根据屏幕提示添加亲友。
远程操控
1 在主屏幕,点击 手机服务。 2 在服务页签下,点击亲情关怀。 3 点击 ,选择要帮助的亲友。 4 发起提供帮助。对方接受邀请后,即可控制对方手机屏幕。
5
1
4
2
3
1
在对方屏幕上进行涂鸦。
2
清除屏幕上的涂鸦内容。
屏界面左右布局,方便单手操作。
4
单手键盘
精彩功能
1 在主屏幕,点击 设置,然后切换到全部设置页签。 2 在智能辅助区域,点击单手操作 > 单手键盘。 3 点击单手键盘开关,开启单手键盘。开启后,点击屏幕任意一侧的箭头,可调整键盘、
拨号盘和通话中按键的位置,方便单手操作。
下拉悬停
在拨号盘、联系人、信息和邮件等界面,当手指无法够到界面上方的菜单时,向下拖动当 前界面,按住 1 秒后松手,界面就会下滑,方便一手掌控。 在拨号盘、联系人或信息界面,下拉悬停后顶部显示您自己的二维码名片,方便朋友扫一 扫,快速获取号码信息。
相机和图库 48 拍照界面 49 拍摄照片 49 图库下拉拍照 49 拍摄模式 52 录制视频 53 录制模式 53 延时摄影 53 在线翻译 54 相机设置 54 图库 56 二维码扫描
音乐和视频 57 添加音乐文件 57 播放音乐 58 创建我的歌单 58 播放我的歌单 58 删除我的歌单 59 将音乐设置为手机铃声 59 搜索在线视频 59 播放视频 60 剪辑视频
解锁屏幕
按电源键唤醒屏幕,向任意方向滑动手指完成屏幕解锁。
10
在锁屏界面,从屏幕底部向上滑动,打开杂志锁屏快捷操作面板。
开始使用
1
停止自动切换杂志页面。
2
查看上一张杂志。
3
删除当前杂志页。
4
分享杂志内容。
5
快速打开录音、计算器、手电筒和相机等功能。
6
对杂志锁屏进行设置。
7
管理杂志锁屏图片。
从旧手机中复制联系人
您可以通过多种方式将联系人从旧手机复制到新手机中。
SIM 卡 存储设备 蓝牙
通过 SIM 卡导入功能将 SIM 卡上的联系人复制到新手机中。请参 考从 SIM 卡导入联系人。
如果手机支持 microSD 卡,可将联系人信息以 vCard 格式导出到 microSD 卡中,然后将 microSD 卡中的联系人导入到新手机中。 请参考从存储设备导入联系人。
8
查看下一张杂志。
11
双卡设置
开始使用
启用或禁用 SIM 卡
您可以同时启用两张 SIM 卡,也可以禁用某一张卡。禁用后,将无法使用此卡进行通话、 发送短信或上网等操作。
1 在主屏幕,点击 设置。 2 在全部设置页签下,点击 SIM 卡管理。 3 点击卡 1 或卡 2 旁边的开关,可以启用或禁用对应的 SIM 卡。
网络和共享 61 连接到移动网络 61 WLAN
ii
62 共享移动网络 63 通过蓝牙传输数据 64 通过 WLAN 直连传输数据 65 在手机和电脑之间传输数据 66 在手机和 USB 存储设备之间传输数据 67 多屏互动
应用程序
68 应用市场 69 应用程序管理 70 备份 70 手机找回 71 手机管家 72 日历 74 时钟 75 天气 76 备忘录 76 收音机
精彩功能
精彩相机
魅我拍照
在手机中预设个人的美肤参数后,使用美肤模式拍照时,即可获得专属的美肤瘦脸效果。
1 在主屏幕,点击 相机。 2 点击 > > 魅我。 3 点击魅我,开启魅我功能。 4 点击添加个人信息,拍摄 3 张个人照片。 5 在设置美肤效果界面,调整美肤参数,点击 。
3
6 在美肤模式下,点击 拍摄照片。
门店和服务网点、服务政策。
• 参与论坛问答或者花粉活动。
访问 /cn/,下载产品手册 (含安全信息)、查阅常见问题、 模拟器、隐私政策等。 打开设置 > 关于手机 > 法律信息,查阅法律信息。 拨打热线:800 830 8300 (仅固话), 400 830 8300。 扫描以下二维码,关注花粉俱乐部官方微信和 Huawei 手机资料课堂微信公众号,下载华 为商城客户端。
3
静音使对方听不到您讲话。
4
结束远程控制。
5
对方屏幕区域,可进行操控。
8
亲情求助
1 在主屏幕,点击 手机服务。 2 在服务页签下,点击亲情关怀。 3 点击 ,选择要求助的亲友。 4 发起请求帮助。对方接受请求后,即可控制您的手机屏幕。
精彩功能
9
开始使用
锁定或解锁屏幕
锁定屏幕
• 手动锁定屏幕:按电源键。 • 自动锁定屏幕:当手机未使用的时间达到设定的休眠时间时,手机会自动锁定屏幕。
5
灵犀一指
精彩功能
贴上灵犀一指专用的智能屏幕保护膜后,可以在任意界面快速启动拍照或录音等操作,虚 拟导航栏不再占用屏幕空间,让您畅享大屏的快捷体验。
贴膜后,双击或长按屏幕左上方、右上方和下方的 5 个触控点的任意一个,进入灵犀一指 的功能引导页面,按照屏幕提示进入设置界面,开启灵犀一指和贴膜导航键替代屏幕导航 栏功能。
精彩功能
亲情关怀
亲情关怀可以让您通过语音对讲或屏幕共享远程操控亲友的手机,也可以邀请亲友远程操 控您的手机,随时随地解决手机操作的各种难题。 您可以通过 WLAN 网络接入互联网或使用移动数据连接发起远程协助,使用移动数据连 接需消耗数据流量。
使用亲情关怀前,请先登录华为帐号。
添加亲友团
1 在主屏幕,点击 手机服务。 2 在服务页签下,点击亲情关怀。 3 点击添加亲友。
通话和联系人 31 拨打电话 33 接听或拒接电话 34 通话中的操作 35 接听第三方来电 35 召开电话会议 35 使用通话记录 36 开启口袋模式 36 通话设置 i
37 管理联系人 38 查找联系人 38 导入或导出联系人 40 收藏联系人 41 联系人群组
信息和电子邮件 43 发送信息 43 回复信息 43 管理信息 45 添加邮件帐户 46 发送邮件 46 查看邮件 47 帐户设置
华为 P8
用户指南
目录
使用本手册
精彩功能 2 情景感知 2 智能识物 3 语音唤醒 3 精彩相机 4 懒人模式 6 灵犀一指 7 文件保密柜 7 亲情关怀
开始使用 10 锁定或解锁屏幕 12 双卡设置 12 连接 WLAN 网络 13 连接移动网络 13 连接手机和电脑 13 从旧手机中复制联系人 14 触屏操作 15 手势控制 17 状态图标 18 导航栏设置 19 主屏幕 21 通知 23 访问应用程序 24 个性化您的手机 25 输入文本
手机设置
78 开启位置服务 78 更改声音设置 79 更改显示设置 79 开启单手操作 80 开启防误触模式 80 开启手套模式 80 开启悬浮按钮 81 更改锁屏风格 82 开启或关闭飞行模式 82 用 PIN 码保护 SIM 卡 83 设置帐户 84 恢复出厂设置 84 升级手机 85 设置日期和时间 85 更改显示语言 86 隐私保护 87 辅助功能设置
查看照片 管理文件 U 盘存储
读取并管理手机中的多媒体文件,在手机和电脑之间进行传输。 请参考通过查看照片方式连接。
读取并管理手机中的文件,在手机和电脑之间进行传输。请参考 通过管理文件方式连接。
如果手机支持 microSD 卡,可将手机作为 U 盘设备,读取 microSD 卡上的文件,与电脑相互传输文件。请参考通过 U 盘方 式连接。
1 在主屏幕,点击 设置。 2 在全部设置页签下,点击 SIM 卡管理。 3 点击默认电话 / 信息旁边的卡 1 பைடு நூலகம்卡 2 单选按钮。
连接 WLAN 网络
1 从状态栏处向下滑动,打开通知面板。 2 在开关页签下,长按 进入 WLAN 设置界面。 3 点击 WLAN 开关,开启 WLAN。手机将搜索并列出可用的 WLAN 网络。 4 点击要连接的 WLAN 网络。如果选择了一个加密的网络,则需要输入访问密码后才能
ਰঞ✑Щୂ
.[G]KO۴ߑމર ׃ԢОֽঀۯؚ
1
精彩功能
情景感知
智能提醒
您的手机可智能识别短信中的航班、火车、酒店入住信息,为您提供行程提醒、天气提 醒、导航一站式贴心服务。它还可以智能识别联系人的生日,并及时提醒,是您智慧生活 的小助手。
1 在主屏幕,点击 设置,然后切换到全部设置页签。 2 在智能辅助区域,点击情景智能。 3 点击情景智能开关,开启情景智能。 4 点击相关的事件类型开关,开启或关闭对应的事件提醒。
流光快门
通过慢速快门,可以拍摄出流光溢彩的照片。
1 在主屏幕,点击 相机。 2 点击流光快门,选择一种预设效果。 3 点击 开始拍摄,曝光合适时,点击
结束拍摄。
精彩功能
懒人模式
懒人模式可以方便您单手操作大屏手机,与朋友快速交换二维码名片。
单手屏幕
1 在主屏幕,点击 设置,然后切换到全部设置页签。 2 在智能辅助区域,点击单手操作 > 单手屏幕。 3 点击单手屏幕开关,开启单手屏幕。开启后,开启后,左右滑动虚拟导航栏,可调整全
