怎么利用ARCGIS裁剪图像
arcgis怎么裁剪影像tif?arcgis几种裁剪影像的方法
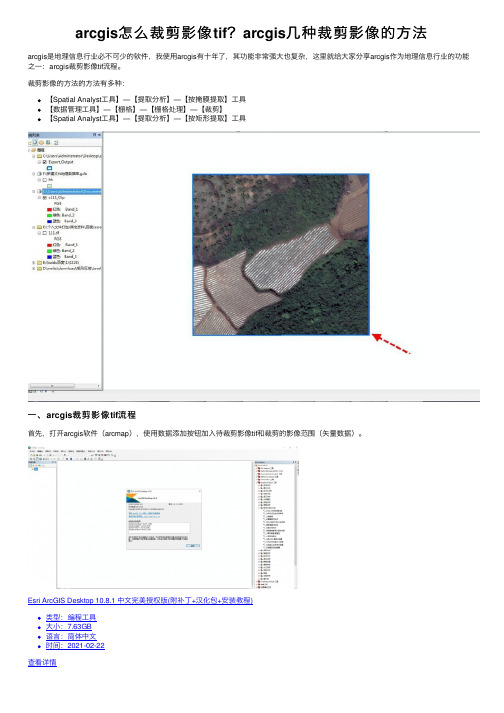
arcgis怎么裁剪影像tif?arcgis⼏种裁剪影像的⽅法arcgis是地理信息⾏业必不可少的软件,我使⽤arcgis有⼗年了,其功能⾮常强⼤也复杂,这⾥就给⼤家分享arcgis作为地理信息⾏业的功能之⼀:arcgis裁剪影像tif流程。
裁剪影像的⽅法的⽅法有多种:【Spatial Analyst⼯具】—【提取分析】—【按掩膜提取】⼯具【数据管理⼯具】—【栅格】—【栅格处理】—【裁剪】【Spatial Analyst⼯具】—【提取分析】—【按矩形提取】⼯具⼀、arcgis裁剪影像tif流程⾸先,打开arcgis软件(arcmap),使⽤数据添加按钮加⼊待裁剪影像tif和裁剪的影像范围(⽮量数据)。
Esri ArcGIS Desktop 10.8.1 中⽂完美授权版(附补丁+汉化包+安装教程)类型:编程⼯具⼤⼩:7.63GB语⾔:简体中⽂时间:2021-02-22查看详情然后,打开菜单栏中的arctoolsbox⼯具箱,点击它即可打开。
再在⼯具箱中依次找到:数据管理⼯具——栅格——栅格处理——裁剪,并打开裁剪。
然后,添加影像(即栅格),范围(即⽮量数据范围)。
再勾选窗⼝中的使⽤输⼊要素裁剪⼏何,勾选后输出tif和裁剪的范围⼀致,不勾选则输⼊的tif为范围外接最⼩矩形。
最后,点击确定,⼯具运⾏完成后,arcgis裁剪影像tif就完成了。
需要注意的是,裁剪保存位置应该是⼀个栅格数据集(默认GDB即可)。
⼆、arcgis⼏种裁剪影像的⽅法打开Arcmap软件,加载影像和要裁剪的数据层;⽅法⼀:⽤【Spatial Analyst⼯具】—【提取分析】—【按掩膜提取】⼯具,设置相关属性,操作如下图;⽤【数据管理⼯具】—【栅格】—【栅格处理】—【裁剪】⼯具,操作如下;⽤【Spatial Analyst⼯具】—【提取分析】—【按矩形提取】⼯具,操作如下;三种⽅法都可以达到⼀样的效果,影像裁剪结果如下;以上就是arcgis⼏种裁剪影像的⽅法,希望⼤家喜欢,请继续关注。
MapGIS 6.7影像裁剪
影像裁剪
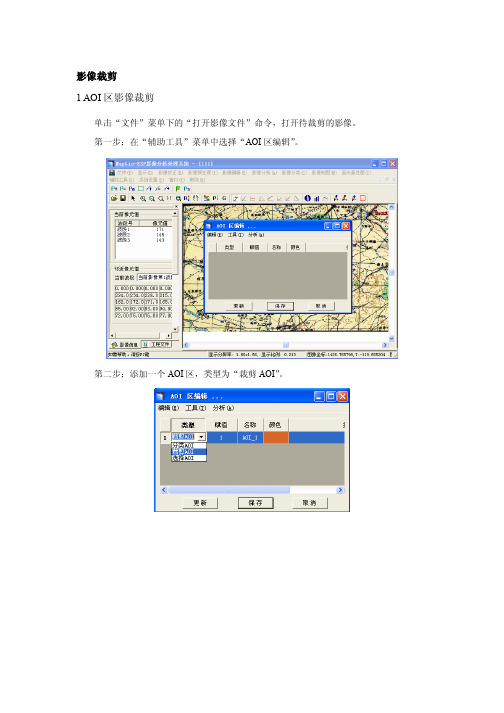
1 AOI区影像裁剪
单击“文件”菜单下的“打开影像文件”命令,打开待裁剪的影像。
第一步:在“辅助工具”菜单中选择“AOI区编辑”。
第二步:添加一个AOI区,类型为“裁剪AOI”。
第三步:选择“影像制图”菜单下的“AOI区影像裁剪”,输出裁剪AOI区范围的图像。
2 区文件裁剪
选择“文件”菜单下的“打开影像”,打开待裁剪的影像。
第一步:打开“系统设置”下的“系统选项”,勾选“主窗口按图形方式显示”。
通过“文件”菜单下的“打开矢量文件”打开裁减区文件。
第二步:选择“影像制图”菜单的“区文件影像裁剪”选项,输入区文件范围内的影像。
备注:影像裁剪后输出的图像包含有AOI裁剪区,AOI裁剪区外的图像部分默认像元值为0。
MAPGIS6.7实用教程--图形裁剪
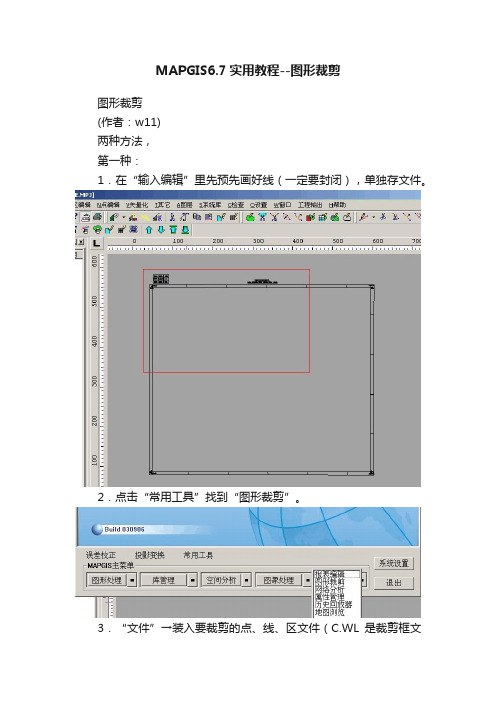
MAPGIS6.7实用教程--图形裁剪
图形裁剪
(作者:w11)
两种方法,
第一种:
1.在“输入编辑”里先预先画好线(一定要封闭),单独存文件。
2.点击“常用工具”找到“图形裁剪”。
3.“文件”→装入要裁剪的点、线、区文件(C.WL是裁剪框文
件)
4.“编辑裁剪框”→“装入裁剪框”→装入裁剪框文件
5.“裁剪工程”→“新建”→打开一个“编辑裁剪工程文件”面板,
6.在“结果文件名”内输入裁剪后的文件路径和文件名,点击“修改”按钮。
7.依次加入线文件,如果区文件再加入区文件。
点击“OK”按钮.
8.在下拉菜单“裁剪工程”→“裁剪”,等待裁剪。
单击鼠标右键弹出“复位窗口”,选择裁剪后的文件,按“确定”按钮。
裁剪后的结果。
第二种方法:
其它步聚同上第5步开始。
本次操作结束,如发现有不清或不对的地方请与我们联系(j-t-*********),我们会及时改正,谢谢!
这里只是讲一些快速的入门法,如果想更深入的了解MAPGIS知识,请看MAPGIS相关书籍。
arcgis影像裁剪的步骤
arcgis影像裁剪的步骤
裁剪影像在ArcGIS中是一个常见的操作,通常用于提取感兴趣区域的影像数据。
以下是在ArcGIS中裁剪影像的一般步骤:
1. 打开ArcMap或ArcGIS Pro软件,并加载需要裁剪的影像数据。
2. 确保在 Catalog 窗口中连接到包含需要裁剪的影像数据的文件夹或数据库。
3. 在 ArcToolbox 中找到 "Data Management Tools" -> "Raster" -> "Ras ter Processing",然后双击 "Clip" 工具。
4. 在 "Clip" 工具对话框中,选择需要裁剪的输入栅格数据。
5. 指定裁剪范围,可以是一个矢量要素类或指定的范围坐标。
6. 指定输出栅格数据的保存位置和名称。
7. 根据需要设置其他裁剪选项,如裁剪像元大小、裁剪范围外
的像元值等。
8. 运行工具,等待裁剪过程完成。
值得注意的是,ArcGIS还提供了其他一些裁剪影像的工具和方法,比如使用遥感影像处理工具进行裁剪,或者使用栅格计算器进行裁剪等。
裁剪影像的具体步骤可能会因数据类型、裁剪范围和需求而有所不同,但以上步骤是一个常见的基本流程。
希望这些信息能帮助到你。
关于arcgis envi剪裁

关于arcgis envi剪裁默认分类2010-07-28 23:56:39 阅读486 评论0 字号:大中小订阅? 目的和任务基于高分辨率的遥感影像提取土地利用信息,并模拟进行土地利用变化分析。
高空间分辨率传感技术的发展为我们提供了丰富的地表景观的信息。
采用遥感技术捕获城市的面貌,直接以反映内在联系综合性很强的地表高分辨率遥感影像作为GIS基础平台,建立一个大比例尺的航空与航天遥感信息场,使得城市管理者和建设者有一个能在计算机上就能看到全市综合特征的信息库。
在这个实习中,我们将使用2景不同时相的SPOT-5影象数据,分辨率为2.5米来进行北京地区的地类的提取工作;并在数据采集的基础上,进行北京的土地利用变化分析。
实习目的:1. 了解ArcGIS软件的基本功能;2. 利用ArcGIS软件采集空间信息;3. 掌握土地利用信息采集的方法;掌握土地利用信息变化监测的一般方法。
实习主要的环节:1、在ARCGIS环境中查看影象数据的基本情况:空间范围,空间参照系统,图象颜色2、找出2景SPOT影象的公共范围,并将其裁剪出来3、对裁剪出来的2005和2007图象进行配准,并进行配准精度的分析4、在配准后的影象上进行土地利用信息的采集a) 建议以线状要素数字化土地利用边界b) 用点状要素采集土地利用类型的信息c) 通过拓扑构建,建立土地利用的空间数据库5、土地利用变化分析方法一:利用ARCGIS软件的转移矩阵进行土地利用变化分析方法二:利用统计图的方法将各种土地利用类型的面积变化进行统计分析,并通过空间制图来进行空间变化分析两种方法任选。
实习具体步骤一,影像裁减有关影像裁减的方法很多,如果在ARCGIS中实现裁减要用到ARCTOOLBOX1.TOOLBOX--DATA MANAGEMENT TOOLS——RASTER——CLIP 工具方法是在影象图上用矩形工具选取想要裁减的范围,查看其X,Y坐标最大与最小值。
arcgis中按范围面裁剪影像
arcgis中按范围面裁剪影像在GIS(地理信息系统)中,影像裁剪是一项常见的操作,通过裁剪可以提取出我们感兴趣的区域,并去除掉不需要的部分。
而在ArcGIS软件中,按范围面裁剪影像是一种常用的裁剪方式,本文将介绍在ArcGIS中如何进行按范围面裁剪影像的操作步骤。
我们需要打开ArcGIS软件,并加载需要裁剪的影像数据。
在ArcMap界面中,点击“添加数据”按钮,选择要裁剪的影像文件,加载进地图视图中。
接下来,我们需要准备好裁剪范围面数据。
这可以是一个面状的矢量文件,比如shp文件,也可以是一个图层文件,比如要素类。
在本例中,我们将使用一个shp文件作为裁剪范围面数据。
同样地,通过点击“添加数据”按钮,将裁剪范围面数据加载进地图视图中。
现在,我们已经加载好了待裁剪的影像数据和裁剪范围面数据,接下来就可以开始按范围面裁剪影像了。
选择“数据管理工具箱”中的“裁剪工具”。
在弹出的对话框中,选择待裁剪的影像数据作为“输入栅格”(Input Raster),选择裁剪范围面数据作为“裁剪几何体”(Clipping Geometry)。
在“裁剪几何体”选项中,我们可以选择多个裁剪几何体。
如果我们只选择了一个裁剪几何体,那么裁剪结果将只包含该几何体范围内的影像数据。
如果我们选择了多个裁剪几何体,那么裁剪结果将包含所有选中几何体范围内的影像数据。
在“输出栅格”(Output Raster)选项中,我们需要指定裁剪后的影像数据保存位置和名称。
点击浏览按钮,选择保存路径和文件名,然后点击确定。
接下来,点击“运行”按钮,开始执行裁剪操作。
在操作完成后,我们将得到按范围面裁剪后的影像数据。
在裁剪完成后,我们可以通过调整地图视图的范围和放大倍数,来查看裁剪结果。
同时,我们还可以对裁剪后的影像数据进行进一步的分析和处理。
总结起来,按范围面裁剪影像是ArcGIS中一种常用的操作,通过这种方式可以提取出我们感兴趣的区域,并去除掉不需要的部分。
arcgis矩形裁剪
arcgis矩形裁剪
ArcGIS矩形裁剪是一种常见的数据处理方法,可以帮助用户在GIS系统中快速地裁剪选定区域内的数据。
在ArcGIS中,用户可以使用多种工具来实现矩形裁剪,例如选择工具、编辑工具和图层属性表等。
下面是一个简单的矩形裁剪操作流程:
1. 打开ArcGIS软件,并加载需要进行裁剪的数据图层。
2. 在工具栏中选择选择工具,并用鼠标在地图上绘制一个矩形框,选定需要裁剪的区域。
3. 在左下角的工具箱中选择“裁剪”工具,然后在弹出的窗口中选择需要裁剪的图层。
4. 点击“输入要素”按钮,选择已经绘制好的矩形框。
5. 点击“输出要素类”按钮,选择保存裁剪后的数据的路径和名称。
6. 点击“运行”按钮,等待裁剪完成。
完成以上步骤后,用户就可以得到裁剪后的数据图层,可以继续在ArcGIS中进行其他的数据处理和分析操作。
需要注意的是,矩形裁剪只能裁剪出矩形框内的数据,如果需要裁剪更复杂的区域,可以使用其他的裁剪工具或方法。
- 1 -。
arcgis裁剪影像tif流程英文版

arcgis裁剪影像tif流程英文版
English:
To clip an image in ArcGIS, first add the image to the map. Then, navigate to the "Data Management" toolbox and select "Raster" > "Ras- ter Processing" > "Clip." In the Clip tool, choose the input raster (the image to be clipped) and the output extent. This can be specified using a bounding box, a feature class, or a .shp file. Once the parameters are set, run the tool to generate the clipped image. The resulting clipped image will be saved as a new file, and the original image will remain unchanged.
中文翻译:
在ArcGIS中裁剪影像,首先将影像添加到地图中。
然后,导航到“数据管理”工具箱,并选择“栅格” > “栅格处理” > “裁剪”。
在裁剪工具中,选择输入栅格(要裁剪的影像)和输出范围。
这可以使用边界框、要素类或.shp文件来指定。
一旦设置了参数,运行该工具以生成裁剪后的影像。
裁剪后的影像将另存为新文件,原始影像将保持不变。
如何arcgis下用SHP文件切DEM和影像图
2、利用矩;raster>clip
InputRaster中选择被裁剪的栅格数据,设定好矩形四个顶点即可//
3、在Spatial Analyst Tools中提供了多种对栅格数据的提取方法:Arctoolbox中,Spatial Analyst Tools>extraction包括提取值到点,根据属性提取,用圆提取,用多边形提取,用掩模提取,用点提取,用矩形提取等,其中的用掩模提取功能可以让我们通过不规则边界来获取需要的栅格数据。
(下面情况未验证~!)
栅格数据的剪切可以用Arcmap spatial analysis 工具中的Raster caculation 首先在spatial analysis中的option中选择要剪切的范围(可利用矢量图层作为掩膜),计算中进行+0运算,就可以得到所要范围的栅格图像。
-------------------------------------
Raster:栅格数据
DEM:数字高程模型(ASCII)
Image:图片
Grid:grid是ARCGIS专有一种栅格数据类型。
---------------------------------------
ArcGIS中对矢量和栅格数据进行裁剪切割的方法
1、对矢量数据进行裁减: Arctoolbox中,spatial tool > extract>clip
如何arcgis下用SHP文件切DEM和影像图
ArcGIS9软件,ArcToolbox -->Spatial Analysis Tools-->Extraction--->Extract by Mask(记得:必须安装SPatial Analysis扩展模块; 地形图shp文件需要是 面 状;空间参考得和你得DEM用一样得,如果不一样,要用PROJECT先转换~。)---ok
arcgis裁剪影像的方法

arcgis裁剪影像的方法
咱们直接上干货,不多罗嗦了。
第一步:打开arcgis(arcmap),将原始影像数据加载进来,将行政界线加载进来(应该也可以自己画个区域)——开始编辑
第二步:右击影像数据——属性——符号系统——勾选显示背景值——拉伸类型选择:无
第三步:打开ArcT oolBox——找到数据管理工具——栅格——栅格处理——裁剪
双击裁剪工具——填写输入栅格数据——输出范围——勾选使用输入要素裁剪集合——确定并等待裁剪完成。
第四步:右击裁剪的数据——导出数据
勾选使用渲染——更改位置、名称和格式——保存
进度条达到100%提示是否添加到地图,加不加都行,这里我不加载。
第五步:重新打开arcgis,将我们保存的数据添加到arcgis一次,会提示金字塔不足,点击是,进度条走完之后,关掉下次就不会提示了
下面看看我们裁好的效果吧!
到这里就全部完成了。
下面我们用思凡将我们裁剪的影像加载到cad中看看效果怎么样?
打开cad——在菜单栏找到思凡制图——思凡设置——绘图影像加载
找到你的栅格影像文件,一定要看清文件格式,点击打开
我们看下在cad中的效果,感觉很清晰呢。
如果觉得有用一定记得给小编一个赞哦。
怎么利用ARCGIS裁剪图像
怎么利用ARCGIS裁剪图像
可以根据
1、范围来采集clip(arctoolbox里面)。
矩形范围
2、好像也可以通过多边形裁剪,如果没有,程序肯定可以的
3、通过mosaic也可以
如何用shp在arcgis中裁剪
1、对矢量数据进行裁减:Arctoolbox中,spatial tool > extract>clip
在InputFeatures中选择被裁剪的图层,在ClipFeatures中选择裁剪形状
2、利用矩形对栅格数据裁剪:Arctoolbox中,data management>raster>clip
InputRaster中选择被裁剪的栅格数据,设定好矩形四个顶点即可
3、在Spatial Analyst Tools中提供了多种对栅格数据的提取方法,Arctoolbox中,Spatial Analyst Tools>extraction包括提取值到点,根据属性提取,用圆提取,用多边形提取,用掩模提取,用点提取,用矩形提取等,其中的用掩模提取功能可以让我们通过不规则边界来获取需要的栅格数据。
arcgis图层裁剪
首先在ArcCatlog 里创建一个shapefile得面,加载到arcmap里,同时也要
把你剪切的shapefile文件和长方形区域的shapefile文件也加载上,切忌这两个文件不能处于编辑状态,点击arctoolbox-analysis tools-extract-clip,在打开的窗口的第一个框里输入要剪切的文件,第二个框里输入长方形区域文件,点ok就好了。
arcgis中怎么用矢量图来裁剪栅格图

arcgis中怎么用矢量图来裁剪栅格图,现在发现了两种方法供大家参考(1)是否需要裁剪栅格图象区域通过一个面状的shapefile表达出来?如果可以,那么就很简单了。
在ArcMap中,调用空间分析扩展模块,将你感兴趣区的shapefile多边形图层设置为掩膜,然后在栅格计算器中重新计算一下你的图象,它就会沿掩膜裁出。
设置掩膜:空间分析工具条的下拉菜单>option里面设置(2)用任意多边形剪切栅格数据(矢量数据转换为栅格数据)2.1在ArcCatlog下新建一个要素类(要素类型为:多边形),命名为:ClipPoly.shp 2.2在ArcMap中,加载栅格数据:例如kunming.img、和ClipPoly.shp2.3打开编辑器工具栏,开始编辑ClipPoly ,根据要剪切的区域,绘制一个任意形状的多边形。
打开属性表,修改多边形的字段“ID”的值为1,保存修改,停止编辑。
2.4打开空间分析工具栏执行命令:<空间分析>-<转换>--<要素到栅格>指定栅格大小:查询要剪切的栅格图层kunming的栅格大小,这里假设指定为1指定输出栅格的名称为路径2.5执行命令: <空间分析>-<栅格计算器>2.6构造表达式:[kunming]*[polyClip4-polyclip4] ,执行栅格图层:kunming和用以剪切的栅格polyClip4 之间的相乘运算1、用ArcCatalog创建一名为Clip.shp的面状要素,并添加一个Clip的INT字段(也可以使用已有的面状要素)2、使用ArcMap加载需要裁减的栅格图层DEM和Clip.shp3、编辑Clip.shp,使其作为裁减区域4、执行spatial Analyst->convert->fratures to raster,把Clip.shp转换成Raster改名为Clip_Raster,这里需要指定字段5、执行栅格计算器,写入[DEM]*[Clip_Raster]完成裁减。
在arcgis、ERDAS下如何进行影像图裁剪
在arcgis、ERDAS下如何进行影像图裁剪ArcgisTOOLBOX--SPATAIL ANALYST TOOLS--EXTRACTION--EXTRACT BY MASK等都可以。
ArcGIS的裁剪功能不怎么好用,裁剪后只能保留三个波段,推荐用ERDAS或PCI进行裁剪.ERDAS中有两个裁剪方法:1.ERDAS--DataPrep--Subset Image2.ERDAS--Interpreter--Utilities--MaskPCI裁剪方法:PCI--Focus--Tools--Clipping/Subsettingarcgis中的裁切,有好几个功能都是不改变影像大小,只改变指定范围外的象元像素值总结一下利用Erdas和Arcgis来随意图形分割影像图:影像图格式为tif随意图形格式随意(就当shape格式)一:合并影像图:由于影像图的分割需要,则要全部覆盖shape格式的边界。
分Erdas和Arcgis两种合并法:Erdas合并:①打开Erdas,再打开viewer窗口(注意:再打开图层时,要将raster option的no stretch和background transparent前打勾,这样图层就不会失真)。
②打开需要合并的图:files of type选择,选择对应的的图层③在窗口viewer—raster—mosaic images,弹出mosaic tool窗口④在窗口mosaic tool—process—run mosaic,弹出窗口⑤在窗口output file nam选择files of type为tif格式,存放路径自己选择,点击ok完成Arcgis合并: ①打开Arcgis(Arcmap), 加入要合并的图层②ArcToolBox—datamanagementtools—raster—mosaic或mosic to new rastevr然后按需求选择input raster 和 output raster还有名称。
[VIP专享]在ArcGIS、ERDAS下进行栅格影像裁剪
![[VIP专享]在ArcGIS、ERDAS下进行栅格影像裁剪](https://img.taocdn.com/s3/m/6ec34090cc175527072208d4.png)
43m1m“-”J520Gm01m24“492k-Z(1)g2L3-”3060@k%3-g“/1”7mD2%BJ/Tg0d1-ZP318¬-A_2"o70)Xc0?y258z6n”217 NE)
土地利用动态监测讲义
在 ArcGIS、ERDAS 下进行栅格影像裁剪
1、背景 在土地利用动态监测中,对阜新市新旧时期影像进行观测,需要裁剪出阜
新市区 TM 影像。
2、数据 辽宁省各市区 shp 文件,2014 年阜新地区 TM 影像
3、利用 shapefile 文件裁剪栅格影像方法 通过阜新市 shp 文件转换成 coverage 矢量文件,利用 coverage 文件制作
43m1m“-”J520Gm01m24“492k-Z(1)g2L3-”3060@k%3-g“/1”7mD2%BJ/Tg0d1-ZP318¬-A_2"o70)Xc0?y258z6n”217 NE)
土地利用动态监测讲义
7、利用 AOI 工具条上的 AOI 转换工具(带右箭头的工具),将此按钮选中单击, 线界转换为 AOI,单击 File—>Save—AOI Layer as,保存为 aoi 文件。
43m1m“-”J520Gm01m24“492k-Z(1)g2L3-”3060@k%3-g“/1”7mD2%BJ/Tg0d1-ZP318¬-A_2"o70)Xc0?y258z6n”21 中进行的波段组合。把几个波段的组合到一起来显示地物目标,比如 TM 的 5 4 3 波段组合显示的假彩色。在 Layer Selection and Stacking 窗口 中的 Input File 中添加影像,Output 中设置输出影像的路径和名称。
arcgis裁剪tif范围

arcgis裁剪tif范围英文版arcgis裁剪tif范围ArcGIS, a popular Geographic Information System (GIS) software, offers a wide range of tools for managing, analyzing, and visualizing spatial data. One such task that is frequently encountered in GIS analysis is clipping a raster dataset, such as a TIFF file, to a specific area of interest. This article aims to guide you through the process of clipping a TIFF file using ArcGIS.Step 1: Opening ArcGIS and Loading the DataLaunch ArcGIS Desktop and navigate to the "File" menu. Select "Add Data" and locate the TIFF file you wish to clip. Click "Add" to bring the raster layer into the map view.Step 2: Defining the Clipping AreaTo define the clipping area, you can use an existing feature such as a shapefile or a polygon drawn manually. If you have a shapefile representing the desired clipping area, simply add it tothe map view by following the same "Add Data" process. If you need to draw a polygon, switch to the "Editor" toolbar, select "Create Features," and then "Draw Polygon" from the dropdown menu. Draw the desired clipping area on the map.Step 3: Clipping the TIFFWith the clipping area defined, it's time to perform the clipping operation. Right-click on the TIFF layer in the "Layers" panel and select "Properties." Navigate to the "Raster" tab and click on the "Clip" button. A new window will appear where you can choose the clipping feature. Select the appropriate feature (either the shapefile or the manually drawn polygon) and click "OK."Step 4: Saving the Clipped TIFFAfter clipping, you will have a new raster layer representing the desired area. To save this clipped TIFF, right-click on the clipped layer and select "Data" > "Export Data." In the Export Data dialog box, choose the desired location and filename foryour clipped TIFF. Ensure that the format is set to TIFF and click "Save" to finalize the export process.ConclusionClipping a TIFF file in ArcGIS is a straightforward process that involves defining the clipping area and applying it to the raster dataset. This article has provided a step-by-step guide to accomplish this task efficiently, allowing users to extract relevant spatial data from their TIFF files for further analysis or visualization.中文版arcgis裁剪tif范围ArcGIS是一款流行的地理信息系统(GIS)软件,它提供了一系列用于管理、分析和可视化空间数据的工具。
arcgis 面积剪裁
arcgis 面积剪裁一、数据准备。
1. 确保你有要进行剪裁操作的两个数据集:一个是被剪裁的要素(例如一个较大的多边形图层代表一片区域),另一个是用于剪裁的要素(例如一个较小的多边形图层,其范围将用于剪裁上述较大的区域)。
二、使用ArcToolbox进行剪裁操作(以ArcMap为例)1. 打开ArcMap软件,加载要进行操作的两个图层(被剪裁层和剪裁层)。
2. 在ArcToolbox中找到“Analysis Tools”(分析工具) - “Extract”(提取) - “Clip”(剪裁)工具。
3. 在“Clip”工具的对话框中:- 将被剪裁的要素数据集指定为“Input Features”(输入要素)。
- 把用于剪裁的要素数据集设置为“Clip Features”(剪裁要素)。
- 为“Output Feature Class”(输出要素类)指定一个保存结果的路径和名称。
4. 点击“OK”按钮,ArcGIS将根据剪裁要素的范围对输入要素进行剪裁操作,最终得到的结果就是被剪裁要素在剪裁要素范围内的部分,并且其面积也相应地被剪裁到了指定范围内。
如果是在ArcGIS Pro中进行操作,步骤也较为相似:1. 打开ArcGIS Pro项目,添加要操作的两个图层。
2. 在“Analysis”(分析)选项卡中,找到“Extract”(提取)组中的“Clip”(剪裁)工具。
3. 在弹出的“Clip”对话框中:- 选择被剪裁的要素作为“Input Features”。
- 选择剪裁要素作为“Clip Features”。
- 设定输出要素类的位置和名称。
4. 点击“Run”(运行)按钮,即可完成面积剪裁操作。
arcgis裁剪影像的方法

arcgis裁剪影像的方法ArcGIS是一款功能强大的地理信息系统软件,其中一个重要的功能就是裁剪影像。
这个功能非常有用,特别是当你需要处理大量的地图数据时,而且要快速剖析不同区域的地图情况时。
在本文中,我们将详细介绍如何使用ArcGIS裁剪影像。
步骤 1:准备裁剪区域首先,我们需要确定裁剪区域,也就是决定我们想要从影像中裁剪哪个部分。
我们可以使用任何在ArcGIS中可用的图层、地图或者其他元素来确定裁剪区域,包括矢量图层(如多边形、线段等),栅格图像、DEM等。
步骤 2:创建一个裁剪图层接下来,我们需要创建一个裁剪图层,以便将裁剪区域与原始影像拼接起来。
可以使用任何图层类型作为裁剪图层。
首先,右击鼠标选择“新建数据集”,然后选择“地图document”或“地图样式模板”,并在“新建地图文档”对话框中指定地图名称、文件夹位置等属性。
步骤 3:裁剪影像在创建裁剪图层后,我们可以开始对影像进行裁剪操作了。
请根据以下步骤进行操作:1、选择“ArcToolbox”窗口中的“Data Management Tools”文件夹,然后单击“Raster”文件夹。
2、选择“Clip”工具并打开。
3、在“输入栅格”字段中输入要裁剪的栅格图像路径。
4、输入要用来裁剪原始影像的多边形或线段等几何图形的路径。
5、设定输出栅格路径和名称,然后在“Environment Settings”标签中设置“Processing Extents”和“Processing Resolution”等参数。
6、单击“OK”按钮,等待处理完毕。
在这个过程中,裁剪的结果将会被保存为新的栅格图像,并存储在指定的输出路径下。
步骤 4:查看裁剪效果裁剪完成后,我们可以通过对裁剪后的影像进行视觉检查,来确定裁剪效果是否符合要求。
我们可以将裁剪后的栅格图像和原始影像进行比较,检查分辨率、图像质量和颜色等方面是否有区别。
最后,尽管ArcGIS的使用需要一定的学习和实践,但是裁剪影像是一项非常有用的功能,可以让地图制作变得更为方便和高效。
arcgis分幅裁切流程

arcgis分幅裁切流程ArcGIS是一种功能强大的地理信息系统软件,可以用于处理和分析地理空间数据。
分幅裁切是ArcGIS的一个重要功能,可以将大范围的地理数据按照指定的分幅要求进行裁切,方便用户进行局部地理数据的查看和分析。
下面将介绍ArcGIS分幅裁切的具体流程。
一、数据准备在进行分幅裁切之前,需要准备好相应的地理数据。
一般来说,可以使用ArcGIS内置的地图数据,也可以导入自己的地理数据。
如果使用ArcGIS内置的地图数据,可以直接在软件中进行选择和加载。
如果使用自己的地理数据,需要先将数据导入ArcGIS中。
二、设置分幅要求在进行分幅裁切之前,需要先设置好分幅要求。
分幅要求包括分幅编号、分幅范围和分幅大小等信息。
可以根据具体需求设置不同的分幅要求。
三、创建分幅图层在ArcGIS中,可以使用分幅图层来表示分幅要求。
通过在地图中创建分幅图层,可以将分幅要求可视化,方便后续的裁切操作。
可以使用ArcGIS的绘图工具在地图中创建分幅图层,也可以导入已有的分幅图层。
四、裁切操作在设置好分幅要求和创建好分幅图层之后,可以进行分幅裁切操作了。
在ArcGIS中,可以使用裁切工具对地理数据进行裁切。
裁切工具可以根据分幅要求对地理数据进行裁切,并生成裁切后的地理数据。
五、输出结果裁切完成后,可以将裁切后的地理数据进行输出。
输出结果可以保存为不同的格式,如shapefile、geodatabase等。
可以选择输出全部裁切结果,也可以选择输出指定的裁切结果。
六、分幅整理在输出裁切结果之后,还可以对裁切结果进行分幅整理。
分幅整理包括对裁切结果进行编号、整理和标注等操作。
可以使用ArcGIS 的标注工具对裁切结果进行标注,方便后续的查看和使用。
七、结果展示可以将整理好的分幅结果进行展示。
在ArcGIS中,可以使用地图布局功能将分幅结果制作成地图,并添加相应的图例、比例尺等元素。
可以选择输出为图片或打印出来,以便于进行查看和分析。
arcgis裁剪影像tif流程英文版
arcgis裁剪影像tif流程英文版全文共3篇示例,供读者参考篇1ArcGIS is a powerful tool for processing and analyzing geographic information, including raster imagery such as TIFF files. One common task in GIS analysis is to clip or crop an image to a specific area of interest in order to reduce its size, focus on a particular region, or prepare it for further analysis. In this guide, we will walk through the process of clipping a TIFF image in ArcGIS.Step 1: Load the ImageThe first step is to load the TIFF image that you want to clip into ArcGIS. You can do this by dragging and dropping the file into ArcMap or by using the Add Data button to browse for the file on your computer.Step 2: Define the Clipping ExtentNext, you need to define the extent of the area you want to clip the image to. This can be done by using an existing shapefile, drawing a new polygon, or specifying the coordinates of the clipping extent. Make sure that the clipping extent covers thearea of interest and does not extend beyond the boundaries of the image.Step 3: Perform the ClipOnce you have defined the clipping extent, you can perform the clip operation by right-clicking on the image in the Table of Contents, selecting Data, and then Export Data. In the Export Raster Data dialog box, select the clipping extent as the Output Extent and choose a file format and location for the clipped image.Step 4: Verify the Clipped ImageAfter the clip operation is complete, you can verify the clipped image by adding it to ArcMap and comparing it to the original image. Make sure that the clipped image only shows the area within the clipping extent and that no data has been lost or distorted during the process.Step 5: Save the Clipped ImageFinally, save the clipped image to a new file on your computer so that you can use it for further analysis or share it with others. You can also apply any additional processing steps or analyses to the clipped image as needed.In conclusion, clipping a TIFF image in ArcGIS is a straightforward process that allows you to focus on specific areas of interest within a larger image. By following the steps outlined in this guide, you can efficiently crop and extract the information you need from your raster imagery for use in your GIS projects.篇2ArcGIS Clip Image TIFF ProcessIntroductionIn ArcGIS, image clipping is a common process used to extract a specific portion of an image, such as a satellite image or aerial photograph. The extracted portion can then be used for further analysis or visualization. In this tutorial, we will outline the process of clipping an image in TIFF format using ArcGIS software.Step 1: Prepare Your DataBefore clipping an image in ArcGIS, it is important to ensure that you have all the necessary data prepared. This includes the image that you wish to clip, as well as any additional data layers that may be needed for reference or analysis.Step 2: Add Your Image to ArcMapOpen ArcMap and add the image that you wish to clip to the map. To do this, go to the "Add Data" button on the toolbar and navigate to the location of the image file on your computer. Once you have selected the image file, click "Add" to add it to the map.Step 3: Open the Image Analysis WindowTo begin the clipping process, open the Image Analysis window in ArcMap. This can be done by going to the "Windows" menu and selecting "Image Analysis". This window provides a variety of tools for working with raster datasets, including the clip tool.Step 4: Set the Clipping ExtentIn the Image Analysis window, select the image that you wish to clip from the "Raster Layer" dropdown menu. Next, click on the "Clip" tool to open the Clip Raster dialog box. In this dialog box, you can set the clipping extent by either drawing a rectangle on the map or entering specific coordinates. Once you have defined the clipping extent, click "OK" to proceed.Step 5: Perform the Clipping OperationAfter setting the clipping extent, click on the "Clip" button in the Clip Raster dialog box to perform the clipping operation.ArcGIS will then process the image and generate a new clipped image based on the specified extent. The clipped image will be added to the map as a new layer.Step 6: Save the Clipped ImageOnce the clipping operation is complete, you can save the clipped image in TIFF format. Right-click on the clipped image layer in the Table of Contents and select "Data" > "Export Data". In the Export Raster Data dialog box, choose TIFF as the output format and specify a location to save the clipped image. Click "Save" to export the clipped image.ConclusionIn this tutorial, we have outlined the process of clipping an image in TIFF format using ArcGIS software. By following these steps, you can extract specific portions of an image for further analysis or visualization. Image clipping is a useful tool for working with raster datasets in ArcGIS, and can help to streamline your workflow when working with geospatial data.篇3ArcGIS is a powerful tool for processing and analyzing geospatial data, including satellite imagery. One common task in satellite image processing is clipping or cropping images to aspecific area of interest. In this tutorial, we will go through the process of clipping a raster image (in TIFF format) in ArcGIS.Step 1: Load the raster imageThe first step is to load the raster image that you want to clip. In ArcGIS, go to the Catalog panel and navigate to the location of your image file. Then drag and drop the image into your current map document.Step 2: Define the clipping boundaryNext, you need to define the area that you want to use as the clipping boundary. This can be a polygon feature or a shapefile that delineates the area of interest. You can create a new shapefile in ArcGIS by going to the "Editor" tab and selecting "Start Editing". Then draw a polygon that covers the area you want to clip.Step 3: Clip the imageOnce you have defined the clipping boundary, go to the “Data Management” toolbox in ArcToolbox and select the “Raster” toolset. Then choose the “Clip” tool. In the Clip tool dialog box, select the input raster image that you loaded in step 1 as the “Input Raster”. The n select the polygon feature or shapefile that you created in step 2 as the “Clipping Features”.Step 4: Specify the output location and nameIn the Clip tool dialog box, specify the output location where you want to save the clipped image. You can also specify a name for the output file. Make sure to select the appropriate raster format (TIFF in this case) for the output image.Step 5: Run the toolClick “OK” to run the Clip tool. ArcGIS will process the raster image and create a new clipped image based on the defined boundary. Once the tool has finished running, you will see the clipped image in your map document.Step 6: Verify the clipped imageTo verify that the image has been properly clipped, you can zoom in to the area of interest and compare it with the original image. Make sure that the boundaries of the clipped image match the defined clipping boundary.In conclusion, clipping a raster image in ArcGIS is a straightforward process that can be done using the Clip tool in the Data Management toolbox. By following the steps outlined in this tutorial, you can easily create a clipped image of a specific area of interest in your satellite imagery data.。
- 1、下载文档前请自行甄别文档内容的完整性,平台不提供额外的编辑、内容补充、找答案等附加服务。
- 2、"仅部分预览"的文档,不可在线预览部分如存在完整性等问题,可反馈申请退款(可完整预览的文档不适用该条件!)。
- 3、如文档侵犯您的权益,请联系客服反馈,我们会尽快为您处理(人工客服工作时间:9:00-18:30)。
怎么利用ARCGIS裁剪图像
可以根据
1、范围来采集clip(arctoolbox里面)。
矩形范围
2、好像也可以通过多边形裁剪,如果没有,程序肯定可以的
3、通过mosaic也可以
如何用shp在arcgis中裁剪
1、对矢量数据进行裁减:Arctoolbox中,spatial tool > extract>clip
在InputFeatures中选择被裁剪的图层,在ClipFeatures中选择裁剪形状
2、利用矩形对栅格数据裁剪:Arctoolbox中,data management>raster>clip
InputRaster中选择被裁剪的栅格数据,设定好矩形四个顶点即可
3、在Spatial Analyst Tools中提供了多种对栅格数据的提取方法,Arctoolbox中,Spatial Analyst Tools>extraction包括提取值到点,根据属性提取,用圆提取,用多边形提取,用掩模提取,用点提取,用矩形提取等,其中的用掩模提取功能可以让我们通过不规则边界来获取需要的栅格数据。
arcgis图层裁剪
首先在ArcCatlog 里创建一个shapefile得面,加载到arcmap里,同时也要
把你剪切的shapefile文件和长方形区域的shapefile文件也加载上,切忌这两个文件不能处于编辑状态,点击arctoolbox-analysis tools-extract-clip,在打开的窗口的第一个框里输入要剪切的文件,第二个框里输入长方形区域文件,点ok就好了。