22-硬件需求规格说明书
E22-400T30D 产品规格书说明书
E22-400T30D产品规格书SX1268433/470MHz1W LoRa无线模块第一章产品概述 (2)1.1产品简介 (2)1.2特点功能 (2)1.3应用场景 (2)第二章规格参数 (3)2.1极限参数 (3)2.2工作参数 (3)第三章机械尺寸与引脚定义 (4)第四章推荐连线图 (5)第五章功能详解 (6)5.1定点发射 (6)5.2广播发射 (6)5.3广播地址 (7)5.4监听地址 (7)5.5模块复位 (7)5.6AUX详解 (7)5.6.1串口数据输出指示 (7)5.6.2无线发射指示 (8)5.6.3模块正在配置过程中 (8)5.6.4注意事项 (8)第六章工作模式 (9)6.1模式切换 (9)6.2一般模式(模式0) (10)6.3WOR模式(模式1) (10)6.4配置模式(模式2) (10)6.5深度休眠模式(模式3) (10)第七章寄存器读写控制 (11)7.1指令格式 (11)7.2寄存器描述 (12)7.3出厂默认参数 (14)第八章中继组网模式使用 (14)第九章上位机配置说明 (15)第十章硬件设计 (16)第十一章常见问题 (17)11.1传输距离不理想 (17)11.2模块易损坏 (17)11.3误码率太高 (17)第十二章焊接作业指导 (18)12.1回流焊温度 (18)12.2回流焊曲线图 (19)第十三章相关型号 (19)第十四章天线指南 (20)14.1天线推荐 (20)第十五章批量包装方式 (21)第一章产品概述1.1产品简介E22-400T30D是全新一代的LoRa无线模块,基于SEMTECH公司SX1268射频芯片的无线串口模块(UART),具有多种传输方式,工作在(410.125~493.125MHz)频段(默认433.125MHz),LoRa扩频技术,TTL电平输出,兼容3.3V与5V的IO口电压。
E22-400T30D采用全新一代LoRa扩频技术,与传统SX1278方案相比,SX1268方案传输距离更远,速度更快,功耗更低,体积更小;支持空中唤醒、无线配置、载波监听、自动中继、通信密钥等功能,支持分包长度设定,可提供定制开发服务。
22 寸宽屏液晶显示器HW222 HW223 用戶手册
22寸宽屏液晶显示器HW222/HW223用戶手册用户说明书在操作显示器前请全部阅读此说明书,说明书应保留好,便于供将来参考用。
FCC B 类射频干扰声明经测试,本设备符合 FCC 规则第 15 部分对“B 类”数字设备的限制规定。
这些限制旨在提供合理的保护措施,以防该设备在住宅区安装时产生有害干扰。
本设备产生、使用并辐射射频能量,如果未遵照说明进行安装和使用,可能会对无线电通信产生干扰。
但也不能保证在特定的安装中不会产生干扰的问题。
如果本设备确实对无线电或电视接收造成干扰(可以通过开关设备来确定),建议用户采取以下一种或多种措施排除干扰:重新调整接收天线的方向或位置。
增大本设备与接收器的间距。
将设备电源连接到不同于接收器所连接到的电路的电源插座上。
咨询经销商或有经验的无线电/电视机技术人员以获取帮助。
本设备符合 FCC 规则第 15 部分的规定。
操作应符合以下两个条件:(1) 本设备不会造成有害干扰,并且(2) 本设备一定能够承受接收到的所有干扰,包括可能会造成意外操作的干扰。
加拿大本 B 类数字设备符合 Canadian Interference-Causing Equipment Regulations(加拿大设备引起干扰法规)的所有要求。
本设备符合电磁兼容性方面的 EMC 法令 89/336/EEC 的规定以及低压法令方面的73/23/EEC 和 93/68/EEC 规定。
电源插座应靠近设备并可以够到。
用户说明书Congratulations!The display you have just purchased carries the TCO’03Displays label. This means that your display is designed,manufactured and tested according to some of the strictestquality and environmental requirements in the world. This makesfor a high performance product, designed with the user in focusthat also minimizes the impact on our natural environment.Some of the features of the TCO’03 Display requirements:Ergonomics• Good visual ergonomics and image quality in order to improve the working environment for the user and to reduce sight and strain problems. Important parameters are luminance, contrast, resolution, reflectance, colour rendition and image stability.Energy• Energy-saving mode after a certain time – beneficial both for the user and the environment• Electrical safetyEmissions• Electromagnetic fields• Noise emissionsEcology• The product must be prepared for recycling and the manufacturer must have a certified environmental management system such as EMAS or ISO 14 001• Restrictions onchlorinated and brominated flame retardants and polymersheavy metals such as cadmium, mercury and lead.The requirements included in this label have been developed by TCO Development in cooperation with scientists, experts, users as well as manufacturers all over the world. Since the end of the 1980s TCO has been involved in influencing the development of IT equipment in a more user-friendly direction. Our labelling system started with displays in 1992 and is now requested by users and IT-manufacturers all over the world.For more information, please visit用户说明书回收信息我们,Hanns.G 极为重视环境保护战略,深信:通过在工业技术设备寿命结束时进行适当的处理和回收可以更好地保护我们的地球这些设备包含有可回收材料,可以将这些材料重新分解处理后用到新的产品中。
需求规格说明书SRS模板
需求规格说明书SRS模板瑞德小说网需求规格说明书版本变更记录版本号日期描述v1.0.0 2017年12月20日初次定档V1.0.1 2017年12月27日目标描述V1.0.22018年1月1日功能需求V1.0.32018年1月7日附件完善V1.0.42018年1月8日汇总归纳目录1.引言 (6)1.1目的 (6)1.2文档格式 (6)1.3 预期的读者和阅读建议 (7)1.4 项目范围 (8)1.5 参考文献 (8)2.需求概述 (8)2.1 项目目的 (8)2.2 项目功能 (9)2.3 用户类和特征 (9)2.4 运行环境 (10)2.5 设计和实现的限制 (10)2.6 假设和依赖 (11)3.系统功能需求 (12)3.1描述和优先级 (12)3.2 功能划分 (12)3.3 功能描述 (13)4.外部接口需求 (14)4.1 用户界面 (14)4.2 硬件接口 (15)4.2 软件接口 (15)4.3 故障处理 (15)5.其他非功能需求 (16)5.1 性能需求 (16)5.2 安全性需求 (16)5.4 软件质量属性 (17)5.5 用户文档 (17)6.分析模型 (18)6.1 系统流程图 (18)6.2 用例图 (18)6.3 ER图 (20)6.4 类图 (21)6.5 数据流程图 (21)7.验收说明 (24)附录一用户需求汇总 (25)附录二目标描述 (33)附录三场景描述 (42)附录四数据字典 (69)附录五用户手册 (74)附录六需求验证与需求管理的相关规范 (77)1.引言1.1目的该文档首先给出了整个系统的整体网络结构和功能结构的概貌,试图从总体架构上给出整个系统的轮廓,然后又对功能需求、性能需求和其它非功能性需求进行了详细的描述。
其中对功能需求的描述采用了UML的用例模型方式,主要描述了每一用例的基本事件流,若有备选事件流则描述,否则则省略。
而且还给出了非常直观的用例图。
《需求规格说明书》编写参考指南

《需求规格说明书》编写参考指南1.概述(Summary)本文档是进行项目策划、概要设计和详细设计的基础,也是软件企业测试部门进行内部验收测试的依据。
1.1 用户简介(User Synopsis)在本章节中要将用户的基本情况描述清楚,以便于分析人员划定系统范围,进行功能、进度、成本、性能等方面的平衡决策。
对于产品开发类项目,需要在此将该产品定义的用户群的特点描述清楚。
1.2 项目的目的与目标(Purpose and Aim of Project)项目的目的是对开发本系统的意图的总概括。
项目的目标是将目的细化后的具体描述。
项目目标应是明确的、可度量的、可以达到的, 项目的范围应能确保项目的目标可以达到。
对于项目的目标可以逐步细化,以便与系统的需求建立对应关系,检查系统的功能是否覆盖了系统的目标。
1.3 术语定义(Terms Glossary)将该需求规格说明书中的术语、缩写进行定义, 包括用户应用领域与计算机领域的术语与缩写等。
1.4 参考资料(References)说明该用户需求报告使用的参考资料,如:[1] 商务合同[2] 招标书[3] 用户领域的资料[4] 用户需求调查表[5] 用户需求报告[6] 参照的标准每一个文件、文献要有标题、或文件号,发布或发表日期以及出版单位。
1.5 相关文档(Related Documents)[1] 项目开发计划[2] 概要设计说明书[3] 详细设计说明书1.6 版本更新信息(V ersion Updated Record)版本更新记录格式,如表5-19所示。
表5-19 版本更新记录2.目标系统描述(System in Target)2.1 组织结构与职责(Organizing Framework and Function)将目标系统的组织结构逐层详细描述,建议采用树状的组织结构图进行表达,每个部门的职责也应进行简单的描述。
组织结构是用户企业业务流程与信息的载体,对分析人员理解企业的业务、确定系统范围很有帮助。
需求规格说明书-v1.0
在线考试需求规格说明书编写:xxx 日期:xxxx/x/xx审核:日期:批准:日期:受控状态:是发布版次:1.0 日期:xxxx/x/xx编号:目录1 引言 (1)1.1 编写目的 (1)1.2 项目背景 (1)1.3 编写说明 (1)1.4 术语定义 (1)1.5 参考资料 (2)1.6版本信息 (2)2 任务概述 (3)2.1 系统定义 (3)2.1.1 项目来源及背景 (3)2.1.2 项目要达到目标 (4)2.1.3 系统整体结构 (4)2.1.4 系统内容组成 (5)2.2 运行环境 (6)2.3 硬件环境 (6)2.4 开发环境 (7)2.4.1 服务器软件环境 (7)2.4.2 服务器硬件环境 (7)2.4.3 开发机器软件环境 (7)2.4.4 开发机器硬件环境 (8)3系统数据结构设计 (8)3.1逻辑结构设计要点 (8)3.2物理结构设计要点 (9)4 功能需求 (14)4.1 管理端子系统中 (14)4.1.1 考生信息管理基本事件流: (14)4.2 教师端子系统中 (14)4.3 学生端子系统中 (15)4.3.1 考试基本事件流: (15)4.3.2 查询成绩基本事件流: (16)4.3.3 修改个人资料基本事件流: (16)5 具体功能描述 (16)5.1 登陆功能 (16)5.2 用户信息管理功能 (17)5.3 题库信息管理功能 (17)5.4 课程管理功能 (18)5.5 试卷管理功能 (18)5.6 留言管理功能 (18)6 运行需求 (18)6.1运行控制 (18)6.2运行时间 (18)7 接口设计 (19)7.1 用户接口 (19)7.2 外部接口 (19)7.3 内部接口 (19)8 故障处理 (19)8.1补救措施 (20)在线考试系统规格说明书内部文档1 引言1.1 编写目的在分析阶段的工作结果是需求说明书,它通过需求分析,明确了解该项目的基本功能。
需求规格说明书(样例)

需求规格说明书目录第一章综述 (1)1.1 编制目的 (1)1.2 适用范围 (1)1.3 参考依据 (1)1.4 编制约束 (1)1.4.1 图元约束 (1)1.4.2 编码约束 (2)1.4.3 格式约束 (3)1.5 内容结构(可选) (4)1.6 导读说明 (4)第二章项目概述 (5)2.1 项目背景 (5)2.2 项目范围 (5)2.3 项目目标 (5)2.4 现状描述 (5)第三章需求总体分析 (6)3.1 功能体系设计 (6)3.1.1 功能结构 (6)3.1.2 功能分布 (7)3.2 整体业务流程(可选) (8)3.3 业务标准体系 (9)第四章功能性需求 (10)4.1 功能综述 (10)4.2 需求清单 (10)4.3 需求优先级(可选) (10)4.4 功能编码•功能项 (11)4.4.1 功能综述 (11)4.4.2 业务流程 (11)4.4.3 关系分析 (13)4.4.4 详细功能需求 (13)第五章非功能性需求 (17)5.1 软件质量属性需求 (17)5.1.1 运行期 (17)5.1.2 非运行期 (20)5.2 约束性需求 (21)5.2.1 基础架构 (21)5.2.2 标准规范 (21)5.2.3 集成要求 (21)5.2.4 其他约束 (21)第六章集成需求 (22)6.1 技术要求 (22)6.2 数据集成 (22)6.3 应用集成 (22)6.4 流程集成 (23)第七章尚需解决的问题 (24)7.1 问题总表 (25)7.2 问题处理 (25)附录I 业务对象 (26)第一章综述若采用分册编制方式组织,则本章与第二章、第三章单独成册,其它分册可略去本章、第二章和第三章内容。
1.1编制目的用简洁的语言描述编写这个文档的目的。
1.2适用范围本文档适用的范围。
1.3参考依据列举编写软件需求规格说明时所参考的资料或其它资源。
这可能包括且不限于:用户界面风格指导、合同、标准、系统需求规格说明、使用实例文档,或相关产品的软件需求规格说明。
E22-900M30S 产品规格书说明书

E22-900M30S产品规格书SX1262 868/915MHz 1W SPI LoRa无线模块第一章概述1.1 简介E22-900M30S是基于Semtech公司生产的全新一代LoRa TM射频芯片SX1262为核心自主研发的最大功率为1W并适用于868/915MHz贴片式LoRa TM无线模块,使用工业级高精度32MHz晶振。
由于采用原装进口的SX1268为模块核心,在原有基础上内置了功率放大器(PA)与低噪声放大器(LNA),使得最大发射功率达到1W的同时接收灵敏度也获得进一步的提升,在整体的通信稳定性上较没有功率放大器与低噪声放大器的产品大幅度提升。
与上一代LoRa TM收发器相比,抗干扰性能与通信距离得到了提升,进一步拉开了与FSK、GFSK调制方式的产品的差距。
该产品已获得FCC、CE、RoHS等国际权威认证报告,用户无需担忧其性能。
该产品可覆盖850~930MHz超宽适用频率范围并向下兼容SX1278、SX1276。
由于该模块是纯射频收发模块,需要使用MCU驱动或使用专用的SPI调试工具。
1.2 特点功能●与SX1276模块相比,SX1262模块具有功耗更低、速度更快、距离更远的显著优势;●理想条件下,通信距离可达12km;●内置PA+LNA,大幅度提升通信距离和通信稳定性;●最大发射功率1W,软件多级可调;●支持全球免许可ISM 868/915MHz频段;●LoRa TM模式下支持0.018k~62.5kbps的数据传输速率;●FSK模式下支持最高300kpbs的数据传输速率;●向下兼容SX1278/SX1276系列射频收发器;●FIFO容量大,支持256Byte数据缓存;●为支持密集网络推出的全新SF5扩频因子;●支持2.5~5.5V供电,大于5V供电均可保证最佳性能;●双天线可选(IPEX/邮票孔),便于用户二次开发,利于集成;1.3 应用场景●家庭安防报警及远程无钥匙进入;●智能家居以及工业传感器等;●无线报警安全系统;●楼宇自动化解决方案;●无线工业级遥控器;●医疗保健产品;●高级抄表架构(AMI);●汽车行业应用。
I22-1031触摸屏说明书
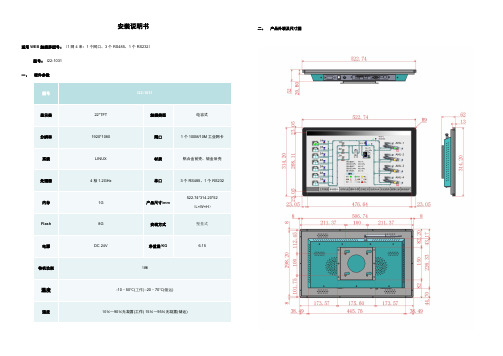
安装说明书二、产品外观及尺寸图适用WEB触摸屏型号:(1网4串:1个网口、3个RS485、1个RS232)Array型号:I22-1031一、硬件参数显示器22''TFT 触摸类型电容式分辨率1920*1080 网口1个100M/10M工业网卡系统LINUX 材质铝合金前壳、钣金后壳处理器4核1.2GHz 串口3个RS485、1个RS232522.74*314.20*52内存1G 产品尺寸/mm(L×W×H)Flash 8G 安装方式壁挂式电源DC 24V 净重量/KG 6.15待机功耗18W温度-10~50℃(工作) -20~70℃(储运)湿度10%~90%无凝露(工作) 15%~95%无凝露(储运)三、接线说明电源:DC 12~24V 注意:本产品供电请使用直流(DC)电源,部分交流(AC)电源产品可能对产品造成损坏,请谨慎使用。
网口:默认IP地址192.168.1.88全隔离RS232接口:(COM1)RXD(2) TXD(3) GND(5)全隔离RS485接口:(COM2, COM3,COM4) A接正(+)B接负(-)GND(接地线)四、登录触摸屏Web服务器网线接到Ethernet口下,在浏览器上输入URL:http://192.168.1.88/login.html登陆用户名:admin 密码:admin123456注:进入web服务器后下载X2View配置软件,具体操作请参考Help文件夹下的PDF文档。
五、触摸屏使用配置步骤(请参考X2View组态软件操作说明)●登录触摸屏Web服务器(网线接到网口,默认IP地址:192.168.1.88,登录用户名:admin 密码:admin123456)●登录迅饶官网/,在“服务与支持/下载中心”栏下载对应配置软件。
●使用X2View组态软件配置相应工程(具体操作请参考Help文件夹下的PDF文档)。
●工程上传到触摸屏。
Inspiron 22 3000 一体机 设置和规格说明书
Inspiron 22 3000 一体机设置和规格计算机型号: Inspiron 22-3275管制型号: W19B管制类型: W19B002注、小心和警告注: “注”表示帮助您更好地使用该产品的重要信息。
小心: “小心”表示可能会损坏硬件或导致数据丢失,并说明如何避免此类问题。
警告: “警告”表示可能会造成财产损失、人身伤害甚至死亡。
© 2017-2018 Dell Inc. 或其子公司。
保留所有权利Dell、EMC 和其他商标为 Dell Inc. 或其子公司的商标。
其他商标均为其各自所有者的商标。
2018-02Rev. A01目录设置您的计算机 (5)设置画架式支架 (8)设置座式支架 (9)创建适用于 Windows 的 USB 恢复驱动器 (11)视图 (12)正面 (12)左 (13)背面 (14)背面板 (15)底部 (15)倾斜 (16)可伸缩摄像头 (18)规格 (19)系统信息 (19)计算机型号 (19)尺寸和重量: (19)操作系统 (20)内存 (20)端口和接口 (20)通信 (21)3无线 (21)音频 (21)存储时 (22)介质卡读取器 (22)摄像头 (22)电源适配器 (22)显示器 (23)视频 (23)计算机环境 (24)获取帮助和联系 Dell (25)自助资源 (25)联系 Dell (26)4设置您的计算机1 设置画架式支架或座式支架。
2 连接键盘和鼠标。
注: 有关设置说明,请参阅键盘和鼠标随附的说明文件。
53 连接电源适配器。
警告: 穿过支架上的布线导向器布放电源适配器电缆,以免支架移至不同的方向时潜在的电源适配器损坏并避免系统意外关机。
画架式支架座式支架64 按下电源按钮。
5 完成操作系统设置。
对于 Ubuntu:按照屏幕上的说明完成设置。
有关配置 Ubuntu 安装的更多信息,请参阅知识库文章SLN151664,网址:/support。
22硬件需求规格说明书
项目名称硬件需求规格说明书版本号:拟制人:日期:审核人:日期:批准人:日期:宇龙计算机通信科技有限公司(限于公司员工内部使用)修订记录*A -增加 M -修改 D -删除目录1 引言 .................................................................................................................................... 错误!未定义书签。
目的 .................................................................................................................... 错误!未定义书签。
内容 .................................................................................................................... 错误!未定义书签。
参考资料 ............................................................................................................ 错误!未定义书签。
2 概述 .................................................................................................................................... 错误!未定义书签。
产品描述 ............................................................................................................ 错误!未定义书签。
软件需求工程_金陵科技学院中国大学mooc课后章节答案期末考试题库2023年

软件需求工程_金陵科技学院中国大学mooc课后章节答案期末考试题库2023年1.软件需求规格说明文档结束审查的标准有()。
参考答案:以上都可能是。
2.后向跟踪是指需求被定义到()之后的演化过程。
参考答案:软件需求规格说明书3.如果用户新增需求或变更需求,正确的做法是()参考答案:灵活处理需求4.需求开发阶段包括需求获取、需求分析、需求规格说明和()四个具体的活动。
参考答案:需求验证5.已经通过正式评审和批准的规格说明或产品,可作为进一步开发的基础,只有通过正式的变更控制过程才能修改的是()参考答案:需求基线6.在实际的项目开发中,人们总是希望使用自动工具来执行需求变更控制过程。
下列描述中()不是这类工具所具有的功能。
参考答案:定义变更控制计划,并指导设计人员按照所制定的计划实施变更。
7.原型可以说是一个()。
参考答案:演示系统8.性能需求、质量属性、约束、接口属于()参考答案:非功能性需求9.需求评审是()中常用的一种方法。
参考答案:需求验证10.下列描述中,属于需求基线的内容的是()参考答案:标识符、版本号、源头11.文档审查是()中常用的一种方法。
参考答案:需求获取12.需求评审的困难有哪些()。
参考答案:以上都是13.在验证过程中发现的问题应及时修正,常见的问题修正方法有()。
参考答案:以上都是14.需求验证的目的()。
参考答案:保证需求及其文档的正确性,即需求正确反映了用户的真实意图15.需求规格说明的目的()。
参考答案:将完整、一致的需求与能够满足需求的软件行为以文档的形式明确的固定下来16.需求分析的目的()。
参考答案:保证需求的完整性和一致性17.需求获取的目的()。
参考答案:从项目的战略规划开始建立最初的原始需求18.需求确认指()。
参考答案:确认每一条需求都是符合用户的真实意愿。
19.以下对需求验证的过程说法正确的是()。
参考答案:需求验证的过程,就是在软件需求规格说明文档完成后,对文档采用相应的验证方法进行验证。
PDB220-22 双向电源模块说明书

有
故障清除后自恢复
故障清除后 5s 后自恢复
-20℃ ~+45℃满足模块完全性能工作;45℃ ~+70℃降额
温度:-20℃ ~+85℃;湿度:10~95%RH,无冷凝
CAN 通讯,支持在线升级
支持
蓝灯:正常;红灯:异常
螺钉规格:M4;最大扭矩:1.5N.m
螺钉规格:M6;最大扭矩:3.0N.m
3.96MM 端子
说明:以上未特别注明的测试条件的指标,均默认为: 230Vac&25℃;②低压侧电压,也可根据客户需求调整至:14Vdc~16Vdc
△! 温馨提示:低压直流侧电压应小于 25Vdc,避免过压致使直流侧输出固态电容爆裂。
2/2
版权所有@深圳市普德新星电源技术有限公司,本手册内容如有更改恕不另行通知 !
效率
整流效率 逆变效率
电压范围
交流参数
(整流输入& 逆变输出)
电压频率 最大电流 电流谐波(THDi)
功率因素
整流输出电压
电压
逆变输入电压 稳压精度
工频纹波
电流
整流输出电流 逆变输入电流
开机时间
开机过冲
启动冲击电流
正反向切换速度
直流短路保护
直流过功率保护
直流过压保护
交流过欠压/过欠频及孤岛保护
过温保护
同时,解决了风扇噪声大的痛点,属于行业同系列最低噪的产品。
产品特点
整流‐逆变能量双向流动 正反方向高效率 正反方向无缝切换 超强过载能力 产品轻量化,超低噪音 完善的故障保护功能 支持 BootLoader 在线升级,具备以太网 升级和智能在线故障分析功能 良好的电磁兼容性,满足 EN55032 ClassA 标准 可通过 UL/TUV/CE/CCC 认证
需求规格说明书(面向对象)

XX系统
需求规格说明书编写人:
提交时间:
目录
1.任务概述1
1.1系统简介1
1.2运行环境1
1.3条件与限制 1 2.系统功能需求1
2.1系统工作流程分析1 2.2 系统用例分析 1
2.3 系统处理功能分析 1 3.性能需求2
4.其它需求2
1.任务概述
1.1系统简介
对准备开发的系统进行简要介绍。
1.2运行环境
操作系统:Microsoft Windows 2000 Advanced Server
支持环境:IIS 5.0
数据库:Microsoft SQL Server 2000
1.3条件与限制
支持运行环境即可,在Windows下基本没限制。
2.系统功能需求
2.1系统工作流程分析
(重点,必须有)
用系统流程图
2.2 系统用例分析
(重点,必须有)
用用例图说明
2.3 系统处理功能分析
(重点,必须有)
对用例图中的每个用例的处理过程用顺序图进行分析。
3.性能需求
4.其它需求
【如可使用性、安全保密、可维护性、可移植性等。
】。
七彩虹 C.H61K V22 C.H61U V22 主板 说明书

C.H61K V22 C.H61U V22C.H61U V22/C.H61K V22目录第一章简介 (1)第二章硬件安装 (6)第三章驱动程序安装说明 (23)第四章BIOS设置 (25)4-1进入BIOS主界面 (25)4-2 BIOS主界面 (28)4-3系统信息 (System Information) (29)4-4高级BIOS设置 (Advanced Settings) (30)4-5 Chipset(芯片组设置) (34)4-6 启动配置特性 (Boot Settings) (37)4-7设定管理员/用户密码Security Settings (38)4-8退出选项(Exit Options) (45)4-9超频设置(C.Oclock) (40)第五章附录 (47)版权本手册版权属于世和资讯公司所有,未经本公司书面许可,任何人不得对此说明书和其中所包含的任何资料进行复制、拷贝或翻译成其它语言。
声明本用户手册没有任何型式的担保、立场表达或其它暗示。
若有任何因本用户手册或其所提到之产品的所有信息,所引起直接或间接的数据流失、利益损失或事业终止,七彩虹及其所属员工恕不为其担负任何责任。
除此之外,本用户手册所提到的产品规格及信息仅供参考,内容亦会随时升级,恕不另行通知。
本用户手册的所有部分,包括硬体及软体,若有任何错误,七彩虹没有义务为其担负任何责任。
商标版权本手册使用的所有商标均属于该商标的持有者所有。
AMD, Athlon , Athlon XP, Thoroughbred 和Duron™是Advanced Micro Devices的注册商标。
Intel®和Pentium®是Intel Corporation的注册商标。
PS/2 和OS® 2是International Business Machines Corporation的注册商标。
Windows® 95/98/2000/NT/XP/Vista是Microsoft Corporation的注册商标。
需求规格说明书模板4种版本.pdf

需求规格说明书模板4种版本
需求规格说明书(ISO标准版)
编者说明:
当需求调查、分析工作告一段落时,你就需要将这些需求进行规格化描述,整理成文,即软件需求规格说明书,也就是SRS。
这是在软件项目过程中最有价值的一个文档。
ISO所提供的标准虽然已经时间久远,但还是颇具参考价值的。
1.引言
1.1编写的目的
[说明编写这份需求说明书的目的,指出预期的读者。
]
1.2背景
a. 待开发的系统的名称;
b. 本项目的任务提出者、开发者、用户;
c. 该系统同其他系统或其他机构的基
本的相互来往关系。
1.3定义
[列出本文件中用到的专门术语的定义
和外文首字母组词的原词组。
]。
2021年Hikvision 22英寸显示器用户手册说明书

22-inch MonitorUser Manual 0Legal Information©2021 Hangzhou Hikvision Digital Technology Co., Ltd. All rights reserved.About this ManualThe Manual includes instructions for using and managing the Product. Pictures, charts, images and all other information hereinafter are for description and explanation only. The information contained in the Manual is subject to change, without notice, due to firmware updates or other reasons. Please find the latest version of this Manual at the Hikvision website (https:///).Please use this Manual with the guidance and assistance of professionals trained in supporting the Product.Trademarksand other Hikvision’s trademarks and logos are the properties of Hikvision in various jurisdictions. Other trademarks and logos mentioned are the properties of their respective owners.: The terms HDMI and HDMI High-Definition Multimedia Interface, and the HDMI Logo are trademarks or registered trademarks of HDMI Licensing Administrator, Inc. in the United States and other countries.DisclaimerTO THE MAXIMUM EXTENT PERMITTED BY APPLICABLE LAW, THIS MANUAL AND THE PRODUCT DESCRIBED, WITH ITS HARDWARE, SOFTWARE AND FIRMWARE, ARE PROVIDED “AS IS” AND “WITH ALL FAULTS AND ERRORS”. HIKVISION MAKES NO WARRANTIES, EXPRESS OR IMPLIED, INCLUDING WITHOUT LIMITATION, MERCHANTABILITY, SATISFACTORY QUALITY, OR FITNESS FOR A PARTICULAR PURPOSE. THE USE OF THE PRODUCT BY YOU IS AT YOUR OWN RISK. IN NO EVENT WILL HIKVISION BE LIABLE TO YOU FOR ANY SPECIAL, CONSEQUENTIAL, INCIDENTAL, OR INDIRECT DAMAGES, INCLUDING, AMONG OTHERS, DAMAGES FOR LOSS OF BUSINESS PROFITS, BUSINESS INTERRUPTION, OR LOSS OF DATA, CORRUPTION OF SYSTEMS, OR LOSS OF DOCUMENTATION, WHETHER BASED ON BREACH OF CONTRACT, TORT (INCLUDING NEGLIGENCE), PRODUCT LIABILITY, OR OTHERWISE, IN CONNECTION WITH THE USE OF THE PRODUCT, EVEN IF HIKVISION HAS BEEN ADVISED OF THE POSSIBILITY OF SUCH DAMAGES OR LOSS.YOU ACKNOWLEDGE THAT THE NATURE OF THE INTERNET PROVIDES FOR INHERENT SECURITY RISKS, AND HIKVISION SHALL NOT TAKE ANY RESPONSIBILITIES FOR ABNORMAL OPERATION, PRIVACY LEAKAGE OR OTHER DAMAGES RESULTING FROM CYBER-ATTACK, HACKER ATTACK, VIRUS INFECTION, OR OTHER INTERNET SECURITY RISKS; HOWEVER, HIKVISION WILL PROVIDE TIMELY TECHNICAL SUPPORT IF REQUIRED.YOU AGREE TO USE THIS PRODUCT IN COMPLIANCE WITH ALL APPLICABLE LAWS, AND YOU ARE SOLELY RESPONSIBLE FOR ENSURING THAT YOUR USE CONFORMS TO THE APPLICABLE LAW. ESPECIALLY, YOU ARE RESPONSIBLE, FOR USING THIS PRODUCT IN A MANNER THAT DOES NOT INFRINGE ON THE RIGHTS OF THIRD PARTIES, INCLUDING WITHOUT LIMITATION, RIGHTS OF PUBLICITY, INTELLECTUAL PROPERTY RIGHTS, OR DATA PROTECTION AND OTHER PRIVACY RIGHTS. YOU SHALL NOT USE THIS PRODUCT FOR ANY PROHIBITED END-USES, INCLUDING THE DEVELOPMENT OR PRODUCTION OF WEAPONS OF MASS DESTRUCTION, THE DEVELOPMENT OR PRODUCTION OF CHEMICAL OR BIOLOGICAL WEAPONS, ANY ACTIVITIES IN THE CONTEXT RELATED TO ANY NUCLEAR EXPLOSIVE OR UNSAFE NUCLEAR FUEL-CYCLE, OR IN SUPPORT OF HUMAN RIGHTS ABUSES.IN THE EVENT OF ANY CONFLICTS BETWEEN THIS MANUAL AND THE APPLICABLE LAW, THE LATER PREVAILS.Regulatory InformationFCC InformationPlease take attention that changes or modification not expressly approved by the party responsible for compliance could void the user’s authority to operate the equipment.FCC compliance: This equipment has been tested and found to comply with the limits for a Class B digital device, pursuant to part 15 of the FCC Rules. These limits are designed to providereasonable protection against harmful interference in a residential installation. This equipment generates, uses and can radiate radio frequency energy and, if not installed and used in accordance with the instructions, may cause harmful interference to radio communications. However, there is no guarantee that interference will not occur in a particular installation. If this equipment does cause harmful interference to radio or television reception, which can be determined by turning the equipment off and on, the user is encouraged to try to correct the interference by one or more of the following measures:— Reorient or relocate the receiving antenna.— Increase the separation between the equipment and receiver.— Connect the equipment into an outlet on a circuit different from that to which the receiver isconnected.— Consult the dealer or an experienced radio/TV technician for help.This equipment should be installed and operated with a minimum distance 20cm between the radiator and your body.FCC ConditionsThis device complies with part 15 of the FCC Rules. Operation is subject to the following two conditions:1. This device may not cause harmful interference.2. This device must accept any interference received, including interference that may causeundesired operation.EU Conformity StatementThis product and - if applicable - the supplied accessories too are marked with "CE"and comply therefore with the applicable harmonized European standards listedunder the EMC Directive 2014/30/EU, the LVD Directive 2014/35/EU, the RoHSDirective 2011/65/EU.2012/19/EU (WEEE directive): Products marked with this symbol cannot be disposedof as unsorted municipal waste in the European Union. For proper recycling, returnthis product to your local supplier upon the purchase of equivalent new equipment,or dispose of it at designated collection points. For more information see:2006/66/EC (battery directive): This product contains a battery that cannot bedisposed of as unsorted municipal waste in the European Union. See the productdocumentation for specific battery information. The battery is marked with thissymbol, which may include lettering to indicate cadmium (Cd), lead (Pb), or mercury (Hg). For proper recycling, return the battery to your supplier or to a designatedcollection point. For more information see:Applicable ModelsThis manual is applicable to 22-inch monitor.Symbol ConventionsThe symbols that may be found in this document are defined as follows.Safety Instructions●In the use of the product, you must be in strict compliance with the electrical safetyregulations of the nation and region.●The equipment shall not be exposed to dripping or splashing and that no objects filled withliquids, such as vases, shall be placed on the equipment.●CAUTION: To reduce the risk of fire, replace only with the same type and rating of fuse.●The equipment must be connected to an earthed mains socket-outlet.●Ensure correct wiring of the terminals for connection to an AC mains supply.●The equipment has been designed, when required, modified for connection to an IT powerdistribution system.●Do not ingest battery. Chemical burn hazard!●This product contains a coin/button cell battery. If the coin/button cell battery is swallowed, itcan cause severe internal burns in just 2 hours and can lead to death.●Keep new and used batteries away from children.●If the battery compartment does not close securely, stop using the product and keep it awayfrom children.●If you think batteries might have been swallowed or placed inside any part of the body, seekimmediate medical attention.●CAUTION: Risk of explosion if the battery is replaced by an incorrect type.●Improper replacement of the battery with an incorrect type may defeat a safeguard (forexample, in the case of some lithium battery types).●Do not dispose of the battery into fire or a hot oven, or mechanically crush or cut the battery,which may result in an explosion.●Do not leave the battery in an extremely high temperature surrounding environment, whichmay result in an explosion or the leakage of flammable liquid or gas.●Do not subject the battery to extremely low air pressure, which may result in an explosion orthe leakage of flammable liquid or gas.●Dispose of used batteries according to the instructions.●identifies the battery holder itself and identifies the positioning of the cell(s) inside thebattery holder.●+ identifies the positive terminal(s) of equipment which is used with, or generates directcurrent. - identifies the negative terminal(s) of equipment which is used with, or generates direct current.●No naked flame sources, such as lighted candles, should be placed on the equipment.●The ventilation should not be impeded by covering the ventilation openings with items, suchas newspapers, tablecloths, curtains, etc. The openings shall never be blocked by placing the equipment on a bed, sofa, rug or other similar surface.●The USB port of the equipment is used for connecting to a mouse, a keyboard, or a USB flashdrive only.●NEVER place items that might tempt children to climb, such as toys and remote controls, onthe top of the equipment.●Install the equipment according to the instructions in this manual.●To prevent injury, this equipment must be securely attached to the floor/wall in accordancewith the installation instructions.●Keep vertical when moving or using the equipment.●CAUTION: This equipment is for use only with specified bracket (Hikvision's monitor stand).Use with other (carts, stands, or carriers) may result in instability causing injury.●To prevent possible hearing damage, do not listen at high volume levels for long periods.Chapter 1 IntroductionKey Features●8-bit/10-bit dual channel LVDS (1920×1080) HD display.●3D digital comb filter and 3D noise reduction technology.●Hi-Fi color OSD and user-friendly menu for operation.●Programmable 12-bit RGB gamma correction.●Complete factory setting mode.● 1 × HDMI 1.4 input interface, and HDCP 1.1 available.●Software spread spectrum technology reduces EMI radiation.The specific features may vary with models. Refer to Rear Panel Interface for details.Packing ListPacking ListName QuantityMonitor 1Power cable (AC device)/Power adapter (DC device) 1HDMI cable (Optional) 1Base set 1User manual 1Quick start guide 1Power OnAC DeviceConnect the device to an earthed mains socket-outlet, and press the power button.●Power supply: 220 VAC~, 50/60 Hz.●Power off the device and disconnect the plug if it is not in use for a long time.●The device cannot be connected to DC power supply.DC DeviceConnect the power adapter to the device, and plug the other end of the adapter to an earthed mains socket-outlet, then press the power button.●Power supply for the adapter: 12 VDC, 2 A.●Power off the device and disconnect the plug if it is not in use for a long time.Chapter 2 Rear Panel InterfaceThe panel appearances and interfaces vary with different models. The devices can be classified as follows.Type AInterface of Type AType BInterface of Type BType CInterface of Type CInterface DescriptionInterface Description Interface DescriptionAUDIO Audio input interface HDMI HDMI digital signal inputinterfaceVGA VGA analog signal inputPOWER AC power supplyinterfaceDC 12 V Power adapter interface -- --Audio input interface is only available to type A, and power adapter interface to type C.Chapter 3 Panel ButtonsThe buttons at the bottom-right corner of the front panel are shown as follows.Panel ButtonsButton DescriptionButton DescriptionPower On/Off●Menu page, source page, and volume page:Exit the current page.●Other pages: Display main menu page.●Display the current input source.●All the menu pages: OK●Second-level page: add/reduce●Volume page: volume up/down●Display all the input sources.●All the menu pages: Switch to next one.Manual Name • Manual Type5 Chapter 4 Basic OperationThe display interfaces vary with different models. The figures followed are for illustration purpose only.Switch Signal SourceConnect the device to mains socket-outlet and signal source, and power the device on.Press to enter the signal source page.Signal SourcePress to switch input sources, and press to confirm.Menu OperationBasic Operation Operation Description Enter main menu pagePress . Check first-level menuOn the main menu page, press to switch. Check parametersOn the first-level menu page, press to enter and check different parameters. Configure parameters ● Press or to adjust the value of theselected parameter, and press toconfirm.● Press to switch to other parameters.Return to the upper menu P resson any pages.You can switch picture modes and adjust image parameters including contrast, brightness, color, sharpness, and hue. The adjustable parameters will change when you switch from a picture mode to another.Image SettingsImage ParametersParameter DescriptionPicture Mode●Standard: Suitable for a normal environment. It is set as thedefault picture mode.●Soft: Suitable for a dark room.●Dynamic: Suitable for a bright room.●Custom: Set the brightness, contrast, color, sharpness or hue toadjust display effect.Brightness Ranges from 0 to 100. The higher the value is, the brighter thedisplay will be.Contrast Ranges from 0 to 100. The higher the value is, the clearer the imagewill beColor Ranges from 0 to 100. The higher the value is, the more colorfulthe image will be.Sharpness Ranges from 0 to 30. Rise the value up to make the image morevivid.Hue Ranges from 0 to 100. It determines the contrast degree betweenthe bright and dark.Eye Protect Off/Weak/Medium/Strong●Under custom mode, brightness, contrast, color, sharpness, and hue are adjustable.●Under other modes, only brightness and contrast are adjustable.●Parameters in white bar are adjustable. If the parameter bar is gray, it indicates that theparameter is not adjustable under the current mode or input source.●Eye protection mode is only available for type C.When you select VGA as the input source, you can adjust VGA parameters to make the picture show in the correct position.VGA SettingsVGA ParametersParameter DescriptionManual Adjust Adjust. Press or to enable or disable.H-Position Ranges from 0 to 100.V-Position Ranges from 0 to 100.Phase Ranges from 0 to 100.Clock Ranges from 0 to 100.Auto Adjust Off/On●Adjusting the value of H-Position and V-Position will change the image position in a largeextent, while Phase and Clock in a slight extent.●Change the value of Clock will stretch or narrow the image.●If Auto Adjust is enabled, the related parameters will self-adjust under the following 3circumstances: The device is restarted, a VGA input source is accessed, and the inputsource is switched to VGA.●VGA parameters cannot be changed when Auto Adjust is disabled.You can change the settings of language, screen saver, volume, and other parameters on the page of system setting. Volume settings is only available to part of the models.System SettingsSystem ParametersParameter DescriptionVolume Ranges from 0 to 100.Mute Off/OnLanguage EnglishUser Restore No/YesScreen Saver Black Screen/Blue ScreenAuto Sleep Off/1 Min/5 Min/10 Min/30 Min/1 HScaling Mode16:9/4:3Volume settings and mute switch are only supported for type A.OSD parameters concern the display effect of OSD, such as position, transparency, and rotation.OSD SettingsOSD ParametersParameter DescriptionHorizontal Ranges from 0 to 100.Vertical Ranges from 0 to 100.Transparency Off/Weak/Medium/StrongOSD Time Out Off/5 S/15 S/30 S/1 MinOSD Rotation Off/OnIf OSD Rotation is enable, the OSD will rotate 270 degrees clockwise, and the point (0, 0) is at the bottom-left corner.VersionUD23569B。
安诺达DT22-M产品说明书

The DT22-M is a PoE enabled Dante I/O unit. It can be used to complement Allen & Heath digital mixing systems, or any other system on a Dante network. It provides 2 mic/line preamps with local gain and phantom power control, and 2 line level outputs. It connects to the Dante network over a single Cat cable.The DT22-M comes complete with brackets for surface mounting.Visit the Audinate website to learn more about Dante, and download Dante Controller to route audio and configure devices on a Dante network: https:///Mic/Line Inputs Balanced Phoenix, +48V PP Analogue Gain 0 to +55dBLine Inputs -20dB PADMaximum Input Level +30dBu (line in)Input Impedance >4kΩ (mic), >10kΩ (line)Line Outputs Balanced PhoenixOutput Impedance <75ΩNominal Output +4dBu = 0dB meter reading Maximum Output +22dBuDante 48kHz/96kHzPower andTemperatureDC Input +12V DC 1.25APower Consumption 10W maxOperating Temperature Range 0°C to 40°C (32°F to 104°F)PoE Requirements 802.3af 15WThe surface mounting ears allow the device to be mounted on top or under a surface, desktop or podium, or vertically on a wall or partition. They can be installed to face either the top or bottom of the unit.Position the ears centrally on each side of the unit, aligned with the threaded holes on the insert bars, facing either up or down as required, and secure them using the 4x M3x6mm screws provided in the package.Up to two units can be rack-mounted in a single 1Urack space with the optional rack kit DT-RK19.Dimensions andWeightWidth x Depth x Height x WeightDT22 130 x 100 x 43 mm, 0.5kg(5.1” x 3.9” x 1.7”, 1lbs)② Output Balanced Phoenix line outputs.③ GainRotary controls for the preamp analogue gain, 0dB to 55dB. Use a Philips screwdriver to adjustthe gain.④ PP +48V Phantom Power and Mic/Line switches for Input 1 and 2.① Ethernet switch or PoE injector to power the unit via this port. ② Power LED indicator and Ready indicator. Ready lights up when the unit is successfully booted andready to pass audio.③ Factory Reset Hold down the recessed switch while powering up. After at least 10 seconds,remove power then power up again normally to reset the network settings and name. This will delete any static IP address and revert to factory default (DHCP / zero-conf).④ DC inputDC 12V connector.。
需求分析规格说明书(PRD)模板-详细1.0

XXX需求分析说明书编写人:核准人:日期:_____年______月_______日序号版本号修订日期修订概述修订人审核人批准人1.V1.02.阅读对象填写说明:罗列本文档对应的阅读对象本文档的阅读对象包括:客户(客户方项目负责人及项目成员) PMOPM、PD、PO项目组成员目录阅读对象 (3)1需求概述 (7)1.1 需求背景(必选) (7)1.2 项目目标(必选) (7)1.3 设计原则(可选) (7)2业务需求 (8)2.1 业务流程图(必选) (8)2.2 用户范围(必选) (8)2.3 术语说明(可选) (9)2.4 应用标准(可选) (11)2.5 需求简述(必选) (11)2.5.1流程及说明 (11)2.5.2交互 (14)2.5.3接收订单[20. 本地退货任务单下传] (15)2.5.4订单初始化 (15)2.5.5一阶波次 .................................................................................................. 错误!未定义书签。
2.5.6二阶波次 .................................................................................................. 错误!未定义书签。
2.5.7任务指派[30. 任务分配] ..................................................................... 错误!未定义书签。
2.5.9任务领取[40. 拣货下架] ..................................................................... 错误!未定义书签。
2.5.10拣货[40. 拣货下架] ............................................................................. 错误!未定义书签。
产品硬件开发需求说明书模版

XXXX产品硬件开发需求说明书XXXXXXXXXXxxxxxxxxxx:XXXXXXX :XXXXXXXXX :XXXXX版本历史1.引言 (5)1.1.文档目的 (5)1.2.参考资料 (5)2.产品说明 (5)2.1.产品机型 (5)2.2.配置信息 (5)2.3.产品应用环境 (6)3.产品模块需求 (6)3.1.模块详细需求表 (6)3.2.功能模块详细需求说明 (7)3.2.1.CPU (7)3.2.2.NOR FLASH (8)3.2.3.NAND FLASH (8)3.2.4.SDRAM (9)3.2.5.DDR RAM (9)B (10)3.2.7.SD 卡 (10)3.2.8.LCD (10)3.2.9.客显 (11)3.2.10.磁条卡 (11)3.2.11.IC 卡 (12)3.2.12.SAM 卡 (12)3.2.13.RF 读卡 (13)3.2.14.热敏打印机 (14)3.2.15.针式打印机 (14)3.2.16.电阻式触摸屏 (15)3.2.17.电容式触摸屏 (16)3.2.18.按键 (16)3.2.19.蜂鸣器 (17)3.2.20.喇叭 (17)3.2.21.MODEM (17)3.2.22.TCP/IP (17)3.2.23.GPRS (18)3.2.24.CDMA (18)3.2.25.WCDMA (18)3.2.26.EVDO (18)3.2.27.WIFI (19)3.2.28.RTC (19)3.2.29.电池 (19)3.2.30.充电 (20)3.2.31.电源管理 (20)3.2.32.适配器 (20)3.2.33.串口 (21)3.2.34.多功能口 (21)3.2.35.座机口 (22)4.认证及安规防护需求 (22)4.1.XXXXXXX0 (22)4.2.XXXXXXX # (22)4.3.QQQQQ.0 (22)4.4.APCA (22)4.5.VVVVVL1 (22)4.6.AAAAL1 (23)C (23)4.8.FFF (23)4.9.防爆认证 (23)5.可靠性需求 (23)5.1.需求说明 (23)5.2.约束条件 (24)5.3.设计原那么 (24)6.可生产型/测试性需求 (26)6.1.可生产性需求 (26)6.1.1.需求说明 (26)6.1.2.约束条件 (26)6.1.3.可实现的技术方案 (26)6.2.可测试性需求 (27)6.2.1.需求说明 (27)6.2.2.约束条件 (27)6.2.3.可实现的技术方案 (27)1.引言LL文档目的本文档为产品开发入口,根据产品部提供的《产品需求说明书》及《市场需求说明书》,通过研发技术识别转化成研发内部硬件的需求文档。
- 1、下载文档前请自行甄别文档内容的完整性,平台不提供额外的编辑、内容补充、找答案等附加服务。
- 2、"仅部分预览"的文档,不可在线预览部分如存在完整性等问题,可反馈申请退款(可完整预览的文档不适用该条件!)。
- 3、如文档侵犯您的权益,请联系客服反馈,我们会尽快为您处理(人工客服工作时间:9:00-18:30)。
文件编号: R1-0220
项目名称
硬件需求规格说明书
版本号:
拟制人: 日期: 审核人: 日期: 批准人: 日期:
宇龙计算机通信科技有限公司
Copyright (c) YULONG.
宇龙计算机通信科技(深圳)有限公司 版权所有 本文档资料属本公司的资产,任何人士不得擅自复印、扫描或以其他任何方式进行传播。
阅读和使用本资料必须获得相应的书面授权,承担保密责任和接受相应的法律约束.
修订记录
*A -增加 M -修改 D -删除
版本日期
图表
章节号
A
M
D
标题或简要描述
变更
申请号
修订者批准者
目录
1 引言 (4)
1.1 目的 (4)
1.2 内容 (4)
1.3 参考资料 (4)
2 概述 (4)
2.1 产品描述 (4)
2.2 硬件需求规格 (4)
2.2.1 音频需求规格 (4)
2.2.2 光电需求规格 (5)
2.2.3 电源管理需求规格 (6)
2.2.4 主芯片的需求 (6)
2.2.5 射频需求规格 (7)
2.3 硬件接口 (8)
2.3.1 内部接口 (8)
2.3.2 外部接口 (8)
1引言
1.1目的
编写该文档的目的
1.2内容
文档包含内容
1.3参考资料
所引用的企业标准与其它标准
2概述
2.1产品描述
对产品定义进行简要描述
2.2硬件需求规格
1补充,完善产品需求包里的硬件需求.
2.分析产品需求包里的硬件需求,按其电气特点进行分类.如: MP3,MP4,录音,立体声,免提,和旋,各种声效属于音频部分.LCD,CAMERA,触摸屏,背光,红外线,感应器属于光电.充电,放电,电池,充电器等属于电源部分.各个控制部分,USB, UART, JTAG, Memory, DSP,LCD Interface, Keypad Interface, Camera Interface等属于数字部分.蓝牙,收音机,GPS,GSM,CDMA,天线等属于射频率部分.
3.对于支持硬件需求,给出具体电性能指标参数,不能给出具体电性能指标参数请注明原因和什么阶段可以给出.
2.2.1音频需求规格
2.2.1.1 MP3/MP4/WMA/…
音频采样率及量化比特数
2.2.1.2 音效
立体声,环绕
2.2.1.3 录音
录音压缩格式,音频采样率,量化比特数,信噪比
2.2.1.4 免提
频响特性,失真度,最大响度
2.2.1.5 通话音频发送与接收
给出GSM,CDMA,Bluetooth等音频标准的要求,如发送灵敏度,接收灵敏度,接收响度,失真度,侧音等2.2.2光电需求规格
2.2.2.1 LCD
根据产品定义,给出类型,像素,透光模式,尺寸大小,接口方式
2.2.2.2 Touch panel
根据产品定义,给出类型,像素,透光模式,尺寸大小,驱动接口方式
2.2.2.3 LCD 背光
确定背光驱动方式,调节的档数
2.2.2.4 Camera
根据产品定义给出的类型,像素,调焦方式,数据传输速率,支持图片格式,接口方式
2.2.2.5 键盘
根据产品定义给出键盘类型,个数
2.2.2.6 键盘的背光
确定背光驱动方式,颜色,调节的档数
2.2.2.7 指示灯
确定背光驱动方式,颜色,调节的档数
2.2.2.8 红外线
2.2.3电源管理需求规格
2.2.
3.1 待机电流:
根据以往产品经验,行业标准,方案规格书给出电流大小
2.2.
3.2 通话电流:
根据以往产品经验,行业标准,方案规格书给出电流大小
2.2.
3.3 电池容量:
根据待机电流或通话电流,结合待机时间或通话时间估计出电池容量2.2.3.4 充电电流:
根据电池容量结合以往产品的充电时间给出最大充电电流
2.2.
3.5 充电器规格:
根据充电电流,其他产品规格确定充电器的规格
2.2.
3.6 CPU,控制和Memory需求规格
2.2.4主芯片的需求
罗列出主芯片的需求:如时钟需求,供电需求,调试接口需求
2.2.4.1 主芯片支持的功能和接口
罗列出支持的功能和接口:如制式,最大存储器的容量,存储器的接口,存储器的种类,LCD的接口的类型,Camera的接口类型,GPIO口的种类和数量,USB接口类型,Uart接口类型和数量,I2C接口,SPI,MP3,MP4,蓝牙,红外,GPS,
2.2.4.2 Nor Flash和SRAM
根据产品定义结合主芯片规格给出接口方式,类型,读写方式,读写速度,容量
2.2.4.3 Nand Flash
根据产品定义结合主芯片规格给出接口方式,读写速度,容量
2.2.4.4 外部存储卡
根据产品定义结合主芯片规格给出存储卡的类型,容量,放置方式
2.2.5射频需求规格
2.2.5.1 频段及制式
给出GSM,CDMA,Bluetooth,GPS,FM Radio等的频率要求,制式要求
2.2.5.2 接收灵敏度
给出GSM,CDMA,Bluetooth,GPS,FM Radio的灵敏度和最大接收功率要求
2.2.5.3 最大最小发射功率
给出GSM,CDMA,Bluetooth,GPS,FM Radio最大最小发射功率
2.2.5.4 接收抗干扰
从GSM,CDMA,Bluetooth,GPS,FM Radio的各自国标种抽出抗干扰指标
2.2.5.5 发射调制
从GSM,CDMA,Bluetooth,GPS,FM Radio的各自国标种抽出发射调制指标
2.2.5.6 EMC
从GSM,CDMA,Bluetooth,GPS,FM Radio的各自国标种抽出EMC指标
2.2.5.7 天线
1:根据ID,机构,射频率的要求给出天线的模式,所需要的体积
2:给出天线必须达到的指标.(效率,隔离度,VSWR等等)
2.3硬件接口
2.3.1内部接口
罗列出各个模块间的接口方式:如CPU与LCD与Memory,键盘,摄像头,触摸屏,SIM Card, RF, GPS, BlueTooth, GPS,FM Radio,GSM模块,外部解码器,外部DSP.
2.3.2外部接口
罗列出各个外部接口方式:如USB,UART,耳机,尾插,JTAG,红外线接口,蓝牙接口,其他无线接口,外部存储接口,
草图。
