INMOTION R1(乐行平衡车)用户手册V1.2
Robin产品手册-易步机器人有限公司

●感谢您选择并购买Robin!●Robin是一款自动保持平衡的电动平衡车。
●《产品手册》旨在帮助您快捷地组装、使用、维护Robin。
●了解驾驶Robin的安全警告和注意事项非常重要。
产品手册·该说明书适用于东莞易步机器人有限公司所生产的Robin系列电动平衡车·●当您驾驶Robin时,您有可能失去控制、碰撞和摔倒。
因此您必须学习如何安全驾驶Robin,以避免危险。
●您可以通过查看《产品手册》和安全视频学习安全驾驶技术。
●本产品手册向客户告知所有操作说明和注意事项,Robin产品使用者必须仔细阅读并按本说明书的要求操作,如果产品使用者未按提示操作或违反警示内容,所产生的一切后果,东莞易步机器人有限公司将不负法律责任。
●如果想得到产品的相关服务支持,您可以联系代理商;您可以登陆东莞易步机器人有限公司网站()查看各代理商的相关信息。
●所有认证代理商可以到东莞易步机器人有限公司网站查看。
1.1文档概述 (2)1.2相关用户手册 (2)1.3文档相关说明 (2)2.产品介绍 (3)2.1Robin车型描述 (3)2.2记录Robin相关序列号 (3)2.3Robin如何工作 (3)3.安装Robin (3)3.1检查Robin包装箱内各部件是否齐全 (3)3.2组装Robin (4)4.Robin控制及信息显示装置 (5)4.1Robin遥控 (5)4.2脚踏传感器 (5)4.3显示板 (6)5.电池使用说明 (6)5.1电池电量为零 (6)5.2充电步骤 (6)5.3温度过高或者过低情况 (7)5.4电池详细规格说明 (7)5.5运输电池时注意事项 (7)6.安全使用Robin (8)6.1驾驶者的重量限制 (8)6.2最大行驶距离 (8)6.3速度限制 (8)6.4震动警告 (9)7.学习驾驶Robin (9)7.1启动Robin (9)7.2安全停车 (9)7.3驾驶步骤 (10)7.4驾驶练习 (10)8.驾驶安全指导 (10)9.维护和保养 (12)9.1搬运Robin (12)9.2车轮的维护 (12)9.3清洁 (12)9.4存放 (12)10.Robin零件 (13)11.Robin参数 (13)12.故障处理 (13)祝您使用愉快 (13)1. 文档概述1.1 文档概述● 描述安全和警告信息,以确保每一位驾驶者都能安全驾驶Robin 并享受其带来的乐趣 ● 介绍Robin 的各个零部件 ● 讨论组装Robin 的步骤 ● 描述驾驶安全注意事项 ●提供详细的驾驶方法及技巧1.2 相关用户手册《产品手册》旨在帮助您正确组装和使用Robin ,更加详细和综合的信息请查看安全视频。
乐行平衡车的工作模式
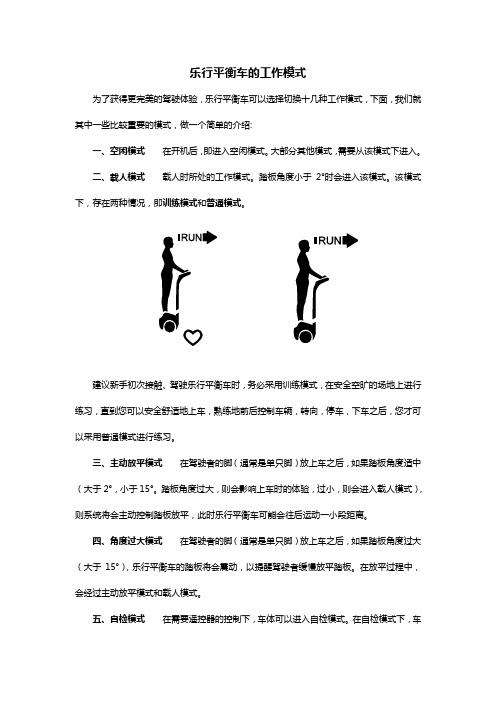
乐行平衡车的工作模式为了获得更完美的驾驶体验,乐行平衡车可以选择切换十几种工作模式,下面,我们就其中一些比较重要的模式,做一个简单的介绍:一、空闲模式在开机后,即进入空闲模式。
大部分其他模式,需要从该模式下进入。
二、载人模式载人时所处的工作模式。
踏板角度小于2°时会进入该模式。
该模式下,存在两种情况,即训练模式和普通模式。
建议新手初次接触、驾驶乐行平衡车时,务必采用训练模式,在安全空旷的场地上进行练习,直到您可以安全舒适地上车,熟练地前后控制车辆,转向,停车,下车之后,您才可以采用普通模式进行练习。
三、主动放平模式在驾驶者的脚(通常是单只脚)放上车之后,如果踏板角度适中(大于2°,小于15°。
踏板角度过大,则会影响上车时的体验,过小,则会进入载人模式),则系统将会主动控制踏板放平,此时乐行平衡车可能会往后运动一小段距离。
四、角度过大模式在驾驶者的脚(通常是单只脚)放上车之后,如果踏板角度过大(大于15°),乐行平衡车的踏板将会震动,以提醒驾驶者缓慢放平踏板。
在放平过程中,会经过主动放平模式和载人模式。
五、自检模式在需要遥控器的控制下,车体可以进入自检模式。
在自检模式下,车体可以进行一些校准和自我检测工作。
六、错误处理模式当系统检测到错误或者警告时,将会自动进入该模式,此时系统将会主动控制车体减速并停车,在停车后,系统将视错误的严重程度来决定是否将车锁定。
车一旦锁定,则无法再度开启,需要送到乐行天下授权代理商或乐行天下售后部门进行检修。
七、助力模式在助力模式下,乐行平衡车将根据初始角度和地面倾斜角提供一定的助力,方便用户搬运,上坡(非骑行)等。
八、自动行走模式自动行走模式,是一种无人平衡模式,需要手机客户端的支持才能进入。
在自动行走下,用户可以通过手机客户端对乐行平衡车进行有效地遥控,或者设置动作序列,让其可以按照事先编制好的动作自动执行。
九、睡眠关机模式该模式下,系统处于等待遥控器开机的状态。
电动滑板车说明书
DO NOT use in dangerous area, where the exploding or catching fire may be caused by something inflammable, explosive or steam, liquid, dust and fiber.
2.3 Folding chart
1.Loosen the folder fixing ring.
Safety measurements should be taken before riding, eg: wear sportswear, helmet, kneecap, elbow pads and so on.
DO NOT ride when it rains.
baby
DO NOT ride with loading DO NOT ride with two people or more, only for one rider.
Warnings: Improper operation may result in personal injury. Tips: Helpful advice & clues for the usage of E-scooter. ● Should you have any inquiries, please contact the supplier immediately.
Beginner mode: no characters in the gear position
Normal mode: gear characters display white
Sports mode: gear characters display red
MotionRT7使用说明书

MotionRT7使用说明书深圳市正运动技术有限公司修订记录日期修订版本修订描述2022.07.11 1.0用户手册的初步创建和制作2022.09.27 1.1内容的修改和补充增加2022.10.12 1.2内容修改目录第一章MotionRT简介 (1)第二章安装驱动 (3)2.1驱动安装 (4)2.2普通网卡安装ECAT总线协议 (14)第三章RT控制台 (17)3.1主界面 (17)3.2UpdateCard界面 (18)3.3License界面 (18)3.4Config界面 (19)第四章功能列表 (20)第五章使用方法 (22)第六章子卡相关指令 (28)6.1CARD_INFO (28)6.2CARD_INFO写入 (29)6.3?*CARD (29)6.4AXIS_ADDRESS (30)6.5REG_CARD (30)第七章注意事项 (32)7.1安装和卸载 (32)7.2UpdateCard更新PCI设备和总线配置保存 (35)7.3License参数配置 (35)7.4Config参数配置 (36)7.5AddECAT总线配置 (36)7.6Start Stop (36)7.7其他 (37)第八章Windows环境配置注意事项 (38)8.1防火墙选项 (38)8.2电源选项 (38)8.3运行库配置 (39)8.4关闭Windows10自动修复功能 (39)8.5关闭Windows10自动更新功能 (40)第一章MotionRT简介MotionRT是正运动实时环境,目前已经开发到第七代。
MotionRT版本规格匹配产品MotionRT1实时运动(RtMotion)实时BASIC(RtBasic)ZMC0系列ZMC1系列ECI1/2/3系列MotionRT2实时运动(RtMotion)实时BASIC(RtBasic)实时梯形图(RtPlc)ZMC2系列MotionRT3实时运动(RtMotion)实时BASIC(RtBasic)实时梯形图(RtPlc)实时组态(RtHmi)ZMC3系列XPLC3系列MotionRT4实时运动(RtMotion)实时BASIC(RtBasic)实时梯形图(RtPlc)实时组态(RtHmi)实时总线(Ethercat,Rtex,XY2)ZMC4系列MotionRT5实时运动(RtMotion)实时BASIC(RtBasic)实时梯形图(RtPlc)实时组态(RtHmi)实时总线(Ethercat,XY2)机器视觉(ZVision)实时Linux(ARM)快速本地LOCAL接口VPLC5系列MotionRT6实时运动(RtMotion)实时BASIC(RtBasic)实时梯形图(RtPlc)实时组态(RtHmi)实时总线(Ethercat)机器视觉(ZVision)VPLC6系列实时Linux(X64)快速本地LOCAL接口MotionRT7实时运动(RtMotion)实时BASIC(RtBasic)实时梯形图(RtPlc)实时组态(RtHmi)实时总线(Ethercat,XY2)机器视觉(ZVision)实时Windows(X64)快速本地LOCAL接口VPLC7系列,普通PC,工控机MotionRT软件特点(1)快速搭建实时应用:相比RTX等实时环境,MotionRT带有易用的实时Basic语言,梯形图,组态等编程语言,快速上手。
两轮平衡车说明书

本车严禁未成年人使用 请自觉遵守当地交通管理条例 驾驶时必须佩戴头盔以及护套 购买本车后请认真阅读本《用户手册》所描述的有关驾驶指引。 如因未按照上述说明操作发生意外,本公司一概不负责,请谨慎驾驶。 当然,将所有与操作及保养双轮平衡车平衡车有关的危险逐一列举出来是不现实的,也是 不可能的。因此,仍需您本人做出及时准确的判断,请随时留意自身以及他人的安全。 本手册包含重要的安全信息---请仔细阅读。
加速或减速。
三、双轮平衡车的启动
4
1. 一只手扶住转向杆,使踏板保持水平,打开电源开关,面板上液晶电量板常亮按百分比 的电量显示,启动完毕(如图 2,3,4),然后双手紧握双轮平衡车手柄(如图 5)。
图2
图3
图4
图5
2. 错误的启动操作 由于双轮平衡车会把当前踏板平面位置作为初始位置设定,所以踏板不平的话,人站
体感平衡车用户手册
欢迎使用
本《用户手册》做为双轮平衡车出售时,应将其随车一并交付用户。 本《用户手册》适用于本公司生产的所有双轮平衡车产品系列。由于产品有不同系列,某 些功能与您所购买的产品系列会有差异,属于正常情况。 本手册中所包含的内容及技术规格在被许可印刷时均视为有效。但是,我司保留随时终止
上去比较困难的,初始平面位置可以通过关闭电源开关,调整,再次启动电源开关以达到 最佳使用状态。
3.正确启动如下:车体启动前必须保持水平。图 6
5
图6
四、双轮平衡车遥控器的功能及模式切换
1.正常启动 打开电源开关,打开电源,嘀一声,液晶电量板按百分比的电量显示,100%表示满电, 50%
要及时充电。踩上踏板,双轮平衡车立刻启动平衡进入工作状态,这时平衡车的转向较灵敏, 最高限速 18KM/H。
MOTION说明书

7
简体中文
4. 如何充电
使用微型 USB 线缆将耳机插入电脑上的任何可 用 USB 连接孔。
4.2 使用壁式充电器充电
使用壁式充电器将耳机插入电源。
注意:出于安全原因,建议充电时不要使用耳机。
8
简体中文
4.1 使用微型 USB 线缆充电
4.3 电池电量状态
使用中
50% - 100% 10% - 50% 0% - 10%
6.1 忙碌指示灯 15 6.2 处理多个来电 15 6.3 语音命令开启/关闭 16 6.4 语音命令 16 6.5 语音提示 17
2
简体中文
1. 欢迎使用............................................4 2. 耳机概览............................................5 3. 如何佩戴........................................... 6
对麦克风设 定静音/解除 静音
通话过程中轻按语音和对麦克风设 定静音按钮,可以将麦克风静音。 再 次轻按此按钮可解除静音。
14
简体中文
6.1 忙碌指示灯
来电指示(快速闪烁的红色指示灯) 通话中指示(慢速闪烁的红色指示灯)
注意:可以使用 Jabra Connect 应用程序打开/关闭忙碌 指示灯。
3
简体中文
7.2 休眠模式 20
1. 欢迎使用
JABRA MOTION 的功能 动作感应技术,可实现通话控制、增强的音效 并且延长电池寿命 休眠模式,可延长电池寿命 智能型音量控制,可根据周围环境自动调整 NFC 近场通讯技术 音量触摸控制 语音控制 高清语音 享受无线自由 Noise Blackout™ 3.0 噪音阻隔技术 风噪声防护 Jabra SafeTone™ 技术,能够保护您的听力 忙碌指示灯 可调整高度,完美贴合
fotbot平衡车说明书

fotbot平衡车说明书用户手册自动平衡电动车非常感谢您选择自动平衡电动车系列。
自动平衡电动车是一种高科技的,轻便的,并且双轮自动平衡的电动车。
《用户手册》可以指导了解自动平衡车的功能及完成用法。
警告!在你开始熟悉如何操作之前,您要保持平衡车在最好的状态,以防发生事故,摔倒,或者失去控制等。
《用户手册》可以帮助你学习安全驾驶电动平衡车。
《用户手册》已告诉所有的指示和注意事项,操作人员必须仔细阅读并遵循这些指示。
如果操作人员未能遵循这些指示或者违反警告,本公司不会承担任何相关的责任。
如果您想获得更多的服务和技术帮助,您可以联系我们当地的代理商或者是本公目录MACRO第一章:基本信息1.关于手册2.驾驶风险3.操作之前的准备4.相关解释第二章:生产指令1.电动平衡车的描述2.配件3.操作原理第三章:附件1.脚踏板感器2.指标第四章:安全地使用1.操作者的重量限制2.充电3.最大化速度第五章:学习如何使用它1.操作步骤2.功能保护3.实践驾驶第六章:安全开车第七章:电池使用1.电池容量2.充电步骤3.温度过高或过低4.电池参数5.电池流放第八章:自动平衡车的维修1.清洁2.贮藏第九章:电东平衡车的规格第十章:装箱单第一章:基本信息1.关于手册在操作这个工具之前,请阅读所有安全装配和操作指示。
《用户手册》可以帮助您了解自动平衡车的功能和完整用法。
用户手册适用于我们工厂生产的所有智能自动平衡车。
如果您有什么问题或者是不能得到您想要的信息手册,请立即联系我们当地的代理商或者公司。
2.驾驶风险自动平衡电动车是一种智能交通和娱乐工具,其技术和生产过程经过了认真测试。
如果您不按照手册要求操作的话,可能会导致受伤。
警告!无论何时何地跌倒、失去控制、摔倒等,包括违反用户手册的规则可能会导致伤害你甚至是死亡。
为了避免受伤,请您仔细阅读手册。
3.操作前的准备使用前,应检查电池是否充满电,请在第七章中找到更多的细节。
如果您不遵守手册的规则,您会受伤。
Ergotron 1x 用户指南说明书
3 of 4
For Warranty visit: /warranty For Service visit: For local customer care phone numbers visit:
࠷৽ͷϢʔβʔΠϯετʔϧΨΠυɺXXXFSHPUSPODPNͰ֬͝ೝ͍͚ͨͩ·͢ɻ De nieuwste Gids voor installatie door de gebruiker kunt u vinden op: Per la versione più recente della Guida all’installazione per l’utente, visitare il sito web: För den senaste Installationshandboken se: 若需最新的用户安装指南,请访问:
888-98-062-W-00 rev. C • 11/17
1 of 4
a
b
Remove clamp if present
a
mm
b
3mm
3mm
3x
M x mm Screws provided with Arm
2 of 4
888-98-062-W-00 rev. C • 11/17
a
b
c
d
mm
888-98-062-W-00 rev. C • 11/17
保証書をご覧ください: /warranty サービスをご覧ください: 最寄りのカスタマー ケアの電話番号については、こちらをご覧ください:
Ga voor garantie naar: /warranty Ga voor service naar: Plaatselijke telefoonnummers voor de klantendienst kunt u vinden op:
乐行天下独轮平衡车系列用户手册说明书

乐行天下独轮平衡车深圳乐行天下科技有限公司用户手册系列1. 文档概述1.1. 关于本手册1.2. 相关文档与资料2. 安全驾驶注意事项3. 产品概述3.1. 产品序列号3.2. 检查包装箱3.3. 产品组成3.4. 产品参数3.5. 产品尺寸图4. 产品功能介绍4.1. 助力推杆与助力模式4.2. 防飞转按键4.3. 过载保护4.4. 过温保护4.5. 侧倾保护4.6. 数据蓝牙4.7. 炫彩氛围灯4.8. 音频蓝牙4.9. 语音提示4.10. 手机客户端3 3 334 4 456 78 8 8 9 9 9 9 10 10 10 10目录15. 使用乐行独轮车5.1. 使用前准备5.2. 初学者操作步骤6. 保养与维护6.1. 存放6.2. 充气以及更换内外胎6.3. 调节脚踏板松紧度6.4. 清洁7. 法律声明7.1. 使用声明7.2. 个人信息声明7.3. 知识产权声明8. 联系我们211 11 1212 12 12 13 1314 14 16 17181.产品概述1.1.关于本手册为了您的驾驶安全,在使用乐行天下V10系列独轮车(以下简称V10独轮车)之前请仔细阅读本手册及用户指南宣传页,并请认真观看驾驶指导视频,确保能够按照正确方法使用。
请认真阅读并理解本手册所列出的所有安全警告和注意事项,有助于您更好的驾驶V10系列独轮车。
本手册适用于深圳乐行天下科技有限公司所生产的乐行天下V10独轮车产品。
如果您有任何疑问或无法从本手册中获取您所需的信息,请及时联系乐行天下授权代理商或乐行天下售后部门。
1.2.相关文档与资料《用户手册》的PDF格式文档、《安全视频》的视频文件、手机客户端及其帮助文档,均可从深圳乐行天下科技有限公司官方网站:下载2.安全驾驶注意事项V10独轮车是一款智能代步娱乐的工具。
如果您不按照本手册的规定来使用,将可能给您带来驾驶风险。
无论何时何地,因为跌落、失控、碰撞等原因,包括不遵守本手册所述要求驾驶V10独轮车,均可能导致您受伤甚至死亡及财产损失。
伟易达 4合1小鹿滑行车 用户手册说明书

电池安装:
1. 电池的更换必须由成人进行安装。 2. 确认主机处于关机状态。 3. 用螺丝起子将位于主机后面的电
池盒后盖拧开,如里面有用过的 电池,请取出。 4. 如右图所示装入3节新的1.5V 5号(AA/LR6/AM-3)电池。 (为达到最佳性能,推荐使用新 的碱性电池。) 5. 盖好电池盒后盖并拧紧螺丝。
组装说明:
1.将带车轴的前轮组件安装在踏 板底部的前轮位置上,并拧紧6 颗螺丝。
2.将两个后轮安装在踏板底部的 后轮位置上,并拧紧两个后轮 上的8颗螺丝。
3
3.将左右把手分别插入小鹿头部两 侧的孔中,听到“嗒”的一声后 说明把手被安全固定好,一旦组 装完成,将无法再拆卸。
4.将小鹿的头部插入机身,听到 “ 嗒”的一声后说明已被固定, 请确保头部已安全固定在机身。 然后拧紧位于踏板底部,前轮组 件下方的两颗螺丝。
6.2 本公司承担维修产品返回所产生的快递费(只 限于在保修期之内的产品),您寄出所产生的快 递费,误工费等其它任何其它费用本公司均不予 承担。
七.一般条款:
7.1 如本条款被法律机关裁定为部分或全部无效,不 影响其他部分的效力,本条款其他内容在未被裁 定为无效的范围内仍然具有完全的效力。
7.2 本保修条款最终解释权归伟易达电子实业(深 圳)有限公司所有。
: 表示该有毒有害物质在该部件所有均质材料中的含量均在 GB/T 26572标准规定的限量要求以下。
: 表示该部件中的部分电子元件(例如:二极管,贴片电阻 等)的玻璃含铅量、陶瓷电子元件的含铅量(例如:陶瓷电 容,陶瓷振荡器等),高温焊料(锡铅合金含铅量>85%)的 含铅量超出 GB/T 26572标准规定的限量要求。但含有有毒 有害物质或元素的部件皆因全球技术发展水平限制而无法 实现有毒有害物质或元素的替代。此部分物料属于欧盟豁 免材料,均符合欧盟RoHS指令2011/65/EU要求。
IN-G1 系列聯網導航車機使用說明書说明书

9
主畫面指南
為了符合在車上的操作情境,車機的主畫面精心設計成簡單直覺的風格,讓使用者擁有【豐富功能、簡單操控】 的產品體驗,此外,在主畫面配備主要功能區,讓您可以一邊同步控制音樂播放或廣播服務。
11
新手上路
IN-G1 系列聯網導航車機所提供的功能非常豐富,您只需要了解以下幾項操作重點,很快就能駕輕就熟。
第一步:建立無線連結
車機提供了【藍牙連結】及【Wi-Fi 聯網】兩種無線連結功能。首先請您先了解如何建立無線連結。
藍牙連結方式
透過藍牙通訊可以讓您在車上使用免持通話及播放手機音樂至車上喇叭。建立連結步驟如下: 1. 進入您手機的藍牙設定頁面,將藍牙設定為開啟。
2
6. 有下列情況之一者,雖在保固期間內,亦得酌收服務費及材料費,敬請諒解: -未按使用手冊之方式操作而導致的損壞情形。 -使用異物造成面板之損壞或刮傷。 -零件之自然耗損及由於天災、地變、電擊、電壓異常等環境因素造成之損害。 -使用不當,或自行拆修、改裝。 -連接其他廠牌之產品產生的不良影響,導致不穩定或故障之情形。 -故障原因發生在機體以外者(如:外接USB等記憶裝置不良、異物掉入等…)。 -水氣或液體侵入等人為因素。 -非經授權管道購得此產品,亦無法判定保固期限者。
行車安全第一,不要再邊開車邊使用手機導航了。IN-G1 系列聯網導航車機內建最受歡迎的正版【導航王】導 航地圖,以及預載了聯網【Google 地圖】服務。從此開車不需再看手機小地圖,平安舒適又愉快。
特色五:隨心所欲,同時觀看兩種 APP。
两轮平衡车说明书

图1-5折叠后
第三章驾驶注意
注意事项
1. 利用辅助轮安全学习驾驶
2. 双轮平衡车是利用陀螺仪进行前后稳定的。当身体前倾,独轮车会感知到动作进行加速;当身体后仰,平衡车也会控制电机减速以维持驾驶者与车体的平衡。双轮平衡车能帮助左右平衡,不像是骑自行车一样,需要靠一定的速度和身体来控制左右平衡。
准备工作
1. 选择适合的场地:请在平坦、空旷、无机动车、人少的场地进行试车。
2. 检查车辆:驾驶前需要检查电力是否充足、摇动车辆是否有异响和松动、手动推行平衡车看车轮是否与外壳产生摩擦。
3. 最好可以找一位朋友一起学习骑行,可以提供协助,会对更快的掌握骑车技巧有帮助。
外观重量
尺寸
高450mm,长392mm(最大厚度163mm,最小厚度70mm
踏板离地距离
112mm(无载重状态)
轮胎尺寸
直径360mm
车体自重
12.6kg(不含辅助轮〕
信息提录
电源及错误
电源开关LED(开机常亮,保护时闪烁)
电量
电量指示LED(大于约85%时,四颗LED全亮,随电量下降逐渐熄灭〕
声音提醒
图1-2车体结构图
图1-3平衡车原理图
1.4动态稳定概述
运用MC9S12XS128单片机,设计一种基于电磁导航的两轮自平衡车系统,并实现车模的直立行走,自主寻迹功能。系统采用飞思卡尔十六位微处理器MC9S12XS128作为核心控制单元,通过运用各种传感器,设计稳压模块、最小系统模块、双轮测速模块、倾角测量模块、电机驱动模块和人机交互模块并编写相应程序以完成平衡控制,速度控制,转向控制三大任务。
见图11图1112产品参数产品性能最高时速约18公里小时12公里小时开始报警续航距离约3035krn视骑行者体重为路况及环境而定最大爬坡角度约20体重60公斤者实际路测可达35电池150瓦时锂电池电池保护板具备均衡功能适用温度1040最适合适用温度1030最大载重120kg充电器电压ac22ov5060hz充电时间约5060分钟保护措施侧倾保护左右均为45超过45时电机会停止运转限速保护大于12kmh开启踏板前端逐渐抬起阻止进一步加速低电量保护电量剩余约10时开启踏板前端开始下沉逐渐减速直至停止外观重量尺寸高450mm长392mm最大厚度163mm最小厚度70mm踏板离地距离112mm无载重状态轮胎尺寸直径360mm车体自重126kg不含辅助轮信息提录电源及错误电源开关led开机常亮保护时闪烁电量电量指示led大于约85时四颗led全亮随电量下降逐渐熄灭声音提醒嘀声开机嘀声提示低电量保护时连续嘀声声音提醒长鸣侧倾时长鸣产品附件标配充电器辅助轮13动力学模型分析一个控制系统要想准确定量的分析设计提高对系统的认知和掌控能力首先要对对象建立模型
SENA智能自行车头盔R1 EVO快速入门指南说明书

骑行连接
具有内置Bluetooth®功能的R1 EVO使您能够收听GPS导航,拨打电话并收听自己喜欢的音乐。
您可以使用网状对讲与其他R1 EVO用户通信,
并使用LED尾灯安全骑行。
集成蓝牙®
网状对讲
最远通话距离900米
LED 尾灯
语音指令
* 在开阔地带
麦克风
扬声器
蓝牙系统按键(-) 键
蓝色/红色/绿色
lED 状态灯
中心键
(+) 键
SENA 键
故障复位键充电和升级插口
快速入门指南
束带垫O-型环可调节插口
插口
扣带
固定系统按钮保留系统
为了获得最大程度保护,必须按照以下说明安装
好该头盔并将其正确穿戴到佩戴者的头部。
如果调整后头盔无法正确安装,请勿使用头盔。
智能骑行踩车用户指南说明书

1. Introduction1.1 What’s in the box 11.2 Trainer component diagram 22. Introduction to Smart Trainers2.1 Compatible devices 32.2 Compatible apps 42.3 Smart trainer modes 53. Getting StartedBefore installing the bike trainer 6 3.1.3.2. Installing the bike in the trainer: first time set-up 73.3. Activate the trainer 113.4. Regular set-up 123.4.1 Removing the bike from the trainer 12 3.4.1Installing the bike on the trainer 12Calibration 123.5.4. Connecting to an App135. 4iiii App155.1 Calibrating the trainer for a smaller wheel size 166. Charging and Storing Fliiiight6.1 Charging 17 6.2 Viewing your battery level 186.3 Storage 197. Troubleshooting7.1 What is the status LED indicating? 20 7.2 Using the 4iiii app for troubleshooting 21 7.3 Troubleshoot connection over ANT+ or Bluetooth® 217.4 Alignment 138. Detailed Specifications249. Safety Information2610.Warranty2811. Regulatory Compliance2912. Contact Information BACK1.1 What’s in the Box?1. Fliiiight Smart Trainer2. Trainer skewer3. Speed index4. USB type C charging cable5. ManualIn order to control your smart trainer, you’ll need a smart training app , running on a device such as a smartphone or laptop.2.1 Compatible devices You can run training apps on:•Smartphones •Tablets •PCs •Macbook Computers •Laptops • Apple TVsYour device needs either Bluetooth Smart or ANT+ in order to communicate with the trainer. Smartphones, tablets and Macbook Computers have Bluetooth built in, whereas you’ll insert an ANT+ dongle in the USB port of a Windows PC or laptop to connect with it. Brand new to smart trainers? Get the complete orientation online at /support2.2 Compatible AppsFliiiight has been tested to be compatible with:• TrainerRoad• ZwiftThere are many other compatible apps out there. In order to be compatible, an app must be capable of sending smart trainer commands using one of two standard connection protocols:• ANT+ FE-C (Fitness Equipment Controlled)• Bluetooth Smart [BLE] FTMS (Fitness Machine Service)2.3 Smart trainer modesThere are two main types of smart trainer workouts.ERG modeERG mode keeps you accountable to your interval workout, ensuring you hit your power targets by increasing resistance if you slow down, or easing up if you pedal faster. Always use your bike’s fastest gear (large front chainring).SIM modeSIM mode simulates an outdoor ride: tougher on the climbs than the downhills. Use your gears like you would outdoors.Fliiiight also has a non-smart mode, Resistance Mode. Use the 4iiii app to set the resistance level, then use your gears to adjust the difficulty.3.1 Before installing the bike in the trainer1. Check your wheel for compatibility, if you have not done so before purchasing.a. Run a strong magnet around the wheel rim, being especially careful to checkopposite the valve stem. If the wheel is compatible, the magnet will not stickanywhere on the flat surface of the wheel rim. Do not use the trainer with anincompatible wheel. Go to /support for assistance.2. Install the included trainer skewer in your bike’s rear wheel.Tip: As long as it is properly installed, it is safe to leave your trainer skewer in your bike during outdoor rides.3.2 Installing the bike in the trainer: first time set-up1. Install the speed index on a spoke. Slide the index towards the rim.2. Open the legs to full extension and place the trainer flat on the floor.3. Rotate the magnet arrays so they are parallel with your wheel rim.4. Turn the threaded rods counter clockwise to retract them. Retract one completely,5.Tip:6. Lift one skewer end into the innermost skewer cup. Hold the other end parallel7. Tighten the other knob until both skewer cups firmly secure the trainer skewer.Final set-up3.3 Activating the trainer1. Flip the “ON” switch. The magnet arrays will close on your wheel in order to centerthemselves. Keep the wheel still until they release.2. Pedal to start your ride.Tip: Until the trainer receives a command from the controlling app, it will default to 36% resistance.Tip: Don’t forget to turn the trainer off when not in use.3.4 Regular set-upLeave one threaded rod in place to easily remove or install your bike.3.4 .1 Removing the bike from the trainer1. Turn off the trainer.2. Loosen one knob to release the bike from the trainer.3.4 .2 Installing the bike on the trainer1. Re-install the speed index if you’ve removed it.2. Back the bike into the frame and insert the skewer in the innermost skewer cup.3. Tighten the other knob until both skewer cups secure the trainer skewer.4. Turn the trainer on.3.5 CalibrationFliiiight is calibrated for a standard 700c road wheel or 29” MTB wheel. Use the 4iiii app to update the wheel rim circumference if you have a different wheel size (Section 5.1). You will not need to do regular recalibrations.Check the app’s support resources for more assistance navigating your individual app.1. Bluetooth Smart or ANT+ must be enabled on your device before connecting tothe trainer.Android or iOS smartphone, tablet, Macbook or Apple TV with Bluetooth Smart Make sure Bluetooth and location services are enabled on your device.Windows PC, Windows Laptop or Macbook with an ANT+ donglePlug the ANT+ dongle into a USB port.Android device with native ANT+ANT Radio Service and ANT+ Plugins may come pre-installed on your device, or you may need to download them from Google Play.2. Start up your cycling app.3. Turn the trainer on.4. Navigate to the app’s device connection page, and search for nearby devices. Yourtrainer should show up as “4iiii Fliiiight” in the device list.5. Connect to the trainer.6. Navigate to your workout.7. Pedal to start your workout.Once you have paired with the trainer, many apps will pair with it automatically next time you start up the app and trainer.Tip: Find more Bluetooth and ANT+ troubleshooting assistance online at/support.The free app is available for Android and iPhone.iPhone: Download the 4iiii iOS app in App StoreAndroid: Download the 4iiii Android app in Play StoreTip: You will need to update older iPhones to iOS 11 or later in order to download the app.Use the app to:• Calibrate the trainer for a different wheel size (Section 5.1)• View your current battery level (Section 6.2)• Update the trainer firmware*• Change your trainer’s Bluetooth device name*• Set an ERG or resistance target*• View, record, and share ride data*• Do advanced troubleshooting (Section 7.2)*Instructions available online at /supportWe highly recommend that you use compatible apps like TrainerRoad or Zwift for training, in order to experience more extensive features, graphics, and workout plans.5.1 Calibrate the trainer for a smaller wheel sizeFliiiight is calibrated for a standard 700c road wheel or 29” MTB wheel. Use the app to update your wheel rim circumference value if you have a different wheel size.1. Download the 4iiii app.2. Sign in. If this is your first time, sign up for an account.3. Select the devices tab. Connect to the trainer.4. Select “>” for more options.5. Go to “Wheel Circumference” and select your wheel from the drop down menu. For more assistance selecting your wheel rim circumference, go to /support6 6.1 ChargingWhen fully charged, Fliiiight allows over 2 hours of wireless riding.Warning: For safety reasons, do not charge the trainer below 5°C (41°F). Doing so may result in damage to the lithium ion battery, explosion, or injury.Tips:• Use the included cable (2A 5V type C USBcharger).• For best results, charge from a USB walloutlet adapter.• Batteries deteriorate more quickly whenleft in a fully depleted state. To maximizethe life of your trainer, charge it regularlyor plug it in during use.• If the battery is fully drained, chargeovernight.•Turn the trainer off when not in use.6.2 View your battery levelCheck battery level in the app1. Download the 4iiii app.2. Sign in. If this is your first time, sign up for an account.3. Select the devices tab. Connect to the trainer. You should now see the battery levelin the device information.When the trainer is low on batteries, the status light will appear yellow.Yellow, alternating with other colors Low battery, advanced warningYellow Low battery, charge trainerThe charging port light will turn on to indicate the trainer is plugged in and receiving power.Yellow Battery very lowRed Battery chargingBlue Battery charged6.3 StorageYou can turn the trainer off and leave it set up with the bike installed, or remove the bike and store it flat. To store flat, turn off the trainer and remove the bike, fold the legs against the frame, and rotate the magnet arrays parallel with the frame. When moving the trainer, carry it by the top of the frame above the legs.To prolong the battery life, do not store the trainer with a fully or nearly depleted battery. Ideally, charge the trainer to about 50% before storing. Store in a dry, temperature controlled location.Please check out our website for more support articles and videos: /support 7.1 What is the status LED indicating?Blue, solid Bluetooth disconnected, ready to pair.Blue, blinking Bluetooth connected, receiving commands.A long blink will alternate with 1-3 short blinks. The number of short blinks indicates the number of Bluetooth channels that are connected.Red, rapid blinking Error message, check the debugging page in the 4iiii app.Yellow, alternating withother colorsLow battery advanced warning. Yellow Low battery, charge trainer.7.2 Using the 4iiii app for troubleshooting1. Download the 4iiii app.2. Sign in. If this is your first time, select sign up for an account.3. Select the devices icon. Connect to the trainer.4. Select “Diagnostic Tools” and scroll down to “Trainer Sensors”.5. This screen will give you feedback on the quality of your sensor inputs and tips forimproving them.7.3 Troubleshoot your connection over Bluetooth or ANT+My app can’t find my trainer when it scans• Press re-scan.• Bluetooth• Do not attempt to connect to the trainer in your phone’s main Bluetoothconnection menu. It is a different connection protocol. If you have previouslytried connecting in the phone’s Bluetooth menu, put the device briefly into,then out of, airplane mode and connect from within the app.• Allow Bluetooth and location permissions for the app.• Make sure Bluetooth and location services are enabled on your phone.• ANT+• Remove and reinstall the ANT+ USB dongle.• Try using a different USB port on your computer.• Make sure no other apps are monopolizing your ANT+ dongle. Only one appcan use an ANT+ dongle at a time. If you want to run two apps that use ANT+,you will need two ANT+ dongles.Interference and signal dropping• If the trainer is low on batteries, this will affect the range of its broadcasts. Charge the trainer.• ANT+ and Bluetooth Smart are short-range, low-power protocols. Try movingyour device closer to the trainer and moving any metal objects between yourtrainer and your device.• ANT+• Use a USB Type A extensions cord (male to female) to get the dongle closerto the trainer.7.4 AlignmentYour magnet array should be level with your bike’s wheel rim. The trainer is shipped aligned for a standard 700c road wheel or 29” MTB wheel. If you have a different wheel size, you may need to adjust the resistance unit up or down.Possible symptoms of misalignment:• Magnets come into contact with wheel or tire.• The trainer is not able to hit your resistance targets.Alignment stepsWith the bike installed in the trainer, and the trainer off, push the resistance unit over to one side, until the magnet array touches the wheel rim. Check that the magnets are level with the rim. If the magnet array is sitting too low (touching the tire) or too high (partially above the wheel rim):1. Loosen both mounting bolts and move the resistance unit lower or higher asneeded.2. Re-tighten the mounting bolts.3. Recheck the height.Accuracy+/-1%Maximum watts0 to 2200WMedium slope7%Cadence accuracy range40 - 160 RPMVirtual flywheel Up to 5kg (11lbs)Noise61.8/66.1 dBA. Only as loud as your drive train Wireless riding time 2 hoursRecharge during use YesBattery type Rechargeable lithium ion pouch cell, 3000mAh Charging cable Type C USB, 5V 2A charging cableCharging temperature5°C to 45°C (41°F to 114°F)Storage temperature-20°C to 45°C (-4°F to 114°F)Weather resistance IPX2Communication protocols ANT+ FEC and Bluetooth Smart FTMS Operating Frequency ANT+: 2457MHz, Bluetooth®: 2402MHz to 2480MHzRF Specifications RF operating frequency: 2402-2480 MHz Operating temperature: 5°C to 45°C (41°F to 114°F) Maximum radiated power: +10dBSupported applications Applications for Windows PC (ANT+), Mac OS (ANT+ or Bluetooth Smart), iOS (Bluetooth Smart) and Android (ANT+ or Bluetooth Smart)Firmware updates Over the airCompatible wheels Aluminium alloy rims with a welded or aluminium sleeve jointCompatible wheel sizes650C-700C or 26”-29”Skewer Compatible with typical road bikes. Fits drop-out widths 130 mm to 150 mm. Thru-axles supported with adapter from Robert Axle ProjectDimensions Rechargeable lithium ion pouch cell, 3000mAh Weight Type C USB, 5V 2A charging cable• Before using your trainer, consult a doctor if you or any member of your household have a medical device such as a pacemaker or ICD that can beaffected by strong magnetic fields.• Store the trainer out of reach of children and pets.• Do not place fingers between the magnet arrays.• Do not adjust the calipers by hand when the trainer is on.• Do not place sensitive electronics immediately next to the magnets.• Be careful when using metal tools near the magnets.• When moving the trainer, carry it by the top of the frame above the legs to avoid the legs closing on your fingers.• Use the designated charging cable (2A USB Type C charger).• The electronics case has an IP rating of IPX2. It is resistant to dripping sweat. Do not expose to rain. Do not submerge. Do not get the charging cable wet while charging.• Do not disassemble or modify the charging cable.• Do not disassemble or modify the trainer electronics.• Do not use or charge the trainer below 5 degrees celsius (41 degrees fahrenheit).Doing so may result in damage to the lithium ion battery, explosion, or injury. • If the battery is completely depleted, charge it as soon as possible. Batteries leftin a depleted state will deteriorate faster.• Do not expose the battery to temperatures below -20°C (-4°F). Doing so will degrade the battery.• Do not expose the battery to temperatures above 45 °C (114°F). Doing so will degrade the battery.• Lithium-ion batteries are recyclable. For information on disposal of used batteries, contact your original dealer.By purchasing this product you acknowledge and agree to the terms of this limited warranty.4iiii Innovations Inc. (“4iiii”) warrants this product to be free from defects in material and workmanship, under normal use, for a period of two (2) years from the date of original purchase (the invoice date) tothe original purchaser. Defects that have resulted from improper or unreasonable use or maintenance, accident, excess moisture, insects, improper or inadequate packing for shipment, lightning, power surges, or unauthorized tampering, alteration or modification are not covered under the limited warranty. 4iiii will, at its sole discretion, repair or replace the defective product with a comparable product, at no charge to the customer for parts or labor, with the customer to be responsible for all shipping and handling costs [and with return shipping and handling costs to be paid for by 4iiii after the product has been repaired or replaced]. Replacement products may be new, refurbished or reconditioned and are warranted for the unexpired period of the original purchase, or 30 days from the date of shipment, whichever is greater. Any products replaced by 4iiii shall be the property of 4iiii.WHERE PERMITTED, THE PROVISIONS OF THIS LIMITED WARRANTY ARE TO SUPERSEDE AND REPLACE ANY OTHER WRITTEN WARRANTY, WHETHER EXPRESS OR IMPLIED, WRITTEN OR ORAL, INCLUDING ANY WARRANTY OF MERCHANTABILITY OR FITNESS FOR A PARTICULAR PURPOSE.IN NO EVENT SHALL 4iiii BE LIABLE FOR ANY DIRECT OR INDIRECT DAMAGES OR OTHER RELIEF ARISING FROM ANY SPECIAL, INCIDENTAL OR CONSEQUENTIAL DAMAGES. To obtain warranty service, email support@4iiii. com for shipping instructions and an RMA tracking number. Return your product, freight prepaid, along with the original sales receipt as a required proof of purchase for warranty repairs, with the RMA tracking number written on the outside of the package to 4iiii.WARNING: This limited warranty becomes null and void if the product is repaired by anyone other than an authorized person of 4iiii.FCC ID: ZZN-ST1ØØModel: ST100FCC Statement: This device complies with Part 15 of the FCC Rules. Operation is subject to the following two conditions: (1) This device may not cause harmful interference, and (2) This device must accept any interference received, including interference that may cause undesired operation.The grantee is not responsible for any changes or modifications not expressly approved by the party responsible for compliance. Such modifications could void the user’s authority to operate the equipment. The device has been evaluated to meet general RF exposure requirements. The device can be used in portable exposure condition without restriction.NOTE: This equipment has been tested and found to comply with the limits for a Class B digital device, pursuant to part 15 of the FCC Rules. These limits are designed to provide reasonable protection against harmful interference in a residential installation. This equipment generates, uses and can radiate radio frequency energy and, if not installed and used in accordance with the instructions, may cause harmful interference to radio communications. However, there is no guarantee that interference will not occur in a particular installation. If this equipment does cause harmful interference to radio or television reception, which can be determined by turning the equipment off and on, the user is encouraged to try to correct the interference by one or more of the following measures: —Reorient or relocate the receiving antenna. —Increase the separation between the equipment and receiver. —Connect the equipment into an outlet on a circuit different from that to which the receiver is connected. —Consult the dealer or an experienced radio/ TV technician for help.ISED Certification Number: 9896A-ST100Model: ST100Statement: This device complies with Innovation, Science and Economic Development Canada licence-exempt RSS standard(s). Operation is subject to the following two conditions: (1) this device may not cause interference, and (2) this device must accept any interference, including interference that may cause undesired operation of the device. CAN ICES-3(B)/NMB-3(B)Le présent appareil est conforme aux CNR Innovation, Sciences et Développement économique Canada applicables aux appareils radio exempts de licence. L’e xploitation est autorisée aux deux conditions suivantes: (1) il ne doit pas produire de brouillage et (2) l’utilisateur du dispositif doit étre prêt à accepter tout brouillage radioélectrique reçu, même si ce brouillage est susceptible de compromettre le fonctionnement du dispositif. CAN ICES-3(B)/NMB-3(B)The device has been evaluated to meet general RF exposure requirements. The device can be used in portable exposure condition without restriction.L’appareil a été évalué pour répondre aux exigences générales d’e xposition aux radiofréquences. L’appareil peut être utilisé en condition d’e xposition portable sans restriction.*****************。
INMOTION R1(乐行平衡车)用户手册V1.2

目录1.文档概述 (7)1.1.关于本手册 (7)1.2.驾驶的风险 (7)1.3.驾驶前的准备工作 (7)1.4.相关文档与资料 (8)1.5.相关约定 (8)2.产品概述 (9)2.1.产品尺寸 (9)2.2.产品序列号 (10)2.2.1.产品参数概述 (10)2.3.产品工作原理 (11)2.4.产品主要组成部分 (13)2.5.安装乐行体感车 (14)2.5.1.检查包装箱 (14)2.5.2.组装乐行体感车 (14)2.6.遥控器 (16)2.6.1.遥控器的按钮与显示界面 (17)2.6.2.遥控器的功能与操作 (20)2.7.人机面板与声音提示 (22)2.7.1.人机面板 (22)2.7.2.声音提示 (24)2.8.车体工作模式 (24)2.8.1.车体工作模式简介 (24)2.8.2.各工作模式之间的状态转换图 (26)2.9.车灯 (27)2.10.脚踏传感器 (27)2.11.通讯与外部接口 (28)2.11.1.WIFI接口 (28)2.11.2.GPRS与GPS (29)B充电接口 (30)2.12.手机客户端 (30)3.使用乐行体感车 (31)3.1.骑行乐行体感车 (31)3.1.1.驾驶前的注意事项 (31)3.1.2.启动乐行体感车 (32)3.1.3.上车 (33)3.1.4.前进后退 (34)3.1.5.减速停车 (35)3.1.6.转向 (36)3.1.7.下车 (37)3.1.8.保护您的乐行体感车 (38)3.1.9.关机 (38)3.2.驾驶练习 (38)3.3.新手模式与普通模式 (39)3.4.助力模式 (39)3.5.自动行走模式 (40)3.5.1.遥控模式 (40)3.5.2.动作序列 (40)3.6.自检模式 (41)3.7.安全警报 (42)3.7.1.过速保护 (42)3.7.2.安全停车 (43)3.7.3.振动提示 (44)3.8.环境因素对整车性能的影响 (45)3.8.1.行驶里程 (45)3.8.2.高温骑行 (45)3.8.3.低温骑行 (46)3.8.4.爬坡 (46)3.8.5.下坡 (46)4.电池使用 (47)4.1.安全使用电池 (47)4.2.电池规格 (47)4.3.充电 (48)4.3.1.充电方法 (48)4.3.2.充电指示 (49)4.4.更换电池 (49)4.5.电池运输 (50)5.安全驾驶注意事项 (52)5.1.必须遵守的事项 (52)5.2.严格禁止的事项 (53)5.3.文明安全驾驶注意事项 (54)6.保养与维护 (56)6.1.搬运 (56)6.1.1.使用方向操纵杆搬运 (56)6.1.2.使用提手搬运 (56)6.2.清洁 (57)6.3.存放 (57)6.4.保养 (57)7.常见故障处理 (59)7.1.常见故障列表 (59)7.2.无法开机 (60)7.3.无法进入载人模式 (61)7.4.容易出现抖动 (61)7.5.转向出现问题 (61)7.6.无法关机 (62)7.7.手机客户端无法连接乐行体感车 (62)8.联系方式与法务信息 (63)8.1.问题反馈 (63)8.2.联系我们 (63)8.3.遵守当地法律条款 (63)1.文档概述1.1.关于本手册为了您的驾驶安全,在使用乐行体感车之前请仔细阅读本手册,并请认真观看驾驶指导视频,确保能够按照正确的指导驾驶乐行体感车。
SML自平衡车SML160用户手册黑马

目录一、导言 (1)二、产品基本概况 (2)三、使用方法/注意事项/指示灯含义 (5)四、保养方法 (14)五、售后/保修卡(附保修单) (16)1234是否正常;开机检查电力是否充足(参阅指示灯含义),确保电池电量处于饱满状态。
3)防护准备:我们建议您在骑行SML自平衡车,特别是初学时,佩戴头盔、护膝、护肘等防护装备,以防发生意外,对您造成不必要的人身伤害。
十五岁以下儿童请在成人协助下学习和使用SML 自平衡车。
一切准备就绪,按照以下步骤,开始您的SML探知之旅吧!567c.双手置于扶手手柄处,将双腿分别置于SML自平衡车两侧,尝试将一只脚踏在踏板上,站稳后,将另一只脚踏上踏板,同时保持身体直立且放松,目光直视前方。
d.身体微微前倾/后仰,此时SML自平衡车已经开始跟着你的身体一起前进或后退了,试着再恢复到直立状态,反复多次,直到你找到这种独特的骑行感觉。
注意:在骑行过程中,切勿剧烈晃动车体,身体倾斜角度不可过大。
89b.在初级学习的基础上,相信您已经找到了控制SML自平衡车的感觉,在中级学习中,您需要注意的是:单腿上车时,利用伸缩式扶手保持车子平稳后,尝试单腿滑行,另一只脚在车子另一侧轻点地面,身体保持直立(微微向前倾),这样的骑行尝试就如骑自行车一样,直至能平稳滑行为止。
10c.单腿向前滑行时,将另一只脚踏到踏板上,身体直立,保持一定的前行惯性。
通过控制左右脚踏板力度配合扶手来控制身体平衡。
按以上步骤来练习,相信你,已经可以骑行一段直线距离了!骑行要领:身体放松,目视前方,着力于脚掌,手握扶手,保持直立,重心微调改变前后速度。
d.现在可以开始练习转弯了!前期的练习是关键,如果你已经可以很自如地直线骑行,那么,转弯也是水到渠成的技能了。
转弯时,身体保持直立,着力点还是在脚掌,通过左右脚的力度来控制车子的倾斜角度,达到转弯的效果。
11给SML自平衡车充电时,请注意以下几点:1)确保在干燥、干净的环境下进行充电,输出电压保证在180v-240v之间,另一端连接SML自平衡车充电接口,充电器指示灯红灯表明正在充电。
乐行体感车产品介绍
乐行体感车产品简介产品介绍产品定位产品功能及应用场景产品设计产品配件产品规格参数产品介绍通过感知身体重心变化而运动的智能体感科技产品由深圳乐行天下科技有限公司独立研发、生产与销售英文名称,SCV是Sensor Controlled Vehicle的英文缩写意指:由传感器操控的车辆产品工作原理后退原地静止前进乐行体感车是通过惯性导航系统来判断车身所处的姿态,然后由精密高速中央微处理器计算出适当的指令后,驱动马达来做到平衡的效果。
产品定位乐行体感车是集科技、时尚、玩趣、环保于一体的智能体感终端。
科技时尚玩趣环保产品定位产品功能及应用场景应用场景个人代步五公里范围内的最佳代步工具乐行体感车轻便小巧,可以自由行使于城市的道路,是您公园或展会游览、五公里范围内上下班的最佳工具。
亲子互动作为一款智能的娱乐科技产品,乐行体感车具有移动拍摄、手机APP 互动、远程视频监控控制等功能,可拉近您与孩子的距离,无论身处何方,都可以实现亲情互动。
汽车搭配使用搭配乐行SCV配件,可以将体感车轻松的放置于汽车的后备箱中,在您驾车到达目的地之后,完成小段距离的代代步,比如到达公园、景区都可以取出乐行SCV用于短距离的代步使用。
巡防可满足各行业安保巡逻需求,包括城管、机场、高铁站、关口、楼盘物业、高尔夫球场等,使用乐行SCV可以节约巡逻人员体力和巡逻时间,提高巡防效率。
移动拍摄:由于体感车具有重力平衡的特点,您只需站在车体保持不动,即可以和DV、相机或手机结合成智能拍摄移动平台,媲美专业拍摄轨道。
节省体力之余,享受自由拍摄乐趣。
编舞编曲:通过事先在手机客户端设置的动作顺序让乐行体感车自动执行这些动作,而不需要人工的参与,它可以实现一些特殊的功能,如让乐行体感车跳舞等。
远程操控:通过移动设备中的APP或者网页来控制乐行体感车的行走与定位,这样就可以轻松完成远程监控、移动会话等操作,让沟通近在咫尺。
远程监控产品设计整车外观乐行体感车颠覆传统的设计,将顶级跑车的流线型元素融入到车体的每个设计细节中,极致炫酷,动感十足。
乐行天下P2说明书
乐行天下P2说明书乐行天下P2电动车说明书:一、主要技术性能要求:1、电动车最高时速应不大于20km/h。
2、电动车的整车质量应不大于40kg。
3、电动车须有良好的脚踏骑行功能。
4、电动自行车一次充电后续行里程应不小于25km。
5、电动自行车以最高车速作电动匀速骑行时的噪声应不大于62db。
6、百公里电耗应不大于1.2kwh。
7、电动自行车的电动机额定连续输出功率应不大于240W。
二、整车安全要求:1、电动自行车以最高车速电动骑行时,其干态制动距离应不大于4m,湿态制动距离应不大于15m。
2、电动自行车车轮的轮胎宽度应不大于54mm。
车架/前*组合冲击/震动强度把立管、把横管、车轮、鞍座、脚蹬应符合GB3565-1993 规定。
3、电动车应装有前灯和前反射器、后反射器、侧反射器,还应装有鸣号装置。
4、电器系统要安装到位,极性正确,系统的电器装置应符合GB3565 -1993的要求。
电器配线应与电流量相适应,以确保电动骑行的安全可。
5、对电器系统采取防雨措施,系统所用的接线均不应裸露,车体和电器部件的外壳不应带电,其绝缘电阻值应不小于2MQ。
6、电动自行车的蓄电池应有良好的密封性。
在正常安装位置条件下,充、放电时不应有渗漏液现象。
蓄电池的标称电压应不大于48V。
7、电动自行车应有制动断电装置,在制动时应能先自动切断电源。
8、电动自行车的控制器应具有欠压、过流保护功能和短路保险装置。
在电动骑行时,调速应稳定。
三、整车装配要求:1、电动自行车应按型号要求组装,不得错装和漏装。
2、电动自行车各紧固件应紧固到位,各转动部件应运转灵活。
3、各对称部件应于车架中心面左右对称,不能有明显的偏斜。
4、变速装置和制动系统应装配正确,操纵灵活。
5、电动自行车的不动件不允许与运动部件相碰擦。
6、轮辋径向、端面圆跳动量、前后轮辋与前*、车架平、立*两边间隙相对偏差、前后轮中心面相对偏差均符合GB/T3566-1993中的规定。
inmotion v3 使用手册说明书

使用手册1.IntroductionINMOTION V3 is a self-balancing unicycle type SCV (Sensor Controlled Vehicle). It is stylish, fun and practical, integrated with a unique hidden draw-bar, auto-switch lights, a touch screen, a slide-to-open charging port and built-in high quality Bluetooth speakers. INMOTION V3 is easy to learn, safe to ride, practical to commute.提手按钮提手握开关灯装饰板拉杆组件脚踝护垫动力电机充电口触摸开小腿护脚踏橡胶轮停车脚垫蓝牙音箱前/后灯提手按钮 Draw-bar Button提手握 Handlebar拉杆组件 Draw-bar Assembly复位开关 Reset Button充电口 Charging Port前/后灯 Lights装饰板 decorating plate脚踝护垫 Ankle Pad动力电机 Motor触摸开关 Touch Screen小腿护垫 Calf Pad蓝牙音箱 Bluetooth Speaker脚踏板 Footboard停车脚垫 Stop-stand Rubber橡胶轮胎 Tire2.PackagingINMOTION V3 package includes the following parts when leaves the factory. Please check carefully before using the product, any missing or visible damaged parts should be reported to your dealer immediately.manual1 INMOTOIN2 User’sV33 Charger Adaptor4 Warranty card, Product Certificate3.Safety AlertINMOTION V3 balances front and back, and stands by itself with its two tires. INMOTION V3 is a reliable product and it has gone through many rigid tests. Due to its new idea of driving, we still ask you to follow all the instructions in this manual and be careful with all the warnings and cautions.You may risk falling off/over, crashing, losing control of the vehicle and so on if you do not follow the instructions to ride INMOTION V3. Again please carefully and thoroughly read this manual and watch related safety videos.3.1Warningz Wear a helmet, elbow and knee protection when riding the INMOTION V3.z Do not ride on steep slopes that are over 20 degrees.z Do not accelerate and decelerate hardly or abruptly on the slopes.z Pay attention to obstacles and be careful of skid when riding the INMOTION V3.z Do not ride on grass.z Do not ride on pebble roads or any other unsmooth surfaces.z Do not drive into water that is over 170 mm.3.2Prohibitionz Do not go up and down stairs or spring off the ground with the INMOTION V3.z Do not ride the INMOTION V3 on motor roads. Some local authorities forbid the use of Sensor Controlled Vehicles on public roads and sidewalks. Please consult localauthorities to become familiar with applicable laws and regulations before riding.z Do not dip the INMOTION V3 into water.z Do not drive the INMOTION V3 over 20 km/h (12 mph).z Do not accelerate hardly when the INMOTION V3 is not totally balanced.z Do not sit on the draw-bar or any other parts when riding.4.General Information4.1DimensionsFigure 2.1 INMOTION V3 Dimensions4.2Display PanelFigure 2.2 Display PanelLightPowerSlide Direction5.How to Use5.1Power OnTouch the Power icon and gently slide towards the arrow direction (Figure 3.1).5.2Hibernation and Shutdownz Touch the Power icon and slide towards the arrow direction to hibernate the system. In between you may also hear a sound prompt. In hibernation mode, if the system is leftunoperated for 2 hours, the system will automatically shut down.z You can directly shut down the system in hibernation mode by pressing the end of the scrolling bar for about 5 seconds.z If the remain power is less than 10%, the hibernation action will also directly shut the system down.Tip: if the touch panel is not responding, or the system cannot be shut down in an emergent situation, please lay flat the INMOTINO V3 for 2 times in 3 seconds and you will hear “Please be careful”, then you can possibly shut down the system.5.3LightPower on the system and slide your finger from right end to left end (towards the opposite arrow direction), the lights on both sides will be illuminated in white. Roll the INMOTION V3 in a direction, the front light will illuminate in white with full brightness and the back light will turn into red. The lights will automatically change in white and red according to the riding direction of INMOTION V3.5.4Bluetooth SpeakerThe built-in Bluetooth module is automatically activated when the INMOTION V3 ispowered on.Turn on Bluetooth on your cellphone, search and pair the Bluetooth signal of the INMOTION V3 (Figure 3.4). If the signals are successfully paired, you may play music through the INMOTION V3’s Hi-Fi loud speakers.5.5Assist ModePress down the draw-bar button, pull up the handle till the highest and then release the button. Now you can trolley the INMOTION V3 like a suitcase.Figure 3.55.6Power IndicatorThere are two battery indicators along the two sides of the touch panel. Each has 6 bars, if the power is over 90%, all 6 bars are illuminated, and if the power is less than 20%, only 1 barwill be illuminated. 5.7 Charge INMOTION V3Slide to open the charging port to charge. If the INMOTION V3 is charging, the charging indicator on the Charger Adapter illuminates in red and the Battery Indicator Bars are rolling up and down. If the INMOTION V3 is fully charged, the charging indicator is in blue.Figure 3.6 5.8 Voice PromptThe system’s default prompt language is Chinese or English, you can change to other languages IF available through INMOTION APP. Here below are some basic voice prompts:1 Welcome2 Hibernation3 Lock4 Unlock5 Low Battery6 Charging7 Power full8 Overload, please get off9 Light is on 10 Light is off 11 Please slow Down 12 Power off13 Please Repair14 Please don’t move the device 15 Data Bluetooth connected 16 Data Bluetooth disconnected 17Music Bluetooth connected18Music Bluetooth disconnected19 Please be careful 205.9ResetWhen unknown errors or abnormal situations occurred, you can press the Reset button to turn off the INMOTION V3 completely.The Reset button can be seen after sliding the charging port cover to the right and it is on the left side of the charging port.5.10Water and Dust ProofV3 is rated IP55 for water and dust proof. It can maximally pass through 170 mm deep water.5.11Over Speed ProtectionWhen the speed is over 18 km/h (11 mph), the footboard will lean back at about 3~4°. The rider can continuously drive at the current speed. If the speed over 20 km/h (12 mph), the footboard will lean back to protect the rider’s safety.5.12Side-tipping ProtectionWhen the INMOTION V3 is side tipping over 45°, it will regard it as an abnormal situation and will exit balance mode, while there will be a voice prompt “Please be careful”. Place the INMOTION V3 to stand and then it will automatically balances itself again.5.13Over Discharge ProtectionThe system of INMOTION V3 will automatically cut off the entire power when the battery islow under hibernation or power off mode. Low battery will make INMOTION V3 to lean back to warn the rider, there will also be a voice prompt.The system will protect the battery from over discharging when it is powered off. You may wake the V3 by charging the battery, if the INMOTION V3 is still not awaken please contact your dealer for a diagnosis.5.14Smart Phone ApplicationThe Application for INMOTION V3 works via Bluetooth 3.0 to connect the vehicle, it is suitable for Android 4.3 and above, iOS 7.0 and above (iPhone 4s and later models only). Some functions are listed as below:1 My SCV2 Parameter settings3 My Profile4 My Route5 Firmware Update6 Sound Customization7 Social 8 Diagnosis9 Log 10 ServiceFor more information about the INMOTION APP, please visit 6.Maintenance6.1DepositInappropriate store the INMOTION V3 may cause damage to the battery, please pay special attention to below warnings.z The best storage temperature is about 20 ℃ (68 ℉). Too high or too low temperature should be avoided.z Please avoid strong humidity.z Please charge the INMOTION V3 at least one time a month event it is powered off.6.2InflationPlease inflate tires in time to make sure the pressure of the two tires are the same. The default tire pressure is 3.5 Bar.6.3Change TireIf you need to change the tires, please contact an authorized INMOTION service center or your dealer.6.4Adjust FootboardPlease use a M8 screwdriver to adjust the tightness of the footboards if needed.6.5CleaningPlease gently clean the INMOTION V3 cases with a piece of soft cloth with clear water or soap water.6.6WarrantyINMOTION provides below warranties for non-human made malfunctions and damages for INMOTION V3.One year warranty for the entire vehicle (Battery and Tires excluded)6 months for the Battery3 months for both inner/outer tiresAppendix: parameters No. Item Value Note1Max. Speed18 km/h (11 mph)This speed is tested with a 75 kg (165 lbs) payload.2Distance per charge20~25km (12.5~15.5 miles)The distance per charge is obtained under the following test conditions: room temperature, 75 kg (165 lbs) payload and smooth terrain.3 Climbing Angle 18°4 Recommended best operating temperature -10~40℃(14~104°F)5 Max load 120 kg (265 lbs)6 Charge time 1.5 H 7Power requirementsAC 100-230 V 50~60 Hz8 Dimensions 420 x 515 x 178 mm 9 Tire size 14 inches 10Weight13.5 kg (30 lbs)7. Operation and Learning 7.1PreparationWhen you attempt the first use, please wear comfortable clothes and shoes. We strongly suggest the beginners to wear a helmet and other protections to avoid serious injuries.Please take the INMOTION V3 onto smooth roads in an open space and then start to learn. 7.2 8 Stepsz Hold the INMOTION V3 still and power it on.z Unfold the footboards and stand one foot on one footboard with force. z Press your calf against the calf pad and push inward to another leg.z Now practice sliding the vehicle forward with only one foot on, while another footpushing off the ground.z Make sure that the INMOTION V3 would always be right in the middle of your legs and not go other directions.z Keep your body straight up and get relaxed, look forward and naturally get on another foot. When you lift another foot off the ground, your body weight is slightly shifting to the foot standing on the footboard.z It is better that someone can hold your arms to help you get balanced or you can learn to get on the vehicle by pushing your hands against a wall.z Try to find your balance standing both feet on the INMOTION V3 and relax your calves. z Someone can hold your arms and lead you drive forward and backward.z When you get used to the feeling, now try to learn forward to go forward and lean backward to go backward.z Learn how to turn is always hard, make sure you are able to drive forward and backward very smoothly.z When you want to turn, twist your upper body towards the direction and push the INMOTION V3 inward. Your upper body will naturally move to the opposite direction to keep you balanced.z Since INMOTION V3 actually has two tires, it is easier to turn with one tire touching the ground and another off the ground.7.3Cautionsz Beginners who are under 18 or over 45 need someone as an assistant to help learn.z Please make sure the battery is fully charged before use and the tires are properly inflated. z Please do not drive fast before you are familiar with riding it. Please accelerate slowly.For more information, please visit our official website .INMOTION Customer Care Center: 4000-1000-12+86 (0)755-8209-17688.Warranty CardCustomer purchase information registrationCustomer name Serial Number Purchasing dateTelephoneE-mailCustomer’s addressDealer’s Name Dealer’s telephoneDealer’s address9. Maintenance recordDate Description of malfunctionSolution Authorized SignatureRemarkLimitation for warrantyThe obligations and responsibilities of warranty of INMOTION for the products and accessories, are restricted to free maintenance of reparation and replacement of defective parts within warranty periods. INMOTION assumes no responsibility (also does not authorize any third party to assume the responsibility) for service beyond this scope. Liability exemption is including but not limited to labor force losses, property losses, and other losses caused during the maintenance period. This limited warranty term is the only applicable guarantee clause for the maintenance towards the INMOTION SCV and its spare parts. INMOTION does not endorse any other guarantee or implied guarantee beyond this limited warranty term. INMOTION assumes no responsibility for other commitments that you make with the third party. This regulation comes into force from the day of its promulgation. The PICC (People’s Insurance Company of China) insures the INMOTION SCV series products. INMOTION Technologies Co., Ltd. Reserves the right of final explanation, reproduction, and revision for the contents in this warranty card.FCC Caution: Any changes or modifications not expressly approved by the party responsible for compliance could void the user's authority to operate this equipment.This device complies with Part 15 of the FCC Rules. Operation is subject to the following two conditions: (1) This device may not cause harmful interference, and (2) this device must accept any interference received, including interference that may cause undesired operation.NOTE: This equipment has been tested and found to comply with the limits for aClass B digital device, pursuant to Part 15 of the FCC Rules.These limits are designed to provide reasonable protection against harmful interference in aresidential installation. This equipment generates, uses and can radiate radiofrequency energy and, if not installed and used in accordance with theinstructions, may cause harmful interference to radio communications.However, there is no guarantee that interference will not occur in a particular installation.If this equipment does cause harmful interference to radio or television reception,which can be determined by turning the equipment off and on, the user is encouraged totry to correct the interference by one or more of the followingmeasures:-- Reorient or relocate the receiving antenna.-- Increase the separation between the equipment and receiver.-- Connect the equipment into an outlet on a circuit different from that to which thereceiver is connected.-- Consult the dealer or an experienced radio/TV technician for help.。
- 1、下载文档前请自行甄别文档内容的完整性,平台不提供额外的编辑、内容补充、找答案等附加服务。
- 2、"仅部分预览"的文档,不可在线预览部分如存在完整性等问题,可反馈申请退款(可完整预览的文档不适用该条件!)。
- 3、如文档侵犯您的权益,请联系客服反馈,我们会尽快为您处理(人工客服工作时间:9:00-18:30)。
目录1.文档概述 (7)1.1.关于本手册 (7)1.2.驾驶的风险 (7)1.3.驾驶前的准备工作 (7)1.4.相关文档与资料 (8)1.5.相关约定 (8)2.产品概述 (9)2.1.产品尺寸 (9)2.2.产品序列号 (10)2.2.1.产品参数概述 (10)2.3.产品工作原理 (11)2.4.产品主要组成部分 (13)2.5.安装乐行体感车 (14)2.5.1.检查包装箱 (14)2.5.2.组装乐行体感车 (14)2.6.遥控器 (16)2.6.1.遥控器的按钮与显示界面 (17)2.6.2.遥控器的功能与操作 (20)2.7.人机面板与声音提示 (22)2.7.1.人机面板 (22)2.7.2.声音提示 (24)2.8.车体工作模式 (24)2.8.1.车体工作模式简介 (24)2.8.2.各工作模式之间的状态转换图 (26)2.9.车灯 (27)2.10.脚踏传感器 (27)2.11.通讯与外部接口 (28)2.11.1.WIFI接口 (28)2.11.2.GPRS与GPS (29)B充电接口 (30)2.12.手机客户端 (30)3.使用乐行体感车 (31)3.1.骑行乐行体感车 (31)3.1.1.驾驶前的注意事项 (31)3.1.2.启动乐行体感车 (32)3.1.3.上车 (33)3.1.4.前进后退 (34)3.1.5.减速停车 (35)3.1.6.转向 (36)3.1.7.下车 (37)3.1.8.保护您的乐行体感车 (38)3.1.9.关机 (38)3.2.驾驶练习 (38)3.3.新手模式与普通模式 (39)3.4.助力模式 (39)3.5.自动行走模式 (40)3.5.1.遥控模式 (40)3.5.2.动作序列 (40)3.6.自检模式 (41)3.7.安全警报 (42)3.7.1.过速保护 (42)3.7.2.安全停车 (43)3.7.3.振动提示 (44)3.8.环境因素对整车性能的影响 (45)3.8.1.行驶里程 (45)3.8.2.高温骑行 (45)3.8.3.低温骑行 (46)3.8.4.爬坡 (46)3.8.5.下坡 (46)4.电池使用 (47)4.1.安全使用电池 (47)4.2.电池规格 (47)4.3.充电 (48)4.3.1.充电方法 (48)4.3.2.充电指示 (49)4.4.更换电池 (49)4.5.电池运输 (50)5.安全驾驶注意事项 (52)5.1.必须遵守的事项 (52)5.2.严格禁止的事项 (53)5.3.文明安全驾驶注意事项 (54)6.保养与维护 (56)6.1.搬运 (56)6.1.1.使用方向操纵杆搬运 (56)6.1.2.使用提手搬运 (56)6.2.清洁 (57)6.3.存放 (57)6.4.保养 (57)7.常见故障处理 (59)7.1.常见故障列表 (59)7.2.无法开机 (60)7.3.无法进入载人模式 (61)7.4.容易出现抖动 (61)7.5.转向出现问题 (61)7.6.无法关机 (62)7.7.手机客户端无法连接乐行体感车 (62)8.联系方式与法务信息 (63)8.1.问题反馈 (63)8.2.联系我们 (63)8.3.遵守当地法律条款 (63)1.文档概述1.1.关于本手册为了您的驾驶安全,在使用乐行体感车之前请仔细阅读本手册,并请认真观看驾驶指导视频,确保能够按照正确的指导驾驶乐行体感车。
知晓本手册所列出的所有安全警告和注意事项,有助于您更好的驾驶乐行体感车。
本手册适用于深圳乐行天下科技有限公司所生产的INMOTION R1以及INMOTION R1S两种型号的产品。
如果您有任何疑问,或无法从本手册中获取您所需的信息,请及时联系乐行天下授权代理商或乐行天下售后部门。
1.2.驾驶的风险乐行体感车是一个具有自动平衡系统的智能代步与生活娱乐辅助工具,其技术与生产过程进行了严格的检验,但是,当您不按照本手册所规定的安全警示来使用,将有可能给您带来伤害。
1.3.驾驶前的准备工作开始使用前,首先需要将乐行体感车组装起来并确认组装到位,将电池持续充电5小时以上,具体的部件安装与电池充电方法,请查看本手册的“2.5安装乐行体感车”以及“4.3充电”章节。
1.4.相关文档与资料乐行体感车《用户手册》的PDF格式文档,《安全视频》的视频文件,手机客户端及其帮助文档,均可从深圳乐行天下科技有限公司官方网站:下载。
1.5.相关约定2.产品概述2.1.产品尺寸2.2.产品序列号产品序列号是产品的唯一标识符,用于产品的质量追踪、售后服务、保险索赔、丢失确认等。
请务必将该序列号记录并保存好。
产品序列号是一个由16个字符组成的序列,通常伴随着一维条形码。
您可以从以下的位臵获取产品的序列号:产品外包装上获取;产品保修卡上获取;从车体上获取,(具体位臵为取下电池后的车体电池腔内)。
2.3.产品工作原理乐行体感车的工作原理,类似人体自身的平衡系统,当身体重心前倾时,为了保证平衡,您需要往前走;重心后倾时同理。
在驾驶乐行体感车的时候,乐行体感车的两个轮子就代替了双脚,同样,当您前倾时,系统会自动感应到,并精确地驱动轮子向前运动,以保持平衡;当重心后倾时,轮子也会向后运动。
乐行体感车采用动态平衡原理,利用其内部的陀螺仪和加速度传感器,来检测车体姿态的变化,并利用伺服控制系统,精确地驱动电机进行相应的调整,以保持系统的平衡。
当您旋转方向操纵杆时,系统会相应地控制左右两边的速度差,实现转向。
在骑行时,将方向操纵杆指向您需要前进的方向,车体将会朝着您指向的方向行驶。
当方向操纵杆处于车体正中间位臵时,系统将朝正前方行驶。
在转向时,让您的身体跟随方向操纵杆倾斜的方向倾斜,将会获得更好的转向体验。
2.4.产品主要组成部分2.5.安装乐行体感车2.5.1.检查包装箱2.5.2.组装乐行体感车第一步:将把手握按图示方向插入伸缩杆组件上杆(即比较纤细的那段伸缩杆)中,用螺丝锁紧(螺丝和锁紧工具均有配送,请注意把手握的前后方向)。
第二步:在快拆锁紧扣松开的状态下,将第一步安装好伸缩杆按图示方向插入乐行体感车的转向接头上,直插到底后,用快拆锁紧扣扣紧即可(注意:当伸缩杆未插到底时快拆锁紧扣将无法扣紧)。
安装好的这部分叫方向操纵杆,它包括把手握、伸缩杆组件、转向接头三个部分,需要时您可通过快拆紧锁扣快速拆装方向操纵杆;第三步:从乐行体感车电池组包装盒中取出电池。
将车体向前倾斜,并扶稳车体。
按照图示3方向将电池对准电池槽,用力将电池顺着方向往插槽里推,当听到“嗒”的一声后,请您再尝试轻拉一下电池如无法拉出即表示已经安装到位;第四步:按下乐行体感车主体后部圆形启动按钮,车体前灯尾灯同时点亮1秒,然后熄灭,以提示车体已经从睡眠模式激活,此时便可使用遥控器正常操作乐行体感车。
2.6.遥控器乐行体感车的遥控器是一个可充电式、可升级、带有信息显示和控制功能的设备。
您可以使用遥控器对乐行体感车进行操作,并监控其工作状态。
遥控器拥有3个控制按钮和一个LCD电子显示屏,遥控乐行体感车的有效通讯距离为5~10m(取决于工作环境和使用方法)。
遥控器尾端具有USB接口,您可以通过Micro USB连接线连接电脑来查看车体信息,同时此连接也可以给遥控器充电,遥控器自身电量不足时会有电量不足的标志提示,约2个小时可完成遥控器的充电。
2.6.1.遥控器的按钮与显示界面遥控器的显示界面,可以显示乐行体感车的工作状态和提示信息,如速度,里程,电量等。
其显示区域如下图所示:2.6.2.遥控器的功能与操作与乐行体感车车体相关的方面,遥控器具备开机、关机、锁车、解锁等功能;遥控器自身方面,具备启动、关闭遥控器,配对,进入、退出SHIFT模式、开启屏幕背光等功能。
这些功能都通过3个按键来触发,因此需要用到不同的按键方式来实现相应的功能。
遥控器的按键分为点击、长按和组合按键3种操作方式,其中,点击定义为按键按下后立即释放,长按定义为按下按键大于2秒(长按功能触发后,在按键释放之前不会重复触发),组合按键仅包含开机+切换键这一组合形式,其定义为首先按住开机键不放,然后点击切换键。
由于遥控器功能较为复杂,因此,系统设计了一个SHIFT模式,将一些不常用的功能放在了SHIFT模式下。
即进入SHIFT 模式后,所有的按钮动作将会表示不同的意义。
说明:表格中“N/A”表示该按键在该状态下无作用。
部分功能在载人时执行可能会导致危害,所以这部分功能只有在车体处于非载人状态下操作才生效,包括:关机、锁车/解锁、自检、进入/退出助力模式和关闭车体电源。
锁车/解锁具体功能取决于当前状态,若当前为锁车状态,则为解锁功能,否则为锁车功能。
遥控器背光开启后,30秒内没有按键动作,则自动关闭背光。
载人模式下,点击开机键,可播放喇叭提示音。
当车体关机、遥控器休眠的情况下,长按开机键可唤醒遥控器。
除了在SHIFT模式下通过长按锁车键可关闭遥控器之外,在一定时间内无按键动作产生,遥控器也会自动关闭。
超时时间根据遥控器与车体的状态不同而不同,具体如下:遥控器未与车体配对时:1分钟;遥控器已与车体配对,但是失去连接或车体不处于载人模式时:3分钟;遥控器已与车体配对并连接,且车体处于载人模式时:10分钟。
遥控器关闭后,可通过点击切换键重新开启。
2.7.人机面板与声音提示2.7.1.人机面板人机面板是车体上用于描述车体的工作状态的LED显示界面,如下图所示:2.7.2.声音提示乐行体感车内臵一个扬声器,可以根据不同的工作模式和状态进行声音提示。
在默认情况下,声音是打开的,如果驾驶者希望静音,可以使用手机客户端设臵关闭声音提示。
为了更大程度上的增加您对车体掌控的自由度,您可以通过手机客户端,对各种不同的事件和状态的声音进行自定义。
具体操作,请查看相关客户端的帮助文档。
2.8.车体工作模式2.8.1.车体工作模式简介乐行体感车存在十多种工作模式,这里将对其中一些重要的工作模式进行简单描述:2.8.2.各工作模式之间的状态转换图2.9.车灯乐行体感车设计有炫酷的蓝色LED前灯和红色LED尾灯。
LED前灯和尾灯在乐行体感车在运行时会根据不同的操作对在遥控器的SHIFT 模式下,通过点击切换键,可以控制前灯常亮,或者恢复默认模式;若需要完全关闭前灯和尾灯,可以在手机客户端里进行操作进行关闭,关闭之后,遥控器将不能对此功能进行操作。
2.10.脚踏传感器乐行体感车采用脚踏传感器来检测人是否踏在踏板上。
脚踏传感器的原理类似于体重秤,其可分辨出单脚,双脚,以及是否载重。
脚踏传感器的引入,可以帮助乐行体感车更好地识别出人在车上的状态,有利于系统对新手模式下的各种状态的处理。
同时,脚踏传感器的引入,带来的一个全新功能,即可以获得驾驶者的体重,该体重将可以在手机客户端上显示出来,方便您观察自己的体重变化。