Revizto BIM云平台操作手册
Revit软件操作

案例一
01
某高速公路项目
案例二
02
某桥梁工程
案例三
03
某隧道工程
公楼机电安装项目
案例三
某酒店机电安装项目
06 未来发展与展望
新功能更新
增强的协同设计功能
未来版本的Revit可能会增加更强大的协同 设计工具,使多团队成员之间更高效地协作 。
智能化建模辅助
参数化驱动
在Revit中,用户可以使用参数化驱动来自动化一些常见的建模任务。例如,通过设置参数来自动调整 墙体的厚度、高度等属性,提高建模效率。
协同设计
协同设计
协同设计是指多个设计师或团队之间通过共享数据和文件来共同完成一个设计任 务的过程。在Revit中,协同设计可以通过链接、工作共享和协同视图等功能实 现。协同设计可以提高设计效率和质量,减少重复工作和错误。
总结词:Revit软件运行缓慢,响应迟钝。
内存不足问题
详细描述:可能是由于模型文件过大、软件设置不当或 系统资源占用过高等原因导致。解决方案包括优化模型 文件、调整软件设置或关闭其他占用资源的程序。
05 应用案例分享
建筑项目
案例一
某商业综合体项目
案例二
某住宅小区项目
案例三
某历史建筑保护项目
基础设施项目
Revit软件操作
目录
CONTENTS
• Revit软件简介 • 基础操作入门 • 高级操作技巧 • 常见问题与解决方案 • 应用案例分享 • 未来发展与展望
01 Revit软件简介
软件概述
1
是一款功能强大的建筑信息模型(BIM)软件, 广泛应用于建筑、结构和机电工程设计领域。
2
支持三维建模、协同设计和建筑信息管理等功能, 为设计师、工程师和承包商提供全面的解决方案。
筑捷BIM协同云平台-v1.6版本产品使用说明书
成都辰联优才科技有限公司筑捷好用的BIM协同云平台目录筑捷BIM协同云平台 (1)第一章前言 (3)第二章系统概述 (3)2.1 筑捷BIM移动端 (3)2.2 筑捷BIM协同平台B/S端 (4)2.3 筑捷BIM协同PC电脑端 (4)第三章APP (4)3.1 登录APP (4)3.1.1 下载筑捷APP (4)3.1.2 登录 (4)3.2 APP首页 (5)3.3 事项管理 (6)3.3.1 简述 (6)3.3.2 创建事项 (6)3.3.3 处理事项 (8)3.3.4 关闭事项 (8)3.3.5 查看事项 (9)3.3.6 快捷创建事项 (10)3.4 消息 (10)3.5 数据统计 (11)3.6 公告 (11)3.7 项目联系人 (12)3.8 设置 (13)3.8.1 使用反馈 (14)3.8.2 检查新版本(限Android) (14)3.8.3 关于我们 (14)第一章前言【筑捷BIM协同云平台】是由成都辰联优才科技有限公司推出的智能建筑工地管理系统,,秉持让工地管理更加高效的理念,将项目工地多方人员连接起来协同办公。
产品以BIM技术为基础,铺以安全管理、质量管理、进度管理、材料管理、数据报表、施工日志、智库等功能模块,贯穿项目设计、施工、运维三个阶段;同时提供物联网管理模块,将闸机、摄像头,LCD/LED 等智能硬件设备无缝连接,解决实名考勤,现场监控,信息展示等工地问题,实现移动端、PC 端的互通互联第二章系统概述2.1筑捷BIM移动端筑捷BIM协同云平台的APP移动端是对工地项目上的现场事务进行管理,主要包括BIM 技术模型查看、安全事项管理、质量事项管理、数据统计分析、消息、公告、项目联系人、智库等模块;用户可借助筑捷BIM协同APP对工地上的现场事务进行管理,实现对工地现场事务的快速处理;2.2筑捷BIM协同平台B/S端筑捷B/S端可查看工地项目上的花名册信息,以及工地人员的刷卡信息数据;并且,可向工地项目上的APP用户发送公告信息;同时,若客户具有多个项目,可切换项目单独查看/操作具体的项目数据。
revit可视化编程插件Dynamo使用手册

revit可视化编程插件Dynamo使用手册Dynamo Language ManualContents1. Language Basics2. Geometry Basics3. Geometric Primitives4. Vector Math5. Range Expressions6. Collections7. Functions8. Math9. Curves: Interpreted and Control Points10. Translation, Rotation, and Other Transformations11. Conditionals and Boolean Logic12. Looping13. Replication Guides14. Collection Rank and Jagged Collections15. Surfaces: Interpreted, Control Points, Loft, Revolve16. Geometric Parameterization17. Intersection and Trim18. Geometric BooleansA-1. Appendix 1: Python Point GeneratorsIntroductionProgramming languages are created to express ideas, usually involving logic and calculation. In addition to these objectives, theDynamo textual language (formerly DesignScript) has been created to express design intentions. It is generally recognizedthat computational designing is exploratory, and Dynamo tries tosupport this: we hope you find the language flexible and fast enough to take a design from concept, through design iterations,to your final form.This manual is structured to give a user with no knowledge ofeither programming or architectural geometry full exposure to avariety of topics in these two intersecting disciplines. Individualswith more experienced backgrounds should jump to the individualsections which are relevant to their interests and problemdomain. Each section is self-contained, and doesn’t require anyknowledge besides the information presented in prior sections.Text blocks inset in the Consolas font should be pasted into aCode Block node. The output of the Code Block should be connected into a Watch node to see the intended result. Imagesare included in the left margin illustrating the correct output ofyour program.This document discusses the Dynamo textual programming language, used inside of the Dynamo editor (sometimes referred to as “Dynamo Sandbox”). To create a new Dynamo script,open the Dynamo editor, and select the “New” button in the “FILES” group:This will open a blank Dynamo graph. To write a Dynamo text script, double click anywhere in the canvas. This will bring up a“Code Block” node. In order to easily see the results of our scripts, attach a “Watch” node to the output of your Code Blocknode, as shown here:Every script is a series of written commands. Some of these commands create geometry; others solve mathematicalproblems, write text files, or generate text strings. A simple, oneline program which gen erates the quote “Less is more.” looks likethis:The Watch node on the left shows the output of the script."Less is more.";1: Language BasicsThe command generates a new String object. Strings in Dynamoare designated by two quotation marks ("), and the enclosed characters, including spaces, are passed out of the node. CodeBlock nodes are not limited to generating Strings. A Code Blocknode to generate the number 5420 looks like this: Every command in Dynamo is terminated by a semicolon. If you do not include one, the Editor will add one for you. Also note thatthe number and combination of spaces, tabs, and carriage returns, called white space, between the elements of a commanddo not matter. This program produces the exact same output asthe first program:Naturally, the use of white space should be used to help improvethe readability of your code, both for yourself and future readers.Comments are another tool to help improve the readability ofyour code. In Dynamo, a single line of code is “co mmented ” withtwo forward slashes, //. This makes the node ignore everythingwritten after the slashes, up to a carriage return (the end of theline). Comments longer than one line begin with a forward slashasterisk, /*, and end with an asterisk forward slash, */.5420;"Less Is More.";So far the Code Block arguments have been ‘literal’ values, either a text string or a number. However it is often more useful for function arguments to be stored in data containers called variables, which both make code more readable, and eliminate redundant commands in your code. The names of variables are up to individual programmers to decide, though each variable name must be unique, start with a lower or uppercase letter, and contain only letters, numbers, or underscores, _. Spaces are not allowed in variable names. Variable names should, though are not required, to describe the data they contain. For instance, a variable to keep track of the rotation of an object could be called rotation. T o describe data with multiple words, programmerstypically use two common conventions: separate the words by capital letters, called camelCase (the successive capital letters mimic the humps of a camel), or to separate individual words with underscores. For instance, a variable to describe the rotation of asmall disk might be namedsmallDiskRotation orsmall_disk_rotation, depending on the programmer’s stylistic preference. To create a variable, write its name to the left of an equal sign, followed by the value you want to assign to it. For instance:Besides making readily apparent what the role of the text string is, variables can help reduce the amount of code that needs updating if data changes in the future. For instance the text of the following quote only needs to be changed in one place, despite its appearance three times in the program.// This is a single line comment/* This is a multiple line comment,which continues for multiplelines. */// All of these comments have no effect on// the execution of the program// This line prints a quote by Mies van der Rohe"Less Is More";quote = "Less is more.";Here we are joining a quote by Mies van der Rohe three times, with spaces between each phrase. Notice the use of the +operator to ‘concatenate’ the strings and variables together toform one continuous output.// My favorite architecture quotequote = "Less is more.";quote + " " + quote + " " + quote;// My NEW favorite architecture quotequote ="Less is a bore.";quote + " " + quote + " " + quote;The simplest geometrical object in the Dynamo standardgeometry library is a point. All geometry is created using specialfunctions called constructors, which each return a new instanceof that particular geometry type. In Dynamo, constructors beginwith th e name of the obje ct’s type, in this case Point , followed bythe method of construction. To create a three dimensional pointspecified by x, y, and z Cartesian coordinates, use theByCoordinates constructor: Constructors in Dynamo are typically design ated with the “By ”prefix, and invoking these functions returns a newly created object of that type. This newly created object is stored in the variable named on the left side of the equal sign, and any use ofthat same original Point.Most objects have many different constructors, and we can usethe BySphericalCoordinates constructor to create a point lyingon a sphere, specified by the sphere’s radius, a first rotation angle, and a second rotation angle (specified in degrees):// create a point with the following x, y, and z// coordinates: x = 10; y = 2.5; z = -6;p = Point.ByCoordinates(x, y, z);// create a point on a sphere with the following radius, // theta, and phi rotation angles (specified in degrees)radius = 5;theta = 75.5;phi = 120.3;cs = CoordinateSystem.Identity();p = Point.BySphericalCoordinates(cs, radius, theta,phi);2: Geometry BasicsPoints can be used to construct higher dimensional geometrysuch as lines. We can use the ByStartPointEndPointconstructor to create a Line object between two points: Similarly, lines can be used to create higher dimensional surface geometry, for instance using the Loft constructor, which takes aseries of lines or curves and interpolates a surface between them.Surfaces too can be used to create higher dimensional solid geometry, for instance by thickening the surface by a specifieddistance. Many objects have functions attached to them, calledmethods, allowing the programmer to perform commands on thatparticular object. Methods common to all pieces of geometryinclude Translate and Rotate , which respectively translate(move) and rotate the geometry by a specified amount.Surfaceshave a Thicken method, which take a single input, a number specifying the new thickness of the surface.// create two points: p1 = Point.ByCoordinates(3, 10, 2);p2 = Point.ByCoordinates(-15, 7, 0.5);// construct a line between p1 and p2l = Line.ByStartPointEndPoint(p1, p2);// create points:p1 = Point.ByCoordinates(3, 10, 2);p2 = Point.ByCoordinates(-15, 7, 0.5);p3 = Point.ByCoordinates(5, -3, 5);p4 = Point.ByCoordinates(-5, -6, 2);p5 = Point.ByCoordinates(9, -10, -2);p6 = Point.ByCoordinates(-11, -12, -4);// create lines:l1 = Line.ByStartPointEndPoint(p1, p2);l2 = Line.ByStartPointEndPoint(p3, p4);l3 = Line.ByStartPointEndPoint(p5, p6);// loft between cross section lines:surf = Surface.ByLoft({l1, l2, l3});Intersection commands can extract lower dimensionalgeometry from higher dimensional objects. This extracted lowerdimensional geometry can form the basis for higher dimensionalgeometry, in a cyclic process of geometrical creation, extraction,and recreation. In this example, we use the generated Solid tocreate a Surface, and use the Surface to create a Curve.p1 = Point.ByCoordinates(3, 10, 2);p2 = Point.ByCoordinates(-15, 7, 0.5);p3 = Point.ByCoordinates(5, -3, 5);p4 = Point.ByCoordinates(-5, -6, 2);l1 = Line.ByStartPointEndPoint(p1, p2);l2 = Line.ByStartPointEndPoint(p3, p4);surf = Surface.ByLoft({l1, l2});// true indicates to thicken both sides of the Surface: solid = surf.Thicken(4.75, true);p1 = Point.ByCoordinates(3, 10, 2);p2 = Point.ByCoordinates(-15, 7, 0.5);p3 = Point.ByCoordinates(5, -3, 5);p4 = Point.ByCoordinates(-5, -6, 2);l1 = Line.ByStartPointEndPoint(p1, p2);l2 = Line.ByStartPointEndPoint(p3, p4);surf = Surface.ByLoft({l1, l2});solid = surf.Thicken(4.75, true);p = Plane.ByOriginNormal(Point.ByCoordinates(2, 0, 0), Vector.ByCoordinates(1, 1, 1));int_surf = solid.Intersect(p);int_line = int_surf.Intersect(Plane.ByOriginNormal(Point.ByCoordinates(0, 0, 0),Vector.ByCoordinates(1, 0, 0)));While Dynamo is capable of creating a variety of complexgeometric forms, simple geometric primitives form the backboneof any computational design: either directly expressed in the finaldesigned form, or used as scaffolding off of which more complexgeometry is generated.While not strictly a piece of geometry, the CoordinateSystem isan important tool for constructing geometry. A CoordinateSystemobject keeps track of both position and geometric transformationssuch as rotation, sheer, and scaling.Creating a CoordinateSystem centered at a point with x = 0, y =0, z = 0, with no rotations, scaling, or sheering transformations,simply requires calling the Identity constructor: CoordinateSystems with geometric transformations are beyond the scope of this chapter, though another constructor allows youto create a coordinate system at a specific point,CoordinateSystem.ByOriginVectors :The simplest geometric primitive is a Point, representing a zero-dimensional location in three-dimensional space. As mentionedearlier there are several different ways to create a point in a particular coordinate system: Point.ByCoordinates creates a // create a CoordinateSystem at x = 0, y = 0, z = 0,// no rotations, scaling, or sheering transformationscs = CoordinateSystem.Identity();// create a CoordinateSystem at a specific location, // no rotations, scaling, or sheering transformations x_pos = 3.6;y_pos = 9.4; z_pos = 13.0;origin = Point.ByCoordinates(x_pos, y_pos, z_pos);identity = CoordinateSystem.Identity();cs = CoordinateSystem.ByOriginVectors(origin,identity.XAxis, identity.YAxis, identity.ZAxis);3: Geometric Primitivespoint with specified x, y, and z coordinates;Point.ByCartesianCoordinates creates a point with a specified x, y, and z coordinates in a specific coordinate system ; Point.ByCylindricalCoordinates creates a point lying on a cylinder with radius, rotation angle, and height; and Point.BySphericalCoordinates creates a point lying on a sphere with radius and two rotation angle.This example shows points created at various coordinatesystems:The next higher dimensional Dynamo primitive is a line segment,representing an infinite number of points between two end points.Lines can be created by explicitly stating the two boundary pointswith the constructor Line.ByStartPointEndPoint , or byspecifying a start point, direction, and length in that direction, Line.ByStartPointDirectionLength .// create a point with x, y, and z coordinatesx_pos = 1;y_pos = 2;z_pos = 3;pCoord = Point.ByCoordinates(x_pos, y_pos, z_pos);// create a point in a specific coordinate systemcs = CoordinateSystem.Identity();pCoordSystem = Point.ByCartesianCoordinates(cs, x_pos,y_pos, z_pos);// create a point on a cylinder with the following// radius and heightradius = 5;height = 15;theta = 75.5;pCyl = Point.ByCylindricalCoordinates(cs, radius, theta, height);// create a point on a sphere with radius and two anglesphi = 120.3;pSphere = Point.BySphericalCoordinates(cs, radius,theta, phi);Dynamo has objects representing the most basic types ofgeometric primitives in three dimensions: Cuboids, created withCuboid.ByLengths ; Cones, created with Cone.ByPointsRadiusand Cone.ByPointsRadii ; Cylinders, created withCylinder.ByRadiusHeight ; and Spheres, created withSphere.ByCenterPointRadius .p1 = Point.ByCoordinates(-2, -5, -10);p2 = Point.ByCoordinates(6, 8, 10);// a line segment between two pointsl2pts = Line.ByStartPointEndPoint(p1, p2);// a line segment at p1 in direction 1, 1, 1 with// length 10lDir = Line.ByStartPointDirectionLength(p1,Vector.ByCoordinates(1, 1, 1), 10);// create a cuboid with specified lengthscs = CoordinateSystem.Identity();cub = Cuboid.ByLengths(cs, 5, 15, 2);// create several conesp1 = Point.ByCoordinates(0, 0, 10); p2 = Point.ByCoordinates(0, 0, 20); p3 = Point.ByCoordinates(0, 0, 30);cone1 = Cone.ByPointsRadii(p1, p2, 10, 6);cone2 = Cone.ByPointsRadii(p2, p3, 6, 0);// make a cylindercylCS = cs.Translate(10, 0, 0);cyl = Cylinder.ByRadiusHeight(cylCS, 3, 10);// make a spherecenterP = Point.ByCoordinates(-10, -10, 0);sph = Sphere.ByCenterPointRadius(centerP, 5);Objects in computational designs are rarely created explicitly intheir final position and form, and are most often translated, rotated, and otherwise positioned based off of existing geometry.Vector math serves as a kind-of geometric scaffolding to give direction and orientation to geometry, as well as to conceptualizemovements through 3D space without visual representation.At its most basic, a vector represents a position in 3D space, andis often times thought of as the endpoint of an arrow from theposition (0, 0, 0) to that position. Vectors can be created withtheByCoordinates constructor, taking the x, y, and z position of thenewly created Vector object. Note that Vector objects are not geometric objects, and don’t appear in the Dynamo window.However, information about a newly created or modified vectorcan be printed in the console window: A set of mathematical operations are defined on Vector objects,allowing you to add, subtract, multiply, and otherwise move objects in 3D space as you would move real numbers in 1D space on a number line.Vector addition is defined as the sum of the components of twovectors, and can be thought of as the resulting vector if the twocomponent vector arrows are placed “tip to tail.” Vector additionis performed with the Add method, and is represented by the diagram on the left.// construct a Vector object v = Vector.ByCoordinates(1, 2, 3);s = v.X + " " + v.Y + " " + v.Z;a = Vector.ByCoordinates(5, 5, 0);b = Vector.ByCoordinates(4, 1, 0);// c has value x = 9, y = 6, z = 0c = a.Add(b);4: Vector MathSimilarly, two Vector objects can be subtracted from each otherwith the Subtract method. Vector subtraction can be thought ofas the direction from first vector to the second vector. Vector multiplication can be thought of as moving the endpoint ofa vector in its own direction by a given scale factor.Often it’s desired when scaling a vector to have the resultingvector’s length exactly equal to the scaled amount. This is easilyachieved by first normalizing a vector, in other words setting thevector’s length exactly equal to one.c still points in the same direction as a (1, 2, 3), though now it haslength exactly equal to 5.a = Vector.ByCoordinates(5, 5, 0);b = Vector.ByCoordinates(4, 1, 0);// c has value x = 1, y = 4, z = 0 c = a.Subtract(b);a = Vector.ByCoordinates(4, 4, 0);// c has value x = 20, y = 20, z = 0c = a.Scale(5);a = Vector.ByCoordinates(1, 2, 3);a_len = a.Length;// set the a's length equal to 1.0b = a.Normalized();c = b.Scale(5);// len is equal to 5len = c.Length;Two additio nal methods exist in vector math which don’t haveclear parallels with 1D math, the cross product and dot product.The cross product is a means of generating a Vector which is orthogonal (at 90 degrees to) to two existing Vectors. Forexample, the cross product of the x and y axes is the z axis, though the two input Vectors don’t need to be orthogonal to eachother. A cross product vector is calculated with the Crossmethod. An additional, though somewhat more advanced function ofvector math is the dot product. The dot product between two vectors is a real number (not a Vector object) that relates to, butis not exactly , the angle between two vectors. One usefulproperties of the dot product is that the dot product between twovectors will be 0 if and only if they are perpendicular. The dot product is calculated with the Dot method.a = Vector.ByCoordinates(1, 0, 1);b = Vector.ByCoordinates(0, 1, 1);// c has value x = -1, y = -1, z = 1c = a.Cross(b);a = Vector.ByCoordinates(1, 2, 1);b = Vector.ByCoordinates(5, -8, 4);// d has value -7d = a.Dot(b);Almost every design involves repetitive elements, and explicitlytyping out the names and constructors of every Point, Line, andother primitives in a script would be prohibitively time consuming.Range expressions give a Dynamo programmer the means toexpress sets of values as parameters on either side of two dots(..), generating intermediate numbers between these twoextremes.For instance, while we have seen variables containing a single number, it is possible with range expressions to have variableswhich contain a set of numbers. The simplest range expressionfills in the whole number increments between the range start andend. In previous examples, if a single number is passed in as theargument of a function, it would produce a single result. Similarly,if a range of values is passed in as the argument of a function, arange of values is returned.For instance, if we pass a range of values into the Lineconstructor, Dynamo returns a range of lines.By default range expressions fill in the range between numbersincrementing by whole digit numbers, which can be useful for aquick topological sketch, but are less appropriate for actual designs. By adding a second ellipsis (..) to the range expression, you can specify the amount the range expression increments between values. Here we want all the numbersbetween 0 and 1, incrementing by 0.1:a = 1..6;x_pos = 1..6;y_pos = 5;z_pos = 1;lines = Line.ByStartPointEndPoint(Point.ByCoordinates(0,0, 0), Point.ByCoordinates(x_pos, y_pos, z_pos));5: Range ExpressionsOne problem that can arise when specifying the increment between range expression boundaries is that the numbers generated will not always fall on the final range value. Forinstance, if we create a range expression between 0 and 7, incrementing by 0.75, the following values are generated:If a design requires a generated range expression to endprecisely on the maximum range expression value, Dynamo canapproximate an increment, coming as close as possible while stillmaintaining an equal distribution of numbers between the rangeboundaries. This is done with the approximate sign (~)before thethird parameter:However, if you want to Dynamo to interpolate between rangeswith a discrete number of elements, the # operator allows you tospecify this:a = 0..1..0.1;a = 0..7..0.75;// DesignScript will increment by 0.777 not 0.75 a = 0..7..~0.75;// Interpolate between 0 and 7 such that// “a” will contain 9 element sa = 0..7..#9;Collections are special types of variables which hold sets of values. For instance, a collection might contain the values 1 to10, {1, 2, 3, 4, 5, 6, 7, 8, 9, 10}, assorted geometryfrom the result of an Intersection operation, {Surface, Point, Line, Point}, or even a set of collections themselves, { {1, 2, 3}, {4, 5}, 6}.One of the easier ways to generate a collection is with range expressions (see: Range Expressions ). Range expressions by default generate collections of numbers, though if thesecollections are passed into functions or constructors, collectionsof objects are returned. When range expressions aren’t appropriate, collections can becreated empty and manually filled with values. The square bracket operator ([]) is used to access members inside of a collection. The square brackets are written after the variable’sname, with the number of the individual collection member contained inside. This numb er is called the collection member’sindex. For historical reasons, indexing starts at 0, meaning thefirst element of a collection is accessed with: collection[0],and is often called the “zeroth” number. Subsequent membersare accessed by increasing the index by one, for example:The individual members of a collection can be modified using the same index operator after the collection has beencreated:// use a range expression to generate a collection of // numbers nums = 0..10..0.75;// use the collection of numbers to generate a// collection of Pointspoints = Point.ByCoordinates(nums, 0, 0);// a collection of numbersnums = 0..10..0.75;// create a single point with the 6th element of the// collectionpoints = Point.ByCoordinates(nums[5], 0, 0);6: Collections。
Revit MEP 2009用户指南:平台、相互操作性、导出说明书
Revit MEP 2009 User's Guide > Platform > Interoperability > Export >Exporting to CAD FormatsRevit MEP supports exporting to CAD (DWG and DXF), ACIS (SAT), and MicroStation® (DGN) file formats.DWG (drawing) format is supported by AutoCAD 2009 and other CAD applications.DXF (data transfer) is an open format that is supported by many CAD applications. A DXF file is a text file that describes a 2D drawing. The text is not encoded or compressed, so DXF files aregenerally large. If you use DXF for 3D drawings, you may need to perform some cleanup to make the drawing display correctly.SAT is the format for ACIS, a solid modelling technology that is supported by many CAD applications.DGN is the file format supported by MicroStation of Bentley Systems, Inc.If you use the Export command while in a 3D view, Revit MEP exports the actual 3D model, not a 2D representation of the model. Exporting in 3D ignores all view settings, including hidden line mode. To export a 2D representation of the 3D model, add the 3D view to a sheet and export the sheet view. You can then open a 2D version of the view in AutoCAD 2009.Before exporting a Revit model, you may want to do the following:Reduce the amount of model geometry to be exported. See Limiting Model Geometry Before Exporting.Create a layer mapping file to control the export process.To preserve information about a project, Revit MEP automatically maps categories and subcategories to preconfigured layer names. These layers are used by AutoCAD 2009 and other applications.Before exporting a Revit MEP project, you may want to change the mappings to the desired layernames. See Exporting Layers.Topics in this sectionLimiting Model Geometry Before ExportingExporting to DWGExporting to DXFExporting to DGNExporting to SATFile Names for Exported FilesExport OptionsExporting Part of a 2D ViewExporting Part of a 3D ViewExporting Intersecting Geometry。
Revizto BIM云平台操作手册
REVIZT4.3平台操作手册
目录:
一、------------------------登陆
二、------------------------进入方法A
三、------------------------进入方法B
四、------------------------浏览模型
一、登陆:
双击图标,选取登陆区域(服务器)为中国,输入平台账号和密码(每个专业有一个共享帐号,请勿修改帐号的显示名称)
二、进入方法A:
输入项目编号过滤项目,双击进入项目
进入项目后,点击3D,加载模型数据,
三、进入方法B:
输入项目编号过滤项目,点击右上角编辑命令后点击要进入的模型菜单,点击加载完整缓存。
加载完毕,重复方法A可以直接进入项目
四、浏览模型:首次运行三维模式,需要选择操作模式:
※推荐选择sketchup(草图大师)模式,※如需修改,可在(设置-导航)里修改:
Sketchup模式操作方法:
模型旋转操作:按住鼠标中键,拖拽鼠标
模型平移操作:按住鼠标中键+ shift ,拖拽鼠标
三维模型界面图标:
点击2D,可查看本项目所有专业二维图纸,并可在二维图纸上进行审图、批注、沟通(具体提出问题流程详《REVIZTO 操作手册及流程》)。
2.BIM全专业系列入门教程1.2Revit通用功能

1.单击“修改 | 编辑表面”选项卡“工具”面
2.在“打开”对话框中,定位到点文件所在的位置。
板 “通过导入创建”下拉列表(指定点文件)。
指定点文件
2.1.1 地形表面
3.在“格式”对话框中,指定用于测量点文件中的点的单位 (例如,十进制英尺或米),然后单击“确定”。 Revit 将根据文件中的坐标信息生成点和地形表面。
放置场地构件
“场地”平面视图,选择体量与场地,选择场地构件,即可添加场地构件。 可在场地平面中放置场地专用构件(如树、电线杆和消防栓)。 如果未在项目中载入场地构件,则会出现一条消息,指出尚未载入相应的族。 1.打开显示要修改的地形表面的视图。 2.单击“体量和场地”选项卡→“场地建模”面板→(场地构件)。
2.1.6 场地及室内构件
3.从“类型选择器”中选择所需的构件。 4.在绘图区域中单击以添加一个或多个构件。
2.1.6 场地及室内构件
载入场地构件
在“插入”选项卡,选择“载入族” 载入场地构件,载入体育设施,篮球 场,公园长椅等
2.1.6 场地及室内构件
载入室内构件
在“插入”选项卡,选择“载入族”
贴图在所有未渲染的视图中显示为一个占位符,如图所示。 将光标移动到该贴图或选 中该贴图时,它显示为矩形横截面。 详细的贴花图像仅在已渲染图像中可见。 6.放置贴花之后,可以继续放置更多相同类型的贴花。 要放置不同的贴花,请在“类型 选择器”中选择所需的贴花,然后在建筑模型上单击所需的位置。 7.要退出“贴花”工具,请按 Esc 键两次。
明细表外观
将页眉、页脚以及空行添加到排序后的行中。
2.2.1 明细表属性 明细表格式
2.2.2 建筑构件明细表
将建筑图元构件列表添加到项目 1.单击“视图”选项卡→ “创建”面板→“明细表”下拉列表→ “明细表/数量”。
revit基本介绍和使用方法

revit基本介绍和使用方法Revit是由Autodesk公司开发的一款三维建模软件,适用于建筑、结构和机电等各种类型的设计和施工项目。
它能够使用BIM技术(Building Information Modeling)来完成建筑设计、构建和维护等过程中的各项工作。
Revit的使用方法:1.创建建筑模型:在Revit中,首先需要创建一个建筑模型,包括建筑的墙体、地面、天花板等各种结构。
2.添加家具和设备:在建筑模型中可以添加家具、设备和灯具等元素,以完善建筑的功能和美观度。
3.设置房间和标记:在建筑模型中可以设置房间,同时添加标记,以便在施工过程中更好的识别和管理建筑。
4.生成图纸:在建筑模型中可生成各种图纸,包括平面图、立面图和断面图等,以便在施工和工厂制造过程中使用。
5.协作:通过Revit,团队成员可以在同一项目中进行设计和修改工作,从而提高协作效率和准确性。
除此之外,Revit还支持自动识别并解决设计中的冲突问题,减少施工中的错误和延误。
总的来说,Revit是一款功能强大且易于使用的建筑设计软件,特别适用于大型项目和复杂建筑设计。
有些Revit的基本操作包括:1. 创建构件:选择构件类型,如墙、窗户、门等,然后通过绘制或放置来创建构件。
2. 编辑构件:在构件上执行操作,如移动、旋转、缩放和拉伸。
3. 创建视图:创建各种类型的视图,如平面图、立面图、3D视图和细节视图等。
4. 添加注释和标记:添加建筑元素的注释和标记,如测量标记、标签和尺寸。
5. 设置材质和光照:为建筑元素设置材质和光照属性,以模拟真实世界中的光照条件。
6. 添加家具和设备:在建筑模型中添加家具、设备和灯具等元素,以完成建筑的功能和美观度。
7. 进行项目协作:Revit支持多用户同时参与建筑设计和模拟,同时进行版本控制和审批流程。
总的来说,使用Revit需要一定的建筑设计知识和技能,包括对建筑模型的理解和操作方法。
建筑师、工程师、室内设计师和其他相关专业人士可以通过培训和实践来掌握Revit的使用技巧和功能特点,以更有效地完成设计和施工任务。
VirtuoZo七步教学手册(已经修改)

全数字摄影测量系统(VirtuoZo)七步教学手册目录前言 (3)一、数字摄影测量数据准备 (4)二、建立测区与模型的参数设置 (6)三、航片的内定向、相对定向与绝对定向 (9)1.内定向作业流程: (10)2.相对定向作业流程: (13)3.绝对定向作业流程: (15)四、同名核线影像的采集与匹配 (17)1.生成核线影像 (18)2.影像匹配 (18)五、DEM、DOM与等高线等数字产品的生成 (21)六、基于立体影像的数字化测图(IGS数字测图) (25)七、多个模型的拼接、成果图输出 (30)前言全数字摄影测量系统(VirtuoZo)是武汉适普软件有限公司与武汉大学遥感学院共同研制的全数字摄影测量系统,属世界同类产品的五大名牌之一。
全数字摄影测量系统是利用数字影像或数字化影像完成摄影测量作业。
由计算机视觉(其核心是影像匹配与影像识别)代替人眼的立体量测与识别,不再需要传统的光机仪器。
从原始资料、中间成果到最后产品都是数字形式,克服了传统摄影测量只能生产单一线划图的缺点,可生产出多种数字产品,如数字高程模型、数字正射影像、数字线划图、景观图等,并提供各种工程设计所需的三维信息、各种信息系统数据库所需的空间信息。
全数字摄影测量系统(VirtuoZo)不仅在国内已成为各测绘部门从模拟摄影测量走向数字摄影测量更新换代的主要装备,而且也被世界诸多国家和地区所采用。
在对全数字摄影测量系统(VirtuoZo)的使用中,武汉适普软件有限公司摸索和总结出一套简单易学的基本作业流程,使初学者能够更快更好的掌握该系统。
该作业流程包括:数据准备、参数设置、定向、核线采集与匹配、DEM与DOM以及等高线生成、数字化测图、拼接与出图七个步骤。
一、数据准备数字摄影测量所需资料:相机参数:应该提供相机主点理论坐标X 0、Y 0,相机焦距f 0,框标距或框标点标控制资料:外业控制点成果及相对应的控制点位图航片扫描数据:符合VirtuoZo 图像格式及成图要求扫描分辨率的扫描影像数据。
Revit软件操作大全总结BIM教程
Revit软件操作大全总结BIM教程Revit软件操作大全总结1、介绍Revit软件界面和功能,视图切换(ctrl+tab)、旋转(shift+中键)、缩放、移动,快速访问工具栏(三维视图窗口、视图平铺(WT),关闭隐藏窗口);2、项目浏览器:平、立、剖视图、明细表、图纸切换(双击,+ -号);视图导航(魔方),状态栏(提示功能);3、应用程序菜单(选项设置、背景设置(黑色、白色)、文件位置);新建项目(项目样板选择)和保存文件(备份文件个数设置);4、视图控制栏(视图比例,视图精细程度,视图显示样式,剪裁显示);5、选择的使用:单选、框选(左右)、过滤器选择,右键选择全部实例;6、Esc键使用(取消、退出命令);Tab键使用(循环选择),撤销与恢复;删除键;7、链接CAD(仅当前视图、保留、毫米、原点对原点),锁定;切换前景、背景;导入CAD、链接Revit,管理链接;8、常用修改工具:对齐、延伸、拆分、复制(多个、约束)、移动、旋转、偏移、镜像命令;常用快捷键的使用;9、可见性设置(VV)、对象样式、过滤器;10、图元实例属性、类型属性,视图属性;视图范围(顶、剖切面、底、视图深度含义);11、视图隐藏(HH)、隔离(HI)、显示(HR);剪裁视图,剪裁区域可见,三维剖切框的使用;12、轴网、标高的创建(复制,修改轴号、高程值,创建平面视图);13、尺寸标注的使用(临时标注、永久标注);细线开关(TL);14、创建墙体、墙饰条、分隔缝(标高控制,内外墙功能,名称、厚度、层次、材质修改,绘图对齐方式(直线、拾取线),墙轮廓编辑);15、幕墙(幕墙与店面样式、网格线、竖挺(轮廓替换)、替换嵌板门窗);16、柱(建筑柱、结构柱),载入族,修改尺寸材质,移动、复制、对齐;17、门窗(空格键翻转作用,对齐,门窗标记);18、楼板(楼板边界、坡度,开洞、墙体附着分离,楼板边缘轮廓,编辑楼板);楼板边缘(散水、台阶);19、屋顶(平屋顶、迹线屋顶、拉伸屋顶(参照平面、设置参照平面)、檐沟、封檐板,屋顶边界、悬挑、定义坡度,坡度箭头,编辑屋顶);20、洞口(面洞口、墙洞口、垂直洞口、竖井洞口、老虎窗);21、楼梯(参照平面、设置的使用,整体式楼梯,梯段(单跑、双跑、多跑、弧形楼梯)、边界、踢面,最小踏步宽、最大踢面高设置,多层楼梯、楼梯扶手,楼梯剖面视图创建,梯边梁,详图符号);踏步(楼板创建,内建模型);22、坡道(类似楼梯,坡度设置,结构样式切换,坡度标记);23、栏杆扶手(栏杆类型,栏杆设置,构造设置,修改轮廓,更改栏杆主体);24、场地(地形表面、建筑地坪、子面域);树木、人物放置;25、构件(放置家具、洁具),二维详图构件放置、详图线的绘制;26、注释介绍:尺寸标注(连续标注、重新编辑标注、等分EQ),角度标注,文字标注,模型文字,模型线,高程点标注,坡度标记,门窗标记,房间标记、房间图例;27、视图创建:创建平面视图、剖面视图、详图索引;28、结构功能介绍(结构柱、梁、支撑、基础的放置);29、修改材质,项目设置;30、明细表、图纸的创建(关键字段、排序、过滤、格式,图纸大小、标题栏,布图、打印图纸);31、日光阴影设置,模拟,渲染;相机视图创建,漫游动画创建;导出图片、视频;32、项目样板定制(项目、样板、族、组样板文件格式);创建视图样板;33、族编辑器、内建模型:实体、空心建模,拉伸、旋转、放样、融合、放样融合等功能,族类别、族属性;34、体量创建与应用;自适应构件;35、柱族、门窗族创建与参数化(新建族、族样板选择、参数化建模、参照平面、参照线、图元锁定、添加标签、保存重命名,载入项目,载入族,编辑族);门窗标记的创建(标记类型选择);36、复杂嵌套族的创建和参数化;。
Revit操作手册(土建)

REVIT操作手册(土建)目录1、新建项目 (1)2、项目样板文件 (10)3、建模标准流程 (11)3.1 获取项目文件 (11)3.2 标高 (13)3.3 轴网 (16)3.4 柱、墙(结构) (18)3.5 梁 (23)3.6 楼板 (27)3.7 结构综合 (27)3.8 建筑面层(建筑做法) (28)3.9 建筑墙 (28)3.10 其他 (28)4、图纸检查 (36)4.1 结构 (36)4.2 建筑 (37)4.3 问题清单 (38)5、模型交付 (39)5.1 协同工作 (39)5.2 模型检查 (39)5.3 二次修改 (39)1、新建项目第一步:打开Revit,找到新建项目选项按钮,点击“项目”,如下:图1.1-1找到新建项目按钮完成以上操作,转到第二步:第二步:新建项目对话框中选择“项目”选项,并点击“浏览”,如下:图1.1-2 选择新建项目完成以上操作,转到第三步:第三步:在选择样板对话框中找到项目样板文件(后缀为.rte),选中并点击“打开”,如下:图1.1-3 找到项目样板文件完成以上操作,转到第四步:第四步:在新建项目对话框中可以看到项目样板文件(后缀.rte的文件),点击“确定”按钮,如下:图1.1-3 完成项目新建图1.1-4 新建项目文件完成以上操作,转到第五步;第五步:将生成的项目文件另存到“bimteam”中所属项目的DESIGN文件夹中,如下:图1.1-5 另存项目文件对项目文件进行重新命名,并点击“保存”,如下:图1.1-6 项目文件重新命名完成以上操作,转到第六步;第六步:在协作面板中找到“协作”并点击,如下:图1.1-7 中心模型文件制作步骤一选择“Collaborate within your network”选项,并点击“OK”按钮,完成工作分享如下:图1.1-8 中心模型文件制作步骤二再对项目文件进行保存,由项目文件制作中心模型文件完成,如下:图1.1-9 中心模型文件制作步骤三在下拉菜单中“同步并修改设置”图标变为彩色,即中心模型已经在制作完成,如下:图1.1-10 中心模型文件完成以上操作,转到第七步;第七步:在协作面板中点击“工作集”,并在工作集对话框中点击“新建”按钮,新建工作集,如下:图1.1-11 新建工作集步骤一在工作集对话框中点击“新建”按钮,如下:图1.1-12 新建工作集步骤二在新建工作集对话框中输入新工作集名称:结构,点击“确定”按钮,重复新建工作集,完成新工作集:建筑,如下:图1.1-13 新建工作集步骤三完成工作集新建后,点击“确定”按钮,如下:图1.1-14 新建工作集步骤四在弹出的指定活动工作集对话框中点击“是”,如下:图1.1-15 新建工作集步骤五新建工作集后,点击“同步并修改设置”,在弹出的对话框中点击“确定”,完成同步,如下:图1.1-16 同步新建工作集内容点击协作面板中的“工作集”,在工作集对话框中,将所有存在的工作集中的“可编辑”属性均改为“否”,点击“确定”,如下:图1.1-17 修改工作集可编辑属性完成以上操作后,再次对文件进行同步,同步后土建项目文件已经新建完成。
Revit 2021 操作案例操作手册
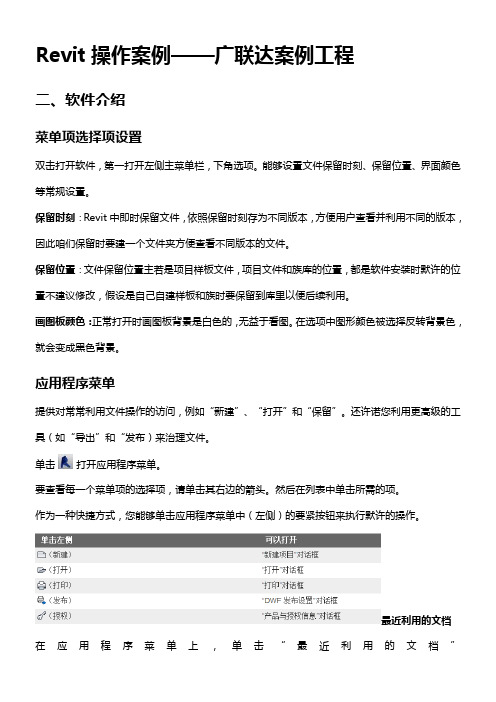
Revit操作案例——广联达案例工程二、软件介绍菜单项选择项设置双击打开软件,第一打开左侧主菜单栏,下角选项。
能够设置文件保留时刻、保留位置、界面颜色等常规设置。
保留时刻:Revit中即时保留文件,依照保留时刻存为不同版本,方便用户查看并利用不同的版本,因此咱们保留时要建一个文件夹方便查看不同版本的文件。
保留位置:文件保留位置主若是项目样板文件,项目文件和族库的位置,都是软件安装时默许的位置不建议修改,假设是自己自建样板和族时要保留到库里以便后续利用。
画图板颜色:正常打开时画图板背景是白色的,无益于看图。
在选项中图形颜色被选择反转背景色,就会变成黑色背景。
应用程序菜单提供对常常利用文件操作的访问,例如“新建”、“打开”和“保留”。
还许诺您利用更高级的工具(如“导出”和“发布)来治理文件。
单击打开应用程序菜单。
要查看每一个菜单项的选择项,请单击其右边的箭头。
然后在列表中单击所需的项。
作为一种快捷方式,您能够单击应用程序菜单中(左侧)的要紧按钮来执行默许的操作。
最近利用的文档在应用程序菜单上,单击“最近利用的文档”按钮,能够看到最近所打开文件的列表。
利用该下拉列表能够修改最近利用的文档的排序顺序。
利用图钉能够使文档始终留在该列表中,而不管打开文档的时刻距此刻多久。
打开的文档在应用程序菜单上,单击“打开的文档”按钮,能够看到在打开的文件中所有已打开视图的列表。
从列表被选择一个视图,以在画图区域中显示。
快速访问工具栏快速访问工具栏包括一组默许工具。
您能够对该工具栏进行自概念,使其显示您最常常利用的工具。
要紧包括打开、保留、撤销、注释、字体、三维、剖面,切换视图等常常利用命令。
软件操作1.新建项目新建项目有三种方式。
第一种,打开软件初始界面有直接的新建项目。
第二种打开应用程序菜单栏,选择新建项目。
第三种确实是直接在软件操作界面打开项目样板文件,直接成立项目。
2.样板文件的选择:通常revit设计时建筑和结构是分开的,因此建筑师和结构师别离采纳不同的样板文件。
BIM软件基础操作

四、浏览Autodesk Revit用户界面
在视图窗口中,将光标悬停在风管的剖面图上。边会高亮显示, 然后工具提示和状态栏会显示关于风管的信息。
四、浏览Autodesk Revit用户界面
检查应用程序窗口底部的视图控制栏,将光标移到视图控制栏上 的工具上,查看工具提示。
可以通过改变功能区的视图状态和重新安排包含工具 的面板来自定义功能区。也可以用管理选项卡右边的控件 ,在功能区的视图状态之间切换。
二、功能区框架
完整的功能区
最小化为选项卡和面板标 签的功能区 最小化为选项卡和面板标签的功能区
二、功能区框架
功能区选项卡
功能区显示了10个选项卡以及Revit中这些选项卡上所有可 用的工具。单击选项卡的名字激活它。每个选项卡都包括分 组工具的面板。下图显示了各种功能区选项卡。
下图显示了Project Browser(项目浏览器)、状态栏、View Control Bar(视图控制栏)和Revit MEP用户界面的其他图元。
一、 Autodesk Revit用户界面
用户界面图元 1项目浏览器 2状态栏
说明 显示当前项目中所有视图、明细表、图纸和族的逻辑层 级结构树视图 鼠标悬停在对象上会显示族和图元类型的名称。如果使 用注释的话,就会显示提示
二、功能区框架
下表列出了可以在Autodesk Revit的11个功能区选项卡上
访问的工具和选项。
选项卡 建筑 结构 系统 插入 注释 分析 管理 设计 协作
视图
工具和选项 包括放置建筑图元,如柱、墙、门、窗、楼梯、楼板、屋顶等常用工具。 包括放置钢结构图元,如柱、梁、桁架等钢结构的常用工具。
Revit-基础教程

点击标志的文字名称,出现一条蓝线。 蓝线表示立面的可视边界,四个立面的 蓝线围合成了绘图的可见范围,即在此 区域内绘制的图形在立面上是可见的。 蓝线的位置可拖动。
点击图形部分可对其视角 方向进行旋转,框选可对 立面标志进行拖动。绘图 之前应将其拖动到轴网范 围之外。
33
基本模型图元的绘制 创建好这个项目的标高、轴网这些基准参照,并生成了相应的平面视
30
如图所示,只有个别横轴和纵轴延伸到F5的标高,则 F5平面图上只显示对应的三根横轴和两根纵轴。
东立面图 南立面图
F5平面图
31
(7)、轴网和标高的锁定。 轴网和标高确定绘制完成后,为防止在以后绘图过程
中位置发生偏移,我们可将其锁定。 框选所有的轴网或标高,点击“修改”选项框里的
“锁定”按钮,对其进行锁定。
选中一根标高,点击“修改”里的“阵列”按钮,则 选项栏如下所示。
线型 阵列
取消勾 选,以 免形成 组,无 法编辑
阵列形 成的个 数
指定参 照间距 类型
在垂直或 水平方向 上的约束
输3)、标高的属性和编辑模式。 选中一根标高,标头位置会出现几个小图标。
Revit Architecture 应用教程
1
第一章、前言
• Revit系列软件简介
Revit系列软件是针对BIM技术推出的建筑设计系列软件, 该软件包含建筑(Architecture) 、结构(Structure)、设备(MEP)专 业等。
该系列软件是将各专业在三维的平台上配合,使建筑的各 专业设计和配合通过三维的形式表现出来,使建筑设计更直观, 更合理,也更精确。通过各专业的碰撞检测,更方便的解决建 筑当中的碰撞问题,使设计的质量得到严格把关。
Revt操作案例,操作手册
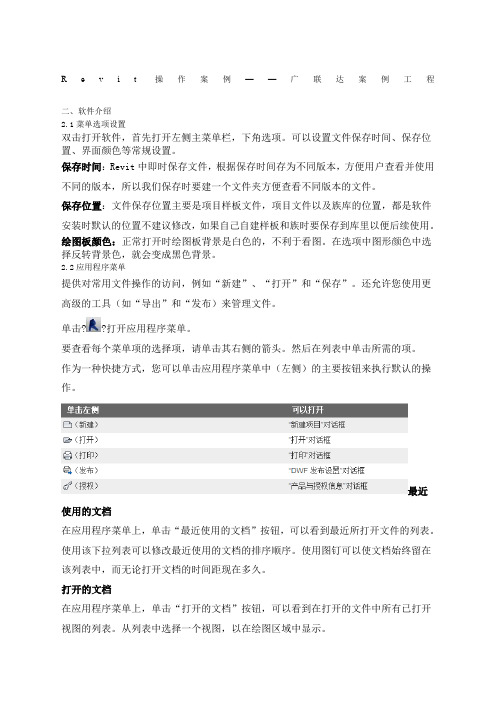
R e v i t操作案例——广联达案例工程二、软件介绍2.1菜单选项设置双击打开软件,首先打开左侧主菜单栏,下角选项。
可以设置文件保存时间、保存位置、界面颜色等常规设置。
保存时间:Revit中即时保存文件,根据保存时间存为不同版本,方便用户查看并使用不同的版本,所以我们保存时要建一个文件夹方便查看不同版本的文件。
保存位置:文件保存位置主要是项目样板文件,项目文件以及族库的位置,都是软件安装时默认的位置不建议修改,如果自己自建样板和族时要保存到库里以便后续使用。
绘图板颜色:正常打开时绘图板背景是白色的,不利于看图。
在选项中图形颜色中选择反转背景色,就会变成黑色背景。
2.2应用程序菜单提供对常用文件操作的访问,例如“新建”、“打开”和“保存”。
还允许您使用更高级的工具(如“导出”和“发布)来管理文件。
单击??打开应用程序菜单。
要查看每个菜单项的选择项,请单击其右侧的箭头。
然后在列表中单击所需的项。
作为一种快捷方式,您可以单击应用程序菜单中(左侧)的主要按钮来执行默认的操作。
最近使用的文档在应用程序菜单上,单击“最近使用的文档”按钮,可以看到最近所打开文件的列表。
使用该下拉列表可以修改最近使用的文档的排序顺序。
使用图钉可以使文档始终留在该列表中,而无论打开文档的时间距现在多久。
打开的文档在应用程序菜单上,单击“打开的文档”按钮,可以看到在打开的文件中所有已打开视图的列表。
从列表中选择一个视图,以在绘图区域中显示。
快速访问工具栏快速访问工具栏包含一组默认工具。
您可以对该工具栏进行自定义,使其显示您最常用的工具。
主要包括打开、保存、撤销、注释、字体、三维、剖面,切换视图等常用命令。
2.3软件操作1.新建项目新建项目有三种方式。
第一种,打开软件初始界面有直接的新建项目。
第二种打开应用程序菜单栏,选择新建项目。
第三种就是直接在软件操作界面打开项目样板文件,直接建立项目。
2.样板文件的选择:通常revit设计时建筑和结构是分开的,所以建筑师和结构师分别采用不同的样板文件。
Revit建筑设计软件实战指南
Revit建筑设计软件实战指南第一章 Revit基础操作 (2)1.1 Revit界面介绍 (2)1.1.1 快速访问工具栏 (2)1.1.2 功能区 (3)1.1.3 项目浏览器 (3)1.1.4 绘图区域 (3)1.1.5 属性窗口 (3)1.1.6 视图控制栏 (3)1.2 文件操作与项目设置 (3)1.2.1 新建项目 (3)1.2.2 打开项目 (3)1.2.3 保存项目 (3)1.2.4 项目设置 (3)1.3 视图控制与管理 (4)1.3.1 视图创建 (4)1.3.2 视图编辑 (4)1.3.3 视图管理 (4)1.3.4 视图显示 (4)第二章建筑模型创建 (4)2.1 建筑构件绘制 (4)2.1.1 墙体绘制 (4)2.1.2 门窗绘制 (4)2.1.3 柱、梁、板绘制 (5)2.2 建筑体量与场地 (5)2.2.1 建筑体量 (5)2.2.2 场地 (5)2.3 楼板、屋顶与墙体 (5)2.3.1 楼板 (5)2.3.2 屋顶 (5)2.3.3 墙体 (6)2.4 柱、梁、板结构 (6)2.4.1 柱 (6)2.4.2 梁 (6)2.4.3 板 (6)第三章模型修改与编辑 (6)3.1 图元选择与编辑 (6)3.2 尺寸修改与约束 (7)3.3 模型拆分与合并 (7)3.4 模型族与参数化 (7)第四章文字、标注与表格 (7)4.1 文字标注 (7)4.2 尺寸标注 (8)4.3 表格制作 (8)4.4 图纸布局与打印 (8)第五章渲染与可视化 (9)5.1 渲染设置 (9)5.2 材质与纹理 (9)5.3 光照与阴影 (9)5.4 视觉效果调整 (10)第六章建筑施工图绘制 (10)6.1 建筑平面图 (10)6.2 建筑立面图 (11)6.3 建筑剖面图 (11)6.4 细部大样图 (11)第七章结构设计 (12)7.1 结构模型创建 (12)7.2 结构分析 (12)7.3 结构构件布置 (13)7.4 结构计算与出图 (13)第八章设施与系统 (14)8.1 机电系统 (14)8.2 给排水系统 (14)8.3 通风与空调系统 (14)8.4 消防系统 (14)第九章协同工作与团队协作 (15)9.1 协同工作原理 (15)9.2 Teamwork功能 (15)9.3 云服务与共享 (16)9.4 项目管理与团队协作 (16)第十章 Revit插件与扩展应用 (17)10.1 插件安装与使用 (17)10.2 常用插件介绍 (17)10.3 扩展应用案例分析 (17)10.4 自定义开发与二次开发 (17)第一章 Revit基础操作1.1 Revit界面介绍Revit作为一款专业的建筑设计软件,其界面设计旨在提高用户的工作效率。
BIM深度应用——新一代工程管理云协同平台Revizto

BIM深度应用——新一代工程管理云协同平台Revizto一、背景现代工程管理常见问题•工程管理流程复杂、错误繁多、成本超支?•BIM培训效果不佳?•BIM模型无人问津?•BIM技术难以推广?•各方无法基于BIM进行高效协作?•BIM设备要求较高?信息化IT投入较大?1.BIM难以普及推广:BIM技术本身带有精细化工程管理的基因,但由于BIM模型较大,信息量较大,对于电脑硬件要求较高,BIM生产软件较难,学习成本较高,效果不好,从而限制了BIM模型的普及,更限制了BIM协作应用,造成BIM很难落地,做好的BIM模型无人问津,加大了BIM技术推广难度。
2.BIM参与度很低:除了BIM工程师经常使用BIM模型外,业主、设计院、施工单位、项目管理方等项目参与方均很难参与到BIM中,更无法基于BIM协作,模型再精确也很难应用和落地,BIM参与度很低,BIM的作用未能充分发挥。
BIM很难普及推广,很难落地应用,是因为缺乏BIM应用媒介或BIM应用平台。
有了平台,大家都会很容易参与到BIM协同中来,对BIM的需求和要求就会提高,BIM普及和推广就会变得轻而易举。
为迎合现代工程建设行业的精细化管理需求,Revizto云协同管理平台应运而生。
友好的工作界面,一分钟上手,轻松加入基于BIM的云协同工程管理模式,引领工程管理行业精细化革新。
二、Revizto简介将BIM模型及图纸上传至Revizto云平台,邀请项目参与人员加入该项目,整个施工团队成员可随时随地登录并查看同一版BIM模型及图纸,并基于这个统一、可视化的BIM云平台进行协同工作。
1.二维图纸与三维BIM模型联动可视化并简化建筑工程管理;2.图审问题圈注并记录关联BIM云平台指定责任人追踪整改;3.现场问题移动端拍照关联BIM云平台指定责任人追踪整改。
(支持现场离线访问并记录问题,有网络自动上传同步)Revizto可视化复杂建筑项目,简化工作流程,改变传统分散低效的协作模式,实现项目信息的集中储存访问,增强协同信息准确性和及时性,提高工作效率、减少问题、及时跟踪处理问题、避免问题遗漏、缩短工期、节约成本。
数据交付BIM模型与数据集操作手册20191127

新建福州至厦门铁路站前工程F X-5 标数字交付BIM模型与数据集系统操作手册(初稿)中铁上海工程局集团有限公司新建福厦铁路5标项目经理部二〇一九年十月目录一、数字交付BIM模型与数据集 (2)(一)首页 (2)(二)BIM整体模型 (3)(三)单位工程详细模型 (4)二、数据集 (8)(一)数字交付数据集管理 (8)(二)数据接口管理 (10)一、数字交付BIM模型与数据集(一)首页1、系统网址:2、查看:用谷歌Chrome 打开此平台,页面未做权限限制,打开网址即可查看3、全屏:F11全屏查看4、显示内容(1)安全生产天数:展示项目的安全施工天数。
(2)产值信息:展示项目产值的完成情况,包括计划产值、当月产值、当年产值、开累产值、完成程度等、以及以折线图的形式按照年、季度、月为维度展示计划和实际开累和当期产值。
(3)项目交底:显示项目交底文件情况,根据分类统计交底文件数量。
(4)管理人员配置:根据部门统计人员的数量。
(5)人员信息:根据工种统计人员(管理、技术、施工人员)数量。
(6)危大工程:根据类型统计项目危大工程的数量。
(7)机械信息:根据类型统计机械数量。
(8)项目介绍:展示项目介绍的视频。
(9)桥梁-形象进度:通过统计主要构件完工情况,了解桥梁类型工程施工进度。
(10)隧道-形象进度:通过统计隧道完工里程数,了解隧道类型工程施工进度。
(二)BIM整体模型1、系统网址:/html/bimDetail.html2、查看:用谷歌Chrome 打开此平台,页面未做权限限制,打开网址即可查看3、全屏:F11全屏查看4、内容介绍(1)BIM整体模型:项目BIM整体模型。
(2)项目介绍:施工项目的项目简介。
(3)视频展示:项目介绍视频。
(4)项目交底:根据分类统计项目交底数量。
(5)产值情况:展示项目、单位工程的产值情况(工程造价、当月产值、当年产值、开累产值、完成程度),初始页面展示的是项目的整体产值情况,通过点击单位工程列表、或模型切换到单位工程的产值情况。
Revizto 商品说明书

Revizto – Digital Coordination from Design to ConstructionBuilding Information Modeling (BIM), and Virtual Design and Construction (VDC) practices have been widespread for more than 15 years now. During that time many software applications and workflows have been used to better access and leverage data rich geometry, and visualization.Throughout this period, there have been gaps in the process that have resulted in key stakeholders being pushed aside. Traditionally the data from a model is separated and reviewed in silos, using manual and often untraceable communication methods.Revizto provides complete transparency through the design review by leveraging an intelligent model and centralized communication. In addition, it enables users to extract the project data and relay it in ways that can alter critical decisions in real time.Revizto is a real-time coordination tool that democratizes the access of BIM to address those issues. One key driver in the adoption of Revizto as a coordination tool is the ease-of-use of the technology. Non-technical users such as executives or site coordinators that are not well versed in the use of a digital coordination workflow are able to interact with the BIM model data very quickly and intuitively. As a result, stakeholders who have been at an arm’s length away from the BIM process can now interact with other members of the project team.Unlike many other BIM applications, technical users and IT professionals can train their staff and implement the technology in a matter of hours instead of weeks or months.Revizto completes complex tasks very easily. It also becomes indispensable to a company’s workflow very quickly as more manual tasks are replaced by the powerful automation within the software.Many firms choose Revizto because of interoperability of the application. Whether the project originates from Revit, Navisworks, AutoCAD, AutoCAD, Sketchup, Rhino, or a combination of file types, all users can access a non-destructive version of that project from the desktop or in the field from directly within Revizto.Projects today are very complex and the ability to relay the information to non-technical personnel is key in accurately conveying intent in any context. The ability to quickly see model views based on a plan, sections and 2D review issues quickly resonates with important project participants that may not be expert software users. Add the ability to gather object data and you have a potent way to get this data to the masses.Even non-technical project stakeholders can easily learn to jump from intelligent 2D sheets to a 3D model. Then they can markup issues that include photos or attachments and assign those issues to specific team members including deadlines and categories.More technical users can sync clashes from Navisworks or Solibri as assignable issues and can switchback from an issue marked up in Revizto to the exact coordinate within the Revit model to make the necessary changes.Project managers can view the bandwidth and bottlenecks on a project from the real-time dashboard, or schedule automated reports to be delivered to other stakeholders in minutes. Automated reporting not only adds a lot of value through saved man hours, but also ensures accuracy, and most importantly is always up to date.Revizto is used for coordination during the schematic process, leveraged by partners as a sales and presentation tool, technical users rely on Revizto for coordination among disciplines during the design process, while Revizto provides a versatile platform for feedback in the field among the GC and trades. Revizto can be used as a true concept- to-completion BIM/VDC coordination platform, documenting the entire process along the way.Revizto also has tools to incorporate reality-capture meshes as well, allowing it the ability to work with data captured from drone flights and scan data. This provides an additional workflow for tracking site issues, visualizing existing conditions during design coordination, and seeing as-built models across your user base as the project develops in concert with your design intent and fabrication models.At any point in the project, project members rely on Revizto to provide them with an archival project that contains the 3D model, 2D sheets, Revisions, and all project communication. Having this history available at any time provides an instant but often overlooked form of return on investment. The key benefit relates to the time spent tracking down and explaining decisions and how they were formulated to solve an issue. As a result, a Revizto workflow often results in recovering those lost man hours over the course of a design or construction project. This project accessibility is key to organization and the ability to quickly recall key moments and significant events in a project.Another thing that separates Revizto from many of the other BIM/VDC technologies in the market today is the commitment and speed by which the tool continues to develop. Contrary to other applications, where new releases are typically introduced on an annual basis, Revizto has consistently rolled out significant enhancements on a quarterly basis for the last several years. An important distinction is that these enhancements are in response to the requests of product users, Revizto’s recent product updates have enabled AEC firms to further automate their ent ire review & coordination processes while reducing clicks, time, and errors along the way.Revizto continues to progress towards the goal of becoming the industry standard for BIM coordination, allowing firms to reduce their technology stacks and leverage the tool for all phases of a building project lifecycle, aside from the actual design content itself.。
revizto简介及主要功能

revizto简介及主要功能VR级BIM云协同管理平台——Revizto 4.0Revizto简介:将BIM模型及图纸分享至Revizto云平台,项目参与各方可随时随地,基于这个统一的BIM云平台进行协同工作,也支持离线浏览,改变了传统分散低效的协作模式,实现项目信息的集中储存访问,增强协同信息准确性和及时性,提高工作效率,减少问题,减少变更,缩短工期,节约成本。
Revizto主要功能:1.Revit、navisworks、sketchup、archicad等BIM模型超级轻量化(10倍)2.VR虚拟展示3.BIM云同步及项目级大协同(让项目参与各方都轻松加入到BIM云平台上协同工作,让BIM成为项目主线)4.设计图纸云同步及协同审图(无缝对接业主、设计院、施工单位、BIM咨询公司、项目管理公司等项目参与单位,让各方集中在统一的BIM云平台上协同审图,及时记录和处理工程设计施工问题)5.工程设计施工问题状态追踪(追踪记录平台上所有工程问题状态,直到该问题被完美解决,以达到缩短项目周期,节省工程成本。
工程问题包括BIM碰撞问题、设计优化问题、施工工艺优化问题等。
让项目管理者清楚知道目前还有多少工程问题未解决掉)6.施工现场照片采集及与BIM模型关联(了解现场问题状况)7.4D虚拟施工计划支持8.项目图纸及BIM模型在线统一存档,保障项目信息统一性及完整性9.移动端随时随地访问项目最新图纸及BIM模型(不用下载图纸及模型,也不需要安装CAD、revit、navisworks、archicad、sketchup等软件,您只需要REVIZTO)10.Revizto简单易用,没有BIM经验的人员,可在10分钟内上手,并加入到BIM协同工作管理中来11.Revizto对电脑配置无要求,无需更换电脑配置12.Revizto支持公有云、半私有云、项目云及私有云搭建。
- 1、下载文档前请自行甄别文档内容的完整性,平台不提供额外的编辑、内容补充、找答案等附加服务。
- 2、"仅部分预览"的文档,不可在线预览部分如存在完整性等问题,可反馈申请退款(可完整预览的文档不适用该条件!)。
- 3、如文档侵犯您的权益,请联系客服反馈,我们会尽快为您处理(人工客服工作时间:9:00-18:30)。
REVIZT4.3平台操作手册
目录:
一、------------------------登陆
二、------------------------进入方法A
三、------------------------进入方法B
四、------------------------浏览模型
一、登陆:
双击图标,选取登陆区域(服务器)为中国,输入平台账号和密码(每个专业有一个共享帐号,请勿修改帐号的显示名称)
二、进入方法A:
输入项目编号过滤项目,双击进入项目
进入项目后,点击3D,加载模型数据,
三、进入方法B:
输入项目编号过滤项目,点击右上角编辑命令后点击要进入的模型菜单,点击加载完整缓存。
加载完毕,重复方法A可以直接进入项目
四、浏览模型:首次运行三维模式,需要选择操作模式:
※推荐选择sketchup(草图大师)模式,※如需修改,可在(设置-导航)里修改:
Sketchup模式操作方法:
模型旋转操作:按住鼠标中键,拖拽鼠标
模型平移操作:按住鼠标中键+ shift ,拖拽鼠标
三维模型界面图标:
点击2D,可查看本项目所有专业二维图纸,并可在二维图纸上进行审图、批注、沟通(具体提出问题流程详《REVIZTO 操作手册及流程》)。
