鹏程万里视频加密系统用户手册
视频服务器SIPX000T操作说明手册(带加密狗)

SIPX000T操作说明一、版本修改: (1)二.改进内容功能说明: (1)三.SIPX000T服务应用的五套网络环境 (2)四.SIPX000T详细配置方法 (6)(一)主机配置 (6)(二)SER程序配置 (6)(三)HSVTDU配置 (20)Mysql数据库 (28)(四)媒体代理配置 (29)(五)VG2005配置 (31)(六)SIP的WEB界面配置 (33)一、版本修改:新版本的SIPX000T服务器,与以前的SIPX000T服务器对比,已经进行了一些功能的整合。
具体内容如下:1.增加了VG2005转发服务;2.在单网卡的基础上,增加了支持双网卡的使用(推荐使用双网卡模式);3.增加了WEB配置功能;4.增加了加密狗的使用;5.磁盘设备使用2GB的IDE电子硬盘。
二.改进内容功能说明:1.VG2005转发服务,主要提供了客户端软件远程登录转发,从而调试编码器的作用。
2.双网卡的使用,主要用于解决,不同型号性能的防火墙设备,对于视频流通过时造成不流畅的现象。
推荐SIPX000T服务器使用双网卡模式,eth0连接局域网,eth1连接公网。
3.以前对SIP程序和VTDU的配置,显得比较烦琐,对于刚接触SIP服务器的人,比较难上手。
现在新增加了WEB配置功能,可以对之前烦琐的配置,进行简单的操作,有效地提高配置时的工作效率。
4.加密狗,可以防止SIP服务在未被授权时,被非法使用。
加密狗为USB接口,在SIPX000T服务器启动前,必须插上加密狗,程序才能正常启动运行。
不同型号的SIP服务器的加密狗不能混插。
加密狗如下图:SIP1000T加密狗 SIP2000T加密狗备注:一台全新的SIPX000T服务器,启动后,自动运行以下多项服务:ser、HSVTDU、VG2005、mediaproxy和WEB配置平台。
现在所需要做的就是,修改各服务的配置文件。
默认情况下,主机只启用网卡eth0。
可以使用命令mii-tool查看当前活动网卡为哪块网卡,如下图:三.SIPX000T服务应用的五套网络环境SIP服务器,在现实应用中,共有5种可能存在的应用环境,1.单IP局域网2.单IP NAT并联3.单IP NAT串联4.双IP无NAT5.双IP有NAT 网络拓扑分别如下:四.SIPX000T详细配置方法(一)主机配置1. 更改IP设置,并重启网卡。
3.0使用手册

软件使用中应当注意的事项;1. 对于v1,v2轨以上的轨道,做轨间特技可利用fx轨,“添加特技素材”后直接把固定特技拖上去即可,但是没有入出方式可选。
2. 故事板的长度和素材长度没有显示,打入出点后能够在故事板回放窗看到。
3. Tp-link网卡在超微主板上和DTV卡有冲突,会导致DIGISUITE驱动状态异常。
拔下网卡并重装驱动即可4. 在使用IDE硬盘作为系统盘的情况下,必须将系统的虚拟内存交换页面文件设置在高速数据硬盘构成的带区集分区上5. X-8000/6000中,在进行mpg文件合成的时候,应该先打开vu表,生成文件的时候应注意vu 表是否正常,如果vu表没起来,表示合成的文件没有声音,要重新生成。
如果有数字卡的话,注意要将音频设置为模拟的输出。
解决方案:1. 唱词文件从中间播造成声画不对位解决:唱词文件不要做太长,每次从头开始播2. 采集素材时能看到图象,停止后找不到素材解决:修改路径设置3. X-9000打包后生成的素材有横向条纹原因:整个带区集呈危险状态,硬盘或电源故障解决: 更换硬盘更换电源4. X-8000设置将MAX卡扩展到整屏时死机,同时打包花屏(MAX卡必须用排线与显卡相连)。
解决:MAX卡或跨桥坏,逐一试着更换5. X-9000带模拟BOB盒“硬件参数”存不住,尤其音频输入输出解决:暂无办法,只能多次设置直到存住为止。
修改时要拖动滑杆不要改数字6. X-9000输入无色彩解决:修改“硬件参数”中输入视频的色饱和度7. X-9000中XCG的项目文件调到故事板中最后一帧永远时黑场解决:暂无办法,如果要跟其它层做过渡特技,打包后再进行8. X-9000中在XCG里做唱词,打开文件时会死机解决:不用“打开”,用“拷贝-粘贴9. 保存特技时存不住解决:1)系统默认的“TEMP”名不能用2)用“另存为”按钮,不能用“保存”按钮10. 用相同用户名登陆但看不到以前的工作(包括素材,项目,故事板)解决:检查是否登陆在同一栏目下,若不是改之11. SQL SERVER 数据库无法启动解决:1)看是否修改了WIN2000的用户登陆密码,若是,修改为原来的2)重新安装SQL SERVER数据库,并在安装时选择用本地用户登陆3) 重装200012. 在运行X-EDIT软件过程中报SQL SERVER 的错误解决:若素材不重要,重新执行SQL脚本文件,否则先将数据库备份,重新执行SQL脚本后再恢复数据库13. X-9000做静帧,如果是摇镜头可能会抖动解决:可设置成0.01倍速度14.做淡入淡出特技过渡不平滑,会闪一下解决:改变入出方式15.故事板播放时,报sql server 通讯失败解决方法:重新建立dynetmange和dycommondate两个数据库,但原来的信息会丢失。
加密系统客户端用户操作手册

PhotoShop
psd
绘图类
CorelDraw ACDSee 画图
二(三)维 CAXA 设计类 AutoCAD
CRM系统
OA系统
业务系统 ERP系统
广意报价系统 健康管理系统
cdr jpg、bmp、png、jpeg jpg、bmp exb dwg doc、docx, xls、xlsx, ppt、pptx,pdf,wps、et、dps doc、docx, xls、xlsx, ppt、pptx,pdf,wps、et、dps
2、如出差时间预计超过72小时的在出差前也可走流程申请更长的离线时间,如下操 作,对着客户端点右键点击“我的控制台”再点击“我的表单”,此时会弹出一个对话框 ,在左下角点击“离线申请”,输入离线时间、申请理由再点击确定,审批员通过后离 线时间即会生效
15 E 亿赛通数据泄露防护解决方案理念与实践
培训目的
E
➢ 了解加密系统使用流程
➢ 了解加密系统部署后的效果与影响
➢ 告知用户在遇到问题时的处理方式
4 E 亿赛通数据泄露防护解决方案理念与实践
透明加密效果图
•电子文档透明加密
内部使用
E
合法 出口
外部使用
明文外发 合法离网脱机
非法 出口
竞争对手窃密
16 E 亿赛通数据泄露防护解决方案理念与实践
注意事项
E
在内部环境打开加密文档出现乱码是什么问题?如何处理? 当在加密客户端电脑上打开加密文档出现乱码时不能修改请及时关闭,出现 这种情况有可能是: ①加密客户端未登陆(登陆即可); ②加密客户端某些程序被破坏(联系管理员处理重新安装); ③新的应用程序(开发工具)未报给管理员添加到加密服务器策略中来(联 系管理员处理员添加策略); ④在加密服务器中某些扩展名未与对应程序关联(联系管理员处理调整策略 );
cryptsetup 手册

cryptsetup 手册cryptsetup是一个用于管理加密硬盘和文件系统的工具。
它提供了创建、删除、挂载和卸载加密设备的功能。
以下是关于cryptsetup的详细手册,约800字。
一、概述cryptsetup是一个命令行工具,用于在Linux系统中管理加密设备。
它使用LUKS(Linux Unified Key Setup)加密技术,可以创建加密的硬盘或文件系统,并允许用户在需要时进行挂载和卸载。
二、安装要使用cryptsetup,您需要先安装它。
在大多数Linux发行版中,您可以使用包管理器来安装。
例如,在Ubuntu上,您可以使用以下命令安装:arduinosudo apt-get install cryptsetup三、基本用法1.创建加密设备要创建一个加密设备,您可以使用以下命令:arduinosudo dd if=/dev/zero of=/dev/sdaX bs=1count=1024sudo cryptsetup --key-file /path/to/keyfile.key --type luksformat /dev/sdaX这将创建一个大小为1MB的加密设备/dev/sdaX,并使用指定的密钥文件进行加密。
请注意,这只是一个示例命令,您需要根据您的实际情况进行调整。
2.挂载加密设备要挂载加密设备,您可以使用以下命令:bashsudo cryptsetup --key-file /path/to/keyfile.key open/dev/sdaX encrypted_devicesudo mount /dev/mapper/encrypted_device/mnt/encrypted_device这将使用指定的密钥文件打开加密设备/dev/sdaX,并将其挂载到/mnt/encrypted_device目录下。
3.卸载加密设备要卸载加密设备,您可以使用以下命令:bashsudo umount /mnt/encrypted_devicesudo cryptsetup --key-file /path/to/keyfile.key closeencrypted_device这将先卸载加密设备,然后关闭其映射。
RCM2000 35 云视频管控系统_用户手册

Software 3.5.0 | November 2015 | 3725-69949-001用户手册RCM2000云视频管控系统i目录概述 (2)1 RCM系统简介 (3)2 首次使用及登录 (4)3 视频会议 (7)预约会议 (7)查询会议 (12)4会议管理 (15)会议审批 (15)会议控制 (18)会议操作 (22)MCU操作 (31)终端操作 (34)5我的会议室 (39)我的会议室 (39)会议室审批 (41)6通讯录 (44)个人通讯录 (44)快捷群组 (46)7统计报告 (48)统计报告 (48)会议查询 (48)8术语表 (51)1概述本手册将作为一个快速指南,介绍RCM2000云视频管控系统V3.5.0(以下简称RCM)的用户界面和常用的操作,带领用户快速上手使用。
RCM系统的主要功能分为会议管理和系统管理两部分,会议管理在本说明中介绍,系统管理部分详见管理员手册。
当文档中出现图标时,表示该信息为提示信息,提醒用户需要注意的问题,如果不正当操作可能会影响系统的功能。
当文档中出现图标时,表示该信息为管理员技巧信息,可能提高工作效率。
手册分为以下几部分:1.RCM系统简介2.首次使用及登录3.视频会议4.会议管理5.我的会议室6.通讯录7.统计报告8.术语表21 RCM系统简介RCM2000 (下面简称RCM)是针对企业新推出的一款帮助其管理视频会议终端和MCU的管理软件。
企业可以通过RCM2000来方便快捷地实现会议管理的相关功能,包括会议预约,会议控制等。
32 首次使用及登录首次使用系统,用户需要知道服务器的IP地址,以:http://<RCM服务器IP地址>来访问,请从系统管理员处拿到登录用户名和密码。
登录页面如下图所示(图 2-1)。
图 2-1系统登录登录成功后,会看到系统主界面。
根据登录用户的类型,主界面中包含的功能会有所不同。
如以管理员账户登录,主界面如下图所示(图2-2):图 2-2管理员主界面如通过Meeting界面直接进入flex界面,就需要点击主Meeting左上方的LOG方可进入flex 界面,主界面如下图所示(图2-3):图 2-3 flex主界面主界面提供了会议管理方式,会议管理包括会议的视频会议、会议管理、我的会议室、通讯录、统计报告等信息。
PG0703P_C02A 等产品的编程手册说明书
目录1. 远程控制概述 (1)1.1 如何远程控制 (1)1.2 通信协议 (3)1.3 远程控制功能 (5)2. SCPI简介 (10)2.1 命令格式 (10)2.2 符号说明 (10)2.3 参数类型 (11)2.4 命令缩写 (12)3. 模式共用命令 (13)3.1 IEEE公用命令子系统 (13)3.2 系统命令 (15)3.3 存储命令 (20)3.4 显示控制 (21)3.5 模式命令 (22)3.6 扫描命令 (22)4. 频谱分析模式 (24)4.1 仪器模式命令 (24)4.2 Initiate命令子系统 (24)4.3 Sense命令子系统 (25)4.4 Calculate命令系统 (43)4.5 Measurement命令系统 (58)4.6 触发 (72)4.7 TG (73)4.8 调制解调 (75)5. 矢量网络分析模式 (77)5.1 频率控制 (77)5.2 幅度控制 (78)5.3 带宽控制 (80)5.4 扫描控制 (80)5.5 TG (81)5.6 迹线 (81)5.7 光标 (85)6. 故障定点分析模式 (98)6.1 频率控制 (98)6.2 幅度控制 (99)6.3 扫描控制 (100)6.4 迹线 (101)6.5 光标 (102)6.6 测量 (105)7. 调制分析模式 (110)7.1 频率控制 (110)7.2 幅度控制 (111)7.3 带宽控制 (112)7.4 扫描控制 (113)7.5 迹线 (114)7.6 光标 (117)7.7 测量 (119)7.8 触发 (124)8. 实时频谱分析模式 (126)8.1 频率控制 (126)8.2 幅度控制 (129)8.3 带宽控制 (131)8.4 扫描控制 (132)8.5 迹线 (134)8.6 光标 (137)8.7 触发 (139)8.8 测量 (142)9. EMI测量 (145)9.1 频率控制 (145)9.2 幅度控制 (147)9.3 带宽控制 (150)9.4 扫描控制 (151)9.5 迹线 (153)9.6 光标 (155)9.7 限制 (159)10. 编程示例 (168)10.1 使用VISA的编程示例 (168)10.2Sockets/Telnet示例 (182)SIGLENT 1. 远程控制概述分析仪支持通过USB、LAN、GPIB-USB接口与计算机进行通信。
视频解码器 用户手册说明书

视频解码器用户手册资料版本:V1.04感谢您购买我们的产品。
使用时若遇到任何问题,请您及时和经销商联系。
声明注意:本产品的默认密码仅供首次登录使用,为保证安全,请您确保在首次登录后修改默认密码。
强烈建议您将密码设置为强密码,字符不小于9位。
•本手册中的产品外观图仅供参考,请以实物为准。
•截取的界面图仅当说明示例,各版本界面存在差异,请以实际界面为准。
•本手册能作为多个型号产品的使用指导,但不一一列举每个产品的使用情况,请您根据实际产品自行对照。
•本公司保留在没有任何通知或者提示的情况下对本手册的内容进行修改的权利,但并不确保手册内容完全没有错误。
•由于物理环境等不确定因素,部分数据的实际值可能与手册中提供的参考值存在偏差,如有任何疑问或争议,请以本公司最终解释为准。
•您使用产品过程中,请遵守本手册操作说明。
对于未按说明而引起的问题,我司恕不负责,感谢您的配合。
安全须知负责安装和日常维护本设备的人员必须具备安全操作基本技能。
在操作本设备前,请务必认真阅读和执行产品手册规定的安全规范。
•此为A级产品,在生活环境中,该产品可能会造成无线电干扰。
在这种情况下,可能需要用户对其干扰采取切实可行的措施。
•请确保设备安装平稳可靠,周围通风良好,设备在工作时必须确保通风口的畅通。
•使设备工作在允许的温度及湿度范围内,避免置于潮湿,多尘,极热,极冷,强电磁辐射、震动等场所。
•请确保环境电压稳定并符合设备供电要求,设备仅可在额定输入输出范围内使用,满足防雷要求,并良好接地。
•请保护电源软线免受踩踏或挤压,特别是在插头、电源插座和从装置引出的接点处。
•安装完成后请检查正确性,以免通电时由于连接错误造成人体伤害和设备部件损坏!•请勿自行拆开设备机箱盖上的防拆封条。
若您要拆封,请先与本公司当地代理商联系;否则,若擅自操作导致设备无法维护,本公司将不承担由此引起的所有后果,感谢您的配合!•异常断电会造成设备硬盘损坏或功能异常,若需对设备关机,请严格按手册说明进行操作。
iDVR 3.0 Build 58用户使用说明手册2
录下,录像回放请使用相关的本地回放工具。
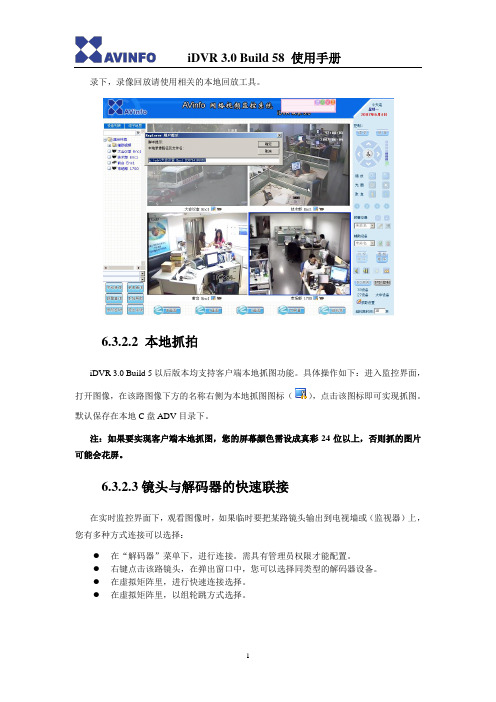
6.3.2.2 本地抓拍iDVR 3.0 Build 5以后版本均支持客户端本地抓图功能。
具体操作如下:进入监控界面,打开图像,在该路图像下方的名称右侧为本地抓图图标(),点击该图标即可实现抓图。
默认保存在本地C盘ADV目录下。
注:如果要实现客户端本地抓图,您的屏幕颜色需设成真彩24位以上,否则抓的图片可能会花屏。
6.3.2.3镜头与解码器的快速联接在实时监控界面下,观看图像时,如果临时要把某路镜头输出到电视墙或(监视器)上,您有多种方式连接可以选择:●在“解码器”菜单下,进行连接。
需具有管理员权限才能配置。
●右键点击该路镜头,在弹出窗口中,您可以选择同类型的解码器设备。
●在虚拟矩阵里,进行快速连接选择。
●在虚拟矩阵里,以组轮跳方式选择。
6.3.2.4 视频窗口转换功能键点击左侧的设备列表名称,再点击展开的镜头名称,该镜头画面就会显示在监控窗口中。
实时监控窗口默认为四画面形式,可以通过点击单画面、四画面、九画面分别将视频窗口转换为相应形式。
双击图像,可以关闭该画面。
要回到管理员界面,请点击“退出系统”。
✧在大屏幕状态下,界面中所有的控制键及功能键都会隐藏起来,只有视频浏览窗口显示在屏幕上,点击屏幕的任一位置即可退出大屏幕状态。
✧组轮跳,是指一个镜头组内的镜头自动依次切换。
轮跳只有在单画面显示时才有效。
先停止播放画面,点击组名,设定轮跳时间,然后点“组轮跳”即可。
在轮跳过程中,点击其它设备组,则会自动切换到该组进行轮跳。
再次点击组轮跳按钮,则关闭轮跳状态。
6.3. 3 PTZ控制区点击实时监控界面右上方的“请求”按钮,您可以获取对PTZ的控制权,点击“放弃”将失去对PTZ键盘的控制权(注:必须IE6.0以上版本功能才能生效)。
对于PTZ的控制只能一人执行,不能多人同时操作。
相同权限等级的用户只能在第一个用户放弃控制权限后,第二个用户才可以控制。
级别的高的用户要“请求”控制权时可以抢夺低级别用户的控制权。
H系列 视频拼接服务器 用户手册说明书

H 系列视频拼接服务器用户手册西安诺瓦星云科技股份有限公司HIPC西安诺瓦星云科技股份有限公司目 录 (i)1 (1) (1) (1) (2) (2).................................................................................................................................................................................. 3 2 (4) (4).................................................................................................................................................................................. 4 3 (7)LED (7)LCD................................................................................................................................................................................ 9 4 (11) (11)BKG (13)OSD (14) (17) (19) (21) (21)3D (23) (25)EDID (27) (28)5 (31) (31) (32) (32)5.3.1.......................................................................................................................................................................... 32 5.3.2 .......................................................................................................................................................................... 34 5.3.3 (34) (38)............................................................................................................................................................................................ 39 6 (40) (40) (44) (45) (46)西安诺瓦星云科技股份有限公司............................................................................................................................................................................................ 49 6.5.1 EDID ........................................................................................................................................................................ 49 6.5.2 IPC ............................................................................................................................................................................ 50 6.5.2.1IPC..............................................................................................................................!6.5.2.2 IPC ..............................................................................................................................! 6.5.2.3 IPC ..............................................................................................................................! 6.5.3 .......................................................................................................................................................................... 57 6.5.4 .......................................................................................................................................................................... 58 6.5.5 .......................................................................................................................................................................... 58 6.5.6 .......................................................................................................................................................................... 59 6.5.7 . (60)6.5.8.................................................................................................................................................................................. 61 6.5.9 .................................................................................................................................................................................. 62 6.5.10 .. (63)西安诺瓦星云科技股份有限公司1 设备连接H●DVI HDMISDI CVBS VGADP● “H_2IP ”图1-1HLED●“H_16+2”LED1182916−LED−CVT4K-SLED图1-2LED西安诺瓦星云科技股份有限公司当输出卡为“H_20网口发送卡”时,连接与配置方式与“H_16路网口+2路光口发送卡”中网口连接和配置方式保持一致。
前沿风雷文档加密软件使用手册范本

前沿文档安全管理系统[风雷版]管理员使用手册2011年4月1.说明----------------------------------------------------------------------------------------- 41.1产品概要----------------------------------------------------------------------------- 41.2使用范围----------------------------------------------------------------------------- 42.产品安装------------------------------------------------------------------------------------ 43.功能使用说明------------------------------------------------------------------------------- 53.1控制端设置 -------------------------------------------------------------------------- 53.1.1 控制端登陆 ------------------------------------------------------------------ 53.1.2控制端界面说明-------------------------------------------------------------- 63.1.3我的工作台------------------------------------------------------------------- 73.1.3.1系统公告-------------------------------------------------------------- 73.1.3.2 消息中心 ------------------------------------------------------------- 93.1.3.3我的申请------------------------------------------------------------- 103.1.3.3.1 文档权限申请------------------------------------------------ 103.1.3.3.2 文档解密申请------------------------------------------------ 113.1.3.3.3 计算机离线申请 --------------------------------------------- 123.1.3.3.4 邮件外发申请------------------------------------------------ 123.1.3.4 我的审批 ------------------------------------------------------------ 123.1.3.4.1 文档权限申请审批------------------------------------------- 133.1.3.4.2 文档解密申请审批------------------------------------------- 143.1.3.4.3 计算机离线申请审批 ---------------------------------------- 153.1.3.4.4 邮件外发申请审批------------------------------------------- 153.1.3.5我的帐号------------------------------------------------------------- 163.1.3.5.1 个人信息----------------------------------------------------- 163.1.3.5.2 密码修改----------------------------------------------------- 173.1.4 安全策略-------------------------------------------------------------------- 173.1.4.1 基础配置 ------------------------------------------------------------ 173.1.4.1.1 受控应用配置------------------------------------------------ 173.1.4.1.2文档密级管理------------------------------------------------- 183.1.4.2 策略配置 ------------------------------------------------------------ 183.1.4.2.1部门策略配置------------------------------------------------- 183.1.4.2.2 文档单独授权管理------------------------------------------- 223.1.4.3安全管理------------------------------------------------------------- 223.1.4.3.1手动离线注册------------------------------------------------- 223.1.4.3.2 计算机扫描加解密------------------------------------------- 233.1.4.3.2.1 扫描文件后辍管理------------------------------------ 243.1.4.3.2.2 计算机扫描任务列表 --------------------------------- 243.1.4.3.3 卸载密码管理------------------------------------------------ 253.1.4.4 匿名用户安全管理 -------------------------------------------------- 263.1.5 系统设置-------------------------------------------------------------------- 263.1.5.1 基本配置 ------------------------------------------------------------ 263.1.5.1.1 系统全局参数配置------------------------------------------- 263.1.5.1.2 水印配置----------------------------------------------------- 283.1.5.1.3 邮件发送服务配置------------------------------------------- 313.1.5.1.4 许可证管理 -------------------------------------------------- 333.1.5.2 人员配置管理 ------------------------------------------------------- 333.1.5.2.1 部门及用户管理-------------------------------------------- 333.1.5.2.2 角色管理----------------------------------------------------- 443.1.5.2.3 批量导入用户和部门--------------------------------------- 463.1.5.2.4 用户同步----------------------------------------------------- 473.1.5.3 计算机配置管理----------------------------------------------------- 483.1.5.3.1计算机管理--------------------------------------------------- 483.1.5.4 系统集成配置 ------------------------------------------------------- 533.1.5.4.1同步用户数据源配置----------------------------------------- 533.1.5.4.2同步用户认证源配置----------------------------------------- 543.1.5.5 申请审批配置 ------------------------------------------------------- 563.1.5.5.1全局审批参数配置 ------------------------------------------- 563.1.5.5.2部门审批参数配置 ------------------------------------------- 623.1.5.5.3审批例外规则管理 ------------------------------------------- 653.1.6日志审计 -------------------------------------------------------------------- 733.2客户端使用 ----------------------------------------------------------------------- 74 3.2.1 文件加密 ---------------------------------------------------------------- 74 3.2.1.1 自动加密 ------------------------------------------------------- 743.2.1.2 手动加密 ------------------------------------------------------- 76 3.2.2 文件申请 ---------------------------------------------------------------- 76 3.2.2.1 文件解密申请 -------------------------------------------------- 763.2.2.2 文件借阅申请 -------------------------------------------------- 783.2.2.3 邮件申请 ------------------------------------------------------- 79 3.2.3 托盘 --------------------------------------------------------------------- 803.2.4 客户端离线-------------------------------------------------------------- 82 3.2.4.1 手动离线 ------------------------------------------------------- 823.2.4.2 自动离线 ------------------------------------------------------- 82 3.2.5 文件授权 -------------------------------------------------------------------------- 83 3.2.5.1 客户端右键授权------------------------------------------------ 831.说明1.1产品概要1)前沿风雷文档加密软件(V6)分为服务端与客户端;2)产品的策略设置使用B/S结构,客户端设计为C/S结构;3)前沿风雷文档加密软件(V6)服务端支持“前沿文档安全管理系统”V4.6与“前沿风雷文档加密软件”V6客户端连接使用;4)前沿风雷文档加密软件(V6)主要功能包括“服务器系统设置、动态水印设置、用户集成同步、多类型数据库连接、计算机用户集中管理、WEB审批、审批规则设置、安全策略设置、日志管理、客户端升级管理、消息中心、系统监控、虚拟打印黑白名单设置、进程黑白名单设置、动态卸载密码、客户端扫描加解密、外发文档管理、离线管理等”;5)红色字体内容为未启用功能。
(完整版)系统用户手册模板

XX系统用户使用说明书共1册第1册共6页XX有限公司二〇一五年六月目录1前言 (1)1.1编写目的 (1)1.2适用对象 (1)1.3通用操作说明 (1)2系统运行环境需求 (1)2.1硬件环境 (1)3系统功能介绍 (2)3.1登录系统 (2)3.2主界面 (3)3.3个人办公 (3)3.3.1 通知通知 (3)4常有问题以及解决方法 (3)4.1系统登录失败问题 (3)4.2信息填写不为空问题 (3)4.3系统界面显示问题 (4)1前言1.1 编写目的本文档旨在对《 X 管理系统》软件功能进行描述,帮助用户掌握该系统的使用方法。
1.2 适用对象本文档适用于 XX 公司内部软件操作人员。
1.3 通用操作说明【盘问】按钮:依照盘问条件盘问吻合条件的信息。
【保存】按钮:保存输入的信息。
【清空】按钮:清空输入的数据。
【导出数据】按钮:导出已选择的文件或数据。
【关闭】按钮:关闭当前弹出窗口,若当前信息被更正但未执行【保存】操作,更正的信息未被保存。
2系统运行环境需求2.1 硬件环境硬件运行环境包括服务器硬件环境、客户端计算机硬件配置环境,详见下表。
表 2.1-1客户端计算机软硬件配置环境配置硬件规格要求办理器双核 2.0G 以上内存512M 以上硬盘80G 以上显示器方正 22’英寸;分辨率:1920*1080 ;显示比率: 150%最正确阅读器: IE9;支持: IE9/10/11( 需要设置兼容模式);显示阅读器比率: 100%表2.1-2服务器端计算机软硬件配置环境配置硬件规格要求办理器双核 2.0G 以上内存2G 以上硬盘150G 以上操作系统Windows Server 2008数据库SQL Server 2008表 2.1-3外面接口表序号接口设备接口种类1打印机USB3系统功能介绍《XX 系统》主若是为XX 公司内部供应完满的电子平台支持,包XX 、系统管理等模块,实现工作的全方向管理。
Milestone Systems XProtect LPR 2023 R1 管理员手册说明书

2023目录Copyright、商标和免责声明5支持的视频管理软件产品和版本6总览7 XProtect LPR(已作说明)7 XProtect LPR系统架构7兼容性8授予许可10 XProtect LPR许可证10要求和注意事项11系统要求11为LPR准备摄像机(已解释)11定位摄像机12摄像机角度13牌照宽度建议14图像分辨率15了解摄像机曝光17物理环境20镜头和快门速度21对比度23不需要的摄像机功能23安装25安装XProtect LPR25配置27查看LPR服务器信息27 LPR服务器信息属性27为LPR配置摄像机28中LPR相关要求Management Client28快照(已解释)29添加LPR摄像机30调整LPR摄像机的设置31“信息”选项卡31“识别设置”选项卡32“匹配列表”选项卡36“国家/地区模块”选项卡37延长时间长度以避免部分识别39选择快照39验证配置40自动配置40匹配列表41匹配列表(已作说明)41未列出的牌照列表(已解释)41添加新匹配列表42编辑匹配列表42导入和导出匹配列表42匹配列表属性43编辑自定义字段属性44牌照样式和别名45牌照样式(已作说明)45别名(已作说明)45查找系统中使用的牌照样式46添加、编辑、删除别名46将牌照样式分组为别名46示例场景46创建别名47将别名分配给牌照样式48通过LPR而触发的事件49通过LPR而触发的警报50 LPR的警报定义50 LPR的警报数据设置50维护52 LPR Server Manager(已作说明)52启动和停止LPR Server服务52显示LPR服务器状态52显示LPR服务器日志52更改LPR服务器设置53升级54升级XProtect LPR54卸载XProtect LPR54Copyright、商标和免责声明Copyright©2023Milestone Systems A/S商标XProtect是Milestone Systems A/S的注册商标。
ViewPoint 8630 综合视讯系统 用户手册
DRM-X3.0如何加密音视频
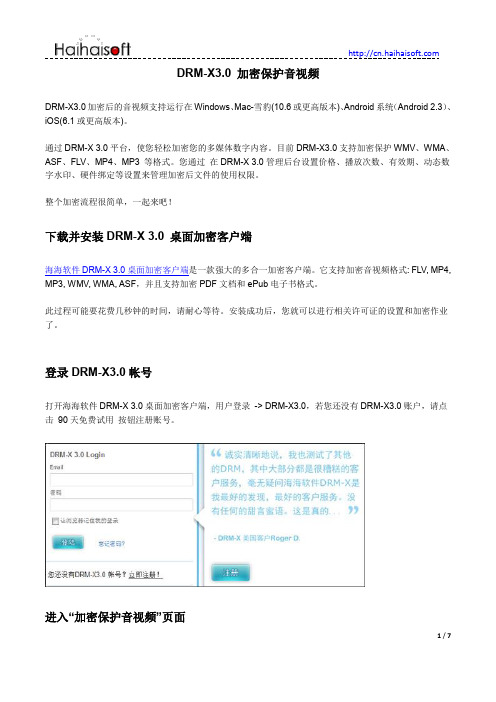
DRM-X3.0 加密保护音视频DRM-X3.0加密后的音视频支持运行在Windows、Mac-雪豹(10.6或更高版本)、Android系统(Android 2.3)、iOS(6.1或更高版本)。
通过DRM-X 3.0平台,使您轻松加密您的多媒体数字内容。
目前DRM-X3.0支持加密保护WMV、WMA、ASF、FLV、MP4、MP3 等格式。
您通过在DRM-X 3.0管理后台设置价格、播放次数、有效期、动态数字水印、硬件绑定等设置来管理加密后文件的使用权限。
整个加密流程很简单,一起来吧!下载并安装DRM-X 3.0 桌面加密客户端海海软件DRM-X 3.0桌面加密客户端是一款强大的多合一加密客户端。
它支持加密音视频格式: FLV, MP4, MP3, WMV, WMA, ASF,并且支持加密PDF文档和ePub电子书格式。
此过程可能要花费几秒钟的时间,请耐心等待。
安装成功后,您就可以进行相关许可证的设置和加密作业了。
登录DRM-X3.0帐号打开海海软件DRM-X 3.0桌面加密客户端,用户登录-> DRM-X3.0,若您还没有DRM-X3.0账户,请点击90天免费试用按钮注册账号。
进入“加密保护音视频”页面在控制后台,点击页面第一个图标- 加密保护音视频(WMV,MP4,MP3,FLV)加密保护音视频请按照以下指示的几个步骤进行操作:第一步:选择许可证模板许可证模版概念:许可证模版就是加密模版。
当设置了一个许可证模版,使用DRM-X3.0加密客户端加密内容时,选择了这个模版,那么这些文件就属于这个模版了。
这个许可证模版中所有的设置信息都将自动附加到这些文件上。
使用一个许可证模版可以加密保护多个音视频文件。
这里的“Video Packager: Basic Classes”是系统默认的许可证模版,您可以编辑或创建新的许可证模版,点击右侧的“新建模板”,会跳出添加许可证模板窗口:许可证模板名称:根据您所需加密文件的类型输入名称。
网络视频解码器快速操作手册V3.0.1

视频解码器用户手册说明书
Video DecoderUser Manual Manual Version:V1.00Thank you for purchasing our product. If there are any questions, or requests, please do not hesitate to contact the dealer.CopyrightCopyright 2016 Zhejiang Uniview Technologies Co., Ltd. All rights reserved. No part of this manual may be copied, reproduced, translated, or distributed in any form or by any means without prior consent in writing from our company.Trademark Acknowledgementand other Uniview's trademarks and logos are the property ofZhejiang Uniview Technologies Co., Ltd. Other trademarks, company names and product names contained in this manual are the property of their respective owners.DisclaimerCAUTION!The default password is used for your first login. To ensure account security, please change the password after your first login. You are recommended to set a strong password (no less than eight characters).●To the maximum extent permitted by applicable law, the productdescribed, with its hardware, software, firmware and documents, isprovided on an "as is" basis.●Best effort has been made to verify the integrity and correctness ofthe contents in this manual, but no statement, information, orrecommendation in this manual shall constitute formal guaranteeof any kind, expressed or implied. We shall not be held responsiblecontents of this manual are subject to change without prior notice.Update will be added to the new version of this manual.●Use of this manual and the product and the subsequent result shallbe entirely on the user's own responsibility. In no event shall we beliable for any special, consequential, incidental, or indirectdamages, including, among others, damages for loss of businessprofits, business interruption, or loss of data or documentation, orproduct malfunction or information leakage caused by cyber attack,hacking or virus in connection with the use of this product.●Video and audio surveillance can be regulated by laws that varyfrom country to country. Check the law in your local region beforeusing this product for surveillance purposes. We shall not be heldresponsible for any consequences resulting from illegal operationsof the device.●The illustrations in this manual are for reference only and may varydepending on the version or model. The screenshots in this manualmay have been customized to meet specific requirements and userpreferences. As a result, some of the examples and functionsfeatured may differ from those displayed on your monitor.●This manual is a guide for multiple product models and so it is notintended for any specific product.●Due to uncertainties such as physical environment, discrepancymay exist between the actual values and reference values providedin this manual. The ultimate right to interpretation resides in ourcompany.Environmental ProtectionThis product has been designed to comply with the requirements onenvironmental protection. For the proper storage, use and disposal ofthis product, national laws and regulations must be observed.Safety and Compliance InformationSafety SymbolsThe symbols in the following table may be found on installation-related equipment. Be aware of the situations indicated and take necessary safety precautions during equipment installation and maintenance.The symbols in the following table may be found in this manual.Carefully follow the instructions indicated by the symbols to avoid hazardous situations and use the product properly.Symbol DescriptionWARNING!Indicates a hazardous situation which, if not avoided, could result in bodily injury or death.CAUTION!Indicates a situation which, if not avoided, could result in damage, data loss or malfunction to product.NOTE!Indicates useful or supplemental information about the use of product.Safety InformationRead through the instructions carefully before starting installation and operation.Installation and maintenance must be performed by qualified●This device is a class A product and may cause radio interference.Take measures if necessary.●While shipping, the device should be packed in its original packing.●Disconnect power before installation and cable connection. Powerdown the device before connecting and disconnecting cables, accessories and peripherals.●Verify installation and cable connection are correct before use.Incorrect installation and connection may cause personal injury and device damage.●Protect the power cable from being stepped on or pressed,particularly at the plug, receptacle, and the part leading out of the device.●Follow the procedure to shut down the device properly. Use anUninterrupted Power Supply (UPS) if possible. Sudden power failures can cause disk damage or device malfunction.●Improper use or replacement of the battery may cause risk ofexplosion. Use the manufacturer recommended battery. Dispose of the used battery according to local regulations or the battery manufacturer's instructions. Never dispose of the battery in fire.●Ensure a proper operating environment, including temperature,humidity, ventilation, power supply, and lightning protection. Make sure the device is always properly grounded. Keep the device from dust, excessive vibration and strong electromagnetic radiation.●Do not use the device near water or expose to rain or moisture.Never spill liquid of any kind on the device. Never let liquid of any kind enter the device.●Never stare at the optical module or optical fiber connector duringoperation.●Take necessary measures to ensure data security and protect thedevice from network attack and hacking (when connected toInternet). Possible risks and consequences are at user's solediscretion.● Contact your dealer if the device does not work properly. Neverattempt to disassemble the device yourself. User shall assume allresponsibility for damage, loss, or injury caused by unauthorizedrepair or maintenance.WARNING!● Never look at the transmit laser while the power is on. Never look directly at the fiber ports and the fiber cable ends when they are powered on.●Use of controls or adjustments to the performance or procedures other than those specified herein may result in hazardous laser emissions.Regulatory ComplianceFCC Part 15This equipment has been tested and found to comply with the limits for digital device, pursuant to part 15 of the FCC Rules. These limits are designed to provide reasonable protection against harmful interference when the equipment is operated in a commercial environment. This equipment generates, uses, and can radiate radio frequency energy and, if not installed and used in accordance with the instruction manual, may cause harmful interference to radio communications. Operation of this equipment in a residential area is likely to cause harmful interference in which case the user will be required to correct the interference at his own expense.This product complies with Part 15 of the FCC Rules. Operation is subject1.This device may not cause harmful interference.2.This device must accept any interference received, includinginterference that may cause undesired operation.LVD/EMC DirectiveThis product complies with the European Low Voltage Directive 2006/95/EC and EMC Directive 2004/108/EC.WEEE Directive–2002/96/ECThe product this manual refers to is covered by the Waste Electrical & Electronic Equipment (WEEE) Directive and must be disposed of in a responsible manner.Contents1 Introduction (1)2 Login (1)3 Common Functions (2)4 Network (3)TCP/IP (3)Telnet (4)SNMP (5)5 Audio and Video (7)Audio (7)Video (8)Media Stream (8)6 Service (9)Image (9)Transparent Channel (11)7 System (12)User (12)Time (12)Management Platform (13)Serial Port (14)8 Maintenance (16)Maintenance (17)Device Status (17)Decoding Status (18)1 IntroductionThis manual describes how to manage the device on a Web browser.The figures in this manual are only for illustration purpose. Theparameters, options and values actually displayed on the Web pages ofyour device may be different from those in this manual.2 LoginBefore you start, check that:The device is operating properly.The computer is connected to the device.The computer is installed with Microsoft Internet Explorer (IE) 7.0 or higher, and no proxy server is being used.NOTE!●The default IP address of your device is 192.168.0.14; the defaultsubnet mask is 255.255.255.0; the default gateway is 192.168.0.1.●Use admin as the username and password for first-time login. Pleasechange the default password under System to ensure accountsecurity.Follow the steps to log in to the device:1.Enter the device's IP address in the address bar and then pressEnter.2.Log in with the correct username and password. The Commonpage is displayed to list the frequently used functions. For details,see Common Functions.3 Common FunctionsThe Common page lists functions that are frequently used to manage the device. The table below describes the meaning of the icons on this page.firmware version, network settings, and management mode.For more details, seethe screen, image resolution and refresh rate, and remainingdecoding capacity of the device. For more details, seeDecoding StatusSet network parameters such as IP address for the device.For more details, seeSet parameters required if the device is to be managed by amanagement platform (central server). For more details, seeManagement PlatformSet vidoe output parameters, including the number ofwindows that appear on the screen, image resolution andrefresh rate. For details, seeSet maintenance parameters. For details, see4 NetworkSet network settings include TCP/IP and Telnet so that the device can communicate with other devices on the network.TCP/IPAssign a static IP address manually, or obtain one using the DHCP server.1.Click Network > TCP/IP.2.Set the parameters. Some are described in the table below.3.Click Save.TelnetEnable Telnet if you want to access the device from a computer with Telnet. The username and password for Telnet are the one you use to access the device on a Web browser. If the password for Web access is changed, the Telnet password changes too. By default the admin username cannot be changed.1.Click Network > Telnet.2.Select the check box to enable Telnet, and then click Save. SNMPEnable Simple Network Management Protocol (SNMPv3) if the device operates in server mode (managed via a central server). Through SNMP the central server synchronizes audio/video channel configurations and some of the scheduled tasks to the device, and the device reports device alarms to the central server.1.Click Network > SNMP.2.Set the parameters. Some are described in the table below.5 Audio and VideoSet video, audio and media stream parameters. The major functionsprovided on the Video&Audio menu are listed in the table below.NOTE!●In standalone mode, all parameters under Video & Audio can beconfigured on the client computer.●In server mode, only Display Mode can be configured on the clientcomputer; other parameters can only be configured on the centralserver.AudioSelect the output channel and adjust the sound volume as needed.1.Click Audio & Video > Audio.2.Set the parameters and then click Save.VideoSelect the output channel and then set the number of windows on the screen, image resolution and refresh rate.1.Click Audio & Video > Video.2.Set the parameters and then click Save.Media StreamSet media stream parameters, including the stream source address and address format, so that the device can receive media streams from the connected cameras.1.Click Audio & Video > Media Stream.2.Set the parameters. Some are described in the table below.6 ServiceSet image parameters and a transparent channel as needed. The major functions provided on the Service menu are listed in the table below.ImageSet the image display ratio, width and color of the divider line on the screen, and crop images as needed.1.Click Service > Image.2.Set the parameters. Some are described in the table below.Transparent ChannelSet the transparent channel to transfer video and audio signals through a serial port.1.Click Service > Transparent Channel.2.Set the parameters. Some are described in the table below.7 SystemSet system parameters, including the user password, system time, system language, management platform, and serial port.UserChange the default password to a strong one (at least 8 digits) after your first login. It is also recommended that you change the password periodically to ensure account security.1.Click System > User.2.Enter the old and new passwords.3.Click Save.TimeSet system time for your device and how the time is updated.1.Click System > Time.2.Set the parameters. Some are described in the table below.NOTE!The device synchronizes time with the central server when operating in server mode.Management PlatformConfigure the management platform only when the device operates inserver mode (managed by a central server).1.Click System > Platform.2.Select Connect to Platform.3.Set the parameters. Some are described in the table below.4.Click Save.Serial PortSet the serial port on the device, including the port type, baud rate, parity check, and flow control method.1.Click System > Serial Port.2.Select the desired port and then set parameters accordingly. Theparameters displayed vary with the serial port selected. Thefigure below shows the parameters displayed when COM 1isselected.The figure below shows the parameters displayed when COM 2is selected.3.Some parameters are described in the table below.NOTE!In server mode, only Duplex can be configured on the Web browser, and all the other parameters can be configured only on the central server. 8 MaintenanceThe major functions provided on the Maintenance menu are listed inthe table below.MaintenanceClick Maintenance> Maintenance and then perform maintenance operations as needed. You can restart the device, restore some factory default settings, import and export configuration files, export logs, and upgrade the device.Device StatusClick Maintenance> Device Status to view basic information of the device, its network settings and operation status. The following shows an example.Decoding StatusClick Maintenance> Decoding Status to view decoding status, including the output channel, number of windows on the screen, image resolution and refresh rate, remaining decoding capacity, and stream source address. The following shows an example.。
网络视频产品用户手册(竖版)

网
3. IE、EasyView 系列软件中“报警设置”采用默认即可。
络
视
频
产
品
14
第
二
2.3 485 控制功能
章
产
品
网络产品包含一组反向 485 控制端口,通过反向 485 控制端口后端用户可以实现对前
常
用
端球云台、解码器的云镜控制功能。
功
能
介
绍
1. 按照标识连接云台、球机控制线到网络视频服务器反向 RS-485 控制端口 A2(+) B2(-);
1-20
485 控制接口
1-20
视频输入 / 出接口
BNC
BNC+VGA
HDMI+ BNC
音频接口
接线端子
尺寸
429mm×300mm×132.8mm
天 地 伟 业 网 络 视 频 产 品
8
第
一
1.6 网络视频产品其他参数介绍
章
网
1.6.1 网络视频产品默认参数
络 视
频
产
【默认 IP 参数】 IP 地址:192.168.1.2;
视 频
双码流
产 品
双向语音
支持 支持 支持 支持 支持 支持
支持 支持 支持 支持 支持 支持
支持 支持 支持 支持 支持 支持
2
第 一 章
视频移动侦测 区域遮挡
支持 支持
支持 支持
网
络
视
频
产
品
支持
介
绍 支持
前端存储
USB
USB
USB
尺寸
206mm×122mm×44mm
系统时钟
Pengo VideoSync Grabber Box V1.8 用户手册说明书

VideoSync Grabber BoxUser Manual (V1.8)- English -Table of Contents1 Introduction (3)2 Features (3)3 System Requirements (3)4 Included Accessories in the Package (3)5 Specification (4)6 Installation (4)7 Capture Operation for Windows OS with OBS (6)a. Computer Detection of VideoSync (6)b. Download Third-Party APP (7)c. Video Setting in OBS (7)d. Video Resolution Set-up (9)e. Audio Setting (10)f. Resize Output Image (12)8 VideoSync APP Quick Operation Guide (13)8.1 APP Download (13)8.2 Control Panel Description (14)a. Info Setting (14)b. VRR Setting (14)c. AFV Setting (15)d. Volume Setting (15)e. Reset Setting (15)f. PIP/PBP Setting (16)1IntroductionPengo VideoSync Grabber Box is the absolute capture card a professional gamer must-have. Play and view your game on your VRR/FreeSync monitor whilst capturing/streaming at 4K30*. Life has never been easier to show every critical movement and sound to the world. Currently, it is the only capture card in the market that allows you to activate VRR/FreeSync on your monitor. Designed to input dual HDMI sources to the computer via the USB-C terminal. Streaming media made easy with Pengo's GUI interface, enabling you to perform dual HDMI PIP and PBP mode*.2Features•HDMI 2.0 input and output (loop-out) supports 4K60 HDR•VRR Mode: Video capture resolution up to 3840 x 2160@30Hz or 1920 x 1080@120Hz•PIP/PBP mode: Maximum video capture resolution up to 1440p/60Hz or 1080p/120Hz•HDMI 2.0 loop-out port supports FreeSync/VRR monitors up to 3840 x 2160@60Hz, 2560 x 1440@144Hz, and 1920 x 1080@240Hz•Supports AUDIO headset (TRRS only)•Must use Pengo GUI interface to support dual HDMI input sources and displays PIP/PBP mode whilst VRR mode disabled (Windows Only)•Compatible with third-party applications, such as OBS, XSplit, vMix, Zoom, Skype, Gamecaster, Broadcaster...etc.3System Requirements•CPU: i5 Dual Core 2.8GHz or higher•RAM: 4GB or higher•OS: Microsoft Windows (8 and above)4Included Accessories in the Package•VideoSync Grabber Box x 1•USB-C to USB-A cable x 1•USB-C to USB-C cable x 1•Power adapter x 15SpecificationINPUT INTERFACE 2 x HDMI 2.0 Type-AOUTPUT INTERFACE 1 x USB Type-C , 1 x HDMI 2.0 Type-AINPUT/OUTPUT(loop out) RESOLUTION 3840 x 2160p 60/50/30/25/24Hz1920 x 1080p 240(PIP Mode Off)/120/60/50/30/25/24Hz 2560 x 1440p 144/60Hz1920 x 1080i 60/50Hz1280 x 720p 60/50HzCAPTURE RESOLUTION USB3.0SuperSpeedNV12 YUY23840 x 2160p(PIP Mode Off)30 Hz2560 x 1440p 60 Hz1920 x 1080p 120/60/50/30/25 Hz1280 x 720p 60 Hz720 x 480p 60 Hz720 x 576p 50 Hz640 x 480p 60 Hz2560 x 1440p 50 Hz1920 x 1080p 60/50/30/25 Hz1280 x 720p 60 Hz720 x 480p 60 Hz720 x 576p 50 Hz640 x 480p 60 HzUSB2.0Hi-Speed1280 x 720p 30 Hz720 x 576p 50 Hz720 x 480p 60 Hz640 x 480p 60 Hz1280 x 720p 30Hz720 x 576p 50 Hz720 x 480p 60 Hz640 x 480p 60 HzCOLOR SAMPLING RGB, YUV (YCbCr 4:4:4, YCbCr 4:2:2, YCbCr 4:2:0)VIDEO FORMAT NV12 , YUY2UAC AUDIO OUTPUT Stereo / 16-bit PCM encoded audio at 48KHz sampling rates AUDIO INTERFACE 3.5mm headset (TRRS only)SYSTEM REQUIREMENTS CPU: i5 Dual Core 2.8GHz or higher RAM: 4GB or higherOS: Windows (8 and above)ENVIRONMENT Operating Temperature 0~45℃Operating Humidity 20~90%DIMENSION 146.5 x 177.5 x 33.5 mm (W x L x H including rubber base) WEIGHT 830 GCOLOR Pacific BlueACCESSORIES USB-C to USB-A Cable x 1, USB-C to USB-C Cable x 1, Power Adapter x 1 PRODUCT NUMBER 8RGRA-H02C02B0PEEAN NUMBER 4718009820524*DOES NOT CAPTURE HDCP CONTENT (ex: DVD, Blue-Ray player)6InstallationPlease follow the set-up instructions step by step as below:REMARK:The HDMI source that you input first will be the main display/capture and loop-out images.As a result, the other HDMI source will show up in the small window when using the Pengo GUIinterface.1. Plug in the power adapter until the blue light in the front of the grabber is flashing.2. Make sure that both HDMI sources are turned on.3. Plug the main HDMI source that you want to capture to HDMI A on the VideoSync Grabber Box.4. Use another HDMI cable to connect the VideoSync Grabber Box to an external monitor throughthe loop-out port. The main HDMI source images will show up in the monitor.5. Plug in the other HDMI source to the VideoSync Grabber Box (HDMI B).6. Grab the provided USB-C to C or USB-C to A cable to bridge the VideoSync Grabber Box and yourPC. (USB 3.0 connection is recommended)7. Lastly, if you have a headset, plug it into the 3.5mm audio jack. (TRRS only)8. If everything is all set/connected, the blue LED light will always be ON at the front.NOTE 1: Please mind the plug-in order. No matter which HDMI ports, the one you plug into theVideoSync Grabber Box first will be the main video source and pass-through to your FreeSync/VRR monitors via loop-out port.NOTE 2: In case you did not follow our steps and the power on the VideoSync was the last one being connected, then by default, the input source from HDMI A will be the main video source.7Capture Operation for Windows OS with OBSputer Detection of VideoSyncAfter plugging in your device, go to This PC➔ click Manager➔Device Manager➔ checkCamera and Sound, video and game controllers. If you can see “Pengo VideoSync”, the Grabber has been detected by the computer.b.Download Third-Party APP (we will use OBS as the set-up example)First, download OBS Studio at https:///downloadc.Video Setting in OBSFind the Sources column, click “+” icon, and select “Video Capture Device”. A pop-up window will show, rename the device if you want, then click OK.d.Video Resolution Set-upA following pop-up window ensues automatically after pressing OK. From the drop-down menus,choose Pengo VideoSync as your input device. Then, deselect default so you can adjust thecapture resolution, frames per second, and video format.e.Audio SettingFind the Audio Mixer column, click the set-up icon on the right-hand side, go to Properties. A pop-up window will display and let you choose the audio input source. Select Pengo VideoSync as your audio input device.The following step is quite important, click the audio set-up icon again, now, choose Advanced Audio Properties. Make sure, under the Audio Monitoring section, allow both monitor and output. Please find the demonstrating pictures below and step by step s et-up.f.Resize Output ImageIn case you can’t see the full image from the HDMI input source. Right click on the middle of the display window, select Resize output (source size). Then, you are all set. Enjoy yourgaming/streaming time.NOTE:•Different versions of OS will have slightly different interfaces•Make sure your source doesn’t have HDCP, the capture unit doesn’t support HDCP•Consult with your third-party user manual for more details tutorials8VideoSync APP Quick Operation Guide8.1APP DownloadDownload the APP at:Go to the DOWNLOAD folder in your computer, open the “.rar” file to launch the APP. No installation required. Then you will see the interface as below:NO.Button DESCRIPTION1INFO Show system information2VRR Enable/disable VRR mode3AFV Audio Follow Video. You can switch anytime during the live session.4VOLUME Adjust headset volume (both mic and headphone) 5RESET Reset to default6A The image from HDMI A input7B The image from HDMI B input8A/B Select PiP/PbP display mode8.2Control Panel Description SettingFrom INFO, you can find all details, including software version, firmware version, dual HDMI input resolution, USB-C capture resolution.b.VRR SettingClick VRR to activate the VRR mode.Choose either A or B to be your streaming image/audio source. You can switch anytimeduring the live session. However, when VRR mode is on, PiP/PbP button will be disableautomatically, as the diagram shows below.NOTE: Remember to turn on VRR mode on both your input HDMI source and the FreeSyncmonitor before launching the APP.c.AFV SettingAudio Follow Video. Meaning, you can output only one audio source when adopting PiP/PbP mode. For example, the picture below shows that HDMI B is taken as the audio source and you can switch it anytime without stopping or re-launching the APP.d.Volume SettingA volume bar will show up when you click it. Drag to adjust your headset volume.e.Reset SettingWhen you want all settings back to system default, click APPLY.NOTE: When you close the APP, all the settings will remain the same until you unplug the VideoSync Grabber Box. Meaning, the APP will set to default automatically when the VideoSync Grabber Box is powered off.f.PIP/PBP SettingSimply click on the APP, input sources will appear in PiP/PbP mode on your preferred APP accordingly. You can swap five displays during the live session.NOTE 1: PiP/PbP mode only works when VRR is disabled.NOTE 2: Under PiP/PbP mode, HDMI A input source will always be taken as loop-out source.NOTE 3: If you choose to mirror the image while live streaming, then the PiP/PbP position will also be mirrored whilst your audiences will see the display as what you choose on the APP.NOTE 4: If you would like to use VideoSync as a switcher, please turn off the VRR mode to avoid any delay ensued.Enjoy Your Game Time or Live Streaming.Gear Yourself Up.。
- 1、下载文档前请自行甄别文档内容的完整性,平台不提供额外的编辑、内容补充、找答案等附加服务。
- 2、"仅部分预览"的文档,不可在线预览部分如存在完整性等问题,可反馈申请退款(可完整预览的文档不适用该条件!)。
- 3、如文档侵犯您的权益,请联系客服反馈,我们会尽快为您处理(人工客服工作时间:9:00-18:30)。
鹏程万里视频加密系统用户手册版权所有目录1 引言 (2)1.1 编写目的 (2)1.2 术语和缩略词 (3)2 软件概述 (4)2.1 软件特点 (4)2.2 加密及认证流程 (5)2.3 软件运行 (6)2.4 系统要求 (6)3 系统使用 (7)3.1 注册登录 (7)3.2 主界面功能介绍 (9)3.2.1 选择项目 (9)3.2.2 视频信息填写 (10)3.2.3 加密模式 (10)3.2.3.1 快速加密 (10)3.2.3.2 编码加密 (10)3.2.4 认证模式 (11)3.2.4.1 网络认证模式 (11)3.2.4.2 离线认证模式 (11)3.2.5 答题设置 (11)3.2.5.1 不启用答题 (11)3.2.5.2 启用简单数学答题 (11)3.2.5.3 启用自定义答题 (12)3.2.5.3.1 添加问题 (13)3.2.5.3.2 编辑问题 (14)3.2.5.3.3 单选题、多选题、简答题 (14)3.2.5.3.4 回到上个问题、继续播放、关闭播放器 (14)3.2.5.3.5 保存问题 (15)3.2.5.4 绑定方式 (15)3.2.5.5 其他设置 (16)3.2.6 水印设置 (17)3.2.7 管理设置 (17)3.2.7.1 视频信息管理 (18)3.2.7.2 网络授权管理 (19)3.2.7.3 批量授权管理 (19)3.2.7.4 离线授权生成 (20)3.2.7.5 子账户管理 (21)1 引言1.1 编写目的在互联网教育培训兴起的时代,讲师们正被视频教学盗版所侵害着,讲师辛辛苦苦录制的视频会被轻易盗版、贩卖,因此损失惨重。
鹏程万里视频加密系统是一款专业的视频加密软件,专门用来保护视频版权,本软件使用微软公司的 DirectShow 系统对视频文件进行重新编码后,采用 AES 256 位高强度逐帧动态加密,在传统文件加密中,采用的是静态加密,既两个相同的文件编码序列加密后的编码序列也是相同的,这样就给破解带来方便,本软件采用动态加密技术,可以保证文件加密后的编码序列具有唯一性,既两个相同的文件编码序列加密后的编码序列是不相同的,就像您的指纹或虹膜一样具有唯一性;加密后的视频文件同时具有哈希效验功能,可防止非法复制、破解和数据篡改,软件采用多线程视频编码技术,加密速度快。
软件以站在用户角度思考,实现方便化,专业化,简洁化等一系列操作。
无需任何专业的软件知识,即可轻松完成视频的加密及保护。
1.2 术语和缩略词DirectShow是微软公司在ActiveMovie和Video for Windows的基础上推出的新一代基于COM(Component Object Model)的流媒体处理的开发包,与DirectX开发包一起发布。
DirectShow使用一种叫Filter Graph的模型来管理整个数据流的处理过程,运用DirectShow,我们可以很方便地从支持WDM驱动模型的采集卡上捕获数据,并且进行相应的后期处理乃至存储到文件中。
这样使在多媒体数据库管理系统(MDBMS)中多媒体数据的存取变得更加方便。
它广泛地支持各种媒体格式,包括Asf、Mpeg、Avi、Dv、Mp3、Wave等,为多媒体流的捕捉和回放提供了强有力的支持。
RSA(RSA algorithm)加密算法是一种非对称加密算法。
在公开密钥加密和电子商业中RSA被广泛使用。
RSA是1977年由罗纳德·李维斯特(Ron Rivest)、阿迪·萨莫尔(Adi Shamir)和伦纳德·阿德曼(Leonard Adleman)一起提出的。
当时他们三人都在麻省理工学院工作。
RSA就是他们三人姓氏开头字母拼在一起组成的。
1973年,在英国政府通讯总部工作的数学家克利福德·柯克斯(Clifford Cocks)在一个内部文件中提出了一个相同的算法,但他的发现被列入机密,一直到1997年才被发表。
对极大整数做因数分解的难度决定了RSA算法的可靠性。
换言之,对一极大整数做因数分解愈困难,RSA算法愈可靠。
假如有人找到一种快速因数分解的算法的话,那么用RSA加密的信息的可靠性就肯定会极度下降。
但找到这样的算法的可能性是非常小的。
今天只有短的RSA钥匙才可能被强力方式解破。
到目前为止,世界上还没有任何可靠的攻击RSA 算法的方式。
只要其钥匙的长度足够长,用RSA加密的信息实际上是不能被解破的。
1983年麻省理工学院在美国为RSA算法申请了专利。
这个专利2000年9月21日失效。
由于该算法在申请专利前就已经被发表了,在世界上大多数其它地区这个专利权不被承认。
AES(Advanced Encryption Standard)高级加密标准,在密码学中又称Rijndael加密法,是美国联邦政府采用的一种区块加密标准。
这个标准用来替代原先的DES,已经被多方分析且广为全世界所使用。
经过五年的甄选流程,高级加密标准由美国国家标准与技术研究院(NIST)于2001年11月26日发布于FIPS PUB 197,并在2002年5月26日成为有效的标准。
2006年,高级加密标准已然成为对称密钥加密中最流行的算法之一。
2 软件概述2.1 软件特点(1)支持所有视频文件:鹏程万里视频加密系统可加密mp4、avi、mkv、mpeg、flv、3gp、mov等所有视频文件格式。
(2)高强度加密算法:鹏程万里视频加密系统采用AES 256位高强度加密算法对视频文件进行逐帧动态加密。
(3)一机一码网络授权:经过加密后的视频文件需要绑定才能正常播放,网络授权可设定过期时间及播放次数,可随时随地收回授权。
(4)内核级防翻录:通过操作系统内核扫描屏幕录像软件,可防范非法手段运行录屏软件。
(5)驱动级视频采集卡检测:采用内核驱动的方式动态视频采集卡检测,只要插上视频采集卡设备就能精准检测,真正的防硬件翻录。
(6)视频互动答题系统:加密者可在加密视频时设置丰富的相关问题,目前可以设置简答题、单选题及多选题。
(7)智能防翻录:可检测所有主流屏幕录制软件及远程控制软件,发现翻录行为可自动封锁授权。
(8)录屏黑化:采用录屏黑化技术既截图、录屏、远控等截取图像操作均被黑化处理,确保视频不被非法窃取。
(9)高强度防破解:采用高级防破解技术,可以防止OD等任何调试程序对加密后的文件进行调试破解。
2.2 加密及认证流程2.3 软件运行本系统运行在PC 及其兼容机上,使用Windows 7或以上版本号操作系统,在软件安装后,直接点击相应图标,就可以显示出软件的主菜单,进行需要的软件操作。
2.4 系统要求Windows 7 及其以上版本处理器(CPU):1千兆赫(GHz)或更快的64位(x64)处理器内存:1GB 内存硬盘:100MB可用硬盘空间显卡:带有WDDM 1.0或更高版本的驱动程序的DirectX 9图形设备,显存128MB。
3 系统使用3.1 注册登录双击软件图标,进入登录界面。
图 3-1 系统登录界面如果没有账号,先注册账号。
图 3-2 系统注册界面注册成功后,输入注册的账号密码即可成功登录,登录后即可看到个人信息和所拥有的对应授权。
图 3-3 软件界面如果下方用户信息显示为试用用户,即没有对应授权,可联系QQ:453188961,购买对应授权。
3.2 主界面功能介绍3.2.1 选择项目选择一个需要加密的视频拖入或者添加进加密系统。
图 3-4 拖入或添加视频3.2.2 视频信息填写填写符合自己所需的视频信息。
图 3-5 视频信息填写其中,视频编号(双击即可生成)和加密密钥(点击即可生成)是系统生成,不由用户填写,如用户填写会导致加密后的文件出错。
3.2.3 加密模式3.2.3.1 快速加密快速加密即不转换视频编码从而直接加密,此模式仅适用于H264编码的视频,如果其他编码的视频使用此模式,可能会导致加密后的视频在播放时出现黑屏等问题。
3.2.3.2 编码加密编码加密是通过X264编码器对视频进行转换编码后,再进行加密,此模式可以支持所有视频的编码格式,具有输出文件小,视频质量清晰的特点,但加密速度较慢。
详情可参考简单设置。
3.2.4 认证模式3.2.4.1 网络认证模式网络认证是将加密的视频信息上传至服务器进行保存,用户在播放时仅需将自己的计算机识别码提供给加密者,或者输入加密者提供的视频激活码,即可授权其播放。
3.2.4.2 离线认证模式离线认证是将加密的视频信息不会上传至服务器进行保存,加密者需要自己保存视频的加密信息,用户在播放时需将自己的计算机识别码提供给加密者,加密者需要使用加密系统提供的密码生成工具,手动生成视频的播放密码,并将播放密码发送给用户,才能完成授权。
3.2.5 答题设置3.2.5.1 不启用答题选择不启用答题,视频会流畅的播放完毕。
3.2.5.2 启用简单数学答题启用简单数学答题,会根据视频的长度在某一个时间段里弹出数学答题。
3.2.5.3 启用自定义答题自定义答题,专门为教育机构所提供的互动功能。
可根据课程关键点设置答题选项。
启用时点击自定义答题选项即可打开设置界面。
图 3-6 自定义答题选项界面3.2.5.3.1 添加问题选择需要添加问题的视频文件,然后选择添加问题即可打开设置界面。
图 3-7 自定义答题设置界面3.2.5.3.2 编辑问题选择需要添加问题的时间轴,然后添加问题。
输入符合视频相对应的互动问题。
图 3-8 自定义答题添加问题界面3.2.5.3.3 单选题、多选题、简答题单选题:A、B、C、D仅有一个答案为正确答案。
多选题:A、B、C、D为多选项正确答案。
简答题:可根据问题填写课堂里所讲到的正确答案。
3.2.5.3.4 回到上个问题、继续播放、关闭播放器回到上个问题:用于一个视频有多个问题,回答错误返回到上个问题的时间轴,如果第一道题打错,则视频重新播放。
继续播放:即使问题回答错误也将继续播放。
关闭播放器:回答错误播放器将自动关闭。
3.2.5.3.5 保存问题可根据视频所讲的关键点设置一个或者多个互动问题,点击添加,回到设置界面时,可根据问题进行修改,确认没问题点击保存问题即可。
图 3-9 自定义答题添加问题界面3.2.5.4 绑定方式用户自定义:将采用默认的所有绑定方式,包括计算机硬件绑定、USB设备绑定、手机扫码。
计算机硬件绑定:通过计算机硬件ID(如CPU、网卡等)获取用户的识别码。
USB设备绑定:支持一切正规带有USB存储的设备。
例:U盘,移动硬盘,手机USB 模式。
手机扫码:用户通过扫描二维码的方式来获取视频的播放授权,方便需要经常变更计算机的用户。
3.2.5.5 其他设置在播放器上显示您的联系方式,如实填写相对应的联系方式即可。