ANSYS Workbench培训课件-接触实例
ANSYS Workbench 19.0基础入门与工程实践 第7章 接触分析

3.无摩擦
• 无摩擦接触,即两接触体之间是理想状态。当外力作用时,两接触体可以发生 分离和相对滑动,当两物体分离后,法向作用力减为0,两物体接触滑动时处 于理想状态,不产生摩擦力作用。
4.静摩擦
• 模拟静摩擦的场景,当两物体之间不发生相对滑动但是存在静摩擦力的时候, 可以使用本接触类型进行设置,可以理解为两物体之间的静摩擦力需要多大就 提供多大。
• 7.3.2 几何建模 • 7.3.3 材料属性设置 • 7.3.4 接触设置 • 7.3.5 网格划分 • 7.3.6 载荷及约束设置 • 7.3.7 模型求解 • 7.3.8 结果后处理
7.4 接触分析实例——螺栓连接
• 螺栓连接在接触问题中非常典型,本例将以螺栓连接为对象,详细介绍如何加 载预紧力、设置螺栓连接接触类型等常见技术问题,为读者进行螺栓连接分析 提供指导。
5.摩擦接触
• 通用摩擦接触,既包含静摩擦也包含滑动摩擦,在接触初始时,两接触体是静摩擦状态,当 外界作用力增大且使两接触体发生相对滑动时,此时产生滑动摩擦,滑动摩擦力基于F=计算, 用户在定义该接触类型时需要定义接触面之间的摩擦系数。
6.滑动摩擦
• 直接滑动摩擦接触是指接触体之间不发生静摩擦作用的阶段。该接触类型只针 对刚体动力学分析,系统接触力与法向正压力成正比。
• 支座及底板材质为结构钢材,在WB 19.0中默认即可;螺栓材质选用45号钢,其材料属性参 数:Ε=209000MPa,泊松比μ=0.269。
• 7.4.4 接触设置 • 7.4.5 网格划分 • 7.4.6 载荷及约束设置 • 7.4.7 模型求解 • 7.4.8 结果后处理
7.5 本章小结
• 本章先对接触问题的基本概念和模型进行介绍,让读者对有限元接触有一个概 念性的了解。然后通过两个实例分析,详细介绍如何在WB 19.0中进行含非线 性接触问题的仿真设置和操作,并对WB 19.0中提供的各类接触模型及接触类 型进行逐一讲解,使读者掌握如何选择接触类型、设置接触参数、查看接触产 生的各种结果类型,最终完成整个接触项目的仿真。
ANSYSWorkbench接触分析案例详解
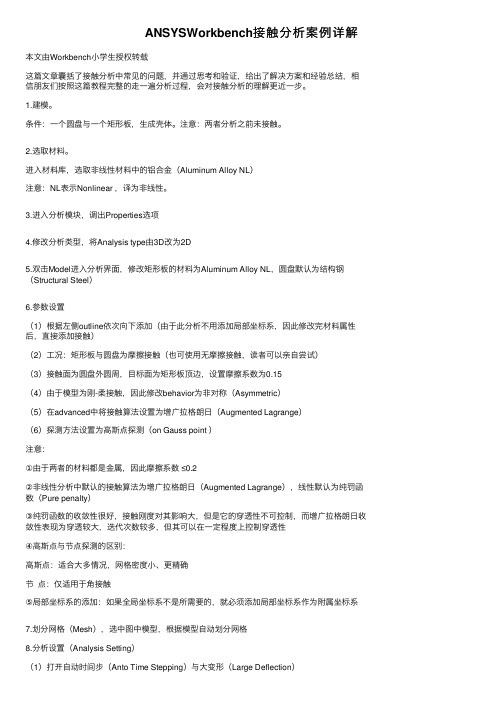
ANSYSWorkbench接触分析案例详解本⽂由Workbench⼩学⽣授权转载这篇⽂章囊括了接触分析中常见的问题,并通过思考和验证,给出了解决⽅案和经验总结,相信朋友们按照这篇教程完整的⾛⼀遍分析过程,会对接触分析的理解更近⼀步。
1.建模。
条件:⼀个圆盘与⼀个矩形板,⽣成壳体。
注意:两者分析之前未接触。
2.选取材料。
进⼊材料库,选取⾮线性材料中的铝合⾦(Aluminum Alloy NL)注意:NL表⽰Nonlinear ,译为⾮线性。
3.进⼊分析模块,调出Properties选项4.修改分析类型,将Analysis type由3D改为2D5.双击Model进⼊分析界⾯,修改矩形板的材料为Aluminum Alloy NL,圆盘默认为结构钢(Structural Steel)6.参数设置(1)根据左侧outline依次向下添加(由于此分析不⽤添加局部坐标系,因此修改完材料属性后,直接添加接触)(2)⼯况:矩形板与圆盘为摩擦接触(也可使⽤⽆摩擦接触,读者可以亲⾃尝试)(3)接触⾯为圆盘外圆周,⽬标⾯为矩形板顶边,设置摩擦系数为0.15(4)由于模型为刚-柔接触,因此修改behavior为⾮对称(Asymmetric)(5)在advanced中将接触算法设置为增⼴拉格朗⽇(Augmented Lagrange)(6)探测⽅法设置为⾼斯点探测(on Gauss point )注意:①由于两者的材料都是⾦属,因此摩擦系数 ≤0.2②⾮线性分析中默认的接触算法为增⼴拉格朗⽇(Augmented Lagrange),线性默认为纯罚函数(Pure penalty)③纯罚函数的收敛性很好,接触刚度对其影响⼤,但是它的穿透性不可控制,⽽增⼴拉格朗⽇收敛性表现为穿透较⼤,迭代次数较多,但其可以在⼀定程度上控制穿透性④⾼斯点与节点探测的区别:⾼斯点:适合⼤多情况,⽹格密度⼩、更精确节点:仅适⽤于⾓接触⑤局部坐标系的添加:如果全局坐标系不是所需要的,就必须添加局部坐标系作为附属坐标系7.划分⽹格(Mesh),选中图中模型,根据模型⾃动划分⽹格8.分析设置(Analysis Setting)(1)打开⾃动时间步(Anto Time Stepping)与⼤变形(Large Deflection)(2)修改载荷⼦步依次为50,50,100后,其他均默认9.添加边界条件(Load or Supports)(1)选中矩形板的下边线,将其设置为Displacement(2)X⽅向数值设置为-15mm,Y⽅向数值设置为0(3)选中圆盘的外圆周,将其设置为Fixed support思考:为什么打开⼤变形开关?答:因为在静⼒学中,极限转动⾓度为10°,⼤位移或者⼤转动即视为⾮线性分析,当受⼒物体的变形与其⼏何尺⼨相⽐较⼤,且线性叠加原理不再适⽤时,可视作⼤变形。
ANSYS Workbench培训课件-接触分析讲义
• Contact is a changing-status nonlinearity: the stiffness of the system depends on the contact status (whether parts are touching or separated).
6
© 2016 ANSYS, Inc.
• Mechanical supports contact relationships with rigid bodies. − Rigid to Rigid − Rigid to Flexible − Useful for improved efficiency when certain Rigid bodies
in the model are considerably stiffer than other Flexible bodies
CONTACT BETWEEN TWO RIGID BODIES
CONTACT BETWEEN ONE RIGID AND ONE FLEXIBLE BODY
5
© 2016 ANSYS, Inc.
SOLID BODY FACE TO
SOLID BODY FACE
4
© 2016 ANSYS, Inc.
June 13, 2016
SURFACE BODY FACE TO
SURFACE BODY FACE
SURFACE BODY EDGE TO
SURFACE BODY FACE
01.01 Contact Technology Review
• Objectives:
Workbench高级工程实例分析培训
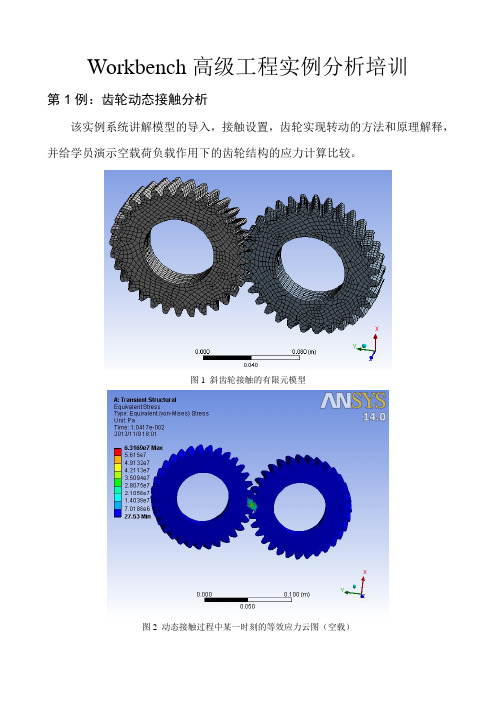
Workbench高级工程实例分析培训第1例:齿轮动态接触分析该实例系统讲解模型的导入,接触设置,齿轮实现转动的方法和原理解释,并给学员演示空载荷负载作用下的齿轮结构的应力计算比较。
图1 斜齿轮接触的有限元模型图2 动态接触过程中某一时刻的等效应力云图(空载)图3 动态接触过程中某一时刻的等效应力云图(负载200N.m)第2例:过盈装配结构分析该实例会系统讲解过盈装配结构的应力分析方法。
不同设置过盈量的计算结果比较和讨论设置过盈量的合理方法,摩擦系数,旋转速度对过盈装配应力的影响。
图4 过盈量为0.00005m时的等效应力(转速=0)图5 过盈量为0.00005m时的接触应力(转速=0)图6 过盈量为0.00005m 时的等效应力(转速=4000) 图7 过盈量为0.00005m 时的接触应力(转速=4000) 第3例:液压阀结构的分析该实例会讲解施加随空间变化的压力载荷和系统分析接触设置对求解的影响,并给出如何合理选取接触参数来实现较为准确的求解。
图8 变化压力载荷分布云图 图9 接触压力云图(摩擦系数=0.1,增强拉格朗日算法)第4例:发动机活塞机构的多体动力学分析该实例会讲解如何为多体设置驱动力和约束多体之间的运动关系的方法,并讲解柔性体的多体动力学分析和刚-柔耦合的多体动力学分析。
图10 0.12s时刻的等效应力云图(柔性体)图11 1.17s时刻的等效应力云图(柔性体)图12 0.12s时刻的等效应力云图(刚-柔耦合)图13 1.17s时刻的等效应力云图(刚-柔耦合)第5例:薄壁结构的非线性屈曲分析该实例会讲解如何在Workbench环境下完成薄壁结构的非线性屈曲分析并获得非线性屈曲载荷的方法,研究不同初始缺陷,弹塑性对非线性屈曲载荷的影响。
图14 线性屈曲1阶屈曲模态云图图15加载23.14%线性屈曲载荷时的位移云图(弹塑性)图16加载33.35%线性屈曲载荷时的位移云图(弹塑性)图17 非线性屈曲分析的位移与求解子步的关系图17加载94.299%线性屈曲载荷时的位移云图(线弹性)图18 非线性屈曲分析的位移与求解子步的关系(线弹性)第6例:盘式制动器热-结构耦合分析该实例为学员系统讲解如何利用Workbench加载方便的优点和ANSYS经典版易容设置求解控制参数的优点联合解决盘式制动器这一类问题,这一实例讲为学员讲解如何为瞬态动力学设置不为0的初始速度,并分别讲解考虑热应力和不考虑热应力的操作方法。
ANSYS Workbench DM模块培训课件
模型查看与修改
在ANSYS Workbench DM模块中查看和修改有限元模型的几何和拓扑关系。
在模型创建或导入后,用户可以在DM模块中对模型进行查看和修改。用户可以调整模型的尺寸、位 置、方向等几何参数,也可以对模型进行布尔运算、分割、倒角等操作。此外,用户还可以查看模型 的拓扑关系,以确保模型的正确性。
航空发动机叶片分析
总结词
利用DM模块对航空发动机叶片进行详细的结构和振动分析,确保其安全可靠 。
详细描述
在DM模块中建立发动机叶片的三维模型,进行详细的有限元分析和振动分析。 通过分析结果,评估叶片的结构强度和振动特性,确保其在各种工况下的安全 性和可靠性。
桥梁结构稳定性分析
总结词
利用DM模块对桥梁结构进行稳定性 分析和优化,提高桥梁的安全性和使 用寿命。
减少不必要的操作
避免重复导入和导出模型,优化操 作流程。
提高分析效率的策略
自动化脚本
编写脚本或宏以自动化重 复性任务,提高工作效率 。
分析流程优化
合理安排分析流程,如先 进行网格划分再进行求解 ,以减少不必要的等待时 间。
团队协作
多人协作完成大型项目, 合理分配任务,提高整体 效率。
06
总结与展望
功能
支持各种CAD模型的导入和编辑 ,提供丰富的建模工具和装配功 能,支持多目标优化和灵敏度分 析等设计优化手段。
DM模块与其他模块的关系
与CAD模块的关系
DM模块可以导入各种CAD模型,进 行编辑和装配,实现与CAD模块的 无缝对接。
与仿真模块的关系
DM模块可以与仿真模块进行关联, 将设计优化结果直接应用到仿真分析 中,实现设计与仿真的集成。
下的疲劳性能。
ANSYS Workbench接触实例培训

• 本章描述的性能通常适用于ANSYS Structural 或以上的license
3-2
Workbench Mechanical - Introduction to Contact
Workbench Mechanical - Introduction to Contact
... 接触公式
Training Manual
• 另外值得一提的是算法不同,接触探测不同:
– Pure Penalty 和 Augmented Lagrange 公式使用积分点探测. 这导致更多的探 测点。(在左侧的例子中有10个)
... 接触公式
Training Manual
• 对于特定的“绑定”和“不分离”两个面间的接触类型,可用多点约束
(MPC) 算法.
– MPC 内部添加约束方程来“联结”接触面间的位移 – 这种方法不基于罚函数法或Lagrange乘子法 .它是直接处理绑定接触接触区域
相关接触面的方式。
– MPC算法支持大变形效应
– 两种方法都是基于罚函数方程:
Training Manual
F k x normal
normal penetration
– 这里对于一个有限的接触力 Fnormal, 存在一个接触刚度的knormal的概念,接触刚 度越高,穿透 量 xpenetration越小,如下图所示
– 对于理想无限大的knormal , 零穿透. 但对于罚函数法,这在数值计算中是不可能 ,但是只要xpenetration 足够小或可忽略,求解的结果就是精确的。
Ansys workbench 螺栓接触实例操作
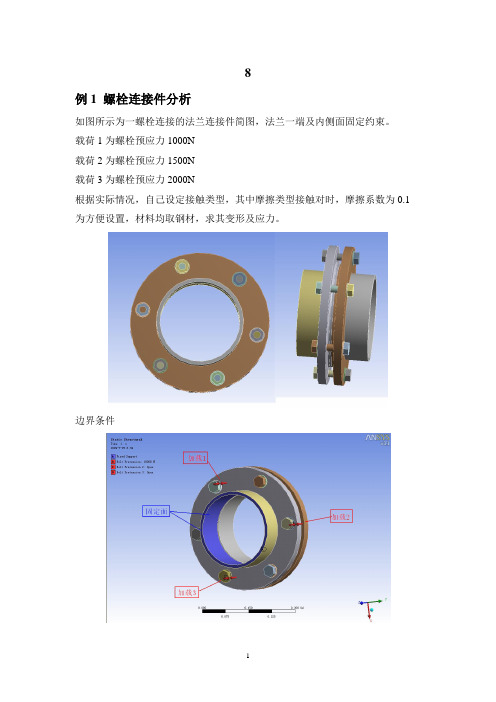
8例1 螺栓连接件分析如图所示为一螺栓连接的法兰连接件简图,法兰一端及内侧面固定约束。
载荷1为螺栓预应力1000N载荷2为螺栓预应力1500N载荷3为螺栓预应力2000N根据实际情况,自己设定接触类型,其中摩擦类型接触对时,摩擦系数为0.1 为方便设置,材料均取钢材,求其变形及应力。
边界条件螺栓连接件分析1 导入几何模型,进入DS模块2 材料设置选择默认的材料:Structural Steel3 设置接触螺栓与螺母的接触类型为Bonded螺栓杆与法兰的接触类型为Frictional,摩擦系数为0.1螺栓杆与垫片内壁的接触类型为Frictional,摩擦系数为0.1其余接触类型为No Separation4 网格划分5 选择分析类型·在“New Analysis”中选择结构静力学分析“Static Structural”;6 施加约束与载荷1)施加固定约束·点击“Static Structural”,在“Supports”中选择固定约束“Fixed Support”·选择法兰一端及内侧面固定约束;2)施加载荷·选择载荷1处螺栓杆表面,添加螺栓预应力“Bolt Pretension”大小为1000N ·选择载荷2处螺栓杆表面,添加螺栓预应力“Bolt Pretension”大小为1500N ·选择载荷3处螺栓杆表面,添加螺栓预应力“Bolt Pretension”大小为2000N5 设定求解类型1)求解变形·点击“solution”,点击“Deformation”选择“Total”,求解变形·点击“Stress”,选择“Equivalent (V on-Mises)”,求解等效应力6 单击“Solve”求解7 观察求解结果·点击“Total Deformation”查看变形·点击“Equivalent Stress”查看应力分布例2卡紧散热片的不锈钢扣件受力分析扣紧件是一个不锈钢的卡子,因为散热片同功率部件之间的接触力同最终的散热有很大关系,因此研究力的大小是很有意义的。
Ansys-Workbench详解教程ppt课件

ppt课件.
33
网格控制
具体操作:选中结构树的Mesh项,点击鼠标右键,选择Insert,弹出 对网格进行控制的各分项,一般只需设置网格的形式(Method)和单元的 大小(Sizing)。
其余一些网格控制项的意义:
Refinement—细化网格 Mapped Face Meshing—映射网格;
定义
真实系统
ppt课件.
有限元模型
4
节点和单元
载荷
节点: 空间中的坐标位置,具有一定自由度和 存在相互物理作用。
单元: 一组节点自由度间相互作用的数值、矩阵 描述(称为刚度或系数矩阵)。单元有线、面或实 体以及二维或三维的单元等种类。
约束
有限元模型由一些简单形状的单元组成,单元之间通过 节点连接,并承受一定载荷。
与单选的方法类似,只需选择Box Select,再在图形窗口中按住 左键、画矩形框进行选取。 3、在结构树中的Geometry分支中进行选择。
屏幕下方的状态条中将显示被选择的目标的信息。
ppt课件.
22
显示/隐藏目标
1、隐藏目标
在图形窗口的模型上选择一个目标,单击鼠标右键,在弹出的选
项里选择
,该目标即被隐藏。用户还可以在结构树中选取一
操作界面的显示 工具条的显示 选择目标 显示/隐藏 旋转、平移、缩放
ppt课件.
18
创建、打开、保存文档
File菜单或者工具条的 1、创建一个新文档。选择File—New命令。 2、 打开文档。选择File—Open命令。 3、保存文档。选择File—Save或Save As命令,
一般保存为.dsdb格式的文档。
5.3.9 接触设置综合实例[共10页]
![5.3.9 接触设置综合实例[共10页]](https://img.taocdn.com/s3/m/cabc9f6769dc5022abea0018.png)
5.3 状态非线性分析——接触5.3.9 接触设置综合实例通过前面例子的学习,已经了解了WB中接触设置。
下面以一个2D压片弯曲挤压胶片,胶片再承受密封流体压力的例子综合描述接触分析。
本例包含刚柔接触、自接触、密封流体压力。
1.建立2D模型如图5-3-99所示,建立一个含压模板、压片、胶片的2D模型。
由于压片上端为曲线,且压片与胶片均处于相对自由状态,所以很难精确定义压模板和胶片与压片相切的位置,因此压模板距压片有微小间隙,胶片与压片呈过盈状态。
压模板在整个过程中几乎不变形,而且也不是本分析所关注的目标,所以将其定义为刚体;压片在整个过程中存在大的弯曲变形,其结果将表现为首尾相接触,将其材料定义为非线性铝合金;胶片为橡胶件,整个过程中存在大应变,且胶片内部存在自接触可能,将其本构定义为Ogden 3rd Order类型。
压模板,命名tie,刚体压片,命名Surface Body,材料本构为非线性铝合金胶片,命名rub,材料本构为Ogden 3rd Order图5-3-99 2D模型2.2D模型及材料设置调用WB默认材料库内的非线性铝合金(General Non-linear Materials→Aluminum Alloy NL),新增一个材料,命名为rub,本构选择Hyperelastic→Ogden 3rd Order,9个参数分别为:MU1=0.043438MPa,A1=1.3,MU2=8.274E−5MPa,A2=5,MU3=−0.0006895MPa,A3=−2,D1=0.029MPa^−1,D2=0MPa^−1,D3=0MPa^−1。
在Geometry→2D Behavior处定义为Plane Stress(平面应力),如图5-3-100所示。
– 435 –第5章 非线性静力学分析– 436 – 3.Virtual Topology (虚拟拓扑)设置虚拟拓扑一般用于合并几个不同平面,使其保证为一个有限元拓扑模型,除此之外,还可用于分割模型。
ANSYS热分析培训热接触解析PPT教学课件
置
创
建
接
触
对
。
第15页/共26页
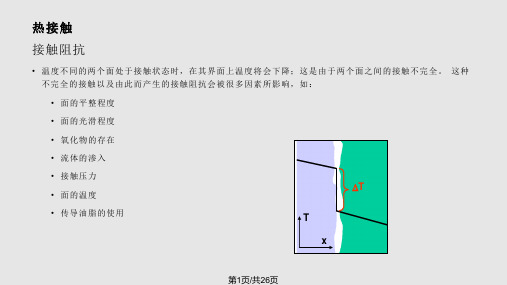
热接触
…3. 实修例改接触单元的选项来包括温度自由度。
第16页/共26页
热接触
…4. 实修例改接触单元实常数来包括接触导热系数( TCC)。
第17页/共26页
热接触
… 实例
• 本例使用常数 TCC = .001.
若接触选项
第18页/共26页
热接触
…5. 实施例加结构分析的边界条件。
车轮的刹车垫
第5页/共26页
热接触
• 对流: q = CONV * (TE - TC) • CONV 为对流换热系数(可由SFE 施加表参数荷载)
• TE 为目标面的温度,或者为自由面的环境温度 (SFE)
• TC 为接触面的温度
• 接触面和目标面间的热流
0 < gap < pinball
• 自由面中接触面到环境的热流
• 重要特性: • 接触面间的热传导 • 摩擦耗能所导致的热生成 • 热对流和/或热辐射 • 具有小间隙的接触面 • 从自由面到环境
注•意开: 本放课的程间主隙要处讲的述热接流触输面入之间的热传导。有关热接触其他功能的情 况请参考ANSYS相关文档。
第3页/共26页
热接触
• 热传导:
q = TCC * (TT - TC)
• TCC为热接触导热系数(由实常数输入)
• 可以使一个表参数(压力和温度的函数)
• TT 与TC 分别为目标面及接触面温度 • 当处于接触状态时将关闭热流
• 模型温度在接触面处不连续
没有 DT (连续材料)
DT (接触面)
第4页/共26页
热接触
《ANSYS基础培训》课件
2
求解分析
学习使用ANSYS求解器进行结构和流体分析,获得精确的模拟结果。
3
后处理
掌握如何在ANSYS中进行后处理,分析和可视化模拟结果。
不同领域的分析
结构分析
深入研究ANSYS在结构分析方 面的应用,如静态、动态、疲 劳分析等。
热分析
学习如何使用ANSYS进行热传 导、热辐射和热对流分析,解 决热问题。
建模与分析
2D和3D建模
学习如何在ANSYS中进行 二维和三维建模,创建复 杂的几何形状。
有限元分析 (FEA)
深入了解有限元分析的原 理和应用,掌握ANSYS中 的FEA技术。
网格生成技术
探索不同的网格生成方法, 优化模型的划分和分析效 果。
边界条件与求解
1
应用边界条件
了解在ANSYS中如何应用边界条件,指定约束和加载。
流体动力学分析
介绍ANSYS在流体动力学领域 的应用,如流体流动、压力分 布等。
优化工具
参数优化
通过ANSYS优化工具进行参数优化,提高产品 性能和效率。
拓扑优化
使用拓扑优化技术,优化结构的材料分布和重 量。
常见问题解决方法
1 错误排查
了解常见的ANSYS错误和故障排除技巧,提高模拟效果。
2 模型修复
《ANSYS基础培训》PPT 课件
欢迎使用《ANSYS基础培训》PPT课件!通过这个课程,您将深入了解 ANSYS的各个方面,从建模到分析,从结构到流体,精通这个强大的工程模 拟软件。
概述
本课程介绍ANSYS的基础知识,包括ANSYS Workbench的概述、ANSYS预 处理、材料属性定义等。
学习如何修复模型中的几何和网格问题,保证模拟的准确性。
ANSYS Workbench入门培训PPT幻灯片
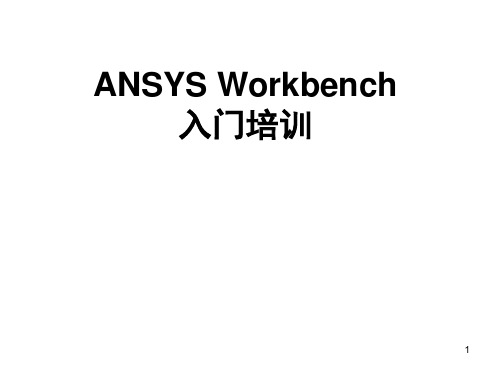
步骤2.Gray Cast Iron灰铸 铁
步骤3.Return Project回到 工程项目管理窗口
(3)添加材料属性
23
添加40Cr(系统中不 存在的材料)
步骤1.General Materials 打勾(Edit library)编辑材料
库
19
进入尺寸标注Dimensions 步骤1.点击 General标注线段长度H1、V2 Horizontal标注水平间距H3 Vertical标注竖直间距V5
步骤2.标注尺寸
步骤3.点击Extrude拉伸
20
步骤1.Imprint Faces 步骤2.Generate 生成区域面,次面无高度、
使基础产生单位法向偏移所需的压力,输入值单位N/m3
29
载荷:
选中Static Structural(B5)
Loads(载荷)
Force(力)
选中需要加载的面,输入载荷值
Apply(应用) 30
载荷类型:
Force力载荷 Bearing Load轴承载荷:载荷作用于圆柱形表面,轴承力沿径向分布 Moment力矩载荷 Remote Force远端载荷:远端加载,可先定义局部坐标系 Bolt Pretension螺栓预紧载荷:模拟螺栓连接
双击B4
预应力模态分析
35
选中Modal(C5) Analysis Setting(分析设置) 设置阶数 Max Modes to Find:10
36
选中Solution(C6) Solve
37
在Graph(图表)区域右键-Select All Creat Mode Shape Results
- 1、下载文档前请自行甄别文档内容的完整性,平台不提供额外的编辑、内容补充、找答案等附加服务。
- 2、"仅部分预览"的文档,不可在线预览部分如存在完整性等问题,可反馈申请退款(可完整预览的文档不适用该条件!)。
- 3、如文档侵犯您的权益,请联系客服反馈,我们会尽快为您处理(人工客服工作时间:9:00-18:30)。
• Linear structural steel
2
© 2015 ANSYS, Inc.
April 16, 2015
…Workshop 1A: Auto Contact Detection
Steps to Follow:
Launch a WB-Mechanical Session.
3
© 2015 ANSYS, Inc.
April 16, 2015
…Workshop 1A: Auto Contact Detection
The Project Schematic should look like the picture below.
4
© 2015 ANSYS, Inc.
April 16, 2015
8
© 2015 ANSYS, Inc.
April 16, 2015
…Workshop 1A: Auto Contact Detection
Highlight the Connection Branch and RMB insert “Contact Tool”…
Highlight the newly created Contact Tool in the Project Tree. RMB “Generate Initial Contact Results”
Workshop 1A Auto Contact Detection
16.0 Release
1
© 2015 ANSYS, Inc.
April 16, 2015
ANSYS Mechanical Advanced Connections
Workshop 1A: Auto Contact Detection
Goal
Explore the use of Auto Contact Detection options and contacttool
Model Description
Assembly of 12 parts with many contacts and joints, one longitudinal spring and one beam element.
Utility Menu>Units>Metric(kg, mm,..)
5
© 2015 ANSYS, Inc.
April 16, 2015
…Workshop 1A: Auto Contact Detic page
Double click (or RMB=>Edit…) on the Model Cell to open MechanicalSession
9
© 2015 ANSYS, Inc.
April 16, 2015
…Workshop 1A: Auto Contact Detection
With Contact Tool=>”Initial Information” highlighted, scroll down the table of information and examine the calculated properties.
6
© 2015 ANSYS, Inc.
April 16, 2015
…Workshop 1A: Auto Contact Detection
Once inside the Mechanical application, verify the working unit system
• “Unit > Metric (mm,kg,N,s,mV,mA)”
From the Project page, Utility Menu=> File=> Restore Archive… browse for file “WS1a_connections.wbpz”
Save as
• File name: “WS1aConnection” • Save as type: Workbench Project Files (*.wbpj)
…Workshop 1A: Auto Contact Detection
Highlight the Engineering Data Cell and double click to open • Verify the predefined material properties • Verify that the units are in Metric (kg,mm,…) system. • If not, fix this by clicking on…
• If beam and spring do not appear in the graphics window, go to “Annotation Preferences” to activate these Remote Boundary Connections graphically.
7
© 2015 ANSYS, Inc.
Expand each folder in the project tree to become familiar with model entities.
Note especially the multiple contact pairs, joints, circular beam and longitudinal spring element.
April 16, 2015
…Workshop 1A: Auto Contact Detection
Execute a solve.
After several iterations and bisections, model fails to converge with element formulation error.
10 © 2015 ANSYS, Inc.
April 16, 2015
…Workshop 1A: Auto Contact Detection
Note the numerous regions, color coded as orange (Bonded in a Closed status, but with penetration or gap same order of magnitude as pinball). These may or may not be acceptable, but they need to be reviewed carefully.
