方案设计师V版本升级说明
方案设计师2020操作说明
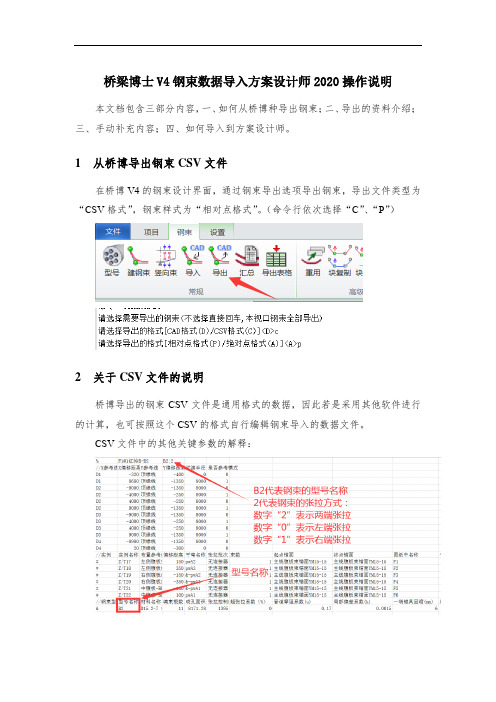
桥梁博士V4钢束数据导入方案设计师2020操作说明本文档包含三部分内容,一、如何从桥博种导出钢束;二、导出的资料介绍;三、手动补充内容;四、如何导入到方案设计师。
1从桥博导出钢束CSV文件在桥博V4的钢束设计界面,通过钢束导出选项导出钢束,导出文件类型为“CSV格式”,钢束样式为“相对点格式”。
(命令行依次选择“C”、“P”)2关于CSV文件的说明桥博导出的钢束CSV文件是通用格式的数据,因此若是采用其他软件进行的计算,也可按照这个CSV的格式自行编辑钢束导入的数据文件。
CSV文件中的其他关键参数的解释:3手动补充内容导出后的CSV文件内已经包含了钢束竖弯、布置、平弯、张拉端形式等信息,但由于方案设计师为出图程序,程序还需要读取钢束的绘制名称、钢束子类型、锚面形式等的相关信息需要手动补充到桥博导出的CSV文件中。
3.1起/终点锚面:名称需与方案设计师零件库中预定义的锚面名称一致。
锚面数据导入后填写在方案设计师钢束属性表中的钢束锚面表格中(见下图)。
关于锚面的操作可参考方案设计师相关资料。
3.2图纸中名称:方案设计师钢束属性表中,钢束类型中的图纸中名称(见下图)。
3.3子类型:方案设计师钢束属性表中,钢束类型中的子类型(见下图)。
CSV表格输入说明:“0”代表腹板束,“1”代表顶板束,“2”代表底板束。
3.4配套文件maogu.csv在准备向方案师导入钢束之前,除了前面提到的钢束CSV文件外,还需要准备一个文件名为“maogu.csv”的文件,与钢束的CSV文件放到同一个文件夹中。
这个文件的主要作用是为各种钢束类型匹配波纹管、锚具、连接器。
程序会根据钢束的编束根数,自动筛选对应的波纹管、锚具、连接器。
波纹管、锚具、连接器等名称应与方案设计师的零件库定义名称保持一致。
4向方案设计师中导入钢束文件数据准备完毕以后,有两种方式可以导入到方案设计师中。
一种是直接导入到构件中,一种是通过应用桥梁表批量导入。
软件升级方案

4.灰度发布:采用灰度发布方式,逐步替换旧版本软件,降低升级风险。
5.备份恢复:在升级过程中,对关键数据进行备份,以便在出现问题时快速恢复。
6.培训与支持:为相关人员提供培训和技术支持,确保他们在升级过程中能够熟练操作。
五、升级流程
三、升级范围
本次软件升级涉及以下范围:
1.核心业务系统。
2.支撑业务系统。
3.数据库管理系统。
4.相关中间件及服务。
四、升级原则
1.合规性:确保升级过程符合相关法律法规和行业标准。
2.安全性:保障数据安全和系统运行安全。
3.稳定性:确保升级过程中业务不受影响,系统稳定运行。
4.可回退性:具备完善的回退机制,确保在升级失败时能够迅速恢复到升级前状态。
-确认系统性能、安全性、稳定性等指标满足预期。
-收集用户反馈,对系统进行优化调整。
5.收尾阶段:
-完成所有系统的升级工作。
-归档升级文档,包括升级记录、测试报告、用户反馈等。
-对项目组进行总结评价,提取经验教训。
七、风险管理
1.预防措施:针对已识别的风险,制定相应的预防措施。
2.应急响应:建立应急响应机制,快速处理升级过程中出现的突发事件。
1.需求分析:收集业务部门需求,分析现有软件的不足,明确升级目标。
2.制定方案:根据需求分析,制定详细的软件升级方案。
3.审批:将方案提交给相关部门进行审批。
4.准备工作:
-采购新版本软件;
-搭建测试环境;
-编写测试用例;
-通知相关人员做好升级准备。
5.测试验证:
-在测试环境中部署新版本软件;
软件应用更新说明

软件应用更新说明尊敬的用户,感谢您选择使用我们的软件应用,并对您在使用过程中遇到的小问题表示歉意。
为了改善您的使用体验并提升产品功能,我们特此推出软件应用的更新版本。
以下是本次更新的详细说明:1. 更新内容一:界面优化在本次更新中,我们对软件应用的界面进行了细致调整,以提升用户的视觉体验。
通过优化布局、颜色搭配以及图标设计,我们致力于为您带来更加美观、简洁的界面。
2. 更新内容二:性能优化针对软件应用在特定设备或操作系统上可能出现的卡顿、闪退等问题,我们针对性地进行了性能优化。
通过调整代码逻辑和优化资源占用等方面的改进,我们努力提高了软件应用的稳定性和响应速度,以确保您能够流畅地使用软件。
3. 更新内容三:新增功能本次更新中,我们增加了一些新功能,以满足用户不断增长的需求。
例如,您现在可以在软件应用中自定义主题,选择喜欢的颜色或背景图案来个性化您的界面。
此外,我们还加入了更多实用的小工具,例如日程管理、笔记功能等,以帮助您更高效地进行工作或学习。
4. 更新内容四:Bug修复我们注意到一些用户在之前版本中反馈了一些Bug问题,例如数据同步错误、功能异常等。
在本次更新中,我们根据用户的反馈意见进行了细致排查和修复,确保软件应用在各种情况下能够正常运行,减少了不必要的操作烦恼。
总结:通过本次软件应用的更新,我们期望能够为您提供更好、更全面的使用体验。
我们将持续改进并加入更多有价值的功能,以便您能够更好地利用软件应用来提高工作效率、管理任务、享受生活的乐趣。
如果您在使用过程中仍然遇到任何问题或有任何反馈意见,请随时联系我们的客服团队。
我们将竭诚为您解决问题,并不断改进产品。
再次感谢您对我们软件应用的支持与厚爱!祝您使用愉快!此致敬礼。
PKPM2010(v1.2)更版说明
(2011.9.30 版本)
中国建筑科学研究院
建研科技股份有限公司 设计软件事业部 (PKPM CAD 工程部)
2011 年 10 月
前言
PKPM2010 新规范版本设计软件于 2011 年 3 月 31 日正式升版后,受到了全国广大用户 的广泛好评,软件稳定可靠,满足了用户的紧迫需要。目前,70%~80%以上的 PKPM 用户 已经完成了升版工作,并且在大量实际工程中开始应用新规范软件进行设计。鉴于《混凝土 结构设计规范》(GB20010-2010)于 2011 年 7 月 1 日正式实施,《高层建筑混凝土结构技术 规程》(JGJ3-2010)于 2011 年 10 月 1 日正式实施,设计软件事业部研发团队根据规范要求 和一些规范局部勘误以及 PKPM 广大用户在新规范软件应用过程中提出的反馈意见和新要 求,对软件进行了持续完善和改进,并发布了 2011 年 9 月 30 日版本。该版本软件在功能上 有了较大提升,同时改正了一些软件设计问题,如增加了一些设计参数,改进了分析和配筋 计算功能,加强了网络版服务程序的稳定性,纠正了不能同时应用多把 PKPM2010 网络锁 问题。我们对 PKPM 2010 新规范版本设计软件进行了更加深入的测试,相信该版本能够更 好地推动 2010 系列新规范的工程应用。
第四部分 基础设计软件改进要点 ................................... 24
一、 新增功能................................................................................................................ 24 二、 功能改进................................................................................................................ 27 三、 推出基础及岩土工具箱软件JCYT ...................................................................... 28
同豪土木软件资料全集下载说明
同豪土木软件资料全集下载说明一、方案设计师4.0发布版本安装及相关说明:1、为增强版本的稳定性,方案设计师进行了更新,最新版本是4.0.3版本,相对4.0.2版本没有做功能上的改变和增加,只是修复了部分安装的问题和bug,原则上建议大家更新到最新版本,也就是4.0.3版本。
4.0.3版本同时兼容XP及以上操作系统,重新梳理方案设计师自带实例(12个完整项目、8个单个构件),方便大家参照学习和使用。
2、安装:3.2.2的基础上,无需更换加密锁,原有模块直接安装即可使用,新增模块需联系销售人员进行升级。
3、为避免安装中一些不必要的麻烦,请大家先阅读一下安装包中readme文件,再按照每条提醒进行安装!!4、安装版本下载链接:4.0.3安装版本:百度云盘下载地址:/s/1pJ3JAY3二、方案设计师4.0.3最新补丁下载:鉴于用户要求,4.0.3的补丁会定期更新发布。
补丁原则上是用来修复某些bug的,没有软件功能上的改变。
补丁都是针对解决已发现的具体问题的,由于每个用户的模型不同工程情况也不一样,所以如果用户使用了补丁之后,发现新的问题,请及时提出,程序会尽快进行修正。
打补丁的注意事项和方式:1、注意事项:4.0.3的补丁一定要打在4.0.3版本上。
因为补丁编译是跟版本环境有关系的。
请勿要随便打在其他版本上,不然可能会引起未知的问题。
2、打补丁方式:先把方案设计师关闭,然后可以把未打补丁的版本复制一下,另存一个地方备用。
然后把下载下来的补丁压缩包解压,把bin文件夹中所有的文件都复制到4.0.3的安装文件夹下,如果用户是默认安装的,路径应该如下:,然后按照提示,选择全部覆盖。
再重启方案设计师进行使用即可。
3、补丁下载链接:更新,用户可以根据自己需要,定期下载更新本机补丁。
谢谢。
三、最新同豪土木软件资料全集1、下载链接地址:/s/1sjHl3Tb2、全集资料会持续进行更新,目前更新情况如下:1)、方案设计师4.0用户手册更新如果用户在使用手册的过程中有什么建议或者需求,可以联系技术支持人员提出来,感谢大家支持。
UCANDAS V3.0 升级说明书
UCANDAS V3.0升级说明书目录1.软件平台升级 (2)1.1新增 (2)1.2优化 (2)2.诊断软件升级 (2)2.1 新增 (2)2.2优化 (3)1.软件平台升级1.1新增增加软件管理模块,可以在线下载升级诊断软件,对本机旧版本诊断软件进行卸载管理,客户信息的编辑功能;增加软件平台多语言切换功能;增加诊断软件license,每个VCI只能使用本机授权的软件;产品的注册和激活1.2优化取消通讯连接设置功能,USB和WIFI连接不需要设置,自动甄别,USB连接优先。
2. 诊断软件升级2.1 新增亚洲车系增加大宇,大发车型诊断软件;欧洲车系增加阿尔法罗密欧车型诊断软件;VW、AUDI、SKODA、SEAT车型增加引导测试功能;雪铁龙:增加C3/C4/C5车型特殊功能。
增加C4 NFU BOSCH ME745发动机系统, C3R NFU BOSCH ME745发动机系统, C3R PLURIEL NFU BOSCH ME745发动机系统,C2 TU1A J34P 、Engine MM6LPC和 TU3A J34P 发动机系统,增加C2仪表系统。
标志:增加发动机系统如307CAN RHY BOSCH_EDC15C2,206+ RHY EDC15C2,207i RHY EDC15C2,207CAN 5FS ME747,407 Engine XFV ME17.4。
增加207/307和308/407特殊功能。
日产:增加部分重要特殊功能,升级NATS 系统。
通用:2010-2011 年款雪佛兰。
现代增加以下车型:01). i30_ELANTRA NEOS(FD) 2012 G 2.0 DOHC02). i30_ELANTRA NEOS(FD) 2012 G 1.4 DOHC03). i30_ELANTRA NEOS(FD) 2012 D 1.6 TCI-U04). i30_ELANTRA NEOS(FD) 2012 D 1.6 TCI-U205). H-1BUS(TQ) 2012 G2.4DOHC06). H-1BUS(TQ) 2012 D2.5TCI-4D5607). H-1BUS(TQ) 2012 D2.5TCI-A08). H-1BUS(TQ) 2012 D2.5TCI-A2(WGT)09). TUCSON(JM) 2010 G2.0DOHC10). TUCSON(JM) 2009 G2.0DOHC11). TUCSON(JM) 2007 G2.0DOHC12). ACCENT(LC) 2002 G 1.3 SOHC13). SONATA/i45(YF) 2012G 2.014). ELANTRA(HD) 2011 G2.015). ELANTRA(MD) 2012 G1.616). ELANTRA(MD) 2012 G1.8起亚增加以下车型:01). Opeima/Magentis[MG] 2010/2009/2008 G 2.7 DOHC02). Opeima/Magentis[MG] 2010/2009/2008 G 2.0 DOHC03). Opeima/Magentis[MG] 2010/2009/2008 G 2.4 DOHC04). Opeima/Magentis[MG] 2010/2009/2008 D 2.0 TCI-D 2.2优化所有诊断车型程序升级为正式版。
方案设计师V 操作过程说明THGW V

方案设计师V1.0(上海地区试行版)操作过程简要说明
——小箱梁、倒T盖梁部分
一、建模流程
二、过程说明(建模)
1.新建项目
2.使用路线文件导入路线平、纵线形
支持的路线文件格式:
3、使用CAD文件导入道路边线、布孔线信息,并在导入过程中创建桥幅对象。
4、批量修改桥墩名称
5、导入标准件数据文件
6、配置设计方法(小箱梁)
7、创建上部结构(小箱梁)
选择创建小箱梁时的默认设计方法
创建小箱梁
根据命令窗口中的提示,完成小箱梁的创建:
8、绘制板梁布置图 打开板梁布置图出图窗口。
按Shift+鼠标右键,打开“构件图纸查看设置”,调整图块比例等内容。
调整之后,进行保存,然后点击“重绘”,就能得到调整后的效果。
也可以按“DXF”将图纸导出后观察。
9、配置下部结构设计方法(倒T)
10、创建下部结构(倒T),也可以使用属性表在创建后做进一步调整。
(类似于上部
构件小箱梁的创建方法)
选择创建倒T盖梁时的默认设计方法
创建倒T盖梁
11、进入倒T的图纸窗口,点击“重绘”进行绘图 图名布局功能同上部结构图纸。
12、输入倒T钢束信息,并输入相关信息。
13、再次进入“图纸”窗口,点击“重绘”,在图纸类型中选择“盖梁预应力钢束布置图”,就可查看钢束图。
方案设计师V5版常见问题解答

⽅案设计师V5版常见问题解答⽅案设计师V5版常见问题解答上海同豪⼟⽊⼯程咨询有限公司截⽌2018-12-20⽬录⼀.程序安装与启动 (9)1.⽅案设计师常见安装问题怎么解决? (9)2.BDN⽂件有没有⾃动保存功能? (9)3.创建设计、联动设计、⾃定义设计分别是什么意思? (10)4.电脑是WIN7,64位的,启动⽅案设计师,提⽰需要安装SP1? (11)⼆.资料下载 (11)5.同豪官⽹有时打不开,同豪软件版本以及相关视频、⽂字资料怎么获得?? (11)三.设计资料 (12)6.如何修改路线名称? (12)7.路线输⼊短链后,设计标⾼相对于地⾯线抬⾼了太多,是什么原因? (12)8.在平曲线或者竖曲线资料中导⼊了数据⽂件,为什么建模视图中看不到竖曲线或者平曲线? (12)9.⽤CAD⽂件导⼊竖曲线或者地⾯线时,导⼊后的数据桩号错误并且跟CAD中显⽰不⼀样? (12)10.怎么创建、修改或删除轮廓线? (13)11.怎么创建或者删除桥幅? (15)12.怎么导⼊布孔线? (15)13.CAD导⼊的路线,XY坐标跟CAD中为什么是反的? (15)14.多幅桥时,怎么切换查看其他桥幅⽴⾯? (16)15.出图提⽰“桥⾯⾼程线个数⼩于1”是什么原因? (16)16.基础设计⽅法中基础定位的地⾯线是哪⼀条地⾯线? (17)17.单独构件创建时跨径怎么输⼊? (18)18.标准横断中多幅桥是怎么定义桥⾯元素的? (24)19.如何批量修改道路设计线的标注名称? (26)20.路线中标准断⾯改过之后,桥型图出图断⾯仍然错误? (27)21.计算资料窗⼝怎么打开? (28)22.环境类别在哪⾥修改? (29)23.路线资料在哪⾥设计断链? (30)24.如何在桥型图中的桩号前⾯加上前缀?⽐如H匝道,想在桩号前都加上H (30)25.点筋直径如何设置⼤⼩? (31)26.程序是怎么判断车道数的? (31)27.弯桥如何建⽴平⾏的布孔线? (32)28.请问下路线中⼼线CAD导⼊⽅案设计师时,导⼊后,线形不对是什么原因? (32)四.⽅案资料 (33)29.左右幅共⽤⼀个桥台该怎么设计? (33)30.桥梁表中,布孔线⾓度不⼀致怎么输⼊? (36)31.运⾏桥梁表,没有⽣成上部或者下部构件是什么原因? (37)32.⽤桥梁表怎么设计折线横梁或分叉箱梁? (40)33.桥梁表运⾏完之后只对部分构件进⾏重新设计该怎么操作? (42)34.为什么建模视图窗⼝和桥型图断⾯显⽰不对? (43)35.在哪⾥可以编辑布孔线信息,⽐如修改桩号和布孔线⾓度? (44)36.重新应⽤了桥梁表,发现构件属性表⾥的参数值变掉了,这是什么原因? (45)37.桥幅名称定义都有什么规则? (45)38.⽅案资料中的剖断⾯配置表怎么输⼊并且进⾏调⽤? (45)39.⽅案资料中的基础标⾼表怎么进⾏应⽤呢? (47)40.桥梁表中只能输⼊中⼼桩号不能输⼊起点桩号定桥梁位置吗? (48)41.请问我已经把构件⾥所有数据都设置好了但是线路的线形有点微调能单独换⼀下线形么? (48)五.项⽬总体 (48)42.构件的绘图设置中,有个选项是“随全局”,是什么意思? (48)43.建模视图窗⼝中的内容显⽰在哪⾥设置?⽐如想修改地⾯线颜⾊或者箱梁显⽰颜⾊。
方案设计师 V2.2.1升级说明 (1) (1)
《方案设计师V2.2.1》升级说明
自2012年7月13日,《方案设计师v2.2》发布以来,在全国各地设计院得到了良好的运用,在客户使用的同时,对程序提出了不少宝贵的建议,促使我们的程序在界面、出图、计算等各个方面都有不少改进。
现已对程序做了一次小版本的升级,由V2.2升级至V2.2.1,以使用户使用程序时更加顺畅。
小版本升级包含内容如下:
1.修改了《方案设计师
2.2》在界面、出图、计算上的一些bug;
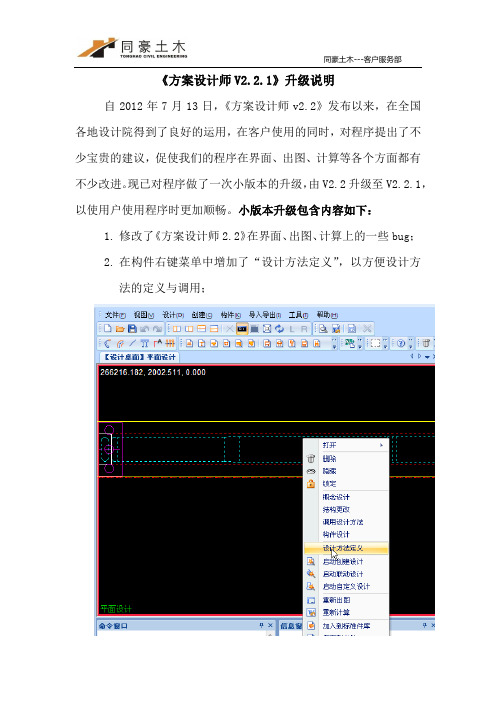
2.在构件右键菜单中增加了“设计方法定义”,以方便设计方
法的定义与调用;
3.界面修改:挡块设计、垫石尺寸设计界面稍有修改。
特别感谢以下单位在此次版本升级过程中给予的大力支持(排名不分先后):
北京特希达交通勘察设计院有限公司
上海浦东建筑设计研究院
南昌市城市规划设计研究总院
中交第一公路勘察设计研究院有限公司
中交第二公路勘察设计研究院有限公司
福建省交通规划设计院
江苏省交通科学研究院
南宁市新点线勘测设计有限责任公司
中铁第四勘察设计院集团有限公司
中国水电顾问集团北京勘测设计研究院
福州市规划设计研究院
湘西自治州交通规划勘察设计研究院
宁德市交通工程勘察设计院
湖南中大设计院有限公司
长沙市规划设计院有限责任公司
2012-9-14。
版本升级方案
版本升级方案随着科技的不断发展,软件产品也在不断迭代升级,为了优化功能、修复BUG、提升用户体验,版本升级成为不可避免的一环。
本文将探讨版本升级的方案,并提出可行的建议。
一、需求分析版本升级方案的制定,首先需要进行全面的需求分析。
以下是常见的需求分析环节:1. 用户反馈:收集用户的意见、建议和需求,以了解用户对产品的期望和不满之处;2. 竞品分析:对同类产品进行调研,了解市场主流趋势和竞争对手的产品优势;3. 技术可行性:评估升级所需的技术资源和成本,确保升级方案的可行性。
二、版本规划基于需求分析的结果,制定版本规划是版本升级方案的重要环节。
版本规划需要考虑以下几个方面:1. 功能优化:根据用户需求和市场竞争状况,提出功能优化方案,对现有功能进行扩展和改进;2. 问题修复:根据用户反馈和产品测试结果,解决已知的问题和BUG;3. 安全性提升:针对系统的安全漏洞和风险,加强系统的安全性;4. 性能提升:通过代码的优化和算法的改进,提升软件的运行速度和响应能力;5. 用户体验升级:优化用户界面,提升用户的使用感受和满意度。
三、版本开发与测试在版本升级方案中,版本的开发和测试是核心环节。
以下是版本开发与测试的几个关键步骤:1. 开发:基于版本规划,开发团队按照开发计划进行功能开发和问题修复;2. 自测:开发完成后,开发人员进行自测,验证功能的正确性和问题的修复情况;3. 内测:将版本交给内部测试团队进行全面的功能和性能测试;4. 公测:将版本发布给部分用户进行公测,收集用户反馈,进一步修复问题和优化功能;5. 专业测试:根据需求,可以委托第三方专业测试团队进行全面的测试。
四、版本发布与推广版本的发布和推广是升级方案的最后一环,也是链接开发团队和用户的重要环节。
以下是版本发布与推广的几个关键步骤:1. 版本发布:根据测试结果和用户反馈,确定版本的发布时间和发布渠道;2. 发布通知:向用户发送版本更新通知,介绍新版本的改进和优化;3. 宣传推广:通过官方网站、社交媒体、行业展会等渠道,宣传新版本的优势和特点;4. 用户培训:对于重大升级,可以组织用户培训,帮助用户更好地使用新版软件。
Autodesk Vault 软件升级指南说明书
Vault GPS: Make All the Right Turns During Your Vault UpgradeIrvin Hayes Jr. – Autodesk, Inc.PL5843-P Upgrading your replicated Vault software environment to a new release of Vault software shouldn’t be an intimidating endeavor. Building an understanding of what actually happens when clicking the install button is crucial to having confidence in your upgrade plan. This class will cover existing and newly supported methods for upgrading your replicated Vault software installation, and you will leave armed with the knowledge of what is actually happening in the background with SQL so that you can proceed with confidence.Learning ObjectivesAt the end of this class, you will be able to:• Understand the importance and role that SQL plays in a Vault software upgrade• Understand the out-of-the-box procedure for Vault software upgrades of replicated environments• Understand the alternate snapshot procedure for Vault software upgrades of replicated environments• Learn how to set yourself up for a successful migrationAbout the SpeakerIrvin Hayes Jr. is a product manager for the data management group at Autodesk in Novi, Michigan. Irvin has worked at Autodesk for seven years starting in product support and as a user experience designer. Irvin is a Microsoft® Certified Professional, and has been working in the information technology field for more than 21 years.Table of ContentsLearning Objectives (1)About the Speaker (1)Introduction (3)What happens with a normal vault upgrade? (3)How it works (3)Understanding the obstacles (5)Planning to overcome the obstacles (6)Using Alternate Snapshots (8)How it works (8)Understanding the obstacles (12)Planning to overcome the obstacles (12)Setting yourself up for success (12)Closing (13)IntroductionUpgrading your replicated Vault software environment to a new release of Vault software shouldn’t be an intimidating endeavor. Building an understanding of what actually happens when clicking the install button is crucial to having confidence in your upgrade plan. This class will cover existing and newly supported methods for upgrading your replicated Vault software installation, and you will leave armed with the knowledge of what is actually happening in the background with SQL so that you can proceed with confidence.What happens with a normal vault upgrade?How it worksSome of the information in this section is taken from the Autodesk Vault Upgrade guide. Please refer to the guide for additional information as this class will not cover everything in the guide. As called out in the guide, the upgrade process for an Autodesk Vault environment is comprised of 5 steps:1. Validating a Backup2. Upgrading SQL3. Upgrading Vault Server4. Upgrading Clients5. Creating a BackupAutodesk recommends that every Vault upgrade starts with a validated backup. This validation will ensure that if the upgrade process fails, there is a backup that can be restored. It is also recommended that you have a test environment that is close to your production environment as possible. The reason for this is to allow you to better estimate how long the actual migration may take. You should add a buffer to the migration time so that you can report back your estimation of downtime to the reset of the business. Also, testing your backup and migration will help you identify potential pitfalls prior to executing the migration in the production environment.Prior to the upgrade, you may want the various business units to sign-off on the migration. Itis recommended to create a document containing the key features that the business uses. Testing workflows, customizations and integrations should all be done the test environment to make sure that everyone understands the changes and can be trained prior to upgrading the production server.Using the test environment provides a safe option to experience the migration process and discover unexpected hurdles. Although this process takes time it can, in the long run, save time and stress by avoiding impact to the production environment. You can use this environmentto create documentation that is necessary for a successful migration. This can come in handy in case something happens to any of the key players involved with the migration. This will be revisited later.Now let’s move on to the Upgrading Vault Server step. Before we can look at a replicated environment, we first must understand the single site environment. This single site environment is made up of the database (SQL), Autodesk Data Management Console (ADMS) and the Autodesk Vault File Store (AVFS).As called out in the Autodesk Vault Upgrade guide, you need to pay attention to how many releases you are skipping over in your migration. For example, if you are going from 2011 to 2015, you will need to go to some intermediate release. In the example, you would need togo from 2011 to 2013 followed by 2013 to 2015. Autodesk doesn’t allow you to migrate more than 2 releases apart. I would recommend getting to the appropriate service pack or hotfix level prior to opening up the ADMS Console during the migration process. Once you open the ADMS Console, the migration will begin. What is going on at this phase is that the databaseis being prepped for the current release. This involves updating stored procedures, tables and restructuring data where necessary.Now let’s look at a replicated environment. It does consist of the same pieces that a single environment entailed. However, it allows for multiple SQL locations which are known as Connected Workgroups. Believe it or not, upgrading a replicated environment isn’t that difficult. You must first upgrade the main Workgroup, also known as the Publisher Workgroup, by upgrading an ADMS machine within the workgroup. This starts the process of migrating the Publisher SQL databases. Once the SQL databases is properly updated, snapshot are created.A snapshot is a read-only view of a database at the time the snapshot was taken. This snapshot is then consumed by the SQL subscriber machines. Once the snapshot is consumed by the subscriber, the environment is now ready for use once all the ADMS / AVFS machines within that workgroup have been updated accordingly with the appropriate software release. It is best to upgrade all the ADMS machines in the subscriber workgroup first prior to moving onto the AVFS machines.Understanding the obstaclesWe recently worked closely with a customer to help them through a rather large migration process. Our goal was to help identify problems that may arise during the migration and also to ensure that the migration completed in a timely manner. In order to have success with this venture, we needed to collect various information from them. In particular, we needed the following:• Their databases• A detailed mapping of their network• Hardware specificationsOnce we had this information, we set up a lab environment close to what they have so that we can better understand the pitfalls. Along with us running a series of tests in our lab they were running similar tests in their lab. This was beneficial since it allowed us to compare notes and focus on various differences within the environment.This is a smaller example of their Vault environment.During our first couple migrations we noticed that there was considerable differences in the timings between the environments. This made us focus on the hardware. Since the migration process is very read/write intensive, we started to focus on the hard drives. We needed to look at what partitions the database were on and the type of RAID configuration. Another area of focus was on memory since SQL utilizations as much as it can (you can limit the amount within SQL itself). We monitored both of these activities use Performance Monitor to help us get a better understanding of what is going on. We also utilized a utility called Wireshark to get an understanding of how much data was going over the network. Upon investigating all avenues, it was determined that we were sending too much data over the network in terms of the snapshot. Remember the snapshot is the data that the publisher creates post migration and is updated from time to time based on the SQL schedule. There was obstacles with the hard drive and memory but they did not impact the total migration time as much as the network traffic did.Planning to overcome the obstaclesNow that we understand the obstacles of the migration we were able to come up with solutions to get around them.The main obstacle was the network. We were able to overcome this obstacle by using the “Alternate Snapshot” solution which will be discussed in the next section.The hard drive can be handled by purchasing additional partitions or reconfigure the existing partitions. If you are going to reconfigure the RAID partition, it is highly recommended copying all data off the entire drive to another location prior to beginning the operation. As mentioned in the previous section, a migration has intense read/write operations. If you are setup up a RAID configuration, you need to make sure that it can handle a lot of read/write operations. You will want to pull out SQL’s temp database and log files to a separate partition. The main database should be on a partition that can handle a lot of read/writes. You will want to have the log files on a separate partition as well. Once you are satisfied with your configuration, restore your data accordingly. NOTE: The file store is not impacted by a migration and if you are running it on the SQL machine as well you will want it on its’ own partition.Depending on your current system, you will want to have a sufficient amount of memory in the system. If more memory is determined to be needed, prior to the migration may be the best time to upgrade it. This way it can be fully utilized during the migration process itself. The memory / processor upgrades is something that the business unit will need to determine if it is worthwhile now or if the budget is even there for the upgrade.We found that having the issues documented prior to the migration made the actual migration run smoothly. If you are working with Autodesk or a reseller during your testing phase and have issues, they can help you solve this problems in the test environment prior to migrating the production environment. A documented process also allows the migration process to be executed by anyone on the team.NOTE: Please contact your reseller or Autodesk to make sure that whatever is being deleted can be deleted. Autodesk or the reseller may have to create a special script in order to make the migration run smoothly.Using Alternate SnapshotsHow it worksSince we determined that the network is a problem for the size of the database we need to migrate, we need to look at the Alternate Snapshot method. The point of this solution is to allow you to move the snapshot from the publisher to the subscribers in a manner that you find conducive to your environment. For example, you do not want to have a 500GB snapshot going over a network that has bandwidth of 1mbs with a 200ms latency. Here are the steps for using the alternate snapshot:1. Wait for the migration and snapshot to be created on the publisher. This can view thestatus by opening SQL Management Studio, launch the Replication Monitor and select the database that you want to see the status on. You should see a dialog as shown below.2. Immediately after the snapshot is created, turn off the SQL job on the remote SQLservers using the SQL Management Studio3. Move the snapshots to the subscriber location4. Modify the agent to point to the Alternate Snapshot location. At the end of the commandline remove “ -Continuous” and add “ -AltSnapshotFolder D:\VC_Replication_Share\” where “D:\VC_Replication_Share\” is the local path of the “unc” folder.5. Reinitialize the SubscriberSelect YES to this dialog.6. Restart the Job7. Wait until the snapshot consumption completes. The status of this can be viewed in the dialog above and when it shows that it is complete.8. Stop the SQL job9. Set the synchronization setting back to Continuous10. Start the SQL job11. Wait until replication to get into steady state. The replication status on a database will show “Waiting 60 second(s)”.12. At this point, your subscriber is ready for useUnderstanding the obstaclesThe reason why we are doing the Alternate Snapshot is that the network has some sort of issues with it whether it is bandwidth, latency or both. This obstacle will still be there. Other obstacles could be around the delivery method used to get the data to the subscribers. The data could arrive and be corrupt. Maybe you sent someone on a plane to the location and somehow the drive was wiped. We will need a plan to overcome these.Planning to overcome the obstaclesWays to get around this would be use multiple methods to assure that data will arrive in a timely manner. If you decide to go with a zip method, you would want to test that the zip is indeed working properly prior to sending it via a device.Setting yourself up for successBefore we do the migration we definitely want to remember that we need to have a goodsolid backup plan which includes a backup and several test iterations in a non-production environment. You will want to make sure that your backups are proper and indeed cover everything in your environment. You never know what could go wrong during the migration.To quote Jonathan Landeros of Inventor Tales, “Should the worst happen, have a backup plan that includes having a backup to restore, instead of slipping out the back door before anyone notices!”. I cannot iterate this enough that you want to run multiple migrations prior to the day of the actual migration. Write out a preliminary migration plan. Take notes during your test migrations. Combine your initial plan along with your notes to create robust document in which anyone can use in case the need arises.Remember, you are the expert of your environment. If you are doing the migration yourself or are getting outside resources to help out, it is best to make sure everyone is aware of the details of the environment. You will be the best to predict slowness at particular workgroups. This knowledge can be used during the testing phase of the migration. Again, your environment should be as close to the production environment as you can make it. You can set up network emulators and such to give you a better idea on what will go on during the migration day. Just remember that during this process there will be down time. Your system will be unavailableto the business units while it is executing. But, you can limit the down time and impact to the business by planning accordingly.Have a plan for migration day. Make sure you have the who, what, where, when & how’s allin order prior to that day. Make sure that the team involved in the migration is lined up. It is worth mentioning that you may want to have backup people ready to go in case something happens on the day of migration. They need to know where they are going to meet (online / at the office). They need to know when to start. This could be during business hours or off hours depending on what your plan yielded. Make sure that everyone understands what their role is during the migration. Who is updating what servers and when are they being updated. With a good predictable plan your team will know where they are at during the entire migration process. This will lead towards a smooth migration.ClosingNow that we know what to expect during a migration we can go forward and have a successful migration.。
版本升级方案(模板)

升级不成功时退回原版本的步骤
备板备件升级安排
是否需要进行备板备件升级以及如何实施
注意事项
需要引起关注的事项
升级后测试项目
升级后系统各项指标的测试内容或项目
确认:
年月日
用户确认
年月日
表QR 75.1731-2004-06升级内容
(说明原版本和新版本)
升级时间
预计升级时间的发生范围
升级人员安排
(参与升级的人员)
升级准备
(数据备份、硬件准备、工具准备、升级前运行状态检查、升级前运行情况记录等一切可能得准备工作的详细记录)
升级步骤
详细的技术步骤
策划方案软件升级实施方案

•项目背景与目标•升级需求分析•技术方案设计•实施步骤与时间表•资源安排与预算•风险管理及应对措施•效果评估与持续改进目录01升级原因升级目的当前软件系统面临的问题项目背景介绍项目目标定义01020304提升系统性能完善功能增强安全性降低维护成本02调研对象调研方法用户需求调研根据用户对每个功能分类的需求程度,确定功能实现的优先级,确保软件升级后的功能能够更好地满足用户需求。
功能需求分析功能优先级功能分类技术可行性分析技术实施方案技术需求评估0303负载均衡和容错机制01基于J2EE的多层架构设计02微服务架构的应用系统架构设计用户管理模块项目管理模块任务管理模块消息通知模块功能模块设计关系型数据库的设计采用MySQL等关系型数据库,实现数据的持久化和查询。
数据库表的设计根据业务需求,设计相应的数据库表结构,包括主外键关系、索引等。
数据库操作的优化通过使用索引、缓存等技术,提高数据库的读写性能和并发处理能力。
数据库设计04制定项目章程成立项目团队制定项目计划030201项目启动与计划系统分析系统设计系统开发系统测试系统开发与测试数据准备数据迁移系统对接数据迁移与对接系统部署正式启用新系统,完成数据迁移和用户培训等工作。
系统上线持续监控与优化系统上线与部署05核心团队外协人员人力资源安排选择适合团队技术栈的开发平台,如Java、Python等。
开发平台数据库服务器工具软件根据项目需求,选择适合的数据库系统,如MySQL、Oracle等。
考虑项目规模和性能要求,选择适当的服务器配置和数量。
包括项目管理工具、版本控制工具、缺陷跟踪工具等。
技术资源需求预算执行在项目执行过程中,对实际支出进行严格控制,确保预算不超支。
预算编制根据项目需求和资源安排,编制详细的预算计划。
预算调整根据项目实际情况,对预算进行合理调整,确保项目的顺利进行。
预算计划与执行06风险评估在项目实施前,对技术风险进行全面评估,包括系统架构、软件版本、硬件设备、网络环境等,识别潜在的技术风险。
方案设计师V3.2升级说明

的有效总体技术控制。
方案设计师V3.2升级说明
(3)变宽梁的构造编辑整理 a) 完善了构造编辑器的编辑思路,按标准构造类型的 编辑、结构骨线的线形编辑、异型对象属性编辑, 以及标准构造在结构上的类型应用编辑。即类型编
辑解决构造尺寸,类型应用编辑解决结构上各处的
构造应用。 b) 用i命令可以全部初案设计师V3.2升级说明
(3)变宽梁的构造编辑整理 c) 用FB\FO\FJ命令完成腹板操作 FB:一系列点创建腹板 FO :偏移创建腹板 FJ:连接线条创建腹板
d) 用TRIM:解决结构相交的处理
e) 用XX命令创建各特殊对象 f) 类型编辑按钮:直接显示结构类型布置,点 击类型对象即可编辑类型应用。
方案设计师V3.2升级说明
(7)方案设计师自动创建变宽桥博模型
a) 平面杆系:
可以生成纵梁的桥博杆系模型,节点: 梁起端,终端,支座处, 跨中处,横梁左右两端,横隔梁,变截面处,用户指定位置处,
其余按界面指定长度进行划分,界面不指定时按默认小于3m长
度进行均分。 b) 单梁模型(此版未正式发布):
悬臂线:THXBX-X
腹板线:THFBX-X 注:-X可为空,区分 多条路线使用
方案设计师V3.2升级说明
3、创建方式支持:CAD导入、用户指定
b、用户指定 指定跨径、上部下部
结构类型、桥幅宽度
及平曲线半径即可快 速建立模型。
方案设计师V3.2升级说明
二、变宽梁的改进
(1)变宽梁的AUTOCAD导入:
方案设计师V3.2升级说明
已建桥博模型导入方案设计师,自动完成钢束布置
方案设计师V3.2升级说明
已建桥博模型导入方案设计师,自动完成钢束布置
方案设计师V4.1.0升级说明

1、支持更为灵活的分阶段施工方式,比如一跨之内可以不设施工缝; 2、箱梁一般构造图
1)平立面构造图支
持相同跨合并出图, 例如25+4*20+25,
可以出一个“边跨
立/平面”“中跨立 /平面”
上 海 同 豪 土 木 工 程 咨 询 有 限 公 司 Shanghai Tonghao Civil Engineering Consulting Co.,Ltd
上 海 同 豪 土 木 工 程 咨 询 有 限 公 司 Shanghai Tonghao Civil Engineering Consulting Co.,Ltd
升级说明
一、旧桥改扩建
• 拓宽项目程序设计实现自动化,填补了国内桥梁 设计市场空白;
11、方案资料桥幅配置表中增加绘制与否选项,以控制旧桥不需出图 12、设计资料一键导入数据文件时修复了断链数据导入后错误的问题,以 及增加了从数据文件导入断链的纬地文件类型;
方案设计师升级说明
BridgeDesigner
上 海 同 豪 土 木 工 程 咨 询 有 限 公 司 Shanghai Tonghao Civil Engineering Consulting Co.,Ltd
公司简介
成立于1997年,同豪土木是一家本土的土木工程咨询高新技术企业。它 融合桥梁科学和信息技术为一体,提供桥梁设计、施工、监理、检测与监控、
5)多联箱梁的钢筋图在同一dxf中绘制并参数化列表
6)多联横梁的钢筋图在同一dxf中绘制并参数化列表
上 海 同 豪 土 木 工 程 咨 询 有 限 公 司 Shanghai Tonghao Civil Engineering Consulting Co.,Ltd
升级说明
方案设计师V4版常见问题解答

方案设计师V4版常见问题解答方案设计师V4版常见问题解答上海同豪土木工程咨询有限公司2015年10月目录一.程序安装与启动 (4)1.加密锁设置及4.0版本常见安装问题怎么解决? (4)二.软件资料下载 (4)2.同豪官网有时打不开,同豪软件版本以及相关视频、文字资料怎么获得?? (4)三.项目总体 (5)3.构件的绘图设置中,有个选项是“随全局”,是什么意思? (5)四.设计资料 (6)4.V4版本,怎么导入路线资料? (6)5.在平曲线或者竖曲线资料中导入了数据文件,为什么建模视图中看不到竖曲线或者平曲线?66.用CAD文件导入竖曲线或者地面线时,导入后的数据桩号错误并且跟CAD中显示不一样?77.V4版本怎么创建、修改或删除轮廓线? (8)8.V4版本怎么创建或者删除桥幅? (9)9.V4版本怎么导入布孔线? (9)五.项目总体 (10)10.桥梁表中只能输入中心桩号不能输入起点桩号定桥梁位置吗??(10)11.基础标高表怎么进行应用? (10)12.剖断面配置表怎么输入并且进行调用? (11)13.桥梁表中定义好的桥幅名称后面为什么会自动加下划线?桥幅名称定义有什么规则?1314.重新应用了桥梁表,发现构件属性表里的参数值变掉了,这是什么原因? (13)六.桥梁设计-总体 (14)15.在哪里可以编辑布孔线信息,比如修改桩号和布孔线角度?(14)16.路线资料的标准横断面中已经输入了桥面布置元素组成,为什么建模视图窗口断面显示不对?桥型图中断面图桥面布置也不对应? (15)七.桥梁设计-变高箱梁 (16)17.构造界面中设置了墩顶横梁人孔,出钢筋图为什么没有绘制人孔加强钢筋图块? (16)18.箱梁钢筋图中,如果不想所有梁段都绘制该怎么设置? (17)19.箱梁构造图中,如果想绘制某位置处自定义的断面,该怎么操作? (18)20.绘制箱梁构造图,发现立平面中纵向标注错位,跟节段构造变化不对应,是什么原因呢?18八.桥梁设计-等高通用箱梁 (19)21.创建好通用箱梁之后,建模视图窗口不显示箱梁,出图提示生成0个文件是什么原因?1922.不同的腹板和横梁,构造(顶底板加厚、腹板加宽、倒角)不同该怎么设置? (20)23.箱梁边腹板做二级倒角时该怎么输入数据? (21)24.一次落架的变高梁在哪里输入变高的数据? (23)25.逐孔施工的现浇箱梁在建模过程中需要注意哪些事项? (24)26.通用箱梁设计方法中边腹板理论中心线据悬臂根部的参数值是什么含义? (27)27.通用箱梁设计方法中支座横向布置数据怎样输入? (28)28.对于一端张拉一端固定的钢束,在程序中怎么设置? (29)29.通用箱梁钢束锚面钢筋怎么设置才能出图? (30)30.通用箱梁齿块钢筋怎么设置才能出图? (33)31.构件中已经执行过出图,为什么文件夹中找不到CAD图纸?(35)九.桥梁设计-附属结构 (37)32.桥面铺装在哪里输入?如果需要用铺装调桥面横坡,怎么操作?(37)33.伸缩缝在哪里设置?缝宽怎么控制? (37)十.桥梁设计-工程图纸 (38)34.桥台和桥墩的挡块垫石图纸在哪里出? (38)35.绘制材料数量表,出图没有材料数量是怎么回事? (39)36.桥型布置图出图,立平面中不绘制锥坡或者绘制出来锥坡显示异常? (39)37.桩位坐标表中为什么只有示意图,没有坐标表格?? (40)38.桥型布置图中,人行道的横坡该怎么设置才能正确出图? (41)一. 程序安装与启动1.加密锁设置及4.0版本常见安装问题怎么解决?Q:加密锁设置及4.0版本常见安装问题怎么解决?A:对此问题4.0用户手册中有详细的说明,见4.0用户手册“第二篇:安装及获得授权”。
- 1、下载文档前请自行甄别文档内容的完整性,平台不提供额外的编辑、内容补充、找答案等附加服务。
- 2、"仅部分预览"的文档,不可在线预览部分如存在完整性等问题,可反馈申请退款(可完整预览的文档不适用该条件!)。
- 3、如文档侵犯您的权益,请联系客服反馈,我们会尽快为您处理(人工客服工作时间:9:00-18:30)。
发布日期:2012-7-12 上海同豪土木
版本升级说明
一、新增主要功能介绍
1、设计功能:变高连续箱梁钢筋设计及绘图。
2、设计功能:变高连续箱梁横、竖向预应力设计、出图。
3、计算功能:桥梁下部结构抗震计算;桥墩稳定性计算。
二、改进功能说明
1、变高连续箱梁钢束:增加纵向对称的设计思想,编制一个边跨和半个中
跨的钢束信息,即可自动完成全桥对称配束。
2、变高连续箱梁齿块:增加构造设计功能,可在一般构造、钢束图中实现
绘制;齿块可实现自动合并、编号、选用。
3、钢束编辑器:提供钢束平面布置的查看功能。
4、盖梁挡块倾角:可以设置内外倾角。
5、墩柱高度取整:增加命令zp,可对墩柱高度一次进行取整。
6、桩基自动设计:增加命令zl,方便桩基长度调整。
7、路线软件范围:增加鸿业路线软件导入功能。
8、路线软件桥宽导入:增加路线软件,桥宽数据导入功能。
