美国山都坪 TPV 291-75B150
登山包之扣具的常识普及

登山包之扣具的常识普及登山背包构成一般包括:面料+防水胶+扣具+拉链+织带+背板(pvc)+网布。
在这里只介绍扣具。
扣具,在我们的日常生活中处处可见,普通到衣服鞋帽,平常使用的背包,相机包,手机包,连MM贴身的bra.都有扣具的存在。
作为一个真正的户外爱好者,了解背包的性能是必要的.增加点扣具知识也是应该的,常见的扣具品牌呢,基本上就“Duraflex”,“ITW”“nifco”,杂牌的有正安,伟盛等一些。
当然名气最大的当属“Duraflex”,但是就性能而言,“ITW”“nifco”并不比前者逊色多少。
Duraflex有三个子公司,分别是美国公司也就是NATIONAL MOLDING(美国模具中心),韩国的woojin-duraflex,以及中国香港的utx-duraflex。
中国深圳的力顿钮扣配件公司是Duraflex在中国大陆的授权生产商。
WOOJIN DURAFLEX是美国NATIONAL MOLDING的韩国授权生产工厂,而DURAFLEX多耐福就是NATIONAL MOLDING公司的注册商标。
大家可以在扣具的背面看到UTX-DURAFLEX以及WOOJIN-duraflex的字样,这只是把工厂名标识在上面。
同样NIFCO扣具也有好几种名称TIFCO,KIFCO都同样是该公司产品,ITW-NEXUS其实是ITW旗下的子公司,专门生厂扣具,质量相当得不错,专业性很强。
其它的没有名气的扣件就提也不用提了,大家有兴趣就按斤去买吧(据说福建泉州那边按麻袋买的)。
“Duraflex”,“ITW”“nifco”的产品不仅有很强的抗低温性能零下30度(很多的扣件在低温条件下易脆裂),而且在过度的弯曲变形下(90度)也不会断裂。
其韧性令人咂舌。
产品品质在户外这种安全性很高的运动来讲是非常重要的,否则在户外旅途中,扣具突然歇屁了,真得令你欲哭無淚,报警无门,现在我来介绍一下扣具的种类以及材料一、扣具的分类(比较繁琐)背包扣具一般划分为插扣(又称旁开扣)、日子扣,梯扣,勾扣、绳扣,另外还有一些比较特殊用途的,现在介绍一下这些扣件的特性、用途及强度。
洗衣房设备采购清单

規格 單位 规格 牌號 Thermopatch 型號 Y-140B 數量 件 1 產地 美國 易损件名称/工作寿命(月) 带闸/18个月 操作方式 自動 電壓 伏 2200V / 1N / 50Hz 耗电量 千瓦 0.4 外型尺寸 毫米 439(W)X445(D)X406(H) 重量 公斤 32 设备特点: 电子控制集打印、切断、粘贴功能于一体, 可编印任何组合多位之安装英文字母及数字手动操作, 打印清晰,不褪色。 項目 16 : 空气压缩机 (7.5HP) 規格 牌號 型號 數量 產地 操作方式 電壓 功率 耗电量 外型尺寸 重量 设备特点: 自动启动控制 單位 规格 IR S75 2 中外合資 活塞 380V / 3N / 50Hz 7.5 5.5 1300(W)X520(D)X920(H) 224
件
Dec, 2006
思朗炊事设计顾问有限公司
广州天誉三期威斯汀酒店 洗衣房設備技术规格表
锅炉 抽濕 控制 電壓 機身重量 機身尺吋 內置 內置 手動 380V / 3N / 50Hz 36 615W x 350D x 11Βιβλιοθήκη 5H伏 公斤 毫米材料
枱面 布面 机身 鍍鋅鐵 设备特点: 配备抽湿系统,自带锅炉,配蒸汽喷枪 脚踏式操作,可任意开启压缩空气 項目 10 : 人像機 規格 牌號 型號 數量 產地 锅炉 控制 電壓 機身重量 機身尺吋 單位 规格 PONY MGC/S 1 意大利 內置 手動 380V / 3N / 50Hz 97 430W x 1200D x 1600H
Kg1/10 mm(inch) mm(inch) dm3 (cu.ft) Kg(Ibs.) Kg(Ibs.) mm(inch) mm(inch) mm(inch) mm(inch) r.p.m r.p.m mm(inch) mm(inch) mm(inch) kvA KW mm(inch)
22756729_时尚新品

Important 双周要闻Dec16 - Dec31,2020WORLD VISION 2020.NO.24102安全。
Oasis的目标是帮助搜索,为救援团队能够在更短的时间内到达更远的地方提供保障。
无人机以网格模式飞行,更有效地扫描水域中是否有人类生命迹象。
每架无人机都配备三台空气螺旋桨和一台水螺旋桨,此外还配有车载光学热像仪,保障了它在白天、黑夜均能有效工作。
动。
“豆荚”外壳用半哑光的硬塑料制成,且富有弹性,可以将球固定在特定位置,也能轻松拿取。
产品还配备从“豆荚”顶部延伸出来的挂钩,作为豆荚有机形态的自然延伸。
挂钩可以挂在球场的网栏上或其他地方,携带使用十分方便。
New Arrival Steam都可兼容。
控制器配备了一个经典的游戏杆和日本三华按钮,这是上世纪80年代和90年代使用最广泛的街机按钮。
采用无线设计,同时支持蓝牙,可连续畅玩18小时。
得到了这个家伙,相信你就再也不想放手!Copyright©博看网 . All Rights Reserved.图表解读Dec16 -Dec31,2020WORLD VISION 2020.NO.2411时尚新品低消费。
un-lim可以根据用户的需求进行组装或拆卸,重组成适合需求的家具。
搭建家具的原理是利用星形突出连接件将模块连接,连接件通过孔洞插入,将不同零部件固定在一起,连接件的齿轮可调整模块之间的角度。
8个un-lim模块可以被改造成多种不同的家具,从茶几到置物架一应俱全。
碳酸酯外壳及航空级铝材制作。
灯具使用一块锂聚合物充电电池供电,单次充电最长使用时间可达6小时。
Neozoon还采用了最先进的USB-C充电技术,配备LED充电指示灯。
吸盘灯按照可持续原则研发制作,使用100%可回收再利用的材料制成,同时易于维修。
食物,底盘可以调节温度,有常温、冷藏、保温3种模式可供选择,根据放入食物的需要轻松调节,密封性极好。
冷藏温度保持在-5℃,帮助食物保鲜。
TPV 8211-35

Santoprene™ 8211-35Thermoplastic Vulcanizate产品说明关键特性它是热塑性弹性体(TPE )• 非吸湿性产品,加工之前很少或不需要干燥。
-中性、易于着色的配方。
- 优异的耐臭氧性能。
- 用于密封应用中。
- 推荐用于要求优异耐挠曲疲劳性能的用途。
-尽管此产品未经 NSF 认证,但是它已经在 NSF系列中的一种软质、可着色、非吸湿性热塑性硫化弹性体(TPV ) 。
这种材料同时具有良好的物理性质和耐化学性, 用于较难注塑成型的领域。
这一牌号的山都平 TPV 是剪切速率依赖型产品,备案了一份《材料提供商申请表》,可在常规热塑性注塑成型设备上加工。
它是聚烯烃基产品, 可以完全回收利用。
这可以方便评估此产品能否用于需要 NSF 认证的应用中。
- 符合 RoHS 规范。
总体 供货地区 1 • 北美洲 • 非洲和中东• 拉丁美洲 • 南美洲 • 欧洲 • 亚太地区 应用• 密封件和垫片• 汽车 - HVAC 挡板门密封条 • 汽车 - 把套 • 汽车 - 车内脚垫 • 汽车 - 密封条 • 汽车 - 内饰 • 软质手柄 • 消费品应用 用途 • 密封• 汽车领域的应用: • 柔软的把手 • 手机• 消费品应用领域机构评级 RoHS 合规性 汽车要求 外观 • EU Annex XVII of Regulation (EC) No 1907/2006 • RoHS 合规• CHRYSLER MS-AR100 AMN • GM GMP.E/P.083 • 自然色• 颗粒料 形式 加工方法 修订信息 • 多次注射成型 • 01/22/2013• 注射成型物理性能 比重 典型数值 (英制 ) 典型数值 (公制 ) 测试依据 0.930 0.930 ASTM D792ISO 1183 密度 0.930 g/cm³ 0.930 g/cm³ 硬度 典型数值 (英制 )38典型数值 (公制 )38测试依据 ISO 868支撐硬度邵氏 A, 15 秒, 73°F (23°C), 0.0787 in (2.00 mm) 弹性体典型数值 (英制 )145 psi 典型数值 (公制 )1.00 MPa 测试依据 拉伸应力(在100%时) - 横向流量 (73°F (23°C)) ASTM D412 拉伸应力(在100%时) - 横向流量 (73°F (23°C)) 145 psi 1.00 MPa ISO 37 拉伸断裂强度 - 横向流量 (73°F (23°C)) 拉伸断裂应力 - 横向流量 (73°F (23°C)) 421 psi 421 psi 350 %2.90 MPa 2.90 MPa 350 % ASTM D412 ISO 37 伸长率(在断裂伸长时) - 横向流量 (73°F (23°C)) ASTM D412 拉伸断裂应变 - 横向流量 (73°F (23°C))350 %350 %ISO 37弹性体典型数值 (英制 ) 典型数值 (公制 ) 测试依据压缩永久变形ASTM D395B73°F (23°C), 22.0 hr, 类型 1 257°F (125°C), 70.0 hr, 类型 1 压缩永久变形10 %36 %10 %36 %ISO 81573°F (23°C), 22.0 hr, 类型 A 257°F (125°C), 70.0 hr, 类型 A 10 %36 %10 %36 %热性能典型数值 (英制 )-85 °F 典型数值 (公制 )-65 °C测试依据ASTM D746ISO 812脆化温度脆化温度-85 °F -65 °C注射典型数值 (英制 )0.080 % 典型数值 (公制 )0.080 %建议的最大水分含量建议的最大回制料比例20 % 20 %螺筒后部温度螺筒中部温度螺筒前部温度射嘴温度350 到 375 °F355 到 380 °F365 到 390 °F365 到 410 °F290 到 420 °F75.0 到 125 °F快速177 到 191 °C179 到 193 °C185 到 199 °C185 到 210 °C143 到 216 °C23.9 到 51.7 °C快速加工(熔体)温度模具温度注射速度背压50.0 到 100 psi100 到 200 rpm3.0 到 5.0 tons/in²0.125 到 0.250 in 0.345 到 0.689 MPa100 到 200 rpm41 到 69 MPa 3.18 到 6.35 mm螺杆转速合模力垫层螺杆长径比16.0:1.0 至20.0:1.0 16.0:1.0 至20.0:1.0螺杆压缩比排气孔深度2.0:1.0 至 2.5:1.00.0010 in2.0:1.0 至 2.5:1.00.025 mm注射说明Santoprene TPV与乙缩醛和PVC不相容。
热塑性硫化弹性体Santoprene291-60B150

产品数据表Santoprene ™ 291-60B150热塑性硫化弹性体产品说明它是热塑性弹性体(TPE)系列中的一种可着色的特种热塑性硫化弹性体(TPV)。
它专为与 PC、ABS、PC/ABS 和 PMMA 粘结而配制,适用于要求硬/软材料组合的应 用。
这一牌号的山都平 TPV 是剪切速率依赖型产品,可在常规热塑性注塑成型或 挤出成型设备上加工。
可在线回收利用。
关键特性•为与 PC、ABS、PC/ABS、ASA 和 PMMA(嵌件注射成型或 2K(双色)成型)具有 优异的粘结性而设计。
•注塑成型中的加工窗口比较宽。
•推荐用于要求优异制品外观的应用中。
供货地区•非洲和中东•欧洲应用•密封件和垫片•汽车 - 火花塞、保险杠、护孔环、管夹•软质手柄•消费品 - 厨具•消费品 - 地板护理用品•消费品 - 电动工具•消费品 - 书写用具•消费品应用用途•厨具•大型家用电器和小型家用电器•电器用具•活动的铰链•家电部件•镜架•密封件•疲劳消除用品•汽车的发动机罩下的零件•汽车领域的应用•柔软的把手•手机•体育用品•消费品应用领域•粘合•粘结树脂RoHS 合规性•RoHS 合规汽车要求•GM GMW15702-250012外观•自然色形式•粒子加工方法•多次注射成型•共挤出成型•注射成型修订日期•06/20/2014密度1.06g/cm ³ 1.06g/cm ³ISO 1183(73°F (23°C))拉伸应力(在100%时) - 横向流量(73°F (23°C))305psi 2.10MPa ISO 37拉伸断裂强度 - 横向流量 (73°F (23°C))1160psi 8.00MPa ASTM D412拉伸断裂应力 - 横向流量 (73°F (23°C))1160psi 8.00MPaISO 37断裂伸长率 - 横向流量 (73°F (23°C))540%540%ASTM D412拉伸断裂应变 - 横向流量 (73°F (23°C))540%540%ISO 37压缩永久变形ASTM D395B73°F (23°C), 22 hr, 类型 134%34%158°F (70°C), 22 hr, 类型 162%62%压缩永久变形ISO 81573°F (23°C), 22 hr, 类型 A 34%34%158°F (70°C), 22 hr, 类型 A62%62%产品数据表Santoprene™ 291-60B150热塑性硫化弹性体(212°F (100°C), 168 hr)0.0%0.0%ISO 188空气中拉伸强度的变化率(212°F (100°C), 168 hr)空气中极限伸长率的变化率-11%-11%ASTM D573 (212°F (100°C), 168 hr)-11%-11%ISO 188在空气中断裂时拉伸应力变化(212°F (100°C), 168 hr)空气中硬度计硬度的变化率-2.0-2.0ASTM D573 (邵氏 A, 212°F (100°C), 672 hr)-2.0-2.0ISO 188空气中邵氏硬度的变化率(邵氏 A, 212°F (100°C), 672 hr)空气中质量的变化-1.1%-1.1%ASTM D573 (212°F (100°C), 168 hr)空气中质量的变化-1.1%-1.1%ISO 188 (212°F (100°C), 168 hr)-1.2%-1.2%ASTM D573空气中容量的变化率(212°F (100°C), 168 hr)空气中容量的变化率-1.2%-1.2%ISO 188 (212°F (100°C), 168 hr)拉伸强度、伸长率和拉伸应力沿垂直流动方向测定 - ISO 1 型,ASTM die C。
注塑机特征参数表

类别直径(mm)cm3(PS)g B1日钢J75EⅡ双曲肘式75650300180-350210*210360*360530*530100M1680A 35115105¢4-R10B2日钢J75EⅡ双曲肘式75650300180-350210*210360*360530*530100M1680A 35115105¢4-R10B3日钢J75EⅡ双曲肘式75650300180-350210*210360*360530*530100M1680A 35115105¢4-R10B4日钢J75EⅡ双曲肘式75650300180-350210*210360*360530*530100M1680A 35115105¢4-R10B5日钢J100EⅡ双曲肘式100750350200-400240*240410*410610*610100M1680A 40176160¢4-R10B6日钢J100EⅡ双曲肘式100750350200-400240*240410*410610*610100M1680A 40176160¢4-R10B7日钢J100EⅡ双曲肘式100750350200-400240*240410*410610*6101组100M1680A 40176160¢4-R10B8日钢J100EⅡ双曲肘式100750350200-400240*240410*410610*6101组100M1680A 40176160¢4-R10B9日钢J100EⅡ双曲肘式100750350200-400240*240410*410610*610100M1680A 40176160¢4-R10B10日钢J150EⅡ双曲肘式150890440220-450300*300510*510740*740120M16130B 51368335¢4-R10B11日钢J150EⅡ-P 双曲肘式150890440220-450300*300510*510740*740120M16130A 46300273¢4-R10B12日钢J150EⅡ-P 双曲肘式150890440220-450300*300510*510740*740120M16130A 46300273¢4-R10B13日钢J150EⅡ双曲肘式150890440220-450300*300510*510740*740120M16130A 46300273¢4-R10B14日钢J150EⅡ双曲肘式150890440220-450300*300510*510740*7401组120M16130A 46300273¢4-R10B15日钢J150EⅡ双曲肘式150890440220-450300*300510*510740*7401组120M16130A 46300273¢4-R10B16日钢J150EⅡ双曲肘式150890440220-450300*300510*510740*740120M16130B 51368335¢4-R10B17日钢J180ELⅡ双曲肘式180940440220-500310*310530*530780*780120M16130A 46300273¢4-R10B18日钢J180ELⅡ双曲肘式180940440220-500310*310530*530780*780120M16130A 46300273¢4-R10B19日钢J180ELⅡ双曲肘式180940440220-500310*310530*530780*780120M16130A 46300273¢4-R10B20日钢J150EⅡ双曲肘式150890440220-450300*300510*510740*740120M16130B 51368335¢4-R10B21日钢J150EⅡ双曲肘式150890440220-450300*300510*510740*740120M16130B 51368335¢4-R10B22日钢J150EⅡ双曲肘式150890440220-450300*300510*510740*740120M16130B 51368335¢4-R10B23日钢J150EⅡ双曲肘式150890440220-450300*300510*510740*740120M16130B 51368335¢4-R10B24日钢J150EⅡ双曲肘式150890440220-450300*300510*510740*740120M16130B 51368335¢4-R10B25日钢J150EⅡ双曲肘式150890440220-450300*300510*510740*740120M16130B 51368335¢4-R10B26日钢J150EⅡ双曲肘式150890440220-450300*300510*510740*740120M16130B51368335¢4-R10B29日精PS60E9ASE液压式62600430170-200*200325*325478*478120M1660126¢2-R10射嘴型号模板最大开距(mm)抽芯容模厚度(mm)实际射胶量(PS)g机型注:①、机号栏“C”代表一楼车间,“B”代表二楼车间;②、C22、C20、C21容模厚度已加大100mm;③、B11、B12为EⅡ-P型闭环注塑机;④、实际射胶量采用5KG/CM2的背压空射;⑤、EⅡ型220吨以下螺杆类型为K、A、B三种(K—小、A—标准、B—加大),280-450吨的螺杆类别为A、B、C三种(A—小、B—标准、C—加大);⑥、B18、B19、B17为全电动式注塑机。
高尔夫球杆价格

商品报价 (打折前)
2,800.00 12,600.00 8,600.00 1,320.00 1,880.00 2,180.00 24,500.00 1,960.00 1,920.00 13,900.00 7,000.00 9,600.00 2,080.00 3,789.00 2,300.00 1,580.00 16,900.00 6,800.00 6,500.00 7,500.00
所在 信用等 地区 级
上海 上海 上海 上海 上海 上海 上海 上海 上海 上海 上海 上海 上海 上海 上海 上海 上海 上海 上海 上海 12 10 10 10 10 10 10 10 10 10 10 10 10 10 10 10格行情调查表
高尔夫球杆 商品名称 61、.. 高尔夫球杆 美津浓 MIZUNO CRAF175 F 球道木 62、高尔夫球杆 男 1号木杆 taylormade R11 男式 专gui.. 63、高尔夫男式球杆 .. 美津浓 mizuno JPX 800 AD开球木杆 1 64、高尔夫铁木杆 登禄普dunlop 球杆 男式 专gui.. 碳素杆身 65、高尔夫套杆 球杆nickent pretty baby ii女士套杆 金粉 66、高尔夫套杆 .. 泰勒梅/taylormade R11 男式反手/左手球杆 67、高尔夫左手/反手套杆 polo男式右手球杆 初级 .. 68、高尔夫球杆 美津浓 MIZUNO MX300 男式 铁杆 组 (碳身) 69、高尔夫球杆高尔夫1号木杆开球 taylormade burner superFas 70、.. 高尔夫球杆 美津浓 MIZUNO MX300铁 杆 组 (钢身) 71、高尔夫套杆 全套 ..POLO NFK1男式球杆 初级 新款 72、高尔夫球杆 铁杆组 泰勒梅Taylormade CB男式钢杆身 73、高尔夫反手球杆 .. 美津浓 mizuno MP53 男式左手铁杆 74、高尔夫套杆 全套POLO BD07男式球杆 初 、中级 2012最新款 75、高尔夫球杆 泰勒梅 taylormade男式 球 道木 专gui.. 76、高尔夫球杆 美津浓 mizuno JPX LADIES METAL 女式球道木杆 77、高尔夫套杆 全套登禄普dunlop 男式球杆 碳素杆身 .. 78、高尔夫套杆 卡拉威/callaway RAZR hawk 男式球杆碳素杆身 79、高尔夫球杆 .. 泰勒梅/taylormade R11 男式铁杆组 碳素 80、高尔夫套杆 泰勒梅/taylormade R11 MC 男式球杆 钢身 锻造
SPVA 24 7操作多功能显示器说明书

SPVA1920 x 1080DVI-DMini D-sub 15 pin5 BNC (RGB/HV)DisplayPortComposite (BNC)S-VideoHDMIBNCStereo Mini JackRS-232C in/out for multiple monitor control, Ethernet, IR, DDC/CI15W Stereo / 8Ω10W Stereo / 8Ω41-104°F / 5-40°C20-80%55”4000:147.6 x 26.8 in. /1209.6 x 680.4 mm4.6 A@100-120V1.85 A@220-240V255W<0.5W0.73 in. / 0.73 in.,18.5 mm / 18.5 mm49.2 x 28.4 x 4.9 in. /1250.2 x 721 x 125.4 mm60.2 x 37.1 x 12.2 in.1530 x 942 x 311 mm88.2 lbs. / 40 kg111.3 lbs. / 50.5 kg400 x 400 mm (4 holes)46”0.530 mm3500:140.1 x 22.5 in. /1018.1 x 572.7 mm3.6 A@100V1.5 A@240V155W0.6 in. / 0.6 in.,16.5 mm / 16.5 mm41.6 x 24 x 4.1 in. /1055.4 x 608.6 x 103 mm47.6 x 30.8 x 10.3 in. /1210 x 782 x 261 mm52.5 lbs. / 23.8 kg67.9 lbs. / 30.8 kg40”0.461 mm3000:134.9 x 19.6 in. /885.6 x 498.2 mm3.5 A@100V1.45 A@240V145W0.6 in. / 0.6 in.,15.5 mm / 15.5 mm36.2 x 21 x 4.1 in. /919.7 x 532.2 x 103 mm42 x 26.9 x 10.3 in. /1066 x 682 x 261 mm45.9 lbs. / 20.8 kg59.1 lbs. / 26.8 kgViewable Size (Diagonal)Panel TechnologyNative ResolutionPixel PitchBrightness (Typical/Maximum)Contrast Ratio (Typical)Active Screen Area (W x H)Input TerminalsOutput TerminalsExternal ControlSpeaker OutputAdditional FeaturesPower RequirementsPower Consumption (Typical)Power Consumption (Standby Mode)Bezel Width (L/R, T/B)Dimensions (without stand; WxHxD)Packaging Dimensions (WxHxD)Net Weight (without stand)Gross Weight (with box)VESA Hole ConfigurationOperating TemperatureOperating HumidityIncludedOptionalRGB1 (Digital)RGB2 (Analog)RGB3 (Analog)RGB4 (Digital)Video 1Video 2Video 3Component Video 1 (DVD/HD)AudioRGB (Analog)RGB (Digital)VideoAudioExternal Speaker JackInternal SpeakerLCD MODULECONNECTIVITYFEATURESPOWERPHYSICAL SPECIFICATIONSENVIRONMENTAL CONDITIONSACCESSORIES70”0.807 mm420 cd/m² / 600 cd/m²2000:161.0 x 34.3 in. /1549.4 x 871.6 mm8.2 A@100-120V3.3 A@220-240V545W2.5 in. / 2.5 in.,62.4 mm / 63.4 mm66.1 x 39.5 x 7.8 in. /1680 x 1004 x 198 mm76.8 x 49.6 x 18.1 in. /1950 x 1260 x 460 mm208.3 lbs. / 94.5 kg251.3 lbs. / 114 kgAdvanced thermal capabilities, Sealed professional panel, Expansion slot, Ethernet control and Communication, CableComp+, TileMatrix (10x10),TileComp, Programmable lookup tables, Plug and Play (DDC/CI, DDC2B), PIP (remote), POP, 6-axis colour adjustment, Multi-level programmable zoom,Scheduler (w/ RTC), Sharpness/softness, Off-timer (countdown), Screen saver, Vacation switch, 10-bit gamma,AutoBright (signal input), Windows Vista-certified IR, Portrait-capable,Metal rear cabinet, Handles, Touch- and protective screen-ready, Ambient light sensor,Carbon footprint meter, Colour temperature adjustment (2600-10,000K)Stand (ST-4020),Speakers (SP-P4046PV),DVI Daisy Chain Board (SB-L008WU),SBC (NET-SBC-01/NET-SBC-02),Media Player Board (SB-L008KU),HD-SDI Board (SB-L007KK),Slot Adapter (SB-02AM),SBC (N8000-8830 / N8000-8822) *3Stand (ST-4620),Speakers (SP-P4046PV),Speakers (SP-RM1),DVI Daisy Chain Board (SB-L008WU),SBC (NET-SBC-01/NET-SBC-02),Media Player Board (SB-L008KU),HD-SDI Board (SB-L007KK),Slot Adapter (SB-02AM),SBC (N8000-8830 / N8000-8822) *3Power cord, Mini D-sub 15 pin cable, Wireless remote control, Batteries, Cable cover,Setup manual, Clamps, Screws, CD-ROM (user manual), Thumbscrew for optional stand (*1), Eyebolt (*2)300 x 300 mm (4 holes)0.630 mm500 cd/m² / 700 cd/m²500 cd/m² / 650 cd/m²<0.5WStand (ST-701), Speakers (SP-RM1),DVI Daisy Chain Board (SB-L008WU),SBC (NET-SBC-01/NET-SBC-02),Media Player Board (SB-L008KU),HD-SDI Board (SB-L007KK),Slot Adapter (SB-02AM),SBC (N8000-8830 / N8000-8822) *3Stand (ST-5220), Speakers (SP-RM1),DVI Daisy Chain Board (SB-L008WU),SBC (NET-SBC-01/NET-SBC-02),Media Player Board (SB-L008KU),HD-SDI Board (SB-L007KK),Slot Adapter (SB-02AM),SBC (N8000-8830 / N8000-8822) *3/ap/Large-Screen LCDDimensionsProfessional Series LCD Public Displays P702: 1680P702: 198P702: 60.5P72:14P72:877.2P402: 888.7P462: 1022.4P552: 1213.2P402: 919.7P462: 1055.4P552: 1250.2P402: 103P462: 103P552: 125.4P42:51.2P462:575.6P552:684P42:532.2P462:68.6P552:721P702: 1555.2All hardware and software names are brand namesand/or registered trademarks of the respective manufacturers.All rights reserved.All specifications are subject to change without notice.Feb 2012WLCD-1202-083D(mm)*1 : Excludes P702 *2 : Only for P702 *3:SB-02AM requiredSharing with 5 BNC (RGB/HV)Audio 1 & 2 (Stereo Mini Jack), Audio 3 Stereo (RCA), HDMINoDVI-D ( DVI-D IN, HDMI IN), DisplayPort ( DisplayPort IN)Stable and reliable 24/7 operation in full HDThe professional-grade construction of P Series panels contributes to 24/7 usage, an overalllonger panel life, lower likelihood of the Mura effect from localized heat, virtually no imageretention and the ability to use in landscape or portrait orientation. Thermal protection of thepanels starts with an extra thermal layer on the display panels to diffuse heat, followed bymulti-fan-based technology specially designed to work in both landscape and portrait modesand be controlled locally or remotely. Internal temperature sensors control self-protective circuits,while special self-diagnostics communicate the status of the thermal characteristics.The screen is equipped with an advanced slim bezel that has beenreduced to 15.5 mm. The bezel* is so slim and inconspicuous that itblends in well with the installation environment while highlighting thepicture.The discreet, slim bezel enables the stunningfull HD images to become the focus of the display*On the P402. The P552 and P462 have bezels of 18.5 mm and 16.5 mm, respectively.A built-in expansion slot for flexible functionality and installationFlexible installation opportunitiesThe expansion slot enables you to integrate an internal board, whichprovides greater flexibility to install displays in locations without space fordisplay devices like computers and display controllers. With a conversionadapter(SB-02AM: option), you can also use OPS*-compliant SBC.Expansion slot for enhanced functionalityThis series comes with an expansion slot, enabling you to expand or addfunctions to the display. You can integrate an internal board at any time,future proofing your investment.*OPS is a standard set up by Intel Corporation.*SB-02AM requiredW i th thi s fe atu re the b r i g htne s s leve l i s adju s te dautomatically, ensuring perfect brightness at all timesavoiding uncomfortable brightness levels and reducingunnecessary power consumption. The ambient light sensorcan be programmed by the user to perfectly adjust thesensor performance to the users needs.Ambient light mode adjusts the panel brightnessautomatically to match ambient light conditionsHigh reliability and user-friendly control function for professional useRS-232C enables multi-display control and daisy chain, allowingfor individual and group-addressable control, and simple,effective setup and monitoring of the display.Ethernet connectivity adds the same RS-232C control plusautomatic email notification for diagnostic purposes.SNMP function allows users to control and monitor items suchas power, brightness and screen mode via network.NaViSet™ software offers an intuitive graphical interface,allowing easy adjustment of display settings via mouse andkeyboard operations. NaViSet Administrator provides all theadvanced control to remotely located IT professionals.DDC/CI standard allows PC control of the display based on theVESA command set.HDMI connector Thinner and lighter (excludes P702)Board SBC (Single Board Controller)Media Player BoardSlot Adapter HD-SDI BoardNET-SBC-01 (with OS)NET-SBC-02 (without OS)N8000-8830/N8000-8822SB-L008KUSB-02AM SB-L007KKThe P Series boasts the industry’ s most extensive control, diagnostics and communication features, providing the highest level of remote display management.。
磁性开关SMC

磁 D-A7□H/A80H型
性 D-A73C/A80C型
开 D-A79W型
关 D-A5/A6型
D-A59W型
D-A9型
D-A9□V型
D-E7□A/E80A型
D-Z7/Z8型
D-P7型
D-B3型
执行元件页码索引 (圆型数字为Best No.。)
4P.1055 4P.1076 4P.1080 4P.1089 4P.1095 4P.1170 4P.1187 4P.1211 4P.1327 4P.1355 4P.1389 4P.1443 4P.1469 4P.1495 4P.1507 4P.1525 4P.1545 )P.15 )P.33 )P.35 )P.35 )P.165 )P.181 )P.205
ø4 ø6·ø10·ø16 ø10·ø16 ø6 ø10·ø16 ø20~ø40 ø20~ø40 ø20~ø40 ø20~ø63 ø80·ø100 ø20~ø63 ø80·ø100 ø20~ø63 ø80·ø100 ø32~ø100 ø32~ø125 ø40~ø100 ø32~ø125 ø40~ø100 ø40~ø100 ø40~ø100 ø125~ø200 ø125~ø160 ø6~ø20 ø6~ø32 ø12~ø20 ø25 ø12~ø25 ø32~ø100 ø125~ø160 ø180~ø200 ø16~ø63 ø20·ø25 ø32~ø50 ø12~ø25 ø32~ø100 ø20~ø40 ø25~ø63
点 磁 性 开 关
D-F5BA型 D-F5□W/J59W型 D-F59F型 D-F5NT型
D-G39C/K39C型
D-M9型
D-M9□V型
D-M9□W型
D-M9□WV型
D-M9□A型
实验室瓶(蓝盖瓶)

1万多个电视机高压包脚位通法

334P12902 334P12903 三棱25″ 三棱25″ MITSUBISHIK 25C-SS1 334P12903 三棱25″ MITSUBISHIK 25C794 334P12903 F 1130 三洋6920 20″ 三洋6920 20″ F 1130 F 1117 三洋4505 16″ 三洋4505 16″ F 1117(B) F1117(B) 三洋450516″ BSC23-0101 金利浦14″ 金利浦14″ BSC23-0101 FCM-2012E21A 37M2012E-21A BSC21-3366 孔雀14″ BSC23-3366 孔雀14″ BSC21-3366 BSC23-3366 BSC23-3366 优纳拉斯14″ 孔雀14″ TFB-3035B 康艺8135 康艺4507 康艺4507 TFB-3035B 康艺8135 康艺8135 TFB-3035B BSC24-1051P 熊猫2118 2119 2128 熊猫54P36 熊猫2118 2119 2128 熊猫54P36 BSC24-1051P BSC22-2501B 康艺CE3703 凯歌4C370S 康艺CE3703 BSC22-2501B 凯歌4C370S 凯歌4C370S BSC22-2501B 康艺CE3703 TLF15550B DNF.FL2732A 2027017-001 53X0528-001 53X0528-001 2027017-001 假松下TC-2198 730-302-1548 39L7014AI 79A316-2 TLF70100 TLF70100 79A316-2 ATK1061 三棱40″ 三棱40″ ATK1061 BSC25-2951C 金星C542 金星C542 BSC25-2951C BSC26-N0401 TFB 4095BD 金星C6428
盖茨工业用软管

POWERING PROGRESS™
2013-Ind-001C
全世界传动带,软管,液压件最值得信赖的品牌
工业软管产品目录
重要信息
酸 - 化学软管
Colt® Mustang® Renegade™ Stallion®
空气及多用途软管
19B Plant Master® 119B Plant Master® 33HB(潜水呼吸气管) 163SB(空气蒸汽导管-重载) Python® Plus(即插式软管) Adapta Flex™ 红色 Adapta Flex™ 黑色 Adapta Flex™ 蓝色,绿色,黄色外胶层 Premo Flex® Terminator® Tufflex® Plus 不含碳软管(不导电) GP40 Plus GP60 Plus GP80 Plus(导电软管)
6 内部磨损 - 在诸如软管需要在一处或者多处弯曲的高度磨损的应用场 合,软管应该定期翻转90˚以获取更长的使用寿命。
软管制造商通过设计和测试确立软管的推荐额定工作压力。用户有责任 精确的确认系统的压力。使用压力表可以测量稳态压力。峰值则较难确 认,可能需要使用电子压力捕获装置。另外,影响峰值的因素众多,要 获取一组有效的压力读数可能需要安排一系列的试验。无论如何,如果 常规使用中存在极限峰值,或者存在在非常规条件先使用系统的可能 性,则必须确认一个可能的峰值范围。
125
9
125
9
吸入压力 最小弯曲半径
In. Hg mm Hg 英寸 毫米 30 762 3.0 76 30 762 3.5 89 30 762 4.0 102 30 762 5.0 127 30 762 6.0 152 30 762 9.0 229 30 762 11.0 279 30 762 16.0 406 30 762 24.0 610
这一届的世锦赛冠军都在用什么球拍

是双打,天斧100ZZ的弹性都能击打出快速球,逼迫对手失误。
更为可贵的是,在快速击球的过程中,天斧100ZZ依然维持了非常好的控球能力与稳定性,减少了自身的失误率。
得益于纤细拍杆与最新的回转力生成系统,天斧100ZZ的连续强攻能力平肯定发挥不出它应有的实力。
NF800对于贾一凡来说,如此轻便的球拍使她在后场大范围的跑动杀球之后,也能保持良好的连贯,不用担心无法持续进攻。
虽然NF800己的便是最好的。
此次凡尘组合能够夺冠,合适的球拍也是功不可没。
YONEX DUORA Z-STRIKE羽毛球拍——适合进攻,反拍平抽挡速度快男双冠军小林优吾的球拍DUORA Z-STRIKE也是一把非常有特点的球拍。
这也是一把老球拍了,安赛龙、周天成等众多单打好手都使用过,没想到这次男双世界冠军的战拍也是它。
自从YONEX推出了“双面异型框科技”——正面盒式拍框、反面破风拍框之后,双刃系列一直都是非常特别的存在。
而双刃系列中的DZS更是特别,球拍正反两面都进行了全新设计,既提高了正面的杀球威胁,也提高了反面的平抽挡速度,反手更加敏捷。
DZS的护线管也是新的双刃护线管,提升了击球威力。
球拍总体上手感很硬,非常适合进攻,反拍面的平抽挡速度也很快。
在我的使用过程中,感觉DZS并不灵活,不太适合双打,没想到这次男双冠军的球拍竟然就是DZS,看来用不好不是球拍的问题,而是我的问题。
YONEX的DUORA 10LT羽毛球拍——正手击球强劲,反手击球敏捷混双冠军德差波的球拍是YONEX的DUORA 10LT,这把球拍也是国羽郑思维所使用的球拍。
作为双刃系列的代表之一,相比于男双冠军使用的DZS,DOU 10LT的正反手更加均衡。
作为轻量版的DUO10,DUO 10LT在力量、速度与控制上找到了完美的平衡点。
DOU 10LT所使用的减震碳素为选手提供了更舒适的击球手感,正手击球强劲,反手击球敏捷。
由于混双的男选手需要覆盖更大的面积,所以不能像男双那样一味的追求攻击力而忽略了连贯性。
100818 常用塑胶材料牌号

日本宝理(Polyplstics),台湾奇美(Chimei),美国通用(GE),美国GLS,美国杜邦(Dupont),美国山都坪(Santoprene),德国拜耳(Bayer),德国巴赛尔(Basell),德国巴斯夫(Basf),瑞士EMS,韩国三星(Samsung),韩国LG,韩国晓星(Hyosung),美国泰科纳(Ticona),美国液氮(LNP),美国伊士曼(Eastman),雪佛龙菲利浦(Chevron Phillips),日本UMG,日本宇部(UBE),日本三菱(Mitsubishi),日本住友(Sumitomo),日本帝人(Teijin),日本油墨(DIC),日本旭化成(Asahi Kasei)日本东丽(Toray),沙特基础(Sabic),比利时苏威(Solvay),英国英力士(Ineos)常用塑胶材料牌号PP泰国HP480S、332K、3342M、3342R、348S、1100NK、1102、1126NK、200F、348N、茂名T30S、T36F、V30G;台塑3015、1005、1040、1080、1120、1124、2080、3040、3040C、FPD943、K1011 K1023北京B303、EPC30R、HHP1、HHP3、HHP4印度SS35N、H030SG、H100EY、H110MA台湾3010、K1020、K1011、K1023、K1035、K4015、K4515、K4535、K8010、K8025、K8802、1005、T8002、4210、4410、7533、6331、7633 ST868M日本住友W531、W531A;韩国现代H1500、H5300、DJ560S、DJ570S、H1501、H4540、M1250、M1600、R1610、DJ570S、台湾永嘉1120、3204、5020、3015、3080、5090T燕山石化1300、B4808、K1001、K1003、K1005、K1008、K4818、K4912、K7726、K7760、K8303、K9020、K9035、T1701、T1702扬子石化F401、F501、J301G、J340、K8003、K9015、K9927、S1004、S2309、S700、3008、307G、706上海赛科K4912、M800E、3317、510M、C1007、K4912、K7926、K7930、K8003、S1003、S2040宁波1120、3015、5090T、台湾福聚366-3、366-4、366-5、6331、6524、73F4-3、7533、7633、7633-3、7633U、PD943、ST751、ST031、ST868M、ST869M、PJ3001、PJ3003、PJ3004、台湾南亚3219M3、3317、3307、3117、3310韩国晓星J440、J440X、J640、J740X、J801R、HJ800R、HJ801R、J440W、R300X、R301、R530A、J340、B100N、J700、J742S、R401、R601、R701新加坡7033N、9999SS、AW564、AZ864、AY564、W531L、W531P、Y101H、Z433、1304E1、AP03B韩国锦湖H150U美国0544、GF30-04、H17UC00、TS01广州金发PP-20、R008、G220、R30-701、TC15G、FR-NC03、香港NB2620G、NB2630G、美国液氮MFL-36S、4036HS、MS-1003南非100P、HKR102埃克森7032E3、7033E3、AP03B、AP3AW、AP7885巴赛尔EP300H、HP550J、KY6110巴西H103、H503中石油独山子A180TM、A002TM、A200T、AF005、DY-GK2590S、W0723F、W0825RT俄罗斯21030法国3365沙特500P、520L、570P、575P、578P、670K、910MNK40上海石化F800E、M1600E、M180R、M250E、M2600R、M450E、M500、M700R、M800E、T300、Y2600、Y3700CPP填充级(滑石粉填充10%-30%)、高刚性、高耐热。
哈弗顿真朴磨装高效跬性拍 Вла Ла一件桶说明书

SAVE TIME! READ THE ENTIRE MANUAL BEFORE BEGINNING HOISTER INSTALLATION.INSTRUCTIONS FOR HOISTING JEEP TOPSHarken,Inc.•N15W24983BluemoundRd,Pewaukee,WI53072-4974•Tel:262-691-3320•Fax:262-701-5780•Email:*******************•Web:*NOTE: (G) Block and tackle variesTOOLSDrill Plumb lineDrill bits: 5/32" (4 mm)**7/32" (5.5 mm)5/16" (8 mm)Pencil Stud finder StepladderKIT INCLUDESA1welded screw eyeB4pigtail lag screwsC1shackleD4pulleysE2webbing straps with buckles 7' (2.13 m)F1single black/red hoisting rope G1block and tackle withcleat (G1) and ropeH4black drop ropes: 2 long, 2 shortI4lag bolts 1/4" x 21/2" (6 x 63 mm)J4washers 1/4" (6 mm)K2organizer platesL2organizer pulleys PURCHASE SEPARATELY IF NEEDED See “note” Step 1B, page 6.1pine board (riser) (grade 2)2" x 6" x 7" (50 mm x 152 mmx 180 mm). Do not use for raftersrunning sideways.2pine boards (grade 2) 2" x 6" x 6'(50 mm x 152 mm x 1.83 m)8lag bolts and washers 5/16" x 4"(8 x 100 mm)PURCHASE ADDITIONAL FOR RAFTERS RUNNING SIDEWAYS See Step 2A, page 7.1pine board (grade 2) 2" x 4" x 6'(50 mm x 100 mm x 1.83 m)2lag bolts and washers 5/16" x 31/2"(8 mm x 90 mm)7803Rope organizer components DO NOT UNTIEDO NOT UNTIEPigtail lag screwsHCP1444BPulleys224AD Welded screw eyeHCP1443AShackle072CDrop black ropesHCP1447/HCP1448**HLag boltsHFS908IOrganizer platesH-28375AKWashersHFS913J Organizer pulleysH-52010LWebbing straps with bucklesHCP1459.SETESingle black/red hoisting ropeHCP1483**FBlock and tackle*G(G1) Cleat7754ASSYPART 1: ASSEMBLY FOR RAFTERS RUNNING FRONT-TO-BACK INSTALLATION OVERVIEW Page 4STEP 1: Determine Hoister location Page 5 - 6 STEP 2: Install mounting boards Page 7STEP 3: Install pigtail lag screws Page 8STEP 4:Install rope organizer Page 9STEP 5:Assemble Hoister system Page 9PART 2: ASSEMBLY FOR RAFTERS RUNNING SIDEWAYS INSTALLATIO NO VERVIEW Page 10STEP 1:Determine Hoister location Page 11 - 12 STEP 2:Install mounting boards Page 13S TEP 3:Install pigtail lag screws Page 13 - 14 STEP 4:Install rope organizer Page 14STEP 5: Assemble Hoister system Page 15 PART 3: FOR ALL ASSEMBLIESSTEP 6:Assemble Hoister systems continued Page 16 - 17 STEP 7: Operating Hoister systems Page 18 Appendix, maintenance, and warranty Page 19Raftercenter-to-centerdistanceMounting boards2" X 4"(50 mm x 100 mm)for mounting organizer –no riser board usedAlternate position for rafters that run sideways.Frontwall2" x 6"50 mm x 152 mmRaftersOrganizer VIEWED FROM BELOW34STEP 1: Determine Hoister location Page 5 - 6STEP 2: Install mounting boards Page 7STEP 3: Install pigtail lag screws Page 8STEP 4: Install rope organizerPage 9STEP 5: Assemble Hoister systemPage 9OPTION 1. Above garage door: Make sure there is enoughclearance to lift and store object above open garage door.OPTION 2. Below garage door: Use if not enough clearance for above garage door storage (Option 1). Object has clearance to lift and store below open garage door.Measure length of object. Plan to position Hoister so garage door can open with object lowered.67DIAGRAM 4. Mark center-to-center distance between rafters on mounting boards. Attach mounting boards to rafters.op ewPull Jeep into garage with object on Jeep rack. Disconnect automatic garage door.MARK LOCATION POINTS89DIAGRAM 12. If distance to front wall is less than distance needed to lift object, move the welded screw eye (A) along the front wall until distance 2 is equal to distance 3(see Diagram 11).DIAGRAM 10. Assemble rope organizer using plate (K) and pulleys (L). Fasten to mounting board with lag bolts (I) and washers (J).IMPORTANT! Do not overtighten bolts. This can keep rope organizer pulleys (L) from turning properly.A. MOUNT RISER BOARD AND DRILL HOLESFRONT WALLfor drop ropes (H) to maximize distance object can be lowered.B. ASSEMBLE ROPE ORGANIZERIf distance to front wall is still too short, consider running block and tackle to the side of to the object instead of lengthwise.SEE APPENDIX — PAGE 19.LEADING BLOCK AND TACKLE TO SIDE WALLDIAGRAM 9can be lowered will be limited by length of rope supplied.Drill a 7/32" (5.5 mm) hole into top plate of garage for mounting welded screw eye. Always wear safety glasses. Screw welded screw eye into top plate until threads just disappear into top plate. Do not overtighten. See procedure and warnings for "Install Pigtail Lag Screws".Mount 2" x 6" x 7" (50 mm x 152 mm x 180 mm) riser board on front mounting board centered between the two pigtail lag screws (B). Drill 5/32" (4 mm) holes.Always wear safety glasses. Attach riser boards using two 1/4" (6 mm) lag bolts (l) and washers (J) (included). Do not overtighten.DIAGRAM 8. Hold rope organizer plate (K) on riser board near the side toward the front wall. Use plate as template to mark center holes. Drill two 5/32" (4 mm) holes.VIEWED FROM BELOW10STEP 1: Determine Hoister location Page 11 - 12STEP 2: Install mounting boards Page 13S TEP 3: Install pigtail lag screws Page 13 - 14STEP 4: Install rope organizerPage 14STEP 5: Assemble Hoister systemPage 15Rafter center-to-center distanceMounting boards2" X 4"(50 mm x 100 mm)for mounting organizer – no riser board usedAlternate position for rafters that run sideways.Front wall2" x 6"RaftersOrganizerVIEWED FROM BELOWMeasure the distance as indicated below. Plan to position Hoister so garage door can open with object lowered.13DIAGRAM 16. Attach board for mounting organizer using 5/16" (8 mm) 31/2" (90 mm) lag bolts and washers (not included). See Step 3A to determine distance between mounting boards.A. DRILL CEILING RAFTER ATTACHMENT POINTSLOCATE AND DRILL CEILING RAFTERSMounting boards must attach to ceiling rafters (see Diagram 16). On finished ceilings, locate rafters using stud finder. Follow manufacturer's instructions. Mark center of ceiling rafters. Drill 7/32" (5.5 mm) holes in a straight line square to the rafters. Always wear safety glasses. See Diagram 4 below.Pull Jeep into garage with object on Jeep rack. Disconnect automatic garage door.A. DETERMINE PIGTAIL LAG SCREW (B) LOCATIONPULL JEEP INTO GARAGEMARK LOCATION POINTSUse plumb line to locate four lifting points on mounting boards above Jeep.Alternate position for rafters that run sideways.Front wallNote: Mount boards so that object width VIEWED FROM BELOWB. DRILL MOUNTING BOARDMeasure center-to-center distance between 7/32" (5.5 mm) rafter holes. Mark distance on mounting boards. Allow room for mounting 2" X 4" toward front wall. Mark drill points in the center of board. Drill 5/16" (8 mm) holes completely through the mounting boards.C. ATTACH MOUNTING BOARDS TO CEILINGAttach mounting boards using 5/16" x 4" (8 mm x 10 mm) lag bolts and washers (not included). Do not over-tighten.D. ATTACH 2" X 4" TO MOUNTING BOARDSHold 2" x 4" up to ends of mounting boards and mark screw location on each side. Lower and drill 5/16" (8 mm) holes. Hold 2" x 4" in place and mark holes in ends of mounting boards. Leave room for pigtail lag screws shown in Diagram 17. Drill a 7/32" (5.5 mm) hole in the end of each mounting board. Attach 2" x 4" mounting boards using 5/16" x 31/2" (8 mm x 90 mm) lag bolts and washers (not included). Do not overtighten.14STEP 4: INSTALL ROPE ORGANIZERB. ASSEMBLE ROPE ORGANIZERA. DRILL HOLES FOR ORGANIZERIMPORTANT! Use smaller drill bit in this e rope organizer plate (K) as a template to mark holes on 2" x 4". See Diagram 17. Drill 5/32" (4 mm) holes. Always wear safety glasses.IMPORTANT! Do not overtighten bolts. This can keep rope organizer pulleys (L) from turning properly.DIAGRAM 19. Assemble rope organizer as shown in Diagram 17 using plate (K) and pulleys (L). Fasten to 2" x 4" (50 mm x 100 mm) with lag bolts (I) and washers (J).Do not use riser board.15DIAGRAM 21. If distance to front wall is less than distance needed to lift object, move the welded screw eye (A) along the front walluntil distance 2 is equal to distance 3 (see Diagram 20).can be lowered will be limited by length of supplied rope.When distance 2 is much greater than 3, purchase longer rope for drop ropes (H) to maximize distance object can be lowered.A. INSTALL WELDED SCREW EYE (A)If distance to front wall is still too short, consider running block and tackle to the side of to the object instead of lengthwise.SEE APPENDIX — PAGE 19.LEADING BLOCK AND TACKLE TO SIDE WALLDrill a 7/32" (5.5 mm) hole into top plate of garage for mounting welded screw eye. Always wear safety glasses. Screw welded screw eye into top plate until threads just disappear into top plate. Do not overtighten. See procedure and warnings for "Install Pigtail Lag Screws".16Shackle (C)Single black/red hoisting rope (F )Block and tackle safety cleat (G1)*7803DIAGRAM 24. Single black/red hoisting rope must face down.*NOTE: Appearance of cleat (G1) varies by system size. Referto system part number for specific block and tackle cleat.B. ATTACH PULLEYSPlace one pulley (D) on each pigtail lag screw (B).ATTACH BLOCK AND TACKLE (G)Attach block and tackle system (G) to welded screw eye (A) with shackle (C). Remove ring from shackle like a key ring. Put pin through top of cleat (G1). Put ring back on to secure shackle (C).INSTALL WELDED SCREW EYE (A) ON FRONT WALL Use stud finder to locate solid wood of top plate. Drill 7/32" (5.5 mm) hole. Screw welded screw eye (A) into top plate of front wall (near top of ceiling).Welded screw eye (A)17retrace original figure-eight knot in reverse. Tightly cinch all four strands of rope exiting the knot.Tighten knots. See /Knots for further knot- tying resources.DIAGRAM 29. Align pigtail lag screws in direction of rope running through pulley.DIAGRAM 27. Tie a black drop rope to each webbing strap (E) using a figure-eight knot. Pass free end of rope through the sewn webbing strap eye.be lifted to ceiling. Adjust strap length in buckle as needed.1234567Webbing strap eyeDIAGRAM 25. Put all four black drop ropes through organizer.Put two shorter black drop ropes through pulleys (D) on mounting board with rope organizer.Put two longer black drop ropes through pulleys (D) on remaining mounting board.89101112131415D. ATTACH STRAPS TO ROPETIE ROPE TO WEBBING STRAPSKeep knot as close to webbing strap (E) eye as possible.Place top in position under system. Place webbing straps (E) under object to be lifted. Push buckles together to lock.E. ADJUSTING LIFTING SYSTEMALIGN SCREW EYESLEVEL OBJECTAll webbing straps and ropes must have equal tension to keep object level. Check by slowly pulling the black/red hoisting rope (F).To level object, adjust tension by moving knot or adjusting webbing strap at buckle.DIAGRAM 26A. Run straps lengthwise from front door to rear tailgate between top and rollbar.18Lowering (cleat open)Tip: Use gloves to protect hands.WARNING! Disable garage door opener when installing, raising, or lowering the Hoister. Do not raise or lower with anyone standing under object. Keep area below Hoister clear. If the load falls it can cause an accident.WARNING! Hang coiled rope where it will not accidentally snag on persons or Jeep. Keep coiled rope out of reach of children. Damage or injury can result if rope is angled away from wall with some tension; the object can come down very quickly and cause an accident.WARNING! When operating system, make sure area below object is clear of persons. If object comes down too quickly, this can cause an accident.WARNING! Stop pulling as soon as object contacts ceiling, or webbing strap knots stop at pulley (D). Damage or injury can result from forcing the system. If in doubt, stop hoisting, allow cleat to lock by angling rope down. Stand back to see if object is raised to the maximum, or if something is jamming rope or object.CAUTION! Avoid injury, do not let rope slip through hands. Angle rope to wall to lock rope.WARNING! Do not use this product for human suspension. Components can fail causing person to fall, possibly resulting in serious injury or death.With rope pointed down, the cleat will lock the rope. Angle to release. Repeat until object is at desired height.A. RAISE OBJECTHoist in a series of pulls. Pull single black/red hoisting rope (F) straight down.B. STORE TOPWith top in raised position, make sure single black/ red hoisting rope (F) is securely locked in cleat with rope pointed down (Diagram 21). Coil loose rope end.C. LOWER TOPSecurely grip rope, apply tension, and angle it away from front wall. Bring arm up to let rope out and then back toward the wall to lock the rope. Repeat until object is at desired height.Tip: The system is rated for 145 lbs (65 kg), but if you feel you need additional security, add two 5/16" polyester ropes. Securely tie ends to pigtail lag screws under object, parallel with webbing straps (E). Remove safety ropes before lowering object.19Organizer mounted to 2" X 6" (50 mm x 152 mm) riserMAINTENANCEInspect rope (H and F), knots, and straps (E)regularly for signs of chafe, wearing, or UV damage. Replace immediately. Inspect knots for signs of slipping. When attaching top, inspect webbing strap buckles (E) to make sure spring clip functions properly. Replace rope and hardware with Harken parts only.WARRANTYWhat is covered – This warranty covers defects inmaterials or workmanship.Who is covered – The original purchaser.For how long – Harken products are warranted for five (5) years from the date of purchase.After the end of any specific warranty period noted above, HARKEN MAKES NO EXPRESS OR IMPLIED WARRANTIES OF ANY KIND WITH RESPECT TO THE PRODUCTS, INCLUDING ANY WARRANTY OF MERCHANTABILITY OR FITNESS FOR A PARTICULAR PURPOSE. Some states, or if you live outside the U.S., some countries, do not allow limitations on how long an implied warranty lasts, so the above limitation may not apply to you.What is not covered – This warranty does not cover any product that was: improperly installed; inadequately inspected after installation; improperly maintained; used in any application for which it was not intended; used under load conditions exceeding the rating or other recommendations published in the Harken catalog; or subject to misuse, negligence, accident, or unauthorized modification or repair. Ropes, buckles and webbing are also not covered. Labor charges are not covered. Separate warranty provisions may be available from vendors on some of the above products. Contact Harken for this warranty information.CONSEQUENTIAL AND INCIDENTAL DAMAGES ARE NOT RECOVERABLE UNDER THIS WARRANTY . Some states do not allow the exclusion or limitation of incidental damages, so the above limitation or exclusion may not apply to you.How to get service – If something goes wrong, contact Harken directly or your local Harken dealer to arrange for warranty assistance. Your dealer has Harken warranty return guidelines that provide you with exact return procedures, depending on the product involved. We will need, in writing, your name, address, phone number, date of purchase, product involved, application, an explanation of the defect, and conditions under which the product was used. We are fair and we do Jeepe when Harken products do not perform.MAINTENANCEBLOCK AND TACKLE RUNNING TO SIDE WALLRafters running front-to-backLead block and tackle at 90 degrees to a conventional direction.Organizer mounted to 2" X 4"(50 mm x 100 mm)Mount pigtail lag screws to 2" X 6" (50 mm x 152 mm)mounting boards similar to Diagram 16 (page 13), except block and tackle goes to side wall of garage. Use a 2" X 4" (50 mm x 100 mm) as shown to mount the organizer.Use 2" X 6" (50 mm x 152 mm) mounting boards. Mount the organizer on a 2" X 6" X 7" (50 mm x 152 mm x 180 mm) riser board.Rafters running sideways4907.JEEP 7/17 Printed in USA。
Kurzweil Musician’s Guide(包括PC3、PC3X、PC361和X-Pro)说

Musician’s Guide(includes PC3, PC3X, PC361, and X-Pro)Kurzweil is a registered trademark of Y oung Chang Co., Ltd. ©2011 All rights reserved. Y oung Chang®, Kurzweil ®, V . A. S. T . ®, PC3®,KDFX®, Pitcher®, and LaserV erb®, KSP8 ™, K2661™, K2600™, K2500™, and K2000™ are trademarks of Y oung Chang Co., Ltd. All other products and brand names are trademarks or registered trademarks of their respective companies. Product features and specifications are subject to change without notice.You may legally print up to two (2) copies of this document for personal use. Commercial use of any copies of this document is prohibited. Young Chang Co. retains ownership of all intellectual property represented by this document.910511-002 – V2 May 2011®iiIMPORTANT SAFETY & INSTALLATION INSTRUCTIONSINSTRUCTIONS PERTAINING TO THE RISK OF FIRE, ELECTRIC SHOCK, OR INJURY TO PERSONSWARNING: When using electric products, basic precautions shouldalways be followed, including the following:1.Read all of the Safety and Installation Instructions and Explanationof Graphic Symbols before using the product.2.This product must be grounded. If it should malfunction or breakdown, grounding provides a path of least resistance for electriccurrent to reduce the risk of electric shock. This product is equippedwith a power supply cord having an equipment-groundingconductor and a grounding plug. The plug must be plugged into anappropriate outlet which is properly installed and grounded inaccordance with all local codes and ordinances.DANGER: Improper connection of the equipment-groundingconductor can result in a risk of electric shock. Do not modify theplug provided with the product - if it will not fit the outlet, have aproper outlet installed by a qualified electrician. Do not use anadaptor which defeats the function of the equipment-groundingconductor. If you are in doubt as to whether the product is properlygrounded, check with a qualified serviceman or electrician.3.WARNING: This product is equipped with an AC input voltageselector. The voltage selector has been factory set for the mainssupply voltage in the country where this unit was sold. Changingthe voltage selector may require the use of a different power supplycord or attachment plug, or both. To reduce the risk of fire or electricshock, refer servicing to qualified maintenance personnel.4.Do not use this product near water - for example, near a bathtub,washbowl, kitchen sink, in a wet basement, or near a swimmingpool, or the like.5.This product should only be used with a stand or cart that isrecommended by the manufacturer.6.This product, either alone or in combination with an amplifier andspeakers or headphones, may be capable of producing soundlevels that could cause permanent hearing loss. Do not operate fora long period of time at a high volume level or at a level that isuncomfortable. If you experience any hearing loss or ringing in theears, you should consult an audiologist.7.The product should be located so that its location or position does not interfere with its proper ventilation.8.The product should be located away from heat sources such as radiators, heat registers, or other products that produce heat.9.The product should be connected to a power supply only of the type described in the operating instructions or as marked on the product.10.This product may be equipped with a polarized line plug (one blade wider than the other). This is a safety feature. If you are unable to insert the plug into the outlet, contact an electrician to replace your obsolete outlet. Do not defeat the safety purpose of the plug.11.The power supply cord of the product should be unplugged from the outlet when left unused for a long period of time. When unplugging the power supply cord, do not pull on the cord, but grasp it by the plug.12.Care should be taken so that objects do not fall and liquids are not spilled into the enclosure through openings.13.The product should be serviced by qualified service personnel when:A.The power supply cord or the plug has been damaged;B.Objects have fallen, or liquid has been spilled into the product;C.The product has been exposed to rain;D.The product does not appear to be operating normally or exhibits a marked change in performance;E.The product has been dropped, or the enclosure damaged.14.Do not attempt to service the product beyond that described in the user maintenance instructions. All other servicing should be referred to qualified service personnel.15.WARNING: Do not place objects on the product’s power supply cord, or place the product in a position where anyone could trip over, walk on, or roll anything over cords of any type. Do not allow the product to rest on or be installed over cords of any type.Improper installations of this type create the possibility of a fire hazard and/or personal injury.RADIO AND TELEVISION INTERFERENCEWARNING: Changes or modifications to this instrument not expresslyapproved by Young Chang could void your authority to operate theinstrument.IMPORTANT: When connecting this product to accessories and/or otherequipment use only high quality shielded cables.NOTE: This instrument has been tested and found to comply with thelimits for a Class B digital device, pursuant to Part 15 of the FCC Rules.These limits are designed to provide reasonable protection againstharmful interference in a residential installation. This instrumentgenerates, uses, and can radiate radio frequency energy and, if notinstalled and used in accordance with the instructions, may causeharmful interference to radio communications. However, there is noguarantee that interference will not occur in a particular installation. If thisinstrument does cause harmful interference to radio or televisionreception, which can be determined by turning the instrument off and on,the user is encouraged to try to correct the interference by one or moreof the following measures:•Reorient or relocate the receiving antenna.•Increase the separation between the instrument and the receiver.•Connect the instrument into an outlet on a circuit other than the one to which the receiver is connected.•If necessary consult your dealer or an experienced radio/television technician for additional suggestions. NOTICE This apparatus does not exceed the Class B limits for radio noise emissions from digital apparatus set out in the Radio Interference Regulations of the Canadian Department of Communications.AVIS Le present appareil numerique n’emet pas de bruits radioelectriques depassant les limites applicables aux appareils numeriques de la class B prescrites dans le Reglement sur le brouillage radioelectriqueedicte par le ministere des Communications du Canada.SAVE THESE INSTRUCTIONSThe lightning flash with the arrowhead symbol, within an equilateral triangle, is intended to alert the user to the presence of uninsulated "dangerous voltage" within the product's enclosure that may be of sufficient magnitude to constitute a risk of electric shock to persons.RISK OF ELECTRIC SHOCKDO NOT OPENCAUTION: TO REDUCE THE RISK OF ELECTRIC SHOCK,DO NOT REMOVE THE COVERNO USER SERVICEABLE PARTS INSIDEREFER SERVICING TO QUALIFIED SERVICE PERSONNEL The exclamation point within an equilateral triangle is intended to alert the user to the presence of important operating and maintenance (servicing) instructions in theliterature accompanying the product.CAUTIONImportant Safety Instructions1)Read these instructions2)Keep these instructions.3)Heed all warnings.4)Follow all instructions.5)Do not use this apparatus near water.6)Clean only with dry cloth.7)Do not block any of the ventilation openings. Install in accordance with the manufacturer’sinstructions.8)Do not install near any heat sources such as radiators, heat registers, stoves, or other appara‐tus (including amplifiers) that produce heat.9)Do not defeat the safety purpose of the polarized or grounding‐type plug. A polarized plughas two blades with one wider than the other. A grounding type plug has two blades and a third grounding prong. The wide blade or the third prong are provided for your safety. If the provided plug does not fit into your outlet, consult an electrician for replacement of the obso‐lete outlet.10)Protect the power cord from being walked on or pinched, particularly at plugs, conveniencereceptacles, and the point where they exit from the apparatus.11)Only use attachments/accessories specified by the manufacturer. Array12)Use only with a cart, stand, tripod, bracket, or table specified by the manu‐facturer, or sold with the apparatus. When a cart is used, use caution whenmoving the cart/apparatus combination to avoid injury from tip‐over.13)Unplug this apparatus during lightning storms or when unused for longperiods of time.14)CAUTION: Danger of explosion if battery is incorrectly replaced. Replace only with the sameor equivalent type (CR2032).15)Refer all servicing to qualified service personnel. Servicing is required when the apparatushas been damaged in any way, such as power‐supply cord or plug is damaged, liquid has been spilled or objects have fallen into the apparatus, the apparatus has been exposed to rain or moisture, does not operate normally, or has been dropped.Warning‐ To reduce the risk of fire or electric shock, do not expose this apparatus to rain or mois‐ture. Do not expose this equipment to dripping or splashing and ensure that no objects filled with liquids, such as vases, are placed on the equipment.To completely disconnect this equipment from the AC Mains, disconnect the power supply cord plug from the AC receptacle.iiiKurzweil International ContactsContact the Kurzweil office listed below to locate your local Kurzweil representative.American Music & Sound22020 Clarendon St, Suite 305Woodland Hills, CA 91367Phone: +1 (800) 431‐2609Fax: +1 (818) 597‐0411Email: ******************************Young Chang Co., Ltd.9th Floor, Bldg 102, I‐Park,Jeongja‐Dong, Bundang‐Gu, Seongnam‐Si, Gyeonggi‐Do463‐811 South KoreaPhone: +82 (31) 786‐7986~7Fax: +82 (31) 785‐2701www.ycpiano.co.krTECHNICAL SUPPORTEmail: ********************ivTable Of ContentsKurzweil International Contacts (iv)Chapter 1IntroductionKeeping Current..............................................................................................................................................................1‐1 Overview of the PC3.......................................................................................................................................................1‐2 How the PC3 Works........................................................................................................................................................1‐2 VAST Synthesis................................................................................................................................................................1‐3 KB3 Tone Wheel Emulation...........................................................................................................................................1‐3 VA‐1 Programs.................................................................................................................................................................1‐3 How to Use This Manual................................................................................................................................................1‐4 Do I Have Everything?....................................................................................................................................................1‐4 Boot Loader.......................................................................................................................................................................1‐4 Battery................................................................................................................................................................................1‐4 Options..............................................................................................................................................................................1‐5 Sound ROM Expansion Card..................................................................................................................................1‐5 Pedals..........................................................................................................................................................................1‐5 Ribbon Controller.....................................................................................................................................................1‐5 Breath Controller......................................................................................................................................................1‐5 Chapter 2StartupMake Connections...........................................................................................................................................................2‐1 Make Music.......................................................................................................................................................................2‐1 Startup—the Details........................................................................................................................................................2‐2 Before You Start........................................................................................................................................................2‐2 Connecting the Power Cable (Line Cord).............................................................................................................2‐2 Connecting Audio Cables........................................................................................................................................2‐2 Connecting MIDI......................................................................................................................................................2‐3 Pedals..........................................................................................................................................................................2‐4 Breath..........................................................................................................................................................................2‐4 Ribbon........................................................................................................................................................................2‐5 Switching On the Power..........................................................................................................................................2‐5 xD Cards....................................................................................................................................................................2‐6 USB Port.....................................................................................................................................................................2‐6 Setting the Clock.......................................................................................................................................................2‐6 PC3 Programs...................................................................................................................................................................2‐7 Selecting Programs...................................................................................................................................................2‐7 Easy Audition............................................................................................................................................................2‐7 Program Mode Display...........................................................................................................................................2‐7 VAST Programs.........................................................................................................................................................2‐8 KB3 Programs............................................................................................................................................................2‐8 Setups................................................................................................................................................................................2‐9 Quick Access.....................................................................................................................................................................2‐9 The Other Modes...........................................................................................................................................................2‐10 Software Upgrades........................................................................................................................................................2‐10TOC-iChapter 3User Interface BasicsMode Selection.................................................................................................................................................................3‐1 Mode Buttons...................................................................................................................................................................3‐2 Bank Buttons.....................................................................................................................................................................3‐2 Sliders................................................................................................................................................................................3‐3 Program and Category Buttons.....................................................................................................................................3‐4 Picking favorites.......................................................................................................................................................3‐4 Pitch Wheel and Mod Wheel.........................................................................................................................................3‐5 Navigation........................................................................................................................................................................3‐6 The Display................................................................................................................................................................3‐6 Pages...........................................................................................................................................................................3‐6 The Top Line..............................................................................................................................................................3‐6 The Bottom Line........................................................................................................................................................3‐6 The Soft Buttons........................................................................................................................................................3‐7 The Cursor Buttons..................................................................................................................................................3‐7 The Chan/Layer Buttons..........................................................................................................................................3‐7 The Edit Button.........................................................................................................................................................3‐8 The Exit Button.........................................................................................................................................................3‐8 Data Entry.........................................................................................................................................................................3‐9 The Alpha Wheel......................................................................................................................................................3‐9 The Plus/Minus Buttons..........................................................................................................................................3‐9 The Alphanumeric Pad............................................................................................................................................3‐9 Double Button Presses...........................................................................................................................................3‐10 Intuitive Data Entry.......................................................................................................................................................3‐11 Changing the Current Layer in Multi‐Layer Programs....................................................................................3‐11 Search...............................................................................................................................................................................3‐12 Quick Song Recording and Playback..........................................................................................................................3‐12 Chapter 4The Operating ModesWhat the Modes Are.......................................................................................................................................................4‐1 Selecting Modes...............................................................................................................................................................4‐1 Finding Square One..................................................................................................................................................4‐2 Using the Modes..............................................................................................................................................................4‐2 Program Mode..........................................................................................................................................................4‐2 Setup Mode................................................................................................................................................................4‐2 Quick Access Mode..................................................................................................................................................4‐3 Effects Mode..............................................................................................................................................................4‐3 MIDI Mode................................................................................................................................................................4‐3 Master Mode.............................................................................................................................................................4‐3 Song Mode.................................................................................................................................................................4‐3 Storage Mode............................................................................................................................................................4‐3 Chapter 5Editing ConventionsIntroduction to Editing...................................................................................................................................................5‐1 What’s an Object?......................................................................................................................................................5‐1 Object Type and ID..........................................................................................................................................................5‐2 Saving and Naming.........................................................................................................................................................5‐3 ROM Objects.............................................................................................................................................................5‐4 Memory Objects........................................................................................................................................................5‐4 TOC-iiKeyboard Naming....................................................................................................................................................5‐5 Deleting Objects...............................................................................................................................................................5‐6 Dependent Objects...................................................................................................................................................5‐6 Saving and Loading Files—Storage Mode...................................................................................................................5‐6 Special Button Functions................................................................................................................................................5‐7 Chapter 6Program ModeThe Program Mode Page................................................................................................................................................6‐1 Selecting Programs...................................................................................................................................................6‐1 The Soft Buttons in Program Mode.......................................................................................................................6‐2 The Info Box...............................................................................................................................................................6‐2 Controllers Assignments For Factory ROM Programs.......................................................................................6‐2 Saving Controller Settings in Program Mode......................................................................................................6‐3 The Arpeggiator In Program Mode.......................................................................................................................6‐3 MIDI Channels..........................................................................................................................................................6‐3 VAST and KB3 Programs................................................................................................................................................6‐4 VAST Program Structure................................................................................................................................................6‐4 KB3 Program Structure...................................................................................................................................................6‐6 KB3 Mode..................................................................................................................................................................6‐6 KB3 Effects And Real‐time Controls......................................................................................................................6‐6 MIDI Control of KB3 Programs..............................................................................................................................6‐8 Control Setup....................................................................................................................................................................6‐9 Control Setup Overview..........................................................................................................................................6‐9 Control Setup Advanced Features.......................................................................................................................6‐10 Selecting And Editing The Control Setup...........................................................................................................6‐10 Editing VAST Programs................................................................................................................................................6‐12 The Soft Buttons in the Program Editor..............................................................................................................6‐12 The MODE Buttons in the Program Editor.........................................................................................................6‐13 Assigning Program Parameters to Control Sources..........................................................................................6‐13 The KEYMAP Page........................................................................................................................................................6‐14 Keymap....................................................................................................................................................................6‐14 Transpose (Xpose)...................................................................................................................................................6‐14 Key Tracking (KeyTrk)...........................................................................................................................................6‐14 Velocity Tracking (VelTrk).....................................................................................................................................6‐15 Method (AltMethod)..............................................................................................................................................6‐15 Stereo........................................................................................................................................................................6‐15 Timbre Shift.............................................................................................................................................................6‐16 Playback Mode........................................................................................................................................................6‐16 Alternative Controller (AltControl).....................................................................................................................6‐16 Alternative Switch (AltControl and AltMethod)...............................................................................................6‐16 The LAYER Page............................................................................................................................................................6‐17 Low Key (LoKey)....................................................................................................................................................6‐18 High Key (HiKey)...................................................................................................................................................6‐18 Low Velocity (LoVel)..............................................................................................................................................6‐18 High Velocity (HiVel).............................................................................................................................................6‐18 Pitch Bend Mode (Bend)........................................................................................................................................6‐18 Trigger (Trig)...........................................................................................................................................................6‐18 Delay Control (DlyCtl)...........................................................................................................................................6‐18 Minimum Delay (MinDly), Maximum Delay (MaxDly)..................................................................................6‐19 Enable.......................................................................................................................................................................6‐19TOC-iii。
【CN305399680S】保温杯2【专利】
1/1 页
3
1/1 页
主视图
俯视图
后视图
仰视图
左视图
立体图
右视图
2
CN 305399680 S
简 要 说 明
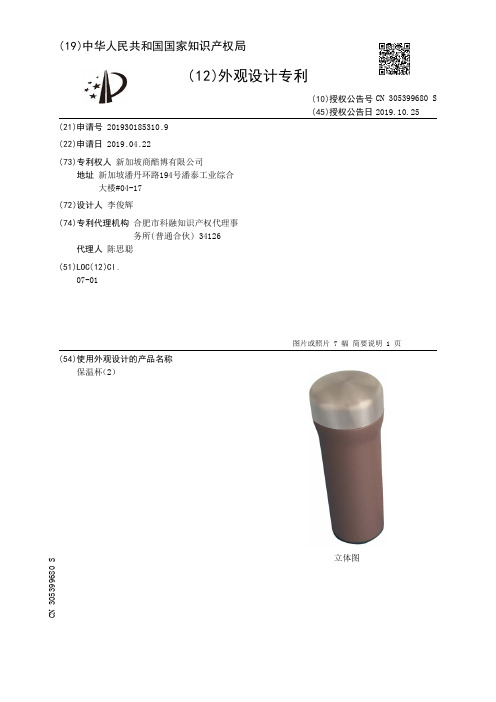
1.本外观设计产品的名称:保温杯(2)。 2.本外观设计产品的用途:本外观设计产品用于盛装液体。 3.本外观设计产品的设计要点:在于形状和色彩结合。 4.最能表明本外观设计设计要点的图片或照片:立体图。 5.请求保护的外观设计包含色彩。
代理人 陈思聪
(51)LOC(12)Cl . 07-01
(10)授权公告号 CN 305399680 S (45)授权公告日 2019.10.25
( 54 )使用外观设计的产品 名称 保温杯(2)
图片或照片 7 幅 简要说明 1 页
CN 305399680 S
立体图
CN 305399680 S
外观设计图片或照片
( 19 )中华人民 共和国国家知识产权局
( 12 )外观设计专利
(21)申请号 201930185310 .9
(22)申请日 2019 .04 .22
(73)专利权人 新加坡商酷博有限公司 地址 新加坡潘丹环路194号潘泰工业综合 大楼#04-17
(72)设计人 李俊辉
(74)专利代4126
TPV 美国山都平 101 55物性表

埃克森美孚的Santoprene®101-55热塑性弹性体
类别:聚合物,热塑性弹性体,热塑性弹性体,热塑性硫化弹性体(TPV)
材质说明:中的一种软质,黑色,通用型热塑性硫化橡胶(TPV)热塑性弹性体(TPE)系列。
这种材料同时具有良好的物理性能和耐化学性,在很宽的应用范围使用。
该牌号Santoprene TPV是剪切速率依赖,可以在常规热塑性注塑或挤出设备加工。
它是聚烯烃基完全回收利用。
主要特点:
UL列名:文件#QMFZ2.E80017,塑料- 组件文件#QMFZ8.E80017,加拿大认证的塑料- 组件。
NSF认证,本产品具有材料供应商与美国国家科学基金会,以促进其评估表格文件要求NSF 认证的应用中使用。
推荐用于要求优异耐挠曲疲劳性的应用。
优异的耐臭氧性。
欧盟和中国RoHS规范。
应用范围:汽车、空气过滤器垫片、进气系统管、火花塞,保险杠,垫圈,夹、密封件和垫片、消费者、电子产业、密封件和垫片
用途:电器元件、消费应用、垫片、汽车上的应用、Diaphrams、密封小号、汽车发动机罩下、电器配件、管道
处理方法:共挤,注塑,型材挤出,挤出,多注射成型和片材挤出
可用性:非洲和中东,欧洲,北美,亚太,拉丁美洲和南美
埃克森美孚所提供的信息
描述性属性
颜色黑色
形式微丸
注射速率快
最大再%20
螺杆压缩比2:1 - 2.5:1
螺杆长径比L / D 16时01分- 20时01分。
户外品牌大全

户外品牌大全ARC`TERYX 始祖鸟――不论从笔划也好,还是从品牌来看,它都应该排在第一。
始祖鸟一向采用最好的材料、最好的生产工艺来做,有人说它是生产作品,而不是生产货品的。
目前做背包、服装等,背包、服装都能算是顶尖产品。
背包采用6061铝条,网页很漂亮。
AKU――意大利的户外鞋品牌,品质出色。
属于中档偏上的档次。
鞋子分类清晰,有mountain (负重登山鞋)、trekking(轻装徒步)等,有支撑减震透气方面的技术IMS、INJ、AIR8000,只有AIR8000申请了商标。
AIGLE――法国品牌,主流产品以户外休闲服装类为主,掺入了很多时尚元素,多走商场。
具有一定的功能服装,比较好看。
国内曾有过一些它的厂货。
我比较喜欢,主要是它的品牌译过来就是'飞鹰',呵呵。
ASOLO――相当好的户外鞋品牌,在国内认知度也很高,品质一流。
产品做工很扎实。
价格对得起他的品质。
我喜欢推荐的好品牌。
有轻量徒步鞋HIKING、负重徒步鞋BACKPACKING、雪山鞋ALPINE,负重徒步鞋有负重减震方面的powermatic、TPS专利。
虽然没用过,但是从官网介绍上和网友评论来看,ASOLO才应该是登山鞋第一品牌。
Bridgedale――专业的登山袜品牌,只做袜子。
分类较细,品质出色,价格也不菲,属高档品牌。
在我穿过的几个品牌登山袜中,我最喜欢的就是它的登山款,可以连着穿上好几天不臭不硬,保暖性也极好。
我喜欢推荐的品牌。
Bergans――挪威品牌。
这个品牌相信大家还不熟悉,中国已经有代理商。
强项在于背包和服装上。
对于它的背包我还不是很了解,服装是比较典型的欧洲风格,非常的花哨和漂亮,工艺也很好,但价格也相当的贵。
曾看中过它的一件冲锋衣,居然在肩部热压TPU来做为耐磨层,很有意思,好象是卖4、5千元,和始祖鸟差不多了。
BIGPACK――在中国户外可以算是家喻户晓的背包品牌啦。
在最适当的时机进入中国户外市场,一举奠定了它在中国背包界的地位。
- 1、下载文档前请自行甄别文档内容的完整性,平台不提供额外的编辑、内容补充、找答案等附加服务。
- 2、"仅部分预览"的文档,不可在线预览部分如存在完整性等问题,可反馈申请退款(可完整预览的文档不适用该条件!)。
- 3、如文档侵犯您的权益,请联系客服反馈,我们会尽快为您处理(人工客服工作时间:9:00-18:30)。
—免—费—热—线—咨—询—
158*1*8**3*1*5**3*8*0*
美国山都坪TPV 291-75B150 产品说明:
它是热塑弹性体(TPE)系列中的一种可着色的特种热塑性硫化弹性体(TPV)。
它专为与PC、ABS、PC/ABS和PMMA粘结而配制,适用于要求硬/软材料组合的应用。
这一牌号的山都坪TPV是剪切速率依赖型产品,可在常规热塑性注塑成型或挤出成型设备上加工。
它可以完全回收利用。
美国山都坪TPV 291-75B150 性能特点:
减震,可回收材料,可粘结性,耐臭氧性能,耐化学性良好,耐油性能。
美国山都坪TPV 291-75B150 用途:
厨具,大型家用电器和小型家用电器,电器用具,活动的铰链,家用部件,镜架,密封,疲劳消除用品,汽车的发动机罩下的零件,汽车领域的应用,柔软的把手,手机,体育用品,消费品应用领域,粘结,粘结树脂。
美国山都坪TPV 291-60B150 外观和机构评级:
291-60B150外观为:自然色。
EU Annex XVII of Regulation(EC)No 1907/2006 UL QMFZ2 UL QMFZ8
美国山都坪TPV 291-60B150 加工方法:
多次注射成型,共挤出成型,注射成型。
美国山都坪TPV 291-60B150 物理性能:
比重 1.08 g/cm³硬度74A
拉伸应力-横向流量(100%应变,23℃) 3.20 Mpa
抗张强度-横向流量(断裂,23℃)11.7 Mpa
伸长率-横向流量(断裂,23℃)570%
撕裂强度-横向流量23℃³46.0 kN/M
阻燃性HB(不阻燃)。
TPV应用领域:
汽车工业
汽车密封条、密封件系列,汽车防尘罩、挡泥板、通风管、缓冲器、波纹管、进气管等,汽车高压点火线。
可耐30-40KV电压,可满足UL94 V0阻燃要求;
消费用品
手动工具、电动工具、除草机等园艺设备的零部件,家用电器上使用的垫片、零件,剪刀、牙刷、鱼竿、运动器材、厨房用品等产品的手柄握把,化妆品、饮料、食品、卫浴用品、医疗用具等产品的各类包装,各种轮子、蜂鸣器、管件、皮带等接头的软质部件,针塞、瓶塞、吸管、套管等软胶件,电筒外壳、儿童玩具、玩具轮胎、高尔夫袋、各类握把等。
电子电器
各种耳机线外皮,耳机线接头,矿山电缆、数控同轴电缆、普通及高档电线电缆绝缘层及护套,电源插座、插头与护套等,电池、无线电话机外壳及电子变压器外壳护套,船舶、矿山、钻
井平台、核电站及其它设施的电力电缆线的绝缘层及护套。
交通器材
道路、桥梁伸缩缝,道路安全设施、缓冲防撞部件,集装箱密封条。
建筑建材
动力部件密封条,建筑伸缩缝、密封条,供排水管密封件、水灌系统控制阀等.。