ABB传动调试软件DriveWindow介绍
ABB传动调试软件DriveWindow介绍

OR
OR
NISA-03 (ISA)
PCMCIA-adapter (PCI) + NDPA-02 (PCMCIA) + NDPC-02 (5Mb) or
3. Ring. Drives can be connected in a ring .
An individual address to be set by parameter 70.02 or 70.15 for every drive in the link.
Note! all the drives in the ring should have power supply on all the time. Otherwise the ring will break.
common manner)
2. Through the distributor,
DriveWindow-link (sectional drives). An individual address to be set by parameter 70.02 or 70.15 for every drive in the link.
Note ! Do not use address one (1) if several drives are in a network (ring or connected together with the distributors). The first (1.) address are meant for sparepart use.
ABB_DriveWindow中文介绍

··DriveWindow是一种用于ACS600、ACS800、ACS6000 和DCS600调试和维护的Windows应用程序。
··适用的操作系统包括WindowsNT、Windows2000或者WindowsXP功能·操作控制(启动、停止、给定等))·监控信号(数字或者图像方式)·参数(改变参数值))·数据记录器(控制和显示))·故障记录器(显示故障和控制))·备份&&恢复(完成软件备份))·通过网路实现所有功能(控制、监控等)) DriveWindow要求的硬件配置::·ISA卡,,或者·PCMCIA-卡(PCMCIA-插槽或者带有PCI/PCMCIA适配器的PCI-插槽)) ·使用远程控制时需要网络适配器·DDCS电缆DW 2.X 介绍DriveWindow 是一种用于ACS600、ACS800、ACS6000和DCS600 调试和维护的Windows 应用程序。
适用的操作系统包括Windows NT、Windows 2000或者Windows XP功能·操作控制(启动、停止、给定等·监控信号(数字或者图像方式)·参数(改变参数值·数据记录器(控制和显示·故障记录器(显示故障和控制·备份恢复(完成软件备份·通过网路实现所有功能(控制、监控等DriveWindow要求的硬件配置·ISA 卡或者·PCMCIA-卡(PCMCIA-插槽或者带有PCI/PCMCIA 适配器的PCI-插槽·使用远程控制时需要网络适配器·DDCS 电缆©Companyname-1-DW 2.X 启动程序11或者双击程序图标只有当传动处于远程控制模式下时,大多 2数操作才可以实现。
ABB drive window light使用说明

暂时适用于ACS800 DCS800 ACS550使用的是ABB面板的串口你需要买1个USB转RS232的线
然后自己做一根RS232转RJ45的线
RE232母头RJ45
2 1
3 3
5 2
5 6 (2,6短接)
安装ABB drive window light
使用自制的RS232转RJ45的线,通过ABB面板串口。
连接RS232转USB线连接电脑。
打开drive window light
我的drive window light 是中文版的可以网上去下个中文的替换下ABB变频器参数设置软件2.7 UP 2.92版本汉化
这个是打开的界面.
选择文件菜单下的新建在线装置。
正在加载中
加载成功之后会显示参数列表
打开装置菜单下参数与信号下的上载全部参数。
把参数全部上载。
把下载下来的全部参数另存。
然后看下另存的文件大小应该不小于100KB。
那就是完整的参数文档。
如果小于旧说明全部参数没有上传请重新再来。
注意:因为是9.6K的传输速率所以在上传全部参数与另存的时候会很慢注意这时不要去动电脑,否则程序会无法响应。
DriveWindow Light连接设置指导

主题
DCS800
DriveWindow Light连接指导
介绍
1、DCS 800与DriveWindow Light连接,需要使用图一中的USB转232的9针串口连接
线(ABB订货号68583667)。
USB头连接电脑,232插头连接DCS800上的X34端子,如下图一所示
图一
2、DriveWindow Light为免费软件,可以点击连接安装Setup.exe。
3、安装完成后,双击打开程序,弹出下图对话框,点击ok。
图二
4、然后弹出下面窗口如下图所示,点击cancel
图三
5、按照图四,选择菜单栏中的communication settings
图四
6、弹出图四对话框,按照图中的参数进行设置。
其中红色标记的Port选项,需要在“我的
电脑”→右键“属性”(图六)→“硬件”→“设备管理器”(图七),硬件选项卡中确定当前使用的端口号(图八)。
图五图六图七
7、设置完成后点击图五的OK按钮,选择图九中菜单栏的新在线传动。
则设备正确连接。
8、连接正确,如下图十所示。
图十感谢使用abb产品!。
DriveWindow2用户手册4

第4章- 参数,信号和故障1.定义•参数和信号•故障和事件•参数文件•项集•模板1.1什么是参数和信号严格来说,参数和信号是在驱动器组织成参数组项目。
其OPC地址是形式:{channel}{node}Par.m.n{通道} {}节点Par.m.n其中m是组数,n是组内的索引。
除了在极少数情况下,DriveWindow软件处理所有类型的OPC项类似,但是。
因此,在一广义上说,所有的OPC项可视为参数或信号。
因此,本文档中,当我们谈论参数和信号,我们的意思是任何OPC项目,除非另有说明。
信号是只读。
参数可以被写入。
大多数参数可以被解读为,但是,根据不同的驱动器上,可以存在只写参数。
在驱动参数组可以通过密码保护。
为了能够浏览他们,你必须输入正确的值转换成通行码参数。
用户参数,松散地讲,参数和信号,它们属于非通行码受保护的参数组1-99。
实际用户参数取决于驱动器上。
ID运行结果参数取决于驱动器上,通常的密码保护。
1.2什么是故障和事件故障和事件都是在一个驱动器故障和事件记录器条目。
他们的OPC地址是形成:{channel}{node}FL.Ln, or{channel}{node}EL.Ln其中,n是从00开始一个两位数条目号码(最新故障或事件)。
虽然故障和事件可以以同样的方式在DriveWindow软件来处理其他项目,也有特殊项目集为他们设计的(在DriveWindow软件2.20或更高版本)。
特殊的项设置故障和事件使观看他们在浏览故障更容易或事件记录器。
某些驱动器,DriveWindow软件甚至可以显示时间标记在“实时”,即使驱动器没有实时时钟。
需要注意的是,虽然所有的驱动器有一个事件记录器,许多驱动器类型不使用它,即,它始终是空。
1.3什么是参数文件参数文件有文件扩展名DWP,它包含(内部ASCII格式)的信息有关驱动器的参数和信号。
没有一个驱动器的所有参数都在那里。
此外组,分别不低于通行码的保护在保存时,有下载过程中所需要的参数,应用属性,驱动器属性,而不支行。
Drivewindow软件的应用

一、DriveWindow软件的应用传动连接方案:1、PC直接和传动的CH3通过RUSB-02光纤转换器直接连接(应用于维护时)2、PC和传动通过分配器NDBU-95/85连接,在70.15设置一个地址3、环路连接,环路中的所有传动必须上电,通过70.15配置地址。
DriveWindow软件的应用1、参数的修改,选择参数双击进行修改2、参数的备份(选择传动,File-Parameters-Save As,弹出对话框,填写保存名称,Save-Ok,生成XXX.DWP文件)3、参数的下载(打开备份参数文件File-Parameters-Open,弹出对话框,选择XXX.DWP文件Open-Ok,选择传动File-Parameters-DownLoad即可。
4、现有参数和备份参数比较(打开备份参数文件File-Parameters-Open,弹出对话框,选择XXX.DWP文件Open-Ok,File-Parameters-Comment,OK,比较完File-Parameters-Comment-Export,弹出对话框生成XXX.TXT文本格式)5、系统软件备份(File-SystemSoftware –New,新建一个文件,File-SystemSoftware –BackUp开始备份,File-SystemSoftware–Save As保存生成XXX.BPG文件)6、系统软件下载(File-SystemSoftware –Open打开备份文件,File-SystemSoftware –Restore选择想要恢复的传动单元,YES,在恢复期间不要对传动或者DriveWindow程序做任何操作,一旦中断只能返厂处理,因此软件的下载必须谨慎操作)7、工作区的创建(File-WorkeSpace –SaveAs保存成XXX.DWDW文件,下次使用可以直接打开)8、故障记录器的建立(DataLogger只有在满足条件的状态下才会记录数据,Trigged By设置触发条件,Trig Variable设置触发的变量的地址,TrigLevel 设置触发的变量的等级)二、BlackBox数据的提取方法1)使用提取工具BlackBox_UpLoad.exe2)进入Dos命令,WIN7系统按Shift,右键打开Dos命令窗口直接进入black.box命令行3)AMC34板上的第二块子板可以保存BlackBox数据,属于LX015XXX版本的固件,主要有(DataLogger1和2、Events\Faults\Alams\改变的参数、软件的版本、用户功能最近20次IGCT开关组合的情况)4)固件下装后执行L-ACSXXX之后会自动生成BlackBox文件夹,包括BlackBox_UpLoad.exe文件,在命令窗口可以执行以下命令行,常用命令blackbox_upload1/bb_upload_data/mbaud=8读取blackbox数据文件,blackbox_upload1/dl_upload_data/mbaud=8读取datalogger数据文件。
Drive window参数下载和备份

Drive Window备份、下装RDCU数据和系统软件一、如何建立网络连接1、计算机直接连接到传动网络中。
2、计算机单独连接指定的RDCU控制板(建议使用此种方式,比较安全)CH3二、系统软件备份1、启动Drive Window软件2、选择“ABB.SMP”,点击“OK”按钮3、选中file下拉菜单中System Software子菜单New子菜单中的Backup Package4、打开已经存在的备份,从新备份。
5.0.0、备份网络内的所有传动点5.1.0备份单个传动点5.1.1选中要备份的传动点。
6、备份进行中7、保持备份包8、或者选中save as选择存储位置9、退出备份四、系统软件恢复1、修改目标RDCU内参数70.15,修改ch3的地址和要恢复参数的地址一致2、打开系统软件备份包3、选择恢复4、等待搜索5、选择要恢复的传动点yes6、确认要恢复传动点参数吗?点8、退出备份包五、参数备份3、启动Drive Window软件4、选择“ABB.SMP”,点击“OK”按钮5、如果通讯正常,会自动连接网络内的所有传动点,选中需要备份的传动点。
4、选择File下拉菜单中Parameter下子菜单中的Save As6、选择存储位置和存储的名字,点击save确认,备份完成。
六、参数恢复1、选择File下拉菜单中Parameter下子菜单中Open2、打开要恢复的传动点参数。
3、选中要把参数恢复到的目标RDCU7、修改目标RDCU参数70.15,修改ch3的地址和要恢复参数的地址一致6、选择File下拉菜单中Parameter下子菜单中Download7、点击弹出对话框的OK8、点击YES9、点击yes10、下装进行中。
DriveWindow2用户手册5

第5章- 控制驱动器注意!控制驱动器可能会造成人身伤害或物理损坏。
你应该有物理访问该驱动器,你必须确保驱动器和机电系统是清晰的控制(你可以看到系统为例)。
控制驱动远程可能需要额外的预防措施,并劝阻。
随着DriveWindow软件,用户可以通过两种方式控制主要驱动器:•浏览和使用原始的控制项目。
•使用驱动器菜单和/或驱动器面板工具栏。
我们建议您不要混合使用的方式,但不是独家使用。
例如,如果你拿控制使用驱动器菜单,驱动器,或驱动器面板工具栏的上下文菜单中,不要使用原始项目控制驱动器。
为了能够控制由DriveWindow软件驱动器,驱动器必须配置这样一种方式,它是可能。
此外,该驱动器的操作面板必须没有采取的控制,即,REM必须具有被选中,而不是LOC。
另请参见:驱动器菜单驱动器面板工具栏查看驱动器的状态1.原控制项目控制您可以通过浏览控制子树在浏览树窗格和写入控制任何驱动器在浏览项目组控制项,例如。
当你控制驱动这样一来,DriveWindow软件盲目行事- 它只是做你要求它做的事。
所以,你必须对驱动器成竹在胸。
需要注意的是,通常不使用布尔只写控制的实际值。
所以,它并不重要,无论你写ON或OFF到Control.Start。
仅仅写作开始的驱动器,如果是在适当的状态。
所有检查由驱动器完成。
如果驱动器拒绝你写的控制,你会得到一个错误信息。
这也可能是该驱动器接受你写的控制,只是默默地将其丢弃。
大多数新的驱动器具有与外部控制有关的看门狗。
如果你要控制这样的与原控制项目驱动,你应该把Control.Local上线,将其锁定,以确保它保持上线,并写了进去。
描述的过程利用了驱动器的控制,并保持对“心跳”。
请注意,因为DriveOPC可以不断通过内部写Control.Local,信中的“心跳”值通常质量不确定性中。
要清除驱动器的故障记录器,浏览故障记录的控制子树在浏览树窗格和写入在浏览项目集清除项目。
你不需要清除故障记录器时采取的控制。
drivewindow使用指南

Drive Window使用指南Drive Window使用指南《数据监控》一、首先打开Drive Window工具二、选择,单击OK,进入如下画面三、双击左上方的蓝色区域,向下移动滚动条,找到Parameters并双击四、单击01:ACTUAL SIGNALS,在右侧上方显示出许多参数五、单击所需要监控的参数,然后分别点击Add Monitored Iems;Activate/Deactivate Items or Item Set;Lock/Unlock Iems三个按钮,一般监控输出频率、输出电流、输出力矩、输出功率、直流母线电压、模块温度六条曲线。
五、双击Parameters,只显示选中的参数六、设置历史缓冲区时间:双击History Buffer,在弹出对话框中填入所需时间,单位为秒,尽量设置长一些,一般设为20000,然后单击OK。
七、设置X轴长度,双击X Axis Length (s),一般设置为100即可。
八、设置Y轴最大值,双击Y Axis Maximum,一般设置为650,大于所监控数据中的最大值即可。
九、设置Y轴最小值,双击Y Axis Minimum,设置为0。
十、单击启动监控按钮Start or Continue Monitoring,即可对所选参数进行监控。
十一、监控过程中如果想查看过去的波形,可按下暂停键Pause Monitoring,查看结束,按下启动按钮会继续监控,暂停期间的数据不会丢失。
十二、监控结束:按下停止按钮Stop Monitoring。
十三、按下停止按钮后必须把以前的曲线删除后才能重新启动监控。
(重要曲线需要先保存)十四、保存曲线:单击File,找到Graph目录下的Save All并单击,在弹出对话框中选择存放位置和文件名,再点击保存即可。
《软件备份》一、Drive Window与电脑、ABB主板连接正常后,单击菜单栏的file,找到System Software-New-Backup Package并单击二、单击菜单栏的file,找到System Software子菜单Back All并单击此时,Drive Window自动开始备份,如下图所示:三、备份完成后,单击菜单栏的file,找到System Software子菜单Save As并单击四、在弹出对话框中选择保存位置和想要保存的文件名,点击保存即可。
ABB传动软件DriveWindow使用教程

a m e -1-•DriveWindow 是一种用于ACS600、ACS800、ACS6000和DCS600调试和维护的Windows 应用程序。
•适用的操作系统包括Windows NT 、Windows 2000或者Windows XP •DriveWindow 是一种用于ACS600、ACS800、ACS6000和DCS600调试和维护的Windows 应用程序。
•适用的操作系统包括Windows NT 、Windows 2000或者Windows XP功能·操作控制(启动、停止、给定等)·监控信号(数字或者图像方式)·参数(改变参数值)·数据记录器(控制和显示)·故障记录器(显示故障和控制)·备份& 恢复(完成软件备份)·通过网路实现所有功能(控制、监控等)功能·操作控制(启动、停止、给定等)·监控信号(数字或者图像方式)·参数(改变参数值)·数据记录器(控制和显示)·故障记录器(显示故障和控制)·备份& 恢复(完成软件备份)·通过网路实现所有功能(控制、监控等)DriveWindow 要求的硬件配置:·ISA 卡, 或者·PCMCIA-卡(PCMCIA-插槽或者带有PCI/PCMCIA 适配器的PCI-·使用远程控制时需要网络适配器·DDCS 电缆DriveWindow 要求的硬件配置:·ISA 卡, 或者·PCMCIA-卡(PCMCIA-插槽或者带有PCI/PCMCIA 适配器的PCI-插槽·使用远程控制时需要网络适配器·DDCS 电缆1工具栏状态栏离线或通信中断没有运转运转(正转)故障警告传动状态浏览树面板监控器/数据记录器Trend Settings Panel 桌面窗口大小可以改变双击电机以打开浏览树只有在传动单元处于远程控制时,大多数操作才能进行。
drivewindow2用户手册

第2章- 用户界面1.概述用户界面由以下几部分组成:1.标题栏Title bar2.菜单栏Menu bar3.工具栏Toolbars4.状态栏Status bar5.窗口区域Window area6.窗户内,滚动被显示出,如果滚动是可能工具栏和状态栏可以单独由用户隐藏。
用户也可以移动工具栏到不同的位置。
用户可以通过拖动任何一个边或角的调整非最大化的窗口。
2.标题栏标题栏位于沿窗口的顶部。
它由以下几部分组成:1.系统菜单按钮System menu button2.应用程序名称(DriveWindow软件)Application name3.网络(OPC)服务器和远程位置4.驱动器或打开参数文件名称目前在浏览树窗格中选择5.最小化按钮,相同的系统菜单最小化。
降低了窗口的图标6.最大化/还原按钮(取决于窗口的当前状态最大化),同最大化或在系统菜单中的恢复。
7.关闭按钮,同样在系统菜单中关闭。
移动窗口,拖动标题栏。
您也可以通过拖动它们的标题栏移动对话框。
需要注意的是最大化窗口不能移动。
最大化的最大化/还原按钮放大窗口以填充可用空间。
最大化的恢复/还原按钮返回窗口的大小和位置您选择之前最大化。
你也可以做到最大化/双击标题栏恢复。
点击关闭按钮结束您的DriveWindow软件会话。
DriveWindow软件可能警告您释放控制,会提示您保存未保存更改的文件,或提醒您未完成打印。
您可以关闭DriveWindow软件还通过双击系统菜单按钮,选择退出命令,在文件菜单中,通过选择系统菜单关闭,或者按快捷键ALT + F4。
您可以通过打开系统菜单按左或右点击系统菜单按钮,按快捷键Alt +空格键,或者通过标题栏的非按钮区域内单击鼠标右键。
另请参见:系统菜单--概观3.菜单栏菜单栏位于紧挨在标题栏的下方。
它主要包含以下菜单:•文件File•编辑Edit•视图View•网络Network•传动Drive•桌面Desktop•监控Monitor•数据记录仪Datalogger•帮助Help要打开(下拉)菜单,单击菜单栏上它的名字。
ABB传动调试软件DriveWindow介绍

3
© ABB Oy FINLAND- 11 -
Selected item shown in the monitor and it is marked in the signal list
DriveWare®
DriveWindow 2
Monitor: Settings and scaling
Monitor mode:Normal or Fast Within the Normal mode min. sampling interval is 10ms within Fast-mode it is 1ms Sampling interval in ms “Size of the history” Size of the buffer in seconds “Size of the history behind the screen” Length of the screen in seconds Change the length by double-click it, if it is necessary Set y-axis minimum and y-axis maximum Scalings; depend on selected Scaling Method, see previous slide. Display = Cofficient*ACT value + offset OR Display = 100 % with full signal range
5
DriveWare®
DriveWindow 2
Line display type
Graph preferences
1
2
Scaling method.
ABBDRIVEWINDOW

Drives WindowDrives WindowUser’s ManualCode:3AFY 61296123 R0401EFFECTIVE: 25. April 1997 SUPERSEDES: 18. November 1996 Library:\CDC-Project\Käsikirjat\61296123.docTable of ContentsTable of Contents (i)Chapter 1 - Introduction to Drives Window Manual..................................................................1-1 Overview............................................................................................................................................1-1 Before You Start................................................................................................................................1-1 What This Manual Contains...............................................................................................................1-1 Related Publications..........................................................................................................................1-2 Conventions Used in This Manual......................................................................................................1-2 Actual Signals..........................................................................................................................1-2Communication Driver..............................................................................................................1-2Communication Link.................................................................................................................1-2DDCS Link...............................................................................................................................1-2Default Drive............................................................................................................................1-3Parameters..............................................................................................................................1-3Reference................................................................................................................................1-3Symbol Table...........................................................................................................................1-3Target Device...........................................................................................................................1-3Target Driver............................................................................................................................1-3 Chapter 2 - Overview of Drives Window....................................................................................2-1 Overview............................................................................................................................................2-1 Program Structure..............................................................................................................................2-1 User Interface..........................................................................................................................2-1Target Driver............................................................................................................................2-1Communication Driver..............................................................................................................2-1 Drives Window Functions...................................................................................................................2-1 System Configuration Display...................................................................................................2-2Drives Panel.............................................................................................................................2-2Signals and Parameters Tool...................................................................................................2-2Monitoring Tool........................................................................................................................2-2Data Logger Tool.....................................................................................................................2-3Event Logger Tool....................................................................................................................2-3Fault Logger Tool.....................................................................................................................2-3Application Tool........................................................................................................................2-3 Chapter 3 - Getting Started.........................................................................................................3-1 Overview............................................................................................................................................3-1 System Requirements........................................................................................................................3-1 Installing the Drives Window Software................................................................................................3-1 Running Set-up........................................................................................................................3-1Uninstall the Drives Window Program.......................................................................................3-2 Communication Statistic.....................................................................................................................3-2 Starting the Program..........................................................................................................................3-2 Using On-Line Documentation............................................................................................................3-2 Drives Window Help.................................................................................................................3-2Table of ContentsChapter 4 - User Interface...........................................................................................................4-1 Overview............................................................................................................................................4-1 Titlebar........................................................................................................................4-2Menubar......................................................................................................................4-2Toolbar........................................................................................................................4-2Statusbar.....................................................................................................................4-3 Using the Keyboard............................................................................................................................4-3 Working with Multiple Windows..........................................................................................................4-3 Customization....................................................................................................................................4-3 Confirmations...........................................................................................................................4-3Device Status...........................................................................................................................4-4Version Checking.....................................................................................................................4-4Workspace Saving and Loading...............................................................................................4-4 Chapter 5 - System Configuration..............................................................................................5-1 Overview............................................................................................................................................5-1 System Configuration Display............................................................................................................5-1 Tree Line.....................................................................................................................5-1Status Icon..................................................................................................................5-2Status Text..................................................................................................................5-2 How To..............................................................................................................................................5-2 Expand and/or Collapse the Drive List......................................................................................5-2View Status Information...........................................................................................................5-3Update the Status Display........................................................................................................5-3View Faults and Warnings Messages.......................................................................................5-3Select Drives...........................................................................................................................5-3Select the Default Drive............................................................................................................5-3Load a Saved File....................................................................................................................5-4Start Another Tool....................................................................................................................5-4Give a Name for the Drive........................................................................................................5-4File Upload...............................................................................................................................5-4File Download..........................................................................................................................5-4Save System Configuration to a File.........................................................................................5-4Reload Parameter and Signal Table.........................................................................................5-4Reidentify Network...................................................................................................................5-5 Chapter 6 - Drives Panel.............................................................................................................6-1 Overview............................................................................................................................................6-1 Using Drives Panel.............................................................................................................................6-1 Features............................................................................................................................................6-2 Drives Window Control.............................................................................................................6-2Operationals Commands..........................................................................................................6-3Setting Reference....................................................................................................................6-3Step Function...........................................................................................................................6-4 Chapter 7 - Monitor Tool.............................................................................................................7-1 Overview............................................................................................................................................7-1 Starting the Monitor Tool....................................................................................................................7-1 How To..............................................................................................................................................7-2 Select Items for Monitoring.......................................................................................................7-2 Values type of packed boolean....................................................................................7-2 Monitor Settings.......................................................................................................................7-3Start and Stop the Monitoring Display.......................................................................................7-4Table of Contents History Data.............................................................................................................................7-4Item Value................................................................................................................................7-4Display Modes.........................................................................................................................7-5Zoom on a Specific Viewing Area.............................................................................................7-5Save Data to a File...................................................................................................................7-6Read Data from a File..............................................................................................................7-6Using a File as a Reference Graph...........................................................................................7-6Print a Graph...........................................................................................................................7-7Copy to the Clipboard...............................................................................................................7-7Clear the Graph Display...........................................................................................................7-7 Chapter 8 - Signals and Parameters Tool..................................................................................8-1 Overview............................................................................................................................................8-1 Starting Signals and Parameters Tool................................................................................................8-1 How To..............................................................................................................................................8-2 Switch to the On/Off-Line Mode...............................................................................................8-2 Off-line Mode...............................................................................................................8-2On-line Mode...............................................................................................................8-2 Select a Parameter..................................................................................................................8-3Selecting a Signal or a Parameter Subset................................................................................8-3Change the Parameter Values.................................................................................................8-4Upload and Download Parameter Values................................................................................8-7 Upload Values.............................................................................................................8-7Download Values.........................................................................................................8-7 Save a Signal and Parameter List to a File...............................................................................8-7Read Signals and Parameters from a File................................................................................8-7 Download Values After Opening a File.........................................................................8-8 Print a Signal and Parameter List.............................................................................................8-8Compare the Parameters.........................................................................................................8-8Copy to the Clipboard...............................................................................................................8-8Find a Parameter.....................................................................................................................8-8Copy a Parameter Set from a Drive to Another.........................................................................8-9Customize the Display..............................................................................................................8-9Open Uploaded Groups............................................................................................................8-9Close All Groups......................................................................................................................8-9Update Group..........................................................................................................................8-9 Chapter 9 - Data Logger Tool......................................................................................................9-1 Overview............................................................................................................................................9-1 Starting the Data Logger Tool............................................................................................................9-1 Status of the Data Logger........................................................................................................9-2 How To..............................................................................................................................................9-2 Select Variables for the Data Logger........................................................................................9-2Adjust the Settings of the Data Logger.....................................................................................9-2Set the Data Logger Window Scaling.......................................................................................9-2Change the Display Mode........................................................................................................9-2Start and Stop the Data Logger................................................................................................9-3Upload the Values in the Data Logger......................................................................................9-3Reset the Pointers of the Data Logger......................................................................................9-3Zoom on a Specific Viewing Area.............................................................................................9-3Numerical Values.....................................................................................................................9-4Save Data to a File...................................................................................................................9-4Read Data from a File..............................................................................................................9-4Table of ContentsUsing a File as a Reference Graph...........................................................................................9-4Print the Display.......................................................................................................................9-4Copy the Display to the Clipboard............................................................................................9-4 Data Logger Settings.........................................................................................................................9-4 Variables.....................................................................................................................9-5Triggering conditions....................................................................................................9-5Setting the Samples Before Triggering.........................................................................9-5Setting Sample Interval................................................................................................9-6Scaling.........................................................................................................................9-6Open...........................................................................................................................9-6Save As.......................................................................................................................9-6Help.............................................................................................................................9-6Cancel.........................................................................................................................9-6Initialize.......................................................................................................................9-6 Chapter 10 - Event Logger Tool................................................................................................10-1 Overview..........................................................................................................................................10-1 Starting the Event Logger Tool.........................................................................................................10-1 The Event Logger of the ACS 600....................................................................................................10-1 How To............................................................................................................................................10-1 Refresh the Display................................................................................................................10-1Save the Event List to a File...................................................................................................10-2Read Events from a File.........................................................................................................10-2Copy the Event List to the Clipboard......................................................................................10-2 Chapter 11 - Fault Logger Tool.................................................................................................11-1 Overview..........................................................................................................................................11-1 Starting the Fault Logger Tool..........................................................................................................11-1 How To............................................................................................................................................11-1 Reset an Active Fault.............................................................................................................11-1Clear the Fault Logger............................................................................................................11-1Refresh the Display................................................................................................................11-2View Faults and Warnings......................................................................................................11-2Save the Fault List to a File....................................................................................................11-2Read Faults from a File..........................................................................................................11-2Copy the Event List to the Clipboard......................................................................................11-2 Chapter 12 - Application Tool...................................................................................................12-1 Overview..........................................................................................................................................12-1 Starting the Application Tool.............................................................................................................12-1 How To............................................................................................................................................12-2 Select Subset of Symbols......................................................................................................12-2Define the Mask.....................................................................................................................12-2Set Force Value.....................................................................................................................12-2Upload and Download Symbol Table......................................................................................12-4 Upload Values...........................................................................................................12-4Download Force Value(s)...........................................................................................12-4 Delete Force Values...............................................................................................................12-5Download an Application........................................................................................................12-5On/Off-line Mode - Application Tool........................................................................................12-5 On-line Mode.............................................................................................................12-5Off-line Mode.............................................................................................................12-6 Selecting Data/Columns to be Viewed....................................................................................12-6Table of Contents Save a Symbol Table to a File................................................................................................12-6Read Symbols from a File......................................................................................................12-6Compare the Symbol Tables..................................................................................................12-6Copy the Symbol Subset to the Clipboard..............................................................................12-6Print the Symbol Subset.........................................................................................................12-6Get Information About the Target Device................................................................................12-7 APPENDIX A- Version Control....................................................................................................A-1 System Software v2.8..............................................................................................................A-1System Software v3.0..............................................................................................................A-1System Software v4.2..............................................................................................................A-1Previous Drives Window Files..................................................................................................A-1 APPENDIX B- Drives Panels.......................................................................................................B-1 System Software v3.0..............................................................................................................B-1System Software v4.x..............................................................................................................B-1System Software v1.0 (ACP600)..............................................................................................B-1 APPENDIX C - CDW.INI file.........................................................................................................C-1 General...................................................................................................................................C-1Target Identification.................................................................................................................C-1Special Target Names.............................................................................................................C-1Product Names.......................................................................................................................C-1 APPENDIX D - DDCS Communication........................................................................................D-1 DDCS Communication Channel Dialog....................................................................................D-1Use the Communication Channel Dialog .................................................................................D-1Communication Channel Dialog Caption..................................................................................D-1Information Group...................................................................................................................D-1Options Group.........................................................................................................................D-1Link Rate Group......................................................................................................................D-2Beam Intensity Group.............................................................................................................D-2Auto Node Numbering Checkbox............................................................................................D-2Auto Node Numbering with NDBU-91 Branching Units............................................................D-3Auto Node Numbering on DDCS loop......................................................................................D-3 INDEX I...........................................................................................................................................I-1。
ABB传动调试软件DriveWindow介绍

DriveWare®
© ABB Oy FINLAND- 2 -
DriveWindow 2
Connection
Connection alternatives:
1. Direct connection (point-to point) between the PC and the drive (the most
GOF= Glass Optic Fibre HCS = Hard Clad Silica Fibre POF = Plastic Optical Fibre
OR
OR
NISA-03 (ISA)
PCMCIA-adapter (PCI) + NDPA-02 (PCMCIA) + NDPC-02 (5Mb) or
ITEM LIST PANE
Size of the window parts can be changes
TREND DISPLAY PANE
TREND SETTINGS PANE
Status bar
DRIVE STATUS OFF-LINE or COMM. BREAK
NOT RUNNING RUNNING (forward) FAULT WARNING
-button from the Toolbar
3
Selected item shown in the monitor and it is marked in the signal list
DriveWare®
© ABB Oy FINLAND- 11 -
DriveWindow 2
Monitor: Settings and scaling
3. Ring. Drives can be connected in a ring .
Drive-window使用简易说明PPT课件
.
11
图8-3
3、设置需要监控的参数,选中参数后再按
键;如图8-3;
.
12
4、按图8-4中红圈设置参数;
.
图8-4
13
5、监控
------开始监控; ------停止监控; ------暂停监控; ------清除所有监控记录;
.
键说明;
14
四、电脑控制变频器启/停例图。
1、点击
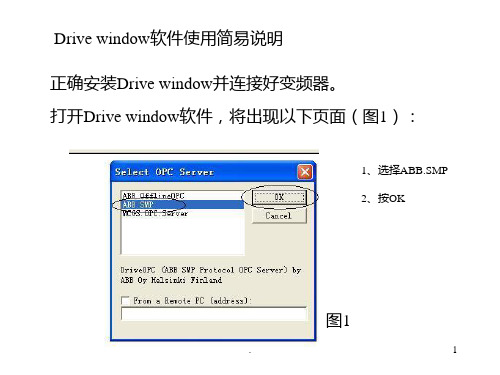
;如图9-1;
Drive window软件使用简易说明 正确安装Drive window并连接好变频器。 打开Drive window软件,将出现以下页面(图1):
1、选择ABB.SMP 2、按OK
图1
.
1
一、参数修改例图。
1、双击
图2-1 见图2-1;
图2-2
2、双击Parameters,见图2-2;
.
2
3、选择需要修改的参数组及参数(双击),如图2-3;
.
图9-1
15
2、电脑控制变频器使用说明;如图9-2;
图9-2
------电脑/变频器控制切换键; ------清除变频器频率给定/速度给定; ------变频器频率给定/速度给定输入; ------变频器频率给定/速度给定值输入确定;
------变频器故障复位; ------变频器启动; ------变频器运行停止;
.
图2-3
3
4、固定参数的修改,如图5-1;
.
图5-1
4
5、固定参数修改后,如图6、需输入参数的修改方法,如图5-2;
.
图5-2
6
5、需输入参数修改后,如图6-2;
.
图6-2
7
浅谈ABB传动工具Drives Window的应用技巧

浅谈ABB传动工具Drives Window的应用技巧
陈姬华
【期刊名称】《中华纸业》
【年(卷),期】2001(022)011
【摘要】随着ABB交流传动系统的广泛应用,其调试和维护工具DrivesWindow 也为越来越多的自动化工程师所熟知,不过他们可能由于更多的关注其基本功能,如参数设置、信号监控、事件或故障记录等,而忽视了一些简单实用的小技巧.笔者从事ABB交流传动维护工作中,发现一些Drive Win-dow应用的小技巧,与大家交流如下.……
【总页数】1页(P43-43)
【作者】陈姬华
【作者单位】浙江杭州华丰纸业有限公司,310011
【正文语种】中文
【中图分类】TS7
【相关文献】
1.浅谈ABB传动工具Drives Window的应用技巧 [J], 陈姬华
2.浅谈非线性编辑工具Edius在微课制作中应用技巧 [J], 杨妍
3.浅谈非线性编辑工具Edius在微课制作中应用技巧 [J], 杨妍
4.浅谈Word2003绘图工具应用的几点技巧 [J], 张冠华
5.浅谈中国画条屏装裱工具及应用技巧 [J], 张殿;
因版权原因,仅展示原文概要,查看原文内容请购买。
- 1、下载文档前请自行甄别文档内容的完整性,平台不提供额外的编辑、内容补充、找答案等附加服务。
- 2、"仅部分预览"的文档,不可在线预览部分如存在完整性等问题,可反馈申请退款(可完整预览的文档不适用该条件!)。
- 3、如文档侵犯您的权益,请联系客服反馈,我们会尽快为您处理(人工客服工作时间:9:00-18:30)。
DDCS-protocol 1 Mbit/s
2.
NDPA-02 (PCMCIA) + NDPC-02 (5Mb) or
NDPC-12 (10Mb)
GOF
max 1000m (NOCR-01 is required)
HCS
max 200 m OR
POF
max 30m
1. 3.
Delete Copy Cut
Status refresh off/on
DriveWare®
Lock/unlock Item into the Desktop
Update items
Select On-/offline for items
Change value
Add/ Remove Logger Items
adapter)
Functions
·Network adapter when using remote connection
·Control operations (start, stop, references, etc.) ·DDCS cabling
·Monitoring signals in numerical and graphical format
-button from the Toolbar
3
Selected item shown in the monitor and it is marked in the signal list
DriveWare®
© ABB Oy FINLAND- 11 -
DriveWindow 2
Monitor: Settings and scaling
ITEM LIST PANE
Size of the window parts can be changes
TREND DISPLAY PANE
TREND SETTINGS PANE
Status bar
DRIVE STATUS OFF-LINE or COMM. BREAK
NOT RUNNING RUNNING (forward) FAULT WARNING
4
Select ACTIVATE/DEACTIVATE ITEMS from the Toolbar
DriveWare®
© ABB Oy FINLAND- 9 -
DriveWindow 2
Graph preferences
Line display type
1
2
Scaling method.
3
Unscaled cursor values
DriveWare®
4
Select or type new value for the parameter. Select OK
© ABB Oy FINLAND- 8 -
DriveWindow 2
Actual values
Click the group with mouse
2
1
Click ++ symbol with
Reset Start Stop Direction of rotation Coast stop
© ABB Oy FINLAND- 7 -
Name and address of the selected drive
DriveWare®
DriveWindow 2
Setting of parameters
Monitor mode:Normal or Fast Within the Normal mode min. sampling interval is 10ms within Fast-mode it is 1ms
Sampling interval in ms “Size of the history”
© ABB Oy FINLAND- 10 -
DriveWare®
DriveWindow 2
Monitor: Select items
1
Click item by mouse
2 Select ADD/REMOVE MONITORED ITEMS from Toolbar
Selected item can be removed from the Monitor by the DEL-key of the keyboard or
GOF= Glass Optic Fibre HCS = Hard Clad Silica Fibre POF = Plastic Optical Fibre
OR
OR
NISA-03 (ISA)
PCMCIA-adapter (PCI) + NDPA-02 (PCMCIA) + NDPC-02 (5Mb) or
Note ! Do not use address one (1) if several drives are in a network (ring or connected together with the distributors). The first (1.) address are meant for sparepart use.
3. Ring. Drives can be connected in a ring .
An individual address to be set by parameter 70.02 or 70.15 for every drive in the link.
Note! all the drives in the ring should have power supply on all the time. Otherwise the ring will break.
© ABB Oy FINLAND- 4 -
DriveWindow 2
1.
Most of the operations can be done only when the drive is in REMOTE-control (Not the local control with the DriveWindow)
DriveWare®
Getting start
1. OR
Double-click the program icon
2.
Select OK
DriveWindow 2
Open Browse Tree by Double-clicking the motor
Tool bar
BROWSE TREE PANE
Change scalings by doubleclicking a row. Scale setting depend on selelected Scaling Method. Values at 100 and 0 Coefficient and Offset (display= coeff *Act. + offset)
Add/remove Monitor Items
Upload Datalogger
© ABB Oy FINLAND- 6 -
DriveWindow 2
Drive Panel Toolbar
Step button Set reference (Enter) Reference value (DW 2.1) Reference edit field Clear faultlogger Take/Release Control (Local/Remote)
common manner)
2. Through the distributor,
DriveWindow-link (sectional drives). An individual address to be set by parameter 70.02 or 70.15 for every drive in the link.
• Operating system Windows NT, Windows 2000, or Windows XP
Required DriveWindow hardware:
·ISA card, or
·PCMCIA-card
(PCMCIA-slot or PCI-slot with PCI/PCMCIA
·Parameters (changing values)
·Datalogger (controls, display)
·Fault Logger (display faults, controls)
·Back-up & Restore (complete software back-up)
·All functions over network (control, monitoring, etc.)
User Interface
Menu bar
Title bar
DriveWindow area
© ABB Oy FINLAND- 5 -
DriveWare®
DriveWindow 2
STANDARD (general)
MONITOR
Toolbar
LOGGER
Reset Zoom
Zoom Out
Zoom In Add Item
DriveWare®
© ABB Oy FINLAND- 2 -
DriveWindow 2
Connection
Connection alternatives:
1. Direct connection (point-to point) between the PC and the drive (the most
Size of the buffer in seconds “Size of the history behind the screen”