ArcEngine C# 选择对象、取消选择、设置可选图层
ArcEngine接口详细说明

1. IField 接口(esriGeoDatabase)
IField 接口的第一个属性 AliasName(只读,获得字段的别名) IField 接口的第二个方法 CheckValue(Value)(方法,对于指定的属性字段,基于字 段类型判断参数值是否有效,有效,则返回 True,否则返回 False) 例子代码: IFeatureClass pFC_SCP_PT; editPT = new FieldClass(); editPT.Precision_2 = 8; editPT.Scale_2 = 3; _2 = "ELEV1"; editPT.Type_2 = esriFieldType.esriFieldTypeDouble; IField 接口的其他属性均为只读属性,常用有 Name(只读,获得字段的名称)
5. ITable 接口(esriGeoDatabase)
ITable 是把要素类当成一个表格来看,每一列对应一个字段(Field),每一行对应一 个要素(Feature),所以对要素类(IFeatureClass)接口的操作均可以类似的在 Itable 接口中找到。 两个接口可以进行如下强制转化:
ARCENGINE 接口详细说明
目录 ARCGIS 接口详细说明.......................................................................................................... 1 1. IField 接口(esriGeoDatabase)................................................................................... 2 2. IFieldEdit 接口(esriGeoDatabase)............................................................................. 2 3. IFields 接口(esriGeoDatabase) ................................................................................. 2 4. IRow 接口(esriGeoDatabase)....................................................................................... 3 5. ITable 接口(esriGeoDatabase) ..................................................................................... 3 6. IArea 接口(esriGeometry)............................................................................................ 4 7. IEnvelope 接口(esriGeometry)..................................................................................... 4 8. IPoint 接口(esriGeometry)........................................................................................... 5 9. IPointArray 接口(esriGeometry)................................................................................... 5 10. IPointCollection 接口(esriGeometry).......................................................................... 6 11. IPolyline 接口(esriGeometry)..................................................................................... 6 12. IGeometry 接口(esriGeometry).................................................................................. 6 13. IFeature 接口(esriGeoDatabase)................................................................................ 7 14. IFeatureLayer 接口(esriCarto).................................................................................... 8 15. IFeatureClass 接口(esriGeoDatabase) ........................................................................ 8 16. IFeatureCursor 接口(esriGeoDatabase).................................................................... 18 17. ISpatialFilter 接口(esriGeoDatabase)........................................................................ 19 18. IQueryFilter 接口(esriGeoDatabase) ........................................................................ 21 19. IFeatureSelection 接口(esriCarto)............................................................................ 21 20. IMap 接口(esriCarto)..................................................................................................... 21 21. IPropertySet 接口(esriSystem) ...................................................................................... 22 22. IFeatureWorkspace 接口(esriGeoDatabase)............................................................. 22 23. IWorkspaceEdit 接口(esriGeoDatabase)................................................................... 25 24. IWorkspaceFactory 接口(esriGeoDatabase)............................................................. 25 25. ITopologicalOperator 接口(esriGeometry) ............................................................... 32
ArcEngine+C#缓冲区分析
AE+C#缓冲区分析public string[] strfname; //得到地图内所有缓冲区内的地物名称public int n;//得到缓冲区内的个数public void CreatBuffer(AxMapControl mc, double x, double y, double Dist, string sLayerName)//创造缓冲区函数{IMap pMap = mc.Map;IActiveView pActiveView = (IActiveView)pMap;IGraphicsContainer pGraphicsContainer = (IGraphicsContainer)pMap;ISimpleFillSymbol pFillSym = new SimpleFillSymbolClass();IRgbColor pColor = new RgbColorClass();pColor = getcolor(255, 255, 0, 255);ILineSymbol pOutline = new SimpleLineSymbolClass();pOutline.Width = 1;pOutline.Color = pColor;pFillSym.Style = esriSimpleFillStyle.esriSFSCross;pFillSym.Color = pColor;pFillSym.Outline = pOutline;IPoint pPoint = new PointClass();pPoint.PutCoords(x, y);ITopologicalOperator pTopol = (ITopologicalOperator)pPoint;IGeometry pBuffer = pTopol.Buffer(Dist);IFillShapeElement pFillEle = new CircleElementClass();pFillEle.Symbol = pFillSym;IElement pEle = (IElement)pFillEle;pEle.Geometry = pBuffer;pGraphicsContainer.AddElement(pEle, 0);//画出缓冲区图形ISpatialFilter pFilter=new SpatialFilter();pFilter.Geometry=pBuffer;pFilter.SpatialRel = esriSpatialRelEnum.esriSpatialRelIntersects;IQueryFilter pQueryFilter=pFilter as QueryFilter;IFeatureLayer pFeatureLayer;pFeatureLayer = mc.get_Layer(GetLayerFromName(sLayerName, mc)) as IFeatureLayer;if (pFeatureLayer == null)return;mc.Map.ClearSelection();IFeatureClass pFeatureClass = pFeatureLayer.FeatureClass;IFeatureCursor pFeatureCursor = pFeatureClass.Search(pQueryFilter, false);IFeature pFeature = pFeatureCursor.NextFeature();IFeatureSelection pFeatureSelection = pFeatureLayer as IFeatureSelection;pFeatureSelection.SelectFeatures(pQueryFilter, esriSelectionResultEnum.esriSelectionResultNew, false);ISelectionSet pSelection = pFeatureSelection.SelectionSet;n=pSelection.Count;strfname = new string[n];int namenumber = 0;while (pFeature != null){mc.FlashShape(pFeature.Shape, 1, 100, null);mc.DrawShape(pFeature.Shape);strfname[namenumber]=pFeature.get_Value(2).ToString();mc.Map.SelectFeature(mc.get_Layer(GetLayerFromName(sLayerName, mc)), pFeature);pFeature = pFeatureCursor.NextFeature();namenumber++;查看文档来源:/dwwinfo/item/fa50a78a0957d0cbef083d9b。
ArcGIS Engine指导书3
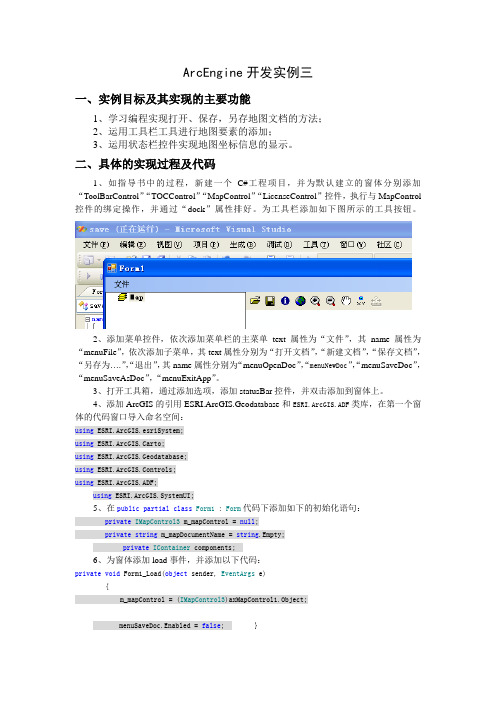
ArcEngine开发实例三一、实例目标及其实现的主要功能1、学习编程实现打开、保存,另存地图文档的方法;2、运用工具栏工具进行地图要素的添加;3、运用状态栏控件实现地图坐标信息的显示。
二、具体的实现过程及代码1、如指导书中的过程,新建一个C#工程项目,并为默认建立的窗体分别添加“ToolBarControl”“TOCControl”“MapControl”“LicenseControl”控件,执行与MapControl 控件的绑定操作,并通过“dock”属性排好。
为工具栏添加如下图所示的工具按钮。
2、添加菜单控件,依次添加菜单栏的主菜单text属性为“文件”,其name属性为“menuFile”,依次添加子菜单,其text属性分别为“打开文档”,“新建文档”,“保存文档”,“另存为….”,“退出”,其name属性分别为“menuOpenDoc”,“menuNewDoc”,“menuSaveDoc”,“menuSaveAsDoc”,“menuExitApp”。
3、打开工具箱,通过添加选项,添加statusBar控件,并双击添加到窗体上。
4、添加ArcGIS的引用ESRI.ArcGIS.Geodatabase和ESRI.ArcGIS.ADF类库,在第一个窗体的代码窗口导入命名空间:using ESRI.ArcGIS.esriSystem;using ESRI.ArcGIS.Carto;using ESRI.ArcGIS.Geodatabase;using ESRI.ArcGIS.Controls;using ESRI.ArcGIS.ADF;using ESRI.ArcGIS.SystemUI;5、在public partial class Form1 : Form代码下添加如下的初始化语句:private IMapControl3 m_mapControl = null;private string m_mapDocumentName = string.Empty;private IContainer components;6、为窗体添加load事件,并添加以下代码:private void Form1_Load(object sender, EventArgs e){m_mapControl = (IMapControl3)axMapControl1.Object;menuSaveDoc.Enabled = false; }7、为菜单“menuOpenDoc”添加click事件,并添加如下代码:ICommand command = new ControlsOpenDocCommandClass();command.OnCreate(m_mapControl.Object);command.OnClick();8、为菜单“menuSaveDoc”添加click事件,并添加如下代码:if (m_mapControl.CheckMxFile(m_mapDocumentName)){IMapDocument mapDoc = new MapDocumentClass();mapDoc.Open(m_mapDocumentName, string.Empty);if (mapDoc.get_IsReadOnly(m_mapDocumentName)){MessageBox.Show("Map document is read only!");mapDoc.Close();return;}mapDoc.ReplaceContents((IMxdContents)m_mapControl.Map);mapDoc.Save(esRelativePaths, false);mapDoc.Close();}9、为菜单“menuSaveAsDoc”添加click事件,并添加如下代码::ICommand command = new ControlsSaveAsDocCommandClass();command.OnCreate(m_mapControl.Object);command.OnClick();10、为菜单“menuExitApp”添加click事件,并添加如下代码:Application.Exit();11、为菜单“menuNewDoc”添加click事件,并添加如下代码:ICommand command = new CreateNewDocument();command.OnCreate(m_mapControl.Object);command.OnClick();12、为控件“axMapControl1”添加OnMouseMove事件,并添加如下代码:statusBar1.Text = string.Format("{0}, {1} {2}", e.mapX.ToString("#######.##"),e.mapY.ToString("#######.##"), axMapControl1.MapUnits.ToString().Substring(4));13、为控件“axMapControl1”添加OnMapReplaced事件,并添加如下代码:m_mapDocumentName = m_mapControl.DocumentFilename;if (m_mapDocumentName == string.Empty){menuSaveDoc.Enabled = false;statusBar1.Text = string.Empty;}else{menuSaveDoc.Enabled = true;statusBar1.Text = Path.GetFileName(m_mapDocumentName);}三、操作通过操作调试该程序源码,观察并掌握AE中对于地图文件保存的操作方法。
arcengine 椭球面积 代码

arcengine 椭球面积代码以下是使用Arcengine计算椭球面积的部分代码:```csharpusing ESRI.ArcGIS.DataManagementTools;using ESRI.arcGIS.Geodatabase;using ESRI.arcGIS.Geoprocessor;/// <summary>/// 属性计算器/// </summary>/// <param name="pFeatureClass">IFeatureClass</param>/// <param name="fieldName">要赋值的字段名称</param>/// <param name="script">py脚本例:!shape.geodesicArea! 计算椭球面积</param>public bool Calculate(IFeatureClass pFeatureClass, string fieldName, string script){try{Geoprocessor gp = new Geoprocessor();gp.OverwriteOutput = true;CalculateField calculateField = new CalculateField();calculateField.in_table = pFeatureClass;calculateField.field = fieldName;calculateField.expression = script;calculateField.expression_type = "PYTHON";return (bool)gp.Execute(calculateField, null);}catch{return false;}}```在上述代码中,首先引入了相关的命名空间。
优-ArcEngine基础开发教程C#二次开发ArcGis
pPolyline.AddGeometry(pPath as IGeometry, ref o, ref o); 2.4.4.2Polylgon 几何对象
2Polylgon 对象是由一个或多个 Ring 对象的有序集合,它可以是由单个 Ring 对象构成,也可以使用多个 Ring 组成如下图所示。其中 Ring 可以分为 Outer Ring(外环)和 Inner Ring(内环)之分。外环和内环都是有方向的, 它们的区别是外环的方向是顺时针的,内环的方向是逆时针。Polygon 通常用来代表有面积的多边形矢量对象, 如行政区,建筑物等。
pPoint1.Y = 100; //定义第二个点
IPoint pPoint2 = new PointClass();
pPoint2.X = 200;
pPoint2.Y = 200; //创建一个 Line 对象
ILine pLine= new LineClass(); //设置 Line 对象的起始终止点
1.6 加载 MXD 地图文档数据 单击 F5 键运行程序,然后单击打开 MXD 地图文档按钮打开 MXD 地图文档,如图 4 所示:
04/04/2011
本文由 fxlcoco 编写 ESRI BBS GIS 大讲堂首发 第 2 页,共 80 页
山东农业大学资源与环境学院
世界有我精彩-【侯志伟】整理
山东农业大学资源与环境学院
地理信息系统08-3
世界有我精彩-【侯志伟】整理
ArcGIS Engine 基础开发教程(1)——创建第一个 ArcGIS Engine 桌面应用程序 1 创建第一个 ArcGIS Engine 桌面应用程序 ArcGIS Engine9.3 提供了丰富的 GIS 组件方便用户快速的定制开发一个 GIS 应用程序,无需写代码即可实现 GIS 数据加载,地图操作等功能甚至可以实现高级编辑以及空间分析功能。接下来使用 ArcGIS Engine9.3 提供了 MapControl Application 模块来创建第一个 ArcGIS Engine 桌面应用程序,并为桌面应用应用程序提供编辑功能。 1.1 目标 1.创建第一个 ArcGIS Engine 桌面应用程序 2.为应用程序添加编辑功能。 1.2 准备工作 1 .IDE:Visual Studio 2005/2008 2. ArcGIS Engine Developer kit 9.3 3. 制作 ArcGIS 实验数据地图文档 MXD 1.3 设计流程图
ArcGIS Engine开发GIS应用 VC

ArcGIS Engine开发GIS应用 VCarcgisengine开发gis应用-vc利用arcgisengine、和windows控件开发gis应用此过程表明适宜那些采用.net创建和部署应用领域的开发者,它叙述了采用arcgis控件创建和部署应用领域的方法和步骤。
你可以在下面的目录下找到相应的样例程序:\\developerkit\\samples\\developer_guide_scenarios\\arcgis_engine\\building_an_arcgis_control_application\\map_viewer注:arcgis样例程序不包含在arcgisengine开发工具包“典型”安装方式中。
如果你没有安装它们,则可以重新运行开发工具包安装向导,选择“定制”或“修改”方式,并选择软件开发包下的样例项进行安装。
一、项目描述在谷歌中读取和内嵌arcgis控件。
?向pagelayoutcontrol和mapcontrol中读取图形文档。
?设置toolbarcontrol和toccontrol的存取控件。
?处置窗口翻转。
向toolbarcontrol添加arcgisengine命令和工具。
?创建弹出式菜单在toccontrol中管理标签编辑?在mapcontrol中绘制图形。
为mapcontrol、pagelayoutcontrol和toolbarcontrol创建定制工具。
?用户化toolbarcontrol。
在windows操作系统中部署应用领域。
二、详述体)访问。
每个控件对象及其功能可以与其他esriarcobjects和自定义控件组合使用,创建用户化的客户应用程序。
此方案就是采用了c#和两种语言建立,但以下技术同时实现分散女性主义于c#方案。
许多开发者可能会感觉用更难受,那是因为他们已经比较熟识visualbasic6.0代码,然而,对于java和c++程序员来说,他们将可以真的对c#程序语言的语法更熟识。
第八章 ArcEngine的基本知识

4.ArcEngine类库
4.ArcEngine类库
1. System类库: System类库是ArcGIS体系结构中最底层的
类库.System类库包含给构成ArcGIS的其他类库提供服务 的组件.System类库中定义了大量开发者可以实现的接口. AoInitializer对象就是在System类库中定义的,所有的开发 者必须使用这个对象来初始化ArcEngine和解除ArcEngine 的初始化.开发者不能扩展这个类库,但可以通过实现这 个类库中包含的接口来扩展ArcGIS系统.
用专题方法为要素着色 动态显示实时或时间序列数据 通过地理编码地址或街道交叉口在地图上查找位置 转换地图数据的坐标系统 在要素几何形状上执行几何操作以创建缓冲区,计 算差异,发现交叉,合并或反交叉 处理要素形状或反旋转地图 创建和更新地理要素及其属性
2.3 ArcEngine功能
编辑要素:使用ArcEngine开发工具包建立能在地理数据库
2.3 ArcEngine功能
显示具有多个图层 地图漫游和缩放 识别地图上的要素 搜索和查找地图上的要素 显示字段值的文本标注 绘制航空相片或卫星影像 绘制描述性文本 用线,框,区域,多边形和圆选择要素 选择与某些要素的距离在一定范围内的要素 用SQL表达式查找和选择要素
2.3 ArcEngine功能
4.ArcEngine类库
3. Geometry类库:该类库处理存储在要素类中的要素几何
图形或形状或其他图形元素.大多数用户会遇到的基本几 何图形对象为Point,MultiPoint,Polyline和Polygon.除 了这些顶级实体外,就是作为多义线和多边形的组成部分 的几何图形,是组成几何图形的子要素,它们是Segment, Path和Ring. GIS中的实体指的是现实世界中的要素.现实世界中要素的 位置由一个带有空间参考的几何图形来定义.空间参考对 象,包括投影坐标和地理坐标系统,都包含在Geometry类 库中.开发者可以通过添加新的空间参考和投影来扩展空 间参考系统.
ArcEngine 专题图制作

ArcEngine 专题图制作(C#)上一篇/ 下一篇 2010-06-24 08:28:50 / 个人分类:ArcEngine查看( 413 ) / 评论( 0 ) / 评分( 0 / 0 )点密度图、分层设色图/等级图、单值图、柱状图、饼状图的实现代码 C# private void 点密度图ToolStripMenuItem_Click(object sender, EventArgs e){//获取当前图层,并把它设置成IGeoFeatureLayer的实例IMap pMap = axMapControl1.Map;ILayer pLayer = pMap.get_Layer(0) as IFeatureLayer;IFeatureLayer pFeatureLayer = pLayer as IFeatureLayer;IGeoFeatureLayer pGeoFeatureLayer = pLayer as IGeoFeatureLayer;//获取图层上的featureIFeatureClass pFeatureClass = pFeatureLayer.FeatureClass;IFeatureCursor pFeatureCursor = pFeatureClass.Search(null, false);IFeature pFeature = pFeatureCursor.NextFeature();////////////////////////////////////////////////////////////////////////////////////////////定义点密度图渲染组件IDotDensityRenderer DotDensityRenderer = new DotDensityRendererClass();//定义点密度图渲染组件对象的渲染字段对象IRendererFields flds = (IRendererFields)DotDensityRenderer;flds.AddField("FID", "FID");//flds.AddField("Shape", "Shape");//定义点密度图渲染得符号对象IDotDensityFillSymbol ddSym = new DotDensityFillSymbolClass();IRgbColor BackColor = new RgbColorClass();BackColor.Red = 234;BackColor.Blue = 128;BackColor.Green = 220;IRgbColor SymbolColor = new RgbColorClass();SymbolColor.Red = 234;SymbolColor.Blue = 128;SymbolColor.Green = 220;////点密度图渲染背景颜色//ddSym.BackgroundColor = BackColor;ddSym.DotSize =8;ddSym.FixedPlacement = true;//ddSym.Color = SymbolColor;ILineSymbol pLineSymbol=new CartographicLineSymbolClass(); ddSym.Outline = pLineSymbol;//定义符号数组ISymbolArray symArray = (ISymbolArray)ddSym;//添加点密度图渲染的点符号到符号数组中去ISimpleMarkerSymbol pMarkerSymbol = new SimpleMarkerSymbolClass(); pMarkerSymbol.Style. = esriSimpleMarkerStyle.esriSMSCircle; pMarkerSymbol.Size = 2;pMarkerSymbol.Color = SymbolColor;;symArray.AddSymbol(pMarkerSymbol as ISymbol );//设置点密度图渲染的点符号//DotDensityRenderer.DotDensitySymbol =symArray; DotDensityRenderer.DotDensitySymbol = ddSym;//确定一个点代表多少值DotDensityRenderer .DotValue=0.2;//点密度渲染采用的颜色模式DotDensityRenderer.ColorScheme = "Custom";//创建点密度图渲染图例DotDensityRenderer.CreateLegend();//设置符号大小是否固定DotDensityRenderer.MaintainSize = true;//将点密度图渲染对象与渲染图层挂钩pGeoFeatureLayer.Renderer = (IFeatureRenderer)DotDensityRenderer;//刷新地图和TOOCotrolIActiveView pActiveView = axMapControl1.Map as IActiveView;pActiveView.Refresh();axTOCControl1.Update();}private void 分层设色ToolStripMenuItem_Click(object sender, EventArgs e) {//获取当前图层,并把它设置成IGeoFeatureLayer的实例IMap pMap = axMapControl1.Map;ILayer pLayer = pMap.get_Layer(0) as IFeatureLayer;IFeatureLayer pFeatureLayer = pLayer as IFeatureLayer;IGeoFeatureLayer pGeoFeatureLayer = pLayer as IGeoFeatureLayer;//获取图层上的featureIFeatureClass pFeatureClass = pFeatureLayer.FeatureClass;IFeatureCursor pFeatureCursor = pFeatureClass.Search(null, false);IFeature pFeature = pFeatureCursor.NextFeature();//IFeatureRenderer PR=pGeoFeatureLayer.Renderer;//JoinData("县级区域", "DZGB", "sectioncode"); //join外部表// int DC ;int desiredClasses = 5;string fieldName = "AREA";int classesCount;double[] classes;string strOutput = "";bool ok;object dataFrequency;object dataValues;ITable pTable ;//IClassify pClassify;EqualIntervalClass pClassify;//IBasicHistogram pTableHistogram = new BasicTableHistogramClass();//IHistogram pTableHistogram = new BasicTableHistogramClass();ITableHistogram pTableHistogram = new BasicTableHistogramClass() as ITableHistogram; IBasicHistogram pHistogram;IClassBreaksRenderer pClassBreaksRenderer;IHsvColor pFromColor;IHsvColor pToColor;IAlgorithmicColorRamp pAlgorithmicColorRamp;IEnumColors pEnumColors;IColor pColor;ISimpleFillSymbol pSimpleFillSymbol;pLayer = (IFeatureLayer)axMapControl1.get_Layer(0);pGeoFeatureLayer = (IGeoFeatureLayer)pLayer;pTable = (ITable)pGeoFeatureLayer;pHistogram = (IBasicHistogram)pTableHistogram;// Get values and frequencies for the fieldpTableHistogram.Field = fieldName;pTableHistogram.Table = pTable;pHistogram.GetHistogram(out dataValues, out dataFrequency);// Put values and frequencies into an Equal Interval Classify ObjectpClassify = new EqualIntervalClass();//pClassify = new NaturalBreaksClass();pClassify.SetHistogramData(dataValues, dataFrequency);pClassify.Classify(dataValues, dataFrequency, ref desiredClasses);//pClassify.Classify(ref desiredClasses);classes = (double[])pClassify.ClassBreaks;classesCount = classes.Length;// Initialise a new Class Breaks renderer// Supply the number of Class Breaks and the field to perform. the class breaks on pClassBreaksRenderer = new ClassBreaksRendererClass(); pClassBreaksRenderer.Field = fieldName;pClassBreaksRenderer.BreakCount = classesCount;pClassBreaksRenderer.SortClassesAscending = true;// Use algorithmic color ramp to generate an range of colors between YELLOW to RED // Initial color: YELLOWpFromColor = new HsvColorClass();pFromColor.Hue = 60;pFromColor.Saturation = 100;pFromColor.Value = 96;// Final color: REDpToColor = new HsvColorClass();pToColor.Hue = 0;pToColor.Saturation = 100;pToColor.Value = 96;// Set up HSV Color ramp to span from YELLOW to REDpAlgorithmicColorRamp = new AlgorithmicColorRampClass(); pAlgorithmicColorRamp.Algorithm = esriColorRampAlgorithm.esriHSVAlgorithm; pAlgorithmicColorRamp.FromColor = pFromColor;pAlgorithmicColorRamp.ToColor = pToColor;pAlgorithmicColorRamp.Size = classesCount;pAlgorithmicColorRamp.CreateRamp(out ok);pEnumColors = pAlgorithmicColorRamp.Colors;for (int index = 0; index < classesCount - 1; index++){pColor = pEnumColors.Next();pSimpleFillSymbol = new SimpleFillSymbolClass();pSimpleFillSymbol.Color = pColor;pSimpleFillSymbol.Style. = esriSimpleFillStyle.esriSFSSolid;pClassBreaksRenderer.set_Symbol(index, (ISymbol)pSimpleFillSymbol);pClassBreaksRenderer.set_Break(index, classes[index + 1]);// Store each break value for user outputstrOutput += "-" + classes[index + 1] + "\n";}pGeoFeatureLayer.Renderer = (IFeatureRenderer)pClassBreaksRenderer; //this.axMapControl1.Refresh();/////////////////////////////////////////////////////////////////////////////////////////////////////////////////////////////////////////////////////////////////////////////////////get the custom property from which is supposed to be the layer to be saved object customProperty = null;//IMapControl3 mapControl = null;customProperty = axMapControl1.CustomProperty;//ask the user to set a name for the new layer fileSaveFileDialog saveFileDialog = new SaveFileDialog();saveFileDialog.Filter = "Layer File|*.lyr|All Files|*.*";saveFileDialog.Title = "生成专题图";saveFileDialog.RestoreDirectory = true;saveFileDialog.FileName = bine(saveFileDialog.InitialDirectory, + ".lyr");//get the layer name from the userDialogResult dr = saveFileDialog.ShowDialog();if (saveFileDialog.FileName != "" && dr == DialogResult.OK){if (System.IO.File.Exists(saveFileDialog.FileName)){//try to delete the existing fileSystem.IO.File.Delete(saveFileDialog.FileName);}//create a new LayerFile instanceILayerFile layerFile = new LayerFileClass();//create a new layer filelayerFile.New(saveFileDialog.FileName);//attach the layer file with the actual layerlayerFile.ReplaceContents((ILayer)pGeoFeatureLayer);//save the layer filelayerFile.Save();//ask the user whether he'd like to add the layer to the mapif (DialogResult.Yes == MessageBox.Show("Would you like to add the layer to the map?", "Message", MessageBoxButtons.YesNo, MessageBoxIcon.Question)){axMapControl1.AddLayerFromFile(saveFileDialog.FileName, 0);}}}private void 单值图ToolStripMenuItem1_Click(object sender, EventArgs e){//获取当前图层,并把它设置成IGeoFeatureLayer的实例IMap pMap = axMapControl1.Map;ILayer pLayer = pMap.get_Layer(0) as IFeatureLayer;IFeatureLayer pFeatureLayer = pLayer as IFeatureLayer;IGeoFeatureLayer pGeoFeatureLayer = pLayer as IGeoFeatureLayer;//获取图层上的featureIFeatureClass pFeatureClass = pFeatureLayer.FeatureClass;IFeatureCursor pFeatureCursor = pFeatureClass.Search(null, false);//定义单值图渲染组件IUniqueValueRenderer pUniqueValueRenderer = new UniqueValueRendererClass();//设置渲染字段对象pUniqueValueRenderer.FieldCount = 1;pUniqueValueRenderer.set_Field(0, "ID");//创建填充符号ISimpleFillSymbol PFillSymbol = new SimpleFillSymbolClass();pUniqueValueRenderer.DefaultSymbol = (ISymbol)PFillSymbol;eDefaultSymbol = false;//QI the table from the geoFeatureLayer and get the field number ofITable pTable;int fieldNumber;pTable = pGeoFeatureLayer as ITable ;fieldNumber = pTable.FindField("ID");if (fieldNumber == -1){MessageBox.Show("Can't find field called ", "Message", MessageBoxButtons.OK, rmation);}//创建并设置随机色谱IRandomColorRamp pColorRamp = new RandomColorRampClass();pColorRamp.StartHue = 0;pColorRamp.MinValue = 99;pColorRamp.MinSaturation = 15;pColorRamp.EndHue = 360;pColorRamp.MaxValue = 100;pColorRamp.MaxSaturation = 30;pColorRamp.Size = 100;//pColorRamp.Size = pUniqueValueRenderer.ValueCount;bool k = true;pColorRamp.CreateRamp(out ok);IEnumColors pEnumRamp;pEnumRamp = pColorRamp.Colors;//为每个值设置一个符号int n = pFeatureClass.FeatureCount(null);for (int i = 0; i < n; i++){IFeature pFeature = pFeatureCursor.NextFeature();IClone pSourceClone = PFillSymbol as IClone;ISimpleFillSymbol pSimpleFillSymbol = pSourceClone.Clone() as ISimpleFillSymbol ;string pFeatureValue = pFeature.get_Value(pFeature.Fields.FindField("ID")).ToString();pUniqueValueRenderer.AddValue(pFeatureValue, "烈度", (ISymbol)pSimpleFillSymbol); }//为每个符号设置颜色for (int i = 0; i <= pUniqueValueRenderer.ValueCount - 1; i++){string xv = pUniqueValueRenderer.get_Value(i);if (xv != ""){ISimpleFillSymbol pNextSymbol =(ISimpleFillSymbol)pUniqueValueRenderer.get_Symbol(xv);pNextSymbol.Color = pEnumRamp.Next();pUniqueValueRenderer.set_Symbol(xv, (ISymbol)pNextSymbol);}}//将单值图渲染对象与渲染图层挂钩pGeoFeatureLayer.Renderer = (IFeatureRenderer)pUniqueValueRenderer;pGeoFeatureLayer.DisplayField = "ID";//刷新地图和TOOCotrolIActiveView pActiveView = axMapControl1.Map as IActiveView;pActiveView.Refresh();axTOCControl1.Update();}private void 等级图ToolStripMenuItem_Click(object sender, EventArgs e) {//获取当前图层,并把它设置成IGeoFeatureLayer的实例IMap pMap = axMapControl1.Map;ILayer pLayer = pMap.get_Layer(0) as IFeatureLayer;IFeatureLayer pFeatureLayer = pLayer as IFeatureLayer;IGeoFeatureLayer pGeoFeatureLayer = pLayer as IGeoFeatureLayer;//获取图层上的featureIFeatureClass pFeatureClass = pFeatureLayer.FeatureClass;IFeatureCursor pFeatureCursor = pFeatureClass.Search(null, false);IFeature pFeature = pFeatureCursor.NextFeature();////////////////////////////////////////////////////////////////////////定义所需的接口对象和相关变量IClassBreaksUIProperties pUIProperties;object dataValues;object dataFrequency;//double[] cb;int breakIndex;long ClassesCount;int numClass;numClass = 10;double[] Classes;///////////////////////////////////////////////////////////////////////* We're going to retrieve frequency data from a populationfield and then classify this data*/ITable pTable;pTable = pFeatureClass as ITable;IBasicHistogram pBasicHist = new BasicTableHistogramClass();ITableHistogram pTableHist;pTableHist = (ITableHistogram)pBasicHist;//Get values and frequencies for the population field into a table histogram objectpTableHist.Field = "AREA";pTableHist.Table = pTable;pBasicHist.GetHistogram(out dataValues, out dataFrequency);IClassifyGEN pClassifyGEN = new QuantileClass();pClassifyGEN.Classify(dataValues, dataFrequency, ref numClass);Classes = (double[])pClassifyGEN.ClassBreaks;ClassesCount = long.Parse(Classes.GetUpperBound(0).ToString());//Initialise a new class breaks renderer and supply the number of class breaks and the field to perform. the class breaks on.IClassBreaksRenderer pClassBreaksRenderer = new ClassBreaksRendererClass();pClassBreaksRenderer.Field = "AREA";//pClassBreaksRenderer.BreakCount = ClassesCount;pClassBreaksRenderer.MinimumBreak = Classes[0];pClassBreaksRenderer.SortClassesAscending = true;//设置着色对象的分级数目pClassBreaksRenderer.BreakCount = int.Parse(ClassesCount.ToString()); //创建并设置随机色谱IAlgorithmicColorRamp pColorRamp = new AlgorithmicColorRampClass(); pColorRamp.Algorithm = esriColorRampAlgorithm.esriCIELabAlgorithm; IEnumColors pEnumColors;IRgbColor pColor1 = new RgbColorClass();IRgbColor pColor2 = new RgbColorClass();pColor1.Red = 255;pColor1.Green = 210;pColor1.Blue = 210;pColor2.Red = 190;pColor2.Green = 0;pColor2.Blue = 170;pColorRamp.FromColor = pColor1;pColorRamp.ToColor = pColor2;pColorRamp.Size = numClass;bool k = true;pColorRamp.CreateRamp(out ok);pEnumColors = pColorRamp.Colors;pEnumColors.Reset();// use this interface to set dialog properties pUIProperties = pClassBreaksRenderer as IClassBreaksUIProperties; pUIProperties.ColorRamp = "Custom";ISimpleFillSymbol pSimpleMarkerSymbol = new SimpleFillSymbolClass(); IColor pColor;int[] colors = new int[numClass];// be careful, indices are different for the diff listsfor (breakIndex = 0; breakIndex < ClassesCount; breakIndex++){pClassBreaksRenderer.set_Label (breakIndex,Classes[breakIndex] + " - " + Classes[breakIndex + 1]);pUIProperties.set_LowBreak (breakIndex ,Classes[breakIndex]);pSimpleMarkerSymbol = new SimpleFillSymbolClass();pColor = pEnumColors.Next();pSimpleMarkerSymbol.Color = pColor;colors[breakIndex] = pColor.RGB;pClassBreaksRenderer.set_Symbol(breakIndex, (ISymbol)pSimpleMarkerSymbol);pClassBreaksRenderer.set_Break(breakIndex, Classes[breakIndex + 1]);}//将等级图渲染对象与渲染图层挂钩pGeoFeatureLayer.Renderer = (IFeatureRenderer)pClassBreaksRenderer;//刷新地图和TOOCotrolIActiveView pActiveView = axMapControl1.Map as IActiveView;pActiveView.Refresh();axTOCControl1.Update();}private void 柱状图ToolStripMenuItem_Click(object sender, EventArgs e) {//获取当前图层,并把它设置成IGeoFeatureLayer的实例IMap pMap = axMapControl1.Map;ILayer pLayer = pMap.get_Layer(0) as IFeatureLayer;IFeatureLayer pFeatureLayer = pLayer as IFeatureLayer;IGeoFeatureLayer pGeoFeatureLayer = pLayer as IGeoFeatureLayer;//获取图层上的featureIFeatureClass pFeatureClass = pFeatureLayer.FeatureClass;//定义柱状图渲染组建对象IChartRenderer pChartRenderer = new ChartRendererClass();//定义渲染字段对象并给字段对象实例化为pChartRendererIRendererFields pRendererFields;pRendererFields = (IRendererFields)pChartRenderer;//向渲染字段对象中添加字段--- 待补充自定义添加pRendererFields.AddField("AREA", "AREA");pRendererFields.AddField("ID", "ID");// 通过查找features的所用字段的值,计算出数据字段的最大值,作为设置柱状图的比例大小的依据ITable pTable;int fieldNumber;pTable = pGeoFeatureLayer as ITable;// 查找出geoFeatureLayer的属性表中的字段个数fieldNumber = pTable.FindField("AREA");if (fieldNumber == -1){MessageBox.Show("Can't find field called ", "Message", MessageBoxButtons.OK, rmation);}const int numFields = 2;// 设置bars的个数int[] fieldIndecies = new int[2];//long fieldIndex;double maxValue;bool firstValue;//double[] fieldValue=new double[5];double fieldValue;fieldIndecies[0] = pTable.FindField("AREA");fieldIndecies[1] = pTable.FindField("ID");firstValue = true;maxValue = 0;int n = pFeatureClass.FeatureCount(null);for (int i = 0; i < numFields; i++){IFeatureCursor pFeatureCursor = pFeatureClass.Search(null, false);for (int j = 0; j < n; j++){IFeature pFeature = pFeatureCursor.NextFeature();fieldValue = Convert.ToDouble(pFeature.get_Value(fieldIndecies[i]));if (firstValue){//给maxValue赋初值maxValue = fieldValue;firstValue = false;}else if (fieldValue > maxValue){maxValue = fieldValue;}}}if (maxValue <= 0){MessageBox.Show("Failed to calculate the maximum value or maxvalue is 0.", "Message", MessageBoxButtons.OK, rmation);}// 定义并设置渲染时用的chart marker symbolIBarChartSymbol pBarChartSymbol = new BarChartSymbolClass();pBarChartSymbol.Width = 6;IChartSymbol pChartSymbol;pChartSymbol = pBarChartSymbol as IChartSymbol;IMarkerSymbol pMarkerSymbol;pMarkerSymbol = (IMarkerSymbol)pBarChartSymbol;IFillSymbol pFillSymbol ;//设置pChartSymbol的最大值pChartSymbol.MaxValue = maxValue;// 设置bars的最大高度pMarkerSymbol.Size = 16;//下面给每一个bar设置符号//定义符号数组ISymbolArray pSymbolArray = (ISymbolArray)pBarChartSymbol;//克隆pFillSymbol用于符号操作//IClone pSourceClone = pFillSymbol as IClone;//ISimpleFillSymbol pSimpleFillSymbol = pSourceClone.Clone() as ISimpleFillSymbol; // 向符号数组中添加设置后的符号//pSimpleFillSymbol.Color = GetRGBColor(193, 252, 179);//pSymbolArray.AddSymbol(pSimpleFillSymbol as ISymbol);//pSimpleFillSymbol.Color = GetRGBColor(145, 55, 200);//pSymbolArray.AddSymbol(pSimpleFillSymbol as ISymbol);//添加第一个符号pFillSymbol = new SimpleFillSymbolClass();pFillSymbol.Color = GetRGBColor(193, 252, 179) as IColor ;pSymbolArray.AddSymbol(pFillSymbol as ISymbol) ;//添加第二个符号pFillSymbol = new SimpleFillSymbolClass();pFillSymbol.Color = GetRGBColor(145, 55, 251)as IColor;pSymbolArray.AddSymbol(pFillSymbol as ISymbol);// 设置背景符号//pSimpleFillSymbol.Color = GetRGBColor(239, 150, 190);//pChartRenderer.BaseSymbol = pSimpleFillSymbol as ISymbol;// Disable overpoaster 让符号处于图形中央eOverposter = false;//pChartRenderer.ChartSymbol = pSymbolArray as IChartSymbol;pChartRenderer.ChartSymbol = pChartSymbol as IChartSymbol;//bel = "AREA";pChartRenderer.CreateLegend();//将柱状图渲染对象与渲染图层挂钩pGeoFeatureLayer.Renderer = (IFeatureRenderer)pChartRenderer;pGeoFeatureLayer.DisplayField = "ID";//刷新地图和TOOCotrolIActiveView pActiveView = axMapControl1.Map as IActiveView;pActiveView.Refresh();axTOCControl1.Update();}private void asdToolStripMenuItem_Click(object sender, EventArgs e) {//获取当前图层,并把它设置成IGeoFeatureLayer的实例IMap pMap = axMapControl1.Map;ILayer pLayer = pMap.get_Layer(0) as IFeatureLayer;IFeatureLayer pFeatureLayer = pLayer as IFeatureLayer;IGeoFeatureLayer pGeoFeatureLayer = pLayer as IGeoFeatureLayer;//获取图层上的featureIFeatureClass pFeatureClass = pFeatureLayer.FeatureClass;IFeatureCursor pFeatureCursor = pFeatureClass.Search(null, false);IFeature pFeature = pFeatureCursor.NextFeature();///////////////////////////////////////////////////////////////////////////////////////////////////////////////////////////////////////////////////////////////IBasicHistogram pHistogram;ITableHistogram pTableHistogram = new BasicTableHistogramClass();ITable pTable;IClassifyGEN pClassifyGEN = new EqualIntervalClass();long ClassesCount;IClassBreaksRenderer pClassBreaksRenderer = new ClassBreaksRendererClass(); IAlgorithmicColorRamp pAlgorithmicColorRamp = new AlgorithmicColorRampClass(); ISimpleMarkerSymbol pSimpleMarkerSymbol = new SimpleMarkerSymbolClass(); IEnumColors pEnumColors;object dataFrequency;object dataValue;double[] Classes;int numClass;numClass = 10;pTable = (ITable)pGeoFeatureLayer;//根据渲染字段得到渲染信息赋值给两个数组。
1ARCENGINE开发篇(原创) 建立范例程序并读取属性数据
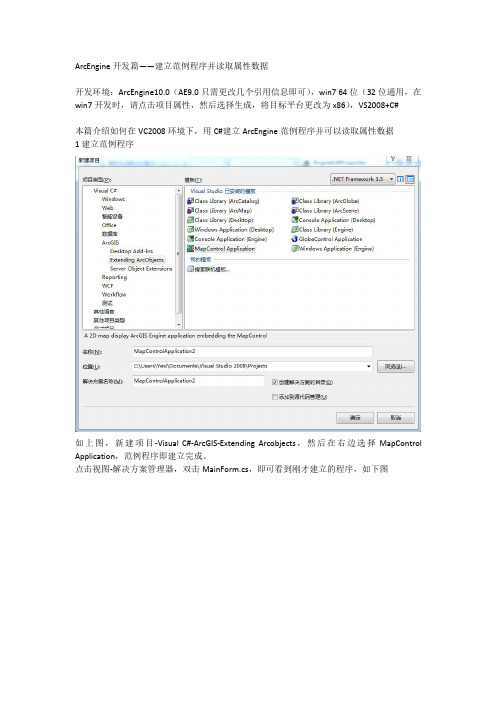
ArcEngine开发篇——建立范例程序并读取属性数据开发环境:ArcEngine10.0(AE9.0只需更改几个引用信息即可),win764位(32位通用,在win7开发时,请点击项目属性,然后选择生成,将目标平台更改为x86),VS2008+C#本篇介绍如何在VC2008环境下,用C#建立ArcEngine范例程序并可以读取属性数据1建立范例程序如上图,新建项目-Visual C#-ArcGIS-Extending Arcobjects,然后在右边选择MapControl Application,范例程序即建立完成。
点击视图-解决方案管理器,双击MainForm.cs,即可看到刚才建立的程序,如下图选择菜单项目,然后点击最下面一行,此处为MapControlApplication2属性,然后选择生成,将目标平台选择为x86(此处为64位win7才需要调整,32位略去)我们此时可以直接点击调试-开始执行(不调试),可以运行程序。
单击“+”号,即可添加shp数据集,如下图(旧金山街道)2.读取shp数据集属性数据首先我们添加一个工具条ToolStrip,然后在工具条上添加一个按钮,点击这个按钮,我们就可以逐条道路以对话框形式弹出其NAME这个属性值(注意:在本处street的shp数据集中有NAME这个属性字段)。
如上图,在公共容器中选择工具条控件ToolStrip,然后拖到右边的地图控件上边,然后点击工具条左边的新建按钮,新增一个按钮,我们取名为GetAttBtn,右键按钮,选择属性,然后在属性框中的最上面(Name)更改为GetAttBtn,在下面的Text更改为“点击显示属性”,如下图,然后双击按钮,为其添加响应函数。
在上面的响应函数中我们暂时只添加一个对话框测试。
如上图。
测试效果如下图下面我们将真正实现显示属性。
先将对话框注释掉添加ArcGIS引用,选择项目-添加引用,在.NET选项卡中选择ESRI.ArcGIS.Geodatabase,如下图,然后在代码最上面(类外)添加一句using ESRI.ArcGIS.Geodatabase;请看下面的代码(全部添加到注释掉的对话框代码的下面即可,即添加到按钮所对应的函数中即可)ILayer pLayer=axMapControl1.get_Layer(0);//得到当前地图窗口的第一个图层IFeatureLayer pFeatureLayer=pLayer as IFeatureLayer;//得到要素层///////////////////////////////////这里先得到Name是第几个属性字段//得到字段的索引值string fieldName="NAME";//定义属性字段名称IFields tIFields=pFeatureLayer.FeatureClass.Fields;//得到当前图层属性字段集int nFieldIndex=tIFields.FindField(fieldName);//得到属性字段索引/////////////////////////////////IFeatureCursor pFeatureCursor=pFeatureLayer.Search(null,false);//将迭代光标设置到要素集头IFeature pFeature=pFeatureCursor.NextFeature();//得到下一条要素(注:也是第一条要素)while(pFeature!=null){string strName=Convert.ToString(pFeature.get_Value(nFieldIndex));//得到属性字段索引值为nFieldIndex的属性值MessageBox.Show(strName);//以对话框的形式弹出属性值pFeature=pFeatureCursor.NextFeature();//将迭代指针移动到下一条要素}效果如下图:上面弹出的对话框显示的是第一条要素的NAME属性值本篇完,所有文档和代码均为原创,可以下载,谢绝转载!。
ArcGISEngine+C缓冲区分析及完整源码6页
1 概述缓冲区分析(Buffer)是对选中的一组或一类地图要素(点、线或面)按设定的距离条件,围绕其要素而形成一定缓冲区多边形实体,从而实现数据在二维空间得以扩展的信息分析方法。
缓冲区应用的实例有如:污染源对其周围的污染量随距离而减小,确定污染的区域;为失火建筑找到距其500米范围内所有的消防水管等。
2 缓冲区的基础缓冲区是地理空间,目标的一种影响范围或服务范围在尺度上的表现。
它是一种因变量,由所研究的要素的形态而发生改变。
从数学的角度来看,缓冲区是给定空间对象或集合后获得的它们的领域,而邻域的大小由邻域的半径或缓冲区建立条件来决定,因此对于一个给定的对象A,它的缓冲区可以定义为:P={x | d(x , A)<=r}(d一般是指欧式距离,也可以是其它的距离,其中r为邻域半径或缓冲区建立的条件)缓冲区建立的形态多种多样,这是根据缓冲区建立的条件来确定的,常用的对于点状要素有圆形,也有三角形、矩形和环形等;对于线状要素有双侧对称、双侧不对称或单侧缓冲区;对于面状要素有内侧和外侧缓冲区,虽然这些形体各异,但是可以适合不同的应用要求,建立的原理都是一样的。
点状要素,线状要素和面状要素的缓冲区示意图如下。
3 定制工具的使用1 打开工程GPBufferLayer\CSharp\GpBufferLayer.sln2 在VS2005内选择重新生成解决方案3 开发需要添加工具的工程4 在ToolBarControl上点右键,选择属性5 选择条目,点击添加6 在命令类中选择“自定义工具集”,选择“缓冲区分析”,可通过双击或者拖放到工具条上。
7 运行程序8 使用“选择要素”命令,选择需要建立缓冲区的要素(点或线)9 点击工具条上的“缓冲区分析按钮”,弹出缓冲区分析对话框选择要素选择缓冲区分析按钮10 选择缓存分析的图层,选择距离及单位,设置输出的图层11 点击分析按钮,当出现“分析完成”字样时,工作完成12 这时通过附加新的图层,即可看到结果4 核心源代码分析4.1 BufferSelectedLayerCmd.cs主要完成定制command的相关代码,具体原理可参见《ArcGIS Engine 中文开发指南》4.2 BufferDlg.cs为缓冲区分析的输入对话框。
arcengine

arcengine 缓冲区查询缓冲区查询特别有⽤,也很⽅便,照着别⼈的⾃⼰写了⼀个,记录⼀下。
缓冲区查询主要⽤到的核⼼接⼝就两个,ITopologcialOperator和ISpatialFilter这两个接⼝。
第⼀个接⼝⽤来构建缓冲区和进⾏其他的拓扑操作,第⼆个接⼝是空间过滤器,其中提供空间查询的各种关系。
这两个接⼝还有很多其他属性和⽅法,⽤到时⾃⾏查看帮助。
⼀下是缓冲区查询的核⼼代码,当然之前必须指定查找的⽬标图层和建⽴缓冲区的图层和对象。
IGeometry pGeometry = TestFeature.Shape;ITopologicalOperator pTopologicalOperator = pGeometry as ITopologicalOperator;pGeometry = pTopologicalOperator.Buffer(Distence);//Distence是缓冲距离pTopologicalOperator.Simplify();ISpatialFilter pSpatialfilter = new SpatialFilterClass();pSpatialfilter.Geometry = pGeometry;pSpatialfilter.SpatialRel = esriSpatialRelEnum.esriSpatialRelCrosses;pSpatialfilter.GeometryField = "Shape";ILayer pLayer = this.axMCl1.get_Layer(0);IFeatureLayer pFeatureLayer = pLayer as IFeatureLayer;IFeatureClass pFeatureClass = pFeatureLayer.FeatureClass;IFeatureCursor FeatureCursor = pFeatureClass.Search(pSpatialfilter, false);IFeature Feature = FeatureCursor.NextFeature();。
优-ArcEngine基础开发教程C#二次开发ArcGis

优-ArcEngine基础开发教程C#二次开发ArcGisArcGIS Engine基础开发教程(1)——创建第一个ArcGIS Engine 桌面应用程序1创建第一个ArcGIS Engine桌面应用程序ArcGIS Engine9.3提供了丰富的GIS组件方便用户快速的定制开发一个GIS应用程序,无需写代码即可实现GIS 数据加载,地图操作等功能甚至可以实现高级编辑以及空间分析功能。
接下来使用ArcGIS Engine9.3提供了MapControl Application模块来创建第一个ArcGIS Engine桌面应用程序,并为桌面应用应用程序提供编辑功能。
1.1目标1.创建第一个ArcGIS Engine桌面应用程序2.为应用程序添加编辑功能。
1.2准备工作1 .IDE:Visual Studio 2005/2008 2. ArcGIS Engine Developer kit 9.3 3. 制作ArcGIS实验数据地图文档MXD 1.3设计流程图1.4制作地图文档在ArcMap中加载数据后,点击保存生成一个*.mxd地图文档,如图1所示:1.5创建第一个ArcGIS Engine桌面应用程序在Visual Studio2008中新创建项à选择àArcGISàEngineàMapControl Application,点击确定,如图2所示:可以看到在Visual Studio中看到在新创建的项目中自动加载了ToolBarControl、T ocControl、LicenseControl、MapControl四个ArcGIS Engine控件以及一个.NET ToolStripMenuItem菜单控件,如图3所示:1.6加载MXD地图文档数据单击F5键运行程序,然后单击打开MXD地图文档按钮打开MXD 地图文档,如图4所示:可以看到应用程序把MXD地图文档加载到MapControl地图上,可以使用ToolbarControl提供的常用GIS 功能如:放大,缩小,信息查询等功能。
ArcGISEngineVC

+ ArcEngine一、初步开始 (1)二、鹰眼功能实现 (3)三、将地图导出为图片 (4)四、打印功能实现(如ArcMap中的打印对话框) (5)五、点击查询 (6)六、mapControl和 pageLayoutControl切换问题 (11)七、mapControl和 pageLayoutControl同步问题 (11)初步开始一、初步开始1.新建exe工程;2.在Application Type中选择SingleDocument单文档模式;在Generated Classes中选择CFormView,创建工程。
3.打开Dialog菜单下的IDD_EMEVALUATION_FORM,点击Toolbox,点击右键,选择Choose Items,弹出对话框,选择Com Components,选择Esri的控件,MapControl控件,TocControl控件(图层控制),LicenseControl控件,ToolbarControl控件等常用的控件。
4.在Toolbox中可以观察到添加了以上选择的控件,在对话框IDD_EMEV ALUATION_FORM中添加MapControl控件,TocControl控件(图层控制),LicenseControl控件,ToolbarControl控件;5.为以上控件添加变量;在*View.cpp中的OnSize函数中添加以下代码:if(0 == cx || 0 == cy || 0 == m_mapControl || 0 == m_tocControl || 0 == m_toolbarControl || 0 ==m_mapEyeControl) return;m_toolbarControl.MoveWindow(0,0,int(cx*0.5),25,TRUE);m_toolbarPLayControl.MoveWindow(int(cx*0.5),0,cx,25,TRUE);m_tocControl.MoveWindow(0,25,300,cy-250,TRUE);m_pagelayoutControl.MoveWindow(300,25,cx-300,cy-25,TRUE);m_mapControl.MoveWindow(300,25,cx-300,cy-25,TRUE);m_mapEyeControl.MoveWindow(0,cy-250,300,250,TRUE);将*.cpp中的m_pMainWnd->ShowWindow(SW_SHOWNORMAL)改为m_pMainWnd->ShowWindow(SW_SHOWMAXIMIZED)使窗口最大化。
C源码ArcEngine最短路径分析

C源码ArcEngine最短路径分析C源码ArcEngine最短路径分析ArcEngine 最短路径分析(源码)⼏何⽹络using System;using ESRI.ArcGIS.Carto;using ESRI.ArcGIS.Geometry;using ESRI.ArcGIS.Geodatabase;using /doc/691283738.htmlworkAnalysis; namespace GisEditor {////// 最短路径分析///public class ClsPathFinder{private IGeometricNetwork m_ipGeometricNetwork;private IMap m_ipMap;private IPointCollection m_ipPoints;private IPointToEID m_ipPointToEID;private double m_dblPathCost =0;private IEnumNetEID m_ipEnumNetEID_Junctions;private IEnumNetEID m_ipEnumNetEID_Edges;private IPolyline m_ipPolyline;#region Public Function//返回和设置当前地图public IMap SetOrGetMap{set{ m_ipMap = value;}get{return m_ipMap;}}//打开⼏何数据集的⽹络⼯作空间public void OpenFeatureDatasetNetwork(IFeatureDataset FeatureDa taset) {CloseWorkspace();if (!InitializeNetworkAndMap(FeatureDataset))Console.WriteLine( "打开network出错");}//输⼊点的集合public IPointCollection StopPoints{set{m_ipPoints= value;}get{return m_ipPoints;}}//路径成本public double PathCost{get {return m_dblPathCost;}}//返回路径的⼏何体public IPolyline PathPolyLine(){IEIDInfo ipEIDInfo;IGeometry ipGeometry;if(m_ipPolyline!=null)return m_ipPolyline;m_ipPolyline = new PolylineClass();IGeometryCollection ipNewGeometryColl = m_ipPolyline as IGeome tryCollection;ISpatialReference ipSpatialReference = m_ipMap.SpatialReferenc e;IEIDHelper ipEIDHelper = new EIDHelperClass();ipEIDHelper.GeometricNetwork = m_ipGeometricNetwork; ipEIDHelper.OutputSpatialReference = ipSpatialReference; ipEIDHelper.ReturnGeometries = true;IEnumEIDInfo ipEnumEIDInfo = ipEIDHelper.CreateEnumEIDInfo(m_i pEnumNetEID_Edges);int count = ipEnumEIDInfo.Count;ipEnumEIDInfo.Reset();for(int i =0;i{ipEIDInfo = ipEnumEIDInfo.Next();ipGeometry = ipEIDInfo.Geometry;ipNewGeometryColl.AddGeometryCollection( ipGeometry as IGeometryCollection);}return m_ipPolyline;}//解决路径public void SolvePath(string WeightName){try{int intEdgeUserClassID;int intEdgeUserID;int intEdgeUserSubID;int intEdgeID;IPoint ipFoundEdgePoint;double dblEdgePercent;/*PutEdgeOrigins⽅法的第⼆个参数要求是IEdgeFlag类型的数组,* 在VB等其他语⾔的代码中,只需传⼈该类型数组的第⼀个元素即* 可,但C#中的机制有所不同,需要作出如下修改:使⽤* ITraceFlowSolverGEN替代ITraceFlowSolver*/ITraceFlowSolverGEN ipTraceFlowSolver = new TraceFlowSolverClass() as ITraceFlowSolverGEN; INetSolver ipNetSolver = ipTraceFlowSolver as INetSolver;INetwork ipNetwork = m_/doc/691283738.htmlwork;ipNetSolver.SourceNetwork = ipNetwork;INetElements ipNetElements = ipNetwork as INetElements;int intCount = m_ipPoints.PointCount;//定义⼀个边线旗数组IEdgeFlag[] pEdgeFlagList = new EdgeFlagClass[intCount];for(int i = 0;i{INetFlag ipNetFlag = new EdgeFlagClass()as INetFlag;IPoint ipEdgePoint = m_ipPoints.get_Point(i);//查找输⼊点的最近的边线m_ipPointToEID.GetNearestEdge(ipEdgePoint, out intEdgeID,out ipFoundEdgePoint, out dblEdgePercent); ipNetElements.QueryIDs( intEdgeID, esriElementType.esriETEdge, out intEdgeUserClassID, out intEdgeUserID,out intEdgeUserSubI D);/doc/691283738.htmlerClassID = intEdgeUserClassID;/doc/691283738.htmlerID = intEdgeUserID;/doc/691283738.htmlerSubID = intEdgeUserSubID;IEdgeFlag pTemp = (IEdgeFlag)(ipNetFlag as IEdgeFlag); pEdgeFlagList[i]=pTemp;}ipTraceFlowSolver.PutEdgeOrigins(ref pEdgeFlagList); INetSchema ipNetSchema = ipNetwork as INetSchema; INetWeight ipNetWeight = ipNetSchema.get_WeightByName(WeightName);INetSolverWeights ipNetSolverWeights = ipTraceFlowSolver as I NetSolverWeights;ipNetSolverWeights.FromToEdgeWeight = ipNetWeight;//开始边线的权重ipNetSolverWeights.ToFromEdgeWeight = ipNetWeight;//终⽌边线的权重object [] vaRes =new object[intCount-1];//通过findpath得到边线和交汇点的集合ipTraceFlowSolver.FindPath(esriFlowMethod.esriFMConnected, esriShortestPathObjFn.esriSPObjFnMinSum,out m_ipEnumNetEID_Junctions,out m_ipEnumNetEID_Edges, intCount-1, ref vaRes);//计算元素成本m_dblPathCost = 0;for (int i =0;i{double m_Va =(double) vaRes[i];m_dblPathCost = m_dblPathCost + m_Va;}m_ipPolyline = null;}catch(Exception ex){Console.WriteLine(ex.Message);}}#endregion#region Private Function//初始化⼏何⽹络和地图private bool InitializeNetworkAndMap(IFeatureDataset FeatureDat aset){IFeatureClassContainer ipFeatureClassContainer;IFeatureClass ipFeatureClass ;IGeoDataset ipGeoDataset;ILayer ipLayer ;IFeatureLayer ipFeatureLayer;IEnvelope ipEnvelope, ipMaxEnvelope ;double dblSearchTol;INetworkCollection ipNetworkCollection = FeatureDataset as INe tworkCollection;int count = ipNetworkCollection.GeometricNetworkCount;//获取第⼀个⼏何⽹络⼯作空间m_ipGeometricNetwork = ipNetworkCollection.get_GeometricNetwor k(0);INetwork ipNetwork = m_/doc/691283738.htmlwork;if(m_ipMap!=null){m_ipMap = new MapClass();ipFeatureClassContainer = m_ipGeometricNetwork as IFeatureCla ssContainer;count = ipFeatureClassContainer.ClassCount;for(int i =0;i{ipFeatureClass = ipFeatureClassContainer.get_Class(i); ipFeatureLayer = new FeatureLayerClass(); ipFeatureLayer.FeatureClass = ipFeatureClass;m_ipMap.AddLayer( ipFeatureLayer);}}count = m_/doc/691283738.htmlyerCount;ipMaxEnvelope = new EnvelopeClass();for(int i =0;i{ipLayer = m_ipMap.get_Layer(i);ipFeatureLayer = ipLayer as IFeatureLayer;ipGeoDataset = ipFeatureLayer as IGeoDataset;ipEnvelope = ipGeoDataset.Extent;ipMaxEnvelope.Union( ipEnvelope);}m_ipPointToEID = new PointToEIDClass();m_ipPointToEID.SourceMap = m_ipMap;m_ipPointToEID.GeometricNetwork = m_ipGeometricNetwork;double dblWidth = ipMaxEnvelope.Width; double dblHeight = ipMaxEnvelope.Height;if( dblWidth > dblHeight)dblSearchTol = dblWidth / 100;elsedblSearchTol = dblHeight / 100;m_ipPointToEID.SnapTolerance = dblSearchTol; return true ;}//关闭⼯作空间private void CloseWorkspace(){m_ipGeometricNetwork = null;m_ipPoints = null;m_ipPointToEID = null;m_ipEnumNetEID_Junctions = null;m_ipEnumNetEID_Edges = null;m_ipPolyline = null;}#endregion}}备注:在调⽤该类时的次序:ClsPathFinder m_ipPathFinder;if(m_ipPathFinder==null)//打开⼏何⽹络⼯作空间{m_ipPathFinder = new ClsPathFinder();ipMap = this.m_ActiveView.FocusMap;ipLayer = ipMap.get_Layer(0);ipFeatureLayer = ipLayer as IFeatureLayer;ipFDB = ipFeatureLayer.FeatureClass.FeatureDataset;m_ipPathFinder.SetOrGetMap = ipMap;m_ipPathFinder.OpenFeatureDatasetNetwork(ipFDB);}private void ViewMap_OnMouseDown(object sender, ESRI.ArcGIS.MapCon trol.IMapControlEvents2_OnMouseDownEvent e)//获取地图上⿏标输⼊的点{IPoint ipNew ;if( m_ipPoints==null){m_ipPoints = new MultipointClass();m_ipPathFinder.StopPoints = m_ipPoints;}ipNew = ViewMap.ActiveView.ScreenDisplay.DisplayTransformation.ToMapPoint(e.x,e.y);object o = Type.Missing;m_ipPoints.AddPoint(ipNew,ref o,ref o);}m_ipPathFinder.SolvePath("Weight");//先解析路径IPolyline ipPolyResult = m_ipPathFinder.PathPolyLine();//最后返回最短路径⽹络数据集的最短路径这⾥的添加出发点或者⽬的点,是往“Facilities”或“Incidents”图层上添加元素。
arcengine下tin的三维显示 c#代码
ArcEngine+C# TIN相关三维功能模块介绍(一)1.TIN数据的加载//下面代码是打开E:"data" 文件夹下名称为tin 的TIN数据。
//定位TIN数据IWorkspaceFactory pWSFact = new TinWorkspaceFactoryClass();IWorkspace pWS = pWSFact.OpenFromFile(@"E:"data"", 0);ITinWorkspace pTinWS = pWS as ITinWorkspace;ITin pTin = pTinWS.OpenTin("tin");//将TIN变为TIN图层ITinLayer pTinLayer = new TinLayerClass();pTinLayer.Dataset = pTin; = "TIN";//用三维控件AxSceneControl加载(也可以用AxMapControl,但看到了只能是平面效果)this.axSceneControl1.Scene.AddLayer(pTinLayer, true);2.TIN图层属性设置这里介绍TIN模型Z轴缩放、沿Z轴上下偏移以及TIN的平面显示与三维显示之间的切换。
其效果与在ArcScene中右击TIN图层,点击属性下设置Z unit conversion factor和Base Heights的效果一样。
主要用到了访问三维数据属性的接口I3DProperties,这段代码也比较简单,相信大家稍微看一下就能明白,对应的功能可以复制后直接使用。
/// <summary>/// 获取TIN图层三维属性/// </summary>/// <param name="pTinLayer">TIN图层</param>/// <returns></returns>public I3DProperties get3DProps(ITinLayer pTinLayer){I3DProperties p3DProps = null;ILayerExtensions lyrExt = pTinLayer as ILayerExtensions;for (int i = 0; i < lyrExt.ExtensionCount; i++){if (lyrExt.get_Extension(i) is I3DProperties){p3DProps = lyrExt.get_Extension(i) as I3DProperties;}}return p3DProps;}/// <summary>/// TIN模型Z轴缩放,设置缩放因子,此函数要位于控件加载TIN图层事件后/// </summary>/// <param name="pTinLayer">TIN图层</param>/// <param name="ZFactor">缩放因子:0-1缩小;1不变;>1拉伸</param> public void SetTinLayerZFactor(ITinLayer pTinLayer, double ZFactor){I3DProperties p3DProps = get3DProps(pTinLayer);if (p3DProps != null){p3DProps.ZFactor = ZFactor;//设置高程缩放因子p3DProps.Apply3DProperties(pTinLayer);}}/// <summary>/// TIN模型整体上下偏移/// </summary>/// <param name="pTinLayer">TIN图层</param>/// <param name="offset">偏移量:正数向上偏移;负数向下偏移</param> public void SetTinLayerOffset(ITinLayer pTinLayer, double offset){I3DProperties p3DProps = get3DProps(pTinLayer);if (p3DProps != null){p3DProps.OffsetExpressionString = offset.ToString();p3DProps.Apply3DProperties(pTinLayer);}}/// <summary>///将TIN变为一个平面,并设置该平面的高程/// </summary>/// <param name="pTinLayer">TIN图层</param>/// <param name="tinHeight">平面的高程</param>public void SetTinLayerHeight(ITinLayer pTinLayer, double tinHeight) {I3DProperties p3DProps = get3DProps(pTinLayer);if (p3DProps != null){p3DProps.BaseOption = esriBaseOption.esriBaseExpression;p3DProps.BaseExpressionString = tinHeight.ToString();p3DProps.Apply3DProperties(pTinLayer);}}/// <summary>/// 将平面TIN还原为三维立体形式/// </summary>/// <param name="pTinLayer">TIN图层</param>public void SetTinAsBase(ITinLayer pTinLayer){I3DProperties p3DProps = get3DProps(pTinLayer);if (p3DProps != null){p3DProps.BaseOption = esriBaseOption.esriBaseSurface;p3DProps.BaseSurface = pTinLayer as IFunctionalSurface;p3DProps.Apply3DProperties(pTinLayer);}}3.TIN模型渲染TIN模型有多种渲染方案,如:单色面渲染(Faces)、高程分级渲染(Elevation)、网格线渲染(Edges)、结点渲染(Nodes)等,这些渲染方案可以在ArcScene中通过TIN图层属性中的Symbology轻松地设置。
- 1、下载文档前请自行甄别文档内容的完整性,平台不提供额外的编辑、内容补充、找答案等附加服务。
- 2、"仅部分预览"的文档,不可在线预览部分如存在完整性等问题,可反馈申请退款(可完整预览的文档不适用该条件!)。
- 3、如文档侵犯您的权益,请联系客服反馈,我们会尽快为您处理(人工客服工作时间:9:00-18:30)。
{
ILayer pLayer = null;
bool bFindLayer = false;
for (int i = 0; i < yerCount; i++)
axMapControlMain.Map.ClearSelection();
axMapControlMain.Refresh();
}
设置可选图层:
//全局变量中添加
string selectedlayerName; // 选择图层名
iFeatureLayer.Selectable = true;
}
}
else
{
iLayer = Tool.GetLayerByName(selectedlayerName, axMapControlMain);
{
pLayer = null;
}
}
if (bFindLayer)
{
//全局变量
public enum enumToolFlag
{
Select
}
IEnumFeature globalEnumFeature; // 选中要素集全局变量
private void btnSelect_Click(object sender, EventArgs e) //选择对象
pLayer = null;
}
}
}
else
{
r.bottom = e.y + 5;
r.top = e.y - 5;
r.left = e.x - 5;
r.right = e.x + 5;
pActiveView.ScreenDisplay.DisplayTransformation.TransformRect(pEnv, ref r, 4);
{
MessageBoxEx.Show(ex.ToString());
}
}
GetLayerByName函数:
public static ILayer GetLayerByName(string strLyrName, AxMapControl axMapControlMain)
private void btnClearSelect_Click(object sender, EventArgs e) //取消选择
{
axMapControlMain.MousePointer= esriControlsMousePointer.esriPointerDefault;
break;
{
axMapControlMain.MousePointer= esriControlsMousePointer.esriPointerDefault;
flag = enumToolFlag.Select;
}
axMapControlMain.Map.SelectByShape(pGeometry, null, false);
axMapControlMain.Refresh();
//获取选中要素
IMap pMap = axMapControlMain.Map;
private void btnSetSelectLayer_Click(object sender, EventArgs e)
{
try
{
//初始设置所有图层不可选
ILayer iLayer;
iFeatureLayer = (IFeatureLayer)iLayer;
iFeatureLayer.Selectable = false;
}
frmSetSelectLayer selectLayerFrm;
pEnv.SpatialReference = pActiveView.FocusMap.SpatialReference;
pGeometry = pEnv as IGeometry;
}
axMapControlMain.Map.ClearSelection();
axMapControlMain.Refresh();
在axMapControl1_OnMouseDown中写如下代码: Βιβλιοθήκη Switch (flag)
{
case enumToolFlag.Select: //选择元素
{
{
iLayer = Tool.GetLayerByName(axMapControlMain.get_Layer(i).Name, axMapControlMain);
iFeatureLayer = (IFeatureLayer)iLayer;
IFeatureLayer iFeatureLayer;
for (int i = 0; i < yerCount; i++)
{
iLayer = Tool.GetLayerByName(axMapControlMain.get_Layer(i).Name, axMapControlMain);
globalEnumFeature = axMapControlMain.Map.FeatureSelection as IEnumFeature;
globalEnumFeature.Reset();
}
break;
}
取消选择:
{
pLayer = pComLyr.get_Layer(j);
if (.Equals(strLyrName))
{
{
ICompositeLayer pComLyr = pLayer as ICompositeLayer;
for (int j = 0; j < pComLyr.Count; j++)
{
pLayer = axMapControlMain.Map.get_Layer(i);
if (pLayer is IGroupLayer || pLayer is ICompositeLayer)
bFindLayer = true;
break;
}
else
{
selectLayerFrm = new frmSetSelectLayer(axMapControlMain);
selectLayerFrm.ShowDialog();
selectedlayerName = selectLayerFrm.selectedLayerName;
//选择要素
IGeometry pGeometry = axMapControlMain.TrackRectangle();
IEnvelope pEnv;
IActiveView pActiveView = axMapControlMain.ActiveView;
//IMap pMap = axMapControlMain.Map;
pEnv = pGeometry as IEnvelope;
if (pEnv.IsEmpty == true)
{
ESRI.ArcGIS.Display.tagRECT r;
if ( == strLyrName)
{
bFindLayer = true;
}
else
iFeatureLayer = (IFeatureLayer)iLayer;
iFeatureLayer.Selectable = true;
}
}
catch (Exception ex)
if (selectedlayerName == null) return;
if (selectedlayerName == "所有图层")
{
for (int i = 0; i < yerCount; i++)
