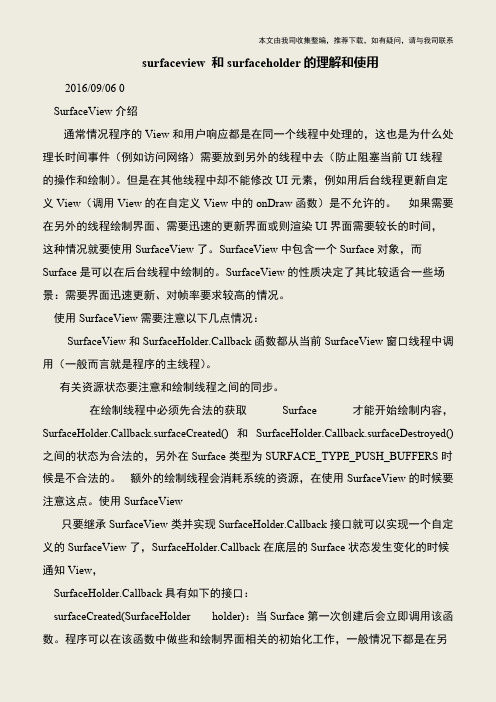
A0230使用ViewHolder
【IT专家】surfaceview 和surfaceholder的理解和使用

本文由我司收集整编,推荐下载,如有疑问,请与我司联系surfaceview 和surfaceholder的理解和使用2016/09/06 0 SurfaceView介绍 通常情况程序的View和用户响应都是在同一个线程中处理的,这也是为什么处理长时间事件(例如访问网络)需要放到另外的线程中去(防止阻塞当前UI线程的操作和绘制)。
但是在其他线程中却不能修改UI元素,例如用后台线程更新自定义View(调用View的在自定义View中的onDraw函数)是不允许的。
如果需要在另外的线程绘制界面、需要迅速的更新界面或则渲染UI界面需要较长的时间,这种情况就要使用SurfaceView了。
SurfaceView中包含一个Surface对象,而Surface是可以在后台线程中绘制的。
SurfaceView的性质决定了其比较适合一些场景:需要界面迅速更新、对帧率要求较高的情况。
使用SurfaceView需要注意以下几点情况: SurfaceView和SurfaceHolder.Callback函数都从当前SurfaceView窗口线程中调用(一般而言就是程序的主线程)。
有关资源状态要注意和绘制线程之间的同步。
在绘制线程中必须先合法的获取Surface 才能开始绘制内容,SurfaceHolder.Callback.surfaceCreated() 和SurfaceHolder.Callback.surfaceDestroyed() 之间的状态为合法的,另外在Surface类型为SURFACE_TYPE_PUSH_BUFFERS时候是不合法的。
额外的绘制线程会消耗系统的资源,在使用SurfaceView的时候要注意这点。
使用SurfaceView 只要继承SurfaceView类并实现SurfaceHolder.Callback接口就可以实现一个自定义的SurfaceView了,SurfaceHolder.Callback在底层的Surface状态发生变化的时候通知View, SurfaceHolder.Callback具有如下的接口: surfaceCreated(SurfaceHolder holder):当Surface第一次创建后会立即调用该函数。
adapt使用技巧

首先我要说明的是这里“android用户编程技巧”系列的文章中所涉及的技术技巧以及讲述方式不是我本人原创。
这些技巧是来自2009年 google开发者日(Google Developer Day 2009)上,google公司一位负负责android系统framework层和浏览器开发的一位工程师(很抱歉没有能记住她的名字)的技巧,因为是在开发者大会上演讲是分享的,所以很多人称之为官方的技巧。
当然演讲的具体内容大家可以通过网络轻易得到我也会在后期的文章中给出演讲视频的地址和文档下载地址。
我这这里写出来主要是想这样的技术人跟多的知道和使用。
过了一年的时间或许这些技巧中有些已经有待更新,那么就让我们一起在这里讨论吧。
重点说演讲中的第一部分——如何使用Adapter。
adapter和listview以及数据源之间的关系listview相信是大家熟知的一种视图控件了,那么在Adapter相信大家也是一定不会陌生。
正如这位是工程师说话Adapter是listview和数据源之间的中间人。
关系如图所示。
图片是演讲时所用ppt中的图片。
adapte listview 数据源之间的关系图当我们滑动listview的时候每一条数据进入可见区域的时候adapter的getView方法就会被调用,返回代表具体数据的视图。
那么当我们的listview 中有多条数据的时候(一般都是有多条数据的),getView方法就会反复多次的频繁调用。
这样的listview就可以显示很多数据,即成百上千条数据。
那么显而易见,由于getview方法是频繁调用的我们应该经历的在这个方法中尽可能少的产生对象,最大可能大的提高这个方法的工作效率。
这样我们的 list的更新速度才不至于太慢。
剖析listview让我们来虚拟一个listview 我们假设这个listview的可见区域中有7个listview,当我们用手指向上滑动一个item的时候,第一条数据就离开了可见区域。
RecyclerView适配器的超省写法

RecyclerView适配器的超省写法RecycleView 作为新出的控件.他规范了 Viewholder 的写法.但是总感觉适配器的写法过于冗长.怎么办呢?我们来简化他.ViewHolder 的实现方式和ListView适配器的超省写法中的ViewHodler 是一样的ViewHolder.class1.public class ViewHolder {2.private SparseArray<View> viewHolder;3.private View view;4.5.public static ViewHolder getViewHolder(View view){6. ViewHolder viewHolder = (ViewHolder) view.getTag();7.if (viewHolder == null) {8. viewHolder = new ViewHolder(view);9. view.setTag(viewHolder);10. }11.return viewHolder;12. }13.private ViewHolder(View view) {14.this.view = view;15. viewHolder = new SparseArray<View>();16. view.setTag(viewHolder);17. }18.public <T extends View> T get(int id) {19. View childView = viewHolder.get(id);20.if (childView == null) {21. childView = view.findViewById(id);22. viewHolder.put(id, childView);23. }24.return (T) childView;25. }26.27.public View getConvertView() {28.return view;29. }30.31.public TextView getTextView(int id) {32.33.return get(id);34. }35.public Button getButton(int id) {36.37.return get(id);38. }39.40.public ImageView getImageView(int id) {41.return get(id);42. }43.44.public void setTextView(int id,CharSequence charSequence){45. getTextView(id).setText(charSequence);46. }47.48.}我们继承 RecyclerView.Adapter<RVHolder>AutoRVAdapter.class1.public abstract class AutoRVAdapter extends RecyclerView.Adapter<RVHolder> {2.3.4.public List<?> list;5.6.private Context context;7.8.public AutoRVAdapter(Context context, List<?> list) {9.this.list = list;10.this.context = context;11. }12.13.@Override14.public RVHolder onCreateViewHolder(ViewGroup parent, int viewType) {15. View view = LayoutInflater.from(context).inflate(onCreateViewLayoutID(viewType), null);16.17.return new RVHolder(view);18. }19.20.public abstract int onCreateViewLayoutID(int viewType);21.22.23.@Override24.public void onViewRecycled(final RVHolder holder) {25.super.onViewRecycled(holder);26. }27.28.@Override29.public void onBindViewHolder(final RVHolder holder, final int position) {30.31. onBindViewHolder(holder.getViewHolder(), position);32.if (onItemClickListener != null) {33. holder.itemView.setOnClickListener(newView.OnClickListener() {34.@Override35.public void onClick(View v) {36. onItemClickListener.onItemClick(null, v, holder.getPosition(), holder.getItemId());37. }38. });39. }40.41. }42.43.public abstract void onBindViewHolder(ViewHolder holder, int position);44.45.@Override46.public int getItemCount() {47.return list.size();48. }49.50.private AdapterView.OnItemClickListener onItemClickListener;51.52.public AdapterView.OnItemClickListener getOnItemClickListener() {53.return onItemClickListener;54. }55.56.public void setOnItemClickListener(AdapterView.OnItemClickListener onItemClickListener) {57.this.onItemClickListener = onItemClickListener;58. }59.}RVHolder.class 继承 RecyclerView.ViewHolder1.public class RVHolder extends RecyclerView.ViewHolder {2.3.4.private ViewHolder viewHolder;5.6.public RVHolder(View itemView) {7.super(itemView);8. viewHolder=ViewHolder.getViewHolder(itemView);9. }10.11.12.public ViewHolder getViewHolder() {13.return viewHolder;14. }15.16.}到此,结束了我们新写的适配器继承AutoRVAdapter 实现onCreateViewLayoutID 和onBindViewHolder 方法即可.onCreateViewLayoutID->返回item 的布局.onBindViewHolder->绑定数据源.1.public class DemoRVAdapter extends AutoRVAdapter {2.public RecyclerAdapter(Context context, List<?>list) {3.super(context, list);4. }5.6.@Override7.public int onCreateViewLayoutID(int viewType) {8.return yout.item;9. }10.11.@Override12.public void onBindViewHolder(ViewHolder holder,int position) {13.14. Entity item=(Entity) list.get(position);15. vh.getTextView().setText(item.getName());16. vh.getTextView(R.id.age).setText(item.getAge());17. vh.setText(R.id.height,item.getHeight());18. }19.}。
【IT专家】无条件布局,来自视图适配器的通胀:应使用View Holder模式

本文由我司收集整编,推荐下载,如有疑问,请与我司联系无条件布局,来自视图适配器的通胀:应使用View Holder 模式无条件布局,来自视图适配器的通胀:应使用View Holder 模式[英]Unconditional layout, inflation from view adapter: Should use View Holder pattern Unconditional layout inflation from view adapter: Should use View Holder pattern (use recycled view passed into this method as the second parameter) for smoother scrolling.来自视图适配器的无条件布局膨胀:应使用View Holder 模式(使用传递给此方法的循环视图作为第二个参数)以实现更平滑的滚动。
on:上:convertView = vi.inflate(yout.activity_friend_list_row, parent, false); I have a base adapter with a CheckBox implemented and I have added a tag to make the CheckBoxwork.我有一个实现了CheckBox 的基础适配器,我添加了一个标签以使CheckBox 工作。
Here is the code:这是代码:public View getView(final int position, View convertView, ViewGroup parent) ViewHolder mViewHolder; mViewHolder = new ViewHolder(); LayoutInflater vi = (LayoutInflater) activity.getSystemService(YOUT_INFLATER_SERVICE); convertView = vi.inflate(yout.activity_friend_list_row, parent, false); mViewHolder.cb = (CheckBox) convertView.findViewById(R.id.checkBox); convertView.setTag(mViewHolder); if (InviteFriends.isChecked[position] == true) mViewHolder.cb.setChecked(true); else mViewHolder.cb.setChecked(false); mViewHolder.cb.setOnCheckedChangeListener(new OnCheckedChangeListener() @Override public void onCheckedChanged(CompoundButton buttonView, boolean ischecked) if (buttonView.isChecked()) InviteFriends.isChecked[position] = true; else。
ViewHolder工具类实现

ViewHolder工具类实现在开发APP的过程中,攻城狮少不了要跟ListView、GridView这些组件眉来眼去,暗送几波秋波。
自然原生态美人BaseAdapter更是程序员的最爱,有了它,我们想怎么干就能怎么干,嘿嘿,你懂的哈哈~前言在开发APP的过程中,攻城狮少不了要跟ListView、GridView这些组件眉来眼去,暗送几波秋波。
自然原生态美人BaseAdapter更是程序员的最爱,有了它,我们想怎么干就能怎么干,嘿嘿,你懂的哈哈~但是,每次写一个BaseAdapter,我们都很自觉的给他写一个ViewHolder,一两个还好,万一应用程序中有数不清的ListView,呵呵~你妹!千篇一律,看得都审美疲劳。
作为最伟大的第二十二世纪的程序员们,脱掉、搞上永远是我们最真挚的追求,所以我们要怎么将ViewHolder从BaseAdapter中脱掉呢?绝非不是不用,而是要将其搞成一个华丽丽的工具类实现,收入角落那个寂寞得tools类中。
ViewHolder的实现我觉得应该简略的介绍下ViewHolder的实现,谷歌很聪明的在Adapter中运用了复用View 的思想,自然让我们的屌丝机也能泡上一些白富美应用多了一点点可能。
ViewHolder的具体实现基本体现在BaseAdapter的getView(int position, View convertView, ViewGroup parent) 这个方法里面,参见下面的代码:1. @Override2. public View getView(int position, View convertView, ViewGroup parent) {3. ViewHolder holder;4. if (convertView == null) {5. convertView = inflater.inflate(yout.listview_item_layout, parent, false);6. holder = new ViewHolder();7. holder.studentName = (TextView) convertView.findViewById(R.id.student_name);8. holder.studentAge = (TextView) convertView.findViewById(R.id.student_age);9. convertView.setTag(holder);10. }11. else {12. holder = (ViewHolder) convertView.getTag();13. }14. Student data = (Student) getItem(position);15. holder.studentName.setText(data.getName());16. holder.studentAge.setText(data.getAge());17. return convertView;18. }19.20. class ViewHolder {21. public TextView studentName;22. public TextView studentAge;23. }很明显,大家不要问我ViewHolder在哪里,稍微把目光往上扶一扶就看到那个大大的class ViewHolder 。
Android的viewHolder模式解剖

Android的viewHolder模式解剖ListView之BaseAdapter的基本使用以及ViewHolder模式。
话说开发用了各种Adapter之后感觉用的最舒服的还是BaseAdapter,尽管使用起来比其他适配器有些麻烦,但是使用它却能实现很多自己喜欢的列表布局,比如ListView、GridView、Gallery、Spinner等等。
它是直接继承自接口类Adapter 的,使用BaseAdapter时需要重写很多方法,其中最重要的当属getView,因为这会涉及到ListView优化等问题,其他的方法可以参考链接的文章BaseAdapter与其他Adapter有些不一样,其他的Adapter可以直接在其构造方法中进行数据的设置,比如SimpleAdapter adapter = new SimpleAdapter(this, getData(),yout.list_item, newString[]{"img","title","info",newint[]{R.id.img, R.id.title,}});但是在BaseAdapter中需要实现一个继承自BaseAdapter的类,并且重写里面的很多方法,例如class MyAdapter extends BaseAdapter{ private Context context; public MyAdapter(Context context) {this.context = context;} @Overridepublic int getCount() {// How many items are in the data set represented by this Adapter.(在此适配器中所代表的数据集中的条目数)return0;} @Overridepublic Object getItem(int position) { // Get the data item associated with the specified position in the data set.(获取数据集中与指定索引对应的数据项)returnnull;} @Overridepublic long getItemId(int position) {// Get the row id associated with the specified position in the list.(取在列表中与指定索引对应的行id)return0;} @Overridepublic View getView(int position, View convertView, ViewGroup parent) {// Get a View that displays the data at the specified position in the data set.returnnull;}}这里面没什么难度,但是这个getView方法必须好好处理,也是最麻烦的第一种:没有任何处理,不建议这样写。
Android通过ViewHolder优化适配器的实现方法(必看)

Android通过ViewHolder优化适配器的实现⽅法(必看)Adapter类的定义:Adapter对象是AdapterView和底层数据见的桥梁。
Adapter⽤于访问数据项,并且负责为数据项⽣成视图AdapterView是⼀个抽象类,⽤于那些需要通过Adapter填充⾃⾝的视图,其常见⼦类是ListView。
显⽰AdapterView时会调⽤Adapter的getView()⽅法创建并添加每个⼦条⽬的视图。
Adapter的getView()⽅法就是⽤来创建这些视图的,Adapter并不会为每⾏数据都创建⼀个新视图,⽽是提供了回收旧视图的⽅法。
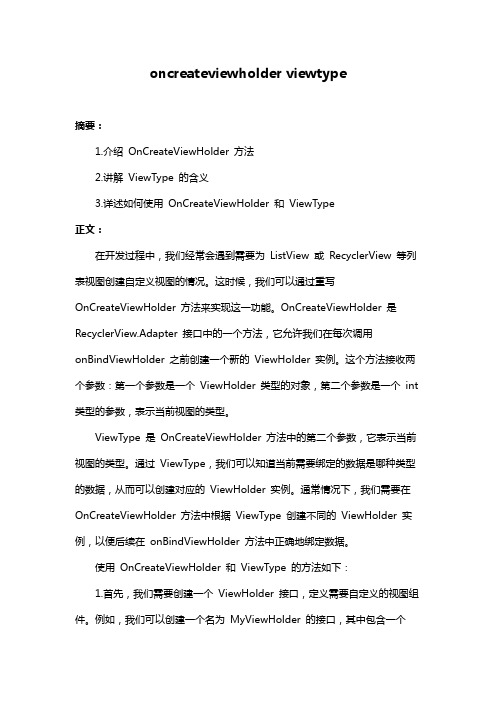
运⾏机制简单说就是当getView()⽅法被调⽤是,如果convertView参数不为null,就使⽤convertView,不⽤新建视图,通过convertView.findViewById()⽅法获取每个UI控件的引⽤,然后使⽤与当前项的位置绑定的数据来填充视图为了优化,使⽤ViewHolder模式,ViewHolder是⼀个静态类,可以⽤于保存每⾏的视图以避免每次调⽤getView时都会调⽤findViewById()public class Hack25Activity extends ListActivity {private static final int MODEL_COUNT = 30;@Overrideprotected void onCreate(Bundle savedInstanceState) {super.onCreate(savedInstanceState);setListAdapter(new ModelAdapter(this, 0, buildModels()));}private List<Model> buildModels() {final ArrayList<Model> ret = new ArrayList<Model>(MODEL_COUNT); for (int i = 0; i < MODEL_COUNT; i++) {final Model model = new Model();model.setImage(R.mipmap.ic_launcher);model.setText1("Name " + i);model.setText2("Description " + i);ret.add(model);}return ret;}}Model.javapublic class Model {private String mText1;private String mText2;private int mImageResId;public String getText1() {return mText1;}public void setText1(String text1) {mText1 = text1;}public String getText2() {return mText2;}public void setText2(String text2) {mText2 = text2;}public int getImage() {return mImageResId;}public void setImage(int imageResId) {mImageResId = imageResId;}}ModelAdapter.javapublic class ModelAdapter extends ArrayAdapter<Model> {private LayoutInflater mInflater;public ModelAdapter(Context context, int textViewResourceId,List<Model> objects) {super(context, textViewResourceId, objects);mInflater = LayoutInflater.from(context);}@Overridepublic View getView(int position, View convertView, ViewGroup parent) {final ViewHolder viewHolder;if (convertView == null) {convertView = mInflater.inflate(yout.row_layout, parent,false);viewHolder = new ViewHolder();viewHolder.imageView = (ImageView) convertView.findViewById(R.id.image);viewHolder.text1 = (TextView) convertView.findViewById(R.id.text1);viewHolder.text2 = (TextView) convertView.findViewById(R.id.text2);convertView.setTag(viewHolder);} else {viewHolder = (ViewHolder) convertView.getTag();}Model model = getItem(position);viewHolder.imageView.setImageResource(model.getImage());viewHolder.text1.setText(model.getText1());viewHolder.text2.setText(model.getText2());return convertView;}private static class ViewHolder {public ImageView imageView;public TextView text1;public TextView text2;}}row_layout.xml<?xml version="1.0" encoding="utf-8"?><RelativeLayout xmlns:android="/apk/res/android"android:layout_width="fill_parent"android:layout_height="wrap_content" ><ImageViewandroid:id="@+id/image"android:layout_width="wrap_content"android:layout_height="wrap_content"android:layout_alignParentLeft="true"android:layout_centerVertical="true" /><LinearLayoutandroid:layout_width="fill_parent"android:layout_height="wrap_content"android:layout_centerVertical="true"android:layout_toRightOf="@id/image"android:orientation="vertical" ><TextViewandroid:id="@+id/text1"android:layout_width="fill_parent"android:layout_height="wrap_content" /><TextViewandroid:id="@+id/text2"android:layout_width="fill_parent"android:layout_height="wrap_content" /></LinearLayout></RelativeLayout>以上代码就基本实现了功能不过每次都⾃定义ViewHolder⽐较繁琐,在⽹上找了⼀个⼯具类,共享⼀下ViewHolder.javapublic class ViewHolder {public static <T extends View> T get(View view, int id) {SparseArray<View> viewHolder = (SparseArray<View>) view.getTag();if (viewHolder == null) {viewHolder = new SparseArray<View>();view.setTag(viewHolder);}View childView = viewHolder.get(id);if (childView == null) {childView = view.findViewById(id);viewHolder.put(id, childView);}return (T) childView;}}使⽤⽅法:@Overridepublic View getView(int position, View convertView, ViewGroup parent) {if (convertView == null) {convertView = LayoutInflater.from(context).inflate(yout.banana_phone, parent, false);}ImageView bananaView = ViewHolder.get(convertView, R.id.banana);TextView phoneView = ViewHolder.get(convertView, R.id.phone);BananaPhone bananaPhone = getItem(position);phoneView.setText(bananaPhone.getPhone());bananaView.setImageResource(bananaPhone.getBanana());return convertView;}以上这篇Android 通过ViewHolder优化适配器的实现⽅法(必看)就是⼩编分享给⼤家的全部内容了,希望能给⼤家⼀个参考,也希望⼤家多多⽀持。
android 的bindviewholder用法

android 的bindviewholder用法在Android中,RecyclerView是一个高度可定制和灵活的列表视图,我们可以使用它来显示大量的数据。
它使用了ViewHolder模式来优化列表的性能。
ViewHolder是RecyclerView的一个内部类,它用于缓存列表项的视图以便重用。
通过ViewHolder模式,我们可以避免频繁地进行findViewById操作,提高列表的滑动流畅性和性能。
在RecyclerView中,需要自定义一个继承自RecyclerView.Adapter的适配器类来处理数据和视图的绑定。
在适配器类中,我们需要覆盖以下三个方法:onCreateViewHolder、onBindViewHolder和getItemCount。
1. onCreateViewHolder方法:onCreateViewHolder方法会在RecyclerView需要新的ViewHolder对象来表示列表项时调用。
在这个方法中,我们需要创建并返回一个ViewHolder对象,该对象关联着列表项的视图。
```java@Overridepublic ViewHolder onCreateViewHolder(ViewGroup parent, int viewType) {View view =LayoutInflater.from(parent.getContext()).inflate(yout.item_lay out, parent, false);ViewHolder viewHolder = new ViewHolder(view);return viewHolder;}```在这个方法中,我们需要通过LayoutInflater来加载列表项的布局,然后用加载的布局来创建ViewHolder对象。
在这个例子中,我们使用inflate方法将item_layout布局文件转换为View对象,并传入parent参数作为父布局,并设置attachToRoot参数为false,因为我们将在后面的onBindViewHolder方法中手动将视图附加到root。
oncreateviewholder viewtype

oncreateviewholder viewtype摘要:1.介绍OnCreateViewHolder 方法2.讲解ViewType 的含义3.详述如何使用OnCreateViewHolder 和ViewType正文:在开发过程中,我们经常会遇到需要为ListView 或RecyclerView 等列表视图创建自定义视图的情况。
这时候,我们可以通过重写OnCreateViewHolder 方法来实现这一功能。
OnCreateViewHolder 是RecyclerView.Adapter 接口中的一个方法,它允许我们在每次调用onBindViewHolder 之前创建一个新的ViewHolder 实例。
这个方法接收两个参数:第一个参数是一个ViewHolder 类型的对象,第二个参数是一个int 类型的参数,表示当前视图的类型。
ViewType 是OnCreateViewHolder 方法中的第二个参数,它表示当前视图的类型。
通过ViewType,我们可以知道当前需要绑定的数据是哪种类型的数据,从而可以创建对应的ViewHolder 实例。
通常情况下,我们需要在OnCreateViewHolder 方法中根据ViewType 创建不同的ViewHolder 实例,以便后续在onBindViewHolder 方法中正确地绑定数据。
使用OnCreateViewHolder 和ViewType 的方法如下:1.首先,我们需要创建一个ViewHolder 接口,定义需要自定义的视图组件。
例如,我们可以创建一个名为MyViewHolder 的接口,其中包含一个TextView 和一个Button。
2.然后,我们需要在Adapter 类中实现OnCreateViewHolder 方法。
在这个方法中,我们需要根据传入的ViewType 参数创建对应的ViewHolder 实例。
例如,如果我们有两个不同的数据类型(如Type1 和Type2),我们可以分别创建对应类型的ViewHolder 实例。
对convertview和viewholder的理解

对convertview和viewholder的理解
ConvertView与ViewHolder的区别
ConvertView:
ConvertView 是每个item对应的缓存,在ListView或者GridView中,它会把每一个item都缓存起来,用于循环滚动从而可以提高效率,因为滚动的过程中,仅仅需要调整item的位置而不用重复去创建view。
在某一个item显示的时候,他就会把以前的item缓存起来。
当它失去了显示的时候,就会把缓存起来的item重新显示出来。
ViewHolder:
ViewHolder是一个非常重要的优化,其主要目的是通过避免重复的findViewById操作来节省内存,并且也可以提升View的加载效率。
ViewHolder的模式就是把每个item当中的控件都存放到一个ViewHolder类当中,然后通过ViewHolder来实例化控件,在滚动的时候只需要取出ViewHolder就可以,不必重复实例化控件。
总结:
ConvertView用于缓存item ,可以有效减少创建View的重复操作,从而提高效率。
ViewHolder是一种优化,用于存放每个item当中的控件,节省内存和提高控件加载效率。
- 1 -。
contextholder类

contextholder类全文共四篇示例,供读者参考第一篇示例:ContextHolder类是一个关键的类,它在软件开发中扮演着重要的角色。
它的作用是在整个应用程序中存储和管理应用程序的上下文信息,使得这些信息可以在不同的组件之间共享和访问。
在现代的软件开发中,应用程序通常会涉及到多个不同的组件和模块,这些组件和模块之间需要共享一些共同的信息来实现协同工作。
ContextHolder类就是负责管理这些共享的上下文信息的工具。
在很多情况下,应用程序中的各个组件需要访问一些全局的信息,比如用户登录信息、配置信息、国际化信息等。
如果每个组件都去单独获取这些信息,就会显得非常麻烦和低效。
而ContextHolder类的作用就是将这些信息统一存储在一个地方,供所有组件共享和访问。
这样,每个组件只需要通过ContextHolder类来获取这些信息即可,大大简化了代码的编写和维护工作。
ContextHolder类通常会以单例模式实现,这意味着在整个应用程序中只会存在一个ContextHolder实例。
这样就可以保证上下文信息的一致性和完整性,避免出现数据不一致的情况。
ContextHolder类通常会提供一些方便的方法来访问和更新上下文信息,比如get和set方法等。
ContextHolder类的实现方式有很多种,其中比较常见的是使用线程本地变量(ThreadLocal)来存储上下文信息。
线程本地变量是一种特殊的变量,它只能被当前线程访问,不会被其他线程共享。
使用线程本地变量可以保证上下文信息的线程安全性,避免出现多个线程同时访问上下文信息导致数据混乱的情况。
ContextHolder类还可以结合AOP(面向切面编程)技术来实现。
AOP是一种编程范式,它的核心思想是将应用程序的业务逻辑和横切关注点进行分离,使得业务逻辑与横切关注点的实现可以独立修改而互不影响。
通过AOP的方式,我们可以在应用程序的各个关键点插入一些处理逻辑,比如在方法调用前后保存和获取上下文信息,实现上下文信息的自动传递和管理。
DCS800-EP 230V Conversion Kit 用户指南说明书

Instructions on how to convert460 Volt DCS800-EP panel drive for 230 Volt operationIMPORTANTRefer to the DCS800-EP Installation and Start Up Manual and the DCS800 Hardware or Firmware manuals for detailed information on drive installation and operation.The following table identifies the proper kit to convert the listed drive panel to 230 Volt operation. Make certain that you have the proper kit for your drive.Drive Panel Type CodePanel Frame ConversionKitNon-Regenerative(2Q) Regenerative(4Q)DCS800-EP1-0020-05DCS800-EP2-0025-05 A 230 VAC Supply-1DCS800-EP1-0045-05DCS800-EP2-0050-05 A 230 VAC Supply-1DCS800-EP1-0065-05DCS800-EP2-0075-05 A 230 VAC Supply-1DCS800-EP1-0090-05DCS800-EP2-0100-05 A 230 VAC Supply-1DCS800-EP1-0125-05DCS800-EP2-0140-05 A 230 VAC Supply-1DCS800-EP1-0180-05- B 230 VAC Supply-1 -DCS800-EP2-0200-05 B 230 VAC Supply-1 DCS800-EP1-0230-05DCS800-EP2-0260-05 B 230 VAC Supply-1DCS800-EP1-0315-05DCS800-EP2-0350-05 B 230 VAC Supply-1DCS800-EP1-0405-05DCS800-EP2-0450-05 C 230 VAC Supply-1DCS800-EP1-0470-05DCS800-EP2-0520-05 C 230 VAC Supply-1DCS800-EP1-0610-05DCS800-EP2-0680-05 C 230 VAC Supply-1 Note: If “+S235” suffix is shown on the product type code (as shown on panel ratings nameplate), then it has been factory configured for 230 Vac operation.INTRODUCTIONReconfiguring a 460 Vac DCS800-EP panel drive for 230 Vac operation can be easily accomplished by using a conversion kit and following the steps below. These steps are intended as a guide and may not cover all required changes for every application. It is the user’s responsibility to consider all conditions before restarting the application.________________________________________________________________________ Important! Only qualified electricians are allowed to install and maintain the drive. Neverwork on the drive, motor cable or motor or attempt reconfiguration when power is applied.________________________________________________________________________ ________________________________________________________________________ Most DCS800-EP panel drives are shipped ready for 460 Vac input power connection.Panel drives that are prewired for 230 Vac are clearly marked with a sticker on the panelratings nameplate or with the suffix “+S235” in the product type code. These instructionsdo not apply to drives already configured for 230 Vac operation.________________________________________________________________________ Panel A - DCS800-EPx-0020-05 thru DCS800-EPx-0140-05The Control Circuit transformer is located under the DCS800 drive module.1.If the DCS800-EP panel drive is already installed, disconnect and lock out all sources of power.2.Remove the cover from the DCS800 module by removing the control panel and pressing down on the twotabs at the lower corners with a screwdriver.Panel A - Continued3.Disconnect the (5) pull-apart control terminal blocksas shown. Then disconnect (1) pull-apart terminalblock at the top of the drive module for the fans. (not shown)4.Remove the (4) drive module mounting screws andcarefully move the module to allow access to thecontrol circuit transformer. Avoid unnecessary stress on any power or control wires.5.Remove insulator plate by unscrewing the (4)mounting screws.Panel A - Continued6. Remove the jumper between H2 and H3, noting that this isactually two jumpers stacked together. Separate the two and jumper H1 to H3 and H2 to H4. Confirm that all connections are tight.See wiring diagram on page 7.7.Secure the insulator plate using the (4) mounting screws. Replace the drive module to its original positionand replace the (4) mounting screws. Confirm that the screws are tight.8.Reconnect the (5) pull apart terminal blocks removed in step 3, and the fan terminal block on top of thedrive module. Then replace the drive module cover, secure, and replace the control panel.The control circuit transformer fuses are located above the drive module and are marked F4, F5 and F6.9. Pull the F4 and F5 fuse holders open and replace the (2)ATQR1-1/8 with the (2) ATQR2 supplied in the kit. Close the holders when finished.IMPORTANT: Be sure to use the correct fuses; the kit maycontain more than one type.10. Affix the “wired for 230Vac” label near the ratingsnameplate located to the left of the drive module.Panel A – Test and Setup________________________________________________________________________Important! Only qualified electricians are allowed to install and maintain the drive. Do not proceed to additional steps until the correct wiring is complete.________________________________________________________________________11. Pull the F6 fuse holder open to disconnect the secondary from the drive logic.12.Apply 230 Volts AC to the drive panel. Using an appropriate VOM, confirm that the control transformersecondary voltage is 110 Volts AC as measured between the top of F6 and panel terminal #2. If the correct voltage is present, close the fuse holder to reconnect the secondary to the drive logic.13. SETUP: Access the drive programming via the Control Panel and change parameter 99.10 (Nominal ACmains voltage) to a value of “230”.14. The drive panel is now ready for operation on 230 Volts ac.Test withF6 fuse pulled open Test PointsPanel B - DCS800-EPx-0180-05 thru DCS800-EPx-0350-05The control circuit transformer is located behind the main ac input fuses (F1,F2,F3) . Access to the jumpers is above the main fuse mounting plate.1.If the DCS800-EP panel drive is already installed, disconnect and lock out all sources of power.2.Remove the jumper between H2 and H3, noting that this is actually two jumpers stacked together.Separate the two and jumper H1 to H3 and H2 to H4. Confirm that all connections are tight.See wiring diagram on page 7.Control transformer fuses are located directly above the main fuses and are marked F4, F5 and F6.Panel B - Continued3. Pull the F4 and F5 fuse holders open andreplace the (2) ATQR1-1/8 with the(2) ATQR2 supplied in the kit. Close the holders when finished.IMPORTANT: Be sure to use the correctfuses; the kit may contain more than one type.4. Affix the “wired for 230Vac” label near theratings nameplate located above the drive module.Factory 460V connection 230V reconnectionPanel B – Test and Setup________________________________________________________________________ Important! Only qualified electricians are allowed to install and maintain the drive. Do notproceed to additional steps until the correct wiring is complete.________________________________________________________________________Test PointsTest with F6fuse holderpulled open5.Pull the F6 fuse holder open to disconnect the secondary from the drive logic.6.Apply 230 Volts AC to the drive panel. Using an appropriate VOM, confirm that the control transformersecondary voltage is 110 Volts AC as measured between the top of F6 and panel terminal #2. If the correct voltage is present, close the fuse holder to reconnect the secondary to the drive logic.7.SETUP: Access the drive programming via the Control Panel and change parameter 99.10 (Nominal ACmains voltage) to a value of “230”.8.The drive panel is now ready for operation on 230 Volts ac.Panel C - DCS800-EPx-0405-05 thru DCS800-EPx-0680-05On the C frame drives built before May, 2013, the control transformer is located to the right of the drive module and is accessible without removing any other equipment.On C frames built since May, 2013, the control transfomer is in the approximate same location but below the bracket (on the same level as the fuses).1.If the DCS800-EP panel drive is already installed, disconnect and lock out all sources of power.2.Remove the jumper between H2 and H3, noting that this is actually two jumpers stacked together.Separate the two and jumper H1 to H3 and H2 to H4. Confirm that all connections are tight.See wiring diagram on page 7.Control transformer fuses are located directly above the drive module and are marked F4, F5 and F6.3.Pull the F4 and F5 fuse holders open and replace the (2) ATQR2 fuses with the (2) ATQR3 supplied inthe kit. Close the holders when finished.IMPORTANT: Be sure to use the correct fuses; the kit may contain more than one type.4.Affix the “wired for 230Vac” label near the ratings nameplate located to thelower edge of the drive module.Panel C – Test and Setup________________________________________________________________________Important! Only qualified electricians are allowed to install and maintain the drive. Do not proceed to additional steps until the correct wiring is complete.5. Pull the F6 fuse holder open to disconnect the secondary from the drive logic.6.Apply 230 Volts AC to the drive panel. Using an appropriate VOM, confirm that the control transformersecondary voltage is 110 Volts AC as measured between the top ofF6 and panel terminal #2. If the correct voltage is present, close the fuse holder to reconnect the secondary to the drive logic.7. SETUP: Access the drive programming via the Control Panel and change parameter 99.10 (Nominal ACmains voltage) to a value of “230”.8. The drive panel is now ready for operation on 230 Volts ac.。
baseviewholder bindingadapterposition详解 -回复

baseviewholder bindingadapterposition详解-回复基于您所提供的主题,我将详细回答有关BaseViewHolder和BindingAdapter关于position的问题,并尝试写一篇1500-2000字的文章。
标题:BaseViewHolder和BindingAdapterPosition详解:让RecyclerView更加强大和灵活引言:在Android应用开发中,RecyclerView是一个十分强大且常用的UI 组件,它提供了高度可定制和灵活的方式来展示大量数据。
而BaseViewHolder和BindingAdapterPosition则是RecyclerView中的两个重要概念。
本文将详细探讨BaseViewHolder和BindingAdapterPosition的含义、作用以及在RecyclerView中的使用方法。
希望通过本文的阐述,能够帮助读者更好地理解和使用RecyclerView,并提高Android应用的开发效率和用户体验。
文章正文:一、BaseViewHolder的定义和作用BaseViewHolder是RecyclerView中一个常用的辅助类,作为RecyclerView.ViewHolder的子类,它主要用于对RecyclerView子项的数据进行缓存和管理。
BaseViewHolder可以根据具体应用的需求,自定义ViewHolder的子类,以便根据子项的不同布局类型,对不同类型的子项进行处理。
在大多数情况下,我们在RecyclerView的Adapter中都会定义自己的ViewHolder,并且通过BaseViewHolder对其进行管理。
BaseViewHolder通常会包含子项中的各个View,并提供一些常用方法来获取和设置子项中的控件。
通过BaseViewHolder,我们可以统一管理和操作子项中的控件,简化了开发过程并提高了代码的可读性和维护性。
listview viewholder 写法 -回复

listview viewholder 写法-回复ListView和ViewHolder是Android开发中常用的两个概念。
ListView 是一种可以展示大量数据的控件,而ViewHolder是一种用于优化ListView性能的设计模式。
本文将逐步介绍ListView和ViewHolder的写法,并讨论它们的重要性和使用。
首先,我们来了解一下ListView控件。
ListView是一种可以展示大量数据的可滚动视图组件,常用于在Android应用中显示列表。
ListView以垂直方向排列列表项,并提供滚动功能以便浏览长列表。
它是一种很常见且广泛使用的UI组件,用于显示各种类型的数据,如联系人列表、歌曲列表、新闻列表等等。
然而,当ListView展示大量数据时,会遇到性能问题。
因为ListView会频繁地创建和销毁列表项,这个过程会占用大量的系统资源,导致界面卡顿和用户体验下降。
为了解决这个问题,Android提供了ViewHolder设计模式。
ViewHolder是一种用于缓存列表项视图的设计模式。
它通过将列表项中的控件实例保存在ViewHolder对象中来避免重复的findViewById操作,从而提高了性能。
ViewHolder通常作为ListView的一个内部类存在,每个列表项都会对应一个ViewHolder对象。
下面,我们来看一下ListView的ViewHolder写法。
首先,我们需要定义一个ViewHolder类,它通常作为ListView的一个内部类存在:static class ViewHolder {TextView textView;ImageView imageView;}在ViewHolder类中,我们可以根据需要添加列表项中的各种控件,如TextView、ImageView等。
接下来,在ListView的适配器Adapter中,我们需要使用ViewHolder来优化性能。
android 的bindviewholder用法

android 的bindviewholder用法在Android 中,onBindViewHolder 是RecyclerView 中的一个方法,用于将数据绑定到 ViewHolder 上,以更新列表中的视图。
这个方法通常在适配器(Adapter)中被实现。
下面是一个简单的示例,演示了 onBindViewHolder 的基本用法:public class MyAdapter extends RecyclerView.Adapter<MyAdapter.MyViewHolder> {private List<String> dataList;// 构造函数,接受数据列表public MyAdapter(List<String> dataList) {this.dataList = dataList;}// 定义ViewHolderpublic static class MyViewHolder extends RecyclerView.ViewHolder {TextView textView;public MyViewHolder(View itemView) {super(itemView);textView = itemView.findViewById(R.id.textView);}}// 创建ViewHolder@Overridepublic MyViewHolder onCreateViewHolder(ViewGroup parent, int viewType) {View itemView = LayoutInflater.from(parent.getContext()).inflate(yout.i tem_layout, parent, false);return new MyViewHolder(itemView);}// 将数据绑定到ViewHolder@Overridepublic void onBindViewHolder(MyViewHolder holder, int position) {// 从数据列表中获取数据String data = dataList.get(position);// 将数据设置到ViewHolder的视图上holder.textView.setText(data);}// 返回数据列表的大小@Overridepublic int getItemCount() {return dataList.size();}}在这个示例中:onCreateViewHolder 方法用于创建 ViewHolder 实例,这里使用了一个简单的布局文件 item_layout.xml。
android baseviewholder设置边距的方法

android baseviewholder设置边距的方法在Android开发中,如果你使用的是RecyclerView和自定义的ViewHolder(可能是你提到的BaseViewHolder),设置边距通常不会直接在ViewHolder中进行,而是在定义RecyclerView的条目布局时设置。
不过,如果你确实需要在ViewHolder中动态地设置边距,可以通过修改视图的LayoutParams来实现。
以下是在ViewHolder中动态设置边距的基本步骤:获取视图的LayoutParams:首先,你需要获取到条目视图的LayoutParams。
这些LayoutParams包含了视图在其父视图(即RecyclerView)中的布局信息,包括边距。
修改边距:然后,你可以修改LayoutParams的边距属性。
这通常涉及到设置左边距、上边距、右边距和下边距。
应用新的LayoutParams:最后,你需要将修改后的LayoutParams 重新应用到视图上,以使更改生效。
下面是一个示例代码,展示了如何在ViewHolder的构造函数中设置边距:java复制代码public class MyViewHolder extends RecyclerView.ViewHolder {public MyViewHolder(View itemView) {super(itemView);// 假设我们想要设置itemView的边距int marginInPixels = 10; // 边距大小,单位为像素// 获取itemView的LayoutParamsViewGroup.MarginLayoutParams layoutParams =(ViewGroup.MarginLayoutParams) itemView.getLayoutParams();// 设置新的边距layoutParams.setMargins(marginInPixels, marginInPixels, marginInPixels, marginInPixels);// 应用新的LayoutParams到itemViewitemView.setLayoutParams(layoutParams);}}请注意以下几点:在上面的示例中,我假设itemView的LayoutParams是MarginLayoutParams的实例。
baseviewholder bindingadapterposition详解 -回复

baseviewholder bindingadapterposition详解-回复一、什么是BaseViewHolder?BaseViewHolder是一个通用的RecyclerView.ViewHolder的封装类。
在使用RecyclerView时,我们通常需要为每一种不同的布局编写一个ViewHolder类,这样会导致代码冗余。
而使用BaseViewHolder,我们可以将通用的ViewHolder逻辑封装在一起,避免代码重复。
二、什么是BindingAdapterPosition?BindingAdapterPosition是BaseViewHolder类中的一个变量。
在ViewHolder的绑定方法中,我们通常需要获取当前ViewHolder在列表中的位置以进行相应的数据绑定操作。
BindingAdapterPosition就是用来保存当前ViewHolder在列表中的位置的。
三、如何使用BaseViewHolder和BindingAdapterPosition?1. 创建BaseViewHolder类我们首先创建一个继承自RecyclerView.ViewHolder的BaseViewHolder类。
这个类中可以封装一些通用的ViewHolder操作,比如findViewById等。
javapublic class BaseViewHolder extends RecyclerView.ViewHolder { 保存当前ViewHolder在列表中的位置private int bindingAdapterPosition;public BaseViewHolder(View itemView) {super(itemView);}public int getBindingAdapterPosition() {return bindingAdapterPosition;}public void setBindingAdapterPosition(int bindingAdapterPosition) {this.bindingAdapterPosition = bindingAdapterPosition;}}2. 创建继承自BaseViewHolder的具体ViewHolder类我们再创建一个具体的ViewHolder类,继承自BaseViewHolder。
- 1、下载文档前请自行甄别文档内容的完整性,平台不提供额外的编辑、内容补充、找答案等附加服务。
- 2、"仅部分预览"的文档,不可在线预览部分如存在完整性等问题,可反馈申请退款(可完整预览的文档不适用该条件!)。
- 3、如文档侵犯您的权益,请联系客服反馈,我们会尽快为您处理(人工客服工作时间:9:00-18:30)。
ArrayList<ImageText> list = new ArrayList<ImageText>();
猿圈 for(int i=0;i<imgs.length;i++){
ImageText it = new ImageText(imgs[i],names[i]); list.add(it); } MyAdapter adapter = new MyAdapter(this,0,list); ListView lv = (ListView) this.findViewById(R.id.listView1); lv.setAdapter(adapter); } class ImageText{ private int imageId; private String text; public ImageText(int imageId,String text){ this.setImageId(imageId); this.setText(text); } public int getImageId() { return imageId;}
降低搜索的时间。它的基本原理是,将layout中的子组件保存到ViewHoder的
属性中,然后将ViewHoder设置成对应View的tag(通过view上的setTag(Object)
方法),后续只需要通过getTag()取出View对应的Tag,即可得到保存了它的
子组件的ViewHolder对象,这样即避免了使用findViewById()去搜索的时间。
下面是一个使用ViewHolder的例子。 class MyAdapter extends ArrayAdapter<ImageText>{
List<ImageText> list; public MyAdapter(Context context, int resource, List<ImageText> objects) {
//自己创建一个Item View LayoutInflater inflater = (LayoutInflater) MainActivity.this.getSystemService(LAYOUT_INF LATER_SERVICE); view = inflater.inflate(yout.item, parent,false); ImageView iv = (ImageView) view.findViewById(R.id.imageView1); TextView tv = (TextView) view.findViewById(R.id.textView1); vh = new ViewHolder(); vh.vh_iv = iv; vh.vh_tv = tv; view.setTag(vh); }else{ view = convertView; vh = (ViewHolder)view.getTag(); } ImageText it = list.get(position);
public void setImageId(int imageId) { this.imageId = imageId;}
public String getText() { return text;}
public void setText(String text) { this.text = text;}
猿圈ቤተ መጻሕፍቲ ባይዱ
// TODO Auto-generated method stub return position; } @Override public View getView(int position, View convertView, ViewGroup parent) { // TODO Auto-generated method stub View view = null; ViewHolder vh = null; if(convertView == null){
猿圈
使用ViewHolder模式
知识解析
在上一个自定义的Adapter中,在getView()方法中每次都需要去从从layout
中去使用findViewById()去寻找对应的组件,这也是一项比较耗时的工作,尤
其是当layout层次比较多比较复杂的时候。而采用ViewHolder模式,可以大大
View view = null; ViewHolder vh = null; if(convertView == null){
//自己创建一个Item View LayoutInflater inflater = (LayoutInflater) MainActivity.this.getSystemService(LAYOUT_INFLATER_SERVICE); view = inflater.inflate(yout.item, parent,false); ImageView iv = (ImageView) view.findViewById(R.id.imageView1); TextView tv = (TextView) view.findViewById(R.id.textView1); vh = new ViewHolder(); vh.vh_iv = iv; vh.vh_tv = tv; view.setTag(vh); }else{ view = convertView; vh = (ViewHolder)view.getTag(); } ImageText it = list.get(position); vh.vh_iv.setImageResource(it.getImageId()); vh.vh_tv.setText(it.getText()); return view; } class ViewHolder{ TextView vh_tv; ImageView vh_iv; } } }
this.list = objects;}
@Override
public int getCount() { return list.size();
}
猿圈
@Override public long getItemId(int position) {
return position; } @Override public View getView(int position, View convertView, ViewGroup parent) {
vh.vh_iv.setImageResource(it.getImageId()); vh.vh_tv.setText(it.getText()); return view;
} class ViewHolder{
TextView vh_tv;
ImageView vh_iv; } }
功能演示
猿圈
super(context, resource, objects); // TODO Auto-generated constructor stub this.list = objects; } @Override public int getCount() { // TODO Auto-generated method stub return list.size(); } @Override public long getItemId(int position) {
实战操作
public class MainActivity extends Activity { @Override protected void onCreate(Bundle savedInstanceState) { super.onCreate(savedInstanceState); setContentView(yout.activity_main); int[] imgs =
}
class MyAdapter extends ArrayAdapter<ImageText>{ List<ImageText> list; public MyAdapter(Context context, int resource,
List<ImageText> objects) { super(context, resource, objects);
{R.drawable.barley,R.drawable.flower,R.drawable.grapes,R.drawable.gr ass,R.drawable.hazelnut};
String[] names = {"Barley","Flower","Grapes","Grass","Hazelnut"};
职业素质
猿圈
ViewHolder通常出现在适配器里,为的是listview滚动的时候快速设置值, 而不必每次都重新创建很多对象,从而提升性能。
在android开发中Listview是一个很重要的组件,它以列表的形式根据数据 的长自适应展示具体内容,用户可以自由的定义listview每一列的布局,但当list view有大量的数据需要加载的时候,会占据大量内存,影响性能,这时候就需 要按需填充并重新使用view来减少对象的创建。
