Darkone-V3.0.1安装及使用
Kommander 软件使用手册说明书

Kommander软件使用手册V4.9适用于:T0、T1、T3、F1、F2服务热线:400-159-0808官方网址:目录1.简介 (1)1.1.概述 (1)1.2.软件运行环境 (1)1.3.产品线差异表 (2)2.软件安装与卸载 (3)3.Kommander界面介绍 (6)3.1.菜单栏 (6)3.1.1.文件菜单 (6)3.1.2.画布菜单 (7)3.1.3.多联机菜单 (7)3.1.4.资源菜单 (8)3.1.5.窗口菜单 (8)3.1.6.设置菜单 (8)3.1.7.锁屏 (9)3.1.8.帮助 (10)3.2.媒体资源库 (10)3.2.1.媒体资源管理 (11)3.2.2.小工具 (11)3.2.3.播放列表 (12)3.2.4.特效库 (13)3.3.播控区 (13)3.3.1.屏幕管理 (14)3.3.2.画布编辑 (15)3.3.3.播放状态 (15)3.3.4.黑屏 (16)3.3.5.画布上素材设置 (16)3.4.参数设置栏 (17)3.4.1.层级调整 (17)3.4.4.文件透明通道 (18)3.4.5.启用Y/C伸张 (18)3.4.6.裁剪 (18)3.4.7.效果设置 (18)3.4.8.时间裁剪 (19)3.4.9.蒙层 (19)3.4.10.抠像 (19)3.4.11.声道映射 (20)3.5.播放进度 (20)3.6.播放预案区 (21)3.6.1.预案分组 (21)3.6.2.预案 (21)3.6.3.主KV (22)3.7.输出区 (23)3.8.更新 (24)3.9.时间码 (24)3.10.音频列表 (25)4.工程编辑流程 (26)4.1.切换电脑显示模式 (26)4.2.运行软件 (26)4.3.新建工程 (26)4.4.添加素材 (27)4.5.进行屏幕管理配置 (27)4.5.1.添加显示口 (28)4.5.2.新建和编辑屏 (28)4.6.画布编辑和输出 (28)5.素材支持 (29)5.1.本地媒体 (29)5.2.播放列表 (30)5.3.字幕 (30)5.4.Office文件 (31)5.7.截屏 (32)5.8.网站 (33)5.9.小工具 (34)5.9.1.字幕 (34)5.9.2.数字时钟 (34)5.9.3.模拟时钟 (34)5.9.4.表格 (34)5.9.5.正计时 (34)5.9.6.倒计时 (35)5.9.7.天气 (35)5.9.8.抽奖 (35)5.9.9.幻彩字 (36)5.9.10.箱体图 (37)5.10.NDI采集 (38)5.11.序列帧 (39)5.12.添加spout (39)6.其他功能 (40)6.1.软件系统设置 (40)6.2.工程打包 (41)6.3.在线更新软件 (42)6.4.图片优化 (42)6.5.自动保存与恢复 (43)6.6.预编布局与实时布局的使用 (43)6.7.云控 (43)6.8.定时任务 (43)6.9.NDI发送 (44)6.10.多联机 (44)6.11.声光电一体化支持 (45)6.12.直播推流-rtmp.....................................................错误!未定义书签。
黑鹰说明

◎ ◎
⊙◎⊙◎⊙◎⊙◎⊙◎⊙◎⊙◎⊙◎⊙◎⊙◎⊙◎⊙◎⊙◎⊙◎⊙◎⊙
⊙ ⊙
更好支持你所喜欢的软件更好发展!本站严厉谴责和鄙夷一切利用本站资
源进行牟利的盗版行为!
⊙ ⊙
◎⊙◎⊙◎⊙◎⊙◎⊙◎⊙◎⊙◎
=================================================================
安装过程很简单,一路按NEXT下去就行,安装完成以后会自动重启,重启以后如果你想修改“DeepFreeza”的管理员密码,你就要按CTRL+ALT+SHIFT+F6呼出DeepFreeze的控制面板(或按住SHIFT点击系统右下图标),
然后输入你想设置的密码,重复输入点OK。请注意这个时候安装成功了的话,DeepFreeze在任务栏的图标为不闪烁就表示成功了。
DeepFreeze 是一个功能强大五星级的系统保护软件,不论什么原因你的系统出现了故障,它都可以快速的恢复到你原先的状态和设置。它会随时记录你的操作,当前打开的文件,运行着的程序和各项设置。程序安全性能非常高,目前还没有听说有什么办法能够破解他的系统安全保护。
一.安装
在安装之前,你先要保证你的系统没有任何病毒和木马,系统已经安装好了所有的驱动程序,和系统所必须的程序。同时你要保证你的系统没有安装还原精灵,如果有请卸载乾净还原精灵。同时,C盘下的临时文件夹里和IE的临时文件夹里不能有任何的临时文件,如果有请删除掉或着改到其它逻辑盘。
重新启动后,你就可以开始更新你的游戏,或安装软件等操作了。
做完你所要做的事情后,再按CTRL+ALT+SHIFT+F6呼出DeepFreeze,选择开机就还原,就完成了DeepFreeze的转存了。重新启动,就可以看到你安装的那些新的软件都在上边了。
洛基英语右脑频闪学习软件使用说明书

目录1.软件主要特点 (2)(1) 海量的资源,真实的语境 (2)(2) 鼠标一点,要听那一句就播放那一句,精确定位,可以显示或隐藏中英字幕 (2)(3) 最完美的导出功能 (3)(4) 录音对比 (3)(5) 非常实用人性化的的听写,隐藏显示功能 (3)(6) 强大的单词本 (4)(7) 英语资料管理 (4)(8) 完美的音标 (4)(9) 完美的语法 (4)(10) 强大的笔记和资料管理功能 (5)(11) 还有学习记录保存,学习进度保存,录音机,英文朗读机等 (5)(12) 软件界面华丽,布局简单,操作方便,有十多种皮肤更换 (5)2.注意事项 (5)3.正式版安装和注册步骤 (6)1.软件主要特点(1) 海量的资源,真实的语境英文歌曲,电台录音(如BBC、VOA),教材(如新概念、走遍美国),好来坞的大片,热播的电视连续剧,只要你喜欢,只要适合你学习,你就可以拿来做你的英语学习材料。
我们的洛基英语右脑频闪学习机,可以帮助你听懂美国大片中的每一句话。
想想看,当你不用字幕就能看懂整部大片,看懂正在热播的电视剧,哇,那感觉该有多棒!电影电视等视频,为我们提供了影像、声音、情景等,构造出真实的语境,10倍速提升英语学习效率!(2) 鼠标一点,要听那一句就播放那一句,精确定位,可以显示或隐藏中英字幕自主开发的播放器,可以随心所欲操控视音频,可以对不同的句子指定不同的播放次数,可以随时进入一句话的循环播放,不用像复读机操作那么麻烦,浪费那么多时间和精力;可以对句子标识难度等级,以难度等级排序,可以对难句狂轰滥炸,对易句不浪费时间。
(3) 最完美的导出功能无论是电影文件还是MP3文件,都可以把里面的一些难句重点句导出成一个新的MP3文件和一个附带的歌词Lrc文件,然后你就可以在手机和MP3播放器上征服这些难点重点句,反反复复,把它们熟悉到像Mother这个词这么熟。
可以把多个媒体文件摘录的单词导出成一个新的MP3文件和一个附带的Lrc文件,然后在手持设备上征服它们。
从零开始玩V3 3.1.1.0

Vocaloid3翻唱高级教程文:青龙圣者百度ID:死蝕之鸦——人生就是不断的学习更新时间2014年8月14日15:34:50 目录第一章Vocaloid3及附带软件的安装1.1 V3主程序安装1.2安装说明第二章认识软件界面2.1工具栏2.2轨道窗口2.3钢琴卷帘窗2.4 参数控制框2.5 混音器窗口2.6 V ocaloid Net 新功能第三章高效使用软件软件基础设置3.1记住快捷键3.2设定里的选项可以用来修改快捷键第四章软件基础设置4.1偏好设定4.1a获得自动滑音4.2默认歌唱风格设置4.2a底音深度:4.2b弯曲长度4.2c 重音4.2d 衰变4.3歌手管理器与歌手编辑器4.4量化设置第五章翻唱大作战战前准备~~~5.1 选择曲目和歌手5.2a下载素材,包括midi 原唱伴奏5.2b 下载音频文件小技巧5.2c如果你在5.2a中无法找到自己想要的midi,那么就请看第十章,无midi翻唱法5.2d如果你在5.2a中无法找到自己想要的伴奏,那么请看第十一章,消音获得伴奏法。
5.3 素材处理5.3a原唱和伴奏的格式转换5.3b伴奏测速5.3c midi人声轨的选择(*)第六章开始翻唱~~~6.1导入材料6.2音符设置(*)6.2a 音符标准化6.2b 音符变调6.3 写入曲速和拍子6.4 填词6.4a填词方法6.4b “-”的使用方法6.4c 拆音6.4d 非标准发音的方法6.4f 详解中文填词处理6.4e 四声调法与研究第七章十大参数7.1参数主要工具7.2 DYN 动态7.3 VEL 速度7.4 OPE 鼻音7.5a PIT弯音7.5b PBS弯音敏感7.5c POR弯音时间7.6 BRI洪亮度7.7 BRE呼吸度7.8 CLE清晰度7.9 GEN 性别度7.* br呼吸音第八章插件使用8.1 插件介绍8.2使用方法8.3部分插件说明第九章后期处理9.1前言9.2宿主9.3软件9.4硬件第十章无midi非耳扒翻唱法10.1 素材转换10.2 原唱和伴奏的对轨10.3 歌声提取10.4 转换VSQ10.5 参数的细节处理10.6外部修改参数及歌词第十一章无伴奏消音制作法11.1 软件选择11.2 参数调整11.3 输出保存第十二章无PV师PV制作法12.1 有待更新后记注:带*号过程为第十章可省略步骤。
Atomos Ninja V 快速入门指南说明书

ContentsIntroduction . . . . . . . . . . . . . . . . . . . . . . . . . . . . . . .3 Checklist . . . . . . . . . . . . . . . . . . . . . . . . . . . . . . . . .3 Y ou will also need . . . . . . . . . . . . . . . . . . . . . . . . .3 Getting started . . . . . . . . . . . . . . . . . . . . . . . . . . . .4 Connect and Power-up . . . . . . . . . . . . . . . . . . . .5 Physical features . . . . . . . . . . . . . . . . . . . . . . . . . .6 Format SSD Media . . . . . . . . . . . . . . . . . . . . . . . .8 T ouchscreen/User Interface . . . . . . . . . . . . . . .9 Connect and Edit . . . . . . . . . . . . . . . . . . . . . . . . .10 AtomX Accessories . . . . . . . . . . . . . . . . . . . . . .10 Warranty & Conditions . . . . . . . . . . . . . . . . . . . .112 NINJA V - Quick Start GuideThank you for purchasing the Atomos Ninja V, utilising professional HDMI 2.0 connectivity to record professional 4Kp60 and High frame rate HD to Apple ProRes and Avid DNxHR. The class leading AtomHDR monitor lets you visualize 10+ stops of dynamic range, with 1000nit brightness for daylight viewing and 10-bit processing for smooth gradations. With so many Recorder, Monitor, Playback & Edit features, please take the time to read through this Quick Start Guide and register your product for free updates and extended warranty.DOWNLOAD THE FULLNINJA V USER MANUAL /supportACTIVATE AVID LICENSE FOR DNxHD® and DNxHR®/activation EXTENDED 3 YR WARRANTY Register now to extend your warranty to 3 years from date of purchase. /registration HDMI CableTo support 4Kp60 recording please use cables that support HDMI 2.0 specification. Atomos have a range of 4Kp60 cables with die cast connectors and coiled cables in a range of lengths and connections (sold separately). See the full range of Atomos HDMI cables on our website: /hdmi-cablesSSD Drives and Docking StationWe test and approve SSD drives from the world’s leading media brands. There are specific approved drives depending on the resolution and frame rate you are capturing - for the full list of compatible drives please refer to: /drivesWe also have a range of Docking Stations suitable for use with Ninja V and compatible SSD media. Visit your nearest reseller or purchase online at: ChecklistYou will also need (sold separately)q 1 x Ninja V Recorderq 1 x Master Caddy IIq 1 x AC Power Adaptorq 1 x Battery Eliminatorq 1 x Quick Start GuideIntroductionNINJA V - Quick Start Guide 3BatteryYou can power the device using the supplied AC power supply and Battery Eliminator, but if you plan to use a battery we recommend you fully charge before use.We recommend using Atomos NP-F series batteries.Connect SSDBefore powering up the Ninja V unit, simply slide your selected disk intodisk slot (see page 7). To remove, ensure the unit is off and gentlyslide out. We strongly recommend SSD for optimal performance andrecording.IMPORTANT: Never remove the SSD whilst recording as this maycause data corruption.Introducing AtomX SSDminiAtomos has teamed with the world’s leading media manufacturers todesign SSD media that is better suited to our ever evolving RecorderMonitors.The new AtomX SSDmini is a little over 1/4 inch tall and 3” long. It isalso 20% shorter than traditional SSDs, yet keeps the standard SATAIII connector. It is backward compatible with previous Atomos devicesby adding a clever extension handle. These tiny, slimline SSDs area true innovation and our close drive partners Angelbird and SonyStorage Media Solutions Corporation are making custom versionsfor your Ninja!For more information about supported drives and accessories, visit:/drivesGetting started4 NINJA V - Quick Start GuideConnect and power-up BatteryNinja V has a single battery slot. To connect a compatible battery, place the battery in front of the retaining lug, align with theconnectors and slide the battery into the lock position.To connect the supplied Battery Eliminator, follow the same procedure and lock battery into position. Once the Battery Eliminator is in place, secure the supplied AC/DC power supply to the DC jack. Alternatively, the Ninja V unit can be powered via a D-Tap power source using D-Tap battery cable (ATOMDTPCB1).Touching the Battery icon in the top right of your screen will allow you to accurately see remaining battery life. Refer to the User Manual for more information.Expansion PortThe Ninja V features a built in Expansion Port that will soon enable- Synchronization control- I/O Expansion- Continuous Power Module(See page 7)DC jackSupplied Battery EliminatorP/N: ATOMDCA001NINJA V - Quick Start Guide 56 NINJA V - Quick Start Guidea. On/Off and Screen LockTo turn the Ninja V on, press the power button on the side of the unit. To shut down, hold the button for at least 4 seconds (until unit turns off).b. Remote Control/LANC and CalibrationOptionally control the Ninja V using LANC/Remote from your camera. Additionally, the Ninja V screen can be calibrated using the X-Rite i1Display Pro. To connect you will need a USB to serial cable. Refer to the AtomX accessory range. USB to serial cable (ATOMCAB004).c. HDMI In/OutHDMI input connection used to record to the Ninja V supports up to 4Kp60. HDMI Output connection provides a live loop out or play out when in Playback mode. Supports up to 4Kp60.d. Battery Release Button Press the release button and slide battery away from unit to remove. e. T ally LightRed Tally light on the rear of the unit indicates active recording. The Tally Light can be turned off in the menu options.f. Screw Holes / Mounts + Locking Pin Holes (Arri)3/8” screw hole with 1/4” adapter. Top and bottom.g. Disk SlotThe NinjaV is compatible with Master Caddy II media and also the latest AtomX SSDmini.Physical featuresf. 3/8” screw hole with 1/4” adapterf. 3/8” screw hole with 1/4” adaptera.On/Off and Screen Lock c. HDMI In c. HDMI Outb. Remoted. Battery releaseNINJA V - Quick Start Guide 7e. Tally lightf. 3/8” screw hole with 1/4” adapterf. 3/8” screw hole with 1/4” adapterd. Battery releaseg. Disk slotExpansion Port8 NINJA V - Quick Start GuideMain controlsThe Ninja V is controlled by a simple user-friendly touchscreeninterface. Pictured below is the home screen and main controls seen when the Ninja V is first powered up. Touching the icons will open menus for the relevant functions. Touch the settings icon located onbottom right to access more menus, or touch individual icons for specific settings such as timecode, audio, remaining disk space and more. For the most up-to-date information visit: /ninjav and click SUPPORT tabNINJA V - Quick Start Guide 9Connect and EditTo access and edit your recorded materialYou will require a USB 3.0 Docking Station or USB-C 3.1 Docking Station.These are available from your reseller, or visit to purchase the Docking Station that is best suited to your requirements.Connect the Docking Station to a Mac ® or Windows ® editingworkstation via USB 2.0 / USB 3.0 / USB-C 3.1 compatible port/s.When using USB 2.0, you may need to connect the second USB enough power is provided when using USB 2.0.Insert SSD it into the Docking Station. After a short wait your recorded video will become accessible as a standard external disk.NoticeCopyright © 2018 ATOMOS Global Pty Ltd (‘referred to as ATOMOS’). All rights reserved. All information in this document is subject to change without notice. No part of the document may be reproduced or transmitted in any form, or by any means, electronic or mechanical, including photocopying or recording, without the express written permission of ATOMOS. A reference to ATOMOS includes its related entities, subsidiaries and parent company.TrademarksNinja V / ATOMOS are registered trademarks of ATOMOS Pty Ltd. Apple, the Apple logo, AppleShare, AppleTalk, FireWire, iPod, iPod Touch, Mac, and Macintosh are registered trademarks of Apple Inc. Final Cut Pro, QuickTime and the QuickTime Logo are trademarks of Apple Inc. All other trademarks are the property of their respective holders. International Hardware Limited Warranty (1 Year Standard/3 Years if registered) ATOMOS warrants that:• The main product, not including the IPS screen, or any external accessories, will be free from defects in materials and workmanship for a period of 1 year from the date of purchase; or 3 years upon completion of product registration at • The TFT/LCD, batteries, case and master caddies will be free from defects in materials and workmanship for a period of 1 year from the date of purchase regardless of registration. This warranty is exclusively for the benefit of the original purchaser and is not assignable or transferable. If during the warranty period the product is shown to be defective ATOMOS may at its option: a) replace the goods or supply equivalent ones, b) repair the goods, c) pay the cost of replacing the goods or of acquiring equivalent ones and d)paying the cost of having the goods repaired; The customer must notify ATOMOS of any defect in the goods in writing prior to the expiry of the warranty periods set out above. The customer will be solely responsible for returning the goods to ATOMOS or its authorized distributor. Upon acceptance of a warranty claim by ATOMOS, where ATOMOS repairs or replaces the goods, it will be responsible for reasonable shipping costs incurred in sending the goods to the Customer, provided that customer is located in a country in which ATOMOS has an authorized distributor or repair center or agent.Warranty ExclusionsThis warranty applies only to defects in workmanship and does not cover defects caused by:• A failure to comply with the then current operating instructions issued by ATOMOS;• Neglect;• Improper or negligent acts or omissions;• Unauthorized repairs or attempted repairs;• Tampering with or modification of the goods;• Connection to incompatible equipment or power sources;• Exposure to water or weather;• Exposure to magnetic fields or corrosive liquids or substances;EXCEPT AS STATED IN THIS WARRANTY, ATOMOS, IT’S VENDORS, AGENTS, RESELLERS AND DISTRIBUTORS DISCLAIM IN THEIR ENTIRETY ALL OTHER WARRANTIES, EXPRESS OR IMPLIED, INCLUDING WITHOUT LIMITATION ALL WARRANTIES OF MERCHANTABILITY OR FITNESS FOR A PARTICULAR PURPOSE. THE REMEDIES OUTLINED IN THIS WARRANTY ARE THE EXCLUSIVE REMEDY A CUSTOMER HAS ARISING FROM DEFECTIVE GOODS WHICH ARE SUBJECT TO THE WARRANTY. ATOMOS DOES NOT WARRANT THAT THE GOODS WILL OPERATE IN A MANNER WHICH IS ERROR FREE, OR UNINTERRUPTED. THE GOODS ARE NOT INTENDED TO BE THE PRIMARY OR ONLY DATA STORAGE DEVICE FOR DATA – CUSTOMERS ARE SOLELY RESPONSIBLE FOR BACK UP AND PROTECTION OF DATA. Software License AgreementIMPORTANT, PLEASE READ CAREFULLY. THIS IS A LICENSE AGREEMENT.This ATOMOS software, related documentation, any included sample images and other files (the “Software”), is protected by copyright laws and international copyright treaties, as well as other intellectual property laws and treaties. The Software is licensed, not sold.This End User License Agreement (“EULA”) is a legal agreement between you (either an individual ora single entity) and ATOMOS with regard to the copyrighted Software provided with this EULA. Use of the Software provided to you by ATOMOS in whatever form or media, will constitute your acceptanceof these terms, unless separate terms are provided by the software supplier, in which case certain additional or different terms may apply. If you do not agree with the terms of this EULA, do not download, install copy or use the Software. By installing, copying or otherwise using the Software, you agree to be bound to the terms of this EULA. If you do not agree to the terms of this EULA, ATOMOS is unwilling to license the Software to you.1. Eligible licensees. This Software is available for license solely to purchasers of the ATOMOS Ninja V, who have purchased a unit manufactured by ATOMOS Ninja V and purchased through an ATOMOS authorized reseller, with no right of duplication or further distribution, licensing or sub-licensing.2. License Grant. ATOMOS grants you a personal, non-transferable and non-exclusive right to use the copy of the Software provided with this EULA. You agree you will not copy the Software except as necessary to use it with the ATOMOS Ninja V. You agree that you may not copy the written materials accompanying the Software. Modifying, reverse engineering, translating, renting, copying, transferring or assigning all or part of the Software or any rights granted hereunder, to any other persons or reverse engineering the hardware on which the Software runs, is strictly prohibited. The software is license, not sold. You acknowledge that no title to intellectual property in the Software is transferable to you. You further acknowledge that title and full ownership rights to the Software will remain the exclusive property of ATOMOS and/ or its suppliers, and you will not acquire any rights to the Software, except as expressly set forth above. All copies of the software will contain the same proprietary notices as contained in oron the Software. All title and copyrights in and to the Software (including but not limited to any images, animations, video, audio, text incorporated), the accompanying printed materials, and any copies of the Software are owned by ATOMOS or its suppliers.3. Reverse engineering. You agree that you will not attempt, and if you are a corporation, you will use your best efforts to prevent your employees and contractors from attempting to reverse compile, derive circuits, modify, translate or disassemble the Software and/or the ATOMOS Ninja V in whole or in part. Any failure to comply with the above or any other terms and conditions contained herein will result in the automatic termination of this license and the reversion of the rights granted hereunder by ATOMOS. ATOMOS reserves the right to terminate this license without prejudice to any additional recourse ATOMOS may have against you if you violate any of its terms and conditions.Warranty & Conditions 10 NINJA V - Quick Start GuideAtomos have a range of accessories tailored to usage with the Ninja V. Visit or your nearest Atomos reseller to discover the range of available accessories that will get you up and running enhance your production workflow.Batteries and power:- ATOMOS 5200mAh 4 Cell NPF Style Battery NP-770- ATOMOS 7800mAh 6 Cell NPF Style Battery NP-970- ATOMOS Fast Battery Charger with Multi plug PSU- ATOMOS Power Kit for all Atomos 5” & 7” Monitor Recorders Media: Master Caddy II- ANGELBIRD Master Caddy II 4K RAW SSD- G-TECHNOLOGY MasterCaddy II 4K SSD- ATOMOS Master Caddy II HDD/SSD Caddies x 5Media: SSDmini-AtomX SSDmini by ANGELBIRD (256GB, 500GB, 1TB)- AtomX SSDmini by SONY (500GB, 1TB, 2TB)Docking stations:- ATOMOS USB 2.0 & 3.0 Docking Station for Atomos Master Caddy - ANGELBIRD USB-C to SATA Media Reader- G-TECHNOLOGY ev Series Reader Atomos Master Caddy Edition (only compatible with SSDmini when using AtomX SSDmini Adaptor handle) Cables:- ATOMOS AtomFLEX HDMI 4K60p Full to Full (30cm/40cm/50cm) - ATOMOS AtomFLEX HDMI 4K60p Full to Micro (30cm/40cm/50cm) - HDMI Coiled cable 4Kp30 Full to Full (30cm/50cm)- HDMI Coiled cable 4Kp30 Full to Micro (30cm/50cm)© Atomos 2018. TM ® All trademarks and registered trademarks are the property of their respective owners.Visit Atomos online for full technical specifications, tutorials, camera compatibility, recommended SSDs and more.For more detailed instructions and important up-to-date information regarding Ninja V please download the complete Ninja V User Manual from:/support 。
纪录黑鹰黑客工具教程3

00402926 . |0FBED3 movsx edx,bl ; 取出来放到edx
00402929 . |DD5C24 >fstp qword ptr ss:[esp+24] ; 转化成ASII存入到edx
FRSTOR src
从src处装入由FSAVE保存的FPU状态
FINCSTP
增加FPU的栈指针值
st(6) <-st(5); st(5) <-st(4),...,st(0) <-?
FDECSTP
减少FPU的栈指针值
st(0) <-st(1); st(1) <-st(2),...,st(7) <-?
减去一个整数
st(0) <- st(0) - src (mem16/mem32)
FISUBR src
用一个整数来减
st(0) <- src - st(0) (mem16/mem32)
乘法
FMUL
乘上一个实数
st(0) <- st(0) * st(1)
FMUL st(i)
除法
FDIV
除以一个实数
st(0) <-st(0) /st(1)
FDIV st(i)
st(0) <- st(0) /t(i)
FDIV st(i),st
st(i) <-st(0) /st(i)
FDIVP st(i),st
st(i) <-st(0) /st(i),然后执行一次出栈操作
玩暗黑必备辅助工具,全图,打中文,看装备等等

Item Value Toggle //显示物品卖给NPC的价格,热键"V"(默认为不显示,拾荒者的最爱^_^)
First Player Stat Key //查看玩家首个特殊属性(MF),热健" "" "引号键)
Next Player Stat Key //查看玩家下一个特殊属性,热键"]}"
重要提示:使用本软件时,首先检查你的DII安装目录是否有"M"或"Plugin"这二个目录,如果已经存在,先删除掉;
提供2种使用方法,任选其一即可:
1、将压缩包内的"M"目录解压缩到暗黑安装目录,然后在D2loader的快捷方式添加“ -pdir M”参数;(需要预先安装D2loder)
2, 增加怪物4防显示 (Monster Resists Toggle"开关);
3, 修正敌对玩家显示bug;
4, 修正Minimap不能显示Claw Viper Temple和Hellforge bug。
4/6/2004
更?鞒绦蛭?.11;
更改生命保护功能的自动退出血线为20%;
Use Custom Font Toggle //中文输入开关,热键"U"(默认开启,觉得Lag就关掉它)
Item Value Toggle //显示物品卖给NPC的价格,热键"V"(默认为不显示,拾荒者的最爱^_^)
First Player Stat Key //查看玩家首个特殊属性(MF),热健" "" &退出游戏,热键大键盘"-"
Quick Next Game Key //快速退出游戏,并对记忆的当前游戏名自动加1,方便RB等,热键大键盘"+"
Razer BlackWidow V3 使用指南说明书

進階指南知名王者,重掌榮耀。
感受 Razer BlackWidow V3 與眾不同的魅力—這款鍵盤不但承襲了極具代表性的首款機械式遊戲鍵盤,還具備全新的改良功能,包括採用了我們享譽全球的按鍵軸。
目錄1. 內含 / 使用需求 (3)2. 使用需求 (4)3. 註冊即可獲得保固 (4)4.技術規格 (5)5. 設定你的 RAZER BLACKWIDOW V3 (6)6. 使用 RAZER BLACKWIDOW V3 的媒體控制功能 (7)7. 透過 RAZER SYNAPSE 設定RAZER BLACKWIDOW V3 (9)8. 安全與維護 (20)9. 法律條文 (22)1. 內含 / 使用需求內含▪ Razer BlackWidow V3即時巨集錄製鍵 遊戲模式鍵 背光控制鍵 睡眠模式鍵 媒體控制鍵 音量控制滾輪 LED 指示燈 立架多元佈線選項▪ 人體工學設計護腕墊▪ 重要產品資訊指南2. 使用需求產品需求▪具有一個閒置 USB Type A 連接埠的電腦RAZER SYNAPSE 需求▪Windows® 7 64 位元(或更新版本)▪網際網路連線(供下載安裝軟體)3. 註冊即可獲得保固你不僅擁有一台超棒的裝置,更享有 2 年有限保固服務。
前往註冊,即可讓裝置發揮所有潛力,並享受獨家 Razer 好康。
您可在此找到產品序號。
▪有問題嗎?歡迎來信詢問 Razer 支援小組:4.技術規格技術規格▪專為遊戲設計的Razer™ 機械軸▪8,000 萬次按鍵敲擊使用壽命▪1,680 萬種色彩可選的Razer Chroma™ RGB 可自訂背光效果▪人體工學設計護腕墊▪多功能數位滾輪▪專門的媒體鍵▪內建記憶體加雲端的混合式儲存設定–多達 5 組設定檔▪支援 Razer Synapse 3▪多元佈線選項▪全區無衝突按鍵▪完全可編程按鍵,具即時巨集錄製功能▪可選遊戲模式▪1000 Hz 超快輪詢率▪鋁製結構產品尺寸與重量無置腕處▪長 :450.7 公釐 / 17.7 英吋▪寬 : 154.8 公釐 / 6.11 英吋▪高 : 42.1 公釐 / 1.7 英吋▪重量 : 1038 公克 / 2.3 磅有置腕處▪長 : 450.7 公釐 / 17.7 英吋▪寬 : 25.1 公釐 / 9.7 英吋▪高 : 42.1 公釐 / 1.7 英吋▪重量 : 1244 公克 / 2.7 磅5. 設定你的 RAZER BLACKWIDOW V31.將 Razer 裝置連接到電腦的 USB 連接埠。
Foobar2000 DarkOne v2.0安装步骤图解
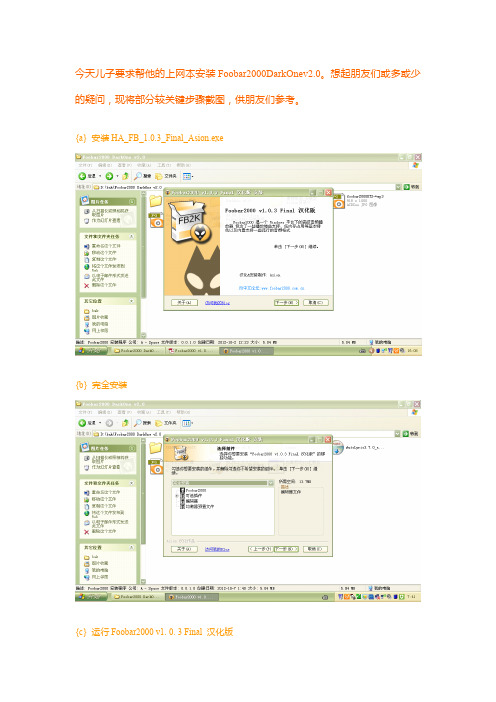
今天儿子要求帮他的上网本安装Foobar2000DarkOnev2.0。
想起朋友们或多或少的疑问,现将部分较关键步骤截图,供朋友们参考。
{a}安装HA_FB_1.0.3_Final_Asion.exe{b}完全安装{c}运行Foobar2000v1.0.3Final汉化版{d}选择外观{e}安装字体,复制tedGo's DarkOne.ttf到C/WINDOWS/Fonts文件夹文件到Program Files/Foobar2000/components文件夹全部文件到Program Files/Foobar2000/configuration文件夹文件夹,libpng13.dll,zlib1.dll到Program Files/Foobar2000文件夹DarkOne_v2_0_1.fcl到Program Files/Foobar2000文件夹(或者:运行Foobar2000,“参数选项”-“显示”-“分栏用户界面”){k}安装AutoLyric3.7.0_setup.exe{l}安装奥特歌词到Program Files/Foobar2000文件夹内{m}选择安装目标{n}窗口设置,可嵌入Foobar2000界面{o}禁止奥特歌词自动升级Foobar2000/components文件夹{q}加载BBE插件。
若弹出错误提示不必理会,确定即可Files/Foobar2000/components文件夹内SonicMaximizer.dll{s}运行Foobar2000,弹出VST机架,BBE参数:5,8,0{t}Foobar2000主窗口设置。
透明参数:220{u}OK。
声明:DarkOne v2.0是tedgo的mod,并不是原创,仅仅只是mod,DarkOne v2.0简体中文版在忠实原作的基础上加了一点点东西。
在此非常感谢tedgo的完美创意。
播放器主界面很靓,用英文显示比中文的视觉要好,也忠实原作的风格;“tedGo's DarkOne”字体很漂亮,所以在汉化时分了两个版本,主要是针对封面查看器,“DarkOne_v2_0.fcl”是保持英文风格的,“DarkOne_v2_0_1.fcl”是汉化的,建议使用“DarkOne_v2_0.fcl”。
黑猫盒子计算机伪装教程

黑猫盒子计算机伪装教程黑猫盒子计算机伪装是指将计算机的真实身份进行隐藏和伪装,使其看起来像是另一种类型的设备或是使用不同的操作系统。
这种伪装可以起到保护隐私、增加网络安全性和对抗网络追踪的作用。
下面是一个简单的黑猫盒子计算机伪装教程,帮助用户实现自己的计算机伪装。
一、选择合适的伪装操作系统为了实现计算机的伪装,首先需要选择一个适合的伪装操作系统。
常见的伪装操作系统包括Tails、Whonix、Qubes OS等。
这些操作系统都具有高度的隐私保护和匿名性,能够帮助用户隐藏自己的真实身份和行踪。
二、安装伪装操作系统选择好伪装操作系统后,需要将其安装到计算机上。
具体的安装过程可以参考伪装操作系统的官方文档或相关教程。
一般来说,用户需要准备一个可启动的安装媒体(比如U盘或DVD),将其插入计算机,然后按照屏幕提示完成安装过程。
安装完成后,用户可以选择使用该操作系统进行伪装。
三、优化伪装设置为了增加伪装的效果,用户还需要对伪装操作系统进行一些优化设置。
例如,可以设置代理服务器、使用VPN网络以隐藏真实IP地址;关闭或屏蔽某些网络功能,如蓝牙、无线网卡等,以避免被识别为普通计算机;调整系统设置,如语言、时区等,使其与伪装目标一致。
这些设置可以根据用户的需求和伪装目标进行自定义。
四、配置防火墙和安全软件为了保护计算机的安全性,用户还需要配置防火墙和安全软件,以防止恶意程序或攻击者对计算机进行入侵。
一般来说,伪装操作系统已经默认安装了一些安全软件,用户可以根据需要进行更新和配置。
同时,用户还可以通过添加额外的安全软件来增强计算机的安全性,如反病毒软件、防火墙等。
五、使用伪装计算机完成上述设置后,用户就可以开始使用伪装计算机了。
在使用过程中,需要注意以下几点:1.关闭或限制使用与伪装目标不相关的功能和服务,以降低被识别的风险;2.避免使用真实身份进行任何与伪装目标相悖的活动,以免被溯源出真实身份;3.定期更新操作系统和安全软件,以修复漏洞和提高安全性;4.注意保护个人隐私信息,不要泄露自己的真实身份和相关信息。
Ducky One 3 鍵盤使用說明書说明书
User ManualOne 3 RGB LED 燈版本One 3非背光版本目錄1234677891011121314151617One 3 Non-backlit version One 3 RGB LED versionCONTENT1819202123242425262728293031323334100%80%■ 結構:機械式結構■ 軸:Cherry MX 機械軸■ 鍵帽材質:PBT 或 ABS ■ 印字技術:二色成形 或 雷射雕刻 或 熱昇華■ 產地:台灣非背光100%100%100%80%■結構:機械式結構■ 軸:Cherry MX RGB機械軸■ 鍵帽材質:PBT 或 ABS■ 印字技術:二色成形 或 雷射雕刻■ 產地:台灣RGB LED 燈● 以上各種模式,皆可透過下列操作來進行細節調整:◆ Fn + ←:降低速度◆ Fn + →:增加速度● Fn + F10 按住3秒鐘,可以關閉所有燈光效果(含CM1、CM2)。
● 有 符號的模式可透過下列操作來進行細節調整:◆Fn + F5:調整紅色(R)亮度,10 階。
◆Fn + F6:調整綠色(G)亮度,10 階。
◆Fn + F7:調整藍色(B)亮度,10 階。
◆Fn + F8:清除紅色、綠色、藍色的顏色設定值。
◆Fn + 空白鍵(調色盤):開啟調色盤顯示各種不同顏色,只要點選想要的顏色即完成顏色設定。
● 操作重點提示:先調整喜歡的燈色,再選擇要指定的按鍵。
1. 按住 Fn + PrtSc 為設定 CM1 的設定,若按下 Fn + Pause 則是設定 CM2 的設定。
2. 當進入錄製模式後,CapsLock 會顯示當前要設定的顯示顏色,可以透過CapsLock + Spacebar 調整顯示燈色。
當有喜歡的顏色出現時,直接在鍵盤上按下任意鍵,該鍵就會儲存成喜歡的顏色。
3. 使用者可以重覆上一個步驟,讓在同一組區域背光設定中,不同按鍵能擁有多種不同燈色。
方德桌面操作系统v3.1安装手册说明书

方德桌面操作系统V3.1安装手册版权所有©2019 中科方德软件有限公司联系电话:400-882-8801电子邮件:***********************官方网站:——微信公众号————产品及服务——目录1.适用范围 (1)2.系统安装前期准备工作 (1)2.1运行环境及硬件配置要求 (1)2.2安装方式 (1)2.3数据备份 (1)3.安装实施 (2)3.1启动安装光盘/U盘 (2)3.2安装类型说明及其步骤详解 (7)3.2.1安装类型说明 (7)3.2.2“共存模式”安装方式 (8)3.2.3“清空磁盘”安装方式 (10)3.2.4“自定义”安装方式 (15)3.3系统安装 (17)4.系统启动配置 (19)4.1 在双系统中隐藏/开启Windows系统 (19)4.2 修改开机默认系统顺序 (20)5.应用安装 (21)5.1应用软件安装 (21)5.2在线安装flash插件 (24)6.系统注册 (25)7.常见问题 (28)8.联系方式 (32)版权所有©中科方德软件有限公司1.适用范围本手册仅适用于方德桌面操作系统V3.1的安装、启动配置和应用安装。
如果您在使用过程中有任何问题或建议,欢迎联系我们,感谢支持!2.系统安装前期准备工作2.1运行环境及硬件配置要求方德桌面操作系统的运行环境及硬件配置要求如下:●平台:支持绝大部分X86硬件平台●CPU:支持Intel、AMD和兆芯等X86平台处理器,主频1GHz 以上,推荐双核主频1GHz 以上●内存:1G以上,推荐4G 或更高配置●硬盘:25G 以上空间,推荐50G 或更高配置●显卡:支持主流集显、独显,推荐256MB 独立显卡或更高配置2.2安装方式1)光盘使用原厂提供的系统安装光盘进行安装。
2)U盘使用原厂提供或技术支持人员协助制作的安装U盘进行安装。
2.3数据备份1)目标机器已有系统或有数据需要备份如果预安装的主机,已有Windows或其他系统,则开机进入主机系统(Windows系统),详细了解Windows系统内盘符结构和各个盘符存放的数据情况。
加拿大枫叶报警 winload软件操作图文说明
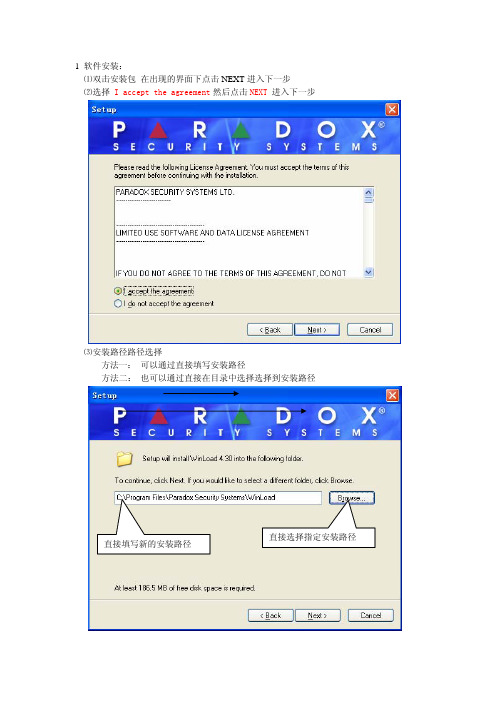
1 软件安装:⑴双击安装包在出现的界面下点击NEXT进入下一步进入下一步⑵选择 I accept the agreement然后点击NEXT⑶安装路径路径选择方法一: 可以通过直接填写安装路径方法二: 也可以通过直接在目录中选择选择到安装路径直接选择指定安装路径直接填写新的安装路径路径选择完成后,点击Next进入下一步⑷安装路径确认点击 是(Y)确认路径⑸软件名称如果需要更改软件名字,可在这里直接修改不创建开始菜单文件夹,如需创建则选中 点击Next进入下一步⑹ 创建快捷方式(可根据需要选择)创建桌面快捷方式创建快速运行快捷方式点击Next 进入下一步⑺ 核对已选择的内容,没问题直接点击Install ,开始安装程序⑻安装完成运行winload ,点击 Finsh运行winload软件安装结束二: 软件操作准备⑴软件语言选择在Select language 中,选择Chinese Senboll 点击 OK 进入下一步⑵ 输入密码 ,然后点击确认⑶找回密码的提示设置在提示问题的下拉菜单中选择问题,在提示问题的答案中,填写答案,然后点击确认,运行软件Ⅱ连接设置要想在Winload 和主机之间建立连接,就要对Winload 进行连接设置,方法有两种,一种是通过307USB 适配器直接连接,另一种是通过MODEM 电话拨号远程连接 第一次使用时,连接设置会自动弹出,如果更改的话在软件窗口的设置栏中点击连接即可 ⑴307USB 适配器连接设置选择直接连接方式,在下拉菜单栏中选择307USB 和 计算机的连接串口号在支持的解调器下拉(3)硬件连接(1) 新建账号(2) 填写主机基础信息远程电话拨号设置电话号码填写好点击下一步设备选择(3)选择主机的型号以及版本,然后点击确认,主机的基本信息就会显示出来(4) 连接主机选择连接方式: 用307USB则选择直接连接用电话远程拨号选择Modem连接选择完毕点击连接注意: (Ⅰ)选择直接连接则在调制解调器连接方式连接中的串口选择中,选择串口为灰色的串口,即不启动拨号连接,(Ⅱ)如果选择电话远程拨号,则在直接连接的串口选择中选择灰色串口,即不启用直接连接(5) 连接成功的显示如下连接成功后,主机所有的编程都会在软件的左边菜单栏中显示出来, (6) 选中主机,双击主机,软件会自动弹出主机的编程板,选中模块,双击模块,软件会自动弹出模块的编程板主机编程如图选择信息上传范围和信息传送方向后点击START 注意:在对主机编程前应先上传主机信息到软件 上传过程:(7) 编程:编程只需将相应的内容选中或填写进去即可,并且主机会将当前修改的内容以红色显示。
星球人直装v3教程

星球人直装v3教程摘要:1.星球人直装v3 教程简介2.星球人直装v3 的安装步骤3.星球人直装v3 的使用方法4.星球人直装v3 的优点与不足5.星球人直装v3 的未来发展正文:一、星球人直装v3 教程简介星球人直装v3 教程是一篇关于如何安装和使用星球人直装v3 软件的教程。
星球人直装v3 是一款实用的软件,可以帮助用户快速安装操作系统,简化电脑使用的步骤。
本文将为大家详细介绍星球人直装v3 的安装步骤、使用方法以及优缺点,让更多的人了解并善用这款软件。
二、星球人直装v3 的安装步骤1.下载星球人直装v3 软件。
在官方网站或其他可靠的下载站点下载软件。
2.运行软件。
双击运行星球人直装v3,进入安装界面。
3.选择安装目标。
用户可以选择将系统安装到电脑的C 盘或其他分区。
4.开始安装。
点击“开始安装”按钮,软件将自动进行安装。
5.安装完成。
安装过程结束后,电脑将自动重启,进入星球人直装v3 系统。
三、星球人直装v3 的使用方法1.进入星球人直装v3 系统后,用户可以通过桌面上的图标或开始菜单找到各种应用软件。
2.如需安装其他软件,可通过控制面板中的“添加/删除程序”进行操作。
3.若遇到问题,可查阅星球人直装v3 的帮助文档或在官方论坛寻求帮助。
四、星球人直装v3 的优点与不足1.优点:星球人直装v3 具有安装简便、系统稳定、操作简单等优点,适合电脑初学者使用。
2.不足:部分用户可能会觉得星球人直装v3 的系统资源占用较高,影响电脑性能。
此外,部分软件可能与星球人直装v3 不兼容。
五、星球人直装v3 的未来发展随着科技的不断发展,星球人直装v3 也在不断完善和升级。
未来,星球人直装v3 有望在系统性能、兼容性等方面取得更大的突破,为用户提供更好的使用体验。
总之,星球人直装v3 教程为广大用户提供了一个简单易懂的安装和使用指南。
Apogee ONE 快速启动指南 V3, 2013年3月说明书
Apogee ONEQuickStart GuideV3, March, 2013ContentsOverview!5.........................................................................................................Introduction!5Package contents!6ONE Panel Tour!8Optional Battery Power!9 Connecting to your Mac!10..............................................................................System Requirements!10Install ONE Software!10Connect to Headphones or Speakers!11Configuring the Input!12..............................................................................Connecting to your iPad!14 System Requirements!14Install Maestro from App Store!14Connect to Headphones or Speakers!17Configuring the Input!18 Adjusting Input & Output Levels!20................................................................Software Setup!22.............................................................................................Using ONE with iOS Apps!29 Additional Support!30.......................................................................................OverviewIntroductionThank you for purchasing ONE. This QuickStart guide describes how to set up ONE with your Mac and iPad, connect headphones to play back music and record your own creations with the built-in mic, an external mic or an electric instrument.ONEThe first studio-quality audio interface and microphone for iPad, iPhone and MacThe Apogee ONE is the first studio quality microphone and USB audio interface for iPad, iPhone and Mac. ONE is designed for easily creating professional and amazing sounding recordings on your iPod touch, iPhone, iPad or Mac. Using Apogee’s premium AD/DA conversion, ONE produces pristine music, podcast, and voice-over recordings while also delivering audiophile quality sound to your headphones.Package contentsThe following items are included in the ONE box: •ONE•Breakout cable with:•1 XLR Mic input•1 1/4” Instrument input•Microphone stand clip•USB cable•30-pin iOS cable•Universal power supply with NA, EU, UK, AU, JP•QuickStart guideSoftware, firmware and the ONE User’s Guide are available online only. Please register your product and download the latest installer here:/downloadsONE Panel Tour Built-in microphoneInput/output indicator Stereo headphone out Speaker outMic/instrument input Breakout cable included DC power Power supply included USB connection to iOS device or MacInput/output level metersController knob - Select function - Set input level - Set output levelOptional Battery PowerWhen connecting to iPad, iPhone or iPod touch, ONE’s optional battery power provides complete portability. Simply remove the lid from the battery compartment on the back of ONE and insert 2 AA batteries (not included).Apogee highly recommends NiMH rechargeable batteries for the maximum amount of uninterrupted recording time. Alternatively, you can connect ONE’s included power supply to charge your iOS device and continuously power ONE without any batteries.Connecting to your Mac - Apogee ONE QuickStart Guide Connecting to your MacSystem Requirements•Computer: Intel Mac 1.5GHz or faster•Memory: 2 GB RAM minimum, 4 GB recommended•OS: 10.6.8 or greater•Connection and power: Any available USB port on a Mac•USB bus powered; DC power optional (DC power supply included)Install ONE Software1.Connect ONE’s USB port to a USB port on your Mac using the supplied USB 2 cable.2.Go to /downloads.php.3.Download the latest ONE software installer.4.Once you have downloaded the package, double-click the Apogee icon to run the firmware updater.5.After the firmware update has completed, double-click the open-box icon to run the software installer.6.You will be required to restart your computer after the install is complete.Choosing ONE for Mac Sound I/OAfter connecting ONE, installing the software and restarting your Mac, a dialog box will prompt you to choose ONE for Mac sound input and output. Click Yes.Connect to Headphones or SpeakersConnect headphones to the 1/8” output jack on ONE’s front panel.Alternatively, you can connect ONE’s output to speakers by using an adapter cable. The cable should go from a stereo 1/8” connection (from ONE) to two separate connectors suitable for your speakers (1/4”, RCA, etc.).Configuring the InputONE offers the following choices for up to 2 simultaneous inputs:•Built-in microphone•Built-in microphone + 1/4” instrument•XLR microphone•XLR microphone + 1/4” instrument•1/4” instrumentWhen using an XLR microphone or 1/4” instrument, connect to ONE’s breakout cable.Open Apogee Maestro software (found in your Mac’s Applications folder), andselect the Input tab.Select the Analog Level setting that corresponds to the microphone source you’dlike to record. For example, if you have a microphone connected to the XLRconnection on the breakout cable, select “Ext Mic” from the Analog Level menuon channel 1. If you would like to utilize ONE’s built-in microphone, select “IntMic”. By default, the 1/4” instrument input is the selected source for Channel 2.Note: If you are using a condensermicrophone that requires phantompower, select “Ext Mic 48V”. Phantompower is indicated on ONE’s display bya red dot above the microphone icon.Connecting to your iPadSystem Requirements•iPhone 4, iPhone 4S, iPad, iPad 2, iPad (3rd gen.)•Connection: 30-pin dock connector•iPod Touch (5th gen.), iPhone 5, iPad (4th gen.), iPad Mini•Connection: Apple’s Lighting to 30-pin adapter (sold separately)•iOS version: 5.1.1 or greater•Power supply or two AA batteries requiredInstall Maestro from App Store1.Connect the provided external power supply to ONE or insert 2 AA batteries. Note: The iPad will not be charging when using ONE’s battery power.2.Connect ONE to your iPad/iPhone using the provided 30-pin iOS cable.3.On the iPad/iPhone, open Settings and choose General > About > ONE, then choose "Find App for Accessory".The App Store will open and navigate automatically to the Apogee Maestro app.4. Once you've signed in to the App Store, click INSTALL to download Apogee Maestro.Note: it's possible to record through the built-in microphone and play back audio without installing Maestro.Connect to Headphones or SpeakersConnect headphones to the 1/8” output jack on ONE’s front panel.Alternatively, you can connect ONE’s output to speakers by using an adapter cable. The cable should go from a stereo 1/8” connection (from ONE) to two separate connectors suitable for your speakers (1/4”, RCA, etc.).Configuring the InputONE offers the following choices for up to 2 simultaneous inputs:•Built-in microphone•Built-in microphone + 1/4” instrument•XLR microphone•XLR microphone + 1/4” instrument•1/4” instrumentWhen using an XLR microphone or 1/4” instrument, connect to ONE’s breakout cable.Open Apogee Maestro app, choose ONE from the main menu and select the Input tab.Select the Analog Level setting that corresponds to the input source you’dlike to record. For example, if you have a microphone connected to the XLRconnection on the breakout cable, select “Ext Mic” from the Analog Levelmenu on channel 1. If you would like to utilize ONE’s built-in microphone,select “Int Mic”. By default, the 1/4” instrument input is the selected sourcefor Channel 2.Note: If you are using a condensermicrophone that requires phantom power,select “Ext Mic 48V”. Phantom power isindicated on ONE’s display by a red dotabove the microphone icon.Adjusting Input & Output Levels Input levelTo change ONE’s input level (i.e the preamp gain of microphones and instruments):1)Push the Controller Knob until the built-inmicrophone, external microphone or instrument iconis lit on the ONE’s display.2)Turn the Controller Knob until the desired recording level is obtained.The controller knob operates in parallel with Maestro’sinput controls.Adjusting Input & Output Levels - Apogee ONE QuickStart GuideHeadphone/Speaker Output levelTo change ONE’s output level (i.e the listening level of connected headphones or speakers):1)Push the Controller Knob until the speaker icon is liton the ONE’s display.2)Turn the controller knob to the desired listening level.The controller knob operates in parallel with any software output controls.Adjusting Input & Output Levels - Apogee ONE QuickStart GuideSoftware Setup Mac OS: Using ONE with Logic1) Go to the Logic Pro or Logic Express menu andchoose Preferences > Audio.2)In the Core Audio pane of the Device tab, select ONE for Output Device and Input Device.3)Set the I/O Buffer Size to 64. Click Apply Changes at the bottom of the Preferences window.Mac OS: Using ONE with Logic (continued)4) Now close the Logic Pro Preferences window andselect New > Empty Project > from the File Menu.5) If you are recording a single microphone orinstrument, make the following selections in the New Tracks dialog box:6) Logic will now ask you to name the projectand save in on your hard drive.7) Click the Record button in the transport controlat the bottom of the Logic window.Mac OS: Using ONE with Avid Pro Tools (9 or greater) 1) Choose Setup menu > Playback Engine.2) Choose ONE for Current Engine.3)Set the Buffer Size to 64. Click OK.4) The following dialog box will appear. Click Yes.Mac OS: Using ONE with Ableton Live1) Choose Live > Preferences. Click on the Audio tab.2) Select CoreAudio in the Driver Type menu.3) Select ONE in both the Audio Input Deviceand Audio Output Device menus.4) Set Buffer Size to 128.5) Close the Preferences window after making settings.Using ONE with iOS AppsONE is designed to work with any iOS Core Audio compatible app on iPod Touch, iPhone or iPad. Simply download your favorite app, connect ONE and you’re ready to go!Recommended apps:GarageBand - https:///us/app/garageband/id408709785?mt=8Auria - https:///us/app/auria/id524122834?mt=8Cubasis - https:///us/app/cubasis/id583976519?mt=8Visit /knowledgebasefor the most up to date list of compatible apps.Additional Support For more information:• Complete Apogee ONE User's Guide• Apogee KnowledgeBase and FAQs• Apogee Product Registration• How to contact Apogee Technical SupportVisit: /support/Apogee Electronics Corp. Santa Monica, CA Part #: 9500-0073-0000Revision 3.0。
DarkOne简易教程

DarkOne简易教程很多人都想用好Foobar,但是觉得Foobar很难用,于是就换回千千了……本人不想就音质方面对两者进行比较,因为那样等于是在找喷……本人着重介绍一下我调教的这个版本。
这是DarkOne版的播放界面:好了,正式进入Foobar主界面,大家可以看到右下方有这些英文:PL代表播放列表,效果如下图LYR代表的是歌词,效果如下图INF代表歌曲信息,效果如下图其他的如AL是媒体库的专辑目录树,FIL也差不多,大家可以自己尝试一下。
好了,接下来简单教大家怎么建立自己的媒体库,首先要切换到PL,然后在播放列表的空白处点右键,选择新建,这样就新建了一个播放列表,重命名什么操作的大家应该都会了吧……然后切换到自己刚刚建立好的播放列表,然后在左上角的一排按钮中选择ADD FILES或者ADD FOLDER,前者表示添加歌曲文件,后者表示添加歌曲文件夹,点击后会弹出个对话框,大家就可以把自己的歌曲添加到播放列表了,当然如果嫌这样麻烦,也可以直接拖动文件到Foobar中。
大家可以根据自己的需要多建立几个播放列表,像我就建了几个,效果挺不错的吧?等等,你说为啥你左下角没看到专辑封面?呵呵,童鞋,这个问题很犀利,很多童鞋都是困在这里的,这里我就发扬共产主义无私奉献精神告诉你们吧~简单说来,要播放时显示专辑封面最简单的办法是在该歌曲文件夹的根目录下有一个cover.jpg文件名的图片文件,当然这个名字是可以通过参数设置进行更改的,具体的操作大家可以自己摸索。
当你没有歌曲封面时怎么办?没关系还有一个办法,见下图:在歌曲上右键---工具---从Last.fm获取专辑封面,你问我Last.fm是啥,自己百度吧……这样会从Last上下载一个封面,然后保存后放到歌曲目录下就可以了。
PS:要调出参数控制面板请按Ctrl+P或按如下图所示的按钮,这个版本用快捷键操作会方便一些。
oniric使用方法

oniric使用方法Oniric使用方法Oniric是一款功能强大的虚拟现实软件,可以为用户提供沉浸式的虚拟现实体验。
本文将介绍Oniric的使用方法,以帮助用户更好地使用该软件。
一、安装和启动1. 下载Oniric软件安装包,双击运行安装程序。
2. 在安装过程中,根据提示选择安装路径和其他设置。
3. 完成安装后,双击桌面上的Oniric图标启动软件。
二、界面介绍1. 主界面:Oniric的主界面包含了虚拟现实场景的预览窗口、导航栏和设置选项等。
2. 预览窗口:该窗口用于显示虚拟现实场景,用户可以通过头戴式显示设备或平板电脑来观看。
3. 导航栏:导航栏位于主界面的顶部,包含了各种操作和设置选项,如场景切换、音量控制、亮度调节等。
4. 设置选项:通过点击导航栏中的设置按钮,用户可以进入设置界面,对软件进行个性化设置。
三、基本操作1. 切换场景:在主界面的导航栏中,点击场景切换按钮,可以选择不同的虚拟现实场景进行体验。
2. 移动和转向:用户可以通过头戴式显示设备的控制器或平板电脑的触摸屏进行移动和转向操作,以在虚拟现实场景中探索。
3. 互动操作:在虚拟现实场景中,用户可以通过手势、语音或控制器按钮与场景中的物体进行互动,如拾取物品、触发事件等。
4. 调整设置:通过点击导航栏中的设置按钮,用户可以对音量、亮度、图像质量等进行个性化调整,以获得更好的用户体验。
四、高级功能1. 自定义场景:Oniric支持用户自定义虚拟现实场景,用户可以导入自己的模型、贴图和音频等资源,创建独特的场景。
2. 多人协作:Oniric还支持多人协作功能,多个用户可以同时进入同一个虚拟现实场景,实时进行交流和互动。
3. 扩展性:Oniric提供了丰富的插件和开发工具,用户可以根据自己的需求进行扩展和定制,以满足特定的应用场景。
五、注意事项1. 使用前请确保电脑或移动设备的硬件配置要求符合Oniric的要求。
2. 在体验虚拟现实场景时,请确保周围环境安全,避免碰撞或摔倒等意外情况。
- 1、下载文档前请自行甄别文档内容的完整性,平台不提供额外的编辑、内容补充、找答案等附加服务。
- 2、"仅部分预览"的文档,不可在线预览部分如存在完整性等问题,可反馈申请退款(可完整预览的文档不适用该条件!)。
- 3、如文档侵犯您的权益,请联系客服反馈,我们会尽快为您处理(人工客服工作时间:9:00-18:30)。
Darkone3.0.1的安装及使用(新手教程)
一.安装皮肤及字体(系统win7)
1.下载英文版主程序并安装,版本v1.1以上。
2.将Darkone
3.0.1的安装包解压到主程序安装目录的根目录下,点击darkone运行程序安装皮肤。
3.启动foobar2000,ctrl+P调出参数选项,导入flc文件(FB\\themes\DarkOne\DarkOne_v3_0_1.fcl)
导入方法见下图。
1.
2.导入安装目录下的FCL文件
(foobar2000\themes\DarkOne
\DarkOne_v3_0_1.fcl)
4.重启FB,在display菜单右侧选择外观模式coumns UI,外观即可变成darkone了,见下图。
5.安装字体文件,在控制面板字体文件夹下把包里的字体文件复制粘帖进去就OK。
如果自己不会配置或懒得配置,可将懒汉包里的本人的二个配置文件configuration,theme.fth 覆盖系统盘下的FB的文件即可。
注:Darkone安装完后在系统盘下会生成一个FB文件夹,里面就是FB的配置文件,D:\Users\yangzk\AppData\Roaming\foobar2000。
把components插件包覆盖FB安装目录下的components文件夹,如需其他插件可自行安装。
二.音效插件及篮管的安装
1.将音效插件包音效插件HA-SRS_v11020HX 解压后直接安装即可。
音效的调整见下图。
2.将篮管插件包蓝色电管VstPlugins 解压到FB 安装目录components 文件夹中,把VstPlugins 中的foo_dsp_vst.dll 剪贴到component 中,foo_dsp_vst.dll 插件必须安装,否则无法安装篮管,安装方法见下图。
音效调节区,调节后按上方的按钮保存
将右边的VST 添加的左边
点此按钮篮管就会显示出来
低音
功率 红灯要点亮
高音
红灯要关掉
关掉后可在后台运行
三.专辑及艺术家的图片显示
%filename%.jpg 歌曲图片
%album%.jpg 专辑图片
folder.jpg 文件夹图片
%front%.*p*g 前封面图片
%cover%.*p*g 封面图片
E:\Program Files2\foobar2000\lastfm\artist\%artist%.*p*g 艺术家图片路径
E:\Program Files2\foobar2000\lastfm\album\%artist album%.*p*g 艺术家-专辑图片路径
把以上代码添加到下图中,图片会自动显示,只要歌曲的标签和图片是一只的,自动下载的的图片一般不会有问题。
四.歌词插件的安装
以前用的1.0版本的歌词插件foo_uie_lyrics2感觉挺好用的,但现在1.1的版本用不成了。
换来换去只能勉强用foo_lyricsgrabber2了,中文基本搜不到,英文还马马虎虎,可能对歌曲的标签要求比较严,歌词插件的安装见下图。
在歌词所在的目录下找
到歌词文件安装即可
下拉菜单中
点setting
以上只是简单的介绍,FB是个非常不错的播放软件,在这要感谢那些无私的制作者。
要精通的话还有很多的东西要学,有不足之处还希望大家指正。
