9 WINDOWSHPC
搭建HPC超详细教程

集群架设钟毅厦门大学物理学系复杂系统研究室2012年8月前言集群就是一堆计算机通过某种方式联系在一起的统一的整体.它有一个主节点,负责管理账户,回答用户的请求,以及命令其它计算机即子节点(计算节点)完成某项任务. 为了能够给子节点下命令,我们必须搭建SSH服务,并且要达到无密码互访(因为子节点要反馈计算结果或者其它信息给主节点);为了管理用户账号的方便,我们要建立NIS服务,而要建立NIS服务,又必须先搭建NFS服务. NFS服务的一项重要的功能是,把主节点的某个或者某些目录共享给子节点,这样,只要在主节点的共享区域安装了某个软件,那么该软件就可以被所有子节点利用.我们复杂系统小组的成员都喜欢编写Fortran程序,所以我们有必要安装Fortran编译器------ifort软件,这是intel公司提供的免费Fortran编译器.又考虑到我们经常要进行大规模模拟计算,这就必须安装MPICH2这个并行计算软件. 此外,我们还必须安装Torque这个作业管理器,对用户提交的作业进行管理.有必要说明的是,这里展示的是每种软件的安装步骤,以及遇到问题时的处理方法;这里面没有对各种软件的功能进行详细的解说哟,也没有对linux的命令进行解说,要知道它们的功能,请参看最后面列出的参考文献吧. 还有一点必须说明,之所以整理这个安装笔记,是为了让师弟师妹们在自己架设集群的时候有一份比较完整的参考资料. 好了,废话少说,开始动手吧,O(∩_∩)O哈哈~一.安装与连接internet两台电脑Hostname分别为centos1,centos21.安装CentOS6.3 , 分区的时候选择如下方式centos1的分区:/ : 90GB/var : 10GB/tmp : 10GBSwap : 3GB/disk1 : 20GBcentos2的分区:/ : 20GB/var : 10GB/tmp : 10GBSwap : 3GB/disk2 : 90GB选择安装basic server 的安装包。
windows正版系统+正版密钥

Wi n d o w s
系 统 下 载 +正 版 密 钥
2010-05-3011:49 喜欢正版 Windows 系统 这是我收集 N 天后的成果,正版的 Windows 系统真的很好用,支持正 版!大家可以用激活工具激活!现将本收集的下载地址发布出来,希望大家多多支持! Windows98第二版(简体中文) 安装序列号: Q99JQ-HVJYX-PGYCY-68GM3-WXT6安8 装序列 号: Q4G74-6RX2W-MWJVB-HPXHX-HBB安XJ装序列号: QY7TT-VJ7VG-7QPHY-QXHD3-B838Q WindowsMillenniumEdition(WindowME) (简体中文) 安装序列号: HJPFQ-KXW9C-D7BRJ-JCGB7-Q2DR安J装序列号: B6BYC-6T7C3-4PXRW-2XKWB-GYV3安3 装序列号: K9KDJ-3XPXY-92WFW-9Q26K-MVRK8Windows2000PROSP(4 简体中文) SerialNumber:XPwithsp3VOL 微软原版(简体中文) 文件名 : 大小 : 字节 MD5:D142469D0C3953D8E4A6A490A58052EF52837F0CFRC32:FFFFFFFF邮寄日期 (UTC) : 5/2/200812:05:18XPprowithsp3VOL 微软原版(简体中文)正版密钥: MRX3F-47B9T-2487J-KWKMF-RPWB工Y(行版 ) (强推此号!!!) QC986-27D34-6M3TY-JJXP9-TBGMD台( 湾交大学生版 ) QHYXK-JCJRX-XXY8Y-2KX2X-CCXG广D州( 政府版 ) MFBF7-2CK8B-93MDB-8MR7T-4QRC北Q京( 政府 版 ) T72KM-6GWBP-GX7TD-CXFT2-7WT2上B海( 政府版 ) DG8FV-B9TKY-FRT9J-6CRCC-XPQ4上G(海 政府版 ) BCJTW-2M9JH-M8HHT-KWWWM-344英4文Y(版 ) CD87T-HFP4C-V7X7H-8VY68-W7D7M英(文 版 ) RFYPJ-BKXH2-26FWP-WB6MT-CYH2英Y文( 版 ) 7HPVP-8VHPV-G7CQ3-BTK2R-TDRF英3(文 版 ) DRXKM-94K47-38QVX-F8K7R-2H7CD日( 文版 ) FCKGW-RHQQ2-YXRKT-8TG6W-2B7韩Q文8( 版 ) VMXC2-M9HKH-DRYGC-FHQ7H-BJY33(04版08) CM3HY-26VYW-6JRYC-X66GX-JVY(2D可用) DP7CM-PD6MC-6BKXT-M8JJ6-RPX(G可J 用) F4297-RCWJP-P482C-YY23Y-XH8W(3可用) HCQ9D-TVCWX-X9QRG-J4B2Y-GR(2T可T用) M6TF9-8XQ2M-YQK9F-7TBB2-XGG(88可用) HH7VV-6P3G9-82TWK-QKJJ3-MXR(96可用) TDWGX-DMF97-BJYDQ-X9DJV-CYH(W可Q用) T8FMX-Q4HQJ-3JW77-JGPDC-FY9(DG可用) G6X78-XG4KV-3MXT7-FT8YM-F3YW(3可用) OEM 版: 华硕: 家庭版 : KR63J-B34MB-CVP9K-T478G-8Y3XG联想: 家庭 版 :PWBPT-6PGKF-TP6MY-299P4-CPXQG(XXXXX-XXXX专TX-4GKQJ(XXXXX-XXXXVXF)4HT-MPWB8-TWV6R-K6QM4-W6JHC3MB8D -MQPF9-WQMFB-GV3R4-VTF7W年(04联想版 ) DELL: 家庭 版 :RCBF6-6KDMK-GD6GR-K6DP3-4C8MT(XXXXX-XXXX专X业) 版 :XJM6Q-BQ8HW-T6DFB-Y934T-YD4YT(XXXXX-XXXXKXG) 7G9-67KHV-4FQKV-4DYXK-BHQTCJOMPA Q: 家庭版 :KG27H-JV9M6-2CXKV-GMP22-HF2BQ(XXXXX-XXXX专X)业 版 :KYKVX-86GQG-2MDY9-F6J9M-K42BQ(XXXXX-XXXXHXP) : 家庭 版 :MK48G-CG8VJ-BRVBB-38MQ9-3PMFT(XXXXX-XXXX专X)业 版 :DMQBW-V8D4K-9BJ82-4PCJX-2WPB6(XXXXX-XXXXPX2)BXT-D7Y8P-F6WF2-HYXYP-49TJDACER: 家庭版 :CXCY9-TTHBT-36J2P-HT3T3-QPMFB(XXXXX-XXXXX专) 业 版 :BW2VG-XXDY6-VW3P7-YHQQ6-C7RYM(XXXXX-XXXKXDXD)3G-HGVGM-M24p4-6BMMY-9XHIBFM8 : 家庭版 :DMY26-78CX9-Q89DP-Q8QK8-VF2B8(XXXXX-XXXXX专) 业 版 :HCBR8-FGC2K-RY7BM-HM3KT-BKVRW(XXXXX-XXX清XX华)同方 : 家庭 版 :KMHJF-9M82Y-YPFV7-YQHXH-F9JW8(XXXXX-XXXX专X)业 版 :M68XC-TX2C9-PKK8H-GP8JH-RC8XB(XXXXX-XXXXTXC) L: 家庭 版 :XPGYX-J7BF9-4YJVV-7MWK9-WQT3Y(XXXXX-XXXX七X)喜 : 家庭 版 :GJMY6-GMJHY-2VJ79-K67WT-KQHYT(XXXXX-XXXXSXa)msung: 家庭 版 :XVX72-2WCXQ-48VWH-T66HT-C7R2B(XXXXX-XXXXTXO) SHIBA家庭 版 :WDHPC-6WQPF-W3R3K-J2VF4-JFP8W(XXXXX-XXXSXOX)NY:专业 版 :K7RGC-CDXYJ-FTYH2-Y3VVV-KBYC7(XXXXX-XXXX方X)正 : 家庭
KMS批量激活指南

用户托管的批量激活指南Windows 7 和 Windows Server 2008 R2Microsoft Corporation发布日期:2009 年 6 月摘要Microsoft®批量激活可帮助批量许可用户将批量许可介质的激活过程自动化并加以管理。
批量许可用户和特殊计划(如 Microsoft 合作伙伴计划、MSDN®和 Microsoft TechNet)订阅者有资格使用批量许可软件和介质。
本指南面向那些计划使用密钥管理服务来部署Windows® 7 和Windows Server®2008 R2 操作系统的批量激活版本的组织,专用于帮助这些组织中的 IT 专业人员。
本文档以及其中引用的任何文档仅供参考,Microsoft 在本文档中未做任何明示或隐含的担保。
本文档中的信息(包括URL 和其他Internet 网站参考)如有更改,恕不另行通知。
使用本文档的全部风险或后果均由用户承担。
除非另有说明,否则本文档举例所言公司、组织、产品、域名、电子邮件地址、徽标、人物、地点和事件均为虚构。
Microsoft 无意将他们与任何真实的公司、组织、产品、域名、电子邮件地址、徽标、人物、地点或事件相关联,也不应推定为存在任何此类关联。
用户有责任遵守所有适用的版权法律。
在适用法律不限制版权权利的前提下,未经Microsoft Corporation 明确书面许可,不得出于任何目的、以任何形式或借助任何手段(电子、机械、影印、录制或其他手段)对本文档任何部分进行复制、存储、引入检索系统或传播。
Microsoft 可能拥有本文档所涉及的专利权、专利申请权、商标权、版权或其他知识产权。
除非Microsoft 在任何书面许可证协议中明确规定,否则提供本文档并不表示授予您上述专利权、商标权、版权或其他知识产权。
© 2009 Microsoft Corporation。
KMS激活专用:所有Windows版本的GVLK密钥对照表

KMS激活专⽤:所有Windows版本的GVLK密钥对照表GVLK密钥是专门⽤于KMS激活的密钥,如果想使⽤KMS激活,那么必须先将系统的KEY替换为对应版本的GVLK密钥。
KMS不仅可以激活Windows 8、Windows 8.1和Windows 7、Windows 10这类我们常⽤的系统,还可以激活各种版本的Windows Server系统。
以下是GVLK密钥版本对照表,可配合KMS服务器进⾏使⽤。
Windows Server 半年频道版本Windows Server 版本 1909、版本1903 和版本 1809WINDOWS SERVER 版本 1909、版本1903 和版本 1809操作系统版本KMS 客户端安装程序密钥Windows Server Datacenter6NMRW-2C8FM-D24W7-TQWMY-CWH2DWindows Server Standard N2KJX-J94YW-TQVFB-DG9YT-724CCWindows Server LTSC/LTSB 版本Windows Server 2019WINDOWS SERVER 2019操作系统版本KMS 客户端安装程序密钥Windows Server 2019 Datacenter WMDGN-G9PQG-XVVXX-R3X43-63DFGWindows Server 2019 Standard N69G4-B89J2-4G8F4-WWYCC-J464CWindows Server 2019 Essentials WVDHN-86M7X-466P6-VHXV7-YY726Windows Server 2016WINDOWS SERVER 2016操作系统版本KMS 客户端安装程序密钥Windows Server 2016 Datacenter CB7KF-BWN84-R7R2Y-793K2-8XDDGWindows Server 2016 Standard WC2BQ-8NRM3-FDDYY-2BFGV-KHKQYWindows Server 2016 Essentials JCKRF-N37P4-C2D82-9YXRT-4M63BWindows 10,所有⽀持的半年频道版本有关受⽀持的版本和服务终⽌⽇期的信息,请参阅。
hpc技术方案

HPC技术方案一、硬件架构高性能计算(HPC)系统的硬件架构主要由高性能处理器、高速内存、存储设备、网络通信设备等组成。
根据应用需求和计算规模,可以选择不同的硬件配置,如CPU、GPU、FPGA等加速器。
同时,需要考虑硬件设备的可扩展性和可维护性。
二、操作系统HPC系统通常采用Linux操作系统,因为它具有稳定性、可扩展性和易维护性等优点。
此外,还需要针对HPC环境进行定制和优化,如配置并行文件系统、实现作业调度等。
三、编程模型为了简化HPC应用程序的开发,可以采用编程模型和工具。
常见的HPC 编程模型包括MPI、OpenMP、CUDA等,它们可以支持并行计算和分布式计算。
此外,还有一些高级编程语言和框架,如Python、MATLAB等,也可以用于HPC应用程序的开发。
四、优化算法针对HPC应用程序,需要对算法进行优化,以提高计算效率和精度。
优化的方法包括算法改进、参数调整、代码优化等。
在优化过程中,需要结合具体的应用场景和需求,进行详细的分析和测试。
五、资源管理HPC系统的资源管理是指对系统的处理器、内存、存储等资源进行分配和管理。
可以采用资源调度工具和云技术等实现资源的动态分配和回收。
资源管理需要考虑资源的利用率和系统的高可用性。
六、数据处理HPC系统通常需要进行大规模的数据处理和分析。
可以采用分布式存储和计算技术,如Hadoop、Spark等,实现数据的分布式存储和处理。
数据处理需要考虑数据的可靠性、一致性和效率。
七、系统集成为了将各种硬件和软件组件集成在一起,形成一个稳定、高效的HPC系统,需要进行系统集成。
系统集成需要考虑系统的可扩展性、可靠性和可维护性,同时需要进行测试和性能优化。
八、运维管理为了确保HPC系统的稳定运行和持续提供高性能计算服务,需要进行运维管理。
运维管理包括系统监控、故障诊断、性能优化、安全防护等方面。
可以采用自动化工具和智能运维技术,提高运维效率和系统的可用性。
九、性能评估性能评估是HPC技术方案的重要环节,用于衡量系统的性能表现和计算效率。
网络操作系统(课后练习题)

项目01 认识网络操作系统大项 1 of 1 - 填空题得分题目 1 of 6 得分Windows Server 2008 操作系统发行版本主要有9个,分别是Windows Server 2008 标准版、Windows Server 2008 企业版、Windows Server 2008 数据中心版、Windows web Server 2008、Windows Server 2008 安腾版、Windows Server2008 标准版(无Hyper-V)、Windows Server 2008 企业版(无Hyper-V)、Windows Server 2008 数据中心版(无Hyper-V)和Windows HPC Server 2008。
答案: 标准, 企业, 数据中心, Web, 安腾, 标准, 企业, 数据中心, HPC题目 2 of 6 得分操作系统是用户与计算机之间的接口,网络操作系统可以理解为是网络用户与计算机网络之间的接口。
答案: 用户, 网络用户题目 3 of 6 得分网络通信是网络最基本的功能,其任务是在源主机和目的主机之间实现无差错的数据传输。
答案: 源主机, 目的主机|目标主机题目 4 of 6 得分Web服务、大型数据库服务等都是典型的客户/服务器模式答案: 客户/服务器|客户机/服务器|C/S|Client/Server题目 5 of 6 得分基于微软NT技术构建的操作系统现在已经发展了5代,依次是:Windows NT Server 、Windows 2000 Server 、Windows Server 2003 、Windows Server 2008 、Windows Server Longhorn 。
答案: NT, 2000, server 2003, server 2008, server 2012题目 6 of 6 得分Windows Server 2003的4个版本按功能从弱到强依次是:Windows Server 2003 Web 服务器版、标准版、企业版、数据中心版。
HP Color LaserJet Pro M252 用户指南说明书

此处包含的信息如有更改,恕不另行通 知。
HP 产品及服务的保修仅以随该产品及 服务提供的书面保修声明为准。本文所 述任何内容不应被视为附加保修。对任 何技术或编辑错误或者本文所述内容的 遗漏,HP 不承担任何责任。
Edition 3, 8/2019
2 纸盘 .......................................................................................................................................................................................................... 15 将纸张装入单页进纸槽(纸盘 1) ................................................................................................................................ 16 简介 ..................................................................................................................................................................... 16 将纸张装入单页优先进纸槽 ........................................................................................................................ 16 在单页优先进纸槽中装入信封(纸盘 1) .............................................................................................. 17 纸盘 1 纸张方向 ............................................................................................................................................... 19 在纸盘 2 中装入纸张 .......................................................................................................................................................... 20 简介 ..................................................................................................................................................................... 20 在纸盘 2 中装入纸张 ...................................................................................................................................... 20 在纸盘 2 中装入信封 ...................................................................................................................................... 22 纸盘 2 纸张方向 ............................................................................................................................................... 25
HP ProBook 450 G9 用户指南说明书

用户指南摘要本指南提供有关组件、网络连接、电源管理、安全性和备份等相关信息。
法律信息©Copyright 2022 HP Development Company, L.P.Bluetooth 是其所有人所拥有的商标,HP Inc. 已取得授权使用。
Intel、Celeron、Pentium 和 Thunderbolt 是 Intel Corporation 或其子公司在美国和/或其他国家/地区的商标。
Windows 是 Microsoft Corporation 在美国和/或其他国家/地区的注册商标或商标。
USB Type-C® 和 USB-C® 是 USB Implementers Forum 的注册商标。
DisplayPort™ 和 DisplayPort™ 徽标是 Video Electronics Standards Association (VESA) 在美国和其他国家/地区所有的商标。
Miracast® 和 Wi-Fi 是 Wi-Fi Alliance 的注册商标。
本文所含信息如有更改,恕不另行通知。
HP 产品和服务附带的明示保修声明中阐明了此类产品和服务的全部保修服务。
本文档中的任何内容均不构成任何额外保修。
HP 对本文档中出现的技术错误、编辑错误或遗漏之处不承担任何责任。
第一版:2022 年 4 月文档部件号:N05204-AA1产品通知本指南介绍大多数产品共有的功能。
您的计算机上可能未提供某些功能。
并非所有功能在所有 Windows 版本中都可用。
系统可能需要升级和/或单独购买硬件、驱动程序、软件或 BIOS 更新,才能充分利用Windows 功能。
Windows 会自动更新,此功能始终处于启用状态。
需要高速互联网和Microsoft 帐户。
可能会收取 ISP 费用,在更新过程中可能还会有其他要求。
请参阅。
如果您的产品出厂随附 S 模式的 Windows:S 模式的Windows 仅适用于来自 Windows 的 MicrosoftStore 中的应用。
HPC详细介绍

一、什么是HPCANSYS HPC软件能够让用户利用一些多核的电脑在更短的时间内,做更大规模的仿真和更准确的仿真计算。
HPC对于用户来说,可以在产品研发规定的时间节点内进行更多方案的仿真计算,而产生实际的商业价值.由于HOC能够用更大规模和更多细节进行仿真,因此HPC能够让客户对产品性能有更深入的控制,帮助客户避免浪费成本,错误的设计和产品研发的失败。
二、为什么市场需要HPC当今市场对于HPC的需求比以往更盛,原因在于:1、产品开发周期缩短2、竞争激烈3、有针对性的研究产品性能三、为什么你要卖HPC1、增加签单规模2、追加销售3、竞争4、提升客户关系四、H PC可以做什么HPC家族产品可以实现多处理器/多核电脑的并行计算。
并行计算将仿真任务分解成若干小块,在一个独立的处理器中同时进行计算。
在这种情况下,你可以讲你的任务分成10份,在10个核上进行计算,这样计算速度就会加快10倍。
此外,由于有多进程处理,你可以解决非常大规模的问题,而避免了单个进程带来的计算速度慢.对于FlUENT 或者Mechanical产品实际执行并行计算时,HPC产品会控制允许多少进程进行仿真.五、H PC的典型应用是什么1、几乎所有的CFD仿真:CFD本身固有特性就是计算慢,因此使用HPC能够缩短仿真时间2、大规模的、更细节的模型仿真3、复杂的非线性结构仿真六、H PC家族产品的种类ANSYS HPC家族产品包含了两个独立的产品:1、ANSYS HPC Packs:这是一个非常有吸引力的并行计算产品, 在高效的并行计算上有客观的效果。
每一个仿真工作会占用一个或多个HPC Pack license. 并行计parallel processing for multiple simulations or combined to offer virtually unlimited parallel on a single simulation。
windows系统全集及相关密钥下载地址

家庭版: DMY26-78CX9-Q89DP-Q8QK8-VF2B8 (XXXXX-119-0001076-XXXXX)
专业版: HCBR8-FGC2K-RY7BM-HM3KT-BKVRW (XXXXX-119-0001076-XXXXX)
清华同方:
家庭版: KMHJF-9M82Y-YPFV7-YQHXH-F9JW8 (XXXXX-119-0001794-XXXXX)
DR4B3-66VPQ-CK3VB-Y3BPY-2CJ2G
JYCJX-CHTJX-RGH97-86WM9-RB6B6
BXJXT-9F88V-XXQWV-3MWMG-FYDJT
Windows server 2008 X86 With SP2 简体中文版
文件名:SW_DVD5_Windows_Svr_2008w_SP2_ChnSimp__x86_DC_EE_SE_X15-41045.ISO
TOSHIBA:
家庭版:WDHPC-6WQPF-W3R3K-J2VF4-JFP8W (XXXXX-119-0001114-XXXXX)
惠普英文:
KYKVX-86GQG-2MDY9-F6J9M-K42BQ(XXXXX-119-0001015-XXXXX)
P2BXT-D7Y8P-F6WF2-HYXY9-49TJD
Windows XP pro with sp3 VOL 微软原版(简体中文)正版密钥:
MRX3F-47B9T-2487J-KWKMF-RPWBY(工行版)(强推此号!!!)
QC986-27D34-6M3TY-JJXP9-TBGMD(台湾交大学生版)
QHYXK-JCJRX-XXY8Y-2KX2X-CCXGD(广州政府版)
windows中文是窗户的意思

中文名: 微软视窗操作系统外文名:MicrosoftWindows开发商: 微软公司 发行商:微软公司 发行时间:1985年11月20日 编程语言:C 、C++、汇编语言 系统家族: W indows 9x ,CE ,NT 源码模式: 闭源 内核类型: 混合内核 软件许可: E ULA ,专有商业软件早期版本For DOS▪ Windows 1.0( 1985)▪ Windows 2.0 ( 1987) ▪ Windows 2.1 ( 1988) ▪ windows 3.0( 1990)▪ windows 3.1 ( 1992) ▪ Windows 3.2 ( 1994) Win 9x▪ Windows 95( 1995) ▪ Windows 98 ( 1998) ▪ Windows 98 SE ( 1999) ▪ Windows Me ( 2000)NT 系列早期版本 ▪ Windows NT 3.1 ( 1993)▪ Windows NT 3.5 ( 1994) ▪ Windows NT 3.51( 1995) ▪ Windows NT 4.0 ( 1996)▪ Windows 2000( 2000)客户端▪ windows xp( 2001) ▪ Windows Vista ( 2005) ▪ Windows 7 ( 2009) ▪ Windows 8 ( 2011)服务器▪ Windows Server 2003 ( 2003)▪ Windows Server 2008 ( 2008)▪ Windows Home Server ( 2008) ▪ Windows HPC Server 2008 ( 2010)▪ Windows Small Business Server ( 2011)▪ Windows EssentialBusiness Server特别版本▪Windows PE▪Windows Azure ▪Windows Fundamentals forLegacy PCs嵌入式系统▪Windows CE▪Windows Mobile ▪Windows Phone ( 2010)目录Windows历代版本开发代号版本版本号发布日期Interface Manager Windows 1.0 1.0 1985-11-20无Windows 2.0 2.0 1987-11-1 无Windows 3.0 3.0 1990-5-22 Janus Windows 3.1 3.1 1992-3-18 NTOS/2 Windows NT 3.1NT 3.1 1993-7-27 Janus Windows 3.2 3.2 1994-4-14 Chicago Windows 95 4.0 1995-8-24 Daytona Windows NT 3.5NT 3.5 1995-11-20 Cairo Windows NT 4.0NT 4.0 1996-7-29 Detroit Windows 95 OSR2 4.00.950B 1996-8-24 Memphis Windows 98 4.1 1998-6-25 Memphis Windows 98 Second Edition 4.10.2222A 1999-5-5 Windows NT 5.0 Windows 2000NT 5.0 2000-2-17 Millennium Windows ME 4.9 2000-9-14 Whistler Windows XP NT 5.1 2001-10-25 Whistler Server Windows Server 2003NT 5.2 2003-4-24 Longhorn Windows Vista NT 6.0 2007-1-30 Longhorn Server Windows Server 2008NT 6.0 2008-2-27 Blackcomb Windows 7NT 6.1 2009-10-22 Windows Server 7 Windows Server 2008 R2NT 6.1 2009-10-22 无Windows Thin PC NT 6.1 2011-07-11Windows 8 Windows UI于2012年10月25日改名称NT 6.2 2012-10-25Windows Server 8 Windows Sever 2012 NT 6.2 2012-9-464位(安腾)操作系统这个系列包括:Windows XP 64-bit Edition、Windows Server 2003 安腾版, Windows Server 2008 安腾版、Windows Server 2008 R2安腾版。
HP Hewlett-Packard 说明书

入门指南Hewlett-Packard 产品和服务的所有保修限于这些产品与服务所附带的明确声明。
本文的任何条款都不应视作构成保修声明的附加条款。
HP不对本文的技术性错误、编印错误或冗长负任何责任。
对于在非HP 提供的设备上 HP 软件的使用和可靠性,HP 概不负责。
本文档包含的所有权信息均受版权保护。
未经 HP 事先书面许可,不得将本文档的任何部分影印、复制或翻译成其他语言。
Hewlett-Packard CompanyP.O. Box 4010Cupertino, CA 95015-4010USACopyright © 2000-2006 Hewlett-Packard Development Company, L.P.截至 2008 年 8 月 28 日之前,在美国可能获得美国专利号 4,930,158 与4,930,160 中一种或两种的许可。
Microsoft 和 Windows 是 Microsoft Corporation 在美国的注册商标。
HP 支持科技产品在法律允许范围内的使用,我们不认可、也不鼓励我们的产品被用于著作权法所不允许的目的。
本文档中的内容可随时更改,恕不另行通知。
目录安装电脑 (1)组装电脑 (1)将电脑放置到适当的位置 (1)使用电涌保护设备 (1)连接到电脑 (2)存放文档和复原光盘 (4)首次启动您的电脑 (4)设置和连接 Internet (5)配置和注册 Norton Internet Security 软件 (6)安全舒适地使用电脑 (7)注册软件更新 (7)在新电脑上设置帐户 (8)创建用户帐户 (8)创建密码 (9)安装软件和硬件设备的指导 (9)使用 HP 和 Compaq 产品 (10)将文件和设置从旧电脑转移到新电脑 (10)使用 HP Organize 或 Compaq Organize 软件 (10)使用键盘 (11)自定义键盘按钮 (13)使用电脑机箱顶部 (15)使用支撑架 (15)iii配置扬声器和声音选项 (19)步骤 1:连接扬声器 (19)音频接口类型 (19)扬声器配置 (22)扬声器类型 (23)连接 2.1(2个扬声器和一个低音炮)音频扬声器 (23)连接 4.1(4个扬声器和一个低音炮)音频扬声器 (24)连接 5.1(5个扬声器和一个低音炮)音频扬声器 (25)连接 7.1(7个扬声器和一个低音炮)音频扬声器 (27)将家用音频系统连接到电脑 (29)2 或 2.1 家用立体声系统的安装 (30)5.1(5 个扬声器和一个低音炮)家用音频系统的安装 (31)5.1(5 个扬声器和一个低音炮)家用音频系统的安装过程 (32)连接数字音频 (33)步骤 2:配置音频软件 (34)使用 Multi-channel Sound Manager 配置音频输出 (35)使用 Sound Effect Manager 配置音频输出 (37)使用 Realtek HD Sound Effect Manager 配置音频输出 (39)配置多音源音频 (41)步骤 3:为媒体软件程序配置声音 (43)选择录音设备 (44)解决关于声音的问题 (44)配置 Creative Sound Blaster X-Fi 声卡(仅适用于部分型号) (45)连接扬声器 (45)配置声卡软件 (46)配置 FlexiJack 接口 (46)使用声卡进行录音 (47)Sound Blaster X-Fi 配置模式 (47)详细信息 (48)使用读卡器 (49)使用读卡器 (50)媒体插入指南 (51)使用 HP Personal Media Drive (53)连接硬盘驱动器 (54)插入硬盘驱动器 (55)定位硬盘驱动器并为之分配一个盘符 (56)使用硬盘驱动器 (57)断开硬盘驱动器的连接 (58)iv入门指南处理数码图像 (59)使用 HP Photosmart Premier (60)播放 CD 和 DVD (63)播放音乐 CD (63)播放 DVD (63)使用国家/地区编码 (64)使用 Windows Media Player 播放 CD 和 DVD (64)播放视频 CD(VCD) (65)使用 Windows Media Player 播放视频 CD(VCD) (65)制作音频和数据光盘 (67)刻录前请擦除光盘上的内容 (68)制作音频 CD (68)验证音频文件刻录是否无误 (69)音频 CD 提示 (69)制作音频 CD (70)制作 jukebox 光盘 (70)制作数据 DVD 和 CD (71)验证数据光盘刻录是否无误 (71)数据光盘提示 (71)制作数据光盘 (72)复制 DVD 或 CD (73)将文件归档至 CD 或 DVD (73)处理映像文件 (74)制作映像文件 (74)从映像文件进行烧录 (74)使用 LightScribe 制作光盘标签 (75)Lightscribe 需求 (75)使用 Sonic Express Labeler 烧录 LightScribe 标签 (75)使用胶粘光盘标签 (76)兼容性信息 (76)光盘特性及兼容性图表 (77)光驱快速参考图表 (78)软件快速参考图表 (79)v制作视频光盘和影片 (81)开始捕获影片之前 (81)Sonic MyDVD Video 项目 (82)制作视频项目 (82)将文件添加到视频项目 (83)为视频项目捕获视频 (83)将幻灯片添加到视频项目 (84)将子菜单添加到视频项目 (84)编辑视频项目的样式 (85)编辑影像文件 (85)将视频项目刻录到光盘 (86)使用 Direct-to-Disc 向导制作视频项目 (87)视频质量和光盘尺寸 (88)DVD 刻录时间 (89)使用 muvee autoProducer 制作影像 (91)制作影像的基本步骤 (91)查找 muvee autoProducer (92)使用 muvee autoProducer (93)入门 (93)从数码视频摄像机截取影像 (94)加入影像 (95)加入图片 (97)加入音乐 (97)选择风格 (98)更改设置 (98)加入开场标题和结束署名 (99)制作影像 (100)预览影像 (100)修改影像 (101)保存影像项目 (102)将影像项目刻录到光碟 (103)获取帮助 (105)查找屏幕指南 (105)从网络上查找指南 (105)使用屏幕上的“帮助和支持中心” (106)使用 PC 帮助和工具 (106)使用 HP(或 Compaq 连接)更新信息 (106)获取消息 (107)关闭消息 (107)重新激活消息 (108)索引 (109)vi入门指南安装电脑警告:您所购买的电脑,已经根据其销往的国家/地区预先设好了电源。
惠普HPC解决方案

全局适应性管理
系统级
硬件基础平台 PC机, 服务器, 高速互联网络, 存储设备, 机房环境
HP集群的构成与特点
• 计算平台 − 刀片服务器 − 高密度机架服务器
• 高速互连网络 − InfiniBand正成为必需 − 10Gb以太网
• 存储瓶颈 − 并行文件系统
• 资源集中管理分配 − 快速部署 − 作业调度
• 全面支持MPI-2功能
• 支持与CPU绑定
• 支持第三方工具软件 − Built-in diagnostic tools − 3rd party tools
• Total View & Trace Analyzer
Value
ISV & End User Benefits
Propositions
Portability
Blades
惠普独有
Storage Blades
Unified
Choice of Power
Services
Management
Assessment Implementati
on
Support
Interconnect choices for LAN, SAN, and Scale-Out Clusters
InfiniBand vs 千兆以太网
Completed Jobs 14,000
12,000
10,000
8,000
6,000
4,000
2,000
0
0
1
Vol-SM1 GbE-SM1
2
4
8
IB is 532% more
Efficient!
16 CPUs
directx9 win10
directx9 win10DirectX 9在Windows 10中的兼容性探讨引言:DirectX是一套由Microsoft开发的多媒体应用程序接口(API),用于在Windows操作系统上实现高性能的图形、音频和多媒体效果。
DirectX 9是DirectX系列中的一部分,是在2002年发布的版本,它是一项重要的技术,为游戏和其他多媒体应用程序提供了强大的图形和音频功能。
然而,随着Windows 10的发布,许多用户开始对DirectX 9在新系统上的兼容性产生疑问。
本文旨在探讨DirectX 9在Windows 10操作系统中的兼容性问题,并提供适用于解决这些问题的解决方案。
1. Directx 9在Windows 10中的兼容性问题1.1 安装问题:许多用户在安装DirectX 9时遇到了问题,这是由于Windows 10系统默认不支持这个旧版本的DirectX。
用户在尝试安装时,可能会收到一条错误消息,提示说DirectX 9与当前操作系统不兼容。
这给用户带来了很多困扰,特别是那些仍然需要使用DirectX 9的游戏或应用程序的用户。
1.2 兼容性问题:即使成功安装了DirectX 9,Windows 10中仍然可能会出现兼容性问题。
这些问题可能包括画面闪烁,图像失真,声音问题等。
这是由于Windows 10系统对旧版DirectX的支持不完全,可能会导致某些功能无法正常运行。
2. 解决方案2.1 使用兼容模式:Windows 10操作系统为用户提供了“兼容性模式”的选项,可以尝试以旧版操作系统的兼容性模式运行DirectX 9。
通过以下步骤可以启用兼容性模式:a. 右键单击DirectX 9的安装程序或应用程序图标。
b. 选择“属性”选项。
c. 在属性窗口中,点击“兼容性”选项卡。
d. 选择“以兼容模式运行此程序”的复选框,并选择Windows XP SP3或其他适用的旧版Windows操作系统。
Mellanox WinOF for Windows 安装指南说明书
Mellanox TechnologiesMellanox WinOF for WindowsInstallation GuideRev 2.00 GA2© Copyright 2008. Mellanox Technologies, Inc. All Rights Reserved.Mellanox, ConnectX, InfiniBlast, InfiniBridge, InfiniHost, InfiniRISC, InfiniScale, and InfiniPCI are regis-tered trademarks of Mellanox Technologies, Ltd. Virtual Protocol Interconnect is a trademark of Mellanox Technologies, Ltd.Mellanox WinOF for Windows Installation GuideDocument Number: 2956Mellanox Technologies, Inc.350 Oakmead ParkwaySunnyvale, CA 94086U.S.A.Tel: (408) 970-3400Fax: (408) 970-3403Mellanox Technologies LtdP.O. Box 586 Hermon-BuildingYokneam 20692IsraelTel: +972-4-909-7200Fax: +972-4-959-3245Mellanox WinOF for Windows Installation Guide3 1 OverviewThis document describes how to install and test Mellanox WinOF for Windows on a single host machine with Mellanox InfiniBand hardware installed. The document includes the following sections:• This overview•“Web Page and Documentation” (page 3)•“Hardware and Software Requirements” (page 3)•“Identifying Mellanox HCAs on Your Machine” (page 4)•“Downloading Mellanox WinOF” (page 6)•“Installing Mellanox WinOF” (page 6)•“Installation Results” (page 17)•“Assigning IP to IPoIB Adapters After Installation” (page 18)•“Modifying Configuration After Installation” (page 21)•“Updating Firmware After Installation” (page 22)•“Uninstalling Mellanox WinOF” (page 24)2Web Page and DocumentationPlease visit the Mellanox WinOF Web page at /products/MLNX_WinOF.php todownload the package and to reference documentation such as release notes, user manuals, FAQ, trouble-shooting, and archive. After installing Mellanox WinOF (see “Installing Mellanox WinOF” below), you will find release notes and user manuals under “Program Files\Mellanox\MLNX_WinOF\Documenta-tion”.3Hardware and Software Requirements3.1Hardware RequirementsRequired Disk Space for Installation•100MBPlatformsAny computer system with an x86 or x64 CPU architecture, and with a PCI adapter card based on one of the following Mellanox Technologies’ InfiniBand HCA devices:•ConnectX® (firmware: fw-25408 v2.5.000 or later)•InfiniHost® III Ex (firmware: fw-25218 v5.3.000 or later for Mem-Free cards, and fw-25208 v4.8.200 or later for cards with memory)•InfiniHost® III Lx (firmware: fw-25204 v1.2.000 or later)•InfiniHost® (firmware: fw-23108 v3.5.000 or later)Note:For the list of supported architecture platforms, please refer to the MellanoxWinOF for Windows Release Notes file under the “Documentation” folder.Identifying Mellanox HCAs on Your Machine 43.2Software RequirementsInstaller PrivilegesThe installation requires administrator privileges on the target machine.Operating Systems•Windows XP•Windows Server 2003•Windows Server 2008Note:For the list of supported operating system distributions and kernels, please referto the Mellanox WinOF for Windows Release Notes file under the “Documenta-tion” folder.4Identifying Mellanox HCAs on Your MachineStep 1.Check the Device Manager display for PCI devices. If the device driver has not been installed, check under Other Devices.Note:If you cannot find any PCI device, make sure that the HCA card(s) is correctlyinstalled in the PCI slot. If no PCI device is identified after your check, tryinstalling the HCA card into a different PCI slot.Mellanox WinOF for Windows Installation Guide5 Step 2.Select a PCI Device entry, right-click and select Properties to display the PCI Device Properties window.Step 3.Click the Details tab and select Device Instance ID from the Property pull-down menu.Step 4.In the Value display box, check the fields VEN and DEV (fields are separated by ‘&’). In the display example above, notice the sub-string “PCI\VEN_15B3&DEV_6340”: VEN isequal to 0x15B3 – this is the Vendor ID of Mellanox Technologies; and DEV is equal to6340 – this is a valid Mellanox Technologies PCI Device ID.Note:The list of Mellanox Technologies PCI Device IDs can be found in the PCI IDrepository at http://pci-ids.ucw.cz/read/PC/15b3.Step 5.If the PCI device does not have a Mellanox HCA ID, return to Step 2 to check another device.Note:If you cannot find any Mellanox HCA device listed as a PCI device, make surethat the HCA card(s) is correctly installed in the PCI slot. If the HCA deviceremains unidentified, try installing the adapter card into a different PCI slot.Downloading Mellanox WinOF 65Downloading Mellanox WinOFDownload the appropriate MSI to your host from the Mellanox WinOF Web page at/products/MLNX_WinOF.php.The MSI’s name has the format MLNX_WinOF_<arch>_<version>.msi, where arch can be eitherx86 or x64.6Installing Mellanox WinOFThis sections provides instructions for two types of installation:•“Attended Installation” on page 6An attended installation is an installation procedure that requires frequent user intervention.•“Unattended Installation” on page 11An unattended installation is an automated installation procedure that requires no user intervention.•“WDS Installation” on page 12A WDS installation is intended for Windows HPC Server 2008 clusters.6.1Attended InstallationNote:The installation requires administrator privileges on the target machine.For operating systems other than Windows 2008, double click the MSI and follow the GUI instructions to install Mellanox WinOF.For Windows 2008, install the MSI by opening a CMD console (click Start-->Run and enter ‘cmd’) andentering the following command:> msiexec.exe /i MLNX_WinOF_<arch>_<version>.msiThe following is an example of a Mellanox WinOF x64 installation session.Mellanox WinOF for Windows Installation Guide7 Step 1.Click Next in the Welcome screen.Step 2.Select the “accept” radio button and click Next.Installing Mellanox WinOF 8Step 3.Select the destination folder for Mellanox WinOF and click Next.Step 4.Select the type of installation: Typical or Custom.Mellanox WinOF for Windows Installation Guide9 If you select Typical, click Next and advance to the next step.If you select Custom, click Next and you will get the screen below. To install/remove a com-ponent, left-click the component and enable/disable it for installation.To continue, click Next and advance to the next step.Installing Mellanox WinOF 10Step 5.To install the chosen components, click Install.Step 6.In the following window, enable the components you need (if any). To complete the instal-lation, click Finish. (See the figure below.)Note:Even if you do not enable any of the displayed components in this step, you willbe able to enable components after the installation completes – see the fileMLNX_WinOF_README.txt.Mellanox WinOF for Windows Installation Guide116.2Unattended InstallationNote:The installation requires administrator privileges on the target machine.To perform a silent/unattended installation, open a CMD console (click Start->Run and enter ‘cmd’) andenter the following command:> msiexec.exe /i MLNX_WinOF_<arch>_<version>.msi /qn [Parameter]where Parameter is:ADDLOCAL Provides the list of components (separated by com-mas) to install. Available components are: Driver,IPoIB, ND, WSD, SDP, OpenSM, SRP, Tools, Docs, andSDK. You can also provide ADDLOCAL=ALL to installall components.Note: If you do not provide the ADDLOCAL parameter,the script will install the following list ofdefault components: Driver, IPoIB, ND, WSD, OpenSM,Tools, Docs, and SDK.WSDENABLE Enable WSD by adding the parameter WSDENABLE=1. (Theinstallation procedure installs WSD but does notenable it.)Installing Mellanox WinOF 12NDENABLE Enable ND by adding the parameter NDENABLE=1. (Theinstallation procedure installs ND as part of theIPoIB component but does not enable it.)Note:For all command options, enter ‘msiexec.exe /?’.Usage Examples•The following command installs MLNX_WinOF in the default configuration:> msiexec /i MLNX_WinOF_x86_<ver>.msi /qn•The following command installs MLNX_WinOF with all the available components:> msiexec /i MLNX_WinOF_x86_<ver>.msi /qn ADDLOCAL=ALL•The following command installs MLNX_WinOF with the default components plus SRP:> msiexec /i MLNX_WinOF_x86_<ver>.msi /qn \ADDLOCAL=Driver,IPoIB,ND,WSD,OpenSM,SRP,Tools,Docs,SDK•The following command installs MLNX_WinOF in the default configuration and enables WSD:> msiexec /i MLNX_WinOF_x86_<ver>.msi /qn WSDENABLE=16.3WDS InstallationTo perform a WDS installation for a Windows HPC Server 2008 cluster, follow the steps below.Step 1.Extract the package Mellanox_WinOF_x64_<ver>_INF.zip to a directory in the head node.Step 2.On the head node, click start--> All Programs --> Microsoft HPC Pack --> HPC Cluster Manager. Select Configuration in the navigation pane and then select To-do List. Next,Click “Manage drivers” and the following dialog will be displayed.Mellanox WinOF for Windows Installation Guide13 Step 3.Click “Add” and navigate in the Open dialog to the directory chosen in Step 1. Then go to the INF directory.Step 4.Select the listed INF files and click “Open” to add the files.Step 5.Click Close in “Manage drivers” dialog.Step 6.To enable ND perform the following steps. Otherwise, skip to the next step.a.Select Node Templates in the Configuration pane.b.Right click on the desired Node Template and select “edit”. An editor window is displayed (see below).Installing Mellanox WinOF 14c.Click Add Task --> Deployment --> Run OS command.Mellanox WinOF for Windows Installation Guide15d.Locate the new Run OS command listed under the Deployment section in the editor. Next, select in theOptional pane ContinueOnFailure to be True and enter the following text in the Description field:“NetworkDirect registration command”.e.In the Required pane of the editor, enter the following text in the Command field: “ndinstall -i”.f.Click Save. The editor window will close.Installing Mellanox WinOF 16Step 7.Select “Node Management” in the navigation pane of HPC Cluster Manager.Step 8.Right-click the desired node and select “Assign Node Template”. The following dialog will be displayed.Step 9.Select the correct node template and click OK to start MLNX_WinOF installation on the node.Mellanox WinOF for Windows Installation Guide17 7Installation ResultsHardwareDisplaying the Device Manager will show the Mellanox HCA devices, the Mellanox InfiniBand fabric, and an IPoIB (network) device for each InfiniBand port.Software•The MLNX_WinOF package is installed under the directory selected in Step 3 of Section 6.1.•OpenSM is installed as a disabled Windows service. To enable it, enter at the command line:> sc start opensmAssigning IP to IPoIB Adapters After Installation 188Assigning IP to IPoIB Adapters After InstallationBy default, your machine is configured to obtain an automatic IP address via a DHCP server. In some cases, the DHCP server may require the MAC address of the network adapter installed in your machine. To obtain the MAC address, open a CMD console and enter the command ‘ipconfig /all’ ; the MAC address is dis-played as “Physical Address”.To assign a static IP addresses to an IPoIB adapter after installation, perform the following steps:Step 1.Open the Network Connections window. Locate Local Area Connections named Mellanox IPoIB Adapter <#>. Each InfiniBand port has one IPoIB Adapter.Mellanox WinOF for Windows Installation Guide19 Step 2.Right-click a Mellanox Local Area Connection and left-click Properties.Step 3.Select Internet Protocol (TCP/IP) from the scroll list and click Properties.Assigning IP to IPoIB Adapters After Installation 20Step 4.Select the “Use the following IP address:” radio button and enter the desired IP informa-tion. Click OK when you are done.Step 5.Close the Local Area Connection dialog.Step 6.Verify the IP configuration by running ‘ipconfig’ from a CMD console.> ipconfig...Ethernet adapter Local Area Connection 3:Connection-specific DNS Suffix . :IP Address. . . . . . . . . . . . : 11.4.3.204Subnet Mask . . . . . . . . . . . : 255.0.0.0Default Gateway . . . . . . . . . :...Mellanox WinOF for Windows Installation Guide21 9Modifying Configuration After Installation9.1Modifying Mellanox HCA ConfigurationTo modify HCA configuration after installation, perform the following steps:a.Open the Registry editor by clicking Start->Run and entering ‘regedit’.b.In the navigation pane, expand HKEY_LOCAL_MACHINE->SYSTEM->CurrentControlSet->Ser-vices.c.Expand (in the navigation pane) the HCA driver service entry:- ‘mtcha’ for the InfiniHost family- ‘mlx4_hca’ and ‘mlx4_bus’ for the ConnectX familyd.Click the Parameters entry in the expanded driver service entry to display HCA parameters.e.Double click the desired HCA parameter and modify it. Repeat this step for all the parameters youwish to modify.f.Close the Registry editor after completing all modifications.g.Open Device Manager and expand the correct InfiniBand Channel Adapters entry (i.e., the adapterwith modified parameters).h.Right click the expanded HCA entry and left-click Disable. This disables the device.i.Right click the expanded HCA entry and left-click Enable. This re-enables the device.Note:For the changes to take effect, you must disable and re-enable the HCA (steps hand i above).9.2Modifying IPoIB ConfigurationTo modify the IPoIB configuration after installation, perform the following steps:a.Open Device Manager and expand Network Adapters in the device display pane.b.Right-click the Mellanox IPoIB Adapter entry and left-click Properties.c.Click the Advanced tab and modify the desired properties.Note:The IPoIB network interface is automatically restarted once you finish modifyingIPoIB parameters.Note:You need to restart opensm after modifying IPoIB configuration.Updating Firmware After Installation 2210Updating Firmware After InstallationThe following steps describe how to burn new firmware downloaded from Mellanox Technologies’ Webpages under /support/firmware_download.php.Step 1.Install the firmware tools package, MFT for Windows (WinMFT), on your machine. You can download it from /products/management_tools.php. Pleasecheck also the documentation on the same Web page.Step 2.Open a CMD console. (Click Start-->Run and enter ‘cmd’.)Step 3.Start mst.> st start mstSERVICE_NAME: mstTYPE : 1 KERNEL_DRIVERSTATE : 4 RUNNING(STOPPABLE, NOT_PAUSABLE, IGNORES_SHUTDOWN))WIN32_EXIT_CODE : 0 (0x0)SERVICE_EXIT_CODE : 0 (0x0)CHECKPOINT : 0x0WAIT_HINT : 0x0PID : 0FLAGS :Step 4.Identify your target InfiniBand device for firmware update.a.Get the list of InfiniBand device names on your machine.> mst statusFound 2 devices:mt25418_pciconf0mt25418_pci_cr0b.Your InfiniBand device is the one with the postfix “_pci_cr0”. In the example listed above, this will bemt25418_pci_cr0. Use the string “mtXXXXX” to identify the device type by checking the Webpage http://pci-ids.ucw.cz/read/PC/15b3. In the example above, mtXXXXX=mt25418, and the deviceis a ConnectX IB.c.Now go to the Mellanox firmware download page at:/support/firmware_download.php.d.Go to the correct firmware download page according to the device type identified in step (b) above.e.Run ‘vstat’ to obtain the PSID of your HCA card. The PSID is a unique identifier for the HCA card.Step ing the PSID obtained in Step 4(e), download the appropriate firmware binary image (*.bin.zip) and unzip it.Step 6.Burn the firmware image using the flint utility (part of your installed WinMFT).Note:Make sure that you burn the correct binary image to your HCA card. Burning thewrong image may cause severe firmware corruption. Please review Step 4 andStep 5 above.> flint -d mt25418_pci_cr0 -image <image>.bin burnMellanox WinOF for Windows Installation Guide23 Note:You may need to run ‘unzip’ on the downloaded firmware image prior to the burnoperation.Step 7.Reboot your machine after the firmware burning is completed.Uninstalling Mellanox WinOF 2411Uninstalling Mellanox WinOFAttended UninstallTo uninstall MLNX_WinOF on a single node, perform one of the following options:a.Click Start->Programs->Mellanox->MLNX_WinOF->Uninstall MLNX_WinOFb.Click Start->Control Panel-> Add Remove Programs-> MLNX_WinOF-> RemoveUnattended UninstallTo uninstall MLNX_WinOF in unattended mode, open a CMD console and perform one of the followingprocedures:a.If the MSI that was used to install MLNX_WinOF is available on your machine, enter the fol-lowing command:> msiexec.exe /x MLNX_WinOF_<arch>_<version>.msi /qn /forcerestartb.Obtain the MLNX_WinOF GUID (product code) by left-clicking Start->Programs->Mellanox->MLNX_WinOF.Now right-click on Uninstall MLNX_WinOF and select Properties, then copy the GUID from the “Tar-get entry. The GUID is the hexadecimal string that appears after ‘/x’. To uninstall the MSI, enter thefollowing command:> msiexec.exe /x <GUID> /qn /forcerestartNote:The ‘/forcerestart’ parameter forces the machine to restart after uninstall-ing the MLNX_WinOF MSI. This is recommended action for a complete unin-stall procedure.Note:For all command options, enter ‘msiexec.exe /?’.。
Windows系统内存限制

Physic al Memory Limits: Windows 7The following table specifies the lim its on physic al memory for Windows 7.Windows 7 Ultimate 4 GB192 GBWindows 7 Enter prise 4 GB192 GBWindows 7 Pr ofessional 4 GB192 GBWindows 7 Home Pr em ium 4 GB16 GBWindows 7 Home Basic 4 GB8 GBWindows 7 Starter 2 GB 2 GBPhysic al Memory Limits: Windows Server 2008 R2The following table specifies the lim its on physic al memory for Windows Server 2008 R2. WindowsServer 2008 R2 is available only in 64-bit editions.Windows Server 2008 R2 Datacenter 2 TBWindows Server 2008 R2 E nterprise 2 TBWindows Server 2008 R2 for Itanium-Based Systems 2 TBWindows Server 2008 R2 Foundation8 GBWindows Server 2008 R2 Standard32 GBWindows HPC Server 2008 R2128 GBWindows Web Server 2008 R232 GBPhysic al Memory Limits: Windows Server 2008The following table specifies the lim its on physic al memory for Windows Server 2008. Lim its greater than 4 GB for 32-bit Windows assume that PAE is enabled.Windows Server 2008 Datac enter64 GB 2 TBWindows Server 2008 Enterprise64 GB 2 TBWindows Server 2008 HPC Edition Not applic able128 GBWindows Server 2008 Standard 4 GB32 GBWindows Server 2008 for Itanium-Based Systems Not applic able 2 TB Windows Small Business Server 2008 4 GB32 GB Windows Web Server 2008 4 GB32 GBPhysic al Memory Limits: Windows VistaThe following table specifies the lim its on physic al memory for Windows Vista.Windows Vista Ultimate 4 GB128 GBWindows Vista Enterprise 4 GB128 GBWindows Vista Business 4 GB128 GBWindows Vista Home Premium 4 GB16 GBWindows Vista Home Basic 4 GB8 GBWindows Vista Starter 1 GB Not applic ablePhysic al Memory Limits: Windows Home ServerWindows Home Server is available only in a 32-bit edition. The physic al memory lim it is 4 GB.Physic al Memory Limits: Windows Server 2003The following table specifies the lim its on physic al memory for Windows Server 2003. Lim its over 4 GB for 32-bit Windows assume that PAE is enabled.Windows Server 2003 with Servic e Pac k 2 (SP2), DatacenterEdition128 GB64 GB with 4GT2 TBWindows Server 2003 with Servic e Pac k 2 (SP2), E nterprise 64 GB 2 TBEditionWindows Stor age Server 2003, Enter prise Edition8 GB Not applic able Windows Stor age Server 2003 4 GB Not applic ableWindows Server 2003 R2 Datacenter E ditionWindows Server 2003 with Servic e Pac k 1 (SP1), DatacenterEdition128 GB16 GB with 4GT1 TBWindows Server 2003 R2 E nterprise EditionWindows Server 2003 with Servic e Pac k 1 (SP1), E nterpriseEdition64 GB16 GB with 4GT1 TBWindows Server 2003 R2 Standard EditionWindows Server 2003, Standar d E dition SP1Windows Server 2003, Standar d E dition SP24 GB32 GBWindows Server 2003, Datac enter Edition128 GB16 GB with 4GT512 GB Windows Server 2003, E nterprise Edition32 GB16 GB with 4GT64 GBWindows Server 2003, Standar d E dition 4 GB16 GBWindows Server 2003, Web Edition 2 GB Not applic ableWindows Small Business Server 2003 4 GB Not applic able Windows Compute Cluster Server 2003Not applic able32 GBPhysic al Memory Limits: Windows XPThe following table specifies the lim its on physic al memory for Windows XP.Windows XP 4 GB128 GBWindows XP Starter Edition512 MB Not applic ablePhysic al Memory Limits: Windows 2000The following table specifies the lim its on physic al memory for Windows 2000.Windows 2000 Professional 4 GBWindows 2000 Server 4 GBWindows 2000 Advanced Server8 GBWindows 2000 Datac enter Server32 GB。
HP PSC Windows设置指南说明书
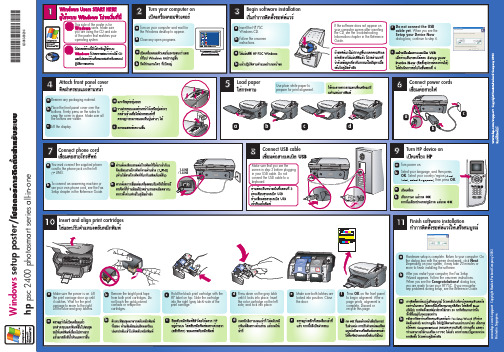
4 Attach front panel cover
a Remove any packaging material.
a
b Place the front panel cover over the buttons. Firmly press on the sides to
snap the cover in place. Make sure all
/support Copyright Hewlett-Packard Company 2003
Printed in Singapore.
a Make sure the power is on. Lift the print carriage door up until it catches. Wait for the print carriage to move to the right. Lift the blue and gray latches.
*Q3083-90204* *Q3083-90204*
Q3083-90204
1 Windows Users START HERE
This side of the poster is for Windows users. Make sure you are using the CD and side of the poster that matches your operating system.
You are ready to begin using your HP device. See the Reference Guide to get started.
d Press down on the gray latch until it locks into place. Insert the color cartridge on the left side, and lock into place.
HPCPACK安装

Windows HPC 使用指南Windows HPC客户端安装系统需求:Windows Xp 专业版SP3 或更高版本(32位或64位)Vista/Win 7企业版、专业版、旗舰版软件需求:Windows 2008 R2 HPC Pack (HpcClient), PowerShell 2.0或更高版本,.Net framework 3.0备注:win 7 V ista 用户已经随系统自带PowerShell 2.0 以及.net FrameWork .无需安装,请直接安装HpcPack (HpcClient工具)安装步骤PowerShell2.0安装1.将下载到的PowerShell2.0软件包解压,并双击安装。
2.选择我同意、并点击下一步3.等待安装结束HPC Pack 安装1.将下载到的HPC Client软件包解压,并双击Setup.exe安装不断点击安装直到将所有的项都安装完成。
Windows Hpc 客户端的使用1、申请Hpc帐户在客户端创建Hpc网络凭证开始-设置-控制面板-切换经典视图-用户帐户点击控制面板-----用户帐户--点击当前登录帐户:例如administrator在相关任务---管理我的网络密码点击添加服务器名:用户名格式:***************** myaccount 请用申请到的帐号替换密码:请输入申请帐号时,设置的密码。
点击确定,就创建好了hpc 网络帐户。
Win7 /Vista 用户添加网络账户选择类别-----小图标选择用户帐户选择当前登录的帐号---------管理您的凭据--------添加windows 凭据服务器名:用户名格式:***************** myaccount 请用申请到的帐号替换密码:请输入申请帐号时,设置的密码。
点击确定,就创建好了hpc 网络帐户。
启动Hpc客户端开始——程序——Microsoft HPC Pack-------HPC Job Manager连接到集群的头接点(管理节点)点击确定—进入Hpc作业管理主界面新建作业基本作业数组作业(批量任务)。
微软HPC-带动Windows转向并行计算(全文)
微软HPC:带动Windows转向并行计算“微软进入高性能计算(HPC)领域历史很短,几年前在全球超级计算机500强(Top500)中看不到微软的名字。
20XX年底,微软与曙光和超级计算中心合作,排到了第10名。
”微软负责HPC的服务器与工具事业部高级总监Vince Mendillo近日在接受专访时表示。
高性能计算机的历史已经有50多年了,即便从1993年Top500开始公布排名算起,也快30年了。
与之相比,微软高性能计算的历史确实很短:微软第一款高性能计算产品Windows Compute Cluster Server 20XX是在20XX 年6月才正式公布。
至于说主打产品Windows HPC Server 20XX则是在20XX年9月才公布。
然而,历史很短的微软高性能计算部门不仅担当着微软进军高性能计算市场的责任,而且还肩负着引领Windows走向并行的义务。
并行化微软的动力高性能计算日趋广泛的应用和x86平台的多核化,已经改变了高性能计算市场阳春白雪的形象,也成为微软进入高性能计算市场的两大契机。
“如今,科学界、工业界、政府甚至分析师用户都面临着同样的问题――有待处理的海量信息,因而对计算性能的要求越来越高。
我们认为,水平扩展(Scle Out)是彻底解决这一问题的方式。
高性能计算不是要把单台机器做得非常大,而是应通过机群来实现。
”Mendillo表示。
与此同时,x86平台多核化带来的并行编程挑战也在颠覆Windows平台传统的串行编程的模式。
“x86平台多核化的进展趋势,使得在不久的将来人们就能用上有几十个内核的PC。
但是现有的大多数软件还无法适应硬件上多核技术的进展。
最核心的问题就是并行编程,原有的编程方式和算法都已经过时。
如何让开发者或用户能非常容易地把并行软件开发出来,这对微软来说是非常重要的。
”Mendillo表示。
“并行计算是高性能计算必需的,也是Windows平台进展的方向。
- 1、下载文档前请自行甄别文档内容的完整性,平台不提供额外的编辑、内容补充、找答案等附加服务。
- 2、"仅部分预览"的文档,不可在线预览部分如存在完整性等问题,可反馈申请退款(可完整预览的文档不适用该条件!)。
- 3、如文档侵犯您的权益,请联系客服反馈,我们会尽快为您处理(人工客服工作时间:9:00-18:30)。
® RVER 2008 R2 套包介 8 介绍 WINDOWS® HPC SERWind dows HPC Server 2008 R2 2,微软第三代 HPC 解决方案 案,释放高性能 能计算动力。
开箱 箱即用——借助 助成熟 的 H HPC 平台,满足 足不同规模企业 业的高性能计算需求,实现快速 速部署各类高性 性能应用程序,并 并具有良好的可 可扩展 性——从个人 HPC 工作站到分布 布在数千节点的大 大型集群均可。
客户能够同时降 降低他们的运营 营以及首次部署 署成本:• • •端到端 端的完整解决方 方案,可以大大 大节省使用零散的组件来 DIY “攒机” 的时间 间以及精力; 充分利 利用现有的技术 术资源和员工的 的技能; 价格合 合理、 功能丰富 业已熟悉的基 富、 基于 Windows Server 的管理 s 理工具集, 够显著提高系统管 能够 管理员的工作效 效率。
Wind dows HPC Se erver 2008 R2 能够和现有的 IT 基础架构集成,使得最终 2 的 终用户能够通过 过熟悉的基于 Wind dows 的技术来 来访问 HPC 资 资源。
通过一系列紧密集成的基 Visual St 基于 tudio 2010 的 的专用集 群和并 并行计 算开发工具,开发人 人员能够简单快 快速地构建鲁棒、可扩展的 HPC 应用程序。
Windows HP Server 200 R2 PC 08 有由 V 合作伙伴组成的 的丰富生态系统来 来确保用户能够 够使用所需的应 应用程序及其资源 源。
还拥有 SI、ISV 以及 OEM 合 功能 能增强 强的生产力通过重 重用用户现有的 的技能,以及和 和您的企业已经在 在使用的工具进 进行集成。
使用 Windows HP Server 用 PC 2008 R2 可以在省 8 省时高效的同时,降低所需的开 开销。
通过在技 技术工作站和集 集群间中使用共同 同的高效和 开发平 平台,管理员和 和开发人员可以 以节省时间。
管理员可以使用现 现有的 Microsoft 管理工具来 来集中管理 整个 Windows Se erver 基础架构 构。
Windows HPC Server 2008 R2 完全支 2 支持命令行界面 面,但并不 要求最终用户掌握命 命令行界面(CLI)才能充分利 利用高性能计算 算能力。
应用程序开发人员可以 以使用熟悉 的本地并行调试 试器,来开发以 以及调试并行程序 序。
团队可以通 通过使用 的开发工具,如 Visual Studio 的 rosoft ShareP Point® Server 2010 来管理 r 理自己的项目,并使用工作流进 进行协作。
架构 构集成。
Micr可扩 扩展的性能Wind dows HPC Se erver 2008 R2 是建立在经过 2 过验证有效的 Windows Serv W ver® 2008 R x64 位 R2 技术上 上的。
Windo ows HPC Serv 2008 R2 可 ver 可以有效地部署 署和管理包含 1 1000 多个 Windows 服 务器的集群。
它包括 括可扩展的管理 理工具,能够帮助系统管理员主 主动监控系统的 的健康和维护系统的稳定。
Windows Serv 2008 R2 企 ver 企业版和 Micr rosoft® SQL Server® 2008 的协同工作,提供了在 S 8 与 W 系统发生故障时故障 障转移的功能。
在 Windows HPC Server 2008 R2 中,WCF 代理也从 从故障转移服务中受益。
持久性存储请求和响应,使应用程序在网络和硬件故障方面更具弹性。
快速、可扩展的部署Windows HPC Server 2008 R2 包括:向导、工具、内置的管理控制台和一个待办事项列表(图 1) 来简化计算节点的配置。
主要功能包括: 快速并行部署计算节点——通过利用 Windows 部署服务(WDS)传输功能,使用 Windows 映像 格式(WIM)文件并行和多播技术。
“待办事项”列表显示了完成一个完整的集群配置所需的必要步骤。
新的用户界面和 API 可用于查看和跟踪部署进度。
集成到管理控制台的图形向导可用于建立一致的计算节点的镜像,它可以创建、修改和在集群中部署该 镜像。
计算节点的镜像可通过注入驱动程序,应用程序或补丁轻松生成。
能够在网络上使用 iSCSI 连接引导节点,使无盘计算节点成为可能。
能够双重启动计算节点用于动态切换计算节点的操作系统, 以便让 Windows 和 Linux 上运行的应用 程序可以在同一时间(图 2)在同一集群上运行。
工作站节点支持 Windows HPC Server 2008 R2 支持在 Windows 7 工作站上进行高性能计算作业的运行,从而扩展现有的集群的计算能力而不用购买额外的硬件。
管理员可以控制何时——也就是一天的哪几个小时,一周的哪几天——Windows 7 工作站可用于运行 计算作业(图 3)。
Windows HPC Server 将仅在工作站可用的时候调度作业给它们。
至始至终确保安全。
工作站所有者能够控制在其工作站上运行的高性能计算作业权限的高低。
工作站,和常规的计算节点一样,可有 HPC 集群管理器来管理,并使用 HPC 集群管理器热图进行监 测。
多种应用类型的平台微软 HPC Pack 2008 R2 包含运行时、API 以及一系列作业调度策略,使多种类型的 HPC 应用程 序能够被开发、部署,并通过一个单一的统一产品进行管理。
包括: 基于 MPI 的应用程序使用微软 MSMPI(或第三方的 MPI)库和运行时,与基于面向服务的架构 (SOA)的应用程序相同。
运行时间长的批处理或低时延的交互式应用程序。
简单的并行应用程序以及需要大量的节点间通信和同步的应用程序。
Excel 工作簿和 Excel 用户定义函数(UDF)。
数百个针对 Windows HPC Server 优化过的商业 ISV 打包的应用软件和开源代码。
作业调度器一个多核的作业调度器允许按核、插槽或服务器进行调度,并适用于多种类型的应用程序。
Windows HPC Server 2008 R2 提供了一系列调度策略:抢占、优先级、增长/缩减、回填、独占、以及 R2 新 增的服务平衡调度。
作业调度器提供了用于提交作业的多个接口,包括图形界面、命令行、Windows PowerShell 2.0、COM、.NET 和开放网格论坛的 HPC 基本说明 Web 服务接口,还包括对于在作 业之前和之后为准备和清理节点用的任务的支持。
新的用户界面和 API 还可用于查看和报告作业进度(图 4)。
监控、管理、诊断和报表在 Windows Server 2008 R2 上构建的 Windows HPC Server 2008 R2 包含可扩展的管理、监 控、故障排除和报表工具,是使用用户所熟悉的 System Center 界面构建的。
管理 集群可以通过命令行界面、PowerShell 或如 Perl 这样的脚本语言编程管理,也可以通过管理控制台 进行图形化管理。
较大的集群为了实现可管理性,更好地匹配作业和服务器类型可划分为节点组;节点 组的变化将会立即影响被排队的作业。
基于位置的节点分组允许管理员根据其位置查看、分类、进行批 处理操作。
监控 热图(图 5)提供了一个实时、概览性的整个集群的状态视图。
最新版本中的增强功能,包括能够定制 热图来监测指标多达三个节点级指标的能力,以及通过颜色来编码指标的能力,便于可视化。
诊断和报表 内置诊断工具允许管理员快速识别和诊断整个集群中的硬件、软件或网络问题。
最新版本包括一个可扩 展的诊断框架,它允许增加定制开发的诊断测试,以及能够在运行时改变诊断参数。
其他功能,如自动 化日常工作、 重复的任务、 智能报表和监测, 能通过使用 System Center Operations Manager 2007 实现。
一个可扩展的报表基础架构让管理员捕获和报告定制的错误、状态和使用情况数据。
这些数据存 储在 SQL Server 数据库,可在 SQL Server Reporting services 或 Excel 中查看。
最新版本包 括了更丰富的报表数据库和增强的 API,可用于创建自定义报表(图 6)。
诊断和报表基础架构被集成到 Windows 事件跟踪(ETW)基础架构中,使得解决问题变得更容易。
具有业务关键性的基于面向服务的架构(SOA)应用程序Windows HPC S e r v e r 支持使用 Windows Communication Foundation(WCF)构建的基于 SOA 的应用程序。
最新版本包括:增强功能,用于建立具有业务关键性的 SOA 应用程序,如: 新的服务平衡的作业调度策略,针对 SOA 和其它动态负载进行过优化。
新的“提交和重取”编程模型通过解耦请求和响应来实现可重新附加的会话以及持久会话, 同时 SOA 运 行时,持久化客户端的请求以做出持续响应,因此在客户或代理失败的情况下也不必重发请求。
使开发人员能够在服务退出前衔接添加服务清理工作。
集群 SOA 调试器以及集群 SOA 分析器可用于构建高性能、强大的 HPC SOA 应用程序。
带有示例代码的更新的高性能计算软件开发工具包(SDK),使开发者更容易地编写基于 Java 的客 户端应用程序与 .NET 服务通信,并能得到与基于.NET 框架和 WCF 的编写的客户端一样好的支持。
MPI、网络和高速互连Windows HPC Server 2008 R2 通过提供网络向导、诊断工具和网络驱动程序管理的简便方法显著 减少了部署在集群中的多个网络的复杂性。
新功能和增强功能包括: 支持新的网络选项——包括来自英特尔的 RDMA over Ethernet(iWARP)以及 RDMA over Infiniband 四倍数据率(40 Gbps)硬件。
基于英特尔 “Nehalem” 处理器,实现了优化的共享内存。
通过 Visual Studio® 2010 整合的 MPI 调试的能力。
用于高性能 LINPACK 的一键优化向导。
增加 Excel 2010 的性能更快的计算,在更短的时间内提供更多的信息,更加深入的分析和重要信息的快速访问,使商业用户和 决策者做出更加明智的决策。
Windows HPC Server 2008 R2 使组织可以利用高性能计算集群,将 Excel® 工作簿的计算时间减少一个或多个数量级,使用更多的核进行近线性的加速。
