酷乐视X2微型投影仪用户手册(中英文)
投影仪快速设置指南说明书
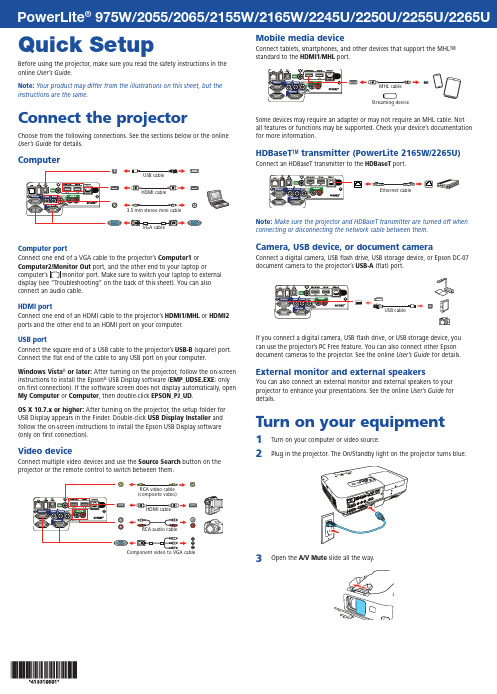
Quick SetupBefore using the projector, make sure you read the safety instructions in the online User’s Guide .Note: Your product may differ from the illustrations on this sheet, but the instructions are the same.Connect the projectorChoose from the following connections. See the sections below or the online User’s Guide for details.Computer3.5 mm stereo mini cableComputer portConnect one end of a VGA cable to the projector’s Computer1 orport, and the other end to your laptop or connect an audio cable.HDMI portConnect one end of an HDMI cable to the projector’s HDMI1/MHL or HDMI2 ports and the other end to an HDMI port on your computer.USB portConnect the square end of a USB cable to the projector’s USB-B (square) port. Connect the flat end of the cable to any USB port on your computer.Windows Vista ® or later: After turning on the projector, follow the on-screen instructions to install the Epson ® USB Display software (EMP_UDSE.EXE ; only on first connection). If the software screen does not display automatically, open My Computer or Computer , then double-click EPSON_PJ_UD .OS X 10.7.x or higher: After turning on the projector, the setup folder for USB Display appears in the Finder. Double-click USB Display Installer and follow the on-screen instructions to install the Epson USB Display software (only on first connection).Video deviceConnect multiple video devices and use the Source Search button on theprojector or the remote control to switch between them.Mobile media deviceConnect tablets, smartphones, and other devices that support the MHL™ standard to the HDMI1/MHLport.Some devices may require an adapter or may not require an MHL cable. Not all features or functions may be supported. Check your device’s documentation for more information.HDBaseT ™ transmitter (PowerLite 2165W/2265U)Connect an HDBaseT transmitter to the HDBaseTport.Ethernet cableNote: Make sure the projector and HDBaseT transmitter are turned off when connecting or disconnecting the network cable between them.Camera, USB device, or document cameraConnect a digital camera, USB flash drive, USB storage device, or Epson DC-07 document camera to the projector’s USB-A(flat) port.If you connect a digital camera, USB flash drive, or USB storage device, you can use the projector’s PC Free feature. You can also connect other Epson document cameras to the projector. See the online User’s Guide for details.External monitor and external speakersYou can also connect an external monitor and external speakers to your projector to enhance your presentations. See the online User’s Guide for details.Turn on your equipment1 Turn on your computer or video source.2Plug in the projector. The On/Standby light on the projector turns blue.3O pen the4 P ress the power button on the projector or remote control. Theprojector beeps, the Status light flashes blue, and then stays on.Note: To shut down the projector, press the power button twice.5 U se the arrow buttons on the remote control to highlight any of theoptions on the Home screen that appears, then press to select it.You can display a QR code, switch between projection sources, andquickly access various adjustment options from this screen.6 T he default language of the menu system is English. To select anotherlanguage, press the Menu button on the projector or remote control.Select Extended and press . Select Language and press . Selectyour language and press . Press the Menu button to exit the menusystem.Adjust the image1 I f you don’t see an image, press the Source Search button on theprojector or the remote control to select the image source.Note: If you still see a blank screen or have other display problems, seethe troubleshooting tips on the back of this sheet.2 TNote: You can also press the button on the projector tofine-tune your adjustments. See the online User’s Guide for details.5 Y our projector automatically adjusts images that are unevenly rectangular), but if necessary you can correctUser’s Guide for details.Using the remote controlInstall the batteries as shown (two AA batteries).Choose which sourceto displayTurn projectoron and offAccess projectormenusTurn off projectordisplayAccess the HomescreenNavigate projectormenusFor more information on using the remote control, see the online User’s Guide.Project wirelesslyFollow the steps here to install the included wireless LAN module and connectthe projector over a wireless network. With the PowerLite 2250U, you willneed the optional wireless LAN module (part number V12H731P02).If you’re projecting from a computer, it must have a wireless card or built-inwireless interface.1 Turn off the projector and unplug the power cord.2 Slide the air filter cover latch and open the air filter cover.3 R emove the screw securing the wireless LAN module stopper andremove the stopper.45Replace the wireless LAN module stopper and secure it using the screwyou removed.6 7 Plug in the power cord and turn on the projector.8 P ress the Menu button on the remote control, select the Networkmenu, and press.9 Choose Network Configuration and press .10Select the Wireless LAN menu and press .11 C hoose Connection Mode , press, select Quick (for a directconnection to a computer, tablet, or smartphone) or Advanced (for a connection to a router or access point), then press again. When you’re finished, press Esc to return to the Wireless LAN menu.12I f you chose the Advanced connection mode, select Search Access Point and press . Use the arrow buttons to highlight your networkname (SSID) in the list of available connections.13 I f your network has security enabled, enter your network password onthe screen that appears. Make sure to enter any uppercase or lowercase letters in the correct case.• To select a number or character, use the arrow buttons on the remote control to highlight it, then press . • To switch between uppercase and lowercase letters, select CAPS and press .• To change the displayed symbols, select SYM1 or SYM2 and press .When you’re finished entering the network password, select Finish and press .14 I f you chose the Advanced connection mode, select IP Settings andpress.If your network assigns addresses automatically, make sure DHCP is turned on. If not, turn off DHCP and enter the projector’s IP Address , Subnet Mask , and Gateway Address , as needed.15 T o prevent the SSID and IP address from appearing on the network standby screen, set the SSID Display and IP Address Display settings to Off .16 W hen you’re finished selecting settings in the Wireless LAN menu,press Esc .17 S elect Complete and press, then select Yes and press again tosave your settings.Install network softwareLinks to download the network software and to the manuals are availablefrom the projector CD. Downloads require an Internet connection. You can also download the software and manuals from the Epson website, as described in “Where to get help.”To monitor and control your projector over the network, install the EasyMP ® Monitor software (Windows ® only). To project from multiple PCs over the network, install the EasyMP Multi PC Projection software. To update your projector’s firmware over a wired LAN, install the EasyMP Network Updater software.Click the icons on your desktop to view the software manuals. See the manuals for instructions on installing and using the software.Project wirelessly from a mobile deviceYou can connect your mobile device and projector using Epson iProjection™ and a QR code. Make sure the latest version of Epson iProjection is installed on your device.Install the Epson iProjection appTo project from an iOS or Android™ device, download and install the Epson iProjection app. Visit /projectorapp (U.S.) orwww.epson.ca/projectorapp (Canada) for more information.Direct wireless connectionMake sure your device and Epson projector are not connected to a network and your Epson projector’s Connection Mode is set to Quick .1 P ress the Home button on the projector or remote control to bring up the Home screen.2 Select Display the QR Code and press.3TapiProjection on your device’s Home screen.4Tap Read QR code .5 Point your device’s camera at the QR code your projector displays; the QR code is read automatically.6If you are using an iOS device, follow the on-screen prompts to register your projector’s Wi-Fi profile.Your device and Epson projector are now connected.Wireless network connectionMake sure your projector and mobile device are connected to the same wireless network.1 Press the Home button on the projector or remote control to bring up the Home screen.2 S elect Display the QR Code and press .3TapiProjectionon your device’s Home screen.4 Tap Read QR code .5Point your device’s camera at the QR code your projector displays; the QR code is read automatically.Your device and Epson projector are now connected.TroubleshootingIf you see a blank screen or the No signal message after turning on your computer or video device, check the following:• M ake sure the Status light on the projector is blue and not flashing, andthe A/V Mute slide is open.• P ress the Source Search button on the projector or the remote controlto switch to the correct image source, if necessary.•Press the Home button on the projector or remote control to verify the source input and settings.• O n Windows 7 or later, hold down the Windows key and press P at thesame time, then click Duplicate .• If you’re using a Windows laptop, press the function key on your keyboard that lets you display on an external monitor. It may be labeled CRT/LCD or have an icon such as . You may have to hold down the Fn key while pressing it (such as Fn + F7). Wait a moment for the display to appear.• I f you’re using a Mac laptop, open System Preferences and selectDisplays . Click the Arrangement tab and select the Mirror Displays checkbox.Where to get helpManualsFor more information about using the projector, click the icons on yourdesktop to access the online manuals (requires an Internet connection). If you don’t see icons to the manuals, you can install them from the projector CD or go to the Epson website, as described below.Telephone support servicesTo use the Epson PrivateLine ® Support service, call (800) 637-7661. This service is available for the duration of your warranty period. You may also speak with a support specialist by calling (562) 276-4394 (U.S.) or (905) 709-3839 (Canada). Support hours are 6 AM to 8 PM , Pacific Time, Monday through Friday, and 7 AM to 4 PM , Pacific Time, Saturday. Days and hours of support are subject to change without notice. Toll or long distance charges may apply.Internet supportVisit /support (U.S.) or www.epson.ca/support(Canada) for solutions to common problems. You can download utilities and documentation, get FAQs and troubleshooting advice, or e-mail Epson.RegistrationRegister today to get product updates and exclusive offers. You can use the CD included with your projector or register online at /webreg.EPSON, EasyMP , and PowerLite are registered trademarks, Epson iProjection is a trademark, and EPSON Exceed Your Vision is a registered logomark of Seiko Epson Corporation. PrivateLine is a registered trademark of Epson America, Inc.Mac and OS X are trademarks of Apple Inc., registered in the U.S. and other countries.Android is a trademark of Google Inc.HDBaseT and the HDBaseT Alliance logo are trademarks of the HDBaseT Alliance.General Notice: Other product names used herein are for identification purposes only and may be trademarks of their respective owners. Epson disclaims any and all rights in those marks.This information is subject to change without notice.© 2016 Epson America, Inc., 10/16CPD-52404R1Optional accessoriesFor a list of optional accessories, see the online User’s Guide .You can purchase screens or other accessories from an Epson authorizedreseller. To find the nearest reseller, call 800-GO-EPSON (800-463-7766). Or you can purchase online at (U.S. sales) or www.epson.ca (Canadian sales).。
投影仪操作手册说明书

投影仪用户手册

版权
©2013 Vivitek Corporation. 是 Vivitek Corporation 的商标。其他商标是其 各自所有者的资产。值、重量和尺寸等均为近似值。规格如有变更,恕不另行通知。
免责声明
本文档中的信息如有变更,恕不另行通知。制造商对于本文档中的内容不提供任何表述或担 保,特别放弃对于适销性或特定用途适用性的任何隐含担保。制造商保留修订本出版物和不 定期更改本文档内容且无须向任何人通知此类修订或更改的权利。
第 1 章 概览 .................................................................................. 1
概览 ........................................................................................................................ 1 附件 ........................................................................................................................ 3 遥控器 .................................................................................................................... 4 Qumi 和遥控器按钮 ................................................................................................ 4 媒体播放器画面 ...................................................................................................... 5
微型投影“神机”对决:丽讯Q2 PK 酷乐视X2

微型投影“神机”对决:丽讯Q2 PK 酷乐视X2微型投影机从2008年进入市场以来,最为市场所诟病的,是亮度不足。
从最开始的几流明,在白天完全无法使用,到后来的100流明级的产品,虽有明显的改善,但仍然显得亮度不够。
随着德州仪器(TI)高清微投DMD芯片的面世,从2011年夏季开始,丽讯、NEC、宏基、优派、明基、华硕等众多知名品牌开始推出了300---500流明的高亮高清微型投影机。
令LED微投的实用性,开始大为改观。
这其中最富盛名的,当数丽讯Q2,该机标称300流明,物理分辨率达到了1280*800,厚度仅31mm,是上市机型中最轻薄小巧的。
进入2012年,国内微型投影领域的标志性品牌酷乐视,也终于推出了自己的第一款高亮、高清微型投影机,就是本文PK的对手:酷乐视X2。
其实早在今年1月,美国拉斯维加斯CES展上,来自中国深圳的酷乐视科技首次展示了这款亮度高达400流明的手持高清微型投影机,令市场为之一震。
随后在1月中旬中国消费电子展新品宣传发布会上再次惊艳亮相,立即引起国内媒体的追捧,誉为“微投神机”。
其实酷乐视X2不是“神”在高清、不是“神”在400流明高亮,因为上述性能的产品,在半年前就已经有了。
酷乐视X2“神”在,如此强大性能配置下,还内置了续航电池,可以手持、移动使用,令高性能与便携移动性完美结合,而类似可手持移动使用的微投产品,在酷乐视X2之前,最高亮度不过100流明而已。
第一回合:先来看看双方外观工艺、体积与便携性丽讯Q2的厚度31mm,体积约560毫升;酷乐视X2的厚度更加极致,仅仅28mm,显得更加纤薄,体积大约是550毫升。
两机体积基本一样,但酷乐视更薄,更加容易携带。
在工艺方面,酷乐视上盖采用镜面工艺,调焦轮位于上盖;丽讯Q2则采用了优质烤漆工艺,调焦轮位于侧面。
虽然两台机的工艺都相当不错,但丽讯还是略胜一筹。
综合下来,第一回合,双方打了一个平手。
第二回合:包装、附件从上图可以看到,酷乐视X2好像稍大一点,其实是因为其更薄,所以长宽就稍大一点。
投影仪操作作业指导书
投影仪操作作业指导书第一篇:一、前言投影仪作为一种常见的现代化教学辅助工具,在教育、商务等领域发挥着重要作用。
为了能够正确高效地操作使用投影仪,本篇文章将为大家提供详细的操作指导。
请仔细阅读以下内容,以便更好地使用投影仪。
二、投影仪的连接与设置1. 连接电源:首先,将投影仪的电源线插入电源插座,并确保电源插座通电。
2. 连接电脑:使用VGA线或HDMI线将投影仪与电脑连接,确保连接稳固。
3. 设置输入模式:投影仪通常自动切换到正确的输入模式,如果没有自动切换,请查看投影仪说明书,并手动切换到正确的输入模式。
三、投影仪的开机与调试1. 打开投影仪:按下投影仪的电源按钮,等待投影仪启动。
2. 调整投影仪位置:根据需要,调整投影仪的位置、高度和投影角度,确保投影画面清晰、居中。
3. 调试画面尺寸:移动投影仪或使用投影仪镜头上的焦距调节环,调试画面尺寸,使其适应屏幕或墙面。
四、投影仪的操作1. 切换输入信号:使用投影仪遥控器或面板上的按钮,切换输入信号,选择正确的源设备。
2. 调整图像亮度和对比度:使用投影仪遥控器上的亮度和对比度调节按钮,根据需要调整图像的亮度和对比度。
3. 调整投影画面的尺寸和位置:通过投影仪遥控器上的方向键,调整投影画面的尺寸和位置,使其适应屏幕或墙面。
4. 静音和调节音量:使用投影仪遥控器上的音量加减按钮,静音和调节音量。
5. 其他操作:根据投影仪的具体型号和功能,了解并学习其他常见操作,如横竖屏切换、菜单导航等。
五、投影仪的关机与存放1. 关机操作:按下投影仪遥控器上的关机按钮,或者在投影仪面板上按下关机按钮,等待投影仪完全关闭。
2. 断开连接:先断开电脑与投影仪之间的连接线,然后断开投影仪的电源线。
3. 清洁和存放:定期清洁投影仪镜头和机身,使用专用清洁布擦拭。
将投影仪放置在干燥、通风的地方,避免直接阳光照射。
六、注意事项1. 使用环境:投影仪应放置在干燥、通风的环境中,避免长时间处于高温、潮湿等特殊环境。
投影仪使用说明
安装 ...................................................................................................... 12
连接投影机...................................................................................................12 打开/关闭投影机电源 ...................................................................................14
连接计算机/笔记本电脑 ........................................................................................ 12 连接到视频源 ....................................................................................................... 13
操作方法 .............................................................................................................. 24 菜单树 .................................................................................................................. 25 图像 ...................................................................................................................... 27 显示设定............................................................................................................... 31 设置 ...................................................................................................................... 35 选项 ...................................................................................................................... 45
投影机快速参考手册说明书
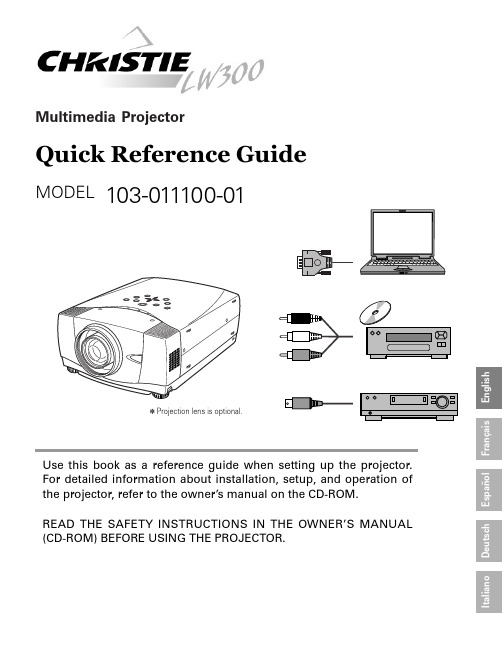
Multimedia ProjectorQuick Reference GuideMODEL103-011100-01Use this book as a reference guid e when setting up the projector.For detailed information about installation, setup, and operation of the projector, refer to the owner’s manual on the CD-ROM.READ THE SAFETY INSTRUCTIONS IN THE OWNER’S MANUAL (CD-ROM) BEFORE USING THE PROJECTOR.E n g l i s hD e u t s c hF r a n ça i s I t a l i a n o E s p a ñol✽Projection lens is optional.E n g l i s hThis projector uses nominal input voltages of 100-120 V or 200-240V AC. This projector automatically selects correct input voltage. It is designed to work with single-phase power systems having a grounded neutral conductor. To reduce risk of electrical shock, do not plug into any other type of power system.Consult your authorized dealer or service station if you are not sure of type of power supply being in use.Connect a projector with a peripheral equipment before turning a projector on.CONNECTING AC POWER CORDAC outlet must be near this equipment and must be easily accessible.LENS SHIFT ADJUSTMENTProjection lens can be moved up and down with motor-driven lens shift function. This function makes it easy to provide projected image where you want.NOTEScreen size and lens shift ratio on the above charts are standard values and they may change by positioning conditions.POSITIONING PROJECTORThis projector is designed to project on a flat projection surface.Before setting up a projector, install Projection Lens on Projector.1.Before installation, check where a projector is used and prepare a suitable lens. For specifications of a Projection Lens, contact sales dealer where you purchased a projector.2.For installation, refer to installation manual in the optional lens.LENS INSTALLATIONWhen installing the lens, remove the cover cap in the projector.NOTE;E n g l i s hADJUSTABLE FEETPicture tilt and projection angle can be adjusted by rotating ADJ USTABLE FEET. Projection angle can be adjusted to 10.5 degrees.Lift front of a projector and pull FEET LOCK LATCHES on both sides of a projector.1Release FEET LOCK LATCHES to lock ADJ USTABLE FEET and rotate ADJ USTABLE FEET to fine tune position and tilt.2To shorten ADJ USTABLE FEET, lift front of a projector and pull and undo FEET LOCK LATCHES.Position and keystone distortion of image can be adjusted using Menu Operation.3INSTALLING PROJECTOR IN PROPER POSITIONInstall the projector properly. Improper installation may reduce the lamp lifetime and cause a fire hazard.Do not tilt the projector more than 10 degrees above and below.Do not point the projector up to project an image.Do not point the projector down to project an image.Do not put the projector on either side to project an image.LATCHESMOVING PROJECTORWhen moving a projector, replace lens cap and retractfeet to prevent damage to lens and cabinet.When this projector is not in use for an extended period,put it into case (not supplied with this projector).E n g l i s hThis projector has input and output terminals on its back for connecting computers and video equipment. Refer to figures on pages 12 to 14 and connect properly.E n g l i s hEn g l i s h●Avoid contact with water or liquid.●Do not expose Remote Control Unit to moisture, or heat.●Do not drop Remote Control Unit.●If a battery has leaked on Remote Control Unit, carefully wipe case clean and install new batteries.●Danger of explosion if battery is incorrectly replaced.●Dispose of used batteries according to batteries manufacturers instructions and local rules.REMOTE CONTROL BATTERIES INSTALLATIONThis projector has CONTROL BUTTONS (TOP CONTROLS) and INDICATORS on its top.En g l i s h HOW TO OPERATE ON-SCREEN MENUFLOW OF ON-SCREEN MENU OPERATIONDisplay ON-SCREEN MENU Press MENU button to display ON-SCREEN MENU (MENU BAR). A red frame is POINTER.Move POINTER (red frame) to MENU ICON that you want to select by pressing POINT RIGHT / LEFT buttons.Adjust ITEM DATA by pressing POINT RIGHT/LEFT buttons.Refer to following pages for details of respective adjustments.Press POINT UP/DOWN buttons and move POINTER (redframe or red arrow)to ITEM that you want to adjust, and then press SELECT button to show ITEM DATA.Select Menu to be adjusted Control or adjust item through ON-SCREEN MENU 1243POINTER (red frame)Press POINT UP/DOWN buttons to move POINTER.POINTER (red frame)ITEMITEM DATAPress POINT LEFT/RIGHTbuttons to adjust value orset function.ContrastAutoTURNING ON THE PROJECTOR Connect the projector's AC power cord into an AC outlet.The LAMP Indicator lights RED, and READY Indicator lights GREEN.Press the POWER ON-OFF button on the top control or onthe remote control to ON. The LAMP Indicator dims, and the cooling fans start to operate. The preparation display appears on the screen and the count down starts. 231The preparation display disappears after 20 ~30 seconds.4After the count-down, the input source that was selected lastand the Lamp control status icon appear on the screen.If the projector is locked with a PIN code, PIN code Input Dialog Box will appear. Enter the PIN code as instructed below.Complete peripheral connections (with a computer, VCR,etc.) before turning on the projector.What is PIN code?PIN code is a security code using Personal Identification Number that allows the person who knows it to operate the projector. Setting PIN code prevents others except the specific users from operating the projector.A PIN code consists of a four-digit number. Refer to PIN Code Lock function in Setting menu in the user’s manual for locking operation of the projector with your PIN code.Pointer PIN code Input Dialog Box Enter a PIN codeSelect a number by pressing the POINT LEFT/RIGHT button and fix the number with the SELECT button. The number will change to "✳". If you fixed a wrong number, move the pointer to "Set" or "Clear" once by pressing the POINT DOWN button, then return to "PIN code". Enter the correct number again.Repeat this step to complete entering a four-digit number.When the four-digit number is fixed, the pointer will automatically move to "Set". Press the SELECT button so that you can start to operate the projector.If you entered a wrong PIN code, "PIN code" and the number (✳✳✳✳) will turn red and disappear. Enter a correct PIN code all over again.After the OK ico n disappears, yo u can operate the projector.En g l i s h Press the POWER ON-OFF button on the top control or onthe remote control, and a message "Power off?" appears on the screen.Press the POWER ON-OFF button again to turn off theprojector. The LAMP Indicator lights bright and READY Indicator turns off. After projector is turned off, Cooling Fans operate (for 90 seconds). During this "Cooling Down" period,this appliance cannot be turned on. 12TO MAINTAIN THE LIFE OF LAMP, ONCE YOU TURN PROJ ECTOR ON, WAIT AT LEAST 5 MINUTES BEFORE TURNING IT OFF.DO NOT DISCONNECT AC POWER CORD WHILE COOLING FANS ARE RUNNING OR BEFORE READY INDICATOR LIGHTS GREEN AGAIN. OTHERWISE IT WILL RESULT IN SHORTENING LAMP LIFE.3When the projector has cooled down, READY Indicator lightsGREEN again and you can turn projector on. After cooling down completely, disconnect AC Power Cord.The message disappears after 4 seconds.• The projector cannot be turned on during the cooling period with the READY indicator turned off. You can turn it on again after the READY indicator GREEN again.• When the On start function is on, this projector is turned on automatically by connecting the AC power cord to an AC outlet.• Do not operate the projector continuously without rest. Continuous use may result in shortening the lamp life. Turn off the projector and give it a rest about an hour in every 24 hours.• This projector monitors internal temperature and automatically controls the running speed of the cooling fans.• If the WARNING TEMP indicator flashes red, see “WARNING TEMP INDICATOR ” in the user’s manual.TURNING OFF THE PROJECTORNOTE;。
酷乐视说明书
手把手教你玩转酷乐视q6无线互动投影1. 简介酷乐视q6是深圳市酷乐视科技有限公司推出的一款具备无线互动功能的发烧智能手机投影伴侣,它能很好的完成与安卓、苹果手机/平板之间的无线影音数据传输,从而达到多屏互动的效果。
无线互动投影在酷乐视q6当中有一个专用名称为wifi-display,进入该功能有miracast和dlna两个子功能,可以通过下滑电源开关来切换它们。
miracas为无线镜像功能,目前市面上较新款的安卓系统智能手机大都支持此功能;dlna为无线推送功能,酷乐视q6的dlna功能同时兼容安卓系统(android)和苹果手机系统(ios)。
2. 玩法下面使用图解分别介绍酷乐视q6在miracast和dlna模式时的无线互动投影玩法。
2.1 安卓手机使用miracast与酷乐视q6同屏镜像向后快速推动电源开关切换酷乐视q6的无线模式为miracast。
使用小米3通过miracast将屏幕镜像传输到酷乐视q6的操作过程:在小米3上操作:①.在设置项中打开全部设置;②.更多无线连接;③.无线显示;④.选择连接q6的预设名,等待服务建立成功后即可正常使用。
小米3使用miracast连接酷乐视q6的操作方法其它手机的设置方法请参考简介中的“市面上主要手机的miracast功能设置目录表”。
2.2 安卓手机使用dlna推送方法2.2.1 安卓手机使用dlna推送本地媒体文件向后快速推动酷乐视q6电源开关切换无线模式为dlna。
以下是使用某款安卓手机通过dlna推送本地图片到酷乐视q6的操作过程:①.打开wifi设置;②.连接到酷乐视q6的预设名;③.进入手机的图片功能打开一张图片;④.选择功能菜单键;⑤选择“选择媒体服务器项”;⑥.选择名称为酷乐视q6预设名的服务器;⑦选择推送logo,等待若干秒后推送成功。
安卓手机使用dlna推送图片到酷乐视q6的操作方法以上安卓手机的界面及操作可能稍有不同,请根据实际使用进行适当的调整。
ASKProximaM22投影机说明书
Regulatory models W1100 and W1102符合性声明制造商:InFocus Corporation, 27500 SW Parkway Ave. Wilsonville, Oregon 97070 USA欧洲办事处:Louis Armstrongweg 110, 1311 RL Almere, The Netherlands我们基于独立承担责任的原则,特此声明,本投影机符合下列指令和规范:EMC指令2004/108/ECEMC:EN 55022EN 55024EN 61000-3-2EN 61000-3-3低电压指令2006/95/EC安全:IEC 60950-1:1版商标DisplayLink是DisplayLink Corporation的商标。
Apple、Macintosh和PowerBook是苹果电脑公司的商标或注册商标。
IBM是国际商用机器公司的商标或注册商标。
Microsoft、PowerPoint和Windows是微软公司的商标或注册商标。
Adobe和Acrobat是Adobe Systems Incorporated公司的商标或注册商标。
DLP®和DLP标志是Texas Instruments公司的注册商标,BrilliantColor™是Texas Instruments公司的商标。
InFocus、In Focus和INFOCUS (美术化)是InFocus Corporation公司在美国和其他国家(地区)的注册商标或商标。
FCC警告注意:本设备已经通过测试并符合FCC规则之第15部分的B级数字设备要求限制。
该限制专为在住宅环境中安装时避免有害干扰提供合理有效的保护。
本设备会产生、使用、和辐射无线电频率能量,如果不按照指示进行安装和使用,可能会对无线电通信产生有害干扰。
但是,本公司不担保在特定安装情况下不产生干扰。
如果本设备对无线电或电视接收造成有害干扰(关闭后再打开设备电源可以确定),建议用户尝试采取以下一项或多项措施来排除此干扰:--调整天线方向或重新放置接收天线。
BLUETREK X2 用户指南说明书
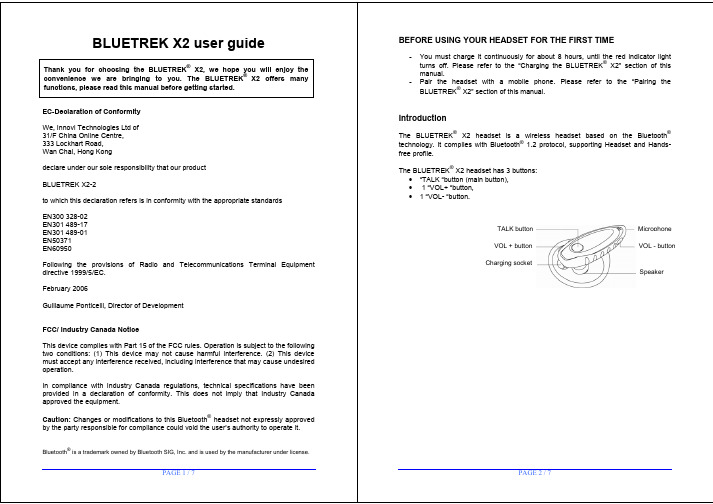
1. Place the BLUETREK® X2 and your mobile phone within 0.3 meter (1 foot) from each other.
2. Switch on your phone and select its Bluetooth® discover mode (refer to the Bluetooth® mobile phone user manual).
To replace with the ear hook: Simply unsnap the ear loop from the headset by pulling gently at the base of the ear clamp ring.
The ear hook is made of a soft material which can be shaped to fit your ear. Please refer to the above diagram of how it can be adjusted.
Bluetooth® is a trademark owned by Bluetooth SIG, Inc. and is used by the manufacturer under license.
PAGE 1 / 7
BEFORE USING YOUR HEADSET FOR THE FIRST TIME
• Do not let the battery charger remain plugged in the headset for more than 24h.
• The use of any other charger will automatically suspend the warranty.
投影机-用户使用说明
多媒体投影机
用 户 手 册
投影机
关于用户手册
请仔细阅读用户手册,以确保正确使用投影机及其功能。 阅读用户手册后,请妥善保管以备日后参考。
1
目录
菜单...........................................................................................................................25
高级菜单 ..............................................................................................................25 演示菜单 ..............................................................................................................28 安全菜单 ..............................................................................................................30 PIN 键入操作 .......................................................................................................33
投影机 ....................................................................................................................6 控制面板 ................................................................................................................7 背面 ........................................................................................................................8
投影仪 说明书

目錄注意事項 (3)眼睛安全性警告 (5)包裝概觀 (6)產品概觀 (7)主機 (7)輸入/輸出連線 (8)91111連接電腦/筆記型電腦 (11)連接影像訊號來源 (12)開啟與關閉投影機電源 (13)開啟投影機電源 (13)關閉投影機 (14)警告指示燈 (14)調整投影的影像 (15)調整投影機的高度 (15)調整投影機的畫面縮放與對焦 (16) (16)操作方式 (17)功能表樹狀結構 (18)影像 (19)顯示設定 (23)設定 (26)功能 (32)附錄 (35)疑難排解 (35)影像問題 (35)其他問題 (38)投影機狀態指示 (38)遙控器問題 (39)更換燈泡 (40)相容性模式 (42)RS232 指令 (44)固定於天花板上的安裝 (48)Optoma 全球辦公室 (49)法規與安全須知 (51)使用須知安全資訊警告:為了避免火災或電擊的風險,請勿將本設備暴露於雨水或溼氣中。
本設備機殼內有危險的高電壓,請勿打開機殼。
唯有合格人員才可進行維修服務。
B 類放射限制此 B 類數位設備符合加拿大干擾產生設備法規 (Canadian Interference-Causing Equipment Regulations) 之規定。
重要的安全指示1. 請勿阻塞任何通風口。
為了確保本投影機的正常操作並防止設備過熱,建議安裝位置不得影響投影機的正常通風。
例如:請勿將本投影機放置在擁擠的咖啡桌、沙發或床上;亦不可將本投機放置在書架或阻礙氣流流通的置物櫃等密閉空間。
2. 請勿在附近有水或濕氣的環境使用本投影機。
為了避免火災和/或電擊的危險,請勿將本投影機置於雨水或濕氣的環境中。
3. 請勿在靠近任何熱源的位置進行安裝,例如散熱器、暖氣機、火爐或任何其他會產生熱度的設備,例如放大器。
4. 僅能以乾布擦拭。
5. 僅能使用製造商規定之附件/配件。
6. 若本裝置受到物理性損壞或濫用,請勿再使用。
物理性損壞/濫用包括 (但不限於):❒裝置掉落。
电子投影仪用户手册说明书

Projector User’sMosicGO ®GuideMOVIES MUSIC POWER GOS I NC E 2017Model:Sport MGFU-SLite MGFU-LMosic GO®1.The ventilation ports prevent overheating. Never block these ports located on the sides and bottom of the projector.(See page 12) Direct obstruction, confined spaces or placing on a cluttered surface restricts airflow, and ruins the projector. 2.To reduce risk of fire or electric shock, do not expose the projector to any liquids, rain, snow or airborne moisture.3.Do not insta4.Do not use the projector in direct sunlight.5.6.Do not use the projector in areas susceptible to excessive dust and dirt.7.Turn off the product before cleaning.8.Disconnect the power cord if the product is not being used for a long period of time.9.Ensure that the ambient room temperature is within 0- 40°C (32-104°F).10. Ensure that relative humidity is 5 - 35°C (41- 95°F), 80% (Max.), non-condensing.11. Do not drop, throw or try to bend your product.explosion.13. Clean only with dry cloth.14. Only use attachments/accessori15. Do not use the unit if it has been physically damaged or abused. Physical damage/abuse would be (but not limited to):♋ Unit has been dropped.♋ Charger or plug has been damaged.♋ Liquid has been spilled on the projector.♋ Projector has been exposed to rain or moisture.♋ Something has fallen into the projector or something is loose inside.Do not attempt to service the unit yourself. Opening or removing covers may expose you to dangerous voltages or other hazards. Please contact your local reseller or service center before you send the unit for repair.17. Follow all warnings and cautions in this manual and on the projector.18. The unit should only be repaired by appropriate service personnel.19. P rojector lamps generate a lot of heat. This causes much of the projector's surface area to heat up. If the projector seems to be excessively hot, t urn it off so that it can cool down and then call customer service.IMPORTANT SAFETY INSTRUCTIONSCOPYRIGHT / TRADEMARK© Copyright 2019. All rights reserved.The manufacturer reserves the right to make technical changes. The manufacturer assumes no liability for damages incurred directly or indirectly from errors, omissions, or discrepancies between the device and this documentation.Other brands or logos are trademarks or registered trademarks of their respective companies.CAUTION – RISK OF BATTERY EXPLOSION IF INCORRECT TYPE IS USED.MAKE SURE TO PROPERLY DISCARD USED BATTERIES ACCORDING TO LOCAL REGULATIONS.DECLARATION OF CONFORMITYTRADEMARKSFCC WARNINGAGENCY APPROVALSApple, Macintosh, iPod, iPod nano, and iPhone are trademarks or registered trademarks of Apple Computer, Inc. IBM is a trademark or registered trademark 2014/30/EUEN 301489-1EN 301489-17EN 55032EN 55024Low Voltage Directive : 2014/35/EU Safety: EN 62368 , EN62133+Annex.MMicrosoft, PowerPoint, and Windows are trademarks or registered trademarks of Microsoft Corporation. Adobe and Acrobat are trademarks or registered trademarks of Adobe Systems Incorporated.household waste in all EU member states. Please follow the guidance of your local environmental authority or ask the shop where you purchased the product for collection or recycling options.(2) this device must accept any interference received, including interference that may cause undesired operation.designed to provide reasonable protection against harmful interference in a residential installation. This equipment generates, uses and can radiate radio frequency energy and, if not installed and used in accordance with the instructions, may cause harmful interference to radio communications. However, there is no guarantee that interference will not occur in a particular installation. If this equipment does cause harmful interference to radio or television reception, which--Reorient or relocate the receiving antenna.--Increase the separation between the equipment and receiver.--Connect the equipment into an outlet on a circuit different from that to which the receiver is connected.Changes or modifications not expressly approved may void authority to operate the equipment.FCC, CE, and LVDOther specific Country Approvals may apply. Please see product certification label.Product offerings and specifications may be altered at any time without notice.6.3FCC CAUTIONAny changes or modifications not expressly approved by the grantee of this device could void the user's authority to operate the equipmentThe changes or modifications not expressly approved by the party responsible for compliance could void the user’s authority to operate the equipment.FCC RF exposure warningThis equipment must be installed and operated in accordance with provided instructions and the antenna(s) used for this transmitter must be installed to provide a separation distance of at least 20 cm from all persons and must not be co-located or operating in conjunction with any other antenna or transmitter. End-users and installers must be provide with antenna installation instructions and transmitter operating conditions for satisfying RF exposure compliance.Ventilation Port Tripod Mount Hole Wireless Speaker ProjectorWireless Speaker On /O B utton 20. Projector On /O Button Battery / Power Status (Battery indicator only for MGFU-S model)Remote ControlMenu 1. W ireless Speaker On/Off, Audio Source Selection(Note)2.Projector On/O Brightness Adjustment (Note)3. U p4.Left5. OK / Enter6.Right 7. Down 8. DPAdjust Keystone Up 9.Adjust Keystone Down 10.Menu HDMI111.Home 12.Video Source Search 13.Audio Source Search 14.15.HDMI216. 1. U p (adjust keystone up)4.Left3.2.Down (adjust keystone down)OK/Enter 5. Input Source Selection 6. Home7. Right Mute 8. 9.Touch Keypad17.Mute 18.Volume Down 19.Volume Up 20.Wireless Audio Input 21.Projector Audio InputNo Funtion1-A AC Adapt r 1-B Power Cord 3.HDMI Cable x14. USB Type C Cable (*Note : only apply for Sport MGFU-S model)4-A Remote Control 4-B Battery (AAAx2)5. 6. Tripod 7. Carrying bagUser’s Guide (with Warranty Card)POWER ON/OFFPress the Wireless Speaker button to activate this feature.It’s blue LED lamp will flash when the Wireless Speaker is in pairing mode. Check “MosicGO ” on your device to connect to MosicGOWireless Speaker . When device is connected successfully, the blue LED lamp will light persistently.To turn off the Wireless Speaker, press down and hold the BT button for over 1 second.When both projector and Wireless Speaker are ON, short pressing the Wireless Speaker button on the remote control will switch audio source between projector and Wireless Speaker.Press the PJ button to turn the projector on andthe status LED indicator will light up. To turn off the projector, press and hold the PJ button for over 1 second. After seeing prompt message, short press PJ button again to confirm. The MosicGO logo will show briefly before the device powers off.The status LED indicator light will be flashing as the projector powers down.When projector is ON, short pressing the PJ button on the remote control will cycle through the following brightness modes: MAX, ECO, and MIN.1.2.USB Type C power Delivery:Type C support PD function. Please refer specification section for details.USB Type A :Provide 5V/1A max power.LEDs indicate battery and charging status as following table.In battery mode, MosicGO will be forced to power off if batterycapacity is under 10% Suggest charging the battery immediately if LED indicator is Red.Adapter ModeBattery ModeGeen(100%)Solid Solid Green (80% ~)Flash Solid Orange(15%~79%)Flash Solid Red(~14%)FlashSolidprojected image tilt.To adjust the tilt:Turn the elevator feet to adjust the projected image position to the desired tilt.Adjust the focus until the image is clear.AProjector Front Edge Distance toEarphone, 3.5mm Jack Pin assignment HPL : Left Channel Audio Signal HPR : Right Channel Audio Signal GND : Signal Ground12V Trigger Port, 3.5mm Jack Pin assignment 12V : 12V trigger signal for screen rolling up/down GND : Signal GroundScrew a standard tripod into the screw hole on the projector.1.Loosen 4 screws metal plate from MosicGO .2.Fasten screwsto ceiling mount kits.Screw hole for tripod*Standard TripodMount on ceilingM4 Screw( x 4 )Note2Keep enough space from speakers and ventilations (30 cm above)On table 4 rubber feet are placed on flat surface.Prevent to block bottom’s ventilations.Note1tabletable*Note:Please keep air vents opend for heat ventilation. Otherwise, projector will be turned off if it's over heat.Contrast: adjust color contrast.Sharpness: adjust picture sharpness.Pattern Test: present pattern picture to verify focus and color situation of display. Press “OK” will return to current video port.Picture Test: circularly present red, green, blue, and white screen to verify picture color. Press “OK” willreturn to current video port.Auto Power Off: Configure the time before power off if there is no signal to projector.H / V Position: Adjust the display positionRGBPICTUREContrast Sharpness Pattern Test Picture TestMosicGOConfigure color properties.Set other configuration.Aspect Ratio: configure ratio of display area.Projector Installation: according to your projector installation, configure the orientation of display.Ultra vivid: enable/disable supporting vivid color.12V Trigger: Enable/disable the output of 12V Trigger Out.Keystone: adjust the rectangle shape of nguage: configure languageTransparency: configure the transparency of OSD(on-screen display).S.P.M: enable/disable Smart Projector Mode. If enable, MosicGO will automatically adjust brightness according current battery and power situation.Buzzer: enable/disable “beep” alert sound.Rest: reset to default setting.Present current video signal information.If you experience a problem with your projector, please refer to the following information. If a problem persists, please contact your local retailer or service center.No image appears on screen Image is out of focusMake sure the projection distance is in valid range (refer to page 10). Ensure the cable is fine. Image is too small or too large No sounds on the remote control .* If an invalid signal is input into the projector, it will not be displayed properly on the screen or amessage such as 'not support' will be displayed.* To provide the best picture quality, 1920 x 1080 (1080p) resolution is recommended.Lens with dust or water drops• Projecting test pattern (“Menu” -> “Picture” ,press ”OK”-> “Pattern Test” ,press ”OK”)• Adjust the focus ring, make the line pattern on four corners and center clear.Exit “Pattern”by press “OK”again.• Use a hairdryer on a low heat setting to clear away dust, water or other particles. To Prevent Damaging the Surface Coating, DO-NOT Touch, Wipe or Clean the Lens.If the projection surface is heavily soiled, contact the manufacturer for further assistance.• https:///faqs.htmlFrequently asked questions3 continuous beep soundYou may hear 3 continuous beep sound accompany following icon on the screenFan error: projector is turned off immediately. If the problem still occurs, please check your vendor.Over heat: projector is turned off immediately. Suggest to letprojector be off for a while before it is turned on again.Low battery: projector is turned off immediately. Please plug power adapter to charge the battery. You can turn on theprojector during charging.Battery fail: if the power adapter is plugged. You can turn on and use projector. If you pull out the power adapter, the projector may be turned off without any warning. If the problem still occurs,please check your vendor.QUICK SETUP FOR MODEL: OMS58H2~ 36.7”(93.2cm)~ 15.7”(39.9cm)Elite Screens Visual & Sound Co., Ltd.To ensure your right, please ask the Dealer to fill in the information above, and have Dealer’s stamp on this card.If date of purchase cannot be provided with dealer’s stamp, the manufacture date as recorded will be deemed to be the start of the Warranty Period.Customer’s name:Phone number:Email:Date of purchase: (M) (D) (Y)Address:Model No:S/N:Dealer’s Stamp:MOVIES MUSIC POWER GOMosicGO®Mosic GO®MOVIES MUSIC POWER GO。
InFocus INFOCUS X2 多功能高性能投影仪说明书
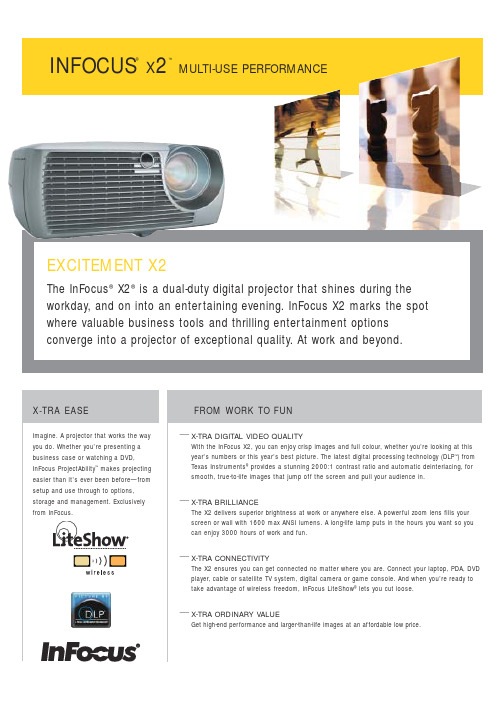
INFOCUS ®X 2™MULTI-USE PERFORMANCEUniting business with lifestyle functions, the InFocus X2 projects a professional-quality image whether you’re in the meeting room or dangling from a cliff with your favourite action hero. A highly portable projector with high-end features, you can take the X2 places. But just look where it takes you.ALL WORK. ALL PLAY.Exercise your option for wireless —SERIOUS IMAGE QUALITY.Going for incredible images? Get to know the technology inside the X2—Digital Light Processing (DLP™) technology from Texas Instruments. It’s the world’s only all-digital display solution. Based on a unique fast digital reflective semiconductor called the Digital Micromirror Device, or DMD, DLP™ projects large, high-contrast images with unmatched colour fidelity and consistency. With InFocus X2 DLP™technology, each image is recreated with maximum fidelity, so you enjoy clear, sharp pictures and brilliant colours. And its wide-screen capability lets you enjoy amazing video performance in a cinema format.—SERIOUS COMPATIBILITY.Easy colour-coded setup lets you go from work to play without missing a beat. An optical zoom lens helps fill your screen or wall from any location. And you can count on crisp images thanks toa 2000:1 contrast ratio and 1600 max ANSI lumens of brightness. Impress your business clientswith brilliant presentations during the workday. Impress your friends with larger-than-life images in the evening.—SERIOUS DEPENDABILITY.You can count on the X2’s superior quality for an exceptionally long time. Its long-life lamp shines for an incredible 3000 hours. So sit back. Relax. Enjoy.—SERIOUS EASE.Like all InFocus projectors, the X2 is designed for easy setup and use. Incorporating years of usability research, the ease-of-use design philosophy we call ProjectAbility makes meetingsshorter and presentations easier. Most of all, it gives users confidence.Get started straight away with intuitive keypads and menus. A simple keypad delivers one-touch operation, so there’s no need to refer to the user manual for common tasks. Hooking up is simple with colour-coded connections. It’s even easy to carr y: at a mere 6.8 lbs/ 3.1 kg, the X2 is super-portable. Connect two sources simultaneously for seamless switching and simple content integration.—SERIOUS FREEDOM.Cut loose with InFocus LiteShow®. It’s a secure wireless solution option that delivers high-resolution, true-colour clarity with fast image updates and smooth, jitter-free images. LiteShow is built onindustry-standard Wi-Fi (802.11b) technology and is compatible with both PC and Mac operating systems. Industry-standard 128-bit data encryption and robust connection authenticationprocedures ensure that data transmissions are secure and reliable.EASY, SERIOUSLY.4531267THE INFOCUS COMMITMENTExperience for yourself why InFocus Corporation is the world-wide leader in large-format displays. Our dedication to quality and customersatisfaction is reflected in service options that will bring you a greater return on your investment. InFocus projectors come with a standard factory limited warranty, including parts and labour, and lamp replacement warranty. Our customer support offers you premium service and convenience,whatever your needs.For service programme details for your region, please visit: /service_offeringsInFocus Corporate Headquarters:27700B SW Parkway Avenue • Wilsonville, Oregon 97070-9215, USA Phone: (1) 503-685-8888 • 1-800-294-6400 • Fax: (1) 503-685-8887In Europe: InFocus International BVStrawinskylaan 585• 1077 XX Amsterdam • The Netherlands Phone: (31) 20 5792000• Fax: (31) 20 5792999Freephone: 008000 4636287 (008000 INFOCUS)In Asia:InFocus Systems Asia Pte Ltd.238A Thomson Road • #18-01/04 Novena SquareSingapore 307684 • Phone: (65) 6334-9005 • Fax: (65) 6333-4525InFocus and LiteShow are registered trademarks and X2 and ProjectAbility are trademarks of InFocus Corporation or its subsidiaries in the United States and other countries. Digital Light Processing and DLP are trademarks of TexasInstruments. All other trademarks are used with permission or are for identification purposes only and are the property of their respective companies. ©2004 InFocus Corporation. 805-0921-03. X2_DS_UK_V03.qxd. 6/04. All rights reserved.—TECHNICAL SPECIFICATIONS +Native Resolution •SVGA 800 x 600Display Technology•DLP by Texas Instruments : 0.55” SVGA DDR DMDInput Sources •Computer (M1-DA); Video (S-Video 4-pin mini DIN and Composite RCA; Audio (Stereo RCA)Output Sources •Monitor Out (VESA); Audio (3.5mm)Computer Compatibility •SVGA, VGA, XGA, Macintosh Video Compatibility •SDTV (NTSC, PAL, SECAM), ED/HDTV (Component, RGBHV,and DVI for these signal formats:480p, 576p, 720p, 1080i)Brightness •1600 max ANSI lumens (standard mode)•1100 max ANSI lumens (whisper mode)Contrast Ratio •2000:1 full on/full off Number of Colours •16.7 million H-Synch Range •31.5 – 80 kHz V-Synch Range•50 – 85 Hz Dot Clock•20 to 95 MHzDigital Keystone Correction •+/- 10°vertical correction; data/videoProjection Lens •Zoom lens with manual focus and manual zoom adjust Zoom Ratio • 1.2:1Throw Ratio • 1.89 to 2.27:1 (D/W), 1.51 to 1.82:1 (D/D)Minimum Projection Distance • 1.5 m (maximum distance 9.8 m)Aspect Ratio •4:3 and 16:9Image size (diagonal)•0.8 m to greater than 6.5 m Projection Methods •Front, ceiling, rear Audio • 2.5 watt monoControl •Projector keypad; IR remote control Lamp*•200W SHP/3000 hours Dimensions•24.9cm x 32.7cm x 10.6cmWeight • 3.1 kg Power Consumption •200 watt typical/250 watt maximum Power Supply•100V – 240V at 50 –- 60 HzOperating Temperature •5°to 40°C at sea level (0 to 3,000 m)Menu Languages •English, Norwegian, Spanish, Italian, Portuguese, German, French, Chinese (simple),Chinese (traditional), Japanese, Korean, Russian Audible Noise •39 dB (standard mode)•37 dB (whisper mode)Approvals •UL, c-UL, TUV GS, CE, GOST, C-Tick, NOM, IRAM, FCC B, CISPR22 /EN55022, EN 55024 / CISPR 24, CB certified according to IEC60950/EN60950: 1997, P(SE), MIC Lamp warranty •90 days or 500 hours, whichever comes first Product warranty • 2 years parts and labour Accessory warranty• 1 year*Actual lamp life may vary based on the ambient environment. Conditions that may affect lamp life include temperature, altitude or rapidly switching the projector on and off.+InFocus reserves the right to alter product offerings and specifications at any time without notice.Contact InFocus or your dealer today.OPTIONAL ACCESSORIESHW-PRESENTER Presenter Remote HW-PRESENTER-RF Presenter RF Remote HW-CONDUCTOR+Conductor Plus Remote LP-LITESHOW LiteShow Wireless Connection SP-DVI-D Digital Computer Cable SP-M1-ADPT M1to Component Adapter CA-ATA-019ATA Roller Case CA-C230Organiser Soft Case SP-CEIL-001Ceiling Mount KitSP-LOCK-B PC Guardian Projector Cable Lock A65050” Portable Projection Screen HW-DLXSCRN 60” Deluxe Insta-Theatre Screen HW-WALLSCR8484” Pull-Down Screen SP-LAMP-017Replacement LampShips Standard With •Lens cap •Wireless Navigator ™Remote Control (including batteries)•Computer cable•RCA Video and Audio cable •Power cord•SCART adapter (EMEA only)•Projector System CD includes: multi-language User Guide, Quick Start Card,URL/service information/accessories after market•User Guide (printed version)•Quick Start Card (printed version)。
投影机说明书
包装箱内有哪些物件?确认包装箱内下列各项物件是否齐全。
如有任何遗漏,请向您的经销商洽询。
请保存原始包装箱及捆包用物品,以便需运送投影机时之用。
篇二:投影仪使用说明投影仪使用说明1.投以仪大家都认识,下面就是我们公司经常用的投影仪2. 将投影仪连接电源3. 将投影仪与电脑连接,通过vga连接线(也就是两头都是梯形口15针的线)连接到投影仪的vga接口上。
4. 打开投影仪,按电源开机,电源指示灯变为绿色时,投影仪启动5. 进入启动完成界面后,按回车按钮(投影仪上的enter键),进入使用页面。
调试投影仪7. 图像清晰度调节,图像大小调节。
屏幕的大小和投影仪距投以幕布之间的距离理论上是越大图像越大,但是需要根据现场的实际使用情况调试。
8. 通过投影仪上的梯形调试按钮可以调节图像的形状。
以上是对投影仪的简单使用介绍,下面为投影仪控制面板上按钮的实际作用。
笔记本切换不到投影仪上故障解决办法(一)2010-06-04 20:20 1.将vga线(接头为15针的线缆)与笔记本电脑连接。
2.按笔记本电脑的功能键“fn” +“f2”/“f3”/“f4”/“f7”等,不同笔记本,切换键有所不同,但功能键(f1~f8)上会有一个键印有两个屏幕的图标,若按了没有效果,则可能是笔记本的快捷键没有驱动,此时则参考附件解决方法。
3.切换不了有可能是因为笔记本本身的分辨率太高,建议调整为1024*768 。
4.电脑本身的屏幕刷新率可能太高了,建议调成70hz以下。
附件:(1)安装笔记本快捷键驱动,可查看安装盘或到官方网站下载相应驱动。
(2)根据显卡的不同型号,设置方法有所不同ati显卡设定方法:桌面点右键,出现ati 显卡管理程序,选择显示器管理器, 选择主显示器(图标),托到右边的显示器2上, 右键选复制方式, 显示器与投影机屏幕同步。
笔记本接到投影仪上时,桌面上的图标在投影仪上不显示,投影仪只显示笔记本桌面背景,可能在显示属性里面选择了扩展桌面的选项,如果是这样,投影仪上显示的是扩展的桌面,也就是说你的鼠标可以从你的笔记本屏幕移动到投影仪上,所以桌面图标不显示,因为只有一个桌面。
乐视说明书

乐视电视看电视直播使用说明步骤简要说明:1、打开电视,进入轮播界面2、向右滑动遥控器可进入应用页面3、在应用页面找到“letv store”,进入4、在“letv store”中找到电视直播软件“电视家”,直接点击安装5、打开“电视家”软件,像使用普通电视机那样看电视图文详细说明一、遥控器介绍乐视s50赠送的超级遥控器超级遥控器的操作方式非常多样,它表面设有9个物理按键,设置键独立存在,可以在电视的任何一个功能界面下调出电视的设置菜单进行功能调节超级遥控器的具体用法滑动触摸板改变焦点。
按下触摸板确定。
切换桌面:左滑进入信号源桌面。
右滑进入应用桌面。
下滑进入节目单。
直播转点播:左右滑动在节目单中切换。
按下触摸板点播选中节目。
二、安装电视直播软件步骤图1、开机后,电视直接进入乐视的轮播界面,轮播界面由多个乐视自己的频道组成即将进入轮播桌面轮播桌面和电视信号界面相似轮播台分类很细篇二:乐视网tv版使用手册乐视网tv版使用手册一、观看直播电视节目开机默认进入直播,若开机未默认,主页面选择“我的应用”,找到“电视家”即可观看中央及地方卫视直播节目。
选台、换台按“确认键”。
二、观看电影及点播节目进入主页面选择“乐视网tv版”,选择“电影”栏目即可观看点播节目。
三、开机默认直播设置方式主页面进入“我的应用”,选择“电视家”进入“设置页面”,在“开机自启”选择“开”即可完成设置。
篇三:乐视c21产品说明书-修订letv-c21产品说明书目录产品简介 ............................................................................. (2)功能介绍 ............................................................................. (2)产品组成 ............................................................................. (4)产品外观 ............................................................................. (5)乐视网tv版 ............................................................................. .. (7)搜索功能 ............................................................................. . (8)用户信息查询 ............................................................................. .. (8)升级功能 ............................................................................. . (8)系统设置 ............................................................................. (9)网络设置 ............................................................................. . (9)有线网络设置 (9)无线网络设置 (9)音视频设置 ............................................................................. . (10)hdmi输出设置 (10)spdif输出设置 (10)显示比例设置 (10)输出分辨率设置 (10)其他设置 ............................................................................. .. (10)系统信息 ............................................................................. . (10)产品简介乐视tv云视频超清机是一款专门针对家庭电视机用户的互联网影视点播产品,该产品以电视机为收看终端,采用遥控器操作方式,使普通的家庭电视机具备了互联网功能,并为用户提供新鲜、丰富的影视综艺等内容,改变了过去只能等待电视台播出什么就看什么的被动收看方式,也不必忍耐烦人的广告,是一种新的收视模式。
可攜式投影機使用手冊说明书

在下列情況下需關閉投影機,拔掉電源線並請有維修資格的維修服務人員維修投影機: - 當電源線或插頭損壞或磨損。 - 如果有液體流入投影機或投影機被暴露於雨水。 - 如果您按照使用手冊裡的說明操作,但投影機還不能正常工作。 - 如果投影機被摔到地上或機殼破損。 - 如果投影機性能有顯著改變,表明需要維修了。 移動投影機時斷開電源線和其他電線。 清潔機殼或更換燈泡前應關閉投影機並拔掉電源線。 如果投影機很長時間不使用,請關閉投影機並拔掉電源線。 當使用 LAN 纜線時(僅限於有 RJ-45 LAN 埠槽的型號): 爲了確保安全,切勿將投影機連接到週邊設備配線有可能超壓的連接器上。i重Fra bibliotek資訊 重要安全措施
這些安全指示可令本投影機維持長久的使用壽命,並可防止火災和電擊。請仔細閱讀並留意所有的警告。
安裝
請勿將本投影機放置在下列環境中 - 不穩定的車、架子或桌子。 - 靠近水、浴池或潮濕的房間。 - 陽光直射、靠近加熱裝置或熱輻射裝置的地方。 - 多塵、多煙或多蒸汽的環境。 - 紙張或布上、墊子或地毯上。 若您欲將投影機安裝在天花板上: - 切勿自行安裝。 - 安裝工作必須委託有資格的技術人員進行,以確保規範操作,並可防範人身傷害。 - 此外,天花板必須牢固,能夠充分承受投影機的重量,而且必須依照當地建築規則進行安裝。 - 詳情請向您的經銷商查詢。 警告 在投影機開啓狀態下,切勿使用除投影機的滑動式鏡頭蓋以外的其他任何物體覆蓋鏡頭。 否則,投射光線釋放的熱量可能導致物體變得極熱,並可能會引起火災或損壞。
切勿讓紙夾和紙屑等異物掉入投影機內。切勿試圖找回可能掉入投影機內的任何物品。切勿將鐵絲或者螺絲起子 等金屬物體插入投影機內。若發現有物體掉入投影機內部,須立即斷開電源,然後委託有維修資格的維修服務人 員取出物體。 切勿在投影機上面放置任何物體。 雷雨天不要觸摸電源插頭。此舉可能引起電擊或者火災。 投影機規定操作電源爲 200-240 伏特 50/60 赫茲交流電。在使用投影機之前,須確認所用電源是否符合本投影機 要求。 切勿在投影機啓動狀態下窺視鏡頭。此舉會導致眼睛嚴重受傷。
OLLEI P37 自动焦点 2 x 2 幻灯片投影仪说明书
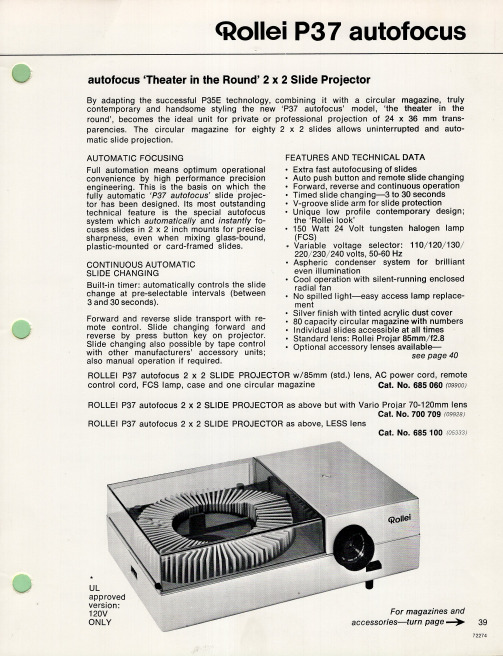
AUTOMATIC FOCUSING
Full automation means optimum operational convenience by high performance precision engineering. This is the bas·is on which the fully automatic I P37 autofocus' slide projector has been designed. Its most outstanding technical feature is the special autofocus system wh ich automatically and instantly focuses slides in 2 x 2 inch mounts for precise sharpness, even when mixing glass-bound, plastic-mounted or card-framed slides.
CONTINUOUS AUTOMATIC SLIDE CHANGING
Built-in timer: automatically controls the slide change at pre-selectable intervals (between 3 and 30 seconds).
Forward and reverse slide transport with remote 60ntrol. Slide changing forward and reverse by press button key on projector. Slide changing also possible by tape control with other manufacturers' accessory units; also manual operation if required.