FormServer部署说明
Exchang服务器部署邮件网关
Exchang服务器部署邮件网关这是一种常见的部署方案,用internet邮件网关,它减轻了主Exchange服务器的垃圾邮件过滤负担,是所有出入电子邮件的第一站。
拥有一个独立的网关让我可以把Exchange服务器放在防火墙后面,DMZ之外。
如果我需要重新启动或者维护我的Exchange服务器的时候,网关服务器仍然可以接收来自互联网的电子邮件。
还可在网关这里部署反病毒,反垃圾邮件系统。
好处太多了,大家尝试下慢慢体会。
下面先来看看我们是如何做的。
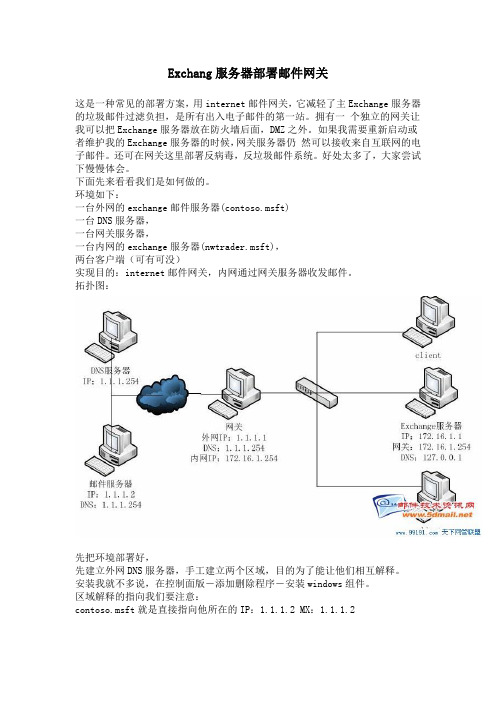
环境如下:一台外网的exchange邮件服务器(contoso.msft)一台DNS服务器,一台网关服务器,一台内网的exchange服务器(nwtrader.msft),两台客户端(可有可没)实现目的:internet邮件网关,内网通过网关服务器收发邮件。
拓扑图:先把环境部署好,先建立外网DNS服务器,手工建立两个区域,目的为了能让他们相互解释。
安装我就不多说,在控制面版-添加删除程序-安装windows组件。
区域解释的指向我们要注意:contoso.msft就是直接指向他所在的IP:1.1.1.2 MX:1.1.1.2nwtrader.msft是内网的exchange服务器,现在让网关来替它收发邮件,所以外网解释的时候是解释到网关的IP:1.1.1.1 MX:1.1.1.1在网关和外网邮件服务器设置好,能相互解释,我们看看结果。
我在外网contoso.msft设置了转发器来解释。
在internet网关服务器上设置DNS指向1.1.1.254。
接下来我们就是在设置一台独立的网关服务器,我用windows自带的SMTP来搭建。
先安装:windows安装程序下IIS里面的SMTP。
接下来,我们配置SMTP属性,在运行里面输入inetmgr,右键打开SMTP虚拟服务器属性,打开在“常规”中,为该服务器配置一个IP地址。
然后点击“访问”。
在这里可以配置认证和连接参数。
Fortify SSC 20.2.0在CentOS 8上的安装与部署指南说明书
Deployment GuideInstalling Fortify SSC 20.2.0 with MySQL 8 in Easy Steps on CentOS 8Fortify SSC 20.xAuthor: Vikas JohariDate: 29 January 2021Document Version: v0.1ContentsContents (2)Introduction (3)Installation of Oracle JDK 1.8 (3)Installing Tomcat 9.0.41 (4)Configure Apache (optional) (5)Installing MySQL 8 Community Edition (6)Configuring MySQL Database for SSC (8)Deploying JDBC Driver on Tomcat Server (11)Deploying SSC on Tomcat Server (11)IntroductionThis document is written to guide Pre-Sales and Partners to install Fortify SSC 20.2.0 in CentOS 8.x with MySQL 8 Community edition Database, in the same server.This document is not written to install Fortify SSC 20.2.0 in a Production Environment. However, this document can be used to setup Fortify SSC 20.2.0 in a controlled environment like Lab or PoC or CoE Environment.The Hardware and Software requirements are given in the link –https:///documentation/fortify-software-security-center/2020/Fortify_Sys_Reqs_20.2.0/index.htm#SSC/SSC_Reqs.htm?TocPath=Fortify%2520Software%2520 Security%2520Center%2520Server%2520Requirements%257C_____0Detailed SSC 20.2.0 User Guide is given in https:///documentation/fortify-software-security-center/2020/SSC_Help_20.2.0/index.htmI have used a VM with the below hardware configuration –CPU: 4 VCPURAM: 8 GB RAMDisk: 100 GB Thin ProvisionedCentOS 8: Download link /centos/8/isos/x86_64/MySQL 8 Community EditionInternet Connection on CentOS VMInstall CentOS 8 and apply all the required patches.Installation of Oracle JDK 1.8Download Oracle JDK 11 “jdk-11.0.10_linux-x64_bin.rpm” file fromhttps:///in/java/technologies/javase-jdk11-downloads.html and upload “jdk-11.0.10_linux-x64_bin.rpm” to server.Install Oracle JDK 11 using –[root@localhost ~]# rpm -ivh jdk-11.0.10_linux-x64_bin.rpmVerify that only Oracle JDK is installed in the server –[root@localhost ~]# rpm -qa | grep -i jdkjdk-11.0.10-11.0.10-ga.x86_64Add the below lines in /etc/profile file (at the end of it) using a text editor.export JAVA_HOME=$(dirname $(dirname $(readlink $(readlink $(which javac))))) export PATH=$PATH:$JAVA_HOME/binexport CLASSPATH=.:$JAVA_HOME/jre/lib:$JAVA_HOME/lib:$JAVA_HOME/lib/tools.jar Reboot the server and login as root.Installing Tomcat 9.0.41Post-installation of JDK 11, now we can install tomcat 9.[root@localhost ~]# cd Downloads[root@localhost Downloads]# wgethttps://mirrors.estointernet.in/apache/tomcat/tomcat-9/v9.0.41/bin/apache-tomcat-9.0.41.tar.gzExtract tomcat[root@localhost Downloads]# tar -xvf apache-tomcat-9.0.41.tar.gz -C /usr/share/Create a symbolic link -[root@localhost Downloads]# ln -s /usr/share/apache-tomcat-9.0.41/ /usr/share/tomcatCreate a tomcat service[root@localhost Downloads]# vi /etc/systemd/system/tomcat.service Add the below configuration –[Unit]Description=Tomcat 9 ServerAfter=syslog.target network.target[Service]Type=forkingUser=rootGroup=rootEnvironment='JAVA_OPTS=-Djava.awt.headless=true'Environment=CATALINA_HOME=/usr/share/tomcatEnvironment=CATALINA_BASE=/usr/share/tomcatEnvironment=CATALINA_PID=/usr/share/tomcat/temp/tomcat.pidEnvironment='CATALINA_OPTS=-Xms4096M -Xmx6144M'ExecStart=/usr/share/tomcat/bin/catalina.sh startExecStop=/usr/share/tomcat/bin/catalina.sh stop[Install]WantedBy=multi-user.targetStart and enable the tomcat service[root@localhost Downloads]# systemctl daemon-reload[root@localhost Downloads]# systemctl start tomcat[root@localhost Downloads]# systemctl status tomcat● tomcat.service - Apache Tomcat ServerLoaded: loaded (/etc/systemd/system/tomcat.service; enabled; vendor preset: disabled)Active: active (running) since Thu 2021-01-28 22:46:02 CST; 2min 59s agoProcess: 1028 ExecStart=/usr/local/tomcat9/bin/catalina.sh start (code=exited, status=0/SUCCESS) Main PID: 1110 (java)Tasks: 99 (limit: 100787)Memory: 2.0GCGroup: /system.slice/tomcat.service└─1110 /usr/bin/java -Djava.util.logging.config.file=/usr/local/tomcat9/conf/logging.properties -Djava.util.logging.manager=org.apache.juli.ClassLoaderLogManager -Djdk.tls.e>Jan 28 22:46:01 systemd[1]: Starting Apache Tomcat Server...Jan 28 22:46:01 catalina.sh[1028]: Tomcat started.Jan 28 22:46:02 systemd[1]: Started Apache Tomcat Server.[root@localhost Downloads]# systemctl enable tomcatCreated symlink /etc/systemd/system/multi-user.target.wants/tomcat.service →/etc/systemd/system/tomcat.service.Open Port 8080 & 80 in the firewall.[root@localhost Downloads]# firewall-cmd --permanent --add-port=8080/tcp success[root@localhost Downloads]# firewall-cmd --permanent --add-port=80/tcp success[root@localhost Downloads]# firewall-cmd --reloadsuccessConfigure Apache (optional)Apache is an optional component, it is used to act as a reverse proxy for tomcat server.Install apache server using -[root@localhost ~]# yum install httpd -yCreate a reverse proxy configuration for tomcat using a text editor -[root@localhost ~]# vi /etc/httpd/conf.d/tomcat9.conf<VirtualHost *:80>ServerAdmin root@localhostServerName DefaultType text/htmlProxyRequests offProxyPreserveHost OnProxyPass / http://localhost:8080/ProxyPassReverse / http://localhost:8080/</VirtualHost>Configure SELinux Rules –[root@localhost ~]# setsebool -P httpd_can_network_connect 1[root@localhost ~]# setsebool -P httpd_can_network_relay 1[root@localhost ~]# setsebool -P httpd_graceful_shutdown 1[root@localhost ~]# setsebool -P nis_enabled 1Restart and enable the apache service.[root@localhost ~]# systemctl restart httpd[root@localhost ~]# systemctl enable httpdUse a browser to validate the tomcat and apache service is running as per configuration, using, http://ip, :8080, http://ip:8080 of the server.Installing MySQL 8 Community EditionRun the below command to download and install MySQL 8 community edition database.[root@localhost Downloads]# wget https:///get/Downloads/MySQL-8.0/mysql-community-libs-8.0.19-1.el8.x86_64.rpm[root@localhost Downloads]# wget https:///get/Downloads/MySQL-8.0/mysql-community-common-8.0.19-1.el8.x86_64.rpm[root@localhost Downloads]# wget https:///get/Downloads/MySQL-8.0/mysql-community-client-8.0.19-1.el8.x86_64.rpm[root@localhost Downloads]# wget https:///get/Downloads/MySQL-8.0/mysql-community-server-8.0.19-1.el8.x86_64.rpm[root@localhost Downloads]# rpm -ivh mysql-community-client-8.0.19-1.el8.x86_64.rpm mysql-community-common-8.0.19-1.el8.x86_64.rpm mysql-community-libs-8.0.19-1.el8.x86_64.rpm mysql-community-server-8.0.19-1.el8.x86_64.rpmStart and Enable the MySQL Service[root@localhost Downloads]# systemctl start mysqld[root@localhost Downloads]# systemctl enable mysqldGrab the temporary password for root user of mysql[root@localhost ~]# cat /var/log/mysqld.log | grep -i 'temporary password'Note down the password.2020-02-12T13:23:05.319292Z 5 [Note] [MY-010454] [Server] A temporary password is generated for root@localhost: niy4pkkn1t,TTest MySQL server.[root@localhost ~]# mysql -u root -pEnter password: niy4pkkn1t,T <- Enter the temporary password from log fileWelcome to the MySQL monitor. Commands end with ; or \g.Your MySQL connection id is 8Server version: 8.0.19 MySQL Community Server - GPLCopyright (c) 2000, 2020, Oracle and/or its affiliates. All rights reserved.Oracle is a registered trademark of Oracle Corporation and/or itsaffiliates. Other names may be trademarks of their respectiveowners.Type 'help;' or '\h' for help. Type '\c' to clear the current input statement.mysql> show databases;+--------------------+| Database |+--------------------+| information_schema || mysql || performance_schema || sys |+--------------------+4 rows in set (0.00 sec) mysql>quitByeConfiguring MySQL Database for SSCModify the MySQL Configuration file for SSC.[root@localhost ~]# mv /etc/f /etc/f_orig [root@localhost ~]# vi /etc/fPaste the below content in the file -[client]port = 3306socket = /var/run/mysqld/mysqld.sock[mysql]no-beepsocket = /var/run/mysqld/mysqld.sock[mysqld]collation-server = latin1_general_csinit-connect = 'SET NAMES latin1'character-set-server = latin1pid-file = /var/run/mysqld/mysqld.pidsocket = /var/run/mysqld/mysqld.sockport = 3306datadir = /var/lib/mysql/datadefault_authentication_plugin = mysql_native_passworddefault-storage-engine = INNODBsql-mode = "TRADITIONAL"long_query_time=10report_port = 3306lower_case_table_names = 1secure-file-priv = NULLsymbolic-links = 0max_connections = 151table_open_cache = 2000tmp_table_size = 648Mthread_cache_size = 10myisam_max_sort_file_size = 100Gmyisam_sort_buffer_size = 2Gkey_buffer_size = 8Mread_buffer_size = 64Kread_rnd_buffer_size = 256Kinnodb_flush_log_at_trx_commit = 1innodb_log_buffer_size = 1Minnodb_buffer_pool_size = 10Ginnodb_log_file_size = 5Ginnodb_lock_wait_timeout = 300innodb_thread_concurrency = 9innodb_autoextend_increment = 64innodb_buffer_pool_instances = 8innodb_concurrency_tickets = 5000innodb_old_blocks_time = 1000innodb_open_files = 300innodb_stats_on_metadata = 0innodb_file_per_table = 1innodb_checksum_algorithm = 0back_log = 80flush_time = 0join_buffer_size = 256Kmax_allowed_packet = 1Gmax_connect_errors = 100open_files_limit = 4161sort_buffer_size = 256Ktable_definition_cache = 1400binlog_row_event_max_size = 8Ksync_master_info = 10000sync_relay_log = 10000sync_relay_log_info = 10000#!includedir /etc/mysql/conf.d/[mysqldump]max_allowed_packet = 1GStop MySQL Service[root@localhost ~]# service mysqld stopInitialize the MySQL Database server.[root@localhost ~]# mysqld --initialize-insecure --console --user=mysql 2020-03-05T10:20:08.891111Z 0 [Warning] [MY-011070] [Server] 'Disabling symbolic links using --skip-symbolic-links (or equivalent) is the default. Consider not using this option as it' is deprecated and will be removed in a future release.2020-03-05T10:20:08.891266Z 0 [System] [MY-013169] [Server] /usr/sbin/mysqld (mysqld8.0.19) initializing of server in progress as process 32938100 200 300 400 500 600 700 800 900 1000 1100 1200 1300 1400 1500 1600 1700 1800 1900 2000 2100 2200 2300 2400 2500 2600 2700 2800 2900 3000 3100 3200 3300 3400 3500 3600 3700 3800 3900 4000 4100 4200 4300 4400 4500 4600 4700 4800 4900 5000 5100100 200 300 400 500 600 700 800 900 1000 1100 1200 1300 1400 1500 1600 1700 1800 1900 2000 2100 2200 2300 2400 2500 2600 2700 2800 2900 3000 3100 3200 3300 3400 3500 3600 3700 3800 3900 4000 4100 4200 4300 4400 4500 4600 4700 4800 4900 5000 51002020-03-05T10:21:25.170585Z 5 [Warning] [MY-010453] [Server] root@localhost is createdwith an empty password ! Please consider switching off the --initialize-insecure option. Start the MySQL Service[root@localhost ~]# service mysqld startValidate the service, make sure it is running[root@localhost ~]# service mysqld statusSecure the installation of MySQL server.[root@localhost ~]# mysql_secure_installationThis wizard will ask many questions, answer them carefully.Would you like to setup VALIDATE PASSWORD component?Press y|Y for Yes, any other key for No: nPlease set the password for root here.New password: <- Enter a password for root user of mysqlRe-enter new password: <- ReEnter a password for root user of mysqlEstimated strength of the password: 100Do you wish to continue with the password provided?(Press y|Y for Yes, any other key for No) : y......Remove anonymous users? (Press y|Y for Yes, any other key for No) : y......Disallow root login remotely? (Press y|Y for Yes, any other key for No) : y......Remove test database and access to it? (Press y|Y for Yes, any other key for No) : y....Reload privilege tables now? (Press y|Y for Yes, any other key for No) : ySuccess.All done!Now let's create a Database and a User which will be used by SSC.[root@localhost ~]# mysql -u root -pEnter password:<- Enter the root’s password of mysqlmysql> create database SSC_DB DEFAULT CHARACTER SET latin1 COLLATElatin1_general_cs;mysql> CREATE USER 'sscuser'@'localhost' IDENTIFIED WITH mysql_native_password BY 'SscUser@123';You may use any complex password for sscuser of MySQL server, but make a note of it.mysql> GRANT ALL PRIVILEGES ON *.* TO 'sscuser'@'localhost' WITH GRANT OPTION; Query OK, 0 rows affected (0.02 sec)mysql> FLUSH PRIVILEGES;mysql> quitByeNow Create the DB structure.Extract the Fortify_SSC_Server_20.2.0.zip file, then extract Fortify_20.2.0_Server_WAR_Tomcat.zip file.The \Fortify_SSC_Server_20.2.0\Fortify_20.2.0_Server_WAR_Tomcat\sql\mysqlIt contains two files.Upload “create-tables.sql” file into /root/Downloads folder of CentOS server.[root@localhost Downloads]# mysql --user="sscuser" -p --database="ssc_db" --host="localhost" < "create-tables.sql"Enter password: <- Type the password of sscuser and then hit enterValidate the DB Structure is created.[root@localhost Downloads]# mysql -u sscuser -pEnter password: <- Type the password of sscuser and then hit enterWelcome to the MySQL monitor. Commands end with ; or \g.Your MySQL connection id is 23Server version: 8.0.19 MySQL Community Server - GPLCopyright (c) 2000, 2020, Oracle and/or its affiliates. All rights reserved.Oracle is a registered trademark of Oracle Corporation and/or itsaffiliates. Other names may be trademarks of their respectiveowners.Type 'help;' or '\h' for help. Type '\c' to clear the current input statement.mysql> use ssc_db;Reading table information for completion of table and column namesYou can turn off this feature to get a quicker startup with -ADatabase changedmysql> show tables;+------------------------------+| Tables_in_ssc_db |+------------------------------+| activity || activity_persona || activitycomment || activityinstance |mysql> quit;Deploying JDBC Driver on Tomcat ServerThere is no need to deploy the JDBC Driver of MySQL on the Tomcat server because SSC 20.2.0 has the JDBC Driver of MySQL and MSSQL inbuilt into the WAR file.Deploying SSC on Tomcat ServerStop Tomcat server.[root@localhost Downloads]# service tomcat stopUpload ssc.war file from Fortify_20.2.0_Server_WAR_Tomcat.zip file to /usr/share/tomcat/webapps.Start tomcat.[root@localhost Downloads]# service tomcat startWait for few mins, tomcat will take few mins to deploy ssc war file.Open Chrome browser and open the URL http://ip_of_server:8080/sscClick on ADMINISTRATORS./root/.fortify/ssc/init.token and paste it in the token field.Click Sign In.Click Next.Click Next.In the URL: http://ip_of_server:8080/sscEnable HTTP host header validation: DisabledGlobal Search: /globalsearchI have read and understood this warning: EnabledClick Next.Database Type: MYSQLDatabase username: sscuserDatabase Password: ss cuser’s passwordJDBC URL:jdbc:mysql://127.0.0.1:3306/ssc_db?connectionCollation=latin1_general_cs&rewriteB atchedStatements=trueClick Test Connection.If Test connection is successful, then click Next.Browse and Select the Process Seed Bundle.Click on Seed Database.Now, Browse and Select Report Seed Bundle and click on Seed Database.This time, Browse and Select PCI Basic Seed Bundle and click on Seed Database.Now the last one, Browse and select PCI SSF Basic Bundle then click on Seed Database.Click Next.Click Finish.Close and Start Browser, then open SSC url.Login as “admin” and password “admin”.In the Change Password window, change the admin’s password. Click Save.Login with new admin credentials.Click on ADMINISTRTION.Click on Rulepacks, then click on “Update from Server”.Click OK.Click Close.Now SSC is ready to use.< !! End of the Document !! >。
Stratus ftServer 容错服务器软件安装和配置手册

Stratus ftServer 容错服务器软件安装和配置手册制定本手册目的指引用户如何安装和配置容错W系列服务器的系统软件对象本手册是专供安装配置ftServer W系列容错服务器的系统软件管理员使用。
修订信息本手册是修订版。
它不再支持W3300,W5600和W6600。
另外,本次修订还包括:·W4300和W4400的步骤细节,W系列新的型号。
·使用ProSet9.0版本代替原来的ProSet4.0版本。
·如果你从Stratus购买了Windows 2003 Server操作系统,还将获得恢复光盘。
执行IPL和Post-IPL过程1、假如操作系统出厂的时候就已经安装好,机器设备的后面就会贴有微软认证的标签。
这种情况下,我们仅仅执行Post-IPL过程2、假如操作系统出厂的时候没有安装,那么,我们就要执行IPL过程3、重装W系列的操作系统(比如说,系统硬盘出现问题,并在远处维修),我们要重新执行IPL过程。
IPL过程安装以下内容:1、Windows Server 2003对于W2400,2500,系统支持Windows Server 2003标准版和企业版。
对于W4300和W4400,系统支持Windows Server 2003企业版。
2、ftServer W系列系统软件,包括硬件驱动,ftServer管理,ftServer管理控制台(ftSMC)和ftServer软件可用性管理(SAM)。
3、为VTM控制台提供Java2运行环境(JRE)。
4、Adobe Acrobat Reader软件。
5、为W系列定制的操作系统文件。
有关IPL的建议:1、假如操作系统已经安装,但没有正确运行,你无法判断是Windows操作系统的原因,还是ftServer系统软件的原因的话,重装IPL。
2、为实现容错,安装完后做DRD实现镜像功能。
这个操作既不属于IPL操作,也不属于Post-IPL操作。
Oracle Forms 12c客户端部署配置选项说明书
Oracle Forms 12cClient Deployment Configuration Options O R A C L E W H I T E P A P E R|M A Y2016Table of ContentsIntroduction 2 Oracle Forms 12c Client Deployment Configuration Options 3 Java Applet Embedded in HTML 3 JNLP Embedded in HTML 4 Java Web Start 4 Forms Standalone Launcher 5 Conclusion 8IntroductionIn the early 1990’s, the Internet (World Wide Web) began to evolve from a system designed and used by government organizations to one used globally by the public. This transition began a wave of related technologies being born. The Internet allowed people to have immediate access to information once thought to be out of reach. Web technology, specifically Web browsers, gave developers an opportunity to deliver their applications to end-users without the need to install software on the end-user’s machine.Until the 1990’s, Oracle Forms was delivered as a t wo-tier technology. With its client and server concept, Oracle Forms required that the technology’s runtime software be installed and configured on the end-user’s machine. This meant that each end-user machine would require an administrator to install runtime software one machine at a time. Often this was a difficult task given that an organization could have thousands of end-users, who could be located anywhere in the world. As we moved toward and into the twenty first century, Oracle realized that Oracle Forms customers would begin expecting to have access to their applications in the same way as so many other applications, through a web browser. Oracle Forms 6i was the first version to fully support application deployment via a web browser. Because of the need for tight integration on the client tier, it was necessary to use Java Applet technology to host the applications. So, although applications were launched from a browser, it was actually the Java Runtime Environment (JRE) on the client that ran or hosted the applications. After more than fifteen years of web browsers supporting integration with the Java Plug-in, many browser vendors are moving to a plugin-free model. As a result, Oracle Forms needs new ways of being deployed if it is to continue using Java technology on the client tier.Beginning with Oracle Forms 12c, product users can now choose from several client configuration options. With several options available, administrators can choose which option best suits their needs. This document aims to describe each of the configuration options and how to use them. It will also explain the advantages and limitations of each.Oracle Forms 12c Client Deployment Configuration OptionsBeginning with Oracle Forms 12c, there are now four supported client deployment configuration options. The available options are as follows.»Java Applet embedded in HTML»JNLP embedded in HTML»Java Web Start (JWS)»Forms Standalone Launcher (aka Standalone or FSAL)Although each option will have minimal to no impact on the appearance and behavior of any application, each will be contained slightly differently. Enabling and configuring any of these can be accomplished in the Forms Web Configuration page (i.e. formsweb.cfg) in Fusion Middleware Control.Any examples provided in this paper assume that you have properly configured Secure Socket Layer (SSL) in the server environment, as this is the most secure way to run any web deployed application. All options can also be used with non-SSL, but this is not recommended. Refer to the Oracle HTTP Server and WebLogic Server Administration Guides for details on properly configuring SSL in your environment.Java Applet Embedded in HTMLThis option was the first offered when browsers began supporting the Java Plug-in. Its configuration is the default for any Oracle Forms installation, 12.2.1 and older. This option can be used to give the appearance that the Forms application (applet) is embedded in a web page. This is often desirable when the HTML content surrounding the Forms application contains related or integrated information. This can also be helpful when using the Forms JavaScript integration feature. Single sign-on and single sign-off are also fully supported in this configuration.Disadvantages of using this option include the requirement of a Java Plug-in and the need for a certified browser that supports the Java Plug-in. The loss of usable space taken up by the browser’s window, toolbar, and menu will also need to be tolerated.Using the Applet embedded in HTML option is simple because this is the default configuration. Simply enter a URL in the browser that appears something like one of the following.»https:///forms/frmservlet»https:///forms/frmservlet?config=defaultThese parameters/values are required for this configuration and are found in the Forms Web Configuration page of Fusion Middleware Control.Non-WebUtil Enabled Forms WebUtil Enabled FormsJNLP Embedded in HTMLEmbedded JNLP is very similar to embedded Applet, however the application is treated more like a Java Web Start application although embedded within a web page. Like an embedded Applet, embedded JNLP fully supports JavaScript integration, single sign-on, single sign-off, and the ability to visually embed the form in a web page. Embedded JNLP has the added advantage of base-64 encoding the JNLP content. This content includes most of the parameter/value pairs configured for the application. Because the base-64 encoded text is not human readable, curious end-users will be discouraged from attempting to alter any of the parameters. It should be understood that the base-64 encoding is not a security mechanism. The base-64 encoding used in this configuration is required by Java and helps to improve the performance of delivery from server to client. This configuration requires the Java Plug-in and a certified browser that supports the Java Plug-in.To use this configuration you can either use the provided example configuration named “jnlp” or create your own.»https:///forms/frmservlet?config=jnlpThese parameters/values are required for this configuration and are found in the Forms Web Configuration page of Fusion Middleware Control.Non-WebUtil Enabled Forms WebUtil Enabled FormsWhen using Java Web Start or Embedded JNLP, if the application uses custom jar files (e.g. jacob.jar, icons.jar, example.jar, etc), these should be added to extensions.jnlp. The file is located in Oracle_Home\forms\java. Open this file in a text editor and make the appropriate entries. An example is included in the file. Each entry should be added on its own line.Java Web StartJava Web Start is considered a semi-browserless configuration. The use of Java Web Start will give an Oracle Forms application the appearance of being a natively installed application rather than a web app because when running, the application is not contained by the boundaries of the browser. This is often desirable with Point of Sale applications where the only application used on the device is the POS application or in cases where the application is designed to use the full screen. Different from the functionality provided by the use of separateFrame=true (available in the previous two configurations only), the use of Web Start allow you to close the browser window used to call the application once it has started.Oracle Forms’ use of Java Web Start allows applications to be called from a browser using a hyperlink or by directly entering a URL. Alternatively, the application can be run from a JNLP file stored on the end-user machine. This method eliminates the need for a browser, except when the application is single sign-on protected. Java Web Start can also be used to call an Oracle Forms application from the command line. Although there are several variations of how Java Web Start can be used, if the application requires the use of single sign-on, it must be called from a browser. Attempts to call an SSO protected application from a static JNLP file or the command line will fail.Because this is a mostly browser-less configuration, features like single sign-off and JavaScript integration are not supported when using the Java Web Start configuration.This configuration requires the Java Plug-in be installed if calling from a browser. If not calling from a browser, either the Java Plug-in or Java Development Kit (JDK) installation is required. A browser is optional and would only be required if single sign-on is used.To use this configuration you can either use the provided example configuration named “webstart” or create your own. The application can be called from a browser or you can use the command line or custom script.»jnlps:///forms/frmservlet?config=webstart»https:///forms/frmservlet?config=webstart»javaws “https:///forms/frmservlet?config=webstart”The “jnlp” and “jnlps” protocols (used in above example) are supported with Java 8u92+ on Microsoft Windows.The following are required parameters/values for this configuration and are found in the Forms Web Configuration page of Fusion Middleware Control.Non-WebUtil Enabled Forms WebUtil Enabled FormsWhen using Java Web Start or Embedded JNLP, if the application uses custom jar files (e.g. jacob.jar, icons.jar, example.jar, etc), these should be added to extensions.jnlp. The file is located in Oracle_Home\forms\java. Open this file in a text editor and make the appropriate entries. An example is included in the file. Each entry should be added on its own line.Forms Standalone LauncherThe Forms Standalone Launcher is a fully browser-less configuration. Further, it does not require that the Java Plug-in be installed. It does require Java on the client, but it can be any one of the following; JRE, JDK, or Server JRE.With this configuration, applications are launched from the command line or custom script files by calling the platform specific “java” executable. This con figuration fully isolates the application from the Java Plug-in or Java Web Start and the browser. Using the Forms Standalone Launcher can provide the appearance of a fully native application. Single sign-on, single sign-off, and JavaScript integration are not supported with this configuration.This configuration requires that a small jar file (frmsal.jar) be stored on the end-user machine. The file can be transferred to the end-user machine using any desirable method (e.g. web download, email, ftp, etc). This file is the Forms Standalone Launcher. It is version specific, so it cannot be used with other Forms versions or patch levels.The file is staged on the server in the Oracle_Home\forms\java directory. However, a helpful usage guide that includes a download link can be easily accessed when the server is running. Administrators can easily disable, remove, or edit this page if desired. Navigate to the following to display the page.»https:///forms/html/fsal.htmTo use this configuration you can either use the provided example configuration named “standaloneapp” or create your own. The application can be called from the command line or custom script. You cannot use a browser with this configuration. The command line entry would look something like the following.»java –jar frmsal.jar –url “https:///forms/frmservlet?config=standaloneapp”»java –jar frmsal.jar –url “https:///forms/frmservlet?config=standaloneapp” –t 30000Refer to the Usage Guide mentioned above for more details on command line syntax.The following are key parameters/values used by this configuration and are found in the Forms Web Configuration page of Fusion Middleware Control.Non-WebUtil Enabled Forms WebUtil Enabled FormsIn this release, the Forms Standalone Launcher does not have the ability to determine which Java version is being used. It will be up to the Administrator and/or user to ensure that an appropriate Java version is used. Refer to Figure 1 below for a simple Microsoft Windows script (batch) example.Figure 1 - Microsoft Windows script example.ConclusionOracle Forms 12c offers a variety of possible client configurations options. Choosing which is best will depend on the application’s needs and desired appearance at runtime. Because users can choose which option suits them best, no longer will they be constrained to a single possibility. If choosing the Java Web Start or Forms Standalone Launcher options, administrators no longer have to be concerned about compatibility between browser and Java versions. This should make application deployment and manageability easier.Oracle Corporation, World Headquarters Worldwide Inquiries 500 Oracle ParkwayPhone: +1.650.506.7000 Redwood Shores, CA 94065, USAFax: +1.650.506.7200Copyright © 2016, Oracle and/or its affiliates. All rights reserved. This document is provided for information purposes only, and the contents hereof are subject to change without notice. This document is not warranted to be error-free, nor subject to any other warranties or conditions, whether expressed orally or implied in law, including implied warranties and conditions of merchantability or fitness for a particular purpose. We specifically disclaim any liability with respect to this document, and no contractual obligations are formed either directly or indirectly by this document. This document may not be reproduced or transmitted in any form or by any means, electronic or mechanical, for any purpose, without our prior written permission.Oracle and Java are registered trademarks of Oracle and/or its affiliates. Other names may be trademarks of their respective owners.Intel and Intel Xeon are trademarks or registered trademarks of Intel Corporation. All SPARC trademarks are used under license and are trademarks or registered trademarks of SPARC International, Inc. AMD, Opteron, the AMD logo, and the AMD Opteron logo are trademarks or registered trademarks of Advanced Micro Devices. UNIX is a registered trademark of The Open Group. 0116Oracle Forms 12c Client Deployment Configuration Options May 2016Author: Michael FerranteContributing Authors: Oracle Forms DevelopmentC O N N E C T W I T H U S/oracle/oracle/oracle。
系统安装部署指南项目实施手册
系统安装部署指南一、软硬件配置参数要求1、服务器端配置参数为了使软件正常顺利的安装和运行,推荐以下配置1)服务器硬件推荐配置CPU:双核2.4GHz以上配置;内存:2G以上;硬盘:160G以上;网卡:100M或1000M以太网;2)软件推荐配置操作系统:Windows 2003 Server 企业版,打Sp2补丁;组件:安装组件IIS服务;杀毒软件:360、瑞星等均可;3)相关端口保证网络畅通,开放1433端口和80端口;2、客户端(网上阅卷端)配置参数1) 阅卷PC机最低配置要求CPU: 奔腾Ⅲ800 以上配置;硬盘:20G 以上;内存:256M 以上;网卡:100M或1000M 以太网;2) 浏览器:IE8或以上版本;3) 保证在一个局域网内,能够正常连接到服务器。
二、系统安装前的准备工作1) 检查服务器硬件是否符合要求,检查服务器的操作系统是否为WindowsServer 2003 Enterprise Edition 并打上sp2 补丁,检查是否已安装杀毒软件,测试相应端口是否已打开、网络是否畅通。
2) 检查是否安装了IIS(若没有安装需首先安装IIS)。
3) 设置服务器操作系统登录密码。
4) 新建共享文件夹PIC ,在属性---共享----权限中对该文件夹添加administrator或当前登录账户并赋予该用户完全控制、更改、读取的权限。
5) 设置服务器IP 地址。
三、系统安装1、安装.net framework 4.01) 安装软件(按系统默认设置即可)。
2) 运用 IIS注册工具进行注册。
运行windows → → Framework → V4.0.*** → aspnet_regiis.exe –i运行windows → →Framework →V4.0.*** →aspnet_regiis.exe –ir–enable2、安装Oracle11g XE系统会自动创建默认数据库XE 。
应用服务器部署手册

应用服务器部署手册应用服务器部署手册1.JDK安装与配置双击文件jdk-6u20-windows-i586.exe点击“接受”选择不安装源代码、公共JRE、JavaDB并选择好安装路径后,点击“下一步”点击“完成”,至此JDK安装完成。
下面配置java环境变量,新建环境变量其中变量名为:JAVA_HOME,变量值为JDK安装路径。
编辑环境变量Path,变量值后面追加“%JAVA_HOME%\bin”JDK配置完成运行cmd输入java –version2.Tomcat安装与配置双击文件apache-tomcat-6.0.26.exe点击“Next”点击“I Agree”根据图示选择好相应组件,点击“Next”设定好安装路径后,点击“Next”配置好监听端口,点击“Next”选择jre路径(之前安装JDK路径下的jre目录)。
点击“Install”点击“Finish”,至此Tomcat安装完成。
配置Tomcat:在任务栏中tomcat图标上点右键,在菜单上选择“Configure…”选择“Java”选卡,配置“Initial memory pool”、“Maximum memory pool”修改tomcat安装目录下的conf\server.xml文件,找到“”节如果tomcat服务起不来,修改一下Initial memory pool参数,变成512(和计算机内存有关,2G内存,最好配置是512)。
3.应用部署及配置3.1.配置系统环境变量新建一个目录如F:\MyEclipseProjects\configfile。
其中变量名为:JAVAAPP_CONFIG_HOME,变量值为各应用配置文件所在目录。
3.2.管理系统部署拷贝netmonitor.properties文件到环境变量指定目录根据生产环境数据库服务器情况修改配置文件中的(其他参数谨慎改动,一般不需要改变)3.3.采集服务部署拷贝netmonitorgather.properties文件到环境变量指定目录3.4.数据装载服务拷贝NetMonitorDataLoad.properties文件到环境变量指定目录完成后在服务管理器中启动“网管系统数据装载服务”如果数据装载服务启动不了,在系统变量里面添加JAVA_HOME 和JAVAAPP_CONFIG_HOME 3.5.存储设备状态获取服务拷贝NetMonitorDataAcquisition.properties文件到环境变量指定目录安装NetMonitorDataAcquisitionSetup.exe完成后在服务管理器中启动“网管系统状态获取服务”在系统变量里面添加JAVA_HOME和JAVAAPP_CONFIG_HOME4.客户机进程监控4.1.Windows系统首先安装.Net FrameWork3.5,然后安装NetMonitorWinClientServiceSetup.msi,在安装目录下找到NetMonitorWinClientService.exe.config黑色部分根据实际情况修改。
ASP.NET中FormView(表单视图)的使用前台绑定

中FormView(表单视图)的使⽤前台绑定 中 FormView(表单视图)的使⽤前台绑定。
<%@ Page Language="C#" AutoEventWireup="true" CodeFile="Fvw.aspx.cs" Inherits="Fvw" %><!DOCTYPE html PUBLIC "-//W3C//DTD XHTML 1.0 Transitional//EN" "/TR/xhtml1/DTD/xhtml1-transitional.dtd"><html xmlns="/1999/xhtml"><head runat="server"><title>⽆标题页</title></head><body><form id="form1" runat="server"><div><h3>FromView</h3><hr /><asp:FormView ID="fvw" runat="server" AllowPaging="True"DataKeyNames="ProductID" DataSourceID="SqlDataSource1"><EditItemTemplate>ProductID:<asp:Label ID="ProductIDLabel1" runat="server"Text='<%# Eval("ProductID") %>' /><br />ProductName:<asp:TextBox ID="ProductNameTextBox" runat="server"Text='<%# Bind("ProductName") %>' /><br />CategoryID:<asp:TextBox ID="CategoryIDTextBox" runat="server"Text='<%# Bind("CategoryID") %>' /><br />UnitPrice:<asp:TextBox ID="UnitPriceTextBox" runat="server"Text='<%# Bind("UnitPrice") %>' /><br /><asp:LinkButton ID="UpdateButton" runat="server" CausesValidation="True"CommandName="Update" Text="更新"/> <asp:LinkButton ID="UpdateCancelButton" runat="server"CausesValidation="False" CommandName="Cancel" Text="取消"/></EditItemTemplate><InsertItemTemplate>ProductName:<asp:TextBox ID="ProductNameTextBox" runat="server"Text='<%# Bind("ProductName") %>' /><br />CategoryID:<asp:TextBox ID="CategoryIDTextBox" runat="server"Text='<%# Bind("CategoryID") %>' /><br />UnitPrice:<asp:TextBox ID="UnitPriceTextBox" runat="server"Text='<%# Bind("UnitPrice") %>' /><br /><asp:LinkButton ID="InsertButton" runat="server" CausesValidation="True"CommandName="Insert" Text="插⼊"/> <asp:LinkButton ID="InsertCancelButton" runat="server"CausesValidation="False" CommandName="Cancel" Text="取消"/></InsertItemTemplate><ItemTemplate>ProductID:<asp:Label ID="ProductIDLabel" runat="server" Text='<%# Eval("ProductID") %>' /><br />ProductName:<asp:Label ID="ProductNameLabel" runat="server"Text='<%# Bind("ProductName") %>' /><br />CategoryID:<asp:Label ID="CategoryIDLabel" runat="server"Text='<%# Bind("CategoryID") %>' /><br />UnitPrice:<asp:Label ID="UnitPriceLabel" runat="server" Text='<%# Bind("UnitPrice") %>' /><br /><asp:LinkButton ID="EditButton" runat="server" CausesValidation="False"CommandName="Edit" Text="编辑"/> <asp:LinkButton ID="DeleteButton" runat="server" CausesValidation="False"CommandName="Delete" Text="删除"/> <asp:LinkButton ID="NewButton" runat="server" CausesValidation="False"CommandName="New" Text="新建"/></ItemTemplate></asp:FormView><asp:SqlDataSource ID="SqlDataSource1" runat="server"ConnectionString="<%$ ConnectionStrings:NorthwindConnectionString %>"DeleteCommand="DELETE FROM [Products] WHERE [ProductID] = @ProductID"InsertCommand="INSERT INTO [Products] ([ProductName], [CategoryID], [UnitPrice]) VALUES (@ProductName, @CategoryID, @UnitPrice)"SelectCommand="SELECT [ProductID], [ProductName], [CategoryID], [UnitPrice] FROM [Products] ORDER BY [ProductID] DESC"UpdateCommand="UPDATE [Products] SET [ProductName] = @ProductName, [CategoryID] = @CategoryID, [UnitPrice] = @UnitPrice WHERE [ProductID] = @ProductID"> <DeleteParameters><asp:Parameter Name="ProductID" Type="Int32"/></DeleteParameters><UpdateParameters><asp:Parameter Name="ProductName" Type="String"/><asp:Parameter Name="CategoryID" Type="Int32"/><asp:Parameter Name="UnitPrice" Type="Decimal"/><asp:Parameter Name="ProductID" Type="Int32"/></UpdateParameters><InsertParameters><asp:Parameter Name="ProductName" Type="String"/><asp:Parameter Name="CategoryID" Type="Int32"/><asp:Parameter Name="UnitPrice" Type="Decimal"/></InsertParameters></asp:SqlDataSource></div></form></body></html>/web.config<connectionStrings><add name="NorthwindConnectionString" connectionString="DataSource=.;Initial Catalog=Northwind;Integrated Security=True"providerName="System.Data.SqlClient"/></connectionStrings>。
WIN2024_R2_域控服务器安装过程
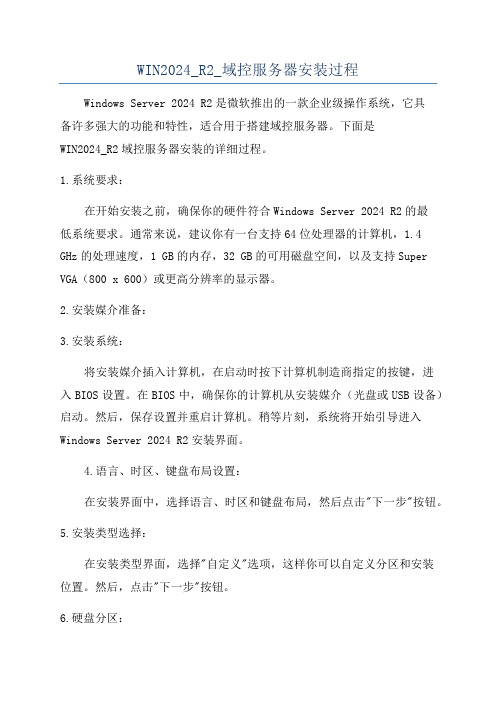
WIN2024_R2_域控服务器安装过程Windows Server 2024 R2是微软推出的一款企业级操作系统,它具备许多强大的功能和特性,适合用于搭建域控服务器。
下面是WIN2024_R2域控服务器安装的详细过程。
1.系统要求:在开始安装之前,确保你的硬件符合Windows Server 2024 R2的最低系统要求。
通常来说,建议你有一台支持64位处理器的计算机,1.4 GHz的处理速度,1 GB的内存,32 GB的可用磁盘空间,以及支持Super VGA(800 x 600)或更高分辨率的显示器。
2.安装媒介准备:3.安装系统:将安装媒介插入计算机,在启动时按下计算机制造商指定的按键,进入BIOS设置。
在BIOS中,确保你的计算机从安装媒介(光盘或USB设备)启动。
然后,保存设置并重启计算机。
稍等片刻,系统将开始引导进入Windows Server 2024 R2安装界面。
4.语言、时区、键盘布局设置:在安装界面中,选择语言、时区和键盘布局,然后点击"下一步"按钮。
5.安装类型选择:在安装类型界面,选择"自定义"选项,这样你可以自定义分区和安装位置。
然后,点击"下一步"按钮。
6.硬盘分区:在硬盘分区界面,选择要安装Windows Server 2024 R2的硬盘分区。
如果硬盘是全新的,可以点击"新建"按钮来创建新的分区。
选择分区后,点击"下一步"按钮。
7.安装系统:系统将开始安装Windows Server 2024 R2、这个过程可能需要一些时间,请耐心等待。
系统会自动进行各种配置和设置。
8.输入产品密钥:在安装过程中,系统会要求你输入产品密钥。
如果你有合法的产品密钥,可以在这里输入。
否则,可以选择跳过此步骤,系统将在之后的30天内保持激活状态。
9.选择安装操作系统的版本:在这一步中,选择要安装的操作系统版本。
使用Python编写一个简单的Web应用程序并部署到云服务器
第一部分:搭建开发环境在开始编写Python Web应用程序之前,您需要搭建一个合适的开发环境。
以下是搭建开发环境的步骤:安装Python解释器:从官方网站下载Python解释器,并按照安装向导完成安装。
安装虚拟环境:为了避免全局安装Python库可能带来的冲突,您可以安装虚拟环境。
使用以下命令创建并激活一个虚拟环境:bashpython -m venv myenvsource myenv/bin/activate安装代码编辑器:选择一个合适的代码编辑器,如Visual Studio Code或PyCharm,用于编写Python代码。
第二部分:安装必要的Python库在编写Web应用程序之前,您需要安装一些必要的Python库。
以下是安装Python库的步骤:Flask:Flask是一种流行的Python Web框架,您可以使用以下命令安装Flask:pip install flaskWTForms:WTForms是一个Python表单库,用于处理Web表单,您可以使用以下命令安装WTForms:pip install wtforms第三部分:编写Web应用程序在完成环境设置和Python库安装之后,您可以开始编写Python Web应用程序。
以下是编写Web应用程序的步骤:导入必要的库:在Python代码中导入必要的库,如Flask和WTForms。
javascriptfrom flask import Flask, render_templatefrom wtforms import StringField, SubmitFieldfrom wtforms.validators import DataRequired创建Flask应用程序:使用以下代码创建一个Flask应用程序:scssapp = Flask(__name__)app.config['SECRET_KEY'] = 'secret_key'创建Web表单:使用WTForms创建一个Web表单,如下所示:scssclass NameForm(FlaskForm):name = StringField('Name', validators=[DataRequired()])submit = SubmitField('Submit')创建路由:在Flask应用程序中创建一个路由,用于处理Web请求。
远程桌面部署的体系结构设计元素与规划指导原则1
远程桌面部署的体系结构设计元素与规划指导原则典型的View体系结构设计采用容器策略,容器包含相应的组件,而组件则可通过使用vSphere 5.1或更高版本基础架构最多支持10000个远程桌面。
由于硬件配置、所用的View和vSphere软件版本以及其他特定于环境的设计因素的不同,容器的定义可能存在差异。
本文档中的示例说明了可扩展设计足以适应各种企业环境及特定要求。
本章详细介绍了有关内存、CPU、存储容量、网络组件和硬件需求的重要细节,为IT架构师和规划人员提供了实用的View解决方案部署指导。
重要本章不涵盖以下主题:托管应用程序的体系结构设计View容器最多可支持200个由Microsoft RDS主机组成的场,每个场最多可包含200 RDS主机。
RDS主机支持的操作系统包括Windows Server 2008 R2、Windows Server 2012和Windows Server 2012 R2。
有关更多信息,请参阅《在View中设置桌面和应用程序池》。
如果您计划使用RDS主机的虚拟机,另请参阅RDS主机虚拟机配置。
View Agent Direct Connect插件的体系结构设计通过在远程虚拟机桌面上运行此插件,客户端可以直接连接到虚拟机。
所有远程桌面功能(包括PCoIP、HTML Access、RDP、USB重定向和会话管理)都以相同方式工作,就像用户已通过View连接服务器进行连接一样。
有关更多信息,请参阅《ViewAgent Direct-Connection插件管理指南》。
相关主题远程桌面的虚拟机要求View ESXi节点特定类型员工的桌面池桌面虚拟机配置RDS主机虚拟机配置vCenter Server和View Composer虚拟机配置View连接服务器最大连接数和虚拟机配置vSphere群集存储和带宽要求View构建基块View容器在一个容器中使用多个vCenter Server的优势1 / 29远程桌面的虚拟机要求2 / 29 在规划远程桌面规格时,您所选择的 RAM 、CPU 和磁盘空间配置将对您的服务器、存储硬件和开销情况产生重要 影响。
HP ProLiant DL380p Gen8 Server 数据中心标准说明书
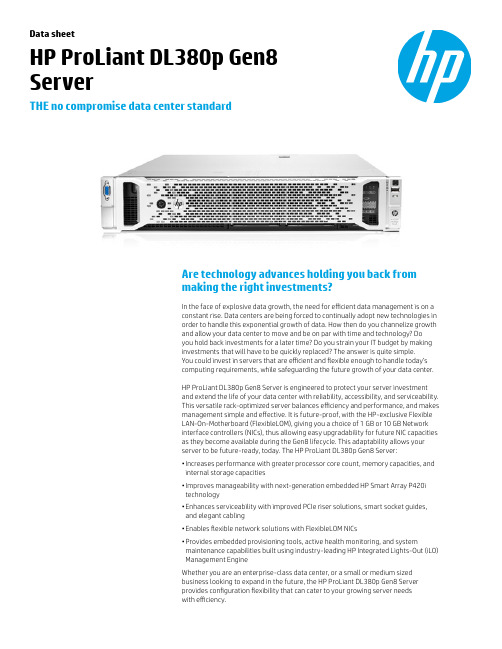
Data sheetHP ProLiant DL380p Gen8ServerTHE no compromise data center standardAre technology advances holding you back frommaking the right investments?In the face of explosive data growth, the need for efficient data management is on aconstant rise. Data centers are being forced to continually adopt new technologies inorder to handle this exponential growth of data. How then do you channelize growthand allow your data center to move and be on par with time and technology? Doyou hold back investments for a later time? Do you strain your IT budget by makinginvestments that will have to be quickly replaced? The answer is quite simple.You could invest in servers that are efficient and flexible enough to handle today’scomputing requirements, while safeguarding the future growth of your data center.HP ProLiant DL380p Gen8 Server is engineered to protect your server investmentand extend the life of your data center with reliability, accessibility, and serviceability.This versatile rack-optimized server balances efficiency and performance, and makesmanagement simple and effective. It is future-proof, with the HP-exclusive FlexibleLAN-On-Motherboard (FlexibleLOM), giving you a choice of 1 GB or 10 GB Networkinterface controllers (NICs), thus allowing easy upgradability for future NIC capacitiesas they become available during the Gen8 lifecycle. This adaptability allows yourserver to be future-ready, today. The HP ProLiant DL380p Gen8 Server:• Increases performance with greater processor core count, memory capacities, andinternal storage capacities• Improves manageability with next-generation embedded HP Smart Array P420itechnology• Enhances serviceability with improved PCIe riser solutions, smart socket guides,and elegant cabling• Enables flexible network solutions with FlexibleLOM NICs• Provides embedded provisioning tools, active health monitoring, and systemmaintenance capabilities built using industry-leading HP Integrated Lights-Out (iLO)Management EngineWhether you are an enterprise-class data center, or a small or medium sizedbusiness looking to expand in the future, the HP ProLiant DL380p Gen8 Serverprovides configuration flexibility that can cater to your growing server needswith efficiency.21 “Intel® NDA Benchmark,” Intel, July 2011.2 A dditional internal storage capacities over G7(total LFF Storage Capacity = 36 TB SAS, 36 TBSATA, 4.8 TB SSD) (Supporting SSD/SAS/SATA inSFF/LFF)3 M ore I/O bandwidth to the processor resulting inlower latency as compared with G7 version(Gen8 = 40 lanes/processor, G7 = 24 lanes/processor)4 H P Gen8 Smart Arrays bring significantenhancement, starting with a 2x increase inperformance (final results awaited)5 “HP internal lab testing,” HP, 20116 A s compared to G7 version that has up to 384G12 DIMM x 32G 4R, whilst Gen8 has 786G24 DIMM x 32G 2R.Key features and benefitsIntel® Xeon® E5-2600 series with dual QuickPathInterconnect (QPI)Up to 80 percent more performance 14 Channels per DIMM and 24 memory DIMM slots2x the memory capacity over G7 with 768 GB max memory Up to 25 small form factor (SFF) or 12 large formfactor (LFF) hard drivesUp to two times the internal storage capacity 2Flexible Network options (FlexibleLOM)Flexibility of choice with 4x1G or 2x10G Ethernet; or 2x10G FlexFabric Up to 6 PCIe Gen3 slots200 percent more I/O capacities with PCIe-Gen33HP SmartStorage SolutionUp to 200 percent more performance with HP SmartDrives, HP Smart Array 4iLO Management Engine4th generation iLO manageability Active Health Always-on diagnostics, 5x faster root cause diagnostics 5Helps increase performance, durability, and storage capacity• Offers higher performance, better power efficiency, and more adaptability with the built-inIntel Xeon E5-2600 processor family, including Intel QuickPath, Integrated Memory Controller,Turbo Boost, Intelligent Power Technologies, and Trusted Execution Technology.• Creates greater memory bandwidth, DIMM count, and new memory health programs with lessdowntime with HP SmartMemory; new memory slots allow up to 768 GB of maximum memoryand 128 GB at maximum speeds of 1,600 MHz.• Provides complete data protection with embedded HP Smart Array P420i RAID controller,transportable Flash Back Write Cache (FBWC), and RAID 6 options.• Renders quicker access to data and increases storage bandwidth forcutting-edge storage performance with up to 25 serial-attached SCSI (SAS) drives and newembedded Smart Array RAID controllers.• Communicates with HP Intelligent power distribution unit (PDU) with high-efficiencyHP Platinum Plus common-slot power supplies (460 W, 750 W, or 1200 W) to enableredundant supplies to be plugged into redundant power PDUs.• Qualifies ENERGY STAR® ProLiant DL380p Gen8 Server configurations.• Enables ambidextrous cable management arm option with cabling flexibility and management for quick access to the server.• Installs quickly with new universal tool-free sliding rails. Quick release levers allow fast server access.Enables improved application, storage, and I/O performance • Supports RDIMM, UDIMM, and LRDIMM with up to 768 GB capacity and 128 GB capacity at 1,600 MHz. HP SmartMemory delivers up to 2x more memory capacity over previous generations.6• Reduces data loss with long-term data retention with FBWC standard. New embedded HP Smart Array P420i RAID controller and support for HP SmartStorage, including PCIe 3.0, HP SmartDrives, and HP FBWC with capacity up to 2 GB. Choice of up to 25 2.5-inch SFF or 12 3.5-inch LFF SAS, Serial ATA (SATA), and Solid State (SS) drives with optical media.• Converges the ability to customize server networking today and meet future needs withFlexibleLOM. Currently, provides choice of bandwidth between 1G and 10G, with the ability toupgrade to 20G and 40G when the technology becomes available. Fabric (Ethernet, FCoE, orInfiniBand) supports Wake-On-LAN (WOL) and offers a shared iLO port for ease of use.HP ProLiant DL380p Gen8 Server unique optionsPart description SKUHP 380/385 Gen8 8-SFF Cage/Backplane Kit (Additional 8 SFF Hard Drive Cage, allowing for up to 16 SFF Drive Bays)662883-B21 HP DL380/385GN 3 slot PCIe Riser Kit (Additional PCIe Gen3 Riser Card [quantity 1x16, 1x8, 1x4] for up to 6 total PCIe slots)653206-B21 HP DL380GN 2 slot x16 Riser Kit (Additional PCIe Gen3 Riser Card [quantity 2x16] for up to 5 total PCIe slots)653208-B21 x16 PCIe slot Aux Power Cable for graphics support up to 150 W669777-B21 HP DL380p Gen8 Double Wide Graphics Riser Cage Kit (to support nVidia Q6000 graphics card)662885-B21 HP DL380p NEBS Conversion Cage Kit (to meet NEBS/ETSI certified environments)707865-B21Technical specificationsProcessor Intel Xeon E5-2600 Series (up to 8 cores, up to 3.3 GHz)Chipset Intel C6XXMemory(24) DDR3, RDIMM, up to 1,600 MHz, ECC, Online SpareMax memory768 GB (24 DIMMs x 32G 2R)Internal storage SATA, SAS, SSD(8 or 25) 2.5" hot plug bays/(8 or 12) 3.5" hot plug baysSmart Array P420i controllerOptional: +8 SFF for 8 SFF ModelMax internal storage25 TB SAS (SFF); 36 TB SATA (LFF)Networking(1) FlexibleLOMChoice of: 4x1G, 2x10G Ethernet, or 2x10G FlexFabricI/O slots(6) PCIe 3.0:Riser 1(1) x16 FL/FH; (1) x8 HL/FH; (1) x4 (PCIe 2.0) HL/FH;Riser 2(1) x16 FL/FH; (1) x8 HL/FH; (1) x8 HL/FH; or (1) x16 FL/FH; (1) x16 HL/FHPorts Front: (2) USB; Rear: (4) USB, video (1600 x 1200), network; Internal: (1) USB, (1) SD CardPower supplies460, 750, 1200 W (92 or 94%)Integrated management HP iLO Management EngineAdditional features Support for two nVidia Q4000 or one nVidia Q6000 GPUForm factor2P/2U RackQuickSpecs URL /products/quickspecs/14212_div/14212_div.html3Sign up for updates /go/getupdated © Copyright 2012 Hewlett-Packard Development Company, L.P . The information contained herein is subject to change without notice. The only warranties for HPproducts and services are set forth in the express warranty statements accompanying such products and services. Nothing herein should be construed as constituting an additional warranty. HP shall not be liable for technical or editorial errors or omissions contained herein.ENERGY STAR is a registered mark owned by the U.S. government. Intel and Intel Xeon are trademarks of Intel Corporation in the U.S. and other countries. 4AA3-9615ENW, December 2012, Rev. 1Removes tedious, time-consuming tasks with intuitive, configurable management system • Takes strengths from products like HP SmartStart, HP Smart Update Manager, and HP ProLiant Support Packs on Intelligent Provisioning and enhances them with the latest ease-of-use features as well as places them, where they can be used instantly on the system board.• Starts working the moment a power cord and an Ethernet cable are connected to the server. Agentless hardware monitoring and alerting capabilities are built into the server with HP Agentless Management (runs on iLO 4 chipset). • Provides 24x7 continuous health monitoring with HP Active Health System that logs 100 percent configuration changes, and helps quicken analysis of problems with HP Service and Support.7Redefines server experience • Automated Energy Optimization improves the server’s ability to analyze and respond to “3D sea of sensors” data within the server, as well as self-identify location and inventory through HP Insight Control for maximum workload optimization across the entire data center.• Precise control of server fans to direct cooling and reduce unnecessary fan power with the first 3D array of temperature sensors that is part of the HP-unique Thermal Discovery. • Dynamic Workload Acceleration delivers smarter data protection for ever-increasing drive capacities, real-time workload-aware analysis to optimize and adapt storage performance and6x faster solid state performance versus previous generation.• User-inspired design features—HP SmartDrive carriers, smart socket guide, “Snap and Go”rails, flat cabling design, and easy tool-less access—anticipate your needs and help eliminatecommon issues that result in downtime of all customer serviceable components.HP ServicesHP Technology Services offers a set of consultancy, deployment, and support solutions designed to meet the lifecycle needs of your IT environments. HP Care Pack Services for industry-standard servers include support for qualified options at no additional cost.HP Foundation Care services delivers scalable support packages for HP industry-standardservers and software. You can choose the type and level of service that is most suitable for yourbusiness needs. New to this portfolio is HP Collaborative Support. This service offers a singlepoint of contact for server problem diagnosis, hardware problem resolution, basic softwareproblem diagnosis, fault isolation, and resolution if available to HP. In case the issue is withHP or supported third-party software product and cannot be resolved by applying known fixes,HP will contact the third-party vendor and create a problem incident on your behalf.If you are running business-critical environments, HP offers HP Proactive Care or HP CriticalAdvantage . These services help you deliver high levels of application availability throughproactive service management.All service options include HP Insight Remote Support for secure remote monitoring, diagnosis,and problem resolution. Also included is the HP Support Center that provides access toinformation, tools, and experts to support HP business products.For more information, visit /go/services .Entry models1 Intel Xeon Processor (80 W)4G DDR3 RDIMM MemoryFlexibleLOM: 4x1G Ethernet3 PCIe slots8 SFF HD Bays1 x 460 W Power Supply (92% Efficient)Fixed Rail KitBase models1 or2 Intel Xeon Processor (95 W)16G DDR3 RDIMM MemoryFlexibleLOM: 4x1G Ethernet3 PCIe slots8 SFF HD Bays1 x 460 W Power Supply (94% Efficient)Rail Kit/CMA standardPerformance models2 Intel Xeon Processor (95 W)32G DDR3 RDIMM MemoryFlexibleLOM: 4x1G Ethernet or 2x10G Ethernet6 PCIe slots8 SFF HD Bays2 x 750 W Power Supply (94% Efficient)Rail Kit/CMA standardHP Insight Control For more informationDiscover server efficiency with technology thatis designed to integrate with the demands of thefuture. Be future-ready today and tomorrow, visit/servers/DL380p-gen87 “HP internal lab testing,” HP, 2011.Rate this document。
锐起信息桌面云管理软件V10.1安装部署手册说明书

目录第一章软件介绍 (5)1.1 软件简介 (5)1.2 硬件需求 (5)1.3 软件需求 (5)第二章部署说明 (6)2.1 准备工作 (6)2.2 部署流程 (6)2.3 服务器配置(网络启动模式) (6)2.4 制作母盘镜像 (7)2.5 添加其他工作站(与上传工作站硬件配置一样) (18)2.6 其他配置工作站启动(与上传工作站硬件配置不同) (20)第三章功能说明 (21)3.1 免加密锁试用 (21)3.1.1 试用版本 (21)3.1.2 试用转正式授权 (21)3.2 桌面系统 (21)3.2.1 桌面系统 (21)3.2.2 磁盘管理 (21)3.2.3 磁盘快照 (22)3.2.4 系统导出 (23)3.2.5 系统导入 (25)3.2.1 同步服务器时间 (26)3.2.2 启用工作站显示器扩展 (26)3.2.3 工作站内存缓存 (27)3.2.4 网卡智能加速 (28)3.2.5 双服务器热备 (28)3.2.6 系统不还原 (29)3.3 工作站 (29)3.3.1 静态工作站 (29)3.3.2 动态工作站 (30)3.3.1 工作站列表项说明 (32)3.3.2 工作站列表导出/导入 (32)3.3.3 远程管理 (32)3.3.4 切换模式 (33)3.4 高级功能 (40)3.4.1 外设管理 (40)3.4.2 计划任务 (40)3.4.3 资产管理 (44)3.4.4 备份任务 (45)3.5 选项设置 (45)3.5.1 智能回写 (45)3.5.2 DHCP服务配置 (46)3.6.1 镜像备份 (46)3.6.2 数据库备份 (47)3.6.3 数据库恢复 (47)第四章个人磁盘 (48)4.1 个人磁盘服务端 (48)4.1.1 管理界面 (48)4.1.2 默认设置 (48)4.1.3 新建用户 (48)4.1.4 编辑用户 (49)4.1.5 删除用户 (50)4.1.6 批量新建用户 (50)4.2 个人磁盘客户端 (51)4.2.1 登录界面 (51)4.2.2 系统托盘 (52)4.2.3 修改用户密码 (52)4.2.4 登录设置 (52)4.2.5 桌面、文档、收藏夹漫游 (53)4.2.6 个人虚拟磁盘部署在其他服务器 (54)第五章硬盘缓存 (55)5.1 服务端配置 (55)5.2 纯网络启动 (57)5.3 按需缓存 (57)5.4 完全缓存 (57)5.5 其他设置 (58)第六章更多功能 (59)6.1 工作站加入域 (59)6.2 个性化目录 (60)6.2.1 服务端配置 (60)6.2.2 客户端配置 (61)第一章软件介绍1.1 软件简介锐起RDV5基于桌面虚拟化技术,将工作站操作系统和用户数据集中存储在服务器上,并充分利用工作站硬件资源,最大限度满足各种复杂应用需求,包括高强度运算、离线应用、多硬件配置环境等。
服务器部署技术手册
服务器部署技术手册一、概述服务器部署是指将服务器系统安装、配置和调整以使其正常运行,并提供各种服务和功能。
本技术手册旨在介绍服务器部署的基本流程、常见问题以及一些实用的技巧和经验。
二、准备工作1. 硬件选购在进行服务器部署之前,需根据预估的负载情况选择适当的硬件配置,包括服务器型号、处理器、内存和存储设备等。
2. 操作系统选择根据需求选择合适的操作系统,常见的选择有Windows Server、Linux、Unix等。
三、服务器部署步骤1. 安装操作系统将所选的操作系统安装到服务器上,按照安装向导进行操作,并设置相关的系统参数。
2. 网络配置配置服务器的网络连接,包括IP地址、子网掩码、默认网关等,确保服务器能够正常连接到局域网或互联网。
3. 安装必要的软件和驱动程序根据需求安装服务器所需的软件和驱动程序,如数据库管理系统、Web服务器、安全工具等。
4. 配置服务器服务根据需求配置服务器提供的各种服务,如文件共享、远程登录、邮件服务等。
5. 安全设置进行必要的安全设置,包括配置防火墙、设置访问控制列表等,以保障服务器的安全性。
6. 性能调优根据服务器的实际负载情况,对系统进行性能调优,包括调整内存分配、优化磁盘读写性能等。
四、常见问题及解决方法1. 硬件故障在服务器部署和运行过程中,可能会遇到硬件故障,如磁盘故障、内存故障等。
此时,需根据相关厂商提供的 troubleshooting guide 进行故障排除和修复。
2. 软件兼容性不同软件之间可能存在兼容性问题,当发现软件之间无法正常协作时,可以查阅官方文档或技术支持论坛,寻找解决方案或联系软件厂商获取支持。
3. 安全漏洞服务器部署后,需要及时对系统进行补丁更新,以修补已知的安全漏洞。
同时,采取一些安全措施,如使用强密码、定期备份数据等,以确保服务器的安全性。
五、部署技巧和经验1. 提前做好规划在服务器部署前,需事先进行详细的规划和设计,包括确定服务器的用途、功能需求,以及估算负载情况,从而选择合适的硬件和软件。
unexpected end of file form server

unexpected end of file form server
摘要:
1.引言
2.文本的意义
3.文本的启示
4.结论
正文:
1.引言
在这个信息时代,我们每天都会接触到大量的文本信息。
然而,当一条信息以“unexpected end of file from server”的形式突然终止时,我们该如何理解与应对呢?
2.文本的意义
“unexpected end of file from server”意味着信息在传输过程中出现了问题,可能是网络故障、服务器问题或者数据传输错误等原因导致的。
这条信息提示我们,在享受信息便利的同时,也要关注信息传输的可靠性。
3.文本的启示
从这个意外的文本中,我们可以得到以下几点启示:
(1)提高信息素养。
我们需要学会辨别信息的真实性、准确性和权威性,避免受到错误或虚假信息的影响。
(2)关注信息安全。
在传输和存储信息时,要确保信息的安全,防止信息泄露、篡改或损毁。
(3)增强应变能力。
面对信息传输过程中的意外情况,我们要学会调整心态,积极应对,避免因为信息传输问题而产生恐慌或焦虑。
4.结论
“unexpected end of file from server”这一文本,既是对我们信息时代的警示,也是对我们信息素养和应变能力的考验。
Cisco UCS C220 M3 Rack Server 数据表说明书
Data SheetCisco UCS C220 M3 Rack ServerProduct OverviewThe Cisco® Unified Computing System™ (Cisco UCS) combines Cisco UCS C-Series Rack Servers and B-Series Blade Servers with networking and storage access into a single converged system that simplifies management and delivers greater cost efficiency and agility with increased visibility and control. The latest expansion of the Cisco UCS portfolio includes the new Cisco® UCS C220 M3 Rack Server (one rack unit [1RU]) and Cisco UCS C240 M3 Rack Server (2RU) and the Cisco UCS B200 M3 Blade Server. These three new servers increase compute density through more cores and cache balanced with more memory capacity, disk drives and with faster I/O. Together these server improvements and complementary Cisco UCS advancements deliver the best combination of features and cost efficiency required to support IT’s diverse server needs.The Cisco UCS C220 M3 Rack Server (Figure 1) is designed for performance and density over a wide range of business workloads, from web serving to distributed databases. Building on the success of the Cisco UCS C200M2 Rack Server, the enterprise-class Cisco UCS C220 M3 server further extends the capabilities of the Cisco UCS portfolio in a 1RU form factor with the addition of the Intel® Xeon® processor E5-2600 and E5-2600 v2 product families, which deliver significant performance and efficiency gains. In addition, the Cisco UCS C220 M3 server offers up to two Intel® Xeon® processor E5-2600 or E5-2600 v2 processors, 16 DIMM slots, eight disk drives, and two 1 Gigabit Ethernet LAN-on-motherboard (LOM) ports, delivering outstanding density and performance in a compact package.The Cisco UCS C220 M3 interfaces with Cisco UCS using another unique Cisco innovation: the Cisco UCS Virtual Interface Card. The Cisco UCS Virtual Interface Card is a virtualization-optimized Fibre Channel over Ethernet (FCoE) PCI Express (PCIe) 2.0 x8 10-Gbps adapter designed for use with Cisco UCS C-Series servers. The VIC is a dual-port 10 Gigabit Ethernet PCIe adapter that can support up to 256 PCIe standards-compliant virtual interfaces, which can be dynamically configured so that both their interface type (network interface card [NIC] or host bus adapter [HBA]) and identity (MAC address and worldwide name [WWN]) are established using just-in-time provisioning. In addition, the Cisco UCS VIC 1225 can support network interface virtualization and Cisco® Data Center Virtual Machine Fabric Extender (VM-FEX) technology.Figure 1. Cisco UCS C220 M3 ServerApplicationsThe Cisco UCS C220 M3 server is a high-density general-purpose 2-socket server optimized to deliver high performance for a large range of workloads, including:●Distributed database clusters●Middleware●High-performance virtual desktops●IT and web infrastructureCisco UCS Servers Change the Economics of the Data CenterIT infrastructure matters now more than ever, as organizations seek to achieve the full potential of infrastructure as a service (IaaS), bare metal, virtualized servers, and cloud computing. Cisco continues to lead in data center innovation with the introduction of new building blocks for Cisco UCS that extend its exceptional simplicity, agility, and efficiency (Figure 2). Cisco leadership with new innovations such as the third-generation Cisco UCS C220 M3 rack server.Figure 2. Cisco UCS ComponentsCisco innovations, such as Cisco UCS Manager, allow administrators to create a software definition for a desired server (using Cisco service profiles and templates) and then instantiate that server and its I/O connectivity by associating a service profile with physical resources. This approach contrasts with the traditional approach of configuring each system resource manually, one at a time, through individual element managers. Unlike the products of other vendors, Cisco service profiles can be moved from rack server to rack or blade server, or between blade or rack servers in different chassis. In other words, Cisco UCS Manager and service profiles are both form-factor agnostic and can bridge blade chassis boundaries.Other Cisco UCS building blocks include enhanced server I/O options and expanded Cisco UCS fabric interconnects that extend scalability and management simplicity for both blade and rack systems acrossbare-metal, virtualized, and cloud-computing environments. Cisco helps ensure that nearly all parts of Cisco UCS offer investment protection and are backward compatible. For example, fabric extenders can be upgraded using the same fabric interconnects and the same Cisco UCS VIC 1225. Fabric interconnect hardware can be upgraded independently of fabric extenders and blade chassis. Cisco continues to innovate in all these areas, helping ensure that both now and in the future, more powerful rack servers with larger, faster memory have adequate I/O bandwidth and compute power. Cisco completes this vision through continuous innovation in VIC, fabric extender, fabric interconnect, blade server, blade chassis, and rack server technologies and form-factor-agnostic Cisco UCS Manager Software.The Cisco UCS C220 M3 is part of a family of rack servers: the Cisco C-Series Rack Servers. Cisco UCS C-Series servers extend unified computing innovations to an industry-standard form factor to help reduce total cost of ownership (TCO) and increase business agility. Designed to operate both in standalone environments and as part of Cisco UCS, the Cisco UCS C-Series servers employ Cisco technology to help customers handle the most challenging workloads. The Cisco UCS C-Series complements a standards-based unified network fabric, Cisco Data Center VM-FEX virtualization support, Cisco UCS Manager Software, Cisco fabric extender and fabric interconnect architectures, and Cisco Extended Memory Technology. Again, Cisco is innovating across all these technologies. With Cisco UCS architectural advantages, software advances, continuous innovation, and unique blade server and chassis designs, Cisco UCS is the first truly unified data center platform. In addition, Cisco UCS can transform IT departments through policy-based automation and deep integration with familiar systems management and orchestration tools.Unique Benefits in a Familiar PackageThe Cisco UCS C220 M3 server extends Cisco’s product portfolio to meet the needs of customers that choose to deploy rack servers. Available from Cisco and its data center partners, the Cisco UCS C220 M3 advances the rack server market with the features outlined in Table 1.Table 1. Features and BenefitsUnified management (when integrated into Cisco UCS) ●Entire solution managed as a single entity with Cisco UCS Manager, improving operational efficiency and flexibility●Service profiles and templates that implement role- and policy-based management, enabling more effective use of skilled server, network, and storage administrators●Automated provisioning and increased business agility, allowing data center managers to provision applications in minutes rather than days by associating a service profile with a new, added or repurposed Cisco UCS C220 M3 server●Capability to move service profiles from rack server to another rack server, or blade to rack server, or rack to blade server in minutes instead of hours or daysIntel Xeon processor E5-2600 and E5-2600 v2 product families ●Automated energy efficiency reduces energy costs by automatically putting the processor and memory in the lowest available power state while still delivering the performance required and flexible virtualization technology that optimizes performance for virtualized environments, including processor support for migration and direct I/O●Up to twice the performance for floating-point operations. Intel Advanced Vector Extensions (Intel AVX) provides new instructions that can significantly improve performance for applications that rely on floating-point or vector computations●Cisco UCS C-Series servers keep pace with Intel Xeon processor innovation by offering the latest processors with an increase in processor frequency and improved security features. With the increased performance provided by the Intel Xeon processor E5-2600 and E5-2600 v2 product families, Cisco UCSC-Series rack servers offer an improved price-to-performance ratio, making Cisco UCS servers among the best values in the industry●Advanced reliability features, including Machine Check Architecture Recovery, to automatically monitor, report, and recover from hardware errors to maintain data integrity and keep mission-critical services online ●Hardened protection for virtual and cloud Environments: Establish trusted pools of virtual resources with Intel® Trusted Execution Technology (Intel® TXT). Intel TXT ensures that physical servers and hypervisors boot only into cryptographically verified “known good states.” It safeguards your business more effectively by protecting your platform from the insertion of malware during or prior to launchHot-swappable SAS, SATA, or SSD drives ●Up to 4 LFF or 8 SFF front-accessible, hot-swappable, internal SAS, SATA, or SSD drives, providing redundancy options and ease of serviceability●Balanced performance and capacity to best meet application needs:◦SATA SSDs◦15,000-RPM SAS drives for highest performance◦10,000 RPM SAS drives for high performance and value◦7200-RPM SATA drives for high capacity and valueRAID 0, 1, 5, 6, 10, 50, and 60 support A choice of RAID controllers provides data protection for up to 8 SAS, SATA, or SSD drives in PCIe and mezzanine card form factors.Cisco UCS C-Series Integrated Management Controller (CIMC) ●Web user interface for server management; remote keyboard, video, and mouse (KVM); virtual media; and administration●Virtual media support for remote CD and DVD drives as if local●Intelligent Platform Management Interface (IPMI) 2.0 support for out-of-band management through third-party enterprise management systems●Command-line interface (CLI) for server managementFast-memory support 16 DIMM slots supporting DDR3 1866-MHz memory for optimal performanceRedundant fans and power supplies ●Dual-redundant fans and hot-swappable, redundant power supplies for enterprise-class reliability and uptime ●Power efficiency through Cisco Common Form-Factor Platinum Power Supplies (450W and 650W)Support for up to 2 PCIe 3.0 slots ●Flexibility, increased performance, and compatibility with industry standards●PCIe 3.0 slots, which are estimated to substantially increase the bandwidth over the previous generation and offer more flexibility while maintaining compatibility with PCIe 2.0●I/O performance and flexibility with one x8, half-height and half-length slot and one x16, full-height andhalf-length slotIntegrated dual-port Gigabit Ethernet ●Outstanding network I/O performance and increased network efficiency and flexibility ●Increased network availability when configured in failover configurationsTrusted Platform Module (TPM) ●TPM is a chip (microcontroller) that can securely store artifacts used to authenticate the platform (server). These artifacts can include passwords, certificates, or encryption keys●TPM can also be used to store platform measurements that help ensure that the platform remains trustworthy, helping ensure authentication and authorizationTool-free access Tool-free access to all serviceable items, and color-coded indicators to guide users to hot-pluggable and serviceable itemsCisco Flexible Flash (FlexFlash) memory The server supports up to two internal Cisco FlexFlash drives (secure digital [SD] cards). The first SD card is preloaded with four virtual drives. The four virtual drives contain, respectively, the Cisco Server Configuration Utility, the Cisco Host Upgrade Utility, the Cisco C-Series server drivers set, and a blank virtual drive on which you can install an OS or a hypervisor. The second SD card is blank and can be used to mirror the first.Product SpecificationsTable 2 lists the specifications for the Cisco UCS C220 M3 server. Table 2. Product SpecificationsRegulatory StandardsTable 3 lists regulatory standards compliance information.Table 3. Regulatory Standards Compliance: Safety and EMCOrdering InformationFor a complete list of part numbers, please refer to the corresponding SFF SpecSheet or LFF SpecSheet. Cisco Unified Computing ServicesUsing a unified view of data center resources, Cisco and our industry-leading partners deliver services that accelerate your transition to a Cisco UCS C-Series Rack Server solution. Cisco Unified Computing Services help you quickly deploy the servers, optimize ongoing operations to better meet your business needs, and migrate to Cisco’s unified computing architecture. For more information, visit/go/unifiedcomputingservices.For More InformationPlease visit /go/unifiedcomputing.。
东方通安装部署手册
第一步检查服务器JDK版本是1.5以上版本Java –version如果没有安装,需要安装JDKsh jdk-6u21-linux-x64.bin安装完JDK需要设置JDK环境变量,编辑.bash_profile 文件JA V A_HOME=/opt/jdk1.5.0_22/CLASSPATH=.:$JA V A_HOME/lib/tools.jar:/lib/dt.jarPATH=$JA V A_HOME/bin:$PATHexport JA VA_HOME CLASSPA TH PATH编辑完成后,保存退出执行source .bash_profile 使环境变量生效。
应用服务器TongWeb5安装第二步安装TongWeb5标准版进入安装文件所在路径,修改安装文件执行权限:chmod a+x Install_TW5.0.1.5_Standard_Linux.bin执行shell安装:sh Install_TW5.0.1.5_Standard_Linux.bin –i console设置安装路径:敲回车键继续安装安装完成启动TongWebcd /home/tongtech/TongWeb5.0/bin/执行. ./startserver.sh 或者nohup ./ startserver.sh &访问管理控制台验证安装:http://172.23.0.73:9060/twns/使用twns/twns登录自启动服务:可以通过把TongWeb设置为系统服务来实现。
具体实现:以root用户进行操作,在/etc/init.d目录下编写TongWeb的服务脚本,用来控制TongWeb 的启动和停止。
脚本内容如下:使用chkconfig命令把服务脚本加入到系统服务列表中。
chkconfig --add tongweb设置系统时自动启动chkconfig tongweb on服务器启动时,TongWeb即可自动启动。
传奇服务端内外网修改及部分文件说明

传奇服务端内外网修改及部分文件说明首先打开传奇服务端目录下的“Config.ini”文件,查看里面的IP是否已经分出内网与外网!如果已经分出了内外网,那就简单的多了。
我们可以直接用“字符替换器”进行替换!如果没分出内外网,所有IP全部都是127.0.0.1那我们就要麻烦点手动修改一下了!就拿以下的“Config.ini"来说明把![GameConf]ShowDebugTab=1GameDirectory=D:\mirserver\ 服务端目录地址(默认如此)HeroDBName=HeroDB 数据库名称(无需修改) GameName=魔龙传奇服务器名称(改为你的)ExtIPaddr=218.59.45.194 服务器外网IP(改为你的外网IP)DynamicIPMode=0dwStopTimeOut=10000 连接端口(无需修改)[DBServer] 数据库服务器RegKey=0123456789 DBServer验证器注册码(无需修改)MainFormX=0 显示验证器窗口坐标(无需修改)MainFormY=326 同上DisableAutoGame=0RegServerAddr=10.142.72.40 服务器内网IP(改为你的内网IP)RegServerPort=63300 连接端口(无需修改)GatePort=5100 同上ServerPort=6000 同上GetStart=1AutoBackup=1BackupClearData=1BackupTime=84000000DBName=HeroDB 数据库名称(无需修改)ShowItemName=0[M2Server] M2Server简称M2 RegKey=254B254B5A50 M2Server简称M2验证器注册码(无需修改)MainFormX=560 显示验证器窗口坐标(无需修改)MainFormY=0 显示验证器窗口坐标(无需修改)RegServerAddr=10.142.72.40 服务器内网IP(改为你的内网IP)RegServerPort=63000 M2验证器验证端口(无需修改) TestLevel=1TestGold=0GatePort=5000 连接端口(无需修改)MsgSrvPort=4900 同上GetStart=1[RunGate] 游戏网关RegKey=0123456789 RunGate网关验证器注册码(无需修改)Count=1RegServerAddr=10.142.72.40 服务器内网IP(改为你的内网IP)RegServerPort=63200 网关验证端口(无需修改)GatePort1=7200 网关使用端口(无需修改)GatePort2=7201 同上GatePort3=7202 同上GatePort4=7500 同上GatePort5=7600 同上GatePort6=7700 同上GatePort7=7800 同上GatePort8=7900 同上[Setup]FormID=0[LoginGate] 游戏登陆网关MainFormX=0 显示窗口坐标(无需修改)MainFormY=0 同上GatePort=7000 游戏登陆端口(无需修改)GetStart=1[SelGate] 角色网关MainFormX=0 显示窗口坐标(无需修改)MainFormY=163 同上GatePort=7100 游戏角色登陆端口(无需修改)GetStart=1GatePort1=7101 同上[LoginServer] 游戏登陆服务器MainFormX=251 显示窗口坐标(无需修改)MainFormY=0 同上GatePort=5500 网关端口(无需修改)ServerPort=5600 服务器端口(无需修改)GetStart=1GateAddr=127.0.0.1 此IP无需修改ServerAddr=127.0.0.1 同上MonAddr=127.0.0.1 同上MonPort=3000 网关端口(无需修改)EnableGetbackPassword=1EnableMakingID=1TestServer=1AutoClear=0AutoClearTime=1000ReadyServers=0[LogServer] 游戏引擎日志服务器MainFormX=251 显示窗口坐标(无需修改)MainFormY=239 同上Port=10000 引擎使用端口(无需修改)GetStart=1[Client]NoticeUrl= 游戏网站地址ClientForm=13ServerAddr=0.0.0.0 此IP无需修改ServerPort=6350 此端口无需修改修改完毕以后我们继续修改其他文件。
unexpected end of file form server

unexpected end of file form server
【最新版】
目录
1.引言
2.文本的意义和背景
3.对文本的理解和分析
4.结论
正文
1.引言
本文将探讨一段来自服务器的意外文件结束。
文本的意义和背景将帮助我们更好地理解这段文字,以及它可能产生的原因和影响。
2.文本的意义和背景
“unexpected end of file from server”(来自服务器的意外文件结束)是计算机领域中的一种错误信息,通常出现在客户端尝试从服务器请求数据时。
这意味着服务器在发送数据过程中遇到了问题,导致数据传输中断。
3.对文本的理解和分析
从这段错误信息中,我们可以推测出以下几个可能的原因:
a.服务器遇到了问题:服务器可能在处理客户端请求时发生了错误,导致无法继续发送数据。
b.网络连接中断:客户端与服务器之间的网络连接可能在数据传输过程中意外中断,导致文件结束。
c.客户端问题:客户端可能在接收数据过程中遇到了问题,导致无法正确解析服务器发送的数据。
要解决这个问题,我们需要对服务器和客户端进行进一步检查,以确定具体原因并采取相应措施。
4.结论
“unexpected end of file from server”错误信息提示了服务器在数据传输过程中出现了问题。
code server 的使用方法
code server 的使用方法CodeServer是一个开源的在线代码编辑器,支持多种编程语言,可以在浏览器中使用。
使用 Code Server 可以快速搭建一个在线开发环境,方便开发者远程协作、学习与编写代码。
以下是 Code Server 的使用方法:1. 安装 Code ServerCode Server 可以在多种操作系统上运行,包括 Linux、macOS 和 Windows。
安装前需要先安装 Node.js 和 npm,然后使用以下命令安装 Code Server:npm install -g code-server2. 启动 Code Server安装完成后,使用以下命令启动 Code Server:code-server启动成功后,会输出一个链接地址,可以在浏览器中打开该链接,访问 Code Server。
3. 配置 Code ServerCode Server 的配置文件为~/.config/code-server/config.yaml,可以通过修改该文件来配置Code Server,例如设置端口号、密码、工作目录等。
4. 在 Code Server 中编写代码使用浏览器访问 Code Server 后,可以在其中使用多种编程语言编写代码,并且可以通过插件扩展功能。
Code Server 支持多个用户同时使用,可以进行实时协作。
5. 发布代码使用 Code Server 编写完成代码后,可以将代码发布到 GitHub 等代码托管平台上,共享给其他开发者使用。
总之,Code Server 是一个功能强大、易于使用的在线代码编辑器,可以帮助开发者提高工作效率和协作能力。
- 1、下载文档前请自行甄别文档内容的完整性,平台不提供额外的编辑、内容补充、找答案等附加服务。
- 2、"仅部分预览"的文档,不可在线预览部分如存在完整性等问题,可反馈申请退款(可完整预览的文档不适用该条件!)。
- 3、如文档侵犯您的权益,请联系客服反馈,我们会尽快为您处理(人工客服工作时间:9:00-18:30)。
1 安装程序1)安装form server 5.1 到10.194.22.81,安装目录为C:\Program Files\Adobe\Form Server2)安装offline插件OfflineClientInstall.exe3)Microsoft® .NET Framework 1.1 版可再发行组件包4)Microsoft® .NET Framework SDK 1.1版5)FSAddPage_Setup注意:安装FSAddPage_Setup时,需要指定虚拟目录名:FSADDPAGE第3、4、5的安装是为了实现动态添加页功能2 FormServer配置文件1)更新FormServer安装目录下C:\Program Files\Adobe\Form Server\codebase\pa目录中的下列文件:✓pa.xci✓pdf.xdc2)更新FormServer安装目录下C:\Program Files\Adobe\Form Server\misc目录中的下列文件:✓clientmodel.js✓offlineModelHTA.js✓offlineScripts.js✓offlineToolbar.htm✓FormServer.jsr3)重启机器下面是对各个文件修改的说明:pa.xci \ pdf.xdc这两个文件和pdf打印有关。
pa.xci的修改的目的是支持超长打印,pdf.xdc修改的目的是支持不同字体的打印Clientmodel.js针对大表单问题解决方案的需要增加脚本。
忽略表单上有DBD_ClientScriptObject_Utility控件,并且accessKey不为C或B的控件if(document.forms[rfIndex].DBD_ClientScriptObject_Utility !=null){if (element.accessKey ==null){continue;}else{if((element.accessKey.toString() == "")||!((element.accessKey.toString()=="C")||(element.accessKey.toString()=="B"))){continue;}}}//*******OfflineScripts.js针对离线表单模板中使“重置”、“保存”和“日期图片”不可用if (htmlForm.elements["FSPRINT_"]!=null){htmlForm.elements["FSPRINT_"].disabled="True";}if (htmlForm.elements["FSSUBMIT_"]!=null){htmlForm.elements["FSSUBMIT_"].disabled="True";}if (htmlForm.elements["DATEGIF"]!=null){htmlForm.elements["DATEGIF"].disabled="True";}var s = htmlForm.elements["DATEGIF"];for(i=0;i<s.length;i++){htmlForm.elements["DATEGIF"][i].disabled="True";}离线模板打开多个xml数据文件,有些空的域会有清除不掉原来显示数据的情况,修改425行注释掉if条件:/*2005-9-28//if (sValue.length > 0)*/curElement.value = sValue;offlineToolbar.htm改为中文。
去掉“重置”。
增加说明文字:请用左侧的“保存”按钮将填写好的数据保存为xml格式,以备在网上“表单上传”时使用。
offlineModelHTA.js动态添加页离线保存时需要的修改259:function saveData(fileName, compressedField){var oRootNode = this.dataDom.documentElement;//remove compressed data and text nodes from dataDomvar i = 0;var tempField = new htaField();tempField.setName(compressedField);var theCurrentPageName ="";var pagenum = "";var PageNumobjNodeList = oRootNode.getElementsByTagName("pagenum");//= this.pageNo;// alert(theCurrentPage);var nlLength1 = oRootNode.childNodes.length;for (i=0;i<nlLength1 ;i++ ){var oNode = oRootNode.childNodes.item(i);if (oNode.nodeType == 1) {if (oNode.nodeName == ) {//remove compressed fieldoRootNode.removeChild(oNode);i = i-1;nlLength1 = nlLength1-1;}}if (oNode.nodeType == 3) {//remove text nodeoRootNode.removeChild(oNode);i = i-1;nlLength1 = nlLength1-1;}if(oNode.nodeName=="OffLine_SaveDate_PageNum"){oRootNode.removeChild(oNode);i = i-1;nlLength1 = nlLength1-1;}}var xmlData = this.dataDom.xml;//compress resulting XML stringvar oComFile = new ActiveXObject("File");this.applicationData = oComFile.TransformBuffer(xmlData, 5);this.addField(compressedField, this.applicationData, true);if (fileName.length > 0) {var j = 0;var thePageNum = 0;i = 0;while (i < oRootNode.childNodes.length){var oNode = oRootNode.childNodes.item(i);//***lisa****if(oNode.nodeType == 7){//theCurrentPageName = oNode.nodeValue ;thePageNum = thePageNum +1;}if (oNode.nodeName == "FS_AddPage_XMLDATA"){j++;var newElem = this.dataDom.createElement("OffLine_SaveDate_PageNum");oRootNode.appendChild(newElem);// alert(PageNumobjNodeList.length);if(thePageNum==this.pageNo){stChild.text = PageNumobjNodeList.item(parseInt(j)-1).text;}}//***********i++;}//write XML to filethis.addWhiteSpace();this.dataDom.save(fileName);}return true;}FormServer.jsr把<text xml:lang="zh-cn">验证错误:</text>中的验证错误拷到<text xml:lang="en">验证错误:</text>中3 表单的存放1)正式表单存放在10.194.22.81\ E:\WSSP_FORM\ZSBD\forms\下2)测试表单存放在10.194.22.81\ E:\WSSP_FORM\CSBD\forms\下3)管理平台表单预览的表单放在10.194.22.81\ E:\WSSP_FORM\CSBD\forms\下,文件名为*_NOV ALIDATE.xft4)拷贝date和images到forms目录下,date和images存放的是表单所用到的日期图片和脚本。
