apc说明书
施耐德 APC Back-UPS BX550CI-CN 说明书
安装和操作Back-UPS ®BX550CI-CN安全和基本信息连接电池拉下电池上连接的把手,然后将其推入本装置。
当 Back-UPS 在市电下运转时,电池将在头 10 小时内充满电。
在此初始充电期间电池可能无法提供额定的电池工作时间。
电池的损耗不包括在有限保修范围内。
Back-UPS 中没有可自行维修的零件。
切勿擅自打开或维修 Back-UPS ,否则会使保修失效。
此设备中的电池不可更换。
请联系 APC 以订购新的 Back-UPS 。
请参考本手册末尾的联系信息。
本设备仅适用于在室内使用。
请勿在阳光直射、接触到液体、灰尘过多或湿度过大的地方使用本设备。
电池通常可以使用二到五年。
环境因素会影响电池寿命。
高温、市电不稳定以及频繁、短时间的放电会缩短电池寿命。
将 Back-UPS 电源线直接连接到壁式插座。
请勿使用浪涌保护器或电源延长线。
连接设备1开/关按钮Array 2电池连接器3电路断路器4市电电源线5电池和防浪涌插座1开/关按钮按下本装置正面的开/关按钮。
本装置会发出一声短促的蜂鸣声,并且绿色的 Power On(电源开启)指示灯亮起,表明 Back-UPS 已启动,正提供电源保护。
Back-UPS 应至少充电 10 小时,以提供最长的工作时间。
当 Back-UPS 连接到市电并且处于开启或者关闭状态时,Back-UPS 电池将进行充电。
在此初始充电期间电池可能无法提供额定的电池工作时间。
2电池连接器用于连接电池。
3电路断路器用于在出现导致电路断路器跳闸的过载状况后重设系统。
4市电电源线使用此电源线将 Back-PS 连接到市电。
5电池后备插座 + 防浪涌这些插座在停电和电压波动期间为连接的设备提供时间有限的电池后备电源。
电池后备电源插座仅在 Back-UPS 开启时才会为连接的设备提供电池电源。
将关键设备连接到这些插座,关键设备包括计算机、计算机显示器、调制解调器或其他对数据敏感的设备。
施耐德APC Back-UPS Pro Gaming UPS 2200 VA 230VAC用户说明书
重要安全说明保存好这些说明 - 本手册包含在安装和维护UPS 和电池的过程中必须遵守的重要说明。
此符号指示“阅读用户手册”。
请阅读用户文档,以便熟悉设备。
在尝试安装或操作设备前,请仔细阅读本说明书并查看设备,以便熟悉设备。
以下特殊消息可能会出现在本文档中或设备上,其目的在于警告您存在潜在危险或者提醒您注意阐明或简化程序的信息。
在“危险”或“警告”安全标签中使用此符号表示如果未遵循说明,可能会导致触电危险,从而造成人身伤害。
这是安全警告符号。
用于提醒您存在潜在的人身伤害危险。
遵守带有此符号的所有安全消息可避免潜在的伤亡风险。
Electric 概不负责。
产品处理指引安全和基本信息到货后,请对包装内容进行检查。
如有任何损坏,请通知托运公司和经销商。
•本UPS仅适用于在室内使用。
•请勿在阳光直射、接触到液体、灰尘过多或湿度过大的地方使用本设备。
•请勿在打开的窗户或门的附近使用UPS。
•请确保未阻塞UPS上的排气口。
请预留足够的空间,以保证适当通风。
注意:UPS前方和后方允许的最小的预留空间距离为20cm。
•将Back-UPS电源线直接连接到壁式插座。
请勿使用浪涌保护器或电源延长线。
•本设备相当重。
务必根据设备的重量采用安全可行的搬运方法。
•未经APC by Schneider Electric许可对本设置进行的改动和修正都不能获得保修。
•将UPS输入电源线连接到接地的电源插座。
电气安全•请使用带绝缘把手的工具。
•在电源完全断开前,请勿触摸任何金属连接器。
•只适用于230 V型号:为了确保符合EMC规程(适用于在欧洲和中国销售的产品),连接至UPS的输出电源线和网线不应超过10米长。
• UPS的保护性接地导线用于将负载设备(计算机设备)中的漏电流载走。
安装绝缘接地导线,该导线是为UPS供电的分支电路的整体组成部分。
该导线必须与接地和不接地分支电路电源导线具有完全相同的尺寸和材质。
该导线通常为带或不带黄条纹的绿色导线。
APC APC500 03-2019 v1.0 产品说明书

巖䔘♏䙫 WAN ⟇˛ 5
4. ὦ䔏䶙巖䷁⯮㜓䔉⒨凮わ䙫曢免怊㎌˛
6
5. 媲╆⊼㿶妤♏Ə✏䶙✧⇾弟⅌㜓䔉⒨䙫溿婴 IP ✗✧ 192.168.2.1˛
㨢㔀濕疋方値䕂 IP ◮◾⺃曆⍊㗪䏠⍿⋊◦Ჾỉ⨎⚝Ʋ廰Ჾ㨣奨 㓌濕妉⊁䀥 ㎋Ḛㄉ⁈Ʋ
庙Ჾ㨣媲㓌媵⊀䀥ḽ䏦ㄉ⁊˛
18
III.䜪ᶴ㙴婼
III-1. ❿㙴⩇垃 㜓Ẏ⒨昫嵇⢨㞝垡ḄƏ僤宐わ⯭⅝⭰墬ṵ⢀⢨˛
⩇垃❿㙴噸᳛ℋ濕媵 ⫄ᵥ⍿ⵓ徦䕂㤟侴俘♩䢹攢˛
4. 寞ℯ䡕宋⹝㟮䤡⥤わペ奨✏⢀杉撢垡Ḅ⬻䙫ἴ何Ə撢⬻⏵⯭⋬墬Ⅼ昫䙫
⢨嘵墬⅌Əⅴ⯭憸ⱅ垡Ḅ擨⅌⢨嘵(垡Ḅ寞ᷴ奨⭳⅏擨⅌Ə寞䕀ᷧ⯶㮜䩡 旛)˛
20
COPYRIGHT Copyright ¤ Edimax Technology Co., Ltd. all rights reserved. No part of this publication may be reproduced, transmitted, transcribed, stored in a retrieval system, or translated into any language or computer language, in any form or by any means, electronic, mechanical, magnetic, optical, chemical, manual or otherwise, without the prior written permission from Edimax Technology Co., Ltd.
17
15. 寞わ巆䜧䔢杉㋮䤡⭳ㇷ㭌檋 1-6Ə㛧⏵䂠忰“Finish”Ọ⬿㈧㛰宥⮁˛
施耐德 APC SMV系列750, 1000, 1500, 2000, 3000 VA说明书
Important Safety InstructionsSAVE THESE INSTRUCTIONS - This manual contains importantinstructions that should be followed during installation and maintenance of the Easy UPS and batteries.Read these instructions carefully and look at the equipment to becomefamiliar with the device before trying to install, operate, service or maintain it. The following special messages may appear throughout this manual or on the equipment to warn of potential hazards or to call attention to information that clarifies or simplifies a procedure.The addition of either symbol to a “Danger” or “Warning” safetylabel indicates that an electrical hazard exists which will resultin personal injury if the instructions are not followed.This is the safety alert symbol. It is used to alert you to potentialpersonal injury hazards. Obey all safety messages that followthis symbol to avoid possible injury or death.Easy UPS SMV Series 750, 1000, 1500, 2000, 3000 VA2Product Handling GuidelinesSafety and General InformationGeneral safety• Adhere to all national and local electrical codes.• This UPS is for indoor use only. To prevent the risk of fire or electric shock, install in temperature and humidity controlled indoor area, free of conductive contaminants.Easy UPS must be installed indoor with controlled environment free of excessive dust, corrosive air or conductive dust. Keep out of direct sun light, water and heat sources.• Place the unit on the stable floor.• Be sure that the mains socket outlet that supplies the UPS is installed near the UPS and easily accessible. Avoid using extension cords.• UPS must be connected to an earthed mains socket outlet.• Connect the power cable directly to a wall outlet. Do not use surge protectors or extension cords.• CAUTION : This UPS is designed to satisfy the requirement of PCs only.• Do not connect printers, heaters, or copiers to the UPS.Battery safety<18 kg <40 lb 18-32 kg 40-70 lb 32-55 kg 70-120 lb >55 kg >120 lb• Servicing of user replaceable batteries should be performed orsupervised by personnel knowledgeable about batteries and requiredprecautions.NOTE: In this case batteries are not user replaceable.• When replacing battery the UPS must be off, and its AC inletunplugged.• CAUTION: Do not dispose of batteries in a fire. The batteries mayexplode.• CAUTION: Do not open or mutilate batteries. Released material isharmful to the skin and eyes and may be toxic.• CAUTION: A battery can present a risk of electrical shock and burns byhigh short-circuit current. Contact with any part of a grounded batterycan result in electrical shock. The following precautions should beobserved when working on batteries.–Remove watches, rings or other metal objects.–Use tool with insulated handles.–Wear rubber gloves and boots.–Do not lay tools or metal parts on top of batteries.–Disconnect the charging source prior to connecting or disconnectingbattery terminals.–Determine if battery is inadvertently grounded. If inadvertentlygrounded, remove source from ground. Contact with any part of agrounded battery can result in electrical shock. The likelihood of suchshock can be reduced if such grounds are removed during installationand maintenance.• CAUTION: The UPS contains internal batteries and may present ashock hazard even when disconnected from AC power.• CAUTION: Battery circuit is not isolated from AC input, hazardousvoltage may exist between battery terminals and ground. Test beforetouching.• CAUTION: Failed batteries can reach temperatures that exceed theburn thresholds for touchable surfaces.Radio Frequency WarningThis is a category C2 UPS product. In a residential environment, this product may cause radio interference, in which case the user may be required to take additional measures.Easy UPS SMV Series 750, 1000, 1500, 2000, 3000 VA3Package Contents4Easy UPS SMV Series 750, 1000, 1500, 2000, 3000 VARear Panel FeaturesEasy UPS SMV Series 750, 1000, 1500, 2000, 3000 VA5Front Panel FeaturesFront panel display6Easy UPS SMV Series 750, 1000, 1500, 2000, 3000 VAEasy UPS SMV Series 750, 1000, 1500, 2000, 3000 VA7Start UpConnect batteryThe battery connector is located on the rear panel. Refer to “Rear Panel Features” on page 5 for details.NOTE : Connect prior to operation.Disconnect prior to transportation. Turn off the UPS and remove input power cable before disconnecting the battery connector. Connect equipment and input power to Easy UPS1. Connect equipment to the battery backup outlets of Easy UPS.2. Plug the Easy UPS power cord directly into a wall outlet, not into asurge protector or power strip.3. Press the POWER ON /OFF button to turn on the unit.NOTE : The Easy UPS should charge the battery for at least 8 hours to ensure sufficient runtime.4. Press the POWER ON /OFF button in 1~3 seconds. Confirm that theEasy UPS is on and is providing power to outlets.Cold start the UPSUse the cold start feature to supply power to connected equipment from the UPS batteries when the UPS is off and there is no power utility.• Press the POWER ON /OFF button. The display panel will illuminate.• Press the POWER ON /OFF button again to supply battery power to the connected equipment.Connect and install management softwareEasy UPS is provided with management software forunattended operating system shutdown, UPSmonitoring, and UPS settings.Refer to for more information. SpecificationsModel SMV750I-MSX SMV1000I-MSXSMV1500AI-MSXSMV2000AI-MSXSMV3000AI-MSXInput SpecificationsVoltage220/230/240 V ACVoltage range165-290 V AC ± 5 V AC165-295 V AC ± 8 V AC Fuse8 A8 A12 A20 A25 A Frequency range45-65 Hz (auto sensing) ±1 HzOutput specificationsUPS capacity (total)750 V A/525 W1000 VA/700 W1500 V A/1050 W2000 V A/1400 W3000 V A/2100 WRated voltage230 VAC Transfer time Typical 2-6 ms, 12 ms max. Waveform Pure Sinewave BatteryType (Maintenance-free Lead acid)12 V /7 Ah x 212 V /7 Ah x 212 V /10 Ah x 212 V /7 Ah x 412 V /9 Ah x 4Charging time4-6 hours recover to 90% capacity PhysicalDimension (D x W x H)410 x 160 x 220 mm(16.1 x 6.3 x 8.7 in)455 x 180 x 240 mm(18 x 7.1 x 9.4 in)Weight withoutpackage13.6 kg17.8 kg23.5 kg25.2 kgPackaging Dimension (D x W x H)508 x 272 x 339 mm(20 x 10.8 x 13.3 in)604 x 319 x 414 mm(23.8 x 12.5 x 163 in)Easy UPS SMV Series 750, 1000, 1500, 2000, 3000 VA8Easy UPS SMV Series 750, 1000, 1500, 2000, 3000 VA 9Audible Indicators and Status IconsTroubleshootingUse the table below to solve minor installation and operation problems.ModelSMV 750I-MSX SMV 1000I-MSX SMV 1500AI-MSX SMV 2000AI-MSX SMV 3000AI-MSX Weight with package 16.6 kg20.75 kg26.9 kg28.9 kgEnvironment Operating,temperature and humidity 0-90% RH @ 0-40 °C (non-condensing)0-95% RH @ 0-40 °C (non-condensing)Noise level < 45 dB International Protection CodeIP20Problem and/or Possible Cause SolutionEasy UPS will not turn on The Easy UPS is not turned on.Press the POWER ON /OFF button to turn on the Easy UPS.The Easy UPS is not connected to AC power, there is no AC power available at the wall outlet, or the AC power is experiencing a brownout or over voltage condition.Be sure that the power cord is securely connected to the utility power outlet and AC power isavailable at the utility power outlet. Check that the wall outlet is switched on or input fuse works properly.10Easy UPS SMV Series 750, 1000, 1500, 2000, 3000 VAServiceIf the unit requires service, do not return it to the dealer. Follow these steps:1. Review the Troubleshooting section of the manual to eliminate commonproblems.2. If the problem persists, contact APC by Schneider Electric CustomerSupport.a.Note the model number and serial number and the date of purchase.The model and serial numbers are located on the rear panel of theunit.b.Call APC by Schneider Electric Customer Support and a technicianwill attempt to solve the problem over the phone. If this is notpossible, the technician will issue a Returned Material AuthorizationNumber (RMA#).c.If the unit is under warranty, the repairs are free.d.Service procedures and returns may vary internationally. Refer to theAPC by Schneider Electric website for country specific instructions.3. Pack the unit in the original packaging whenever possible to avoiddamage in transit. Never use foam beads for packaging. Damagesustained in transit is not covered under warranty.4. Always DISCONNECT THE UPS BATTERIES before shipping.The United States Department of Transportation (DOT), and theInternational Air Transport Association (IATA) regulations requirethat UPS batteries be disconnected before shipping. The internalbatteries may remain in the UPS.5. Write the RMA# provided by Customer Support on the outside of thepackage.6. Return the unit by insured, pre-paid carrier to the address provided byCustomer Support.Easy UPS SMV Series 750, 1000, 1500, 2000, 3000 VA11© 2020 APC by Schneider Electric. APC, the APC logo, and Easy UPS areowned by Schneider Electric Industries S.A.S., or their affiliated companies. All other trademarks are property of their respective owners.EN 990-9144811/2020WarrantyRegister your product on-line The standard warranty is two (2) years from the date of purchase. SEITstandard procedure is to replace the original unit with a factoryreconditioned unit. Customers who must have the original unit back due to the assignment of asset tags and set depreciation schedules must declaresuch a need at first contact with an SEIT Technical Support representative.SEIT will ship the replacement unit once the defective unit has beenreceived by the repair department, or cross-ship upon the receipt of a valid credit card number. The customer pays for shipping the unit to SEIT. SEIT pays ground freight transportation costs to ship the replacement unit to the customer.APC by Schneider Electric IT Customer SupportWorldwideFor country specific customer support, go to the APC by Schneider Electric website, .。
apc说明书

引言apc smart-ups rt是一套高性能的不间断电源(ups),用于保护电子设备免受市电电源断电、电压降低、电流下降和浪涌的影响。
此ups能够滤除市电线路上小的电压波动,并且在发生较大的电压干扰时,通过从内部将市电线路断开来避免您的电气设备受到影响。
此ups将由其内部电池提供不间断电源,直到市电电源恢复正常或电池完全放电为止。
安装安装ups前,请仔细阅读“安全说明”。
1、开箱到货后,请对ups进行检查。
如有损坏,请通知运货商或经销商。
包装可回收利用;请妥善保管,以便下次使用。
检查货物内容。
a upsb 前面板窗c 全套文字资料包含:1 软件光盘2 smart-ups用户手册光盘3 串行电缆4 六根输出电源线5 两个电池电缆配件6 两根接地线7 产品文档、质保和安全信息8 网络管理卡文档2、规格将面板窗连接至ups硬排线说明1 必须由合格的电气人员进行布线。
2 遵守国家和当地的所有电气规程。
3 为输入线路安装市电断路器(参见下表)。
关闭ups输入断路器(参见图中的a)和市电断路器。
拆除面板(参见图中的b)。
拆下圆形拆卸器。
将尺寸合适的配线穿过前面板并连接到接线盒(绿色:地线,褐色:火线,绿色:零线)。
首先连接接地线。
使用合适的应变电缆(没有包含)。
对于三相输入,将输入相位选择器开关(参见图中的c)设置为“3”。
对于单相输入,将开关置于缺省位置“1”。
合上面板。
断路器基本连接器连接外部电池电池安全注意事项安装或维修外部电池时,请阅读并遵守下列警告。
不遵守这些警告可能会导致严重的人身伤害或死亡,或者对设备造成损害。
1 请勿尝试单独安装或维修外部电池。
应该由合格的电气人员进行外部电池的安装和维修工作。
2 在连接或断开电池终端之前,请先断开充电电源。
3 在断开电源并关闭所有开关后,外部电池可能还保持着很强的电压。
4 连接终端时,请小心操作。
除所需终端外,请勿使电缆接触其它任何物品。
操作规范始终佩戴:护目镜或面部护罩、抗酸性绝缘手套、防护服、防护套鞋或橡胶靴始终使用:绝缘工具、橡胶垫,用于在维修期间保护电池、、橡胶垫或橡胶支架,置于地板上、适当的提升设备取下:手表、戒指以及身上的其它金属物品防范措施1 为了避免静电累积,在对电池进行处理之前,维修人员应该首先建立接地触点。
APC 商品说明书:Switched Rack PDU AP7902B 和 AP7911B
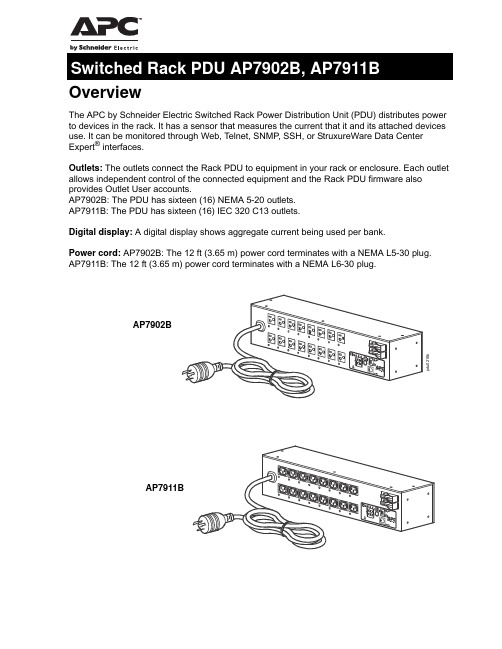
OverviewThe APC by Schneider Electric Switched Rack Power Distribution Unit (PDU) distributes power to devices in the rack. It has a sensor that measures the current that it and its attached devices use. It can be monitored through Web, Telnet, SNMP , SSH, or StruxureWare Data Center Expert ® interfaces.Outlets: The outlets connect the Rack PDU to equipment in your rack or enclosure. Each outlet allows independent control of the connected equipment and the Rack PDU firmware also provides Outlet User accounts.AP7902B: The PDU has sixteen (16) NEMA 5-20 outlets.AP7911B: The PDU has sixteen (16) IEC 320 C13 outlets.Digital display: A digital display shows aggregate current being used per bank.Power cord: AP7902B: The 12 ft (3.65 m) power cord terminates with a NEMA L5-30 plug.AP7911B: The 12 ft (3.65 m) power cord terminates with a NEMA L6-30 plug.AP7902BAP7911BCustomer support and warranty information are available on the website, .© 2016 APC by Schneider Electric. All rights reserved.990-5828-0019/2016Specifications Electrical AP7902AP7911Nominal input voltage 120 V 208 V Acceptable input voltage ± 10% Nominal input voltage Maximum input current 24 AInput frequency 47–63 HzCord length 12 ft (3.65 m)Input connectors NEMA L5-30 plug NEMA L6-30 plug Output connectors (16) NEMA 5-20 (16) IEC 320 C13 Overload protection Two (2) 20 A 1P circuit breakers(16 A per bank, derated)PhysicalSize (H × W × D) 3.5×17.5×4.5 in (88.9×444.5×114.3 mm)Weight 9.9 lb (4.49 kg)Shipping weight 14.4 lb (6.53 kg)EnvironmentalElevation (above MSL)Operating Storage 0–15 000 ft (0–4500 m)0–50 000 ft (0–15 000 m)TemperatureOperating Storage –5 to 45° C (23 to 115° F)–25 to 65° C (–13 to 149° F)HumidityOperating Storage 5–95% RH Non-condensing5–95% RH Non-condensingComplianceSafety UL/cULEMC FCC Part 15 Class A, ICES-003 Class A。
APC SU2200ICH SU3000ICH 说明书
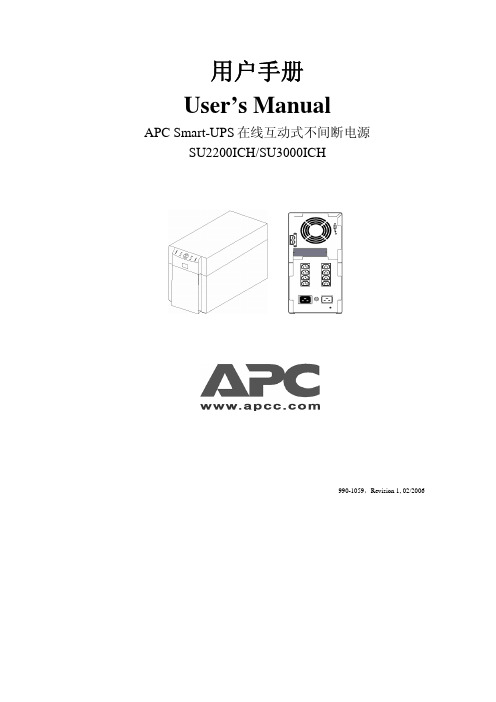
用户手册User’s ManualAPC Smart-UPS在线互动式不间断电源SU2200ICH/SU3000ICH990-1059,Revision 1, 02/2006重要的安全说明本安全操作指南向您提供在安装与维护APC 的设备与电池时应当严加遵守的各种重要说明。
这是为APC 用户在进行调整、安装、搬迁或维护APC 设备而制订的。
操作安全措施•要注意,举起重物时,应有人帮忙。
• 移动带有小脚轮的设备时,应在光滑且无障碍的地面上进行。
• 不要使用超过10度的斜坡。
• 该设备应安装在室内,并对周围温度有一定限制的环境中 (详细的温度范围见本手册“规格”部分)。
电气安全• 在危险条件下,不要单独一人工作。
• 当巨大的短路电流通过导电物质时会引起严重烧伤或火灾。
• 应由持有执照的电工来安装永久性电气设备。
• 应检查电源线、插销及插座是否完好无损。
• 在安装设备或同其它设备连接之前,如果不能证实接地情况,应将设备与交流电源断开,以减少触电危险,只有将所有的连线都接好以后,才能重新接通电源。
• 在本设备断开电源之前,不要接触任何金属连接器。
• 在连接或断开信号电缆时,尽量使用单手操作,以免同时触及两个电位不同的导体而造成触电。
•将设备连接到三线交流插座(两条相线,一条地线)。
插座应连接到适当的支线或干线保护装置(保险丝或断路器)。
连接到其它形式的插座可能导致触电危险。
注意!切断电流,保证安全• 如果设备带有内部电源 (电池),即使该设备未与交流电源相连,其输出端也可能带电。
•插入式设备切断电流方法:首先按下Off 按钮持续一秒钟以上,将设备关断。
然后将设备与交流电源断开。
最后将电池断开。
• 永久连接式设备切断电流方法:将电源开关置于待机位置 。
然后,将交流断路器置于待机位置 。
接着将电池(包括各扩展设备电池) 断开。
最后将交流电源与建筑物电源断开。
• 插入式设备有一保护性接地导体,供负荷装置 (电脑设备) 的泄漏电流从中流过。
APC 电源冗余转换器 说明书

4、 连接 PowerChute 电缆 • 当你准备安装 PowerChuteplus 时,请将 PowerChuteplus 通讯电缆安装在冗余开
关的服务器端口和服务器的串口之间。
个合格的电工能够将内部四针蓝色的阴极连接器连接到紧急停电系统。这样一来,紧
急停电系统就可以运行了。只要系统启动,UPS 系统都会停止供电。
注意 紧急停电系统接口是一个安全低压电路,只可以与其他安全低压电路连接。紧 急停电系统是一个控制电路,不需要有源电压。所用闭环电路应通过与市电隔 离的开关或者继电器实现。使用其他非闭环电路会损害冗余开关。
前部面板用户操作 用户操作设置面板位于冗余开关的前部,便于操作。
ΟΟΟ功能选择 LED 指示灯 这三个绿色的 LEDS 显示用户选择的状态参数,使用左边的键可以选择以上所列 5 种 用户设置。 Ο 功能状态 LED 指示灯 绿色的功能状态 LED 显示用户所选的功能状态。使用左边的键可以进行选择。
AC 电源 LED 指示灯
电源,连接安装完毕后再接通电源。 • 在处理任何金属连接器之前,应该先断开电源。 • 尽量使用一只手连接或者断开信号电缆,以免碰触两极,遭到电击。 • 将设备连接到三相 AC 电源(火,零和地)。插座应该有适宜的电路保护装置(保
险丝和电路断路器)。和其他类型的插座相连可能会引起电击危险。 注意:断电安全 • 断电步骤:按住 UPS 的电源开关,保持一秒钟以上,关掉 UPS 电源。然后从 AC
如果 PowerChute plus多次显示:self test failed: invalids test, UPS-A 失去了输出电压 功能,请通过 PowerChute plus做自检,如果自检失败,则按照随电源附带的 SmartUPS 快速参考指示排除故障,如需协助请遵照服务部分指示。
施耐德 APC Back-UPS 500 和 Back-UPS 650 说明书

Back-UPS™500和Back-UPS 650用户指南故障排除使用下表不能解决的问题,请咨询APC 在线技术支持部门或致电APC 技术支持部门以获得协助。
Back-UPS 不能启动。
连接的设备没有电源。
电源指示器发亮,而且Back-UPS 每30秒有四个嘀嘀声,或正在发出持续音调。
电源开关每秒闪烁一次,而且Back-UPS 也同时每秒发出一个嘀嘀声。
运转时间不足断路器已切断。
墙壁插座没有电源。
Back-UPS 超载。
Back-UPS 已用完现有的电池电源。
连接在Back-UPS 上的设备不接受其提供的近似正弦波形。
Back-UPS 可能需要维修。
Back-UPS 正在使用电池。
电池容量低(只剩2分钟使用时间)。
电池没有完全充电。
电池的使用寿命快要完结。
规格保修期限:2年;服务流程:1.请察看上面的故障排除表格以解决一般问题。
2.如果还有问题,请与 APC 技术支持代表联系。
请准备好:购买日期、型号和系列号(在设备的底部)3.请做好在电话上解决问题的准备。
如果通过电话无法解决问题且设备在保修期限内,APC 的技术支持代表会安排让您更换设备。
APC 联系信息公司中文网址:APC by Schneider Electric IT 全球客户服务关于具体国家/地区的支持部门,请访问APC by Schneider Electric 网站, 。
减少“电池后备加浪涌保护”插座上插入的设备数量。
将断路器推回去,使其复位。
确定墙壁插座的保险丝或断路器没有问题,而且控制墙壁插座的墙壁开关(如果有的话)处于闭合的位置。
确定在断电时需要电源的设备已插入Back-UPS。
确定Back-UPS 插座上插入的设备没有超过其容量。
拔掉一些设备,试试看问题是否继续存在。
Back-UPS 使用电池电源只能运转有限的时间,在可用的电池电源耗尽时会关闭。
继续使用之前应重新充电24个小时。
输出波形只用于电脑和与电脑相关的设备,不可用于电动机类型的设备。
apc说明书。

Smart-UPS VT 系列
警告! 只有经过培训且熟悉设备构造和操作 (包括所涉及的电气和机械危险)的专业 人员才能安装和拆除系统组件。 有关 UPS 尺寸、运行时间、重量等的详细信息,可在 UPS 尺寸、重量和电池配 置 的附录中获得。
Note
虽然大多数示意图显示的是 523 毫米电池柜,但可同时适用于两种电池柜尺寸。 本手册会说明两种电池柜尺寸间的所有差别。
机械旁路 在机械旁路中,市电绕过所有内部 UPS 功能和过滤器,通过机械断路器直接传送到所连接的 负载。可通过操作前盖后的机械旁路断路器控制杆以使用机械旁路模式。机械旁路功能的设 计目的是为了在维护 UPS 电源部件过程中保持负载的市电供应。 当 UPS 运行于机械旁路模式 和直接用非专用市电为负载供电时,可执行所有的主要维护操作。
ON
OFF
市电 断路器
!
Output Pwr Zone Probe 10/100Base-T
Reset
10/100
AP9619 Network Management Card EM
Serial: Model:
BATTERY UNIT
Serial: Model:
BATTERY UNIT
Serial: Model:
BATTERY UNIT
Serial: Model:
BATTERY UNIT
Serial: Model:
Serial: Model:
BATTERY UNIT
BATTERY UNIT
Serial: Model:
BATTERY UNIT
Serial: Model:
BATTERY UNIT
Serial: Model:
APC APC Smart-UPS 说明书

APC Smart-UPS®1400VA XL 230VAC/120VAC/100VAC3U Rack and Stack (機架疊放二式)不斷電系統目錄1:安全資訊 (1)操作安全 (1)電氣安全 (1)消電安全 (DEENERGIZING) (2)電池安全 (2)2:安裝 (3)開箱 (3)放置 UPS (3)安裝 SMART-UPS (3)附件 (7)3:操作 (8)SMART-UPS 前面板 (8)SMART-UPS 後面板 (11)由電池供電 (13)4:用戶配置項目 (14)5:運輸 SMART-UPS (16)運輸前斷開電池 (16)從機架中取出 UPS (16)6:儲存和維護 (17)儲存 (17)更換電池模塊 (17)7:故障處理 (19)檢修 (21)聯絡 APC (21)8:管理和擔保資訊 (22)管理機關許可和射頻干擾 (22)一致性聲明 (23)有限擔保 (23)2001 American Power Conversion公司對全部內容擁有版權。
保留所有權利。
未經許可,嚴禁複製全部或部分內容。
APC、Smart-UPS 和 PowerChute 是 APC 公司的注冊商標。
所有其他商標均屬其相應所有者之財産。
1: 安全資訊APC (American Power Conversion) 是美國和全球領先的製造商,它提供業界領先的不斷電系統、冗餘交換機、電源管理軟體和相關設備。
APC 的産品在全球範圍內對商業和政府機關的硬體、軟體和資料提供保護,免除電源干擾的威脅。
APC 不斷電系統 (UPS) 專門用來防止您的電腦和其他重要電子設備遭受斷電、電壓變低、突降和突波的影響。
此 UPS 能過濾掉市電線路上小的電壓脈動,並且在發生大的電壓干擾時,通過從內部將市電線路斷開來避免影響您的設備。
UPS 用其內部的電池提供不間斷電源,直到市電線路恢復正常爲止。
操作安全考慮到該 UPS 的重量,需要兩個人來安裝它。
施耐德 APC Back-UPS BR1500G-CN 安装和操作用户说明书
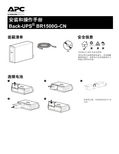
连接电池装箱清单安全信息本设备专门设计为室内使用。
请勿在阳光直接照射的地方、容易接触液体的地方、或者灰尘过多或湿度过大的地方使用本设备。
12345在使用之前,对电池充电至少 16小时。
安装和操作手册Back-UPS ®BR1500G-CNPowerChute®个人版软件概述利用 PowerChute 个人版软件,您可以通过计算机使用 Back-UPS 的附加电源保护和管理功能。
利用 PowerChute,您可以:• 在停电期间使计算机进入休眠模式,从而保留正在进行的工作。
当电源恢复时,计算机将回到停电前的状态。
• 配置 Back-UPS 管理功能,如省电插座、关机参数、静音警报等。
• 监控和查看 Back-UPS 的状态,包括估计的运行时间、功耗、电源事件历史记录等。
哪些功能可用会因 Back-UPS 型号和操作系统不同而存在差异。
如果选择不安装 PowerChute,Back-UPS 仍将为所连接的设备提供后备电源和电源保护。
但是,您只能通过显示界面配置有限的功能。
兼容性PowerChute 只与 Windows 操作系统兼容。
有关支持的操作系统的详细列表,请转到,选择Software & Firmware(软件和固件)。
对于 Mac 操作系统,我们建议使用其自身的关机应用程序(在“系统参数”中),它可以识别您的电池后备电源并允许您配置在停电期间的系统关闭方式。
为使用此应用程序,请将一条 USB 线从 Back-UPS 数据端口(POWERCHUTE 端口)连接到计算机上的一个 USB 端口,参见计算机随附的文档。
安装使用 USB 线将 Back-UPS 连接到计算机。
将一端插入 Back-UPS 后面板上的P OWER C HUTE端口,另一端插入计算机上的 USB 端口。
将 PowerChute 光盘放入计算机中,按照屏幕说明进行操作。
如果您的 Back-UPS 没有随附 PowerChute 光盘,可以从选择Software & Firmware(软件和固件)下载软件。
APC 电源Backup UPS 用户指南说明书
Important InformationRead these instructions carefully and look at the equipment to become familiar with the device before trying to install, operate, service or maintain it.Inspect the package contents upon receipt. Notify the carrier and dealer if there is any damage.Detailed user documentation is available online:1. Go to APC by Schneider Electric Web site: /support.2. Use the search bar to enter the model number of the Back-UPS(BE650G2-GR or BE850G2-GR).3. On the product page you will have access to the detailed user manual,FAQs, replacement batteries, software updates and more.Safety and General Information• This UPS is for indoor use only.• Do not operate this UPS in direct sunlight, in contact with fluids, orwhere there is excessive dust or high humidity.• Do not operate the UPS near open windows or doors.• Be sure the air vents on the UPS are not blocked. Allow adequate spacefor proper ventilation.Note: Allow a minimum of 20 cm clearance on both front and rear sidesof the UPS.• Environmental factors impact battery life. Elevated ambienttemperatures, poor quality utility power, and frequent discharges willshorten battery life. Follow the battery manufacturer recommendations.• Connect the UPS power cable directly to a wall outlet. Do not use surgeprotectors or extension cords.• CAUTION: Before installing or replacing the batteries, remove jewelrysuch as wristwatches and rings.High short circuit current through conductive materials could causesevere burns.• CAUTION: Do not open or mutilate batteries. Released material isharmful to the skin and eyes and may be toxic.Back-UPS BE650G2-GR/BE850G2-GR2Connect the BatteryPanel FeaturesRemove the “Stop! Connect the Battery ” label from the top cover.Invert the Back-UPS. Press the batterycompartment cover and release thetabs. Slide open the battery cover.Connect the battery cable securely tothe battery terminal.Note: It is normal for small sparks tobe seen when the battery cable isconnected to the battery terminal. Reinstall the battery compartmentcover. Be sure that the release tabslock into place.Top Panel Side Panel P OWER ON /OFF button and LED Use to switch the Back-UPS on or off.The LED illuminates green indicating that power is supplied to theconnected equipment both on utility power and on battery.Back-UPS BE650G2-GR/BE850G2-GR 3Turn On the Back-UPSPress the P OWER ON /OFF button located on the top of the Back-UPS. ThePower on/off LED will illuminate green and a single short beep will indicate that the Back-UPS is on and providing protection to the connected equipment.The Back-UPS battery charges to capacity during the first 24 hours while connected to the utility power. The Back-UPS battery will charge while the Back-UPS is turned on or off and as long as it is connected to utility power. Surge protection outlets Surge protection outlets provide protection to connected equipment from power surges or spikes, when the Back-UPS is turned on andconnected to utility power. Connect peripheral devices (such as printer,scanner, etc.) that do not need to remain on during power outages orbrownout condition, to these outlets.Battery backup + surge protection outletsBattery backup outlets provide power from the battery for a limitedperiod of time during power outage, or brownout condition. Batterybackup outlets provide protection to connected equipment from powersurges or spikes, when the Back-UPS is turned on and connected toutility power. Connect a computer, monitor and other peripheraldevices which need to remain on during power outages or brownoutcondition, to these outlets. Type A USB charging port This USB charging port provides a maximum of 2 A DC power. The port will charge the connected equipment when the Back-UPS is turned on. Type C USB charging port (BE850G2-GR only)Battery status LED The four Battery status LEDs indicate the remaining runtime. When battery is fully charged, all four LEDs illuminate.M UTE button Press M UTE button to Enable or Disable the mute function. Mute status LEDIlluminates when the mute function is enabled. Input power cord Connect the Input power cord to a wall outlet (utility power). Do notconnect the power cord to a surge protector or power strip.DSL/modem network/fax port Connect a DSL or dial-up modem, phone, fax machine, or10/100 Base-T Ethernet equipment.Note: Do not connect the UPS telephone protection ports to both thetelephone and network system cables at the same time.Wall outlet Connect the Back-UPS to a data line wall outlet.Data port Connect a RJ45/USB cable (not supplied) to connect the Back-UPS toa computer for installing the software. See “PowerChute™ PersonalEdition Software” on page 4Circuit breakerTrips when the Back-UPS experiences an overload condition.© 2019 APC by Schneider Electric. APC, the APC logo, Back-UPS andPowerChute are owned by Schneider Electric Industries S.A.S., or their affiliated companies. All other trademarks are property of their respective owners.EN 990-609103/2019Do not expect the battery to run for its expected capacity during the initialcharge period. The UPS will have full runtime capability after the initialcharging period.Turn Off the Back-UPSPress the P OWER ON/OFF button for at least 2 seconds to turn off theBack-UPS. At the first beep, release the button and the UPS will turn off.A 2 second delay has been added to mitigate unintentional contact with thePOWER ON/OFF button.PowerChute™ Personal Edition SoftwareOverviewUse PowerChute Personal Edition software to configure the UPS settings,protect your computer and other equipment during a utility power outage.During a power outage, PowerChute will save any open files on your computer and shut it down. When utility power is restored, it will restart the computer.Note: PowerChute is only compatible with a Windows operating system. If you are using Mac OSX, use the native shutdown feature to protect yoursystem. See the documentation provided with your computer.InstallationNote: To reduce electronic waste and protect the environment, USB cables are no longer shipped in every box. Order the cable free of charge athttps:///usbcable.Use the USB cable to connect the Data port on the UPS to the USB port on your computer. Download PowerChute™ Personal Edition Software from/pcpe. Select the appropriate operating system and followdirections to download the software.Warranty RegistrationRegister your product on-line at .APC by Schneider Electric IT Customer Support WorldwideFor country specific customer support, go to the APC by Schneider Electric Web site, .。
APC 安全指南手册说明书
Important Safety InformationRead the instructions carefully and look at the equipment to become familiar with the device before trying to install, operate, service or maintain it. The following special messages may appear throughout this document or on the equipment to warn of potential hazards or to call attention to information that clarifies or simplifies a procedure.The addition of this symbol to a Danger or Warning product safety label indicates that an electrical hazard exists that will result in personal injury if the instructions are not followed.This is the safety alert symbol. It is used to alert you to potential personal injury hazards. Obey all safety messages that follow this symbol to avoid possible injury or death.DANGERDANGER indicates a hazardous situation which, if not avoided, will result in death or serious injury.WARNINGWARNING indicates a hazardous situation which, if not avoided, could result in death or serious injury .CAUTION CAUTION indicates a hazardous situation which, if not avoided, could result in minor or moderate injury.NOTICENOTICE is used to address practices not related to physical injury.2 SNMP Card APV9601Product DescriptionIntegrated with SchneiderUPS software, devices with the SNMP Card installed can be monitored and controlled in the LAN. These devices can manage using SNMP Protocol versions 1, 2c and 3 standards.APV9601 SNMP Card:● Provides support for SchneiderUPS Network Shutdown.● Supports using a Dynamic Host Configuration Protocol (DHCP) to provide the network (TCP/IP) values of the NMC.Devices in which you can install the SNMP CardThe SNMP Card can be installed in any compatible device that has an Intelligent Card Slot, including: ● Easy UPS On-Line: SRV series UPSPackage ContentsThe packaging is recyclable; save it for reuse or dispose of it properly.(1)SNMP Card (1) User manual (1) Utility CDDisclaimerAPC by Schneider Electric is not responsible for damage sustained during reshipment of this product.The SNMP Card is sensitive to static electricity. When handling the SNMP Card, touch onlythe end plate while using one or more of these electrostatic-discharge devices (ESDs): wriststraps, heel straps, toe straps, or conductive shoes.Please recycleThe shipping materials are recyclable. Save them for later use, or dispose of themappropriate.3SNMP Card APV9601 Product OverviewFront PanelSensor port Connects SNMP card to temperature or smoke sensor (thisaccessory is not available for SRV and SRVS series).10/100 Base-T connector Connects SNMP card to the Ethernet network.Status LED See “Status LED”.Status LEDColor LED Condition Description100M LED (Green)FlashPort is operating at 100Mbit/sOff Card is not connected to the network10M LED (Yellow) Flash Port is operating at 10Mbit/sOff Card is not connected to the networkSpecificationsPhysical Dimensions with packageWidth x Height x Depth168 mm (6.61in) x 42 mm (1.65in) x 132 mm (5.2in)Dimensions without packageWidth x Height x Depth47 mm (1.85in) x 25 mm (0.98in) x 80 mm (3.15 in)Weight with package 0.3 kg (0.66 lb)Weight without package 0.11 kg (0.24 lb)Temperature Operating 0 to 40 °C (32 to 104 °F)Storage -15 to 50 °C (5 to 122 °F)Humidity Operating0 to 95% relative humidity, non-condensingSupported Protocol Network Auto-sense 10/100 Mbps Fast Ethernet RJ45 LANConnectorNetwork Protocol TCP/IP, UDP, SNMP-V1, SNMP-V2, SNMP-V3 SNMP MIB RFC1213, RFC16284 SNMP Card APV9601InstallationInstall the SNMP cardYou do not need to turn off power to install the SNMP Card in a supported Easy UPS.The SNMP Card is sensitive to static electricity. When handling the SNMP Card, touch only theend plate while using one or more of these electrostatic-discharge devices (ESDs): wrist straps,heel straps, toe straps, or conductive shoes.For the location of the UPS Intelligent Card Slot, see the UPS User Manual.1.Remove the cover of Intelligent Card Slot on the back of the UPS and retain the screws.2.Slide the card into the open slot and secure with the screws from step 1. (See below chart)3.Connect a network interface cable to the 10/100 Base-T network connector (RJ-45) on the SNMP Card.When the network interface cable is connected, the SNMP Card will attempt to obtain an IP address via DHCP. See “Configuration methods” on page 6.Configure the SNMP CardSee “Quick Configuration” on page 6.5SNMP Card APV96016 SNMP Card APV9601Quick ConfigurationConfiguration Method1. Please install SchneiderUPS monitoring software in your PC. After software is installedsuccessfully, it will pop up a plug icon in the tray. Select “SNMP manager” by clicking rightbutton of the mouse.2. Enter specific IP address to search all SNMP devices in LAN. (The SNMP manager will automatically collect the IPaddress from sever by default via a DHCP server. It will apply default IP address of 192.168.102.230, default subnet mask as 255.255.255.0, and default gateway as 192.168.102.254 without a DHCP server.3. You can modify IP setting, online upgrade, password management, and static trap address setting in SNMPManager interface. It is necessary to enter password for any modification. The default password is 12345678.Monitoring1. After all setting is complete, select “Open Monitor” by clicking right button of the mouse.NOTE: For enhanced security, change the SNMP version to V3 in System management and change the default password.2.Then, it will open the monitor view. Refer to below chart.Please check Schneider UPS monitoring software manual in the install location or in the CD.7SNMP Card APV9601APC by Schneider Electric Worldwide Customer SupportCustomer support for this or any other APC by Schneider Electric product is available at no charge in any of the following ways:•Visit the APC by Schneider Electric website to access documents in the APC by Schneider ElectricKnowledge Base and to submit customer support requests.– (Corporate Headquarters)Connect to localized APC by Schneider Electric websites for specific countries, each of whichprovides customer support information.–/support/Global support searching APC by Schneider Electric Knowledge Base and using e-support.•Contact the APC by Schneider Electric Customer Support Center by telephone or e-mail.–Local, country specific centers: go to /support/contactfor contact information.For information on how to obtain local customer support, contact the APC by Schneider Electricrepresentative or other distributor from whom you purchased your APC by Schneider Electric product.© 2020 APC by Schneider Electric. APC, the APC logo are owned by Schneider Electric Industries S.A.S., or their affiliated companies. All other trademarks are property of their respective owners.EN 990-91198A07/2020。
APC 电源备用系统说明书
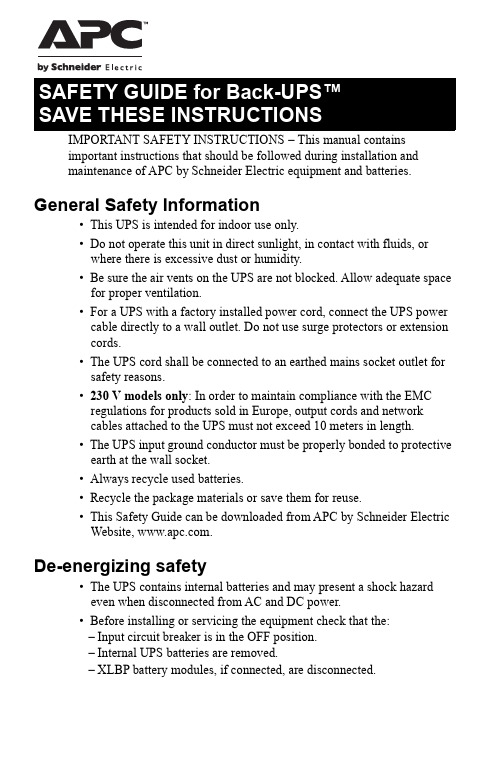
IMPORTANT SAFETY INSTRUCTIONS – This manual containsimportant instructions that should be followed during installation andmaintenance of APC by Schneider Electric equipment and batteries. General Safety Information• This UPS is intended for indoor use only.• Do not operate this unit in direct sunlight, in contact with fluids, orwhere there is excessive dust or humidity.• Be sure the air vents on the UPS are not blocked. Allow adequate spacefor proper ventilation.• For a UPS with a factory installed power cord, connect the UPS powercable directly to a wall outlet. Do not use surge protectors or extensioncords.• The UPS cord shall be connected to an earthed mains socket outlet forsafety reasons.• 230 V models only: In order to maintain compliance with the EMCregulations for products sold in Europe, output cords and networkcables attached to the UPS must not exceed 10 meters in length.• The UPS input ground conductor must be properly bonded to protectiveearth at the wall socket.• Always recycle used batteries.• Recycle the package materials or save them for reuse.• This Safety Guide can be downloaded from APC by Schneider ElectricWebsite, .De-energizing safety• The UPS contains internal batteries and may present a shock hazardeven when disconnected from AC and DC power.• Before installing or servicing the equipment check that the:–Input circuit breaker is in the OFF position.–Internal UPS batteries are removed.–XLBP battery modules, if connected, are disconnected.© 2021 APC by Schneider Electric. APC, the APC logo, and Back-UPS areowned by Schneider Electric Industries S.A.S. or their affiliated companies. All other trademarks are property of their respective owners.EN 990-6155A-00112/2021Battery Safety•Servicing of batteries should be performed or supervised by personnelknowledgeable about batteries and required precautions.•When replacing batteries, replace with the same type and number ofbatteries or battery packs.•Failed batteries can reach temperatures that exceed the burn thresholdsfor touchable surfaces.•CAUTION: Do not dispose of batteries in a fire. The batteries mayexplode.•CAUTION: Do not open or mutilate batteries. Released material isharmful to the skin and eyes. It may be toxic.•CAUTION: A battery can present a risk of electrical shock and highshort-circuit current. The following precautions should be observedwhen installing or replacing batteries:–Disconnect the charging source prior to connecting of disconnectingterminals.–Do not wear any metal objects including wrist watches and rings.Remove conductive jewelry such as chains, wrist watches and rings.High energy through conductive materials could cause severe burns.–Do not lay tools or metal parts on top of batteries.–Use tools with insulated handles.–Wear rubber gloves and boots.–Determine if battery is either intentionally or inadvertently grounded.Contact with any part of a grounded battery can result in electric shockand burns by high short-circuit current. The risk of such hazards can bereduced if grounds are removed during installation and maintenanceby a skilled person.。
APC 操作说明书
APC 操作说明书1.操作说明2.运行准备条件3.排除故障方法4.日常维修1 APC操作顺序1-1 TOP/BOTTOM/TOTAL 操作顺序(1)生产开始后,将TOP/BOTTOM测厚仪的手柄,扳至ON位置。
(2)确认主操作面板的APC MODE是否为USE状态。
如果为UNUSE 时,应将CALENDER画面的APC MODE 置于[USE]。
(3)在PLOFILE画面的TOP/BOTOOM的A VE值,输入TARGET,并输入TOTAL厚度的TARGET。
(4)待CALIBRATION画面的TOP`BOTTM CALIBRATION 的显示数值稳定后,按动“CALIBRATION”键1 秒钟。
1— 2 TOTAL操作(1)确认READY CONDITION画面的READY的指示灯点亮。
有关READY CONDITION的条件,参见《2项的运行准备条件》。
(2)按动PROFILE 画面的《SCAN》键。
(3)按动TREND画面的CLEAR键,去除图表。
(4)在CALIBRATION画面的BWP(BOTTOM WIRE POSITION)中,输入50后,按动CALIBRATION键。
1—3AGC 的操作顺序(1)确认READY CONDITION 画面的AGC CONDITION是否在READY状态。
有关READY CONDITION的条件,参见《2项的运行准备条件》。
(2)待TOP,BOTTOM测厚仪的操作顺序结束,生产稳定后,按动PROFILE画面的AGC 键,使之ON。
№1`№4的GAP手动操作,在LINE 停止后,AGC/APC 自动OFF。
如要再次起动时,应再次按照操作顺序进行。
1—2APC 的操作顺序(1)确认READY CONDITION 画面的APC CONDITION 是否在READY状态。
有关READY CONDITION的条件,参见《2项的运行准备条件》。
(2)待PROFILE画面的AGC键ON后,将APC键ON。
施耐德 APC Smart-UPS安全指南 说明书

990-7305D 06/02 安全信息 – 请保存中文本安全指导包含 APC 设备与电池之安装和维护的重要指示,供客户在设置、安装、移动和维修 APC 设备时遵照使用。
未经 APC 明确同意而对设备作改动,可能使保修服务失效。
操作安全<18 千克 (<40 磅)32–55 千克 (70–120磅)18–32千克 (40–70磅)>55 千克 (>120磅)>10º 小心!电气安全•在危险条件下,请勿单独一人工作。
•高的短路电流流过导电物质时可以造成严重烧伤。
•请检查电源线、插头及插座是否完好。
•只有合格的维修人员才可更换 UPS 上的插头或安装永久性连接设备。
•当不能确定接地情况时,为了减少触电的危险,在安装设备或与其他设备连接前,应将设备与交流电源断开。
只有当所有的连线都接好以后,才能重新接通电源。
•接触任何金属接头前,务必断开电源。
•连接设备时,应采用三线交流接线(两条火线,一条地线)。
插座应连接于合适的支线(或干线)保护装置(保险丝或断路器)。
采用其他类型的插座可能导致触电危险。
•只 230V 型号:为遵照欧洲之 EMC 规定,与 UPS 连接之输出电线长度不得超过 10 米。
• 只 230V 型号:对于插入式 A 类设备,UPS 和连接设备的总泄漏电流不得超过 3.5 毫安。
小心!消电安全 (Deenergizing)•如果设备带有内部电源(电池),即使该设备未与交流电源相连,其输出端也可能带电。
• 为了对插入式 UPS 消电,首先按 OFF 按钮将设备关闭,然后将设备与交流电源断开。
断开外部电池及内部电池(参见用户手册),按ON 按钮以消去电容器的储蓄电能。
为了对永久连接式 UPS 消电,首先按 OFF 按钮将设备关闭,然后关闭向 UPS 供电的交流电断电器。
断开外部电池及内部电池(参见用户手册)。
警告!电池安全•此设备具有潜在的危险电压。
施耐德 APC Back-UPS ES 500 说明书
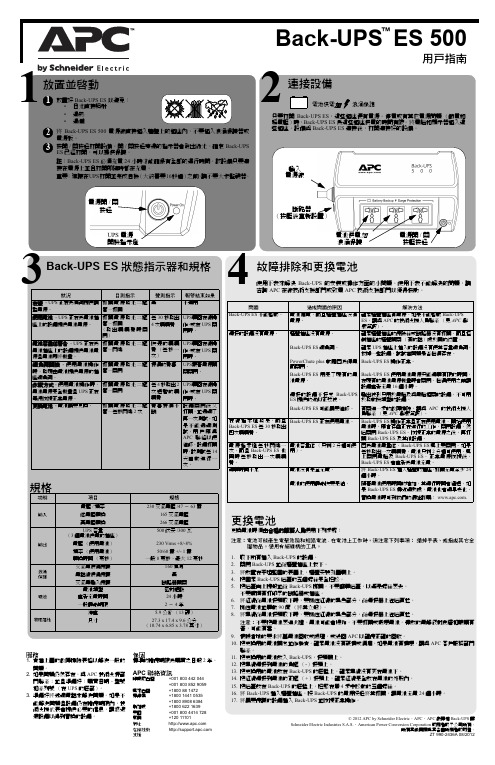
更換電池更換電池時須由合格的服務人員使用下列步驟︰注意︰電池可能產生電擊危險和短路電流. 在電池上工作時,須注意下列事項︰ 摘掉手表、戒指或其它金屬物品。
使用有絕緣柄的工具。
1.取下所有插入Back-UPS 的設備。
2.關閉Back-UPS 並從牆壁插座上拔下。
3.將放置在平坦堅固的表面上,牆壁安裝孔面朝上。
4.把固定Back-UPS 后蓋的五個螺絲完全扭松。
5.把后蓋向上提起並從Back-UPS 挪開。
不要翻轉后蓋,以避免螺絲丟失。
不要觸摸有打印字的斷路器或插座。
6.將紅線從電池接頭取下時,要抓住紅線的黑色部分,從連接器上往后直拉。
7.抓住電池並轉動90度(將其立起)。
8.將黑線從電池接頭取下時,要抓住紅線的黑色部分,從連接器上往后直拉。
注意︰不要把電池丟進火裡。
電池可能會爆炸。
不要打開或毀壞電池。
釋放的電解液對皮膚和眼睛有害, 可能有毒。
9.根據當地的要求將舊電池回收或處理,或送回APC 以確保正確的回收。
10.把更換用的電池開包並作檢查。
確定電池沒有破損或滴漏。
如果電池有損壞,請與APC 客戶服務部門聯系。
11.把更換用的電池放入Back-UPS ,接頭朝上。
12.把黑線連接到電池的負極(-)接頭上。
13.把更換用的電池放在Back-UPS 的底盤上。
確定黑線沒有夾在電池下。
14.把紅線連接到電池的正極(+)接頭上。
確定紅線完全放在電池的外殼內。
15.把后蓋放在Back-UPS 的底盤上,扭緊在第4步中松動的五個螺絲。
16.將Back-UPS 插入牆壁插座,按Back-UPS 的電源按鈕將其打開,讓電池充電24個小時。
17.將需要保護的設備插入Back-UPS 並恢複正常操作。
連接設備3電池供電加浪涌保護只要打開Back-UPS ES ,這些插座便有電源。
停電或有其它電源問題(節電和超電壓)時,Back-UPS ES 為這些插座供電的時間有限。
將電腦和顯示器插入這些插座。
設備與Back-UPS ES 連接後,打開連接好的設備。
施耐德 APC Back-UPS ES 500 说明书
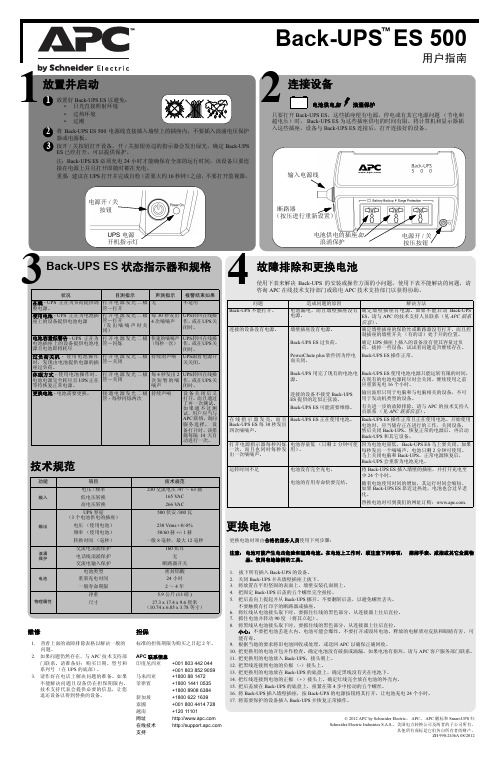
更换电池更换电池时须由合格的服务人员使用下列步骤:注意:电池可能产生电击危险和短路电流。
在电池上工作时,须注意下列事项: 摘掉手表、戒指或其它金属物品。
使用有绝缘柄的工具。
1.拔下所有插入Back-UPS 的设备。
2.关闭Back-UPS 并从墙壁插座上拔下。
3.将放置在平坦坚固的表面上,墙壁安装孔面朝上。
4.把固定Back-UPS 后盖的五个螺丝完全扭松。
5.把后盖向上提起并从Back-UPS 挪开。
不要翻转后盖,以避免螺丝丢失。
不要触摸有打印字的断路器或插座。
6.将红线从电池接头取下时,要抓住红线的黑色部分,从连接器上往后直拉。
7.抓住电池并转动90度(将其立起)。
8.将黑线从电池接头取下时,要抓住线的黑色部分,从连接器上往后直拉。
小心:不要把电池丢进火内。
电池可能会爆炸。
不要打开或毁坏电池。
释放的电解质对皮肤和眼睛有害, 可能有毒。
9.根据当地的要求将旧电池回收或处理,或送回APC 以确保正确回收。
10.把更换用的电池开包并作检查。
确定电池没有破损或滴漏。
如果电池有损坏,请与APC 客户服务部门联系。
11.把更换用的电池放入Back-UPS ,接头朝上。
12.把黑线连接到电池的负极(-)接头上。
13.把更换用的电池放在Back-UPS 的底盘上。
确定黑线没有夹在电池下。
14.把红线连接到电池的正极(+)接头上。
确定红线完全放在电池的外壳内。
15.把后盖放在Back-UPS 的底盘上,扭紧在第4步中松动的五个螺丝。
16.将Back-UPS 插入墙壁插座,按Back-UPS 的电源按钮将其打开,让电池充电24个小时。
17.将需要保护的设备插入Back-UPS 并恢复正常操作。
连接设备3电池供电加浪涌保护只要打开Back-UPS ES ,这些插座便有电源。
停电或有其它电源问题(节电和超电压)时,Back-UPS ES 为这些插座供电的时间有限。
将计算机和显示器插入这些插座。
设备与Back-UPS ES 连接后,打开连接好的设备。
施耐德 APC SAFETY GUIDE for Back-UPS (Rev A) 说明书

保存这些指令 – 本手册包含施耐德电气设备和电池在安装和维护过程中应遵循的重要指导。
一般性安全信息• 此UPS仅供室内使用。
• 请勿在阳光直射、接触液体、灰尘过多或湿度过大的地方使用本设备。
• 确保 UPS 上的通风孔不被堵塞。
请预留足够的空间以保证适当通风。
• 如果UPS使用工厂安装的电源线,请将UPS电源线直接连接到墙上的插座。
不要使用浪涌保护器或延长电线。
• 出于安全考虑,UPS电缆应与接地的电源插座连接。
• 仅限230 V型:为了符合 EMC 指令,以便产品可以在欧洲销售,连接到 UPS 的输出电线和网络线缆长度不得超过 10 米。
• UPS输入接地导体必须正确连接到墙上插座的保护接地装置。
• 请务必回收废旧电池。
• 请回收包装材料或保存以供重复使用。
• 本安全指南可通过施耐德电气网站 () 从APC下载。
断电安全注意事项• UPS配有内置电池,即使将其从交流或直流电源断开后,仍可能存在触电的危险。
• 在安装或维修设备前,请确认下述事项:–输入断路器处于关闭位置。
–UPS内部电池已卸下–XLBP 电池模块(如已连接)断开连接。
© 2021 APC by Schneider Electric。
APC和标识以及Back-UPS属于Schneider Electric Industries S.A.S.或其附属公司。
所有其他商标均为其各自所有者的财产。
ZH 990-6155A-00412/2021电池安全• 电池维修应由了解电池知识和必要预防措施的人员执行或监督。
• 更换电池时,应更换相同型号和数量的电池或电池组。
• 故障电池的温度会超过可触摸表面的燃烧阈值。
• 注意: 切勿将电池丢入火中。
电池可能会爆炸。
• 注意:请勿打开或损毁电池。
流出的液体物质会损伤皮肤和眼睛。
电解质可能有毒。
• 注意:电池可能产生触电危险和很高的短路电流。
安装或更换电池时应遵守以下事项:–在连接或断开接线端子之前,请断开充电电源。
- 1、下载文档前请自行甄别文档内容的完整性,平台不提供额外的编辑、内容补充、找答案等附加服务。
- 2、"仅部分预览"的文档,不可在线预览部分如存在完整性等问题,可反馈申请退款(可完整预览的文档不适用该条件!)。
- 3、如文档侵犯您的权益,请联系客服反馈,我们会尽快为您处理(人工客服工作时间:9:00-18:30)。
引言apc smart-ups rt是一套高性能的不间断电源(ups),用于保护电子设备免受市电电源断电、电压降低、电流下降和浪涌的影响。
此ups能够滤除市电线路上小的电压波动,并且在发生较大的电压干扰时,通过从内部将市电线路断开来避免您的电气设备受到影响。
此ups将由其内部电池提供不间断电源,直到市电电源恢复正常或电池完全放电为止。
安装安装ups前,请仔细阅读“安全说明”。
1、开箱到货后,请对ups进行检查。
如有损坏,请通知运货商或经销商。
包装可回收利用;请妥善保管,以便下次使用。
检查货物内容。
a upsb 前面板窗c 全套文字资料包含:1 软件光盘2 smart-ups用户手册光盘3 串行电缆4 六根输出电源线5 两个电池电缆配件6 两根接地线7 产品文档、质保和安全信息8 网络管理卡文档2、规格将面板窗连接至ups硬排线说明1 必须由合格的电气人员进行布线。
2 遵守国家和当地的所有电气规程。
3 为输入线路安装市电断路器(参见下表)。
关闭ups输入断路器(参见图中的a)和市电断路器。
拆除面板(参见图中的b)。
拆下圆形拆卸器。
将尺寸合适的配线穿过前面板并连接到接线盒(绿色:地线,褐色:火线,绿色:零线)。
首先连接接地线。
使用合适的应变电缆(没有包含)。
对于三相输入,将输入相位选择器开关(参见图中的c)设置为“3”。
对于单相输入,将开关置于缺省位置“1”。
合上面板。
断路器基本连接器连接外部电池电池安全注意事项安装或维修外部电池时,请阅读并遵守下列警告。
不遵守这些警告可能会导致严重的人身伤害或死亡,或者对设备造成损害。
1 请勿尝试单独安装或维修外部电池。
应该由合格的电气人员进行外部电池的安装和维修工作。
2 在连接或断开电池终端之前,请先断开充电电源。
3 在断开电源并关闭所有开关后,外部电池可能还保持着很强的电压。
4 连接终端时,请小心操作。
除所需终端外,请勿使电缆接触其它任何物品。
操作规范始终佩戴:护目镜或面部护罩、抗酸性绝缘手套、防护服、防护套鞋或橡胶靴始终使用:绝缘工具、橡胶垫,用于在维修期间保护电池、、橡胶垫或橡胶支架,置于地板上、适当的提升设备取下:手表、戒指以及身上的其它金属物品防范措施1 为了避免静电累积,在对电池进行处理之前,维修人员应该首先建立接地触点。
2 请勿将工具或金属部件放在电池上。
3 弱酸性电池内包含危险且有毒的材料。
4 请勿打开、改动或毁伤电池。
内部电池可能会伤害皮肤和眼睛。
5 请勿将电池置于火中。
否则会有爆炸的危险。
6 请按照当地的规定处理、运输和回收电池。
apc 电池处理方案请参见apc网站,或者联系您的apc经销商以获得有关apc外部电池组的信息。
第三方电池解决方案必须是密封的弱酸性电池。
请使用50 a、250 vdc的保险丝,其截断额定值≥ 20,000 a。
在将电池连接至ups之前,请首先确保已连接了外部电池。
使用第三方电池解决方案时,需要两个独立的绝缘的192 v电池系统。
每个192 v电池系统都必须连接一个电缆配件。
随ups附含两个电缆配件,每个192 v电池系统使用一个电缆配件。
连接地线和电池系统1. 将随附的地线连接至每个电池密封接地端和ups背面的tvss螺钉上。
2. 在每个电缆配件上切掉一个连接器,露出每根电缆中的正极和负极电线。
3. 将正极(红色)和负极(黑色)连接到每个外部电池系统上的正极接线端子和负极接线端子。
确保极性连接正确。
4. 将电缆连接器插入ups背面上的电池连接器插座中。
操作指示灯及说明当ups接通市电电源并执行双向转换以为连接的设备供电时,在线led灯亮起。
此时ups将电池能量提供给所连接的设备。
旁路led灯亮起表示ups处于旁路模式。
市电电源在以旁路模式运行期间被直接送达连接的设备。
旁路模式运行是内部ups故障、过载或者用户通过附件或手动旁路开关启动的命令所产生的结果。
在ups处于旁路模式时不能使用电池运行。
请参考本手册中的故障检测。
ups检测到内部故障。
请参考本手册中的故障检测。
发生过载问题。
请参考本手册中的故障检测。
电池断开连接或必须更换。
请参考本手册中的故障检测。
特性及功能按下此按钮打开ups。
(请参见下面的内容以获得其它功能。
)按下此按钮关闭ups。
手动旁路使用户能够手动地将连接的设备置于旁路模式。
在旁路模式中时,市电电源绕过ups并直接通到连接的设备。
在ups处于旁路模式时不能使用电池运行。
请参考本手册中的故障检测。
此情况属非正常情况。
ups将发出两次哔声。
在第二次哔声期间松开此按钮。
自动:ups在打开时自动进行自检,并且在以后每两周自检一次(缺省设置)。
在自检期间,ups暂时使用电池对连接的设备供电。
ups具有诊断功能,可显示市电电压。
将ups插入标准市电电源。
ups将启动自检,这是此过程的一部分。
该自检不影响电压显示。
由电池供电当市电发生故障时,ups将自动切换到电池供电。
电池供电时,ups每隔30秒钟发出4次哔声警报。
当还有2分钟的运行时间时,ups将发出连续的哔声。
如果不在使用powerchute软件或网络管理卡,必须手动保存文件并且必须在ups将电池完全放电之前关闭计算机。
ups电池的寿命取决于使用方法和环境。
关于电池运行系统,请参考。
将设备和电源与ups 相连1. 将设备连接到ups。
2. 打开所有连接设备的电源开关。
要将ups用作主on/off开关,请确保所有的连接设备均在on上。
该设备将不通电,直到打开ups。
3. 打开市电断路器的开关。
a ups在连接至市电电源时开始充电。
b 在将设备连接至ups之前,请至少为电池充电24小时以充满电。
5. 配置网络管理卡。
参考网络管理卡用户手册。
配置ups 参数和设置电池组数目的终端模式终端模式是一个由菜单驱动的界面,用于启用ups的加强型配置。
将串行电缆从计算机连接至ups背面的串行通讯端口连接器。
powerchute 网络关机软件使用说明:1. 打开终端程序。
实例:超级终端从桌面上转到开始 =] 程序 =] 附件 =] 通讯 =] 超级终端。
2. 双击超级终端图标。
a 按照提示选择名称并选择图标。
如果显示消息“...必须安装调制解调器”,则忽略此消息。
单击“确定”。
b 选择连接至您的ups的com端口。
端口设置包括:每秒位数 - 2400、数据位 - 8、奇偶校验 - 无、停止位 - 1、数据流控制 - 无c 按下enter键3. 设置外部电池组数量的实例:空白的终端窗口打开后,按照以下步骤输入电池组的数量:a 按下enter键启动终端模式。
多次按下enter键,直至显示提示用户名:。
按照提示进行操作。
慢慢键入,等到每个字符都显示在屏幕上后,再键入下一个字符。
网络管理卡缺省设置:用户名:apc、密码:apcb 按下1和enter键来选择设备管理器。
通过输入相应的数字来选择型号,然后按下“确定”键。
c 按下3和enter键来选择配置。
d 按下1和enter键来选择电池。
e 按下2和enter键来改变电池设置。
键入外部电池组的数目。
组数:1 = 1920 vah、2 = 3840 vah、3 = 5760 vah,等等。
f 按下3和enter键来接受改变。
g 多次(约5)按下esc,返回到主菜单。
h 按下4和enter键来退出。
用户可设置的参数连接epo ( 紧急电源关闭)在出现紧急事件时,可通过关闭epo上连接的开关来禁用输出电源。
在对epo布线时,必须遵守国家和当地的电气规程。
必须由合格的电气人员进行布线。
开关应该被连接到常开的开关触点。
不需要外部电压;开关由12v内部电源驱动。
在关闭的情况中,流出2ma电流。
epo开关由ups进行内部供电,以便与非电力开关断路器一起使用。
epo电路属于2级电路(ul、csa标准)和selv电路(iec标准)。
2级电路和selv电路均必须与所有主电路隔离。
请勿将任何电路连接到epo接线盒,除非能够确定该电路属于2级电路或selv电路。
如果不能确定电路标准,请使用触点关闭开关。
使用下列电缆类型之一将ups连接至epo开关:1 cl2:用于常规用途的2类电缆2 cl2p:用于管道、高压通风系统和其它环境通风场所的高压电缆。
3 cl2r:用于在层间轴中垂直运行的提升器电缆。
4 clex:用于住宅区和电缆管道的有限用途的电缆。
5 对于在加拿大进行的安装:仅使用经csa认证的elc型电缆(超低电压控制电缆)。
6 在其他国家的安装:按照当地规章使用标准的低电压电缆。
维修、服务电池更换与您的经销商联系,或者访问apc网站以获得有关更换电池模块的信息。
维修如果ups需要进行维修,不要将其送回经销商。
根据以下步骤处理:1. 查看本手册故障检测一节中讨论的问题以解决常见问题。
2. 如果问题仍旧存在,请通过apc网站联系apc客户支持部。
a 请记下位于ups设备后面的型号、序列号和购买日期。
如果打电话给apc客户支持中心,技术人员会要求您描述故障并尝试在电话中解决。
如果不能在电话中解决,技术人员将签发给您一张“返修产品授权号码(rma#)”。
b 如果ups在保修期内,可以免费维修。
c 维修或退回产品的步骤可能因国家而各不相同。
参考apc网站以获取国家特定的说明。
3. 请将ups用原包装寄回。
a 如果原包装丢失,则请访问apc网站,获得有关获取新包装的信息。
b 妥善包装ups以避免在运输过程中损坏。
不要使用聚苯乙烯泡沫塑料作为包装材料。
运输中发生的损坏不在保修范围内。
运输前始终将电池断开,以符合美国运输部(dot)和iata规定。
4. 在外包装上标记rma#号。
按照客户服务部提供的地址将ups寄回,邮寄时应加上保险并预付邮资。
故障检测使用下列图表解决安装和操作期间出现的小故障。
请访问apc网站以获得处理复杂ups问题的帮助信息。
管理和质保信息管理机关许可和射频干扰警告220 、230 、240 v 型号根据fcc 规则第15部分的规定,本设备经检测符合数字设备a 级标准。
这些限制旨在为商业环境中运行的设备提供合理的保护,使之免受有害干扰。
此设备产生、使用且可以发出射频能量。
如果不按照说明手册安装和使用,会导致对无线电通讯的有害干扰。
在居住区域中使用此设备可能会导致有害干扰,在这种情况中,需要用户自费采取各种可能必需的措施来克服干扰。
这是甲类的资讯产品,在居住的环境中使用时,可能会造成射频干扰,在这种情况下,使用者会被要求采取某些适当的对策。
有限质保美国电力转换公司 (apc) 担保自产品购买之日起两年内其产品没有材料和工艺上的缺陷。
在此期间内apc会为此类故障产品提供维修和更换服务。
要在此质保下获得服务,您必须从客户支持部获得“返修产品授权”(rma) 号码。
返修的产品必须预付运费,并附上所遇问题的简短描述,以及购买时间和地点的证明。
