猪场超级管家软件6.0快速入门手册
Supermicro Server Manager 快速入门指南说明书
Supermicro Server Manager Quick Start GuideRevision 1.0The information in this QUICK START GUIDE has been carefully reviewed and is believed to be accurate. The vendor assumes no responsibility for any inaccuracies that may be contained in this document, makes no commitment to update or to keep current the information in this manual, or to notify any person organization of the updates. Please Note: For the most up-to-date version of this manual, please see our web site at .Super Micro Computer, Inc. (“Supermicro”) reserves the right to make changes to the product described in this manual at any time and without notice. This product, including software, if any, and documentation may not, in whole or in part, be copied, photocopied, reproduced, translated or reduced to any medium or machine without prior written consent.DISCLAIMER OF WARRANTY ON SOFTWARE AND MATERIALS. You expressly acknowledge and agree that use of the Software and Materials is at your sole risk. FURTHERMORE, SUPER MICRO COMPUTER INC. DOES NOT WARRANT OR MAKE ANY REPRESENTATIONS REGARDING THE USE OR THE RESULTS OF THE USE OF THE SOFTWARE OR MATERIALS IN TERMS OF THEIR CORRECTNESS, ACCURACY, RELIABILITY, OR OTHERWISE. NO ORAL OR WRITTEN INFORMATION OR ADVICE GIVEN BY SUPER MICRO COMPUTER INC. OR SUPER MICRO COMPUTER INC. AUTHORIZED REPRESENTATIVE SHALL CREATE A WARRANTY OR IN ANY WAY INCREASE THE SCOPE OF THIS WARRANTY. SHOULD THE SOFTWARE AND/OR MATERIALS PROVE DEFECTIVE, YOU (AND NOT SUPER MICRO COMPUTER INC. OR A SUPER MICRO COMPUTER INC. AUTHORIZED REPRESENTATIVE) ASSUME THE ENTIRE COST OF ALL NECESSARY SERVICE, REPAIR, OR CORRECTION.LIMITATION OF LIABILITY. UNDER NO CIRCUMSTANCES INCLUDING NEGLIGENCE, SHALL SUPER MICRO COMPUTER INC. BE LIABLE FOR ANY INCIDENTAL, SPECIAL, OR CONSEQUENTIAL DAMAGES THAT RESULT FROM THE USE OR INABILITY TO USE THE SOFTWARE OR MATERIALS, EVEN IF SUPER MICRO COMPUTER INC. OR A SUPER MICRO COMPUTER INC. AUTHORIZED REPRESENTATIVE HAS BEEN ADVISED OF THE POSSIBILITY OF SUCH DAMAGES.Any disputes arising between manufacturer and customer shall be governed by the laws of Santa Clara County in the State of California, USA. The State of California, County of Santa Clara shall be the exclusive venue for the resolution of any such disputes. Super Micro's total liability for all claims will not exceed the price paid for the hardware product.Manual Revision: 1.0Release Date: 5/12/2022Unless you request and receive written permission from Super Micro Computer, Inc., you may not copy any part of this document.Information in this document is subject to change without notice. Other products and companies referred to herein are trademarks or registered trademarks of their respective companies or mark holders.Copyright © 2022 Super Micro Computer, Inc.All rights reserved.Printed in the United States of AmericaRevision HistoryDate Rev DescriptionMay-12-2022 1.0 1.Initial document.ContentsPart 1 Preparation (5)1Requirements for Target BMCs (6)2Resetting All Passwords of Target BMCs (6)3System Requirements for Management Server (7)3.1Managing Up to 1,999 Hosts 7 3.2Managing 2,000 Hosts or More 8 4Downloading and Installing SSM (9)Part 2 Usage (10)5Activating SFT-DCMS-Single and SFT-DCMS-SVC-KEY Keys (11)6Setting Up a Server Address (12)7Setting Up Contact Addresses for the Admin Account (13)8Discovering and Adding a Host (14)8.1Discovering Hosts with the Host Discovery Wizard 14 8.2Discovering Hosts by Scheduled Tasks 14 9Changing Date, Time and NTP for All Managed Redfish Hosts (15)10Changing BMC Passwords for All Managed Redfish Hosts (16)11Checking Host Status and Service Status (17)12Enabling Service Calls (18)12.1Creating a New Customer 18 12.2Creating a New Recipient 18 12.3Creating a New Site Location 18 12.4Creating a New Setup 19 12.5Assigning a Site Location 19 12.6Editing the Triggers 19 12.7Enabling Service Calls 19 12.8Testing the Service Calls function 20 Contacting Supermicro (21)Part 1 Preparation1Requirements for Target BMCs•Each target host’s BMC must be activated with an SFT-DCMS-SINGLE product key. To use the Service Calls, another SFT-DCMS-SVC product key is required as well.•Redfish protocol is the preferred communication method between SSM1 and its managed BMC hosts. •To avoid any security vulnerabilities, it is strongly suggested that you should modify and not use the default port (623) of RMCP protocol.2Resetting All Passwords of Target BMCsIn SSM, to add a Supermicro server with BMC as either an IPMI or Redfish host, you must reset the password for the administrator account. Please follow these steps:1.click here and thenclick the ACCEPT button to agree to the End User License Agreement.2.Download and unzip “ResetBMCPasswordToADMIN.zip.”3.Locate the Reset P assword to “ADMIN” Using Raw Command Script document and refer to thePrerequisites section to prepare a Python environment.4.Execute the “python reset_bmc_password_to_admin [your_supermicro_mapping_file][your_start_ip] [your_end_ip]” script to reset the BMC unique password to “ADMIN.”The “ADMIN” password can only be used temporarily. To change all BMC passwords on SSM hosts at once, refer to 10 Changing BMC Passwords for All Managed Redfish Hosts.1 SSM v5.1.0 and its SSM User Guide are referenced in this document.3System Requirements for Management Server3.1Managing Up to 1,999 HostsHardware Requirements•40.0 GB free disk space• 4 CPU cores•Available 16.0 GB RAM•An Ethernet network interface cardOperating System Requirements•Red Hat Enterprise Linux Server 6.x (64-bit), 7.x (64-bit), 8.x (64-bit)•SUSE Linux Enterprise 12.x (64-bit), 15.x (64-bit)•Windows Server 2012 R2 64-bit•Windows Server 2016 64-bit•Windows Server 2019 64-bitNote: To run SSM on a virtual machine, more CPU cores and RAMs may be neededdepending on the number of managed systems.For SSM to communicate with BMCs, open ports in your firewall. See 1.7.3 Default TCP/UDP Ports in the SSM User Guide for details.3.2Managing 2,000 Hosts or More Hardware Requirements•80.0 GB free disk space•12 CPU cores with Intel® Xeon® or AMD EPYC™ Processor or later •Available 32.0 GB RAM•An Ethernet network interface cardOperating System Requirements•Red Hat Enterprise Linux Server 7.x (64-bit), 8.x (64-bit)•SUSE Linux Enterprise 15.x (64-bit)4Downloading and Installing SSM1.Go tohttps:///en/support/resources/downloadcenter/smsdownload?category=SSM, download and unzip the file of the latest version of SSM.2.Execute the SSM installer and follow the prompts to complete the installation.•Windows users: You should log in with administrator privileges.•Linux users: Make sure you have root privileges.3.When prompted to Set the password for built-in ADMIN user, configure the password for theadministrator account to access the SSM Web.4.When prompted to Setup SMTP, configure an SMTP server, an SMTP port, a sender’s email address,a user account, and the password. Check SSL (Secure Sockets Layer) or StartTLS (Transport LayerSecurity) if the SMTP server uses secure connections.Note: The data will be used by the SSM server to send notifications.5.When complete, a message “Install Completed Successfully” appears. You are now ready to use SSM.Part 2 Usage5Activating SFT-DCMS-Single and SFT-DCMS-SVC-KEY KeysThe SFT-DCMS-SINGLE product keys for BMCs on your systems must be activated. If not, target BMCs are not able to be added into SSM for management. The SFT-DCMS-SVC key is required for SSM Service Calls functions. If you have bought the license keys for systems, you can skip this chapter; otherwise, follow the steps below or refer to 6.6 Node PK Activation in the SSM User Guide for details.1.Open a web browser and type https://[SSM Web address]:8443/SSMWeb.2.Log into SSM Web with the built-in ADMIN account ID and the password you configured whileinstalling SSM.3.Go to SSM Main Page > Administration > Monitoring Setup > Node PK Activation Step 1 Area.4.Fill out the BMC Address, BMC ID, and BMC Password fields and then click the Collect button.5.Click the Export MAC(s) File button to export all MAC addresses to a file. The output file(“SSM_mymacs.txt”) includes a list of MAC address and BMC address.Note: The BMC passwords of the managed systems were reset to “ADMIN” in theprevious step.6.Contact Supermicro to generate an activation file with the exported MAC file.7.Go to SSM Main Page > Administration > Monitoring Setup > Node PK Activation Step 3 Area.8.Click the Choose File button, select the activation file from Supermicro, fill in the BMC ID and BMCPassword fields, and then click the Activate button.Note: When a product key fails to activate on a host, it is automatically selected to be re-activated later. Click the Run button to activate the product key again in case the BMC isnot available at the time.6Setting Up a Server AddressFor a Supermicro server equipped with multiple network interfaces, you must configure a valid address for SSM to receive messages from the managed hosts. Refer to 6.12 Server Address in the SSM User Guide for details.1.Log into SSM Web with the ID and password of the built-in ADMIN account.2.Go to SSM Main Page > Administration > Management Server Setup > Server Address.3.Fill out the Server Address field and then click the Submit button.7Setting Up Contact Addresses for the Admin AccountA contact is the receiver of a notification message, which is sent by the SSM Server when the status of a host or service has changed. You could refer to 6.4 Contact Management in the SSM User Guide for details.1.Log into SSM Web with the ID and password of the built-in ADMIN account.2.Go to SSM Main Page > Administration > Monitoring Setup > Contact.3.Select the admin contact in the working area and use the Edit Contact command in the Commandsarea to edit it.4.Fill in the E-Mail Address or SNMP Trap Receivers field and then click the Submit button.Note: It is highly recommended that you click the Send Test E-Mail and Send Test Trapbuttons to ensure your email and trap receiver addresses are both accessible.8Discovering and Adding a HostYou could either add Redfish hosts manually or set a scheduler to discover them automatically.8.1Discovering Hosts with the Host Discovery Wizard1.Log into SSM Web with the ID and password of the built-in ADMIN account.2.Go to SSM Main Page > Administration > Host Discovery Wizard.3.Select the Redfish option and click the Next button.4.Set the BMC ID with the Administrator privileges and the password. Click the Next button.5.Input an IP address, an IP range (e.g., 192.168.12.10 to 192.168.12.80), a class C range (e.g.,192.168.12.), or DNS names to discover hosts. Click the Next button to start the discovery process.6.In the Discovery Result setup, select the hosts to be monitored and click the Next button to continue.7.When the Host Discovery Wizard is complete, click the Finish button to close the wizard. See 6.15 inthe SSM User Guide for details.8.2Discovering Hosts by Scheduled Tasks1.Log into SSM Web with the ID and password of the built-in ADMIN account.2.Go to SSM Main Page > Monitoring > All > Task View > Scheduled Task Management.3.The Scheduled Task Management dialog box appears and displays the existing scheduled tasks. Clickthe Add button to create a new scheduled task. The Add Scheduled Task Setting dialog box appears.Fill out Name and select Discover Redfish Host in the Command field. The corresponding parameters appear in the Command Parameters area.Notes:•The Enabled check box must be selected for the commands to be executed.•All fields are case-insensitive except the BMC ID and BMC Password fields.• A hint appears when the mouse hovers over the target field.•If the Detect NM field is set to “yes,” settings of the rest of fields, includ ing "Clear Policy," "Derated DC Power," "Derated AC Power," and "Max PS Output," will takeeffect at the same time.•It is highly recommended that you click the Send Test E-Mail and Send Test Trap buttons to ensure your e-mail and trap receiver addresses are respectivelyaccessible.4.Click the Schedule tab, use the Repeat On drop-down list to select Once or Weekly to determinethe execution frequency. Click the Submit button. The new task is now added.5.When the scheduled task execution begins, its status is displayed in Task View. See 7.2.6 in theSSM User Guide for details.9Changing Date, Time and NTP for All Managed Redfish HostsTo keep all clocks on the managed system synchronized, you can enable Network Time Protocol (NTP) on the BMCs and assign an NTP server at once.1.Log into SSM Web with the ID and password of the built-in ADMIN account.2.Go to SSM Main Page > Monitoring > All > Host View > Edit BMC Setting.3.Press and hold both [Ctrl] and [left mouse click] to select multiple hosts in the Host View table, andthen click Edit BMC Setting in the Commands area.4.In the Edit BMC Setting dialog box, use the drop-down list to select [NTP] Enabled and set the valueto yes. Click the Add Item button to create a new drop-down list, select [NTP] Primary NTP Server, and set the value to or the IP address where the NTP server also works. Click the Next button to continue.5.Click the Run button, and then click the Task ID link to check for results.10Changing BMC Passwords for All Managed Redfish HostsThe Change BMC password command allows users to update the BMC password saved by the BMC and SSM.1.Log into SSM Web with the ID and password of the built-in ADMIN account.2.Go to SSM Main Page > Monitoring > All > Host View > Change BMC Password.e [Ctrl] and [left mouse click] to select multiple hosts in the Host View table then click ChangeBMC Password in the Commands area and the Change BMC Password dialog box appears.4.Fill out the fields and then click the Next button to change password and close this dialog box.11C hecking Host Status and Service StatusHost Status in the Host View shows the current status of hosts while Service Status displays the combined service status. When services are problematic, you should first check the host status to see if the host is online or offline. The Redfish SEL Health service is used to check the health of a managed system based on the System Event Log, and Redfish System Information is used to gather system information.1.Log into SSM Web with the ID and password of the built-in ADMIN account.2.Go to SSM Main Page > Monitoring > All > Host View.3.The host status shows “Up” indicating the host is running.4.Click the service status tab in the Detail View, the Redfish SEL Health and Redfish System Informationshould be available and displayed in green.Notes:•The View Details command under the System Information category in the Commands area is available for viewing all types of the system information objects.•To run SSM on a virtual machine, more CPU cores and RAMs may be neededdepending on the number of managed systems.12E nabling Service CallsThe Service Calls function aims to promptly respond to a host’s urgent problems. Service calls are delivered via email with messages to help the recipient diagnose the issue. Refer to 12 Service Calls in the SSM User Guide for reference. The diagram shown below indicates that a Setup can include only one Customer, but many Recipients, and any positive or null number of Devices.12.1Creating a New Customer1.Log into SSM Web with the ID and password of the built-in ADMIN account.2.Go to SSM Main Page > Administration > Service Calls > Customer Management.3.Click Add Customer in the Commands area and an Add Customer dialog box appears.4.Fill in the fields and then click the Submit button to add the customer and close this dialog box. 12.2Creating a New Recipient1.Log into SSM Web with the ID and password of the built-in ADMIN account.2.Go to SSM Main Page > Administration > Service Calls > Recipient Management.3.Click Add Recipient in the Commands area and an Add Recipient dialog box appears.4.Fill in the fields and then click the Submit button to add the recipient and close this dialog box. 12.3Creating a New Site Location1.Log into SSM Web with the ID and password of the built-in ADMIN account.2.Go to SSM Main Page > Administration > Service Calls > Site Management.3.Click Add Site Location in the Commands area and an Add Site Location dialog box appears.4.Fill in the fields and then click the Submit button to add the site location and close this dialog box.12.4Creating a New Setup1.Log into SSM Web with the ID and password of the built-in ADMIN account.2.Go to SSM Main Page > Administration > Service Calls > Setup Management.3.Click Add Setup in the Commands area and an Add Setup dialog box appears.4.Fill out the fields and then click the Submit button to add the setup and close this dialog box. 12.5Assigning a Site Location1.Login to SSM Web with the ID and password of the built-in ADMIN account.2.Go to SSM Main Page > Administration > Service Calls > Setup Management.e [Ctrl] and [left mouse click] to select multiple devices in the working area then click Assign SiteLocation in the Commands area and an Assign Site Location query dialog box appears.4.Select the site location to be assigned and click the Submit button.12.6Editing the TriggersEdit the trigger for devices in a setup, and choose the desired trigger items. When a trigger item is problematic, recipients in the setup are able to receive alerts for it.1.Log into SSM Web with the ID and password of the built-in ADMIN account.2.Go to SSM Main Page > Administration > Service Calls > Setup Management.e [Ctrl] and [left mouse click] to select multiple devices in the working area then click EditTrigger in the Commands area and the Edit Trigger dialog box appears.4.Select the boxes in the Override column to apply the current settings to all selected devices.5.Click the Submit button to edit the trigger items.Note: For Supermicro Service recipients, the trigger types are limited: only Error itemsare available. Also, all triggers for a device are locked and checked by default.12.7Enabling Service CallsEnable Service Calls when the device is ready to trigger alerts whenever it encounters an error.1.Log into SSM Web with the ID and password of the built-in ADMIN account.2.Go to SSM Main Page > Administration > Service Calls > Setup Management.e [Ctrl] and [left mouse click] to select multiple devices in the working area then click EnableService Call in the Commands area and an Enable Service Call dialog box appears.4.Click the Run button to enable the selected devices and close this dialog box.Note: Enable Service Call only supports the Redfish hosts with the SFT-DCMS-SVC-KEYproduct key activated.12.8Testing the Service Calls functionTest the Service Calls function to pre-check if all settings are complete for a service call.1.Log into SSM Web with the ID and password of the built-in ADMIN account.2.Go to SSM Main Page > Administration > Service Calls > Setup Management.3.Select one or more devices to be tested in the working area.4.Click Test Service Call in the Commands area and a Test Service Call dialog box appears.5.Click the Run button to test the selected devices and close this dialog box.Note: It is highly recommended that you click Test Service Call to ensure Service Callssettings are complete.Contacting SupermicroHeadquartersAddress: Super Micro Computer, Inc.980 Rock Ave.San Jose, CA 95131 U.S.A.Tel: +1 (408) 503-8000Fax: +1 (408) 503-8008Email: ************************(GeneralInformation) **********************(TechnicalSupport) Website: EuropeAddress: Super Micro Computer B.V.Het Sterrenbeeld 28, 5215 ML's-Hertogenbosch, The NetherlandsTel: +31 (0) 73-6400390Fax: +31 (0) 73-6416525Email: *******************(GeneralInformation)*********************(TechnicalSupport)*****************(CustomerSupport) Website: www.supermicro.nlAsia-PacificAddress: Super Micro Computer, Inc.3F, No. 150, Jian 1st Rd.Zhonghe Dist., New Taipei City 235Taiwan (R.O.C)Tel: +886-(2) 8226-3990Fax: +886-(2) 8226-3992Email: **********************.twWebsite: 。
小管家软件快速入门说明
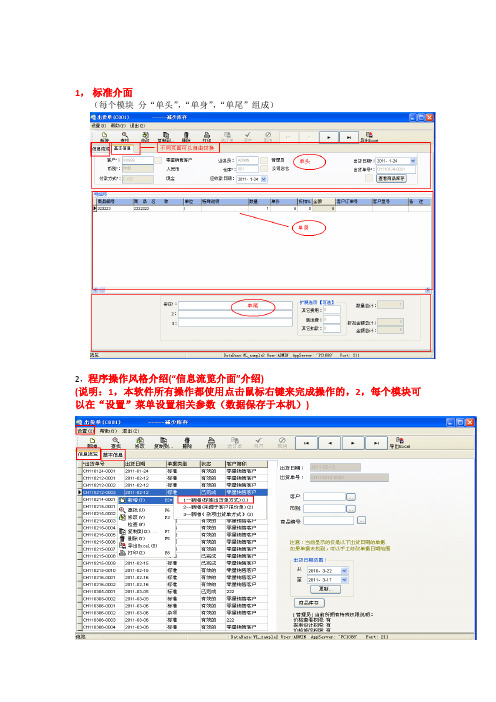
1,标准介面(每个模块分“单头”,“单身”,“单尾”组成)2,程序操作风格介绍(“信息流览介面”介绍)(说明:1,本软件所有操作都使用点击鼠标右键来完成操作的,2,每个模块可以在“设置”菜单设置相关参数(数据保存于本机))3, 程序操作风格介绍(“资料输入介面”介绍)4,默认参数设置1-1(参数设置的信息保存在本机)5,默认参数设置1-26,系统开关介绍1-17,系统开关介绍1-28,用户权限设置说明:1,可以单独每个用户设置相应的权限,2,也可以统一使用一个组的权限(在该用户中,设置属于那个“组”,关联后,该组的权限可以继承到该用户3,“系统权限列表”:是当前系统中所有权限清单,双击鼠标(或右键)可以将对应的权限添加到‘用户’为‘组’上4,“用户权限列表”:是当前该用户单独所取得之权限,双击鼠标(或右键)可以将对应的权限移除5,“所属组权限列表”:是当前组所有的权限,双击鼠标可以将对应的权限移除说明:如果某用户隶属于该组的话,如果该组有某个权限(如“C001_03 出货单删除”权限),那么,即使该用户在“当前用户本身权限明细”中无“C001_03 出货单册除”此权限,该用户一样可以有此权限(因为他所属的组已拥有该权限,用户可以继承到该权限)6,“所属组别”:是可选项,如果用户不想拥用某个组的权限,可以不需要添加到该组,即为该用户单独设置权限7,增加‘用户’之前,必须要先建好‘员工’资料,才能增加用户及设置权限,说明:员工资料是针对于公司所有员工的信息,员工账户不能作为程序登录账户,操作员账户才能作为程序登录账户,例如,一个厂员工可以几百人,但并非所有的人都需要用到进销存软件9, 权限代码及每个模块对应的程序代码查看说明:1,每个模块在窗口上都可以查看到对应的程序代码的,如出货单,程序代码为:C001, 采购订单, 程序代码为:C003 ,2,该程序对应的权限代码字头都是由程序代码组成的(格式:程序代码+XX),如C001_01 出货单新增权限,C001_02 出货单修改权限…等如图所示!。
猪场生产管理手册(规模化猪场生产管理培训教材)
猪场生产管理手册(规模化猪场生产管理培训教材)/article_56465.html目前,我国养猪业正朝着规模化、集约化的方向发展。
为了满足规模化养猪场的实际需求,提高管理水平及经济效益,中国农产品加工网特约湖南广田生物科技集团根据国内外集约化、规模化猪场的管理特点和要求,在总结了近几年养猪生产实践经验的基础上,编辑了《规模化猪场生产管理手册》,供广大养猪户参考。
(中国农产品加工网)猪场生产管理手册(规模化猪场生产管理培训教材)目录(点击打开相应内容)第一章规模化猪场设计与管理第一节猪场建设第二节猪舍常用设施及维修第三节猪场生产指标、生产计划与生产流程第四节猪场组织架构、岗位定编及责任分工第五节猪场生产例会与技术培训制度第六节猪场物资与报表管理第七节猪场各项规章制度第八节每周工作流程第九节猪场存栏猪结构第十节各类猪喂料标准第十一节种猪淘汰原则与更新计划第二章饲养管理技术操作规程第一节隔离舍(后备猪)饲养管理技术操作规程第二节配种妊娠舍饲养管理技术操作规程附人工授精技术操作规程第三节分娩舍饲养管理技术操作规程第四节保育舍饲养管理技术操作规程第五节生长育肥舍饲养管理技术操作规程第六节种猪代售栏的管理第三章猪病防制第一节总论及摘要第二节兽医临床技术操作规程第三节猪场卫生防疫制度第四节猪场免疫程序第五节猪场驱虫程序第六节猪场消毒制度第七节猪场预防用药及保健第八节猪场常见病防治第九节常见传染病诊断与防制第一章规模化猪场设计与管理第一节猪场建设1.猪场选址原则猪场建设地应远离村镇、交通要道、其它畜牧场3公里以上,远离屠宰场、化工厂及其它污染源。
向阳避风、地势高燥、通风良好、水电充足(万头猪场日用水量约100-150吨)、水质好、排水方便、交通较方便。
最好配套有渔塘、果林或耕地。
2.猪场布局猪场布局应设置四区,即生活管理区、生产配套区(饲料车间、仓库、兽医室、更衣室等)、生产区和种猪运动区;生产区应包含繁殖、保育、育肥区,每区应相距10米以上;配种舍、怀孕舍、保育舍、生长舍、育肥(或育成)舍、装猪台建设,应按从上风向下风方向排列。
产品软件快速上手指南说明书

产品软件快速上手指南Version:V1.0.0目录目录 (2)1声明 (I)2概述 (2)2.1系统要求 (2)2.2C#编程语言 (2)2.3硬件驱动 (2)2.4JYDM(JYTEK Device Manager) (3)2.5安装SeeSharpTools (3)2.6快速上手 (3)2.7Linux系统下运行C#程序 (3)2.8Python (3)2.9QT (4)3Windows平台下的产品软件使用 (5)3.1FirmDrive的安装 (5)3.2产品驱动安装 (6)3.3锐视开发软件安装 (8)3.4范例使用 (10)4JYDM使用 (11)4.1JYDM安装 (11)4.2板卡驱动和固件升级 (13)板卡驱动升级 (13)板卡固件升级 (15)软件在线升级提示 (16)4.3TestPanel使用 (18)5Linux平台下的产品软件使用 (20)5.1FirmDriveRuntime安装 (20)5.2产品驱动安装 (20)5.3锐视软件安装 (20)5.4范例使用 (21)6Python环境下的软件使用 (25)6.1模块化仪器Python驱动的说明 (25)6.2模块化仪器python驱动的部署 (25)6.3模块化仪器Python驱动的使用 (26)6.4SeeSharpPythonTools的使用 (27)6.5范例使用 (27)7QT环境下的产品软件使用 (29)7.1安装Qt(5.9.0) (29)下载QT (29)安装Qt (31)7.2运行前的准备 (35)7.3范例使用 (45)下载Qt范例 (45)运行范例 (46)8关于简仪科技 (54)8.1简仪科技中国 (54)8.2简仪科技韩国和其它国家的简仪科技 (54)8.3简仪科技硬件产品 (54)8.4简仪科技的软件平台 (54)8.5简仪科技服务 (54)1声明本文档介绍了如何快速的安装和使用简仪科技自研硬件产品。
《猪场管理培训手册》课件
明确猪场管理的具体目标和要求,为管理人员提供明确的指导。
猪群管理
1
猪的生命周期管理
了解从新生猪到成熟猪的各个阶段,并学习如何有效管理每个阶段的猪群。
2
猪的健康监测与防疫措施
学习猪群健康监测的方法以及预防疾病传播的重要措施。
3
猪的饲养管理
了解猪的饲养需求和最佳实践,以提供营养均衡的饲料和适宜的饲养环境。
《猪场管理培训手册》 PPT课件
本课件旨在介绍猪场管理的重要性、基本原则、目标与要求,以及猪群管理、 饲料管理、猪舍管理、猪市场分析等内容。让我们一起进入猪场管理的世界 吧!
概述
猪场管理的重要性
了解为什么猪场管理对于提高生产效率和保证猪健康至关重要。
猪场管理的基本原则
探讨有效的猪场管理原则,以确保猪群的最佳生长和发展。
猪场管理的未来发展 趋势
展望猪场管理的未来,探讨行业 发展趋势和新兴技术。
猪场管理的挑战与机 遇
分析猪场管理面临的挑战和可能 的机遇,为管理人员提供思路。
猪场管理案例研究
1 成功的猪场管理案例
2 失败的猪场管理案例
3 猪场管理经验分享
研究一些成功的猪场管理案 例,并探讨其管理策略和经 验。
借鉴一些失败的猪场管理经 验教训,以避免类似的错误。
与管理人员分享一些实用的 猪场管理经验和技巧。
总结
猪场管理的关键点
总结猪场管理中的关键要点,以 指导管理人员的日常操作。
猪舍的环境监测
学习如何监测猪舍的温度、湿度和 空气质量,以确保猪群的良好生长 环境。
猪舍卫生管理和消毒措施
探究猪舍清洁和消毒的重要性,以 预防传染病的发生。
猪市场分析
EAS种猪系统操作手册
EAS种猪系统开发项目组编写EAS 种猪系统操作手册广东温氏集团信息中心与广东华农温氏联合出版目录第一部分种猪场基本生产流程与概念一、猪场基本概念 (1)二、猪场生产的基本生产流程 (6)三、每周原始报表类型 (7)四、录入系统的总原则 (11)五、系统常用指标计算方法 (12)第二部分 EAS种猪系统操作规范一、EAS种猪系统安装和权限说明 (13)二、EAS种猪系统常用功能操作规范 (15)第三部分 IO种猪系统操作规范一、IO种猪系统权限说明 (44)二、IO种猪系统报表相关操作 (44)第四部分种猪系统常见疑难问题解决方法一、种猪状态关联与修改方法 (52)二、仔猪存栏问题跟踪 (53)三、种猪存栏问题处理方法 (56)四、扩繁场仔猪调动/选留操作 (58)第一部分商品、扩繁场基本概念与生产流程一、猪场生产的基本概念3个品种。
⑶原种场由于品种较多,这里没有列出。
4、群体与品系⑴群体原种场种猪所属群体为“核心群、扩繁群”;扩繁场种猪所属群体为“杂繁群”;商品场种猪所属群体为“商品群”。
⑵品系,根据种猪的来源确定品系。
譬如:从水台原种场调出来的种猪-是温系猪;从沙湖原种场调出来的种猪-是加系猪。
5、各类猪只的简单说明⑴种用猪只类型简介:⑵公猪精液检测与配制:❖精液被抽取后进行检测,合格后用于配制(做人工授精用)。
❖用于配制的精液都需要检测,如检测不及格则予以弃置。
❖可能出现多头种猪的精液混合配制的情况,该情况只能用于杂交配种(因为不能判明后代的系谱),而且精液混合以后应进行常规检测。
❖同一批号的精液分装若干个独立的小份(称头份),每头份用于与一头母猪进行一次配种。
❖抽精应相隔若干天,累计抽精次数达到某个限度后一般淘汰。
❖另外,有少量公猪存栏在生产线,主要用于诱情⑶母猪繁殖周期中对应关系与名词❖母猪的繁殖周期<1> 典型的繁殖周期:配种后转入怀孕舍,临产前转入分娩舍。
分娩、断奶后,再转回配种舍。
PigCHAMP猪场管理软件
Swine Health Professionals (Canada), SisPro Consulting (Mexico/South America), Agroceres PIC (Brazil), Prime M (Russia) Swine Health Professionals (加拿大)、 SisPro Consulting (墨西哥/南 美洲)、 Agroceres PIC (巴西)、 Prime M(俄罗斯) 4
36 Major Universities 36所大学
Iowa State University, Kansas State University, Purdue University, University of Illinois, Prairie Swine research Centre 比如普渡大学、艾奥瓦州立大学、伊利诺斯大学等
PigCHAMP软件在上世纪70年代末80年代初由明尼苏达大学开发,用于养猪 数据的记录和分析,最早版本是基于DOS系统的。
In November 2001 PigCHAMP was purchased by the Company
在2001年11月,PigCHAMP团队被收购。
Software can be found in more then 50 countries and 13 languages
软件在50多个国家和13种语言下使用
3
Who Uses PigCHAMP
PigCHAMP 软件客户
Over 2,000 producers in 54 countries 在54个国家有超过2000家养猪企业使用 Majority of large producers in U.S. and Canada 大多数大型养猪企业客户分布在美国和加拿大
猪场管理系统使用说明

猪场管理软件用Excel在E立方管理平台上开发的养猪场管理软件E立方管理平台2012年5月一、软件操作导航 (5)1.1软件导航界面 (5)1.2数据中心---数据查看 (13)二、基础资料 (16)2.1猪栏信息录入表填写说明 (16)2.2员工信息录入表填写说明 (16)2.3种猪信息录入表填写说明 (17)2.4药品信息表填写说明 (17)2.5免疫程序基础表填写说明 (18)2.6保健基础表填写说明 (18)2.7消毒基础表填写说明 (18)三、原始数据的录入 (19)3.1种公猪免疫原始信息录入表 (19)3.2种母猪免疫原始信息录入表 (19)3.3猪栏消毒原始信息录入表 (19)3.4肥猪原始信息录入表 (20)3.5种母猪原始信息录入表 (20)四、种母猪管理 (21)4.1登记 (21)4.2提醒 (25)五、仔猪管理 (28)5.1提醒 (28)5.2登记 (30)六、种公猪管理 (33)6.1种公猪免疫提醒 (33)6.2种公猪免疫登记 (34)6.3种公猪转栏登记 (34)6.4种公猪销售登记 (34)6.5种公猪死亡登记 (35)七、育肥猪管理 (35)7.1育肥猪转栏登记 (35)7.2育肥猪销售登记 (35)八、猪栏管理 (36)8.1猪栏消毒提醒 (36)8.2猪栏消毒登记 (36)九、药品管理 (37)9.1药品失效提醒 (37)9.2药品入库单 (37)9.3 药品出库单 (37)9.4 药品出入库统计 (38)9.5药品出入库明细 (38)9.6药品库存盘点单 (38)十、统计查询 (39)10.1猪栏信息统计查询 (39)10.2员工信息统计表 (39)10.3猪场现存猪统计查询 (39)10.4种母猪履历查询 (40)10.5日报表 (40)系统机构:一、软件操作导航1.1软件导航界面1.1.1导航界面:用填报精灵输入用户名和密码以后登录系统以后,首先进入软件的导航窗口,导航界面如下图:软件分九个模块,在导航栏左侧九个模块分别是基础资料、原始数据录入、种母猪管理、种公猪管理、仔猪管理、育肥猪管理、猪栏管理、统计查询、药品管理。
猪场管家说明书
第一章应用猪场生产管理系统的有关约定1、首先将介绍几个常用按钮,这些按钮的功能在此系统中的任意窗口中都相同。
(1)R.刷新:取得满足条件的所有的数据。
(2)I.增加:新增一条空行,输入新的数据。
(3) D.删除:删除当前光标所在的行。
(4)S.保存:对数据的改动结果进行保存,请注意时刻保存数据,以防数据丢失。
(5)P.打印:打印当前窗口中所显示的所有数据。
(6)X.退出:关闭当前窗口。
2、鼠标单击:约定为单击鼠标左键,若是要用右键单击,则会在下面的说明过程中特别注明。
3、鼠标双击:约定为连续两次快速单击鼠标左键,若是要用右键双击,则会在下面的说明过程中特别注明。
4、按回车:约定为按键盘上的“Enter”键。
5、凡是遇到输入数据的列方格的右边有一个黑色的小三角形,则表示该列的内容不用手工录入数据。
按键盘上的↑,↓键可选择要输入的内容;或用鼠标单击小黑色三角形,弹出一个显示了您可以选择的内容的小窗口,用鼠标单击要输入的内容,则该内容将自动显示在这一列的方格内;或手工输入该列对应内容的代码。
6、场别代码:只能是由0-9这10个数字组成,而且第1位数字不能是0。
7、录入耳号的约定:(1)完整耳号的组成:耳号一般由“品种(2位)”+“性别(1位)”+“年度(2位)+0“数字编码(5位)”四项组成。
其中“品种”由两个英文字母组成;“性别”则由“M”表示公猪,“F”表示母猪;“数字编码”则由5位数字组成(不足5位请在前面补0);“年度”由年度的后两位数据组成。
耳号在猪场内要求是唯一的。
(2)录入耳号完整性约定:在录入公猪卡片及母猪卡片等所有要录入耳号的地方;在录入期初配种记录中的配种公猪耳号处;在录入人工配种的配种公猪耳号处;都要录入完整的耳号,耳号的英文字母部分不分大小。
(3)录入耳号数字化约定:除了上面第(2)点以外所有的耳号处,录入耳号时只输入数字编码部分,按回车键后,电脑自动从种猪卡片中读出与输入的数字编码相匹配的完整的耳号,若数字编码相同的种猪有多于一个的话,则将会弹出一个列有数字编码相同的耳号的窗口,用户可根据您所要的品种,用键盘的↑,↓进行选择某个耳号,选中的那个耳号呈现深亮色,之后按回车键,确定所选中的耳号,则该完整耳号填写在耳号栏处。
V660用户使用说明书(V2.0.1)
前 言尊敬的用户:首先感谢您选用产品。
为了您方便及充分地了解和使用本机的功能,敬请仔细阅读本机使用手册。
阅读后请将本手册存放在方便位置,以供日后参考。
本产品内存储的数据敬请随时备份。
对因操作不当、维修、靠近较强磁场等情况下引起的机内数据损失以及因数据泄露给第三方所造成的损失,本公司概不负责。
本公司不断致力于提高产品质量、完善产品的功能,软件版本时有更新。
说明书所载内容可能与实际产品的功能、规格或设计略有不同,而说明书不能及时修正并知会,产品功能请以出厂时实际产品功能为准。
若有错漏之处,敬请原谅及赐教指正。
目 录注意事项 (5)第一章使用说明 (8)1.1产品功能简介 (8)1.1.1各部位功能说明 (8)1.2桌面功能描述 (9)1.3输入法 (9)1.4按键定义 (9)1.5触控键盘 (10)1.6在线帮助 (10)第二章词典 (11)2.1 全能搜 (11)2.2 朗文当代 (11)2.2.1 输入界面 (11)2.2.2 词典设置 (11)2.2.3 索引界面 (12)2.2.4 浏览界面 (12)2.2.5 帮助 (13)2.2.6 智能拼写 (13)2.2.7 例句查询 (13)2.3 朗文双解 (13)2.4 现代汉语 (13)2.5 古汉语 (13)2.6 英汉词典 (13)2.7 汉英词典 (13)2.8 文化词典 (13)2.9 朗文新词 (13)2.0 雅思词汇 (13)2.a 百科图解 (13)2.b 单词插图 (14)2.c 成语词典 (14)2.d 汉字字典 (14)2.e 朗文3000 (14)2.f 分级词典 (14)2.g 菜谱词典 (14)2.h交通词典 (14)2.j.1 词典附录 (14)2.j.2 生词库 (14)2.j.3 自建词库 (14)2.k 专业词典 (14)第三章学习 (15)3.1 语音评测 (15)3.2 课文背诵 (15)3.3 整句翻译 (16)3.3.1 英译汉 (16)3.3.2 汉译英 (16)3.4互动对话 (16)3.5学习资料 (16)3.6背单词 (17)3.6.1五维立体记忆法 (17)3.6.2艾宾浩斯记忆法 (18)3.6.3逆序记忆 (18)3.6.4单词复习 (18)3.6.5难记本强化 (18)3.6.6学习评估 (18)3.6.7闪电记忆 (19)3.6.8难记本 (19)3.7 动漫学习 (19)3.8 特教指导 (19)3.9 实战听力 (19)3.9.1 听力技巧 (19)3.9.2 听力练习 (19)3.9.3 听力考场 (19)3.0 语法大全 (19)3.0.1 英语语法 (19)3.0.2 语法学习 (19)3.a 造句高手 (19)3.b 模拟考场 (20)3.b.1模拟 (20)3.b.2 练习 (20)3.e 国际音标 (20)3.e.1基础音标 (20)3.e.2发音规则 (21)3.e.3音标测试 (21)3.f汉字学习 (21)3.f.1声母学习 (21)3.f.2韵母学习 (21)3.f.3整体音节学习 (21)3.e.4拼音学习 (21)3.f.5笔顺练习 (21)3.g 五笔练习 (21)3.g.1 输入介绍 (21)3.g.2字根练习 (21)3.g.3单字练习 (21)3.g.4词组练习 (21)3.g.5编码反查 (22)3.h 百科知识 (22)第四章娱乐 (23)4.1 MP4影音 (23)4.2 MP3音乐 (23)4.3 FLASH驿站 (23)4.4 数码录音 (23)4.5 语音图书 (24)4.6 电子相册 (24)4.7 电子画板 (24)4.8 我的铃音 (25)4.9 游戏天地 (25)4.0 客户服务 (25)4.a 磁盘管理 (25)第五章助理 (26)5.1机主信息 (26)5.2电话簿 (26)5.3日记本 (27)5.4行程表 (27)5.7万年历 (27)5.8时间 (28)5.9秒表 (28)5.0定时器 (28)5.a计算换算 (28)5.a.1计算大全 (28)5.a.2换算大全 (28)第六章工具 (29)6.1 按键设置 (29)6.2 开机设置 (29)6.3 电源管理 (29)6.4 音量调节 (29)6.5 主题设置 (29)6.6 密码设置 (29)6.7 发音设置 (30)6.8 LED设置 (30)6.9 游戏设置 (30)6.0 手写设置 (30)6.a 笔尖定位 (30)6.b 语言设置 (30)附录Ⅰ产品规格及装箱清单 (31)附录Ⅱ 有毒有害物质或元素名称及含量表 (32)注意事项为安全正确的使用和存放本机,请先仔细阅读本使用手册注意事项说明。
兴县种猪场6S管理手册

兴县新大象农牧发展有限公司6S管理手册点滴做起追求完善6S基础知识6S是起源于日本的一套管理方法的简称,就是通过规范现场、现物,营造一目了然的工作环境,培养员工良好的工作习惯、形成良好素养,从而提高产品和服务的品质。
6S即是:①整理(Seifi);②整顿(Seiton);③清扫(Seiso);④清洁(Seiketsu);⑤素养(Shitsuke);⑥安全(Safety);1.整理就是:◇将工作场所任何东西区分为必要的与不必要的;◇把必要的东西与不必要的东西明确地、严格地区分开来;◇不必要的东西要尽快处理掉。
目的是:●腾出空间,空间活用●防止误用、误送●塑造清爽的工作场所2.整顿就是:◇对整理之后留在现场的必要的物品分门别类放置,排列整齐。
◇明确数量,并进行有效地标识。
目的是:●工作场所一目了然;●整整齐齐的工作环境;●消除找寻物品的时间;●消除过多的积压物品;3.清扫就是:◇将工作场所清的干干净净;◇保持工作场所干净、亮丽的环境;目的是:●消除脏污,保持工作场所干干净净、明明亮亮;●稳定品质;●减少工业伤害;4.清洁就是:◇将上面的3S实施的做法和成果,长期保持下去。
通过检查评比,奖罚督促,最终做到制度化、规范化。
目的是:●维持上面3S的成果5.素养就是:◇通过长期地坚持,养成好的习惯。
人人依规则行事,做事简洁明了,从而提高全员文明水准,提高行动的品质。
目的:●培养出具有好习惯、遵守规则的员工;●提高员工文明礼貌水准;●营造团体精神;6.安全就是:◇一切行为、措施、方法都要基于安全考虑;一切行动措施不影响安全,任何环境场所人不受伤害。
目的:●树立生命、安全高于一切的经营思想;●培养企业要为社会负责的崇高境界;●把安全工作真正落到实处;★推行6S管理的意义:●提升企业形象——客户、领导等外界人士对整齐干净的工厂,给予很高的评价;●提升员工的归属感——员工乐意在自己营造的良好环境中工作;●减少浪费——不会把良品误以为是废品扔掉,找起东西来很方便,节约时间;●保障安全——不会误用开关、不会操作、不会被乱放的物品绊倒;●提高效率——工作区域划分、物品摆放一目了然,干起活来又快又省力;●创建企业文化——好的企业文化就是好的企业品位;最终意义:提升人的品质,提升企业品位6S管理制度1、目的为改善环境、提高品质,提升素养,创建良好的企业文化,实现持续的良好企业管理绩效,制定本制度。
猪场管家软件操作小技巧

软件操作小技巧1、日常录入(只适应电脑安装版)看着今日提示快速录入,操作步骤:打开今日提示窗口→打开相应录入窗口(如配种记录管理/繁殖记录管理…)→缩小录入窗口并移动停靠在不阻碍查看相应今日提示的地方→新增记录猪的耳号、现在在哪个舍都出来了,不用到处翻看它在哪里,还可以顺便核对记录的正确性,提示表上没有的耳号该注意了,最好核对一遍。
图例:2、生产录入(只适应电脑安装版)A.通过配种记录快速查找并登记该猪的下一条记录(下一步可进行妊娠检查、登记产仔、登记变动、转舍等)打开配种记录管理→点击相应猪只耳号(也可以通过查询筛选找到)→点击右键(弹出下一步可执行的各项操作)→选择相应操作即可直接打开录入窗口进行下一步录入工作。
图例(选相应猪只做繁殖记录):B.通过繁殖记录快速查找并登记该猪的下一条记录(下一步可进行妊娠检查、登记产仔、登记变动、转舍等)如果已有断奶,就只能变动或转舍了。
3、批量处理(通用所有版)带耳号猪只的批量录入(适用于种猪的配种、断奶(如需记录母猪成绩不宜使用)、转舍、变动、妊娠检查)打开相应录入窗口→新增→选定时间→用英文逗号隔开,批量录入猪只耳号→保存即可图例:4、报表排序(只适应电脑安装版)可对报表内容按项目进行重新排序。
打开需要查询的报表页面→点击报表表头即可图例:5、存栏表的使用(只适应电脑安装版)快速查询统计表中各项数据的明细记录打开存栏统计表→将鼠标停在舍号或相应数据上→双击,即可打开相应的明细表。
6、模糊查询(通用所有版)在录入耳号、舍号、物品等名称时,输入名称的一个字,系统将自动调出符合条件的所有信息,录入更加快捷、方便。
打开管理模块→新增→耳号/舍号/物品选择框→输入名称的第一个字,即可从下拉表中看到所有符合条件的记录。
图例7、批量出库(只适应电脑安装版)物品出库可多种物品同时出库,也可以同时出库到多头猪或多个舍打开物品出入库管理→出库→选择第一个需要出库的品种→点添加→选择第二个需要出库的品种→点添加;多猪舍选择方法:添加第一个舍后→输入需要选择的第二个舍的名称的第一个字→从下拉框选择→点添加即可。
EZ3600入门指南:TMR Tracker畜牧管理软件用户手册 说明书
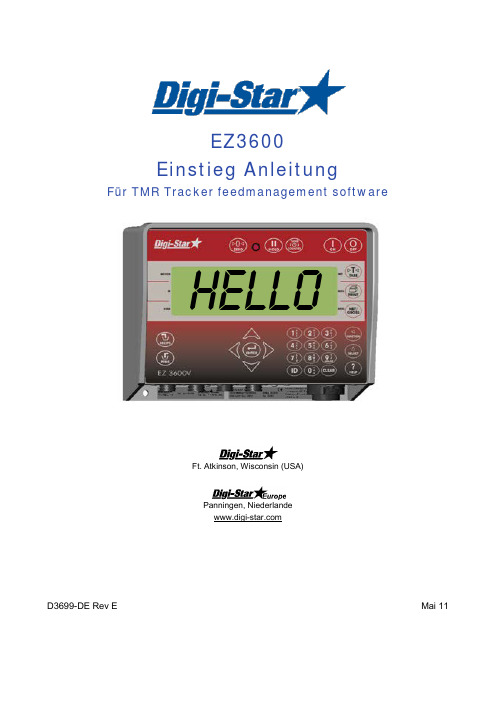
EZ3600 Einstieg AnleitungFür TMR Tracker feedmanagement softwareFt. Atkinson, Wisconsin (USA)Panningen, Niederlande D3699-DE Rev EMai 11HELLOCopyright Alle Rechte vorbehalten. Nichts aus dieser Anleitung darf ohne vorherige schriftliche Erlaubnis von Digi-Star vollständig oder teilweise kopiert, verbreitet oder in andere Sprachen übersetzt werden. Digi-Star behält sich das Recht vor, Änderungen in der Anleitung vorzunehmen. Digi-Star kann jedoch keineGarantie für diese Anleitung übernehmen, weder explizit noch implizit. Das Risiko dafür trägt ausschließlich der Anwender.© Copyright ! 2008 Digi-Star, Fort Atkinson (U.S.A.).Sicherheit während des GebrauchsSICHERHEIT WÄHREND DES GEBRAUCHSVorsichtSystemtest vor InbetriebnahmeBevor Sie das Digi-Star Wiegesystem anwenden, ist es notwending die korrekte Wirkung des Systems zu kontrollieren durch alle Wiegepunkte mit einem bekannten Gewicht zu belasten.Digi-Star kann nicht verantwortlich gehalten werden für Abweichungen und Probleme die entstanden sind als Folge falscher Anwendung der Wiegeanzeige, falscher Kalibration oder Einstellungen. Weiterhin kann Digi-Star nicht verantwortlich gehalten werden für Abweichungen die entstanden sind als Folge technischer Probleme an dem Wiegesystem.ReinigenVerwenden Sie kein fließendes Wasser (Hochdruckreiniger, Wasserschlauch) zum Reinigen des Wiegeindikators.Akku aufladen und SchweißarbeitenBei schweißen ist es notwendig die Wiegestäbe zu entfernen um Beschädigungen zu vermeiden. Wenn dies nicht möglich ist, müssen Sie die …Erde“-Klemme so dicht möglich bei dem Schweißpunkt anbringen, sodass kein Strom durch die Wiegestäbe fließen kann.Digi-Star kann nicht verantwortlich gehalten werden für Probleme als Folge von Schweißtätigkeiten oder bei dem Aufladen des Akkus.Alle Kabel lösenFerndisplay(optional)J-BoxWiegeindikatorBedienungBEDIENUNGWiegeindikator einschalten1. Drücken Sie auf .2. Geben Sie erforderlichenfalls dieBenutzernummer ein.3. Drücken Sie auf .4. Halten Sie 3 Sekunden lang gedrückt, um den Wiegeindikator auf Null zu stellen.HeLLOBenutz1234DatenübertragungDATENÜBERTRAGUNGUSB-Modus1. Stecken Sie den USB Stick in denWiegeindikator.2. Drücken Sie auf , um Daten hinaufzuladenAchtung: Wenn der Wiegeindikator anzeigt, dass noch nicht verwendete Rationen vorhanden sind, drücken Sie auf , um diese Daten zu überschreiben. Entfernen Sie den USB Stick nach der Datenübertragung.Herunterladen der Daten zu den gefütterten Rationen:Stecken Sie den USB Stick in denWiegeindikator. Die Daten werden automatisch vom Wiegeindikator auf den USB Stick übertragen.Entfernen Sie den USB Stick.DataLink-ModiBedienungDisplay-Anzeige DataLink stellt Kontakt zum Wiegeindikator her←PC → DataLink sendet Daten an den WiegeindikatorDL ←IN Wiegeindikator meldet, wenn alle Daten empfangen worden sindNEUE DATEN Wiegeindikator stellt Kontakt zu DataLink her←PC → Wiegeindikator sendet komplette Daten an DataLink DL →OUT12LADEN UND FÜTTERN IM KOMPLETTLADEMODUSRation laden1. D rücken Sie auf .1. Auf dem Wiegeindikator erscheinennacheinander Ration, Gruppennummer undFutternummer.2. Drücken Sie aufbzw. , um diegewünschte Ration zu selektieren. 3. Drücken Sie auf , um die selektierteRation zu starten.Rationsmenge anpassenWenn die RESIZE-Funktion aktiviert ist, können Sie die Rationsmenge für die Gruppe(n) anpassen.1. Geben Sie die neue Rationsmenge ein oder behalten Sie die ursprüngliche Menge bei.2. Drücken Sie auf . Der Wiegeindikatorberechnet die Ration neu.Achtung: Drücken Sie auf , wenn Sie nicht die Rationsmenge, sondern die Anzahl der Tiereändern möchten. Der Wiegeindikator passt die Rationsmenge nach der Änderung der Anzahl der Tiere automatisch an.Drücken Sie auf , um die Rationsmenge für die Gruppe(n) ohne Änderung zu übernehmen.Wenn der Wiegeindikator meldet, dass die geänderte Rationsmenge die Kapazität desFuttermischwagens übersteigt, drücken Sie auf , um diese zu ignorieren.GRUPPEFutterRESIZE1213 121. Die erste Komponente und die zugehörigeMenge blinken auf dem Display.2. Sobald die Menge gegen Null geht, beginntdas Warnlämpchen zu blinken und ein Alarmsignal ertönt.3. a) Komponenten manuell weiterschalten:Wenn die zu ladende Komponentenmenge erreicht ist, drücken Sie auf , um diese zu bestätigen. Drücken Sie erneut auf , um zur nächsten Komponente weiterzuschalten.b) Komponenten automatisch weiterschalten: Wenn die zu ladende Komponentenmenge erreicht ist, schaltet der Wiegeindikatorautomatisch zur nächsten Komponente weiter. Achtung: Hinweise zu den Einstellungen finden Sie auf den Seiten 26 bis 28.Achtung: Wenn Sie die Komponenten in einer anderen Reihenfolge laden möchten, drücken Sieauf oder , um die gewünschte Komponente auszuwählen. Drücken Sie auf , um diese Komponente zu starten.Ausdosierung an GruppenWenn die Komponenten geladen sind, zeigt der Wiegeindikator die erste Tiergruppe an, die gefüttert werden soll.1. a) Manuell weiterschalten:Drücken Sie auf , um die zu fütternde Gruppe zu selektieren. Wenn die zu fütternde Menge ausdosiert ist, drücken Sie auf , um diese zu bestätigen. Drücken Sienochmals auf , um zur nächsten Gruppe weiterzuschalten, oderb) Automatisch weiterschalten:Wenn die zu fütternde Menge ausdosiert ist, schaltet der Wiegeindikator automatisch zur nächsten Gruppe weiter.Wenn die letzte Gruppe gefüttert ist, erscheint auf dem Display die folgende Meldung: ration komplettAchtung: Drücken Sie nicht auf .Wenn Sie die Gruppen in einer anderen Reihenfolge füttern möchten, drücken Sie auf oder , um die gewünschte Gruppe auszuwählen. Drücken Sie auf , um die Fütterung dieser Gruppe zu starten.MAISGRUPPE1321AM HÄUFIGSTEN VERWENDETE DIREKTWAHLNUMMERNVoralarm[P-ALM ]Meldung, wenn die voreingestellte, zu ladende Menge fast erreicht ist1. Geben Sie 401 ein.2. Drücken Sie auf .3. Drücken Sie nochmals auf , um weight (Gewicht) oder PERCNT (Prozent) auszuwählen.4. Drücken Sie auf .5. Geben Sie den Wert für den Voralarm als Gewicht oder Prozentanteil ein.6. Drücken Sie auf .Komponenten automatisch weiterschaltenBeim automatischen Weiterschalten der Komponenten schaltet der Wiegeindikator nach dem Laden der aktuellen Komponente unter Berücksichtigung der eingestellten Toleranz und der Verzögerungszeiten automatisch zur nächsten zu ladenden Komponente weiter.Toleranz[TOLER ]Die Toleranz ist ein Prozentsatz der gewünschten Komponentenmenge. Der Wiegeindikator akzeptiert bei Erreichen der gewünschten Menge minus Toleranz das geladene Gewicht und schaltet, je nach Verzögerungszeit, automatisch zur nächsten Komponente weiter.1. Geben Sie 442 ein.2. Drücken Sie auf .3. Drücken Sie so oft auf bis dergewünschte Prozentsatz (Toleranz) auf dem Display erscheint:AUS, 0,5, 1 - 5, 7, oder 10.4. Drücken Sie auf .1/52/34/640112/34442Verzögerungszeit[DELAY ]Mit dieser Funktion geben Sie ein, wie lange der Wiegeindikator beim Laden der Komponenten warten soll, bevor er zur nächsten Komponente weiterschaltet.1. Geben Sie 443 ein.2. Drücken Sie auf .3. Drücken Sie so oft auf , bis diegewünschte Verzögerungszeit (in Sekunden) auf dem Display erscheint: MANUAL, 1, 2, 3, 5, 7, 10, 20, 30, oder 60. 4. Drücken Sie auf .Achtung: Wenn der Wiegeindikator nichtautomatisch weiterschalten soll, stellen Sie hier MANUAL ein.Zeit einstellen [TIME ]1. Geben Sie 202 ein.2. Drücken Sie auf .3. Drücken Sie auf , um den Cursor zu bewegen.4. Drücken Sie auf , um die Zeit einzustellen.5. Drücken Sie auf .Datum einstellen [DATE ]1. Geben Sie 204 ein.2. Drücken Sie auf .3. Drücken Sie auf , um den Cursor zu bewegen.4. Drücken Sie auf , um das Datum einzustellen.5. Drücken Sie auf .123 444312311:38:5911364 51231104084 5。
大北农猪场生产管理手册

生产流程
本方案以万头生产线为例 ,生 产程序是以“周”为计算单位, 工厂化流水作业生产方式,全过 程分为四个生产环节。按下列工 艺流程图示进行。
工艺流程图
妊娠舍 15周 产 房 4 周 配种舍 1-2周 保 育 舍 4 周 肥 猪 舍
15
种猪 9-10 周
周
肉猪 23周
出栏 上市
四阶段
1待配母猪阶段。在配种舍内饲养空怀、 后备、断奶母猪及公猪进行配种。每条 万头生产线每周参加配种的母猪 24 头, 保证每周能有 20 头母猪分娩。妊娠母猪 放在妊娠母猪舍内定位栏饲养,在临产 前一周转入产房。 2.母猪产仔阶段。母猪按预产期进分娩 舍产仔,在分娩舍内4周,仔猪平均21天 断奶。母猪断奶当天转入配种舍,仔猪 原栏饲养7天后转入保育舍。如果有特殊 情况,可将仔猪进行合并,这样不负担 哺乳的母猪提前转回配种舍等待配种。
分娩保育舍 日常工作;大清洁大消毒; 临断奶母猪淘汰鉴定 日常工作;更换消毒池盆药 液;断奶母猪转出;空栏冲 洗消毒 日常工作 驱虫、免疫注射 日常工作 大清洁大消毒 仔猪去势、 僵猪集中饲养 日常工作 更换消毒池盆药液 接收临产母猪 做好分娩准备 日常工作 仔猪强弱分群 出生仔猪剪牙、 断尾、补铁等 日常工作 清点仔猪数 设备检查维修 周报表
生产技术指标表
项目指标 配种分娩率85% 胎均活产仔数10 出生重1.2~1.4 胎均断奶活仔数9.5 21日龄个体重6.0 8周龄个体重18.0 24周龄个体重93.0 哺乳期成活率95.0 保育期成活率97.0 育成期成活率99.0 全期成活率91.0
生产计划一览表
基础母猪数473 满负荷配种母猪数:周24, 年1248 满负荷分娩胎数: 周20, 年1040 满负荷活产仔数: 周200,年10400 满负荷断奶仔猪数: 周190,年9880 满负荷保育成活数: 周184,年9568 满负荷上市肉猪数: 周182,年9464 注:万头场以周为节律,一年按52周计算;按 设计产房每单元20栏计划。
好管家物业软件操作手册

物业管理软件{ 用户操作手册}2008年04月01日目录前言............................................................................................................... 错误!未定义书签。
第一节系统特性 (3)第二节功能简介 (4)第三节业务导航图 (5)第四节业务流程 (6)第二章系统安装 (6)第一节运行环境 (6)第二节安装数据库服务器 (7)第三节安装物业管理程序 (9)第四节创建与连接帐务数据库 (12)第五节运行软件的注意事项 (14)第三章软件注册及启用帐套 (14)第一节软件注册 (14)第二节启用帐套 (16)第四章基础资料 (17)第一节区域设置 (17)第二节楼座设置 (19)第三节房间类型设置 (20)第四节房间资料 (21)第五章基础设置 (22)第一节费用项目 (22)一如何增加一个收费项目 (22)二增加即时收费项目 (24)第二节房间状态 (25)第三节打印格式 (26)一缴费单上打印新增收费项目 (26)二即时缴费单上打印新增计时收费项目 (27)第六章收费管理 (27)第一节数据录入 (28)第二节缴费开单 (28)一缴费开单与预交费 (28)二即时缴费开单 (30)三缴费取消 (31)第三节费用综合管理 (31)第四节打印收费通知单 (32)第六章系统维护 (32)第一节系统设置 (32)第二节操作员管理 (32)第三节权限设置 (32)一功能简介 (32)二操作路径 (32)三操作指南 (33)第四节操作员密码 (34)一功能简介 (34)二操作路径 (34)三操作指南 (34)第五节帐套属性 (35)一功能简介 (35)二操作路径 (35)第六节数据备份 (35)一功能简介 (35)二操作路径 (36)三操作指南 (36)第七节数据恢复 (36)一功能简介 (36)二操作路径 (37)三操作指南 (37)第七章期末处理 (37)第一节期末结账 (37)一操作路径 (38)二操作指南 (38)第二节期末管理 (38)第八章数据库升级 (38)一功能简介 (38)二操作路径 (39)三操作指南 (39)第十四章常见问题解答 (40)技术支持与服务 (42)第一章系统简介物业管理软件为了顺应市场的需求,在综合了用户的反馈意见的基础上,经过开发人员的不断研发以及测试人员的反复测试后推出的。
智能化养猪生产技术管理操作流程
断奶 0-4 天 5 天以后
2800 2400
哺乳料 哺乳料
N G站 N 电子饲喂站
哺乳仔猪 5 日龄—14 日龄 5-50
超早断奶 仔猪
14 日龄-28 日龄
自由采食
超早断奶料 超早断奶料
≥5
少量多餐,新鲜, 杜绝浪费!
保育仔猪
28 日龄—42 日龄 200-400g 42 日龄—20kg 400-800
第 3 页 共 18 页
新湘农生态科技有限公司
生产技术管理标准操作流程
25. 对任何违反此安全防疫的责任者、违规者,公司可作出严厉处罚,严重者保留追究刑事 责任权力。
第二1节、猪群猪给群料给表料操作流程
猪群类别
猪只阶段(日龄)
给料量 (g/天/头)
饲料品种
后备母猪
100-配种前 2 周 2800-3000 配种前 2 周-配种 自由采食
第 7 页 共 18 页
新湘农生态科技有限公司
生产技术管理标准操作流程
第4步
固定饲喂量:1.6kg,下料 110g/分钟。。
上午辅助没进入 G 站的母猪进站采食;
注意:在 G 站进门处和里面不再撒料,引诱母猪自己到 G 站
新湘农生态科技有限公司
生产技术管理标准操作流程
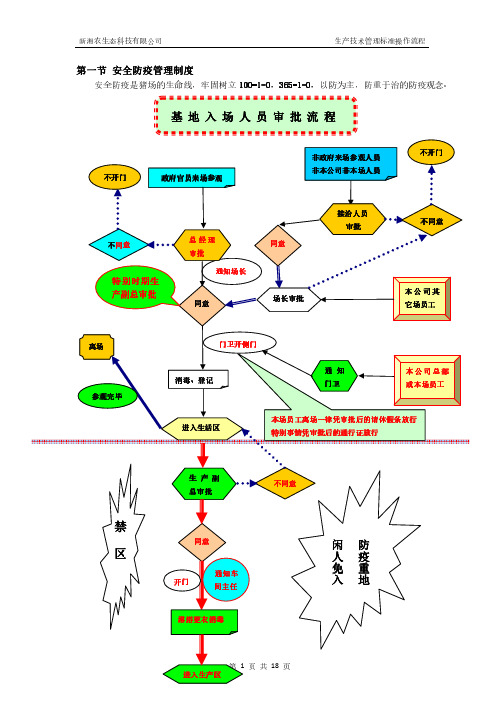
第一安节全防安疫全是防猪疫场管的理生制命线度,牢固树立 100-1=0,365-1=0,以防为主,防重于治的防疫观念。
基地入场人员审批流程
不开门 政府官员来场参观
非政府来场参观人员
不开副总审批
总经理 审批
通知场长
同意
安全防疫 25 条
1. 各部门的负责人为本部门安全防疫管理的第一责任人,各岗位责任人是直接责任者; 2. 门卫应负责保证大门消毒池、人员通道中消毒液的有效浓度,保证大门口紫外线灯和喷
饲养管理手册 海兰灰父母代 Sonia PS Guide CHI

p软件操作练习(一)
Primavera 6.0 软件操作练习一软件操作练习第一篇项目时间进度管理练习1:创建企业项目结构按下图所示建立企业的项目结构(EPS)。
步骤1:启动Project Management(PM)程序,输入用户名(admin)和密码(admin),登录PM。
步骤2:选择菜单“企业-〉EPS”,在弹出窗口中,创建企业项目结构。
第 2 页共38 页软件操作练习练习2:创建项目按如下表格内容,创建项目计划。
项目类型项目代码项目名称步骤2:在项目的详情表中填写每个项目的计划开始时间。
第 3 页共38 页软件操作练习练习3:创建工作分解结构按下图所示的内容,为Hospital医科大学附属医院建设项目创建工作分解结构。
步骤1:切换到项目窗口,选中Hospital医科大学附属医院建设项目,在右键菜单中打开该项目。
步骤2:切换到工作分解结构(WBS)窗口中,为“医科大学附属医院建设项目”建立WBS编码和结构。
第 4 页共38 页软件操作练习练习4:增加作业并估算工期根据下列表格,为“医科大学附属医院建设项目”增加作业,并填写作业工期。
步骤1:切换到作业窗口中,为每个WBS节点增加相关的作业。
步骤2:将作业“开始施工”的作业类型修改为开始里程碑,作业“基础施工完成”和“建筑完工”的作业类型修改为完成里程碑,其他作业的类型都为任务作业。
第 5 页共38 页软件操作练习步骤3:在原定工期栏位中,填写每个任务作业的原定工期。
练习5:建立作业之间的逻辑关系根据下列表格所示,连接作业之间的逻辑关系。
第 6 页共38 页软件操作练习步骤1:在作业的“紧前作业”栏位中,为每一道作业选择它的前序工作。
或直接在横道图上连接作业之间的逻辑关系线。
练习6:进度计算对该项目执行进度计算,计算后检查作业时间是否与下列时间一致。
如果不一致,查找原因。
作业“A1080 开始施工”的开始时间为:2008-03-18作业“A1140 基础施工完成”的完成时间为:2008-06-20第7 页共38 页软件操作练习作业“A1340 建筑完工”的完成时间为:2009-08-13步骤1:按F9执行进度计算,将当前数据日期修改为2008年2月1日。
- 1、下载文档前请自行甄别文档内容的完整性,平台不提供额外的编辑、内容补充、找答案等附加服务。
- 2、"仅部分预览"的文档,不可在线预览部分如存在完整性等问题,可反馈申请退款(可完整预览的文档不适用该条件!)。
- 3、如文档侵犯您的权益,请联系客服反馈,我们会尽快为您处理(人工客服工作时间:9:00-18:30)。
猪场超级管家软件快速入门手册
软件安装:将软件光盘放入光驱,双击文件夹“猪场超级管家”下的文件setup.exe,然后按提示进行安装即可。
第一阶段(代码设置):
1、双击桌面图标“猪场超级管家”,出现登陆界面(用户名:admin,密码是空的,场别代
码:1);点“连接设置”,在“登录方案”选择“业务数据”(3.2版在连接名称选择“本地”),点确认即可,在登录窗口再点确认即可进入系统。
2、进入系统后,点“系统”下“代码设置”,首先进行“场别代码”、“猪舍代码”设置(其
他代码也可设置,也可以后再进行设置),设置好后一定要保存,退出系统。
(如果有多个分场,则在设置“场别代码”的级别时注意:是生产场的选择分场,以分场登录才能录数据;是总公司的选总公司,以总公司登录不能录数据,但可查看合并报表。
)
设置场别代码、猪舍代码建议:如总公司代码是1,那么一分场代码为101,二分场为102,一分场的猪舍代码为10101、10102、……;其他以此类推。
3、重新登录系统,在“场别代码”处输入您所设置的场别代码,点确定重新登录系统,即
会出现所有系统菜单。
4、此时您就可以设置用户名、密码、权限等,亦可以后再设置
5、可在参数设置里选择相应的参数设置
第二阶段(初始数据录入):
1.公猪资料、母猪资料录入(以母猪资料为例):点数据录入---初始录入---母猪基本资料,
进入母猪档案录入窗,点“新增”按钮,输入相关数据(包括后代繁殖记录,特别是期初日期还未断奶的那一胎繁殖记录一定要录入)---保存,然后可直接录入下一头资料,记得每录完一头一定要保存;公猪资料的录入雷同。
2、猪只期初存栏:第一次点系统会提示先定“期初时间”(期初时间就是电脑开始管理猪场
的时间),定好“期初时间”后,再点一次“猪只期初存栏”,即可录入猪场当日的盘点数据(种猪的耳号、重量、所在舍号,带仔母猪要录入带仔数量;保育、育肥猪只需输入数量、重量、舍号),盘点数的耳号、舍号、带仔数量等数据要准确。
(修改期初时间方法:系统--数据备份/删除/恢复--点删除数据即可)
3、配种数据期初录入:期初日期之前已经配种但还没繁殖的配种记录数据在此录入,期初
日期当日及往后的配种数据在后面的正常数据录入部分的“配种数据”录入。
第三阶段(正常的生产数据录入,也就是期初日期后的数据录入):
备注:转舍
1、数据录入可参考上面流程图;
2、当从外购入种猪时,先登记其资料,然后在“猪群变动”登记,购入类型选择购入,登记实际猪舍即可;
3、生产数据的采集、录入要做到及时、真实、准确,最好当天数据当天录,否则很容易产生数据混乱;
4、生产数据的录入要遵循数据发生时间的先后顺序录入;
5、详细操作可参考软件帮助。
关于免疫程序设置问题问答:
问:“免疫程序设置”,若“免疫时间类型”设置为“固定日期”,则“开始”和“结束”如何填入时间(时间格式)答:开始结束
09.01 03.31 表示每年的9月份至第二年3月底
6 10 表示每月的6-10日
25 3 表示每月的25日到第二月的3日
问:“免疫程序设置”里的“开始”和“结束”是开始时间和结束时间吗?或是别的意思
答:如分娩后1星期内要注射疫苗,则开始:1,结束:7
如出生后30-35天内要注射疫苗,则开始:30,结束:35。
