LM LINK驱动安装方法
欧讯对讲机 写频线驱动下载安装说明

写频线驱动下载安装说明
1.下载安装相应的驱动。
串口:不需要安装驱动,可直接与电脑对讲机连接使用。
USB端口:根据不同的电脑程序版本来选择正确的USB驱动下载安装。
2.具体的USB驱动下载安装步骤:
一、安装US驱动程序。
a.根据个人使用的电脑操作系统版本选择正确的USB驱动,注意
Windows2000/XP,Windows Vista和Windows 7等不同操作系统指定的USB驱动。
b.解压USB驱动的压缩文件,可以看到如下四个子文件。
c.找到子文件" setup.exe " 双击,并开始安装。
d.安装开始后,进入如下页面,点击“下一步”继续。
e.安装过程中会有一段时间停顿,之后进入如下页面提示该安装向导的驱动
程序安装成功,点击“完成”。
注意:如果本机已安装过类似的USB驱动程序,点击安装程序进入“下一步”开始安装的时候会出现如下页面:
如果点击重新安装的话,之后完成安装之后是否重启计算机来完成并运行该程序的修改:。
Mellanox 光纤网卡驱动Driver for Linux的安装
\
英文原厂文档
/related-docs/prod_software/Mellanox_EN_for_Linux_Release_Notes_v3_4-1_0_0_3.pdf
Mellanox ConnectX®-4
Mellanox ConnectX®-4 Lx
Mellanox ConnectX®-3/ConnectX®-3 Pro
Mellanox ConnectX®-2
Mellanox PCI Express 2.0
Mellanox PCI Express 3.0
2
2.1下载驱动的地址比较难找
Mellanox EN Driver for Linux的安装
编者按:Redhat默认支持博科和intel的网卡驱动,对于其他厂商的光纤网卡,或者统后,网卡不能识别工作,安装厂家驱动后正常工作的情况
1
Mellanox EN Driver for Linux支持的网络光纤卡系列有大致以下几种:
2.2Redhat 7系列安装比较麻烦
3
1、在redhat/centos/Oracle linux 6等其他linux上安装驱动
2、在redhat/centos/Oracle linux等其他linux 7上安装驱动
(原程序不支持redhat7,需要重新编译添加支持)
3、驱动下载地址
第一部分
redhat 6.X(在6.6测试过)
yum install kernel-devel-3.10.0-229.el7.x86_64 redhat-rpm-config
---安装网卡驱动
[root@localhost /itsm/mlnx-en-3.4-1.0.0.3-ol7.1-x86_64 ]#./install --add-kernel-support
Mellanox -ib驱动安装手册linux
Mellanox OFED for Linux Installation GuideRev 1.5.1Mellanox Technologies350 Oakmead Parkway, Suite 100Sunnyvale, CA 94085U.S.A.Tel: (408) 970-3400Fax: (408) 970-3403Mellanox Technologies, Ltd.PO Box 586 Hermon Building Yokneam 20692Israel Tel: +972-4-909-7200Fax: +972-4-959-3245© Copyright 2010. Mellanox Technologies, Inc. All Rights Reserved.Mellanox®, BridgeX®, ConnectX®, InfiniBlast®, InfiniBridge®, InfiniHost®, InfiniPCI®, InfiniRISC®, InfiniScale®, andVirtual Protocol Interconnect are registered trademarks of Mellanox Technologies, Ltd.CORE-Direct , FabricIT, and PhyX are trademarks of Mellanox Technologies, Ltd.All other marks and names mentioned herein may be trademarks of their respective companies.Document Number: 2914Rev 1.5.1Mellanox Technologies 2NOTE:THIS HARDWARE, SOFTWARE OR TEST SUITE PRODUCT (“PRODUCT(S)”) AND ITS RELATED DOCUMENTATION ARE PRO-VIDED BY MELLANOX TECHNOLOGIES “AS-IS” WITH ALL FAULTS OF ANY KIND AND SOLELY FOR THE PURPOSE OF AIDING THE CUSTOMER IN TESTING APPLICATIONS THAT USE THE PRODUCTS IN DESIGNATED SOLUTIONS. THE CUS-TOMER'S MANUFACTURING TEST ENVIRONMENT HAS NOT MET THE STANDARDS SET BY MELLANOX TECHNOLOGIES TO FULLY QUALIFY THE PRODUCTO(S) AND/OR THE SYSTEM USING IT. THEREFORE, MELLANOX TECHNOLOGIES CAN-NOT AND DOES NOT GUARANTEE OR WARRANT THAT THE PRODUCTS WILL OPERATE WITH THE HIGHEST QUALITY . ANY EXPRESS OR IMPLIED WARRANTIES, INCLUDING , BUT NOT LIMITED TO, THE IMPLIED WARRANTIES OF MER-CHANTABILITY , FITNESS FOR A PARTICULAR PURPOSE AND NONINFRINGEMENT ARE DISCLAIMED. IN NO EVENT SHALL MELLANOX BE LIABLE TO CUSTOMER OR ANY THIRD PARTIES FOR ANY DIRECT, INDIRECT, SPECIAL, EXEM-PLARY , OR CONSEQUENTIAL DAMAGES OF ANY KIND (INCLUDING , BUT NOT LIMITED TO, PAYMENT FOR PROCURE-MENT OF SUBSTITUTE GOODS OR SERVICES; LOSS OF USE, DATA, OR PROFITS; OR BUSINESS INTERRUPTION) HOWEVER CAUSED AND ON ANY THEORY OF LIABILITY , WHETHER IN CONTRACT, STRICT LIABILITY , OR TORT(INCLUDING NEGLIGENCE OR OTHERWISE) ARISING IN ANY WAY FROM THE USE OF THE PRODUCT(S) AND RELATED DOCUMENTATION EVEN IF ADVISED OF THE POSSIBILITY OF SUCH DAMAGE.Mellanox OFED for Linux User’s Manual Rev 1.5.1 InstallationThis chapter describes how to install and test the Mellanox OFED for Linux package on a singlehost machine with Mellanox InfiniBand and/or Ethernet adapter hardware installed. The chapterincludes the following sections:•“Hardware and Software Requirements” (page 3)•“Downloading Mellanox OFED” (page 4)•“Installing Mellanox OFED” (page 4)•“Uninstalling Mellanox OFED” (page 15)Hardware and Software RequirementsHardware RequirementsPlatforms• A server platform with an adapter card based on one of the following Mellanox Technologies’InfiniBand HCA devices:-MT25408 ConnectX®-2 (VPI, IB, EN, FCoE) (firmware: fw-ConnectX2)-MT25408 ConnectX® (VPI, IB, EN, FCoE) (firmware: fw-25408)-MT25208 InfiniHost® III Ex (firmware: fw-25218 for Mem-Free cards, and fw-25208 for cards withmemory)-MT25204 InfiniHost® III Lx (firmware: fw-25204)-MT23108 InfiniHost® (firmware: fw-23108)Note For the list of supported architecture platforms, please refer to the Mellanox OFEDRelease Notes file.Required Disk Space for Installation•400MBSoftware RequirementsOperating System•Linux operating systemNote For the list of supported operating system distributions and kernels, please refer to the Mellanox OFED Release Notes file.Installer Privileges•The installation requires administrator privileges on the target machineMellanox Technologies3Rev 1.5.1Mellanox Technologies 4Downloading Mellanox OFEDStep 1.Verify that the system has a Mellanox network adapter (HCA/NIC) installed by ensuringthat you can see ConnectX or InfiniHost entries in the display.The following example shows a system with an installed Mellanox HCA:host1# lspci -v | grep Mellanox02:00.0 InfiniBand: Mellanox Technologies MT25418 [ConnectX IB DDR, PCIe 2.0 2.5GT/s] (reva0)Step 2.Download the ISO image to your host.The image’s name has the format MLNX_OFED_LINUX-<ver>-<OS label>.iso. You candownload it from > Products > IB SW/Drivers.Step e the md5sum utility to confirm the file integrity of your ISO image. Run the followingcommand and compare the result to the value provided on the download page.host1$ md5sum MLNX_OFED_LINUX-<ver>-<OS label>.isoInstalling Mellanox OFEDThe installation script, mlnxofedinstall , performs the following:•Discovers the currently installed kernel•Uninstalls any software stacks that are part of the standard operating system distribution oranother vendor's commercial stack•Installs the MLNX_OFED_LINUX binary RPMs (if they are available for the current kernel)•Identifies the currently installed InfiniBand and Ethernet network adapters and automatically 1upgrades the firmwarePre-installation Notes•The installation script removes all previously installed Mellanox OFED packages and re-installsfrom scratch. You will be prompted to acknowledge the deletion of the old packages.Note Pre-existing configuration files will be saved with the extension “.conf.saverpm”.•If you need to install Mellanox OFED on an entire (homogeneous) cluster, a common strategy isto mount the ISO image on one of the cluster nodes and then copy it to a shared file system suchas NFS. To install on all the cluster nodes, use cluster-aware tools (such as pdsh).•If your kernel version does not match with any of the offered pre-built RPMs, you can add yourkernel version by using the “mlnx_add_kernel_support.sh ” script located under the docs/directory.Usage:mlnx_add_kernel_support.sh -i|--iso <mlnx iso>[-t|--tmpdir <local work dir>][-v|--verbose]1.The firmware will not be updated if you run the install script with the ‘--without-fw-update’ option.Mellanox OFED for Linux User’s Manual Rev 1.5.1 ExampleThe following command will create a MLNX_OFED_LINUX ISO image for RedHat 5.4 underthe/tmp directory.MLNX_OFED_LINUX-1.5.1-rhel5.4/docs/mlnx_add_kernel_support.sh -i/mnt/MLNX_OFED_LINUX-1.5.1-rhel5.4.isoAll Mellanox, OEM, OFED, or Distribution IB packages will be removed.Do you want to continue?[y/N]:yRemoving OFED RPMs...Running mkisofs...Created /tmp/MLNX_OFED_LINUX-1.5.1-rhel5.4.isoInstallation ScriptMellanox OFED includes an installation script called mlnxofedinstall. Its usage is describedbelow. You will use it during the installation procedure described in Section , “Installation Proce-dure,” on page 6.Usage./mlnxofedinstall [OPTIONS]Note If no options are provided to the script, then all available RPMs are installed.Options-c|--config <packages config_file>Example of the configuration file can be found under docs -n|--net <network config file>Example of the network configuration file can be foundunder docs-p|--print-available Print available packages for the current platform and cre-ate a corresponding ofed.conf file. The installation scriptexits after creating ofed.conf.--with-fc Install FCoE support — Available on RHEL5.2 ONLY--with-32bit Install 32-bit libraries (default). This is relevant forx86_64 and ppc64 platforms.--without-32bit Skip 32-bit libraries installation--without-ib-bonding Skip ib-bonding RPM installation--without-depcheck Skip Distro's libraries check--without-fw-update Skip firmware update--force-fw-update Force firmware update--force Force installation (without querying the user)--all Install all kernel modules, libibverbs, libibumad, librd-macm, mft, mstflint, diagnostic tools, OpenSM, ib-bonding,MVAPICH, Open MPI, MPI tests, MPI selector, perftest, sdp-netstat and libsdp srptools, rds-tools, static and dynamiclibrariesMellanox Technologies5Rev 1.5.1Mellanox Technologies6--hpc Install all kernel modules, libibverbs, libibumad, librd-macm, mft, mstflint, diagnostic tools, OpenSM , ib-bonding,MVAPICH, Open MPI, MPI tests, MPI selector, dynamic librar-ies--basic Install all kernel modules, libibverbs, libibumad, mft,mstflint, dynamic libraries--msmInstall all kernel modules, libibverbs, libibumad, mft,mstflint, diagnostic tools, OpenSM , ib-bonding, dynamiclibrariesNOTE: With --msm flag, the OpenSM daemon is configured torun upon boot.-v|-vv|-vvvSet verbosity level -q Set quiet - no messages will be printed mlnxofedinstall Return CodesTable 1 lists the mlnxofedinstall script return codes and their meanings.Installation ProcedureStep 1.Login to the installation machine as root.Step 2.Mount the ISO image on your machine host1# mount -o ro,loop MLNX_OFED_LINUX-<ver>-<OS label>.iso /mntNote After mounting the ISO image, /mnt will be a Read Only folder.Step 3.Run the installation scripthost1# /mnt/mlnxofedinstallThis program will install the MLNX_OFED_LINUX package on your machine.Note that all other Mellanox, OEM, OFED, or Distribution IB packages will be removed.Do you want to continue?[y/N]:yUninstalling the previous version of OFEDTable 1 - mlnxofedinstall Return CodesReturn CodeMeaning 0The Installation ended successfully 1The installation failed 2No firmware was found for the adapter device 3Failed to start the mst driverMellanox OFED for Linux User’s Manual Rev 1.5.1 Starting MLNX_OFED_LINUX-1.5.1-rc6 installation ...Installing kernel-ib RPMPreparing... ########################################### [100%]1:kernel-ib ########################################### [100%]Installing kernel-ib-devel RPMPreparing... ########################################### [100%]1:kernel-ib-devel ########################################### [100%]Installing mft RPMPreparing... ########################################### [100%]1:mft ########################################### [100%]Installing mpi-selector RPMPreparing... ########################################### [100%]1:mpi-selector ########################################### [100%]Install user level RPMs:Preparing... ########################################### [100%]1:libibumad ########################################### [100%]Preparing... ########################################### [100%]1:libibumad ########################################### [100%]Preparing... ########################################### [100%]1:libibmad ########################################### [100%]Preparing... ########################################### [100%]1:libibmad ########################################### [100%]Preparing... ########################################### [100%]1:libibumad-devel ########################################### [100%]Preparing... ########################################### [100%]1:libibumad-devel ########################################### [100%]Preparing... ########################################### [100%]1:libibmad-devel ########################################### [100%]Preparing... ########################################### [100%]1:libibmad-devel ########################################### [100%]Preparing... ########################################### [100%]1:ofed-scripts ########################################### [100%]Preparing... ########################################### [100%]1:libibverbs ########################################### [100%]Preparing... ########################################### [100%]1:libibverbs ########################################### [100%]Preparing... ########################################### [100%]1:libibverbs-devel ########################################### [100%]Preparing... ########################################### [100%]1:libibverbs-devel ########################################### [100%]Preparing... ########################################### [100%]1:libibverbs-devel-static########################################### [100%]Preparing... ########################################### [100%]1:libibverbs-devel-static########################################### [100%]Preparing... ########################################### [100%]1:libibverbs-utils ########################################### [100%]Preparing... ########################################### [100%]1:libmthca ########################################### [100%]Mellanox Technologies7Rev 1.5.1Mellanox Technologies8Preparing... ########################################### [100%]1:libmthca ########################################### [100%]Preparing... ########################################### [100%]1:libmthca-devel-static ########################################### [100%]Preparing... ########################################### [100%]1:libmthca-devel-static ########################################### [100%]Preparing... ########################################### [100%]1:libmlx4 ########################################### [100%]Preparing... ########################################### [100%]1:libmlx4 ########################################### [100%]Preparing... ########################################### [100%]1:libmlx4-devel ########################################### [100%]Preparing... ########################################### [100%]1:libmlx4-devel ########################################### [100%]Preparing... ########################################### [100%]1:libibcm ########################################### [100%]Preparing... ########################################### [100%]1:libibcm ########################################### [100%]Preparing... ########################################### [100%]1:libibcm-devel ########################################### [100%]Preparing... ########################################### [100%]1:libibcm-devel ########################################### [100%]Preparing... ########################################### [100%]1:libibumad-static ########################################### [100%]Preparing... ########################################### [100%]1:libibumad-static ########################################### [100%]Preparing... ########################################### [100%]1:libibmad-static ########################################### [100%]Preparing... ########################################### [100%]1:libibmad-static ########################################### [100%]Preparing... ########################################### [100%]1:ibsim ########################################### [100%]Preparing... ########################################### [100%]1:librdmacm ########################################### [100%]Preparing... ########################################### [100%]1:librdmacm ########################################### [100%]Preparing... ########################################### [100%]1:librdmacm-utils ########################################### [100%]Preparing... ########################################### [100%]1:librdmacm-devel ########################################### [100%]Preparing... ########################################### [100%]1:librdmacm-devel ########################################### [100%]Preparing... ########################################### [100%]1:libsdp ########################################### [100%]Preparing... ########################################### [100%]1:libsdp ########################################### [100%]Preparing... ########################################### [100%]1:libsdp-devel ########################################### [100%]Preparing... ########################################### [100%]1:libsdp-devel ########################################### [100%]Mellanox OFED for Linux User’s Manual Rev 1.5.1Preparing... ########################################### [100%]1:opensm-libs ########################################### [100%]Preparing... ########################################### [100%]1:opensm-libs ########################################### [100%]Preparing... ########################################### [100%]1:opensm ########################################### [100%]opensmd 0:off 1:off 2:off 3:off 4:off 5:off 6:offPreparing... ########################################### [100%]1:opensm-devel ########################################### [100%]Preparing... ########################################### [100%]1:opensm-devel ########################################### [100%]Preparing... ########################################### [100%]1:opensm-static ########################################### [100%]Preparing... ########################################### [100%]1:opensm-static ########################################### [100%]Preparing... ########################################### [100%]1:compat-dapl ########################################### [100%]Preparing... ########################################### [100%]1:compat-dapl ########################################### [100%]Preparing... ########################################### [100%]1:compat-dapl-devel ########################################### [100%]Preparing... ########################################### [100%]1:compat-dapl-devel ########################################### [100%]Preparing... ########################################### [100%]1:dapl ########################################### [100%]Preparing... ########################################### [100%]1:dapl ########################################### [100%]Preparing... ########################################### [100%]1:dapl-devel ########################################### [100%]Preparing... ########################################### [100%]1:dapl-devel ########################################### [100%]Preparing... ########################################### [100%]1:dapl-devel-static ########################################### [100%]Preparing... ########################################### [100%]1:dapl-devel-static ########################################### [100%]Preparing... ########################################### [100%]1:dapl-utils ########################################### [100%]Preparing... ########################################### [100%]1:perftest ########################################### [100%]Preparing... ########################################### [100%]1:mstflint ########################################### [100%]Preparing... ########################################### [100%]1:sdpnetstat ########################################### [100%]Preparing... ########################################### [100%]1:srptools ########################################### [100%]Preparing... ########################################### [100%]1:rds-tools ########################################### [100%]Preparing... ########################################### [100%]1:rnfs-utils ########################################### [100%]Preparing... ########################################### [100%]Mellanox Technologies9Rev 1.5.1Mellanox Technologies 10 1:ibutils ########################################### [100%]Preparing... ########################################### [100%]1:ibutils2 ########################################### [100%]Preparing... ########################################### [100%]1:ibdump ########################################### [100%]Preparing... ########################################### [100%]1:infiniband-diags ########################################### [100%]Preparing... ########################################### [100%]1:qperf ########################################### [100%]Preparing... ########################################### [100%]1:mlnxofed-docs ########################################### [100%]Preparing... ########################################### [100%]1:mvapich_gcc ########################################### [100%]Preparing... ########################################### [100%]1:mvapich_pgi ########################################### [100%]Preparing... ########################################### [100%]1:mvapich_intel ########################################### [100%]Preparing... ########################################### [100%]1:openmpi_gcc ########################################### [100%]Preparing... ########################################### [100%]1:openmpi_pgi ########################################### [100%]Preparing... ########################################### [100%]1:openmpi_intel ########################################### [100%]Preparing... ########################################### [100%]1:mpitests_mvapich_gcc ########################################### [100%]Preparing... ########################################### [100%]1:mpitests_mvapich_pgi ########################################### [100%]Preparing... ########################################### [100%]1:mpitests_mvapich_intel ########################################### [100%]Preparing... ########################################### [100%]1:mpitests_openmpi_gcc ########################################### [100%]Preparing... ########################################### [100%]1:mpitests_openmpi_pgi ########################################### [100%]Preparing... ########################################### [100%]1:mpitests_openmpi_intel ########################################### [100%]Device (15b3:634a):02:00.0 InfiniBand: Mellanox Technologies MT25418 [ConnectX IB DDR, PCIe 2.0 2.5GT/s] (rev a0)Link Width: 8xLink Speed: 2.5Gb/sInstallation finished successfully.Programming HCA firmware for /dev/mst/mt25418_pci_cr0 deviceRunning: mlxburn -d /dev/mst/mt25418_pci_cr0 -fw /tmp/MLNX_OFED_LINUX-1.5.1/MLNX_OFED_LINUX-1.5.1-sles11/firmware/fw-25408/2_7_000/fw-25408-rel.mlx -dev_type 25408 -no-I- Querying device ...-I- Using auto detected configuration file: /tmp/MLNX_OFED_LINUX-1.5.1/MLNX_OFED_LINUX-1.5.1-sles11/firmware/fw-25408/2_7_000/MHGH28-XTC_A4-A7.ini (PSID = MT_04A0140005)-I- Generating image ...Current FW version on flash: 2.6.0New FW version: 2.7.0Burning FW image without signatures - OKRestoring signature - OK-I- Image burn completed successfully.Please reboot your system for the changes to take effect.warning: /etc/infiniband/openib.conf saved as /etc/infiniband/openib.conf.rpmsaveNote In case your machine has the latest firmware, no firmware update will occur and the installation script will print at the end of installation a message similar to the following:...Installation finished successfully.The firmware version 2.7.000 is up to date.Note: To force firmware update use '--force-fw-update' flag.Note In case your machine has an unsupported network adapter device, no firmware update will occur and the error message below will be printed. Please contact your hardwarevendor for help on firmware updates.Error message:-I- Querying device ...-E- Can't auto detect fw configuration file: ...Step 4.In case the installation script performed firmware updates to your network adapter hard-ware, it will ask you to reboot your machine.Step 5.The script adds the following lines to /etc/security/limits.conf for the userspace components such as MPI:* soft memlock unlimited* hard memlock unlimitedThese settings unlimit the amount of memory that can be pinned by a user space application.If desired, tune the value unlimited to a specific amount of RAM.Step 6.For your machine to be part of the InfiniBand/VPI fabric, a Subnet Manager must be run-ning on one of the fabric nodes. At this point, Mellanox OFED for Linux has alreadyinstalled the OpenSM Subnet Manager on your machine. For details on starting OpenSM,see Chapter 12, “OpenSM – Subnet Manager”.Step 7.(InfiniBand only) Run the hca_self_test.ofed utility to verify whether or not the InfiniBand link is up. The utility also checks for and displays additional information suchas•HCA firmware version•Kernel architecture•Driver version•Number of active HCA ports along with their states•Node GUIDNote For more details on hca_self_test.ofed, see the file hca_self_test.readme under docs/.host1# /usr/bin/hca_self_test.ofed---- Performing InfiniBand HCA Self Test ----Number of HCAs Detected (1)PCI Device Check ....................... PASSKernel Arch ............................ x86_64Host Driver Version .................... MLNX_OFED_LINUX-1.5.1 (OFED-1.5.1-mlnx9) 1.5.1-2.6.9_89.ELlargesmpHost Driver RPM Check .................. PASSHCA Firmware on HCA #0 ................. 2.7.000HCA Firmware Check on HCA #0 ........... PASSHost Driver Initialization ............. PASSNumber of HCA Ports Active 0Port State of Port #0 on HCA #0 ........ INITPort State of Port #0 on HCA #0 ........ DOWNError Counter Check on HCA #0 .......... PASSKernel Syslog Check .................... PASSNode GUID on HCA #0 .................... 00:02:c9:03:00:00:10:e0------------------ DONE ---------------------Note After the installer completes, information about the Mellanox OFED installation such as prefix, kernel version, and installation parameters can be retrieved by running the com-mand /etc/infiniband/info.Installation ResultsSoftware•The OFED and MFT packages are installed under the /usr directory.•The kernel modules are installed under:-InfiniBand subsystem:/lib/modules/`uname -r`/updates/kernel/drivers/infiniband/-mlx4 driver:Under /lib/modules/`uname -r`/updates/kernel/drivers/net/mlx4you will find mlx4_core.ko, mlx4_en.ko, mlx4_ib.ko (and mlx4_fc ifyou ran the installation script with --with-fc)-RDS:/lib/modules/`uname -r`/updates/kernel/net/rds/rds.ko-Bonding module:/lib/modules/`uname -r`/updates/kernel/drivers/net/bonding/bonding.ko •The package kernel-ib-devel include files are placed under /usr/src/ofa_kernel/include/. These include files should be used when building kernel modules that use the stack. (Note that the include files, if needed, are “backported” to your kernel.)•The raw package (un-backported) source files are placed under/usr/src/ofa_kernel-<ver>•The script openibd is installed under /etc/init.d/. This script can be used to load and unload the software stack.•The script connectx_port_config is installed under /sbin. This script can be used to con-figure the ports of ConnectX network adapter cards to Ethernet and/or InfiniBand. For details on this script, please see Section 3.1, “Port Type Management”.•The directory /etc/infiniband is created with the files info and openib.conf and con-nectx.conf. The info script can be used to retrieve Mellanox OFED installation information. The openib.conf file contains the list of modules that are loaded when the openibd script is used. The connectx.conf file saves the ConnectX adapter card’s ports configuration to Ether-net and/or InfiniBand. This file is used at driver start/restart (/etc/init.d/openibd start) .•The file 90-ib.rules is installed under /etc/udev/rules.d/•If OpenSM is installed, the daemon opensmd is installed under /etc/init.d/ and opensm.conf is installed under /etc.•If IPoIB configuration files are included, ifcfg-ib<n> files will be installed under:-/etc/sysconfig/network-scripts/ on a RedHat machine-/etc/sysconfig/network/ on a SuSE machine•The installation process unlimits the amount of memory that can be pinned by a user space application. See Step 5.•Man pages will be installed under /usr/share/man/Firmware•The firmware of existing network adapter devices will be updated if the following two condi-tions are fullfilled:1. You run the installation script in default mode; that is, without the option‘--without-fw-update’.2. The firmware version of the adapter device is older than the firmware version includedwiththe Mellanox OFED ISO imageNote If an adapter’s Flash was originially programmed with an Expansion ROM image, the automatic firmware update will also burn an Expansion ROM image.•In case your machine has an unsupported network adapter device, no firmware update will occur and the error message below will be printed. Please contact your hardware vendor for help on firmware updates.Error message:。
MagIQ Link模块安装指南说明书

OR
2. HEATER
OR
3. AIR SENSOR
1. WALL CONTROL
(MAGIQ TOUCH CONTROLLER)
Cable lengths between all other components should be no greater than 20m. For more information, refer to System Configuration diagrams at the end of this manual.
SAFETY
EMPLOYER AND EMPLOYEE RESPONSIBILITIES
The installation and maintenance of evaporative coolers at height has the potential to create Occupational Health and Safety issues for those involved. Installers are advised to ensure they are familiar with Local Acts, Regulations and Standards, which may offer practical guidance on health and safety issues. Compliance with these regulations will require appropriate work practices, equipment, training and qualifications of workers. INSTALLER AND MAINTENANCE CONTRACTORS– RISK ASSESSMENT
JLINK 驱动安装方法简单说明——jlink v9教程资料文档
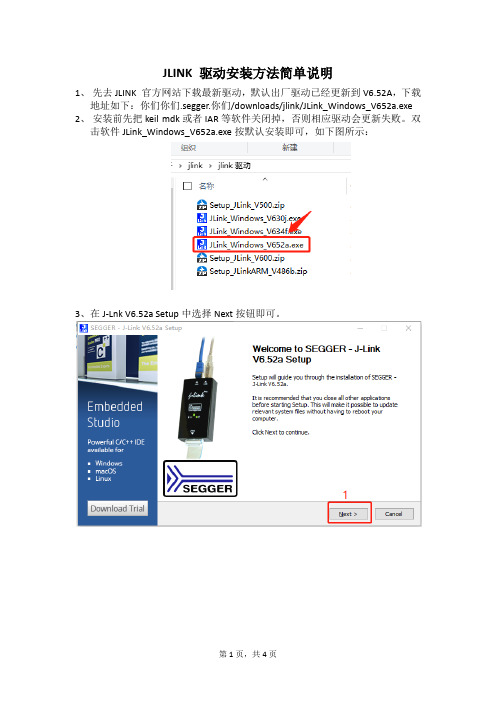
JLINK 驱动安装方法简单说明
1、先去JLINK 官方网站下载最新驱动,默认出厂驱动已经更新到V6.52A,下载
地址如下:你们你们.segger.你们/downloads/jlink/JLink_Windows_V652a.exe 2、安装前先把keil mdk或者IAR等软件关闭掉,否则相应驱动会更新失败。
双
击软件JLink_Windows_V652a.exe按默认安装即可,如下图所示:
3、在J-Lnk V6.52a Setup中选择Next按钮即可。
4、License Agreement界面中,请选择I Agree按钮,执行下一步。
5、Choose Optional 你们ponents 默认安装即可,也可以选择Install a new instance。
6、Inst alling界面中,是安装过程,安装需要几秒钟。
7、J-Link DLL Updater V6.52a界面中,一定要勾选上MDK-ARM等选项。
8、安装完成,点击Finish即可。
9、会在桌面创建两个快捷键按钮,如下图所示:
注意:关于烧录使用教程,请参考我的另外一篇文章“J-FLASH烧录STM32F103ZET6芯片的说明”等。
联发科MTK平台线刷工具和驱动安装

联发科MTK平台线刷工具和驱动安装如有必要,请先阅读新手入门指南文件下载:MTK平台手机刷机工具和驱动.rar(在本站下载的刷机包里已包含工具和驱动,无需重复下载)解压后里面有三个文件夹,Driver_Auto_Installer是驱动程序,SP_Flash_T ool是刷机工具,分为v1336和v1224两个版本一、安装驱动:打开 Driver_Auto_Installer / SmartPhoneDriver 文件夹驱动安装教程基于win7系统,xp电脑也可参考本文,请举一反三多多摸索1、进入SmartPhoneDriver文件夹后请根本你的电脑选择x86或x64,运行里面的spinstall.exe文件1.1、xp系统的电脑请直接跳到第6步2、打开电脑的设备管理器(针对win7电脑:鼠标右键单击计算机、单击属性、再点左边的-设备管理器)3、将手机断电后再装上电池,按住侧上键(音量+)不要松开(极少手机是按住下键,如有实体home键就需要同时按住),再用数据线把手机连到电脑USB接口上3.1、此时【设备管理器】中就会出现一个黄颜色感叹号的设备3.2、黄感叹号设备一般显示为【MT65xx Preloader】,有时会显示为【未知设备】3.2.a、这个黄颜色感叹号的设备很快就会消失,此时需要快速进行第4步的操作3.2.b、如果没来得及进行第4步操作,请取下手机重复第3步骤即可4、在黄感叹号的设备上点鼠标右键,在菜单中点击【更新驱动程序软件】(如果鼠标右键的菜单中没有【更新驱动程序软件】,而是【扫描检测硬件改动】,请点击【属性】,再在弹出的对话框中点【重新安装驱动程序】)5、定位驱动程序位置到【SmartPhoneDriver】文件夹,点击下一步按引导提示完成驱动安装。
6、取下手机,将手机断电后再装上电池,按住侧上键(音量+)不要松开(极少手机是按住下键,如有实体home键就需要同时按住),再用数据线把手机连到电脑USB接口上(部分电脑需要重复此步骤三次)7、一般情况下,此时电脑就自动更新驱动,如弹出窗口,请点击【同意、接受、下一步】等类似选择,千万不要拒绝就行了。
IC读卡机驱动安装步骤

IC读卡机驱动安装步骤
读卡机(IC卡读卡器)是一种将IC卡中的数据读取出来并传输给电
脑的设备。
为了使读卡机能够正常工作,需要安装相应的驱动程序。
下面
是一般IC读卡机驱动的安装步骤:
1.确认读卡机型号:首先,需要确认读卡机的型号和厂家信息,因为
不同型号的读卡机对应的驱动程序是不同的。
4.连接读卡机:将读卡机通过USB或其他接口连接到电脑上,并确保
读卡机处于正常工作状态。
5. 安装驱动程序:打开解压缩后的驱动文件夹,在其中找到可执行
的驱动安装文件(一般以.exe为后缀),双击运行该文件。
6.安装向导:运行驱动安装文件后,会弹出一个安装向导窗口。
按照
向导提示逐步进行安装。
一般来说,首先会弹出欢迎界面,然后需要用户
阅读并同意软件许可协议。
接下来,通常会询问用户是否要更改安装路径,可以选择按照默认路径或自定义安装路径。
然后,安装程序一般会需要用
户指定安装的组件和其他选项。
最后,会出现安装完成的提示界面。
7.重启电脑:在安装完成后,有些驱动程序可能要求重启电脑,以使
驱动程序正常加载。
8.测试读卡机:在重启电脑后,可以尝试将一张IC卡放入读卡机中,看是否能够正常识别和读取IC卡的数据。
如果能够正常工作,则说明驱
动安装成功。
总结:。
ARM64 Win11安装STLINK驱动成功MacBook M1 M2系列可完美用于STM32华大

ARM64 Win11安装STLINK驱动成功MacBook M1/M2系列可完美⽤于STM32华⼤等单⽚机开发驱动需要下载修改过的,直接装是装不上的,需要⾸先关闭系统驱动签名验证:按住Shift键同时重启后就有选项关闭。
另外CH340有官⽅驱动程序,所以⼤部分单⽚机的开发,MacBook M1已经可以满⾜
步骤
1. 需要下载专⻔驱动包,截⽌发稿前,还没有正式版本驱动!
2. 按住Shift键,重启,这时候会进⼊下⾯界⾯,点击疑难解答
3. 这时候会进⼊下⾯界⾯,点击⾼级选项
4. 这时候会进⼊下⾯界⾯,点击启动设置
5. 这时候会进⼊下⾯界⾯,点击重启
6. 这时候会进⼊下⾯界⾯,选择7,禁⽤驱动程序强制签名
7. 解压驱动程序
8. 打开设备管理,找到ST-LINK这个设备,右键选择菜单:更新驱动程序
9. 然后选择刚才解压的驱动程序
10. 这样就可以了。
视频驱动怎么安装

视频驱动怎么安装导引视频驱动程序是计算机中控制显示器和视频输出的关键组件之一。
正确安装视频驱动程序可以确保计算机能够正常显示高质量的图像和视频。
本文将介绍视频驱动程序的安装步骤,以确保您的计算机能够正确运行并能够完全利用显示设备的性能。
第一步:确定型号和制造商在安装视频驱动程序之前,您需要确定您计算机上的显示适配器的型号和制造商。
这个信息通常可以在计算机的设备管理器中找到。
1. 在Windows操作系统中,右键单击“开始”按钮,然后选择“设备管理器”。
2. 在设备管理器中,展开“显示适配器”选项,以查看已安装的显示适配器。
记下显示适配器的型号和制造商,以便在后续操作中使用。
第二步:确保操作系统更新在安装视频驱动程序之前,建议先确保您的操作系统是最新的版本。
操作系统的更新通常包括对硬件的兼容性改进和修复。
1. 在Windows操作系统中,右键单击“开始”按钮,然后选择“设置”。
2. 在设置页面中,选择“更新和安全”。
3. 在更新和安全页面中,选择“Windows更新”。
4. 点击“检查更新”按钮,系统将自动检查并安装适用于您的计算机的最新更新。
完成操作系统的更新后,您的计算机将具备更好的硬件兼容性和稳定性,从而有助于视频驱动程序的安装和性能。
第三步:下载视频驱动程序一旦您确定了显示适配器的型号和制造商,并确保操作系统是最新的版本后,接下来您需要下载适用于您的显示适配器的视频驱动程序。
根据您的显示适配器的制造商和型号,您可以从制造商的官方网站上下载驱动程序。
大多数制造商都提供最新的驱动程序下载,并通常将其分成不同的操作系统版本。
访问制造商的官方网站,并找到与您的显示适配器型号和操作系统相匹配的最新驱动程序下载。
第四步:安装视频驱动程序完成视频驱动程序下载之后,接下来是将其安装到您的计算机上。
1. 打开驱动程序安装文件,通常是一个可执行文件,后缀名可能是.exe或.msi。
2. 双击执行文件,启动驱动程序安装向导。
Marvell网卡驱动安装说明

指定要记录到事件日志的信息。
默认值:“状态信息”
有效值:
- “所有信息”:
仅应用于测试目的。
- “状态信息”:
每次连接状态更改时,驱动程序都会生成事件日志
条目。
- “警告”:
仅会生成警告或错误信息。
- “错误”:
仅会生成错误信息。
- “无”:
如果操作无法找到用于适配器的驱动程序,则会在“设备管理器”中“其它
设备”下安装为“以太网控制器”。在此情况下,必须执行驱动程序更新操
作才能安装本驱动程序。有关详情,请参见下一节。
3.2 更新驱动程序
更新驱动程序:
1. 在桌面上,在“我的电脑”上单击鼠标右键。
2. 选择“管理”。
3. 在“设备管理器”中,双击适配器。
默认值:“启用Tx 和 Rx”
有效值:
- “启用Tx 和 Rx”
- “启用Tx”
- “启用Rx”
- “禁用”
注意:对于每种适配器类型,IPv6 参数不可用。
唤醒功能 (Wake-Up Capabilities)
--------------------------------
默认值:“Magic Packet 和 Pattern Match 唤醒模式”
通过这两种唤醒模式从关闭状态唤醒,
从冬眠或待机状态唤醒受控的操作系统
- “Link Change 唤醒模式”
通过 Link Change 唤醒模式从关闭状态唤醒,
从冬眠或待机状态唤醒受控的操作系统
从关闭状态唤醒 (Wake From Shutdown)
---------------------------------
Ralink网卡安装说明和软件AP设置方法
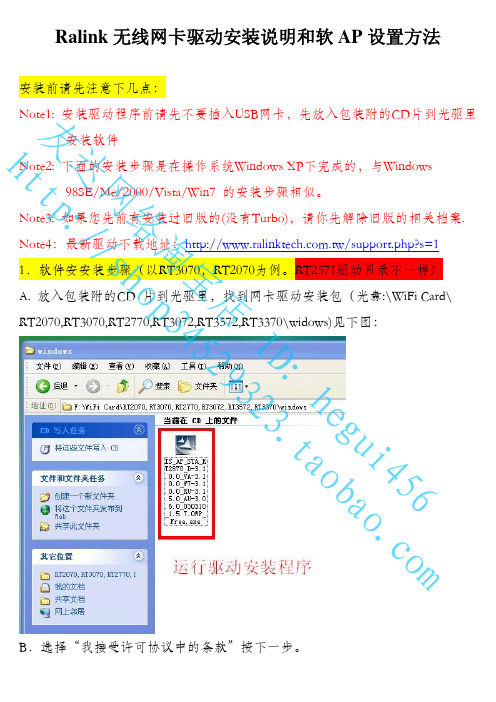
Ralink 无线网卡驱动安装说明和软AP 设置方法安装前请先注意下几点:Note1: 安装驱动程序前请先不要插入USB网卡,先放入包装附的CD片到光驱里安装软件Note2: 下面的安装步骤是在操作系统Windows XP下完成的,与Windows98SE/Me/2000/Vista/Win7 的安装步骤相似。
Note3: 如果您先前有安装过旧版的(没有Turbo),请你先解除旧版的相关档案.Note4:最新驱动下载地址:/support.php?s=1 1.软件安安装步骤(以RT3070,RT2070为例。
RT2571驱动目录不一样) A. 放入包装附的CD 片到光驱里,找到网卡驱动安装包(光盘:\WiFi Card\RT2070,RT3070,RT2770,RT3072,RT3572,RT3370\widows)见下图:友达网络淘宝店 I D : h e g u i 456 h tt p ://s h o p 34529323.t a o b a o .c o mC.按实际选择,只是当无线网卡使用,就选择“只安装驱动程序” 如要用AP模式QOS功能就必须安装Ralink无线网络设定程序。
这里我们选择安装Ralink无线网络设定程序。
按下一步友达网络淘宝店 I D : h e g u i 456 h tt p ://s h o p 34529323.t a o b a o .c o mE.软件安装完成,点“完成”后退出!完成后可以插上USB无线网卡2.连接无线网络。
友达网络淘宝店 I D : h e g u i 456 h tt p ://s h o p 34529323.t a o b a o .c o mB.Windows无线管理介面。
点击“刷新网络列表”可以查找到可用网络。
友达网络淘宝店 I D : h e g u i 456 h tt p ://s h o p 34529323.t a o b a o .c o m小窍门:两个无线管理介面,都可以通过右下角R+图标切换。
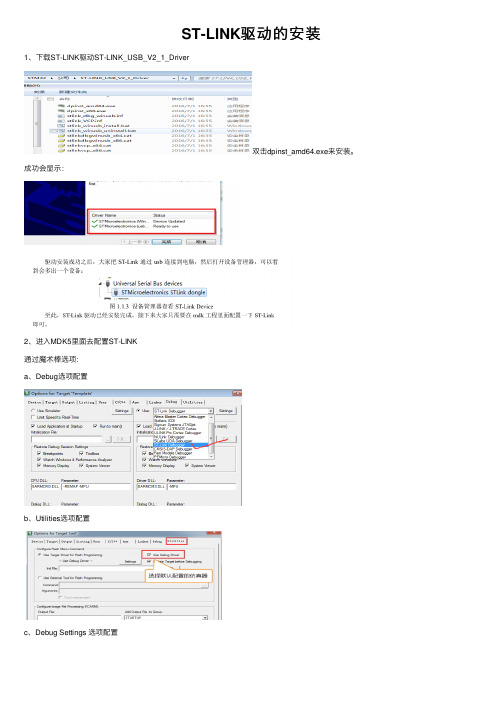
ST-LINK驱动的安装
c、Debug Settings 选项配置
d、选择目标板 选择目标板,具体选择多大的 FLASH 要根据板子上的芯片型号决定。STM32F429ZIT6,是2MB的flash;这里面有个小技巧就是把 Reset and Run 也勾选上,这样程序下载完之后就会自动运行,否则需要手动复位。擦除的 FLASH 大小选择 Sectors即可,不要选择 Full Chip, 不然下载会比较慢。
e、
博客园 用户登录 代码改变世界 密码登录 短信登录 忘记登录用户名 忘记密码 记住我 登录 第三方登录/注册 没有账户, 立即注册
ST-LINK驱 动 的 安 装
1、下载ST-LINK驱动ST-LINK_USB_V2_1_Driver
成功会显示:
双击dpinst_amd64.exe来安装。
2、进入MDK5里面去配置ST-LINK 通ຫໍສະໝຸດ 魔术棒选项: a、Debug选项配置
Ralink安装教程

USB无线网卡(Ralink)安装指南说明:本安装指南选取WindowsXP和Windows7系统示范安装,Windows8和Windows8.1系统请参考Windows7系统的安装步骤。
一、WindowsXP系统环境下的无线网卡安装。
请按下面步骤安装无线网卡到你的电脑:01.插入USB无线网卡到电脑一个空闲USB接口并开机(台式电脑请将无线网卡插入后置USB 接口),WindowsXP系统下,电脑会提示发现新硬件并弹出窗口,点击取消,如图所示。
02.请将配套的驱动程序光盘放入电脑光驱,电脑没有光驱的话,请通过EDUP官网下载驱动程序安装。
打开光盘,找到windows文件夹,找到Setup.exe文件。
03.双击Setup.exe文件,打开驱动程序开始安装。
如下图,程序准备安装。
04.程序初始化完毕,准备安装。
选择“我接受许可证中的条款”,点击“下一步”继续安装。
安装方式一05.选择“只安装驱动程序”,点击“下一步”继续安装。
06.点击“安装”按钮开始安装。
07.安装程序正在进行,请不要中断操作。
08.点击“完成”按钮完成驱动程序安装,这时任务栏右下角出现对话框提示。
09.点击任务栏图标,在弹出的无线网络列表对话框里选择你的无线网络信号并双击,在弹出的对话框里输入无线网络连接密码,点击“连接”然后就可以无线上网。
安装方式二10.重复前面安装步骤01,02,03,04,然后选择“安装驱动程序与Mediatek无线网络设定程序”,点击“下一步”继续安装。
11.选择“Mediatek无线网络设定程序”,点击“下一步”继续安装。
12.点击“安装”按钮开始安装。
13.安装程序正在进行,请不要中断操作。
现无线网络连接图标和无线网络设置图标。
15.双击任务栏图标,打开无线网络设置对话框,如图所示。
点击“无线网络(图1)”按钮,选择右侧无线网络列表的无线信号(图2)。
双击该无线信号打开左下角对话框并点击“下一步”按钮(图3)。
Ralink 芯片产品驱动安装使用说明书

一.驱动安装与上网设置1.驱动安装①双击驱动进行安装。
(未安装驱动前,请不要插入无线网卡)②选择后单击下一步如下图:③选择默认的图标后单击下一步如下图:④选择默认图标后单击下一步:⑤单击安装进行安装过程(注意:有些杀毒软件可能影响安装,如安装不完全,请在安装前关闭杀毒软件)。
如下图:⑥驱动正在安装,如下图:⑦驱动安装完成。
单击完成后如下图:完成以后电脑右下角任务栏会出现驱动图标,这时驱动已经安装全部完成,然后将无线网卡插入电脑USB口,电脑自动更新完成后即可连接无密码的网络。
2.上网设置2.1 路由器上网设置①双击电脑右下角任务栏驱动图标出现入下图:②单击放大镜后选择左上角第一个按钮重新扫描刷新网络如下图:(刷新时多刷新几次网络就越多)③单击刷新后,找到自己路由器名(这里我选择TP-LINK-2A4F10)然后单击上图中第二个按钮加入连线设定,后出现如下图:④单击下一步图标出现如下图:⑤再次单击上图中下一步图标出现如下图:⑥在上图中密钥框输入已知密码单击下一步图标出现如下图:输入密码时要正确的输对密码,注意大小写字母。
错误的密码输入会造成不能连接网络或者不能自动获取IP地址。
其中序号③④⑤⑥界面设置为默认的⑦单击下一步图标出现如下图:⑧选择上图连线设定列表中网络名TP-LINK-2A4F10后单击右下角套用图标出现如下图:(网络名称前面打钩了,证明添加连线成功)此时IP地址为软件自动获取,连接成功即可正常高速上网了。
网络名称前面打钩了,证明添加连线成功(注意:如果没有获取到IP或收不到数据包都有可能是没有输对密码,请输入对应的密码重新获取IP)2.2 WLAN上网设置①双击电脑右下角任务栏驱动图标出现入下图:②单击放大镜后选择左上角第一个按钮重新扫描刷新网络如下图:(刷新时多刷新几次网络就越多)③单击刷新后,找到CMCC信号(Chinanet、China unicom信号也是如此操作),然后单击上图中第二个按钮加入连线设定,一直点按扭再点后出现如下图:网络名称前面打钩了,证明添加连线成功打开ie浏览器在左侧对话框输入:wlan帐号和六位数密码,点击,即可网上冲浪了。
Comtrol IO-Link Master初始安装与配置应用程序注释说明书

IO-Link MasterInitial Installation and ConfigurationApplication NoteThis document provides the following information:•Connecting the IOLM (power and network)•Using PortVision DX to program the IP address•Verifying the latest firmware is loadedTable of ContentsConnecting the IOLM (Power and Network) (3)DR-8-EIP (IP20 DIN Rail) (3)Connecting to the Network (3)Connecting the Power (3)IOLM 4-EIP (IP67) (5)Setting the Rotary Switch (5)Mounting the IOLM 4-EIP (6)Connecting to the Network (6)Connecting the Power (6)Using PortVision DX to Program the IP Address (8)Download and Install PortVision DX (9)Programming the IP Address (9)Verifying the Software (Image Versions) (12)Checking the IOLM Software Versions (12)Checking the Comtrol ftp Site for the Latest Files (13)Updating Software (13)PortVision DX (13)Using the Web Page to Update Software (14)Connecting the IOLM (Power and Network)For detailed procedures, refer to the appropriate guide for your model:•IO-Link Master 4-EIP User Guide•IO-Link DR-8-EIP User Guide.The IO-Link Master is referred to simply as the IOLM in this document unless there is specific information about a specific model.Use the appropriate discussion for you IOLM model.•DR-8-EIP (IP20 DIN rail)•4-EIP (IP67 with rotary switches)DR-8-EIP (IP20 DIN Rail)The following procedures discuss connecting the IOLM DR-8-EIP power and network.Connecting to the NetworkThe IOLM DR-8-EIP provides two Fast Ethernet (10/100BASE-TX) RJ45 connections.1. Securely connect one end of the RJ45 Ethernet cable to either Ethernet port.2. Connect the other end to the network.3. Optionally, you can use the other Ethernet port to daisy-chain to another Ethernet device.Connecting the PowerUse either power terminal (top or bottom) but do not use both to supply power to the DR-8-EIP.Signal DescriptionPowerRequirementsValuesV- 24VDC Power Supply Return Voltage InputRange18 to 30VDCV- 24VDC Power Supply Return Input Power 24VDC @4AV+ Primary +24VDC Supply Output power 24VDC @200mA†V+ Secondary +24VDC Supply †The total supply of current for allconnected IO-Link devices.You can use this procedure to connect the DR-8-EIP to a power supply.Note: Disconnect the power from the power supply before connecting it to the DR-8-EIP. Otherwise, your screw driver blade can inadvertently short your terminal connections to the groundedenclosure.1. Insert positive and negative wires (12-24AWG) into the V+ and V- contacts.2. Tighten the wire-clamp screws to prevent the wires from coming loose.3. Apply the power and verify that the following LEDs are lit indicating that you are ready to attachyour IO-Link or digital I/O devices.•PWR – a green lit LED indicates the DR-8-EIP is receiving power.•MS, first the flashing green and red LEDs displays that it is in self-test mode. After the self-test, depending on whether you set the IP address with the rotary switch one of the following occurs:o The green LED is flashing to indicate that the DR-8-EIP is in standby mode.o The green LED is lit to indicate that the DR-8-EIP is operational.•NS, first it flashes green and red indicating that it is in self-test mode. After the self-test, depending on whether you set the IP address with the rotary switch one of the followingoccurs:o Off indicates there is no IP addresso Steady red indicates a duplicate IP address on the network•LINK should be lit (green) to indicate a valid network connection.•ACT•Port LEDs should display in this manner if there is no deviceattached:o The IO-Link port LED should be flashing green indicating that itis searching for an IO-Link device.o DI (Digital input) should be off to indicate that there is no deviceattached to the port.If the LEDs indicate that you are ready to attach devices, go the Using PortVision DX to Program the IP Address subsection.If the LEDs do not meet the above conditions, you can refer to the IO-Link DR-8-EIP User Guide.IOLM 4-EIP (IP67)The following procedures discuss connecting the IOLM 4-EIP power and network.Setting the Rotary SwitchYou can use the rotary switches under the configuration window on the IOLM 4-EIP to set the lower 3-digits (8 bits) of the static IP address.If the rotary switches are set to a non-default position, the upper 9-digits (24 bits) of the IP address are then taken from the static network address and DHCP maybe disabled.The switches only take effect during startup. The current position displays in the Help | SUPPORT web page.Optionally, you can leave the rotary switch set to the default and use the web interface or PortVision DX to set the network address.Note: If you set the network address using the rotary switches, the Rotary Switch setting overrides the network settings in the web interface.Switch Setting Node Address000(Default setting) Use the network configuration stored in the flash. The default network values are: •IP address = 192.168.1.250•Subnet mask = 255.255.255.0•IP gateway = 0.0.0.0001-254 This is the last three digits in the IP address. This uses the first three numbers from the configured static address, which defaults to 192.168.1.xxx.255-887 Reserved.888 Reset to factory defaults.889-997 Use the network configuration values stored in the flash (reserved).998 Use DHCP addressing.999 Use the default IP address.Use the following steps if you want to change the default rotary switch settings.1. Remove the two Phillips screws securing the switch window.2. Gently swing open the switch window from the left to the right, allowing it to pivot on the hinge onthe right side.3. Turn each dial to the appropriate position using a smallflathead screwdriver.The default setting is 000 as shown.The arrow points to the switch location. 0 is located at the3:00 position. Turn the dial clockwise to the appropriate setting.4. Carefully close the window making sure that it is properly aligned.5. Reinsert and hand tighten the two screws making sure that the window is securely sealed. Note: Failure to reassemble the configuration window properly may compromise IP67 integrity.Mounting the IOLM 4-EIPUse the following procedure to mount the IOLM 4-EIP. Install the IOLM 4-EIP on a mounting panel or a machine.1. Verify that the mounting surface is level (flat) to prevent mechanical stress to the IOLM 4-EIP.2. Attach the IOLM 4-EIP to the surface with two 6mm screws and washers.a. Attach the grounding strap to chassis or earth ground.b. Torque down to 8Nm.Note: Make sure that you connect the FE terminal at low impedance to function ground to meet EMCstandards.Connecting to the NetworkThe IOLM 4-EIP provides two Fast Ethernet (10/100BASE-TX) M12 connections (4-pin female /D-coded). You can use this procedure to connect the IOLM 4-EIP to the network.1. Securely connect one end of the M12 Ethernet cableto EIP 1 or EIP 2 Ethernet port. 2. Connect the other end to the network.3. Optionally, you can use the other Ethernet port todaisy-chain to another Ethernet device.4. If you did not connect both Ethernet ports, make surethat the port is covered with a connector cap, which was shipped with the IOLM 4-EIP to keep dust and liquids from getting in the connector.Note: Ethernet ports must have an approved cable or protective cover attached to the port to guaranteeIP67 compliance.Connecting the PowerThe IOLM 4-EIP provides dual M12 (A-coded) power connectors.Note: Power connectors must have an approved cable orprotective cover attached to the port guarantee to IP67 compliance.Pin Input - Male Output - FemalePower Supply Voltage/CurrentValues1 L+ L+ Voltage Input Range 20 to 30VDC2 L2+ L2+ Current (for the IOLM 4-EIP) 100mA3 L- L- Maximum Output Current1.9A†4 L2-L2- Note: The total supply of current for all connected IO-Link devices.The IOLM 4-EIP requires a UL listed power supply with an output rating of 24VDC.5Not connectedNote: Maximum EMC protection is provided by a low impedance connection between functional earth,the grounding tabs, and protective earth.Pin Signal 1 Tx+ 2 Rx+ 3 Tx- 4Rx-5. Securely attach the power cable between the male power connector (Pwr In) and the powersupply.6. Either attach a power cable between the female power connector and another device to whichyou want to provide power or securely attach a connector cap to prevent dust or liquids from getting into the connector. Connector caps are shipped with the IOLM.7. Apply the power and verify that the following LEDs are lit indicating that you are ready to attachyour IO-Link or digital I/O devices.•PWR – a green lit LED indicates the IOLM 4-EIP is receiving power.•MS, first the flashing green and red LEDs displays that it is in self-test mode. After the self-test, depending on whether you set the IP address with the rotary switch one of the following occurs:o The green LED is flashing to indicate that the IOLM 4-EIP is in standby mode.o The green LED is lit to indicate that the IOLM 4-EIP is operational.•NET, first it flashes green and red indicating that it is in self-test mode. After the self-test, depending on whether you set the IP address with the rotary switch one of the followingoccurs:o Off indicates there is no IP addresso Steady red indicates a duplicate IP address on the network•LINK should be lit (green) to indicate a valid network connection.•ACT blinks if there is network traffic between the IOLM 4-EIP and the network.•EIP 1/2 should be lit (green) indicating that the link is up if both connectors are connected.•Port LEDs should display in this manner if there is no device attached:o IO-Link port LED should be flashing green indicating that it is searching for an IO-Link device.o DIIf the LEDs indicate that you are ready to attach devices, go the Using PortVision DX to Program the IP Address subsection.If the LEDs do not meet the above conditions, you can refer to the IO-Link Master 4-EIP User Guide.Using PortVision DX to Program the IP AddressPortVision DX automatically detects Comtrol Ethernet attached products physically attached to the local network segment so that you can quickly configure the network address, upload firmware, access IOLM embedded web pages, download the latest product documentation, and manage the following products:•DeviceMaster family•IO-Link Master•RocketLinx managed switchesIn addition to identifying, Comtrol Ethernet attached products, you can use PortVision DX to display any third-party switch and hardware that may be connected directly to those devices. All non-Comtrolproducts and unmanaged RocketLinx devices are treated as non-intelligent devices and have limitedfeature support. For example, you cannot configure or update firmware on a third-party switch.PortVision DX also provides these features:•Telnet/SSH interface•PuTTY•Ability to save and load IOLM configuration files•Save Device Diagnostics Data, which can be sent to Comtrol in the event you have a support issue•LED Tracker featureUse the Advanced | Network embedded web page, if you want to configure the following:•Host name•DNS servers•Syslog Server IP/Host name•Syslog Port•SSH Server EnableNote: You can use PortVision DX to configure the IP address information and then use the web interface to configure the options not configurable in PortVision DX.This subsection provides the following procedures:•Download and install PortVision DX•Scan the network and locate the IOLM•Program the IOLM IP address to operate on your networkFor more information about PortVision DX features and procedures, refer to the help system or thePortVision DX User Guide.Download and Install PortVision DXYou can use this procedure to download and install PortVision DX.1. Download PortVision DX.2. Execute the PortVision_DX_x.xx.msi file, where x.xx is the version number.3. Click Next to start the installation.4. Click I accept the terms in the License Agreement and Next.5. Click Next to install in the default location or browse to another location and then click Next.6. Click Next to continue the installation.7. Click Install. Depending on your operating system, you may need to click Yes to the Do you wantto allow the following program to install software on this computer User Account Control popupmessage.8. Click Finish.PortVision DX is installed and you can use the next subsection to program the IP address into the IOLM.Programming the IP AddressUse the following procedure to program the IP address into the IOLM using PortVision DX.Note: Connect a single IOLM at a time because they all have the same default IP address. PortVision DX cannot program an IP address in cases where there are multiple IOLMs with the same IPaddress.1. 4-EIP: Optionally, you can use the web interface to configure or Rotary switch to configure the IPaddress. The Rotary switch settings override the lower 3 digits (8 bits) of the static IP addressconfigured in PortVision DX or the Configuration | Network page.2. Start PortVision DX by using the desktop icon or click PortVision DX in the Start menu.3. Depending on theoperating system, youmay need to click Yes tothe Do you want to allowthe following program tomake changes on thiscomputer User AccountControl popup message.4. Click the Scan button tolocate your IOLM orIOLMs on the network.5. Click the hardware typesthat you want to locateand click Scan.6. Right-click the IOLM that you want to program in the Device List pane (lower) and then clickProperties.Optionally, you can double-click on the IOLM to open the Properties tabs. It may take a few moments for the next screen to open.7. Optionally, enter a device name, which displays in PortVision DX on the Main screen.The MAC address, Serial Number, and Device Status fields are automatically completed and are status-only fields. This image may not reflect your model.8. Enter the appropriate network information on the General tab. You can configure the IOLM for astatic IP address or set it to DHCP.•If you select Static for the IP Type:a. Enter a valid IPv4 address. If necessary, see your Network Administrator for a valid IPaddress for this IOLM. The default IP address is: 192.168.1.250.b. Enter a valid subnet mask for your network. The default Subnet Mask is: 255.255.255.0.c. Enter a valid IP gateway address for your network. The default Gateway Address is:0.0.0.0.•If you select DHCP, this field displays the last IP address programmed into the IOLM.Note: Rotary switch settings on the 4-EIP override the lower 3 digits (8 bits) of static IP address.9. Click Close to exit the Properties tabs.Wait until PortVision DX polls to display the updated IOLM IP address or you can click Refresh until the new IP address displays in the Device List pane.Verifying the Software (Image Versions)You can use the following information to determine whether the IOLM contains the latest software.•Checking the versions on the IOLM•Checking the Comtrol ftp site for the latest version and downloading the files•Using PortVision DX to update softwareNote: PortVision DX displays the Application Base image version, for example: EtherNet/IP. The IOLM contains four images.Checking the IOLM Software VersionsUse this procedure to check the software on the IOLM.1. Open your web browser and enter the IP address of the IOLM or highlight the IOLM in PortVisionDX and click the Webpage button.2. Click Advanced | Software.3. Check the version numbers of the IOLM images.Checking the Comtrol ftp Site for the Latest FilesUse this procedure to locate the latest software for your IOLM model.1. Go to the Comtrol ftp Download interface.2. Select the IOLM model.3. Download all image versions that are later than the images on the IOLM.Updating SoftwareUse one of these methods to update software (images or application subassemblies) on the IOLM: •PortVision DX•IOLM web interfacePortVision DXYou can use this procedure to update software on the IOLM using PortVision DX.1. If necessary, start PortVision DX.2. Right-click the IO-Link Master that you want to update and click Advanced and then UploadFirmware.3. Browse to the location you saved the image or images, highlight a file name, and click Open.4. Click Yes to the Upload Firmware... Important Notice.5. Click OK to the Upload Firmware... Status message.6. You may notice that PortVision DX first displays a Firmware uploaded status message. After thenext PortVision DX polling cycle the status message displays ON-LINE.7. Repeat the above steps for each image.Using the Web Page to Update SoftwareUse the following procedure to update software on the IOLM using the IOLM web page.1. Open your web browser and enter the IP address of the IOLM or highlight the IOLM in PortVisionDX and click the Webpage button.2. Click Advanced | Software.3. Click the UPDATE button that corresponds to the image that you want to upload.4. Click the Browse… button.5. Locate and highlight the file.6. Click Open.7. Click the Install button.8. Click the CONTINUE button to the Update Image pop up message.9. Wait the recommended time period before clicking the OK button to the In Progress message.The Software page refreshes and displays that the version updated.。
LM LINK驱动安装说明

LM LINK驱动安装说明
1、将光盘内的“LM LINK 驱动”文件夹下的“FTDI”文件夹复
制下C 盘根目录下。
如图1.1、图1.2所示。
图1.1 安装LM LINK驱动程序
图1.2 复制到C 盘根目录下
2、用USB 电缆将LM LINK 与PC相连,打开设备管理器。
如图1.3所示。
图1.3 打开设备管理器
3、右击“Stellaris Evaluation Board”选择“更新驱动软件(P)…”
进入更新驱动界面。
如下图1.4所示。
图1.4 更新驱动界面
4、选择“浏览计算机以查找驱动程序软”,指向C 盘的FTDI
文件夹,如图1.5所示。
图1.5 指向FTDI目录
点击“下一步”。
5、安装过程中将出现如图1.6 所示的窗口,选择“始终安装此
驱动程序软件”
6、完成安装,如图1.7所示。
图1.7 安装完成
点击“关闭”,重复上述步骤3-6完成第二个驱动,即可下载程序。
云驱动使用说明书1.与安装

云驱动使用说明书1.下载与安装登录“易联云”官网,;官网下载“云驱动”并安装。
注意:安装时需建立新文件夹做为安装目录,并且命名为英文,文件夹中不要放云驱动以外的内容,以免卸载时误删。
安装时建议退出防护软件,如360安全卫士。
注意:安装时若防护软件(如360安全卫士)出现提示,请选择允许程序所有操作。
2.登录易联云账号打开云驱动并登录“易联云”账号。
3.绑定终端至易联云后台点击导航栏“绑定终端”,输入打印机信息点击绑定;打印机将同步绑定至登录账号的易联云后台。
注意:打印机需绑定至易联云后台之后,才可安装驱动。
已在易联云后台绑定过的打印机,请忽略此步,可直接前往下一步“安装驱动”。
4.安装驱动点击导航栏“终端管理”,已绑定至易联云后台的打印机将在此显示,灰色即代表未安装驱动,蓝色即代表已安装驱动;点击打印机左下角“安装”按钮即可为打印机安装驱动。
安装后如果需要卸载驱动,点击打印机左下角“卸载”按钮即可,打印机将变为灰色;打印机卸载驱动不会导致易联云后台删除打印机绑定信息。
注意:安装驱动时,若防护软件(如360安全卫士)出现提示,请选择允许程序所有操作。
安装成功后,即可打印本地文件,如需连接餐饮管理系统,则需要在餐饮管理系统中添加打印机。
5.行业管理软件使用说明以“智慧餐饮系统”为例,其他收银系统配置可能稍有区别。
5.1点击设置绑定打印机5.2点击“添加打印机”5.3选择您在“云驱动”中安装的打印机成功示例:注意:添加打印机时,需选择打印机品牌。
品牌选择“易联云”,如果没有“易联云”选项,则选择“其它”。
5.4绑定成功后,点餐结账,订单即可完成自动打印。
Ralink3070芯片网卡使用说明及破解讲解

Ralink3070芯片网卡使用说明及破解教程讲解(本资料仅供学习参考,请勿使用非法用途)驱动安装:第一步:将USB无线王网卡插入电脑,放入光盘,运行setup安装文件:第二步:选择安装驱动程序与Ralink无线网络设定程序:第三步:选择Ralink无线网络设定程序:第四步:开始安装:第五步:安装完成。
网卡使用:第一步:双击电脑右下角或者符号,点击重新扫描:第二步:选中已获取密码无线网络,点击假如连线设定,输入密码后点击确定按钮:第三步:点击左上角按钮,选中已加入网络后点击套用进行连接网络:待IP地址、子网掩码、预设闸道获取后已连接网络,至此可以畅享无线网络了!Ralink3070芯片网卡之BT4学习简约教程讲解准备工作:1、将电脑设置为光驱启动,如果您不知道如何设置,请参考主板说明书或者直接百度一下。
(现在多数笔记本电脑默认光驱启动,所以您不设置也说不定可以进入)2、放入BT4光盘(然后重启电脑),默认进入linum系统。
正式开始破解,首先拿自己的路由开刀(无客户端模式)第一步:双击桌面spoonwep2按钮,进入第一个窗口:NET CARD 网卡接口选择MONODRIVER 驱动选择NORMALMODE 模式选择UNKNOWN VICTIM点击NEXT转到VICTIMS DISCOVERY窗口:第二步:点击右上角LAUNCH按钮(点完后会变成ABORT)这时任务栏会弹出抓包窗口,可作为参考,也可不用理会。
20秒左右程序会显示扫描到的信息,其中:ESSID 路由广播名称MAC 路由的MAC地址CHAN 使用的频道POW 信号强度DA TA (注意:这个数值一直为0基本无法破解,你可另寻时机等到有DA TA再破)CLIS 空白代表无客户端,打勾则代表有客户端选择目标路由,这里以自己的MaJieNet为例,然后点SELECTION OK转到ATTACK PANE L窗口第三步:第一个下拉菜单有4个选项,后面3个都可以作为无客户端攻击模式,其中:ARP REPLAY ATTACK (有客户端时用)P0841 REPLAY ATTACK (首选)CHOPCHOP & FORGEATTACK (次次选)FRAGMENTATION & FORGE ATTACK (次选)第二个下拉菜单有3个选项,其中:??? LENGTH (不指定加密位数,首选)128 BITS LENGTH(指定128位加密,次次选)64 BITS LENGTH (指定64位加密,次选)右边Inj Rate和Channel选项默认即可。
- 1、下载文档前请自行甄别文档内容的完整性,平台不提供额外的编辑、内容补充、找答案等附加服务。
- 2、"仅部分预览"的文档,不可在线预览部分如存在完整性等问题,可反馈申请退款(可完整预览的文档不适用该条件!)。
- 3、如文档侵犯您的权益,请联系客服反馈,我们会尽快为您处理(人工客服工作时间:9:00-18:30)。
LM LINK是在IAR软件下使用的,它只支持Lumunary单片机的程序的下载与调试!!!
把我提供的“FTDI”文件夹复制到C盘下,插上LM LINK后将提示“欢迎使用找到新硬件向导”安装驱动界面,在这个界面中选择“从列表或指定位置安装”,点击“下一步”,在这个界面中选择C:\FTDI后点击“下一步”继续,如果出错,选择“仍然继续”直到安装完成。
这一次安装完后,还要提示再安装一下,按照上面所说的同样的步骤再安装一次就可以了。
安装完后,在“设备管理器”的“通用串行总线控制器”中可以看到ZLG LM LINK A和ZLG LM LINK B,这表示驱动已经成功安装。
最后你就可以使用这个小小