CV60调试说明书
NC60 快速指引说明书

快速指引注意使用操作本激光头前 请务必详阅本手册 并确认了解其内容请妥善保存本手册为日后操作维修之用由于产品功能的不断更新,您所收到的产品在某些方面可能与本手册的陈述有所出入,在此谨表歉意!目录1、封面2、产品结构部分-----------------------------12.1安装尺寸-------------------------------2.32.2安装调试-------------------------------4 2.3电气接口和定义-----------------------5-11 2.4光纤接口------------------------------12.13 2.5调喷嘴中心----------------------------142.6平台配置-------------------------------153、维护/拆装3.1常规维护-------------------------------163.2陶瓷环/嚅嘴---------------------------173.3保护镜片1------------------------------183.4保护镜片2------------------------------193.5保护镜片3------------------------------203.6准直镜片-------------------------------213.7聚焦镜片-------------------------------221. 编码器&限位信号2.三相动力线3.光纤接口4.冷却水接口15.冷却水接口26.冷却气体接口7.切割气体接口8.冷却水接口39.随动信号接口10.陶瓷环11.喷嘴12.锁紧环13.中心调节(X.Y)14.中心调节(X.Y)15.观察窗口单轴驱动器 50W-400W TYPE-M.TYPE-M2柏楚FSCUT2000A 激光切割控制系统BCL3764 端子板W 轴DB15 伺服控制接口连接三协伺部分参数表,具体以实际应用和三协伺服说明书为准。
60简明操作手册
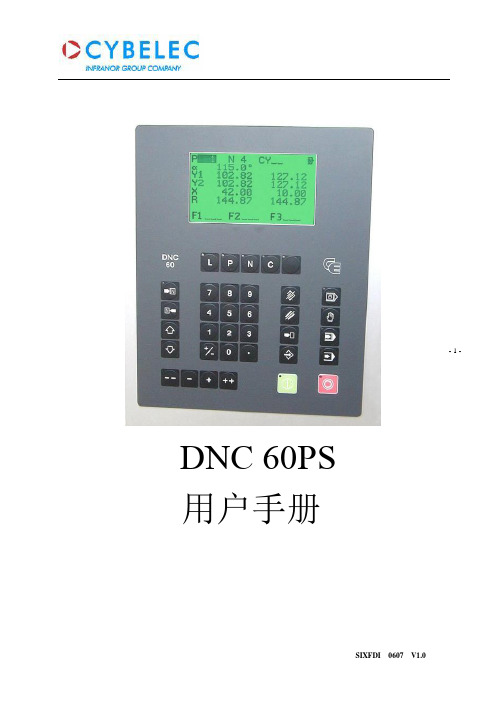
- 1 - DNC 60PS用户手册- 2 - 目录1 硬件介绍...................................................................................................................1 1.1 前面板....................................................................................................................1 2 按键功能...................................................................................................................2 2.1 屏幕页面选择键........................................................................................................2 2.2 工作模式选择键........................................................................................................2 2.3 指令键....................................................................................................................3 2.4 光标键....................................................................................................................4 2.5 “手动操作”键.......................................................................................................4 3 系统说明..................................................................................................................4 3.1 主菜单...................................................................................................................4 3.2 等级保护................................................................................................................5 4 模具编程..................................................................................................................6 4.1 查询上模目录..........................................................................................................6 4.2 查询下模目录..........................................................................................................7 4.3 上模/下模编制..........................................................................................................7 5 产品编程..................................................................................................................8 5.1 L-alpha 长度角度编程.............................................................................................8 5.2 N 页面直接编程. (16)5.3 产品校正...............................................................................................................19 6 产品目录管理...........................................................................................................20 6.1 调用产品...................................................................................................................20 6.2 删除产品...................................................................................................................20 7 参数模具备份和一键恢复功能......................................................................................20 7.1 Internal backup 内部备份......................................................................................21 7.2 Internal restore 内部恢复.......................................................................................21 8 系统报警信息说明 (22)- 3 -1 硬件介绍1.1 前面板下图为60系统的前面板,该前面板包括1块5.5英寸高对比度LCD 液晶显示器和编程及轴控制所需用到的各类按键.各按键功能将在下一章节详细介绍.按键面板包括以下按键: ·10个数字键(0-9) ·指令键·翻页与光标移动键 ·手动操作键·屏幕页面选择键(LED 灯显示按键状态) ·4种工作模式选择键(LED 灯显示按键状态) ·启动与停止键(LED 灯显示按键状态)液晶显示器 屏幕页面选择键 工作模式选择键 数字键 指令键 手动操作键 启动键 停止键- 4 - 2 按键功能2.1 屏幕页面选择键主菜单进入主菜单和EASY BEND(轻松折弯)页面。
CVW 全高清低延迟通墙IP流音视频传输设备用户操作指南 V1.0说明书
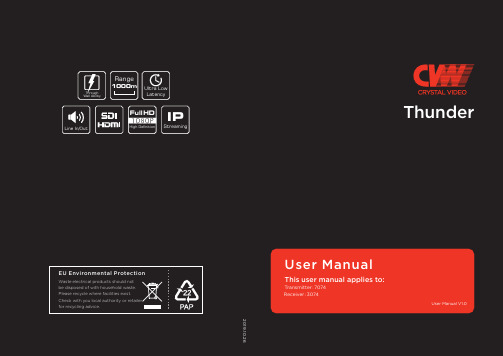
Structure & Interface
TX: 7074
Antenna Interface
Battery Interface
OLED Display MODE RESET LAN
SDI LOOP Out
SDI In DC-IN
Power Switch
Transmitter Key Operation
RESET
Press the “RESET” button for about 3s
During the restart of the coding-decoding board, the “RESET” string will always be displayed on the OLED display, and the string will disappear after the restart.
Thank you for choosing CVW's professional wireless HD audio and video transmission product. Read the following precautions carefully before using this product: 01
01
* Do not use this product for a long tiห้องสมุดไป่ตู้e in the sun or dusty place.
01
* Be sure to use this product within the temperature and humidity ranges.
02 * Do not operate the product under vibration or strong magnetic fields.
04_SINAMICS V60调试手册
SINAMICS V60
65
SIMATIC PLC/SINAMICS V60
S7-200 Q0.2
Q0.3
PULS
Q0.0
Q0.1
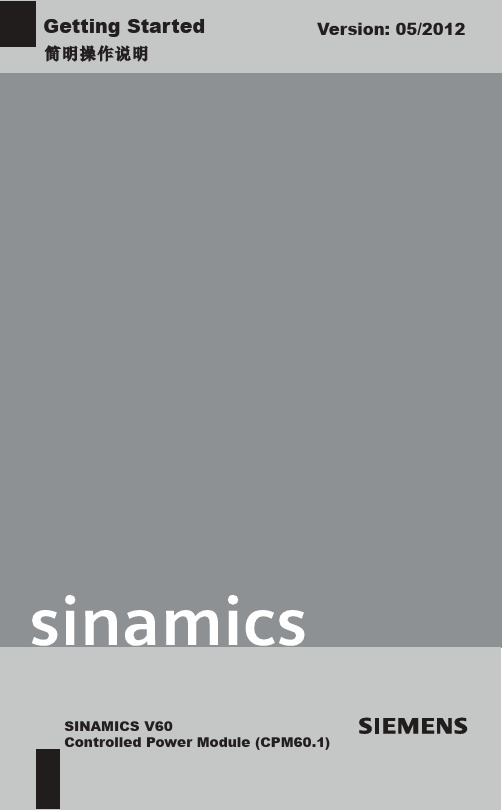
对于 PNP 和 NPN 类型,X5 上的接头排列方式是不同的。因此,请依据实际情况正确对 X5 进行连接。
2.0 kVA
4 Nm + 7.7 Nm + 10 Nm
2.5 kVA
4 Nm + 10 Nm + 10 Nm
2.5 kVA
CHS-8
SINAMICS V60 CPM60.1 偅ࡼഫ᪡䇈ᯢ
বय़఼ᡔᴃ᭄
㤤বय़఼㉏ൟ
380 V/220 V SG ㋏߫3 ⳌѸ⌕䱨行Ԏ᳡বय़఼
ᐌ
6 Nm + 6 Nm + 6 Nm
1M 1L+ Q0.0 Q0.1 Q0.2 Q0.3 PE M L+
CPU 224XP CN DC / DC / DC
1M
I0.0 I0.1 I0.2
M L+
ALM RDY Z-M
P24V/M M P24V
PULS1(橙色) PULS2(橙白) DIR1 DIR2 ENA1 ENA2
RST M24 ALM1 ALM1 RDY1 RDY2 +24V Z-M Z-M24
CHS-5
6SL3210-5CC21-0UA0 W3YYN123456
VERSION: B
MLFB
6SL3210-5CC21-0UA0
SINAMICS 3 AC 220 ... 240 V
瑞士CYBELEC DNC 60系统使用说明书
FLASH 闪 存 DNC 配 置 有 闪 存 内 装 有 数 控 系 统 的 程 序 和 整 个 操 作 步 骤 。 机 器 的 整 个 操 作 步 骤 可 用 串 行 连 接 电 缆 RS232( 选 项 ) 进 行 升 级 。
围上。按
键和
键光标可以向前或向后的范围内移动。
FASTER 无 论 光 标 在 本 页 的 什 么 位 置 上 , 同 时 按
和
键
可以把光标移在本页面上的第一编程范围上。
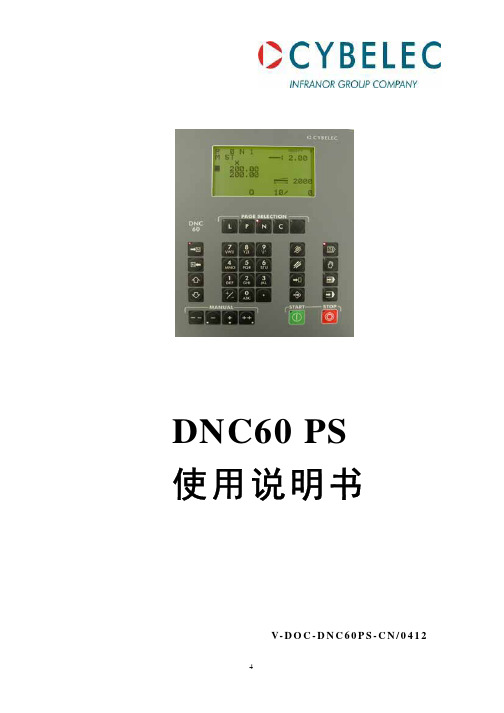
键盘
键盘被分为 6 个区域: z数 字 键 z屏 幕 页 面 选 择 键 z工 作 模 式 区 域 z指 令 键 z光 标 键 z手 动 模 式 键
9
存储器 SRAM 存 储 器 允 许 对 产 品 、模 具 和 机 器 参 数 编 程 和 存 储 。锂 电 池 保 存 数 据 约 10 年 。
工作存储器(或缓冲器) 该 存 储 器 用 于 产 品 编 程 、修 改 、执 行 。它 是 一 个 暂 存 器 ,无 论 何 时 , 当 别 的 产 品 被 调 用 时 , 它 的 内 容 就 被 删 除 了 , 如 果 DNC 电 源 被 切 断 ,即 使 该 存 储 器 内 容 还 没 有 存 储 在 内 存 中 ,该 存 储 器 内 容 仍 然 被 保存。
由操作者进行编程
z非 同 步 滑 块 锥 形 折 弯 z底 部 ( 深 度 ) 折 弯 z保 压 时 间 z后 挡 料 释 放 z步 序 重 复 z生 产 自 动 化 z需 要 生 产 产 量 , 已 经 生 产 产 量
CV说明书

7
3. 分接开关的整机介绍
分接开关本体结构可解体为顶部圆盖,快速机构、吸油管、绝缘主轴、油室五大件。
3.1 顶部圆盖 顶部圆盖由铝合金低压铸造成形,头盖上有齿轮传动机构,档位观察孔,油气排溢
阀,防爆盖,顶部圆盖与法兰间联接由耐油密封圈密封。(图1)
3.2 快速机构 它位于顶盖下,在头部法兰中,由精铸钢件的齿轮、槽轮、拔槽件、弹簧等组成一单
2. 开关的技术参数
2.1 额定参数 (见表1)
项
型号
CV
SV
CV
1
最大额定通过电流(A)
350
500
700
2
额定频率(Hz)
50 或60
3
相数
1
3
3
1
4
连接方式
-
Y
D
Y
D
-
5
承受短路能力 热稳定(3s)
(kA)
动稳定(峰值)
5 12.5
7 17.5
10 25
6
最大额定级电压 (V)
10 接点 12 接点 14 接点
电压
35kV 63kV 35kV 63kV
尺寸 (h)
Ö不带转换 带转换
670
865
710
865
910
1141
950
1141
2.4 分接开关性能参数 2.4.1 开关各触点接触电阻不大于500微欧; 2.4.2 开关每操作一次时间为4.4秒; 2.4.3 开关在额定级容量下切换时触头寿命可达20万次以上; 2.4.4 开关机械寿命80万次以上。
图4
图5 9
5. 开关触头切换过程
5.1 切换操作原理与时间 (图6)
东芝电梯内部调试资料.
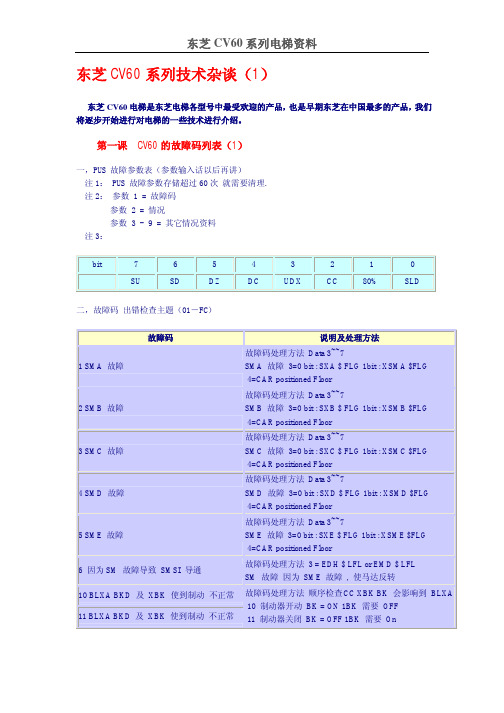
东芝CV60系列技术杂谈(1)东芝CV60电梯是东芝电梯各型号中最受欢迎的产品,也是早期东芝在中国最多的产品,我们将逐步开始进行对电梯的一些技术进行介绍。
第一课 CV60的故障码列表(1)一,PUS 故障参数表(参数输入话以后再讲)注1: PUS 故障参数存储超过60次就需要清理.注2:参数 1 = 故障码参数 2 = 情况参数 3 - 9 = 其它情况资料注3:bit76543210 SU SD DZ DC UDX CC80% SLD二,故障码出错检查主题(01-FC)故障码说明及处理方法1 SMA 故障故障码处理方法Data 3~~7SMA 故障3=0 bit : SXA $ FLG 1bit : XSMA $FLG 4=CAR positioned Floor2 SMB 故障故障码处理方法Data 3~~7SMB 故障3=0 bit : SXB $ FLG 1bit : XSMB $FLG 4=CAR positioned Floor3 SMC 故障故障码处理方法Data 3~~7SMC 故障3=0 bit : SXC $ FLG 1bit : XSMC $FLG 4=CAR positioned Floor4 SMD 故障故障码处理方法Data 3~~7SMD 故障3=0 bit : SXD $ FLG 1bit : XSMD $FLG 4=CAR positioned Floor5 SME 故障故障码处理方法Data 3~~7SME 故障3=0 bit : SXE $ FLG 1bit : XSME $FLG 4=CAR positioned Floor6 因为SM 故障导致SMSI 导通故障码处理方法3 = EDH $ LFL or EMD $ LFL SM 故障因为SME 故障, 使马达反转10 BLXA BKD 及XBK 使到制动不正常11 BLXA BKD 及XBK 使到制动不正常故障码处理方法顺序检查CC XBK BK 会影响到BLXA10 制动器开动BK = ON 1BK 需要OFF11 制动器关闭BK = OFF 1BK 需要On13 BKD 讯号反应不正常20 7LS , 8LS 反应不正常故障码处理方法上行及下行限位开关出错 20 限位开关问题SLD ON LS 7 LS 8 ON21 起动, 驱动及停车脉动讯号不正常22 ADCPD 脉动讯号异常故障码处理方法电梯上下运行不停中间楼层21 脉动讯号不正常车上层楼遮板脉动讯号不正常或牵引机22 ADCPD 脉动讯号异常比率错误或ROM 参数23 提前通知脉动讯号异常24 脉动讯输入号异常故障码处理方法检查ADCPD脉动讯号因为俩个脉动24 脉动讯输入号异常不一致( 参数1及2 有关)25 没有脉动讯输入26 ADCPD 接线出错故障码处理方法检查PG 脉动发动机或输入26 ADCPD 接线出错PG 脉动发动机参数不一致27 脉动讯参数出错故障码处理方法当电梯在运行时PG 脉冲讯号位移超过27脉动讯参数出错设定参数范围.30 开门受到干扰故障码处理方法门马达有问题, DOL问题, 门无法开30开门受到干扰门锁问题,门马达皮带问题等等.31 当开门时:被中断了如:没电断线32 当开门时:门的SWITCH 开关不正常43 23 DS 或18DS 开关位置不正确44 23 DS 或24DS 开关接触不良45 24 DS 位置需要从调47 18 DS 位置需要从调48 当18 DS开关不通时位置需要从调49 当18 DS开关接通时位置需要从调4A 当24 DS开关位置需要从调4B 门马达:在同一时间内有超过倆个开关不正常4C 18 DS 位置需要从调4D 门马达:在同一时间内有超过倆个开关不正常4F 18 DS 开关接触不良50 上行或下行回输讯号出错51 SM模式出错时安全电路CC没有切断52 SCC :逻辑安全电路出错53 电线开关出错54 5LS 及6LS 开关不正常5A/5B 门马达输入讯号出错开关13CS,14CS 及18DS5C/5D LU / LD LS1 LS2 SDZ 不正常60/64 LU / LD 开关接触不良67 LD / LD 或SDZ 位置需要从调68 井道内有超过倆开关不正常69 LS2位置需要从调或SDZ接触不良6A LS2位置及SDZ之间距离不正确6B LS2位置需要从调6C LU / LD 或LS1 开关接触不良6F LU / LD位置需要从调东芝CV60系列技术杂谈(2)第二课 CV60的故障码列表(2)故障码说明71 LS1 位置需要从调74 LS2 开关接触不良75 LS1 位置需要从调或LS2 开关接触不良77 需要检查SW及脉冲信号78 SDZ 开关接触不良80 远程监督控制屏把CC切断了81 输入 53S 讯号出错83 远程监督控制屏把DC切断了(开关门电路切断了)84 "停车PARK时, PUL输出讯号出错"85 "当门在开始关时, UND切断了"86 "当门在开始开时, DC切断了,DT接通或DC接通DT切断了"88 "电梯内有人在按钮时, CC被切断了"8A 平层故障 RUT输出讯号出错8B 平层停车18DS没接通故障8C 远程监督控制屏没有反应 RUT讯号出错80~8C Supervisory panel 远程监督控制屏及电梯,开关信号不协调出现的故障码91 电梯运行了45秒 DZ没有离开平层区92 电梯运行了45秒检测不到DZ动作93 DT接通7秒后18CS或18DS没反应94 DT接通7秒后DC没有电95 "电梯在平层区内运行了超过10秒, 无法平层"96 电梯在平层时超过正常平层范围 DN UP 或PG问题电梯在操作时期出现故障A0 路径错误检查输入/输出数据程序单元A1 路径错误检查运行控制程序单元A3 路径错误检查门控制程序单元B0 CPU 及PUL 关系错误B1 CPU 及SLS 关系错误B2 CPU 及ADCP 关系错误B3 CPU 及SLS线传送或CCU 关系错误B4 CPU 及PUL反应延迟超过2秒B5 CPU 及PUM反应延迟超过2秒B8 "CPU 及PUG , WDT恢复超过6次的反应不正常" B9 "CPU 及WDT , CCU恢复超过3次的反应不正常" 故障包括: 硬件/ 软件 /板子内的跳线及型号出错BA "CPU 及SLS , WDT恢复超过3次的反应不正常" BB "CPU 及ADCPD , WDT恢复超过3次的反应不正常" BC "CPU 及PUL , WDT发生故障"BD "CPU 及PUM , WDT发生故障"BE "CPU 及PUG , WDT发生故障"BF "CPU 及CCU , WDT发生故障"。
蒸汽冷却机CVHE CVHF系列60Hz应用说明书

Adaptive Frequency™ Drive Remote-Mounted DriveCenTraVac™ chiller models CVHE/CVHF 460/480V and 575/600V 60 Hz applications Adaptive Frequency™ DrivesWhile chiller efficiencies have improved dramatically over the past twenty years, for most commercial buildings the single largest energy user is still the chilled water system. A Trane® Adaptive Frequency Drive (AFD) can improve chilled water system efficiency without sacrificing comfort. AdaptiveFrequency is a trademarked term for a Trane variable speed drive which is made to Trane specifications and uses proprietary control logic.A variable speed drive maximizes chiller efficiency and reduces power consumption by adapting the compressor motor speed and inlet guide vanes to the chiller operating temperatures.Features and benefitsEnergy reductionConventional chillers use inlet guide vanes to provide stable operation at part load conditions. Capacity is reduced by closing the vanes while maintaining a constant motor speed.While AFDs can increase the off-design efficiency of chillers, adding them for every application may not be appropriate. Intelligent control of the condenser and chilled water temperatures is crucial for AFD savings in chiller system applications.As with any chiller plant design strategy, it’s important to look at various alternatives and use tools such as Trane System Analyzer™ or TRACE™ 700 HVAC system analysis software programs to determine the best overall design strategy.The myPLV™ Chiller Performance Evaluation Tool provides a simple tool for quick and reliable chiller economic comparisons considering both full and part load ratings. To learn more or to download a free copy of the myPLV tool, please visit /myPLV.Patented Adaptive Control™ chiller controllerThe combination of speed control and inlet guide vane position is optimized mathematically and controlled simultaneously to meet the dual requirements of water temperature control and efficiency.Tracer AdaptiView™ AFD control reaches the optimum speed faster, responds to changes more quickly, and provides improved water temperature stability. The chiller controller reduces speed to the surge boundary based on the current differential operating pressure, making instantaneous corrections to speed and guide vane settings as conditions change, to optimize chiller efficiency.Trane – by Trane Technologies (NYSE: TT), a global climate innovator – creates comfortable, energy efficient indoor environments through a broad portfolio of heating, ventilating and air conditioning systems and controls, services, parts and supply. For more information, please visit or .© 2020 Trane. All Rights Reserved.All trademarks referenced in this document are the trademarks of their respective owners.CTV-SLB031-EN05/19/2020GG HIBFEDCB A Remote (free-standing) AFDThe compact design of this AFD offers a flexible option for installation in mechanical rooms in which space is limited and a unit-mounted drive may not fit. The AFD is designed for front access only and ships completely factory-tested and wired.The drive has a DC link choke that minimizes harmonic distortion and results in a Total Demand Distortion (TDD) of approximately 30%.Design informationTonnage range: CenTraVac chillers, 120-1600 tons. Voltage: 460/480V and 575/600V 60 Hz input power, ±10%.Efficiency: Minimum efficiency of 97% at rated load.Power factor: Displacement power factor of 0.96 at all loads.Enclosure: NEMA 1 ventilated enclosure1 with tested short circuit current rating (SCCR) of 65,000 amps. Includes padlockable door-mounted circuit breaker/shunt trip with ampere interrupting capacity (AIC) rating of 65,000 amps.2 The entire package is UL/CUL listed.1 option for NEMA 12 enclosure2 SCCR/AIC of 65,000 amps standard for 460/480V with option for 100,000 amps.Weights and dimensions are provided for general information only. Always refer to the Trane submittal package for information specific to your chiller.Data TableFrame 460/480V575/600VDimensions (inches)Estimated Weight (lbs.)Power (hp)Max. AmpsPower (hp)Max. AmpsWidth Depth Height D3h 150-200213150-200171482486953D4h 250-350394250-40035648248611584504765624901292E2500-6006494504005624901634500-6505606424901681F3650-750791750-105084012724902885900-1100103112724902885F41200-135013601150-1350112015024903419Air Exhaust Circuit Breaker AFD Display Interface Lockable Enclosure Low Voltage Access Door Air Intake (filter on inside)Top Line Power Entry AFD Rectifier and Inverter (with top cover removed)Control Power Transformer。
panasonic+nv-gs60gc+用户手册说明书

使用說明書Operating InstructionsLSQT1135 B2LSQT1135安全注意事項ª請仔細閱讀使用說明書並正確使用攝像機。
≥由於未按照使用說明書中說明的操作步驟進行操作,而導致的損害或材料的損壞僅由用戶負責。
試用攝像機在記錄首個重要事件前,首先要試用一下攝像機,以保證其錄製性能與各種功能能夠正常使用。
製造商對於錄製內容的損失不承擔任何責任。
製造商對於因攝像機、其附件或錄影帶的故障或缺陷造成的任何損失概不負責。
請嚴格遵守版權法。
若非個人使用,複製先期錄製的錄影帶、磁碟、其他出版物或播放材料都侵犯版權法。
即使是個人使用,也嚴禁複製某些特定的材料。
≥攝像機使用了版權保護技術,並且被日本和美國的專利技術和知識產權所保護。
要想使用這些版權保護技術,必須得到Macrovision 公司的授權。
禁止分解或改裝攝像機。
≥使用說明書中的所有其他公司和產品名稱都是各個公司的商標或註冊商標。
參照頁參照頁頁碼的兩側標有短划線,例如:-00- 菜單操作流程用>>表示。
請僅使用推薦的附件。
≥除提供的AV 電纜外,請勿使用任何其他的AV 電纜。
≥當您使用單獨購買的線纜時,使用線纜的長度一定要在3 m 之內。
警告:若想降低起火、電擊或產品損壞的危險,≥請勿將本設備暴露於雨中、潮濕、滴水或濺水的環境中,並且勿將盛滿液體的物體(如花瓶)放在本設備上。
≥請僅使用推薦的附件。
≥請勿卸下機身的前蓋(或後蓋);機身內沒有用戶可維修的部件。
需要維修時,請聯繫授權的維修人員。
注意!≥請勿將此設備安置在書櫃、壁櫥或其他狹窄的地方。
請確保本機通風良好。
若想降低由於過熱而導致的電擊或火災的危險,請勿讓窗簾或其他物品遮住通風孔。
≥請勿用報紙、桌布、窗簾及類似物品遮住本機的通風孔。
≥請勿將明火放置在本機上,如點燃的蠟燭。
≥用環保的方式處理電池。
電源插座應當安置在本設備附近,並便於連接。
電源線的主要插頭應當保持隨時可以使用的狀態。
Goulds泵安装,操作和维护手册 型号CV 3196 i-FRAME说明书
强威60英寸槽式地面扑打吸氧器产品说明书

60in. Drum Spike AeratorOwner’s ManualWARNING: Read carefully and understand all ASSEMBLY AND OPERATION INSTRUCTIONS before operating. Failure to follow the safety rules and other basic safety precautions may result in serious personal injury.Item # 4917406082015Thank you very much for choosing a Strongway product!For future reference, please complete the owner’s record below:Serial Number/Lot Date Code: ________________________________ Purchase Date: ____________________________________________ Save the receipt, the warranty, and this manual. It is important that you read the entire manual to become familiar with this product before you begin using it.This Drum Spike Aerator is designed for certain applications only. Northern Tool and Equipment cannot be responsible for issues arising from modification or use of this product in an application for which it was not designed. We strongly recommend that this product not be modified and/or used for any application other than that for which it was designed. For technical questions, please call 1-800-222-5381.Intended Use (4)Technical Specifications (4)Important Safety Information (4)Specific Operation Warnings (6)Assembly (7)Before Each Use (7)Maintenance (7)Parts Diagram (7)Parts List (8)Replacement Parts (8)Limited Warranty (9)This Drum Spike Aerator has 126 three-inch spikes that penetrate up to 2½” into the ground to allow w ater and nutrients to reach plants’ roots. It holds up to 40 gallons of water for a total filled weight of 482 lbs. This aerator works well with hard soil or clay.1. Locate all parts as shown in the Parts Diagram. Use caution, as the points are sharp.2. Place the U-Style Hitch Bracket (8) around the Drum Body Weldment (1). Place the Joint BushingWeldment (3) over axle and attach with Bolts (5), Flat Washers (6), and Lock Nuts (7) on each side.3. Place the T-Style Hitch Bracket (12) against the U-Style Hitch Bracket (8) and attach using Bolts(9), Flat Washers (10), and Lock Nuts (11). Tighten all hardware securely. Check all hardware periodically to assure tightness.4. Fill the drum with water to achieve the desired weight. Install the Plug (2) and the Washer (13).5. Grease or oil the bushings as needed.∙ Always check for damaged or worn-out parts. ∙ Grease or oil the bushings as needed.∙Check hardware for tightness before each use.Maintain your aerator. It is recommended that the general condition of any aerator be examinedbefore it is used. Keep your aerator in good repair by adopting a program of conscientious repair and maintenance in accordance with the recommended procedures found in this manual. Keep all cutting tools sharp and clean. Properly maintained cutting tools with sharp cutting edges are less likely to bind and are easier to control. Keep handles dry, clean, and free from oil and grease. Drain water completely from the drum after each use.567∙For replacement parts and technical questions, please call Customer Service at 1-800-222-5381. ∙Not all product components are available for replacement. The illustrations provided are a convenient reference to the location and position of parts in the assembly sequence.∙When ordering parts, the following will be required: Model Number, Serial Number/Lot Date Code, and Description.∙The distributor reserves the rights to make design changes and/or improvements to product lines and manuals without notice.Northern Tool and Equipment Company, Inc. ("We'' or '"Us'') warrants to the original purchaser only ("You'' or “Your”) that the S trongway product purchased will be free from material defects in both materials and workmanship, normal wear and tear excepted, for a period of one year from date of purchase. The foregoing warranty is valid only if the installation and use of the product is strictly in accordance with product instructions. There are no other warranties, express or implied, including the warranty of merchantability or fitness for a particular purpose. If the product does not comply with this limited warranty, Your sole and exclusive remedy is that We will, at our sole option and within a commercially reasonable time, either replace the product or product component without charge to You or refund the purchase price (less shipping). This limited warranty is not transferable.Limitations on the WarrantyThis limited warranty does not cover: (a) normal wear and tear; (b) damage through abuse, neglect, misuse, or as a result of any accident or in any other manner; (c) damage from misapplication, overloading, or improper installation; (d) improper maintenance and repair; and (e) product alteration in any manner by anyone other than Us, with the sole exception of alterations made pursuant to product instructions and in a workmanlike manner.Obligations of Purcha serYou must retain Your product purchase receipt to verify date of purchase and that You are the original purchaser. To make a warranty claim, contact Us at 1-800-222-5381, identify the product by make and model number, and follow the claim instructions that will be provided. The product and the purchase receipt must be provided to Us in order to process Your warranty claim. Any returned product that is replaced or refunded by Us becomes our property. You will be responsible for return shipping costs or costs related to Your return visit to a retail store.Remedy LimitsProduct replacement or a refund of the purchase price is Your sole remedy under this limited warranty or any other warranty related to the product. We shall not be liable for: service or labor charges or damage to Your property incurred in removing or replacing the product; any damages, including, without limitation, damages to tangible personal property or personal injury, related to Your improper use, installation, or maintenance of the product or product component; or any indirect, incidental or consequential damages of any kind for any reason.Assumption of RiskYou acknowledge and agree that any use of the product for any purpose other than the specifieduse(s) stated in the product instructions is at Your own risk.Governing LawThis limited warranty gives You specific legal rights, and You also may have other rights which vary from state to state. Some states do not allow limitations or exclusions on implied warranties or incidental or consequential damages, so the above limitations may not apply to You. This limited warranty is governed by the laws of the State of Minnesota, without regard to rules pertaining to conflicts of law. The state courts located in Dakota County, Minnesota shall have exclusive jurisdiction for any disputes relating to this warranty.Distributed byNorthern Tool and Equipment Company, Inc.Burnsville, Minnesota 55306Made in China。
CV60调试手册.

目录1.前言 (3)1—1 一般之注意事项 (3)1—2 RESET方法 (4)1—3 设定日期 (5)1—4 资料设定方法 (5)2.作业顺序 (7)3.试运转 (11)3—1 确定外部配线 (11)3—2 绝缘试验 (12)3—3 试运转顺序 (13)4.机械的设定与调整 (16)4—1 GOV之测试 (16)4—2 缓冲器之测试 (16)4—3 钢索 (17)4—4 导滑器 (18)4—5 紧急停止器(SAFETY) (18)4—6 车厢之定心 (18)4—7 乘场门 (18)4—8 车厢门 (19)4—9 门联动机构 (19)4—10 门CAM与门速度 (19)4—11 着床检测板与极限SW (20)5.高速运转 (21)5—1 传送关系确认 (21)5—2 传输线之确认 (22)5—3 高速运转顺序 (22)5—4 舒适感调整 (23)6.性能确认 (34)6—1 刹车器之调整 (34)6—2 荷重测试 (34)6—3 重叠(LAP)时间测试(同DSD) (34)6—4 操作确认 (34)6—5 门速度调整 (35)6—6 资料取得、尺寸确认 (35)6—7 检查准备 (35)7.参考资料(基板关系) (37)7—1 UNIT箱内基板配置 (37)7—2 MCU旋转一览表 (38)7—3 MCU跨接脚一览表 (40)7—4 MCU SW设定一览表 (41)7—5 8WLS.3WLS初设定一表 (41)7—6 保护机能检出数值一表 (42)7—7 PATTERN资料一表 (44)7—8 PUS7节管显示一表 (45)7—9 机械室接线 (45)7—10 线性补偿器 (46)8—6 检核滑轮磨损引起脉冲频率变化 (47)CV—60 现场调整报告书 (49)60.70系列ERROR CODE表 (51)1.前言1—1 一般的注意事项1.基板采用CMOS—IC因此需充分注意静电问题(1)手指必须接地后,才可接触基板。
东芝CV调试手册
CV180系统调整步骤使用说明书99年5月株式会社东芝?TOSHIBACorporation,1999.AllRightsReserved.希望●在使用前,请详细阅读此使用说明书,完全理解其中内容后,再操作制品。
●阅读后,请妥善保管说明书,以便随时可以使用。
●在移置或转卖该制品时,必须将说明书与制品一起移交。
前言本使用说明书,就在进行标准型电梯(CV180)控制装置的安装·保养·调整作业所必要的处理方法上进行了说明。
本说明书的内容的适用对象为具有控制系统基本知识的技术以及管理人员。
在实施各种作业时,必须事先熟读该说明书,根据上面记载的指示进行操作。
禁止进行说明书上记载内容以外的行为·操作。
请妥善保管好该说明书,谨请彻底管理。
控制系统操作时的注意事项: 6E6MA000: 6E6M001: 6E6MA002: 6E6MA003: 6E6MA004: 6E6MA005安全上的注意事项为了防止对管理和使用者及他人造成危害和财产的损害与未然,安全正确地使用商品。
在装置的本体以及其使用说明书上,记载有重要的内容。
请将以下内容(表示·图记号)充分理解后,再阅读本文,并遵守其记载事项。
[本体警告表示标签的确认]在指定处(参考别的使用说明书[使用操作时的注意事项(6E1M0969)])请确认本体警告标签的贴付。
如果,标签遗失,由于污损而看不清楚时,请向本公司售后服务部门联系。
一般禁止·注意事项为了维护制品·利用者·作业者的安全性,将作业时的注意事项例举于以下。
请掌握和遵守其内容。
电梯系统的不适当操作·作业是导致故障,坏损,灾害的起因。
万一实施本说明书上记载的内容之外的行为,禁止的操作等,造成直接或间接的故障的场合,本公司将不负此责任,谨请谅解。
1)在电梯控制盘上贴有PL标签(制品安全标签)。
禁止进行违反PL标签指示的事。
必须按照指示进行作业。
东芝CV-60自学习、调故障、清故障方法

第一部分CV-60调故障方法PUL板(单梯左数第2块板)上从上到下排有RS1~RS6六个旋转拨码开关,RS6下面黑色按钮为STB(确认)按钮,再下面有4个拨码开关,第三个为数据保护开关,平常在左侧ON(保护状态)。
1、将RS1拨到2, RS2拨到7, RS3~6拨到0, 按STB一下注:RS1~4为输入地址用,此为输入区域地址---2700。
RS5,RS6为功能拨码。
拨到00为输入区域地址。
STB为确认此区域地址2700。
2、将RS1~2拨回0, RS3~5拨到0, RS6拨到1, 按STB一下注:此为输入偏置地址—0000,STB为确认此偏置地址0000。
3、将RS6拨到2, 按STB一下,数码管2顺序显示2-7-0-0---0-0-0-0。
注:察看所输入的地址(2700—0000)是否正确,4、将RS6拨到3, 按STB一下注:进入数据纪录,读出数据,数码管2顺序显示两个数(年份)。
开关位置七段码显示数据BIT位地址RS4---0 显示年0 0000RS4---1 显示月 1 0001RS4---2 显示日 2 0002RS4---3 显示星期 3 0003RS4---4 显示时 4 0004RS4---5 显示分 5 0005RS4---6 显示秒 6 0006RS4---7 显示故障代码D1 7 0007RS4---8 显示电梯运转状况D2 8 0008RS4---9 显示故障内容辅助信号D3 9 0009RS4---A 显示故障内容辅助信号D4 A 000ARS4---B 显示故障内容辅助信号D5 B 000BRS4---C 显示故障内容辅助信号D6 C 000CRS4---D 显示故障内容辅助信号D7 D 000DRS4---E 显示故障内容辅助信号D8 E 000ERS4---F 显示故障内容辅助信号D9 F 000FRS3---1 显示第2个故障代码D1 0017RS3---2 显示第3个故障代码D1 0027RS3---B 显示第11个故障代码D1 00B7-------------------------------------------------------------------------------RS1---0, RS2---3, RS3---B, RS4---7显示第60个故障代码D1 03B7D2内容说明:显示数据为16进制,转化为2进制后与BIT位对应察看。
星马ACVF(安利索)门机变频器调试说明

1.确认及安装注 意● 受损的变频器和零部件不全的变频器,切勿安装。
● 请安装在金属等不易燃烧的材料上,以免发生火灾。
● 安装时请不要抓在外壳或两端接线端子上,当心掉下来压脚,有受伤的危险。
● 请确定已安装牢靠。
否则,可能会掉下来砸伤人。
2.布线注 意● 请确认交流主回路电源的电压与变频器的额定电压是否一致。
切勿对变频器进行耐电压试验。
● 请勿将电源接到输出U 、V 、W 端子上。
安 全 注 意 事 项危 险在安装和设备投入运行前,请仔细阅读安全说明和警告,避免对人员、设备造成伤害及损坏。
本说明书有关安全注意事项的等级分为“注意”和“危险”两级。
注意危险:错误使用会有危险,可能会致人重伤、残废甚至死亡以及重大财物损失。
:错误使用会有危险,可能会造成轻伤、中度伤害或财物损失。
●接线前,请确认输入电源是否处于OFF 状态。
●只允许连接交流单相220V的输入电源,本设备必须接地(NEC和其它应用标准)。
●非专业电气工程人员,请勿进行接线作业。
3.操作和运行注意●因散热片温度会变得很高,所以,请不要触摸,以免被烫伤。
●请勿随意变更变频器的设定,本变频器在出厂时已经进行了适当的设定。
危险●请务必在装上外壳后再接通电源。
接通电源前请将开关置于OFF位置。
●变频器通电时,即使在停机状态也不要触摸变频器的端子,以免触电。
4.维护和检查危险●检查要在切断电源5分钟后进行,否则有触电的危险。
●检查和维护要由专业人员进行●变频器的端子在通电情况下切勿触摸,端子上有高电压,非常危险。
●进行检查、维护作业时请使用绝缘工具,并避免手上佩带手表、戒指等金属物。
5.其它危险●绝对禁止对变频器进行改造,以免发生伤亡事故。
目录1、安全注意事项-------------------------------------------------------------------------------1 2.目录------------------------------------------------------------------------------------------2 3.接线------------------------------------------------------------------------------------------4 3—1 变频器接线图---------------------------------------------------------------------4 3—2 控制器接线--------------------------------------------------------------------------5 4.操作-------------------------------------------------------------------------------------------6 4—1 各按键功能及指示-----------------------------------------------------------------6 4—2 基本操作-----------------------------------------------------------------------------7 4—3 系统参数-----------------------------------------------------------------------------7 5.其它参数------------------------------------------------------------------------------------10 5—1 相关技术参数-----------------------------------------------------------------------10 5—2 电气参数-----------------------------------------------------------------------------10 6.调试说明------------------------------------------------------------------------------------11 6-1两个关键词的解释---------------------------------------------------------------------11 6-2门机控制器调试的具体步骤---------------------------------------------------------11 7.故障处理-------------------------------------------------------------------------------------13 8、其它---------------------------------------------------------------------------------------------138—1 废物处理------------------------------------------------------------------------------13 8—2 咨询修理------------------------------------------------------------------------------13 9、附页---------------------------------------------------------------------------------------------14 附页1:门机安装注意事项-----------------------------------------------------------------14 附页2:双折门机直梁安装示意图--------------------------------------------------------15 附页3;轿顶安装示意图--------------------------------------------------------------------161- 1TYPE :ACVF003CSOURCE :1φ200-240V 50/60Hz OUTPUT :0.5KV A 1.5 SER.NO.:03AA-0888额定输出电流2、外观和各部分的名称额定输入电流 型号生产号(例如0888,08893-1 控制器接线插座号端子及标识功能插座号端子及标识功能P11 L 电源相线P4 4 开门到位2 PE 接地 5 公用3 N 电源中性线 6 关门到位P2 1 U电机端子7 公用2 V 8 位置3 W 9 公用4 PE 接地P61 AP3 1 开门指令 3 5V2 公用 5 B3 关门指令 6 PE 接地P5 10 外接开门到位(到位通)9 OV 11注:P3开关门指令输入,要求是开关量无源输入。
V-60HD 4-6-2 4K 60P 多屏环境下的生产切换器说明书

Corporate event production is the fastest growing live event space with companies hosting town halls, meetings, trainings, new product announcements, both in person and streaming.Video communication helps improve the effectiveness of education when used for streaming lectures, assemblies, distance learning, sports, liveperformances or theater productions.The V-60HD is ideal for multiscreen environments usually found in churches, conference centers, hotels, and trade show facilities where different content needs to be switched to independentscreens.Live ProductionEducationChurch/TheaterPlug-n-Play Production Switcher with Audio for Live Event and Streaming● 4 SDI Inputs (with de-interlacer)● 2 HDMI Inputs (scaled)● 1 RGB shared with HDMI input 6 (scaled)● 2 SDI Outputs – Assignable to PGM, PVW, AUX ●2 HDMI Outputs – Assignable to PGM, PVW, AUX● 1 Multiview Outputs – Program, Preview, plus 8 video sources with Audio meters● LAN – Remote control and Smart Tally ●1 x Stereo RCA Line Outpu2 x SDI and 2 x HDMI outputs1213BLOCK DIAGRAMAUDIOVIDEORoland's unique and proprietary wireless tally system uses a wireless LAN router connected to the V-60HD to send tally information to iOS or Android devices on the network.Extending the V-60HD’s audio mixer with outboard USBcontrol surfaces is an economical alternative to using adedicated full-size audio mixer. USB MIDI control devices are instantly recognizable by Mac and Windows PCs including the V-60HD Remote Control Software.For a gaming-like experience, pick up a USB gamepad and command a team of PTZ cameras. Instincts will guide the way as cameras Pan, Tilt and Zoom effortlessly on the action.Smart TallyRemote ControlCut, Mix with cross dissolve and NAM, FAM transitions. Useup to 30 different wipe patterns. Time based corrected andframe synched provides seamless transitions between 6 videosources and 2 still images instead of buses. Auto-Scan (Ver.2.0)enables to switch automatically to reduce operator work.1415SPECIFICATIONS V-60HD(0dBu=0,775Vrms)The Ver.2.5 update supports JVC, Panasonic PTZ and Canoncamcorder control, audio effect preset, adds PNG still imageformat, improves User interface, and more.Assign up to eight analog audio inputs a separate audioembed channel on SDI 1 and 2 outputs, for a separatemix pre-effect (dry) or post-effect (wet) for correcting audioproblems post live event.Discrete Multi-Channel Audio EmbeddingThe V-60HDs’ preamp and dynamics effects include a high-pass filter, gate, compressor, a 3-band EQ and delay. Anyonewithout audio knowledge can run sound thanks to the built-ineffect's library packed with presets for common productionscenarios including interviews, ambient sound recording andelimination of “pops” & wind noise.The included Auto-Mixing function ensures the correct mix formultiple panel participants at conferences by automaticallyadjusting levels across multiple audio sources. A priorityweighting assignment that is channel specific can be set givingthe moderator or priority audio channel a higher volume levelwhile using the Auto-Mixing function allowing the operator tofocus on video switching and production.Audio Mixer with preamp and dynamicsAuto mixingAUDIOLive streams, HD recording, and confidence monitorsoften have different visual needs from the main programoutput. Switch any of the connected input sources to anyof the four SDI or HDMI outputs without affecting the mainPGM destination. AUX Linked PGM enables AUX output tosynchronize with the Program (PGM) output.The V-60HD includes a DSK (downstream keyer), Picture-in-Picture (PinP), Split composition effects ideal for creating newsstyle broadcasts and corporate presentations. PinP windowshapes include rectangle, circle, heart and diamond patternsto add a special touch to special events. Cropping of PinPand adjusting of SPLIT center portion (Ver.2.0) are suitable forcomposition of vertically long screen of smart phone.Professional broadcast cross point buttons with PGM/PSTLED color indicators. Rugged T-Bar, DSK quick edit knobs forkey level and gain. Two dedicated PinP and Split buttons withknobs for center framing of Split and PinP placement. Changetransition type using either mix or two preset wipe buttons withdedicated transition dissolve time knob. Front panel 3-inch LCDdisplay with quick access menu navigation to adjust switcherparameters.V-60HD can preview all six video inputs and two still images,PGM and PVW to a single preview monitor via the Multi-viewoutput. In addition, you can display the menu on the Multi-view display, so you make setting changes without changingyour focus from the preview display. From Ver.2.0, exchangingPGM and PVW window and editing label name of IN1 to 6 arepossible.AUX busVideo compositionProfessional user interfaceMulti-view output。
G60调试手册

0.00% 0.01% 0.01% 368.02% 1.33% 0.65% 0.60% 95.01% -0.17% -0.17% -0.17% 134.01% 0.57% 0.57% 0.57% 0.45%
5% 5% 5% 5% 5% 5% 5% 5% 5% 5% 5% 5% 5% 5% 5% 5%
Itest > BP2⋅ CTT2 = 11.55
4 of 26
2006-4-17
G60调试完全手册
做三个点的电流值:
Itest_T7 := BP2⋅ CTT2 * Itest_T7 = 11.55 Itest_T8 := 1.5 ⋅ ( BP2⋅ CTT2 ) * Itest_T8 = 17.325 Itest_T9 := 2⋅ ( BP2⋅ CTT2 ) * Itest_T9 = 23.1
0.10% -1.00% -5.05% -18.75% -66.63% -67.00% -68.35% -2.50% -82.65% -82.84% -83.54% -2.50% -85.70% -85.86% -86.44% -2.50%
误差
5% 5% 5% 5% 5% 5% 5% 5% 5% 5% 5% 5% 5% 5% 5% 5%
G60调试完全手册
G60调试手册
一、保护测量精度测试
根据图纸,在相应的电流和电压输入端子加入测试值,再从URPC的实测值菜单中 把数据读入以下表格.URPC软件读实测值的菜单如下图:
CT参数 CT F1 PARAMETER 25000 A Phase CT Primary 5 A Phase CT Secondary 1 A Ground CT Primary 1 A Ground CT Secondary
