Precision Measuring Part #2
干分尺的读数方法

干分尺的读数方法The micrometer is a precision measuring instrument commonly used in manufacturing and metrology. Its reading method is crucial for accurate measurements. To read a micrometer, one must first understand its basic structure, which typically includes a fixed jaw, a movable jaw, a spindle, and a thimble.干分尺,即我们常说的千分尺,是制造和计量领域常用的精密测量工具。
其读数方法对于确保测量的准确性至关重要。
要读取千分尺的数值,首先需要了解其基本结构,通常包括固定砧座、可动砧座、主轴和测微螺杆等部分。
The first step is to zero the micrometer. This involves adjusting the movable jaw until it firmly contacts the fixed jaw, ensuring that the reading on the sleeve is zero. Any deviation from zero should be noted and accounted for during the measurement.第一步是校准千分尺。
这需要将可动砧座调整到与固定砧座紧密接触,确保套筒上的读数为零。
如果在校准过程中发现任何偏差,应在测量时予以记录并考虑在内。
Next, place the object to be measured between the jaws of the micrometer. Gently rotate the thimble until the movable jaw firmly grips the object without causing damage. Avoid excessive force as it may affect the accuracy of the measurement.接下来,将被测物体置于千分尺的砧座之间。
量检具专业英语
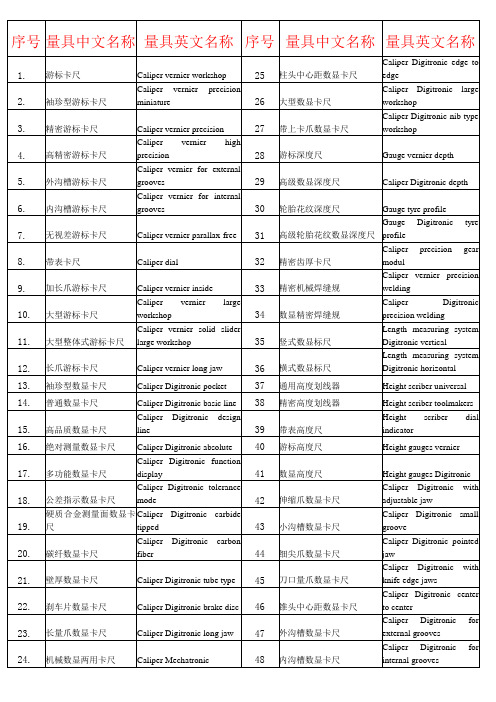
游标深度尺
Gauge vernier depth
5.
外沟槽游标卡尺
Caliper vernier for external grooves
29
高级数显深度尺
Caliper Digitronic depth
6.
内沟槽游标卡尺
Caliper vernier for internal grooves
30
Micrometer depth
133
提升式测厚规
Thickness gauge lifting type
109
u计数器深度千分尺
Micrometer Mechadigit depth
134
提升式数显测厚规
Thickness gauge lifting type Digitronic
110
Caliper Digitronic design line
39
带表高度尺
Height scriber dial indicator
16.
绝对测量数显卡尺
Caliper Digitronic absolute
40
游标高度尺
Height gauges vernier
17.
多功能数显卡尺
Caliper Digitronic function display
125
数显杠杆百分表/千分表
Indicator digital test
101
u计数器卡尺型内测千分尺
Micrometer Mechadigit caliper inside type
126
矩形数显百分表
Indicator Digitronic linear test
平整度检测方法
平整度检测方法简介平整度是描述表面平整程度的指标,通常用来评估某一物体表面的平整程度。
在制造业、建筑工程和地质勘探等领域都有广泛的应用。
本文将介绍几种常见的平整度检测方法。
直尺法直尺法是一种简单直观的平整度检测方法。
它通过在被检测物体的表面放置一根直尺,在直尺与表面之间观察是否存在间隙来判断平整度。
这种方法适用于一些相对粗糙的表面。
检测步骤1.准备一把精确度较高的直尺。
2.将直尺放置在被检测表面上,并用手轻轻按压直尺使其与表面紧密贴合。
3.观察直尺与表面之间是否存在间隙。
如果存在间隙,则表明表面不平整;如果不存在间隙,则表明表面平整。
优缺点直尺法的优点是简单易行、成本低。
但它对被检测物体表面的要求较高,适用于比较粗糙的表面,对于细微的不平整很难准确检测出来。
光源法光源法是一种通过观察平行光线经被检测物体表面反射后的明暗变化来判断平整度的方法。
它适用于比较光滑的表面。
检测步骤1.准备一束平行光源,如激光光束或平行光线。
2.将光源照射到被检测表面上,并调整光源与表面的角度,使得光线与表面平行。
3.观察被检测表面的反射光线,如果表面平整,则光线反射出均匀的明亮光斑;如果表面不平整,则光斑呈现出明暗变化。
优缺点光源法的优点是对表面平整度的检测精度较高,适用于比较光滑的表面。
但它的设备要求较高,需要光源和检测仪器,成本较高。
基于影像的方法基于影像的方法是一种利用计算机视觉技术对被检测表面进行图像处理和分析,从而得到平整度的方法。
它可以适用于各种表面,包括粗糙和光滑表面。
检测步骤1.使用相机或扫描仪对被检测表面进行拍摄或扫描,获取表面图像。
2.使用图像处理算法对图像进行预处理,如去噪、增强和边缘检测等。
3.基于预处理后的图像,采用适当的算法计算表面的平整度指标,如均方根误差(RMS)或表面粗糙度等。
优缺点基于影像的方法的优点是非接触式检测,可以适用于各种表面。
它还可以通过图像处理算法对表面进行更加详细和准确的分析。
美国ABI公司产品说明书
Microbalances MXA/1 (3)Microbalances MXA/F (4)Analytical balances XA (5)Analytical balances XA/X (6)Analytical balances WAS/X (7)Analytical balances AS/X (8)Analytical balances AS (9)Precision balances WPX (10)Precision balances WPX/G (11)Precision balances WLX (12)Precision balances WTX (13)Precision balances PS/C/2 (14)Precision balances PS/C/1 (15)Precision balances WLC/C/2 (16)Precision balances WLC (17)Precision balances APP/X (19)Precision balances APP/C (20)Precision balances WTB (21)Jeweller's balances PS/CT (22)Jeweller's balances AS/CT (23)Pharmaceutical balances WXD (24)Pharmaceutical balances WPX (25)Pharmaceutical balances PS/C2 (26)Pharmaceutical balances PS/C1 (27)Moisture analyzers MAC (28)Moisture analyzers MAX (29)Mass comparators WAX 21/KO (30)Mass comparators WAX 210-5100/KO (31)Mass comparators WPP 21/KO (32)Mass comparators HX 510-2100/KO (33)Checkweighing Filling Percentage Statistics Air Buoyancy Correction MXA/1 series of balances has beendesigned to meet high requirements formeasuring small masses with highreadability. They are equipped withgraphic display with extended user menu.In order to guarantee proper accuracy ofmeasurements, has been appliedautomatic system of calibration.M i c r o b a l a n c e c o n s i s t s o f t w ocomponents. One of them containselectronic modules, and the other precisemechanical measuring system. Such asolution guarantees elimination oftemperature changes influencing theindications of the micro balance.Balances are equipped with esthetic, cylindrical shaped weighing chamber with small glass draught shield.All elements of the weighing chamber are manufactured from glass or metal which minimalizes theinfluence of electrostatic charges on weighing result. Microbalance is equipped with user friendly menu.User has access to multiple functions and measuring units which allow for specification of workingrequirements. Microbalance software allows for composition of GLP procedures as standard printout or asInfrared sensors Pipette calibration GLP GLP proceduresMXA/F series of balances has beendesigned to meet high requirements formeasuring small masses with highreadability (d = 1 µg). They are equippedwith graphic display with extended usermenu.In order to guarantee proper accuracy ofmeasurements, has been appliedautomatic system of calibration.M i c r o b a l a n c e c o n s i s t s o f t w ocomponents. One of them containselectronic modules, and the other precisemechanical measuring system. Suchsolution guarantees elimination oftemperature changes influencing theindication of the micro balance.Microbalances series MXA/F are offered with one capacitie - 5g, (with readability 1 µg.). Balances areequipped with esthetic, cylindrical shaped weighing chamber with aluminum draught shield . All elements ofthe weighing chamber are manufactured from glass or metal which minimalizes the influence ofelectrostatic charges on weighing result. Microbalance is equipped with user friendly menu. User hasCheckweighing Filling Percentage Statistics Air Buoyancy CorrectionXA series presents the professional level of analyticalbalances. This balance is equipped with backlit graphicdisplay with extended user menu. The accuracy ofmeasurement is guaranteed by automatic internal calibrationdependant on time and temperature changes.Analytical balances series XA are offered with followingcapacities:-100, 160, 220, 310 g (readability 0,1 mg);-100 g and 210 g (readability 0,01 mg);-60/220 g (readability 0,01/0,1 mg - moveable fine range ).Advantages of XA series is possibility of creation of GLPprocedures as standard printout and freely definable userprintout. User has access to big weighing chamber with twosliding glass side doors and sliding top glass door.Each scale is equipped with RS 232, PS/2 output andadditional display output as standard.Counting pieces Checkweighing Density determination Filling Animal weighing Percentage StatisticsMax capacityMinimal loadReadabilityTare rangeTechnical data:XA 110/X *100 g 1 mg 0,01 mg -100 g XA/X series- professional level analitycal balancesWAS/X series represents professional level of analyticalbalances. It is equipped with big backlit display with extendedmenu. Accuracy of balances is guaranteed by automaticinternal calibration, depending on time and temperaturechanges.Analytical balances series WAS/X are offered with capacities110, 160 and 220 g with readability of 0,1mg.Advantages of balances series WAS/X are possibility ofgeneration of GLP procedures as standard printout or freelyadjustable printout. User can perform measures in bigweighing chamber equipped with sliding doors and sliding topglass. Each balance has RS 232, PS/2 output and possibilityof connection of additional display as standard.Quality of balances series WAS/X has been confirmed byEuropean certificate EC Type Approval.Balances have possibility of weighing loads under theCounting pieces Checkweighing Density determination Filling Animal weighing Percentage StatisticsBalances series AS/X represent standard level ofanalytical balances. They are equipped with backlitgraphic display. Accuracy and precise measurement ofthe balances are determined by automatic internalcalibration, dependant on time and temperaturechanges.Analytical balances AS/X series are offered withfollowing capacities: 110, 160, 220, 310 g with readabilityof 0,1 mg, 60 g with readability of 0,01 mg and 60/220 gwith readability of 0,01/0,1 mg.AS/X balances are equipped with optional pipettecalibration as well as automatic door opening system.GLP procedure of these balances is a report fromcalibration process of the balance, and this informationhas unchangeable shape (no modification possible).User has access to big measuring chamber with slidingdoors and sliding top glass. Each balance is equippedwith RS 232 output and possibility of connection ofadditional display as standard.Balances are equipped with possibility of weighing loadsCounting pieces Checkweighing Density determination Filling Animal weighing FormulationPercentage StatisticsBalances series AS represent standard level of analyticalbalances. They are equipped with backlit LCD display.Accuracy and precise measurement of the balances aredetermined by internal calibration, dependant on time andtemperature changes.Analytical balances AS series are offered with followingcapacities: 110, 160, 220, 310 g with readability of 0,1 m g and60/220 with readability 0,1/0,01 mg and 100 g with readability0,01 mg.GLP procedure of these balances is a report from calibrationprocess of the balance, and this information hasunchangeable shape (no modification possible).User has access to big measuring chamber with sliding doorsand sliding top glass. Each balance is equipped with RS 232output and possibility of connection of additional display asstandard.Balances have possibility of weighing loads under theweighing pan, i.e. under-hook weighing. In such case theCounting pieces Density determination PercentageWPX series constitute for two groups of balances for which the main common feature is big graphic backlit display with extender user menu. Accuracy of balances is guaranteed by automatic internal calibration, depending on time and temperature changes.First group of balances is equipped with weighing pan 128×128 mm, small glass draft shield, and readability of 1 mg. an option for these balances is glass draft shield with sliding doors, which substantially improves working conditions, particularly in case of breeze.Second group of balances is equipped with weighing pan 195×195 mm and readability 10 mg.Scales have possibility of weighing loads under the weighing pan, i.e. under-hook weighing. In such case the mass of loadMax capacity Minimal load ReadabilityTare range Working temperature WXD 200/20002000 g0,02 g0,001/0,01 g-2000 gWPX 2500,001 gTechnical data:Counting piecesCheckweighing Density determination Filling Animal weighing PercentageCounting pieces Checkweighing Densitydetermination Filling Animal weighing Percentage grains. They are equipped with system of automatic internal calibration, 195×195 mm weighing pan and big backlit graphic display with extender user menu.The density determination of grains in loose form is performer with application of precision balance series WPX 4500/G and a density measuring device of 1l volume. The density is calculated automatically by the software of balance (in accordance to tables for density measuring devices for grains). Density determination can be performed for following grains: wheat, oats, barley, rye.Balance, as a precise measuring device is equipped with control procedures complying with ISO/GLP, memory with high capacity (reduction tables for grains), possibility ofBalances series WLX are offered with capacities from 6 to 120kg and readabilities 0,1-2 g. They are offered with graphic display, RS 232, and computer keyboard PS/2 output as standard equipment of this balance. There is also possibility of connection of an additional display.Counting pieces Checkweighing Densitydetermination Filling Animal weighing Percentagewhich allow for determination of mass with high resolution in first and second weighing range.All of WTX balances are equipped with stainless steel weighing pan and backlit graphic display providing good reading of weighing indications.Weighing part of this series of balances is a load cell class C3(d=e=3000). Each balance series WTX is equipped with RS 232 and RS485 outputs, PS/2 socket andadditional LCDdisplay plug.Advantages of WTX series is possibility of generating GLP reports as standard and nonstandard, freely definableshape. Balances series WTX have option of implementing special software (for labeling or counting and labeling) with extended structure of data bases. Database capacity for labeling software: 2000 assortments, 100 operators, 1000 labels, 500 contractors. Data base capacity for counting and labeling software: 2500 assortments, 100operators, 1000Counting pieces Checkweighing Densitydetermination Filling Animal weighing FormulationPercentage StatisticsMax capacity Minimal load Readability Tare range Repeatability Linearity Technical data:Counting pieces Densitydetermination Balances series PS are equipped with 12 key front panel and LCD backlit display. Pan dimension is this series is 195×195 or 128×128 mm with a glass shield over the weighing pan which protects the load against possible breeze. Each balance has RS 232 and additionalPan sizePS 200/2000/C/2Max capacity Minimal load Readability Tare range Repeatability Linearity Technical data:Counting pieces Densitydetermination Balances series PS are equipped with 12 key front panel and LCD backlit display. Pan dimension is this series is 195×195 or 128×128 mm with a glass shield over the weighing pan which protects the load against possible breeze. Each balance has RS 232 and additional Pan sizePS 200/2000/C/1200/2000 g 20 mg 1/10 mg 1/10 mg ±2/10 mg-2000 gprecise mass determination in laboratory and industrial conditions. They can also be used in areas with no access to mains (230V), as their standard equipment they includes internal rechargeable battery and RS 232 output. All kinds of this balance (pan size: 128×128, and 195×195 mm) are equipped with stainless steel weighing platform and backlit LCD display providing good reading of weighing result.Balances have possibility of weighing loads outside weighing platform (so called under hook weighing). where a load is hanged under the instrument. This is anCounting pieces Checkweighing Measurement in NewtonCaps lock of max indication Percentagedetermination in laboratory and industrial conditions. They can also be used in areas with no access to mains (230V), as their standard equipment they includes internal rechargeable battery and RS 232Counting pieces Checkweighing Max capacity Readability Tare range Repeatability Linearity Pan size Power supply Technical data:0,6/B1*0,6 kg 0,01 g -0,6 kg 0,01 g ±0,01 gWLC 125 × 145 mmWLCA2 version/R version/K version B1 versionPrecision balances series APP/X are offered in two solutions, weighing platform dimensions either 300×250 mm or 285×365 mm. Depending on the type, balances are equipped with backlit graphic display.Each series of APP/X balances is offered with following capacities: 8 and 25 kg. Independently on version, APP/X balance is based on electromagnetic measuring system, external calibration (internal for scales X/2) and RS 232 output.Balance casing is made of aluminum, weighing pan is in stainless steel technology. Balances series APP have under hook weighing as standard solution.Counting pieces Checkweighing Densitydetermination Filling Animal weighing Percentage StatisticsPrecision balances series APP/C are offered in two solutions, weighing platform dimensions either 300×50 mm or 285×365 mm. Depending on the type, balances are equipped with backlit LCD display.Each series of APP/C balances is offered with following capacities: 8, 25, 30 and 6/35 kg. Independently on version, APP/C balance is based on electromagnetic measuring system, external calibration (internal for scales C/2) and RS 232 output.Balance casing is made of aluminum, weighing pan is in stainless steel technology. Balances series APP have under hook weighing as standard solution.Counting pieces Densitydetermination PercentagePRECISION BALANCES SERIES WTBWTB balances are designed for fast and precisedetermination of mass in laboratory conditions. They can be used in locations where no power (230V) is accessible as they are equipped with internal rechargeable battery.Balances are equipped with stainless steel weighin pan, RS 232 output and backlit LCDdisplay.Counting pieces +/- controlWeighing animals Percentage Peak hold of maximal indicationSumming functionCounting pieces Densitydetermination Percentagedisplay and weighing pan 128×128 mm with glass draught shield and readability 1 mg. Second group of jewelerry balances has weighing pan 195×195 mm and readability 10 mg.GLP procedure of these balances is a report from calibration process of the balance, and this information has unchangeable shape. Each balance is equipped with RS 232 output.Balances are equipped with possibility of weighing loads outside the main weighing platform (so called under hook weighing). This means of mass measuring is an alternative for loads with non-standard dimensions and shapes and those which create magnetic field. Under hook weighing is also applied for density determination procedures.Analytical balances AS series are offered with following capacities: 140 g, 240 g and 320 g with readability of 0,2 mg.They are equipped with anti breeze draught shield with sliding glass doors and backlit LCD display.These balances have system of internal automatic calibration (C2 version) activated on time and temperature changes. Balances are equipped with possibility of weighing loads outside the main weighing platform (so called under hook weighing). This means of mass measuring is an alternative for loads with non-standard dimensions and shapes andCounting pieces Densitydetermination Percentage Summing functionPharmaceutical balances WXD have weighing pan 128×128 mm, big graphic, backlit display with extended user menu and readability 1mg. Accuracy of balances is guaranteed by automatic internal calibration, depending on time and temperature changes.Advantages of pharmaceutical balances series WXD is possibility of generation of GLP procedures as standard printout or freely adjustable printout. Each balance has RS 232, PS/2 output and possibility of connection of additional display as standard.Quality of balances series WXD has been confirmed by European certificate EC Type Approval.Counting pieces Checkweighing Densitydetermination Filling Animal weighing PercentagePharmaceutical balances WPX have weighing pan 195×195 mm, big graphic, backlit display with extended user menu and readability 10mg. Accuracy of balances is guaranteed by automatic internal calibration, depending on time and temperature changes.Advantages of pharmaceutical balances series WPX is possibility of generation of GLP procedures as standard printout or freely adjustable printout. Each balance has RS 232, PS/2 output and possibility of connection of additional display as standard.Counting pieces Checkweighing Densitydetermination Filling Animal weighingCountingpiecesDensitydeterminationPercentageSummingfunction Pharmaceutical balances series PS are equipped with 12 keyfront panel and LCD backlit display. Pan dimension is thisseries is 195×195 or 128×128 mm with a glass shield over theweighing pan which protects the load against possible breeze.Each balance has RS 232 and additional display outputs asstandard.GLP procedure is available in a form of a report from balancecalibration. shape of the printout is modifiable. User name,project name, print of date and time, and print frame are userdefined on printout.Balances marked as C/2 are equipped with system of internalautomatic calibration.Balances are equipped with optional weighing of loadsoutside the weighing pan, so called under hook weighing. it isCheckweighingCountingpiecesDensitydeterminationPercentageSummingfunction Pharmaceutical balances series PS are equipped with 12 keyfront panel and LCD backlit display. Pan dimension is thisseries is 195×195 or 128×128 mm with a glass shield over theweighing pan which protects the load against possible breeze.Each balance has RS 232 and additional display outputs asstandard.GLP procedure is available in a form of a report from balancecalibration. shape of the printout is modifiable. User name,project name, print of date and time, and print frame are userdefined on printout.Balances are equipped with optional weighing of loadsoutside the weighing pan, so called under hook weighing. it isan alternative for weighing loads with non standarddimensions or made of magnetic substances. Under hookCheckweighingMoisture analyzers are measuring devices specially designed for determination of moisture content of relatively small samples of various materials.Moisture analyzer MAC enables:·easy access due to backlit LCD display ·drying profile (standard, mild, step, rapid).·finish mode (manual, humidity stabilization, automatic, time defined).·GLP/GMP printouts and reports ·halogen or infrared lamps·standard and non-standard applications·optimization of work due to halogen lamps modeMaximal capacity of moisture analyzer series MAC is 210 g /1 mg. Moisture content is measured with accuracy 0,01% (0,001% for samples up to 1,5g). Max capacity Reading unit Tare rangeMax mass of samplingTechnical data:Moisture analyzers are measuring devices specially designed for determination of moisture content of relatively small samples of various materials.Moisture analyzer MAX is equipped with backlit graphic display, due to which the user interface is clear and easy to use. User menu includes data base with 99 drying procedures, where each entry has its programmed name (for instance material name, its number, ID, etc).Moisture analyzer MAX enables:·easy access due to backlit graphic display;·standard and non-standard applications;·available languages Polish, English, German, French, Spanish, Russian, Czech;·communication with usage of PC keyboard;Max capacity Reading unit Tare rangeMax mass of samplingTechnical data:Mass comparators are devices designed fordetermining the differences between masses ofcalibration weight (B) and reference weight (A).Comparators are most often used in measuringlaboratories for calibration of weights and masses.Radwag offers comparators designed for calibration ofweights and masses class E2, F1, F2, M1 according toOIML R111, with masses from 1mg to 20g withreadability 1 µg.Comparator WAX21/KO consists of two components.One of them holds the electronic module, and the otherprecise mechanical measuring system Such solutionguarantees elimination of temperature influence(warming of electronic elements) on the indications ofcomparator.Comparator is equipped with big graphic display with user friendly menu in Polish and English language. In order to guarantee proper accuracy of measurements, a half-automatic system of external calibration with calibration weight has been applied. Comparator is equipped with esthetic, cylindrical shaped weighing chamber with glass draught shield. All elements of the weighing chamber are manufactured from glass or metal which minimalizes the influence of electrostatic charges on weighing result. Comparator is equipped with user friendly menu. The software allows for composition of GLP procedures as standard printout or as freely definable non-standard printout. Each comparator is equipped with RS 232, PS/2 output and possibility of connecting additional display as standard.Mass comparators are devices designed for determining the Array differences between masses of calibration weight (B) andreference weight (A). Comparators are most often used inmeasuring laboratories for calibration of weights and masses.Radwag offers comparators designed for calibration of weightsand masses class E1, E2, F1, F2, M1 according to OIML R111,ranging from 100g to 5000g with readability from 0.01mg to 1mg. Main part of the comparator is precise mechanical measuring system which is separated from electronic circuits. Such solution guarantees elimination of temperature influence (warming of electronic elements) on the indications of comparator. Comparator is equipped with big graphic backlit display with user friendly menu in Polish and English language In order to guarantee proper accuracy of measurements, a half-automatic system of external calibration with calibration weight has been applied. Comparator is equipped with esthetic weighing chamber with glass anti-draught protection. All elements of the weighing chamber are manufactured from glass or metal which minimalizes the influence of electrostatic charges on weighing result. Comparator is equipped with user friendly menu. The software allows for composition of GLP procedures as standard printout or as freely definable non-standard printout. Each comparator is equipped with RS 232, PS/2 output and possibility of connecting additionaldisplay as standard.Mass comparators are devices specially designer for determining Array the differences between the weight of checked standard mass (B) and weight of reference standard mass (A). Mass comparators are most often applicable in measuring laboratories, where calibration of weights and standard masses is performed. Radwag includes in its offer mass comparators for calibration of weights and standard masses classes: F2, M1 according to OIML R111, ranging from 5kg to 20kg with readability 10mg.mass comparator series APP is a compact housing with precise measuring set.Mass comparator series APP is equipped with big, backlit, graphic display, and user menu operating in Polish and English. In order to assure highest measuring accuracy, mass comparator has semi-automatic adjusting system with external standard mass. Weighing pan of APP mass comparator is manufactured in stainless steel technology, it is resistant against scratching, and easy to keep clean. All elements of mass comparator series WPP are made from metal, which eliminates the influence of electrostatic charges on weighing process.Mass comparator is equipped with user friendly menu allowing for generation of GLP procedures as a standard printout or freely definable user printout. Mass comparator is equipped with RS 232output, PS/2 plug and possibility of connecting additional display.Mass comparators are devices specially designer for determining thedifferences between the weight of checked standard mass (B) andweight of reference standard mass (A). Mass comparators are mostoften applicable in measuring laboratories, where calibration ofweights and standard masses is performed. Radwag includes in itsoffer mass comparators for calibration of weights and standard massesclass M1 according to OIML R111, ranging from 500kg, 1000kg and2000kg with readability 5g, 10g or 20g.the main parts of mass comparator series HX are high class transducer.Electronic module is closed in a separate stainless steel casing.Mass comparator series HX is equipped with big, backlit, graphicdisplay, and user menu operating in Polish and English. In order toassure highest measuring accuracy, mass comparator has semi-automatic adjusting system with external standard mass.Weighing platform is manufactured in mild steel technology. It isresistant against scratching and easy to keep clean. Mass comparatoris equipped with user friendly menu allowing for generation of GLPprocedures as a standard printout or freely definable user printout.Mass comparator is equipped with RS 232 output, PS/2 plug and。
数控车尾椎的零件的加工工艺流程

数控车尾椎的零件的加工工艺流程The processing technology of the CNC lathe tailstock parts is a critical aspect of manufacturing. Numerical control machining technology is widely used in the production of tailstock parts due to its high precision and efficiency. 数控车尾座的零件加工工艺流程对于制造业来说至关重要。
由于其高精度和效率,数控加工技术被广泛应用于尾座零件的生产。
The first step in the processing technology of the CNC lathe tailstock parts is the design and planning phase. This involves creating a detailed blueprint of the part, including its dimensions, tolerances, and surface finishes. Additionally, the planning phase determines the most efficient and accurate way to produce the part using CNC machining. 数控车尾座零件加工技术的第一步是设计和规划阶段。
这涉及到创建零件的详细蓝图,包括其尺寸、公差和表面处理。
此外,规划阶段确定了使用数控加工技术生产零件的最有效和精确的方式。
The next step in the processing technology of the CNC lathe tailstock parts is the selection of raw materials. The quality and composition of the raw materials are crucial to the success of the machiningprocess. The selection of the appropriate raw materials ensures that the finished part meets the required specifications and standards. 数控车尾座零件加工技术的下一步是原材料的选择。
航空发动机常用汉英词汇
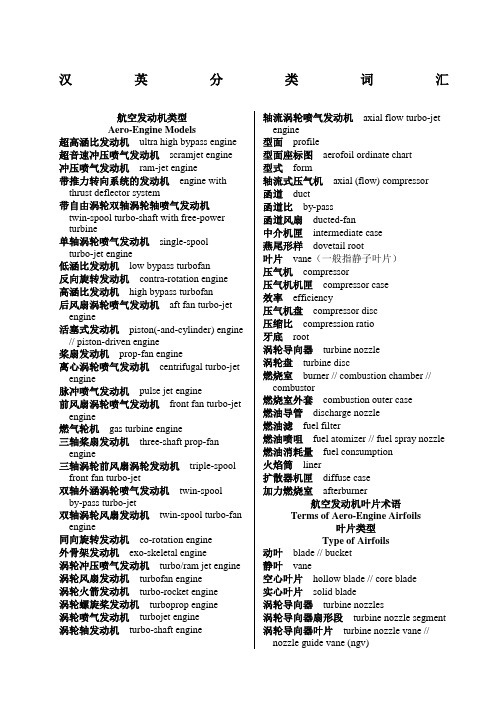
汉英分类词汇航空发动机类型Aero-Engine Models超高涵比发动机ultra high bypass engine 超音速冲压喷气发动机scramjet engine 冲压喷气发动机ram-jet engine带推力转向系统的发动机engine with thrust deflector system带自由涡轮双轴涡轮轴喷气发动机twin-spool turbo-shaft with free-power turbine单轴涡轮喷气发动机single-spoolturbo-jet engine低涵比发动机low bypass turbofan反向旋转发动机contra-rotation engine高涵比发动机high bypass turbofan后风扇涡轮喷气发动机aft fan turbo-jet engine活塞式发动机piston(-and-cylinder) engine // piston-driven engine桨扇发动机prop-fan engine离心涡轮喷气发动机centrifugal turbo-jet engine脉冲喷气发动机pulse jet engine前风扇涡轮喷气发动机front fan turbo-jet engine燃气轮机gas turbine engine三轴桨扇发动机three-shaft prop-fan engine三轴涡轮前风扇涡轮发动机triple-spool front fan turbo-jet双轴外涵涡轮喷气发动机twin-spoolby-pass turbo-jet双轴涡轮风扇发动机twin-spool turbo-fan engine同向旋转发动机co-rotation engine外骨架发动机exo-skeletal engine涡轮冲压喷气发动机turbo/ram jet engine 涡轮风扇发动机turbofan engine涡轮火箭发动机turbo-rocket engine涡轮螺旋桨发动机turboprop engine涡轮喷气发动机turbojet engine涡轮轴发动机turbo-shaft engine 轴流涡轮喷气发动机axial flow turbo-jet engine型面profile型面座标图aerofoil ordinate chart型式form轴流式压气机axial (flow) compressor函道duct函道比by-pass函道风扇ducted-fan中介机匣intermediate case燕尾形样dovetail root叶片vane(一般指静子叶片)压气机compressor压气机机匣compressor case效率efficiency压气机盘compressor disc压缩比compression ratio牙底root涡轮导向器turbine nozzle涡轮盘turbine disc燃烧室burner // combustion chamber // combustor燃烧室外套combustion outer case燃油导管discharge nozzle燃油滤fuel filter燃油喷咀fuel atomizer // fuel spray nozzle 燃油消耗量fuel consumption火焰筒liner扩散器机匣diffuse case加力燃烧室afterburner航空发动机叶片术语Terms of Aero-Engine Airfoils叶片类型Type of Airfoils动叶blade // bucket静叶vane空心叶片hollow blade // core blade实心叶片solid blade涡轮导向器turbine nozzles涡轮导向器扇形段turbine nozzle segment 涡轮导向器叶片turbine nozzle vane // nozzle guide vane (ngv)涡轮工作叶片turbine blade // bucket涡轮静子叶片turbine nozzle vane // nozzle guide vane (ngv)涡轮叶轮turbine wheel涡轮叶片turbine blades & vanes // buckets 涡轮转子叶片turbine blade // bucket压气机定子叶片compressor vane // vane 压气机工作叶片compressor blade // blade 压气机叶轮compressor impeller // compressor wheel压气机叶片compressor blades & vanes压气机整流叶片compressor vane // vane 压气机转子叶片compressor blade // blade叶片的结构特点Characteristics of Airfoil Structure基体部分base榫头tip // cog // fir-tree // root // tenon叶根blade root // root // vane tang叶冠shroud // tip platform // tip shroud叶身blade body叶型部分aerofoil // profile缘板platform // shroud叶片的主要名称Key Terms of Airfoil Body基体base进气边/前缘leading edge理论叶型theoretical developedairfoil/profile排气边/后缘trailing edge // exhaust edge 弦chord型线airfoil curve叶背blade back // convex side // blade convex叶盆blade basin // vane basin // blade/vane concave叶片阻尼台blade damper // clapper //mid-span叶身blade body叶型公差airfoil tolerance叶型理论airfoil theory叶型剖面airfoil section中弧线airfoil mean line工装Tooling标准件master piece // standard part // tool master 标准块master block // reference block测具gauge // measuring fixture // measuring tool测头feeler // gauge head measuring head // stylus车床夹具lathe fixture车刀lathe tool// cutter// turning tool吊具lifting tool夹具fixture饺孔夹具reaming fixture // reaming jig孔位置度测具hole true position gauge拉刀broach (Bro.) // broaching cutter拉削夹具broaching fixture刨削夹具planner fixture钳工工具bench-work tool丝套insert // thread insert丝锥taper // (screwing)tap镗刀boring cutter镗杆boring bar (B/bar) // boring spindle镗孔夹具boring fixture // boring jig铣槽工具grooving tool铣床夹具milling jig铣床铣槽刀milling machine // miller铣铣槽刀刀milling cutter // milling tool铣削夹具milling fixture钻铰刀drill reamer钻铰复合刀具combined drill and reamer 钻具jig钻孔铰孔夹具drilling and tapping fixture 钻孔样板drill template (DRT)// drilling template钻模(drill) jig钻模板drill plate (DRP)钻模与夹具jigs and fixtures钻套jig bush钻套jig bush(ing)钻头bit // drill // drilling bit机械加工术语Terms for Machining半精加工semi-finishing // semifinishing machining插slotting车turning车床lathe// turning machine车床研磨lathe lapping车端面facing车螺纹thread turning车螺纹/螺纹加工thread/threading车削turning车削螺纹cut thread成形法forming冲头blanking ram // piercer // punch // ram head // slider冲压(punch) pressing冲压加工stamping冲压件pressing //stamping穿孔/套孔trepan/trepanning粗加工roughing machining锉file倒角deburr // chamfer倒角/去毛刺deburr(ing)倒棱chamfer电解抛光electrochemical polishing // electrolytic polishing // electro-polishing 电解蚀刻与抛光electrolytic etching and polishing调整法machining on preset machine tool 定位locating // location对刀to size // tool setting仿形法copying夹紧clamping饺reaming饺孔reaming饺孔机reaming machine饺孔钻reamer drill饺铆钉孔ream a rivet hole精加工finishing // finish machining锯sawing锯背back of the saw锯槽kerf锯齿serration锯齿铣sawtooth milling拉削broaching冷装shrinkage fitting铆rivet(ing)铆钉rivet磨床grind // grinding machine磨端面face grinding磨料abraser // abrasive material // grinding compound磨削加工abrasive machining抛polish 抛光buffing // burning // polish (Pol.)刨planing// shapering刨槽fillister // slot shaping刨齿gear shaper cutting // gear-shaping刨床planer // planing machine// shaper刨削shaping去毛刺deburring // fin cutting镗boring镗车两用机床boring lathe镗床borer // boring machine镗孔boring // borizing (金刚石)镗磨联合机床combined boring and honing machine镗钻两用机床boring and drilling machine 铣mill // milling铣槽slot milling铣镗床milling-borer // milling and boring machine铣钻联合机床combined drill and mill machine铣钻两用机床milling and drilling machine旋spin旋锻spin forging // rotary forging // rotary swaging旋锻机spin forging machine // rotary forging machine // rotary swaging machine 旋压spinning旋压成型stretch planishing // spin forming 压装press fitting研lapping研齿gear lapping研磨lapping找正aligning // to center align装夹set-up装配assembly钻drill(ing)钻床drilling machine钻孔drilling钻埋头孔countersink表面处理(镀层、涂漆和金属喷镀)Surface treatment (Plating,Paining & Metal sparying)涂层不良imperfectly coated spots涂层过厚thickening涂层凸起lifting of the coating, protrusion, or lifting冲压Punch尺寸检验dimension inspecting基准datum技术条件technical condition加工fabricate夹clamping夹紧面clamping surface夹具fixture钻孔drill钻头drill图纸及工艺规程常用词汇EverydayVocabularies on Working Drawings &W.P.S尺scale尺寸dimension // size尺寸单向极限single of size尺寸过大oversize尺寸过小undersize尺寸极限limit of size尺寸最大极限maximum of size尺寸最大余量极限maximum metal of size 尺寸最小极限minimum of size齿根root处理treatment吹砂blast // abrasive blasting垂直度perpendicularity // squareness垂直度公差squareness tolerance单位燃油消耗量specific fuel consumption 单位压力unit pressure单位装配件assembly unit单向公差unilateral tolerance单向公差域bilateral tolerance zone氮化nitriding当量equivalent挡块stop刀柄holder刀杆cutter bar刀痕scar // tool mark等离子喷镀plasma spray等值equivalent低压压气机LP compressor地面试车ground run典型加工typical operation 防锈rust protection // rust proof仿形copy仿形铣床copying milling machine // duplicator仿型加工form machine高速钢high speed steel高速工具钢high speed tool steel高温合金high temperature alloy高压压气机HP compressor根root根切undercut公差tolerance公差带tolerance band公称尺寸nominal size功能function功能尺寸function dimension功能要求functional requirement构造尺寸constructional dimension固定fasten固定工具fastening tool故障defect // blemish // failure // fault // imperfection // trouble故障分析trouble shooting关键零件critical part观点view过盈interference过盈配合interference fit过载overload互换性interchangeability互换性组件interchangeable assembly 花键splined shaft花键轴splined shaft火裂fire cracks机床machine (tool)机匣case // casing基本尺寸base dimension // basic size 基本公差basic tolerance基本数basic member基本锥体basic taper基孔制hole basis limit system基线basic line基轴制shaft basis基轴制shaft basis limit system基准data // reference基准尺寸datum dimension基准点datum point基准件basic member基准角basic angle基准面datum face // datum plane基准线datum line // zero line基准叶片master vane几何公差geometrical tolerance几何精度accuracy geometrical加工制造fabricate夹紧fastening夹具clamping apparatus // dogging tool // fixture // holding device // jig检验装置checker节径pitch diameter精度accuracy // precision精锻precision forging精加工finishing精磨precision ground精确长度exact length精调fine adjustment // accurate adjustment //precision adjustment孔bore // hole框flame拉床broacher // broaching machine拉刀broacher拉销broach离心式压气机centrifugal compressor离心铸造centrispum casting iron立式车床vertical lathe立式钻床upright drill螺母nut螺栓bolt名义尺寸base size // nominal size内径inner diameter内裂internal crack内外函发动机by-pass engine内应力internal stress内圆磨床internal grinding machine耐磨性resistance to wear耐热钢heat resisting steel耐热合金heat-resisting啮合mesh啮合线action line扭转twisting排气边trailing edge排气喷口exhaust nozzle盘disc 抛光polishing抛光机polisher // burnishing wheel 刨平plane泡疤blister配合fit // matching // mating配合等级classes of fit // grade of fit 配合间隙class of fit配合类型types of fit配合容差fitting allowance配合直径snap diameter配合制system of fits配件mating piece喷口nozzle喷丸peening // shot-blasting喷丸处理shot peening喷雾器atomizer喷嘴nozzle批生产mass production疲劳断裂fatigue fracture匹配matching片sheet偏心的eccentric偏心距eccentric distance偏心轮eccentric偏心套eccentric bushing偏心轴eccentric axis偏心装置eccentric偏移deviation漆paint切断parting切面cutting切切削深度depth of cut切头cropping切削cut切削工具cutter切削加工machining轻合金light alloy轻微的slight清楚的clear清理cleaning清漆层不好poorly varnished film 区域zone曲度curve曲面curved surface曲线curve屈服yield屈服点yield point屈服强度yield strength屈服应力proof stress // yield stress缺口敏感性notch sensitivity缺陷blemish // defect // failure // fault // imperfection热脆性red shortness热裂hot crack热裂纹clink热损heat waste容差allowance熔化smelt (ing)蠕变creep设计design设计草图rough plan设计尺寸design size设计角design angle伸长elongation伸长率elongation失速stall(飞机)湿吹砂vapour blast时间表schedule时效ag(e)ing时效处理seasoning识别号identification number实际尺寸actual size实际有效直径virtual effective diameter 式样form // manner事故accident // failure视图view试车test run // trial run试件test piece试验examine // test试验参数test data试样coupon // (test) sample // test specimen试样长度sample释放release手册manual手段means寿命limit of life数number数据data数量quantity说明书description // specification 榫头root调正adjustment调质improvement跳动量runout凸起overfill凸台boss凸缘collar // flange图scheme图板drawing board图号drawing number图形机体feature图样draft // drawing图纸drawing (sheet)图纸比例drawing scale图纸技术要求drawing call-out涂层不良imperfectly coated spots涂层过厚thickening涂层凸起lifting of the coating, protrusion, or lifting涂漆paint推荐尺寸preferred size推力thrust推力比thrust ratio椭圆度ovality外部检查visual inspection外函道by-pass duct外螺纹external screw thread外形outline外圆磨床circular grinding machine位置location位置公差positional tolerance蜗杆worm蜗轮work wheel卧式钻镗床horizontal boring & drilling machine误差error习惯表示法conventional representation 铣床milling machine铣刀milling现场site // spot相当的equivalent相应值equivalent消除应力stress relieved // stress released 消耗consumption销钉pin销孔bore // pin hole销子pin斜度angularity (tolerance)压板clamp (plate)氩弧焊argon-arc welding应变strain应变时效strain ageing应力stress应力腐蚀裂纹stress corrosion crack应力消除stress relieving应力-应变曲线stress strain curve应力-应变图stress strain diagram圆度circularity // roundness圆滑smoothness圆心center of circle圆柱度cylindricity直径diameter制度system制造manufacture质量quality质量验收标准quality acceptance standard 中心距center distance中心孔center hole轴shaft轴承bearing轴线axis轴线axis主喷咀main nozzle铸造casting铸造组织casting iron structure专门技术know-how专门铣床planomilling machine专用工具special tool专用工装special tooling专用设备special purpose machine专用铣床production machine转换reset转子叶片blade装备device装夹mount装配assembly // mount装配车间assembling shop // assembly shop // erecting shop // fitting shop装配间隙fit clearance装配件assembly装配图assembly drawing // erection drawing 装箱退火close annealing装置device锥齿轮bevel gear锥度taper锥螺纹taper thread锥面conical surface锥体slow object // taper总尺寸外形尺寸overall dimension总体布置图general layout总装车间assembly department总装件assembly // general assembly总装图general layout组合件joint组件assembly组装件sub assembly钻drill钻床drill machine钻具jig钻孔drill钻套drill jig bush钻头号drill number最大长度max length最大间隙major clearance最大推力full thrust // top thrust最大直径major diameter最小长度min length最小间隙minor clearance最小直径minor diameter缺陷解释Interpretation of Defects凹陷undercutting (在母材上沿焊接边的沟槽或充填不足)变形deformation (在加工时未能保持住形状不变或与相邻部有不顺滑转接)电解腐蚀electrolytic action(不同金属间的电蚀作用造成的缺陷)断裂fracture(受力过大造成的破坏)开裂flaw外贸常用词语和术语Everyday Vocabularies of Foreign Trade询盘Inquiry把某物交付给某人to deliver sth to sb把询价记录在卷to keep the inquiry on file 办理交货to effect delivery // to make delivery还盘Counter Offer还盘counter offer享有盛誉enjoy great popularity与某人达成交易conclude business with sb.达成交易close business // close a deal // close a transaction // close a bargain价格Price成本加保险费运费价cost, insurance & freight (C.I.F.)成本加运费价cost & freight (CFR) 船上交货free on board (F.O.B)底价floor price货币currency价格偏低on the low side价格条件price terms廉价出售 a bargain sale市场价market price讨价还价bargain为某事拼命讨价还价drive a hard bargain over sth.与某人成交make a bargain with sb最低价rock-bottom price。
机加工精度要求 英文

机加工精度要求英文Machining accuracy is a crucial aspect in the manufacturing industry, as it directly affects the quality, performance, and durability of the final product. The precision with which a part is machined determines its fitness for use and its ability to meet design specifications. Therefore, it is essential to understand and control machining accuracy to ensure the consistency and reliability of manufactured components.Machining accuracy requirements vary depending on the application and the type of material being machined. For example, high-precision machining is required for components in the aerospace, medical, and automotive industries, where parts must meet strict tolerances and performance standards. On the other hand, lower precision may be acceptable for certain applications where the parts do not require as much accuracy.To achieve the desired machining accuracy, it isnecessary to consider several factors, including machinetool precision, cutting tool selection, workpiece material, and machining processes. Machine tool precision is influenced by factors such as machine rigidity, thermal stability, and vibration control. Cutting tool selection involves choosing the appropriate tool material, geometry, and coating to match the workpiece material and machining conditions. Workpiece material properties, such as hardness, ductility, and thermal conductivity, also affect machining accuracy.Machining processes, such as turning, milling, drilling, and grinding, each have their own unique challenges and considerations. For example, turning is typically used for cylindrical parts and requires precise control of feed rate, spindle speed, and cutting depth to achieve the desired surface finish and dimensional accuracy. Milling, on the other hand, is suitable for flat and contoured surfaces and requires careful selection of cutting conditions to avoid tool wear and maintain dimensional stability.To ensure machining accuracy, it is important toimplement quality control measures throughout the manufacturing process. This includes regular machine tool maintenance and calibration, inspection of workpieces before and after machining, and the use of precision measuring equipment. Additionally, it is beneficial to employ advanced machining technologies, such as CNC machining and additive manufacturing, which provide greater control and repeatability.In conclusion, machining accuracy requirements are critical for ensuring the quality and performance of manufactured components. By considering machine tool precision, cutting tool selection, workpiece material, and machining processes, as well as implementing qualitycontrol measures, manufacturers can achieve the desired machining accuracy and produce reliable parts that meet design specifications.。
内径百分表和内径千分表的英语区别

内径百分表和内径千分表的英语区别英文回答:Dial Bore Gauge.A dial bore gauge is a precision measuring instrument used to measure the internal diameter of a hole. It consists of a base with a dial indicator attached to it. The dial indicator is connected to a plunger that is inserted into the hole being measured. As the plunger is moved in and out of the hole, the dial indicator will indicate the diameter of the hole.Dial bore gauges are available in a variety of sizes and ranges. The most common type of dial bore gauge is the two-point contact gauge. This type of gauge has two contact points that are positioned on opposite sides of the hole being measured. The other type of dial bore gauge is the three-point contact gauge. This type of gauge has three contact points that are positioned evenly around the holebeing measured.Dial bore gauges are typically used to measure holes that are between 1/4 inch and 6 inches in diameter. They are also used to measure holes that are out of round or tapered.Bore Micrometer.A bore micrometer is a precision measuring instrument used to measure the internal diameter of a hole. It consists of a C-shaped frame with a micrometer head attached to it. The micrometer head is connected to a spindle that is inserted into the hole being measured. As the spindle is moved in and out of the hole, the micrometer head will indicate the diameter of the hole.Bore micrometers are available in a variety of sizes and ranges. The most common type of bore micrometer is the two-point contact micrometer. This type of micrometer has two contact points that are positioned on opposite sides of the hole being measured. The other type of bore micrometeris the three-point contact micrometer. This type of micrometer has three contact points that are positioned evenly around the hole being measured.Bore micrometers are typically used to measure holesthat are between 1/8 inch and 3 inches in diameter. Theyare also used to measure holes that are out of round or tapered.中文回答:内径百分表。
公差配合与测量技术英文
公差配合与测量技术英文Title: The Essentials of Tolerance, Fit, and Measurement Techniques in Engineering.Tolerance, fit, and measurement techniques are fundamental concepts in engineering that play a pivotalrole in ensuring the precision and reliability of mechanical components. This article delves into the intricacies of these topics, discussing their significance, applications, and practical implications in the realm of manufacturing and quality control.Tolerance Analysis.Tolerance analysis is the process of determining the acceptable range of variations in the dimensions of a component or assembly. It ensures that parts will function as intended when assembled, accounting for manufacturing tolerances and wear over time. Understanding tolerance analysis is crucial for designers, engineers, and qualitycontrol personnel to ensure the interoperability and performance of mechanical systems.Types of Tolerances.There are several types of tolerances commonly used in engineering, including:1. Basic Size Tolerance: This tolerance is based on the nominal or basic size of a part and defines the maximum and minimum allowable deviations from this size.2. Limit Tolerance: It defines the upper and lowerlimits of acceptable dimensions for a part. Any dimension falling outside these limits is considered out of tolerance.3. Fit Tolerance: This tolerance governs therelationship between two mating parts and ensures that they fit together properly. There are various types of fits, including clearance fits (where there is a gap between the parts) and interference fits (where the parts are pressed together).Tolerance Stack-Up.Tolerance stack-up is the cumulative effect of individual tolerances on the overall performance of a system. It considers the tolerances of each component and assembly to predict the overall variation in the final product. Proper tolerance stack-up analysis is essential for ensuring that a system meets its performance requirements.Fit Analysis.Fit analysis is the study of how different components fit together within a mechanical system. It considers both the dimensional tolerances of the individual parts and the functional requirements of the system. Fit analysis helps designers choose appropriate fits for different applications, ensuring reliable performance and ease of assembly.Measurement Techniques.Accurate measurement is crucial for effective tolerance and fit analysis. There are various measurement techniques used in engineering, including:1. Dimensional Measurement: This involves the use of precision measuring tools such as calipers, micrometers, and gauges to measure the dimensions of parts.2. Surface Finish Measurement: Techniques such as profilometry and surface roughness meters are used to assess the surface texture and finish of components.3. Geometric Measurement: Geometric measurements involve the use of tools like coordinate measuring machines (CMMs) to determine the precise geometry and position of features on a part.The selection of appropriate measurement techniques depends on the specific requirements of the application and the accuracy needed for the measurements.Conclusion.Tolerance, fit, and measurement techniques are integral to ensuring the quality and performance of mechanical systems. A thorough understanding of these concepts, along with the ability to apply them effectively, is essentialfor engineers and designers working in the field of manufacturing and quality control. By mastering tolerance analysis, fit analysis, and precise measurement techniques, professionals can create reliable and efficient mechanical systems that meet the demands of modern engineering challenges.。
精密尺度测量仪说明书
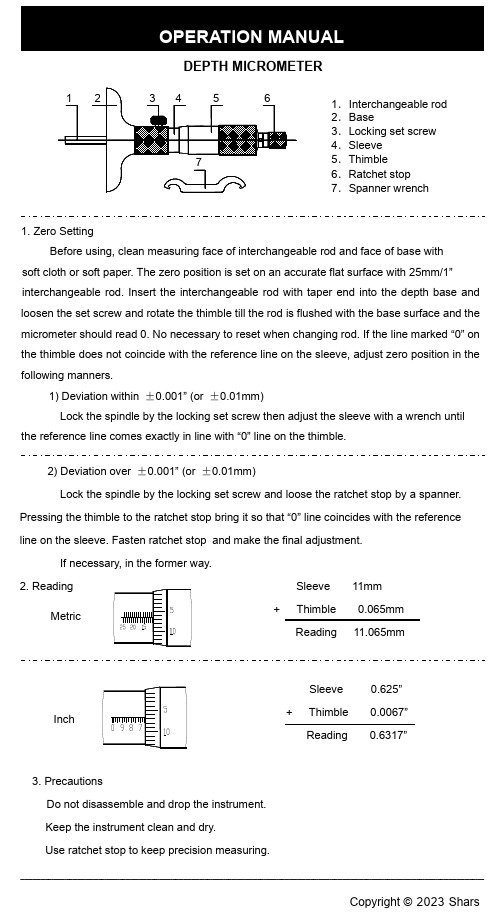
2) Deviation over ±0.001” (or ±0.01mm)
Lock the spindle by the locking set screw and loose the ratchet stop by a spanner.
Pressing the thimble to the ratchet stop bring it so that “0” line coincides with the reference
Copyright © 2023 Shars
line on the sleeve. Fasten ratchet stop and make the final adjustment.
If necessary, in the former way.
2. Rea+ Thimble 0.065mm Reading 11.065mm
Sleeve 0.625”
Inch
+ Thimble 0.0067”
Reading 0.6317”
3. Precautions Do not disassemble and drop the instrument. Keep the instrument clean and dry. Use ratchet stop to keep precision measuring.
soft cloth or soft paper. The zero position is set on an accurate flat surface with 25mm/1” interchangeable rod. Insert the interchangeable rod with taper end into the depth base and loosen the set screw and rotate the thimble till the rod is flushed with the base surface and the micrometer should read 0. No necessary to reset when changing rod. If the line marked “0” on the thimble does not coincide with the reference line on the sleeve, adjust zero position in the following manners.
车间常用英语

车间常用英语一、引言车间是制造业中最重要的生产环节之一,为了顺利进行车间生产工作,工人们需要掌握一定的英语表达能力。
本文将介绍车间常用的英语词汇和表达,以帮助工人们更好地理解和应用。
二、车间设备和工具1. 机床(Machine Tools)- Lathe(车床): A machine tool used for shaping metal or wood.- Milling machine(铣床): A machine tool used for removing material from a workpiece.- Grinder(磨床): A machine tool used for grinding and smoothing surfaces.- Drill press(钻床): A machine tool used for drilling holes in various materials.- CNC machine(数控机床): A computer-controlled machine tool used for precision machining.2. 测量工具(Measuring Tools)- Vernier caliper(游标卡尺): A measuring instrument used to measure the dimensions of an object.- Micrometer(千分尺): A precision measuring instrument used for measuring small distances or thicknesses.- Tape measure(卷尺): A flexible ruler used to measure length or distance.- Angle gauge(角度测量尺): A tool used to measure angles.- Height gauge(高度测量尺): A tool used to measure the height of an object.3. 安全设备(Safety Equipment)- Safety goggles(安全护目镜): Protective eyewear used to protect the eyes from debris or chemicals.- Earplugs(耳塞): A device inserted into the ear canal to protect against loud noises.- Safety helmet(安全帽): A hard hat worn to protect the head from falling objects.- Safety gloves(安全手套): Protective gloves worn to protect hands from cuts, burns, or chemicals.- Safety shoes(安全鞋): Protective footwear worn to protect feet from falling objects or hazardous materials.三、车间生产流程1. 生产计划(Production Planning)- Production schedule(生产计划表): A document that outlines the sequence of operations and resources required for production.- Lead time(交货期): The time required to complete a production order from start to finish.- Work order(工作指令): A document that specifies the tasks, materials, and resources required for a specific job.2. 原材料(Raw Materials)- Inventory(库存): The quantity of raw materials or finished goods available for use or sale.- Reorder point(再订购点): The inventory level at which a new order for materials should be placed.- Bill of materials(物料清单): A list of all the materials required to manufacture a product.3. 生产过程(Production Process)- Assembly line(装配线): A series of workstations where a product is assembled.- Quality control(质量控制): The process of ensuring that products meet specified quality standards.- Production efficiency(生产效率): The ratio of output to input in a production process.- Machine downtime(机器停机时间): The period during which a machine is not in operation.- Waste reduction(减少浪费): The process of minimizing waste during production.四、车间指令和交流1. 指令(Instructions)- Start the machine(启动机器): Begin operating the machine.- Stop the machine(停止机器): Cease operating the machine.- Adjust the settings(调整设置): Modify the machine's parameters or configuration.- Follow the safety procedures(遵守安全程序): Adhere to the established safety protocols.- Report any issues(报告任何问题): Inform the supervisor about any problems or malfunctions.2. 交流(Communication)- Can you pass me the wrench, please?(请把扳手递给我好吗?): Requesting a tool from a colleague.- I need assistance with this task.(我需要在这个任务上得到帮助。
fpga毕业设计

The system uses FPGA to realize the high precision digital frequency meter design. In addition to the signal input part outside, the rest allin the realization of a FPGA chip, the whole system is very compact, and flexible change of scene.
加工刀具的工艺流程
加工刀具的工艺流程The process of manufacturing cutting tools is a complex and intricate one that requires precision and expertise. 加工刀具的工艺流程涉及到多个步骤和环节,需要精湛的技术和经验。
The first step in the manufacturing process is the design phase, where the specifications of the cutting tool are determined. During this phase, engineers and designers work together to create detailed drawings and plans for the tool. 在制造过程的第一步是设计阶段,确定刀具的规格。
在这个阶段,工程师和设计师共同制定详细的图纸和计划。
Once the design is finalized, the next step is to select the appropriate materials for the cutting tool. The choice of material will depend on the type of cutting tool being manufactured and the intended use. 一旦设计完成,下一步就是选择适当的材料来制造刀具。
材料的选择将取决于所制造的切削工具的类型和预期的使用方式。
After the materials are selected, the manufacturing process begins. This typically involves cutting, shaping, and grinding the raw materials to create the desired shape and dimensions of the cuttingtool. 材料确定之后,制造过程开始。
基于D-H模型的机器人运动学参数标定方法
基于D-H模型的机器人运动学参数标定方法摘要:通用机器人视觉检测站中的机器人是整个测量系统中产生误差的最主要环节,而机器人的连杆参数误差又是影响其绝对定位精度的最主要因素。
借助高精度且可以实现绝对坐标测量的先进测量设备——激光跟踪仪,及其功能强大的CAM2 Measure 4.0配套软件,并利用串联六自由度机器人运动的约束条件,重新构建起D-H模型坐标系,进而对运动学参数进行修正,获得关节变量与末端法兰盘中心位置在基坐标系下的准确映射关系,以提高机器人的绝对定位精度,最后通过进一步验证,证明取得了较为理想的标定结果。
关键词:视觉检测站;工业机器人;绝对定位精度;激光跟踪仪;D-H模型;Robot kinematic parameters calibration based on D-H modelWang Yi(State key laboratory of precision measuring technology and instruments, Tianjin University, 300072,China)Abstract:Robot for universal robot visual measurement station is the most primary part causing errors in the entire system and link parameter errors of industrial robot have a great influence on accuracy. Employing laser tracker, which can offer highly accurate measurement and implement ADM (absolute distance measurement), as well as relevant software, making use of movement constrain of series-wound six-degree robot, D-H model coordinates were rebuilt. Accordingly, kinematic parameters were modified, and precise mapping from joint variables to the center of the end-effector in base coordinate was obtained and accuracy got improved. At last, result is proved acceptable by validation.Keywords: visual measurement station; industrial robot; accuracy; laser tracker; D-H model;引言:随着立体视觉技术的不断完善与发展,利用机器人的柔性特点,发展基于立体视觉的通用测量机器人三维测试技术逐渐成为各大机器人生产厂家非常重视的市场领域。
游标卡尺测量注意事项英语

游标卡尺测量注意事项英语## Precautions for Using a Vernier Caliper.A vernier caliper is a precision measuring instrument used to measure the dimensions of objects accurately. It is a versatile tool that can measure internal and external dimensions, as well as depth measurements. However, to ensure accurate measurements, it is essential to use the vernier caliper correctly and observe certain precautions.Here are some important precautions to keep in mind when using a vernier caliper:1. Clean the caliper before use. Remove any dirt or debris from the jaws and the measuring surfaces to ensure accurate readings.2. Hold the caliper perpendicular to the object being measured. This will ensure that the jaws are parallel tothe surface being measured and that the reading is accurate.3. Apply gentle pressure when closing the jaws. Excessive force can damage the caliper or the object being measured.4. Read the scale from the zero mark. The zero mark on the vernier scale should be aligned with the zero mark onthe main scale before taking a measurement.5. Estimate the fractional part of the measurement. The vernier scale is divided into smaller divisions than the main scale, allowing for more precise measurements.6. Use the appropriate measuring jaws. The vernier caliper has different jaws for measuring external dimensions, internal dimensions, and depth measurements. Select the appropriate jaws for the measurement being taken.7. Handle the caliper with care. The vernier caliper isa precision instrument and should be handled with care to avoid damage.8. Calibrate the caliper regularly. Calibrating the vernier caliper ensures that it is measuring accurately.9. Store the caliper in a safe place. When not in use, store the vernier caliper in a protective case or box to prevent damage.10. Use the vernier caliper for its intended purpose. The vernier caliper is designed for measuring dimensions. Do not use it for other purposes such as cutting or prying.## Additional Tips for Using a Vernier Caliper.In addition to the precautions listed above, here are some additional tips to help you use a vernier caliper effectively:Use a magnifying glass for more precise readings. A magnifying glass can help you read the vernier scale more accurately, especially for fractional measurements.Take multiple measurements and average the results.This will help to reduce the effects of any errors in the measurement process.Familiarize yourself with the vernier scale before using the caliper. Understanding how the scale works will help you take more accurate measurements.Practice using the caliper on objects of known dimensions. This will help you develop your skills and improve your accuracy.By following these precautions and tips, you can ensure that you are using the vernier caliper correctly and obtaining accurate measurements.。
千分尺的各部分名称
千分尺的各部分名称英文回答:A thousandth of an inch is a unit of measurement used in engineering and manufacturing. It is also known as a "thou" and is equal to 0.001 inches or 0.0254 millimeters. The thousandth of an inch is commonly used to measure very small tolerances and clearances in precision parts.The various parts of a thousandth of an inch are as follows:1. Inch: The inch is a unit of length measurement commonly used in the United States. It is equal to 25.4 millimeters or2.54 centimeters.2. Thousandth: The thousandth is a fraction of an inch and represents the smallest division on a thousandth of an inch scale. It is denoted by the symbol "mil" or "thou."3. Vernier Scale: The vernier scale is a secondary scale that allows for more precise measurements. It is used in conjunction with the main scale to read measurements to the nearest thousandth of an inch.4. Main Scale: The main scale is the primary scale on a thousandth of an inch measuring instrument. It is divided into inches and fractions of an inch, with each inch divided into 10 or 20 parts.5. Micrometer: A micrometer, also known as a screw gauge, is a precision measuring instrument used to measure small dimensions with high accuracy. It is commonly used to measure the thickness of objects to the nearest thousandth of an inch.6. Dial Indicator: A dial indicator is a mechanical device used to measure small distances or displacements. It consists of a needle or pointer that moves over a dial with markings in thousandths of an inch.7. Caliper: A caliper is a measuring tool used tomeasure the distance between two opposite sides of an object. It can be used to measure the thickness of objectsto the nearest thousandth of an inch.中文回答:千分尺是一种工程和制造业中使用的测量单位。
内径百分表英文缩写
内径百分表英文缩写Internal Diameter Micrometer: An Essential Tool for Precision Measurement.In the world of precision measurement, the internal diameter micrometer, often referred to as an ID micrometer or simply a micrometer, plays a crucial role. This tool, with its ability to measure the internal dimensions of objects to high degrees of accuracy, is essential in various industries, including manufacturing, engineering, and quality control.The internal diameter micrometer is a precision measuring instrument that consists of a main body, a measuring head, and a set of anvils or feelers. The main body typically has a dial or digital display that indicates the measurement reading. The measuring head is adjustable and can be inserted into the internal space of the object to be measured. The anvils or feelers are the contact points that measure the internal diameter by contacting theinner walls of the object.The working principle of the internal diameter micrometer is based on the principle of least action. When the measuring head is inserted into the internal space of the object, the anvils or feelers are adjusted until they make contact with the inner walls. The pressure exerted by the anvils on the inner walls is carefully controlled to ensure that it is neither too high nor too low. This ensures that the measurement is accurate and does not cause any damage to the object.The accuracy of the internal diameter micrometer depends on several factors, including the quality of the instrument, the skill of the operator, and the condition of the object being measured. Regular calibration and maintenance of the micrometer are crucial to ensure its accuracy and reliability. Additionally, proper usage and handling of the instrument are essential to avoid anyerrors in the measurement.Applications of the internal diameter micrometer arewidespread and diverse. In the manufacturing industry, itis used to measure the internal dimensions of parts and components to ensure they meet the specified tolerances. In the engineering sector, it is employed to monitor wear and tear in machinery and equipment. In quality control, it plays a vital role in ensuring that products meet the required standards and specifications.Moreover, the internal diameter micrometer is also used in research and development, where precise measurements are crucial for the development of new products or processes. It is also employed in the medical field, where it is used to measure the internal diameter of blood vessels, tubes, and other medical devices.In conclusion, the internal diameter micrometer is an indispensable tool for precision measurement. Its accuracy, reliability, and versatility make it an essential instrument in various industries, including manufacturing, engineering, quality control, research and development, and even the medical field. With its ability to measureinternal dimensions to high degrees of accuracy, it plays acrucial role in ensuring the quality and performance of products, parts, and components.。
数字指示秤术语与定义
数字指示秤术语与定义英文回答:A.Accuracy: The closeness of a measurement result to the true value of the measurand.Analog scale: A scale that displays the weight measurement using a pointer or needle that moves along a graduated scale.Auto-zero: A feature that automatically resets the scale to zero when there is no weight on the platform.Calibration: The process of adjusting a scale to ensure that it is measuring accurately.B.Capacity: The maximum weight that a scale can measure.Class: A classification system that indicates the accuracy and precision of a scale.Counting mode: A feature that allows the scale to count the number of items placed on the platform.Display: The part of the scale that shows the weight measurement.D.Decimal point: The point that separates the whole number part of a weight measurement from the fractional part.Digits: The number of digits that are displayed on the scale's display.Dual display: A scale that has two displays, one for the weight measurement and one for the unit of measurement.E.Error message: A message that is displayed on the scale's display when an error occurs.External calibration: A calibration procedure that requires the use of an external weight or calibration kit.External power supply: A power supply that is not built into the scale.F.Footprint: The area of the platform that is used to weigh objects.Function keys: Keys on the scale that are used to access different features or functions.G.Grams: The unit of measurement for weight in the metric system.Gross weight: The total weight of an object, including its packaging and any other materials.H.Hold function: A feature that allows the scale to hold the weight measurement on the display, even after the object is removed from the platform.I.Internal calibration: A calibration procedure that is performed using the scale's internal weight mechanism.Interval: The smallest increment that a scale can measure.IP rating: A rating that indicates the level of protection that a scale has against dust and water.J.Joules: The unit of measurement for energy.K.Kilograms: The unit of measurement for weight in the metric system.L.LCD display: A type of display that uses liquid crystals to create the numbers and characters.Load cell: A sensor that measures the weight of an object.M.Mechanical scale: A scale that uses a spring or balance to measure weight.Metric system: A system of measurement that uses meters, liters, and grams as the base units.Mode: A setting on the scale that determines how it will measure weight.N.Net weight: The weight of an object without its packaging or any other materials.Nonlinearity: A characteristic of a scale where the accuracy of the measurement decreases as the weight increases.O.OIML: The International Organization of Legal Metrology.P.Platform: The part of the scale that is used to hold the object that is being weighed.Precision: The ability of a scale to produce the same measurement result repeatedly.Q.Quality assurance: A set of procedures that are used to ensure that a scale is meeting its performance specifications.R.Resolution: The smallest change in weight that a scale can detect.S.Scale: A device that measures weight.Sensor: A device that converts a physical propertyinto an electrical signal.Serial port: A port on the scale that allows it to communicate with other devices.Sensitivity: The ability of a scale to detect small changes in weight.Stability indicator: An indicator on the scale'sdisplay that shows whether the weight measurement is stable.T.Tare function: A feature that allows the scale to subtract the weight of the container or packaging from the weight of the object.Tolerance: The amount of error that is allowed in a weight measurement.Transducer: A device that converts a physical propertyinto an electrical signal.U.Unit of measurement: The unit that is used to express the weight measurement.User manual: A document that provides instructions on how to use the scale.V.Verification: A process of checking the accuracy and precision of a scale.W.Weight: The force exerted on an object by gravity.X.X-ray scanner: A device that uses X-rays to create animage of the inside of an object.Y.Yield: The amount of product that is obtained from a given amount of raw material.Z.Zero: The point at which a scale's display reads zero when there is no weight on the platform.中文回答:A.准确度,测量结果与被测量真实值之间的接近程度。
微米千分尺英语

微米千分尺英语Micrometer ScrewgaugeThe micrometer screwgauge, often referred to as a micrometer or a micrometer caliper, is a precision measuring instrument widely used in industries, laboratories, and educational settings. Its primaryfunction is to measure the dimensions of small objects or features with an extremely high degree of accuracy.At its core, the micrometer screwgauge consists of a fine-threaded screw mounted within a frame. One end of the screw has a fixed jaw, while the other end is attached to an adjustable jaw. By rotating the thimble, which is the knob at the top of the micrometer, the adjustable jaw can be moved towards or away from the fixed jaw. This mechanism allows for precise adjustments and measurements.The micrometer screwgauge's accuracy is derived from the fine thread of the screw and the calibrated scale etched onto its sleeve. The scale typically has graduations in millimeters, with each graduation further divided into smaller subdivisions, often down to the micrometer level(one-thousandth of a millimeter). This fine graduation allows for measurements with a very high resolution.When using a micrometer screwgauge, it is essential to follow proper technique to ensure accurate measurements. First, the jaws of the micrometer must be carefully adjusted to fit around the object being measured. Then, the thimble is rotated until the jaws firmly but gently clamp the object. It is important to avoid overtightening, which could distort the measurement.Once the jaws are in position, the reading can be taken from the scale. This involves noting the position of the fixed jaw on the main scale and the position of the thimble on the circular scale. The reading is obtained by adding the values from both scales, taking into account any necessary corrections or offsets.The micrometer screwgauge's precision and versatility make it a valuable tool in various industries. In manufacturing, it is used to inspect the dimensions of machined parts and assemblies, ensuring they meet specifications. In the medical field, micrometers are used to measure the size of cells, tissues, and other biologicalsamples. Scientists and researchers also rely on micrometers for precise measurements in experiments and research projects.Moreover, the micrometer screwgauge is also used in metrology, the science of measurement. Metrologists use micrometers to calibrate other measuring instruments and ensure the accuracy of measurements across various applications.In addition to its precision, the micrometer screwgauge is also valued for its durability and ease of use. Its design allows for repeated and reliable measurements, even in harsh or demanding environments. The micrometer's robust construction also ensures it can withstand regular use and maintain its accuracy over time.With the advent of digital measuring instruments, some modern micrometers now feature electronic sensors and displays that provide digital readings. These digital micrometers offer additional convenience and can further enhance measurement accuracy by eliminating human error in reading the scale.In conclusion, the micrometer screwgauge is a crucial tool for precise measurements in various fields. Its fine graduation, durability, and ease of use make it an indispensable part of the toolkit for professionals across industries, from manufacturing to scientific research. As technology continues to evolve, micrometers will continue to play a vital role in ensuring the accuracy andreliability of measurements.。
瑞思国际贸易 最新一代手动带有微调系统的三坐标测量机 说明书
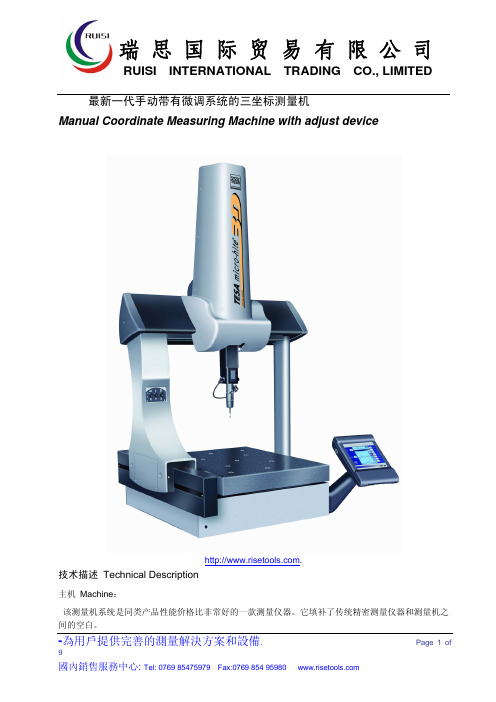
最新一代手动带有微调系统的三坐标测量机Manual Coordinate Measuring Machine with adjust device.技术描述 Technical Description主机 Machine:该测量机系统是同类产品性能价格比非常好的一款测量仪器。
它填补了传统精密测量仪器和测量机之间的空白。
This coordinate measuring system is the only one of its class that offers high price/performance ratio;it’s the missing link between the conventional precision measuring tool and the coordinate machine.这是真正的由瑞士在Renens生产和制造的产品,它尤其可以满足工业生产对高性能测量产品的要求。
This true SWISS MADE product is produced at Renens, in a cell specially laid out to meet the high requirements of its manufacturer.TESA的新型MICRO-HITE 3D_F测量机的精度可以达到微米,令人感到惊奇的是操作非常简单,即使操作者并不熟悉测量操作。
该测量机所使用的测量软件REFLEX软件具有用户友好的界面操作方式,操作者在使用它几个小时后就可以测量复杂的工件。
TESA’s new MICRO-HITE3D_F measures to the micron. Surprisingly easy to operate, there’s noneed of for the operator to be an expert. Owing to the interactive TESA REFLEX application software,he will be able to take complex part measurements after just a few hours of use.该类测量机带有精密调节系统,方便用户的使用。
- 1、下载文档前请自行甄别文档内容的完整性,平台不提供额外的编辑、内容补充、找答案等附加服务。
- 2、"仅部分预览"的文档,不可在线预览部分如存在完整性等问题,可反馈申请退款(可完整预览的文档不适用该条件!)。
- 3、如文档侵犯您的权益,请联系客服反馈,我们会尽快为您处理(人工客服工作时间:9:00-18:30)。
失圆
Out-of-Round A journal should be measured in two positions across the diameter and every 120 degrees around the journal. Calculate the out-of-round measurement by subtracting the lowest reading from the highest reading for both A and B positions.
Piston ring gap Piston ring side clearance Connecting rod side clearance
A group of feeler gauges (known as thickness gauges), used to measure between two parts. The long gauges on the bottom are used to measure piston-to-cylinder wall clearance.
Copyright © 2012 Nelson Education Limited
The imperial main scale is divided into inches with each inch divided into 10 parts, each equal to 0.100 inch. The area between the 0.100 marks is divided into four. Each of these divisions is equal to 0.025 inches
Position A: 2.0000 - 1.9995 = 0.0005 inch Position B: 2.0000 - 1.9989 = 0.0011 inch
The maximum out-of-round measurement occurs in position B (0.0011 inch), which should be used to compare against factory specs to determine if machining will be necessary.
feeler
gauge (also known as a thickness gauge) 薄厚计量器
A feeler gauge (also known as a thickness gauge) is an accurately manufactured strip of metal used to determine gap or clearance between two components, such as:
Use a micrometer to measure the telescopic gauge.
A telescopic gauge can also be used to measure the camshaft bearing, main bearing bore (housing bore) measurement and connecting rod bore.
Copyright © 2012 Nelson Education Limited
A vernier dial caliper is used to measure the outside diameter or length of a component such as a piston diameter or crankshaft and camshaft bearing journal diameter.
(a) A typical vernier dial caliper. This is a very useful measuring tool for automotive engine work because it is capable of measuring inside and outside measurements. (b) To read a vernier dial caliper, simply add the reading on the blade to the reading on the dial.
Copyright © 2012 Nelson Education Limited
Measurement readings are taken by combining the main and vernier scales. At all times, only one division line on the main scale will line up with a line on the vernier Scale. This is the basis for accurate measurements.
dial
indicator 千分表
A dial indicator is a precision measuring instrument used to measure crankshaft end play, crankshaft runout, and valve guide wear. A dial indicator can be mounted different ways, including:
(a)
(b)
(a)
(b)
small-hole
gauge (split-ball gauge) 小孔内口量具
A small-hole gauge (split-ball gauge) is used to measure inside diameter of small holes such as a valve guide in a cylinder head.
Pos A
Pos B
2.0000 - 2.0000 = 0.0000
1.9999 - 1.9999 = 0.0000
1.9995 - 1.9989 = 0.0006
Use 0.0006 inch as the taper for the journal and compare with factory specifications.
Copyright © 2012 Nelson Education Limited
To get a final measurement, line up the vernier scale line that is exactly aligned with any line on the main scale.
Cylinder heads Cylinder block deck Straightness of the main bearing bores (saddles)
A Straightedge is used with a feeler gauge to determine if a cylinder head is warped or twisted.
Magnetic mount This is a very useful method because a dial indicator can be attached to any steel or cast iron part. Clamp mount A clamp-mounted dial indicator is used in many places where a mount could be clamped. Threaded rod Using a threaded rod allows the dial indicator to be securely mounted.
Caliper
Vernier Caliper
A vernier caliper has a movable scale that is parallel to a fixed scale. These precision measuring instruments are capable of measuring outside and inside diameters and most will even measure depth.
凸轮轴Camshaft
测量
Camshaft Measurement The journal of the camshaft(s) can be measured and compared to specs for taper and out-of-round. The lift can also be measured and compared to factory specs.
Cutaway of a valve guide with a hole gauge adjusted to the hole dibeing measured with a micrometer.
游标卡尺
Vernier
Taper
锥形
Taper To determine the taper of the journal, compare readings in the same place between A and B positions and subtract the lower readings from the higher reading. For example:
Copyright © 2012 Nelson Education Limited
telescopic
gauge 伸缩性量规
A telescopic gauge is used with a micrometer to measure the inside diameter of a hole or bore. The cylinder bore can be measured by inserting a telescopic gauge into the bore and rotating the handle lock to allow the arms of the gauge to contact the inside bore of the cylinder. Tighten the handle lock and remove the gauge from the cylinder.
