Mercury SiteScope 使用手册
网络分析仪的操作与介绍

网络分析仪的操作与介绍首先,简单认识一下各种不同用途及类型品牌的网络分析仪一﹕仪表使用注意事项1 °防静电:仪表应良好接地.如果不接地网络分析仪会有105V或75V漏电压,对人体和仪器都会有伤害.2 °清洁:仪表要注意清洁和保养.否则仪表使用时间会减短.3 °防潮:在仪表的旁边不要放水、饮料、酒精等各种对仪表有损害的液体.4 °仪表的输入和输出功率不要过高.5 °仪表的电源开关不要频繁关断和打开.特别不要刚刚打开就立即关掉,仪表关掉后要至少5~10分钟打开.6 °强磁性的物体禁止放在仪表旁边、和磁铁、隔离器等物品.7 °带有磁性的起子,扳手禁止直接接触仪表显示屏或按键.8°各种仪器和射频连接器连接时,要注意拧的方法.只允许用于在自然状态下拧紧.二﹕操作说明方法1. AGICENT公司E5062A系列网络分析仪设置标准方法.2. 开机预热3-5分钟.3. 基本设置A. 按Center硬键设置中心频率.B .按 Spa硬键设置工作带宽.C .按Marker硬键1.....4软键.设置频点.D .按Display硬键→按Allocate、Channels软键可把仪表分成不同的频段进行测试.如果选择X1,则仪表一个频段.按Num of、Traces 软键.选择1、2、3、4.则可把这个频段分成2.3.或4长轨迹,即是2、3、4、个信道;按Allocate、Channels软键,可把屏幕分成几个所需要的窗口,一般设置两个窗口,按Channel、Pre硬键,是将完全独立的频段进行切换;按Trace、Prev是将不同的信道进行切换;按Channel、Max硬键,是将所选中的频段进行放大;按Trace、Max硬键,是将所选中的信道进行放大.4.1.按Sweep、Setup硬键→Points软键选择401扫描点;按Power软键选择+10dBM输出功率(这是调SP.BP.MS等各种无源器件设置的)当测试有源器件时,仪表输出功率一定只能设置为-20dBM,以免烧坏仪表.4.2 按AVG硬键→IF、Bandwidth软键选择30KHZ.4.3 按Cal硬键→Calkit、85032B/E软键→85032B/E(这要看校准件是什么样的CALKIT,如有的是85032F)三﹕标准方法双端口标准>a. 按Cal硬键→Calibrate软键→按2-Portcal软键→按Reflection 软键,.在仪表Port1端口电缆上接“开路”标准件→按Port1 Open、Open CFS软键→换下“开路”标准件,接上“短路”标准件→按Port1 Short、Short C软键→按F“短路”标准件,接上“负载”标准件→按Port Load、Broad band软键→换下“负载”标准件→在仪表Port2 端口电缆上接“开路(Open)”标准件→按Port2 Open、Open(F)软件→换下“开路”标准件,接上“短路(Short)”标准件→按Port2 Short、Short(F)软键→换F“短路”标准件,接上“负载(Load)”标准件→按Port 2Load、Broad band软键→按Return软件返回→换下“负载”标准件→将Port1电缆, Port2电缆用“双阴”短接→按Transmission软键→按Port1-2Thru软键→按Return软键返回→按Done软键完成. 标准完后,仪表显示屏下角会出现“Cor”字符,表示标准正确.b.这时,可在Port1端口接上“负载”标准件检验标准效果,在Port2端口接上“负载”标准件检验标准效果;若回波总在70dB 以或驻波比在1.00处,则表示已标准好.c.标准的存储:标准完后,按Savel、Recall硬键,选择Save、State 软键,可直接在State 01*~08*存储,或选择File dialog…存储在仪表的D盘上.标准文件的调用:按Savel Recall硬键→Recall State软键,可直接在State 01*~08*调用或直接选择Filedialog……..从D盘上调用.四﹕仪表常用设置a. 设置存储文件或(建立图像存储文件夹)按Savel Recall硬键→Explorer软键→出现一个文件夹,这时可在文件夹上打到My Computer的文件夹,右键单击鼠标,出现一个菜单栏,然后选择Map Network、Drive……弹出一个对话框,有两栏 Drive: Folder: 在Drive中选择文件所在的盘符,一般为G; 在Folder中点击会出现一个下拉菜单,选择/DZ3/D/N6(其中N6指明相对应的仪表编号)然后,按Finish.这时会弹出一个对话框,要求输入用户名现密码,可在用户名中输入: Administrator 密码无,按OK完成.b. 存储整个屏幕按System硬键→Screen Image…软键.出现一个文件夹选择Input from the front panel→输入文件名→Enter→Save.即可.c. 存储通带/驻波现取消:选择某一个信值.如S21信值,按Display 硬键→Date软键→men软键→Date math、OFF软键→Date/men软键. 取消存储时,按“OFF”软键.d. 划分辅助界线:选择某一信道如信道S21,按Analysis 硬键→limit Test、OFF软键→按Editlimitline软键(改成limit line 、ON 形成) →按 Editlimitline软键→会出现一个窗口,按Type →OFF关闭. Max最大. min 最小. →选择Max 或min→在 BeginStimucus对应的本质内输入开始频点(横向的终点);在BeginResponse 对应的框内输入起始值,如-63dB(纵向的起点).在End Response对应的框内输入终止值(纵向的终点)如 -73 dB,按 Focus 硬键→Return软键,即可.e. 扫描频点的设置:选择某一频点(如频点S),按Marker Search硬键→按Max / min 软键(最大值/最小值.一般是按Max软键) → Tracking 、OFF软键,即可. 如何确搜索范围:如上后,按Searchrange、OFF软键→ Start软键(输入搜索起始频点) → Stop 软键(输入搜索终止频点)f. 参考值的设置按 Scace 硬键,出现一系列软键,其中常用的有下面几个软键:f.1 Scace /dic 代表每一格的高度.如回波形式,一般设为10dB /Divf.2 Referenceposition 代表从起始值到最下面的总格数3°Reference Volue代表起始值. 如在回波形式一般设为OdB 驻波形式一般为1.具体操作如下:1°回波形式,选中某一信道,如S21 按Scace 硬键 1. Scace/ Div软键→输入10 dB /Div 2. Referenceposition软键→输入10 Divf.3. Reference Volue软键→输入0 dB 2°驻波形式:同上只不过一般分别输入. 180m/div; 0div 1g. 格式的设置:选择某一信道,如S21.S11.S12,按Format 硬键→Cogmag软键(回波形式)或→SWR软键(驻波形式)一般情况:S11.S22设为驻波形式. S21.S12设为回波形式h. 打印. 按System 硬键→Print软键,开始打印,全屏显示主工作区,按 Entry off 硬键.附:调试区存图到电脑上的设置(小型局域网):按Savel Recall硬键→Explorer软键→出现一个文件夹,这时可在文件夹上打到My Computer的文件夹,右键单击鼠标,出现一个菜单栏,然后选择Map Network、Drive……弹出一个对话框,有两栏Drive: Folder: 在Drive中选择文件所在的盘符,一般为G;在Folder中点击“浏览”,选择服务器所在的电脑名称,然后,点需要的盘符.这时会弹出一个对话框,要求输入用户名现密码,可在用户名中输入: Administrator 密码无,按OK完成.问题解答:找不到服务器所在的电脑名称?答:要排除的几类 1,网线没插好,2,仪表的IP设置:设置方法:A按Savel Recall硬键→Explorer软键→出现一个文件夹,这时可在文件夹上找到网上邻居的文件夹,右键单击鼠标,出现一个菜单栏,点属性,B,在对话框里,右键点“本地连接”,点属性,在出现的对话框里,选择“Internet协议(TCP/IP),点属性,然后输入相应的IP,点确定五﹕仪表单词英译汉Aug平均Allocate 分配,分派Analysis分析Administrator超级管理员Bandwidth 带宽Browse 浏览band 带状物Broad 宽阔的、广大的Cal 标准Center中心Channel水道.航道.频道Done 完成Drive 驱动Dialog 对话,对白Display 显示,展览explorer 探测员Edit 编辑Enter 进入,开始从事file 文件format格式,版式.形式Finish 完成Folder 文件夹From 从……起Front 前面Focus 焦点image. 映像.图像Input 输入kit 装备load 载装,负载limit 界限.范围my computer我的电脑max 最大min 最小Map networkdrive 映像网络驱动Marker 标记.频点next 下一个.下一次off 关on 开Open 开放.找开.开路Panel 控制板.面板Point点position位置Power 电力,功率Port 港口,端口R:return 回来,返回 Recall召回,调用Reference 参考 response响应Range 区域 reflection反射,思考S:save 存储 system 系统,体系Scale 标度,标尺 Screen屏幕Span 跨距,带宽 search搜索Sweep 打扫,扫描 short 短的,短路State 状态.说明 stimulus 刺激T:trace 痕迹.踪迹transmission 播送,发射Test 测试,试验Trigger扳机,触发器。
美科星通 双频千兆 Mesh 无线路由器 详细配置指南

第5章 设置路由器参数 . . . . . . . . . . . . . . . . . . . . . . . . . . . . . . . . . . . . . . . . . . . . . . . . . . . . . . . .31 5. 1. LAN口IP地址设置 . . . . . . . . . . . . . . . . . . . . . . . . . . . . . . . . . . . . . . . . . . . . . . . . . . . . . . . . . . . . . . . 31 5. 2. MAC地址设置 . . . . . . . . . . . . . . . . . . . . . . . . . . . . . . . . . . . . . . . . . . . . . . . . . . . . . . . . . . . . . . . . . . . 31
第3章 管理设备上网行为 . . . . . . . . . . . . . . . . . . . . . . . . . . . . . . . . . . . . . . . . . . . . . . . . . . . . . .18 3. 1. 管理已连接设备 . . . . . . . . . . . . . . . . . . . . . . . . . . . . . . . . . . . . . . . . . . . . . . . . . . . . . . . . . . . . . . . . . 18 3. 2. 家长控制 . . . . . . . . . . . . . . . . . . . . . . . . . . . . . . . . . . . . . . . . . . . . . . . . . . . . . . . . . . . . . . . . . . . . . . . 19 3. 3. 上网行为管理 . . . . . . . . . . . . . . . . . . . . . . . . . . . . . . . . . . . . . . . . . . . . . . . . . . . . . . . . . . . . . . . . . . . 20 3. 4. 主人网络保护 . . . . . . . . . . . . . . . . . . . . . . . . . . . . . . . . . . . . . . . . . . . . . . . . . . . . . . . . . . . . . . . . . . . 22
红狮网络产品指南说明书

Ethernet Switches | Cellular M2M Routers & RTUs | Wi-Fi Radios | Communication ConvertersLearn more at 13Learn more at 3Table of ContentsEthernet SolutionsManaged Ethernet SwitchesAdvanced Managed Ethernet Switches Monitored Ethernet Switches Unmanaged Ethernet Switches Power over Ethernet (PoE) Solutions IP67 Switches Wi-Fi Radios Wired RoutersCellular M2M SolutionsCellular RTUs Cellular RoutersCommunication ConvertersSerial Converters Fiber ConvertersAccessoriesEthernet Accessories Cellular Accessories4202118161878232610142224Managed Ethernet SwitchesRed Lion’s rugged, reliable managed industrial Ethernet switches support industry‑standard applications. These hardened switches are ideally suited for harsh industrial environments where real‑time performance under extreme operating conditions is required. Built‑in redundancy and network management ensure communications stay up and running while providing tools for monitoring and tracking.>Layer 2 managed industrial Ethernet switches > R ugged enclosure supports deployment in extreme environments >Powerful network management >Gigabit copper, fiber and SFP optionsNetwork Healing TechnologiesN-Ring ® is a proprietary high‑speed ring technology that providesconsistent healing times of ~20 milliseconds (ms) for up to 250 switches. N-Link ® provides the ability to link two N‑Rings for network redundancy.Real-Time Ring is a highly‑reliable, proprietary ring technology from Sixnet offering 30 ms healing time plus 5 ms per hop.Rapid Spanning Tree Protocol (RSTP) IEEE 802.1w is an industry standard protocol providing ~2‑3 second recovery time and offers asolution for multi‑vendor Ethernet networks.Managed Ethernet Switch ComparisonPartner LinkMasterN-Link SlaveN-Ring 2Red Lion ManagedIndustrial Ethernet Switches45Learn more at NT24k ® Modular Managed Gigabit Ethernet Switches>Hot swappable modules with Fast Ethernet and Gigabit configurations >Robust remote monitoring with N‑View™ monitoring technology >Smart plug‑and‑play operation >DIN‑rail and rackmount options >Extreme environment specificationsSFP ports support 100Base or 1000Base SFP transceivers, which are sold separately. Low-voltage power supplies feature redundant power inputs.Compact NT24k Managed Switches >Fast Ethernet, Gigabit, fiber and SFP models>Robust remote monitoring with N‑View monitoring technology >Smart plug‑and‑play operation >Extreme environment specificationsSFP ports support 100Base or 1000Base SFP transceivers, which are sold separately.Multimode and singlemode options available. FX models available with SC or ST connectors; GX models available with SC style connectors.6Learn more at 700 & 7000 Managed Ethernet Switches>Plug‑and‑play deployment with IGMP auto‑configuration >N‑View monitoring provides real‑time switch diagnostics >Ideally suited to use as N‑Ring or N‑Link managerFAST ETHERNETGIGABIT ETHERNET *KEMA approved IEC 61850-3 and IEEE 1613 HV models available.Fiber models available in multimode and singlemode configurations with SC or ST fiber connectors. SFP ports support 1000Base SFP transceivers, which are sold separately.SLX Managed Ethernet Switches>Versatile networking solutions with copper and fiber models >Real‑time Modbus over Ethernet monitoring >Fast Ethernet and Gigabit port options >DIN‑rail or panel mounting optionsFiber models available in multimode and singlemode configurations with SC or ST fiber connectors. SFP ports support 100Base or 1000Base SFP transceivers, which are sold separately.7Learn more at Advanced Managed Ethernet SwitchesRed Lion’s advanced managed industrial Ethernet switches offer powerful enterprise‑class networking with security options that prevent unauthorized access and enable policy enforcement. These powerful switches provide QoS traffic classification and sophisticated multicast controls, reducing traffic and ensuring real‑time message delivery. The flexible industrial design is built to support the harshest environments.*Rackmount - MetalSFP ports support 100Base or 1000Base SFP transceivers, which are sold separately.EL Advanced Management Ethernet Switches>Layer 3 functionality with enterprise class networking features >Hardened enclosure for harsh industrial applications >Up to 10G ports for high‑bandwidth backhaul >Advanced security control8Monitored Ethernet SwitchesRed Lion’s monitored industrial Ethernet switches providenetwork performance monitoring with Modbus or N‑Viewmonitoring technology. These rugged, compact switches arebuilt for mission‑critical applications and provide cost‑effectivenetwork monitoring options that can be integrated directly intoany industrial control system.>Layer 2 unmanaged industrial switches>Network performance monitoring via Modbus or N‑View technology>Versatile networking solutions>Copper and fiber port configurations>Hardened for the toughest applicationsMonitored Ethernet Switch Comparison500-A Monitored Process Control Switches>Advanced management features include IGMP snooping, VLAN,QoS and Port Mirroring>N‑View monitoring provides real‑time switch diagnostics>Rugged industrial DIN‑rail and rackmount optionsFiber models available in multimode and singlemode configurations with SC or ST fiber connectors.9Learn more at SL & SLX Fast Ethernet Ring Switches>Fast, fault‑tolerant Real‑Time Ring network redundancy >Pre‑configured for plug‑and‑play ring functionality >Redundant power inputs>Real‑time Modbus over Ethernet monitoringFiber models available in multimode and singlemode configurations with SC or ST fiber connectors.300 & 500 Monitored Fast Ethernet Switches >High reliability in industrial applications >Plug‑and‑play operation>N‑View monitoring provides real‑time switch diagnosticsFAST ETHERNETFiber models available in multimode and singlemode configurations with SC or ST fiber connectors.10Unmanaged Ethernet SwitchesRed Lion’s industrial unmanaged Ethernet switches offer powerful network performance with plug‑and‑play functionality. With an endless range of port options, these unmanaged switches are set to tackle the demands of industrial data acquisition, control and Ethernet I/O applications.>Compact IEEE 802.3 Layer 2 industrial switches >Automatic speed, duplex and cable sensing >Designed for use in mission‑critical applications >Plug‑and‑play functionalityUnmanaged Ethernet Switch Comparison*2015 data is forecastedIndustrial Ethernet & the IIoTBuilding on the foundation of the Internet of Things, the Industrial Internet of Things (IIoT) promises significant returns for businesses looking to better connect and share data between disparate devices. With potential returns achieved through greater efficiency, process improvements and preventative maintenance, Red Lion offers an array of rugged, reliable industrial Ethernet switches to meet varying IIoT requirements. And the number of Ethernet ports shipped continues to grow year over year as more and more organizations turn to Red Lion.11Learn more at 100, 300 & 500 Unmanaged Fast Ethernet Switches >Compact, rugged, all‑metal enclosure>Wide operating temperature range >Redundant power inputsFiber models available in multimode and singlemode configurations with SC or ST fiber connectors.12Learn more at SL & SLX Unmanaged Fast Ethernet Switches >Mixed copper and fiber port options>Compact lightweight Lexan or all‑metal housing >Redundant power inputsFiber models available in multimode and singlemode configurations with SC or ST fiber connectors.1000 & SLX Unmanaged Gigabit Ethernet Switches >Plug‑and‑play unmanaged operation >Gigabit‑speed port options>Compact, rugged, all‑metal enclosuresSFP transceivers sold separately.Power over Ethernet (PoE) is a method to transmit power and data, up to 100 meters, over a single Ethernet (CAT5e/CAT6/PSESwitch Midspan Injector PoEPSEPDPDNon-PoE010111100111000010111113Learn more at 14Learn more atIndustrial PoE SolutionsRed Lion’s industrial PoE solutions are designed to transmit power and data over an Ethernet network. PoE networks eliminate the need for running separate wires for power and are ideal in installations with devices such as IP surveillance cameras, wireless access points, IP phones and other PoE‑enabled devices. These industrial PoE devices offer a compact, rugged design for harsh, remote locations.>Compact, rugged design >Switches, injectors and splitters> T ransmit power and data over Ethernet networksCompact NT24k-POE Managed PoE Switches >IEEE 802.3af/at PoE+ on all copper ports> R edundant 22 to 49 VDC power inputs with power boostcircuit to provide 240 watts of PoE+ output > A ll copper ports support 10/100/1000Base speeds and IEEE 802.3af/at PoE+ output > A vailable with FX or GX fiber ports, or SFP ports for optional SFP transceivers >Extreme environment specificationsSFP ports support 100Base or 1000Base SFP transceivers, sold separately.Multimode and singlemode options available. FX models available with SC or ST connectors; GX models available with SC style connectors.15Learn more at PoE Switch Comparison* M odel specificGIGABIT ETHERNETSFP ports support 100Base or 1000Base SFP transceivers, sold separately. Fiber models available with SC or ST fiber connectors.* R edundant 10 to 30 VDC power inputs with power boost circuit to provide IEEE 802.3at output.SLX & EB PoE Switches, Injectors & Splitters >IEEE 802.3af PoE support>Easily integrates PoE equipment into existing networks >Seamless plug‑and‑play operation100 & 1000 PoE Switches, Injectors & Splitters >IEEE 802.3af PoE support >Rugged, all‑metal enclosures >Easy plug‑and‑play operation16Learn more at Red Lion’s ultra‑rugged IP67 switches are built to military standards, bringing advanced networking capabilities to the field. Thousands of today’s deployed tanks, armored personnel carriers, unattended vehicles (UAVs), weapons control systems, naval vessels, helicopters, airplanes, drones and other assets depend on Red Lion IP67 switches.>Ultra‑rugged construction> S uperior performance in critical applications >MIL standard compliantUltra-Rugged IP67 SwitchesUltra-Rugged IP67 Switches>IP67/NEMA 6 ingress protection for harsh environments >Commercial Off‑The‑Shelf (COTS) military‑grade solutions >MIL‑DTL‑38999 series III connectors >Up to 10Gig backhaul connectivityMIL31X switches available with Layer 2 or Layer 3 management functionality. *Multimode and Singlemode fiber options available.17Learn more at FAST ETHERNET*Ethernet ports have M12 connectorsIP67 Industrial Switches >Rugged IP67/NEMA 6 enclosures>Versatile unmanaged and managed solutions > H ardened for the toughest applicationsOEM Board-Level Switches >Wide operating temperature range >Ready for copper, fiber or SFP connectors > L ow power consumptionGIGABIT ETHERNET18SecurityRed Lion can help secure industrial networks to ensuresensitive data is protected. Common features of Red Lion security products include:Virtual Private Networks (VPNs) securely extend private networks to remote locations using certificates to ensure security between two network points. Stateful Packet Inspection (SPI) is a firewall process that scans individual packets of data and approves or denies each packet based on known services that are currently running.Access Control List (ACL) is a list of approved or denied user credentials that allow or deny users from accessing equipment. Coupling an ACL with user‑level authentication adds security by only allowing certainservices to be accessed by specified users.*Ethernet port has M12 connectorWi-Fi RadiosRed Lion’s family of IEEE 802.11a,b,g,n hardened products provide a powerful wireless solution for industrial applications. Data bandwidths up to 300 Mb/s can be attained using the 802.11n MIMO wireless technology. These wireless radios offer standard powerful transceivers to extend network ranges well beyond that of most commercial wireless products.>IEEE 802.11a,b,g,n compliant>Support data bandwidths up to 300Mb/s > C onfigurable as Wireless Station, Station WDS, Access Point, Access Point WDS >Operate in bridge or router mode >IEEE 802.3af Powered DeviceWired RouterRed Lion’s RAM ® 6021 industrial wired routers offer secure and reliable communication to remotely deployed assets. Rugged RAM 6021 routers are ideal for connecting to Modbus or DNP3 devices such as SCADA servers, PLCs and other automation equipment located in harsh environments.>Intrusion protection and secure data access> I Psec and SSL VPN tunnels >N AT translationsEtherTRAK I/O ModuleGraphite HMIPLCRAM-602119Learn more at is a device that transmits a native protocol across a cellular network to another cellular is a device that converts a native protocol to TCP/IP for transmission across a cellular network. Cellular gateways are designed to simply gateway functionality along with additional security and packet‑level routing capabilities. Cellular routers often include firewalls, Access Control Lists and VPN RAM 6000RAM 6000RAM 6000RAM 6000RAM 900020SixView Manager ®This remote device management software isdesigned to increase productivity and reduce cost for organizations using Sixnet series cellular RTUs and routers. A web‑based console and customized dashboard provide users the ability to remotely access, configure and manage critical device information for several, even thousands of RAM cellular RTUs and IndustrialPro ® cellular routers from a central location.Cellular M2M SolutionsRed Lion offers a broad range of cellular M2M RTUs and routers that feature standards‑based, enterprise‑class functionality to enable secure, reliable cellular data access – anywhere, anytime. These rugged industrial solutions provide the ability to remotely monitor sites across a range of applications.AM (Generic) model includes Bell Mobility, TELUS and Rogers carriers or other North American carriers. EU (Europe) model is not supported in North America. JP (Japan) model only supported in Japan.RAM ® 9000 Industrial Cellular RTUs> H igh‑density I/O reduces need for external equipment >Supports 4G LTE multi‑carrier operation with fallback to 3G > B uilt‑in active GPS mobile for semi‑mobile applications > S ecure, reliable Modbus concentrator for remote site monitoring> E vent Engine that can send SMS messages or control I/O based upon operational data >Wide ‑40° to 75°C operating temperature range21MULTI DEFAULT AM (Generic) model includes Bell Mobility, TELUS and Rogers carriers or other North American carriers. EU (Europe) model is not supported in North America. JP (Japan) model only supported in Japan.RAM 6000 Industrial Cellular RTUs >Supports 4G LTE with fallback to 3G >LTE multi‑carrier operation in single device > S plit WAN/LAN on multi‑Ethernet port models> F ully configurable router with firewall and built‑in Modbus gateway >Event Engine can trigger I/O or send SMS messages >Optional PoE Powered Device (PD) support >Wide ‑40° to 75°C operating temperature range >Redundant 8 to 30 VDC power inputsIndustrialPro ® SN 6000 Cellular Routers>Supports 4G LTE multi‑carrier operation with fallback to 3G > R ugged, compact industrial design> S ecure Out‑of‑Band Management (OOBM) solution for remote assets > F ully configurable router with firewall>Wide ‑40° to 75°C operating temperature rangeAM (Generic) model includes Bell Mobility, TELUS and Rogers carriers or other North American carriers. JP (Japan) model only supported in Japan.22Learn more at Media ConvertersRed Lion’s suite of media and protocol converters are designed to bridge connectivity between diverse media types as well as legacy and Ethernet networks. Providing fast performance and ruggedoperating specifications, the series includes remote access servers, serial‑to‑fiber converters, isolators, repeaters, serial‑to‑Ethernet converters, along with Ethernet media converters.>Fast Ethernet and Gigabit connectivity solutions >Secure remote serial access servers >Designed for harsh industrial applicationsSER & ESERV Serial Media Converters >Extended environmental specifications>Data rates up to 115.2Kbps (SER), 230.4Kbps (ESERV) >Hardened DIN‑rail enclosure10/10023Learn more at ET Serial-to-Ethernet Converters>Wide environmental specifications >Easy to configure and deploy >Reliable data transfer ratesSL & SLX Fiber Media Converters>Plug‑and‑play installation saves time and money >Slim robust design for industrial applications >Wide selection of fiber connectivity options100, 300 & 1000 Fiber Media Converters >Compact, hardened metal DIN‑rail housing >Convert copper to Fast Ethernet or Gigabit Fiber >Available in SC and ST fiber connectors24Learn more at Power SuppliesConfiguration & Recovery DevicesAccessoriesRed Lion’s rugged, reliable industrial Ethernet and wireless products demand the same level of performance as theapplications that they are a part of. That’s why the following power supplies, configuration and recovery devices, mounting kits and SFP transceivers are designed to provide years of trouble‑free service in industrial applications.>Industrial‑grade accessories>Designed to provide reliable performance in harshenvironments25Learn more at Wi-Fi AccessoriesSFP TransceiversMounting Kits26Learn more at 3G Antennas>Support for 3G and 2G cellular frequencies>Mounting options include magnetic or bolt‑through options >Available with GPS and/or Wi‑Fi built‑in>Two antennas recommended for optimal performance4G Antennas>Support for 4G LTE, 3G and 2G cellular frequencies>Mounting options include direct, magnetic or bolt‑through options >Available with built‑in GPS and/or Wi‑Fi>MIMO configuration requires two antennas for optimal performance27Cellular Wi-Fi Antennas >2.4 GHz band Wi‑Fi>RPSMA male antenna connector >Small size for tight spaces>High‑gain models for longer distance connectivityCellular Cables & Mounts >Industrial‑grade accessories >Power adapters, cables and mounts28Learn more at Americas *****************Asia-Pacific ****************Europe, Africa Middle East******************+1 (717) 767-6511Industrial solutions, reliable performance and unwavering support.As the global experts in communication, monitoring and control for industrial automation and networking, Red Lion has been delivering innovative solutions for over forty years. Our automation, Ethernet and cellular M2M technology enables companies worldwide to gain real‑time data visibility that drives productivity. Product brands include Red Lion, N‑Tron and Sixnet. With headquarters in York, Pennsylvania, the company has offices across the Americas, Asia‑Pacific and Europe. Red Lion is part of Spectris plc, the productivity‑enhancing instrumentation and controls company. For more information, please visit .Connect. Monitor. Control.ADLD0342 031816© 2016 Red Lion Controls, Inc. All rights reserved. Red Lion, the Red Lion logo, N‑Tron and Sixnet are registered trademarks of Red Lion Controls, Inc. All other company and product names are trademarks of their respective owners.。
2022新SiteScope用户手册

SiteScope用户手册1.文档目的 (3)1.1 目的 (3)1.2 术语定义 (4)2.SiteScope界面介绍 (4)2.1 通用按钮说明 (4)2.2模版 (4)2.2.1 模版概述 (4)2.2.2 建立模版 (4)2.2.3 变量使用 (8)2.2.4 使用模版来建立组、监控器或警报 (10)2.2.5 模版导入导出 (11)2.3导航树 (13)2.3.1 导航树概述 (13)2.3.2 导航树图标含义 (14)2.4控制面板 (15)2.4.1 控制面板概述 (15)2.5视图 (16)2.5.1 视图概述 (16)2.5.2 视图定义 (16)2.5.3 视图使用 (17)2.6类别 (18)2.6.1 类别概述 (18)2.6.2 类别定义 (18)2.6.3 为监控元素分配类别 (20)2.6.4 在视图中使用类别 (21)3.SiteScope配置 (23)3.1 许可证输入 (23)3.2 用户管理 (24)3.3 日志管理 (26)3.4 MS Windows Remote Preferences配置 (27)3.5 Unix Remote Preferences配置 (29)4.监控器配置 (30)4.1 Windows主机资源监控 (30)4.2 Ping监控 (33)4.3 SiteScope Health (34)5.警报配置 (34)5.1 警报概述 (34)5.2 警报定义 (35)5.3 警报查询 (37)1.文档目的1.1目的本文档描述了SiteScope及其监控器在IMS国电综合网管项目中的配置和日常使用相关的内容。
1.2术语定义本文档一方面作为本次的交付物,也可为进一步设计相关的所有技术与管理人员运行和维护的文档。
2.SiteScope界面介绍2.1 通用按钮说明名称图标功能说明编辑点击按钮可以进入编辑界面以便用户修改指定元素的属性删除点击该按钮可以删除指定元素,一般需要先选定需要删除的内容在进行删除。
mercury无线路由器桥接设置图解

mercury无线路由器桥接设置图解当我们的无线路由器覆盖范围不够时,我们可以使用无线路由器的桥接功能,下面店铺以mercury无线路由器为例,为大家介绍mercury无线路由器桥接设置图解,希望对您有所帮助!mercury无线路由器桥接设置图解一、进入桥接设置页面1、输入或者192.168.1.1——>输入“登录密码”,登录到mercury无线路由器的设置界面。
2、点击“高级设置”3、点击“无线设置”——>“WDS无线桥接”二、mercury无线桥接设置1、扫描无线信号(1)、点击“下一步”(2)、此时水星mercury无线路由器会自动扫描附近的无线信号,请在结果中找到主路由器的无线信号(本例中是:zhangsan),然后点击“选择”。
(3)、输入主路由器的无线密码,点击“下一步”。
2、设置mercury无线的无线参数设置“无线名称”、“无线密码”——>点击“下一步”。
注意问题这里的“无线名称”、“无线密码”,建议大家将其设置为与主路由器上的无线名称、无线密码一致,这样可以实现无线漫游。
3、修改水星mercury无线的LAN口IP地址(1)、在“新的LAN口IP地址”后面,填写新的IP地址——>然后点击“下一步”。
修改原则如果主路由器的IP地址是:192.168.1.1;则mercury无线的LAN 口IP地址,修改为:192.168.1.252如果主路由器的IP地址是:192.168.0.1;则mercury无线的LAN 口IP地址,修改为:192.168.0.2252请按照上面介绍的规则,结合你自己主路由器的IP地址,来修改水星mercury无线的LAN口IP地址重要说明修改mercury无线的LAN口IP地址后,需要在浏览器中输入修改后的IP地址,才能重新打开mercury无线的设置界面。
本例中需要输入192.168.1.252,才能重新登录到水星mercury无线的设置界面了。
SiteScope使用小问题解决

关于Sitescop e监控对sitescope的相应操作,添加主机设备(如服务器、虚拟机、主机、路由器等)的步骤如下:1、在preference下选择要建立的服务器类型,如UNIX和Windows服务器,选择新建服务器,添加主机名(IP地址),填写用户名和密码,注意大小写,选择ok,对着新建的服务器右击,选择测试即可。
注意:⑴测试服务器连通性时可用安装目录下的Tools文件夹中的putty小工具。
⑵如果不通,而且服务器是Unix类的,则可选择不同的登录方式来尝试,Unix大部分选择Telnet,少部分选择ssh或者其他方式,Redhat选择ssh方式。
2、在解决方案模版里面右击选择“新建组”,添加新的管理系统名称,在新的管理系统中新建组。
3、对新建的服务器进行数据采集,Windows系统进行下列采集:CPU使用率、磁盘换页率(在Windows资源中的memory中选择Page In/Out)、磁盘空间、主机状态(Ping)、内存使用率、连续运行时长。
Unix系统一般进行下列采集:CPU使用率、主机状态、文件系统、连续运行时长(Unix资源中选择up)、内存使用率。
对着新建的服务器右击,选择新建监控器,依次输入用户名和密码,注意大小写,下划线特殊符号。
最后确认配置成功。
添加数据库的操作如下:1、先将ext.rar拷贝到安装目录下的WEB-INF/lib文件夹中,不要解压,并且重启sitescope服务(开始——运行——services.msc,选择sitescope,右击选择重启服务。
2、然后添加两个文件mibExpr.conf和SUSE.conf添加到conf文件中。
3、然后在管理中直接添加新建监控器,添加数据库计数器,依次填入名称、数据库链接URL等选项,见oracle的IMS SQL语句。
URL格式如下:jdbc:oracle:thin:@<server name or IP address>:<database如选项是灰色的,说明数据库没有该表项,则不选,否则,选择,点击确认。
Sitescope 小问题处理

关于Sitescope监控对sitescope的相应操作,添加主机设备(如服务器、虚拟机、主机、路由器等)的步骤如下:1、在preference下选择要建立的服务器类型,如UNIX和Windows 服务器,选择新建服务器,添加主机名(IP地址),填写用户名和密码,注意大小写,选择ok,对着新建的服务器右击,选择测试即可。
注意:⑴测试服务器连通性时可用安装目录下的Tools文件夹中的putty小工具。
⑵如果不通,而且服务器是Unix类的,则可选择不同的登录方式来尝试,Unix大部分选择Telnet,少部分选择ssh或者其他方式,Redhat选择ssh 方式。
2、在解决方案模版里面右击选择“新建组”,添加新的管理系统名称,在新的管理系统中新建组。
3、对新建的服务器进行数据采集,Windows系统进行下列采集:CPU 使用率、磁盘换页率(在Windows资源中的memory中选择Page In/Out)、磁盘空间、主机状态(Ping)、内存使用率、连续运行时长。
Unix系统一般进行下列采集:CPU使用率、主机状态、文件系统、连续运行时长(Unix资源中选择up)、内存使用率。
对着新建的服务器右击,选择新建监控器,依次输入用户名和密码,注意大小写,下划线特殊符号。
最后确认配置成功。
添加数据库的操作如下:1、先将ext.rar拷贝到安装目录下的WEB-INF/lib 文件夹中,不要解压,并且重启sitescope服务(开始——运行——services.msc,选择sitescope,右击选择重启服务。
2、然后添加两个文件mibExpr.conf和SUSE.conf添加到conf文件中。
3、然后在管理中直接添加新建监控器,添加数据库计数器,依次填入名称、数据库链接URL等选项,见oracle的IMS SQL语句。
URL格式如下:jdbc:oracle:thin:@<server name or IP address>:<database 如选项是灰色的,说明数据库没有该表项,则不选,否则,选择,点击确认。
BAC影响视图创建文档_(SiteScope安装使用)
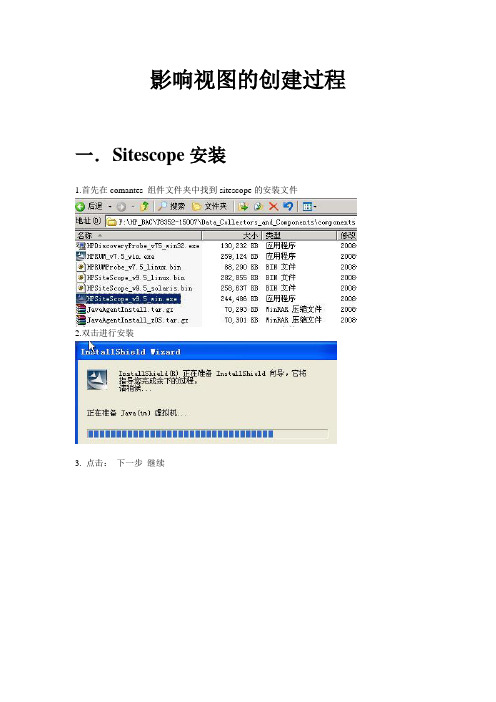
影响视图的创建过程一.S itescope安装1.首先在comantes 组件文件夹中找到sitescope的安装文件2.双击进行安装3. 点击:下一步继续4. 选择:我接受许可证协议的条款(A) ,然后点击:下一步继续5. 点击:浏览进行安装目录的选择然后点击:下一步继续6. 选择:HP SiteScope 然后点击:下一步继续7. 输入HP SiteScope服务器使用的端口号,默认为:8080输入管理员电子邮件地址后点击:下一步继续8. 输入SiteScope的许可证号以及可选许可证号然后点击:下一步继续9.此窗口会出现安装的汇总信息,点击:下一步继续10. 开始安装11.点击:下一步完成HP SiteScope的安装注:在IE地址栏中输入:http://(主机名/ip地址/localhost):端口号/SiteScope 可打开SiteScope的管理界面例如本次环境为自己本机安装,主机名为:ultra-sunlei 主机IP为:192.168.2.161 则管理界面打开地址为:1.)http://localhost:58080/SiteScope2.)http://192.168.2.161:58080/SiteScope3.)http://ultra-sunlei:58080/SiteScope二.Sitescope创建监视器1)首先打开IE,地址栏内输入::58080/SiteScope用户名: admin 密码:admin2)进入sitescope后在监视器部分,右键单击SiteScope选择新建组,在组名处输入新建组的名称,点击OK即可、以BAM为例、3) 在新建的组下,建立新的监视器,用来监控采集不通的指标数据右键单击新建的组名,选择:新建监视器,在右面窗口中的类别,选择:服务器监视器,然后选择左边的内存,在主设置中填入监视器的名称:MEM_TEST ,频率那默认都为10分钟,可以根据实际情况进行修改监视器以监视内存为例其他可以默认不进行设置。
网月科技无线网络产品用户手册

网月科技股份有限公司
5
专业网络设备设计制造商
Netmoon-MP 系列云管理型无线接入点软件操作手册
目录
版权声明 ............................................................................................................................................................. 2 前言 ..................................................................................................................................................................... 3 产品约定及默认配置 ......................................................................................................................................... 4
产品默认出厂配置:
项目 默认 IP 默认子网掩码 默认用户名 默认密码
192.168.170.1 255.255.255.0 admin(区分大小写) admin(区分大小写)
配置参数
联系我们:
如果您在产品使用过程中,遇到了无法解决的问题,您可以通过拨打 400-600-9451 电话的方式,让我
们的技术支持工程师协助您解决。同时您也可以通过我们官网 上的“服务支持
迈锐步 Mercury Interactive 负载测试软件 LoadRunner Analysis

iç~ÇoìååÉê^å~äóëáë=用户指南TKU=版LoadRunner Analysis 用户指南, 7.8 版本手册及附带的软件和其他文档受美国和国际版权法保护,并且只能依据附带的许可协议使用。
软件功能及Mercury Interactive Corporation 其他产品和服务的功能包含于以下一项或多项专利中:美国专利号5,701,139、5,657,438、5,511,185、5,870,559、5,958,008、5,974,572、6,138,157、6,144,962、6,205,122、6,237,006、6,341,310、6,360,332, 6,449,739、6,470,383、6,477,483、6,560,564 和6,564,342。
以及待批准的其他专利。
保留所有权利。
ActiveTest、ActiveTune、Astra、FastTrack、Global SiteReliance、LoadRunner、Mercury Interactive、Mercury Interactive 徽标、Open Test Architecture、Optane、POPs on Demand、ProTune、QuickTest、RapidTest、SiteReliance、SiteRunner、SiteScope、SiteSeer、TestCenter、TestDirector、TestSuite、Topaz、Topaz AIMS、Topaz Business Process Monitor、Topaz Client Monitor、Topaz Console、Topaz Delta、Topaz Diagnostics、Topaz Global Monitor、Topaz Managed Services、Topaz Open DataSource、Topaz Real User Monitor、Topaz WeatherMap、TurboLoad、Twinlook、Visual Testing、Visual Web Display、WebTest、WebTrace、WinRunner 和 XRunner 是 Mercury Interactive Corporation 或其完全控股的 Mercury Interactive (Israel) Ltd. 在美国和/或其他国家(地区)的商标或注册商标。
测试管理工具MercuryQualityCenter9.0使用说明书

测试管理工具Mercury Quality Center 9.0使用说明编制人:航编制日期:2010-03-01版本号:1.01目录1目录 (3)2概述 (4)3安装 (5)4站点管理 (6)4.1站点项目 (6)4.2站点用户 (10)4.3站点连接 (11)4.4数据库服务器 (12)4.5站点配置 (12)5登录页面 (13)6自定义设置 (14)6.1设置项目用户和权限组 (15)6.2添加自定义字段 (18)6.3添加查找列表 (20)7测试需求 (22)7.1测试需求简介 (22)7.2需求的建立 (22)7.3需求与用例的关联 (24)7.4需求与缺陷的关联 (25)7.5需求的覆盖 (27)8测试计划 (29)8.1测试计划简介 (29)8.2测试用例的建立 (29)8.2.1用例的建立和命名 (29)8.2.2详细信息 (30)8.2.3测试步骤 (31)8.3测试数据及参数化 (33)8.4与需求的关联 (35)8.5的缺陷 (36)9测试实验室 (37)9.1测试实验室简介 (37)9.2测试集的建立 (37)9.3测试集的运行 (38)9.4执行流 (42)10缺陷 (44)10.1Defects简介 (44)10.2缺陷的添加 (44)10.3缺陷的浏览和筛选 (46)11QC MSExcel Addin (47)12缺陷图表和文档生成 (51)12.1缺陷分析 (51)12.2文档生成552概述Quality Center是Mercury Interactive 公司推出的一个基于Web 且支持测试管理的所有必要方面的应用程序。
该软件提供统一、可重复的流程,用于收集需求、计划和安排测试、分析结果并管理缺陷和问题。
组织可使用该软件在较大的应用程序生命周期中实现特定质量流程和过程的数字化。
该软件还支持在IT 团队间进行高水平沟通和协调。
QC的主要功能:1.Quality Center 有助于维护测试的项目数据库,这个数据库涵盖了应用程序功能的各个方面。
美证网络设备产品说明书
The Meraki MX60 is an integrated router, next-generation fi rewall,traffi c shaper, and Internet gateway that is centrally managed over theweb. The MX60 offers an extensive feature set, yet is incredibly easyto deploy and manage. Intuitive web-based administration eliminatesspecialized training and dedicated staff, and cloud-based centralizedmanagement provides seamless multi-site networks, automaticfi rmware upgrades, and much more.Cloud-Based Centralized ManagementManage from one branch to thousands, seamlessly over the webWith Meraki's cloud-based Dashboard, you can easily createnetwork-wide policies, monitor all of your branches, receive e-mailalerts and troubleshoot using real-time diagnostic tools. The MX60'sfi rmware is always up to date, with new features and enhancementsdelivered seamlessly from the cloud. Administrators never have tomanually download software updates or security patches.Cloud-Managed Multi-Service RouterMeraki MX60Next-Generation Firewall and Traffi c ShaperControl applications and users, not just portsThe MX60 features a powerful packet engine that performsdeep packet inspection, stateful fi rewall services, 1:1 NAT, DMZ,and layer 7 traffi c shaping and application fi rewall at very highspeed. Additional features include network asset discovery, useridentifi cation and fi ngerprinting, user and device quarantine,application-aware traffi c analysis, and per-application QoS.Advanced Web SecurityUse Cases> Cloud-Managed Multi-Service RouterBuild an easy to deploy and reliable network that doesn't requirecostly solutions like MPLS tunnels. Deploy the MX60 in mission-critical networks using link failover. Simplify access and visibilitythrough cloud-managed site-to-site VPN. Secure remote networksusing advanced security features like anti-virus fi ltering. Optimizenetwork costs using traffi c shaping.> Inline Traffi c Shaper and Network MonitorThe MX60 is equally indispensable when deployed behindan existing fi rewall and router. Optimize network traffi c withapplication-aware (layer 7) traffi c shaping and fi rewall. Prioritizemission critical applications or VoIP traffi c while setting limits onrecreational traffi c, e.g. peer-to-peer applications. Discover all clientdevices, identify users and monitor printers.> Ordering InformationThe Meraki MX60 is available in both Enterprise Edition andAdvanced Security Edition licenses:• MX60-HW: Meraki MX60 Cloud Managed Router• LIC-MX60-ENT-1YR: Meraki MX60, 1 year Enterprise LicenseSpecifi cations> Performance• Stateful fi rewall throughput: 100 Mbps• Advanced security throughput: 20 Mbps• Maximum site-to-site VPN sessions: 20• Maximum VLANs: 4• Recommended for: Small Branches(10to20Users)> Network Services• Application-level (L7) traffi c analysis and shaping• Stateful fi rewall, 1:1 NAT, DMZ• Multiple WAN IP, PPPoE, NAT and DHCP• User and device quarantine> Monitoring and Management• Web based management and confi guration• Throughput, connectivity monitoring and alerts• Network asset discovery and user identifi cation• Built-in network-wide reporting, monitoring and alerts• Centralized policy management• Real-time diagnostic and troubleshooting over the web• Automatic fi rmware upgrades and security patches• Searchable network-wide event logs> Advanced Security Services*• Next generation application-level (L7) fi rewall• Site-to-site (IPsec) VPN• Content Filtering• Anti-Virus• Anti-Phishing*Meraki Advanced Security License required> Interfaces• WAN interfaces: 1 × 1000 Base-T Ethernet• LAN interfaces: 4 × 1000 Base-T Ethernet• USB interfaces: 1 × USB 2.0> Power• 12V / 1Amp power supply。
霍比路由器配置指南说明书
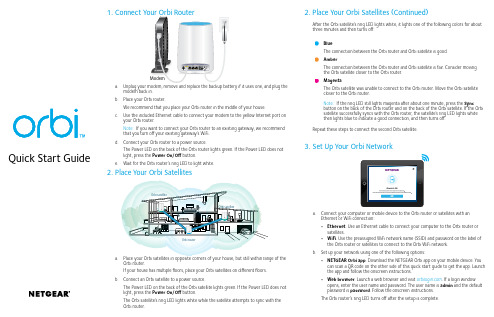
a. Place your Orbi satellites in opposite corners of your house, but still within range of theOrbi router.If your house has multiple floors, place your Orbi satellites on different floors.b. Connect an Orbi satellite to a power source.The Power LED on the back of the Orbi satellite lights green. If the Power LED does not light, press the Power On/Off button.The Orbi satellite’s ring LED lights white while the satellite attempts to sync with the Orbi router.2. Place Your Orbi Satellites (Continued)Orbi router Orbi satelliteOrbi satellite After the Orbi satellite’s ring LED lights white, it lights one of the following colors for about three minutes and then turns off:BlueThe connection between the Orbi router and Orbi satellite is good.AmberThe connection between the Orbi router and Orbi satellite is fair. Consider movingthe Orbi satellite closer to the Orbi router.MagentaThe Orbi satellite was unable to connect to the Orbi router. Move the Orbi satellitecloser to the Orbi router.Note: If the ring LED still lights magenta after about one minute, press the Syncbutton on the back of the Orbi router and on the back of the Orbi satellite. If the Orbi satellite successfully syncs with the Orbi router, the satellite’s ring LED lights whitethen lights blue to indicate a good connection, and then turns off.a. Connect your computer or mobile device to the Orbi router or satellites with anEthernet or WiFi connection:• Ethernet. Use an Ethernet cable to connect your computer to the Orbi router or satellites.• WiFi. Use the preassigned WiFi network name (SSID) and password on the label of the Orbi router or satellites to connect to the Orbi WiFi network.b. Set up your network using one of the following options:• NETGEAR Orbi app. Download the NETGEAR Orbi app on your mobile device. You can scan a QR code on the other side of this quick start guide to get the app. Launch the app and follow the onscreen instructions.• Web browser. Launch a web browser and visit . If a login window opens, enter the user name and password. The user name is admin and the defaultpassword is password. Follow the onscreen instructions.The Orbi router’s ring LED turns off after the setup is complete.SupportThank you for purchasing this NETGEAR product. You can visit/support to register your product, get help, access the latest downloads and user manuals, and join our community. We recommend that you use only official NETGEAR support resources.For the current EU Declaration of Conformity, visit/app/answers/detail/a_id/11621/.For regulatory compliance information, visit /about/regulatory/.See the regulatory compliance document before connecting the power supply.NETGEAR INTL LTDBuilding 3, University Technology CentreCurraheen Road, Cork, IrelandNETGEAR, Inc.350 East Plumeria Drive San Jose, CA 95134, USA© NETGEAR, Inc., NETGEAR and the NETGEAR Logo are trademarks of NETGEAR, Inc. Any non‑NETGEAR trademarks are used for reference purposes only.December 2016Orbi router (Model RBR50)Orbi satellites (2)(Model RBS50)Ethernet cablePower adapters (3)Ring LED (not shown in image)Sync button (also used for WPS connection)Internet port (the Orbi satellite does not include an Internet port)Ethernet ports2134128218USB portPower On/Off button and Power LED DC Power connector Reset button5678Download the NETGEAR Orbi AppUse the NETGEAR Orbi app to set up and manage your network. To find the app, scan one of the following QR codes or search for NETGEAR Orbi in the Apple App Store or Google Play Store.。
SiteScope使用手册
SiteScope 使用手册网络在现今的企业组织中扮演着越来越重要的角色,公司经营者或是网络的管理人员,要确保公司网站或网络应用系统能够24×7正常顺畅的运作,Mercury SiteScope提供了一个能符合低成本又可快速全面监控应用系统的解决方案,以保障网络系统的正常运作。
本文详细介绍SiteScope的功能,希望对大家有所帮助。
SiteScope简介 (2)SiteScope特性 (3)SiteScope基本结构图 (3)SiteScope 软硬件需求 (4)SiteScope安装注册 (4)SiteScope配置 (6)导航条 (8)Multi-view (9)Manage Monitors and Groups (10)Browse (11)Remote UNIX/NT (12)Tools (13)Progress (13)Alerts (14)Reports (17)Quick Report (18)Preference (20)Users (21)Configure file (23)常见问题: (24)1.各种MONITOR的告警值自定义: (24)2.连接不到被监视的服务器: (26)3.更改服务器密码后,连接不到被监视的服务器: (27)SiteScope简介SiteScope是一个监控您企业网络系统的一个非常便利有效的工具。
它不需一小时即可安装使用,大大节省了您的人力成本。
SiteScope 监控即时的系统运作,只需短短数分钟,您便可完成下载、安装并执行您的监控作业,多元化的监控功能 -URL 的执行、网络、应用系统等超过 72 种的监控方式以及自动化系统管理与复原作业,是具高度扩充性的系统中心监控系统,而其优异的产品特色包括:弹性的警示系统、资料库传输装置、监控设定范本、易於使用的监控实例范本..等等。
让企业预先发现、确认并解决问题,以避免影响到使用者,可立即显示监控结果,并让企业提高应用系统的投资回报率!!Mercury SiteScope是一种为确保分布式IT基础部件的可用性和性能的无代理的监视解决方案。
连接新泽西的生态(CHANJ)网络查看器快速指南说明书
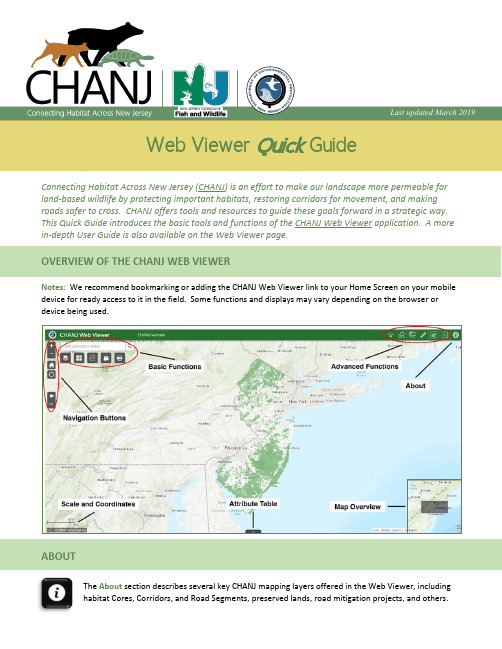
Web Viewer Quick GuideConnecting Habitat Across New Jersey (CHANJ) is an effort to make our landscape more permeable for land-based wildlife by protecting important habitats, restoring corridors for movement, and making roads safer to cross. CHANJ offers tools and resources to guide these goals forward in a strategic way. This Quick Guide introduces the basic tools and functions of the CHANJ Web Viewer application. A more in-depth User Guide is also available on the Web Viewer page. OVERVIEW OF THE CHANJ WEB VIEWERNotes: We recommend bookmarking or adding the CHANJ Web Viewer link to your Home Screen on your mobile device for ready access to it in the field. Some functions and displays may vary depending on the browser or device being used.ABOUTThe About section describes several key CHANJ mapping layers offered in the Web Viewer, includinghabitat Cores, Corridors, and Road Segments, preserved lands, road mitigation projects, and others.Last updated March 2019BASIC FUNCTIONSFind locations using the search bar above the Basic Functions buttons.Users can search by addresses or coordinates to zoom to a location.The Basemap Gallery includes several background maps to choose from to customize the map display,such as aerial imagery, street maps, and topography.Use the Layer List to see and select (or un-select) the various layers that can appear on your map. Inaddition to the key CHANJ mapping, other layers include aquatic features like vernal pools andstreams, parcel boundaries, municipal and county lines, watersheds, several aerial imagery options,and more. Check the box beside each layer you’d like to appear. Use the ••• icon to refine thedisplay of a given layer, such as its transparency or visibility range.The Legend displays the names and symbology of layers currently visible on the map.Add Data allows you to add other data layers to the map from the following sources:Search: Search by keyword for existing data sources.URL: Enter the URL of a known data source.File: Add data locally from your device in an accepted file format.Print brings up print options for the current map display, such as layout, format, and additionaloptions under Advanced, such as extent, size, and print quality. The map can also be saved to a file. NAVIGATION BUTTONSNavigation Buttons control the location and extent of the map display. To move or pan the map, simply click and drag anywhere on the map display.Zoom in and out of the map view by clicking the plus (+) and minus (-) symbols, respectively. (You canalso zoom in and out using the wheel on your mouse.)Clicking the Home icon will return the map display to its default view, zoomed out to show the entirestate of NJ. Your chosen basemap and any layers you’ve selected will still be active.Clicking the My Location icon will zoom and center the map display on your current location, if using alocation-enabled device. This button is especially handy in the field, to quickly see how a parcel of land or stretch of road you’re on fits within NJ’s connectivity puzzle.Go back to a previous map view using the previous and next extent arrow buttons. These buttons areuseful if you’ve zoomed to a new map scale (or accidentally panned away from your area of interest)and want to return to a previous view or go back and forth between different views.。
CPE安装及使用说明.

CPE安装及使用客户端CPE夹具安装步骤示意图1、首先打开产品包装箱,可以看到产品主设备,电源适配器,POE合路器,夹具,螺丝;先把夹具按下图,首先如图把夹具简单的组装好,(圈环、u型夹具钢板、方形小钢块、5号螺丝和垫片各两个)2、按如下把夹夹具两边的活动螺丝卡入设备背部的两条槽孔中,如下图所示:卡入后,调试到适宜的位置拧紧夹具两边的螺丝固定夹具位置即可;3、安装设备时根据所需安装杆的大小调整夹具圈环的大小。
(拧圈环上的一字螺丝)安装成功后如下图所示:下图为产品侧面图:5、电源和POE合路器连接如下图所示:一、使用说明1、系统登录请先将本机IP设置为192.168.1.x(2-254)网段:(图1.1:TCP/IP协议设置)打开IE浏览器,在地址栏输入http://192.168.1.250/(图1.2:登录界面)输入默认用户名:admin,默认密码:admin,点击“登录”,进入WEB管理初始界面;(图1.3:系统状态)这里可以查看系统的基本信息,运行状态,运行时间,无线配置信息等;在Client 模式下,如果设备已经连接上热点AP,则在“无线配置”里面的“状态”显示“Connected”,如果没有连接上,则显示“Scanning”,这里判断设备间是否连接成功的标志。
2、操作模式设备支持两种操作模式: 桥接, 无线ISP, 系统默认是“桥接”模式,普通用户推荐使用桥接模式,设备相当于一个无线终端。
(图2.1:操作模式设置)3、无线设置该菜单项设置无线各项相关参数。
3.1 基本设置该页面设置无线工作在不同模式下相关参数。
(图3.1:无线基本设置)禁用无线网络接口: 勾选将关闭无线功能.频带: 可选如下模式2.4G Hz(B):11b模式,最高速率是11Mbps2.4G Hz (G):11g模式,最高速率是54 Mbps2.4G Hz(N):11n模式,最高速率是150 Mbps(1T1R)300 Mbps(2T2R)2.4G Hz (B+G):11b/g模式,最高速率分别是11 Mbps和54 Mbps2.4G Hz(G+N):11g/n模式,最高速率分别是54 Mbps和150 Mbps /300 Mbps2.4G Hz(B+G+N):11b/g/n模式,最高速率分别是11 Mbps,54 Mbps,150Mbps /300 Mbps。
锐捷路由器配置手册之欧阳美创编

锐捷路由器配置手册目录:路由器基础:控制台远程登录其它配置方法命令模式命令模式的切换CLI命令的编辑技巧常见CLI错误提示使用 no 和 default 选项查看配置文件保存配置文件删除配置文件备份配置文件文件系统概述文件操作目录操作搭建环境用TFTP传输文件用Xmodem传输文件ROM监控模式路由器的基本配置:配置控制台口令配置远程登录口令配置特权口令以太网接口的一般配置配置多个IP地址配置MAC地址接口信息的查看同步串行口的一般配置配置反转时钟配置链路封装协议配置线路编解码方式忽略DCD信号接口信息的查看回环接口的配置接口信息的查看配置路由:配置静态路由配置默认路由配置缺省网络配置可被动态路由覆盖的静态路由RIP协议的一般配置RIP协议参数的配置OSPF协议的一般配置广域网协议配置:配置接口的HDLC封装配置keepalive时间配置接口的PPP封装配置PPP协商超时时间配置CHAP服务端配置CHAP客户端配置双向CHAP验证配置PAP服务端配置PAP客户端配置双向PAP验证点到点的帧中继配置NAT的配置:静态NAT的配置静态NAPT的配置动态NAT的配置动态NAPT的配置接口动态NAPT的配置外部源地址的静态NAT配置外部源地址的动态NAT配置DHCP的配置:启用DHCP服务器配置DHCP地址池配置选项访问控制列表的配置:标准ACLs的语句规则配置标号的标准ACLs配置命名的标准ACLs扩展ACLs的语句规则配置标号的扩展ACLs配置命名的扩展ACLsMAC扩展ACLs的语句规则配置标号的MAC扩展ACLs配置命名的MAC扩展ACLsExpert扩展ACLs的语句规则配置标号的Expert扩展ACLs配置命名的Expert扩展ACLs带序号的ACLs带时间区的ACLs第一部分路由器基础:路由器的几种配置方法控制台用一台计算机作为控制台和网络设备相连,通过计算机对网络设备进行配置。
1、硬件连接:把Console线一端连接在计算机的串行口上,另一端连接在网络设备的Console口上。
水星路由器设置说明 完全版(带图)之欧阳科创编

1、把路由器连接到外网时间:2021.02.05 创作:欧阳科步骤一:连接好线路在没有路由器之前,我们是通过电脑直接连接宽带来上网的,那么现在要使用路由器共享宽带上网,当然首先要用路由器来直接连接宽带了。
因此我们要做的第一步工作就是连接线路,把前端宽带线连到路由器(WAN口)上,然后把电脑也连接到路由器上(LAN口),如下图:注意事项l 如果您的宽带是直接网线入户,直接把前端网线插到路由器WAN口,电脑通过网线连接到LAN口即可。
物理接线实物图插上电之后,路由器正常工作后系统指示灯(SYS灯或者是小齿轮图标)是闪烁的。
线路连好后,路由器的WAN口和有线连接电脑的LAN口对应的指示灯都会常亮或闪烁,如果相应端口的指示灯不亮或电脑的网卡图标显示红色的叉,则表明线路连接有问题,尝试检查下网线连接或换根网线试试。
请查看:网线接上了指示灯却不亮怎么办?注意事项l 宽带线一定要连接到路由器的WAN口。
WAN口与另外四个端口一般颜色有所不同,物理上也有隔开,电脑连接到编号1/2/3/4的任意一个端口。
请小心确认,如果线路连错了,肯定上不了网。
<<返回到目录步骤二:配置好电脑电脑和路由器需要进行通讯,因此首先要对电脑进行设置。
对于绝大多数的电脑来说,默认不需要做任何设置,您可以跳过此步直接进行步骤三,若在步骤三无法登录到路由器管理界面时,可返回此处配置电脑的IP地址。
Windows 2000/XP系统:双击电脑桌面右下角的本地连接"小电脑"图标(若电脑右下角没有网卡图标,进入方法为"开始--控制面板--网络连接--双击本地连接"),然后按照下图进行配置即可。
Windows 7/Vista系统:点击桌面右下角的网络连接图标,依次点击"打开网络和共享中心--更改适配器设置/管理网络连接--右击本地连接--属性"(或者点击"开始按钮--控制面板--网络和Internet--网络和共享中心--更改适配器设置/管理网络连接--右击本地连接--属性"),然后按照下图配置即可。
崭适通讯室外无线AP说明书
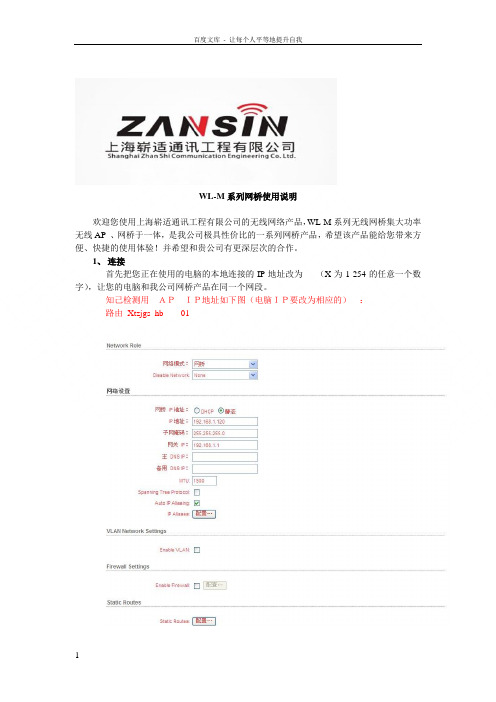
WL-M系列网桥使用说明欢迎您使用上海崭适通讯工程有限公司的无线网络产品,WL-M系列无线网桥集大功率无线AP 、网桥于一体,是我公司极具性价比的一系列网桥产品,希望该产品能给您带来方便、快捷的使用体验!并希望和贵公司有更深层次的合作。
1、连接首先把您正在使用的电脑的本地连接的IP地址改为(X为1-254的任意一个数字),让您的电脑和我公司网桥产品在同一个网段。
知己检测用APIP地址如下图(电脑IP要改为相应的):路由Xtzjgs_hb 01我公司网桥随机附送的电源为48V或者24V/15V POE 一体化电源,电源一端为电源线接口,另一端有两个RJ45网线接口,先把电源通电,电源指示灯亮起,两个RJ45网线接口,Data in(LAN)连接您正在使用的电脑或者跟电脑连接的交换机,Data&Power Out(POE)接口连接我公司的无线网桥或者无线AP。
此时,与Data in(LAN)接口连接的电脑的本地连接应该显示正在连接或者已连接的状态电源模块根据机器不同可能稍有变化AP复位:设备通电的情况下按住红色按钮(防水盒下方)30秒,30秒后把电源断开10秒后在重新连接到电脑来,复位后IP 静态的、登陆打开IE 浏览器,在地址栏输入网桥的IP地址,默认为用户名:ubnt 密码:ubnt,即可登陆或者用户名:admin密码:admin3、功能介绍登陆后界面如下:第一个页面为状态显示,该页面显示当前连接状态,包括信号强度,速率,MAC地址,工作信道,等等信息,另外还有几个有用的工具软件,在TOOLS选项里。
信号搜索工具WIRELESS菜单Xtzjgs_hb 01Wireless Mode :无线模式选择可选STA TION (客户端网桥)、STATION WDS(客户端WDS)、Access Point(AP模式)、Access Point WDS(AP WDS模式).,一对网桥组网应该选择(AP 模式对应客户端网桥模式)或者(AP WDS 对应STATION WDS 模式),如果两端都设置成AP WDS模式,两端连接后,还都能发射信号。
- 1、下载文档前请自行甄别文档内容的完整性,平台不提供额外的编辑、内容补充、找答案等附加服务。
- 2、"仅部分预览"的文档,不可在线预览部分如存在完整性等问题,可反馈申请退款(可完整预览的文档不适用该条件!)。
- 3、如文档侵犯您的权益,请联系客服反馈,我们会尽快为您处理(人工客服工作时间:9:00-18:30)。
【摘要】由于电子商务的蓬勃发展,网络在现今的企业组织中扮演着越来越吃重的角色,公司经营者或是网络的管理人员,一方面要确保公司网站或网络应用系统能够24×7正常顺畅的运作,Mercury SiteScope提供了一个能符合低成本又可快速全面监控应用系统的解决方案,以保障网络系统的正常运作。
本文详细介绍SiteScope的功能,希望大家可以从中获得更多的东西。
【关键词】性能监控,性能测试,Mercury,自动化测试Part I▪SiteScope简介Mercury SiteScope是一种为确保分布式IT基础部件的可用性和性能的无代理的监视解决方案。
这种分布式基础部件包括服务器、操作系统、网络设备、网络服务、应用程序及应用组件。
SiteScope也充当其他Mercury产品(如Mercury BAC, MMS, LoadRunner)基础的监视器。
SiteScope可以为您提供您需要的基础部件的实时信息,提供问题的通知,以便能在问题变棘手之前及时解决。
SiteScope是工业界第一种提供这种无代理式的监视解决方案。
已经有超过5,000家公司从中获得利益。
与基于高管理费,维护费和劳动成本的代理式监视方法不同,SiteScope可以从以下方面减低总成本:▪可以采集详细的基础部件的性能数据▪消除在产品系统中运行代理程序带来的额外内存和CPU资源▪通过在一台服务器上集中进行维护来减少维护的总时间和代价▪消除为升级代理程序而使产品系统中断的任何必要▪消除为调谐监视代理程序与共存的其他代理程序所浪费的时间▪通过减少必要的有形的观察产品服务或者等待软件程序分发运行的安装时间▪避免由于不可靠的代理程序引起的系统停工或者交易丢失的可能性▪SiteScope特性Mercury SiteScope是提供无需运行在产品系统上的基础部件监视的软件,也提供Failover (故障转移)能力,支持同时监视大量系统,支持通过SSH的安全连接,能够与其他Mercury 应用管理解决方案的整合。
SiteScope能够监视超过65种危及的健康和性能的特性,如利用率、响应时间、占用率和可用资源等,允许设置阀值(threshold) 在问题产生前发送预制的警告信息。
SiteScope同样也可以专注于Website的监视和管理,使用如URL内容监视,URL序列监视,或者Link 检查等特性。
SiteScope包含了标准的通知方法,如E-mail,SNMP Trap和Pager (呼机,也支持SMS设备) ,还提供附加的Post和DB alerts,并且能够根据问题的严重程度自动产生管理报告并警告不同的人。
SiteScope可以自动执行用户自定义的行为脚本,支持正则表达式。
SiteScope支持Windows、UNIX、Linux操作系统,能够覆盖绝大多数的不同类型的环境。
SiteScope服务程序可独立安装在Windows,UNIX,或者Linux监视服务器上,也可以直接安装在产品服务的系统上。
▪SiteScope基本结构图▪SiteScope 软硬件需求如果您对Mercury SiteScope产品感兴趣,欢迎到Mercury网站下载10天的评估版,也可以访问进行在线的试用评估。
本手册的绝大数内容均可在上测试试用。
本手册将以建立一套系统产品的监视过程为线索,为您展示SiteScope的一些基本功能和常用用法。
▪SiteScope安装注册Mercury SiteScope有多种平台的安装版本,包括for Windows,for Linux等。
Mercury SiteScope安装包内嵌有Apache和JRE,因此无需额外的web server程序。
整个安装过程十分简单,这里就不再介绍了。
当SiteScope安装完毕之后,需要对SiteScope进行产品注册。
所谓注册,就是使用SiteScope所特有的点数系统。
点数的大小取决于您使用的License,它灵活地为客户提供全套的监视器。
每个license提供一批点数,这些点数可以被用在多种服务器和监视器上。
SiteScope监视器类型根据激活他们(监视器)的点数来分类。
对于任何企业部署来说,可测量性是很重要的考量。
点数系统允许公司根据未来预期的增长来提前购买所需要的点数。
这对于SiteScope Web Site和访问这个site没有任何限制。
基于以下两个因素来建立SiteScope监视器的点数:▪您所购买监视器的总点数▪您想使用监视器的类型举例说明:为一个Web页建立一个URL监视器,那么您需要为每个监视器实体支付一个监视器信用点数。
为建立一个Apache服务器监视器,则需要为每个您想要监视的性能度量标准支付一个信用点数。
再举例:一个购买了具有100点数的公司,可以建立10应用监视器,每个监视器有监视5个性能指标(10 X 5 = 50 点),2个URL序列监视器,每个序列有10个处理步骤(2 X 10 = 20 点),和30个1点的网络服务或者系统服务(30 X 1 = 30 点)。
也可以用这100点建立10个应用监视器,每个监视器度量1个指标(10 X 1 = 10点),一个URL序列监视器,每个序列监视器有5步(1 X 5 = 5点),和85个网络服务或者总计85点的系统监视器。
▪SiteScope配置SiteScope主界面主要分为两大功能区域:导航条和主视图区。
导航区主要包括SiteScope Homepage,Alerts,Reports,Health,Preference和Help六大项。
▪导航条3.1.1.Multi-view3.1.2.Manage Monitors and Groups您可以根据采集到的监视数据确定的性能指标的平均值和标准偏差来确定一个固定的性能基线特性。
这个基线一旦确定,error/warning/good条件将根据这个基线来设置。
3.1.3.Browse可根据不同类型的过滤条件快速察看各监视器的状态。
如图所示3.1.4.Remote UNIX/NT添加用于监视的机器。
对于远程的机器在使用Telnet可能会出现无法连接或者超时的情况,可以通过更改配置文件中相关设置对应的值。
有关配置文件部分后面再做介绍。
3.1.5.ToolsSiteScope还额外提供一些不同类型的工具来帮助您建立不同的监视器。
3.1.6.Progress显示出当前SiteScope运行的状态。
图中标明的是当前SiteScope所运行的监视器负载数。
Alerts点击导航条“Alerts”,浏览器将显示SiteScope上已经定义好的alert,若没有定义,您可以根据需要自行定义。
如图所示点击“Add”,点击“Define Alert”,点击“Edit E-mail Preferences”来创建自己的Email信息,以便SiteScope发送alert到设定的Email地址。
所有已定义的alert均被记录,SiteScope允许您通过Alert Report或者Alert Log察看。
Email示例,如图所示。
Reports点击导航条“Reports”,浏览器将显示SiteScope上已经定义好的report,若没有定义,您可以根据需要自行定义。
如图所示点击“Add”,您可以在Report Sections设置不同的内容项以产生符合自身需要的report内容和格式。
如果您希望产生的report自动发送到某人的Email中,那么请在“Send Report by Email”设置好被发送人的Email地址,如果是多个人,请用逗号分隔。
如果您设置了“Report Schedule”,那么SiteScope将定时自动产生Reports。
Quick Report当您点击生成Quick Report时,它将立刻产生。
它只显示文本和图形格式,且不会自动保存。
其它与“Reports”相类似,这里就不再介绍了。
Preference点击导航条“Preference”,浏览器将显示SiteScope site本身的设置项。
也是您首次安装完毕之后,需要首先进行设置的地方。
当您首次安装好SiteScope之后,进入Preference如图所示。
如果您没有license,那么您只有10天的试用期。
填完license并update之后,您将可以看到license的状态,该license 所支持的总点数,以及您可以使用不同类型的监视器,如下图所示(示例)。
Users安装好SiteScope,系统将自动创建两个用户:administrator和user。
且默认使用administrator身份直接登录。
如需要,可自行修改设置。
如图所示Configure file如果您想更为个性化的定制自己的SiteScope,那么您需要更改<SiteScope install path>/SiteScope/groups/master.config中相对应的设置,更改前请先备份!Master.config摘要:…_urlRedirectMax=10_URLRemoteLocationsMax=6_urlRemoteRequestMax=4_URLSequenceMonitorIgnoreHTMLComments=_URLSequenceMonitorSteps=20_urlUnixSSL=_URLUserAgent=Mozilla/4.0 (compatible; MSIE 4.01; Windows NT)_userRedirectFile=_userReportIndexHTML=_userURL=http://192.168.0.4:8888/SiteScope/userhtml/SiteScope.html_useThreadPool=yes_verifySleepDuration=5000举例说明,如何删除Email Alert中的SiteScope server的IP信息?首先,您找到master.config文件,用文本编辑器打开之,然后添加一行参数:_hideServerInSubject=true保存后,重新启动SiteScope服务,即可生效。
