DS_YSUMA00-341A 优胜USB串口转换器说明书
USB串行转换器说明书
USB Serial Converter USB Serial Converter20116.0520Rev. 1.0.0.000Rev. 11Contents1.1.Introduction Introduction (2)1-1. Overview.............................................................................. 2 1-2. Package Contents................................................................ 2 1-3. System Requirements and Restrictions.............................. 2 1-4. DB9(RS-232C) connector Pin Assignment..........................32.I nstallation on nstallation on Windows PC Windows PC (4)2-1. Installation on Windows 10/8.1/8/7/VistaServer2012 R2/Server2012/Server2008 R2/Server2008........ 4 2-2. Confirmation........................................................................ 8 2-3. Uninstallation on Windows 10/8.1/8/7/VistaServer2012 R2/Server2012/Server2008 R2/Server2008 (9)3. . Sp Sp Specification ecification ecifications s (11)*All trademarks and logos are the properties of their respective holders. *The specifications and pictures are subject to change without notice.21.1.Introduction Introduction Introduction1-1.1. Overview Overview Overview● REX-USB60F is a USB to serial converter.Compatible with Universal Serial Bus specifications Rev. 1.1. ● Up to 230.4Kbps data transfer rate. ● Standard USB (A type Male) Easy to connect PC.●Virtual COM port driverREX-USB60F can be used with FTDI’s VCP drivers to provide a COM port on a PC.●LED indicatorsREX-USB60F has “PWR/TXD/RXD” LED indicators for monitoring communication status.PWR: power / TXD: transmit / RXD: receive1-2. Package C Package Contents ontents ontentsThis product is shipped with the following items: ● REX-USB60F USB Serial Converter ● Setup CD-ROM. ● Installation Guide● Warranty Card in Japanese1-3. System Requirements and Restrictions System Requirements and RestrictionsHost machine●Windows PC with free Standard USB A type portOperating System● Windows 10, Windows 8.1, Windows 8, Windows7, Windows Vista● Windows Server 2012 R2, Windows Server 2012, Windows Server 2008 R2, Windows Server 200831-4. DB9(DB9(RS RS RS--232C 232C)) connector connector Pin Assignment Pin Assignment Pin AssignmentThe pin assignment of the connector is below:This DB9pin connector is compatible with ANSI/EIA/TIA-574 specifications.Signal Name Name Direction Direction DTE DTE – DCE. DCE.Meaning Meaning1 DCD <--- Data Carrier Detected2 RXD <--- Received Data3 TXD ---> Transmitted Data4 DTR ---> Data Terminal Ready5 GND - Signal Ground6 DSR <--- Data Set Ready7 RTS ---> Request to Send8 CTS <--- Clear to Send 9RI<---Ring Indicator1 2 3 4 56 7 8 942. Installation Installation on on on Windows PC Windows PC Windows PCPlease make sure that the Windows PC meets the following specifications: • USB port is Standard-USB A • Windows version is Vista or later2-1.1. Installation Installation on Windows 10/8.1/8/7/Vista/on Windows 10/8.1/8/7/Vista/on Windows 10/8.1/8/7/Vista/Server 2012Server 2012 R2/Server2012R2/Server2012/Server 2008 R2/ Server 2008/Server 2008 R2/ Server 2008/Server 2008 R2/ Server 2008Before connecting the REX-USB60F USB serial converter to a USB port, follow the instructions below:1) Insert the setup CD-ROM for the REX-USB60F into your CD-ROM drive. Navigate to the [Setup] folder on the CD that contains the USB60F_Setup.exe Double click USB60F_Setup.exe.2) A “User Account Control” dialog box may appear. Click [Yes] to proceed with the installation.3) The InstallShield Wizard for RATOC REX-USB60F Installer will start. Click [Next] to proceed with the installation.4) A “RATOC REX-USB60F Installer“ will start.Click [Install] to proceed with the installation.55) A “Windows Security” dialog box will appear.Click [Install] to proceed with the installation.6) A “Windows Security” dialog box will appear again. Click [Install] to proceed with the installation.67) The screen will automatically complete and then change to the one below:Click [Finish]. The “RATOC REX-USB60F Installer” has finished. Connect the REX-USB60F to a spare USB port on your PC.The necessary drivers will be found.It will start installation and automatically finish.Proceed to (2-2) Confirmation of setting REX-USB60F to confirm the installation has finished properly.72-2.ConfirmationConfirmationFor confirming the installation has finished properly.Open the Device Manager and select “View > Devices by Connection”. Under the “Ports(COM/LPT)”category, the label “USB Serial Port” with an additional COM port will appear.If the label “USB Serial Port” shows without yellow “!” mark, the installation is done properly.892-3. Uninstallation on Wind Uninstallation on Windo o ws 10/8.1/8/7/Vista ws 10/8.1/8/7/Vista Server 2012Server 2012 R2/R2/Server 2012/S Server 2012/S Server 2012/Server 2008erver 2008erver 2008 R2/Server 2008R2/Server 2008Open the [Program and function] at the [Control Panel].Select the [RATOC REX-USB60F Installer] and click [Uninstall].The InstallShield Wizard for RATOC REX-USB60F Installer will start.The following dialog will appear. Click [Yes] to proceed with the uninstallation.The screen will automatically complete and then change to the one below:Click [Finish] to finish with the uninstallation.103. SpecificationSpecifications sProduct Name REX-USB60FSerial Input/Output level RS-232C levelUSB Specification USB(Universal Serial Bus) Specifications Rev. 1.1 Connector USB :Standard-USB Type A maleRS-232C:D-Sub9 male (with anchor [#4-40]) Number of I/O ports 1 portUnit Dimensions 3.35[L] x 1.1[W] x 0.43[H] in (85[L] x 28[W] x 11[H] mm) Cable Length Approx. 2.83 ft (85 cm)Weight 0.194 oz (55 g)Data transfer mode Asynchronous (Start stop synchronization)Data transfer Rate (Baud) 300/600/1,200/2,400/4,800/9,600/19,200/38,40057,600/115,200/230,400 bpsTransmit Distance Within 50ft (15m)Power Voltage DC+5V (Powered for USB Bus)Power Consumption Average: 36mA(5V) Max.: 60mA(5V)Serial Parameter Data bit: 7/8 Start bit:1 Stop bit: 1/2Parity bit: even/odd/noneRS-232C connector D-SUB9PIN RS-232C connector MaleANSI/EIA/TIA-574LED Indicators PWR:Power LEDIf 5V power from USB bus is properly suppliedfrom USB bus, this indicator LED will be on.TXD:Transmit data indicator (Host to Device)RXD:Receive data indicator (Device to Host) Operating Environment Temperature: 32ºF to 122ºF (0ºC to 50ºC)Humidity: 10 to 90% (non condensing)Storage Environment Temperature: -4ºF to 149ºF (-20ºC to 65ºC)Humidity: 10 to 90%(non condensing)Note:1.Do not remove while the application is communicating. System will beunstable.2.Do not operate to suspend while the application is communicating.System will be unable to resume properly.3.This product does not support the serial mouse for connecting to RS-232Cport.1112。
USB多功能电源适配器P3使用说明书
重要说明: ★请不要将本机放置或靠近暴露的火焰源,如点燃的蜡烛。并避免
长期置于高温、潮湿的环境中,避免曝晒、雨淋、水滴,否则将 严重影响产品的正常使用寿命或导致产品故障。 ★充电时,为保证正常工作,请务必正确装入两节同规格的电池。 ★长时间不使用本机器时,请将电池取出。 ★请避免将两节不同规格或不同品类的电池一起使用。
主要特点: ●携带方便 ●标准USB插座输出 ●自动短路保护,自动过载保护 ●内置镍氢电池智能充电电路 ●内置高效电压转换电路 ●LED状态指示
输出指示灯 灯亮:表示USB插座有电压输出
USB输出接口 接入配套的USB连接线
插头 可折叠
拨动开关 开:电池可对外充电 关:电池不对外充电
电池仓 ※
电池充电状态指示 规律闪烁:正在充电 无规律闪烁:电池错误 常亮:充电完成
UAB端口供电时, 负载过重,请减轻输出负载(如调低音箱的音量)
输出不稳定
电池电量低,请更换电池
规格参数
市电输入 USB输出 电池输入 USB输出 电池充电电流 外型尺寸 重量
输入 输出 输入 输出
100-240~,50/60Hz,0.15A
两节5号(AA)电池,两节7号(AAA)电池 (输入1.5VX2)
可充电电池※ 2节5号(AA)或 2节7号(AAA)
电池盖 装入电池后 请盖好
※ 当装入两节不同规格的可充电电池时,将不能保证充电饱和;只 装入一节电池时无法充电.
※※当装入两节不可充电电池时,指示灯将无规律闪烁或常亮,此时 请取出电池.
携带使用与功能说明
以下图示功能均指没有插入市电的情况下:
标准USB接口输出(红色指示灯亮) 连接需要充电的电子设备时,开始充电
P3
戴尔微型USB加密狗用户手册说明书
Dongle Dell Micro-USB Para datos y cargaManual del usuarioNOTA: una NOTA indica información importante que le ayuda a hacerun mejor uso de su ordenador.PRECAUCIÓN: una PRECAUCIÓN indica un daño potencial al hardwareo pérdida de datos si no sigue las instrucciones.Copyright © 2014 Dell Inc. Todos los derechos reservados. Este producto está protegido por las leyes de propiedad intelectual y derechos de copia de los EE.UU. e internacionales. Dell™ y el logotipo Dell son marcas de Dell Inc. en los Estados Unidos y/u otras jurisdicciones. Todas las marcas y nombres mencionados aquí pueden ser marcas de sus respectivas compañías.2014 – 06 Rev. A00Introducción 3IntroducciónEl dongle Dell Micro-USB le permite conectar dispositivos USB comounidades USB, discos duros externos, teclados, ratones y otros a su tablet. También le permite cargar su tablet mientras los dispositivos USB están conectados.Puede conectar simultáneamente múltiples dispositivos a la tablet usando un hub USB, Dependiendo del tipo y número de dispositivos USB, puede que necesite un hub USB alimentado.NOTA: este dongle es compatible con USB 2.0.Conectar el dongleNOTA: el cable de alimentación y el adaptador no se incluyen con el dongle. Utilice el cable y adaptador de alimentación incluidos con su tablet.PRECAUCIÓN: utilice sólo el adaptador de corriente diseñado para su tablet. El uso de adaptadores de alimentación o cables no autorizados podrían dañar seriamente su tablet.1. Conecte el dongle al puerto micro-USB de su tablet.2. Conecte el adaptador de corriente al dongle.3.Conecte un dispositivo USB estándar o un hub USB al dongle.Dongle Micro-USBDispositivo USB o hub USB Cable de alimentación (Micro USB)Fuente de alimentaciónToma de corrienteSolución de problemasProblemas Posibles causas Posibles soluciones Los dispositivos USBdejan de funcionar temporalmenteal conectar o desconectar el adaptador de corriente en el dongle.Esto es algo normal y el dispositivo continuará funcionandoautomáticamente.El disco duro USB no es detectado.El adaptador decorriente no estáconectado al dongle.Conecte el adaptadorde corriente USB aldongle Dell Micro-USB.El cable USB usadopara conectar el discoduro es demasiadolargo o no es estándar.Utilice un cableUSB más corto paraconectar el disco duroal dongle o utilice uncable de más calidad.La unidad que intentautilizar requiere másenergía de la disponiblea través del dongle.Utilice un hubUSB alimentado.PRECAUCIÓN: para evitar pérdida de datos, retire con seguridad los dispositivos de almacenamiento USB antes de desconectarlosdel dongle.4 Introducción。
usb使用说明书

XBR2= 0x40;//交叉开关使能
XBR3= 0x01; // T3连到0.6
P0MDOUT = 0x81;//P0.0及P0.7输出为推挽方式,P0.1~P0.6输出为漏极开路。
P1MDIN= 0xfd;//P1.1输入为模拟输入方式,P1其他位为数字输入方式。
上位机的波形显示采用的是NTGraph控件。选择正确的输出/输入通道后即可点击“试验开始”按钮进行本次采样了,与此同时,“试验开始”按钮将变化为“试验结束”按钮。待采样完成后点击“试验结束”按钮即可。
采样完成后,点击上位机界面的“波形显示”即会显示刚刚采集过的数据。由于本USB数据采集卡采用的是批量传输,故一次传输的数据较多,从而导致无法实线实时波形显示。本系统采用的是将N次采样数据求平均值的方法显示波形。故N不宜过大,建议不大于5次
ADCn(n=0,1)的电压基准电路允许使用多种不同的电压基准配置,可以使用专用的内部电压基准或外部基准。
此外,本系统还使用了C8051F060单片机的ADC2转换测量得到的单体泵工作环境温度。ADC2子系统包括一个9通道的可编程模拟多路选择器(AMUX2),一个可编程增益放大器(PGA0)和一个200ksps,10位分辨率的逐次逼近型寄存器。ADC中集成了跟踪保存电路和可编程窗口检测器。ADC2可以工作在单端方式或差分方式,可以被配置为测量端口1任一引脚的输入或温度传感器的输出。
USB数据采集系统
技术手册
济南润天测试机械有限公司
第一章
本产品是一款主要面向同步高速信号测量的USB2.0总线采集模块。采用新华龙电子公司的C8051F060单片机,基于16位AD转换,采集的数据通过CYPRESS公司的CY68013型USB转换芯片上传给上位机,上位机将采集的数据进行保存,并进行相关数据、波形处理。使采样结果能够简单明了的展示给用户。
Moxa UPort 1200 1400 1600 系列 USB 转串行转换器说明书

UPort1200/1400/1600系列2到16埠RS-232、RS-422/485和RS-232/422/485USB轉串列轉換器特色與優點•高速USB2.0,USB資料傳輸率可達480Mbps•快速資料傳輸,最高傳輸率達921.6Kbps•用於Windows、Linux及macOS的Real COM/TTY驅動程式•Mini-DB9母接頭轉接線端子模組,簡化接線工作•LED指示燈可指示USB與TxD/RxD活動傳輸•2kV光電隔離保護(「-I」型號適用)認證簡介UPort®1200/1400/1600系列的USB轉串列轉換器是對於沒有串列埠的筆記型電腦或是工作站電腦來說是絕佳配件。
對於需要在現場連接不同串列設備或是沒有標準COM埠或DB9接頭獨立介面轉換器的工程師來說,UPort®1200/1400/1600系列是必要的。
UPort®1200/1400/1600系列可將USB轉換成RS-232/422/485。
所有產品皆與傳統串列設備相容,適用於儀器控制與銷售點應用。
規格USB InterfaceSpeed12Mbps,480MbpsUSB Connector USB Type BUSB Standards USB1.1/2.0compliantSerial InterfaceNo.of Ports UPort1200Series:2UPort1400Series:4UPort1600-8Series:8UPort1600-16Series:16Connector DB9maleBaudrate50bps to921.6kbpsData Bits5,6,7,8Stop Bits1,1.5,2Parity None,Even,Odd,Space,MarkFlow Control None,RTS/CTS,XON/XOFFIsolation2kV(I models)Serial Standards UPort1410/1610-8/1610-16:RS-232UPort1250/1250I/1450/1650-8/1650-16:RS-232,RS-422,RS-485Serial SignalsRS-232TxD,RxD,RTS,CTS,DTR,DSR,DCD,GNDRS-422Tx+,Tx-,Rx+,Rx-,GNDRS-485-4w Tx+,Tx-,Rx+,Rx-,GNDRS-485-2w Data+,Data-,GNDSerial Software FeaturesWindows Drivers Windows10(x86/x64)Windows8.1Windows8Windows7Windows MEWindows VistaWindows XPWindows98Windows95Windows Server2019Windows Server2016Windows Server2012R2Windows Server2012Windows Server2008R2Windows Server2008Windows2000Windows NTMac Drivers macOS11.0macOS10.15macOS10.14macOS10.13macOS10.12Linux Drivers Linux kernel5.x,Linux kernel4.x,Linux kernel3.x,Linux kernel2.6.x,Linux kernel2.4.x Power ParametersInput Voltage UPort1250/1410/1450:5VDC1UPort1250I/1400/1600-8Series:12to48VDCUPort1600-16Series:100to240VACInput Current UPort1250:360mA@5VDCUPort1250I:200mA@12VDCUPort1410/1450:260mA@12VDCUPort1450I:360mA@12VDCUPort1610-8/1650-8:580mA@12VDCUPort1600-16Series:220mA@100VACPhysical CharacteristicsHousing MetalDimensions UPort1250/1250I:77x26x111mm(3.03x1.02x4.37in)UPort1410/1450/1450I:204x30x125mm(8.03x1.18x4.92in)UPort1610-8/1650-8:204x44x125mm(8.03x1.73x4.92in)UPort1610-16/1650-16:440x45.5x198.1mm(17.32x1.79x7.80in)Weight UPort1250/1250I:180g(0.40lb)UPort1410/1450/1450I:720g(1.59lb)UPort1610-8/1650-8:835g(1.84lb)UPort1610-16/1650-16:2,475g(5.45lb)1.UPort1410/1450系列:5V適用於USB連接埠電力,12V適用於外部電源轉接器Environmental LimitsStorage Temperature(package included)-20to75°C(-4to167°F)Ambient Relative Humidity5to95%(non-condensing)Operating Temperature UPort1200Models:0to60°C(32to140°F)UPort1400//1600-8/1600-16Models:0to55°C(32to131°F) Standards and CertificationsEMC EN55032/35EMI CISPR32,FCC Part15B Class AEMS IEC61000-4-2ESD:Contact:4kV;Air:8kVIEC61000-4-3RS:80MHz to1GHz:3V/mIEC61000-4-4EFT:Power:1kVIEC61000-4-5Surge:Power:1kVIEC61000-4-6CS:150kHz to80MHz:3V/mIEC61000-4-8PFMFSafety UPort1200/1600-16models:UL60950-1UPort1400/1600-8models:UL/IEC62368-1DeclarationGreen Product RoHS,CRoHS,WEEEMTBFTime UPort1250/1250I:563,179hrsUPort1410:394,441hrsUPort1450/1450I:546,770hrsUPort1610-8:208,413hrsUPort1650-8:186,567hrsUPort1610-16:138,704hrsUPort1650-16:120,001hrsStandards UPort1250/1250I/1410/1450/1450I:Telcordia(Bellcore)StandardUPort1610-8/1650-8/1610-16/1650-16:MIL-HDBK-217F WarrantyWarranty Period5yearsDetails See /tw/warrantyPackage ContentsDevice1x UPort1200/1400/1600Series USB-to-serial converterCable1x USB type A male to USB type B maleConnectors1x Mini DB9F-to-TB(UPort1250/1450/1650Series)Power Supply1x power adapter,universal(UPort1250I/1450/1450I/1600-8)1x power cord(UPort1600-16)Installation Kit1x rack-mounting ear(UPort1600-16Series)Documentation1x quick installation guide1x warranty card尺寸UPort1250UPort1250IUPort1410/1450UPort1450IUPort1610–8/1650–8UPort1610–16/1650–16訂購資訊Model Name USB Interface Serial Standards No.of Serial Ports Isolation Housing Material Operating Temp. UPort1250USB2.0RS-232/422/4852–Metal0to55°C UPort1250I USB2.0RS-232/422/48522kV Metal0to55°C UPort1410USB2.0RS-2324–Metal0to55°C UPort1450USB2.0RS-232/422/4854–Metal0to55°C UPort1450I USB2.0RS-232/422/48542kV Metal0to55°C UPort1610-8USB2.0RS-2328–Metal0to55°C UPort1650-8USB2.0RS-232/422/4858–Metal0to55°C UPort1610-16USB2.0RS-23216–Metal0to55°C UPort1650-16USB2.0RS-232/422/48516–Metal0to55°C 配件(選購)CablesCBL-USBA/B-100USB Type A to USB Type B cable,1mCN2007010-pin RJ45to DB9female serial cableNP21101DB25male to DB9female cable for RS-232transmission,30cmCBL-F9M9-20DB9female to DB9male serial cable,20cmCBL-F9M9-150DB9female to DB9male serial cable,1.5mCBL-RJ45SF9-1508-pin RJ45to DB9female serial cable with shielding,1.5mConnectorsMini DB9F-to-TB DB9female to terminal block connectorADP-RJ458P-DB9F DB9female to RJ45connectorA-ADP-RJ458P-DB9F-ABC01DB9female to RJ45connector for the ABC-01SeriesMounting KitsDK-UP1200DIN rail(25x48.3mm)with2screws(FMS M3X6)Applicable Models:UPort1250UPort1250IDK-UP1400DIN-rail/wall-mounting kit,2plates,6screws,and2DIN-rail plates,4screwsApplicable Models:UPort1410UPort1450UPort1450IUPort1610-8UPort1650-8DIN-Rail Mounting KitsDK-UP-14168DIN-rail kit with2plates(89x19mm),6screws(FMS M3x5mm)for the UPort1400(V1.5.0and after)and1600-8(V1.4.0and after)modelsApplicable Models:UPort1410UPort1450UPort1450IUPort1610-8UPort1650-8Wall-Mounting KitsWK-35-02Wall-mounting kit with2plates(35x24x1.2mm)and6screwsApplicable Models:UPort1250UPort1250IWK-35-01Wall-mounting kit with2plates(35x44x2.5mm)and6screwsApplicable Models:UPort1410UPort1450UPort1450IUPort1610-8UPort1650-8WK-UP-14168Wall-mounting kit with2plates(35x44mm),6screws(FMS M3x4mm)for the UPort1400and1600-8modelsApplicable Models:UPort1410UPort1450UPort1450IUPort1610-8UPort1650-8Rack-Mounting KitsWK-45-01Rack-mounting kit,2L-shaped plates,6screws,45x57x2.5mmApplicable Models:UPort1610-16UPort1650-16Power AdaptersPWR-12150-WP-S4PWR-12150-WP-S4Applicable Models:UPort1250UPort1250IUPort1410UPort1450UPort1450IUPort1610-8UPort1650-8Power CordsPWC-C13EU-3B-183Power cord with Continental Europe(EU)plug,1.83mApplicable Models:UPort1610-16UPort1650-16PWC-C13CN-3B-183Power cord with three-prong China(CN)plug,1.83mApplicable Models:UPort1610-16UPort1650-16PWC-C13JP-3B-183Power cord with Japan(JP)plug,7A/125V,1.83mApplicable Models:UPort1610-16UPort1650-16PWC-C13US-3B-183Power cord with United States(US)plug,1.83mApplicable Models:UPort1610-16UPort1650-16PWC-C13UK-3B-183Power cord with United Kingdom(UK)plug,1.83mApplicable Models:UPort1610-16UPort1650-16PWC-C13AU-3B-183Power cord with Australian(AU)plug,1.83mApplicable Models:UPort1610-16UPort1650-16PWC-C7EU-2B-183Power cord with Continental Europe(EU)plug,2.5A/250V,1.83mApplicable Models:UPort1250UPort1250IUPort1410UPort1450UPort1450IUPort1610-8UPort1650-8PWC-C7CN-2B-183Power cord with three-prong China(CN)plug,2.5A/250V,1.83mApplicable Models:UPort1250UPort1250IUPort1410UPort1450UPort1450IUPort1610-8UPort1650-8PWC-C7JP-2B-183Power cord for desktop-type power adapters with Japan(JP)plug,7A/125V,1.83mApplicable Models:UPort1250UPort1250IUPort1410UPort1450UPort1450IUPort1610-8UPort1650-8PWC-C7US-2B-183Power cord with United States(US)plug,10A/125V,1.83mApplicable Models:UPort1250UPort1250IUPort1410UPort1450UPort1450IUPort1610-8UPort1650-8PWC-C7UK-2B-183Power cord with United Kingdom(UK)plug,2.5A/250V,1.83mApplicable Models:UPort1250UPort1250IUPort1410UPort1450UPort1450IUPort1610-8UPort1650-8PWC-C7AU-2B-183Power cord with Australian(AU)plug,2.5A/250V,1.83mApplicable Models:UPort1250UPort1250IUPort1410UPort1450UPort1450IUPort1610-8UPort1650-8©Moxa Inc.版權所有.2021年10月26日更新。
CH341A编程器使用说明中文
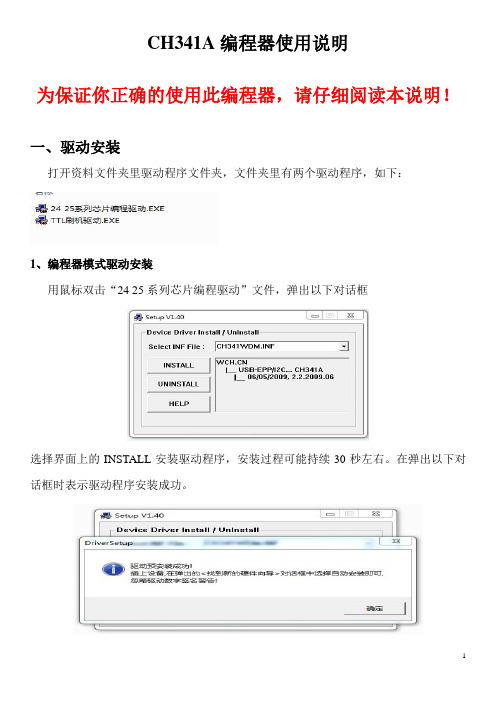
CH341A编程器使用说明为保证你正确的使用此编程器,请仔细阅读本说明!一、驱动安装打开资料文件夹里驱动程序文件夹,文件夹里有两个驱动程序,如下:1、编程器模式驱动安装用鼠标双击“24 25系列芯片编程驱动”文件,弹出以下对话框选择界面上的INSTALL安装驱动程序,安装过程可能持续30秒左右。
在弹出以下对话框时表示驱动程序安装成功。
将编程器上功能选择按下将编程器连接到电脑USB口,电脑会弹出找到新硬件提示,在弹出的对话框中选择自动安装即可。
2、TTL刷机模式驱动安装用鼠标双击“TTL刷机驱动”文件,弹出以下对话框选择界面上的INSTALL安装驱动程序,安装过程可能持续30秒左右。
在弹出以下对话框时表示驱动程序安装成功。
将编程器上功能选择开关按起状态将编程器连接到电脑USB口,电脑会弹出找到新硬件提示,在弹出的对话框中选择自动安装即可。
二、编程软件操作1、25系列BIOS芯片编程将编程器连接到电脑上,打开编程器软件,用鼠标双击CH341A.exe文件将出现以下编程界面此时编程界面右下角设备连接状态处应显示“已连接”。
现在便可以正式开始写程序了!!!!操作步骤如下:1、根据你的芯片类型和型号,在以下位置选择你要写的芯片2、将你的待写芯片放在编程器以下位置:25系列芯片放置位置24系列芯片放置位置3、在编程软件界面工具栏点击打开按钮出现如下对话框,在对话框中找到你要写的数据,这里默认的数据类型为.BIN或.HEX 文件,如果你的文件是其他类型的,如.ROM等,可以在文件类型处选择全部即可找到相应的数据文件后,点击对话框的打开按钮,此时编程器数据编辑区内可以看到你要写的文件内容,特别注意,请不要随意修改数据编辑区里的数据,避免造成数据错误而芯片无法使用。
4、在编程界面工具栏上选择你要操作的功能,一般写芯片的话选择自动就可以了。
5、开始编程后,编程界面左下角会显示当前操作进度,当擦出---验空等步骤完成时,此时编程完成,你的芯片就可以使用了!CH341A编程器使用说明一、驱动安装打开资料文件夹里驱动程序文件夹,文件夹里有两个驱动程序,如下:1、编程器模式驱动安装打开“CH341-USB编程驱动_支持WIN7”文件夹,用鼠标双击“CH341PAR.EX”弹出以下对话框选择界面上的”安装”驱动程序,安装过程可能持续几秒左右。
USB适配器使用说明书

USB适配器使用说明书USB /MPI (Isolated)Cable 适配器使用说明书PC Adapter USB V5.3一、概述USB/MPI (Isolated) Cable(产品订货号为: 6ES7 972-0CB20-0XA0)适配器实现USB到RS485接口的电平转换和USB到MPI(MultiPoint Interface)协议的转换,用于连接Siemens S7-300/400 系列PLC的MPI口(RS485)和PC的USB口。
本适配器通过内部的ASIC芯片将USB虚拟成标准的RS232端口,从而实现USB到MPI 协议的转换。
USB/MPI Cable V5.3是面对普通应用的适配器,在USB端口和RS485端口均设有浪涌保护和防雷击保护电路,可任意带电插拔,适用于西门子S7-300/400全系列PLC及其它带有MPI接口的装置。
USB/MPI Isolated Cable V5.3是面向工业设计的光电隔离型适配器,在USB端口和RS485端口均设有浪涌保护和防雷击保护电路,可任意带电插拔,适用于西门子S7-300/400全系列PLC及其它带有MPI接口的装置,特别适合于干扰较大易损坏通信口的工业现场,电路中的多种保护措施保证了系统的安全运行。
二、特性及主要技术参数:·电源:由PLC的MPI端口24VDC和USB分别供电,功耗约1W,带过流保护和浪涌保护·隔离电压:2500VDC【仅ISO(Isolated Cable)型具有】·RS485端口具有600W防雷击保护和过流保护·USB虚拟的RS232端口波特率:19.2Kbps~115.2Kbp标准波特率自动适应·MPI端波特率:187.5Kbps和19.2Kbps自动适应·带工作指示灯、数据接收指示灯和数据传送指示灯·工作温度:-20~75℃·电缆总长度:3M三、适配器USB 端口和RS485端口针脚信号定义:指示灯的状态说明四、STEP7 软件的设置:进入STEP7 编程软件主界面(SIMATIC Manager),点击“Options”菜单下的“Set PG/PC Interface……”选项进入PG/PC 设置界面。
USB转换线使用说明1

USB转换线使用说明请安装好打印机驱动后再进行下列设置1、并口一头连接上打印机,打开打印机电源。
2、插入转换线的USB口到电脑“USB”插口上。
3、XP、2003系统自动弹出提示“找到新硬件”,自动安装并显示可以使用。
4、(最好拔出来,再插进去一次)5、到打印机管理页面上6、鼠标右键——点击打印机型号——选择“属性”——选择“端口”7、端口上已经多出了一个“USB”选项,选择,并“应用或确定”备注:如果显示多个USB项,请选择最上面那个。
然后,到“常规”选项里面选择“打印测试页”,正常打印机后,说明设备安装正常。
如果还没能打印,请选择下一个“USB”端口,继续测试,估计是与别的端口出现冲突。
请固定选择一个“USB”插座,不要更换,否则因为端口设置的问题会出现不兼容的错误。
本打印线是经过测试好后才发货的,请放心使用2:USB转换线端口问题端口问题是常见的一种问题,在您打印的时候,打印状态直接提示错误,这就说明是端口错误。
原因:您电脑上插的USB口与您电脑上插的口没有对应上,传输路径不对,所以电脑上的数据无法发送到打印机。
解决办法:首先查看您打印机驱动的端口是否选择了USB 端口,(点开始-设置-打印机和传真,打印机的图标就是驱动程序)对着驱动鼠标右键,点击属性,端口查看,如果没有选择,选择USB端口点应用,则双击打印机驱动查看打印机打印状态,显示正在打印说明端口对应上,如果还是显示错误的话,说明电脑上这个USB是您电脑上接的这个口,则换个电脑上的USB插口插,因为每换一个电脑上的插口,电脑上的USB端口则会读取到,多出一个USB端口选择,则这个多出的就是你电脑上刚刚插的,选择这个点应用,在双击驱动查看打印状态,等待几秒,会由错误转变为正在打印机,然后重启打印机,放A4。
- 1、下载文档前请自行甄别文档内容的完整性,平台不提供额外的编辑、内容补充、找答案等附加服务。
- 2、"仅部分预览"的文档,不可在线预览部分如存在完整性等问题,可反馈申请退款(可完整预览的文档不适用该条件!)。
- 3、如文档侵犯您的权益,请联系客服反馈,我们会尽快为您处理(人工客服工作时间:9:00-18:30)。
优胜 USB 串口转换器使用说明
USB 串 口 转 换 器 使 用 说 明 书
档案号:YSDOC201201 版本号:YSUMA00-341A
由于串口在 PC 机上的日渐稀少,特别是在笔记本上,几乎难觅踪影。
为方便广大 电子工程师在笔记本上做调试,USB 串口转换器就应用而生了:她采用南京沁恒公司生 产的 USB 总线转接芯片 CH341A,功能全,用法简单,性能稳定,对于广泛使用的宏晶科 技的 MCU(STC MCU)支持稳定良好。
关键字:USB 转 UART、USB 转 I2C、USB 转 SPI、USB 转 ISP、USB 转串口。
*************************************************************************** 感谢您购买本产品,如果在使用过程中有什么意见和建议欢迎您随时联系我们;如 果您感觉不错,请给我们店铺 5 分评价,再次感谢您的支持! *************************************************************************** 1
优胜电子科技有限公司 Usen Electronic Technology Co., Ltd.
优胜 USB 串口转换器使用说明
转换器特色简介
使用通用 USB-A 公头设计,直接与电脑 USB 接驳,无需另外配线,方便使用; 电脑 USB 直接供电,无需外部供电; 支持 3.3V 和 5V 目标系统; 多种工作模式:支持 UART、I2C、ISP、SPI 等; 完美支持全系列 STC MCU 程序下载与调试; 提供 3.3V 或则 5V 电源输出,方便对目标板进行初步调试; (可对输出电压,是否输出做选择) 状态指示灯,工作模式一目了然; 支持常用通讯波特率:50、75、100、110、134.5、150、300、600、900、1 200、 1 800、2 400、3 600、4 800、9 600、14 400、19 200、28 800、33 600、38 400、 56 000、57 600、76 800、115 200、128 000、153 600、230 400、460 800、921 600、1 500 000、2 000 000 等; 主控芯片功能脚引出,可供用户后期开发更多功能. 支持 WINDOWS 98/ME/2000/XP/server 2003/VISTA/server 2008/WIN 7/64/32-bit。
优胜电子科技有限公司 Usen Electronic Technology Co., Ltd.
2
优胜 USB 串口转换器使用说明
转换器使用详解
一, 驱动安装 在使用前,需要先安装转换器主控芯片的驱动,文件位于资料包目录 Drivers 下面。
1. Windows 平台驱动安装 Drivers 目录下 Windows.rar 压缩包里是 windows 平台的驱动,解压后有如下 文件:CH341SER.exe 和 CH341PAR.exe, Readme.txt 三个文件,前两个是驱动 文件,第三个是说明文档。
1>点击 CH341SER.exe,在弹出的对话框中点击 INSTALL 按钮开始安装,
安装完成后会有“驱动预安装成功”的弹窗出现。
2>点击 CH341PAR.exe,在弹出的对话框中点击 INSTALL 按钮开始安装,
优胜电子科技有限公司 Usen Electronic Technology Co., Ltd.
3
优胜 USB 串口转换器使用说明
安装完成后会有“驱动预安装成功”的弹窗出现。
2. Linux 平台驱动安装 Drivers 目录下 Linux.rar 压缩包里是 Linux 平台下的驱动, 解压后有两种 Linux 内核下的驱动及安装说明文件, 内有详细的安装方法, 在此就不再叙 述。
二, 模式及状态指示详解 转换器主要有两种工作模式:USB-EPP/I2C 模式和 USB-SERIAL 模式. 1. USB–EPP/I2C 模式(简称为 I2C 模式)设置 转换器右上角 MD 跳线帽(绿色)接通 I2C&SPI 与 MD 插针即可。
把转换器插到 PC 的 USB 口,自动配置到 I2C 模式,在电脑的设备管理器 里面会多出 “外部接口” 项, 进入该项会发现 “USB–EPP/I2C…CH341A”, 到此转换器配置完成,可以正常使用了。
模式配置完成后,灯的状态:红灯亮,绿灯灭,表示 I2C 模式配置完成。
2. USB-SERIAL 模式(简称为 UART 模式)设置 转换器右上角 MD 跳线帽(绿色)接通 UART 与 MD 插针即可。
把转换器插到 PC 的 USB 口,自动配置到 UART 模式,在电脑的设备管理器 里查看“端口(COM&LPT)”项,会发现“USB-SERIA CH341A(COM4)”, 到此转换器配置完成,可以正常使用了。
这里的 COM 端口号因插入 USB 端口不同而不一样,在下载软件里需要选择 该端口号才能使用转换器。
模式配置完成后,灯的状态:绿灯亮,数据传输时红灯闪亮,无数据传输 红灯灭。
绿灯亮,表示接收准备就绪,红灯亮,表示数据传送中。
3. 在使用 USB 转 SPI 功能的时候,设置与 I2C 模式相同。
4
优胜电子科技有限公司 Usen Electronic Technology Co., Ltd.
优胜 USB 串口转换器使用说明
三, 其他设置 转换器除了模式设置外还可以对输出信号电平进行选择,对输出电压进行选择。
1. 输出信号电平选择 转换器右上方 Level Select 两个跳线帽(红色)向上(3.3V 侧),表示输 出信号电平为 3.3V,适合对只支持 3.3V 的目标系统进行操作;两个跳线 帽向下(5V 侧),则表示输出信号电平为 5V,适合对 5V 的目标系统进行 操作。
2. 输出电压选择 在转换器的两个输出接口之间,跳线 PWR-SEL 就是对输出电压进行选择: A.跳线帽(红色)跳到 VCC 一端,表示接口输出电压和信号电平一致; B.跳线帽(红色)跳到 5V 一端,表示接口输出电压始终为 5V,跟信号电 平无关。
C.跳线帽(红色)去掉,表示不输送电压到接口端。
四, 接口说明
输出接口:
USB 转 I2C(USB2IIC)(PH2.0 or 2,54MM Header) SCL: I2C 总线时钟 GND0: 地 PWR0: 输出电源(3.3V or 5V or No Power,受 PWR-SEL 调节) SDA: I2C 总线串行数据 USB 转 UART(USB2UART) PWR1:输出电源(3.3V or 5V or No Power,受 PWR-SEL 调节) RXD:接收端,接 MCU 的发送端(TxD) TXD:发送端,接 MCU 的接收端(RXD) GND1:地 SPI 接口(SPI Interface) GND3:地 VDD:输出电源(3.3V or 5V or No Power,受 PWR-SEL 调节) CS0:片选信号
优胜电子科技有限公司 Usen Electronic Technology Co., Ltd.
5
优胜 USB 串口转换器使用说明
SCK:串行时钟 MOSI:主出从入 MISO:主入从出
输入接口:
USB-A 口,直接接电脑 USB 口,或者接 USB 延长线。
五, 产品图片
六, 订购信息 本产品在优胜电子科技有限公司(Usen Electronic Technology Co., Ltd.)淘 宝店有售: 联系 QQ:158931394 阿里旺旺:usendz 6
优胜电子科技有限公司 Usen Electronic Technology Co., Ltd.
优胜 USB 串口转换器使用说明
2012-02-24 优胜电子 注意:在 UART(TTL)模式下,输出接口(PH2.0 4Pin 座和 2.54mm 插针)的 RXD 应该 接 MCU 的 TxD 端口,TXD 接 MCU 的 RxD 端口。
附件(见优胜资料包) USB 串口转换器使用说明书(DS_YSUMA00-341A.rar) /file/anfsb8qf# USB 串口转换器相关开发资料包(SDK_YSUMA00_341A.rar) /file/dp5qs6h4# USB 串口转换器驱动程序(DRV_YSUMA00-341A.rar) /file/bespadoj# USB 串口转换器应用程序(PR_YSUMA00-341A.rar) /file/e7lq253l#
*************************************************************************** 感谢您购买本产品,如果在使用过程中有什么意见和建议欢迎您随时联系我们;如 果您感觉不错,请给我们店铺 5 分评价,再次感谢您的支持! *************************************************************************** 7
优胜电子科技有限公司 Usen Electronic Technology Co., Ltd.
。