MS5540-CM 程序集
戴尔Latitude 5540 用户手册
Latitude 5540用户手册4 2023注意、小心和警告:“注意”表示可帮助您更好地使用产品的重要信息。
:“小心”表示可能会导致硬件损坏或数据丢失,并告诉您如何避免问题。
:“警告”表示可能会导致财产损坏、人身伤害甚至死亡。
© 2023 Dell Inc. 或其子公司。
保留所有权利Dell Technologies、Dell 和其他商标均是 Dell Inc. 或其子公司的商标。
其他商标可能是其各自所有者的商标。
章 1: Latitude 5540的视图 (8)右 (8)左侧 (9)顶部 (10)正面 (11)背面 (12)底部 (12)服务编号 (12)电池电量和状态指示灯 (13)章 2: 设置 Latitude 5540 (14)章 3: Latitude 5540 的规格 (16)尺寸和重量 (16)处理器 (16)芯片组 (17)操作系统 (18)内存 (18)外部端口 (19)内部插槽 (19)以太网 (19)无线模块 (20)WWAN 模块 (20)音频 (21)存储 (22)介质卡读卡器 (22)键盘 (22)键盘功能键 (23)摄像头 (24)触控板 (24)电源适配器 (25)电池 (26)显示屏 (27)指纹读取器(可选) (28)传感器 (28)GPU —集成 (29)GPU —独立 (29)外部显示屏支持 (29)硬件安全性 (29)智能卡读卡器 (30)非接触式智能卡读卡器 (30)接触式智能卡读卡器 (31)操作和存储环境 (32)戴尔支持政策 (32)目录3Dell Optimizer 戴尔智能调优软件 (33)章 4: 拆装计算机内部组件 (34)安全说明 (34)拆装计算机内部组件之前 (34)安全防范措施 (35)静电放电— ESD 保护 (35)ESD 现场服务工具包 (36)运输敏感组件 (36)拆装计算机内部组件之后 (36)BitLocker (37)建议工具 (37)螺钉列表 (37)Latitude 5540的主要组件 (38)章 5: 卸下和安装客户可更换部件 (CRU) (41)SIM 卡托盘(可选) (41)卸下 SIM 卡托盘(可选) (41)安装 SIM 卡托盘(可选) (42)基座护盖 (43)卸下底座护盖 (43)安装底座护盖 (45)无线网卡 (48)卸下 WLAN 卡 (48)安装 WLAN 卡 (49)WWAN 卡(可选) (50)卸下 4G WWAN 卡(可选) (50)安装 4G WWAN 卡(可选) (51)卸下 5G WWAN 卡(可选) (53)安装 5G WWAN 卡(可选) (54)内存模块 (55)卸下内存模块 (55)安装内存模块 (56)固态驱动器 (57)卸下插槽 1 中的 M.2 2230 固态硬盘 (57)在插槽 1 中安装 M.2 2230 固态硬盘 (58)卸下插槽 1 中的 M.2 2280 固态硬盘 (59)在插槽 1 中安装 M.2 2280 固态硬盘 (60)卸下插槽 2 中的 M.2 2230 固态硬盘 (61)在插槽 2 中安装 M.2 2230 固态硬盘 (62)风扇 (63)卸下风扇 (63)安装风扇 (63)章 6: 卸下和安装现场可更换部件 (FRU) (65)电池 (65)锂离子电池预防措施 (65)4目录组件内框架 (69)卸下组件内框架 (69)安装组件内框架 (70)扬声器 (72)卸下扬声器 (72)安装扬声器 (73)币形电池 (74)卸下钮扣电池 (74)安装钮扣电池 (75)散热器 (76)卸下散热器(独立 GPU) (76)安装散热器(独立 GPU) (77)卸下散热器(集成 GPU) (78)安装散热器(集成 GPU) (79)系统板 (80)卸下系统主板 (80)安装系统主板 (83)电源按钮 (86)卸下电源按钮 (86)安装电源按钮 (87)电源按钮,带可选的指纹读取器 (88)卸下带可选指纹读取器的电源按钮 (88)安装带可选指纹读取器的电源按钮 (89)键盘 (90)卸下键盘 (90)安装键盘 (92)显示屏部件 (94)卸下显示屏组件 (94)安装显示屏组件 (97)显示屏挡板 (99)卸下显示屏挡板 (99)安装显示屏挡板 (99)显示屏面板 (100)卸下显示屏面板 (100)安装显示屏面板 (103)摄像头模块 (106)卸下摄像头模块 (106)安装摄像头模块 (107)显示屏转轴 (108)卸下显示屏转轴 (108)安装显示屏转轴 (109)显示屏后盖 (110)卸下显示屏后盖 (110)安装显示屏后盖 (111)显示屏线缆 (112)卸下显示屏线缆 (112)安装显示屏线缆 (113)传感器板 (114)目录5指纹读取器(可选) (116)卸下指纹读取器(可选) (116)安装指纹读取器(可选) (117)智能卡读卡器 (119)卸下智能卡读卡器 (119)安装智能卡读卡器 (119)虚拟 SIM 卡插槽填充挡片 (120)卸下虚拟 SIM 卡插槽填充挡片 (120)安装虚拟 SIM 卡插槽填充挡片 (121)掌托部件 (122)卸下掌托组件 (122)安装掌托组件 (124)章 7: 软件 (126)操作系统 (126)驱动程序与下载 (126)章 8: BIOS 设置 (127)进入 BIOS 设置程序 (127)导航键 (127)一次性启动菜单 (127)系统设置选项 (128)更新 BIOS (138)在 Windows 中更新 BIOS (138)在 Linux 和 Ubuntu 环境中更新 BIOS (138)在 Windows 环境中使用 USB 驱动器更新 BIOS (138)从 F12 一次性启动菜单更新 BIOS (139)系统密码和设置密码 (139)分配系统设置密码 (140)删除或更改现有的系统设置密码 (140)清除 CMOS 设置 (141)清除 BIOS(系统设置)和系统密码 (141)章 9: 故障排除 (142)处理膨胀锂离子电池 (142)找到戴尔计算机的服务编号或快速服务代码 (142)Dell SupportAssist 启动前系统性能检查诊断程序 (142)运行 SupportAssist 启动前系统性能检查 (143)内置自检 (BIST) (143)M-BIST (143)液晶屏电源导轨测试 (L-BIST) (143)液晶屏内置自检 (BIST) (144)系统诊断指示灯 (144)恢复操作系统 (145)实时时钟 (RTC) 重置 (145)备份介质和恢复选项 (146)Wi-Fi 重启 (146)6目录耗尽剩余弱电(执行硬重置) (146)章 10: 获取帮助和联系戴尔 (147)目录7Latitude 5540的视图右1.microSD 卡插槽针对 microSD 卡进行读取和写入。
5450ISC 内部呼叫跟踪简要流程

5450ISC 内部呼叫跟踪简要流程一、Trace 方法:1.用lss登录:2.logCtrl3.依次选择4.tail -F master.log<shlab-s00c01h0:lss>/export/home/lss/logs:# who am ilss pts/3 Jun 30 09:45 (10.0.1.149)<shlab-s00c01h0:lss>/export/home/lss/logs:# logCtrlLog control main menu:1: Host sub menu2: Restore all clients to default settingq: QuitPlease enter your selection(1-2), Return(r) or Quit(q):1Index IP Address Host Name Service List=============================================================1 169.254.64.16 shlab-s00c01h0 cnfg/mi/sns2 169.254.64.32 shlab-s00c02h0 cnfg/mi/sns3 169.254.64.48 shlab-s00c03h0 h248/ims4 169.254.64.64 shlab-s00c04h0 h248/imsPlease enter your selection(1-4), Return(r) or Quit(q):3Log Client Submenu for shlab-s00c03h0 [169.254.64.48]Index Client Name Log Level Debug Level ---------------------------------------------------------------------1 anonymous2 0Message Class=0xffffffff ffffffff ffffffff ffffffff2 ipm-169.254.64.48 2 0Message Class=0xffffffff ffffffff ffffffff ffffffff3 lxprofile-169.254.64.48 2 0Message Class=0xffffffff ffffffff ffffffff ffffffff4 IPmon-169.254.64.48 2 0Message Class=0xffffffff ffffffff ffffffff ffffffff5 aim-169.254.64.48 2 0Message Class=0xffffffff ffffffff ffffffff ffffffff6 LCPlogLocal-169.254.64.48 2 0Message Class=0xffffffff ffffffff ffffffff ffffffff7 h248ds-169.254.139.0 2 08 ngss-169.254.154.0 4 0Message Class=0xffffffff ffffffff ffffffff ffffffffPlease enter your selection(1-8), Return(r) or Quit(q):qExiting logCtrl.<shlab-s00c01h0:lss>/export/home/lss/logs:# tail -F master.log二、SIP to SIP call 消息流程以下是一个实验室软phone终端用SIP互拨正常接通的流程,实际现场VoLTE流程会更复杂点。
16550初始化流程
16550初始化流程下载温馨提示:该文档是我店铺精心编制而成,希望大家下载以后,能够帮助大家解决实际的问题。
文档下载后可定制随意修改,请根据实际需要进行相应的调整和使用,谢谢!并且,本店铺为大家提供各种各样类型的实用资料,如教育随笔、日记赏析、句子摘抄、古诗大全、经典美文、话题作文、工作总结、词语解析、文案摘录、其他资料等等,如想了解不同资料格式和写法,敬请关注!Download tips: This document is carefully compiled by theeditor. I hope that after you download them,they can help yousolve practical problems. The document can be customized andmodified after downloading,please adjust and use it according toactual needs, thank you!In addition, our shop provides you with various types ofpractical materials,such as educational essays, diaryappreciation,sentence excerpts,ancient poems,classic articles,topic composition,work summary,word parsing,copy excerpts,other materials and so on,want to know different data formats andwriting methods,please pay attention!1. 设置波特率:16550 支持多种波特率,通过设置除数锁存器(Divisor Latch)来选择。
MS5540C中文版
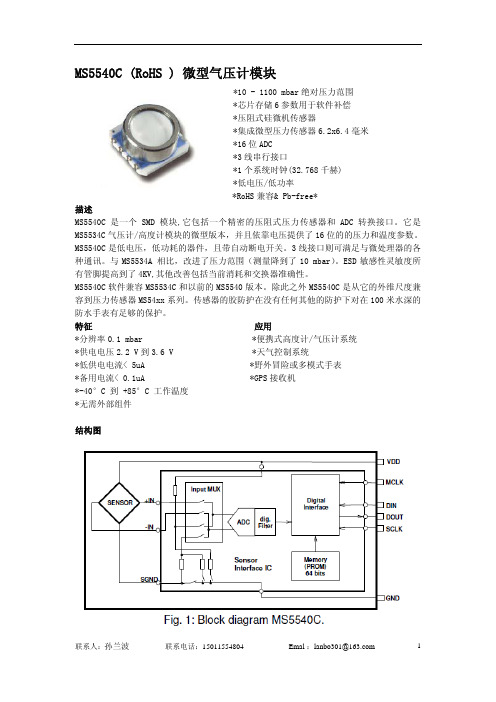
压力和温度测量
压力和温度读数次序和软件补偿操作在图3,图5的流程图里有描述。 首先通过串行接口读取1段字节到4段字节。重起连接MS5540C串行接口的微控制器后可以立 即完成1段字节到4段字节的读取。 其次补偿系数C1到C6通过逻辑和转移操作逐位提取(参见 图4). 为压力测量微控制器在闭路环内(例如每秒钟)必须通过串行接口为压力(D1)和温度(D2) 读 16个位值。然后,根据图3的运算法则,补偿的压力在D1、D2和C1至C6外面被计算(根据图5, 可能使用二次方温度补偿).增殖的结果也许是由32位长决定(+sign)。 在流程中根据图3每 次增殖伴随一次分裂。 这次分裂可以通过逐位转移执行(到功率2是除数)。可以保证的是这 些分裂的结果少于65536(16位)。 由于信号定时由1段字节到4段字节,D1和 D2读出,请参见“串行接口”章节
联系人:孙兰波
联系电话:15011554804
Emal :lanbo301@
9
Fig. 3:压力/温度读取和软件补偿流程图
注意
1)可以不连续地读取D2,但在这种情况下结果将是较为不稳定的。 2)为0.1mbar分辨率显示的稳定性,建议显示8其后的压力平均值。
联系人:孙兰波
联系电话:15011554804
*-40°C 到 +85°C 工作温度
*无需外部组件
结构图
联系人:孙兰波
联系电话:15011554804
Emal :lanbo301@
CMS-40简易编程操作手册(数码键盘)

CMS-40简易编程操作手册(数码键盘)一、基本操作(出厂值:用户密码是2580;安装密码是1234)1、布撤防系统布防:用户密码+# ,周界布防:用户密码+* ,撤防:用户密码+#2、常用操作指令:输入安装员密码或用户密码,再输入操作命令(见下表),然后按【#】。
命令功能操作权限【▲】或【▼】用户菜单,仅中文键盘有效仅用户密码有效【2】【0】旁路查询(按“▲”和“▼”键查询),仅中文键盘有效仅用户密码有效【2】【1】旁路/取消旁路防区(防区号+“*”),取消旁路仅对LED键盘有效仅用户密码有效【2】【2】取消旁路(防区号+“*”),仅对中文键盘有效仅用户密码有效【3】【1】清除报警记忆仅用户密码有效【3】【2】报警输出复位仅用户密码有效【4】【1】故障查询(按“▲”和“▼”键查询)【4】【2】事件查询(按“*”键查询下一条)【5】【1】设置/显示日期和时间(【YY】【MM】【DD】【HH】【MM】)【5】【2】添加/更改/删除用户密码【6】【1】警号测试【6】【2】通讯测试【6】【3】步行测试:进入/退出步测都是密码+ 63 + #3、LED键盘故障查询故障方法:输入安装员密码或用户密码, 然后按【4】【1】,再按【#】,亮起的防区灯表示故障大类,再按相应的数字键进入二级故障指示。
按[0] 回到主菜单,按【#】号退出查看故障大类故障大类指示灯下级故障指示灯详细故障描述日期和时间设置故障 1 1 日期时间未设置2 系统防拆故障电源故障 21 电池低压故障2、3 辅助电源1、2 故障4、5 总线电源1、2 故障通讯故障 3 1、2、3、4 通讯路径1、2、3、4 故障5 电话线故障6、7 网络模块1、2 故障可编输出故障 4 1、2、3、4 板载输出1、2、3、4 故障5、6 输出扩展模块1、2 故障键盘通讯故障 5 1、2、3、4 键盘1、2、3、4 通讯故障键盘防拆故障 6 1、2、3、4 键盘1、2、3、4 防拆故障防区扩展模块故障7 1、2、3 防区扩展模块1、2、3 故障防区扩展模块防拆8 1、2、3 防区扩展模块1、2、3 防拆4、添加/更改/删除用户密码1)输入安装员密码或用户密码,然后按[5][2],再按[#]。
罗克韦尔自动化 CodeMeter 设备规格说明书 (9509-CMSDCD4, 9509-CMST

Technical DataOriginal InstructionsCodeMeter Devices SpecificationsCatalog Numbers 9509-CMSDCD4, 9509-CMSTICKCRockwell Automation® industrial controllers and computers use CodeMeter devices to enable product license activations. FactoryTalk® Activation software 4.00 and later is required to activate the CodeMeter devices.•For Activation Instructions, see FactoryTalk Activation Manager Online Help.•For use with Studio 5000 Logix Designer® and ControlLogix® features, see Studio 5000 Logix Designer Online Help.•For supported firmware, see the Product Compatibility and Download Center at rok.auto/pcdc.Summary of ChangesThis publication contains the following new or updated information. This list includes substantive updates only and is not intended to reflect all changes.Topic PageRecommended FactoryTalk-Supported Device Types2CodeMeter Device Descriptions2Technical Specifications3Environmental Specifications3Certifications3Topic PageRemoved the 9509-CMSTICK8 device ThroughoutUpdated the 9509-USB-DONG2 storage size from 2 GB to 8 GB22Rockwell Automation Publication 9509-TD001B-EN-P - February 2023CodeMeter Devices Specifications Technical DataRecommended FactoryTalk-Supported Device TypesCodeMeter Device DescriptionsType Labels Catalog Number NameStorage CodeMeter CmCard 9509-CMSDCD4CodeMeter CmCard SD4 GBCmStick9509-CMSTICKC CodeMeter CmStick Compact None FlexNetFlexNet, Flexera, HASP, or Flex ID9509-USB-DONG2FlexNet (plug and play)8 GBIMPORTANTIn some cases, product activations require a specific device type. If you see the `Different dongle type needed’ message, the device that you are using is not supported for activating the product. Themessage indicates the type of device that is required. Remove the incorrect device from the computer and insert a device of the correct type.CodeMeter Device Cat. No.Flash Storage DescriptionCmCard SD9509-CMSDCD4 4 GB•Secure Digital (SD) card, use with controllers, SD 2.0, SD 3.0 (UHS-I)•Performance Read seq. up to 24 MB/s, Write seq. up to 23 MB/s •4 GB, single-level cell (SLC), nonvolatile memory for high industrial requirements•Based on High-Performance Security Crypto-ChipCmStick Compact9509-CMSTICKC none•USB stick•Based on High-Performance Security Crypto-ChipRockwell Automation Publication 9509-TD001B-EN-P - February 20233CodeMeter Devices Specifications Technical DataTechnical SpecificationsEnvironmental SpecificationsCertificationsFor CodeMeter certifications, see the following Wibu-Systems data sheets:•9509-CMSDCD4 - 1040-03-106•9509-CMSTICKC - 1001-03-160-9001Attribute 9509-CMSDCD49509-CMSTICKC Memory 4 GBNoneSupported Devices •ControlLogix 5580 controllers•CompactLogix™ 5480 and 5380 controllers •Personal computers •Personal computersWeight, approx 2 g (0.07 oz)CmStick - 6 g (0.21 oz)Cover - 8 g (0.28 oz)Power Supply 2.7...3.6 V Bus-powered, Type. 25 mA 5V Bus-poweredInterfacePersonal computersHi-speed USB 2.0 certified, Mass Storage Communication (MSC)Attribute9509-CMSDCD49509-CMSTICKCTemperature, operating -40…+85 °C (-40…+185 °F)-25…+70 °C (-13…+158 °F)Temperature, storage -40…+100°C (-40…+212 °F)-40…+100°C (-40…+212 °F)Relative humidity 85% RH, 85 °C (185 °F)85% RH, 85 °C (185 °F)Dimensions (HxWxD), Approx 32 x 24 x 2.1 mm (1.26 x 0.94 x 0.08 in.)21 x 14 x 6.5 mm(0.83 x 0.55 x 0.26 in.)Weight 2 g (0.08 oz)CmStick - 6 g (0.24 oz)Cover - 8 g (0.31 oz)Status IndicatorsN/A< 20 mA (status indicators off), < 60 mA (both status indicators on)Publication 9509-TD001B-EN-P - February 2023Supersedes Publication 9509-TD001A-EN-P - December 2016Copyright © 2023 Rockwell Automation, Inc. All rights reserved. Printed in the U.S.A.Additional ResourcesThese documents contain additional information concerning related products from Rockwell Automation. You can view or download publications at rok.auto/literature .Rockwell Automation SupportUse these resources to access support information.Documentation FeedbackYour comments help us serve your documentation needs better. If you have any suggestions on how to improve our content, complete the form at rok.auto/docfeedback .Resource DescriptionIndustrial Automation Wiring and Grounding Guidelines, publication 1770-4.1Provides general guidelines for installing a Rockwell Automation industrial system.Rockwell Automation Product Certifications website, rok.auto/certifications Provides declarations of conformity, certificates, and other certification details.Technical Support CenterFind help with how-to videos, FAQs, chat, user forums, Knowledgebase, and product notification updates.rok.auto/support Local Technical Support Phone Numbers Locate the telephone number for your country.rok.auto/phonesupport Technical Documentation CenterQuickly access and download technical specifications, installation instructions, and user manuals.rok.auto/techdocs Literature LibraryFind installation instructions, manuals, brochures, and technical data publications.rok.auto/literature Product Compatibility and Download Center (PCDC)Download firmware, associated files (such as AOP, EDS, and DTM), and access product release notes.rok.auto/pcdcRockwell Automation maintains current product environmental compliance information on its website at rok.auto/pec .Allen-Bradley, CompactLogix, ControlLogix, FactoryTalk, Rockwell Automation, and Studio 5000 Logix Designer are trademarks of Rockwell Automation, Inc.Trademarks not belonging to Rockwell Automation are property of their respective companies.Rockwell Otomasyon Ticaret A.Ş. Kar Plaza İş Merkezi E Blok Kat:6 34752, İçerenköy, İstanbul, Tel: +90 (216) 5698400 EEE Yönetmeli ğine Uygundur。
数码彩色多功能机 ApeosPort-IV C5570 C4470 C3370 C2270 说明书

禁止复制请注意法律禁止以下产品的复制:国内及海外银行发行的纸币与硬币,政府发行的有价证券,国家及地方债券票据,未使用的邮票与明信片,法律保护的证明贴纸。
禁止有版权产品的复制 (书籍、音乐、绘画、雕刻、地图、电影、摄影,等等),除了私人用途及在家或在上述限定范围内。
本产品安装有防伪功能。
该功能并非用于防止非法复制。
请务必仔细管理您的设备。
为了您的安全使用使用前请认真阅读产品手册。
应使用合适的电源及电压。
请确保机器接地以避免故障或短路可能会引起的触电。
北京 北京市朝阳区建国路甲92号世茂大厦904室 电话:010-********上海 上海市淮海中路300号香港新世界大厦29F/30F/32F 电话:021-********广州 广州市东风中路410-412号健力宝大厦15楼 电话:020-********深圳 深圳市福田区益田路4068号卓越时代广场32楼01~08、10室 电话:0755-********成都 成都市锦江区滨江东路9号B 座香格里拉中心办公楼6层 电话:028-********沈阳 沈阳市和平区和平南大街2号东宇大厦1305,1306室 电话:024-********天津 天津市南京路75号国际大厦502室 电话:022-********长春 长春市南关区亚泰大街3218号通钢国际大厦A 座21层01室 电话:0431-********青岛 青岛市香港中路61号阳光大厦A 座30层EH 电话:0532-********/69大连 大连市西岗区中山路147号森茂大厦1202E 电话:0411-********/80哈尔滨 哈尔滨市南岗区民益街76号网通广场20楼 电话:0451-********杭州 杭州市潮王路240号银地大厦一层 电话:0571-********武汉 武汉市建设大道568号新世界国贸大厦I 座21层2105-2107室 电话:027-********长沙 长沙市芙蓉区燕山路鸿飞大厦1208,1209号 电话:0731-*******郑州 郑州市中原中路220号裕达国际贸易中心A 座22层2212 电话:0371-********温州 温州市车站大道高联大厦9B3 电话:0577-********合肥 合肥市淮河路303号安徽邮电大厦11层D 座2号 电话:0551-*******南京 南京市汉中路89号金鹰国际商城21层B2-C1座 电话:025-********常州 常州市延陵西路23、25、27、29号投资广场17层1706单元 电话:0519-********无锡 无锡市中山路343号东方广场商务楼11层GH 座 电话:0510-********苏州 苏州市苏州工业园区苏华路2号国际大厦1610单元 电话:0512-********东莞 东莞市南城区元美路8号华凯广场B 座1712 电话:0769-********厦门 厦门市思明区湖东路6号华龙大厦805室 电话:0592-*******福州 福州市五四路国贸广场29楼C1 电话:0591-********西安 西安市南关正街88号长安国际广场B 座1006室 电话:029-********重庆 重庆市渝中区邹容路68号大都会商厦2301室 电话:023-********昆明 昆明市北京路155号附1号红塔大厦1201室 电话:0871-*******乌鲁木齐 乌鲁木齐市中山路86号中泉广场13楼B 座 电话:0991-*******富士施乐在华分支机构富士施乐全国服务热线:800-820-5146 400-820-5146/ApeosPort-IV C5570C4470C3370C2270ApeosPort-IVC5570/C4470/C3370/C2270数码彩色多功能机色彩革命ApeosPort-IV C5570 / C4470 / C3370 / C2270系列规格复印功能AP-IV C5570 AP-IV C4470 AP-IV C3370 AP-IV C2270类型稿台型内存1,5 GB(最大2 GB)硬盘80 GB(可用空间:40 GB)预热时间28 秒以下(室温20。
MacroSAN MS 系列存储设备 重删和压缩特性 图形界面用户手册说明书
MacroSAN MS系列存储设备重删和压缩特性图形界面用户手册文档版本:V2.08杭州宏杉科技股份有限公司400-650-5527声明Copyright © 2022杭州宏杉科技股份有限公司及其许可者版权所有,保留一切权利。
未经杭州宏杉科技股份有限公司书面许可,任何单位和个人不得擅自摘抄本手册的内容,且不得以任何形式传播本手册。
本手册仅作为操作参考,由于软件版本升级或其他原因,本手册的内容可能滞后于最新的软件版本,杭州宏杉科技股份有限公司保留在没有任何通知或提示的情况下对本手册的内容进行修改的权利。
商标信息MacroSAN、ODSP、ODSP Scope、宏杉均为杭州宏杉科技股份有限公司的商标。
对于本手册中出现的其他公司的商标、产品标识及商品名称,由各自权利人拥有。
目录MacroSAN MS系列存储设备重删和压缩特性........................................................................................ 1-1图形界面用户手册 ................................................................................................................................... 1-1声明.......................................................................................................................................................... 1-2商标信息 .................................................................................................................................................. 1-3目录.......................................................................................................................................................... 1-4图目录...................................................................................................................................................... 1-6表目录...................................................................................................................................................... 1-7文档结构 .................................................................................................................................................. 1-8第一部分:概述 ....................................................................................................................................... 1-9 1前言....................................................................................................................................................... 1-91.1 读者对象............................................................................................................................................ 1-91.2 资料指南............................................................................................................................................ 1-91.3 资料约定.......................................................................................................................................... 1-101.3.1 资料描述约定........................................................................................................................ 1-101.3.2 其他约定 ............................................................................................................................... 1-101.4 资料获取方式................................................................................................................................... 1-101.5 资料意见反馈方式 ........................................................................................................................... 1-112 MS系列存储设备概述......................................................................................................................... 2-112.1 MS系列存储设备简介 ..................................................................................................................... 2-112.2 MS系列存储设备典型组网介绍....................................................................................................... 2-113 ODSP Scope+控制台 ......................................................................................................................... 3-123.1 ODSP Scope+简介 ......................................................................................................................... 3-123.2 运行ODSP Scope+......................................................................................................................... 3-133.3 ODSP Scope+界面组成 .................................................................................................................. 3-143.3.1 界面概述 ............................................................................................................................... 3-143.3.2 导航树................................................................................................................................... 3-153.3.3 导航栏................................................................................................................................... 3-163.3.4 信息显示区............................................................................................................................ 3-163.3.5 扩展区................................................................................................................................... 3-173.3.6 版权显示区............................................................................................................................ 3-17第二部分:重删和压缩特性................................................................................................................... 3-18 4重删和压缩特性简介 ........................................................................................................................... 4-18 5配置重删和压缩前准备........................................................................................................................ 5-185.1 激活License .................................................................................................................................... 5-185.1.1 激活重删License .................................................................................................................. 5-185.1.2 激活压缩License .................................................................................................................. 5-185.2 设置重删预留内存 ........................................................................................................................... 5-185.2.1 分配重删预留内存................................................................................................................. 5-185.2.2 取消分配重删预留内存 ......................................................................................................... 5-195.3 设置存储池DDSR ........................................................................................................................... 5-195.3.1 开启DDSR ........................................................................................................................... 5-195.3.2 关闭DDSR ........................................................................................................................... 5-20 6配置重删和压缩 .................................................................................................................................. 6-216.1 创建缩减LUN .................................................................................................................................. 6-216.1.1 创建单个缩减LUN ................................................................................................................ 6-216.1.2 批量创建缩减LUN ................................................................................................................ 6-236.2 管理缩减LUN .................................................................................................................................. 6-266.3 查看缩减率 ...................................................................................................................................... 6-266.3.1 查看实时缩减率 .................................................................................................................... 6-266.3.2 查看历史缩减率 .................................................................................................................... 6-26 7重删/压缩特性和其他特性................................................................................................................... 7-277.1 重删和HotCache ............................................................................................................................ 7-277.2 其他................................................................................................................................................. 7-27附录A.设备默认配置 ................................................................................................................... 7-28附录B.术语.................................................................................................................................. 7-29附录C.缩略语.............................................................................................................................. 7-36图2-1 MS系列存储设备典型组网.......................................................................................................... 2-12图3-1证书异常提示界面示例................................................................................................................ 3-13图3-2 ODSP Scope+登录界面.............................................................................................................. 3-14图3-3 ODSP Scope+首页 ..................................................................................................................... 3-14图3-4 ODSP Scope+典型界面示例....................................................................................................... 3-15图3-5 ODSP Scope+导航树示例 .......................................................................................................... 3-15图3-6 ODSP Scope+导航栏示例 .......................................................................................................... 3-16图3-7 ODSP Scope+关注事项示例....................................................................................................... 3-16图3-8 ODSP Scope+告警项示例 .......................................................................................................... 3-16图3-9 ODSP Scope+信息显示区示例................................................................................................... 3-17图5-1设置重删预留内存 ....................................................................................................................... 5-19图5-2存储池基本属性界面.................................................................................................................... 5-20图6-1创建缩减LUN界面(一)........................................................................................................... 6-22图6-2创建缩减LUN界面(二)........................................................................................................... 6-22图6-3批量创建缩减LUN界面(一) ................................................................................................... 6-24图6-4批量创建缩减LUN界面(二) ................................................................................................... 6-24图6-5批量创建缩减LUN界面(三) ................................................................................................... 6-25图6-6查看历史缩减率........................................................................................................................... 6-27表1-1 用户手册清单 ................................................................................................................................ 1-9表6-1 创建缩减LUN界面(二)参数说明............................................................................................ 6-23表6-2 批量创建缩减LUN界面(二)参数说明 .................................................................................... 6-24表6-3 批量创建缩减LUN界面(三)参数说明 .................................................................................... 6-25表7-1 设备默认配置 .............................................................................................................................. 7-28文档结构第一部分:概述1 前言1.1 读者对象图形界面用户手册用于指导MacroSAN MS系列存储设备的配置、管理和维护等操作,适用于MacroSAN员工、合作伙伴、存储架构师、系统管理员、维护人员,要求读者熟悉存储系统相关基础知识。
浩康科技与Velosti发布USB3.0超高速硬件加密优盘方案说明书

设为主页 | 登录 | 现在注册 | 订阅电子快讯 | 杂志订阅首页新闻设计中心专题下载视频论坛博客小组微博在线研讨会热点搜索:Webench设计大赛谐振放大器PSoC4充电器网络分析仪尝试E源搜索,享受专业体验文章搜索高级搜索温馨提示:访问论坛和博客的设置方法[特刊] 新一期《分销与供应链特刊》订阅《EDN电子技术设计》杂志研发、品管、热分析全套红外解决方案作者: 浩康科技上网日期: 2013年05月27日打印版订阅存储器热点厂商方案推荐:加英特尔官方微博获得专业技术支持浩康科技联同Velosti发布USB3.0超高速硬件加密优盘关键字:USB3.0 硬件加密优盘浩康科技2013年5月21日,香港浩康科技(Crypton Tech)发布了USB3.0超高速AES / UCA硬件加密优盘方案。
在高速数据传输领域,数据传输速度和保密性是两个最重要的考察指标,该方案成功满足了这两个指标。
方案采用Velosti USB3.0 控制器 (以32位ARM架构为基础 ),内置AES /UCA 硬件加密机制,具有保密性好,极难破解的特点,而且速度比一般USB2.0优盘快 10 倍左右。
方案特点以ARM 32bits为基础,快速进行AES加密支持USB3.0并向下兼容 (有USB-IF USB3.0证书及FIPS加密证书 )密码输入错误10次时,优盘将自动格式化优盘采用AES硬件配合个人密码进行加密采用UCA 保密, 用户可选择只有在特定电脑上才能读取优盘资料,加强保密性,不怕密码外泄UCA 保密基于用户密码和电脑签名等信息,计算出保密信息,极难破解。
支持Mac/Windows XP/Vista/7/8系统方案内容方案采用四层沉金板,Velosti VLS5100 搭配32GB MLC ( 16GB x 2) 闪存芯片,外围元器件较少,布线简单。
浩康科技联同Velosti发布USB3.0超高速硬件加密优盘更多电子元器件Datasheet下载>>热门文章与存储相关的五项突破,彻底改变了成本与复杂性的规则东芝推出全球写入速度最快的新系列SD存储卡PMC推出12Gb/s SAS存储解决方案提升SSD闪存性能更多精品文章网友推荐相关文章与存储相关的五项突破,彻底改变了成本与复杂性的规则(2013-09-16)LSI选择Cypress并行nvSRAM非易失性存储器(2013-09-11)东芝推出全球写入速度最快的新系列SD存储卡(2013-09-09)PMC推出12Gb/s SAS存储解决方案提升SSD闪存性能(2013-09-06)2018年全球大数据市场规模将达463.4亿美元(2013-09-05)整合远程服务器和存储设备,实现安全与高效(2013-09-04)数据手册相关热门搜索最近更新元器件热门器件型号热门厂商线性调节器RT9058-25GVL表贴型晶振EQRD32A1J-106.250M交流转直流电源HLG-120H-C1050D电池管理S-8230BAB-I6T1U纸质电容PFD1C152J精彩在线研讨会EDN China > 产品新闻 > 嵌入式系统 > 存储器 > 正文 2013原创博客大赛不限话题月月给你惊喜好礼!TI WEBENCH设计大赛等你参加!投票数:收藏订阅杂志东芝TX03微控制器阵容再添新成员全球首个基于软件的Super-Resolution技...分享到:相关文章力科公司携手百佳泰等共同举办USB3.0专题...富士通推出业界领先PC外围使用的USB3.0–...与存储相关的五项突破,彻底改变了成本与...LSI选择Cypress并行nvSRAM非易失性存储器东芝推出全球写入速度最快的新系列SD存储卡PMC推出12Gb/s SAS存储解决方案提升SSD闪...编辑推荐“推特”吧,工程师们!采用非隔离驱动器的LED灯泡减小了体积与...简化多输出隔离DC-DC转换器设计的栅极驱...用1V电源使激光驱动器保护加倍恢复反激变压器的漏泄能量WinPath4处理器可扩大LTE回传网络容量我来评论您的昵称:香港的游客(您将以游客身份发表,请登录 | 注册)评论:验证码:分享:评论最多文章中移动4G商业化倒计时全年417亿砸向建... ( 3 )方块统计:一种快速估算PCB走线电阻的... ( 2 )智能机硬件“核战”:八核是噱头还是创... ( 2 )手机产业链“核战”:八核竞争难避免 ( 2 )中国发明新晶体管,提高国际芯片制造话... ( 2 )恩智浦将优势技术运用于智能交通和汽车... ( 2 )黑客帝国到来:芯片植入脑意念控制动作 ( 2 )智能手机市场:透着血腥味的强者乐园 ( 1 )一款小型化高压小功率电源的设计 ( 1 )FinFET引爆投资热半导体业战火重燃 ( 1 )商情观察2018年全球大数据市场规模将达463.4亿美元人命关天:FRAM在医疗设备中的应用现状全球速度最快嵌入式存储芯片实现量产2013年第一季度全球SSD出货劲增NAND闪存2013年第一季度意外出现短缺2013第一季度移动DRAM表现逊色新品导读LSI选择Cypress并行nvSRAM非易失性存储器东芝推出全球写入速度最快的新系列SD存储卡PMC推出12Gb/s SAS存储解决方案提升SSD闪...北京石竹科技推出迷你规格SATA 6Gbps固态...世界唯一自加密0.5TB 2.5”SATA SLC固态...恩智浦推出双向电压I2C总线转换缓冲器浩康科技联同Velosti发布USB3.0超高速硬件加密优盘《电子设计技术》网站版权所有,谢绝转载本文链接:浩康科技联同Velosti发布USB3.0超高速硬件加密优盘/ART_8800512114_29_35573_NP_63e510f0.HTM[10月16日]一堂课成为红外专家,研发、品管、热分析轻松搞定![10月22日]新的宽禁带大功率半导体测量技术[10月23日]全新锂电池性能及安全性测试方案[10月24日] AMD嵌入式解决方案 - 针对嵌入式应用程序的DASH实施[10月29日]如何简化与测试包络跟踪功率放大器的功率附加效率测量信号微小幅度变化的示波器技巧Spansion SPI NOR Flash在嵌入式产品的应用力科示波器调制信号时频域分析嵌入式设计调试挑战与低成本综合解决方案恩智浦半导体I2C总线多路复用器和开关介绍数模转换器的信号处理应用模数转换器设计基础专题聚焦2013 IIC China第十八届国际集成电路研讨会暨展览会(IIC China)为前瞻创新技术、行业资讯交流的平台,本次展会将吸引众多国际知名厂商带来新的产业机遇...每月定期向您递送电子元器件规格书网中的最新元器件数据手册下载、库存信息及技术参数更新。
惠普扫描仪Scanjet 5590说明书

订购信息
产品号 说明 附件 C9937-68001 C9915-60056
+
L1910A HP Scanjet 5590数字平板式扫描仪
自动进纸器压纸滚轴替换组件+ 自动进纸器清洁纸10张+
附件可从 /support/scannersupplies 购买。
ቤተ መጻሕፍቲ ባይዱ
附加特性 速度
欲知详情
请访问HP网站:,或者电话垂询当地HP销售办事处 或离您最近的授权经销商。
经销商印章
分辨率 成像技术 位深度 缩放比例 最大文档尺寸 接口及操作系统要求
外形尺寸 重量 最低系统要求
HP 客户服务
1年有限保修+;从购买之日起3年的可选HP金牌服务;24小时免费电子 支持:
+欲了解具体的保修细节,请向当地经销商查询。
包装箱内容
HP售前咨询热线:
完美效果,立竿见影
每分钟可以扫描多达8页,每一次扫描都可以在7秒钟 内快速预览。扫描和预览功能操作十分简便,只需 轻按一键,即可完成。
轻松一键
Scanjet 5590使您快速、轻松地完成各种不同的任务。 扫描、复印、打印、发送电子邮件和将文档保存到光盘 上-只需按下前控制面板上的预配置按钮,即可轻松 完成所有这些工作。
电源 符合的标准
* ISIS 驱动程序需单独购买。 # 扫描速度:测试基于配有256 MB RAM、1.7GHz处理器的HP Vectra PC,操作系统为Windows 2000。 ^ 扫描分辨率设置为200dpi,1位。 † 扫描的最大分辨率受限于可用的计算机内存、磁盘空间及其它系统因素。
Word 、 Adobe PDF 或 JPEG 文件。实际上,“文件 文档”按钮可将文件以一个文档或多个文件的形式, 直接保存到您的计算机上,增加您的灵活性。
CS5460A中文数据手册
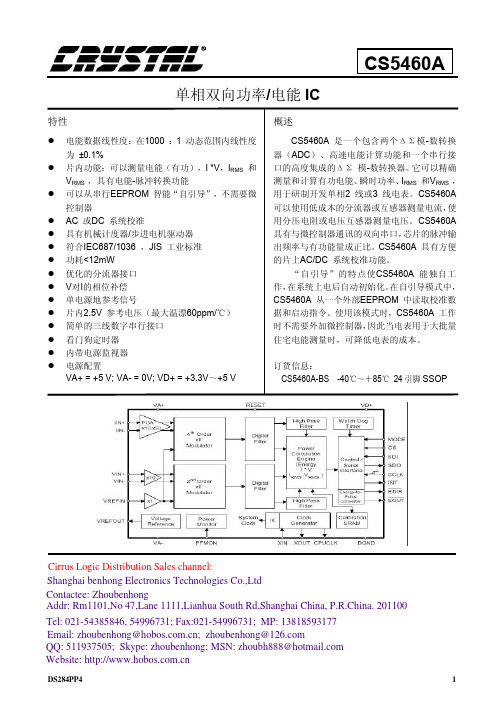
l 片内功能:可以测量电能(有功),I *V,IRMS 和 VRMS ,具有电能-脉冲转换功能
l 可以从串行EEPROM 智能“自引导”,不需要微 控制器
l AC 或DC 系统校准 l 具有机械计度器/步进电机驱动器 l 符合IEC687/1036 ,JIS 工业标准 l 功耗<12mW l 优化的分流器接口 l V对I的相位补偿 l 单电源地参考信号 l 片内2.5V 参考电压(最大温漂60ppm/℃) l 简单的三线数字串行接口 l 看门狗定时器 l 内带电源监视器 l 电源配置
VA+ = +5 V; VA- = 0V; VD+ = +3.3V~+5 V
概述
CS5460A 是一个包含两个ΔΣ模-数转换 器(ADC)、高速电能计算功能和一个串行接 口的高度集成的ΔΣ 模-数转换器。它可以精确 测量和计算有功电能、瞬时功率、IRMS 和VRMS , 用于研制开发单相2 线或3 线电表。CS5460A 可以使用低成本的分流器或互感器测量电流,使 用分压电阻或电压互感器测量电压。CS5460A 具有与微控制器通讯的双向串口,芯片的脉冲输 出频率与有功能量成正比。CS5460A 具有方便 的片上AC/DC 系统校准功能。
cs5460a单相双向功率电能ic特性rms具有电能脉冲转换功能可以从串行eeprom智能自引导不需要微控制器ac或dc系统校准符合iec6871036jis工业标准片内25v参考电压最大温漂60ppm电源配置va0v
华为安装和配置常用外购软件
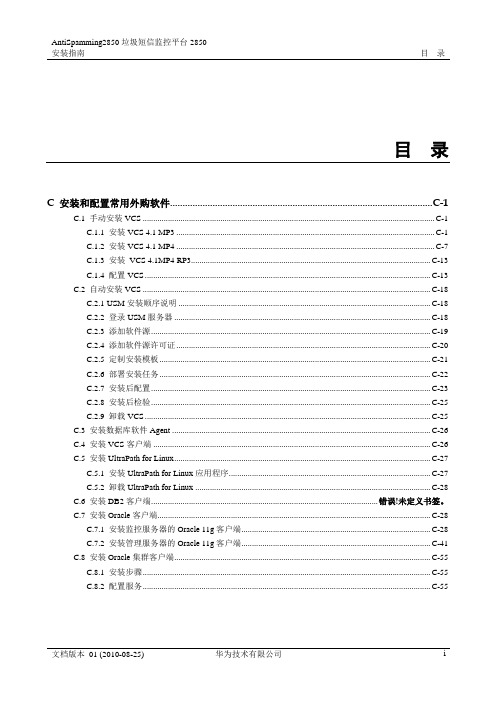
AntiSpamming2850垃圾短信监控平台2850安装指南目录目录C 安装和配置常用外购软件......................................................................................................... C-1C.1 手动安装VCS ............................................................................................................................................................ C-1C.1.1 安装VCS 4.1 MP3 .......................................................................................................................................... C-1C.1.2 安装VCS 4.1 MP4 .......................................................................................................................................... C-7C.1.3 安装VCS 4.1MP4 RP3................................................................................................................................ C-13C.1.4 配置VCS......................................................................................................................................................... C-13C.2 自动安装VCS .......................................................................................................................................................... C-18C.2.1 USM安装顺序说明....................................................................................................................................... C-18C.2.2 登录USM服务器 ......................................................................................................................................... C-18C.2.3 添加软件源 ..................................................................................................................................................... C-19C.2.4 添加软件源许可证........................................................................................................................................ C-20C.2.5 定制安装模板................................................................................................................................................. C-21C.2.6 部署安装任务................................................................................................................................................. C-22C.2.7 安装后配置 ..................................................................................................................................................... C-23C.2.8 安装后检验 ..................................................................................................................................................... C-25C.2.9 卸载VCS......................................................................................................................................................... C-25C.3 安装数据库软件Agent........................................................................................................................................... C-26C.4 安装VCS客户端..................................................................................................................................................... C-26C.5 安装UltraPath for Linux......................................................................................................................................... C-26C.5.1 安装UltraPath for Linux应用程序 ........................................................................................................... C-27C.5.2 卸载UltraPath for Linux .............................................................................................................................. C-28C.6 安装DB2客户端......................................................................................................................错误!未定义书签。
FUJITSU Software BS2000 VM2000 V11.5 虚拟化白皮书说明书

White paperFUJITSU Software BS2000 VM2000 V11.5 Virtualization of BS2000 within the Dynamic Data Center.Introduction 2 VM2000 as base for different system environments 2 Optimal use of resources with VM2000 3 Support of Live Migration 4 Further functional enhancements with VM2000 V11.5 4 Version overview 5 Summary of VM2000 benefits 5IntroductionA virtual infrastructure like FUJITSU Software BS2000 VM2000 reduces IT costs by increasing efficiency,flexibility and response capability. It provides IT resource allocation on-the-fly in response to newbusiness requirements and service requests. Extremely high levels of server utilization are abyproduct.VM2000 supports the simultaneous operation of different, totally segregated system environmentson one server. The operating resources (CPU power and main memory) of one real server can bedistributed across up to 32 BS2000 guest systems. This distribution can be modified dynamically. Theconfiguration of peripherals, including their connections (channels), and other devices can bemodified or extended during live operation.The advantage of using VM2000 as compared with the use of multiple servers is the possibility ofconsolidation with the aim of providing more efficient use of hardware resources, human resourcesand infrastructure.VM2000 as base for different system environmentsCustomers are increasingly faced with the need to handle different system environments simultaneously on one server in order to cope most effectively with the wide variety of IT tasks they have to deal with.The reasons are:⏹Optimization of costs⏹Simple and uniform handling and administration⏹Parallel operation of production, development, test and version updates⏹Automation and operational reliability⏹Differentiated systems, for example for service data centers⏹Availability of backup systems⏹Separation of sensitive applicationsVM2000 V11.5 is exclusively released for the FUJITSU Server BS2000 SE series and supports the current versions of the BS2000 operating system BS2000 OSD/BC as guest systems.The provision of different system environments fulfills VM2000 in a flexible manner by the following features:Simultaneous operation of many guest systemsOn Server Unit x86 up to 32 BS2000 guest systems (incl. monitor system) can run simultaneously (on Server Unit /390 the number of guest systems is limited to 15).Full separation of guest systemsAccess to memory areas and devices of other guest systems is not possible. Faults in operation on one guest system do not affect the other guest systems, even if these errors cause the system to crash.Flexible assignment of resources to the guest systemsMemory, devices, CPU power and global store can be assigned to guest system s “on the fly”. The granularity of assignment is optimally small. The Capacity-on-Demand feature is offered: through connection of extra CPUs on the fly, CPU power can be increased for a certain time. Increased reliability and availabilityWhen the guest system (or the monitor system) fails, it can be automatically restarted. A manual restart of the monitor system can also be initiated. This does not affect the remaining guest systems.When one CPU fails, VM2000 automatically activates the available spare CPU (on servers unit /390), system performance remains unchanged. The same applies to possible affected guest systems: a virtual spare CPU will be switched on – the guest system performance remains the same. With this technique, the availability of mono guest systems is equal to the availability level of multiprocessor guest systems.BS2000 guest systems have the same functionality as systems in native modeThe instruction set, network communication options as well as test and diagnostic utilities of all guest systems running under VM2000 correspond to operation without VM2000.Performance of guest systems is comparable with native modeThe guest systems access the CPUs directly, with only minor emulation required.The memory is assigned permanently to the guest system and necessary address conversion is done by hardware.The guest systems execute the IO’s normally directly.Important guest systems can be prioritized, thus enabling a flexible response to customer requirements.The management of I/O peripherals can be done VM2000 spanning: the reconfiguration and the dynamic expansion of peripheral objects is done in common for all guest systems from the monitor system.Optimal use of resources with VM2000VM2000 allows data center service providers to install one or a small number of high-performance servers that can run several operating systems for a variety of external customers.This enables detailed capacity planning throughout the organization. Obvious knock-on effects of this include cost savings in relation to operating staff and space requirements for computers. The virtualization of resources such as CPU, main memory and global storage guarantees a high level of efficiency and optimum use of resources.The billing of the consumed CPU power can be done in two different ways:⏹Usage basedVM2000 writes VM-specific accounting records. They show the consumed CPU and the time periods of resource assignment.⏹Service level agreementsthe customer is guaranteed a certain CPU power, for which a RPF-based constant pricing is determined. The amount of CPU power used can be limited using the VM2000 function MAX-CPU-UTILIZATION.Formation of CPU poolsCPUs can be combined dynamically CPU pools. For such a pool VMs can be determined, which only can use this pool. The CPUs and VMs of the pool form a part of the Server Unit, which is provided to a customer.Dedicated CPUsIf the number of connected real CPUs in a CPU pool is greater or equal to the sum of connected virtual CPUs, then VM2000 assigns each virtual CPU of a VM one real CPU.The solid CPU assignment is optimal for a sufficient number of real CPUs in terms of performance, because each virtual CPU is always running on one and the same real CPU.Limitation of the CPU power for a group of guest systemsMultiple VMs on a Server Unit /390 can be combined into a VM group for which CPU scheduling specifications (CPU-Quota andMAX-CPU-UTILIZATION) can be effected comprehensive. The first step is to determine which CPU performance and CPU power limitation receives the VM group. In the second step, the power distribution within the VM group is determined. VM2000 provides for priority allocation of the group planned CPU power within the group. Service data centers can thus organize guaranteed computing performance for customers with multiple VMs.Granularity setting of CPU-QUOTA and MAX-CPU-UTILIZATIONThe two attributes for controlling the VM’s performance can be s pecified with two decimal places. This means that for very big Server Units definitions are possible in the one-digit RPF area up to one percent of the CPU capacity.Operation of several guest systems under VM2000 on Server Unit /390Support of Live MigrationLive Migration provides on SE servers an uninterruptable relocation of a running BS2000 guest system from one Server Unit to another. This enables a simple relocation of the guest systems with running applications to another server, for example prior to planned maintenance work respectively updates for hardware or firmware, including the reverse relocation of the systems or changing the load distribution between two servers. Those take place without affecting the users.With the new VM2000 command MIGRATE-VM a virtual machine (BS2000-VM) can be relocated from the local Server Unit to another Server Unit (target SU) of the same SU cluster in a running guest system operation while maintaining the operating resources.The Live Migration of a BS2000-VM between two Server Units /390 in SE network is fully executed by VM2000. The target SU is still located in another SE server. The LM functionality of Xen/X2000 in SU x86 is encased by VM2000 commands and messages. During VM migration of an SU x86 the target SU can be located in the same or a different SE server.In addition to the Live Migration of BS2000-VM (VM status RUNNING or INIT-ONLY/DOWN) VM2000 V11.5 supports also the migration of a VM definition (VM status DEFINED-ONLY) between two Server Units of a SU cluster using the command MIGRATE-VM-DEFINITION.The command CHECK-VM-INTEGRATION can check if a Live Migration of a VM is currently feasible.In addition to VM2000 V11.5 the Live Migration functionality requires SE V6.2 (M2000, X2000, HNC) and ONETSERV V4.0 on all guest systems. Further functional enhancements with VM2000 V11.5Besides Live Migration the following new features are released with VM2000 V11.5:Support of VM recoveryWith the new command RECOVER-VM-DEFINITION a VM definition of a shutdowned or failed Server Unit of the same SU cluster can be adopted. Subsequently, the VM definition can be activated on the local Server Unit and the BS2000 guest system can be booted. The command is currently supported on SU / 390.Update of VM2000 disk configurationService technicians can perform configuration changes in a disk storage system during operation. The new commandCHECK-VM-DISK-CONFIGURATION starts an update of VM2000 disk configuration, in order to implement appropriate configuration changes. The virtual machine system FUJITSU Software BS2000 VM2000 V11.5 exclusively supports the SE servers. On S and SQ servers VM2000 V11.5 has not been released.Version overviewServer models supported by VM2000:*in VM2000 V10.0 the new functions for the SE servers are not availableVersion of operating systems supported by VM2000 V11.0Summary of VM2000 benefits⏹Parallel operation of several BS2000 systems, respectively on Server Unit x86 also Linux/Windows systems on one server ⏹Support for version upgrades of the operating system, system-specific software and application systems⏹More flexible resource distribution than is possible on multi-server configurations⏹Provision of backup systems⏹Price advantages compared to several servers (consolidation)⏹Minimization of planned downtimes by uninterruptable relocation of running BS2000 guest systemsContact:FujitsuBarbara StadlerMies-van-der-Rohe-Str. 8, 80807 Munich GermanyEmail:**************************.com Web site: September 30, 2019 EM EN Copyright © 2019 Fujitsu Technology Solutions GmbHFujitsu and the Fujitsu Logo are trademarks or registered trademarks of Fujitsu Limited in Japan and in other countries. Other company, product or service names can be trademarks or registered trademarks of the respective owner.Delivery subject to availability; right of technical modifications reserved. No liability or warranty assumed for completeness, validity and accuracy of the specified data and illustrations.All designations used may be trademarks and/or copyrights, use of these by third parties for their own purposes could violate the rights of the respective owners.。
CodeWarrior Development Studio for MPC55xx MPC56xx
CodeWarrior Development Studiofor MPC55xx/MPC56xx Microcontrollers,version 2.xx — Quick StartSYSTEM REQUIREMENTSHardware PC with 1.4 GHz Pentium®-compatible processor(1.8 GHz recommended)1GB RAM (2 GB recommended)CD-ROM drive (for installation)USB port (for communication with target hardware)Ethernet port (for network communication)2nd Ethernet port (optional, but recommended forcommunication with target hardware)Operating System Microsoft® Windows® XPWindows Vista™, 32-bit or 64-bit editionWindows 7, 32-bit or 64-bit editionDisk Space 1 GB free hard disk space (2 GB recommended),400 MB of which must be on Windows system disk This document explains how to install this CodeWarrior product and how to use the IDE to create and build an MPC55xx/MPC56xx project.1.Install the CodeWarrior software.a.Insert the CodeWarrior Development Studio installation CD in theCD drive of your PC — the CodeWarrior setup menu appears.NOTE If auto-install is disabled, run Launch.exe manually. This program is in the root directory of the installation CD.CodeWarrior Installation Menu b.Click the Launch the installer option to start the install wizard — the installation menu appears.c.Follow the wizard instructions to install the CodeWarrior software and theP&E ICDPPCNEXUS™ Starter Edition debugger. When the installation finishes, the Installation Complete page appears.d.In this page, check Yes , check for program updates .e.Click Finish — the CodeWarrior Updater window appears.2.Check for software updates.a.In the CodeWarrior Updater window, click Next — the updater checks fornewer versions of the CodeWarrior products currently on your PC.b.If updates are available, follow the on-screen instructions to downloadand install them.c.Click Finish — the updater exits and software installation is complete.1.Create a project.a.From the Windows taskbar, click start — the start menu appears.b.From this menu, select Programs > Freescale CodeWarrior >CW for MPC55xx, MPC56xx 2.xx > CodeWarrior IDE — the Startup dialog box appears.Creating and Building a ProjectStartup Dialog Boxc.From the Startup dialog box, click Create New Project — the NewProject Wizard starts and displays the microcontrollers derivative page.The list below explains the purpose of each of the other Startup dialog box options:–Load Example Project — Displays a list of "cookbook" example projects and creates a new project based on the example you select.–Load Previous Project — Displays a list of recently used projects and opens the one you select.–Start Using CodeWarrior — Lets you use the CodeWarrior IDE's main window.Microcontroller Derivative Paged.From the microcontroller derivative page, select the MPC55xx/MPC56xxmicrocontroller derivative on your target board.e.Click Next — the languages and libraries page appears.NOTE If you selected a multicore device (such as the MPC5514E or the MPC5643L), the multicore configuration page appearsinstead of the languages and libraries page. In this case, referto Targeting MPC55xx-MPC56xx Microcontrollers.pdf forinstructions. This document is in the layout here:installDir\Help\PDF.Languages and Libraries Pagef.In the Project name text box, type the name of the new project.g.In the Location text box, type the path in which to create this project.Alternatively, click Set to display a dialog box with which to selectthis path.h.Check the C checkbox.i.Uncheck the Use size optimized MSL libraries checkbox.j.Check the Use unsigned chars checkbox.k.Uncheck the Use VLE checkbox.l.Click Next — the PC-lint page appears.NOTE If OSEKTurbo is installed, the OSEK page appears. Refer to the targeting manual for instructions that explain how to fill inthis page.PC-lint Pagem.Select No.n.Click Next — the floating-point format support page appears.Floating-Point Format Support Pageo.Select Software.p.Click Finish — the wizard creates a project according to you specifications and displays it in a project window.Project Window2.Build the project.a.From the project window toolbar, click Make — the IDE compiles theproject’s source code and links the resulting object code into anELF-format executable file.Make Buttone the debugger of your choice to run and debug the executable file. NOTE This CodeWarrior product includes a source code debugger and flash programmer from P&E Micro. For instructions thatexplain how to use these tools, refer to theP&E ICDPPCNEXUS Quick Start Guide.Congratulations!You have installed your CodeWarrior software, created an MPC55xx/MPC56xx project, and built this project.NOTE If you obtained this product as part of a CodeWarriorDevelopment Suite, you now have a 30-day evaluation license.To obtain your permanent license, follow the registration andactivation instructions in the CodeWarrior Development SuiteQuick Start.If you have the Special Edition of this product, you do not haveto register because you have a permanent, but feature-limitedlicense. This license lets you develop projects that generatebinaries up to 128 KB in size. To upgrade, you must purchasethe CodeWarrior Development Suite - Professional Edition. Formore information, go to:/CodeWarriorSuites.Freescale, the Freescale logo, and CodeWarrior are trademarks of Freescale Semiconductor, Inc., Reg. U.S. Pat. & Tm. Off. The Power Architecture and word marks and the Power and logos and related marks are trademarks and service marks licensed by . All other product or service names are the property of their respective owners.© 2007-2012 Freescale Semiconductor, Inc.Information in this document is provided solely to enable system and software implementers to use Freescale Semiconductor products. There are no express or implied copyright licenses granted hereunder to design or fabricate any integrated circuits or integrated circuits based on the information in this document.Freescale Semiconductor reserves the right to make changes without further notice to any products herein. Freescale Semiconductor makes no warranty, representation or guarantee regarding the suitability of its products for any particular purpose, nor does Freescale Semiconductor assume any liability arising out of the application or use of any product or circuit, and specifically disclaims any and all liability, including without limitation consequential or incidental damages. “Typical” parameters that may be provided in Freescale Semiconductor data sheets and/or specifications can and do vary in different applications and actual performance may vary over time. All operating parameters, including “Typicals”, must be validated for each customer application by customer's technical experts. Freescale Semiconductor does not convey any license under its patent rights nor the rights of others. Freescale Semiconductor products are not designed, intended, or authorized for use as components in systems intended for surgical implant into the body, or other applications intended to support or sustain life, or for any other application in which the failure of the Freescale Semiconductor product could create a situation where personal injury or death may occur. Should Buyer purchase or use Freescale Semiconductor products for any such unintended or unauthorized application, Buyer shall indemnify and hold Freescale Semiconductor and its officers, employees, subsidiaries, affiliates, and distributors harmless against all claims, costs, damages, and expenses, and reasonable attorney fees arising out of, directly or indirectly, any claim of personal injury or death associated with such unintended or unauthorized use, even if such claim alleges that Freescale Semiconductor was negligent regarding the design or manufacture of the part.How to Contact UsCorporate Headquarters Freescale Semiconductor, Inc. 6501 William Cannon Drive West Austin, Texas 78735U.S.A.World Wide Web /codewarrior Technical Support /supportRevised: 9 February 201210Freescale, the Freescale logo and CodeWarrior are trademarks of Freescale Semiconductor, Inc., Reg. U.S. Pat. & Tm. Off.All other product or service names are the property of their respective owners. © 2010-2012 Freescale Semiconductor, Inc. 926-76773 Rev J。
NEC Express5800 53Xi系列服务器系统配置指南说明书

Technical SpecificationModel number Processor ChipsetTypeMountable memory Maximum sizeError detection/correction Number of slots Mountable HDD Maximum sizeMaximum mountable number ControllerInternal graphics Chip type Mountable graphics card Network functionSerial Display USB *03LANAudio *03Internal 3.5 inch bay [Open]5.25 inch bay [Open]Riser cardStandard Option (N8006-1011)PCI Express (x16) [Open]PCI Express (x4) [Open] 1 slot [1] (Mechanically x8, Short size)PCI Express 2.0 supported-32 bit PCI slot [Open]-1 slot [1] (33MHz/5V, Short size)Power consumptionAt maximum configuration *05 (under heav y load)*1 There are some functional limitations for Windows® 8 Pro 64 bit model. (RAID function not supported, some option boards not supported (LAN board))*3 Not all the peripherals are guaranteed to run properly.*5 Power consumption of the serv er in the maximum configuration is measured.SATA HDD: 500GB / 1TB / 2TB (7,200rpm)NEC Express5800/53XiNP8000-9011FP02/03/04/05/06Intel® C226DDR3-1600 (PC3-12800) SDRAMIntel® X eon® Processor E3-1275v3 (3.50GHz, 8MB Cache, Quad Core)Intel® X eon® Processor E3-1225v3 (3.20GHz, 8MB Cache, Quad Core)4th Generation Intel® Core™ i3 Processor 4330 (3.50GHz, 4MB Cache, Dual Core)1 slot [1] (Short size) PCI Express 3.0 supported90×373×336 mm (Vertical mounting, stabilizers not included)160×373×336 mm (Vertical mounting, stabilizers included)336×373×97 mm (Horizontal mounting)1000BASE-T / 100BASE-TX / 10BASE-T (Wake On LAN/PX E boot supported) x2RS-232C D-sub 9 pin (16550A compatible)×1 (Rear)USB 3.0 compliant×6 (Rear: 6), USB 2.0 compliant×2 (Front: 2)RJ-45×2 (Rear)DP×2 (Rear), mini D-sub 15 pin×1 (Rear) (Triple monitor supported)Supported OS Attached softwareApprox. 9.2 kgAC100/200V ±10%, 50/60Hz±3Hz250VA/244WWindows® 8 Pro 64 bit *01 Windows® 7 Professional (SP1) 32 bit*07 Windows® 7 Professional (SP1) 64 bit*07In operation: 10 - 35°C / 10 - 80% (No condensation) In storage: -10 - 55°C / 10 - 80% (No condensation)Expansion slot *04Dimension (W x D x H)Weight (Maximum)PowerTemperature/humidity condition *06MemoryInternal HDD/SSDInterfaceExpansion bay Headphone terminal×1 (Front), microphone terminal (Stereo)×2 (Front:1, Rear:1),Line-out (Dual-used for headphone)×1 (Rear), Line-in×1 (Rear)2 slots [1]1 slot (Flat type) [0]SATA HDD: 4TB2SATA III/600(LSI Embedded MegaRAID™: RAID-0/1 supported)*01Intel® HD Graphics P4600 (Built-in in CPU)NVIDIA Quadro® K600 / NVIDIA Quadro® K2000 / NVIDIA Quadro® K40004GB / 8GB32GB *02ECC 4 slots*6 When the server is stored at low or high temperature, the system clock may run significantly faster or slower. Use of a time serv er (NTP serv er) is recommended if high accuracy is required in the system clock.*7 When installing Windows 7 Professional manually in the onboard RAID configuration or optional RAID configuration, prepare your USB memory or choose Flash FDD [N8160-86].*2 When 4GB memory is installed in Windows 7 Professional, usable memory is approximately 3GB.*4 The depth of the mountable board is either within 312 mm (long size), 350 mm with the retainer, 173 mm (short size), or 167.6 mm (MD2). Also, the width of the mountable board is either within 111 mm (with no "Low-Profile" indication) or within 64 mm (with "Low-Profile" indication).EX PRESSBUILDER, NEC ESMPRO Manager, NEC ESMPRO AgentWorkstationConfigurationNP8000-9011FP02 (Express5800/53Xi (E3-1275v3/MULTI))CPU Intel® Xeon® Processor E3-1275v3 (3.50 GHz, 8MB Cache, 4-core)MEM lessHDD lessODD DVD Super MULTIRiser PCI Express x16, PCI Express x4GA CPU Integrated GANP8000-9011FP03 (Express5800/53Xi (E3-1225v3/DVD))CPU Intel® Xeon® Processor E3-1225v3 (3.20 GHz, 8MB Cache, 4-core)MEM lessHDD lessODD DVD ROMRiser PCI Express x16, PCI Express x4GA CPU Integrated GANP8000-9011FP04 (Express5800/53Xi (E3-1225v3/MULTI))CPU Intel® Xeon® Processor E3-1225v3 (3.20 GHz, 8MB Cache, 4-core)MEM lessHDD lessODD DVD Super MULTIRiser PCI Express x16, PCI Express x4GA CPU Integrated GANP8000-9011FP05 (Express5800/53Xi (Ci3-4330/DVD))CPU Intel® Core i3-4330 (3.50 GHz, 4MB Cache, 2-core)MEM lessHDD lessODD DVD ROMRiser PCI Express x16, PCI Express x4GA CPU Integrated GANP8000-9011FP06 (Express5800/53Xi (Ci3-4330/MULTI))CPU Intel® Core i3-4330 (3.50 GHz, 4MB Cache, 2-core)MEM lessHDD lessODD DVD Super MULTIRiser PCI Express x16, PCI Express x4GA CPU Integrated GANote on purchaseThe models stated above do not include memory, HDD, keyboard and mouse, which are required components for a workstation. Select your desired components from the lists.Note on configurationWindows 8 Pro system has limitations such as on-board RAID and certain optional board not supported.CPUOne processor comes standard with this workstation. ConfigurationCPU socketx1Product listNP8000-9011FP02Intel® Xeon® Processor E3-1275v3 (3.50 GHz, 8MB Cache, 4-core,Built-in graphics (HD Graphics P4600)NP8000-9011FP03NP8000-9011FP04Intel® Xeon® Processor E3-1225v3 (3.20 GHz, 8MB Cache, 4-core),Built-in graphics (HD Graphics P4600)NP8000-9011FP05NP8000-9011FP064th Generation Intel Core i3 Processor4330 (3.50 GHz, 4MB Cache,2-core), Built-in graphics (HD Graphics P4600)Memory boardUp to four memory boards can be installed in this workstation. Select your desired memories from the list. ConfigurationMemory slotx4Product listN8002-1788GB Memory Board8GB x1, DDR3-1600 SDRAM Unbuffered, ECC memory N8002-1774GB Memory Board4GB x1, DDR3-1600 SDRAM Unbuffered, ECC memoryNote on configurationTwo identical memories in pair installed in a workstation works as two-way interleaved memory.Hard disk drive(HDD)Up to two SATA HDDs can be installed in this workstation. Select a configuration below and your desired HDDs from the list.SATA HDD on-board connectionSATA disk drive is connected individually or through on-board RAID connection (RAID 0/1).ConfigurationSATA connectorx2Standard SATA cable for 1st disk drive1st HDDK410-311(00)SATA cable30cm-cable for additional SATA HDD. Straight connector.2nd HDDProduct list N8050-2202TB HDD SATA III/600, 7200 rpm, 3.5-inch N8050-2191TB HDD SATA III/600, 7200 rpm, 3.5-inch N8050-218500GB HDD SATA III/600, 7200 rpm, 3.5-inchNote on purchase-A SATA cable comes with this workstation for connecting one HDD. With 2 or more HDDs, the designated SATA cables should be selected.-On-board RAID is not supported for Windows 8 Pro system.-To configure RAID pack, select the same HDDs.Note on configurationSee the end of this guide for HDD configurations supported by your operating systems.Optical disk driveOne optical disk drive comes standard with this workstation.ConfigurationSATA connectorx1Product listNP8000-9011FP02NP8000-9011FP04NP8000-9011FP06DVD Super Multi Drive as standardNP8000-9011FP03NP8000-9011FP05DVD-ROM Drive as standardKeyboardOne keyboard can be connected to this workstation.MouseOne mouse can be connected to this workstation. Select your desired mouse from the list. ConfigurationUSB connectorx6 (Rear)x2 (Front)Product list (USB interface)N8052-06USB 2-Button Optical Wheel Mouse 2 button optical wheel mouse. USB connection.N8170-22Mouse 2 button optical wheel mouse. USB connection. Riser cardPCI slots (PCI Express (x16) and PCI Express (x4)) come standard with this workstation. By replacing the riser card, the PCI slots can be changed to PCI Express (x16) and PCI (32bit).ConfigurationRiser card connectorx1Product listOptional N8006-1011Riser Card (PCI)Riser card for PCI Express (x16)and PCI(32bit).Standard -Riser Card (PCIe4)Riser card for PCI Express (x16) and PCIExpress (x4).ConfigurationUSB connectorx6 (Rear)x2 (Front)Product listN8170-25104 Keyboard USB, EnglishGraphicsWith built-in graphics processor installed, on-board graphics become available as a standard. By installing graphics accelerator, a greater features become available. Select your desired graphics accelerator from the list. ConfigurationDisplay connector (DP)x2N8005-1004DP-DVI conversion connectorA cable to convert DP output to DVI-D(single-link) output.Display (one or two)Displayconnector(analog RGB)x1Display (one)Riser card connectorx1Riser card (PCI Express (x16))Product listN8005-114Graphics Accelerator (NVIDIAQuadro K4000)NVIDIA Quadro® K4000 (3GB GDDR5) with DVI-VGA conversion connector x1N8005-113Graphics Accelerator (NVIDIAQuadro K2000)NVIDIA Quadro® K2000 (2GB GDDR5) with DVI-VGA conversion connector x1N8005-112Graphics Accelerator (NVIDIAQuadro K600)NVIDIA Quadro® K600 (1GB GDDR3) with DVI-Iinterface (dual-link support) x1, DP x1 with DVI-VGA conversion connector x1Display (from one to three)Additional product listN8005-1001 DVI-VGA Conversion Connector A connector to convert DVI-I output to VGA (15-pin mini D-sub) output.N8005-1004 DP-DVI Conversion Connector A cable to convert DP output to DVI-D (single-link) output.Internal power connectorx1K410-312(00)Power Branch Cable53Xi bifurcated cable supplies power tohigh-end graphics board.Graphics acceleratorNote on purchase-With Quadro K4000/K2000/K600 installed, select additional DP-DVI conversion connector to connect two displays via DVI interface. Two displays with VGA interface cannot be connected.-With Quadro K4000 installed, select Power Branch Cable.Network (LAN)This workstation has two LAN connectors to connect to external network device. Teaming feature such as AFT/ALB is supported. By installing LAN board, a connecting port can be added. Select your desired LAN board from the list.ConfigurationLAN connectorX2Connect to a network device.Riser card connectorX1Raiser cardProduct list N8104-1211000BASE-T (2ch)PCI Express (x4), Full height, short length N8104-1261000BASE-TPCI Express (x1), Low profile/full height, short lengthConnect to a network deviceNote on configurationWhen AMT is set to enable, the teaming feature is disabled.Note on purchase-Optional LAN board is not supported for Windows 8 Pro system.-When standard riser card is used with graphics accelerator, LAN board cannot be selected for slot (x16).Serial deviceThis workstationhas one serial port to connect to external serial device.ConfigurationSerial port connectorx1Connect to serial deviceNote on configurationThe serial port in this workstation is only for connecting serial device. A dedicated or public line cannot be connected.Other optional expansionConfigurationExternal FDDN8160-86Flash FDD External USB connection. 1.44MB flash memory to emulate FDD. Unable toconcurrently connect two FDDs. Connection to the workstation is exclusivelylimited to one FDD when another FDD is connected.Note on purchaseTo install on-board RAID configuration, prepare your own USB memory, or select Flash FDD [N8160-86].PCI slots supported by optional productsTo add PCI board to this workstation, installation location varies depending on the PCI board type. Refer the below table and select a required PCI board.PCI #1PCI #2PCI #1PCI #2Type PCI ExpressPCI ExpressPCI ExpressPCI Slot spec.x16x4(x8 mechanical)x1632bit/33M hz/5VSlot size Board sizeN8005-114O -O -Quadro K4000, bifurcated power cable [K410-312(00)] required, Windows 8 not supported N8005-113O -O -Quadro K2000N8005-112O -O -Quadro K600N8104-121O *1X O *1-N8104-126O*1XO*1-X : Supported (recommended position), O: Supported, -: Not supportedProduct CodeDescriptionRemarksGraphics AcceleratorStandard riser cardSlotFull HeightShort lengthOptional N8006-1011SlotFull Height Short lengthGraphics Accelerator 1000BASE-T (2ch)1000BASE-TWindows 8 not supported*1 PCI Express (x16) slot can be used only when graphics accelerator is not installed.Graphics AcceleratorSupported HDD configurationsWhen HDD is connected to this workstation, configuration supported varies depending on the connected HDD. Refer the below table and select required HDD configuration.53XiSATA RAID config HDD RAID config HDDOnboardNon RAID 1O RAID 01‐Non RAID 2O RAID 12O RAID 02O RAID 01RAID 01OO : Supported ‐ : Not supported2 units# of HDD devicesRAID supportPack 1Pack 21 unit。
xerox DocuMate 5540 扫描仪用户指南说明书

年月®®扫描仪用户指南用户请确保在使用机器之前阅读本说明书。
阅读完本说明书之后,请妥善保管。
© 2017 Xerox 公司。
保留所有权利。
XEROX®、XEROX and Design® 和 DocuMate® 是 Xerox 公司在美国和/或其他国家/地区的注册商标,其使用需经 Xerox 公司许可。
Visioneer 已得到 Xerox® 的商标许可。
Content © 2017 Visioneer, Inc. 保留所有权利。
Visioneer 品牌名和 OneTouch® 徽标是 Visioneer, Inc. 的注册商标。
请前往,选择您的产品型号,然后点击 “保修计划” 链接,查看扫描仪的保修条款和条件。
文档版本:05-0893-300(2017 年 12 月)未经书面许可,不得复制、改编或翻译,除非版权法允许。
所声明的版权保护包括各种内容的受版权保护的材料和信息,这些材料和信息现在被法规或司法所允许或在本文中得到许可,包括但不限于从屏幕上所显示的软件程序中生成的材料,如样式、模板、图标、屏幕显示、外观等。
ISIS®是 EMC2®公司在美国和/或其他国家/地区的注册商标。
Adobe®、Adobe® Acrobat®、Adobe® Reader®以及 Adobe® PDF 徽标是 Adobe Systems Incorporated 在美国和/或其他国家的注册商标。
Post-It®是 3M 在美国和/或其他国家的注册商标。
Microsoft 是 Microsoft Corporation 在美国的注册商标。
Windows™ 和 SharePoint®是 Microsoft Corporation 的注册商标。
番茄花园WinXP系统光集成技术分析(下)5
番茄花园WinXP系统光集成技术分析(下)5番茄花园 Win XP系统光集成技术分析(下)52009-10-02 00:02PCI\VEN_1095&DEV_3512&SUBSYS_35121095&REV_01 = "si3112r"PCI\VEN_1095&DEV_3112&SUBSYS_2A1E103C = "si3112r"PCI\VEN_1095&DEV_3112&SUBSYS_0C2A105B = "si3112r"PCI\VEN_1095&DEV_3112&SUBSYS_0C22105B = "si3112r"PCI\VEN_1095&DEV_3112&SUBSYS_0C44105B = "si3112r"PCI\VEN_1095&DEV_3112&SUBSYS_0C43105B = "si3112r"PCI\VEN_1095&DEV_3112&SUBSYS_0C42105B = "si3112r"PCI\VEN_1095&DEV_3112&SUBSYS_0C41105B = "si3112r"PCI\VEN_1095&DEV_3112&SUBSYS_0C40105B = "si3112r"PCI\VEN_1095&DEV_3112&SUBSYS_0C58105B = "si3112r"PCI\VEN_1095&DEV_3112&SUBSYS_0C13105B = "si3112r"PCI\VEN_1095&DEV_3112&SUBSYS_0C0F105B = "si3112r"PCI\VEN_1095&DEV_3112&SUBSYS_F641270F = "si3112r"PCI\VEN_1095&DEV_3112&SUBSYS_100415BD = "si3112r"PCI\VEN_1095&DEV_3112&SUBSYS_340217F2 = "si3112r"PCI\VEN_1095&DEV_3112&SUBSYS_15D40035 = "si3112r"PCI\VEN_1095&DEV_3112&SUBSYS_C2011297 = "si3112r"PCI\VEN_1095&DEV_3112&SUBSYS_C2001297 = "si3112r"PCI\VEN_1095&DEV_3112&SUBSYS_90171695 = "si3112r"PCI\VEN_1095&DEV_3112&SUBSYS_A71910FD = "si3112r"PCI\VEN_1095&DEV_3112&SUBSYS_A41910FD = "si3112r"PCI\VEN_1095&DEV_3112&SUBSYS_A41810FD = "si3112r"PCI\VEN_1095&DEV_3112&SUBSYS_904B1905 = "si3112r"PCI\VEN_1095&DEV_3112&SUBSYS_904C1905 = "si3112r"PCI\VEN_1095&DEV_3112&SUBSYS_92151905 = "si3112r"PCI\VEN_1095&DEV_3112&SUBSYS_044CA0A0 = "si3112r" PCI\VEN_1095&DEV_3112&SUBSYS_044DA0A0 = "si3112r" PCI\VEN_1095&DEV_3112&SUBSYS_0270A0A0 = "si3112r" PCI\VEN_1095&DEV_3112&SUBSYS_809D1043 = "si3112r" PCI\VEN_1095&DEV_3112&SUBSYS_249510F1 = "si3112r" PCI\VEN_1095&DEV_3112&SUBSYS_5930107D = "si3112r" PCI\VEN_1095&DEV_3112&SUBSYS_1C00147B = "si3112r" PCI\VEN_1095&DEV_3112&SUBSYS_1804147B = "si3112r" PCI\VEN_1095&DEV_3112&SUBSYS_1802147B = "si3112r" PCI\VEN_1095&DEV_3112&SUBSYS_1404147B = "si3112r" PCI\VEN_1095&DEV_3112&SUBSYS_1402147B = "si3112r" PCI\VEN_1095&DEV_3112&SUBSYS_100B147B = "si3112r" PCI\VEN_1095&DEV_3112&SUBSYS_1014147B = "si3112r" PCI\VEN_1095&DEV_3112&SUBSYS_A0151019 = "si3112r" PCI\VEN_1095&DEV_3112&SUBSYS_A0141019 = "si3112r" PCI\VEN_1095&DEV_3112&SUBSYS_A0131019 = "si3112r" PCI\VEN_1095&DEV_3112&SUBSYS_A0121019 = "si3112r" PCI\VEN_1095&DEV_3112&SUBSYS_A0111019 = "si3112r" PCI\VEN_1095&DEV_3112&SUBSYS_B0031458 = "si3112r" PCI\VEN_1095&DEV_3112&SUBSYS_34228086 = "si3112r" PCI\VEN_1095&DEV_3112&SUBSYS_611215D9 = "si3112r" PCI\VEN_1095&DEV_3112&SUBSYS_61121095 = "si3112r" PCI\VEN_1002&DEV_437A&SUBSYS_437A1002 = "si3112" PCI\VEN_1002&DEV_4379&SUBSYS_43791002 = "si3112" PCI\VEN_1002&DEV_436E&SUBSYS_436E1002 = "si3112" PCI\VEN_1095&DEV_3512&SUBSYS_145A1462 = "si3112" PCI\VEN_1095&DEV_3512&SUBSYS_820B104D = "si3112" PCI\VEN_1095&DEV_3512&SUBSYS_81E8104D = "si3112" PCI\VEN_1095&DEV_3512&SUBSYS_B0021458 = "si3112"PCI\VEN_1095&DEV_3512&SUBSYS_35121014 = "si3112" PCI\VEN_1095&DEV_3512&SUBSYS_01661028 = "si3112" PCI\VEN_1095&DEV_3512&SUBSYS_35121095 = "si3112" PCI\VEN_1095&DEV_3112&SUBSYS_81E8104D = "si3112" PCI\VEN_1095&DEV_3112&SUBSYS_01661028 = "si3112" PCI\VEN_1095&DEV_3112&SUBSYS_B0021458 = "si3112" PCI\VEN_1095&DEV_3112&SUBSYS_311215D9 = "si3112" PCI\VEN_1095&DEV_3112&SUBSYS_34238086 = "si3112" PCI\VEN_1095&DEV_3112&SUBSYS_31121095 = "si3112" PCI\VEN_1095&DEV_0680&SUBSYS_36801095 = "pnp680r" PCI\VEN_1095&DEV_0680&SUBSYS_06801095 = "pnp680" PCI\VEN_1095&DEV_0649&SUBSYS_36491095 = "pnp649r" PCI\VEN_1077&DEV_1216&SUBSYS_001215D4 = "ql12160" PCI\VEN_1077&DEV_1216&SUBSYS_00078086 = "ql12160" PCI\VEN_1077&DEV_1016&SUBSYS_00081077 = "ql12160" PCI\VEN_1077&DEV_1216&SUBSYS_00071077 = "ql12160" PCI\VEN_1077&DEV_2312&SUBSYS_010C1077 = "ql2300" PCI\VEN_1077&DEV_2312&SUBSYS_013C1028 = "ql2300" PCI\VEN_1077&DEV_2312&SUBSYS_011A1028 = "ql2300" PCI\VEN_1077&DEV_2312&SUBSYS_01091077 = "ql2300" PCI\VEN_1077&DEV_2312&SUBSYS_01021077 = "ql2300" PCI\VEN_1077&DEV_2312&SUBSYS_01001077 = "ql2300" PCI\VEN_1077&DEV_2300&SUBSYS_00091077 = "ql2300" PCI\VEN_1077&DEV_2200&SUBSYS_00021077 = "ql2200" PCI\VEN_1077&DEV_2100&SUBSYS_00011077 = "ql2100" PCI\VEN_105A&DEV_4D38&SUBSYS_4D33105A = "ultra" PCI\VEN_105A&DEV_0D30&SUBSYS_4D33105A = "ultra" PCI\VEN_105A&DEV_4D30&SUBSYS_4D33105A = "ultra" PCI\VEN_105A&DEV_4D68 = "ultra"PCI\VEN_105A&DEV_4D69 = "ultra"PCI\VEN_105A&DEV_3D17 = "ulsata2"PCI\VEN_105A&DEV_3D73 = "ulsata2"PCI\VEN_105A&DEV_3577&SUBSYS_3D77105A = "ulsata2"PCI\VEN_105A&DEV_3D18 = "ulsata2"PCI\VEN_105A&DEV_3D75&SUBSYS_3D75105A&REV_02 = "ulsata2"PCI\VEN_105A&DEV_3D75 = "ulsata2"PCI\VEN_105A&DEV_3D74 = "ulsata2"PCI\VEN_105A&DEV_6626 = "ulsata"PCI\VEN_105A&DEV_3318 = "ulsata"PCI\VEN_105A&DEV_3375 = "ulsata"PCI\VEN_8086&DEV_1962 = "sptrak"PCI\VEN_105A&DEV_6622 = "fastsx"PCI\VEN_105A&DEV_6621 = "fastsx"PCI\VEN_105A&DEV_8006 = "s150sx8"PCI\VEN_105A&DEV_8004 = "s150sx8"PCI\VEN_105A&DEV_8002 = "s150sx8"PCI\VEN_105A&DEV_8000 = "s150sx8"PCI\VEN_105A&DEV_3373 = "aftx2k"PCI\VEN_105A&DEV_3376 = "aftx2k"PCI\VEN_105A&DEV_3319 = "fasttx2k"PCI\VEN_105A&DEV_3371 = "fasttx2k"PCI\VEN_105A&DEV_6629 = "fasttx2k"PCI\VEN_105A&DEV_7275 = "fasttrak"PCI\VEN_105A&DEV_7275&CC_0104 = "fasttrak"PCI\VEN_105A&DEV_5275&CC_0104 = "fasttrak"PCI\VEN_105A&DEV_5275 = "fasttrak"PCI\VEN_105A&DEV_6269 = "fasttrak"PCI\VEN_105A&DEV_6268 = "fasttrak"PCI\VEN_105A&DEV_6268&CC_0104 = "fasttrak"PCI\VEN_105A&DEV_4D38&SUBSYS_4D39105A = "fasttrak" PCI\VEN_105A&DEV_4D38&CC_0104 = "fasttrak"PCI\VEN_105A&DEV_4D30&SUBSYS_4D39105A = "fasttrak" PCI\VEN_105A&DEV_4D30&CC_0104 = "fasttrak"PCI\VEN_105A&DEV_1275&CC_0104 = "fasttrak"PCI\VEN_105A&DEV_0D30&CC_0104 = "fasttrak"*NVRAIDBUS = "nvraid"*_NVRAIDBUS = "nvraid"GenNvRaidDisk = "nvraid"PCI\VEN_10DE&DEV_0055 = "nvatabus"PCI\VEN_10DE&DEV_0054 = "nvatabus"PCI\VEN_10DE&DEV_0053 = "nvatabus"PCI\VEN_10DE&DEV_003E = "nvatabus"PCI\VEN_10DE&DEV_0036 = "nvatabus"PCI\VEN_10DE&DEV_0035 = "nvatabus"PCI\VEN_10DE&DEV_00E5 = "nvatabus"PCI\VEN_10DE&DEV_00E3 = "nvatabus"PCI\VEN_10DE&DEV_00EE = "nvatabus"PCI\VEN_10DE&DEV_00D5 = "nvatabus"PCI\VEN_10DE&DEV_0085 = "nvatabus"PCI\VEN_10DE&DEV_008E = "nvatabus"PCI\VEN_1000&DEV_0032 = "symmpi"PCI\VEN_1000&DEV_0030 = "symmpi"PCI\VEN_1000&DEV_0628 = "symmpi"PCI\VEN_1000&DEV_0626 = "symmpi"PCI\VEN_1000&DEV_0624 = "symmpi"PCI\VEN_1000&DEV_0622 = "symmpi"PCI\VEN_1069&DEV_BA56&SUBSYS_00301069 = "dac2w2k" PCI\VEN_1069&DEV_BA56&SUBSYS_00401069 = "dac2w2k"PCI\VEN_1011&DEV_1065&SUBSYS_00201069 = "dac960nt"PCI\VEN_1069&DEV_0010&SUBSYS_00101069 = "dac960nt"PCI\VEN_1069&DEV_0050&SUBSYS_00501069 = "dac2w2k"PCI\VEN_1069&DEV_0050&SUBSYS_00521069 = "dac2w2k"PCI\VEN_1069&DEV_0050&SUBSYS_00541069 = "dac2w2k"PCI\VEN_101E&DEV_1960&SUBSYS_60E8103C = "mraid35x"PCI\VEN_101E&DEV_1960&SUBSYS_60E7103C = "mraid35x"PCI\VEN_8086&DEV_1960&SUBSYS_10CD103C = "mraid35x"PCI\VEN_8086&DEV_1960&SUBSYS_10CC103C = "mraid35x"PCI\VEN_8086&DEV_1960&SUBSYS_10C7103C = "mraid35x"PCI\VEN_8086&DEV_1960&SUBSYS_10C6103C = "mraid35x"PCI\VEN_1000&DEV_1960&SUBSYS_45231000 = "mraid35x"PCI\VEN_1000&DEV_1960&SUBSYS_05231000 = "mraid35x"PCI\VEN_1000&DEV_1960&SUBSYS_05221000 = "mraid35x"PCI\VEN_101E&DEV_1960&SUBSYS_0522101E = "mraid35x"PCI\VEN_1000&DEV_0407&SUBSYS_05321000 = "mraid35x"PCI\VEN_1000&DEV_0407&SUBSYS_05311000 = "mraid35x"PCI\VEN_1000&DEV_1960&SUBSYS_05201000 = "mraid35x"PCI\VEN_1000&DEV_1960&SUBSYS_05181000 = "mraid35x"PCI\VEN_1000&DEV_1960&SUBSYS_A5201000 = "mraid35x"PCI\VEN_101E&DEV_1960&SUBSYS_0511101E = "mraid35x"PCI\VEN_8086&DEV_1960&SUBSYS_0503101E = "mraid35x"PCI\VEN_101E&DEV_1960&SUBSYS_0503101E = "mraid35x"PCI\VEN_8086&DEV_1960&SUBSYS_0494101E = "mraid35x"PCI\VEN_101E&DEV_1960&SUBSYS_0494101E = "mraid35x"PCI\VEN_8086&DEV_B555&SUBSYS_0489101E = "mraid35x" PCI\VEN_1011&DEV_0046&SUBSYS_0489101E = "mraid35x" PCI\VEN_101E&DEV_1960&SUBSYS_0475101E = "mraid35x" PCI\VEN_8086&DEV_1960&SUBSYS_0475101E = "mraid35x" PCI\VEN_8086&DEV_1960&SUBSYS_0762101E = "mraid35x" PCI\VEN_1000&DEV_0408&SUBSYS_00021000 = "mraid35x" PCI\VEN_1000&DEV_0408&SUBSYS_00011000 = "mraid35x" PCI\VEN_1000&DEV_0407&SUBSYS_05301000 = "mraid35x" PCI\VEN_101E&DEV_1960&SUBSYS_0493101E = "mraid35x" PCI\VEN_8086&DEV_1960&SUBSYS_0493101E = "mraid35x" PCI\VEN_8086&DEV_1960&SUBSYS_0490101E = "mraid35x" PCI\VEN_101E&DEV_1960&SUBSYS_0471101E = "mraid35x" PCI\VEN_8086&DEV_1960&SUBSYS_0471101E = "mraid35x" PCI\VEN_8086&DEV_1960&SUBSYS_0467101E = "mraid35x" PCI\VEN_8086&DEV_1960&SUBSYS_0466101E = "mraid35x" PCI\VEN_8086&DEV_1960&SUBSYS_0438101E = "mraid35x" PCI\VEN_101E&DEV_9060 = "mraid35x"PCI\VEN_8086&DEV_1960&SUBSYS_0431101E = "mraid35x" PCI\VEN_101E&DEV_9010 = "mraid35x"PCI\VEN_1166&DEV_0213&SUBSYS_02131000 = "megaide" PCI\VEN_1095&DEV_3112&SUBSYS_05341000 = "megaide" PCI\VEN_1095&DEV_0680&SUBSYS_05241000 = "megaide" PCI\VEN_1095&DEV_0649&SUBSYS_FE001179 = "megaide" PCI\VEN_1095&DEV_0649&SUBSYS_007E0E11 = "megaide" PCI\VEN_1095&DEV_0649&SUBSYS_005D0E11 = "megaide" PCI\VEN_1095&DEV_0649&SUBSYS_0649101E = "megaide" PCI\VEN_197B&DEV_2360 = "jahci"PCI\VEN_1283&DEV_8212&SUBSYS_0C7F105B = "iteraid" PCI\VEN_1283&DEV_8212&SUBSYS_0C7E105B = "iteraid" PCI\VEN_1283&DEV_8212&SUBSYS_0C7D105B = "iteraid"PCI\VEN_1283&DEV_8212&SUBSYS_0C7C105B = "iteraid" PCI\VEN_1283&DEV_8212&SUBSYS_0C7B105B = "iteraid" PCI\VEN_1283&DEV_8212&SUBSYS_0C7A105B = "iteraid" PCI\VEN_1283&DEV_8211&SUBSYS_72001565 = "iteraid" PCI\VEN_1283&DEV_8212&SUBSYS_72001565 = "iteraid" PCI\VEN_1283&DEV_8212&SUBSYS_10181919 = "iteraid" PCI\VEN_1283&DEV_8212&SUBSYS_10171919 = "iteraid" PCI\VEN_1283&DEV_8212&SUBSYS_100F1919 = "iteraid" PCI\VEN_1283&DEV_8212&SUBSYS_100E1919 = "iteraid" PCI\VEN_1283&DEV_8212&SUBSYS_0C2D105B = "iteraid" PCI\VEN_1283&DEV_8212&SUBSYS_0CC1105B = "iteraid" PCI\VEN_1283&DEV_8212&SUBSYS_0CC0105B = "iteraid" PCI\VEN_1283&DEV_8212&SUBSYS_82121019 = "iteraid" PCI\VEN_1283&DEV_8212&SUBSYS_0C2F105B = "iteraid" PCI\VEN_1283&DEV_8212&SUBSYS_0C25105B = "iteraid" PCI\VEN_1283&DEV_8212&SUBSYS_2801270F = "iteraid" PCI\VEN_1283&DEV_8212&SUBSYS_90261695 = "iteraid" PCI\VEN_1283&DEV_8211&SUBSYS_0A46174B = "iteraid" PCI\VEN_1283&DEV_8212&SUBSYS_0A46174B = "iteraid" PCI\VEN_1283&DEV_8212&SUBSYS_1940B000 = "iteraid" PCI\VEN_1283&DEV_8212&SUBSYS_1458B000 = "iteraid" PCI\VEN_1283&DEV_8212&SUBSYS_2C0717F2 = "iteraid" PCI\VEN_1283&DEV_8211&SUBSYS_81381043 = "iteraid" PCI\VEN_1283&DEV_8212&SUBSYS_81381043 = "iteraid" PCI\VEN_1283&DEV_8212&SUBSYS_813A1043 = "iteraid" PCI\VEN_1283&DEV_8211&SUBSYS_2A1D103C = "iteraid" PCI\VEN_1283&DEV_8212&SUBSYS_2A1D103C = "iteraid" PCI\VEN_1283&DEV_8211&SUBSYS_82111283 = "iteraid" PCI\VEN_1283&DEV_8212&SUBSYS_00000000 = "iteraid" PCI\VEN_1283&DEV_8212&SUBSYS_00011283 = "iteraid"PCI\VEN_8086&DEV_0601 = "rdsrc" PCI\VEN_8086&DEV_0600 = "rdsrc" PCI\VEN_1119&DEV_0300 = "rdsrc" PCI\VEN_1119&DEV_02F6 = "rdsrc" PCI\VEN_1119&DEV_0261 = "rdsrc" PCI\VEN_1119&DEV_0260 = "rdsrc" PCI\VEN_1119&DEV_0211 = "rdsrc" PCI\VEN_1119&DEV_0210 = "rdsrc" PCI\VEN_1119&DEV_01FF = "rdsrc" PCI\VEN_1119&DEV_01FE = "rdsrc" PCI\VEN_1119&DEV_01FD = "rdsrc" PCI\VEN_1119&DEV_01FC = "rdsrc" PCI\VEN_1119&DEV_01F7 = "rdsrc" PCI\VEN_1119&DEV_01F6 = "rdsrc" PCI\VEN_1119&DEV_01D7 = "rdsrc" PCI\VEN_1119&DEV_01D6 = "rdsrc" PCI\VEN_1119&DEV_016F = "rdsrc" PCI\VEN_1119&DEV_016E = "rdsrc" PCI\VEN_1119&DEV_016D = "rdsrc" PCI\VEN_1119&DEV_016C = "rdsrc" PCI\VEN_1119&DEV_016B = "rdsrc" PCI\VEN_1119&DEV_016A = "rdsrc" PCI\VEN_1119&DEV_0169 = "rdsrc" PCI\VEN_1119&DEV_0168 = "rdsrc" PCI\VEN_1119&DEV_0167 = "rdsrc" PCI\VEN_1119&DEV_0166 = "rdsrc" PCI\VEN_1119&DEV_013F = "rdsrc" PCI\VEN_1119&DEV_013E = "rdsrc" PCI\VEN_1119&DEV_013D = "rdsrc" PCI\VEN_1119&DEV_013C = "rdsrc"PCI\VEN_1119&DEV_013B = "rdsrc" PCI\VEN_1119&DEV_013A = "rdsrc" PCI\VEN_1119&DEV_0139 = "rdsrc" PCI\VEN_1119&DEV_0138 = "rdsrc" PCI\VEN_1119&DEV_0137 = "rdsrc" PCI\VEN_1119&DEV_0136 = "rdsrc" PCI\VEN_1119&DEV_011B = "rdsrc" PCI\VEN_1119&DEV_011A = "rdsrc" PCI\VEN_1119&DEV_0119 = "rdsrc" PCI\VEN_1119&DEV_0118 = "rdsrc" PCI\VEN_1119&DEV_0115 = "rdsrc" PCI\VEN_1119&DEV_0114 = "rdsrc" PCI\VEN_1119&DEV_0113 = "rdsrc" PCI\VEN_1119&DEV_0112 = "rdsrc" PCI\VEN_1119&DEV_0111 = "rdsrc" PCI\VEN_1119&DEV_0110 = "rdsrc" PCI\VEN_1119&DEV_0105 = "rdsrc" PCI\VEN_1119&DEV_0104 = "rdsrc" PCI\VEN_1119&DEV_0103 = "rdsrc" PCI\VEN_1119&DEV_0102 = "rdsrc" PCI\VEN_1119&DEV_0101 = "rdsrc" PCI\VEN_1119&DEV_0100 = "rdsrc" PCI\VEN_1119&DEV_000D = "rdsrc" PCI\VEN_1119&DEV_000C = "rdsrc" PCI\VEN_1119&DEV_000B = "rdsrc" PCI\VEN_1119&DEV_000A = "rdsrc" PCI\VEN_1119&DEV_0009 = "rdsrc" PCI\VEN_1119&DEV_0008 = "rdsrc" PCI\VEN_1119&DEV_0007 = "rdsrc" PCI\VEN_1119&DEV_0006 = "rdsrc"PCI\VEN_1119&DEV_0005 = "rdsrc" PCI\VEN_1119&DEV_0004 = "rdsrc" PCI\VEN_1119&DEV_0003 = "rdsrc" PCI\VEN_1119&DEV_0002 = "rdsrc" PCI\VEN_1119&DEV_0001 = "rdsrc" PCI\VEN_1119&DEV_0000 = "rdsrc" PCI\VEN_8086&DEV_27C3&CC_0104 = "iastor" PCI\VEN_8086&DEV_2652&CC_0104 = "iastor" PCI\VEN_8086&DEV_25B0&CC_0104 = "iastor" PCI\VEN_8086&DEV_24DF&CC_0104 = "iastor" PCI\VEN_8086&DEV_27C5&CC_0106 = "iastor" PCI\VEN_8086&DEV_27C1&CC_0106 = "iastor" PCI\VEN_8086&DEV_2653&CC_0106 = "iastor" PCI\VEN_8086&DEV_2652&CC_0106 = "iastor" PCI\VEN_9005&DEV_0250&SUBSYS_028C1014 = "nfrd960" PCI\VEN_9005&DEV_0250&SUBSYS_02791014 = "nfrd960" PCI\VEN_1014&DEV_01BD&SUBSYS_02591014 = "nfrd960" PCI\VEN_1014&DEV_01BD&SUBSYS_020E1014 = "nfrd960" PCI\VEN_1014&DEV_01BD&SUBSYS_02081014 = "nfrd960" PCI\VEN_1014&DEV_01BD&SUBSYS_01BF1014 = "nfrd960" PCI\VEN_1014&DEV_01BD&SUBSYS_01BE1014 = "nfrd960" PCI\VEN_1014&DEV_002E&SUBSYS_00000000&REV_02 = "ipsraidn"PCI\VEN_1014&DEV_002E&SUBSYS_00000000&REV_03 = "ipsraidn"PCI\VEN_1014&DEV_002E&SUBSYS_00000000&REV_04 = "ipsraidn"PCI\VEN_1014&DEV_002E&SUBSYS_002E1014&REV_0D = "ipsraidn"PCI\VEN_1014&DEV_002E&SUBSYS_022E1014&REV_10 ="ipsraidn" PCI\VEN_1103&DEV_2310 = "rr2310" PCI\VEN_1103&DEV_0008&SUBSYS_00011103&REV_07 = "rr404" PCI\VEN_1103&DEV_2320 = "rr2320" PCI\VEN_11AB&DEV_6081 = "hptmv6" PCI\VEN_1103&DEV_0004&REV_01 = "hpt366" PCI\VEN_11AB&DEV_5081 = "hptmv" PCI\VEN_1103&DEV_0008 = "hpt374" PCI\VEN_1103&DEV_0006 = "hpt3xx" PCI\VEN_1103&DEV_0005 = "hpt3xx" PCI\VEN_1103&DEV_0004 = "hpt3xx" PCI\VEN_1103&DEV_0005&SUBSYS_100415BD = "rhpt3xx" PCI\VEN_1103&DEV_0004&SUBSYS_00011103&REV_04 = "hpt3xx"PCI\VEN_1103&DEV_0004&SUBSYS_00011103&REV_03 = "hpt3xx" PCI\VEN_1103&DEV_0004&SUBSYS_00011103 = "hpt3xx" PCI\VEN_9005&DEV_0285&SUBSYS_02911028 = "cercsr6" PCI\VEN_17D3&DEV_1260 = "arcm_x86" PCI\VEN_17D3&DEV_1230 = "arcm_x86" PCI\VEN_17D3&DEV_1220 = "arcm_x86" PCI\VEN_17D3&DEV_1210 = "arcm_x86" PCI\VEN_17D3&DEV_1160 = "arcm_x86" PCI\VEN_17D3&DEV_1130 = "arcm_x86" PCI\VEN_17D3&DEV_1120 = "arcm_x86" PCI\VEN_17D3&DEV_1110 = "arcm_x86" PCI\VEN_1022&DEV_7469 = "amdbusdr" PCI\VEN_10B9&DEV_5289 = "m5289" PCI\VEN_10B9&DEV_5288 = "m5288" PCI\VEN_10B9&DEV_5287 = "m5287" PCI\VEN_10B9&DEV_5281 = "m5281" PCI\VEN_10B9&DEV_5228 = "m5228"PCI\VEN_10B9&DEV_5229 = "aliide" PCI\VEN_10B9&DEV_5219 = "aliide" PCI\VEN_10B9&DEV_5215 = "aliide" PCI\VEN_8086&DEV_25B0 = "aarich" PCI\VEN_8086&DEV_24DF&SUBSYS_498015D9&REV_02 = "aarich" PCI\VEN_8086&DEV_24DF = "aarich" PCI\VEN_1095&DEV_3112&SUBSYS_02509005 = "si3112r" PCI\VEN_1095&DEV_3512&SUBSYS_34238086 = "si3112r" PCI\VEN_9005&DEV_00c3 = "cda1000" PCI\VEN_9005&DEV_0053 = "cda1000" PCI\VEN_9005&DEV_0013 = "cda1000" PCI\VEN_9004&DEV_7895 = "cda1000" PCI\VEN_9004&DEV_7893 = "cda1000" PCI\VEN_9004&DEV_8378 = "cda1000" PCI\VEN_9004&DEV_7378 = "cda1000" PCI\VEN_9004&DEV_7815 = "cda1000" PCI\VEN_9005&DEV_8096 = "a320raid" PCI\VEN_9005&DEV_8095 = "a320raid" PCI\VEN_9005&DEV_809C = "a320raid" PCI\VEN_9005&DEV_809D = "a320raid" PCI\VEN_9005&DEV_8097 = "a320raid" PCI\VEN_9005&DEV_8080 = "a320raid" PCI\VEN_9005&DEV_808F = "a320raid" PCI\VEN_9005&DEV_809E = "a320raid" PCI\VEN_9005&DEV_8094 = "a320raid" PCI\VEN_9005&DEV_8093 = "a320raid" PCI\VEN_9005&DEV_8092 = "a320raid" PCI\VEN_9005&DEV_8091 = "a320raid" PCI\VEN_9005&DEV_8090 = "a320raid" PCI\VEN_9005&DEV_809F = "a320raid"PCI\VEN_9005&DEV_8011&SUBSYS_00AC0E11 = "aadpu320" PCI\VEN_9005&DEV_8017&SUBSYS_00449005 = "adpu320" PCI\VEN_9005&DEV_8016&SUBSYS_00409005 = "adpu320" PCI\VEN_9005&DEV_8015&SUBSYS_00409005 = "adpu320" PCI\VEN_9005&DEV_8014&SUBSYS_00449005 = "adpu320" PCI\VEN_9005&DEV_8012&SUBSYS_00429005 = "adpu320" PCI\VEN_9005&DEV_8011&SUBSYS_00419005 = "adpu320" PCI\VEN_9005&DEV_8010&SUBSYS_00409005 = "adpu320" PCI\VEN_9005&DEV_8000&SUBSYS_00609005 = "adpu320" PCI\VEN_9005&DEV_800F&SUBSYS_005F9005 = "adpu320" PCI\VEN_9005&DEV_800F = "adpu320" PCI\VEN_9005&DEV_801F = "adpu320" PCI\VEN_9005&DEV_801E = "adpu320" PCI\VEN_9005&DEV_801D = "adpu320" PCI\VEN_9005&DEV_00CF = "adpu160m" PCI\VEN_9005&DEV_008F = "adpu160m" PCI\VEN_9005&DEV_0082&SUBSYS_02109005 = "adpu160m" PCI\VEN_9005&DEV_0081&SUBSYS_62A19005 = "adpu160m" PCI\VEN_9005&DEV_0080&SUBSYS_E2209005 = "adpu160m" PCI\VEN_9005&DEV_0080&SUBSYS_62A09005 = "adpu160m" PCI\VEN_9005&DEV_0080&SUBSYS_E2A00E11 = "adpu160m" PCI\VEN_9005&DEV_0080&SUBSYS_E2A09005 = "adpu160m"。
