VPS Kloxo面板操作指南
欧凯数据中心操作手册 (2)

1.目的:确保欧凯数据中心的各项功能,任何人通过本手册都能单独操作,让生产过程更顺畅,信息更准确,特制定本程序。
2.适用范围:本手册适用欧凯数据中心所涉及到的所有模块。
3.定义:3.1.冷冻计划:一切生产资料都已配套备齐,不可变动的计划。
它是《主生产计划》表中第一天的生产计划,即当天确定第二天的生产计划后,第二天的生产计划即为冷冻计划;3.2.特殊物料:同一物料编码的物料中存在部分使用上的不确定性或特殊性的物料。
4.职责:4.1.销售部:负责销售订单的整理和录入,保证信息的正确性;4.2.PMC部:负责生产计划的制定及其物料的排查;4.3.采购部:负责外购订单的下达及来料的跟催回复;4.4.仓库:负责库存数据的准备,保证数据的准确性;4.5.生产部:负责统计生产订单的生产进度状况以及生产领料欠料情况;4.6.技术部:负责编制物料编码(保证其唯一性和准确性),编制BOM(保证其准确性),确定物料如何使用。
5.具体内容:5.1.销售部:销售订单整理5.1.1.销售部根据业务员接到的订单,区分国内和国外,分别录入到《销售订单状态表(国内)》/《销售订单状态表(国外)》中,并将书面订单下达给PMC部主计划员(李贤兼);5.1.2.国内和国外订单编码的区别:国内以“N”开头,国外以“W”开头;5.1.3.《销售订单状态表》表格说明:必须录入日期--“客户期望交期”,不可以标为“急”、“特急”。
当订单为分批交货时,需要给出不同的销售单号以便计划、生产、采购部门按分批的需求的具体日期组织生产和准备物料;5.1.4.每天【8:00-8:30】与PMC计划人员进行对单,当订单集中导致产能不够时,销售部内勤必须在《销售订单状态表》中给出订单交货的“优先顺序”;5.1.5.《销售订单状态表(国内)》附图如下:5.1.6.《销售订单状态表(国外)》附图如下:5.2.PMC部:主生产计划制定5.2.1.每天【8:00-8:30】计划员与销售部对单,确定订单需求的“优先顺序”;5.2.2.计划的时间分布分别为(天):1、1、1、1、1、1、1、7、7、7、15、15;5.2.3.主计划员结合销售订单、订单优先顺序、生产进度、产能、物料等状况,每天上午【11:00】前更新出《主生产计划》,并以只读方式复制到共享平台;;5.2.4.《主生产计划》表格说明:1.“本期起始日期”是本期第一天的时间,一个月给一次(例如:上月26日至本月25日,以上月26日为起始日期);2.“计划日期”为当天重排计划的日期;(计划日期为计划排定日期,如果计划调整以重新调整时间为计划日期)3.表中数量使用“计划单位”;4.新的销售订单数据对应日期输入到“期末未排计划”与“销售本期下单”之间,表格会自动统计到“销售本期下单”中;5.三天滚动冷冻生产计划需考虑产能,第一天的生产冷冻计划,日计划员必须和物控员一起确定;6.每天拿到总装生产线的生产日报表《车间生产状态表(总装)》时,在第一天的计划中,将前一日的生产完成数据输入到“完成”栏中;7.滚动处理:a. 上面第6点完成后,将“未完成”栏中不等于零的数据,全部分配到后面的计划中并达到一致(如:“未完成”大于零,将此数据等量增加到后面的计划中,如“未完成”小于零,将此数据等量减少后面的计划);b. 将完成栏数据复制粘贴到表格后面栏位“BX-DB”间相同日期栏中;c. 清除第一天“计划”和“完成”栏的数据内容;d. 将表中第二天开始的,后六天的“计划”数据全部移前一天;e. 清除表中第七天的数据;f. 计划员对主计划进行调整。
希科系统用户手册
1
3. 管理员指南 ..................................................................................................................................................... 25 3.1. 如何指定管理权限 ............................................................................................................................. 25 3.2. 如何维护资助类别 ............................................................................................................................. 26 3.3. 如何启动项目申报 ............................................................................................................................. 27 3.4. 如何撰写申报通知 ............................................................................................................................. 28 3.5. 如何指派评议人 ................................................................................................................................. 28 3.6. 如何进行批量评议 ............................................................................................................................. 29 3.7. 如何进行评议进度检查 ..................................................................................................................... 29 3.8. 如何进行项目经费管理 ..................................................................................................................... 30
如何使用Linux VPS控制面板KLOXO

如何使用Linux VPS控制面板KLOXOVPS Kloxo安装教程(一):第一:SSH登陆你的VPS,执行:wget /download/kloxo/production/kloxo-install-master.shsh ./kloxo-install-master.sh会出现已系列的安装命令,稍等什么都不做就行第二:安装完后请执行:yum install php-bcmath /*高精度数学运算组件,默认没安装,MD5运算时用到*/yum check-update /*检查全部更新*/yum update /*更新全部更新*/yum clean all /*清理全部缓存的安装文件以节省空间*/第三:登陆这就安装完了kloxo,可以web登陆面板了。
地址:https://yourip:7777/ /*安全连接*/http://yourip:7778/ /*普通链接,常用*/1:重设Kloxo密码使用http://您的ip地址:7778 登录Kloxo,初始用户名和密码都是admin。
第一次登录Kloxo之后系统会提示更改密码,未更改密码前无法进行任何操作。
如果您觉得http方式不能保证您的安全,还可以采用加密的https协议来访问您的后台https://您的ip地址:77772:绑定域名有一点需要注意,绑定完顶级域名后会自动绑定www子域名到这个目录。
也就是说,绑定到diavps目录后,会自动把绑定到diavps目录。
注意:请不要启用php-fastcgi, 否则可能会出现5003:添加数据库4:登录FTPIP为您VPS的IP用户名为admin密码为Kloxo的密码,也就是第一步中修改的密码。
VPS Kloxo使用教程(二):第一:解决中文网页显示乱码修改apache的httpd.conf默认编码的设置,如下:首先用SSH登陆VPS,修改httpd.conf文件vi /etc/httpd/conf/httpd.conf查找:AddDefaultCharset把:AddDefaultCharset UTF8改为:AddDefaultCharset OFF 或改为#AddDefaultCharset UTF8(不只知道怎么用vi?G一下吧)这样的话,打开页面的时候就会按照网页的编码设置来打开网页。
惠家VPS说明书

惠家VPS说明书
步骤/方法:选择咖啡粉。
其实咖啡豆也行,就要自己磨一磨了。
有各种口味的咖啡,什么香草味啊,还有口味的轻重有5个等级,从MILD 到DARK。
用滤纸,有竹子做的,也有普通的。
将滤纸展开成漏斗形,根据个人口味将几勺咖啡粉放入滤纸内(一般放多少咖啡包装上会有)。
滤纸的好处是大大的,不仅能过滤渣子,还能增加水流过咖啡粉的时间,使咖啡变得香浓,而且也方便清洁。
将咖啡连滤纸像这样放入filter basket,就是滤纸篓中,尽量放正了吧。
将咖啡壶中的水全部倒入咖啡机后面的储水器中,储水器中的刻度应该和咖啡壶的刻度是一致的。
将顶盖盖好,将咖啡壶这样放置,打开开关。
首先应确定惠家VPS咖啡机的适用范围。
一般专业咖啡店、咖啡吧,意大利传统手动咖啡机是首选。
因为在这些地方,训练有素的专业人员使用压力式咖啡机,即时研磨、冲泡,不但营造出浓浓的咖啡情调,而且空气中弥漫着咖啡的芳香,使客人更能体验到咖啡独特的魅力。
而饭店咖啡厅、餐厅、酒吧、办公室则多选用全自动咖啡机。
因为这些地方客流量大、需求集中,选用压力式咖啡机将充分显示其方便快捷、高品质的优点,使客人能在最短的时间内及时享用质量恒定品质优异的咖啡,得到身心的满足。
购买咖啡机要做市场调查,广泛收集资料或向专业的咖啡商或公司咨
询,从而确定自己需求的咖啡机的类型:下一步就要选择合格的供应商。
专业的咖啡机供应商不但有着丰富的经验,可为您选择咖啡机提供多方面的参考、帮助和最合理的价格,而且具有良好的售后服务体系和充足及时的零备件供应。
克雷尔一智能家居安防系统操作指南说明书
ClareOne Driver / Control4 Release NotesDOC ID - 1935, Last Modified 05/30/2023Change LogRevision Date Description1.0.01 5/1/2020 Initial revision.02 5/16/2020 Bug Fixes.03 6/18/2020 Fixed binding issue.Fixed issue where director needsa restart after driver update.Change name to ClareOne.1.5.0 10/21/2020 Add support for Instant Stay.Add support for Auto Bypassing.Add support for Secure Arming.Bug fix for zone state not reporting to navigators.1.5.1 11/1/2020 Fixed issue with zone states on Control 4 UIs notupdating after adding new sensors.1.5.2 12/15/2020 Fixed default user code not functioning after update. 1.5.3 3/18/2021 Fixed issue with zones not being removed.Fixed issue where commands to the panel may bedelayed.1.5.4 11/3/2021 Fixed issues with Alarm Names not showing correctly,and C4 zone chimes being disabled.1.5.5 1/14/2022 Fixed issue with disarming on entry delay.1.5.6 1/18/2022 Fixed Exit Delay time consistency when arming stay. 1.5.7 6/08/2022 Fixed issue when deleting last panel zone.Added Programming commands for Arm Auto Bypassand Zone Bypass / Un-bypass.16 5/30/2023 Added Zone Trouble Conditions to Event History andFixed an issue where Trouble conditions may not show.See the Events section for updated Events List.Syncing up versioning to match Driver Version. Online DocumentationManufacturer Website: /Support Site: /contactFull Documentation: /helpcenterIntroductionClareOne™ is the unified smart security and smart home control panel from Clare Controls. The ClareOne Panel integrates with Control4 to add easy-to-install security features into a Control4 system. The ClareOne panel and its attached security zones auto-discover in a Control4 project, and this driver populates a rich set of security control.The ClareOne driver enables two-way set of security controls (arm, disarm, emergency alarm triggering, zone status and zone bypass), and provides metadata feedback for the current panel state (if the panel is armed, alarmed, faulted, alarmed, or in a troubled state).Notes•This driver requires Control OS 3.0.0 or later to operate.•This driver requires that the ClareOne panel is on the same network as the Control4 system.InstallationOnly qualified installation technicians should install the ClareOne Panel and integrate it into a Control4 system. Follow the installation and programming instructions that came with your ClareOne equipment. Clare Controls does not assume responsibility for damages caused byimproper installation, connection the network, or use of the device.SDDP SetupInstall, configure, and test the ClareOne panel and all connected sensors. The ClareOne driver supports communication within the Control4 system over Wi-Fi and ethernet connection types. Verify that the ClareOne panel is fully functional and configured before integrating with Control4.The ClareOne panel and system needs to be activated through the Clare back-end management platform, FusionPro™, to have security monitoring services enabled. All Control4 integrators authorized to sell ClareOne have been set up with FusionPro accounts. For full ClareOne panel installation and configuration, see ClareOne Wireless Security and Smart Home Panel User Manual (DOC ID 1871).To add the driver (SDDP):Access Composer and browse to the Discovered tab.Composer > System Design > Discovered.Sort the list of discovered SDDP devices by Manufacturer.The ClareOne panel is listed with:Type: SecurityManufacturer: Clare ControlsModel: CLR-C1-PNLAddress field: clarecontrols:security-clarehome-MAC ADDRESSNote: The MAC address uses all capital letters.Double-click on the discovered ClareOne Panel to add it and its attached sensors to the project. When the panel is added this way, it automatically configures itself.That’s it, you are done with setup.Proceed to testing the integration and custom programming.Supported FeaturesOnce the ClareOne panel is added to the project in Composer, the Control4 user interface displays ClareOne as the security subsystem and allows the Control4 system to control the ClareOne panel. The available Control4 security commands enabled by the ClareOne driver are listed below.Arm Stay: Allows Control4 to arm the ClareOne panel in Arm Stay mode. When the ClareOne panel is armed to Stay any zone configured as Active in Stay in the ClareOne Sensor Management Settings with be armed.Arm Away: Allows Control4 to arm the ClareOne panel in Arm Away mode. When the ClareOne panel is armed to Away any zone configured as Active in Away in the ClareOne Sensor Management Settings with be armed.Note: When arming to Away without opening a zone, the ClareOne panel will arm in Stay mode. This is called Auto Armed Stay. This option can be disabled on the ClareOne panel under User Settings > Security & Arming > Auto Armed StayInstant Stay: Allows Control4 to arm the ClareOne panel to Armed Stay mode Instantly with no delay.Note: When using this option there is no entry delay. If an entry zone is tripped, the ClareOne will enter an intrusion alarm condition.Secure Arming: Allows the ClareOne panel to require a user PIN code when arming the system. Secure Arming is disabled by default and can be enabled by navigating to Settings > User Settings > Security & Arming. When Secure Arming is enabled the Control4 system prompts the user for a PIN code.Note: Regardless of the Secure Arming state (enabled/disabled), the user is always prompted for a PIN when arming the system with open zones (Auto Zone Bypass).Disarm: Allows Control4 to disarm the ClareOne panel.Remote Arming / Disarming Support– With an active 4sight subscription, users can access their ClareOne system remotely. The ClareOne panel supports remote arming and disarming through Control4. The integrator has the option to disable remote disarming in Composer Pro. Security Sensor States: Sensor states can be used for Automation Events in Control4Zone Status: Supports real-time zone status updates, even when the ClareOne panel is Disarmed. Zones and their names are automatically imported and show real-time status in Control4. Automations can be built inside Control4 triggered by ClareOne events.Note: The active in arm states of non-Environmental ClareOne sensors can be set for Away and Stay individually. When a sensor is ignored in a particular arm state the sensor will still report its status in real-time but will not trigger an alarm event. This setting can be accessed from the ClareOne panel by selecting User Settings > Sensor Management then select the pencil icon next to a particular sensor. The Control4 integrator can take advantage of this feature with custom programming to trigger activities.Auto Zone Bypass: Allows Control4 to prompt the user with all open zones and allows for auto bypassing with confirmation from the user.Note: The user’s PIN will be required when auto bypassing sensors, whether Secure Arming is enabled or disabled.Emergency: Allows Control4 to set an Emergency condition on the ClareOne panel. Warning: The Control4 user could trigger a Panic or an Emergency condition remotely. The alarm call center will act and respond the same as if trigger locally.Fire: Alerts the central station to a fire panic.Panic: Alerts the central station that police are needed.Police: Calls the monitored alarm station and allows for two-way voice communication(two-way communication is not available for silent panic).Auxiliary (Medical): Calls the monitored alarm station and allows for two-way voicecommunication (two-way communication is not available for silent panic).Trouble Conditions: Allows Control4 to display the ClareOne panel’s trouble conditions.•Panel tamper: The panel’s tamper has been activated.•Missing battery: There is no battery detected/installed.•Panel low battery: The panel’s battery charge is low.•Panel on battery: The only panel power is provided by the battery.•Supervisory trouble: The panel lost connection to the central station.•Ethernet trouble: Ethernet or Wi-Fi connection is lost.•Auto configuration and zone importing: All zones are automatically added with their set names. New zones are added when the ClareOne panel is updated.Note: A dealer may need to refresh the Control4 Navigator when new zones are added.Zones / Users: The ClareOne Panel supports up to 128 sensor zones and 99 users. The ClareOne Duress user pin code cannot be used to disarm the panel through Control4.Entry / Exit Delay Countdown: The number of seconds remaining in the exit or entry process. The countdown timer will be shown in the Control4 apps and on T3/T4 Series Touch Screens. SDDP: Supports SDDP discovery over Wi-Fi or Ethernet connections.Supported Features using theT3/T4 Series Touch ScreenWhen using a T3/T4 Series Touch Screen the ClareOne panel(s) must be enabled to show on each touch screen device individually. Navigate to the Security Partition device in Composer Pro and click on the “Set UI Associations” button. Select Show Panel, Entr y/Exit Chime, and PanelChime to take advantage of all ClareOne features below.The following feature are supported by the ClareOne panel when using T3/T4 Series Touch Screens:Chime on Entry Delay and Exit DelayTo enable the delay chimes on your T3/T4 touch screen tap on your security paneldevice, then Settings, and select “Chime on entry/exit delay”Chime on Zone OpenTo enable the Chime on Zone Open for a certain zone, in Composer Pro navigate to the Security Panel Zone Properties, double click on a zone, select the Chimes box, selectSave, and refresh the Navigators.Emergency TriggeringEmergency Alarms can be triggered from the T3/T4 Touch Screen. To trigger anEmergency, open the Security Partition, then tap the Emergency icon on the left, select your Emergency type, then tap Send to confirm.Real time zone statusUnder the Zones section of the Security Partition, each Zone Name, Status and Type isdisplayed automatically, in real time.Arming to Away, Stay, or Instant Stay with or without a pin.When arming the ClareOne panel from a T3/T4 Touch Screen or mobile app you arepresented with 3 options, Stay, Away, and Instant Stay. When Secure Arming is enabled, the user will be required to enter their PIN, then ClareOne will immediately start thearming process.Entry / Exit Delay CountdownWhen the ClareOne panel is in Entry or Exit Delay, the countdown timer will display onT3/T4 Series Touch Screens and the Control4 mobile applications.Disarming the panel.The ClareOne panel can be disarmed from a T3/T4 Touch Screen by tapping the red lockicon on the Security Partition or entry delay countdown timer and entering a PIN code.In the event an invalid pin is used to disarm the system the Control4 UI will display “Failed toD isarm Invalid Pin”Auto Bypassing Open Zones.The ClareOne panel supports Auto Bypassing from a T3/T4 Touch Screen. When arming the ClareOne panel with open zones, the Control4 user interface will prompt the user with all open zones and request permission to continue.Note: When Auto Bypassing the Control4 user interface will always prompt for a PIN code. History of Partition and Zone events.•Control4 supports Partition and Zone History if enabled. To enable History, in Composer Pro navigate to Agents from the Go menu in the menu bar or the icon in the bottom left,click the Add button in the top left and select History from the list.•Partition and Zone History can be viewed from the Security Partition. Open the Security Partition, then tap History. At the bottom the user can filter History by Event, Alert, andAlarm. Event, Alert, and Alarm history are shown in the order the event occurred.▪History Agent settings can be adjusted in Composer Pro to control how much history is shown on the touch screens and apps.Multiple PartitionsA single ClareOne panel only supports a single security partition. To accomplish the effect of multiple partitions on a single project, you will need to dedicate one ClareOne panel for each partition.The second ClareOne is added the same as the first panel. Please refer to the SDDP Setup section for instructions on how to add the second panel.Once the second ClareOne panel is in your Control4 project, tap the “Set UI Associations” button under the partition device and enable “Show Panel” on any or all touchscreens. Refresh the Navigators and confirm the two ClareOne security partitions are functional on the touchscreens and apps associated with the Control4 project.Note: When using Disarm in an action the “Default User Code” needs to be set under the partition device.To create these actions the integrator would first create Actions under the primary security partition by choosing the security event Arm Status Changed. Next create logic on Current Arm Status = Armed | Stay and another for Armed | Away. When the logic condition is satisfied the security action would then be to send a command for Stay or Away to the secondary partition.For the Disarm action, use the Security Event Disarmed on the primary panel, and the Disarm command for the secondary partition. Make sure to set a “Default User Code” for the secondary partition panel to successfully execute the disarm command.Additional ClareOne panels and partitions are added following the above procedures.Zone Auto BypassThe ClareOne panel supports Auto Bypassing of any open zones. When arming the ClareOne panel to any arming state the Control4 UI will display any open zones and prompt the user for confirmation. Whether Secure Arming is enabled or disabled on the ClareOne panel the user will always be prompted to enter a PIN with auto bypassing.CommandsThe ClareOne Driver supports commands that can be used for custom programming.▪Arm Auto Bypass: Allows for programming to force arming of a ClareOne pane;regardless of any open zones. Any open zones will be automatically bypassed.Supported Arm Types:▪ARM_AWAY▪ARM_STAY▪INSTANT▪Zone Bypass: Allows for programming to bypass a specific zone.▪Zone Un-bypass: Allows for programming to un-bypass a specific zone.Note: Arm Auto Bypass commands require the Default User Code to be set in Composer regardless of whether Secure Arming is enabled in the ClareOne Panel.PropertiesThe ClareOne Driver properties available in Control4 include:▪Log Level: A list of set logging (for example: debug, trace, critical).▪Log Mode: Allows the user to select the desired logging mode.1 – Printing2 – Trace3 – Printing and Trace▪Version: This is a read only field displaying the driver version.EventsThe ClareOne panel provides Events to the Control4 system that the integrator can create Control4 Actions against. The following events are supported in the ClareOne driver:Trouble Start – The ClareOne panel will send Trouble Start event when any of the following panel trouble conditions are active.Available Trouble Conditions▪Panel Tamper▪Missing Battery▪Panel Low Battery▪Panel On Battery▪Supervisory Trouble▪Ethernet Trouble▪Zone Low Battery▪Zone Loss Supervisory▪Zone Tamper▪Zone On Battery▪Zone Aux Power DrawTrouble Clear – When a panel trouble condition is cleared the ClareOne panel will send a Trouble Clear event.Armed Status / Type - When the Armed status is changed, the ClareOne panel will send an Armed Status Changed event. The supported status change events are:Available Armed Type•Stay•Away•AlarmedDisarmed State – When the panel is disarmed, the ClareOne will send a Disarm event.Alarm – When in an Alarm state, the ClareOne panel will send an Alarm event. This includes any environmental sensor alarms, such as Water, Heat, CO, and Smoke.Available Alarm Types•Burglary – This alarm type includes contact closure, motion, glass break, and shock sensors.•Smoke – This alarm type includes smoke sensors.•Fire – This alarm type includes heat rate of rise sensors.•Water Leakage – This alarm type includes flood sensors.•CO – This alarm type includes Carbon Monoxide sensors.Alarm Clear – When an Alarm is cleared, the ClareOne panel will send an Alarm Clear Event Partition State Changed – The ClareOne panel will send Partition State Changed events when any of the following panel states exist.Available Partition States•DISARMED_READY•DISARMED_NOT_READY•EXIT_DELAY•ARMED•ALARMDelay Time Remaining – The ClareOne panel will send the time remaining during an entry or exit delay process.Open Zone Count – The status of the number of opened zones. The ClareOne panel will send an Open Zone Count event with every zone status change.Disarm Failed – The status of the failure to disarm the ClareOne panel when executed from the Control4 platform.Emergency Triggered – the status event when an Emergency Alarm condition is triggered on the ClareOne panel.Available Emergency Types•Police Panic•Silent Police Panic•Fire Panic•Auxiliary PanicTroubleshootingIf the mobile user interface is not updating, refresh the project Navigator. Once refreshed, the mobile user interface updates and displays the correct status.If you have updated the driver and do not see the correct zone names, restart the main controller. IMPORTANT: Refresh Navigators, Refresh Project or restart of Composer will not resolve this. LimitationsThe ClareOne panel only supports one security partition per Control4 project. (However, multiple ClareOne panels can be attached to a Control4 project, each acting as a separate partition. Please refer to the Multiple Partitions section for more information.)Arming the panel to Instant Stay with an exit delay is not supported.The ClareOne driver does not support the addition of time in the exit delay during Arm Away. Contact InformationSnap One, LLC dba Clare Controls7525 Pennsylvania Ave, Suite 103Sarasota, FL 34243General: 866.424.4489******************************。
海洛斯操作手册(说明书)

HIROSS恒温恒湿机房精密空调操作手册HIMOD系列北京****科技有限公司技术部2009年01月01日目录第一章HIMOD系列海洛斯空调概述 (2)型号多 (3)控制技术先进 (3)制冷系统 (3)送风系统 (3)加湿系统 (3)加热系统 (4)1.7其它 (4)第二章HIMOD系列海洛斯空调型号含义 (4)第三章有关空调的一些资料 (5)气流组织方式(详见下图) (5)盖板纽开启方式(详见下图) (5)空调重量(单位:Kg) (5)机组尺寸及维护空间 (6)第四章制冷循环管路示意图 (7)风冷却(A型) (7)水冷却(W型) (8)双冷源(D型) (9)单系统(C型) (10)双系统(C型) (10)第五章调速风机调速接线示意图 (11)第六章MICROF ACE概述 (12)概述 (12)面板简介液晶显示屏 (13)液晶显示屏介绍 (13)第七章MICROF ACE面板的操作 (13)第八章控制器的使用 (14)控制器(HIROMATIC)概述 (14)控制器的操作 (15)菜单结构 (17)第九章日常维护及特殊维护 (18)日常维护 (18)特殊维护 (19)第十章常见报警及处理 (20)低压报警 (20)高压报警 (21)加湿报警 (21)失风报警 (21)电加热过热报警 (22)显示器发黑 (22)空调不制冷 (22)附录1:参数列表 (22)附录2:报警内容列表 (26)附录3:各菜单项含义: (28)第一章HIMOD系列海洛斯空调概述HIMOD系列海洛斯空调(HIMOD空调)是当今世界上最先进的机房专用恒温恒湿机房专用精密空调。
随着IT业的突飞猛进的发展,各种布局、面积差别很大的机房如雨后春笋般纷纷出现了,使用环境也不一而同。
为适应各种不同要求的机房,新开发的海洛斯HIMOD系列空调应运而生。
她是在保留她的前一代产品HIRANGE系列机房空调的优点,又应用了当今世界上提高了的制冷技术及制冷部件制造工艺,使用当今最先进的模块化设计理念生产出来的高科技机房空调产品。
openbox 说明书中文版

软件升 DVB-S2 Standard级(ETSI EN 302 307)
950MHz ~ -2251d5B0Mmh~z QPS65Kd, B8mPSK, MPEG-2 ISO/IEC 1381816TAraPnSsKport Stream Specification
1.编辑频道 .............................................................................7
1.1 电 视 频 道 列 表 ........................................................................ 7 1.2 广 播 频 道 列 表 ........................................................................ 9 1.3 全部删除.............................................................................9
机器出现故障时请用户急时与供货商或技术人员联系咨询 . 用户可以技术人员的指导下进行处理 ,但用户不得擅自拆开机箱 .否则后果自负 .
如机器出现严重问题请与供货商联系 ,安排机器退回原厂维护 .
注意 :
1. 不要在易触水的环境下使用本机器.如盛有水的花瓶四周,水盆/水池周围,洗涤间,游泳池等环境. 2. 在清洁机器前用户需切断电源.在断电3-5分钟后才可擦拭机身/面板/摇控器. 需使用柔软质地的布料
STAND BY MENU
OUO i-box NAS10用户手册
IBOX-NAS10 用户手册
目录
第一部分 产品介绍................................................................................................................................................................. 2 简介 ቤተ መጻሕፍቲ ባይዱ...........................................................................................................................................................................................2 功能 ............................................................................................................................................................................................2
克罗韦尔 PanelView Plus 6 Compact 终端 说明书

新信息和更新信息
本手册中包含新增信息和更新信息。
变更摘要
下表包含了本版本所做的变更。
主题 更新了表 7 中的交流电压和频率。 更新了 2711PCT10C4D8 终端。从最新系列 B 终端中移除了 迷你 USB 端口 (B 型 )。 在整本用户手册中,移除了系列 B 2711PCT10C4D8 终端的 数据和图纸中的迷你 USB 端口 (B 型 )。
Allen-Bradley、 Rockwell Software、 Rockwell Automation、 PanelView、 FactoryTalk、 RSLinx、 CompactLogix、 ControlLogix、 SLC、 MicroLogix、 PLC-5 和 RSView 是罗克韦尔自动化有限公司的商标。 不属于罗克韦尔自动化的商标是其各自所属公司的财产。
用户手册
PanelView Plus 6 Compact 终端
产品目录号 2711PC-K4M20D8、 2711PC-B4C20D8、 2711PC-B4C20D8-LR、 2711PC-T6M20D8、 2711PC-T6C20D8、 2711PC-T10C4D8
重要用户须知
在安装、配置、操作或维护设备之前,请仔细阅读本文档及 “ 其他资源 ” 部分列出的文档,了解设备的安 装、配置和操作信息。除了所有适用的条例、法律和标准的要求之外,用户还必须熟悉安装和接线说明。
注意:标识可能会导致人员伤亡、财产损坏或经济损失的操作或情况的信息。注意符号 可帮助您确定危险情况,避免发生危险,并了解可能的后果。
重要信息 标识对成功应用和了解产品有重要作用的信息。
标签可能位于设备上或设备内,用于提供特定警示。
电击危险:位于设备 ( 例如,驱动器或电机 ) 表面或内部的标签,提醒人们可能存在危险 电压。
千衍Jbox用户手册
非常感谢您购买我司产品,如您有任何疑问或需求请随时联系我们。
适用型号本手册适用于以下产品:产品系列产品型号互联网视频盒子千衍Jbox声明在使用视频监控设备时,请您严格遵守适用的法律、法规要求。
出于非法目的使用视频监控设备、探听他人隐私等,均属于非法监听。
本手册可能包含技术上不准确的地方、或与产品功能及操作不相符的地方、或印刷错误。
我司将根据产品功能的增强或变化而定期改进及更新本手册中描述的软硬件产品。
更新的内容将会在本手册的新版本中加入,恕不另行通知。
本手册中提到的部件、组件和附件仅作说明之用,不代表购买机型的配置,详细配置请以装箱单为准。
文档中图片仅供参考,最新界面请以实物为准。
1产品简介 (3)1.1产品简介 (3)1.2典型应用 (4)1.3装箱清单 (4)1.4外观外设介绍 (5)2安装与连接 (6)2.1 操作必读 (6)2.1.1 连接电源 (6)2.1.2 连接路由器 (7)2.2 安装注意事项 (7)3设备功能设置 (8)3.1 开关机 (8)3.1.1 开机 (8)3.1.2 关机、重启 (8)3.2 开机向导 (9)3.2.1 启动Jbox (9)3.2.2锁定 (10)3.3网络连接配置 (10)3.4登陆操作 (11)3.4.1盒子命名 (12)3.5 添加删除修改摄像机 (13)1产品简介1.1产品简介千衍Jbox——精彩瞬间,时刻相随。
一款你不可错过的第三方视频盒子!产品功能特点:1、采用Intel X86架构高性能处理器,强大的视频图像处理能力,搭载自主研发的操作系统。
2、在该盒子上接入第三方设备时,用户可以通过移动客户端直接在线观看接入的第三方设备的视频信息。
可以通过JBox盒子把重要视频上传至云端进行永久储存。
接入的第三方设备的视频可以储存在本地,连接显示器进行直接观看。
3、独特的硬盘分区,用户区采用标准文件系统。
用户可将现有视频分享到互联网进行观看。
1.2典型应用1.3装箱清单打开产品包装后,请确认设备是否完好,对照下表确认配件是否齐全。
博克操作手册

、引导1、软件风格:博克智能服装板型设计系统是至今为止智能化程度最高的服装CAD系统。
其卓越的智能表 美国 Micorosoft公司的最新开发技术确保系统功能强大,稳定性极佳;意大利设计师2、设计流程:进入系统后,您可以选择自动设计,随后您将进入丰富的产品中心,在这里您可以选择经 一般是需要纸样中心设计完毕后进入裁片中心进行样板的工艺处理与规格放缩(即放码3、学习方法:初次使用的用户完全可以通过系统内的教学演示中心(在主界面中选择操作学习按钮)完4、技能提高:通过观看系统内的自动演示,您可以掌握大部分纸样的制图方法和技巧处理。
您也可以进二、智能模式纸样中心智能模式1、关于智能模式在本系统的主界面中选择“手动设计”进入纸样中心后,系统默认为进入智能模式。
在智能模式下系2、绘图功能用法方框: 1、空白处左键拖动鼠标即可画出方框。
2、参数栏内输入相关参数。
注:从点开始画方框需要按住shift键。
参数栏参数设置方法如下:如果需要从尺码表内调用公式,就选择,系统会出现,选择必要的公式即可 以下所有部分参数输入方法相同。
平行线: 1、从参考线上左键拖动鼠标至目标侧。
2、参数栏内输入平行线的根数和间距。
直线: 1、空白处或点上单击左键确定直线的始端。
注意:这时可以通过右键切换自由直线与丁字尺。
2、在空白处或点上再次单击左键确定直线的末端。
3、右键结束并输入有关数据即可(若结束点在已知点上则不需要输入数据)。
注意:直线除了可以输入线长和档差外还可以输入直线与水平方向的夹角。
曲线: 1、从任一点或空白处单击左键开始绘制曲线。
2、根据需要移动鼠标并单击左键确定曲线点(可以在空白处或在已知的固定点上)绘制曲线的形状。
按3、确定最后一点右键结束。
注意:绘曲线点的过程中可以直接在线上取点,也可以直接以某点为中心产生偏移点(需要按住ctrl键延长线:1、框选需要延长的线段。
2、在延长一端单击左键,移动鼠标并左键确定即可以画出该线的延长线。
使用kloxo面板建站步骤详解
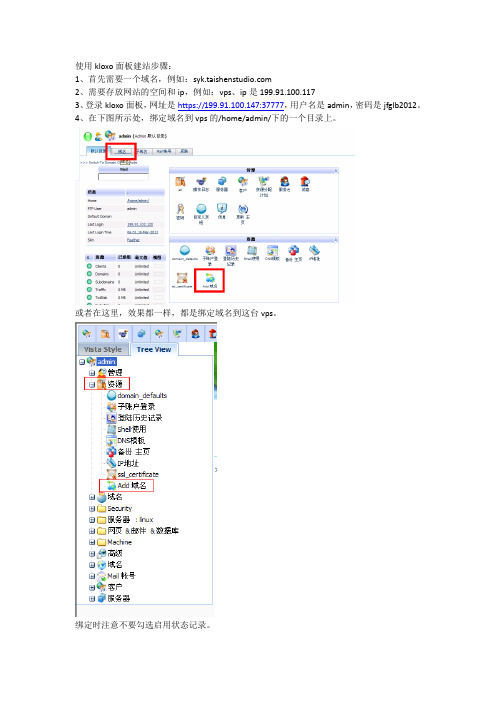
使用kloxo面板建站步骤:1、首先需要一个域名,例如:2、需要存放网站的空间和ip,例如:vps、ip是199.91.100.1173、登录kloxo面板,网址是https://199.91.100.147:37777,用户名是admin,密码是jfglb2012。
4、在下图所示处,绑定域名到vps的/home/admin/下的一个目录上。
或者在这里,效果都一样,都是绑定域名到这台vps。
绑定时注意不要勾选启用状态记录。
绑定时输入自己的域名,注意不要带www.例如下图中,绑定到/home/admin/ 注意目录最好和域名一样,方便以后识别。
如图:6、绑定完域名后,会在/home/admin/下生成三个测试文件(夹),将他们删掉。
使用kloxo面板的文件管理器功能。
如图:或者然后点击目录名进去:全部选择并删除:7、建立网站的数据库,在域名——mysql数据库中,添加数据库,如图或者是:接下来:注意:这里添加的是一个mysql数据库用户,这里建议大家建一个站添加一个数据库用户,密码最好和数据库用户名一样目的是给每个站建立一个数据库用户,以后管理方便。
如下图:在接下来的过程中给大家演示安装过程中的注意事项。
8、利用ftp工具上传网站程序的压缩包。
ftp工具常用的是filezilla和flashfXP。
先要在kloxo面板里面重置ftp用户密码。
如图:或者是:然后打开ftp用户面板:注意:可以看到这里有以我刚刚绑过的域名作为用户名的一个ftp用户,这里ftp用户都是使用kloxo面板admin的密码:jfglb2012 如果登陆失败,就在下图所示地方重置密码,记住,这里重置的是kloxo面板的密码,只需要覆盖重置即可,就是还输入原来的密码。
然后下载安装filezilla和flashfXP。
使用方法如下:flashfXP,菜单栏——会话——快速连接登录成功后如图所示:这里用flashfXP然后在putty下用命令解压。
Linux vps 免费面板kloxo 两种安装方法及汉化

Linux vps 免费面板kloxo 两种安装方法及汉化Linux vps 应用非常广泛,在服务器领域使用率大大超越windows 系统。
尤其国外服务商,主要是他是免费的漏洞相对比较少。
非图形化操作,入门稍有难度。
在没有模版的情况下创建站点设置域名等等都得用命令来实现,实在是有点麻烦。
好在这几年陆续退出了很多优秀的图形化面板,建站操作起来就方便多了,今天给大家推荐的是一款比较成熟功能比较齐全的免费面板kloxo 。
这个面板主要特点是退出时间长,一直有志愿者在更新,解决新系统升级的BUG。
使用率高有问题容易找到答案,个人比较喜欢它的自动定时备份功能,支持发送远程FTP 这样对数据安全有较好的保障,目前最新版对 centos 6X 兼容不是太好,所以建议使用centos5X 版本 32位的.下面一起来看看吧.今天介绍两种安装方式(推荐使用第2种安装方式)第一种常规安装,完成后装汉化补丁。
安装完系统后进入ssh,先卸载掉系统默认组件防止安装出现意外错误不过出错的机会也似乎很小我安装多次都是正常的呵呵。
1.卸载Mysqrpm -qa | grep mysqlyum remove mysql2.卸载Apacherpm -qa | grep httpdyum remove httpd3.卸载PHPrpm -qa | grep phpyum remove php卸载完毕后运行安装命令先下载登陆ssh 输入:wget /download/kloxo/production/kloxo-installer.sh运行安装脚本sh ./kloxo-installer.sh --type=master安装过程中有3个地方需要注意,详情见安装方法2 有图片说明。
安装完成后可以更新一下组件yum install php-bcmathyum install php-mbstringyum check-updateyum updateyum clean all面板后台管理地址:/soft/kloxo/cn.zipunzip cn.zip完成后进入后台选择中文即可Advanced,Appearance,Language选择chinese 点 update 完成这就是常规安装方法,有这么几个步骤要做,第二种一键安装包(推荐)先说下一键包的优点吧,第一只需要输入一次命令这是不用说了。
Look Solutions产品radio远程操作详细说明书
10
4.4 Changing the frequency
12
4.5 Wiring of the connectors
12
5. System range
13
6. Technical Data
14
7. Warranty Conditions
15
3
1. Introduction
The UHF radio system consists of a radio transmitter and one or several receivers. The operating frequency of the system is 433.62 MHz (freq. 1) or 434.22 MHz (freq. 2). The operating frequency is selected by putting the Jumper into the right position. The radio remote is supplied with freq. 1 as operating frequency. The machine will be triggered to run as long as the button is held down. If the button is released, the machine will stop working. The radio transmitter allows you to address four channels which can either be four individual receivers or four receiving groups. The number of the receivers per channel is not limited. The transmitter is supplied with the first button pre-programmed, allowing the radio remote to be used immediately.
免费linux vps面板 kloxo 建站及自动备份教程完整版

免费linux vps面板 kloxo 建站及自动备份教程完整版kloxo 是一款linux vps服务器非常优秀国外免费面板,国内用户保有量也非常大。
汉化也很到位了.之前老鹰以介绍了一键安装包的使用非常方便(一键安装kloxo)。
尽管如此单对于初次使用的朋友可能还是有点陌生,今天抽时间老鹰就给新手朋友门做一份使用操作的基本教程。
可以使新手朋友们很快上手。
上一节安装教程以介绍了初次修改管理员密码和登陆显示中文操作接下来为了安全起见我们创建站点前需要修改mysql 的密码如下图:这个过程可能会有点慢快的几十秒慢的要1-2两分钟。
密码改好后,在创建站点前我们需要先设置个 dns模版。
注意箭头的步骤,这个dns 我们实际上是不使用的,所以随便怎么写都可以,写好了后提交。
下面我们就可以创建站点了添加域名以及网站所在路径,第图片 4 处根据自己站点需要选择一般安图片所示就可以了日志如果不要不勾选就行了。
在创建站点的同时ftp 系统以自动创建,我们只需要去修改下密码即可。
如图 2处就是FTP 用户名点进去改密码完成后点update 保存下一步创建mysql 数据库按图片标的数字顺序操作第4步是系统生产密码当然你也可以自己设置如果是生产把密码记录下来网站配置的时候需要用。
经过这3步操作我们就完成了站点 FTP mysql的创建了。
这个面板还有个不错的功能就是自动备份网站及数据库功能,而且可以发送到远程FTP。
非常不错,不用手动操作可以确保数据安全。
下面来看下具体操作。
首先备份网站WEB文件,如果是使用admin 创建备份系统可以备份所有创建的站点。
这都是中文操作我就不一步一步截图了,看上图的数字标识操作,先找到备份选项,设置备份字符,然后设置远程FTP信息。
然后配置计划任务让他自动执行这样就完成了web 文件备份的配置。
下一步设置mysql 的备份很简单吧,数据备份到远程FTP去了这个就可以保证数据绝对安全了.不过需要注意的是备份出来的文件也只能通过kloxo还原。
kloxo的安装和配置

Kloxo是一个优秀的Web控制面板,有商业版本和免费版本。免费版本的Kloxo允许绑定40个域名,对普通客户来讲40个域名也足够用了。瑞豪开源的VPS提供了预装免费版Kloxo的Linux系统。本文介绍Kloxo控制面板的基本使用方法。
下面介绍一下如何安装使用kloxo。
如果使用的VPS的管理界面是HyperVM,从控制界面”Console”下的”Rebuild”可以快速重装系统。另外CentOS- i386-hostinabox就是集成了
Email Address:用户的email地址,必须填写,当用户忘记密码后可以根据Email找回
Send Welcome Message:这个选要选上
Choose Plan:这是要开通的空间的型号,不要管,除非你是卖空间的
然后点击Add,出现新的页面,新页面里的信息不需要修改,继续点击Add即可。然后系统就会给用户的邮箱里面发生邮件,告知登录地址,用户名密码等信息。
Apache吧。Dns用djbdns,一个轻量级的高效DNS。
升级Kloxo到最新版本
进入Kloxo后要做的第一件事情就是升级Kloxo到最新版本,这是非常必要的,因为老版本可能有bug存在,这些bug有可能导致Kloxo被入侵,而最新版本往往修复了这些bug。
在首页中间的Administration部分,点击Update Home然后就会看到当前的Kloxo是否是最新版本,如果不是最新版本,就点击下面的Update Now按钮进行升级。
昨天本来已经装好了LNMP的,但是想用个图形端来控制VPS,这样方便些,所以就重新reload了下系统,装了Kloxo.话说,这东西还是挺不错的,基本上不需要太多的设置,安全方面也挺有保障,从装好到现在拦截了很多ssh暴力连接(应该是肉鸡扫描把找相应IP段的无root密码的主机),下面找了一些相关的安装配置信息。
中医vps操作流程

中医vps操作流程下载温馨提示:该文档是我店铺精心编制而成,希望大家下载以后,能够帮助大家解决实际的问题。
文档下载后可定制随意修改,请根据实际需要进行相应的调整和使用,谢谢!并且,本店铺为大家提供各种各样类型的实用资料,如教育随笔、日记赏析、句子摘抄、古诗大全、经典美文、话题作文、工作总结、词语解析、文案摘录、其他资料等等,如想了解不同资料格式和写法,敬请关注!Download tips: This document is carefully compiled by theeditor. I hope that after you download them,they can help yousolve practical problems. The document can be customized andmodified after downloading,please adjust and use it according toactual needs, thank you!In addition, our shop provides you with various types ofpractical materials,such as educational essays, diaryappreciation,sentence excerpts,ancient poems,classic articles,topic composition,work summary,word parsing,copy excerpts,other materials and so on,want to know different data formats andwriting methods,please pay attention!中医VPS操作流程一、准备工作1. 选择合适的VPS提供商:在选择VPS提供商时,需要考虑服务器的性能、稳定性、安全性和价格等因素。
Kickasspanel FULL COLOR用户手册说明书
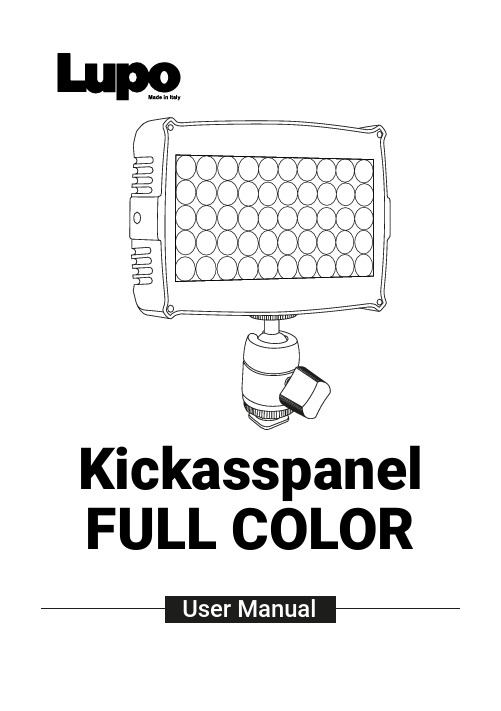
Kickasspanel FULL COLORSAFETY PRECAUTIONS:Do not operate the equipment before studying the instruction manual and the accompanying safety precautions. Make sure that Lupo Safety Instruction is always included with the equipment! Lupo products are intended for professional use. Do not place or use the equipment where it can be exposed to moisture, extreme electromagnetic fields or in areas with flammable gases or dust! Do not expose the equipment to hasty temperature changes in humid condition as could lead to condensation water in the unit. Equipment must only be serviced, modified or repaired by authorized. Dealers or the factory.CAUTION - BURN HAZARD - HOT PARTS Do not touch hot parts with bare fingers! LED bulbs and certain metal parts emit strong heat when used!Do not point lamps too close to persons. Always use the fixtures with the front part closed.NOTICE - EQUIPMENT OVERHEATING RISK Do not obstruct ventilation by placing filters, diffusing materials, etc. over inlets and outlets of the equipment ventilation or directly over glass cover or LED bulbs.FINAL DISPOSALEquipment contains electrical and electronic components that could be harmful to the environment.Equipment may be returned to Lupo distributors free of charge for recyclingaccording to WEEE. Follow local legalrequirements for separate disposal of waste, for instance WEEE directive for electrical and electronic equipment on the European market, when product life has ended.MAINTENANCE AND CAREPlease do not forget that the safe operation of lampheads also includes their maintenance and care.A visual inspection should be conducted before every use and an inspection ofelectrical safety should be conducted at least once every 12 months.WARRANTYThe warranty period for Lupo products and those marketed by Lupo is twelve months from the date of delivery. Lupo guarantees that the goods it supplies are well manufactured and of good quality. The warranty guarantees the repair of any parts that show acknowledged defects in materials, construction orworkmanship during the warranty period. The guarantee excludes any liability for direct or indirect damage of any kind and for any reason, for which Lupo will therefore not be required to pay compensation. The customers shall see to delivering the parts that need repair or replacement to Lupo’s works at their own expense and risk. The repaired or replacement parts shall be delivered by Lupo ex-works. The customers will be charged for materials and labor or replacement of the product after the expiration of the warranty period.Thanks for having purchased Lupo products. All the products are made in Italy and all the efforts have been put to keep the quality standards high. We hope this product can help you in your job and make your life easier as a professional. We also hope you will enjoy its use and we would be happy to receive your feedback about it.PLEASE NOTE:This manual is valid from 3.6 firmware version.•Device for indoor use only.•Maximum ambient temperature: 35 °C.•Make sure power supply plug is suitable for power required.•To switch on the light push the on/off button.•Kickasspanel model are equipped with new generation high quality powerleds. ATTENTION: when the C type cable is connected, and the unity is powered by Type C cable, the power is 50%.Kickasspanel Diffuser Stand and camera adapterUSB cableFor battery use:insert the battery (not included) and switch ON the unit.1For use with USBcable: insert che USB cable in the USB port andswitch ON the unit.* Charger SV min. 2A2For use with ACAdapter Connection: insert the Adapter Connection in the AC port and switch ON the unit.3Intensity knobUSB Port* Charger SV min. 2A Temperature knob DisplayUSB PortAC Adapter ConnectionLIGHT MODESA. CCT MODE: Warm and cold white control mode. It allows you to adjust colour temperature (CCT), green/magenta compensation (GN) and light intensity. This is the default settingB. HSI MODE: Colour composition mode. It allows you to adjust hue of colour (HUE), colour saturation (SAT) and light intensity.C. RGBW MODE: RGBW colour control mode allows to individually set the R, G, B, W, Color Temperature (CT), green/magenta compensation (GN) values and to adjust light intensityD. P RESET MODE: Mode with 53 PRESET colors, 48 factory preset and 5 user-defined preset. 1. In MANUAL OPTIONS menu select PRESET MODE .2. Select the PRESET to be activated with the « » 1 o « » 3 buttons, confirm the selection by pressing the « OK » 2 button.3. In current mode, use the « » 1 o « » 3 button to change the PRESET in ascending or descending order. THE PRESET ON THE DISPLAY IS THE SELECTED PRESET .4. Use the « INTENSITY » 4 knob to adjust the light intensity from 0 to 100%.SAVING THE SET VALUES AS A PRESET You can store up to 5 PRESETS .1. In CCT / HSI / RGBW mode, press the « » 1 and « » 3 at the same time.CONTROL PANELMANUAL OPERATION-In current mode press the « OK » 2 button to enter the main MENU. -In the sub-menus press the « OK » 2 button to confirm a selection.-Use the « » 1 or « » 3 buttons to navigate in the main MENU and sub-menus. -Use the « INTENSITY » 4 knob to adjust the light intensity from 0 to 100%. -Use the knobs 5 and 6 to adjust the light mode parameters. -Display 7.1. Press the « OK » 2 button to enter the main MENU.2. Select MANUAL by pressing the « OK » 2 button.3. Select the light mode between CCT / HSI / RGBW / PRESET / EFFECT with the « » 1 or « » 3 button, press « OK » 2 to confirm selection.4. See LIGHT MODES.2. Save the set values in one of the available presets between USER PRESET 1 / 2 / 3 / 4 /5 press the « » 1or « » 3 button to select the PRESET number and press « OK » 2to confirm the selection. THE SET COLOR IS SAVED AS PRESET."BUSY" indicates that in the user preset there are parameters memorized if you select it, the parameters will be replaced by the new ones. "EMPTY" indicates that the user preset is free.E. SPECIAL EFFECT MODE: Mode with 10 SPECIAL EFFECTS. STROBE / PARTY / COPCAR /DISCO / TELEVISION / PAPARAZZI / LIGHTNING / EXPLOSION / FIREWORKS / FIRE.1. In MANUAL OPTIONS or DMX MODE menu select EFFECT MODE.2. Select the EFFECT to be activated with the « » 1o « » 3 buttons, confirm theselection by pressing the « OK » 2 button.3. In current mode, use the « » 1o « » 3 button to change the EFFECT in ascending ordescending order. THE EFFECT ON THE DISPLAY IS THE SELECTED EFFECT.4. Use the knobs 5 and 6 to adjust the effect setting values. See table below.ATTENTION - Only to STROBE effect1. The strobe effect is AVAiLABLE ONL Y IN MANUAL OPERATION.2. The strobe effect is applied to the parameters of the last configured CCT/HSI/RGBW/PRESETmode.3. The STROBE effect is NOT WORK if PARTY, COPCAR, DISCO, TELEVISION, PAPARAZZI ,LIGHTNING, EXPLOSION, FIREWORKS or FIRE effects are in functioning.DEVICE SETTINGS1. Press the « OK » 2 button to enter the main MENU.2. Navigate through the MENU using the « » 1or « » 3 buttons, select DEVICESETTINGS, press the « OK » 2 button to confirm the selection.3. Navigate through the FAN / DISPLAY / MENU VIEW / FILTER / LINEARIZATION / CCT LIMITfunctions, use the « » 1and « » 3 buttons to select the desired function and press « OK » 2 to confirm the selection.4. Within each function select the option to be activated, use the « » 1and « » 3buttons to select one between the options, press « OK » 2 to activate it.Use USB port for firmware updates.Display: Time during which the display backlight stays on. 30sec / 1min / ALWAYS ON . Filter: It is the speed response of the system (smooth factor).FULL SPEED / NORMAL SPEED / HIGH SPEED / LOW SPEED.Linearization: Linearization is the compensation curve for the human eye’s perception of the luminous intensity emitted as a function of the required power. Required power = dimmer value on the display. LINEAR / EXPONENTIAL / LOGARITHMIC .Linear: No compensation, the intensity of the light is directly proportional to requested power.Exponential: The light intensity increases from 0 to 100 exponentially. Logarithmic: The light intensity increases from 0 to 100 T Limit: The colour temperature is limited. 3200K - 5600K / 2800K - 10000K.RESET DEVICE1. Press the « OK » 2 button to enter the main MENU.2. Select RESET DEVICE using the « » 1 or « » 3 buttons, press the « OK » 2 button to confirm the selection.3. Select YES with the « » 1 or « » 3 buttons, press « OK » 2 to confirm the selection.4. The device will ask for further confirmation, select YES by pressing the « OK » 2 button.THE DEVICE WILL RETURN TO FACTORY DEFAULT SETTINGS.Select “EXIT” to return to the current mode.Select "BACK" to return to the previous menu. After 1 minute ofinactivity in the menu, the device automatically exits and returns to the last selected mode.MANUALDEVICE SETTINGSRESET DEVICEEXITCCT LIMIT 3200K - 5600K 2800K - 10000K BACKYESBACKDISPLAY OPTIONS30 SEC 1 MINALWAYS ON BACKFILTERFULL SPEED NORMAL SPEED HIGH SPEED LINEARIZATIONEXITLINEARBACKLOGARITHMIC EXPONENTIAL RGBW MODE CCT MODE HSI MODE EFFECT MODEPRESET MODERED ...SOFT PINK BLUELOW SPEED STROBE PARTY COPCAR DISCOTELEVISION PAPARAZZI LIGHTNING EXPLOSION FIREWORKS FIRE BACKEXITGREEN USER PRE3USER PRE4USER PRE5BACK BACK2 BatteryBattery option 1: NP-F-SERIES (7.4 V)Battery option 2: V-Mount type (14.8 V)The accessories are products sold separately.23 AC Power Cord Cable and AC Adapter (cod. 752)AC input: 100 V - 240 V DC output: 24 VAttention: AC center pin must be positive.3Lupo srlVia V. Sassi 28/30Collegno (TO) - 10093 - Italy Phone: +39 011 411 9919E-mail:***************Website: www.lupo.it。
lkoa.0.操作手册【word版】6p

输入正确,将进入系统的主界面(个人桌面),登录后的主页面(个人桌面)如下图:此首页(个人桌面)页面中,显示与当前操作员有关额员工待办事宜列表个人办公工具等相关信息。
在此首页页面的上方有几个操作图片和链接,其中:点击可显示或隐藏页面左边的功能菜单列表。
点击可重新进入此‘个人桌面’(见‘个人桌面’说明)。
点击可进入短消息和定时提醒管理(见收发短消息和定时提醒说明)。
如果有员工向当前操作员发送消息,则其会开始闪动,同时会有声音提醒;点击进入即可查看相应的消息内容,当所有的消息均已查看完毕后,会自动停止闪动。
点击则重新显示(刷新)当前正在工作的页面内容。
点击则返回到前一个操作页面。
点击则转到下一个操作页面。
点击退出LKOA系统,返回到系统登录页面。
在标题栏中,点击当前操作员的姓名,可显示当前操作员的详细个人信息。
点击‘当前有XX用户在线’可查看当前正在使用LKOA系统的人员情况,如下图:点击某一离线人员的‘离线(详细)’链接,可查看该员工的离线留言信息。
级机构设置是一次性的。
一旦设置完以后是不能删除的,只能修改。
如果您不是首次进入且已经配置好了顶级机构信息,您看到的将是如下的登录界面:如果登录口令输入错误,您看到相应的登录出错提示信息页面,并要求重新输入登录密码。
如果登录口令输入正确,您看到的将是带TreeView引擎的管理页面(如下图):界面右方显示的是公司的体系结构,顶级机构在最上层,下面是各个部门的名称,部门可以是多级的,即部门下面可以有子部门,顶级机构下面的部门叫做一级部门,以此类推。
界面左方白色背景的就是TreeView引擎管理器,所有的部门、人事、职位等信息的设置都是由它来作导航。
它的结构以及操作方法类似于Windows的资源管理器,都是按层次列出每个节点,单击节点,可以在界面的右方浏览或编辑详细信息;双击节点或单击收缩开关(代表未展开、代表已展开)就可以展开或收缩当前节点。
在顶级机构下分层次列出了其下的所有部门以及部门下面的人员信息,在每个节点上显示的内容是机构或部门的名称,名称后面的‘姓名’代表该机构或部门的主管。
