向ArcGIS导入OpenStreetMap数据
arcgis导入线路方案

arcgis导入线路方案
在ArcGIS中导入线路方案,可以按照以下步骤进行:
1. 打开ArcGIS软件,创建一个新的地图文档或打开一个已有的地图文档。
2. 在菜单栏中选择“文件”->“导入”->“导入线路方案”。
3. 在弹出的文件选择对话框中,选择要导入的线路方案文件(如.dxf、.dwg 等),然后点击“打开”。
4. 在导入选项设置界面中,根据需要进行相关设置,如缩放比例、坐标系等。
5. 点击“确定”开始导入线路方案。
6. 等待导入完成,可以在ArcGIS中查看和编辑导入的线路方案。
需要注意的是,在导入线路方案之前,需要确保线路方案文件的格式和坐标系与ArcGIS中的地图文档相匹配,否则可能会出现坐标错位或无法导入的
情况。
同时,还需要根据具体情况进行相关设置和调整,以确保线路方案的准确性和可编辑性。
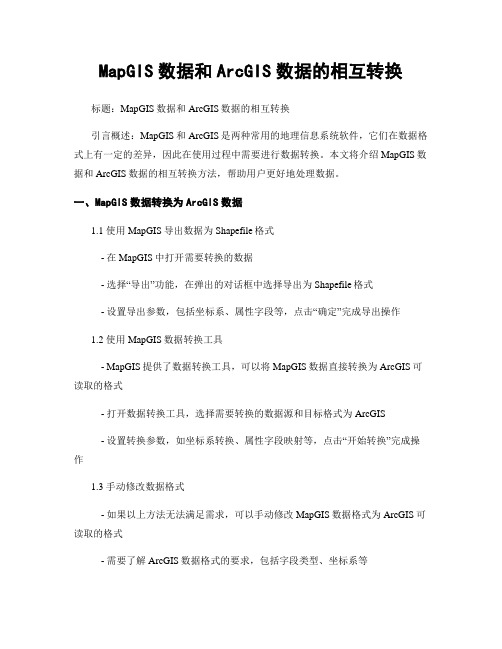
MapGIS数据和ArcGIS数据的相互转换

MapGIS数据和ArcGIS数据的相互转换概述:在地理信息系统(GIS)领域中,MapGIS和ArcGIS是两个常用的软件平台。
由于不同软件平台之间的数据格式存在差异,需要进行数据的相互转换。
本文将详细介绍MapGIS数据和ArcGIS数据之间的相互转换的标准格式。
一、MapGIS数据转换为ArcGIS数据:MapGIS数据转换为ArcGIS数据的过程可以分为以下几个步骤:1. 数据准备:首先,需要准备MapGIS数据文件,包括矢量数据和栅格数据。
矢量数据可以是点、线、面等要素,栅格数据可以是影像、DEM等。
确保数据文件的格式正确,并且包含必要的属性信息。
2. 数据导出:打开MapGIS软件,选择需要转换的数据文件,通过导出功能将数据文件导出为通用的数据格式,如Shapefile格式(.shp)或者GeoTIFF格式(.tif)。
在导出过程中,可以根据需要选择导出的图层、属性等信息。
3. 数据导入:打开ArcGIS软件,选择导入功能,将导出的数据文件导入到ArcGIS中。
在导入过程中,可以选择投影坐标系、字段映射等选项,确保导入后的数据与原始数据保持一致。
4. 数据处理:在ArcGIS中对导入的数据进行必要的处理,如属性字段的重命名、数据的裁剪、投影坐标系的转换等。
根据具体需求,可以进行空间分析、数据编辑等操作。
5. 数据保存:完成数据处理后,将数据保存为ArcGIS支持的格式,如File Geodatabase(.gdb)或者Geodatabase XML(.xml)等。
同时,建议对数据进行备份,以防数据丢失或者损坏。
二、ArcGIS数据转换为MapGIS数据:ArcGIS数据转换为MapGIS数据的过程与MapGIS数据转换为ArcGIS数据的过程类似,只是在具体操作上有所区别。
以下是详细步骤:1. 数据准备:首先,需要准备ArcGIS数据文件,包括矢量数据和栅格数据。
确保数据文件的格式正确,并且包含必要的属性信息。
arcgis数据入库流程

arcgis数据入库流程1.数据收集:首先,需要收集各种地理数据,包括地图、航空摄影图像、卫星图像、属性数据等。
这些数据可以来自于各个源头,如地理调查、卫星遥感、GPS测量等。
2. 数据预处理:在导入ArcGIS之前,需要对数据进行一些预处理工作。
这包括校正数据的几何和拓扑错误、清理不一致的数据、填充缺失数据、投影转换等。
3. 数据格式转换:不同数据源往往使用不同的数据格式,例如矢量数据可以是Shapefile、File Geodatabase等格式,栅格数据可以是TIFF、JPEG等格式。
在导入ArcGIS之前,需要将数据转换为ArcGIS支持的格式。
4. 数据入库:将转换后的数据导入到ArcGIS中进行管理和分析。
在ArcGIS中,可以使用ArcCatalog工具来创建和管理各种空间数据集和表格数据集,并将数据导入到这些数据集中。
可以按照需要进行分层管理、设置数据库索引、定义数据关系等。
5. 数据质量检查:在数据导入之后,需要进行数据质量检查,确保导入的数据的准确性、完整性和一致性。
可以使用ArcGIS的数据质量管理工具检查数据集的几何拓扑、数据完整性、属性一致性等。
6.数据索引和优化:为了提高查询和分析性能,可以对导入的数据建立索引。
索引可以加快数据查询速度并减少数据库访问时间。
此外,还可以进行数据优化操作,如裁剪数据、合并数据集等,以提高数据访问效率。
7. 数据发布:在完成数据入库后,可以将数据发布为Web服务,使其他用户可以通过互联网访问和使用这些数据。
可以使用ArcGIS Server 来发布地图服务、地理处理服务、要素服务等。
8.数据更新和维护:数据入库是一个持续的过程,随着时间推移,数据会发生更新和变化。
因此,需要定期对数据进行更新和维护工作,包括添加新数据、更新旧数据、删除过期数据等。
总结起来,ArcGIS数据入库流程包括数据收集、数据预处理、数据格式转换、数据入库、数据质量检查、数据索引和优化、数据发布以及数据更新和维护。
MapGIS数据和ArcGIS数据的相互转换

MapGIS数据和ArcGIS数据的相互转换一、背景介绍MapGIS和ArcGIS是两种常用的地理信息系统(GIS)软件,它们在地理数据处理和空间分析方面具有广泛的应用。
由于不同软件之间的数据格式存在差异,需要进行数据的相互转换,以便在不同的GIS软件中进行数据共享和交流。
二、MapGIS数据转换为ArcGIS数据1. 数据准备在进行MapGIS数据转换为ArcGIS数据之前,首先需要准备好MapGIS的数据文件。
这些数据文件可以包括地图、图层、属性数据等。
2. 数据格式转换利用ArcGIS软件提供的工具,可以将MapGIS数据转换为ArcGIS支持的数据格式。
具体步骤如下:a. 打开ArcGIS软件,选择“工具箱”。
b. 在工具箱中找到“转换工具”,选择“地理数据转换工具”。
c. 在地理数据转换工具中,选择“转换格式”。
d. 在转换格式中,选择“MapGIS数据”作为输入数据源,选择“ArcGIS数据”作为输出数据源。
e. 设置转换参数,包括数据文件路径、数据类型、坐标系等。
f. 点击“运行”按钮,开始进行数据转换。
g. 等待转换完成,转换后的数据将保存在指定的输出路径中。
3. 数据验证转换完成后,需要对转换后的数据进行验证,确保数据的完整性和准确性。
可以在ArcGIS软件中打开转换后的数据,检查地图、图层和属性数据等是否与原始数据一致。
三、ArcGIS数据转换为MapGIS数据1. 数据准备在进行ArcGIS数据转换为MapGIS数据之前,首先需要准备好ArcGIS的数据文件。
这些数据文件可以包括地图、图层、属性数据等。
2. 数据格式转换利用MapGIS软件提供的工具,可以将ArcGIS数据转换为MapGIS支持的数据格式。
具体步骤如下:a. 打开MapGIS软件,选择“数据转换”。
b. 在数据转换中,选择“导入数据”。
c. 选择“ArcGIS数据”作为输入数据源,设置输入数据路径。
d. 设置转换参数,包括数据类型、坐标系等。
MapGIS数据和ArcGIS数据的相互转换
MapGIS数据和ArcGIS数据的相互转换标题:MapGIS数据和ArcGIS数据的相互转换引言概述:MapGIS和ArcGIS是两种常用的地理信息系统软件,它们在数据格式上有一定的差异,因此在使用过程中需要进行数据转换。
本文将介绍MapGIS数据和ArcGIS数据的相互转换方法,帮助用户更好地处理数据。
一、MapGIS数据转换为ArcGIS数据1.1 使用MapGIS导出数据为Shapefile格式- 在MapGIS中打开需要转换的数据- 选择“导出”功能,在弹出的对话框中选择导出为Shapefile格式- 设置导出参数,包括坐标系、属性字段等,点击“确定”完成导出操作1.2 使用MapGIS数据转换工具- MapGIS提供了数据转换工具,可以将MapGIS数据直接转换为ArcGIS可读取的格式- 打开数据转换工具,选择需要转换的数据源和目标格式为ArcGIS- 设置转换参数,如坐标系转换、属性字段映射等,点击“开始转换”完成操作1.3 手动修改数据格式- 如果以上方法无法满足需求,可以手动修改MapGIS数据格式为ArcGIS可读取的格式- 需要了解ArcGIS数据格式的要求,包括字段类型、坐标系等- 逐个字段进行修改,确保数据格式符合ArcGIS的要求二、ArcGIS数据转换为MapGIS数据2.1 使用ArcGIS导出数据为MapGIS支持的格式- 在ArcGIS中打开需要转换的数据- 选择“导出”功能,在导出格式中选择MapGIS支持的格式,如DGN、SHP 等- 设置导出参数,包括坐标系、属性字段等,点击“确定”完成导出操作2.2 使用ArcGIS数据转换工具- ArcGIS也提供了数据转换工具,可以将ArcGIS数据转换为MapGIS可读取的格式- 打开数据转换工具,选择需要转换的数据源和目标格式为MapGIS- 设置转换参数,如坐标系转换、属性字段映射等,点击“开始转换”完成操作2.3 手动修改数据格式- 如果以上方法无法满足需求,可以手动修改ArcGIS数据格式为MapGIS可读取的格式- 需要了解MapGIS数据格式的要求,包括字段类型、坐标系等- 逐个字段进行修改,确保数据格式符合MapGIS的要求三、注意事项3.1 坐标系转换- 在进行数据转换时,需要注意坐标系的转换问题- 确保MapGIS和ArcGIS使用的坐标系一致,否则会导致数据显示错误3.2 字段映射- 在数据转换过程中,需要进行字段映射,确保属性字段的对应关系正确- 可以通过数据转换工具自动进行字段映射,也可以手动设置映射关系3.3 数据完整性- 在数据转换过程中,需要确保数据的完整性- 检查转换后的数据是否包含所有的属性字段和几何信息,确保数据没有丢失四、数据转换工具推荐4.1 FME- FME是一款专业的数据转换工具,支持MapGIS和ArcGIS数据的相互转换- 提供了丰富的转换功能和参数设置,可以满足各种数据转换需求4.2 Global Mapper- Global Mapper也是一款功能强大的数据转换工具,支持多种GIS软件的数据格式- 用户友好的界面和丰富的功能,适合初学者和专业人士使用4.3 MapInfo- MapInfo是一款专业的GIS软件,也提供了数据转换功能- 可以将MapInfo数据转换为ArcGIS或MapGIS支持的格式,方便数据共享和交换五、总结5.1 数据转换是GIS数据处理中常见的操作,MapGIS数据和ArcGIS数据的相互转换也是常见需求5.2 通过本文介绍的方法和工具,用户可以更方便地进行数据转换操作,提高工作效率5.3 在进行数据转换时,需要注意坐标系、字段映射和数据完整性等问题,确保转换结果准确无误通过以上介绍,相信读者对MapGIS数据和ArcGIS数据的相互转换有了更深入的了解,希望可以帮助读者更好地处理GIS数据。
MapGIS数据和ArcGIS数据的相互转换

MapGIS数据和ArcGIS数据的相互转换在GIS(地理信息系统)领域中,MapGIS和ArcGIS是两个常用的软件平台,用于处理和管理地理空间数据。
有时候,我们需要将MapGIS数据转换为ArcGIS数据,或者将ArcGIS数据转换为MapGIS数据,以便在不同的平台上进行数据交换和共享。
本文将详细介绍如何进行MapGIS数据和ArcGIS数据的相互转换。
1. MapGIS数据转换为ArcGIS数据首先,我们需要准备MapGIS数据的源文件。
假设我们有一个MapGIS数据集,包含点、线和面要素。
接下来,按照以下步骤进行转换:步骤1:打开MapGIS软件,并加载要转换的数据集。
步骤2:选择要转换的要素类,右键点击并选择“导出”。
步骤3:在导出对话框中,选择输出文件的格式为“Shapefile”,并指定输出文件的路径和名称。
步骤4:点击“确定”按钮,开始导出MapGIS数据为Shapefile格式。
步骤5:打开ArcGIS软件,并加载刚刚导出的Shapefile文件。
步骤6:现在,您可以在ArcGIS中使用MapGIS数据了。
2. ArcGIS数据转换为MapGIS数据与上述步骤相反,如果您需要将ArcGIS数据转换为MapGIS数据,可以按照以下步骤进行:步骤1:打开ArcGIS软件,并加载要转换的数据集。
步骤2:选择要转换的要素类,右键点击并选择“导出”。
步骤3:在导出对话框中,选择输出文件的格式为“MapGIS数据格式”,并指定输出文件的路径和名称。
步骤4:点击“确定”按钮,开始导出ArcGIS数据为MapGIS数据格式。
步骤5:打开MapGIS软件,并加载刚刚导出的MapGIS数据文件。
步骤6:现在,您可以在MapGIS中使用ArcGIS数据了。
需要注意的是,转换过程中可能会出现一些数据格式不兼容的问题。
在这种情况下,您可能需要进行一些数据清理和转换,以确保数据能够正确导出和导入。
总结:通过上述步骤,您可以将MapGIS数据转换为ArcGIS数据,或者将ArcGIS数据转换为MapGIS数据。
arcgis坐标导入方法

arcgis坐标导入方法
要导入坐标到ArcGIS中,你可以按照以下步骤进行操作:
1. 准备数据,首先,确保你已经准备好包含坐标信息的数据。
这些数据可以是以表格形式存在的经纬度坐标,或者是包含空间坐标信息的文件,比如Shapefile、Geodatabase等。
2. 打开ArcMap,启动ArcMap软件,创建一个新的地图文档。
3. 添加数据,使用“添加数据”工具将你准备好的数据添加到地图文档中。
你可以通过“文件”菜单中的“添加数据”选项或者工具栏上的“添加数据”按钮来实现。
4. 确认坐标系统,在添加数据后,确保数据的坐标系统被正确识别。
如果数据的坐标系统没有被正确识别,可以通过右键点击图层,选择“属性”来查看和更改坐标系统。
5. 显示坐标,一旦数据被添加到地图文档中,你可以选择合适的方式来显示坐标信息。
这可以是通过创建点、线或面要素来展示空间数据,或者通过标注来显示具体的坐标数值。
6. 进行空间分析,一旦数据被添加并展示出来,你可以使用ArcGIS提供的空间分析工具来对数据进行进一步的处理和分析,比如空间查询、缓冲区分析等。
总的来说,导入坐标到ArcGIS中并进行相应的空间分析,需要你熟悉ArcGIS软件的基本操作和空间分析功能,并且对数据的坐标系统和格式有一定的了解。
希望这些步骤对你有所帮助。
ArcGIS如何导入带经纬度的数据
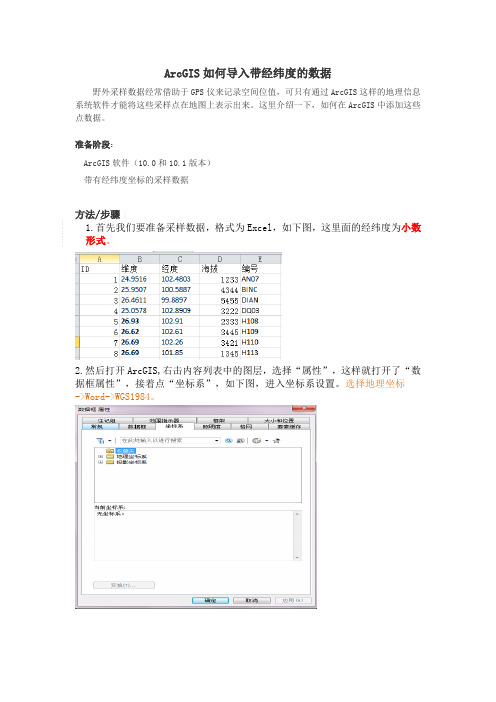
ArcGIS如何导入带经纬度的数据野外采样数据经常借助于GPS仪来记录空间位值,可只有通过ArcGIS这样的地理信息系统软件才能将这些采样点在地图上表示出来。
这里介绍一下,如何在ArcGIS中添加这些点数据。
准备阶段:ArcGIS软件(10.0和10.1版本)带有经纬度坐标的采样数据方法/步骤11.首先我们要准备采样数据,格式为Excel,如下图,这里面的经纬度为小数形式。
2.然后打开ArcGIS,右击内容列表中的图层,选择“属性”,这样就打开了“数据框属性”,接着点“坐标系”,如下图,进入坐标系设置。
选择地理坐标->Word->WGS1984。
3.如下图,,按照以下顺序依次点击:“预定义”—“Geographic coordinate System”—“World”—“WGS1984”,再点击“确定”即可。
4.再添加数据:这里要把Excel文件中存储采样数据的那个sheet添加进来,具体如下图。
(有的同学打开文件夹是空的,没关系,选择时只要选到那个文件夹就好了,不需要选择到某个具体数据,你选择文件夹打开后就可以看到你要添加的数据了。
)5.开始添加点:先右击刚刚添加的Sheet,然后选择“显示XY数据(X)”,这就打开了“显示XY数据”的数据框。
6.“显示XY数据”的数据框中各个选项按照下图的红色标识选择即可。
这里要注意的是下面又有一个坐标系选择:因为采样数据一般借助于GPS来获取经纬度,所以坐标系必须为GCS_WGS1984。
7.如图,即为导入的点数据;若要生成Shape文件,则需要将数据导出,操作如最后一图。
原文参考:/article/6dad5075f76c7aa123e36e13.html,这也是本人在学习这方面知识找到的比较好的说明,希望大家可以共同学习(QQ:767241461)。
MapGIS数据和ArcGIS数据的相互转换
MapGIS数据和ArcGIS数据的相互转换概述:本文将详细介绍如何将MapGIS数据和ArcGIS数据进行相互转换的方法和步骤。
MapGIS和ArcGIS是两种常用的地理信息系统软件,它们在数据格式上存在一定的差异。
因此,当我们需要在这两个平台之间进行数据交换或共享时,就需要进行数据转换。
本文将以具体的示例来说明数据转换的过程,以帮助读者更好地理解和应用。
步骤一:准备工作在进行数据转换之前,我们需要确保MapGIS和ArcGIS软件已经安装在计算机上,并且具备相应的数据访问权限。
同时,我们还需要准备待转换的MapGIS数据和ArcGIS数据。
步骤二:MapGIS数据转换为ArcGIS数据1. 打开MapGIS软件,并在菜单栏中选择“数据导出”选项。
2. 在弹出的对话框中,选择要导出的MapGIS数据文件,并指定导出的目标文件夹和文件名。
3. 选择导出的数据格式为ArcGIS Shapefile格式,并点击“导出”按钮。
4. 等待数据导出完成,导出的ArcGIS数据将保存在指定的目标文件夹中。
步骤三:ArcGIS数据转换为MapGIS数据1. 打开ArcGIS软件,并在菜单栏中选择“文件”->“添加数据”->“添加Shapefile”选项。
2. 在弹出的对话框中,选择要导入的ArcGIS数据文件,并点击“添加”按钮。
3. 在ArcGIS软件中,选择要导出的数据图层,并右键点击该图层,在弹出的菜单中选择“数据”->“导出数据”选项。
4. 在弹出的对话框中,选择导出的数据格式为MapGIS数据格式,并指定导出的目标文件夹和文件名。
5. 点击“导出”按钮,等待数据导出完成,导出的MapGIS数据将保存在指定的目标文件夹中。
步骤四:验证数据转换结果1. 打开MapGIS软件,并在菜单栏中选择“数据导入”选项。
2. 在弹出的对话框中,选择要导入的转换后的ArcGIS数据文件,并点击“导入”按钮。
arcgis pro openstreetmap符号

arcgis pro openstreetmap符号
ArcGIS Pro中符号化OpenStreetMap的方式如下:
1. 在ArcGIS Pro工程项目中新建一个名称为“符号化”的地图。
2. 重命名新建地图的名称为符号化,移除符号化地图中系统自动加载的底图。
3. 加载我们之前保存在本地的shapefile矢量要素。
4. 对states面要素进行符号化,打开符号系统窗口(注意:以前Map中符号系统是在图层属性窗口中的,现在符号系统已经变成了一个单独的窗口)。
在符号化系统中有很多符号化的样式,这里可以选择OpenStreetMap的符号进行练习。
5. 在属性选项卡中可设置符号的基本属性,在图库选项卡中,也可以选择ArcGIS Pro为我们提供的2D和3D的符号样式。
6. 根据自己需要选择cities点图层和Border的符号样式。
按照上述步骤操作后,就可以在ArcGIS Pro中成功地使用OpenStreetMap 的符号了。
ArcGis连接配置及数据导出导入
二、ArcGis地图数据导出
1、点击某一视图,按右键,在菜单栏中选择:ExportTo CAD。(图3)
图3
2、在弹出的导出界面中,Output 后(图4),点OK进行导出(图4、5)
图4
图5
三、地图数据导入
1、导入图数据前应先建好表,表结构应与原表一致。选择Connection to 129.50.1.8,按右键后选择:NewFeature Class(图6)
图11
图12
5、选择你所需导入的文件(DWG格式),并打开(图13、14)
图13
图14
6、打开后选择对应的视图(图15),打开后执行下一步完成数据导入(图
图15
图16
ArcGis连接配置及数据导出导入
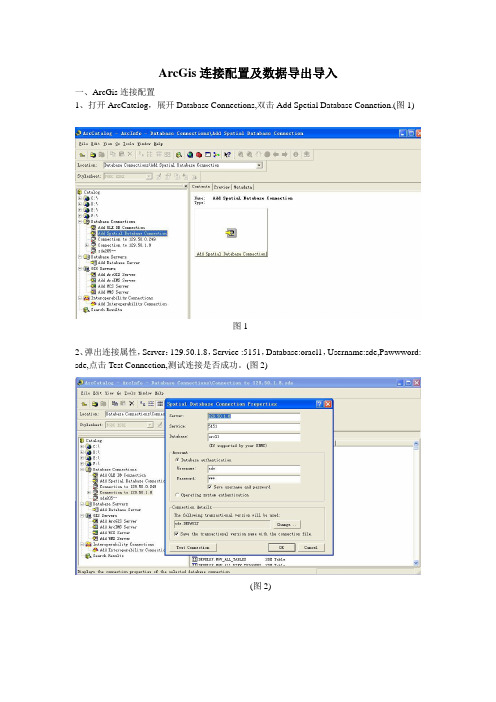
一、ArcGis连接配置
1、打开ArcCatelog,展开Database Connections,双击Add Spetial Database Connetion.(图1)
图1
2、弹出连接属性,Server:129.50.1.8,Service :5151,Database:oracl1,Username:sde,Pawwword: sde,点击Test Connection,测试连接是否成功。(图2)
图6
2、在Name中输入表名,Type中选择相应的类型(含点、线、面等),下一步(图7);选择Unknow,下一步(图8);选择Default,下一步(图9)
图7
图8
图9
3、输入表的名称及类型(默认有OBJECTID和SHAPE字段),完成后点finish (图10)
图10
4、选择刚才所创建的表,右键,选择:LoadLoad Data(图11),弹出simple data loader界面,点击下一步(图12)
MapGIS数据和ArcGIS数据的相互转换

MapGIS数据和ArcGIS数据的相互转换数据转换是地理信息系统(GIS)中非常重要的一项工作。
在实际应用中,不同的GIS软件之间存在着数据格式的差异,因此需要进行数据转换,以便在不同的GIS软件中进行数据的共享和交流。
本文将详细介绍如何实现MapGIS数据和ArcGIS数据的相互转换。
一、MapGIS数据转换为ArcGIS数据MapGIS是一款国产的GIS软件,其数据格式为MGD。
如果我们需要将MapGIS数据转换为ArcGIS数据,可以按照以下步骤进行操作:1. 打开MapGIS软件,选择需要转换的数据文件,如MGD格式的矢量数据文件。
2. 在MapGIS中,选择“文件”菜单,然后选择“导出”选项。
3. 在导出选项中,选择“导出为Shapefile”选项,然后点击“确定”按钮。
4. 在弹出的保存对话框中,选择保存的路径和文件名,并点击“保存”按钮。
5. 等待MapGIS软件完成数据的导出过程,导出的文件将保存为ArcGIS支持的Shapefile格式。
二、ArcGIS数据转换为MapGIS数据如果我们需要将ArcGIS数据转换为MapGIS数据,可以按照以下步骤进行操作:1. 打开ArcGIS软件,选择需要转换的数据文件,如Shapefile格式的矢量数据文件。
2. 在ArcGIS中,选择“文件”菜单,然后选择“另存为”选项。
3. 在另存为对话框中,选择保存的路径和文件名,并在“保存类型”中选择MapGIS支持的数据格式,如MGD格式。
4. 点击“保存”按钮,等待ArcGIS软件完成数据的导出过程。
5. 导出完成后,我们可以在指定的保存路径中找到转换后的MapGIS数据文件。
总结:通过上述步骤,我们可以实现MapGIS数据和ArcGIS数据的相互转换。
这样,无论是使用MapGIS还是ArcGIS,我们都可以方便地进行数据的共享和交流。
需要注意的是,在进行数据转换时,我们需要确保目标GIS软件支持所选择的数据格式,以保证数据的正确导入和使用。
arcgis editor for openstreetmap使用方法

arcgis editor for openstreetmap使用方法ArcGIS Editor for OpenStreetMap 是一款强大的工具,用于在ArcGIS平台上编辑和管理OpenStreetMap(OSM)数据。
下面是关于如何使用ArcGIS Editor for OpenStreetMap的详细步骤:1. 安装和启动ArcGIS Editor for OpenStreetMap:- 首先,确保你已经安装了ArcGIS软件,例如ArcGIS Desktop或ArcGIS Pro。
- 在ArcGIS软件中,导航到插件管理器(Plugin Manager)。
- 在插件管理器中搜索“ArcGIS Editor for OpenStreetMap”插件,并安装它。
- 安装完成后,重新启动ArcGIS软件。
2. 连接到OpenStreetMap服务器:- 在ArcGIS软件中,打开“ArcGIS Editor for OpenStreetMap”插件。
- 在插件界面中,选择“连接到服务器”选项。
- 输入OpenStreetMap服务器的URL地址,并点击“连接”按钮。
3. 下载OpenStreetMap数据:- 在插件界面中,选择“下载数据”选项。
- 根据需要选择下载的数据范围,可以是当前视图范围、指定区域或整个地图。
- 点击“下载”按钮开始下载数据。
下载完成后,数据将显示在ArcGIS软件中的地图视图中。
4. 编辑OpenStreetMap数据:- 在插件界面中,选择“编辑数据”选项。
- 在地图视图中选择要编辑的要素,例如道路、建筑物或其他地理要素。
- 使用ArcGIS软件提供的编辑工具进行编辑,例如添加、删除或修改要素。
- 完成编辑后,保存更改并上传到OpenStreetMap服务器。
5. 上传和同步数据:- 在插件界面中,选择“上传数据”选项。
- 确认要上传的要素和更改,并点击“上传”按钮。
arcgis editor for openstreetmap使用方法

arcgis editor for openstreetmap使用方法摘要:1.ArcGIS Editor for OpenStreetMap简介2.安装与配置ArcGIS Editor for OpenStreetMap3.ArcGIS Editor for OpenStreetMap的基本功能与操作4.高级功能与应用5.常见问题与解决方法6.总结与建议正文:** ArcGIS Editor for OpenStreetMap简介**ArcGIS Editor for OpenStreetMap是一款基于QGIS开发的OpenStreetMap编辑器,旨在为用户提供一个便捷、高效的地图编辑工具。
它支持多种操作系统,如Windows、MacOS和Linux,并具有丰富的功能,如地图显示、编辑、查询、导出等。
通过使用ArcGIS Editor for OpenStreetMap,用户可以轻松地创建、修改和分析地理空间数据,为各种行业应用提供支持。
** 安装与配置ArcGIS Editor for OpenStreetMap **1.下载ArcGIS Editor for OpenStreetMap安装包,可根据操作系统选择相应版本。
2.解压安装包,找到Setup.exe(Windows)或安装脚本(MacOS、Linux),运行并按照提示完成安装。
3.安装完成后,启动ArcGIS Editor for OpenStreetMap,根据需要配置相关参数,如设置工作空间、投影等。
** ArcGIS Editor for OpenStreetMap的基本功能与操作**1.地图显示:打开地图,可以查看OSM数据、矢量数据、栅格数据等。
2.地图编辑:对地图要素进行增加、删除、修改等操作,支持节点、边框、面等多种地理元素。
3.地理查询:通过地址、关键字等方式查询地图上的地点,支持缓冲区分析、叠加分析等。
4.数据导出:将编辑好的地图导出为常用格式,如Shapefile、GeoJSON 等。
向ArcGIS导入OpenStreetMap数据
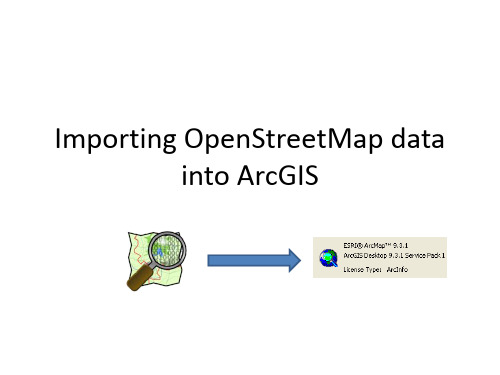
Importing OpenStreetMap datainto ArcGISDifferent ArcGIS versions •This process is different for different ArcGISversions. Click below for your version:–ArcGIS v9.3.1 SP1–ArcGIS v10ArcGIS v9.3.1 SP1 is required!•ArcGIS v9.3.1 Service Pack 1 (or higher) is required to import (.osm) data•Also make sure the Data Interoperability Extension is installed and enabled (From ArcCatalog, Tools->Extensions, then check “Data Interoperability”)•You must use ArcCatalog to create a geodatabase and import the OSM into this geodatabase•Do NOT try to import OSM data directly into ArcMap. There is currently a bug in ESRI’s software that prevents this from working correctly•The following steps detail the process of exporting data from OSM website into an XML format, and then importing this XML data into ArcGIS.•Go to the OpenStreetMap website (link centered on USF campus:/?lat=28.06173&lon=-82.41359&zoom=16&layers=00B0FTF•Login with your user account (free to create, if you don’t have one), then select the Export tab at the top of the page.•Choose the area that you want to export, select the “OpenStreetMap XML Data” format, and click the “Export” button to save th e .osm file to yourcomputer•In ArcCatalog, find the XML file you just saved by using the file explorer column on the left•Right-click on the folder containing the .osm file, then select “New->File Geodatabase”.•Name the geodatabase file accordingly.•You should now have a new geodatabase in the same directory as the XML file that you exported from OSM•Right-click on the .osm XML file and select “Export->to Geodatabase(multiple)”•You should now see the above screen which has selected all features in the OSM data file as input features•For “Output Geodatabase”, select the geodatabase file you just createdin the previous step, and then click on “OK” to start the import process•You should see the above screen during the import process•Once the import process is complete, open ArcMap and select “A new empty map” (or existing map, if you want to layer OSM data with other data).•Then, click on the “Add data” button and select the Geodatabase (.gdb) file that you just imported the OSM data into. •Be sure to select all the attributes within the file, then click “Add”•The geodatabase file is now open in ArcMap. However, usually it defaults to a very zoomed-out view so that all data appears as a dot (see above).•Use the Zoom tool several times to zoom in on the dot to see all the data•You should now see all the OSM data in ArcMap! You can use all the normal ArcGIS tools and queries now on all the data attributesFollowing slides are for ArcGIS 10ArcGIS 10•If you have a current version of “ArcGIS Editor for OSM” installed, uninstall it via “Start->Control Panel->Add/Remove Programs”.•Download and install the newest “ArcGIS Editor for OSM plugin:–/releases/view/52158•Open ArcCatalog, Right click on “Folder Connections”, then click “Connect Folder” and choose the installation folder of the plugin:–Default: c:\Program Files\ESRI\OSMEditor•Then expand “Folder Connections” to the installation location for the plugin, and the “data” folder. Then, drag the “OpenStreetMap Toolbox” to the “Toolboxes->My Toolboxes” folder to make it easily accessible forfuture useArcGIS 10•Create a new folder in your workspace, and then right-click on it and select “New->File Geodatabase”, and give it a name•Go to the OpenStreetMap website (link centered on USF campus):/?lat=28.06173&lon=-82.41359&zoom=16&layers=00B0FTF•Login with your user account (free to create, if you don’t have one), then select the Export tab at the top of the page.•Choose the area that you want to export, select the “OpenStreetMap XML Data” format, and click the “Export” button to save th e .osm file to yourcomputerArcGIS 10•In ArcCatalog, expand the “OpenStreetMap Toolbox and click on “Load OSM File”ArcGIS 10•Select your OSM file, then click on the folder next to “Target Feature Dataset”, and browse to the geodatabase you created earlier. Then, type in a name for the Data elements in the geodatabase and click “Save” then “Ok”.ArcGIS 10•You should now be able to view the data elements in ArcGIS “Preview” mode, and use the geodatabase like normal!About V2.0Created by:Sean J. Barbeau, M.S. Comp.Sci.Research AssociateCenter for Urban Transportation ResearchUniversity of South Florida4202 E. Fowler Avenue, CUT100Tampa, FL 33620-5375813.974.7208 2D barcode813.974.5168 (fax)barbeau@USF Location-Aware Information Systems Lab。
ArcGis连接配置及数据导出导入
图12
5、选择你所需导入的文件(DWG格式),并打开(图13、14)
图13
图14
6、打开后选择对应的视图(图15),打开后执行下一步完成数据导入(图
图15
图16
图1
2、弹出连接属性,Server:129.50.1.8,Service :5151,Database:oracl1,Username:sde,Pawwword: sde,点击Test Connection,测试连接是否成功。(图2)
(图2)
二、ArcGis地图数据导出
1、点击某一视图,按右键,在菜单栏中选择:ExportTo CAD。(图3)
arcgis黑头导出液微信聊天记录导出dota2配置lol配置电脑配置怎么看电脑配置剑灵配置英雄联盟配置怎么查看电脑配置
ArcGis连接配置及数据导出导入
一、ArcGis连接配置
1、打开ArcCatelog,展开Database Connections,双击Add Spetial Database Connetion.(图1)
图3
2、在弹出的导出界面中,Output type默认为:DWG_R2000,选择保存的路径及名称后(图4),点OK进行导出(图4、5)
图4
图5
三、地图数据导入
1、导入图数据前应先建好表,表结构应与原表一致。选择Connection to 129.50.1.8,按右键后选择:NewFeature Class(图6)
图6
2、在Name中输入表名,Type中选择相应的类型(含点、线、面等),下一步(图7);选择Unknow,下一步(图8);选择Defau名称及类型(默认有OBJECTID和SHAPE字段),完成后点finish (图10)
ESRI ArcGIS StreetMap 教程说明书
ArcGIS® 9 Arc GIS®StreetMa p™ TutorialCopyright © 2001–2008 ESRIAll Rights Reserved.Printed in the United States of America.The information contained in this document is the exclusive property of ESRI. This work is protected under United States copyright law and the copyright laws of the given countries of origin and applicable international laws, treaties, and/or conventions. No part of this work may be reproduced or transmitted in any form or by any means, electronic or mechanical, including photocopying or recording, or by any information storage or retrieval system, except as expressly permitted in writing by ESRI. All requests should be sent to Attention: Contracts Manager, ESRI, 380 New York Street, Redlands, CA 92373-8100, USA. The information contained in this document is subject to change without notice.CONTRIBUTING WRITERSKyle Watson, Mark Berry, Paul Tsushima, Jeff RogersU.S. GOVERNMENT RESTRICTED/LIMITED RIGHTSAny software, documentation, and/or data delivered hereunder is subject to the terms of the License Agreement. In no event shall the U.S. Government acquire greater than RESTRICTED/LIMITED RIGH TS. At a minimum, use, duplication, or disclosure by the U.S. Government is subject to restrictions as set forth in FAR §52.227-14 Alternates I, II, and III (JUN 1987); FAR §52.227-19 (JUN 1987) and/or FAR §12.211/12.212 (Commercial Technical Data/Computer Software); and DFARS §252.227-7015 (NOV 1995) (Technical Data) and/or DFARS §227.7202 (Computer Software), as applicable. Contractor/Manufacturer is ESRI, 380 New York Street, Redlands, CA 92373-8100, USA.ESRI, ArcView, StreetMap, ArcGIS, ArcMap, ArcCatalog, ArcInfo, ArcEditor, and ArcSDE are trademarks, registered trademarks, or service marks of ESRI in the United States, the European Community, or certain other jurisdictions.Other companies and products mentioned herein are trademarks or registered trademarks of their respective trademark owners.IN THIS TUTORIAL•Exercise 1: Getting started with StreetMap•Exercise 2: Exporting StreetMap data•Exercise 3: Geocoding on an ArcSDE server•Exercise 4: Finding a route This tutorial introduces you to the ESRI® StreetMap™ extension to ArcGIS®. It will introduce you to the basic techniques for viewing StreetMap North America data, found on the Data and Maps DVD, using the StreetMap address locator and finding a route. Exercise 2 shows how you can convert the compressed StreetMap data to a shapefile or geodatabase feature class. Exercise 3 will show you how to create an address locator in an ArcSDE® geodatabase. Exercise 4 shows how to use the Find Route function in StreetMap.This tutorial assumes that you are already familiar with using ArcCatalog™and ArcMap™. You should know how to copy data to a new location and add data to a map. If you’re not familiar with geocoding, first complete the Geocoding tutorial. If you’re new to GIS or feel you need to refresh your knowledge, please take some time to read Getting Started with ArcGIS. You might also work through the quick-start tutorials in Using ArcCatalog and Using ArcMap.ArcGIS StreetMap Tutorial1Exercise 1: Getting started with StreetMapThe StreetMap North America data and map document will be accessed from the Data & Maps/StreetMap North America DVD. You have the option to put the Data & Maps/StreetMap North America data DVD in your com-puter, copy the StreetMap North America data to your local hard drive, or find where the data from this DVD is located on your network.Enabling the StreetMap extensionThe StreetMap extension is automatically installed with ArcGIS. The install loads the extension but not the StreetMap North America data, which can be accessed from the DVD or copied with its MXD to a local or network drive.1.Start ArcMap, click a new empty map, then click OK.2.Click Tools, Customize, and ensure StreetMap ischecked on the Toolbars tab. This will make theStreetMap Find Route icon visible.3.Click Close.Opening the map for this tutorial1.In ArcMap, click File, click Open, then navigate toStreetMap North America.mxd on the Data & Mapsand StreetMap North America DVD in the\streetmap_na folder. If the contents of thestreetmap_na folder were copied to your local hard drive or a drive on your network, you can also find theStreetMap North America.mxd there.The StreetMap extension must be enabled before youcan access the StreetMap data on this DVD and before you can use the address locator.2.Double-click the StreetMap North America.mxd mapdocument.The map opens in ArcMap. You can use the maptemplate or group layer to create your own map at alater time.The map contains a group layer named StreetMap North America Data. This layer provides different levels of detail at different map scales. Each of the layers appear when the map’s scale falls within the appropriate range for that layer. For example, the Local Streets layer in the Streets and Highways category appears on the map when the map’s scale is 1:200,000 or larger.Try zooming in and out or setting the map to different scales. Click the plus sign next to a layer category to see the individual layers it contains. Layers that aren’t currently drawn on the map have gray check boxes. Look at a layer’s properties to see the map scale at which it appears and the data that it references. If you zoom to an area with a map scale of 1:20,000 or larger, the detail streets are drawn in thick double lines. If you’re an advanced user, you can alter the cartographic appearance by using the data frame-based Advanced Drawing option. It can be accessed by right-clicking the data frame or by clicking Layers in the table of contents.Finding an address interactivelyYou can use the StreetMap North America address locator to locate addresses with the StreetMap data.1.Click the Find button on the Tools toolbar in ArcMap.2.Click the Addresses tab in the Find dialog box. If youhave not previously selected an address locator, you will need to click the folder icon and browse for one. TheStreetMap North America data set provides aStreetMap North America address locator for geocoding addresses in the United States and Canada. It can befound on the ESRI Data & Maps and StreetMap North America DVD in the streetmap_na\data folder. Thename of the file is StreetMap North America.loc.Double-click on it and the following dialog box willappear.Find3.Type a valid U.S. street or intersection address contain-ing the street, city, state abbreviation, and a 5-digit ZIP Code.4.Click Find.The candidates appear in the list below the Find dialog box.5.Right-click the top candidate in the list and click AddLabeled Point.A graphic point representing the address’s locationappears on the map. Your map’s scale will remain thesame. If a large area is displayed on the map, right-click the top candidate again and click Zoom To. The map will zoom to the Local level; this gives you a better look at where the address is located.6.Click Cancel on the Find dialog box.Geocoding addresses in a tableIf you have a table that contains address information, you can geocode all of its addresses at once.1.In ArcMap, click Tools, point to Geocoding, then clickGeocode Addresses.The Choose an address locator to use dialog boxappears. It lists the geocoding services that are available in your local Address Locator Manager. Click on theStreetMap North America, or other locator, andclick OK.2.If no locator is present, click Add to browse for alocator.3.In the Add Address Locator dialog box, navigate to theData & Maps and StreetMap North America DVD–ROM. The StreetMap North America address locator can be found in the streetmap_na\data folder. Click the file named StreetMap North America.loc, click Add,then click OK to continue.4.In the Geocode Addresses: StreetMap North Americadialog box, browse to locate the table of addresses you want to geocode on the map. If you’ve installed theArcGIS Tutorial data, you can find a sample addressdatabase (addr_us.dbf) in the following folder: <ArcGIS install location>\ArcTutor\Streetmap.5.Select the Address Field names using the drop-downarrows.6.Click the Browse button to define the Output shapefileor feature class.7.In the Saving Data dialog box, navigate to your copy ofthe StreetMap folder. In the Name text box, type“US_Result”. Click Save.A new point shapefile named US_Result will be createdin the StreetMap folder. The point features generated by the geocoding process will be saved in that shapefile. If you prefer, the geocoding results can be saved in a new geodatabase feature class.8.Click OK to geocode the table of addresses.When the table finishes geocoding, the Review/Rematch Addresses dialog will appear. You can rematch theresulting features later if you wish.9.Click Done.The geocoded points are added as a layer in your table of contents and to your map.When the table finishes geocoding, the Review/Rematch Addresses dialog box will appear. You can rematch theresulting features later if you wish. 6While you can use the street data directly from the CD, you may prefer to convert some of the compressed street data to a local shapefile or geodatabase feature class on your computer. You can export the StreetMap data using ArcMap.Converting compressed street data using ArcMap 1.In ArcMap, zoom to a local area on the map or set themap’s scale to 50,000 or larger in the scale box on theStandard toolbar.2.Right-click the Streets (Local) in the Streets and High-ways layer in the map’s table of contents, point to Data, then click Export Data.The Export Data dialog box appears.3.Click the Export drop-down arrow, then click All fea-tures In View Extent.If you chose to export All features instead, all streetfeatures in the United States would be exported.4.Click the Browse button to define the Output shapefileor feature class. Navigate to your copy of the StreetMap folder. In the Name text box, type a name such as“exported_streets” for the new shapefile that will becreated. Click Save.If you prefer, the exported data can be saved to a new geodatabase feature class. If the exported data will be saved to disk, make sure there is enough space available to store the results. For example, if the map scale is1:50,000 or larger, 5 to 10 MB of space should besufficient.5.Click OK to export the data.Exercise 2: Exporting StreetMap dataBe aware that even if you are not viewing the contents of the streets, possibly because you are zoomed out to a point where they are not visible on the map, all features associated with this layer that fall within the view’s extent will be exported.When a very large number of features are exported, it will require a long period of time to convert the data, and unexpected system errors may occur due to insufficient disk space. If this happens, click Cancel in the Export Progress dialog box to halt the process.If ArcInfo® or ArcEditor™ is installed on your computer, and if you have access to an ArcSDE geodatabase, you can complete this exercise. ArcView® users will not be able to complete this exercise.Make sure the spatial database administrator has installed and set up the StreetMap extension to the ArcSDE server. The data from the Data & Maps and StreetMap North America DVD–ROM should be accessible from the server. To accomplish this, the administrator should create an environment variable named ESRI_NA_STREETS_DIR in the /etc/dbinit.sde file under the database installation folder. This variable must contain the path to the directory thatcontains the North American Streets data—for example, ESRI_NA_STREETS_DIR=/streetmap_na/data. Consult the ArcSDE install guide for more details.Once it has been set up correctly, you will be able to create geocoding services in your spatial database and share them with others in your organization. When you use those services, the ArcSDE server will do the work of matching addresses to geographic locations.Do not use the StreetMap North America address locator in the Data & Maps and StreetMapNorth America DVD–ROM. It can only be used for client-side geocoding. You need to create a new one in the ArcSDE server.1.In ArcCatalog, create a database connection thataccesses the ArcSDE server that you will use forgeocoding.2.Right-click the database connection, point to New, andclick Address Locator.The Create New Geocoding Service dialog box appears.Exercise 3: Geocoding on an ArcSDE server3.Click SDE.StreetMap USA, then click OK.The New SDE.StreetMap USA Geocoding Servicedialog box appears.4.In the Name text box, replace the default name “NewGeocoding Service” with the name “StreetMap USA”.5.Click OK.The new geocoding service appears in the databaseconnection. As with the geocoding services created on your computer, ArcSDE geocoding services will beprefaced by the username you used to access thegeodatabase.Now you can repeat the task you completed in the first exercise (geocoding the addresses in the addr_us dBASE®table). This time, use the ArcSDE geocoding service.Exercise 4: Finding a routeThe Find Route wizard lets you find routes between pointsusing a variety of methods. You can find an optimized route,which is the most efficient travel route between the pointsyou select, or you can find a route from point to point basedon an order you select. You can set the points, or stops, byclicking the map with your mouse, by adding them from alayer, or by geocoding them. In this exercise, you will learnhow to use the Find Route wizard.1.In ArcMap, open StreetMap North America.mxd andzoom to Southern California.2.Click the StreetMap Find Route button .3.Click the Options tab and then click the Routing Servicebrowse folder. The StreetMap North America datasetincludes a routing service. It can be found on the ESRIData & Maps StreetMap North America DVD in thestreetmap_na\data folder. Browse to find the StreetMaprouting service file (streets.rs) and double-click on it.4.Click the Define Stops tab and click the Add Stopbutton.The ArcMap Find dialog box appears.5.Click the Addresses tab and click the StreetMap NorthAmerica address locator. This address locator is foundin the \streetmap_na\data folder.6.Type 380 New York Street in the Street or Intersectionfield.7Type Redlands in the City text box.8.Type CA in the State Abbreviation text box.9.Type 92373 in the Zipcode text box.10.Click the Find button.11.Right-click the found location and click Add as Stop toStreetMap Route. You can also use this context menu to zoom to the point on the map or to add the point as amap graphic. The highest-scoring found location appears on top.12.Repeat these steps, this time using the address “210Indian Canyon Dr., Palm Springs, CA, 92262”.13.Optionally, add other stops to the list and click Cancel onthe Find dialog box when finished.14.Click Find Route.The wizard calculates the route for you and draws it on the map.15.Click the Directions tab to see detailed directions foryour route that includes distance in miles.。
ArcSDE数据导入导出

注意投影 注意范围
数据导入-Copy/Paste
• Geodatabase 数据集 • Geodatabase 要素类
使用Copy/Paste方法不仅直接导入要素类 ,而且要素类直接创建的拓扑、几何网络、关 系类等信息也可以自动创建。
数据导入-Load Data
• 加载已有数据
• 有些情况下用户的数据是分批生产 ,分批导入的,而且这些数据的数 据结构都是一样的,在这种情况下 使用这种方法也是可以的。 • 如果数据结构不一样,也可以使用 这种方法直接对应不同的字段。
数据导出-Export Data
不同范围
xport
数据导出-Export XML
数据导出-Copy/Paste
复制粘贴功能是ArcGIS最推荐用户使用的数据迁移方式,也就是说直接 对ArcSDE数据库的数据集进行复制,然后在新建的File Geodatabase(强 烈建议经常使用Personal Geodatabase的用户使用文件地理数据库)进行 粘贴。 该迁移方式将所有Geodatabase支持的简单模型(点、线、面要素类
LOGO
ArcSDE数据导入导出
数据导入-Import
• Shapefile • Geodatabase 要素类
导入多个要素类
如果要将许多要素类导入地理数据库,并且在导入时它们需要的设置相 同,则可使用“多要素类至地理数据库”工具同时导入这些要素类。将为导 入的每个要素类创建一个要素类。 另一方面,要导入的许多要素类在导入时可能需要各自不同的设置,例 如,目标地理数据库、自定义配置关键字或空间索引。
)和复杂模型(拓扑、几何网络、关系类等)全部进行了迁移。
数据导出-Copy/Paste
Subdivision
不用注册申请,如何快速地将天地图数据服务加载到GIS软件中

不用注册申请,如何快速地将天地图数据服务加载到GIS软件
中
在4月17日,自然资源部发布了《关于启用地理信息公共服务平台2020版的公告》,在2020版中做了以下方面的更新:1、在数据更新方面1)更新了2米分辨率遥感影像1000万平方千米、优于1米分辨率遥感影像537万平方千米;2)更新了道路、水系、居民地和地名地址等地理信息,其中,铁路总里程增加21%、水系要素增加12%、居民地要素增加14%;3)更新了1:25万公众版基础地理信息数据,提供交通、水系、居民地、地名地址等数据层的分幅下载服务;4)更新了测绘地理信息资源目录81.9万条,总数达到517万条。
2、在功能优化方面1)所有省级节点实现了统一标准基础服务、统一应用程序接口、统一域名设置规则、统一门户界面样式;2)优化了联动更新功能,提升了节点联动更新效率;3)国家级节点新增用户数据存储和可视化功能,支持用户在线制作个性化地图;4)升级实时地理编码引擎服务,新增全球三维地形和三维地名应用程序接口。
天地图作为国家唯一一个官方提供、内容权威的数据提供方,上面有很多高精度的数据,我们应该想办法充分利用这些数据。
那么针对这些高精度的数据服务,我们在具体工作学习中如何使用呢?
昨天一位知识星球的密友问“如何将天地图的服务加载到QGIS中?“ 刚好之前录制了一个相关的操作视频,一并和大家分享下吧。
购买的配音服务又可以用啦。
- 1、下载文档前请自行甄别文档内容的完整性,平台不提供额外的编辑、内容补充、找答案等附加服务。
- 2、"仅部分预览"的文档,不可在线预览部分如存在完整性等问题,可反馈申请退款(可完整预览的文档不适用该条件!)。
- 3、如文档侵犯您的权益,请联系客服反馈,我们会尽快为您处理(人工客服工作时间:9:00-18:30)。
Importing OpenStreetMap datainto ArcGISDifferent ArcGIS versions •This process is different for different ArcGISversions. Click below for your version:–ArcGIS v9.3.1 SP1–ArcGIS v10ArcGIS v9.3.1 SP1 is required!•ArcGIS v9.3.1 Service Pack 1 (or higher) is required to import (.osm) data•Also make sure the Data Interoperability Extension is installed and enabled (From ArcCatalog, Tools->Extensions, then check “Data Interoperability”)•You must use ArcCatalog to create a geodatabase and import the OSM into this geodatabase•Do NOT try to import OSM data directly into ArcMap. There is currently a bug in ESRI’s software that prevents this from working correctly•The following steps detail the process of exporting data from OSM website into an XML format, and then importing this XML data into ArcGIS.•Go to the OpenStreetMap website (link centered on USF campus:/?lat=28.06173&lon=-82.41359&zoom=16&layers=00B0FTF•Login with your user account (free to create, if you don’t have one), then select the Export tab at the top of the page.•Choose the area that you want to export, select the “OpenStreetMap XML Data” format, and click the “Export” button to save th e .osm file to yourcomputer•In ArcCatalog, find the XML file you just saved by using the file explorer column on the left•Right-click on the folder containing the .osm file, then select “New->File Geodatabase”.•Name the geodatabase file accordingly.•You should now have a new geodatabase in the same directory as the XML file that you exported from OSM•Right-click on the .osm XML file and select “Export->to Geodatabase(multiple)”•You should now see the above screen which has selected all features in the OSM data file as input features•For “Output Geodatabase”, select the geodatabase file you just createdin the previous step, and then click on “OK” to start the import process•You should see the above screen during the import process•Once the import process is complete, open ArcMap and select “A new empty map” (or existing map, if you want to layer OSM data with other data).•Then, click on the “Add data” button and select the Geodatabase (.gdb) file that you just imported the OSM data into. •Be sure to select all the attributes within the file, then click “Add”•The geodatabase file is now open in ArcMap. However, usually it defaults to a very zoomed-out view so that all data appears as a dot (see above).•Use the Zoom tool several times to zoom in on the dot to see all the data•You should now see all the OSM data in ArcMap! You can use all the normal ArcGIS tools and queries now on all the data attributesFollowing slides are for ArcGIS 10ArcGIS 10•If you have a current version of “ArcGIS Editor for OSM” installed, uninstall it via “Start->Control Panel->Add/Remove Programs”.•Download and install the newest “ArcGIS Editor for OSM plugin:–/releases/view/52158•Open ArcCatalog, Right click on “Folder Connections”, then click “Connect Folder” and choose the installation folder of the plugin:–Default: c:\Program Files\ESRI\OSMEditor•Then expand “Folder Connections” to the installation location for the plugin, and the “data” folder. Then, drag the “OpenStreetMap Toolbox” to the “Toolboxes->My Toolboxes” folder to make it easily accessible forfuture useArcGIS 10•Create a new folder in your workspace, and then right-click on it and select “New->File Geodatabase”, and give it a name•Go to the OpenStreetMap website (link centered on USF campus):/?lat=28.06173&lon=-82.41359&zoom=16&layers=00B0FTF•Login with your user account (free to create, if you don’t have one), then select the Export tab at the top of the page.•Choose the area that you want to export, select the “OpenStreetMap XML Data” format, and click the “Export” button to save th e .osm file to yourcomputerArcGIS 10•In ArcCatalog, expand the “OpenStreetMap Toolbox and click on “Load OSM File”ArcGIS 10•Select your OSM file, then click on the folder next to “Target Feature Dataset”, and browse to the geodatabase you created earlier. Then, type in a name for the Data elements in the geodatabase and click “Save” then “Ok”.ArcGIS 10•You should now be able to view the data elements in ArcGIS “Preview” mode, and use the geodatabase like normal!About V2.0Created by:Sean J. Barbeau, M.S. Comp.Sci.Research AssociateCenter for Urban Transportation ResearchUniversity of South Florida4202 E. Fowler Avenue, CUT100Tampa, FL 33620-5375813.974.7208 2D barcode813.974.5168 (fax)barbeau@USF Location-Aware Information Systems Lab。