镜头知识
各种镜头知识点总结
各种镜头知识点总结一、镜头的种类1. 定焦镜头:定焦镜头是焦距固定的镜头,例如50mm定焦镜头、85mm定焦镜头等,它们的优点是成像质量高、光圈大,适合拍摄人像、静物等。
2. 变焦镜头:变焦镜头的焦距可调节,例如24-70mm的变焦镜头、70-200mm的变焦镜头等,它们的优点是灵活多变,适合拍摄风景、运动等。
3. 微距镜头:微距镜头是专门用于拍摄微小物体的镜头,具有1:1的放大比例,可以拍摄出非常细小的细节。
4. 鱼眼镜头:鱼眼镜头的特点是视野极广,可以拍摄到180度的全景,适合拍摄建筑、风景等。
5. 平板头镜头:平板头镜头是一种专门用于拍摄人像的镜头,它的设计可以减少变形,使得人像更加真实。
6. Tilt shift镜头:Tilt shift镜头是一种特殊的镜头,可以让摄影师在拍摄时调整景深与透视。
二、镜头的参数1. 焦距:焦距是指镜头到成像面的距离,焦距越长,景深越浅,背景虚化效果越明显;焦距越短,景深越深,背景虚化效果越不明显。
2. 光圈:光圈越大,进光量越多,景深越浅,背景虚化效果越明显;光圈越小,进光量越少,景深越深,背景虚化效果越不明显。
3. 对焦距离:对焦距离是指镜头能够调节的最近对焦距离,不同的镜头对焦距离不同。
4. 等效焦距:等效焦距是指35mm全画幅相机上,和在不同画幅相机上,产生相似画幅的镜头焦距相对应的值。
5. 滤镜口径:镜头前端有一个镜框,可以安装滤镜。
滤镜口径大小,就是指安装的滤镜应该是多大口径的。
6. 防抖:防抖是指镜头内部的一种技术,可以减少摄影时的抖动,提高拍摄的稳定性。
三、镜头的选购1. 根据需求选择不同焦距的镜头,例如适合拍摄人像的85mm、适合拍摄风景的24-70mm等。
2. 注意镜头的质量,选择有口碑和信誉的品牌和型号,尽量避免购买劣质的镜头。
3. 考虑需要的功能和特性,例如需要定焦镜头还是变焦镜头、需要防抖功能还是不需要等。
4. 考虑携带便携性,一些大光圈的定焦镜头,可能比变焦镜头更加小巧轻便。
镜头语言的基本知识
镜头语言的基本知识一、景别:根据景距、视角的不同,一般分为:极远景:极端遥远的镜头景观,人物小如蚂蚁。
远景:深远的镜头景观,人物在画面中只占有很小位置。
广义的远景基于景距的不同,又可分为大远景、远景、小远景三个层次。
大全景:包含整个拍摄主体及周围大环境的画面,通常用来作影视作品的环境介绍,因此被叫做最广的镜头。
全景:摄取人物全身或较小场景全貌的影视画面,相当于话剧、歌舞剧场“舞台框”内的景观。
在全景中可以看清人物动作和所处的环境。
小全景:演员“顶天立地”,处于比全景小得多,又保持相对完整的规格。
中景:俗称“七分像”,指摄取人物小腿以上部分的镜头,或用来拍摄与此相当的场景的镜头,是表演性场面的常用景别。
半身景:俗称“半身像”,指从腰部到头的景致,也称为“中近景”。
近景:指摄取胸部以上的影视画面,有时也用于表现景物的某一局部。
特写:指摄像机在很近距离内摄取对象。
通常以人体肩部以上的头像为取景参照,突出强调人体的某个局部,或相应的物件细节、景物细节等。
大特写:又称“细部特写”,指突出头像的局部,或身体、物体的某一细部,如眉毛、眼睛、枪栓、扳机等。
二、摄像机的运动(拍摄方式)推:即推拍、推镜头,指被摄体不动,由拍摄机器作向前的运动拍摄,取景范围由大变小,分快推、慢推、猛推,与变焦距推拍存在本质的区别。
拉:被摄体不动,由拍摄机器作向后的拉摄运动,取景范围由小变大,也可分为慢拉、快拉、猛拉。
摇:摄像机位置不动,机身依托于三角架上的底盘作上下、左右旋转等运动,使观众如同站在原地环顾、打量周围的人或事物。
移:又称移动拍摄。
从广义说,运动拍摄的各种方式都为移动拍摄。
但在通常的意义上,移动拍摄专指把摄像机安放在运载工具上,如轨道或摇臂,沿水平面在移动中拍摄对象。
移拍与摇拍结合可以形成摇移拍摄方式。
跟:指跟踪拍摄。
跟移是一种,还有跟摇、跟推、跟拉、跟升、跟降等,即将跟摄与拉、摇、移、升、降等20多种拍摄方法结合在一起。
摄影专业镜头知识点总结

摄影专业镜头知识点总结一、镜头种类1. 定焦镜头定焦镜头是指焦距固定的镜头,如50mm定焦镜头、85mm定焦镜头等。
因为焦距不可变化,所以使用定焦镜头要求摄影师根据拍摄对象的位置来调整相机的位置,适应各种不同的拍摄距离。
定焦镜头的优点是成像质量较高,镜头构造简单,体积小巧,适合拍摄静态场景。
2. 变焦镜头变焦镜头是指可以根据需要调整焦距的镜头,如24-70mm变焦镜头、70-200mm变焦镜头等。
变焦镜头具有灵活性强的优点,可以适应不同拍摄场景的需要。
但相对于定焦镜头,成像质量稍逊一筹,尤其是在光圈完全开启时,变焦镜头的成像质量可能会有所下降。
3. 广角镜头广角镜头的焦距通常小于35mm,可以拍摄较宽的画面,适合拍摄风景、建筑等大场景。
广角镜头的特点是视角广阔,适合拍摄近景和弥补透视变形。
4. 中长焦镜头中长焦镜头的焦距在35mm至85mm之间,适合拍摄人像、动物和运动等需要一定距离的场景。
中长焦镜头的特点是能够拉近拍摄对象,突出主体,使画面更加聚焦。
5. 长焦镜头长焦镜头的焦距大于85mm,通常可以达到200mm、300mm、400mm甚至更高。
长焦镜头的特点是能够拍摄远距离的画面,适合拍摄野生动物、运动比赛等需要远距离观察的场景。
二、镜头特点1. 光圈镜头的光圈是指镜头的进光口径大小,也是控制进光量和景深的重要参数。
光圈越大,进光量越大,景深越浅,背景虚化效果越明显;光圈越小,进光量越小,景深越深,背景虚化效果越不明显。
掌握光圈的使用可以在拍摄中控制景深和背景虚化效果,达到更好的艺术表现。
2. 焦距镜头的焦距是指镜头能够聚焦的范围,焦距越长,景深越浅,适合拍摄远距离的场景;焦距越短,景深越深,适合拍摄近距离的场景。
掌握焦距的使用可以根据拍摄对象的位置和距离选择合适的镜头,获得最佳的画面效果。
3. 对焦距离镜头的对焦距离是指镜头能够聚焦的最短距离,也是拍摄距离的重要参数。
对焦距离越小,能够拍摄的最近距离就越近,适合拍摄微距和特写镜头;对焦距离越大,能够拍摄的最近距离就越远,适合拍摄远景和远距离的场景。
镜头基本知识

镜头基本知识————————————————————————————————作者: ————————————————————————————————日期:1镜头基本知识景别根据景距、视角的不同,一般分为:极远景:极端遥远的镜头景观,人物小如蚂蚁。
远景:深远的镜头景观,人物在画面中只占有很小位置。
广义的远景基于景距的不同,又可分为大远景、远景、小远景三个层次。
大全景:包含整个拍摄主体及周围大环境的画面,通常用来作影视作品的环境介绍,因此被叫做最广的镜头。
全景:摄取人物全身或较小场景全貌的影视画面,相当于话剧、歌舞剧场“舞台框”内的景观。
在全景中可以看清人物动作和所处的环境。
小全景:演员“顶天立地”,处于比全景小得多,又保持相对完整的规格。
中景:俗称“七分像”,指摄取人物小腿以上部分的镜头,或用来拍摄与此相当的场景的镜头,是表演性场面的常用景别。
半身景:俗称“半身像”,指从腰部到头的景致,也称为“中近景”。
近景:指摄取胸部以上的影视画面,有时也用于表现景物的某一局部。
特写:指摄像机在很近距离内摄取对象。
通常以人体肩部以上的头像为取景参照,突出强调人体的某个局部,或相应的物件细节、景物细节等。
大特写:又称“细部特写”,指突出头像的局部,或身体、物体的某一细部,如眉毛、眼睛、枪栓、扳机等。
摄像机的运动(拍摄方式)推:即推拍、推镜头,指被摄体不动,由拍摄机器作向前的运动拍摄,取景范围由大变小,分快推、慢推、猛推,与变焦距推拍存在本质的区别。
拉:被摄体不动,由拍摄机器作向后的拉摄运动,取景范围由小变大,也可分为慢拉、快拉、猛拉。
摇:摄像机位置不动,机身依托于三角架上的底盘作上下、左右旋转等运动,使观众如同站在原地环顾、打量周围的人或事物。
移:又称移动拍摄。
从广义说,运动拍摄的各种方式都为移动拍摄。
但在通常的意义上,移动拍摄专指把摄像机安放在运载工具上,如轨道或摇臂,沿水平面在移动中拍摄对象。
移拍与摇拍结合可以形成摇移拍摄方式。
镜头美学知识点总结

镜头美学知识点总结一、镜头分类1. 定焦镜头与变焦镜头定焦镜头是焦距固定的镜头,不可调焦,通常拥有更大的光圈和更高的光学品质,适合拍摄人像、静物等。
变焦镜头可以调整焦距,便于拍摄远近物体,灵活性更强,适合拍摄运动、风景等。
2. 广角镜头、标准镜头和长焦镜头广角镜头的焦距比较短,视野广阔,适合拍摄风景、建筑等。
标准镜头的焦距一般为50mm,是最接近人眼所见的画面,适合日常拍摄。
长焦镜头的焦距较长,适合拍摄远处物体,如野生动物、运动比赛等。
3. 微距镜头微距镜头专门用于拍摄微小的物体,如花朵、昆虫、珠宝等,可以将微小的细节放大展现。
4. 鱼眼镜头、鱼眼镜头鱼眼镜头的特点是极大的视角,可以呈现出半球状的画面,适合拍摄特殊效果的照片。
鱼眼镜头则是一种特殊的广角镜头,具有特殊的透视效果,常用于创意摄影。
二、镜头参数1. 焦距焦距决定了拍摄画面的视野大小,焦距越短,视野就越广;焦距越长,视野就越窄。
2. 光圈光圈是控制镜头进光量的装置,通过调节光圈大小可以控制景深和曝光。
光圈越大,进光量越多,景深越浅;光圈越小,进光量越少,景深越深。
3. 对焦距离对焦距离是指镜头能够对焦的最短距离,不同镜头的对焦距离不同,影响着拍摄微距和远景的能力。
4. 滤镜滤镜可以改变光线的颜色和方向,用于改善拍摄条件、增强画面效果,如偏振镜、渐变镜等。
三、镜头使用技巧1. 拍摄角度不同的拍摄角度可以营造不同的画面效果,低角度可以突出被拍摄物体的庄严威严,高角度可以强调被拍摄物体的柔和气质。
2. 对焦技巧合理的对焦是拍摄中至关重要的一步,需要根据拍摄对象和所需效果来选择对焦点和对焦模式。
3. 控制景深景深决定了照片中前后景物体的清晰度范围,通过合理调整光圈和焦距,可以控制景深来创造出不同的画面效果。
4. 動靜結合在拍摄运动场景时,可以利用慢门拍摄来呈现动感效果,同时通过对静态物体加入运动元素也可以产生截然不同的画面效果。
四、镜头故事镜头美学也包含了拍摄中的故事表达和情感传达,通过镜头的选择、构图的处理、光线的运用等方面来传达摄影师自身的情感和感知。
镜头美学知识点总结图文

镜头美学知识点总结图文摄影镜头是摄影师用来捕捉画面的工具,是摄影过程中至关重要的一环。
镜头的选择和使用对于摄影作品的质量和效果起着决定性的作用。
镜头美学是指通过对镜头特性,成像效果和使用方法的研究来追求摄影艺术的审美效果。
一、镜头的特性1. 焦距焦距是镜头的一个重要参数,决定了镜头的视野范围和视角大小。
焦距越长,视野范围越窄,适合拍摄远景或者局部细节;焦距越短,视野范围越广,适合拍摄广角景观或者大场景。
2. 光圈镜头的光圈控制了进入相机的光线量,决定了景深的大小和背景虚化的效果。
光圈越大,景深越小,背景虚化效果越明显;光圈越小,景深越大,背景虚化效果越不明显。
3. 对焦距离对焦距离是指镜头能够对焦的最近距离,不同的镜头对焦距离不同,有的镜头能够拍摄极微距离的细节,有的则对近距离拍摄效果不佳。
4. 镜头畸变镜头畸变是指由于镜头结构和光线折射造成的画面失真,包括桶形畸变、枕形畸变和透视畸变。
摄影师需要了解并掌握镜头畸变的特点,避免在拍摄中产生不必要的失真效果。
二、成像效果1. 锐度镜头的锐度指的是镜头在拍摄时对画面细节的清晰程度,包括边缘清晰度、对比度和细节层次。
好的镜头应具有较高的锐度,能够捕捉更多的细节和纹理。
2. 色彩还原镜头对于色彩还原的表现能力很重要,色彩还原好的镜头可以保持画面中的色彩真实和饱满,使得照片更加生动和有吸引力。
3. 对比度镜头的对比度表现了画面中明暗部分的对比程度,高对比度的镜头可以使画面更加立体感和鲜明,引人注目。
4. 背景虚化背景虚化效果是用来突出主体的一种手法,镜头的光圈大小和镜头对焦的位置会影响到背景虚化的效果。
三、镜头的应用1. 人像摄影人像摄影需要选用焦距适中的镜头,能够突出人物的面部特征,同时产生自然的景深和背景虚化效果。
2. 风景摄影风景摄影需要选用广角镜头,能够捕捉更广阔的景色和更多的细节,同时保持距离感和景深感。
3. 静物摄影静物摄影通常需要使用微距镜头或者中焦镜头,能够捕捉静物的细节和纹理,同时保持适当的景深和背景虚化效果。
镜头基础知识

镜头基础知识镜头是摄像机的第一道关口,他的作用是将光信号(可见光与非可见光)成像在摄像机的CCD上。
(1)镜头主要的参数A、什么是镜头的焦距?答:从光学原理来讲焦距就是从焦点到透镜中心的距离。
即焦距长度。
如“f=8-24mm”,就是指镜头的焦距长度为8-24mm。
B、焦距长短与成像大小、视角大小有什么关系?答:焦距长短与成像大小成正比,焦距越长成像越大,焦距越短成像越小。
镜头焦距长短与视角大小成反比,焦距越长视角越小,焦距越短视角越大。
C、焦距长短与景深透视感又什么关系?答:焦距长短与景深成反比,焦距越长景深越小,焦距越短景深越大。
焦距长短与透视感的强弱成反比,焦距越长透视感越弱,焦距越短透视感越强。
D、什么是镜头的光圈?答:光圈的功能就如同我们人类眼睛的虹蟆,主要用来调整摄像机的进光量,F 表示镜头的孔径,较小的F值表示较大的光圈。
E、什么是景深?答:当某一物体聚焦清晰时,从该物体前面的某一段距离到其后面的某一段距离内的所有景物也都当清晰的。
焦点相当清晰的这段从前到后的距离就叫做景深。
F、什么是广角镜头?答:广角镜头因焦距非常短,所以投射到底片上的景物就变小了扩阔镜头拍摄角度,除可拍摄更多景物,更能在狭窄的环境下拍摄出宽阔角度的影像。
视角90度以上,观察范围较大,近处图像有变形。
G、什么是长焦镜头?答:视角20度以内,焦距可达几十毫米或上百毫米。
H、什么是镜头的视频驱动?答:它将一个视频信号及电源从摄像机输送到透镜来控制镜头上的光圈,这种视频输入型镜头内包含有放大器电路,用以将摄像机传来的视频信号转换成对光圈马达的控制。
I、什么是镜头的直流驱动(DC driverno Amp)答:它利用摄像机上的直流电压来直接控制光圈,这种镜头内只包含电流计式光圈马达,摄像机内没有放大器电路。
二种驱动方式产品不具可互换性,但现已有通用型自动光圈镜头推出。
J、什么是镜头的有效距离答:指不同尺寸的镜头,最佳的成像距离。
镜头基础知识

镜头基础知识 镜头在影视中有两指,⼀指电影摄影机、放映机⽤以⽣成影像的光学部件,由多⽚透镜组成。
那么你对镜头了解多少呢?以下是由店铺整理关于镜头知识的内容,希望⼤家喜欢! 镜头的性能及外形 根据镜头的性能及外形区分,⽬前有P型、E型、L型和⾃动变焦镜头等类型,来⾃中国仪器超市的资料分别叙述如下: 1、P型镜头 (1)⾃动定位镜头,本⾝瞳焦已经调节好,需要检验从最⼤倍率到最⼩倍率的清晰度,是否⼀致、是否清晰。
(2)检验同轴度,即最⼤倍率到最⼩倍率取像在同⼀位置,不能偏移或偏移太⼤,均视为不良品,必需重新更换镜头。
(3)光学放⼤倍率为0、7—4、5X,即0、7倍到4、5倍之间共九种倍率。
(4)清晰度根据校正块、实际对象成像反映来进⾏判断。
2、E型镜头 (1)此镜头为普通⼯业镜头,需要⼿动调节瞳焦,在机台安装好以后,⼿动调节使⽤最⼤倍率和最⼩倍率时,图像同样的清晰,如果不能调节清晰度视为不良品,如果调节后镜头有晃动等不稳定因素存在,也视为不良品。
(2)检验同轴度,即最⼤倍率到最⼩倍率取像在同⼀位置,不能偏移或偏移太⼤,均视为不良品,必需重新更换镜头。
(3)光学放⼤倍率为0、7—4、5X。
(4)清晰度根据校正块、实际对象成像反映来进⾏判读。
3、L型镜头 (1)此镜头为普通⼯业镜头,需要⼿动调节瞳焦,在机台安装好以后,⼿动调节使最⼤倍率和最⼩倍率时,图像同样的清晰,如果不能调节清晰度视为不良品,如果调节后镜头有晃动等不稳定因素存在,也视为不良品。
(2)检验同轴度,即最⼤倍率到最⼩倍率取像在同⼀位置,不能偏移或偏移太⼤,均视为不良品,必需重新更换镜头。
(3)光学放⼤倍率为0、7—4、5X。
(4)清晰度根据校正块、实际对象成像反映来进⾏判读。
4、⾃动变焦镜头 (1)为⾃动定位镜头本⾝瞳焦已经调节好,需要检验从最⼤倍率到最⼩倍率的清晰度,是否⼀致、是否清晰。
(2)检验同轴度,即最⼤倍率到最⼩倍率取像在同⼀位置,不能偏移或偏移太⼤,均视为不良品,必需重新更换镜头。
认识镜头知识点总结图

认识镜头知识点总结图一、镜头的构成1.透镜系统透镜是镜头的核心部件,它决定了镜头的成像质量。
不同的透镜构型和镜片材质会影响到成像的清晰度、色彩还原、边缘光晕等性能。
在摄影镜头中,常见的透镜系统有单片透镜、双高透镜、高折射率透镜、非球面透镜等不同构型。
2.光圈系统光圈是控制镜头透过光线的大小的部件,它决定了光线的通量和景深。
光圈的大小不仅影响了照片的曝光量,还直接影响了照片的前景和背景的清晰度。
3.快门系统快门是在摄影过程中控制光线进入感光芯片或底片时间的装置,它能够控制曝光时间。
不同的快门速度可以捕捉到不同程度的运动轨迹,可以用来拍摄运动拍摄、追焦拍摄等不同场景。
二、镜头的参数1.焦距焦距是用来衡量镜头能够捕捉到的景深范围的参数,它决定了拍摄画面的视角和远近感。
常见的焦距有超广角镜头、广角镜头、标准镜头、中长焦镜头、长焦镜头等不同种类。
2.最大光圈最大光圈是指镜头能够透过的最大光线通量,它决定了镜头的透光能力和景深范围。
常见的最大光圈有F1.4、F2.8、F4、F5.6等不同等级,光圈越大,景深范围越宽,能够在光线较暗的环境下拍摄清晰的照片。
3.最近对焦距离最近对焦距离是指镜头能够对焦的最短距离,它决定了镜头的近拍能力。
不同的镜头最近对焦距离不同,能够满足摄影师的不同需求。
三、镜头的分类1.定焦镜头定焦镜头是指镜头的焦距是固定的,不能进行变焦调节。
它的设计简单、成像质量较高,能够制造出较为均匀的成像效果,常见的定焦镜头有50mm定焦、85mm定焦、105mm微距定焦等。
2.变焦镜头变焦镜头是指镜头的焦距可以进行调节,能够满足拍摄不同远近的场景。
变焦镜头有较大的灵活性,能够快速调整拍摄画面的大小和远近感,常见的变焦镜头有24-70mm变焦、70-200mm变焦、18-135mm变焦等。
3.特殊镜头特殊镜头是指根据特定的拍摄需求而设计的专用镜头,能够拍摄出特殊效果的成像。
常见的特殊镜头有鱼眼镜头、微距镜头、长焦镜头、逆转镜头等,它们能够满足摄影师的不同需求。
常用镜头知识点总结归纳

常用镜头知识点总结归纳镜头是摄影中必不可少的器材之一,它的选择和使用对于摄影作品的质量有着至关重要的影响。
下面将对常用镜头的知识点进行总结归纳,希望能帮助大家更好地了解和使用镜头。
一、镜头的基本构造1.镜头结构镜头的构造一般包括镜片组、光圈系统、对焦系统和镜头框架等部分。
镜头的构造复杂,内部的镜片组和光圈系统的设计和排列对镜头的成像质量有着重要的影响。
2.镜头焦距镜头焦距是指镜头的焦点与感光介质(例如胶片或传感器)之间的距离。
焦距决定了镜头的视角和成像效果,一般来说,焦距越长,视角越窄,适合拍摄远景或者局部细节;焦距越短,视角越宽,适合拍摄大景或者广角场景。
3.镜头光圈镜头的光圈是指镜头的入光孔径大小,光圈的大小决定了镜头的透光量和景深范围。
在实际拍摄中,通过调整光圈大小可以控制景深和曝光量,从而实现不同的拍摄效果。
4.镜头对焦镜头的对焦系统通常包括自动对焦和手动对焦两种方式,通过对焦系统可以调整镜头的焦点位置,确保拍摄的主体清晰。
二、常用镜头类型1.标准镜头标准镜头一般指焦距在50mm左右的镜头,它具有视角适中、透视效果自然等特点。
标准镜头适合拍摄人像、风景、静物等多种主题,是摄影入门者首选的镜头类型之一。
2.广角镜头广角镜头的焦距相对较短,一般小于35mm,视角宽阔,适合拍摄大景、建筑、室内等场景。
广角镜头具有良好的景深表现和透视效果,能够让画面更加立体感,是风光摄影和建筑摄影的常用镜头类型。
3.长焦镜头长焦镜头的焦距较长,一般大于85mm,视角较窄,适合拍摄远景、野生动物、运动比赛等主题。
长焦镜头能够压缩景深,突出主体,使得背景更加虚化,是拍摄远景和局部细节的理想选择。
4.微距镜头微距镜头的特点是能够拍摄非常接近的主体,并保持清晰的成像效果。
微距镜头广泛应用于拍摄昆虫、花卉、珠宝等微小物体,能够呈现出细致入微的细节和纹理,是摄影爱好者常用的专业镜头类型之一。
5.变焦镜头变焦镜头具有可调焦距的特点,能够在一定范围内实现焦距的变化。
(完整版)相机镜头参数知识普及

相机镜头参数知识普及测光方式:一般为矩阵,中央,点测光。
1.测光不要对着天空,不要对着最暗的地方.要去抓中间值。
2、因为机器为方便后期,自动曝光会欠曝,导致灰蒙蒙的,白的不白,黑的不黑。
所以,遇到白色要加曝光,遇到黑色要减曝光!3.依照你拍的题材,善用测光模式(权衡测光.点测光.中央重点测光...)。
4.若遇到测光抓不准的时候,请用AE lock 对身边灰色的东西曝光锁定后再来拍摄。
5。
对于M档,测光无效,但是会影响液晶屏直方图信息提示。
手动测光:1. 寻找画面中接近18%灰的区块。
当拍摄经验逐渐累积之后.我们就很容易在一个画面中找出接近18%反光率的地方.它可能是监天.可能是大太阳下的柏油路面.可能是青绿的草丛,也可能是没有粉刷过的墙面。
经验可以帮助我们确认进行点测光的地方.应当多多拍摄.然后观察结果并修正自己的判断。
2.使用灰卡或是手掌来测光如果判断中间调的经验不足或是环境混乱.可以直接将灰卡置于环境光源下,直接对着它来测光。
如果没有灰卡.可以用自己的手掌来取代。
人的肤色接近18%的灰调.所以自己的手其实就是一张很好用的灰卡。
不过要记得别用被太阳晒得很黑的手背.那样会影响测光结果。
曝光的准确:拍摄时,准确的曝光是获取高质量影像的关键。
后期软件来弥补曝光不正确的失误,但很难达到满意的效果。
曝光准确的影像,影调自然,颜色饱和、鲜艳;曝光不足,影像晦暗,暗部层次损失严重;曝光过度,影像的高光部分没有层次。
1、逆光拍摄,但不追求剪影效果可以使用反光板或闪光灯对主体进行补光,如与被摄体距离太远而导致无法使用反光板或闪光灯进行补光时,可以使用点测光功能对主体进行精确测光,也可以使用测光表走近主体进行入射光测量。
2、被摄主体处于大面积白色背景前由于大面积白色或浅色背景会严重影响测光表的准确性,在这种情况下,我们可以选择同方向、同等光线亮度的其它中灰色为主的物体来进行测光,如实在找不到参照物,则可以适当增加曝光补偿,至于增加多少曝光量,要看现场拍摄时白色背景所占比例的大小和光线反差的强弱来确定,一般会在1-2 级之间。
相机镜头知识点总结大全

相机镜头知识点总结大全相机镜头是摄影的核心部件之一,它直接影响着照片的成像质量。
因此,了解相机镜头的知识是每个摄影爱好者都应该掌握的重要内容。
本文将从相机镜头的定义、种类、参数、技术、品牌等方面进行详细的介绍和总结,希望能够帮助读者更深入地了解相机镜头。
一、相机镜头的定义相机镜头是用于聚焦光线,将物体成像在感光元件上的光学器件。
它是相机的重要组成部分,影响着成像的画质、透视角度和景深等参数。
一般来说,相机镜头由多个透镜组成,通过透镜的光学原理将被摄物体的影像成像在感光元件(底片或传感器)上。
相机镜头的主要功能包括:聚焦、控制光线透射、改变景深和透视角等。
通过调节相机镜头的各种参数,可以实现对被摄物体的不同成像效果。
二、相机镜头的种类根据不同的使用需求和拍摄对象,相机镜头可以分为多种不同的类型。
常见的相机镜头种类包括:标准镜头、广角镜头、长焦镜头、微距镜头、定焦镜头、变焦镜头等。
1. 标准镜头:一般称为常规镜头,焦距在35mm到50mm之间。
它的透视角度与人眼接近,是最接近人眼视觉的焦段。
适用于拍摄人像、风景等。
2. 广角镜头:焦距较短,通常在24mm以下。
透视角度较大,可拍摄更广阔的景物,适用于风景、建筑等拍摄。
3. 长焦镜头:焦距较长,通常在85mm以上。
透视角度较小,适用于拍摄远景、动物、体育比赛等。
4. 微距镜头:专门用于拍摄微小物体,可以将微小的物体放大成真实尺寸的照片。
5. 定焦镜头:焦距固定,不可变焦。
一般来说,定焦镜头成像质量比变焦镜头更高。
6. 变焦镜头:可以调节焦距,适用于不同的拍摄需求。
以上只是相机镜头种类的一部分,实际上还有很多其他类型的镜头,如鱼眼镜头、倒置镜头、Tilt-Shift镜头等。
三、相机镜头的参数了解相机镜头的参数对于选择合适的镜头和拍摄出理想的照片非常重要。
相机镜头的一些重要参数包括:焦距、光圈、最小对焦距禑、滤镜口径、重量等。
1. 焦距:是相机镜头的一个重要参数,它表示镜头光轴与焦点之间的距离。
相机镜头的知识点总结
相机镜头的知识点总结一、镜头的基本构造1.光圈光圈是镜头中最重要的一个参数,它决定了镜头能够控制的光线量。
光圈越大,能够通过的光线就越多,拍摄出来的照片就越亮。
而光圈越小,能够通过的光线就越少,拍摄出来的照片就越暗。
光圈的大小一般用F数来表示,F数越小,光圈就越大,反之亦然。
2.焦距焦距是指镜头能够聚焦的范围,焦距越长,能够聚焦的范围就越远,拍摄出来的图片看起来就更加近大远小。
而焦距越短,能够聚焦的范围就越近,拍摄出来的图片看起来就更加广角。
3.镜头构造镜头由多个透镜组成,透镜的材质和形状不同会影响到光线的传播和聚焦。
近年来,随着科技的不断发展,镜头的构造也在不断革新,有一些先进的镜头甚至使用了非球面透镜和超低色散透镜,以获得更加清晰和高对比的画面效果。
二、镜头的种类1.定焦镜头定焦镜头也叫单焦镜头,它的焦距是固定的,无法调节焦距。
定焦镜头一般都有较大的光圈,能够拍摄出背景虚化的效果,适合拍摄人像和静物。
2.变焦镜头变焦镜头的焦距是可以调节的,可以通过旋转镜头来达到放大或缩小的效果。
变焦镜头的优点是拍摄时不需要频繁更换镜头,可以适应不同拍摄场景和拍摄对象的需求。
3.广角镜头广角镜头的焦距较短,能够拍摄到较宽广的画面,适合拍摄风景、建筑和大场景。
4.长焦镜头长焦镜头的焦距较长,能够拍摄到远处的景物,适合拍摄运动、野生动物等需要远距离拍摄的场景。
5.微距镜头微距镜头能够拍摄到非常小的物体,并且通过放大效果,将细节展现得非常清晰。
微距镜头一般用来拍摄昆虫、花卉等微小物体。
6.鱼眼镜头鱼眼镜头是一种特殊的广角镜头,它的视角非常广,可以拍摄到近乎全景的画面,但是会出现一定程度的变形效果。
鱼眼镜头一般用于创意摄影和艺术拍摄。
三、镜头的选购1.品牌和型号市面上有很多不同品牌和型号的镜头,选择镜头时应该根据自己的拍摄需求和预算来确定。
一般来说,知名品牌的镜头质量和性能更加可靠,但是价格也会偏高一些。
2.兼容性在购买镜头时,也需要考虑镜头和相机的兼容性。
镜头培训知识
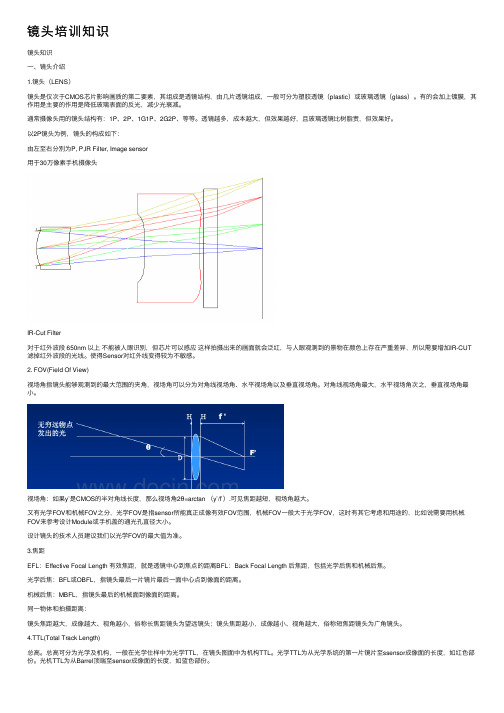
镜头培训知识镜头知识⼀、镜头介绍1.镜头(LENS)镜头是仅次于CMOS芯⽚影响画质的第⼆要素,其组成是透镜结构,由⼏⽚透镜组成,⼀般可分为塑胶透镜(plastic)或玻璃透镜(glass)。
有的会加上镀膜,其作⽤是主要的作⽤是降低玻璃表⾯的反光,减少光衰减。
通常摄像头⽤的镜头结构有:1P、2P、1G1P、2G2P、等等。
透镜越多,成本越⼤,但效果越好,且玻璃透镜⽐树脂贵,但效果好。
以2P镜头为例,镜头的构成如下:由左⾄右分別为P, P,IR Filter, Image sensor⽤于30万像素⼿机摄像头IR-Cut Filter对于红外波段 650nm 以上不能被⼈眼识别,但芯⽚可以感应这样拍摄出来的画⾯就会泛红,与⼈眼观测到的景物在颜⾊上存在严重差异,所以需要增加IR-CUT 滤掉红外波段的光线。
使得Sensor对红外线变得较为不敏感。
2. FOV(Field Of View)视场⾓指镜头能够观测到的最⼤范围的夹⾓,视场⾓可以分为对⾓线视场⾓、⽔平视场⾓以及垂直视场⾓。
对⾓线视场⾓最⼤,⽔平视场⾓次之,垂直视场⾓最⼩。
视场⾓:如果y’是CMOS的半对⾓线长度,那么视场⾓2θ=arctan (y’/f’).可见焦距越短,视场⾓越⼤。
⼜有光学FOV和机械FOV之分,光学FOV是指sensor所能真正成像有效FOV范围,机械FOV⼀般⼤于光学FOV,这时有其它考虑和⽤途的,⽐如说需要⽤机械FOV来参考设计Module或⼿机盖的通光孔直径⼤⼩。
设计镜头的技术⼈员建议我们以光学FOV的最⼤值为准。
3.焦距EFL:Effective Focal Length 有效焦距,就是透镜中⼼到焦点的距离BFL:Back Focal Length 后焦距,包括光学后焦和机械后焦。
光学后焦:BFL或OBFL,指镜头最后⼀⽚镜⽚最后⼀⾯中⼼点到像⾯的距离。
机械后焦:MBFL,指镜头最后的机械⾯到像⾯的距离。
同⼀物体和拍摄距离:镜头焦距越⼤,成像越⼤、视⾓越⼩,俗称长焦距镜头为望远镜头;镜头焦距越⼩,成像越⼩、视⾓越⼤,俗称短焦距镜头为⼴⾓镜头。
镜头知识

1.镜头构成:以成像为目的的镜头,可以分为透镜组和光阑两部分。
●透镜组:常见的有凸透镜和凹透镜两种,凸透镜对光线具有会聚作用,凹透镜对光线具有发散作用。
镜头设计中一般将这两类透镜结合使用。
●光阑:光阑的作用是约束进入镜头的光束成分。
使有益的光束进入镜头成像,而有害的光束不能进入镜头。
可分为以下三种:孔径光阑:它决定了进入镜头的成像光束的多寡(口径)。
从而决定了镜头成像面的亮度,是镜头的关键部件之一。
通常说的“调节光圈”,就是调节孔径光阑的口径,从而改变成面的亮度。
视场光阑:限制、约束着镜头的成像范围。
例如:单透镜的边框限制斜入射的光束;CCD、CMOS或者其他感光器件的物理边界也限制了有效成像的范围。
消杂光光阑:为限制杂散光到达像面而设置的光阑。
2.镜头参数●光圈:光圈的结构:光圈是由光圈叶片组成一个可以改变孔径大小的部件,调节镜头的光圈调节环,可以改变光圈孔径的大小。
光圈叶片都是用金属薄片组成,光圈叶片一般由一片、两片、三片,最多乃至六、七片组成。
光圈的功能:有效孔径:✧镜头的有效孔径实际就是该镜头的最大一级光圈,指的是通过镜头前镜片光束的直径。
✧有效孔径的大小决定焦平面上影像的明暗程度,有效孔径越大,焦平面上的影像就越亮。
焦平面上影像的明暗程度与镜头通光孔径的平方(也就是镜头的通光力)成正比关系。
摄影镜头的孔径每增大一倍,射入镜头光束的截面积和光通量就要增大四倍。
相对孔径:相对孔径是镜头的有效孔径与焦距的比值。
光圈为相对孔径的倒数。
因此有效孔径越大,光圈值越小,通光量越大。
光圈系数排列于下:1.4、2.0、2.8、4、5.6、8、11、16、22、32。
●焦距f、物距u、像距v关系:1/u+1/v=1/f●景深根据透镜的成像原理,焦点只有一个,只有把焦点调到目标上,才能使在焦平面上的感光胶片结成清晰图像。
一般情况下被摄景物离镜头有远有近,我们把镜头的焦点到其中的一点上,这一点无疑是清晰的,能在焦平面位置上的感光胶片结成清晰图像的,这清晰点就是焦点。
镜头相关知识点总结
镜头相关知识点总结一、镜头的构造与类型1. 镜头的构造镜头主要由几个基本部分构成,包括镜头前端的镜片、中部的光圈和后部的镜筒。
镜片主要用来聚焦和成像,光圈用来控制光线的进入量,镜筒则主要起到支撑作用。
2. 镜头的类型根据不同的功能和用途,镜头可以分为定焦镜头和变焦镜头两种类型。
定焦镜头焦距固定,适合拍摄静态场景,成像质量较高;变焦镜头可以根据需要调节焦距,适合拍摄运动或远景,但成像质量一般要低于定焦镜头。
二、镜头的参数和特性1. 焦距焦距是指镜头的焦点到镜片面的距离,通常用毫米表示。
长焦距的镜头适合拍摄远景,短焦距的镜头适合拍摄近景。
2. 光圈光圈是用来控制光线进入量的装置,通常用F数表示。
F数越大,光圈越小,进光量越少;F数越小,光圈越大,进光量越多。
常用的光圈有F1.4、F2.8、F4等。
3. 对焦距离对焦距离是指镜头最近能对焦的距离,长焦距的镜头对焦距离一般会比短焦距的镜头长。
4. 成像质量镜头的成像质量主要取决于镜片的材质和涂层技术,高端镜头一般会采用特殊材质和多层涂层,以提高成像质量和降低反光。
5. 是否防抖防抖功能可以减少手持拍摄时由于手抖带来的模糊,一般分为光学防抖和电子防抖两种方式。
三、镜头的应用和使用技巧1. 拍摄静态场景对于拍摄静态场景,可以选择焦距适中的定焦镜头,通过调整光圈和快门速度来控制景深和曝光。
2. 拍摄运动场景对于拍摄运动场景,可以选择焦距较长的变焦镜头,以便远距离捕捉到运动物体的画面。
3. 使用滤镜滤镜可以改变光线颜色、增强对比度、减少反光等效果,适当使用滤镜可以提高拍摄的效果。
4. 精确对焦镜头对焦时可以使用自动对焦和手动对焦两种方式,对于特殊场景或要求精确对焦时可以选择手动对焦。
四、镜头的保养和维护1. 镜头的清洁镜头表面容易积聚灰尘和污垢,定期用专用的镜头清洁液和布清洁镜头表面。
2. 镜头的保护不使用时应当用镜头盖把镜头盖上,避免灰尘进入和镜片受损。
3. 镜头的防护在使用镜头时要避免撞击和摔落,以免造成镜片损坏。
镜头参数知识
镜头参数知识镜头参数是摄影领域中非常重要的概念,了解镜头的参数对于拍摄出优质的照片至关重要。
以下是关于镜头参数的一些基本知识。
1. 焦距(Focal length):焦距是指从镜头中心到感光元件(或者胶片)的距离,通常用毫米(mm)表示。
焦距越长,镜头的视角越窄,景深越深。
相反,焦距越短,视角越宽,景深越浅。
较长焦距的镜头适合拍摄远距离的主体,较短焦距的镜头适合拍摄广角照片。
2. 光圈(Aperture):光圈是镜头的一个开口,通过调整光圈大小可以控制镜头进光的多少。
光圈的大小通常用F数表示,比如F2.8、F4等。
较大的光圈(比如F1.4)可以让更多的光线进入镜头,适用于低光条件下的拍摄,同时也能帮助实现浅景深。
较小的光圈(比如F16)可以减少光线进入镜头,适用于明亮的环境下或者需要大景深的拍摄。
3. 对焦距离(Focus Distance):对焦距离是指摄影师设定的焦点到主体的距离。
通过调整对焦距离,可以确保主体清晰而背景模糊。
近焦距镜头适合拍摄近距离的主体,远焦距镜头适合拍摄较远距离的主体。
4. 最大放大倍率(Maximum Magnification):最大放大倍率表示镜头能够放大主体的最大程度。
较高的最大放大倍率意味着镜头可以拍摄较小的主体,并保持其清晰度。
最大放大倍率通常用倍数或者百分比表示,比如1:1或者100%。
5. 镜头构造(Optical construction):镜头构造指的是镜头内部的光学组件。
不同构造的镜头具有不同的性能和功能,比如逆变镜结构的镜头对应用领域的限制较多,而高级镜头采用复杂的结构可以较好地纠正光线偏移和畸变。
6. 图像稳定(Image stabilization):图像稳定是一种技术,通过调节光学组件来抵消相机抖动,从而在手持拍摄时减少模糊。
一些镜头配备了内置的图像稳定功能,可以帮助摄影师在低光条件下获得更清晰的照片。
7. 滤镜尺寸(Filter size):滤镜尺寸指的是可在镜头前面安装的滤镜的尺寸。
- 1、下载文档前请自行甄别文档内容的完整性,平台不提供额外的编辑、内容补充、找答案等附加服务。
- 2、"仅部分预览"的文档,不可在线预览部分如存在完整性等问题,可反馈申请退款(可完整预览的文档不适用该条件!)。
- 3、如文档侵犯您的权益,请联系客服反馈,我们会尽快为您处理(人工客服工作时间:9:00-18:30)。
Chromatic aberrationsWhen different colors of light propagate at different speeds in a medium, the refractive index is wavelength dependent. This phenomenon is known as dispersion. A well- known example is the glass prism that disperses an incident beam of white light into a rainbow of colors [1]. Photographic lenses comprise various dispersive, dielectric glasses. These glasses do not refract all constituent colors of incident light at equal angles, and great efforts may be required to design an overall well-corrected lens that brings all colors together in the same focus. Chromatic aberrations are those departures from perfect imaging that are due to dispersion. Whereas the Seidel aberrations are monochromatic, i.e. they occur also with light of a single color, chromatic aberrations are only noticed with polychromatic light.Longitudinal and transverse chromatic aberrationOne discriminates between two types of chromatic aberration. Longitudinal chromatic aberration, also known as axial color, is the inability of a lens to focus different colors in the same focal plane. For a subject point on the optical axis the foci of the various colors are also on the optical axis, but displaced in the longitudinal direction (i.e. along the axis). This behavior is elucidated in Fig. 1 for a distant light source. In this sketch, only the green light is in sharp focus on the sensor. The blue and red light have a so-called circle of confusion in the sensor plane and are not sharply imaged.Figure 1. Origin of longitudinal chromatic aberration. The focal planes of the various colors do not coincide.Obliquely incident light leads to the transverse chromatic aberration, also known as lateral color. It refers to sideward displaced foci. In the absence of axial color, all colors are in focus in the same plane, but the image magnification depends on the wavelength. This behavior is illustrated in Fig. 2. The occurrence of lateral color implies that the focal length depends on the wavelength, whereas the occurrence of axial color in a complex lens does not strictly require a variable focal length. This seems counterintuitive, but in a lens corrected for longitudinal chromatic aberration the principal planes do not need to coincide for all colors. Since the focal length is determined by the distance from the rear principal plane to the image plane, the focal length may depend on the wavelength even when all images are in the same plane.Figure 2. Origin of transverse chromatic aberration. The size of the image varies from one color to the next.Figures 1 and 2 distinguish two simplified cases because in practice the longitudinal and lateral components are coexistent.A polychromatic subject fills a volume in the image space, which is comprised of a continuum of monochromatic images of various sizes and positions. Lateral color is particularly manifest in telephoto and reversed telephoto (retro focus) lenses. Chromatic aberrations often limit the performance of otherwise well-corrected telephoto designs. Lateral color, and not astigmatism, is the chief cause of the separation between the sagittal and tangential curves in their modulation transfer functions. The archetypal manifestation of chromatic aberrations is color fringing along boundaries that separate dark and bright parts of the image. This said, descriptions of the perceptible effects of chromatic aberrations do vary in literature. It is read that lateral color is a more serious aberration than axial color, because the former gives rise to colored fringes while the latter merely reduces the sharpness [2]. Oberkochen holds a different view and points to axial color as the most conspicuous color aberration [3]. Hecht describes the cumulative effect of chromatic aberrations as a whitish blur or hazed overlay [4]. The residual color errors of an optical system with achromatic (under)correction for axial color lead to a magenta halo or blur around each image point [5,6].ExamplesA cross was made from two black matchsticks and mounted on a cork. It was photographed with the Canon EF 85/1.2 L USM at a routine portrait distance of one meter. The cross was placed in the very image center, against a bright white background. The high contrast and the large working aperture of f/1.2 are responsible for the longitudinal chromatic aberration observed in Fig. 3. When auto focus is used to focus on the cross, there are purple fringes all around it. After slightly defocusing the lens manually, the color of the fringes becomes green. This green fringing is perhaps less distressing than the purple fringing, but it is still clearly visible. As the human eye and auto focus systems are particularly sensitive to green light, both manual focus and auto focus tend to bring the green image in sharp focus. The other colors of the spectrum are left defocused and add up to a magenta fringe. For this reason purple fringing is more common than green fringing.Figure 3. Examples of axial color (longitudinal chromatic aberration) with the Canon EF 85/1.2 L USM.A: auto focus on the cross. B: after slight manual defocus. The lens is used at full aperture on a Canon 5D.The same cross was photographed with three retro focus wide angle lenses (Fig. 4). It was placed close to the top-left image corner and tilted so as to point the long bar in the radial direction. This orientation places the crossbar in the tangential direction. For both Cosina lenses the crossbar evidences color fringes while the radial bar is unaffected. The joint presence of purple and green fringes at opposite sides of a tangential detail (lens A) are very characteristic of the transverse chromatic aberration. The bluish and yellowish fringes noticed with lens B are less common. Lens C is remarkably well corrected for a short-focus lens of the retro focus type. There is only the slightest hint of purple and green.Figure 4. Examples of lateral color (transverse chromatic aberration). All lenses are used at f/11 on a Canon 5D.A: Cosina 3.5-4.5/19-35 @ 20 mm. B: Cosina 3.8/20. C: Carl Zeiss Distagon 2.8/21. Longitudinal and lateral chromatic aberration can both give rise to colored edges, but properties are different. Axial color causes fringes all around objects, whereas lateral color only affects tangential details. Axial color can occur at any position in the image, whereas lateral color is absent in the image center and progressively worsens toward the image corners. Axial color is cured by stopping down the lens, whereas lateral color is present at all apertures. Chromatic aberration can manifest itself as a mixture of axial and later color, in which case it is partly cured by the use of a small aperture. Axial color yields fringes of a single color for an "in-focus" object (Fig. 3), whereas lateral color delivers two differently colored fringes at either side of the tangential structure (Fig. 4). Fringes due to axial color are particularly clear in parts of the scenery that are (just) out of focus, e.g. purple in front of the subject in sharp focus and green behind it, or vice versa. Although color fringing is only observed in places with a high contrast, both the longitudinal and transverse chromatic aberration degrade the overall resolution of a lens. Longitudinal chromatic aberration often operates in tandem with spherical aberration toshape the bokeh of a large-aperture lens. The combined effect of longitudinal chromatic aberration and spherical aberration is also known as spherochromatism [7,8].Secondary spectrumTransverse chromatic aberration leads to difficulties mostly in retro focus and telephoto lens designs, which are markedly asymmetrical, and longitudinal chromatic aberration in large-aperture lenses. An uncorrected design is called chromatic. The human eye is most sensitive to green light, and when a chromatic lens is focused for the green part of the visible spectrum, the blue and red ends are out of focus (see Fig. 5). The incorporation of simple achromatic doublets is quite effective against chromatic aberration. A famous example of such a doublet is the combination of a convex crown glass element with a concave flint glass element [9]. The achromatic correction of a photographic lens applies to two wavelengths toward the blue and red ends of the spectrum. Figure 5 shows a typical achromatic correction scheme. The zero crossings occur for the two matched wavelengths, the residual focus shift of the other colors is known as the secondary spectrum.Figure 5. Principles of color correction. The colored faces are known as the secondary spectrum.The advent of exotic glasses featuring low or anomalous dispersion enabled great progress in chromatic correction of photographic lenses. A design that brings three visible colors together is called apochromatic. A superachromatic lens corrects for four or more wavelengths and virtually eliminates color errors [10,11]. Strictly speaking it is not the number of zero crossings that determines the image quality, but the departures of the in-between wavelengths (the secondary spectrum). The designation APO is nowadays used by many a manufacturer to indicate such a reduced secondary spectrum, but true apochromatism is of rare occurrence in photographic lens designs. The typical correction curves shown in figure 5 are usually found with a 'focus shift' along the ordinate [2, 9,12] but sometimes with the 'focal length'. This may appear unimportant, but it makes a difference as the former case implies correction for axial color and the latter for lateral color. Likewise, the term secondary spectrum is most often encountered in relation to the longitudinal chromatic aberration. Nonetheless some authors use the term also to describe the transverse chromatic aberration [3,13] or explicitly plot correction curves with 'focal length' along the ordinate [7].Achromatic lensesThe achromatic design (Fig. 5) is the most common correction level in a photographic lens and accounts for the purple and green fringes observed in Fig. 3. When the green light is in proper focus on the sensor, red and blue are similarly defocused and add up to magenta. Conversely, when blue light is in proper focus the red light is also in focus, leaving only green defocused. Upon replacing "focus shift" by "focal length" along the ordinate in Fig. 5, the achromatic scheme also accounts for the fringes observed in Fig. 4 (case A) with purple toward the image center and green toward the image corner. For the case of transverse chromatic aberration a longer focal length corresponds to a larger image magnification. This implies that for the achromatic diagram in Fig 5, the blue and red images of a nonaxial detail are displaced slightly more outward from the image center than the green image. Figure 6 shows a cross, where the blue and red images are displaced upward relative to the green image. The addition of the three monochromatic images results in the aberrated cross at the right. Blue, green and red add up to white, blue and red add up to purple. To be sure, figure 6 is a simplified scheme of pure transverse chromatic aberration, with only three colors, and merely serves as an illustration. As it appears, the fringes are both inside and outside the original cross. The crossbar is broadened, but at the same time part of its interior is eaten away by the aberration.Figure 6. Origin of color fringing due to lateral color. The addition of the constituent colors leads to fringes in the right image.Purple fringing: lens or sensor?Chromatic aberration, and purple fringing in particular, have received considerable attention with the advent of digital cameras. Indeed, although chromatic aberrations can be noticed on film (Fig. 7), they do look more intense on CCD or CMOS images. On the one hand the digital photographer is only a few mouse clicks away from a full screen display, and few lenses stand image inspection at high magnification. On the other hand it is possible that digital imaging somehow renders the color fringes due to chromatic aberration more distinct. One of the proposed mechanisms is an enhanced spectral sensitivity in the (ultra)violet and (infra)red regimes, where lenses tend to be poorly corrected for chromatic aberration. Purple fringing is often blamed on sensor bloom, which is odd as blooming is a quite different phenomenon [14, 15]. In fact, there are as many arguments against sensor bloom as there are in favor of chromatic aberration to account for purple fringing. The examples shown on the present page are all demonstrably due to the lens and not to the sensor. Sensor bloom has no known color preference, and if it had, it would not change its colors upon defocusing a lens (as in Fig. 3) or upon swapping lenses (as in Fig. 4). The list of arguments is long [16].Figure 7. Chromatic aberrations recorded on film. The church cross is photographed off a slide projection screen; the vane, taken at the "best" focus and after slight defocusing, is a 2900 dpi scan obtained with a slide scanner. Notice the similarities with Figs. 3 and 4.© PA van Walree 2001-2007References[1] Isaac Newton, "A new theory about light and colours," Phil. Trans. 6, 3075-3087 (1672).[2] SPSE handbook of photographic science and engineering, edited by Woodlief Thomas Jr., John Whiley & sons.[3] Carl Zeiss, Camera Lens News 12 (2000).[4] Eugene Hecht, Optics, 3rd ed., Addison Wesley (1998).[5] Warren J. Smith, Modern optical engineering, 3rd ed., McGraw-Hill (2000).[6] Bruce H. Walker, "Understanding secondary color," Optical Spectra 12, 44-46 (1978).[7] Sidney F. Ray, Applied photographic optics, 3rd ed., Focal Press (2002).[8] Applied optics and optical engineering, Vol. III, edited by Rudolf Kingslake, Academic Press (1965).[9] Arthur Cox, Optics: the technique of definition, 6th ed., Focal Press (1946).[10] Max Herzberger and Nancy R. McClure, "The design of superachromatic lenses," Applied Optics 2, 553-560 (1963).[11] Hans Sauer, "Zeiss Sonnar F/5.6 250mm superachromat," The British Journal of Photography 123, 166-169 (1976).[12] Handbuch der Fototechnik, 9th ed., edited by Gerhard Teicher, VEB Fotokinoverlag Leipzig (1986).[13] Francis A. Jenkins and Harvey E. White, Fundamentals of optics, 4th ed., McGraw-Hill (1976).[14] /primer/digitalimaging/concepts/ccdsatandblooming.html[15] /ccd102.html[16] Ronald Parr, /~parr/photography/faq.html#purplefringespherical aberration | astigmatism and field curvature | distortion | chromatic aberrations | vignetting | lens hoods | flare | filter flare | depth of field | dof equations | vwdof | bokeh | spurious resolution | misconceptionsVignettingA photograph or drawing whose edges gradually fade into the surrounding paper is called a vignette. The art of creating such an illustration is a deliberate one. Yet the word vignetting is also used to indicate an unintended darkening of the image corners in a photographic image. There are three different mechanisms which may be responsible. Natural and optical vignetting are inherent to each lens design, while mechanical vignetting is due to the use of improper attachments to the lens. Natural and optical vignetting lead to a gradual transition from a brighter image center to darker corners. At large apertures both phenomena are present and the combined effect is often designated by the term 'illumination falloff'. Mechanical vignetting can also give rise to gradual falloff, although the usual connotation is one where it causes an abrupt transition with entirely black image corners.Optical vignettingMost photographic lenses exhibit optical vignetting to some degree. The effect is strongest when the lens is used wide open and will disappear when the lens is stopped down by a few stops. Together with natural vignetting, optical vignetting causes a gradual darkening of the image towards the corners. This illumination falloff often goes unnoticed but it may become disturbing when the subject has large faces with an even color or brightness. The steepness of the film also plays a role: the more contrasty the film, the more pronounced the effect.Figure 1 illustrates optical vignetting for the Planar 50/1.4 with an ever exciting subject like a brick wall. At full aperture the image reveals a 'hot spot': a brighter center and a darkening towards the corners (left photograph). When the lens is closed down to f/5.6, the light falloff has disappeared and an evenly illuminated wall remains (right photograph).Figure 1. Optical vignetting with the Planar 50/1.4. Left: f/1.4. Right: f/5.6.Optical vignetting is also known as artificial or physical vignetting. Its origin relates to the simple fact that a lens has a length. Obliquely incident light is confronted with a smaller lens opening than light approaching the lens head-on. In figure 2 the lens used to photograph the wall in figure 1 is shown at two f-stops and from two viewpoints. The white openings in the top illustrations denote the entrance pupil, which is the image of the aperture stop seen through all lens elements in front of it and from a position on the optical axis. The entrance pupil is the clear aperture for light that approaches the lens from the front and ends up in the image center.Figure 2. The Planar 50/1.4 at f/1.4 (left) and f/5.6 (right) seen from the optical axis (top) and from the semifield angle (bottom).The bottom illustrations show the lens from the semifield angle, which is half the full angle of view of the lens. Here, the white openings correspond to the clear aperture for light that is heading for the image corner. At f/1.4 the clear aperture is markedly reduced compared to the on-axis case: the entrance pupil is partially shielded by the lens barrel. More precisely, the aperture is delimited by the rims surrounding the front and rear elements. A smaller aperture implies that the lens collects less light for off-axis points than for on-axis points and hence that the image corners will be darker than the image center. At f/5.6 the entrance pupil is much smaller and no longer shielded by the lens barrel. Consequently, obliquely incident light sees the same aperture as normally incident light and there is no optical vignetting any more.Cat's eye effectThe consequences of optical vignetting for a subject that is in focus (cf. figure 1) is merely a reduced brightness towards the image corners. However, optical vignetting can also have a pronounced effect on out-of-focus parts of the image. Because the shape of an out-of-focus highlight (OOFH) mimics the shape of the clear aperture, the bottom left situation of figure 2 leads to the so-called cat's eye effect [1]. Figure 3 evidences the resemblance between the appearance of OOFH's and the aperture shape. With an increasing distance from the optical axis the shape of the OOFH progressively narrows and starts to resemble a cat's eye. The larger the distance from the image center, the narrower the cat's eye becomes.Figure 3. The cat's eye effect. The rectangular area indicated by the dotted white line is shown enlarged at the bottom. (Photograph by Peter Boehmer.)The cat's eye effect is readily observed in an SLR viewfinder. Just inspect distant street lights with the lens set atclose-focus. By judging the narrowness of the cat's eye with an OOFH in the image corner it is possible to estimate the amount of optical vignetting. If the lens is stopped down the aperture where optical vignetting disappears may also be visually found. For instance, the Planar 50/1.4 is almost completely cured at f/2.8.Optical vignetting tends to be stronger in wideangle lenses and large aperture lenses, but the effect can be noticed with most photographic lenses. Zoom lenses are often saddled with a fair amount of optical vignetting. Oversized front or rear elements help to reduce this type of vignetting and are frequently applied in wideangle lens designs. At any rate, the given speed of a lens always refers to the on-axis case; the full aperture for off-axis objects is smaller.Natural vignettingNatural vignetting, more properly termed natural light falloff, is inherent to each lens design and becomes more troublesome for wideangle lenses. It is associated with the famous cos4 law of illumination falloff. Contrary to popular belief, the argument for this law is not measured in object space but in image space. It is measured at the rear end of the lens as the angle at which the light impinges upon the film.To illustrate natural vignetting and to point out differences between lens designs at the same time, I consider two examples. While rangefinder wideangle lenses tend to be better corrected than their retrofocus competitors, in particular for curvilinear distortion and lateral color, they also have the disadvantage of persistent light fall-off. Two contemporary wideangle designs are shown in figure 4: the Carl Zeiss Distagon 21/2.8 and the Carl Zeiss Biogon 21/2.8. The top design is an asymmetrical retrofocus lens for Contax SLR cameras (and all that to give way to the mirror!), the bottom lens is a symmetrical design for use on the Contax G rangefinder cameras. The black bars indicate the actual position of the variable leaf diaphragm (the aperture stop), the red bars indicate the exit pupil, which is the image of the aperture stop that an observer sees when he looks into the lens from the rear. The exit pupil serves to illuminate the film and delineates the light cone received by a point on the film (figure 5).Figure 4. Image illumination in relation to the position of the exit pupil for two 21/2.8 lenses. Top: the retrofocus Distagon 21/2.8 design. Bottom: the Biogon 21/2.8 rangefinder design. The angle b differs between the designs.Figure 5. The cos4 law explained for the Biogon.Whereas the exit pupil of the rangefinder lens is separated from the film by approximately its focal length, the exit pupil of the retrofocus design is pushed away from the film with the glass. Thus, from the yellow cones illuminating the film, the angle b is significantly larger for the Biogon than for the Distagon. It is this angle that is most important for the cos4 law. An enlargement of the Biogon rear end is found in figure 5. Two cones are indicated, one to illuminate a point on the optical axis (image center) and one to illuminate an off-axis point (image corner). Compared with the image center, the corner illumination is less for three reasons. First, there is a cos2(b) factor due to the inverse square law: the light has a longer way to travel to the image corner. Second, the pupil seen by the off-axis point is not round but elliptical and has a smaller area than the round pupil seen by the image center. This yields another cos(b) factor. Note however that this cosine factor is approximate. It needs refinement when the pupil diameter is not small compared to its distance from the film [2]. Third, while the light hits the image center at normal incidence, it strikes the image corner at the angle b. This yields anothercos(b) factor. The last effect relates to Lambert's law and can be compared with a late afternoon sun which heats the earth less than the sun at noon because the same beam of sunlight is spread over a larger area. The combined effect of all cosine factors is a cos4 illumination falloff towards the image corners.It is remarked that the cos4 law is not truly a law but rather a combination of cosine factors which may or may not be all present in a given situation.Although the cos4 law is indeed better applied to image space than object space, for many (but not all) lenses good agreement between theory and practice is actually found by taking one cosine in object space and three cosines in image space. The single cosine in object space then accounts for the amount of light collected by the lens. If one presumes that all collected light is also projected on the film (conservation of energy), this one cosine replaces the second of the abovementioned factors. The resulting cos4 law then reads cos(a)*cos3(b), where a denotes the angle in object space. Significant departures from this law arise when lens designers use the Slyusarev effect [1] to increase the apparent size ofone or both pupils for off-axis points. This may result in a dramatic improvement of the image illumination.The angle a is the same for both 21-mm lenses, but since the angle b differs between the Distagon and the Biogon it is expected that the image illumination will differ between the two lenses. Indeed, there is a considerable difference: figure 6.Figure 6. Illumination charts for the Distagon 21/2.8 and the Biogon 21/2.8 (Zeiss data).In an illumination chart the curves are given relative to the image center. I.e, the image center illuminance is 1.0 and the illuminance at other points is given as a fraction relative to the image center. At full aperture both designs have a corner illuminance of 0.2, which means that the image center receives five times the amount of light the image corner receives. This will certainly be noticed in photographs which include a blue sky or the brick wall of figure 1. Upon stopping down the lenses, the Distagon image illumination improves drastically. At f/11 the corner is only 0.8 stops darker than the center. The Biogon illumination however does not improve that much, the corner illumination remaining 1.8 stops behind the center. A full stop difference remains between the corner illuminations of the two designs. The difference is that the Distagon suffers mostly from optical vignetting at full aperture and benefits from a smaller aperture. The Biogon on the other hand suffers primarily from natural vignetting, which is not cured by a smaller aperture. Figure 6 also shows the cos4 curves for both designs. There is an excellent match for the Distagon at small apertures. By contrast, the Biogon illuminance is close to its cos4 curve at all apertures.Mechanical vignettingWhen mechanical extensions to a lens protrude into its field of view, the image corners receive less light than they would in the absence of the extension and vignetting occurs. The extension can be too long a lens hood, stacked filters, or a combination. The hood and/or filters obscure the entrance pupil from obliquely incident light and the remedy is obvious: use proper accessories. A single, thick filter can already vignette a wideangle lens so it pays to check on vignetting behavior before filters and lens hoods are purchased.Figure 7. A typical case of mechanical vignetting. (Distagon 28/2 @ f/11 + Contax metal hood #3)Figure 7 illustrates a typical case of mechanical vignetting. The image was taken with the Distagon 28/2 equipped with Contax metal hood #3, which is simply too long for this lens. A graphical explanation is given in Figure 8. With the Distagon used at f/11 and infinity, an image corner relies for its illumination on the orange ray pencil, which comes from infinity heading towards the entrance pupil (in red). The angle with the optical axis is the semifield angle, which amounts to 37 degrees. In the absence of a hood the oblique ray pencil has full access to the entrance pupil, but in the presence of the hood the entrance pupil is invisible to this pencil. The pupil is eclipsed by the hood and the image corner receives no light at all. A comprehensive discussion on mechanical vignetting is found on the lens hood page.Figure 8. The Distagon 28/2 without and with Contax metal hood #3. The oblique ray pencil is blocked when the hood is attached.Note that figure 8 does not show refraction of the pencils. For mechanical vignetting it suffices to consider the entrance pupil and obstructions in front of the lens. Refraction is indirectly taken into account by the position and size of the entrance pupil (Zeiss data). However, the pencils are drawn correctly outside the lens.RemediesThree causes of dark image corners have passed in review. Optical vignetting is due to the dimensions of the lens: off-axis object points are confronted with a smaller aperture than a point on the optical axis. The remedy is to stop down the lens. The darkening noticed at full aperture already improves greatly when the lens opening is decreased by one stop. A complete cure often requires two or three stops - depending on the design. The darkening that remains at small apertures is due to natural vignetting. Natural vignetting is not cured by stopping down the lens. Lenses which strongly suffer from natural vignetting, such as the Carl Zeiss Hologon 16/8, benefit from a gradual gray filter which is dark in the center and brighter towards the corner. Finally, mechanical vignetting is due to extensions attached to a lens. The image corners may become completely black and the photographer can only blame himself as he should use proper accessories.All types of vignetting are at their worst with the lens focused at infinity. At close focus the field of view decreases and the image circle increases. The vignetted area is pushed outwards with the image circle and when the focus is close enough the optical or mechanical vignetting will be outside the film frame (or digital sensor). As a matter of fact, it is optical vignetting that determines the size of the image circle in the first place. Natural vignetting improves too, since the exit pupil moves away from the film (at least, with most lens designs).It should be mentioned that vignetting is not always a bad thing. A lens designer can deliberately introduce vignetting in favor of a better control of aberrations, sacrificing field coverage for overall contrast and sharpness. Also, the vignetting effect can be used artistically to draw the attention away from the image periphery and to emphasize the subject. Commercially available attachments like the Lindahl Low Key en High Key Vignetters are popular among portrait photographers.© PA van Walree 2002-2007References[1] Sidney F. Ray, Applied photographic optics, 2nd ed., Focal Press (1997).[2] Warren J. Smith, Modern optical engineering, 3rd ed., McGraw-Hill (2000).People who arrived on this page through wikipedia, or otherwise wonder about the unorthodox terminology ... the terms "natural vignetting", "optical vignetting", "artificial vignetting", "physical vignetting", "mechanical vignetting" and "cat's eye effect" have all been adopted from reference [1].spherical aberration | astigmatism and field curvature | distortion | chromatic aberrations | vignetting | lens hoods | flare | filter flare | depth of field | dof equations | vwdof | bokeh | spurious resolution | misconceptions。
