android蓝牙应用开发
AndroidStudio蓝牙开发实例——基于Android6.0
AndroidStudio蓝⽛开发实例——基于Android6.0因项⽬需要做⼀个Android 的蓝⽛app来通过⼿机蓝⽛传输数据以及控制飞⾏器,在此,我对这段时间⾥写的蓝⽛app的代码进⾏知识梳理和出现错误的总结。
该应⽤的Compile Sdk Version 和targetSdkVersion均为26,Min Sdk Version为22,基于Android studio平台开发。
⼀、声明蓝⽛权限⾸先,要在新建项⽬中的AndroidManifest.xml中声明两个权限:BLUETOOTH权限和BLUETOOTH_ADMIN权限。
其中,BLUETOOTH权限⽤于请求连接和传送数据;BLUETOOTH_ADMIN权限⽤于启动设备、发现或进⾏蓝⽛设置,如果要拥有该权限,必须现拥有BLUETOOTH权限。
其次,因为android 6.0之后采⽤新的权限机制来保护⽤户的隐私,如果我们设置的targetSdkVersion⼤于或等于23,则需要另外添加ACCESS_COARSE_LOCATION和ACCESS_FINE_LOCATION权限,否则,可能会出现搜索不到蓝⽛设备的问题。
<uses-permission android:name="android.permission.ACCESS_FINE_LOCATION"/><uses-permission android:name="android.permission.BLUETOOTH"/><uses-permission android:name="android.permission.BLUETOOTH_ADMIN"/><uses-permission-sdk-23 android:name="android.permission.ACCESS_COARSE_LOCATION"/>⼆、启动和关闭蓝⽛1.⾸先,要获取BluetoothAdapter蓝⽛适配器的对象,然后检测设备是否⽀持蓝⽛。
[转载]蓝牙4-Android BLE开发官方文档翻译
![[转载]蓝牙4-Android BLE开发官方文档翻译](https://img.taocdn.com/s3/m/2fc6011fcc17552707220856.png)
添加关注 (/sign_in)
[转载]蓝牙4.0——Android BLE开发官方文档翻译
字数3340 阅读1719 评论2 喜欢19
... } 如果你只想扫描指定类型的外围设备,可以改为调用startLeScan(UUID[], BluetoothAdapter.LeScanCallback)),需要提供 你的app支持的GATT services的UUID对象数组。 作为BLE扫描结果的接口,下面是BluetoothAdapter.LeScanCallback的实现。
发现BLE设备 为了发现BLE设备,使用startLeScan())方法。这个方法需要一个参数BluetoothAdapter.LeScanCallback。你必须实现它 的回调函数,那就是返回的扫描结果。因为扫描非常消耗电量,你应当遵守以下准则: 只要找到所需的设备,停止扫描。 不要在循环里扫描,并且对扫描设置时间限制。以前可用的设备可能已经移出范围,继续扫描消耗电池电量。 下面代码显示了如何开始和停止一个扫描: // 扫描和显示可以提供的蓝牙设备.
// 使用此检查确定BLE是否支持在设备上,然后你可以有选择性禁用BLE相关的功能 if (!getPackageManager().hasSystemFeature(PackageManager.FEATURE_BLUETOOTH_LE)) { Toast.makeText(this, R.string.ble_not_supported, Toast.LENGTH_SHORT).show(); finish(); }
android 蓝牙开发原理
android 蓝牙开发原理
Android蓝牙开发原理主要有三个步骤:(1)启动蓝牙连接并配对设备;(2)使用Android API对蓝牙设备进行控制;(3)使用蓝牙API处理数据传输。
首先,在Android设备上打开蓝牙,并确保目标蓝牙设备也处于开启状态,然后在“添加设备”对话框中选择“蓝牙”选项进行配对。
配对成功后,可以通过蓝牙工具类BleController实现对蓝牙设备的控制,如扫描设备、连接设备、状态检测及数据读写等。
值得注意的是,安卓系统存在蓝牙漏洞,可能会让用户在无意间遭到黑客入侵。
因此,在使用蓝牙设备时,建议用户关闭蓝牙设备并避免进入蓝牙搜索画面,以降低风险。
此外,蓝牙数据传输主要通过UUID获取目标服务和characteristic,通过writeCharacteristic()和readCharacteristic()进行。
蓝牙40分为标准蓝牙和低功耗蓝牙(BLE),标准蓝牙用于手机,BLE用于可穿戴设备。
基于Android系统蓝牙开发的研究与实现
Ab s t r a c t : Bl u e t o o t h i s wi d l y a p p l i e d i n e l e c t r o n i c d e v i c e s . As a s h o r t — r a n g e wi r e l e s s c o m mu n i c a t i o n t e c h n o l o g y, i t i s a b l e t o c o n n e c t d i f f e r e n t d e v i c e s ,n o t h a v i n g t o r e l y o n t r a n s mi s s i o n l i n e .H o we v e r ,t h e r e s e a r c h o n t h e b l u e t o o t h p r o g r a mm i n g b a s e d o n t h e An d r o i d s y s t e m i s s c a n t .As a r e s u l t ,t h e B l u e t o o t h p r o t o c o l s t a c k o f t h e An d r o i d s y s t e m i s b r i e f l y
( S c h o o l o f Op t i c a l — El e c t r i c a l a n d Co mp u t e r En g i ne e r i n g,U n i v e r s i t y of S h a n g h a i f o r S c i e nc e a n d Te c h n o l o g y,Sh a n gh a i 2 0 0 0 9 3 ,Ch i n a)
蓝牙app开发教程

蓝牙app开发教程(实例)深圳蓝牙app开发公司《酷点网络》总结:在很多方面,蓝牙是一种能够发送或接受两个不同的设备之间传输的数据,蓝牙app开发主要分为安卓和苹果ios 开发。
Android平台包含了蓝牙框架,使设备以无线方式与其他蓝牙设备进行数据交换的支持。
Android提供蓝牙API来执行这些不同的操作。
扫描其他蓝牙设备获取配对设备列表连接到通过服务发现其他设备Lbs:北京、上海、广州、武汉、成都、东莞、佛山、珠海、中山、惠州、汕头、厦门、南京、苏州、无锡、杭州、厦门、大连、天津、合肥、长沙、贵阳、昆明、南宁、南昌、福州、宁波、温州、郑州、西安、沈阳、济南、青岛、太原、重庆、无锡、青岛、海口智能蓝牙穿戴手机app软件开发公司--酷点网络。
Android提供BluetoothAdapter类蓝牙通信。
通过调用创建的对象的静态方法getDefaultAdapter()。
其语法如下给出。
为了使用设备的蓝牙,调用下列蓝牙ACTION_REQUEST_ENABLE的意图。
其语法如下:除了这个常量,有提供其它的API,支持不同任务的其他常数。
它们在下面列出。
启用了蓝牙功能之后,可以通过调用 getBondedDevices()方法来获取配对设备列表。
它返回一组的蓝牙设备。
其语法如下:除了配对的设备,还有API,让更多蓝牙控制权等方法。
它们在下面列出。
示例这个例子提供了示范BluetoothAdapter类操纵蓝牙,并显示通过蓝牙配对设备列表。
为了试验这个例子,需要在实际设备上运行此程序以下是src/com.yiibai.bluetooth/MainActivity.java 文件的内容:import android.os.Bundle;import android.app.Activity;import androi d.bluetooth.BluetoothAdapter;import android.bluetooth.BluetoothDev ice;import android.content.Intent;import android.view.Menu;import android.view.View;import android.widget.ArrayAdapter;import androi d.widget.Button;import android.widget.ListAdapter;import android.w idget.ListView;import android.widget.Toast;public class MainActivity extends Activity{private Button On,Off,Visible,list;private BluetoothAdapter BA;private Set<BluetoothDevice>pairedDevices;private ListView lv;@Overrideprotected void onCreate(Bundle savedInstanceState){super.onCreate(savedInstanceState);setContentView(yout.activity_main);On=(Button)findViewById(R.id.button1);Off=(Button)findViewById(R.id.button2);Visible=(Button)findViewById(R.id.button3);list =(Button)findViewById(R.id.button4);lv =(ListView)findViewById(R.id.listView1);BA =BluetoothAdapter.getDefaultAdapter();}public void on(View view){if(!BA.isEnabled()){Intent turnOn =new Intent(BluetoothAdapter.ACTION_REQUEST_ ENABLE);startActivityForResult(turnOn,0);Toast.makeText(getApplicationContext(),"Turned on",Toast.LENGTH_LONG).show();}else{Toast.makeText(getApplicationContext(),"Already on",Toast.LENGTH_LONG).show();}}public void list(View view){pairedDevices = BA.getBondedDevices();ArrayList list =new ArrayList();for(BluetoothDevice bt : pairedDevices)list.add(bt.getName());Toast.makeText(getApplicationContext(),"Showing Paired Device s",Toast.LENGTH_SHORT).show();final ArrayAdapter adapter =new ArrayAdapter(this,yout.simple_list_item_1, list);lv.setAdapter(adapter);}public void off(View view){BA.disable();Toast.makeText(getApplicationContext(),"Turned off",Toast.LENGTH_LONG).show();}public void visible(View view){Intent getVisible =new Intent(BluetoothAdapter.ACTION_REQUEST_DISCOVERABLE);startActivityForResult(getVisible,0);}@Overridepublic boolean onCreateOptionsMenu(Menu menu){// Inflate the menu; this adds items to the action bar if it is present.getMenuInflater().inflate(R.menu.main, menu);return true;}}这里是activity_main.xml 文件的内容:<RelativeLayout xmlns:android="/apk/res/ android"xmlns:tools="/tools"android:layout_width="match_parent"android:layout_height="match_parent"android:paddingBottom="@dimen/activity_vertical_margin"android:paddingLeft="@dimen/activity_horizontal_margin"android:paddingRight="@dimen/activity_horizontal_margin"android:paddingTop="@dimen/activity_vertical_margin"tools:context=".MainActivity"><ScrollViewandroid:id="@+id/scrollView1"android:layout_width="wrap_content"android:layout_height="wrap_content"android:layout_alignParentBottom="true"android:layout_alignParentLeft="true"android:layout_alignParentRight="true"android:layout_alignParentTop="true"><LinearLayoutandroid:layout_width="match_parent"android:layout_height="match_parent"android:orientation="vertical"><TextViewandroid:id="@+id/textView1"android:layout_width="wrap_content"android:layout_height="wrap_content"android:text="@string/app_name"android:textAppearance="?android:attr/textAppearanceLarge"/><Buttonandroid:id="@+id/button1"android:layout_width="wrap_content"android:layout_height="wrap_content"android:onClick="on"android:text="@string/on"/><Buttonandroid:id="@+id/button2"android:layout_width="wrap_content"android:layout_height="wrap_content"android:onClick="visible"android:text="@string/Visible"/><Buttonandroid:id="@+id/button3"android:layout_width="wrap_content"android:layout_height="wrap_content"android:onClick="list"android:text="@string/List"/><Buttonandroid:id="@+id/button4"android:layout_width="wrap_content"android:layout_height="wrap_content"android:onClick="off"android:text="@string/off"/><ListViewandroid:id="@+id/listView1"android:layout_width="match_parent"android:layout_height="wrap_content"android:visibility="visible"></ListView></LinearLayout></ScrollView></RelativeLayout>这里是Strings.xml 文件的内容:<?xml version="1.0" encoding="utf-8"?><resources><string name="app_name">Bluetooth</string><string name="action_settings">Settings</string><string name="hello_world">Hello world!</string><string name="on">Turn On</string><string name="off">Turn Off</string><string name="Visible">Get Visible</string><string name="List">List Devices</string></resources>这里是AndroidManifest.xml 文件的内容:<?xml version="1.0" encoding="utf-8"?><manifest xmlns:android="htt p:///apk/res/android"package="com.yiibai.bluetooth"android:versionCode="1"android:versionName="1.0"><uses-sdkandroid:minSdkVersion="8"android:targetSdkVersion="17"/><uses-permission android:name="android.permission.BLUETOOTH"/><uses-permission android:name="android.permission.BLUETOOTH_ADM IN"/><applicationandroid:allowBackup="true"android:icon="@drawable/ic_launcher"android:label="@string/app_name"android:theme="@style/AppTheme"><activityandroid:name="com.yiibai.bluetooth.MainActivity"android:label="@string/app_name"><intent-filter><action android:name="android.intent.action.MAIN"/><category android:name="UNCHER "/></intent-filter></activity></application></manifest>让我们试着运行AndroidCapture应用程序。
Android之Bluetooth(蓝牙)编程实现

//HEXCheckBox = (CheckBox) findViewById(R.id.radioMale); /*****************************************************************/ /*****************************************************************/ /*****************************************************************/ breakButton = (Button) findViewById(R.id.button_break); // 得到当地的蓝牙适配器 mBluetoothAdapter = BluetoothAdapter.getDefaultAdapter(); /*****************************************************************/ /*****************************************************************/ /*****************************************************************/ // 初始化 CheckBox //checkBox_sixteen = (CheckBox) findViewById(R.id.checkBox_sixteen); /*****************************************************************/ /*****************************************************************/ /*****************************************************************/
Android蓝牙开发经典笔记,程序和说明
Bluetooth Low Energy——蓝牙低功耗Android4.3(API级别18)引入内置平台支持BLE的central角色,同时提供API和app应用程序用来发现设备,查询服务,和读/写characteristics。
与传统蓝牙(ClassicBluetooth)不同,蓝牙低功耗(BLE)的目的是提供更显著的低功耗。
这使得Android 应用程序可以和具有低功耗的要求BLE设备,如接近传感器,心脏速率监视器,健身设备等进行通信。
关键术语和概念下面是关键BLE术语和概念的总结:通用属性规范(GATT)—GATTprofile是一个通用规范用于在BLE链路发送和接收被称为―属性(attributes)‖的数据片。
目前所有的低功耗应用profile都是基于GATT。
蓝牙SIG定义了许多profile用于低功耗设备。
Profile(配置文件)是一个规范,规范了设备如何工作在一个特定的应用场景。
注意:一个设备可以实现多个profile。
例如,一个设备可以包含一个心脏监测仪和电池电平检测器。
属性协议(ATT )—GATT是建立在属性协议(ATT )的顶层,通常也被称为GATT/ ATT 。
ATT进行了优化用于在BLE设备上运行。
为此,它采用尽可能少的字节越好。
每个attribute 属性被UUID(通用唯一标识符)唯一标识,UUID是标准128-bit格式的ID用来唯一标识信息。
attributes 被ATT 格式化characteristics和services形式进行传送。
特征(Characteristics)—一个characteristics包含一个单独的value值和0 –n个用来描述characteristic 值(value)的descriptors。
一个characteristics可以被认为是一种类型的,类似于一个类。
描述符(descriptor)—descriptor是被定义的attributes,用来描述一个characteristic的值。
Android之蓝牙驱动开发总结

Android之蓝牙驱动开发总结二Android Bluetooth架构 (1)2.1 Bluetooth架构图 (1)2.2 Bluetooth代码层次结构 (3)三Bluetooth协议栈分析 (4)3.1 蓝牙协议栈 (4)3.2 Android与蓝牙协议栈的关系 (5)四Bluetooth之HCI层分析 (5)4.1 HCI层与基带的通信方式 (6)4.2 包的分析及研究 (7)4.3 通信过程的研究与分析 (8)五Bluetooth之编程实现 (8)5.1 HCI层编程 (8)5.2 L2CAP层编程 (10)5.3 SDP层编程 (12)六Bluetooth之启动过程实现 (13)6.1 Bluetooth启动步骤 (14)6.2 Bluetooth启动流程 (14)6.3 Bluetooth数据流向 (14)6.4 Bluez控制流程 (14)6.5 Bluetooth启动过程分析 (15)七Bluetooth之驱动移植 (15)7.1 android系统配置 (15)7.2 启动项修改 (16)7.3 电源管理rfkill驱动 (16)7.4 Rebuild Android image and reboot (16)7.5 实现BT睡眠唤醒机制 (16)7.6 系统集成 (17)八Bluetooth之调试与编译 (17)8.1 Bluetooth驱动调试 (17)九Bluetooth之应用程序开发 (18)9.1 Bluetooth的API开发 (18)9.2 The Basics开发 (18)9.3 Bluetooth Permissions开发 (19)9.4 Setting Up Bluetooth服务 (19)9.5 Finding Devices服务 (20)9.6 Connecting Devices服务 (22)9.7 Managing a Connection服务 (26)9.8 Working with Profiles服务 (28)十总结与疑问 (29)一Bluetooth基本概念蓝牙是无线数据和语音传输的开放式标准,它将各种通信设备、计算机及其终端设备、各种数字数据系统、甚至家用电器采用无线方式联接起来。
Andorid蓝牙开发详细教程
2. 软件开发
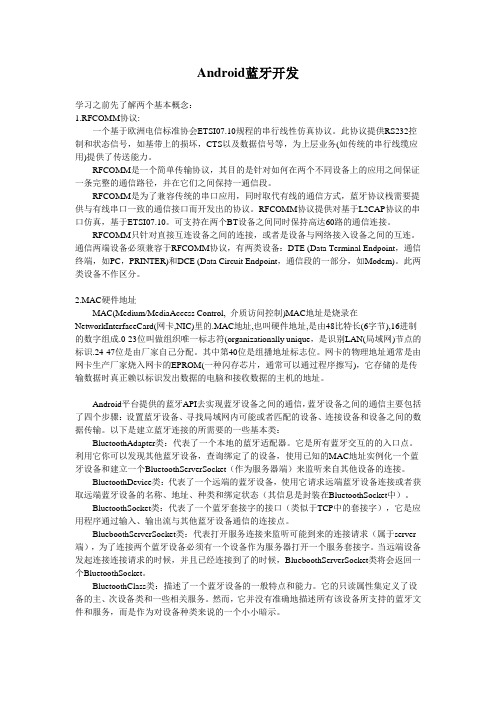
图 1 JDK 配置环境
开发环境搭建好之后,我们便进入到具体的软件开发。Android 从 2.0 之后 才支持蓝牙 API,Android 本身对蓝牙设备的操作进行了封装以方便我们的调用。 Android 蓝 牙 使 用 的 是 Bluez 协 议 栈 。 本 程 序 主 要 用 到 以 下 几 个 类 : BluetoothAdapter 类 、 BluetoothDevice 类 、 Bluetoothsocket 类 以 及 Blueboothserversocket 类。
Android 蓝牙安全通信
陈颖 高国勇 张帆 杭州电子科技大学通信工程学院
当我们对手机通话司空见惯的时候,文字聊天也成为了人们所非常喜爱的方 式。人们常常按着手机上的微型数字键盘,快速发着短信 SMS(Short Messaging Service)。短信的发送是基于控制通道的通路与手机发射塔进行通信,这就意味 着在某些情况下如手机信号微弱、手机信号被关闭(飞行模式,关闭无线电信号) 的情况下,短信将无法发送,这时候人们是不是就不能聊天了呢?答案是否定的: 手机除了基于无线信号的通信之外,还有基于蓝牙的通信、基于 WiFi 的通信等 等多种方式。对于 Android 平台,它对这些通信方式的开发支持得非常好。实际 上,Android 平台的手机功能应用开发支持非常广泛,我们能够基于 Android 平 台提供的支持开发出各种各样的应用,例如:我们可以将蓝牙或者 WiFi 短消息 聊天与 Android 的传感器开发结合起来,开发类似于微信的 Android 应用:通过 摇一摇来找到周围的朋友,继而进行聊天等。本文尝试设计一个 Android 平台下 基于蓝牙的安全通讯软件,通过蓝牙连接进行加密短消息通信,以作抛砖引玉。 其进一步的开发(如与传感器开发的结合等),留作将来的工作。
android蓝牙简单开发示例教程

android蓝⽛简单开发⽰例教程⽬录概述1、权限申请2、打开蓝⽛3、接收蓝⽛状态的改变4、扫描其他的设备5、蓝⽛配对6、获取已经配对的设备7、连接设备概述前段时间学习了⼀些蓝⽛开发的知识,记录⼀下Android中蓝⽛的简单开发。
下⾯是最重要的两个类。
BluetoothAdapter : 蓝⽛适配器,通过getDefaultAdapter ()去获取⼀个实例,如果设备不⽀持蓝⽛的话,返回的是⼀个null对象,通过它,可以打开、关闭蓝⽛,扫描设备、向指定设备创建socket通道…BluetoothDevice : 代表⼀个设备对象,可以通过它获取设备的名字、地址、类型等,也可以创建匹配,建⽴socket通道等等。
1、权限申请<uses-permission android:name="android.permission.BLUETOOTH"/> 使⽤蓝⽛所需要的权限<uses-permission android:name="android.permission.BLUETOOTH_ADMIN"/> 使⽤扫描和设置蓝⽛的权限(申明这⼀个权限必须申明上⾯⼀个权限)Android6以上版本,扫描其他蓝⽛还需要位置权限// Android 9 以下版本<user-permission android:name="android.permission.ACCESS_COARSE_LOCATION"/>// Android 9 以上<uses-permission android:name="android.permission.ACCESS_FINE_LOCATION"/>2、打开蓝⽛mBluetoothAdapter = BluetoothAdapter.getDefaultAdapter();// 如果设备不⽀持蓝⽛if (mBluetoothAdapter == null){return;}// 设备⽀持蓝⽛功能,调⽤startActivityForResult去启动蓝⽛if (!mBluetoothAdapter.isEnabled()){unch(new Intent(BluetoothAdapter.ACTION_REQUEST_ENABLE));}打开蓝⽛功能是通过startActivity去启动的,但是startActivity这个函数已经过期了,所以我使⽤官⽅推荐的Activity Result替代它ActivityResultLauncher<Intent> startBlueTooth = registerForActivityResult(new ActivityResultContracts.StartActivityForResult(),new ActivityResultCallback<ActivityResult>() {@Overridepublic void onActivityResult(ActivityResult result) {if (result==null){Toast.makeText(BlueToothActivity.this, "open failed", Toast.LENGTH_SHORT).show();}else {if (result.getResultCode() == RESULT_CANCELED){Toast.makeText(BlueToothActivity.this,"⽤户取消",Toast.LENGTH_SHORT);}}}});3、接收蓝⽛状态的改变通过⼴播去接收蓝⽛状态的改变class BluetoothStateChangeReceiver extends BroadcastReceiver{public int DEFAULT_VALUE_BLUETOOTH = 1000;@Overridepublic void onReceive(Context context, Intent intent) {String action = intent.getAction();if (BluetoothAdapter.ACTION_STATE_CHANGED.equals(action)){int state = intent.getIntExtra(BluetoothAdapter.EXTRA_STATE,DEFAULT_VALUE_BLUETOOTH); switch(state){case BluetoothAdapter.STATE_ON:Log.d(TAG, "onReceive: open");break;case BluetoothAdapter.STATE_OFF:Log.d(TAG, "onReceive: off");break;case BluetoothAdapter.STATE_TURNING_ON :Log.d(TAG, "onReceive: 正在打开");break;case BluetoothAdapter.STATE_TURNING_OFF:Log.d(TAG, "onReceive: 正在关闭");break;}}}}别忘了⼴播的注册和解注册IntentFilter filter = new IntentFilter(BluetoothAdapter.ACTION_STATE_CHANGED);stateReceiver = new BluetoothStateChangeReceiver() ;registerReceiver(stateReceiver,filter);4、扫描其他的设备同样通过⼴播接收,action是BluetoothDevice.ACTION_FOUNDclass MyReceiver extends BroadcastReceiver{@Overridepublic void onReceive(Context context, Intent intent) {String action = intent.getAction();if (BluetoothDevice.ACTION_FOUND.equals(action)) {// 从intent对象中获取蓝⽛设备的信息BluetoothDevice device = intent.getParcelableExtra(BluetoothDevice.EXTRA_DEVICE);// 当发现新设备不存在于配对列表中时添加if (device.getBondState() != BluetoothDevice.BOND_BONDED) {blueNames.add(device.getName()+"\t"+device.getAddress());}blueAdpater.notifyDataSetChanged();Log.d(TAG, "onReceive: " + device.getName());}}}动态注册⼴播IntentFilter filter = new IntentFilter(BluetoothDevice.ACTION_FOUND);registerReceiver(mReceiver,filter);开启扫描mBluetoothAdapter.startDiscovery();5、蓝⽛配对public class BondReceiver extends BroadcastReceiver{@Overridepublic void onReceive(Context context, Intent intent) {if (BluetoothDevice.ACTION_BOND_STATE_CHANGED.equals(intent.getAction())){BluetoothDevice device = intent.getParcelableExtra(BluetoothDevice.EXTRA_DEVICE);switch(device.getBondState()){case BluetoothDevice.BOND_BONDED:Log.d(TAG, "onReceive: 配对完成");break;case BluetoothDevice.BOND_BONDING:Log.d(TAG, "onReceive: 正在配对");break;case BluetoothDevice.BOND_NONE:Log.d(TAG, "onReceive: 取消配对");break;}}}}6、获取已经配对的设备已经配对的设备会被存储起来,通过BluetoothAdpater直接获取即可Set<BluetoothDevice> paireDevices = mBluetoothAdapter.getBondedDevices();if (paireDevices.size()>0){for (BluetoothDevice pairedDevice : pairedDevices) {blueNames.add(pairedDevice.getName()+" "+pairedDevice.getAddress());Log.d(TAG, "onClick: "+pairedDevice.getName());}}7、连接设备想要在两台设备之间创建连接,必须实现客户端和服务端机制,他们之间使⽤套接字机制进⾏连接,服务端开放服务器套接字,客户端通过MAC地址向服务端发起连接。
基于Android Studio的蓝牙通信开发与设计

基于Android Studio的蓝牙通信开发与设计在開放技术支持下,蓝牙技术已经成为无线局域网和便携设备网络的延伸,尤其是在智能手机上的应用,通过蓝牙技术手机可以与周边事物进行无线连接,实现信息交互。
文章基于Android Studio开发工具,进行蓝牙界面设计和蓝牙通信功能调用,实现了安卓手机与蓝牙设备之间的无线连接。
标签:Android Studio;蓝牙通信;客户端引言目前蓝牙4.0技术已经相对完善,而且具有功耗低,稳定性高,传输距离较远,数度较快等特点。
一大批无线设备开始使用蓝牙来进行通信,各种蓝牙设备应用而生。
市场上各种可穿戴设备如智能跑鞋、智能手表、智能眼镜等基本都使用蓝牙与手机进行通信。
这些蓝牙设备在市场售卖后,获得了极大认可,蓝牙通信技术功不可没。
近几年由于Android开发应用非常火,谷歌开发了一套属于自己的开发程序Android Studio。
Android Studio具有许多非常高效的特性:集成Gradle的打包工具;随时可见的效果;可以拖拽UI操作;代码可自动补全;更丰富的操作接口;Google Cloud的高度集成以及全新的特性JUnit和Maven仓库的集成。
因此本文采用最新版的Android Studio进行蓝牙通信客户端的开发。
1 Android Studio客户端设计流程图1是客户端从开发到测试的整个设计流程,使用Android Studio平台进行设界面语言和程序内部功能算法语言的设计,使用基于安卓6.0的内置虚拟机进行软件界面显示及页面跳转的测试,最后使用Android Studio对软件进行打包,把打包好的软件安装在测试手机上,进行蓝牙通信功能测试。
2 藍牙通信界面设计如图2所示的界面,布局文件放在主目录下,res文件夹下的layout文件下的activity_main.xml文件。
下面对布局代码进行详细的说明:首先,打开activity_mian.xml文件进行界面设计,针对布局代码及按钮代码进行编写,采用线性布局(LinearLayout);然后通过以下语句进行显示内容设置:android:layout_width=“fill_parent”选择界面;android:layout_height=“0dp”设置高度;android:layout_weight=“1”设置宽度;android:gravity=“top”设置样式等等。
Android蓝牙实例(和单片机蓝牙模块通信)

Android蓝⽛实例(和单⽚机蓝⽛模块通信)1、Android蓝⽛编程 蓝⽛3.0及以下版本编程需要使⽤UUID,UUID是通⽤唯⼀识别码(Universally Unique Identifier),这是⼀个软件构建的标准,也是被开源基⾦会组织应⽤在分布式计算环境领域的⼀部分。
在蓝⽛3.0及下⼀版本中,UUID被⽤于唯⼀标识⼀个服务,⽐如⽂件传输服务,串⼝服务、打印机服务等,如下:#蓝⽛串⼝服务SerialPortServiceClass_UUID = '{00001101-0000-1000-8000-00805F9B34FB}'LANAccessUsingPPPServiceClass_UUID = '{00001102-0000-1000-8000-00805F9B34FB}'#拨号⽹络服务DialupNetworkingServiceClass_UUID = '{00001103-0000-1000-8000-00805F9B34FB}'#信息同步服务IrMCSyncServiceClass_UUID = '{00001104-0000-1000-8000-00805F9B34FB}'SDP_OBEXObjectPushServiceClass_UUID = '{00001105-0000-1000-8000-00805F9B34FB}'#⽂件传输服务OBEXFileTransferServiceClass_UUID = '{00001106-0000-1000-8000-00805F9B34FB}'IrMCSyncCommandServiceClass_UUID = '{00001107-0000-1000-8000-00805F9B34FB}' 蓝⽛的连接有主从设备,提供服务的可以认为是从设备。
Android蓝牙聊天示例应用程序使用
本文我们将通过学习Android的蓝牙聊天示例应用程序来介绍蓝牙开发包的使用,该示例程序完整的包含了蓝牙开发的各个部分,将实现两个设备通过蓝牙进行连接并聊天。
AndroidManifest.xml前面我们说过,在使用蓝牙API时就需要开启某些权限,同时我们还可以从And roidManifest.xml文件中找到应用程序启动时所进入的界面Activity等信息,因此下面我们首先打开AndroidManifest.xml文件,代码如下:1.<manifest xmlns:android="/apk/res/android"package="com.example.android.BluetoothChat"android: versionCode="1"android:versionName="1.0"> <!-- 最小的sdk 版本 -->> <uses-sdk minSdkVersion="6" /> <!-- 权限申明 -->> <uses-permission android:name="android.permission.BLUETOOTH_ADMIN" /> <uses-permission android:name="android.perm ission.BLUETOOTH" /> <application android:label="@string/app_n ame"android:icon="@drawable/app_icon" > <!-- 默认Activity -->> <activity android:name=".BluetoothChat"android:labe l="@string/app_name"android:configChanges="orientation|keybo ardHidden"> <intent-filter> <action android:name="android.i ntent.action.MAIN" /> <category android:name="android.intent.c UNCHER" /> </intent-filter> </activity> <!-- 用于显示蓝牙设备列表的Activity --> <activity android:name=".Dev iceListActivity"android:label="@string/select_device"android: theme="@android:style/Theme.Dialog"android:configChanges="o rientation|keyboardHidden" /> </application> </manifest>首先minSdkVersion用于说明该应用程序所需要使用的最小SDK版本,这里设置为6,也就是说最小需要使用android1.6版本的sdk,同时Ophone则需要使用o ms2.0版本,然后打开了BLUETOOTH和BLUETOOTH_ADMIN两个蓝牙操作相关的权限,最后看到了两个Activity的声明,他们分别是BluetoothChat(默认主Activity)和DeviceListActivity(显示设备列表),其中DeviceListActivity风格被定义为一个对话框风格,下面我们将分析该程序的每个细节。
Android蓝牙开发(整理)
Android蓝牙开发学习之前先了解两个基本概念:1.RFCOMM协议:一个基于欧洲电信标准协会ETSI07.10规程的串行线性仿真协议。
此协议提供RS232控制和状态信号,如基带上的损坏,CTS以及数据信号等,为上层业务(如传统的串行线缆应用)提供了传送能力。
RFCOMM是一个简单传输协议,其目的是针对如何在两个不同设备上的应用之间保证一条完整的通信路径,并在它们之间保持一通信段。
RFCOMM是为了兼容传统的串口应用,同时取代有线的通信方式,蓝牙协议栈需要提供与有线串口一致的通信接口而开发出的协议。
RFCOMM协议提供对基于L2CAP协议的串口仿真,基于ETSI07.10。
可支持在两个BT设备之间同时保持高达60路的通信连接。
RFCOMM只针对直接互连设备之间的连接,或者是设备与网络接入设备之间的互连。
通信两端设备必须兼容于RFCOMM协议,有两类设备:DTE (Data Terminal Endpoint,通信终端,如PC,PRINTER)和DCE (Data Circuit Endpoint,通信段的一部分,如Modem)。
此两类设备不作区分。
2.MAC硬件地址MAC(Medium/MediaAccess Control, 介质访问控制)MAC地址是烧录在NetworkInterfaceCard(网卡,NIC)里的.MAC地址,也叫硬件地址,是由48比特长(6字节),16进制的数字组成.0-23位叫做组织唯一标志符(organizationally unique,是识别LAN(局域网)节点的标识.24-47位是由厂家自己分配。
其中第40位是组播地址标志位。
网卡的物理地址通常是由网卡生产厂家烧入网卡的EPROM(一种闪存芯片,通常可以通过程序擦写),它存储的是传输数据时真正赖以标识发出数据的电脑和接收数据的主机的地址。
Android平台提供的蓝牙API去实现蓝牙设备之间的通信,蓝牙设备之间的通信主要包括了四个步骤:设置蓝牙设备、寻找局域网内可能或者匹配的设备、连接设备和设备之间的数据传输。
Android蓝牙开发深入解析
Android蓝⽛开发深⼊解析复制代码代码如下:<uses-permission android:name="android.permission.BLUETOOTH" /><uses-permission android:name="android.permission.BLUETOOTH_ADMIN" />在这⾥⾸先要了解对蓝⽛操作⼀个核⼼类BluetoothAdapter复制代码代码如下:BluetoothAdapter adapter = BluetoothAdapter.getDefaultAdapter();//直接打开系统的蓝⽛设置⾯板Intent intent = new Intent(BluetoothAdapter.ACTION_REQUEST_ENABLE);startActivityForResult(intent, 0x1);//直接打开蓝⽛adapter.enable();//关闭蓝⽛adapter.disable();//打开本机的蓝⽛发现功能(默认打开120秒,可以将时间最多延长⾄300秒)Intent discoveryIntent = new Intent(BluetoothAdapter.ACTION_REQUEST_DISCOVERABLE);discoverableIntent.putExtra(BluetoothAdapter.EXTRA_DISCOVERABLE_DURATION, 300);//设置持续时间(最多300秒)使⽤BluetoothAdapter的startDiscovery()⽅法来搜索蓝⽛设备startDiscovery()⽅法是⼀个异步⽅法,调⽤后会⽴即返回。
该⽅法会进⾏对其他蓝⽛设备的搜索,该过程会持续12秒。
该⽅法调⽤后,搜索过程实际上是在⼀个System Service中进⾏的,所以可以调⽤cancelDiscovery()⽅法来停⽌搜索(该⽅法可以在未执⾏discovery请求时调⽤)。
Android开发-蓝牙、NFC、网络和Wi-Fi
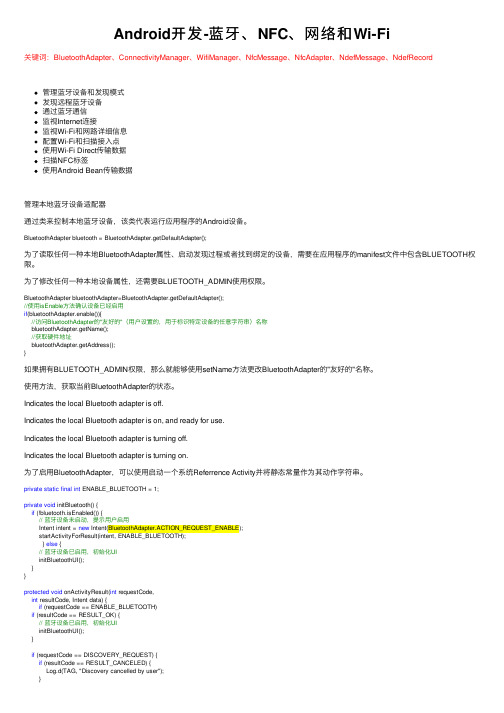
Android开发-蓝⽛、NFC、⽹络和Wi-Fi关键词:BluetoothAdapter、ConnectivityManager、WifiManager、NfcMessage、NfcAdapter、NdefMessage、NdefRecord管理蓝⽛设备和发现模式发现远程蓝⽛设备通过蓝⽛通信监视Internet连接监视Wi-Fi和⽹路详细信息配置Wi-Fi和扫描接⼊点使⽤Wi-Fi Direct传输数据扫描NFC标签使⽤Android Bean传输数据管理本地蓝⽛设备适配器通过类来控制本地蓝⽛设备,该类代表运⾏应⽤程序的Android设备。
BluetoothAdapter bluetooth = BluetoothAdapter.getDefaultAdapter();为了读取任何⼀种本地BluetoothAdapter属性、启动发现过程或者找到绑定的设备,需要在应⽤程序的manifest⽂件中包含BLUETOOTH权限。
为了修改任何⼀种本地设备属性,还需要BLUETOOTH_ADMIN使⽤权限。
BluetoothAdapter bluetoothAdapter=BluetoothAdapter.getDefaultAdapter();//使⽤isEnable⽅法确认设备已经启⽤if(bluetoothAdapter.enable()){//访问BluetoothAdapter的"友好的"(⽤户设置的,⽤于标识特定设备的任意字符串)名称bluetoothAdapter.getName();//获取硬件地址bluetoothAdapter.getAddress();}如果拥有BLUETOOTH_ADMIN权限,那么就能够使⽤setName⽅法更改BluetoothAdapter的"友好的"名称。
使⽤⽅法,获取当前BluetoothAdapter的状态。
Indicates the local Bluetooth adapter is off.Indicates the local Bluetooth adapter is on, and ready for use.Indicates the local Bluetooth adapter is turning off.Indicates the local Bluetooth adapter is turning on.为了启⽤BluetoothAdapter,可以使⽤启动⼀个系统Referrence Activity并将静态常量作为其动作字符串。
android蓝牙开发的基本流程
android蓝牙开发的基本流程
1. 检查当前设备是否支持蓝牙功能:首先,要确认当前设备是否支持蓝牙,可以通
过BluetoothAdapter对象来检查。
2. 启用蓝牙功能:如果发现设备不支持蓝牙功能,则可以调用BluetoothAdapter方
法enable()来启用蓝牙。
3. 当不能直接启用蓝牙功能时,需要请求额外的权限:如果不能直接启用蓝牙功能,则可以使用Intent的ACTION_REQUEST_ENABLE来请求额外的权限。
调用startActivityForResult方法后App会显示来自系统的提示框,用户可以在其中输入额外的权限信息。
4. 实例化BluetoothDevice对象:为了发现服务和特性,需要建立BluetoothDevice 对象的实例。
通常可以使用getRemoteDevice方法,该方法可以接收一个MAC地址参数。
5. 建立连接:下一步要建立连接。
调用BluetoothDevice实例的connectGatt()方法来建立连接。
6. 搜索服务:当连接建立成功,就可以使用BluetoothGatt对象来发现服务。
8. 使用特性:最后,可以使用找到的特性进行通信,从而实现蓝牙功能。
以上就是Android蓝牙开发的基本流程。
除了上面提到的步骤之外,还可以添加其他
一些额外的功能,以实现更加灵活和完善的蓝牙功能。
蓝牙app方案
蓝牙app方案概述蓝牙技术在现代的无线通信中扮演着重要的角色。
它广泛应用于智能手机、耳机、手表等设备中,使得设备之间可以方便地进行无线通信和数据传输。
在本文档中,我们将介绍一种基于蓝牙技术的移动应用解决方案,该解决方案可用于开发具备蓝牙功能的移动应用。
目标本方案的目标是开发一款功能丰富的蓝牙应用,使用户能够方便地与蓝牙设备进行配对、连接和数据交换。
该应用将提供以下主要功能: 1. 设备搜索和配对:用户可以通过应用搜索附近的蓝牙设备,并进行配对操作。
2. 设备连接和断开:用户可以通过应用连接到已配对的蓝牙设备,并在需要时断开连接。
3. 数据传输:用户可以通过应用向连接的蓝牙设备发送数据,并可以接收来自设备的数据。
4.数据处理和展示:应用将提供数据处理和展示功能,以便用户能够对接收到的数据进行操作和查看。
技术选型基于以上目标,我们将采用以下技术来实现蓝牙应用: - Android平台开发:由于Android系统在移动设备市场占有很大份额,所以我们选择使用Android平台进行开发。
同时,Android提供了强大的蓝牙API和工具来帮助我们实现蓝牙功能。
架构设计蓝牙应用的架构设计如下: - 用户界面:应用的前端界面,用于与用户进行交互。
用户可以通过界面来搜索设备、进行配对、连接和数据传输操作。
- 蓝牙管理器:负责管理蓝牙功能,包括搜索设备、配对、连接和数据传输等操作。
这一层将调用Android平台提供的蓝牙API来实现这些功能。
- 数据处理和展示模块:用于处理和展示从蓝牙设备接收到的数据。
该模块可以对接收到的原始数据进行处理,并将处理后的数据展示给用户。
实现步骤以下是实现蓝牙应用的基本步骤:1.创建Android工程:使用Android Studio创建一个新的Android工程,设置工程的基本配置,包括应用名称、包名等。
2.添加蓝牙权限:在AndroidManifest.xml文件中添加蓝牙权限,以便应用能够访问蓝牙功能。
- 1、下载文档前请自行甄别文档内容的完整性,平台不提供额外的编辑、内容补充、找答案等附加服务。
- 2、"仅部分预览"的文档,不可在线预览部分如存在完整性等问题,可反馈申请退款(可完整预览的文档不适用该条件!)。
- 3、如文档侵犯您的权益,请联系客服反馈,我们会尽快为您处理(人工客服工作时间:9:00-18:30)。
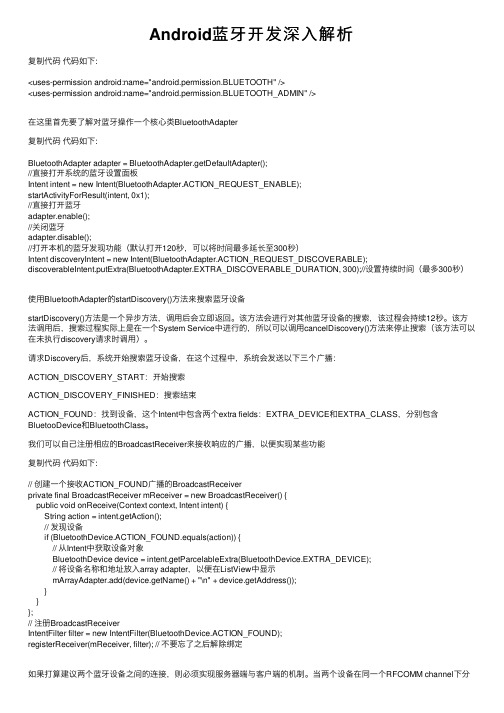
1. 概述
Bluetooth 是几乎现在每部手机标准配备的功能,多用于耳机mic 等设备与手机的连接,除此之外,还可以多部手机之间建立bluetooth 通信,本文就通过SDK 中带的一个聊天室的例程,来介绍一下Android 上的Bluetooth 的开发。
在Android1.x 的时候,相关API 非常不完善,还不能简单的使用Bluetooth 开发,有一个开源项目可以帮助程序员使用、开发蓝牙,支持直接方法bluetooth 协议栈。
在Android2 以后,框架提供了一些官方API 来进行蓝牙的通信,但目前的程序也比较不完善。
本文主要讨论Android2 后的Bluetooth 通信的API 使用方法。
首先看聊天室的效果图:
2. Bluetooth 通信API 介绍2.1. Bluetooth 通信过程
2.2. Bluetooth API 的主要方法
BluetoothAdapter 类
BluetoothAdapter.getDefaultAdapter() :得到本地默认的BluetoothAdapter ,若返回为
null 则表示本地不支持蓝牙;
isDiscovering() :返回设备是否正在发现周围蓝牙设备;
cancelDiscovery() :取消正在发现远程蓝牙设备的过程;
startDiscovery() :开始发现过程;
getScanMode() :得到本地蓝牙设备的Scan Mode ;
getBondedDevices() :得到已配对的设备;
isEnabled() :蓝牙功能是否启用。
当发现蓝牙功能未启用时,如下调用设置启用蓝牙:
if (! mBluetoothAdapter .isEnabled()) {
Intent enableIntent = new Intent(BluetoothAdapter. ACTION_REQUEST_ENABLE );
startActivityForResult(enableIntent, REQUEST_ENABLE_BT );
}
如果发现当前设备没有打开对外可见模式,则传递Intent 来调用打开可发现模式,代码如下:
Intent discoverableIntent = new Intent(BluetoothAdapter. ACTION_REQUEST_DISCOVERABLE );
discoverableIntent.putExtra(BluetoothAdapter.
EXTRA_DISCOVERABLE_DURATION , 300);
startActivity(discoverableIntent);
复制代码
BluetoothDevice 类,此为对应的远程蓝牙Device
createRfcommSocketToServiceRecord() :创建该Device 的socket 。
BluetoothSocket 类
connect() :请求连接蓝牙。
getInputStream() :得到输入流,用于接收远程方信息。
getOutputStream() :得到输出流,发送给远程方的信息。
close() :关闭蓝牙连接。
InputStream 类:
read(byte[]) :以阻塞方式读取输入流。
OutputStream 类:
write(byte[]) :将信息写入该输出流,发送给远程。
3. BluetoothChat 例程分析
Google 提供的关于Bluetooth 开发的例程为Bluetoothchat ,使用截图可见本文一开始。
除去配置及ui 定义等文件,主程序文件共三个:BluetoothChat.java 、BluetoothChatService.java 以及DeviceListActivity.java ,详细功能可见下面的描述。
3.1. 整体调用关系序列图
3.2. BluetoothChat.java
例程的主Activity 。
onCreate() 得到本地BluetoothAdapter 设备,检查是否支持。
onStart() 中检查是否启用蓝牙,并请求启用,然后执行setupChat()。
setupChat() 中先对界面中的控件进行初始化增加点击监听器等,然创建BluetoothChatService 对象,该对象在整个应用过程中存在,并执行蓝牙连接建立、消息发送接受等实际的行为。
3.3. BluetoothChatService.java
public synchronized void start() :
开启mAcceptThread 线程,由于样例程序是仅 2 人的聊天过程,故之前先检测mConnectThread 和mConnectedThread 是否运行,运行则先退出这些线程。
public synchronized void connect(BluetoothDevice device) :
取消CONNECTING 和CONNECTED 状态下的相关线程,然后运行新的mConnectThread 线程。
public synchronized void connected(BluetoothSocket socket, BluetoothDevice device) :
开启一个ConnectedThread 来管理对应的当前连接。
之前先取消任意现存的mConnectThread 、mConnectedThread 、mAcceptThread 线程,然后开启新mConnectedThread ,传入当前刚刚接受的socket 连接。
最后通过Handler 来通知UI 连接OK 。
public synchronized void stop() :
停止所有相关线程,设当前状态为NONE 。
public void write(byte[] out) :
在STATE_CONNECTED 状态下,调用mConnectedThread 里的write 方法,写入byte 。
private void connectionFailed() :
连接失败的时候处理,通知ui ,并设为STATE_LISTEN 状态。
private void connectionLost() :
当连接失去的时候,设为STATE_LISTEN 状态并通知ui 。
内部类:
private class AcceptThread extends Thread :
创建监听线程,准备接受新连接。
使用阻塞方式,调用BluetoothServerSocket.accept() 。
提供cancel 方法关闭socket 。
private class ConnectThread extends Thread :
这是定义的连接线程,专门用来对外发出连接对方蓝牙的请求和处理流程。
构造函数里通过BluetoothDevice.createRfcommSocketToServiceRecord(),从待连接的device 产生BluetoothSocket. 然后在run 方法中connect ,成功后调用BluetoothChatSevice 的connected() 方法。
定义cancel() 在关闭线程时能够关闭相关socket 。
private class ConnectedThread extends Thread :
这个是双方蓝牙连接后一直运行的线程。
构造函数中设置输入输出流。
Run 方法中使用阻塞模式的InputStream.read() 循环读取输入流,然后post 到UI 线程中更新聊天消息。
也提供了write() 将聊天消息写入输出流传输至对方,传输成功后回写入UI 线程。
最后cancel() 关闭连接的socket 。
3.4. DeviceListActivity.java
该类包含UI 和操作的Activity 类,作用是得到系统默认蓝牙设备的已配对设备列表,以及搜索出的未配对的新设备的列表。
然后提供点击后发出连接设备请求的功能。
除了RFCOMM 通信外,Android 上关于Bluetooth 的还有SDP 、GAP 、耳机设备连接等内容,本文还未涉及,将会随着蓝牙相关API 在新版本中的进一步完善来学习使用。