168E使用说明书2NEW
FY168A2 简易 说明书
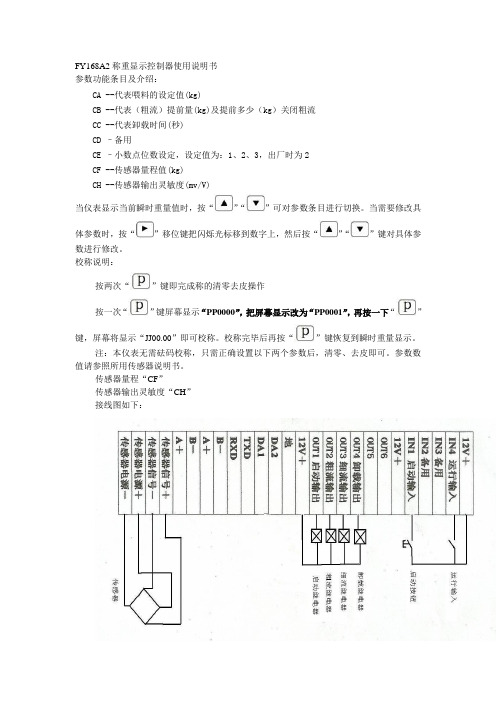
FY168A2称重显示控制器使用说明书
参数功能条目及介绍:
CA --代表喂料的设定值(kg)
CB --代表(粗流)提前量(kg)及提前多少(kg)关闭粗流
CC --代表卸载时间(秒)
CD –备用
CE –小数点位数设定,设定值为:1、2、3,出厂时为2
CF --传感器量程值(kg)
CH --传感器输出灵敏度(mv/V)
当仪表显示当前瞬时重量值时,按“”“”可对参数条目进行切换。
当需要修改具
体参数时,按“”移位键把闪烁光标移到数字上,然后按“”“”键对具体参数进行修改。
校称说明:
按两次“”键即完成称的清零去皮操作
按一次“”键屏幕显示“PP0000”,把屏幕显示改为“PP0001”,再按一下“”
键,屏幕将显示“JJ00.00”即可校称。
校称完毕后再按“”键恢复到瞬时重量显示。
注:本仪表无需砝码校称,只需正确设置以下两个参数后,清零、去皮即可。
参数数值请参照所用传感器说明书。
传感器量程“CF”
传感器输出灵敏度“CH”
接线图如下:。
PI168E普传使用说明书
希望用户妥善保管本说明书,这对今后的维护、保养以及其它场合的使用会有所俾益。
注:本说明书凡在型号中出现“9”均示为“8”,如 91R5E3 即为 81R5E3。
目录
第一章 检查与安全注意事项.................................................................................................... 2 第二章 安装................................................................................................................................ 3 第三章 操作键盘与参数设定器................................................................................................ 6 第四章 试运行............................................................................................................................ 8 第五章 功能参数一览表............................................................................................................ 9 第六章 功能参数说明.............................................................................................................. 10 第七章 异常诊断与处理.......................................................................................................... 19 第八章 规范.............................................................................................................................. 20 第九章 保养与检修.................................................................................................................. 23 第十章 任选件.......................................................................................................................... 24 第十一章 品质保证.................................................................................................................. 26
GS8.2E快瘦机产品说明书

GS8.2E Fast Slimm i ng MachineManualCONTENTSParts introduction 1 Annex 1 Basic Operati o n 2 Functions and operation 2 Notice 4 Forbidden group 4 Technical parameters 5 Annex List 5Parts introduction7 8Annex shelf1 2 5 364Obve r seBack910 11 12 13Annex1、M80 ultrasound head jack2、Medium supersonic head jack3、Small supersonic head jack4、Add button 、Decrease bu t ton5、f u nction6、St a rt/pause7、G e neral power switch8、Power supply line9、work t i me10、Continuous Wave 11、Out p ut intensity 12、fu n ction 13、Pulse waveM80 ultrasound headMedium supersonic headSmall supersonic head— 1 —Basic Operation1、P l ace annex well and connect to mainframe.①Insert M80 ult r asound head to [1 ].②Insert medium supersonic he a d to[2].③Insert small supersonic head to [3].2. Connect power line [8],t u rn on General power switch[ 7].3. Press[ 5] fu c tion sele c t bu t ton, move to the right place ,the light will shining, press[4] .Sett i ng funct i on s,work t i me,work mode and output intensity, p ress [8] start working.4. During operation, if you want to change to o t her functions within the sett i ng time, pleasepress [6] first, a nd press [5] to change.5. Turn off the General power switch, unplug the power line when finished. Sterilize the usedWork h e ad.Functions and operationM80 u l trasound h e ad1. Applied gel on fleshy part s(eg.abdomen,hip,t h igh) The amount depends on moving flexibiliof the ultrasoun d head.2.Set work time(10 min every part),Adjust output int e nsity(1 weak~5 strong).3.Click “Start”, put the service brake under your feet, step on to start working, move away for pause4. Beautician hold t h e ultrasound h e ad to move slowly on skin, in circle or beeline repeatly,theother han d push the fat towards t h e ultrasound head.5.Do not use o n back,aviod using on bones.6.Do not use o n uterus part when women do abdomen care. A bdomen treatment duringMenst r uat e shou l d b e avoided.* Enough gel are needed, you may feel painful if medium is not enough.* The total treat m ent time for daily care should be within 30 min.7.The machine will pau s e aut o mat i cally if th e set t ing time is over.8.Clean the lef t overs wit h hot t o wel, use warm towel to clean the ultrasou n d head.—2 —Super s onic func t ionSupersonic has a mechanical,h y perthermia and biochemical effect,make local tissue cells can be micro-massaged,promote blood circulat i o n,sof t en organizat i ons, speed up chemicalreact i ons, and promot e metabolism.It can promote blood circulation and lymph circulation,t h us has the effect of detoxification, wrinkle removal,tightening,lifting, l ightening f l e c ks and eliminating pouch and dark circles.1.To clean deeply, a pply medium(nutrition gel, extract oil a n d etc)The amou n t sh o uld be according to moving f l exibility of ultrasound head.2.Set work time. Press [ 7] to choose medium or small ultrasound head according t o parts need cared.(Medium size head suit fo r face and arms,the small size f o r eye a n d nosewing.3.Set t ing work mod(1-continous wave output ,2-pulse wave),to regulate output int e nsity according to diff e rent parts(1weak~9strong)4.Press start t o work.5.During operation, if you want t o chan g e to ot h er functions within the sett i ng t i me, pleasepress pause and then press [ 7] to move the curso r to the right place,t h en press [4] or [5] to Change,readjust work time,work mode,out p ut intensit y and press start.6.The machine will stop aut o matically if t h e set t ing time if over.e warm water to clean skin.8.St e rilize all the used ultrasound heads.—3 —Notice1. In operation, in o r der t o maint a in sufficient ge l.2.The ultraso u nd head should not stay out of work for to o lo n g time while outpu t ting energy.Click “pause” to stop working to avoid damage.3. M50, M80 ultrasound h e ads should not stay st i ll at one part for t o o long time,and do not use it on bones.4, Please step on service brake the n there will be sound wave exist when using M80 ultrasound head.5, M80 u l t r asound head can not be used on the back, avoid on the bo n es, and daily ca r e should Be within 30 minutes every time.6. Do not use on eyeba l l top , A d am' s apple, h eart .Do not stay st i ll on one part for to o lo n g. Forbidden group1.Peo p le who has fever, inf e ct i ous diseases, acut e diseases.2. People with heart disease or co n figured cardiac p a cemaker.3. Patients with severe high blood pressure, tumor disease, asthma, deep vein thrombosis,Varix, t h yroid ,cancer, falling sickness.4. People with hemorrhagic disease, trauma, vascular rupt u re, skin inflammation, skin disease.5.Pregnant women6. Do not use at the abdomen durin g men s trual period7. Medical P l astic p a rt s, or part s with metal inside8. People with an abnormal immune syst e m—4 —Technical parametersVolt a ge:AC 220V/50Hz or AC 110V/60Hz p o wer:≤75W Operating f r e q uency:1MHz/40KHzAnnex List1.Mainframe 1set2.Power supply line 1pc3. Use manual 1 c opy4. big ultrasound head 1pc5.Medium Ultrasound head (with wire) 1pc6.Small Ult r asound head (with wire) 1pc7.Ann e x shelf 1pc8.Hexa g onal screws 3pc—5 —。
MS-168W使用说明书

MS-168W使用说明书TAKSTAR 无线/有线两用台式会议麦克风,主要为会议、公众传播、户外演讲等场合而设计。
这套无线麦克风系统具有使用距离长、高保真音色、频率响应宽、极低的失真度和无线/有线自动切换等特点。
本系统的设计不需幻象电源供电,解决了传统的利用幻象电源和连线复杂的缺陷。
麦克风的鹅颈部分灵活多变的组合,能够满足不同场合的特殊需要。
麦克风采用电池供电,安装方便、操作简单。
既可单独使用,也可配合会议系统工程安装。
主要特性1.使用VHF 220-260MHz频段。
2.采用多级窄带滤波,充分消除干扰信号。
3.采用低电压供电。
4.全部采用石英晶体振荡,使频率更加稳定。
5.动态范围宽广。
6.设有声反馈防啸叫功能,能有效减小回授啸叫。
7.超强指向性。
8.外观流畅,安装方便,操作简单。
麦克风操作说明1.打开底座电池盖,按标示装好1.5V(5#)电池两节,注意电池不能装反。
2.打开电源开关,按下POWER钮,会议麦克风咪头部红色光环点亮,无线麦克风开始工作。
3.使用有线时,将卡侬线插入台式会议麦克风的输出插孔内,无线发射部分自动切换,并将卡侬线的另一端插入功放,有线开始工作。
4.若长期不使用时,请从底座内取出电池,以免电池漏液而损坏麦克风。
接收机操作说明1.将电源转换器插头插入供电插座,注意电源电压为AC 220V/50Hz。
2.打开电源开关,电源指示灯亮。
3.拉出天线,使之与机体成90°角。
4.将音频输出线插入音频输出座,另一端插入功放。
5.长期不使用时,请拔出电源转换器。
注意事项1.接收机的安装离地面要高于1m,距离墙面大于1m。
2.麦克风使用时,应避免放置到死角的地方,以保持信号接收状况良好。
3.机体应避免直接日晒雨淋,尽量远离电磁场。
4.会议台式麦克风电源供电为DC 3V电池供电,决不能使用幻象电源供电。
5.没有经过厂家授权同意,用户不得擅自对机体内做任何修改或变动,修改或擅自改系统内部配件,可能导致机器不能正常工作,并且可能使保修承诺作废。
AR168F IAX2 电话 说明书

AR168F IAX2 电话 使用手册目 录1.产品介绍 (3)2.规格与特性 (4)2.1.硬件特性 (4)2.2.软件特性 (4)2.3.协议、标准 (5)2.4.电器指标 (6)2.5.外形尺寸 (6)2.6.使用环境 (6)3.安装 (7)3.1.包装物品清单 (7)3.2.连接电话 (7)4.AR168F话机外形 (7)4.1.按键示意 (7)4.2.按键功能说明 (9)4.3.LED指示灯功能说明 (9)5.配置指南 (10)5.1.使用电话按键配置话机 (10)5.1.1.键盘操作 (10)5.1.2.查看当前系统信息 (11)5.1.3.网络设置 (12)5.1.4.语音设置 (12)5.1.5.协议设置 (13)5.1.6.呼叫设置 (14)5.1.7.系统设置 (14)5.2.通过Web页面配置话机 (15)5.2.1.网络设置 (15)5.2.2.语音设置 (17)5.2.3.协议设置 (18)5.2.4.呼叫设置 (19)5.2.5.系统设置 (21)5.2.6.设置电话薄 (22)5.2.7.设置拨号规则 (22)6.基本操作 (24)6.1.呼叫 (24)6.1.1.摘机/挂机/免提状态切换 (24)6.1.2.直接拨号 (24)6.1.3.重拨 (24)6.1.4.查询呼叫历史拨号 (25)6.1.5.查询电话簿拨号 (25)6.1.6.快速拨号 (25)6.2.接听 (25)6.2.1.接听来电 (25)6.2.2.呼叫保持 (26)6.2.3.接听等待中的来电 (26)6.2.4.恢复接听 (26)6.3.呼叫前转(Blind Transfer) (26)6.4.呼叫转移(Forward) (27)6.4.1.呼叫转移号码 (27)6.4.2.无条件转移 (27)6.4.3.遇忙转移 (27)6.4.4.无应答转移 (27)6.5.自动应答(Auto Answer) (27)6.6.静音 (27)6.7.免打扰 (28)6.8.察看留言 (28)6.9.保存及删除呼叫历史 (28)6.10.维护电话簿 (29)6.10.2.保存电话簿 (29)6.8.2.增加电话簿条目 (29)6.8.3修改电话簿条目 (30)6.8.4删除特定电话簿条目 (30)6.8.5删除所有电话簿条目 (31)7.软件升级 (31)7.1手工升级 (31)7.1.1. 选定升级类别 (32)7.1.2. 定位升级文件 (32)7.1.3. 开始升级 (32)8.恢复与保存出厂设置 (32)8.1恢复出厂设置 (32)8.2保存出厂设置 (32)1.产品介绍IP 是网际互联网协议(Internet Protocol)的简称,IP 电话是利用IP协议的分组数据包进行语音的传送。
浙江亿泰DCS-168E集团电话使用手册

-5-
■振铃回音:表示正在等待被叫接听电话 ■内部通话:表示两部内部分机正在通话 ■出通话:表示内部分机正与外部电话通话 ■入通话:表示外部电话正与内部分机通话 ■外部呼入:表示分机正在通话时又有外部电话呼叫 ■语音提示:表示正在接收语音提示 ■听音乐:表示正在等待 ■叫醒振铃:表示正在提供叫醒服务 ■收号:表示正在结束通话 ■录音状态:表示正在进行中继录音 ■电话会议:表示正在进行电话会议 ■证实音:提示输入命令正确有效 ■闹钟:提示该分机设置了叫醒服务功能
第二节 、系统监控 一、各板块的在线信息
双击主界面中的[系统导航]/[系统监控]/[板卡通道状态]进入如下界面:
各板块的插槽位置在物理地址上已固定,同种类型的板只能按前后顺序依次设置或从后到 前的顺序撤消,操作错误时状态栏中会显示错误信息。 1、板块说明: ◆中继板(TRK): 与外部建立通讯的板块,每一块板为 4 路,系统可设置 0-2 块,插槽
DCS-168E 集团电话使用手册
第一章、话务软件的操作指南
本章节对系统的组合方式中的组合一(即集团电话处于与电脑连接的状态下)有效。 同时要求在阅读本章节前,已正确安装了话务软件。 注意:当集团电话没有与电脑连接时,本章节无效,此类用户无须阅读本章节。
一、菜单说明
第一节、界面名词解释
1、系统管理 修改密码:修改当前操作员的登录密码 数据库管理:定时、手动备份数据库或恢复数据库 话单库管理:备份、删除话单数据库 员工管理: 由管理员对操作员信息进行增加、删除、修改。操作员等级分普通级、操作员 级、管理员级、维护员级,其中以维护员级别权限最高 (1)普通级:可进行监控、浏览 出厂时工号:3333 密码:3333 (2)操作员级:可进行话务监控、用户/中继设置及管理、话单查询及结算等 出厂时工号:2222 密码:2222 (3)管理员级:除普通、操作员级权限外,可对操作员进行管理,并对字头表、 弹性号码、费率、折价日及折价时段等参数进行设置与操作 出厂时工号:1111 密码:1111 (4)维护员级:除普通、操作员及管理员级权限外,可对操作员及管理员进行管 理,并对串行口、系统板类型设置、系统初始化等参数进行设置 与操作 出厂时工号:0000 密码:0000 重新登录:改换用户的登录级别 ,按[重新登录]时会弹出用户登录窗口 退出系统:关闭话务软件
亿泰交换机说明书168T

4、计费管理
• 用户结算:结算用户 • 话单查询:查询话单 • 折价设置:设置折价信息 • 普通费率设置:设置普通费率 • IP 费率及字头设置:设置 IP 费率、IP 字头及接入费 • 话单结算:结算用户
杭州解放路 85 号 0571-87169900
-3-
DCS—168T 数模混合商务集团电话使用手册
二、工具栏说明
下载 上传 校验 备份 恢复 保存 新建 删除 查找 上面的按钮从左至右依次为 下载:把当前界面上的参数信息全部下传到集团电话主机 上传:把集团电话主机的参数全部上传到电脑话务台 校验:检查集团电话主机与电脑话务台的全部参数设置是否一致 备份:备份电脑话务台的参数设置信息 恢复:把已备份的信息装入到电脑话务台(必须要先备份) 保存:保存电脑话务台已设置的参数 新建:增加一行记录 删除:删除一行记录 查找:在当前表查找指定的记录 打印:打印当前界面上选中的信息 帮助:帮助文件 退出:关闭程序
1、系统管理 修改密码:修改当前操作员的登录密码 数据库管理:定时、手动备份数据库或恢复数据库 话单库管理:备份、删除话单数据库 员工管理:由管理员对操作员信息进行增加、删除、修改。操作员等级分普通级、操作 员级、管理员级、维护员级,其中以维护员级最高 (1)普 通 级: 可进行监控、浏览 出厂时工号:3333 密码:3333 (2)操作员级: 可进行话务监控、用户/中继设置及管理、话单查询及结算等 出厂时工号:2222 密码:2222 (3)管理员级:除普通、操作员级权限外,可对操作员进行管理,并对字头表、弹性号码、 费率、折价日及折价时段等参数进行设置与操作 出厂时工号:1111 密码:1111 (4)维护员级:除普通、操作员及管理员级权限外,可对操作员及管理员进行管理,并对 串行口、系统板类型设置、系统初始化等参数进行设置与操作 出厂时工号:0000 密码:0000 重新登录:改换用户的登录级别 ,按[重新登录]时会弹出用户登录窗口 退出系统:关闭话务软件
瑜杰YuJieRM-168B万能电视机遥控器使用说明书精品文档16页
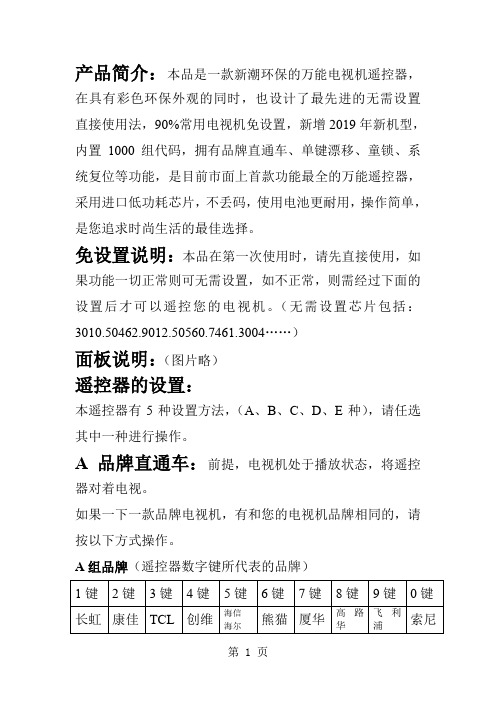
产品简介:本品是一款新潮环保的万能电视机遥控器,在具有彩色环保外观的同时,也设计了最先进的无需设置直接使用法,90%常用电视机免设置,新增2019年新机型,内置1000组代码,拥有品牌直通车、单键漂移、童锁、系统复位等功能,是目前市面上首款功能最全的万能遥控器,采用进口低功耗芯片,不丢码,使用电池更耐用,操作简单,是您追求时尚生活的最佳选择。
免设置说明:本品在第一次使用时,请先直接使用,如果功能一切正常则可无需设置,如不正常,则需经过下面的设置后才可以遥控您的电视机。
(无需设置芯片包括:3010.50462.9012.50560.7461.3004……)面板说明:(图片略)遥控器的设置:本遥控器有5种设置方法,(A、B、C、D、E种),请任选其中一种进行操作。
A品牌直通车:前提,电视机处于播放状态,将遥控器对着电视。
如果一下一款品牌电视机,有和您的电视机品牌相同的,请按以下方式操作。
A组品牌(遥控器数字键所代表的品牌)按住您电视机品牌相应的数字键不放(假如您家电视机是创维品牌,就按住4号键),5秒后指示灯开始闪烁,当电视机出现音量符号时,立即松开此键,设置结束。
※检查如有功能键不符,可重新设置。
B品牌直通车1+1:前提:让电视机处于播放状态,将遥控器对着电视如果一下十款品牌电视机,有和您电视机品牌相同的,请按以下方式操作。
B组品牌(遥控器数字键所代表的品牌)按住设置键不放,再按住代表您电视机品牌的数字键不放,(假如您家里电视机是金星牌,先按住设置键不放,再按住6号键),5秒后指示灯开始闪烁,当电视机出现音量符号时,立即松开两键,设置结束。
※检查如有功能键不符,可重新设置。
C“单键漂移”一键通数码搜索:前提:让电视机处于播放状态,约3秒指示灯亮起并闪烁,当电视机出现静音符号时,立即松开设置键,此时遥控器仍要对准电视机,当静音消失,即电视机出现音量符号时,立即按一下设置键,指示灯熄灭,设置结束。
※检查如有功能键不符,可重新设置D经典半自动搜索:前提:让电视机处于播放状态,将遥控器对着电视按住设置键不放,再按下电源键,指示灯亮起后松开两键,每按一下“音量+”(或“音量-”)键,遥控器会发射一次码,且指示灯会闪烁一次,反复此操作,直至电视机上出现音量符号时,立即停止操作,然后按一下设置键完成,此时指示灯熄灭,设置结束。
Eu romec 168型号双向气缸说明书

Technical DataStandard(32–100 mm dia.) ISO 6431, VDMA 24562CNOMO / NFE 49-003-1Working pressure, max.10 bar (145 psi)Ambient temperature range-25 °C to +70 °C (-13 °F to +158 °F)Medium Compressed air, lubricated or non-lubricatedMaterials Piston rod Stainless steel (BS 303 S 31)Piston rod bushing Steel with a PVDF + PTFE bearing surfaceCylinder body Anodized aluminumEnd covers AluminiumEnd cover screws Surface treated steelWiper PolyurethanePiston25–63 mm dia. polyamide,80–100 mm dia. AluminumCushioning screws BrassSeals Nitrile rubberNut Zinc plated steelApplication areaThis cylinder series is suitable for use where large masses are to be moved or where the impactfrequency is high: the automobile industry for welding, painting, handling sheet steel, pressingetc., the food industry where the shape of the cylinder assists in meeting hygiene regulations, thepackaging industry where high frequency and long service life are required.Technical Information (for further information see chapter 15)Piston diameter[mm]253240506380100 Theoretical piston force push stroke[N]2954827561176186030004676(lbf)(66.3)(108)(170)(264)(418)(674)(1050) at 6 bar (87 psi)pull stroke[N]227415636990168027184229(lbf)(51)(93.3)(143)(223)(378)(611)(951) Cushioning length[mm]11,011,515,017,016,519,519,5 Cushioning energy¹)[Nm]1,04,89,015,027,054,088,0(in.lbs)(8.85)(42.48)(79.66)(132.76)(238.97)(477.94)(788.86) Cylinder weight0 mm stroke[kg]0,270,450,761,101,702,503,70(lbs)(0.595)(0.992)(1.68)(2.43)(3.75)(5.51)(8.16) add. per 100 mm[kg]0,180,200,290,450,490,781,00(lbs)(0.397)(0.441)(0.639)(0.992)(1.08)(1.72)(2.2) For cushioning diagram, see general technical information of this cataloguePart no.Piston Ø2532405063 Piston rod thread M 10 x 1,25M 10 x 1,25M 12 x 1,25M 16 x 1,5M 16 x 1,5Connection port G1/8G1/8G 1/4G 1/4G 3/8 Stroke2516802020001680302000168040200016805020001680602000501680205000168030500016804050001680505000168060500080168020800016803080001680408000168050800016806080001001680210000168031000016804100001680510000168061000012516802120001680312000168041200016805120001680612000160168021600016803160001680416000168051600016806160002001680220000168032000016804200001680520000168062000025016802250001680325000168042500016805250001680625000320–1680332000168043200016805320001680632000400–1680340000168044000016805400001680640000500–1680350000168045000016805500001680650000Optional Stroke ²)16802000001680300000168040000016805000001680600000Rec. max. stroke³)15001500160016001600 Piston Ø80100Piston rod thread M 20 x 1,5M 20 x 1,5Connection port G 3/8G 1/2Stroke2516808020101681002020501680805010168100502080168080801016810080201001680810010168101002012516808120101681012020160168081601016810160202001680820010168102002025016808250101681025020320168083201016810320204001680840010168104002050016808500101681050020Optional Stroke ²)16808000101681000020Rec. max. stroke³)17001700²) When ordering optional stroke the length of the stroke must always be given in mm, for example 1680300000, stroke 185 mm.³) Longer strokes on request.Accessories (to be ordered separately)Accesssory TypePiston dia.25324050Flange front or rear3682002000523000601252310060125232006012Angle brackets3682202000523000050252310005025232000502 Male trunnion mounting3682802000368280300036828040003682805000 Pivoted mounting3683802000523081690252318169025232816902 Rear clevis3682902590368290359036829045903682905590 Rear eye for "Bearing blockwith rod end bearing"–523000343252310034325232003432 Rear eye with PTFE sinteredbushings–523000340252310034025232003402 Rear eye with rubber bushing3683202000368320300036832040003683205000 Hinge with PTFE sintered bushing andmounting screws–523000341252310034125232003412 Rear eye with ball joint3683602000368360300036836040003683605000Foot mounting3682302001368230300136823040013682305001Piston dia.6380100Flange front or rear523300601252340060125235006012Angle brackets523300050252340005025235000502Male trunnion mounting368280600036828080003682810000Pivoted mounting523381690252348169025235816902Rear clevis368290659036829085903682910590Rear eye for "Bearing blockwith rod end bearing"523300343252340034325235003432Rear eye with PTFE sinteredbushings523300340252340034025235003402Rear eye with rubber bushing368320600036832080003683210000Hinge with PTFE sintered bushing andmounting screws523300341252340034125235003412Rear eye with ball joint368360600036836080003683610000Foot mounting––Piston dia.25324050Rod clevis1822122024182212202418221220251822122005 Rod clevis corrosion proof3590502000359050200035905040003590505000 Mounting plate3670803000367080300036708040003670805000Ball eye rod end8958207602182212400318221240041822124005 Compensating coupling1826409002182640900218264090031826409004 Coupling piece5230816002523081600252318160025232816002Piston dia.6380100Rod clevis182212200518221220041822122004Rod clevis corrosion proof359050500035905080003590508000Mounting plate3670805000––Ball eye rod end182212400518221240061822124006Compensating coupling182640900418264090051826409005Coupling piece523281600252348160025234816002Piston dia.25 - 100Sensor with 2,5 m cable, Reed2750132310Sensor with 2,5 m cable, PNP2750131110Sensor mounting for sensors 2752752111000Seal kitPiston dia.253240506380100Part no.0490351302049039430304903944000490394508049039460504903947020490394818S* = StrokeTolerance 25–50 mm dia. = +2/-063–100 mm dia. = +2,5/-0Piston ØB¹)e 11E P V AM BG EA EE KK MM g 82525³)37516227,52040G 1/8M 10x1,251232304551522162849G 1/8M 10x1,251240355071924163358G 1/4M12x1,251650406272432163169G 1/4M16x1,52063457382432163884G 3/8M16x1,5208045921230401638104G 3/8M 20x1,525100551091035401642126G 1/2M 20x1,525Piston ØNV1NV2²)PL RT TG VA VD VF WH ZB ZD 2510179M 527 ±0,2–462498 74 ±0,432101714M632,5 ±0,23,54626120 94 ±0,440131915M638 ±0,23,546,530135105 ±0,450172414M846,5 ±0,244837143106 ±0,463172418M856,5 ±0,244837158121±0,480223017M 1072 ±0,2441046174128 ±0,8100223021M 1089 ±0,2441051189138 ±0,8¹) There is no guide on the rear end cover of the 25 mm diameter cylinder.²) The cylinder is supplied fitted with a nut as per ISO 4035, DIN 439.³) This dimension does not correspond with 25 mm dia. cylinders, series 167. Other external dimensions are the same.。
伊林思 H685e EDGE 无线路由器 规格说明书

H685e EDGE无线路由器规格说明书产品概述H685系列路由器是伊林思科技有限公司基于无线网络需求,采用最新硬件系统平台,使用Linux软件系统引用最新技术研发出来的一款全新的,性能更为优异的物联网无线通信路由器产品。
采用工业级设计标准,它主要应用于行业用户的数据传输业务。
该产品采用高性能的32位嵌入式处理器,内嵌完备的TCP/IP协议栈,同时提供RS串口和10/100M以太网接口。
集成IO端子座,提供串口或者GPIO接口。
串口分别提供RS-232、RS-485、TTL电平接口的透明传输模式,支持的VPN 通信功能,采用IPSec/PPTP/L2TP/GRE VPN技术,企业级VPN隧道技术和防火墙技术,保证高安全性行业的数据安全,支持自动在线检测,实时动态刷新网络状态,保持链路畅通,产品以性能稳定、体积小、易于安装嵌入、抵抗环境能力强等优点,深受用户欢迎。
支持WEB/Telnet/Console多种配置方式,其中用户面对的是WEB图形化管理配制界面,管理方便简单。
该产品已广泛应用于物联网产业链中的M2M 行业,如智能电网、智能交通、智能家居、金融、移动POS 终端、供应链自动化、工业自动化、智能建筑、消防、公共安全、环境保护、气象、数字化医疗、遥感勘测、军事、空间探索、农业、林业、水务、煤矿、石化等领域。
行业应用金融:银行储蓄点机房监控,移动性证券交易和信息查询通信:电信机房动力环境监控,通信维护人员线路资料查询交通:GPRS/SMS/GPS 机动车辆监控调度系统;银行运钞车,邮政运输车监控调度。
公安:公安、110、交警车辆监控调度,公安移动性数据(身份证、犯罪档案等)查询,交警移动通信数据(车辆、司机档案等)查询。
热力:热力系统实时监控和维护电力:电力系统城市中电网实时监控和自动补偿,远程自动抄表公司:移动办公及管理,其他外勤人员移动性数据查询工业:工业遥感,遥测,遥控信息回报气象:气象数据采集与传输水利:水文监测生活:煤气调压站实时数据采集自动控制,自来水,污水管道,闸门、泵站与水厂实时监控维护电子商务:支持B2B、B2C的电子商务和电子支付、股票交易等。
168 12S Series高压滤网说明书

BOX 4: Seals
Symbol Description
V
Fluorocarbon (FKM)
E1
Ethylene Propylene (EPR)
P
Perfluorocarbon (FFKM)
Note:
1.Recomended for DI Water applications
BOX 5: Indicator
Efficiency
Efficiency %
PSID
100
2QH
55QQH
80
1000
200 100
10QH
99.9 60
99.5 99.0
40
20QH
20
95.0
20
20QH
Capacity
2
50.0
0
0
5
10
15
0
4
8
12 16 20
Grams
Micron Size (c)
Multipass tests run @ 15 gpm to 100 psid terminal - 5mg/L BUGL
DOUBLE LENGTH: 11.80 (299.72)
PORT SIZES PER REQUIREMENTS (BOTH SIDES)
APPLY PST PIPE SEALANT #567 TO THREADS LUBRICATE O-RING TORQUE BOWL TO 75 ± 10 FT-LBS
10QH 05QH
2QH
55QQH
80
6
1000
99.9
5
10QH
60 4
200
爱威特 挂壁式电吹风 AYT-168 说明书
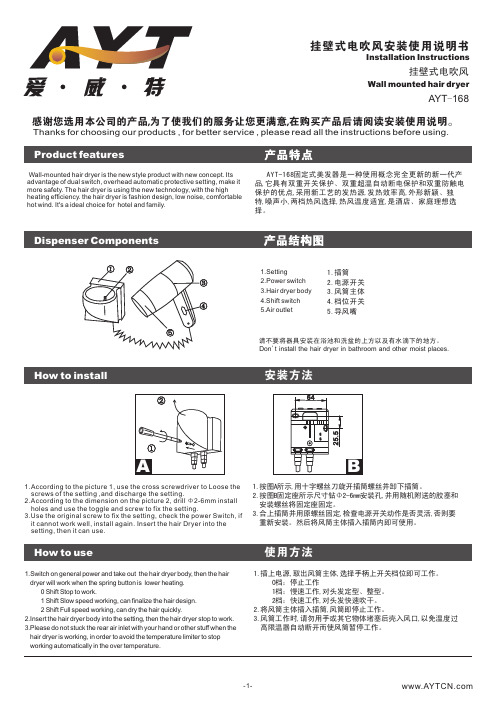
AYT-168固定式美发器是一种使用概念完全更新的新一代产品,它具有双重开关保护、双重超温自动断电保护和双重防触电保护的优点,采用新工艺的发热源,发热效率高,外形新颖、独特,噪声小,两档热风选择,热风温度适宜,是酒店、家庭理想选择。
产品特点Installation InstructionsWall mounted hair dryer挂壁式电吹风Thanks for choosing our products , for better service , please read all the instructions before using.AYT -168挂壁式电吹风安装使用说明书感谢您选用本公司的产品,为了使我们的服务让您更满意,在购买产品后请阅读安装使用说明。
Wall-mounted hair dryer is the new style product with new concept. Its advantage of dual switch, overhead automatic protective setting, make it more safety. The hair dryer is using the new technology, with the highheating efficiency. the hair dryer is fashion design, low noise, comfortable hot wind. It's a ideal choice for hotel and family.①②③④⑤1.插筒2.电源开关3.风筒主体4.档位开关5.导风嘴请不要将器具安装在浴池和洗盆的上方以及有水滴下的地方。
1.Setting2.Power switch3.Hair dryer body4.Shift switch5.Air outletDon 't install the hair dryer in bathroom and other moist places .1.按图A所示,用十字螺丝刀旋开插筒螺丝并卸下插筒。
洛雷智能家居安全中心L871T8E系列说明书

Lorex Smart Home Security CenterA versatile and expandable security system without monthly fees.Plus, local built-in storage, to keep your footage private and secure.Enhance your home security experience with the Lorex Smart Home Security Center. View and control all your Lorex cameras and connected devices from a central location with a user-friendly touch screen displaying live and recorded views from multiple cameras simultaneously. You can install the included wire-free cameras indoors or outdoors.The Smart Home Security Center assures privacy with a built-in camera cover with a microphone mute switch, facial unlock, and the option to use the system in offline mode.The Lorex Smart Home Security Center is a Network Video Recorder (NVR) but unlike the traditional NVR, it comes with a touchscreen display. It also allows you to pair with wireless cameras. Video recordings are stored on the pre-installed MicroSD card for greater privacy and security.Want a video doorbell for your front door? Or how about a floodlight camera for the garage? With an on-screen device setup, you can add up to eight Lorex Wi-Fi devices and expand your security system to match your needs. It can connect up to 32 sensors and can also be used for audio streaming (from your smartphone). The versatile LSHSC allows you to integrate your existing Lorex 1080p and additional 2K security cameras, if required, to accommodate your evolving needs.Touch, Talk, Record, and View— the Lorex Smart Home Security Center is a one-stop solution for your home monitoring needs.Connectivity and ControlObserve and control all your Lorex cameras and connected devices from a central location. Stay connected and receive notifications through the Lorex Home app while away.Works smarter for youAn easy-to-use touch-screen interface allows for efficient home monitoring forusers of all ages.Exceptional ValueThere are no expensive or hidden monthly cloud fees thanks to secure, built-in storage.Always have room to growMix and match additional Lorex devices and accessories to create the perfect smart home monitoring for your family.Set-up seamlesslyHome monitoring has never been easier! Installation and set-up can becompleted in minutes.Enhanced PrivacyPair Lorex devices directly to the LSHSC to store footage, ensuring privacy as the footage is not saved on the cloud. It serves as a backup in case your security cameraor doorbell is stolen.No Monthly FeesYour footage is safely stored on the security-grade MicroSD card located within the device. Upgrade the storage to a maximum of 256GB MicroSD or 1TB SSD.Seamless Set upThe all-in-one security system is easy to install, and the intuitive touch screen directions facilitate easy setup. Follow the simple on-screen instructions to pair additional Lorex devices as needed.Versatile Security SystemsAdd a variety of Lorex wireless devices like indoor/ outdoor Wi-Fi cameras, doorbells, floodlights, and sensors to your Lorex Smart Home Security Center for a personalized monitoring solution.The Heart of SecurityEnjoy complete control of the Smart Home Security Center at your fingertips. Merely swipe your screen to access the key features and view up to four cameras at a time. You can view all the sensors connected to the Lorex Home Center as well.* Face unlock supports up to 3 faces and requires a well-lit area.** An internet connection is required to use the Lorex Home App and to receive automatic device update notifications.Remote viewing from your mobile with Lorex Home™ appEnsure that your smart home security system is always within reach. Remotely access your Lorex Smart Home Security Center through the app to view live videos, customize system settings, playback recorded motion events, and more.Lorex Home ™Multiple Connection OptionsOfflineInternet connection is not required for operating and connecting to differentLorex devices.**Enhanced Privacy FeaturesFace UnlockLogin to the Lorex Smart Home Security Centerquickly with the Face Unlock* feature.Camera CoverCover the lens of the built-in camera if you’renot using the Face Unlock feature.Microphone Mute SwitchSlide the microphone switch to mute to keepyour conversations private.WiredUse the included Ethernet cable to connect to your home router.WirelessConnect to your home router wirelessly for flexible placement.Smart Home compatibilityUse simple voice commands to get faster access to your security system and activate camera features with Amazon Alexa™ and Google Assistant™.Product SpecificationsScreen Size 7" Diagonal Screen Type LCD Touch Screen Audio Full Duplex 2-way AudioMicrophone 2 × Noise Cancelling Microphones Speakers 3 × SpeakersCamera Built-in, for Face Unlock Camera Support Up to 8×, 2K or 1080p Sensor Support Up to 32 sensors Camera Viewing Up to 4 channels Voice Assistant Lorex Voice Assistant Privacy Features Microphone Mute Switch, Camera CoverDigital Zoom Yes, Camera Dependent Log-in OptionsPassword or Face UnlockStatus LED Multi-color LED status bar indicator Sensors Ambient LightStorage TypeMicroSD (up to 256GB)or M.2 2280 SATA SSD M (up to 1TB)*Internet Recommendation 2 cameras ~4Mbps / 4 cameras~10Mbps @1080p upload speed*Home Router Connectivity 100Mbps Ethernet or 5GHz Wi-Fi 5 Device Connectivity 2.4/5GHz Wi-Fi / BLE 5.0Ports1× Power, 1× Ethernet, 1× USB Weather Rating Indoor only Operating Temp. Range 32~104°F / 0~40°C On-screen Languages English Power12V DC / 2A Unit Dimensions (W × D × H)7.5 × 3.6 × 7.0” / 19.0 × 9.1 × 17.7 cm Unit Weight1.81lb / 0.92kgDisclaimers:1. Video is captured and can be exported in full resolution based on the maximum resolution supported by the camera and the resolution settings the resolution as per custom user setting.2. Compatible with certain Lorex devices only. For a list of compatible devices please visit /compatibility3. Accessing your security system remotely requires a high-speed Internet connection. Ensure your recorder has a connection to a router (not included). An upload speed of 100 Mbps Ethernet or 5GHz Wi-Fi is recommended for remote video viewing.4. Image quality and frame rate are dependent on the distance and types/locations of objects between the devices and the Lorex Smart Home Security Center. An optional Range Extender (model # AX62TR) is available to further extend the range (not included).5. The Lorex Home Center can be connected to your home router wired (using included CAT5E cable) or wireless. Lorex always recommends using a wired connection whenever possible. For a wireless connection, you will need a home router supporting dual band (2.4/5Ghz) and the 5GHz network needs to be accessible.6. The Lorex Home Center supports offline use which does not require a home router. It does mean that you will not be able to access it remotely using the Lorex Home App.Model InformationL871T8E-ELorex Smart Home Security Center with 64GB Security Grade MicroSD6-95529-02701-2DimensionsPackage Retail Box Package Weight 3.96lb / 1.79kg Package Dimensions (W × D × H)9.45 × 9.45 × 4.76” / 240 × 240 × 121mm Package Cube0.246 cbf / 0.006cbmBack PanelTop PanelLorex Corporation999 Corporate Blvd. Suite 110 Linthicum, MD, 21090, United States© 2021 Lorex CorporationL871T8E Series What’s in the boxLocal reliable storage you can count onThe WD Purple MicroSD card offers exceptional performance and reliability to meet high-definition video recordingproviding peace of mind.All trademarks belong to their respective owners. No claim is made to the exclusive right to use the trademarks listed, other than the trademarks owned by Lorex Corporation. We reserve the right to change models, configurations or specifications without notice or liability. Product may not be exactly as shown.Apple, the Apple logo and AppleTV are trademarks of Apple Inc., registered in the U.S. and other countries. App Store is a service mark of Apple Inc.Google, Google Home, Google Play, Google Play logo, Google Assistant logo and Chromecast are trademarks of Google Inc.* Devices stream by default using substream at lower resolution.Lorex Smart Home Security Center64GB MicroSDPower AdapterEthernet CableQuick Start Guide。
迷鹿 MINOTAUR MSR18T、MSR19E 安全电流切换器安装说明书

GeneralThe safety relay by itself can not provide safety. The safety relay requires proper component application and maintenance. The application must anticipate failures by using system safety risk assessment. This product must be installed and maintained inaccordance with the manufacturer’s instructions as well as applicable standards.MountingThe units must be mounted on a 35 mm DIN rail.INSTRUCTION SHEETATTENTION: To prevent electrical shocks, disconnect power source before servicing. Save these instructions for future use.The auxiliary terminals are NOT monitored and must not be used as safety outputs. These may be used for data and signaling.To avoid contact welding, a fuse must be connected externally. See performance specifications sheet for details.***ConstructionThe relays and expander units have (4) groups of terminals: 1. Power Terminals:(A1-A2) for 110V AC (23061, 23063) or 230V AC (23062, 23064) or (+B1 -B2) for 24V AC/DCAll units have a built-in transformer protected by an electronic fuse. 2. Input Terminals:The E-Stop and Gate interlock operator: Ch 1 (T11,T12), Ch 2 (X1,X2) (Fig. 1, 3, 4, 5) Start button: (T31...T34) (Fig. 1, 4, 5) Two-hand operator (T11...T34) (Fig. 2)Expander Feedback (T34, T35, S1...S4, J1, J2) (Fig. 4) *3. Safety Output Terminals: Relay: 13-14...53-54 Expander: 13-14...83-84These are monitored outputs. These outputs are voltage free.**4. Auxiliary Terminals:Relay: 61-62, 73-74, Expander: 91-92, 101-102Applications: E-Stop, Gate Interlock, Two Hand Control, Expanders and Auxiliary RelaysE-Stop (Fig. 1)a) Use an E-Stop button conforming to EN 418. It must have (2) Normally Closed (N.C.) contact blocks. The contact blocksmust conform to EN 60947-5-1 positive-opening operation. b) Use a start/reset momentary pushbutton with a single contact block with (2) circuits (1) Normally Open (N.O.) and (1) N.C.If two separate blocks are used, the N.O. must be assembledto the operator first and the N.C. assembled on it, so that if theN.O. welds, the N.C. will be held open and a fault detected(See Fig. 2B).Two-Hand Control (Fig. 2A)This device conforms to the requirements of EN574 IIIC of less than 0.5 sec. of synchronous actions of two buttons. Use only pushbuttons with two direct-opening contact blocks; each contact block must have a N.O. and N.C. If four separate blocks are used, the N.O. must be assembled to the operator first, and the N.C. assembled onto it, so that if the N.O. welds, the N.C. will be held open and a fault detected (See Fig. 2B). The Attaching an Expander Relay (Fig. 4)The expander can be used with E-Stop, Gate Interlock and Two-Hand Control. Fig. 4Gate Interlock (Fig. 3)Fig. 3Attaching Auxiliary Relays (Fig. 5)The auxiliary relays must be of the "positively-guided/Direct Drive TM " style conforming to EN 50205. The auxiliary relays may be monitored by connecting N.C. contacts in series to the reset circuit.。
亿泰DCS168E交换机说明书
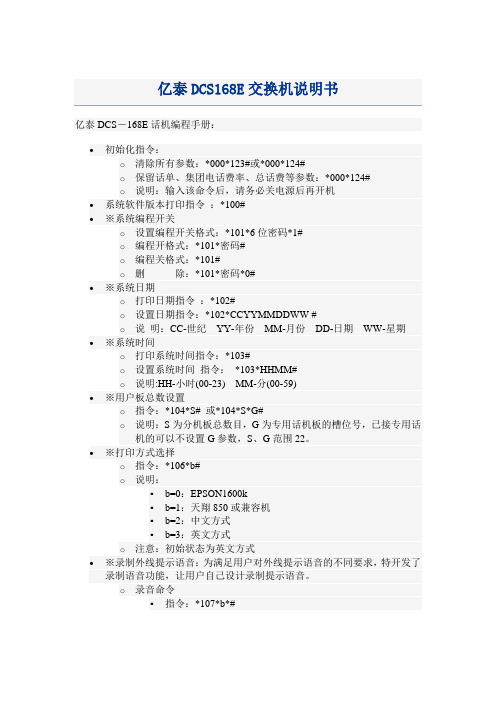
亿泰DCS-168E话机编程手册:•初始化指令:o清除所有参数:*000*123#或*000*124#o保留话单、集团电话费率、总话费等参数:*000*124#o说明:输入该命令后,请务必关电源后再开机•系统软件版本打印指令:*100#•※系统编程开关o设置编程开关格式:*101*6位密码*1#o编程开格式:*101*密码#o编程关格式:*101#o删除:*101*密码*0#•※系统日期o打印日期指令:*102#o设置日期指令:*102*CCYYMMDDWW #o说明:CC-世纪YY-年份MM-月份DD-日期WW-星期•※系统时间o打印系统时间指令:*103#o设置系统时间指令:*103*HHMM#o说明:HH-小时(00-23) MM-分(00-59)•※用户板总数设置o指令:*104*S# 或*104*S*G#o说明:S为分机板总数目,G为专用话机板的槽位号,已接专用话机的可以不设置G参数,S、G范围22。
•※打印方式选择o指令:*106*b#o说明:▪b=0:EPSON1600k▪b=1:天翔850或兼容机▪b=2:中文方式▪b=3:英文方式o注意:初始状态为英文方式•※录制外线提示语音:为满足用户对外线提示语音的不同要求,特开发了录制语音功能,让用户自己设计录制提示语音。
o录音命令▪指令:*107*b*#▪说明:总机拨入*107*b*#,听到一声短促的提示音后,用户即可通过话机录制相应时间的外线提示语音,总机挂机表示录音完毕。
录音时要求使用音质较好的话机,周围无噪声。
o※放音命令▪指令:*107*b#▪说明:本命令用于检查录音效果。
总机提机拨*107*b#,即可听到所录制的话音效果,语音放完后应立即听到忙音。
否则说明录音时总机挂机过缓,可以用下面命令调整或重新录制。
o调整命令:*107*b*a#o说明:▪a表示放音的时间,单位为0.1秒。
通过以上调整,用户可以获得较好效果的外线提示语音。
使用说明书(4)(1)
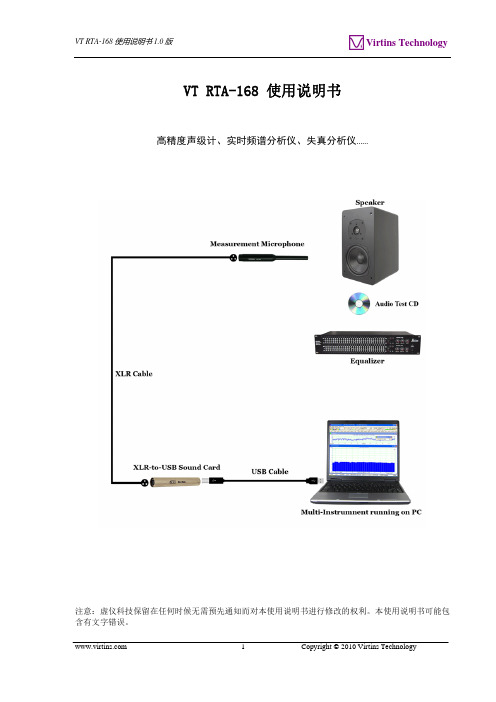
VT RTA-168 使用说明书高精度声级计、实时频谱分析仪、失真分析仪……注意:虚仪科技保留在任何时候无需预先通知而对本使用说明书进行修改的权利。
本使用说明书可能包含有文字错误。
目录1 安装及快速上手指南 (3)1.1系统组成 (3)1.2硬件连接图 (4)1.3安装硬件驱动程序 (6)1.4软件M ULTI-I NSTRUMENT的安装和配置 (6)1.4.1 安装Multi-Instrument软件 (6)1.4.2 启动Multi-Instrument软件 (6)1.4.3 配置Multi-Instrument软件 (7)1.5声级计标定参数的录入和输入增益的调节 (9)1.5.1 在Windows XP或更早的Windows版本下 (10)1.5.2 在Windows Vista下 (10)1.5.3 在Windows 7下 (11)1.5.4 通过硬件增益开关调节输入增益 (13)1.6最常用的20种测量的参数设置 (14)1.7音频测试CD音轨列表 (16)1.8操作注意事项 (18)1.9话筒频率补偿 (18)2 性能指标 (19)2.1VT RTA-168系列的硬件配置 (19)2.2VT RTA-168性能指标 (19)2.3测量话筒ECM999性能指标 (19)2.4测量话筒EMM-6性能指标 (21)2.5VT XLR-TO-USB P RE 性能指标 (22)2.6M ULTI-I NSTRUMENT软件性能指标 (24)3 MULTI-INSTRUMENT软件使用许可证信息 (28)3.1软件使用许可证类别 (28)3.2软件使用许可证升级 (29)3.3同级软件版本升级 (29)4 产品质保 (29)5 免责声明 (30)1 安装及快速上手指南1.1 系统组成一套标准的VT RTA-168系统包括以下部件:1)测量话筒及其附件(挡风罩和话筒夹子)话筒挡风罩话筒夹子2)XLR转USB声卡3)USB电缆(1.5米)4)CD(包含经加密的Multi-Instrument软件)5)USB硬匙(包含Multi-Instrument标准版软件使用许可证)6)音频测试CD(包含一系列的测试信号和噪声)7) 3.5毫米立体声电缆(1.8米)8) 黑色软质工具小包9)一对一的声压标定数据10)一对一的话筒标定数据 (仅RTA-168B提供)1.2 硬件连接图有两种连接方式,区别只在于在测量话筒与XLR转USB声卡之间采用或不采用XLR电缆来连接。
- 1、下载文档前请自行甄别文档内容的完整性,平台不提供额外的编辑、内容补充、找答案等附加服务。
- 2、"仅部分预览"的文档,不可在线预览部分如存在完整性等问题,可反馈申请退款(可完整预览的文档不适用该条件!)。
- 3、如文档侵犯您的权益,请联系客服反馈,我们会尽快为您处理(人工客服工作时间:9:00-18:30)。
上限频率
下限频率
0
100% 频率设定信号
15、 一段加速时间 10.0S
从 0Hz 到最大频率(#11)的加速时间
出厂值设定:
16、 一段减速时间 10.0S
从最大频率到 0Hz 的减速时间
最大频率
出厂值设定:
0
一段加速时间
一段减速时间
时间
19
19、转矩提升
出厂值设定:1
总共提供 21 种 V/F 特性曲线供选用。其中 0—10 适於恒转矩类
漏电保护器时可能引起其误动作,也可能引起过电流的发生。
当低载波频率运用时,则与上述现象大体相反,过低的载波频率
将引起低频运行不稳,转矩减低甚至振荡的出现。
不同的电机对载波频率的反应也不相同。最佳的载波频率也需按
实际情况进行调节而获得。但随着电机容量的增大,载波频率应该选
得较小。
本公司保留最大载波频率限制的权利。
输出电压 100% Un
50% Un
FBASE 输出频率(Hz) 其中 Un 为:电机额定电压(#55)
寸动减速时间
时间
※ 端子寸动指令具有优先指令权。即在任何调速方式下,一旦寸动指令 有效时,立即以当前调速方式下的加减速时间由当前运行频率加减速
到寸动频率。
21
直流制动
24、停止时直流制动起始频率
出厂值设定:0.0Hz
变频器减速到此频率时,停止输出 PWM 波形,开始输出直流制
动波形。
25、直流制动电压
载波频率
电磁噪声 杂讯、漏电流 开关损耗
2KHz
大
小
小
8KHz
16KHz
小
大
大
24
52、加减速模式
出厂值设定:1
0:直线型 1:双 S 型 2:单 S 型
3:倒 L 型 本变频器提供 4 种(直线型、双 S 型、S 型、倒 L 型)加减速模式, 以满足不同机械的使用需要
输出频率 Fmax
②
①
①
②
一段加速时间
此共振频率
最多可设置 3 个共振频率点执行跳跃
跳跃频率范围是以跳跃频率为基准向上和向下跳过的频率范围
例: 跳跃频率 1: 40.0Hz
跳跃范围: 3.0HZ 运行如下图
跳跃频率
输出频率
跳跃频率范围
43
40
37
频率设定信号
辅助参数
50、载波频率范围
出厂值设定:8.0KHz
此功能主要用於改善变频器运转中可能出现的噪声及振动现象。
0.0 0.0 0.0 2.0
参见页
23 23 23 23
辅助参数
序号
功能描述
50 载波频率范围
51 保留
52 加减速模式
53 保留 54 输出电压 55 电机额定电压 56 变频器额定输出电流 57 电机转速比率因子
58 模拟输入选择
运转保护控制
序号
功能描述
59 反转禁止
设定值范围及定义
2.0-16.0KHz
JOG
2X 输出频率
Fmax
ON ON
ON 2X
JOGF
Jat
at2
dt2
二段速度加、减速时间定义
跳跃频率
46、跳跃频率 1 47、跳跃频率 2
出厂值设定:0.0Hz 出厂值设定:0.0Hz
23
48、跳跃频率 3 49、跳跃频率范围
出厂值设定:0.0Hz 出厂值设定:2.0Hz
运转中要避免机械系统固有振动点所致共振时,可使用跳频方式跳过
12、 基频频率
50.0Hz
对应不同基频的电机选用此功能
13、 上限频率
60.0Hz
输出频率的上限
14、 下限频率
18
出厂值设定: 出厂值设定: 出厂值设定: 出厂值设定:
0.5Hz
输出频率的下限 当频率设定指令高於上限时,运转频率为上限频率;当频率设
定指令低於下限频率时,运转频率为下限频率。启动处於停止状态 的电机时,变频器输出从 0Hz 开始按照一段加速时间向着设定的频 率加速。停止电机时,从设定的频率开始按照减速时间向 0Hz 作减 速。
0.0-10.0%
26 停止时直流制动时间
0.0-10.0Sec
出厂值
0.0 5.0% 0.5
参见页
22 22 22
二段速度
序号
功能描述
27 28 29-3 3 34 35
保留 二段速度设定 2X
保留
二段加速时间 at2 二段减速时间 dt2
设定值范围及定义 出厂值 参见页
0.5-400Hz
30.0
例:模拟输入+键盘运行 频率指令由外接键盘电位器控制,运行由外接键盘控制 (#10=4,#58=1)(键盘选择 1:OFF,2:ON)
※ 空载运行、调速检查
NFB
MCC
HZ
TRIP
SEC
%
FUN
RUN STOP
PRG ENT
FREQUENCY INVERTER REMOTE CONTROLLER
※ 确认最低与最高输出频率设定。 ※ 寸动控制检查。 ※ 确认加减速时间。 ※ 接上电机。 ※ 以低速运转并检查电机的运转方向。 ※ 检查所有操作过程中的显示及输出是否正确。
出厂值 参见页
8.0
24
0:直线型 1:双 S 型
1
25
2:单 S 型 3:倒 L 型
50%-100%
100
26
200-460V
380
26
1-800A
10
26
0.1-60.0
30.0
27
0:本机内置键盘电位器
1:外接键盘电位器
0
27
2-3:保留,设定无效
15
设定值范围及定义
0:不禁止 1:禁止
出厂值 参见页
0:键盘调速+键盘运行: 外接参数设定键盘中的 RUN 键控制运行 外接参数设定键盘中的 ▲、▼进行调速
※ 控制端子中的键盘选择开关 SW1 选择 R:外接键盘为 ON, D:本机键盘为 OFF。
1:二段速度+端子运行: 端子台中的 FOR、REV 与 COM 短接控制正、反转运行 外接控制端子 JOG、2X 与 COM 短接实现寸动,二段速度。
因寸动指令具有优先权,即在实现二段速度时,必须断开寸动指 令。
2:模拟输入+端子运行: 端子台中的 FOR、REV 与 COM 短接控制正、反转运行 键盘电位器进行调速
※ 功能参数#58:选择内置键盘电位器或外接键盘电位器。 3:键盘调速+端子运行
端子台中的 FOR、REV 与 COM 短接控制正、反转运行 外接参数设定键盘中的 ▲、▼进行调速 ※ 控制端子中的键盘选择开关 SW1 选择 R:外接键盘为 ON,
指示运行期间的每个状态
17
转速
设定值范围及定义
0.5-400.0HZ 0:键盘调速+键盘运行 1:二段速度+端子运行 2:模拟输入+端子运行 3:键盘调速+端子运行 4:模拟输入+键盘运行 50.0-400.0Hz 50.0-400.0Hz 0.0-400.0Hz 0.0-400.0Hz
出厂值 参见页
出厂值设定:5%
此参数设定启动及停止时送入电机直流制动电压的准位。此数值
是以变频器额定电压为基准。所以当设定此参数时,务必由小慢慢增
大。
26、停止时直流制动时间
停止时直流制动电压持续的时间。
出厂值设定:0.5Sec
输出频率
停止时制动频率
时间
直流制动电压
T 时间 制动时间 停止时直流制动
二段速度
28、二段速度设定 2X
5MIN 1MIN 2S
120 130 150 180 200 %Ia
变频器 OL 曲线
寸动参数
21、寸动频率 JOGF
出厂值设定:5.0Hz
22、寸动加速时间 Jat 2.0Sec
出厂值设定:
23、寸动减速时间 Jat 2.0Sec
寸动加减速时间定义同一段加减速时间
出厂值设定:
最大频率
寸动频率
0
寸动加速时间
68 故障查询功能
设定值范围及定义
0:无 1:进入查询状态
出厂值
0
参见页
31
*“保留”功能为软件更换系列时留用,在本系列中不起作用。
பைடு நூலகம்
第六章 功能参数说1明6
运行监视
00、输出频率
运行时,显示当前变频器输出频率
01、 设定频率
速度设定方式下所设定的频率
02、输出电流百分比
此项显示负载电流的百分比。 显示数值的计算方式为:变频器内部电流传感器检测之数值占变频 器额定输出电流的百分比。
第五章 功能参数一览表
运行监视
序号
功能描述
00 输出频率 01 设定频率 02 输出电流百分比 03 输出电流实际值 04 输入电压 05 电机转速
基本参数
序号
功能描述
01 设定频率
10 控制方式
11 最大频率 12 基频频率 13 上限频率 14 下限频率
设定值范围及定义 出厂值 参见页
05 电机
此项显示电机的线速度,显示数据关联於#57 功能(电机转速比 例因子),用户可以通过修改此参数来修正所显示的电机转速数值。
※ 以上运行监视具有记忆功能,用户可以在运行状态下通过参 数设定器中的“PRG”键选择适当的运行监视,下次上电运 行时仍然默认上次设定好的运行监视
17
基本参数
10、控制方式
出厂值设定:4
