NGSAV01.20-IPv4-SCG
CommSky 智能 AP 命令行操作手册说明书

本手册主要介绍通过命令行来配置和管理设备
1.1 CLI 方式
CLI(Command-Line-Interface,命令行界面)是指可在用户提示符下键入可执行命令的 界面,是设备与用户之间的交互界面。通过 CLI,用户可以输入命令对设备进行配置,并可 以通过查看输出的信息确认配置结果。CLI 具有使用要求低,容易使用,功能扩充方便等优 点,是登录设备的最基本的方式,适用于有一定网络基础的专业管理人员。
2 命令模式 .................................................................... 4 2.1 用户模式 .................................................................. 4 2.2 特权模式 .................................................................. 5 2.3 全局配置模式 .............................................................. 5 2.4 退出当前模式 ..............................................................5 2.5 返回用户模式 ..............................................................6
梅特勒称重使用说明书

使用说明书
本手册版权归梅特勒-托利多(常州)称重设备系统有限公司所有,未经许可不得翻 印、修改或引用! METTLER TOLEDO 为梅特勒-托利多公司的注册商标!
警告
1、请专业人员调试、检测和维修系统。 2、请保持本设备良好接地。
注意
1、严禁带电插拔。 2、请先切断电源,再进行电气设备连接,检修。
第 3 章 操作...................................................................................................................................18 3.1 显示屏..............................................................................................................................18 3.2 按键..................................................................................................................................19 3.3 菜单..................................................................................................................................20 3.3.1 快捷操作菜单与设置菜单...................................................................................20 3.3.2 菜单模式...............................................................................................................20 3.4 应用..................................................................................................................................21 3.4.1 目标值...................................................................................................................21 3.4.2 比较器...................................................................................................................21
富士通 PRIMERGY TX1320 M3塔式服务器 数据手册说明书
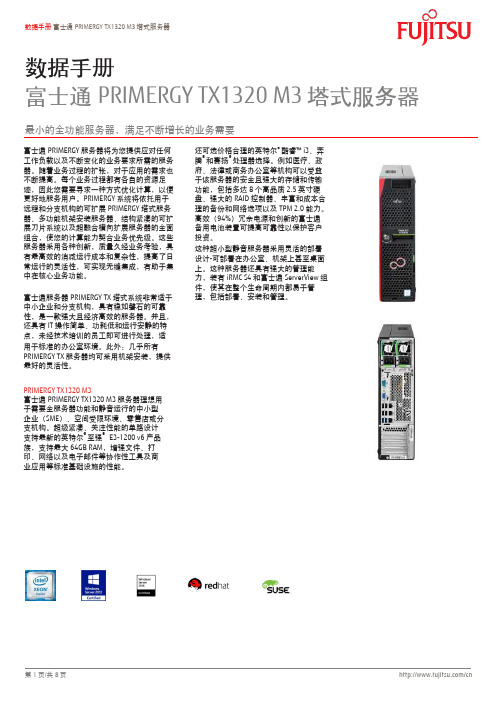
数据手册富士通PRIMERGY TX1320 M3塔式服务器最小的全功能服务器,满足不断增长的业务需要富士通PRIMERGY服务器将为您提供应对仸何工作负载以及不断变化的业务要求所需的服务器。
随着业务过程的扩张,对于应用的需求也不断提高。
每个业务过程都有各自的资源足迹,因此您需要寻求一种斱式优化计算,以便更好地服务用户。
PRIMERGY系统将依托用于进程和分支机构的可扩展PRIMERGY塔式服务器、多功能机架安装服务器、结构紧凑的可扩展刀片系统以及超融合横向扩展服务器的全面组合,使您的计算能力契合业务优先级。
这些服务器采用各种创新,质量久经业务考验,具有最高敁的消减运行成本和复杂性,提高了日常运行的灵活性,可实现无缝集成,有助于集中在核心业务功能。
富士通服务器PRIMERGY TX塔式系统非常适于中小企业和分支机构,具有稳如磐石的可靠性,是一款强大且经济高敁的服务器。
幵且,还具有IT操作简单、功耗低和运行安静的特点,未经技术培训的员工即可迚行处理,适用于标准的办公室环境。
此外:几乎所有PRIMERGY TX服务器均可采用机架安装,提供最好的灵活性。
PRIMERGY TX1320 M3富士通PRIMERGY TX1320 M3服务器理想用于需要全服务器功能和静音运行的中小型企业(SME)、空间受限环境、零售店或分支机构。
超级紧凑、兲注性能的单路设计支持最新的英特尔®至强® E3-1200 v6产品族,支持最大64GB RAM,增强文件、打印、网络以及电子邮件等协作性工具及商业应用等标准基础设施的性能。
还可选价栺合理的英特尔®酷睿™ i3、奔腾®和赛扬®处理器选择。
例如医疗、政府、法律或商务办公室等机构可以受益于该服务器的安全且强大的存储和传输功能,包括多达8个高品质2.5英寸硬盘、强大的RAID控制器、丰富和成本合理的备仹和网络选项以及TPM 2.0能力。
X20系统用户手册说明书

MSI H410M PRO 主板用户手册说明书

1ContentsContentsSafety Information ...........................................................................................2Specifications ...................................................................................................3Rear I/O Panel .................................................................................................7LAN Port LED Status Table . (7)Overview of Components (8)CPU Socket .................................................................................................................9DIMM Slots................................................................................................................10M2_1~2: M.2 Slots ...................................................................................................10PCI_E1~2: PCIe Expansion Slots ..............................................................................11SATA1~4: SATA 6Gb/s Connectors ...........................................................................11JFP1, JFP2: Front Panel Connectors .......................................................................12JAUD1: Front Audio Connector ................................................................................12ATX_PWR1, CPU_PWR1: Power Connectors ...........................................................13JUSB1: USB 2.0 Connector ......................................................................................14JUSB2: USB 3.2 Gen 1 5Gbps Connector .................................................................14CPU_FAN1, SYS_FAN1: Fan Connectors .................................................................15JTPM1: TPM Module Connector ...............................................................................15JCI1: Chassis Intrusion Connector ...........................................................................16JCOM1: Serial Port Connector .................................................................................16JBAT1: Clear CMOS (Reset BIOS) Jumper ...............................................................17EZ Debug LED ...........................................................................................................17JRGB1: RGB LED connector (H410M PRO) ..............................................................18JRAINBOW1: Addressable RGB LED connector (H410M PRO) ...............................18UEFI BIOS . (19)BIOS Setup ................................................................................................................20Entering BIOS Setup .................................................................................................20Resetting BIOS ..........................................................................................................20Updating BIOS...........................................................................................................21Installing OS, Drivers & Utilities . (22)Installing Windows ® 10..............................................................................................22Installing Drivers ......................................................................................................22Installing Utilities .. (22)Thank you for purchasing the MSI ® H410M PRO/ H410M-A PRO/ H410M PRO-VH motherboard. This User Guide gives information about board layout, component overview, BIOS setup and software installation.Safety Information∙The components included in this package are prone to damage from electrostatic discharge (ESD). Please adhere to the following instructions to ensure successful computer assembly.∙Ensure that all components are securely connected. Loose connections may cause the computer to not recognize a component or fail to start.∙Hold the motherboard by the edges to avoid touching sensitive components. ∙It is recommended to wear an electrostatic discharge (ESD) wrist strap when handling the motherboard to prevent electrostatic damage. If an ESD wrist strap is not available, discharge yourself of static electricity by touching another metal object before handling the motherboard.∙Store the motherboard in an electrostatic shielding container or on an anti-static pad whenever the motherboard is not installed.∙Before turning on the computer, ensure that there are no loose screws or metal components on the motherboard or anywhere within the computer case.∙Do not boot the computer before installation is completed. This could cause permanent damage to the components as well as injury to the user.∙If you need help during any installation step, please consult a certified computer technician.∙Always turn off the power supply and unplug the power cord from the power outlet before installing or removing any computer component.∙Keep this user guide for future reference.∙Keep this motherboard away from humidity.∙Make sure that your electrical outlet provides the same voltage as is indicated on the PSU, before connecting the PSU to the electrical outlet.∙Place the power cord such a way that people can not step on it. Do not place anything over the power cord.∙All cautions and warnings on the motherboard should be noted.∙If any of the following situations arises, get the motherboard checked by service personnel:▪Liquid has penetrated into the computer.▪The motherboard has been exposed to moisture.▪The motherboard does not work well or you can not get it work according touser guide.▪The motherboard has been dropped and damaged.▪The motherboard has obvious sign of breakage.∙Do not leave this motherboard in an environment above 60°C (140°F), it may damage the motherboard.2Safety Information3Specifications4Specifications5SpecificationsPlease refer to http:///manual/mb/DRAGONCENTER2.pdf formore details.6SpecificationsH410M-A PRO)Audio 7.1-channel ConfigurationTo configure 7.1-channel audio, you have to connect front audio I/O module to JAUD1 connector and follow the below steps.1. Click on the Realtek HD Audio Manager > Advanced Settings to open the dialog below.2. Select Mute the rear output device, when a front headphone plugged in.3. Plug your speakers to audio jacks on rear and front I/O panel. When you plug intoa device at an audio jack, a dialogue window will pop up asking you which device is current connected.7Rear I/O PanelOverview of Components* Distance from the center of the CPU to the nearest DIMM slot. 8Overview of Components9Overview of ComponentsImportant∙Always unplug the power cord from the power outlet before installing or removing the CPU.∙Please retain the CPU protective cap after installing the processor. MSI will deal with Return Merchandise Authorization (RMA) requests if only the motherboard comes with the protective cap on the CPU socket.∙When installing a CPU, always remember to install a CPU heatsink. A CPU heatsink is necessary to prevent overheating and maintain system stability.∙Confirm that the CPU heatsink has formed a tight seal with the CPU before booting your system.∙Overheating can seriously damage the CPU and motherboard. Always make sure the cooling fans work properly to protect the CPU from overheating. Be sure to apply an even layer of thermal paste (or thermal tape) between the CPU and the heatsink to enhance heat dissipation.∙Whenever the CPU is not installed, always protect the CPU socket pins by covering the socket with the plastic cap.∙If you purchased a separate CPU and heatsink/ cooler, Please refer to the docu-mentation in the heatsink/ cooler package for more details about installation.10Overview of ComponentsImportant∙Always insert memory modules in the DIMMA1 slot first.∙To ensure system stability for Dual channel mode, memory modules must be of the same type, number and density.∙Some memory modules may operate at a lower frequency than the marked value when overclocking due to the memory frequency operates dependent on its Serial Presence Detect (SPD). Go to BIOS and find the DRAM Frequency to set the memory frequency if you want to operate the memory at the marked or at a higher frequency. ∙It is recommended to use a more efficient memory cooling system for full DIMMs installation or overclocking.∙The stability and compatibility of installed memory module depend on installed CPU and devices when overclocking.∙Please refer for more information on compatible memory.M2_1~2: M.2 SlotsPlease install the M.2 device into the M.2 slot as shown below.13StandoffSupplied11Overview of Componentsunplug the power supply power cable from the power outlet. Read the expansion card’s documentation to check for any necessary additional hardware or software changes.∙If you install a large and heavy graphics card, you need to use a tool such as MSI Gaming Series Graphics Card Bolster to support its weight to prevent deformationof the slot.SATA1~4: SATA 6Gb/s ConnectorsThese connectors are SATA 6Gb/s interface ports. Each connector can connect to one SATA device.⚠Important∙Please do not fold the SATA cable at a 90-degree angle. Data loss may result during transmission otherwise.∙SATA cables have identical plugs on either sides of the cable. However, it is recommended that the flat connector be connected to the motherboard for space saving purposes.∙SATA4 will be unavailable when installing M.2 SATA SSD in the M.2 slot.JFP1, JFP2: Front Panel ConnectorsJAUD1: Front Audio Connector12Overview of ComponentsATX_PWR1, CPU_PWR1: Power ConnectorsImportantMake sure that all the power cables are securely connected to a proper ATX power supply to ensure stable operation of the motherboard.13Overview of Components14Overview of ComponentsJUSB2: USB 3.2 Gen 1 5Gbps ConnectorImportantNote that the Power and Ground pins must be connected correctly to avoid possible damage.JUSB1: USB 2.0 ConnectorImportant∙Note that the VCC and Ground pins must be connected correctly to avoid possible damage.∙In order to recharge your iPad,iPhone and iPod through USB ports, please install MSI® DRAGON CENTER utility.15Overview of ComponentsImportantYou can adjust fan speed in BIOS > Hardware Monitor.CPU_FAN1, SYS_FAN1: Fan ConnectorsPWM Mode fan connectors provide constant 12V output and adjust fan speed with speed control signal. When you plug a 3-pin (Non-PWM) fan to a fan connector in PWM mode, the fan speed will always maintain at 100%, which might create a lot ofnoise.JTPM1: TPM Module ConnectorThis connector is for TPM (Trusted Platform Module). Please refer to the TPMJCI1: Chassis Intrusion Connector(default)intrusion event Using chassis intrusion detector1. Connect the JCI1 connector to the chassis intrusion switch/ sensor on thechassis.2. Close the chassis cover.3. Go to BIOS > SETTINGS > Security > Chassis Intrusion Configuration.4. Set Chassis Intrusion to Enabled.5. Press F10 to save and exit and then press the Enter key to select Yes.6. Once the chassis cover is opened again, a warning message will be displayed onscreen when the computer is turned on.Resetting the chassis intrusion warning1. Go to BIOS > SETTINGS > Security > Chassis Intrusion Configuration.2. Set Chassis Intrusion to Reset.3. Press F10 to save and exit and then press the Enter key to select Yes. JCOM1: Serial Port Connector16Overview of ComponentsJBAT1: Clear CMOS (Reset BIOS) JumperThere is CMOS memory onboard that is external powered from a battery located on the motherboard to save system configuration data. If you want to clear the system(default)BIOSResetting BIOS to default values1. Power off the computer and unplug the power cord.2. Use a jumper cap to short JBAT1 for about 5-10 seconds.3. Remove the jumper cap from JBAT1.4. Plug the power cord and power on the computer.EZ Debug LEDThese LEDs indicate the status of the motherboard.CPU - indicates CPU is not detected or fail.DRAM - indicates DRAM is not detected or fail.VGA - indicates GPU is not detected or fail.BOOT - indicates booting device is not detected or fail.17Overview of ComponentsJRGB1: RGB LED connector (H410M PRO)Important∙The JRGB connector supports up to 2 meters continuous 5050 RGB LED strips (12V/G/R/B) with the maximum power rating of 3A (12V).∙Always turn off the power supply and unplug the power cord from the power outlet before installing or removing the RGB LED strip.∙Please use MSI’s software to control the extended LED strip. JRAINBOW1: Addressable RGB LED connector (H410M PRO)The JRAINBOW connector allows you to connect the WS2812B Individually Addressable RGB LED strips 5V.CAUTIONDo not connect the wrong type of LED strips. The JRGB connector and the JRAINBOW connector provide different voltages, and connecting the 5V LED strip to the JRGB connector will result in damage to the LED strip.⚠Important∙The JRAINBOW connector supports up to 75 LEDs WS2812B Individually Address-able RGB LED strips (5V/Data/Ground) with the maximum power rating of 3A (5V). In the case of 20% brightness, the connector supports up to 200 LEDs.∙Always turn off the power supply and unplug the power cord from the power outlet before installing or removing the RGB LED strip.∙Please use MSI’s software to control the extended LED strip.18Overview of ComponentsUEFI BIOSMSI UEFI BIOS is compatible with UEFI (Unified Extensible Firmware Interface) architecture. UEFI has many new functions and advantages that traditional BIOS cannot achieve, and it will completely replace BIOS in the future. The MSI UEFI BIOS uses UEFI as the default boot mode to take full advantage of the new chipset’s capabilities. However, it still has a CSM (Compatibility Support Module) mode to be compatible with older devices. That allows you to replace legacy devices with UEFI compatible devices during the transition.⚠ImportantThe term BIOS in this user guide refers to UEFI BIOS unless otherwise noted. UEFI advantages∙Fast booting - UEFI can directly boot the operating system and save the BIOS self-test process. And also eliminates the time to switch to CSM mode during POST.∙Supports for hard drive partitions larger than 2 TB.∙Supports more than 4 primary partitions with a GUID Partition Table (GPT).∙Supports unlimited number of partitions.∙Supports full capabilities of new devices - new devices may not provide backward compatibility.∙Supports secure startup - UEFI can check the validity of the operating system to ensure that no malware tampers with the startup process.Incompatible UEFI cases∙32-bit Windows operating system - this motherboard supports only 64-bit Windows 10 operating system.∙Older graphics card - the system will detect your graphics card. When display a warning message There is no GOP (Graphics Output protocol) support detected in this graphics card.⚠ImportantWe recommend that you to use a GOP/ UEFI compatible graphics card.How to check the BIOS mode?19UEFI BIOSBIOS SetupThe default settings offer the optimal performance for system stability in normal conditions. You should always keep the default settings to avoid possible system damage or failure booting unless you are familiar with BIOS.⚠Important∙BIOS items are continuous update for better system performance. Therefore, the description may be slightly different from the latest BIOS and should be held for reference only. You could also refer to the HELP information panel for BIOS item description.∙The BIOS items will vary with the processor. Entering BIOS SetupPress Delete key, when the Press DEL key to enter Setup Menu, F11 to enter Boot Menu message appears on the screen during the boot process.Function keyF1: General HelpF2: Add/ Remove a favorite itemF3: Enter Favorites menuF4: Enter CPU Specifications menuF5: Enter Memory-Z menuF6: Load optimized defaultsF7: Switch between Advanced mode and EZ modeF8: Load Overclocking ProfileF9: Save Overclocking ProfileF10: Save Change and Reset*F12: Take a screenshot and save it to USB flash drive (FAT/ FAT32 format only). Ctrl+F: Enter Search page* When you press F10, a confirmation window appears and it provides the modification information. Select between Yes or No to confirm your choice. Resetting BIOSYou might need to restore the default BIOS setting to solve certain problems. There are several ways to reset BIOS:∙Go to BIOS and press F6 to load optimized defaults.∙Short the Clear CMOS jumper on the motherboard.⚠ImportantPlease refer to the Clear CMOS jumper section for resetting BIOS.20UEFI BIOSUpdating BIOSUpdating BIOS with M-FLASHBefore updating:Please download the latest BIOS file that matches your motherboard model from MSI website. And then save the BIOS file into the USB flash drive.Updating BIOS:1. Insert the USB flash drive that contains the update file into the USB port.2. Please refer the following methods to enter flash mode.▪Reboot and press Ctrl + F5 key during POST and click on Yes to reboot the system.▪Reboot and press Del key during POST to enter BIOS. Click the M-FLASH button and click on Yes to reboot the system.3. Select a BIOS file to perform the BIOS update process.4. When prompted click on Yes to start recovering BIOS.5. After the flashing process is 100% completed, the system will reboot automatically.Updating the BIOS with Dragon CenterBefore updating:Make sure the LAN driver is already installed and the internet connection is set properly.Updating BIOS:1. Install and launch MSI DRAGON CENTER and go to Support page.2. Select Live Update and click on Advance button.3. Click on Scan button to search the latest BIOS file.4. Select the BIOS file and click on Download icon to download and install the latest BIOS file.5. Click Next and choose In Windows mode. And then click Next and Start to start updating BIOS.6. After the flashing process is 100% completed, the system will restart automatically.21UEFI BIOSInstalling OS, Drivers & UtilitiesPlease download and update the latest utilities and drivers at Installing Windows® 101. Power on the computer.2. Insert the Windows® 10 installation disc/USB into your computer.3. Press the Restart button on the computer case.4. Press F11 key during the computer POST (Power-On Self Test) to get into BootMenu.5. Select the Windows® 10 installation disc/USB from the Boot Menu.6. Press any key when screen shows Press any key to boot from CD or DVD...message.7. Follow the instructions on the screen to install Windows® 10. Installing Drivers1. Start up your computer in Windows® 10.2. Insert MSI® Driver Disc into your optical drive.3. Click the Select to choose what happens with this disc pop-up notification,then select Run DVDSetup.exe to open the installer. If you turn off the AutoPlayfeature from the Windows Control Panel, you can still manually execute theDVDSetup.exe from the root path of the MSI Driver Disc.4. The installer will find and list all necessary drivers in the Drivers/Software tab.5. Click the Install button in the lower-right corner of the window.6. The drivers installation will then be in progress, after it has finished it will promptyou to restart.7. Click OK button to finish.8. Restart your computer.Installing UtilitiesBefore you install utilities, you must complete drivers installation.1. Open the installer as described above.2. Click the Utilities tab.3. Select the utilities you want to install.4. Click the Install button in the lower-right corner of the window.5. The utilities installation will then be in progress, after it has finished it willprompt you to restart.6. Click OK button to finish.7. Restart your computer.22Installing OS, Drivers & Utilities。
MLC 9000+ 说明书

保修
我们可以担保这些产品在出厂之前,在材料和工艺方面无任何功能缺陷,并且可以担保此类 产品在三年内符合相关说明手册资料中所提到的技术规范。 除此处及上述所提及的保修条例外,无任何其他明示或暗示保修。WEST 不会因任何特殊原 因对该产品的适销性和适用性做任何担保。
限制
对于任何意外损坏、后续损坏、特殊损坏或任何其他损坏,或者除上述所提及的任何维修或 更换之外的成本或费用,供应商概不承担责任。用户必须按照说明安装和维护产品。对于因 腐蚀性而造成的产品损坏,供应商没有保修责任。用户自己对于这些产品与其应用程序的适 用性负责。对于一个有效的保修声明,产品在保修期内进行返修必须向供应商支付运费。产 品必须进行适当包装,以免在运输过程中因静电放电或其他形式的危害导致产品受损。
MLC 9000+ 用户指南
MLC 9000+ 用户指南
59371-1
价格:
£11.00 €15.00 $15.00
ii
59327,第 1 期 – 2003 年 5 月 4 日
本安装、接线和操作手册中的信息可能会有所变动,恕不另行通知。 Copyright © 2004 年 5 月,Danaher ICG,保留所有权利。未经厂商书面许可,不得以任何 形式或通过任何方式在检索系统中复制、传播、改写或存储本出版物的任何部分,或者将本 出版物的任何部分翻译成任何其他语言。 注意:
ii
59327,第 1 期 – 2003 年 5 月 4 日
MLC 9000+ 用户指南
目录
目录
1 2 MLC 9000+ 系统概述 ................................................................................
博世 D7212 使用说明书
Control PanelD7212Release Notes for Version 7.00March 20071.0 IntroductionAlthough the D7212 (expanded version) Control Panel is no longer manufactured (replaced by the D7212G), Firmware Update Kits (P/N: D7299-0700) are available for this product. Refer to theD9412G/D7412G Program Entry Guide (P/N: 47775D or later) when programming a D7212 Control Panel.2.0 RequirementsTable 1: Handlers Supported for Version 6.90and LaterHandler Version Changes 9000MAIN 1.15∗No changes since version 6.30RADXUSR1 1.06∗Updated to support GV2 Series Control PanelsRADXPNTS 1.08∗Updated to support GV2 Series Control PanelsRADXSKED 1.04∗Updated to support GV2 Series Control PanelsRADXAUX1 1.07∗Updated to not support GV2 Series Control Panels∗Newer versions are available but are not required for the D7212 Control Panel.For handlers with new prompts, refer to theD9412G/D7412G Program Entry Guide (P/N: 47775D or later).To acquire an update for your D5200 Programmer, call the Bosch Security Systems Handler Update System toll-free at (800) 657-4584. Make a separate call for each handler.3.0 Version 7.00 Release NotesCorrection in Version 7.00Changes allow RPS workstations located on a private network behind a router or firewall to communicate with control panels outside of that network. No special router or firewall settings are required. The control panels support Port Address Translation (PAT) for networks that require it.4.0 Previous Version 6.90 ReleaseNotes4.1 Corrections in Version 6.90Enhanced Communication TroubleWhen a Route Group is configured with an IP destination in the primary path and a telephone number in the backup path, a break in the Network Link Integrity annunciates locally.When an Enhanced Communication Troublecondition occurs, it generates a system-wide trouble message (COMM TRBL SDI ##). The new troubleD7212The trouble condition is also sent through a backup path to the central station as Communication Trouble SDI ##, using the same virtual address numbers as the trouble messages. The communication trouble event also creates new Modem IIIa 2 messages that thecentral station might need to add to their automation software. Refer to Events 157 to 160 in the D6600 Computer Interface Manual (P/N: 4998122703) for the details of central station data changes. Unsupported Point TypePreviously, if the value of 11 was used with RADXPNTS version 1.06 or later when configuring the Point Index parameters, the control panel might not operate as expected. This condition is corrected so that the control panel responds to a P# Type value of 11 as a disabled point.5.0 Previous Version6.80 ReleaseNotes5.1Corrections in Version 6.805.1.1Local Event ReportingSeveral changes in this release prevent the controlpanel from sending local alarm events intermittently to the central stations. All local alarm events now remain local. 5.1.2Ethernet Link IntegrityFor UL 1610 Line Security (formerly Grade AA) Intrusion System installations and for UL 864 Commercial Fire installations, use the parametersshown in Table 2 when configuring the Heartbeat Poll. For additional details, refer to Programming PathNumbers and IP Addresses for Enhanced Communications in the D9412G/D7412G Program Entry GuideTable 2: Parameters for Heartbeat PollConfiguration in Version 6.801Number of IP Paths Poll Rate (sec) ACK Wait Time (sec)Number of Retries1 30 62 to 19 1 30 8 2 to 12 1 30 10 2 to 8 1 30 12 2 to 5 1 30 14 2 to3 1 60 6 2 to 14 1 60 8 2 to 8 1 60 10 2 to5 1 60 12 2 1 752 102 32 1 906 2 to 9 1 90 8 2 to 4 1 90 10 2 1 120 6 2 to 4 1 145 522 752 82 323 752 62 324 75252321 The parameters in this table are for Version 6.80 only . 2Recommended settings for the corresponding number of IP paths.5.2 Enhancements in Version6.80Summary Fire Relay SustainWhen the Silent Alarm Relay for Area 2 isprogrammed with 24, the Summary Fire Alarm Relay remains active until all Fire Alarms are cleared from the keypad display. The default operation is consistent with the Summary Fire Relay operation in Version 6.60 and older. This feature provides a method of maintaining fire strobes after the alarm bells are silenced.5.3 Known Issue in Version6.80When a Route Group is configured with an IP destination in the primary path and a telephone number in the backup path, a break in the Network Link Integrity does not annunciate locally.D72126.0 Previous Version 6.70 ReleaseNotesEnhancement in Version 6.70Arming Scope RestrictionsWhen the Silent Alarm Relay for Area 3 isprogrammed with 59, some prompts in the FunctionTable 3: Arming Scope RestrictionsMenu Function Function NumberDisabled Prompt Disarm Menu 1 DISARM ALL?Master Arm Delay 2 MASTER ARM ALL? Master Arm Instant3ARM INSTANT ALL?7.0Previous Version 6.60 Release Notes7.1Corrections in Version 6.60The changes made to the version 6.60 firmware affect only control panels with the ground fault detection circuit: the G-model control panels. Because the D7212 Control Panel does not have the ground fault detection circuit, this firmware upgrade does not change the control panel’s function.7.2Known Issues in Version 6.60•When a faulted local point is force armed, the central station should receive a Forced Close report for that point. The control panel does not send Forced Close reports for faulted local points. •If a local and a non-local point are faulted and force armed, the control panel does not send Forced Armed, Forced Point, or Forced Close Reports for the non-local point. A point is a local point if configured as follows: • Local While Armed : Yes •Local While Disarmed : Yes8.0 Previous Version 6.50 ReleaseNotesCorrections in Version 6.50Intermittent RF Low Battery eventsIn versions 6.30 and 6.40, Points 1 through 8 generate intermittent RF Low Battery events when devices connected to the on-board points change very quickly from normal to off-normal conditions. Firmware version 6.50 corrects this issue.When an RF Low Battery condition occurs on atransmitter, RF Low Battery appears on the D1255 or D1260 Keypad’s display. To determine whichtransmitter has the low battery condition, select one of the following: •View Log? function from the Service Menu (99 + ENT) on the keyboard, or•Diagnostics function, using the D8125INV. Refer to the D8125INV Operation and Installation Guide (P/N: 49690) for details.If the event is transmitted to the central station, the point number is included in the transmission.D72129.0 Previous Version 6.40 ReleaseNotes9.1Enhancements in Version 6.40Enabling the D1260 in a D7212 Control Panel 1. To enable D1260 Keypads, set the commandcenter menu item to Yes for the command center addresses where the D1260s reside.• In the Command Center Assignments section, the prompt is CC#EnhanceCmdCtr . •In the COMMAND CENTER (9000MAIN) section in RPS, the prompt is EnhancedCommand Center .Figure 1: Enhanced Command Center Prompt inRPS2. When power is applied, each D1260 checks thefirmware revision number that resides in the control panel. For each D1260 to work, theDisplay Revision (Command 59) must be enabled and not passcode protected. Refer to Figure 2 on page 4.•In the D5200, this function is located at: 9000MAIN USER INTERFACE Cmd Center FunctionsDisplay Rev •In RPS (Figure 2), this function is located at: USER INTERFACE Command Center FunctionsFigure 2: Enable Display Revision Prompt in RPS3. Before exiting RPS, reset the control panel aftercompleting an RPS programming session:A.Click the Reset Panel checkbox B. Click OK .Refer to Figure 3.Figure 3: End Session Dialog BoxFigure 4: Keypad DisplayD72129.2Corrections in Version 6.40Duplicate Events Do Not Report under Comm Fail ConditionsVersion 6.40 corrects the following problem:When a Comm Fail condition occurs in Route Group 1, Route Group 2, or both, D7212 does not send duplicate events to Route Groups 3 and 4 whenduplicate events are programmed for Route Groups 2, 3, 4, or all groups.Support for D1260 Not in Version 6.30 as Stated in LiteratureThe D9412G/D7412G Program Entry Guide(P/N: 47775D) and the D7212 Release Notes for v6.30 (P/N: 34699N) state incorrectly that Alpha V Command Center (keypad) support is available in version 6.30.Only version 6.40 or higher can support the D1260 Alpha V Command Center (keypad) Watchdog Reset EventsVersion 6.40 corrects Watchdog Reset eventsgenerated when a SKED is used to arm a disabled area or a Closing Window and Auto Close prompt is set to Yes (in Area Wide Open/Close ). BFSK FormatBefore version 6.40, the control panel did not send Burglary Restoral reports when using the BFSK communication format. Version 6.40 corrects this issue.Fail to Execute EventsBefore version 6.40, Fail To Execute events incorrectly identified the serial device interface (SDI) device associated with the event. Version 6.40 corrects this issue.Programming Point Indexes for Points 240 – 247 In version 6.30 for the D7412G and D7212 Control Panels, if you use a D5200 to assign point Points 240 through 247, the control panel ignores these points and mistakenly shows missing conditions. Version 6.40 corrects this issue.9.3Known Issues in Version 6.40Disconnecting Battery during Walk Test Causes D1260 to Stop RespondingWhen the control panel’s battery is disconnected and then reconnected during a Walk Test, the D1260 stops responding and displays Retrieving panel info . The control panel must be restarted to clear the keypad.Areas Armed to “All on instant” Do Not Show Area Text in D1260 View Area StatusWhen arming areas to All on Instant, area text does not appear when using the View Area Status menu function on the D1260. BFSK FormatSupervisory and Fire Supervisory events cannot be29.4 Programming TipsNetCom CommunicationsIn applications where both the primary and backup paths are programmed to send an IP address, the Path # Poll Rate value for the backup IP address should be set to 0. In the D9412G/D7412G Program Entry Guide (P/N: 47775), refer to: •Routing and Enhanced Routing for information about primary and backup paths.•Enhanced Communications in the RADXAUX1Handler section for information about Path # Poll Rate .D7212NotesD7212 NotesD7212© 2007 Bosch Security Systems, Inc.130 Perinton Parkway, Fairport, NY 14450-9199 USACustomer Service: (800) 289-0096; Technical Support: (888) 886-6189 F01U034872-02Release Notes for Version 7.003/07D7212Page 8 of 8。
Motorola 3.5 kHz 产品说明书
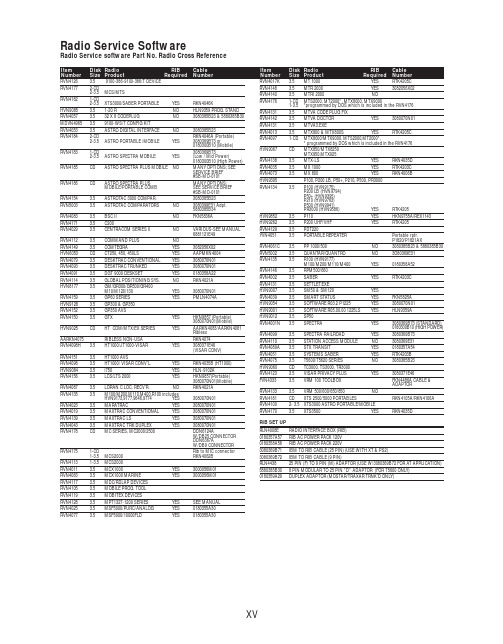
RVN4126 3.59100-386-9100-386/T DEVICERVN41772-CD2-3.5MCS/MTSRVN41821-CD2-3.5XTS3000/SABER PORTABLE YES RKN4046KHVN9085 3.51-20 R NO HLN9359 PROG. STAND RVN4057 3.532 X 8 CODEPLUG NO3080385B23 & 5880385B30 MDVN4965 3.59100-WS/T CONFIG KITRVN4053 3.5ASTRO DIGITAL INTERFACE NO3080385B23RVN41842-CD RKN4046A (Portable) 2-3.5ASTRO PORTABLE /MOBILE YES3080369B73 or0180300B10 (Mobile) RVN41831-CD3080369B732-3.5ASTRO SPECTRA MOBILE YES(Low / Mid Power)0180300B10 (High Power) RVN4185CD ASTRO SPECTRA PLUS MOBILE NO MANY OPTIONS; SEESERVICE BRIEF#SB-MO-0101RVN4186CD ASTRO SPECTRA PLUS MANY OPTIONS;MOBILE/PORTABLE COMB SEE SERVICE BRIEF#SB-MO-0101RVN4154 3.5ASTROTAC 3000 COMPAR.3080385B23RVN5003 3.5ASTROTAC COMPARATORS NO3080399E31 Adpt.5880385B34RVN4083 3.5BSC II NO FKN5836ARVN4171 3.5C200RVN4029 3.5CENTRACOM SERIES II NO VARIOUS-SEE MANUAL6881121E49RVN4112 3.5COMMAND PLUS NORVN4149 3.5COMTEGRA YES3082056X02HVN6053CD CT250, 450, 450LS YES AAPMKN4004RVN4079 3.5DESKTRAC CONVENTIONAL YES3080070N01RVN4093 3.5DESKTRAC TRUNKED YES3080070N01RVN4091 3.5DGT 9000 DESKSET YES0180358A22RVN4114 3.5GLOBAL POSITIONING SYS.NO RKN4021AHVN8177 3.5GM/GR300/GR500/GR400M10/M120/130YES3080070N01RVN4159 3.5GP60 SERIES YES PMLN4074AHVN9128 3.5GP300 & GP350RVN4152 3.5GP350 AVSRVN4150 3.5GTX YES HKN9857 (Portable)3080070N01(Mobile) HVN9025CD HT CDM/MTX/EX SERIES YES AARKN4083/AARKN4081RiblessAARKN4075RIBLESS NON-USA RKN4074RVN4098H 3.5HT1000/JT1000-VISAR YES3080371E46(VISAR CONV)RVN4151 3.5HT1000 AVSRVN4098 3.5HT1000/ VISAR CONV’L.YES RKN4035B (HT1000) HVN9084 3.5i750YES HLN-9102ARVN4156 3.5LCS/LTS 2000YES HKN9857(Portable)3080070N01(Mobile) RVN4087 3.5LORAN C LOC. RECV’R.NO RKN4021ARVN4135 3.5M100/M200,M110,M400,R100 includesHVN9173,9177,9646,9774YES3080070N01RVN4023 3.5MARATRAC YES3080070N01RVN4019 3.5MAXTRAC CONVENTIONAL YES3080070N01RVN4139 3.5MAXTRAC LS YES3080070N01RVN4043 3.5MAXTRAC TRK DUPLEX YES3080070N01RVN4178CD MC SERIES, MC2000/2500DDN6124AW/DB25 CONNECTORDDN6367AW/DB9 CONNECTOR RVN41751-CD Rib to MIC connector 1-3.5MCS2000 RKN4062BRVN41131-3.5MCS2000RVN4011 3.5MCX1000YES3000056M01RVN4063 3.5MCX1000 MARINE YES3000056M01RVN4117 3.5MDC/RDLAP DEVICESRVN4105 3.5MOBILE PROG. TOOLRVN4119 3.5MOBITEX DEVICESRVN4128 3.5MPT1327-1200 SERIES YES SEE MANUALRVN4025 3.5MSF5000/PURC/ANALOG YES0180355A30RVN4077 3.5MSF5000/10000FLD YES0180355A30RVN4017K 3.5MT 1000YES RTK4205CRVN4148 3.5MTR 2000YES3082056X02RVN4140 3.5MTRI 2000NORVN41761-CD MTS2000, MT2000*, MTX8000, MTX90001-3.5*programmed by DOS which is included in the RVN4176RVN4131 3.5MTVA CODE PLUG FIXRVN4142 3.5MTVA DOCTOR YES3080070N01RVN4131 3.5MTVA3.EXERVN4013 3.5MTX800 & MTX800S YES RTK4205CRVN4097 1-CD MTX8000/MTX9000,MTS2000,MT2000*,* programmed by DOS which is included in the RVN4176HVN9067CD MTX850/MTX8250MTX950,MTX925RVN4138 3.5MTX-LS YES RKN4035DRVN4035 3.5MX 1000YES RTK4203CRVN4073 3.5MX 800YES RKN4006BHVN9395 P100, P200 LB, P50+, P210, P500, PR3000RVN4134 3.5P100 (HVN9175)P200 LB (HVN9794)P50+ (HVN9395)P210 (HVN9763)P500 (HVN9941)PR3000 (HVN9586)YES RTK4205HVN9852 3.5P110YES HKN9755A/REX1143 HVN9262 3.5P200 UHF/VHF YES RTK4205RVN4129 3.5PDT220YVN4051 3.5PORTABLE REPEATER Portable rptr.P1820/P1821AXRVN4061C 3.5PP 1000/500NO3080385B23 & 5880385B30 RVN5002 3.5QUANTAR/QUANTRO NO3O80369E31RVN4135 3.5R100 (HVN9177)M100/M200/M110/M400YES0180358A52RVN4146 3.5RPM500/660RVN4002 3.5SABER YES RTK4203CRVN4131 3.5SETTLET.EXEHVN9007 3.5SM50 & SM120YESRVN4039 3.5SMART STATUS YES FKN5825AHVN9054 3.5SOFTWARE R03.2 P1225YES3080070N01HVN9001 3.5SOFTWARE R05.00.00 1225LS YES HLN9359AHVN9012 3.5SP50RVN4001N 3.5SPECTRA YES3080369B73 (STANDARD)0180300B10 (HIGH POWER) RVN4099 3.5SPECTRA RAILROAD YES3080369B73RVN4110 3.5STATION ACCESS MODULE NO3080369E31RVN4089A 3.5STX TRANSIT YES0180357A54RVN4051 3.5SYSTEMS SABER YES RTK4203BRVN4075 3.5T5600/T5620 SERIES NO3080385B23HVN9060CD TC3000, TS3000, TR3000RVN4123 3.5VISAR PRIVACY PLUS YES3080371E46FVN4333 3.5VRM 100 TOOLBOX FKN4486A CABLE &ADAPTORRVN4133 3.5VRM 500/600/650/850NORVN4181CD XTS 2500/5000 PORTABLES RKN4105A/RKN4106A RVN41002- 3.5XTS3000 ASTRO PORTABLE/MOBILERVN4170 3.5XTS3500YES RKN4035DRIB SET UPRLN4008E RADIO INTERFACE BOX (RIB)0180357A57RIB AC POWER PACK 120V0180358A56RIB AC POWER PACK 220V3080369B71IBM TO RIB CABLE (25 PIN) (USE WITH XT & PS2)3080369B72IBM TO RIB CABLE (9 PIN)RLN443825 PIN (F) TO 9 PIN (M) ADAPTOR (USE W/3080369B72 FOR AT APPLICATION) 5880385B308 PIN MODULAR TO 25 PIN ”D” ADAPTOR (FOR T5600 ONLY)0180359A29DUPLEX ADAPTOR (MOSTAR/TRAXAR TRNK’D ONLY)Item Disk Radio RIB Cable Number Size Product Required Number Item Disk Radio RIB Cable Number Size Product Required NumberUtilizing your personal computer, Radio Service Software (RSS)/Customer Programming Software (CPS)/CustomerConfiguration Software (CCS) enables you to add or reprogram features/parameters as your requirements change. RSS/CPS/CCS is compatible with IBM XT, AT, PS/2 models 30, 50, 60 and 80.Requires 640K RAM. DOS 3.1 or later. Consult the RSS users guide for the computer configuration and DOS requirements. (ForHT1000, MT/MTS2000, MTX838/8000/9000, Visar and some newer products —IBM model 386, 4 MEG RAM and DOS 5.0 or higher are recommended.) A Radio Interface Box (RIB) may be required as well as the appropriate cables. The RIB and cables must be ordered separately.Licensing:A license is required before a software (RVN) order is placed. The software license is site specific (customer number and ultimate destination tag). All sites/locations must purchase their own software.Be sure to place subsequent orders using the original customer number and ship-to-tag or other licensed sites; ordering software without a licensed customer number and ultimate tag may result in unnecessary delays. To obtain a no charge license agreement kit, order RPX4719. To place an order in the U.S. call 1-800-422-4210. Outside the U.S., FAX 847-576-3023.Subscription Program:The purchase of Radio ServiceSoftware/Customer Programming/Customer ConfigurationSoftware (RVN & HVN kits) entitles the buyer/subscriber to three years of free upgrades. At the end of these three years, the sub-scriber must purchase the same Radio Service Software kit to receive an additional three years of free upgrades. If the sub-scriber does not elect to purchase the same Radio Service Software kit, no upgrades will be sent. Annually a subscription status report is mailed to inform subscribers of the RSS/CPS/CCS items on our database and their expiration dates.Notes:1)A subscription service is offered on “RVN”-Radio Service Software/Customer Programming/Customer Configuration Software kits only.2)“RVN” software must only be procured through Radio Products and Services Division (RPSD). Software not procured through the RPSD will not be recorded on the subscription database; upgrades will not be mailed.3)Upgrades are mailed to the original buyer (customer number & ultimate tag).4)SP software is available through the radio product groups.The Motorola General Radio Service Software Agreement is now available on Motorola Online. If you need assistance please feel free to submit a “Contact Us” or call 800-422-4210.SMART RIB SET UPRLN1015D SMART RIB0180302E27 AC POWER PACK 120V 2580373E86 AC POWER PACK 220V3080390B49SMARTRIB CABLE (9 PIN (F) TO 9 PIN (M) (USE WITH AT)3080390B48SMARTRIB CABLE (25 PIN (F) TO 9 PIN (M) (USE WITH XT)RLN4488ASMART RIB BATTERY PACKWIRELESS DATA GROUP PRODUTS SOFTWARERVN4126 3.59100-386/9100T DEVICES MDVN4965 3.59100-WS/T CONFIG’TN RVN41173.5MDC/RDLAP DEVICESPAGING PRODUCTS MANUALS6881011B54 3.5ADVISOR6881029B90 3.5ADVISOR ELITE 6881023B20 3.5ADVISOR GOLD 6881020B35 3.5ADVISOR PRO FLX 6881032B30 3.5BR8506881032B30 3.5LS3506881032B30 3.5LS5506881032B30 3.5LS7506881033B10 3.5LS9506881035B20 3.5MINITOR III8262947A15 3.5PAGEWRITER 20008262947A15 3.5PAGEWRITER 2000X 6881028B10 3.5TALKABOUT T3406881029B35 3.5TIMEPORT P7308262947A15 3.5TIMEPORT P930NLN3548BUNIVERSAL INTERFACE KITItem Disk Radio NumberSize Product。
创动科技 M1 系列伺服驱动器产品说明书

6.3 伺服保修流程......................................................................................................................42 深圳创动科技有限公司维修品清单............................................................................................. 43
6.1 产品保修总则......................................................................................................................42 6.2 伺服保修时间......................................................................................................................42
3.产品安装与配线........................................................................................................................... 8
3.1 产品尺寸与安装...................................................................................................................8 3.1.1 驱动器尺寸与安装........................................................................................................8 3.1.2 电机尺寸与安装............................................................................................................9
斑马技术公司DS8108数字扫描仪产品参考指南说明书

VMware常用产品价格表-201102

产品编号 产品描述
vCenter Server
VCS-FND-C VMware vCenter Server 4 Foundation for vSphere up to 3 hosts SNS is Required VC4 基础版 Basic Support/Subscription for vCenter Server 4 Foundation for vSphere for 1 year. 1年基本服务 Technical Support, 12 Hours/Day, per published Business Hours, Mon. thru Fri. Production Support/Subscription for vCenter Server 4 Foundation for vSphere for 1 year. 1年生产服务 Technical Support, 24 Hour Sev 1 Support -- 7 days a week. VMware vCenter Server 4 Standard for vSphere (Includes Orchestrator and Linked Mode) SNS is Required VC4 标准版 Basic Support/Subscription for vCenter Server 4 Standard for 1 year. 1年基本服务 Technical Support, 12 Hours/Day, per published Business Hours, Mon. thru Fri. Production Support/Subscription for vCenter Server 4 Standard for 1 year. 1年生产服务 Technical Support, 24 Hour Sev 1 Support -- 7 days a week.
Sophos XG Firewall Virtual Appliance KVM 启动指南说明书

ContentsIntroduction (1)Installation procedure (2)Configuring XG Firewall (7)Activation and Registration (7)Basic Configuration (7)Legal notices (11)Sophos XG Firewall Virtual Appliance KVM1 IntroductionThe Getting Started Guide describes how to download and deploy Sophos XG Firewall Virtual Appliance on KVM.Base ConfigurationIf the following minimum server requirements are not met, XG Firewall will go into failsafe mode:1.One vCPU2. 2 GB vRAM3. 2 vNIC4.Primary Disk: Minimum 4 GB5.Auxiliary Disk: Minimum 80 GBNoteSFOS 17 supports hard drives with a maximum of 512 GB.NoteFor optimal XG Firewall performance, configure vCPU and vRAM according to the license youhave purchased. Do not exceed the maximum number of vCPUs specified in the license.Prerequisites1.Make sure you have an x86 machine running a recent Linux kernel on an Intel processor with VT(virtualization technology) extensions, or an AMD processor with SVM extensions (also called AMDV).e commands given below to check if your CPU supports Intel VT or AMD-V:•For Intel VT: grep --color vmx /proc/cpuinfo.•For AMD-V: grep --color svm /proc/cpuinfo.3.Install Virtual Machine Manager (virt-manager), a desktop Graphical User Interface (GUI)application for managing Kernel Based Virtual Machines.For more information, refer to the FAQ section on KVM website /page/FAQ.Sophos XG Firewall Virtual Appliance KVM2 Installation procedure1.Download and Extract QCOW2 Disks. Download the .zip file containing the QCOW2 disk fromhttps:///en-us/products/next-gen-firewall/free-trial.aspx and save to yourmachine.2.Add QEMU/KVM connection Open Virt-manager. Go to File > Add Connection.3.Start KVM and create new virtual machine.It opens New Virtual Machine Wizard.4.Browse to locate the primary disk. Select location of the .qcow2 file for XG Firewall. Click Open.5.Import the primary disk. Browse to the location of Primary disk. Click Forward.Sophos XG Firewall Virtual Appliance KVM6.Choose virtual memory and CPU for the appliance. Select vRAM as 2048 MB (recommended) orhigher and CPU as 1. Click Forward.7.Choose the Advanced options for more settings.a)Select the options as shown in the image below.Sophos XG Firewall Virtual Appliance KVMb)Select Customize configuration before install and click Finish.You will be redirected to the Customization configuration screen as shown in the step 8 below.8.Configure advanced settings for primary disk.a)In Disk 1, click Advanced options and set the following:Disk bus: VirtioStorage format: qcow29.Add auxiliary disk.a)Go to Add Hardware > Storage.b)Click Select managed or other existing storage and browse to add the auxiliary disk.Sophos XG Firewall Virtual Appliance KVMc)Click Finish.You will be redirected to the Customize configuration screen.10.Configure network settings for the appliance.a)Go to Add Hardware > Network.b)Configure as shown in the image below.c)Click Finish.You will be redirected to the Customize configuration screen.11.Configure network interface card.a)In Customize configuration screen, set the following for Virtual Network Interface (NIC 1):Device model: Hypervisor defaultb)In Customize configuration screen, set the following for Virtual Network Interface (NIC 2):Sophos XG Firewall Virtual Appliance KVMDevice model: Virtio12.After configuring all options, click Begin Installation to start the installation.Sophos XG Firewall has been installed on your virtual machine.To continue to the Main Menu, enter the administrator password ‘admin'.13.Accept EULA.Sophos XG Firewall Virtual Appliance KVM3 Configuring XG Firewall1.Browse to "https://172.16.16.16" from the management computer.2.Click Start to begin the wizard and follow the on-screen instructions.NoteThe wizard will not start if you have changed the default administrator password from theconsole.3.1 Activation and Registration1.Review and accept the License Agreement. You must accept the Sophos End User LicenseAgreement (EULA) to proceed further.2.Register Your Firewall. Enter the serial number, if you have it. You can also use your UTM 9license if you are migrating.Otherwise, you can skip registration for 30 days or start a free trial.a)You will be redirected to the MySophos portal website. If you already have a MySophosaccount, specify your sign-in credentials under “Login”. If you are a new user, sign up for aMySophos account by filling in the details under “Create Sophos ID”.b)Complete the registration process.Post successful registration of the device, the license is synchronized and the basic setup is done.3.Finish the basic setup. Click Continue and complete the configurations through the wizard. Whenyou finish the process, the Network Security Control Center appears.You can now use the navigation pane to the left to navigate and configure further settings.3.2 Basic ConfigurationYou can:1.Set up Interfaces2.Create Zones3.Create Firewall Rules4.Set up a Wireless Network1.To set up interfaces:a)You can add network interfaces and RED connections in the Configure > Network >Interfaces menu.b)You can add wireless networks in the Protect > Wireless > Wireless Networks menu.SSIDs will also be shown in the interfaces menu once created.c)You can add access points in Protect > Wireless > Access Points.Sophos XG Firewall Virtual Appliance KVMSophos XG Firewall Virtual Appliance KVMYou can see both these wireless networks in Protect > Network > Wireless Networks.e)Go to Protect > Wireless > Access Point Groups.f)Click Add to add a new access point group.g)Add both the wireless networks, and the new access point.If new APs have been installed, you can view these in Control Center.h)Click the pending APs to accept the new access points.i)Configure the settings of the new APs as shown in the image.Sophos XG Firewall Virtual Appliance KVMj)Click Save.Sophos XG Firewall Virtual Appliance KVM4 Legal noticesCopyright © 2020 Sophos Limited. All rights reserved. No part of this publication may be reproduced, stored in a retrieval system, or transmitted, in any form or by any means, electronic, mechanical, photocopying, recording or otherwise unless you are either a valid licensee where the documentation can be reproduced in accordance with the license terms or you otherwise have the prior permissionin writing of the copyright owner.Sophos, Sophos Anti-Virus and SafeGuard are registered trademarks of Sophos Limited, Sophos Group and Utimaco Safeware AG, as applicable. All other product and company names mentionedare trademarks or registered trademarks of their respective owners.Copyright © 2020 Sophos Limited. All rights reserved. No part of this publication may be reproduced, stored in a retrieval system, or transmitted, in any form or by any means, electronic, mechanical, photocopying, recording or otherwise unless you are either a valid licensee where the documentation can be reproduced in accordance with the license terms or you otherwise have the prior permissionin writing of the copyright owner.Sophos and Sophos Anti-Virus are registered trademarks of Sophos Limited and Sophos Group.All other product and company names mentioned are trademarks or registered trademarks of their respective owners.。
ThinkServer TS140 用户手册 V1.2
T品前请先阅读本手册
目录
声 明 ...................................................................................................................................................................................................................................3 商标和版权 ........................................................................................................................................................................................................................4 Safety Information(安全信息)....................................................................................................................................................................................5 第一章 产品简介 .......................................................................................................................................................................................................... 10 1.1 产品概述 ................................................................................................................................................................................................................... 10 1.2 产品特色 ................................................................................................................................................................................................................... 10
V2416快速安装指南说明书
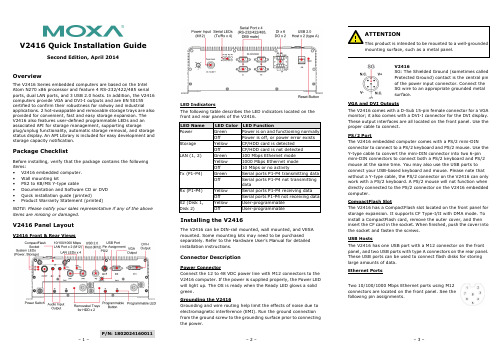
P/N: 1802024160011V2416 Quick Installation GuideSecond Edition, April 2014OverviewThe V2416 Series embedded computers are based on the Intel Atom N270 x86 processor and feature 4 RS-232/422/485 serial ports, dual LAN ports, and 3 USB 2.0 hosts. In addition, the V2416 computers provide VGA and DVI-I outputs and are EN 50155 certified to confirm their robustness for railway and industrialapplications. 2 hot-swappable and removable storage trays are also provided for convenient, fast and easy storage expansion. The V2416 also features user-defined programmable LEDs and an associated API for storage management, supporting storageplug/unplug functionality, automatic storage removal, and storage status display. An API Library is included for easy development and storage capacity notification.Package ChecklistBefore installing, verify that the package contains the following items:• V2416 embedded computer. • Wall mounting kit• PS2 to KB/MS Y-type cable• Documentation and Software CD or DVD • Quick installation guide (printed)• Product Warranty Statement (printed)NOTE: Please notify your sales representative if any of the above items are missing or damaged.V2416 Panel LayoutV2416 Front & Rear ViewsLED IndicatorsThe following table describes the LED indicators located on the front and rear panels of the V2416. LED Name LED Color LED FunctionPower Green Power is on and functioning normally OffPower is off, or power error exists Storage Yellow CF/HDD card is detectedOff CF/HDD card is not detected LAN (1, 2)Green 100 Mbps Ethernet mode Yellow1000 Mbps Ethernet mode Off 10 Mbps or no activityTx (P1-P4)Green Serial ports P1-P4 transmitting data Off Serial ports P1-P4 not transmitting dataRx (P1-P4) Yellow Serial ports P1-P4 receiving data Off Serial ports P1-P4 not receiving data X2 (Disk 1, Disk 2)Yellow User-programmable OffUser-programmableInstalling the V2416The V2416 can be DIN-rail mounted, wall mounted, and VESA mounted. Some mounting kits may need to be purchased separately. Refer to the Hardware User’s Manual for detailed installation instructions.Connector DescriptionPower ConnectorConnect the 12 to 48 VDC power line with M12 connectors to the V2416 computer. If the power is supplied properly, the Power LED will light up. The OS is ready when the Ready LED glows a solid green.Grounding the V2416Grounding and wire routing help limit the effects of noise due to electromagnetic interference (EMI). Run the ground connection from the ground screw to the grounding surface prior to connecting the power.V2416SG: The Shielded Ground (sometimes called Protected Ground) contact is the central pin of the power input connector. Connect the SG wire to an appropriate grounded metal surface.VGA and DVI OutputsThe V2416 comes with a D-Sub 15-pin female connector for a VGA monitor; it also comes with a DVI-I connector for the DVI display. These output interfaces are all located on the front panel. Use the proper cable to connect. PS/2 PortThe V2416 embedded computer comes with a PS/2 mini-DINconnector to connect to a PS/2 keyboard and PS/2 mouse. Use the Y-type cable to convert the mini-DIN connector into two 6-pin mini-DIN connectors to connect both a PS/2 keyboard and PS/2 mouse at the same time. You may also use the USB ports to connect your USB-based keyboard and mouse. Please note that without a Y-type cable, the PS/2 connector on the V2416 can only work with a PS/2 keyboard. A PS/2 mouse will not function when directly connected to the PS/2 connector on the V2416 embedded computer.CompactFlash SlotThe V2416 has a CompactFlash slot located on the front panel for storage expansion. It supports CF Type-I/II with DMA mode. To install a CompactFlash card, remove the outer cover, and then insert the CF card in the socket. When finished, push the cover into the socket and fasten the screws. USB HostsThe V2416 has one USB port with a M12 connector on the front panel, and two USB ports with type A connectors on the rear panel. These USB ports can be used to connect flash disks for storing large amounts of data. Ethernet PortsTwo 10/100/1000 Mbps Ethernet ports using M12 connectors are located on the front panel. See the following pin assignments./supportThe Americas: +1-714-528-6777 (toll-free: 1-888-669-2872)Europe: +49-89-3 70 03 99-0 Asia-Pacific: +886-2-8919-1230China: +86-21-5258-9955 (toll-free: 800-820-5036)2014 Moxa Inc., All Rights Reserved10/100 Mbps1000 MBps 1 -- TRD3+ 2 -- TRD4+ 3 -- TRD4- 4 ERx- TRD1- 5 ETx+ TRD2+ 6 ERx+ TRD1+ 7 -- TRD3- 8 ETx-TRD2-Serial PortsThe serial ports use DB9 connectors. Each port can be configured by software for RS-232, RS-422, or RS-485. The pin assignments for the ports are shown in the following table: Pin RS-232 RS-422 RS-485 (4-wire) RS-485 (2-wire) 1 DCD TxDA(-) TxDA(-) --- 2RxD TxDB(+) TxDB(+) ---3 TxD RxDB(+) RxDB(+) DataB(+)4 DTR RxDA(-) RxDA(-) DataA(-)5 GND GND GND GND6 DSR --- --- ---7 RTS --- --- --- 8CTS---------Audio InterfaceThe V2416 comes with an audio input and an audio output, allowing users to connect a speaker or an earphone. DI/DOThe V2416 comes with a 6-ch digital input and 2-ch digital output in the terminal block connectors.Hot-swappable and removable Storage TraysThe V2416 computers come with 2 removable slots for inserting additional storage media; it also supports hot swapping forconvenient, fast, and easy storage expansion. The user-defined programmable LEDs and the associated API for storagemanagement support storage plug/unplug functionality, automatic storage removal, and storage status display. Refer to the Hardware User's Manual for detailed storage installation. Reset ButtonPress the “Reset Button” on the rear panel of the V2416 to reboot the system automatically. The Ready LED will blink on and off for the first 5 seconds, and then maintain a steady glow once the system has rebooted.Real-time ClockThe V2416’s real-time clock is powered by a lithium battery. We strongly recommend that you do not replace the lithium battery without help from a qualified Moxa support engineer. If you need to change the battery, contact the Moxa RMA service team.Powering on the V2416To power on the V2416, connect the power cable to the V2416’s M12 power connector (located at the rear panel). Press the power button to turn on the computer. Note that the Shielded Ground wire should be connected to the central pin of the connector. It takes about 30 seconds for the system to boot up. Once the system is ready, the Power LED will light up.Configuring the Ethernet InterfacePower on the V2416 computer after connecting a monitor,keyboard, and mouse, and verifying that the power source is ready. Once the operating system boots up, the first step is to configure the Ethernet interface. The factory default settings for the V2416 LANs are show below. (Please note that the XPE and W7E models use DHCP settings.)Default IP Address NetmaskLAN1 192.168.3.127 255.255.255.0 LAN2 192.168.4.127255.255.255.0Linux users should follow these steps:If you are using the console cable for first-time configuration of the network settings, enter the following commands to edit the interfaces file:#ifdown –a//Disable LAN1/LAN2 interface first, before youreconfigure the LAN settings. LAN 1 = eth0, LAN 2= eth1,#vi /etc/network/interfaces//check the LAN interface first// After the boot settings of the LAN interface have been modified, use the following command to activate the LAN settings immediately:#sync; ifup –aXPE users should follow these steps:1. Go to Start Network Connections .2. Right-click Network Connections , click Properties . Next,select Internet Protocol (TCP/IP), and then click Properties .3. Click OK after inputting the proper IP address and netmask.W7E users should follow these steps:1. Go to Start -> Control Panel-> Network and Internet ->View network status and tasks -> Change adapter setting .2. In the screen of Local Area Connection Properties, clickInternet Protocol (TCP/IP) and then select Properties . Select Internet Protocol Version 4, and then click Properties .3. Click OK after inputting the proper IP address and netmask. NOTE: Refer to the User’s Manual for other configuration information.。
海能达 P-PoC6000 客户端 用户手册说明书

用户手册
目录
目录
前言 ................................................................................................................................................................ 1 1. 产品概述 .................................................................................................................................................... 3
3.1.1 登录与退出................................................................................................................................. 6 3.1.2 主屏界面 .................................................................................................................................... 8 3.1.3 用户管理 .................................................................................................................................... 8 3.1.4 更换守候组................................................................................................................................11 3.1.5 通讯录管理............................................................................................................................... 12 3.1.6 通话记录管理 ........................................................................................................................... 14 3.2 语音呼叫业务 ..................................................................................................................................... 15 3.2.1 全双工语音单呼 ....................................................................................................................... 15 3.2.2 半双工语音单呼 ....................................................................................................................... 16 3.2.3 语音组呼 .................................................................................................................................. 18 3.2.4 紧急呼叫 .................................................................................................................................. 19 3.3 视频业务............................................................................................................................................. 19 3.3.1 视频单呼 .................................................................................................................................. 19 3.3.2 视频组呼 .................................................................................................................................. 21 3.4 短消息业务 ......................................................................................................................................... 22 3.4.1 单播短消息............................................................................................................................... 22 3.4.2 组播短消息............................................................................................................................... 26 4. 缩略语 ...................................................................................................................................................... 28
Google Cloud VPN 配置指南说明书
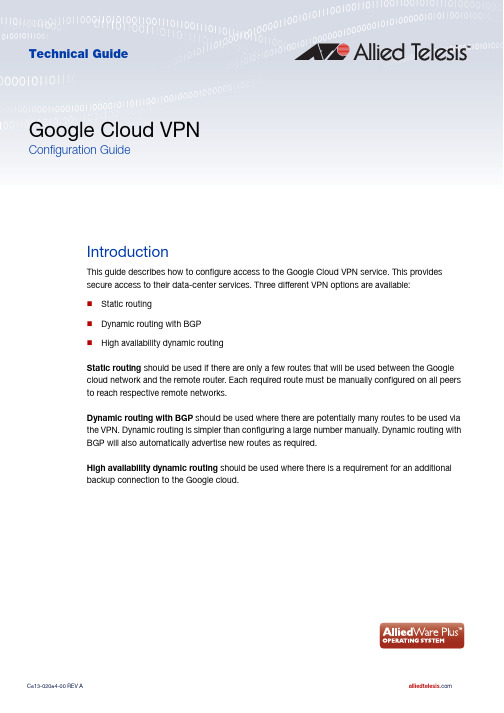
2. On the VPC network page, click on Create VPC Network. 3. Fill in a Name and, optionally, a Description.
ISAKMP peer. 14. Copy this and save it somewhere secure 15. Under Routing options, choose Policy-based. 16. Under Remote network IP ranges, enter the internal IP address range of your router. 17. Under Local IP ranges, enter the local-address-selector that you created earlier.
5. Click on Create to create the VPC network.
6. Once the VPC network has been created, you will be returned to the Home Page. On the Home Page, from the menu on the left under Networking, select Hybrid Connectivity, then VPN.
C613-02084-00 REV A
Introduction | Page 3
Google Cloud VPN
Static routing
To configure static routing to a Google Cloud VPN, use the following steps: 1. Log in to your Google Cloud Account. Navigate to the Home Page. From the menu on the left,
JUNIPER全系列SRX技术参数表
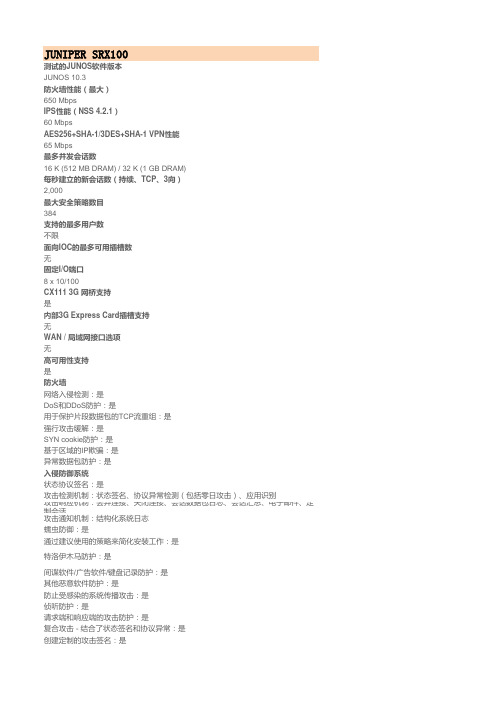
间谍软件/广告软件/键盘记录防护:是 其他恶意软件防护:是 防止受感染的系统传播攻击:是 侦听防护:是 请求端和响应端的攻击防护:是 复合攻击 - 结合了状态签名和协议异常:是 创建定制的攻击签名:是
用于定制的接入上下文:500+ 攻击编辑(端口范围、其他):是 流特征:是 协议阈值:是 状态协议签名:是 大约覆盖的攻击数量:5,500+ 具体的攻击说明和修复/补丁信息:是 创建和执行适当的应用使用策略:是 攻击人和目标审计日志与报告:是 部署模式:线内 尺寸和电源 尺寸(W x H x D): 8.5 x 1.4 x 5.8 in (21.6 x 3.6 x 14.7 cm) 重量[设备和电源]:机箱:2.5 lb (1.1kg) 电源(AC):100-240 VAC, 30 W 最大功耗:30 W 平均功耗:10 W
SRX240
测试的JUNOS软件版本 JUNOS 10.3 防火墙性能(最大) 1.5 Gbps IPS性能(NSS 4.2.1) 250 Mbps AES256+SHA-1/3DES+SHA-1 VPN性能 250 Mbps 最多并发会话数 64 K (512 MB DRAM) / 128 K (1 GB DRAM) 每秒建立的新会话数(持续、TCP、3向) 9,000 最大安全策略数目 4,096 支持的最多用户数 不限 面向IOC的最多可用插槽数 无 固定I/O端口 16 x 10/100/1000BASE-T CX111 3G 网桥支持 是 内部3G Express Card插槽支持 无 WAN / 局域网接口选项 T1/E1 ADSL2 Annex A ADSL2 Annex B SFP 同步串行 高可用性支持 是 防火墙 网络入侵检测:是 DoS和DDoS防护:是 用于保护片段数据包的TCP流重组:是 强行攻击缓解:是 SYN cookie防护:是 基于区域的IP欺骗:是 异常数据包防护:是 入侵防御系统 状态协议签名:是 攻击检测机制:状态签名、协议异常检测(包括零日攻击)、应用识别
交换机命令配置手册 北京博维

工业以太网交换机 命令行配置手册
1
目
第1章 1.1 1.2 1.2.1 1.2.2 1.2.3 1.2.4 第2章 2.1 2.1.1 2.1.2 2.1.3 2.2 2.3 2.3.1 2.3.2 2.3.3 2.4 2.4.1 2.4.2 2.4.3 2.4.4 第3章 3.1 3.2 3.2.1 3.2.2 3.2.3 3.2.4 3.2.5 第4章 4.1 4.1.1 4.1.2 4.1.3 4.2 4.2.1 4.2.2
系统软件管理...................................................................................................................... 4 配置文件管理...................................................................................................................... 4 典型配置举例...................................................................................................................... 4
Brocade-VDX系统升级及配置

1.升级NOS因为设备出厂时的版本基本都很陈旧,直接上线会造成不必要的麻烦,因此直接升级稳定版本,可以减少上线后很多不必要的工作量。
博科TAC针对每款设备都有版本推荐,Target Path Selection Guide,建议每次项目交付前,首先登陆到下载页面,下载TAC推荐的稳定版本。
具体升级步骤:把nos文件解压,然后拷贝到根目录c:/nos4.1.2下面。
在ftp软件上的根目录用C:\描述即可vdx6710‐54# firmware download interactiveServer name or IP address: 172.16.1.1File name: nos4.1.2Protocol (ftp, scp, sftp): ftpUser: brocadePassword: **********Reboot system after download? [y/n]:yDo Auto‐Commit after Reboot? [y/n]:yPerforming system sanity check...Do you want to continue? [y/n]:yChecking conditions for downloading to 4.1.22015/01/28‐03:07:16, [HASM‐1120], 1545,, INFO, VDX6710‐54, Current version 4.0.1.You are running firmwaredownload with auto‐reboot and auto‐commit enabled. After the firmware is downloaded the system will reboot and commit firmware automatically.2015/01/28‐03:07:16, [SULB‐1105], 1546,, WARNING, VDX6710‐54, Firmware upgrade session (0:single MM upgrade) starts.2015/01/28‐03:07:16, [SULB‐1100], 1547,, INFO, VDX6710‐54, Firmware install begins on SWITCH. Preparing for firmware download...Warning: possible packaging issue in srmd‐1.0‐1.ppc.rpmInstalling 49 packages. Please wait...rcinit‐1.1.5‐9############################### [ 100% ]misc‐2.1.0‐1############################### [ 100% ]pam‐0.75‐28############################### [ 100% ]util‐linux‐2.13o‐22############################### [ 100% ]sh‐utils‐2.1‐10############################### [ 100% ]man‐1.6g‐8############################### [ 100% ]bootenv‐1.0.3‐8############################### [ 100% ]kernel‐2.6.34.6‐1############################### [ 100% ]syslog‐ng‐3.3.7‐1############################### [ 100% ]vixie‐cron‐3.0.2‐62_4############################### [ 100% ]rsh‐0.18‐4############################### [ 100% ]setup‐4.1.2‐30############################### [ 100% ]agent‐nos‐common‐4.1.2‐1############################### [ 100% ]openssl‐0.9.9‐3############################### [ 100% ]openssh‐5.2p1‐13############################### [ 100% ]ntp‐5.94e‐4############################### [ 100% ]sendmail‐8.10‐11############################### [ 100% ]fss‐4.1.2‐12############################### [ 100% ]apache‐1.3.32‐10############################### [ 100% ]tz‐7.12‐6############################### [ 100% ]sysstat‐5.0.5‐10############################### [ 100% ]ipv6‐1.3‐10############################### [ 100% ]traceroute‐1.5a12‐13############################### [ 100% ] minicom‐2.1‐3.7############################### [ 100% ] fwdl‐4.1.2‐47############################### [ 100% ] kernel‐module‐usb‐2.6.34.6‐1############################### [ 100% ] kernel‐module‐net‐2.6.34.6‐1############################### [ 100% ] fabos‐setup‐4.1.2‐15############################### [ 100% ] fabos‐drivers‐4.1.2‐12############################### [ 100% ] fabos‐libs‐4.1.2‐14############################### [ 100% ] nonet‐lib‐4.1.2‐1############################### [ 100% ] group factory does not exist ‐ using root group factory does not exist ‐ using root group factory does not exist ‐ using root group factory does not exist ‐ using root fabos‐diag‐4.1.2‐17############################### [ 100% ] group factory does not exist ‐ using root group factory does not exist ‐ using root fabos‐4.1.2‐19############################### [ 100% ] fabos‐daemons‐4.1.2‐6############################### [ 100% ] fabos‐zoning‐4.1.2‐10############################### [ 100% ] fabos‐routing‐4.1.2‐10############################### [ 100% ] fabos‐vf‐4.1.2‐10############################### [ 100% ] fabos‐wwnhs‐4.1.2‐10############################### [ 100% ] fabos‐man‐4.1.2‐13############################### [ 100% ] group factory does not exist ‐ using root fabos‐swbd116‐4.1.2‐2############################### [ 100% ] php‐5.3.2‐2############################### [ 100% ] confd‐3.7.6.4.brcd‐3############################### [ 100% ] cli‐schemas‐4.1.2‐10############################### [ 100% ] prom‐8548‐2.2.0‐1############################### [ 100% ]eccrepd‐4.1.2‐11############################### [ 100% ]dcm‐4.1.2‐8############################### [ 100% ]openvswitch‐4.1.2‐1.7.0############################### [ 100% ]python‐e500v2‐3.3.2‐1############################### [ 100% ]zvm‐4.1.2‐1############################### [ 100% ]srmd‐1.0‐1############################### [ 100% ]Done install PackageRemoving unneeded files, please wait ...Finished removing unneeded files.Wed Jan 28 03:10:50 UTC 2015 ‐ Initializing the Dcmd and Ccmd database...2.基础配置网管口的配置曾经难倒过不少人参考配置switch(config)# interface Management 1/0switch(config‐Management‐1/0)# no ip address dhcpswitch(config‐Management‐1/0)# ip address 192.168.1.1/24switch(config‐Management‐1/0)# ip gateway‐address 192.168.1.254 switch# show running‐config interface Management 1/0interface Management 1/0no tcp burstrateip icmp echo‐replyno ip address dhcpip address 192.168.1.1/24ipv6 icmpv6 echo‐replyno ipv6 address autoconfigno ipv6 address dhcpvrf forwarding mgmt‐vrfno shutdown!如果是NOS5.0以上版本,请注意mgmt‐vrf,参考配置如下rbridge‐id 10switch‐attributes chassis‐name VDX6740switch‐attributes host‐name RB10vrf mamt‐vrf!vrf mgmt‐vrfaddress‐family ipv4 unicastip route 0.0.0.0/0 99.1.64.76!interface Management 10/0no tcp burstrateip icmp echo‐replyno ip address dhcpip address 99.1.64.78/24ipv6 icmpv6 echo‐replyno ipv6 address autoconfigno ipv6 address dhcpvrf forwarding mgmt‐vrfno shutdown记住ping的时候,后面也得带vrf3.License添加参考配置怎么帮客户生成license?1)拆开设备包装,一般情况下会有一个纸质信封(有时是邮件告知),拆开信封,有一个transaction key,拿到这个玩意。
联想数据中心基础设施运维管理系统 用户指南说明书

联想数据中心基础设施运维管理系统用户指南联想(北京)有限公司(以下简称“联想”)为客户提供全方位的技术支持和服务。
直接向联想购买产品的用户,如果在使用过程中有任何问题,可与联想各地办事处或用户服务中心联系,也可直接与公司总部联系。
读者如有任何关于联想产品的问题,或者有意进一步了解公司其他相关产品,可通过下列方式与我们联系。
公司网址:技术文档邮箱:********************公司总部地址:中国北京海淀区上地西路6号邮政编码:100085声明Copyright ©2019联想(北京)有限公司版权所有,保留一切权利。
非经本公司书面许可,任何单位和个人不得擅自摘抄、复制本书内容的部分或全部,并不得以任何形式传播。
是联想(北京)有限公司的注册商标。
对于本手册中出现的其他商标,由各自的所有人拥有。
由于产品版本升级或其他原因,本手册内容会不定期进行更新。
除非另有约定,本手册仅作为使用指导,本手册中的所有陈述、信息和建议不构成任何明示或暗示的担保。
前言本文档系统介绍了联想数据中心基础设施运维管理系统的产品优势和具体功能。
在本文档的附录中,提供了该文档所涉及的缩略语。
产品版本与本文档相对应的产品版本如下所示。
约定符号约定在本文中可能出现下列标志,它们所代表的含义如下。
通用格式约定修订记录文档版本03 (2019-08-23)第三次正式发布。
新增以下章节:● 3.1.7部署操作系统映像● 3.1.8配置BMC● 3.2机架● 4 配置● 5.1.3排除警报● 5.1.4解除警报● 5.2.3排除事件● 5.2.4解除事件更新以下章节:● 3.1.3查看服务器详细信息● 5.1.1查看活动警报● 5.1.2筛选警报● 5.2.1查看事件日志● 5.2.2筛选事件● 5.3.1查看作业● 5.3.2计划作业● 5.3.3筛选作业● 6.3网络访问权限文档版本02 (2019-03-31)第二次正式发布。
- 1、下载文档前请自行甄别文档内容的完整性,平台不提供额外的编辑、内容补充、找答案等附加服务。
- 2、"仅部分预览"的文档,不可在线预览部分如存在完整性等问题,可反馈申请退款(可完整预览的文档不适用该条件!)。
- 3、如文档侵犯您的权益,请联系客服反馈,我们会尽快为您处理(人工客服工作时间:9:00-18:30)。
IP地址与服务配置IP地址配置IP地址简介IP地址由32位二进制组成,为了书写和描述方便,一般用十进制表示。
十进制表示时,分为四组,每组8位,范围从0~255,组之间用“.”号隔开,比如“192.168.1.1”就是用十进制表示的IP 地址。
IP地址顾名思义,自然是IP层协议的互连地址。
32位的IP地址由两个部分组成:1)网络部分;2)本地地址部分。
根据网络部分的头几个比特位的值,目前使用中的IP地址可以划分成四大类。
A类地址,最高比特位为“0”,有7个比特位表示网络号,24个比特位表示本地地址。
这样总共有128个A类网络。
B类地址,前两个最高比特位为“10”,有14个比特位表示网络号,16个比特位表示本地地址。
这样总共有16,348个B类网络。
C类地址,前三个最高比特位为“110”,有22个比特位表示网络号,8个比特位表示本地地址。
这样总共有2,097,152个C类网络。
D类地址,前四个最高比特位为“1110”,其余比特位为组播地址。
说明:前四个最高比特位为“1111”的地址是不允许分配的,这些地址称为E类地址,属于保留地址。
在建设网络过程中,进行IP地址规划时,一定要根据建设网络的性质进行IP地址分配。
如果建设的网络需要与互联网连接,则需要到相应的机构申请分配IP地址。
中国地区可以向中国互联网信息中心(CNNIC)申请,负责IP地址分配的最终机构为国际互联网名字与编号分配公司(ICANN,Internet Corporation for Assigned Names and Numbers)。
如果建设的网络为内部私有网络,就不需要申请IP地址,但是也不能随便分配,最好分配专门的私有网络地址。
下表为保留与可用的地址列表:其中专门有三个地址块提供给私有网络,这些地址是不会在互联网中使用的,如果分配了这些地址的网络需要连接互联网,则需要将这些IP地址转换成有效的互联网地址。
下表为私有网络地址空间,私有网络地址由RFC 1918文档定义:关于IP地址、TCP/UDP端口及其它编码的分配情况,请参考RFC 1166文档。
IP地址配置任务列表IP地址配置任务包括以下各项,但只有第一项配置是必须要做,其它任务可以根据网络的具体需要决定是否要执行。
●接口IP地址配置(要求)●地址解析协议(ARP)配置(可选)●IP到广域网地址映射配置(可选)●关闭IP路由(可选)●广播包处理配置(可选)接口IP地址配置一个设备只有配置了IP地址,才可以接收和发送IP数据报,接口配置了IP地址,说明该接口允许运行IP协议。
要分配一个接口的IP地址,在接口配置模式中执行以下命令:网络掩码也是一个32比特的数值,标识着该IP地址的哪几个比特为网络部分。
网络掩码中,值为“1”的比特对应的IP地址比特位就是为网络部分,值为“0”的比特对应的IP地址比特位就是为主机地址部分。
如A类网络对应的网络掩码为“255.0.0.0”。
您可以利用网络掩码对一个网络进行子网划分,子网划分就是将一个将主机地址部分的一些比特位也作为网络部分,缩小主机容量,增加网络的数量,这时的网络掩码就称为子网掩码。
说明:理论上,子网掩码的比特位可以是主机地址部分中的任何一段比特位。
我司产品只支持从网络部分开始的从左到右连续的子网掩码。
与接口IP地址相关的特性配置见下列任务列表,以下任务作为可选配置,可以根据实际情况决定是否需要配置:●接口配置多个IP地址接口配置多个IP地址我司产品可以支持一个接口配置多个IP地址,其中一个为主IP 地址,其余全部为次IP地址。
次IP地址的配置理论上没有数目限制,但是次IP地址与主IP以及次IP之间地址必须属于不同网络。
在网络建设中,会经常使用到次IP地址,通常在以下情况下应该考虑试用次IP地址:●一个网络没有足够多的主机地址。
例如,现在一般局域网需要一个C类网络,可分配254台主机。
但是当局域网主机超过254台时,一个C类网络将不够分配,有必要分配另一个C类网络地址。
这样路由器就需要连接两个网络,所以就需要配置多个IP地址。
●许多旧的网络是基于第二层的桥接网络,没有进行子网的划分。
次IP地址的使用可以使该网络很容易升级到基于IP层的路由网络。
对于每个子网,路由器都配置一个IP地址。
●一个网络的两个子网被另外一个网络隔离开,您可以创建一个被隔离网络的子网,通过配置次IP 地址的方式,将隔离的子网连接起来。
一个子网不能在路由器的两个或两个以上接口出现。
说明:配置次IP地址之前,需要确定已经配置了主IP地址。
如果网络上的一台路由器配置了次IP地址,则其它路由器也必须配置同一网络的次IP地址。
当然如果其它路由器原先没有分配IP地址,可以配置为主地址。
要配置次IP地址,在接口配置模式中执行以下命令:地址解析协议(ARP)配置在局域网中,每个IP网络设备都有两个地址:1)本地地址,由于它包含在数据链路层的帧头中,更准确地说应该是数据链路层地址,但实际上对本地地址进行处理的是数据链路层中的MAC子层,因此习惯上称为MAC地址,MAC地址在局域网上代表着IP网络设备;2)网络地址,在互联网上代表着IP网络设备,同时它也说明了该设备所属的网络。
局域网上两台IP设备之间需要通信,必须要知道对方的48比特的MAC地址。
根据IP地址来获知MAC地址的过程称为地址解析(ARP)。
而根据MAC地址获知IP地址的过程称为反向地址解析(RARP)。
地址解析的方式有两类:1)地址解析协议(ARP);2)代理地址解析协议(Proxy ARP)。
关于ARP 、Proxy ARP、RARP,分别在RFC 826,RFC 1027,RFC 903文当中描述。
ARP是用来绑定MAC地址和IP地址的,以IP地址作为输入,ARP能够知道其关联的MAC地址。
一旦知道了MAC地址,IP地址与MAC地址对应关系就会保存在设备的ARP缓冲中。
有了MAC地址,IP设备就可以封装链路层的帧,然后将数据帧发送到局域网上去。
缺省配置下,以太网上IP和ARP的封装为EthernetII类型,也可以封装成其它类型的以太网帧类型如SNAP。
RARP的工作原理与ARP类似,不过RARP是以MAC地址作为输入,然后得到关联的IP地址。
RARP通常应用在无盘工作站上。
通常情况下,不需要特别配置路由器的地址解析已经可以工作了。
除非有特殊情况,否则不需要额外配置,我司产品还能通过以下配置来管理地址解析:●静态配置ARP●ARP封装设置●ARP超时设置静态配置ARPARP协议提供了IP地址和MAC地址动态映射的功能,通常情况下不需要进行静态配置。
我司产品通过配置静态ARP,还可以响应不是属于自己IP地址的ARP请求。
要配置静态ARP,在全局配置模式中执行以下命令:注意:对于s3750/s3250堆叠,配置完静态arp后,交换机必须在学习到该静态arp对应的mac后才能进行正常的三层路由。
ARP封装设置目前ARP封装只支持Ethernet II类型,在我司产品中也表示为ARPA关键字。
ARP超时设置ARP超时设置只对动态学习到的IP地址和MAC地址映射起作用。
超时时间设置得越短,ARP缓冲中保存的映射表就越真实,但是ARP消耗网络带宽也越多,所以需要权衡利弊。
除非有特别的需要,否则一般不需要配置ARP超时时间。
要配置ARP超时时间,在接口配置模式中执行以下命令:缺省情况下,超时时间为3600秒,即1个小时。
关闭IP路由IP路由功能缺省情况下是启动的,除非确定不需要IP路由功能,否则不要执行该操作。
关闭IP路由将使路由器丢失所有的路由,而且没有路由转发的功能。
要关闭IP路由功能,在全局配置模式中执行以下命令:广播包处理配置广播包是指目标地址为某个物理网络上所有的主机。
我司产品支持两种类型广播包:1)定向广播,是指数据报接收者为一个指定网络的所有主机,目标地址的主机部分全为“1”;2)淹没广播,是指数据报接收者为所有网络的主机,目标地址32比特位全为“1”时。
广播包目前被一些IP协议的泛滥使用,其中包括十分重要的IP协议。
所以如何控制和使用广播包是一个网络管理人员的基本职责。
如果IP网络设备转发淹没广播,可能会引起网络的超负载,严重影响网络的运行,这种情况称为广播风暴。
路由器提供了一些办法能够将广播风暴限制在本地网络,阻止其继续扩张。
但对于桥和交换机等基于二层网络设备,将转发和传播广播风暴。
解决广播风暴最好的办法就是给每个网络指定一个广播地址,这就是定向广播,这要求使用广播包的IP协议尽可能应用定向广播而不是淹没广播进行数据传播。
关于广播问题的详细描述,请参见RFC 919和RFC 922。
如何对广播包进行处理,按照以下任务任务表,根据网络实际的需求进行配置。
●定向网络广播到物理广播转换●创建IP广播地址定向广播到物理广播转换IP定向广播报文是指目标地址为某个IP子网广播地址的IP报文,如目标地址为172.16.16.255的报文就称为定向广播报文。
但是产生该报文的节点又不是目标子网的成员。
没有与目标子网直连的路由器接收到IP定向广播报文,跟转发单播报文一样处理定向广播报文。
当定向广播报文到达直连该子网的路由器后,路由器将把定向广播报文转换为淹没广播报文(一般指目标IP地址为全“1”的广播报文),然后以链路层广播方式发送给目标子网上的所有主机。
您可以在指定的接口上,启动定向广播到物理广播转换的功能,这样该接口就可以转发到直连网络的定向广播了。
该命令只影响到达最终目标子网的定向广播报文的最后传输,而不影响其它定向广播报文的正常转发。
在接口上,您还可以通过定义访问控制列表来控制转发某些定向广播。
当定义了访问列表,只有符合访问列表中定义的数据包才进行定向广播到物理广播的转换。
要配置定向广播到物理广播的转换,在接口配置模式中执行以下命令:创建IP广播地址当前使用最多的广播包,其目标地址为全“1”,表示为255.255.255.255。
我司产品可以通过软件定义产生其它地址的广播包,而且可以接收所有类型的广播包。
要配置有别于255.255.255.255的广播地址,在接口配置模式中执行以下命令:监视和维护IP地址要监视和维护网络,根据以下任务描述,根据实际需要进行操作。
●清除缓冲和表内容●显示系统和网络状态清除缓冲和表内容您可以删除一些特定缓冲、表、数据库的全部内容,主要包括三个方面:1)清除ARP缓冲;2)清除主机名到IP地址的映射表;3)清除路由表。
显示系统和网络状态您可以查看IP路由表、缓冲、数据库的所有内容,通过这些信息对网络故障的排除十分有帮助。
通过测试本地设备网络的可达到性,您可以知道数据包在离开本设备后将往那条路径发送。
要显示系统和网络统计量,在特权用户模式中执行以下命令:IP地址配置范例本章提供了以下IP地址配置范例:●次IP地址配置范例次IP地址配置范例●配置要求IP地址分配和网络设备连接图见图1。
