HDMI转3GSDI高清转换盒
HDMI 3G-SDI双显示器安装与使用指南说明书
HDMI / 3G-SDI Dual DisplayInstallation and Operation Manual500841© Muxlab Inc. 2019 94-000910-A / SE-00910-A Page 1Contents1.0 Product Introduction (4)2.0 Features (4)3.0 Product Description (5)3.1 Front Panel Description (5)3.2 Rear Panel Description (6)4.0 Display Operation Instructions (8)4.1Ethernet connection (8)4.2Display Button Instructions (10)4.2 Menu Instructions (11)4.2.1 Main Menu Bar – Picture (12)4.2.2 Main Menu Bar – Settings (13)4.2.3 Main Menu Bar – Functions (15)4.2.4 Main Menu Bar – Custom Buttons (16)5.0 Technical Specifications (17)6.0. Troubleshooting (18)6.1 Only Monochrome or Single Color Image/Video: (18)6.2 No Image/Video after Power On (18)6.3 No Sound Output (18)To ensure the best operation and performance from thisproduct, please read this manual carefully.CAUTION1. Only use the included power supply to power the unit.2. Do not expose the product to direct sunlight, heat or excessive humidity.3. Keep away from strong sources of light when using the product to obtaina clear, high contrast and colorful picture.4. Do not drop the unit and avoid any heavy unit impact.5. Do not use chemical solutions to clean the unit. Simply wipe with a clean soft cloth to keep the unit surface clean.6. To avoid damaging the product, do not dismantle or attempt to repair the unit yourself. There are no user serviceable parts inside.Defective units must be returned to seller for repair, following RMA procedures.Rackmount Dual display unit monitor adopts advanced integrated circuits, high-quality IPS LCD panel which makes it brighter, stable performance, color temperature control, etc. Advanced features include Peaking Focus, Center Marker, Screen Marker, Image Flip, Check Field Color Temperature Adjustment etc. It is an ideal NLE (Nonlinear Edit) matching monitor. This is a stable performer, operating at a low power consumption. The unit supports HDMI (1080p), 3G-SDI, CVBS and AUDIO inputs, plus HDMI (1080p), 3G-SDI, CVBS, and stereo headphone outputs. It may be used in a wide range of applications, supporting a compact size, rackmount capability, and simple operation.2.0 FeaturesDual IPS LCD displaysSupports HDMI (1080p), 3G-SDI and CVBS with AudioFits 19-inch rackmount @ 2 RUTri-color Tally light indicator per displaySupports advanced functions such as Center Marker, Safe Frames, Check Field, Focus Assist, Aspect Ratio, Image Flip, Pixel to Pixel &Image FreezeCustomizable buttons tailored to customer needsSupports firmware update via mini USB3.1 Front Panel DescriptionEach display supports a number of buttons for control and setting of a given display as follows:1. [ MODE ]Signal input selection.2. [ <] Dual function button. Typically used for headphone VolumeDown. During menu operation, it is used for making menuand item selects.3. [ >] Dual function button.Typically used for headphone VolumeUp. During menu operation, it is used for making menu anditem selects.4. [ MENU ] Used to enter and exit Menu mode.5. [ ∧/F1 ] Dual function button.Typically used as the F1 custom button.During menu operation, it is used for navigating up the menu.6. [ ∨/F2 ] Dual function button.Typically used as the F2 custom button.During menu operation, it is used for navigating down themenu.7. [ F3 ] Custom button F38. On/Standby button9. Headphone jack10. [ TALLY light indicator ] See rear panel Tally section for more details.3.2 Rear Panel Description1.DC power input port (default input) :2. 4-pin XLR DC12V power input (alternate input):3. 3G/SDI:3G-SDI input & output4. CVBS:CVBS input & output5. AUDIO:Audio input L / R6. HDMI:HDMI (1080p) input & output7. USB Firmware Update: Used to update the embedded firmware8. LAN IN: Ethernet LAN Connector9. TALLY Light: Input signal. Each of two Tally lights support three colors, green, red and yellow, depending on the input applied.GND port 5 and 8 is sharing4.0 Display Operation InstructionsConnect the provided power supply provided into the unit. The two displays will turn on, and the unit is ready to use. The user can operate and set each display as necessary via the corresponding buttons next to each screen.4.1Ethernet connectionThe 500841 can be managed through the LAN port using the software control. Follow these instructions to control the display.1. Connect your computer into the Ethernet port (or through a networkswitch/router). IP address will be displayed in the monitor.2. Open the folder which should be previously downloaded in thecomputer and click on the Monitor Control.exe icon3. Login and add monitor4. Enter IP address5. Select the display you wish to controlIf the unit is connected, the IP will be displayed at the bottom6. Three tabs will appear: Control, Function1 and Function2Control TabIt allows you to navigate through the menu, access to the interfaces among others fonctionalities.Funtion1 TabIt allows you to change the language, control aspect ratio, center marker, etc. See screenshot for details.Funtion2 TabIn this tab, user has access to Image flip, check field, Zoom amongothers parameters. See below for more details:4.2Display Button InstructionsEach display has a number of buttons for controlling and adjusting setting for the given display.Toggles the display power between On and Standby.MODE Selects the input signal.MENU Enter and exit the Menu.>Dual function. Typically used for headphone Volume Up.While in the upper Menu operation, it is used for mainmenu bar selectionWhile in the lower Sub-Menu operation, it is used as afunction selection, or to increase item values.<Dual function. Typically for headphone Volume Down.While in the upper Menu operation, it is used for mainmenu bar selectionWhile in the lower Sub-Menu operation, it is used as afunction selection, or to decrease item values.∧/F1 Dual function.Typically used as the F1 custom button.While in the lower Sub-Menu operation, it is used formoving up the Sub-Menu items.∨/F2Dual function.Typically used as the F2 custom button.While in the upper Menu operation, pressing this buttonenters the lower Sub-Menus.While in the lower Sub-Menu operation, it is used fornavigating down the menu.F3 Custom button F3Power switch.4.2 Menu InstructionsPress the MENU button to bring up the pop-up main menu, and press the “<” or “>” button to enter menu selection, then press the “∨/F2” button to enter the sub-menu, and then use the “∧/F1” or “∨/F2” button to select the sub-menu item, then once in the sum-menu item, use the “>” or “<” button to adjust item parameters. Press the MENU button to exit after changes have been made.4.2.1 Main Menu Bar – PicturePicturePic. Mode: Standard, Dynamic, Mild, User.Standard, Dynamic and Mild are presets.Select “User” to adjust Brightness, Contrast, Saturation,Sharpness according to site conditions.Brightness: Adjust image brightness.Contrast: Adjust image contract.Saturation: Adjust color concentration.Sharpness: Adjust image edge sharpness.Color Temp.: Adjust the color temperature to6500, 9300, or to User.When “User” is selected, adjust the R/G/B to meet thespecific requirements for the desired color temperature. Tint: In NTSC video mode, color tint is adjusted by Tint.4.2.2 Main Menu Bar – SettingsSettingsLanguage: Select the Language for the On Screen Display (OSD): English, 中文, Español, Português,Français, Nederlands, Deutsch, 日本語Aspect Ratio: Change the aspect ratio between: Panorama, Just Scan,Zoom 1, Zoom 2, 16:9, 4:3, and Autome.No Signal: Color option of screen background when noSignal is present: Blue Screen, Red Screen, Green Screen,Black Screen, or White Screen.OSD Trans.: To adjust the level of OSD transparency.OSD H: To adjust the OSD horizontal position.OSD V: To adjust the OSD vertical position.Zoom All:Use the “<” or “>” button to Zoom-In or Zoom-Out of the image/video.OSD Time:OSD Menu display time-out options: 30s, 20s, 10s, Off.U/D Zoom: Press the “<” or “>” button to Zoom In or Zoom Out(stretch or shrink) the image/video vertically.L/R Zoom Press the “<” or “>” button to Zoom In or Zoom Out(stretch or shrink) the image/video horizontally.Backlight To adjust the monitor backlight brightness.USB Upgrade: To upgrade the embedded firmware application, copy theupgrade file to a USB drive, and via a USB cable, connectthe USB drive to the USB upgrade port. Then press the“>” key to begin the upgrade process. After the upgrade iscomplete, the device will automatically restart. To avoidany issues, upgrading this device should be performedwith the assistance of Technical Support.Reset: While in the Reset Sub-Menu, press the “>” button, toreturn the unit to its original settings.4.2.3 Main Menu Bar – FunctionsFunctionsCenter Marker: Use to set the center mark (cross mark) on the display.Safe Frames: To adjust screen marker to (off, 96%, 93%, 90%,85%, 80%, or 2.35:1)Image Freeze: Freeze the video for screen capture.Image Flip: Flip the image/video horizontally and vertically (H_V Flip),horizontally (H Flip), or vertically (V Flip) around flip, or set toOff (default).Check field: To switch the screen between: Color, Monochrome, Red,Green, and Blue modes.P2P: Pixel to Pixel,forces the resolution of the image/video to be consistent with display physical resolution.Focus Assist:This function helps the user focus an HDMI image/video.When Focus Assist is enabled (turned On), the image/videoreceived switches to a monochrome view and a red outline isadded to high contrast edges. This makes it easier tomanually focus sources such as cameras, etc. Once focus isachieved, disable (turned Off) Focus Assist.4.2.4 Main Menu Bar – Custom ButtonsCustom ButtonsF1:Setting custom button F1: Select custom button “F1”, press the “>” or “<” button to pop-up the “F” button functions andselect between (Center Marker, Safe Frames, Check Field,Focus Assist, Aspect Ratio, Image Flip, Pixel to Pixel “P2P”,or Image Freeze). Then press the “∧/F1” button to assign it tothe “F1” custom button, then press the “MENU” button toconfirm.F2:Setting custom button F2: Follow the same procedure asabove, but substitute with the “F2” and “∧/F2” buttons.F3:Customized button. Procedure is the same as F1.5.0 Technical Specifications6.0. Troubleshooting6.1 Only Monochrome or Single Color Image/Video:① Check the Saturation, Brightness & Contrast adjustment.② Check the unit "Check Field" settings. Is "Check Field" in Monochromeimage/video, or in another single color state? If so, change to “Color”mode.6.2 No Image/Video after Power On① Check condition of the signal cable and connection. Also if the display iscorrectly synchronized with the input signal. Press the “Mode” button to test and confirm the correct setting.② Make sure to use a standard AV connector/adapter to connect to the unit.6.3 No Sound Output① Volume control may be too low. Press the Volume Up button to increasethe volume.② Check the source Audio signal and confirm that Audio is present. Ifavailable, test on a separate device.Important Note:If you still cannot diagnose the problem, please call MuxLab Customer Technical Support at 877-689-5228 (toll-free in North America) or (+1) 514-905-0588 (International).2321 Cohen St, Montreal Quebec, Canada. H4R 2N7 Tel: (514) 905-0588 Fax: (514) 905-0589Toll Free (North America): (877) 689-5228E-mail: ***************URL: 。
格非科技 VIO MFC-UDC 高标清数字视频转换器 说明书
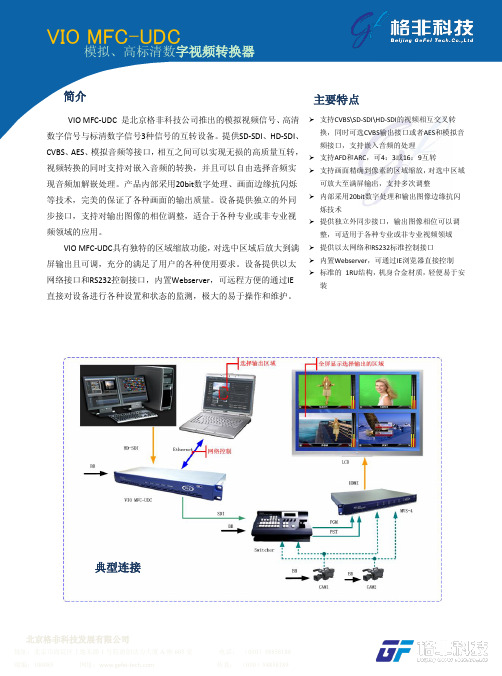
简介VIO MFC-UDC 是北京格非科技公司推出的模拟视频信号、高清数字信号与标清数字信号3种信号的互转设备。
提供SD-SDI 、HD-SDI 、CVBS 、AES 、模拟音频等接口,相互之间可以实现无损的高质量互转,视频转换的同时支持对嵌入音频的转换,并且可以自由选择音频实现音频加解嵌处理。
产品内部采用20bit 数字处理、画面边缘抗闪烁等技术,完美的保证了各种画面的输出质量。
设备提供独立的外同步接口,支持对输出图像的相位调整,适合于各种专业或非专业视频领域的应用。
VIO MFC-UDC 具有独特的区域缩放功能,对选中区域后放大到满屏输出且可调,充分的满足了用户的各种使用要求。
设备提供以太网络接口和RS232控制接口,内置Webserver ,可远程方便的通过IE 直接对设备进行各种设置和状态的监测,极大的易于操作和维护。
支持CVBS\SD-SDI\HD-SDI 的视频相互交叉转换,同时可选CVBS 输出接口或者AES 和模拟音频接口,支持嵌入音频的处理 支持AFD 和ARC ,可4:3或16:9互转 支持画面精确到像素的区域缩放,对选中区域可放大至满屏输出,支持多次调整 内部采用20bit 数字处理和输出图像边缘抗闪烁技术提供独立外同步接口,输出图像相位可以调整,可适用于各种专业或非专业视频领域 提供以太网络和RS232标准控制接口 内置Webserver ,可通过IE 浏览器直接控制 标准的 1RU 结构,机身合金材质,轻便易于安装VIO MFC-UDC模拟、高标清数字视频转换器主要特点北京格非科技发展有限公司地址:北京市海淀区上地东路1号院盈创动力大厦A 座603室 电话: (010)58858188 邮编:100085 网址: 传真: (010)58858189典型连接状态指示:当前处理输入信号指示灯/当前处理输出信号指示灯/电源指示灯液晶菜单控制: 输入、输出格式输出分辨率选择/行场相位调整/区域缩放坐标设置/亮度设置等外部控制:输出接口: 1*COM (RS232) 1*RJ45电源功耗:模块电源功耗: 2X120W 冗余 输入电压范围: 110~250V AC 输出电压: +12V DC工作温度:工作温度范围: 0℃~35℃视频输入:输入接口: 1*GENLOCK (模拟)1*3G/SD/HD-SDI 1*CVBS视频输出:输出接口: 2*3G/SD/HD-SDI OUT1*3G/SD/HD-SDI LOOP OUT 4*CVBS (选配)音频输入(选配):输入接口: 2*AES(阻抗75欧)2*Analog Audio (3-pin ,Balance)音频输出(选配):输出接口: 2*AES(阻抗75欧)2*Analog Audio ((3-pin ,Balance)技术参数北京格非科技发展有限公司地址:北京市海淀区上地东路1号院盈创动力大厦A 座603室 电话: (010)58858188 邮编:100085 网址: 传真: (010)58858189VIO MFC-X 通用多格式转换器VIO MFC-UDC HD/SD-SDI 到HD/SD-SDI 转换器 VIO MFC- HDMI-SD VGA+HDMI 到SD-SDI 转换器 V IO MFC- HDMI-HD VGA+HDMI 到HD/SD-SDI 转换器。
hdmi转换器原理
hdmi转换器原理HDMI转换器是一种电子设备,用于将高清多媒体接口(HDMI)信号转换成其他类型的视频或音频信号。
它通过分析和重新编码输入信号来实现转换。
HDMI转换器的原理基于数字信号的传输和转换。
HDMI信号是一种数字信号,它包含了视频和音频的数据。
当HDMI信号进入转换器时,转换器首先会解析信号,并将视频和音频数据分开处理。
对于视频信号,HDMI转换器会根据输入信号的特性,如分辨率、刷新率和色彩空间等,重新编码成其他类型的视频信号。
常见的转换包括将HDMI信号转换成VGA、DVI或DisplayPort信号。
这涉及到对视频数据进行重新采样、重新编码和重新同步。
对于音频信号,HDMI转换器会提取出HDMI信号中的音频数据,并将其转换成其他类型的音频信号。
常见的转换包括将HDMI信号转换成立体声音频或光纤/同轴数字音频信号。
这涉及到对音频数据进行解码和重新编码。
转换完成后,HDMI转换器会将转换后的信号输出到相应的输出端口,以供连接到其他设备使用。
输出端口可能是VGA、DVI、DisplayPort、立体声音频插孔、光纤音频接口或同轴音频接口等,具体取决于转换器的设计。
需要注意的是,HDMI转换器只能进行数字信号之间的转换,无法实现模拟信号到数字信号的转换。
若需要将模拟信号(如Composite或Component)转换成数字信号,还需要另外的转换器。
综上所述,HDMI转换器通过解析、重新编码和重新同步输入的HDMI信号,将其转换成其他类型的视频或音频信号,并输出到相应的端口。
这样,用户就可以将HDMI设备连接到不同类型的显示器或音响设备上,实现高质量的多媒体传输。
ProHD-4601 HDMI to SDI 转换器使用说明书
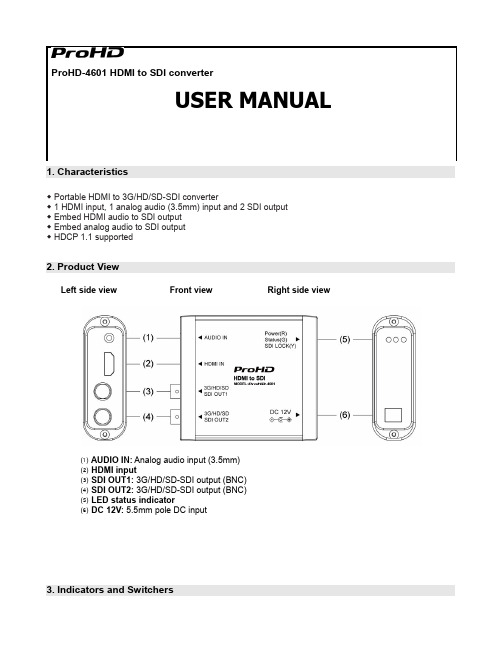
ProHD-4601 HDMI to SDI converter1. Characteristics◆Portable HDMI to 3G/HD/SD-SDI converter◆1 HDMI input, 1 analog audio (3.5mm) input and2 SDI output◆Embed HDMI audio to SDI output◆Embed analog audio to SDI output◆HDCP 1.1 supported2. Product ViewLeft side view Front view Right side view⑴AUDIO IN: Analog audio input (3.5mm)⑵HDMI input⑶SDI OUT1: 3G/HD/SD-SDI output (BNC)⑷SDI OUT2: 3G/HD/SD-SDI output (BNC)⑸LED status indicator⑹DC 12V: 5.5mm pole DC input3. Indicators and SwitchersPower (Red): Power indicator⑴ Status (Green): Status indictor, lights on when there’s HDMI input recognized⑵ SDI LOCK (Yellow): SDI indicator, lights on when there’s SDI output⑶4. Specifications5. Maintenance1. Please do not disassemble the product by yourself.2. Keep the product away from rain or moisture.3. Please use the provided power adapter and if you use third party power adapter, please make sure thevoltage range, supplied power, and polarity of power lead are fit.This model is manufactured, warranted and supported by SWIT Electronics Co., Ltd. / SWIT Electronics USA, LLC , and distributed in North America by JVC Professional Video Products .To obtain service or for further information, please contact:SWIT Electronics USA, LLC.Address: 4300 Stevens Creek Blvd., Suite 230, San Jose, CA 95129Toll free: 1 866 986-SWIT (7948) • Tel: 408 260-8258·Fax: 408 228-8438Email: ************ • Website: 。
爱思创设备图文说明
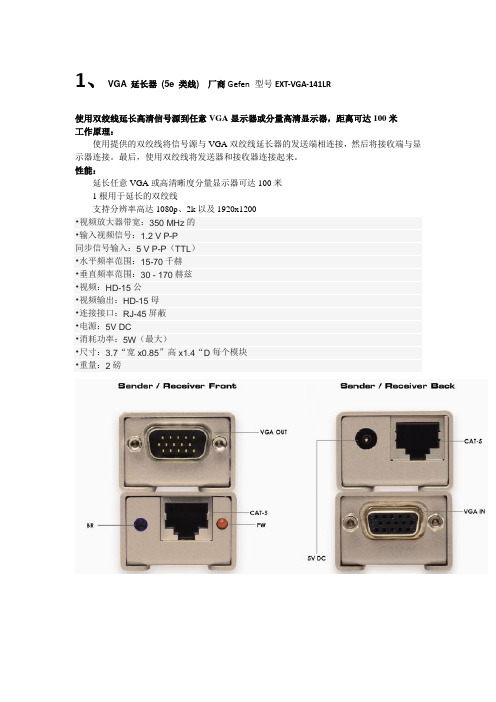
1、VGA 延长器(5e 类线) 厂商Gefen 型号EXT-VGA-141LR使用双绞线延长高清信号源到任意VGA显示器或分量高清显示器,距离可达100米工作原理:使用提供的双绞线将信号源与VGA双绞线延长器的发送端相连接,然后将接收端与显示器连接。
最后,使用双绞线将发送器和接收器连接起来。
性能:延长任意VGA或高清晰度分量显示器可达100米1根用于延长的双绞线支持分辨率高达1080p、2k以及1920x1200•视频放大器带宽:350 MHz的•输入视频信号:1.2 V P-P同步信号输入:5 V P-P(TTL)•水平频率范围:15-70千赫•垂直频率范围:30 - 170赫兹•视频:HD-15公•视频输出:HD-15母•连接接口:RJ-45屏蔽•电源:5V DC•消耗功率:5W(最大)•尺寸:3.7“宽x0.85”高x1.4“D每个模块•重量:2磅2、RS232 延长器厂商:Genfen 型号EXT-RS232可延长您的RS-232设备与您的计算机相距300米。
通过RS-232或其他系列设备,控制您的RS-232接口产品。
从一端到另一端,全部的9针都是完全复制的。
工作原理:使用提供的线缆将RS-232延长器的发送器与您的计算机连接。
将所要延长的RS-232设备连接到RS-232延长器的接收器。
然后,将发送器与接收器使用双绞线连接,距离可达300米。
发送器使用1个5伏电源供电,接收器可由双绞线提供电力。
性能:延长任意RS232设备可达300米远,只需使用1根双绞线,延长适用于数字标志1、发件人RS-232端口(连接计算机到这个端口)2、接收机RS-232端口(绘图板,鼠标/键盘或其他RS-232连接这里的附件)3、CAT5端口- 发送方和接收方连接在一起,在这里CAT5/CAT5e/CAT6电缆(RJ45接头)4、5V直流电源输入发件人(供电系统)5、接收器- 红色LED亮起,表示成功传输电源和RS-232信号发送器和接收器之间4、USB延长器厂商:Aten 型号:UCE60UCE60可让用户延长USB周边设备或集线器与电脑之间的距离达60m,进而突破传统USB连接线的距离限制。
hdmi切换器 原理
hdmi切换器原理HDMI切换器是指一种可以将多个HDMI信号源切换到一个HDMI显示设备上的设备。
它的作用是将多个不同的HDMI信号源(如电视机、电脑、游戏机、DVD播放器等)的输出信号通过切换器进行集中管理,再通过一个HDMI线缆连接到显示设备。
用户可以通过切换器上的按钮、遥控器或者自动切换功能来选择不同的信号源进行显示。
HDMI切换器的原理主要基于HDMI技术。
HDMI是一种高清晰度多媒体接口,它可以通过单一的线缆传输音频和视频信号。
在HDMI切换器内部,有多个HDMI输入端口和一个HDMI输出端口。
当用户选择切换到某个输入端口时,切换器会将选中的输入端口的信号通过内部电路进行处理,并输出到HDMI 输出端口,从而将选中的信号源显示在HDMI显示设备上。
切换器在处理HDMI信号时,需要对输入信号进行解码、处理和重新编码。
首先,它会对输入的HDMI信号进行解码,将视频信号和音频信号分离出来。
接下来,它会根据用户的选择或者自动切换功能,将选中的输入信号重新编码,并输出到HDMI输出端口上。
在重新编码的过程中,切换器会根据HDMI规范对信号进行处理,包括分辨率的调整、色彩空间的转换等。
此外,HDMI切换器还支持一些特殊功能,如远程控制、自动切换等。
远程控制功能可以通过遥控器来操作切换器,使用户可以轻松切换输入信号源。
自动切换功能可以根据信号源的接入情况,自动选择当前有信号输入的端口进行切换,提供更便捷的使用体验。
总的来说,HDMI切换器的原理是基于HDMI技术,通过对输入信号进行解码、处理和重新编码,将多个HDMI信号源切换到一个HDMI显示设备上。
它提供了多种切换方式和特殊功能,使用户可以方便地管理和选择不同的HDMI信号源。
第一标段单频道高标清播出系统技术参数
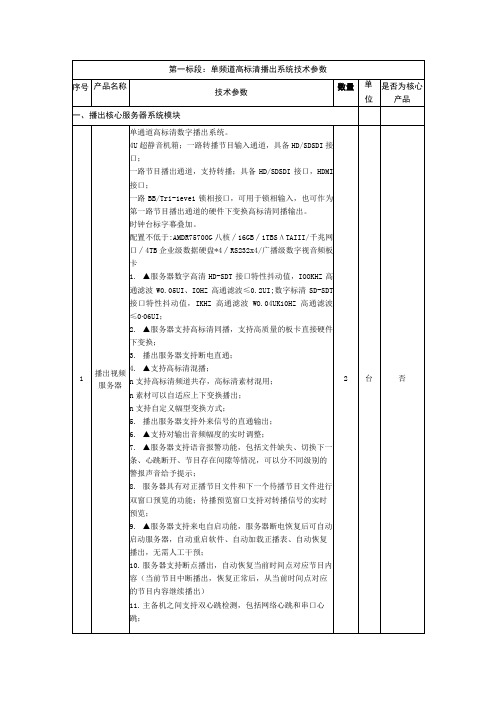
2
台
否
12.▲支持第三备播,可选一体化播出和分离播出作为第三备播,能够与主备播控同时进行加单播出,并能实时响应播控操作;
13.▲播出软件支持定时加载节目单,支持定时加载多单;播出软件支持定时加载字幕单播出;
14.▲支持在线存储区轮询检测功能,可以实时检测节目单中素材是否在线,发现不再自动提交迁移任务,将数据补齐;
19.支持播控界面锁定,只有具有相应权限,输入用户名密码才可解锁进行操作,防止误操作;
20.支持对多存储区的智能统一管理,支持水位线自动监测预警;
21.支持二级存储组策略,一个存储区可以由多个访问站点组成,二级阵列存储容量不足时便于扩展;
22.支持AFD信息识别;
23.素材审片支持倍速预览,可以倍速前进或者后退;
第一标段:单频道高标清播出系统技术参数
序号
产品名称
技术参数
数量
单
位
是否为核心产品
一、播出核心服务器系统模块
1
播出视频服务器
单通道高标清数字播出系统。
4U超静音机箱;一路转播节目输入通道,具备HD/SDSDI接口;
一路节目播出通道,支持转播;具备HD/SDSDI接口,HDMI接口;
一路BB/Tri-1eve1锁相接口,可用于锁相输入,也可作为第一路节目播出通道的硬件下变换高标清同播输出。
电源管理采用1+1冗余电源配置,提高存储的安全性。主机通道本次配置4个IGb/S自适应以太网口;扩展能力具备存储容量扩容能力,可选配磁盘扩展柜(JBOD),最大可连接不少于7个扩展柜。
管理软件集成中文版存储系统管理软件。
管理界面要求要求配置图形界面管理工具。
MINI 3G SDI to HDMI 转换器说明书
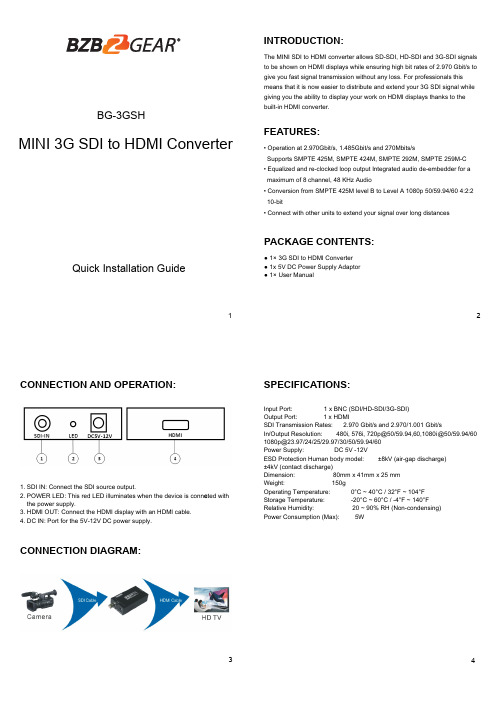
1MINI 3G SDI to HDMI Converter2INTRODUCTION:FEATURES:34The MINI SDI to HDMI converter allows SD-SDI, HD-SDI and 3G-SDI signals to be shown on HDMI displays while ensuring high bit rates of 2.970 Gbit/s to give you fast signal transmission without any loss. For professionals this means that it is now easier to distribute and extend your 3G SDI signal while giving you the ability to display your work on HDMI displays thanks to the built-in HDMI converter.PACKAGE CONTENTS:CONNECTION DIAGRAM:SPECIFICATIONS:CONNECTION AND OPERATION:● 1× 3G SDI to HDMI Converter ● 1x 5V DC Power Supply Adaptor ● 1× User Manual1. SDI IN: Connect the SDI source output.2. POWER LED: This red LED illuminates when the device is conne c ted with the power supply.3. HDMI OUT: Connect the HDMI display with an HDMI cable.4. DC IN: Port for the 5V-12V DC power supply.Input Port: 1 x BNC (SDI/HD-SDI/3G-SDI)Output Port: 1 x HDMISDI Transmission Rates: 2.970 Gbit/s and 2.970/1.001 Gbit/sIn/Output Resolution: 480i, 576i, 720p@50/59.94,60,1080i@50/59.94/60 ***********/24/25/29.97/30/50/59.94/60Power Supply: DC 5V -12VESD Protection Human body model: ±8kV (air-gap discharge) ±4kV (contact discharge)Dimension: 80mm x 41mm x 25 mm Weight: 150gOperating Temperature: 0°C ~ 40°C / 32°F ~ 104°F Storage Temperature: -20°C ~ 60°C / -4°F ~ 140°F Relative Humidity: 20 ~ 90% RH (Non-condensing)Power Consumption (Max): 5W• Operation at 2.970Gbit/s, 1.485Gbit/s and 270Mbits/sSupports SMPTE 425M, SMPTE 424M, SMPTE 292M, SMPTE 259M-C • Equalized and re-clocked loop output Integrated audio de-embe dder for a maximum of 8 channel, 48 KHz Audio• Conversion from SMPTE 425M level B to Level A 1080p 50/59.94/60 4:2:2 10-bit• Connect with other units to extend your signal over long distancesBG-3GSHQuick Installation Guide56WARRANTY:MISSION STATEMENT:BZBGEAR manifests from the competitive nature of the audiovisual industry to innovate while keeping the customer in mind. AV solutions can cost a pretty penny, and new technology only adds to it. We believe everyone deserves to see, hear, and feel the advancements made in today’s AV world without having to break the bank. BZBGEAR is the solution for small to medium-sized applications requiring the latest professional products in AV. We live in a DIY era where resources are abundant on the internet. With that in mind, our team offers system design consultation and expert tech support seven days a week for the products in our BZBGEAR catalog. You’ll notice comparably lower prices with BZBGEAR solutions, but the quality of the products is on par with the top brands in the industry. The unparalleled support from our team is our way of showing we care for every one of our customers. Whether you’re an integrator, home theater enthusiast, or a do-it-yourselfer, BZBGEAR offers the solutions to allow you to focus on your project and not your budget.BZBGEAR wants to assure you peace of mind. We're so confident in the quality of our products that along with the manufacturer's one-year limited warranty, we are offering free second-year warranty coverage upon registration*!Taking advantage of this program is simple, just follow the steps below:1. Register your product within 90 days of purchase by visiting /warranty.2. Complete the registration form. Provide all necessary proof of purchase details, including serial number and a copy of your sales receipt.Forquestions,**************************************************.For complete warranty information, please visit /warranty or scan the QR code below.*Terms and conditions apply. Registration is required.。
显卡接口转换HDMI转VGADP转HDMI等实用指南
显卡接口转换HDMI转VGADP转HDMI等实用指南显卡接口转换:HDMI转VGA、DP转HDMI等实用指南随着电子设备的快速发展和普及,我们在日常生活中经常会遇到不同设备之间的连接问题。
显示器作为电子设备中不可或缺的一部分,不同型号和规格的显示器常常需要与不同类型的设备进行连接。
而显卡接口转换器则成为了解决这一问题的重要工具。
本文将为大家介绍几种常用的显卡接口转换器,包括HDMI转VGA、DP转HDMI等,并提供一些实用指南。
一、HDMI转VGAHDMI转VGA是我们常见的一种显卡接口转换器。
由于现在大部分电脑和电视都支持HDMI接口,而一些老式的投影仪和显示器只支持VGA接口,所以当我们需要将电脑连接到老式显示设备时,就需要使用HDMI转VGA转换器。
使用HDMI转VGA转换器的步骤如下:1.将HDMI转VGA转换器的HDMI端口插入电脑的HDMI接口上。
2.将VGA线连接到HDMI转VGA转换器的VGA端口上。
3.将另一端的VGA线连接到显示器的VGA接口上。
4.打开电脑和显示器,进入电脑设置界面,选择显示设置。
5.在显示设置中,选择“检测显示器”或者“扩展显示”,根据自己的需求选择合适的显示方式。
需要注意的是,HDMI转VGA转换器只能实现单向转换,即将HDMI信号转换为VGA信号。
而且,由于HDMI和VGA之间的信号传输方式不同,转换过程中可能会有一定的信号损失,所以在使用过程中可能会存在一些画面质量的差异。
二、DP转HDMIDP转HDMI是另一种常见的显卡接口转换器。
DP,即DisplayPort,是一种数字信号传输接口,广泛应用于计算机和显示设备之间的连接。
而HDMI则是一种高清晰度多媒体接口,用于连接高清电视、投影仪等高清显示设备。
当我们的电脑显卡是DP接口的时候,而显示设备只支持HDMI接口时,就需要使用DP转HDMI转换器。
使用DP转HDMI转换器的步骤如下:1.将DP转HDMI转换器的DP端口插入电脑的DP接口上。
hdmi 切换器原理
hdmi 切换器原理
HDMI切换器是一种用于在多个HDMI源设备和目标设备之间切换信号的设备。
它的工作原理是基于数码信号的传输和选择。
HDMI(高清晰度多媒体接口)是一种用于将音频和视频信号
传输到高清电视或显示器的接口标准。
它通过数字信号传输,可以提供高质量的音视频体验。
HDMI切换器主要由多个HDMI输入端口和一个HDMI输出
端口组成。
当多个HDMI源设备连接到输入端口上时,切换
器通过一个选择器来选择其中一个输入源,并将其信号传递到输出端口上,以供目标设备使用。
选择器通常由一个小型电子开关组成,可以根据用户的选择或设备的自动切换功能来控制信号的切换。
用户可以通过切换器上的按钮、遥控器或其他外部控制设备来选择要传输到输出端口的输入源。
在切换过程中,切换器会根据输入源的类型和分辨率等参数,进行信号处理和适配,以确保输出端口接收到的信号与目标设备的要求相符。
这样可以确保输出信号的质量和兼容性,并提供最佳的音视频效果。
总之,HDMI切换器通过选择输入源,并进行信号处理和适配,将选定的输入源信号传递到输出端口,以实现多个HDMI设
备间的信号切换。
它为用户提供了方便和灵活的多媒体体验,使多个HDMI设备可以轻松共享一个显示屏幕或音频系统。
星辰科技 SDI2HD 3G-SDI 支持 SDI 到 HDMI 转换器说明书
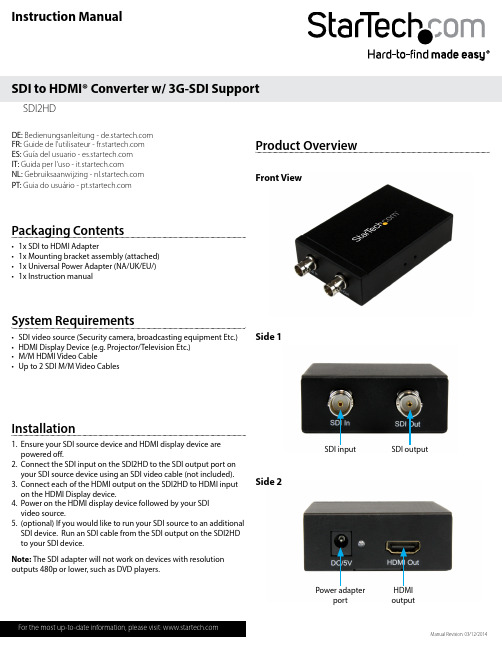
Instruction ManualDE: Bedienungsanleitung - FR: Guide de l'utilisateur - ES: Guía del usuario - IT: Guida per l'uso - NL: Gebruiksaanwijzing - PT: Guia do usuário - Manual Revision: 03/12/2014Packaging Contents• 1x SDI to HDMI Adapter • 1x Mounting bracket assembly (attached) • 1x Universal Power Adapter (NA/UK/EU/) • 1x Instruction manualSystem Requirements• SDI video source (Security camera, broadcasting equipment Etc.)• HDMI Display Device (e.g. Projector/Television Etc.)• M/M HDMI Video Cable • Up to 2 SDI M/M Video CablesSDI2HD SDI to HDMI® Converter w/ 3G-SDI SupportInstallation1. Ensure your SDI source device and HDMI display device are powered off.2. Connect the SDI input on the SDI2HD to the SDI output port on your SDI source device using an SDI video cable (not included).3. Connect each of the HDMI output on the SDI2HD to HDMI input on the HDMI Display device.4. Power on the HDMI display device followed by your SDI video source.5. (optional) If you would like to run your SDI source to an additional SDI device. Run an SDI cable from the SDI output on the SDI2HD to your SDI device.Product Overview Front View Side 1Side 2Power adapter port HDMI output SDI input SDI output Note: The SDI adapter will not work on devices with resolution outputs 480p or lower, such as DVD players.FCC Compliance StatementThis equipment has been tested and found to comply with the limits for a Class B digital device, pursuant to part 15 of the FCC Rules. These limits are designed to provide reasonable protection against harmful interference in a residential installation. This equipment generates, uses and can radiate radio frequency energy and, if not installed and used in accordance with the instructions, may cause harmful interference to radio communications. However, there is no guarantee that interference will not occur in a particular installation. If this equipment does cause harmful interference to radio or television reception, which can be determined by turning the equipment off and on, the user is encouraged to try to correct the interference by one or more of the following measures:• Reorient or relocate the receiving antenna.• Increase the separation between the equipment and receiver.• Connect the equipment into an outlet on a circuit different from that to which the receiver is connected.• Consult the dealer or an experienced radio/TV technician for help.Use of Trademarks, Registered Trademarks, and other Protected Names and SymbolsThis manual may make reference to trademarks, registered trademarks, and other protected names and/or symbols of third-party companies not related in any way to . Where they occur these references are for illustrative purposes only and do not represent an endorsement of a product or service by , or an endorsement of the product(s) to which this manual applies by the third-party company in question. Regardless of any direct acknowledgement elsewhere in the body of this document, hereby acknowledges that all trademarks, registered trademarks, service marks, and other protected names and/or symbols contained in this manual and related documents are the property of their respective holders.Technical Support’s lifetime technical support is an integral part of our commitment to provide industry-leading solutions. If you ever need help with your product, visit /support and access our comprehensive selection of online tools, documentation, and downloads.For the latest drivers/software, please visit /downloadsWarranty InformationThis product is backed by a one year warranty. In addition, warrants its products against defects in materials and workmanship for the periods noted, following the initial date of purchase. During this period, the products may be returned for repair, or replacement with equivalent products at our discretion. The warranty covers parts and labor costs only. does not warrant its products from defects or damages arising from misuse, abuse, alteration, or normal wear and tear.Limitation of LiabilityIn no event shall the liability of Ltd. and USA LLP (or their officers, directors, employees or agents) for any damages (whether direct or indirect, special, punitive, incidental, consequential, or otherwise), loss of profits, loss of business, or any pecuniary loss, arising out of or related to the use of the product exceed the actual price paid for the product. Some states do not allow the exclusion or limitation of incidental or consequential damages. If such laws apply, the limitations or exclusions contained in this statement may not apply to you.Specifications。
星科(StarTech)SDI2HD 3G SDI到HDMI转换器商品说明说明书
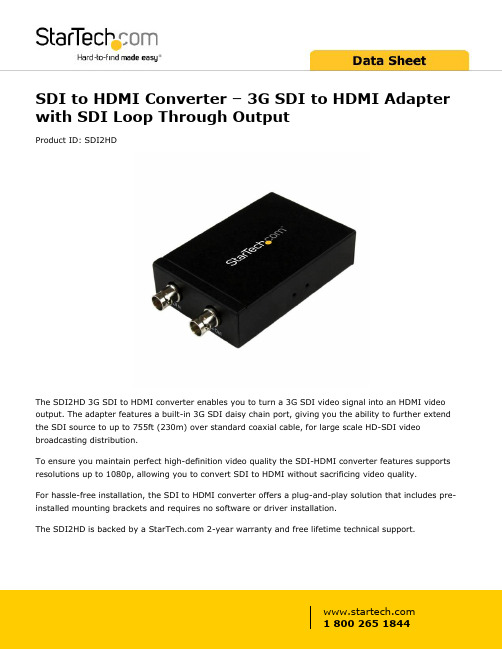
SDI to HDMI Converter – 3G SDI to HDMI Adapter with SDI Loop Through OutputProduct ID: SDI2HDThe SDI2HD 3G SDI to HDMI converter enables you to turn a 3G SDI video signal into an HDMI video output. The adapter features a built-in 3G SDI daisy chain port, giving you the ability to further extend the SDI source to up to 755ft (230m) over standard coaxial cable, for large scale HD-SDI video broadcasting distribution.To ensure you maintain perfect high-definition video quality the SDI-HDMI converter features supports resolutions up to 1080p, allowing you to convert SDI to HDMI without sacrificing video quality.For hassle-free installation, the SDI to HDMI converter offers a plug-and-play solution that includes pre-installed mounting brackets and requires no software or driver installation.The SDI2HD is backed by a 2-year warranty and free lifetime technical support.Certifications, Reports and Compatibility Applications•Convert a 3G SDI video run to HDMI from up to 755ft (300m) away•Connect your HDMI display to a 3G SDI video run•Output to an HDMI Display and continue your 3G SDI run up to an additonal 755ft (300m) using the daisy chain portFeatures•Built-in 3G SDI daisy chain port•Receives 3G SDI signals from up to 755ft (230m)•Supports video resolutions up to 1920x1200 / 1080p•Plug and play SDI to HDMI conversion•Supports AES & EBU Audio Decoding•Pre-installed Mounting bracketsWarranty 2 YearsHardware Active or Passive Adapter ActiveAudio YesAV Input SDI (BNC)AV Output HDMISDI (BNC)Cabling CoaxialChipset ID Gennum - GV7600Daisy-Chain YesPorts1Rack-Mountable YesPerformance Audio Specifications8 Channel Digital Audio @ 48 kHzMax Distance230 m / 755 ftMaximum Cable Length754.4 ft [230 m]Maximum Data Transfer Rate 2.97 GbpsMaximum Digital Resolutions1080pSupported Resolutions1920x1080 (1080p) @ 24, 25, 30, 50 & 60 FPS1920x1080 (1080i) @ 50 & 60 FPS1280x720 (720p) @ 24, 25, 30, 50 & 60 FPSSupports 525i & 625i SD D1 formatSupports 8-bit or 10-bit component digital video RGB or YCbCr 4:4:4 sampled YCbCr 4:2:2 or 4:2:0 sampledWide Screen Supported YesConnector(s)Connector A 1 - SDI (BNC) Receptacle InputConnector B 1 - HDMI (19 pin) Female OutputConnector Type(s) 1 - SDI (BNC) Receptacle Output Power Center Tip Polarity PositiveInput Current0.5 AInput Voltage100 - 240 ACOutput Current 2 AOutput Voltage 5 DCPlug Type MPower Consumption (In Watts)10Power Source AC Adapter IncludedEnvironmental Humidity5% to 90 % RH (no condensation)Operating Temperature0°C to 70°C (32°F to 158°F)Storage Temperature-10°C to 80°C (14°F to 176°F)Color BlackPhysicalCharacteristicsProduct Height 1 in [2.5 cm]Product Length 3.9 in [10 cm]Product Width 2.8 in [70 mm]Weight of Product7.3 oz [207 g]PackagingPackage Height 2 in [52 mm]InformationPackage Length 6 in [15.2 cm]Package Width8.5 in [21.5 cm]Shipping (Package) Weight17.4 oz [492 g]What's in the Box Included in Package 1 - SDI to HDMI Adapter1 - Mounting bracket assembly (attached)1 - Universal Power Adapter (NA/UK/EU/)1 - Instruction manualProduct appearance and specifications are subject to change without notice.。
3G-SDI HDMI FULL HD Gen-lock 摄像机操作手册说明书
3G-SDI/HDMI FULL HD Gen-lock Camera OPER ATION GUIDE GEN3G-200To prevent damage which may result in fire or electric shock hazard, do not expose this appliance to rain or moisture.1. Be sure to use only the standard adapter that is specified in the specification sheet. Using any other adapter could cause fire,electrical shock, or damage to the product.2. Incorrectly connecting the power supply or replacing battery may cause explosion,cause excessive heat or fire3. Do not connect multiple cameras to a single adapter. Exceeding the capacity may cause excessive heat or fire.4. Securely plug the power cord into the power receptacle. Insecure connection may cause fire.5. When installing the camera, fasten it securely and firmly. A falling camera may cause personal injury.WARNINGThis symbol indicates that dangerousvoltage consisting a risk of electric shockis present within this unit.PRECAUTION This exclamation point symbol is intended to alert the user to the presence of important operating and maintenance (servicing) instructions in the literature accompanying the appliance.cause personal injury due to fire, electric shock, or falling objects.7. Do not install the unit in humid, dusty, or sooty locations. Doing so may cause fire or electric shock.8. If any unusual smells or smoke come from the unit, stop using the product. Immediately disconnect the power source and contact the servicecenter. Continued use in such a condition may cause fire or electric shock.9. . If this product fails to operate normally, contact the nearest service center. Never disassemble or modify this product in any way.Please read this Operation Guide before installing and using the camera & retain this copy for your reference.1. Always follow the instructions in the operations guide when applying power. Fire and equipment damage can occur if power isapplied incorrectly. For the correct power supply,refer to the specifications page.2. Do not use camera if fumes, smoke or a strange odor is emitted from the camera, or if it seems not functional correctly.Disconnect the power source immediately and consult with your supplier.3. Do not use the camera in extreme environments where high temperatures or high humidity exists. Use the camera underconditions where temperatures are between 32°F ~ 104°F, and humidity is below 90%.4. If installed close to a TV, radio transmitter, magnet, electric motor transformer or audio speakers the magnetic field generatedmay interfere with or distort the image.5. Try to avoid fluorescent light reflections, unstable light conditions, direct pointing toward the sun. Use caution when operating the camerain the vicinity of spotlights or other bright lights and light reflecting objects.6. To prevent damage, do not drop the camera or subject it to strong shock or vibration.L- Left | R- Right | U- Up | D- Down |- Select • 2.1 Megapixel CMOS progressive sensor provides superb image quality and excellent color reproduction.• SMPTE 292M & 424M standard high definition video format including 59.94Hz.• ‘Self-Adaptive’ resolution and frame rate feature allows camera to self-adopt to the external reference sync signal.• Highly compatible with Tri Level reference.• Versatile, compact and rugged design.• Built in OSD control button & control via SONY VISCA protocol.• Embedded audio via SDI & HDMI.• Wide range of white balance.• High Dynamic Range & Noise Reduction.• Simultaneous SDI and HDMI Output.1. Move the Cursor Up/Down to Choose Menu To move from item to item in the menu, move the joystick to the Up/Down.2. Change the Value To change the value of the selected item, move the joystick to the Left/Right.3. Shift to the Sub Menu of the Chosen MenuTo go into sub menu, press SEL key. The menu items with always have its sub menu.MAIN MENU*WB CONTROLAE CONTROLDAY /NIGHTAUDIOIMAGE CONTROL SPECIALSETUPRESET EXITLENSDC IRIS MANUAL IRIS WHITE BALANCE AUTO ATW PUSH MANUAL EXPOSURE AUTO SHUTTER PRI. FLICKER-LESS MANUAL BLACK-LIGHT SPOT HDR BLC OFF ACEDAY/NIGHTCOLOR NIGHTAUDIO MICMIC LINE OFFGEN-LOCKMODE, OUTPUT EN, H-SYNC, PHASE SETIMAGE CONTROLCONTRAST, SATURATION, MIRROR, FLIP, D-ZOOMNOISE REDUCTION, GAMMA, FRAME RATESETTINGSOFTWARE VERSION, CAM ID, BAUDRATE, LANGUAGE, DEFECT DETRESETSPOT HDR BLC OFF EXITMENU *LENS DC IRISWB CONTROL ATWEXPOSURE AUTOBACKLIGHTDAY/NIGHT COLORAUDIO OFFGENLOCKIMAGE CONTROLSPECIALRESETEXITLENS DC IRIS Select “DC IRIS” when using the DC Iris lens (CS/C Mount). Iris will be controlled by the camera.• AUTO : Camera will automatically adjust the white balance if the color temperature falls within 3,000°K ~ 8,000°K.• ATW : Wider range of color temperature than “AUTO” mode. Camera will automatically adjust the white balance if the color temperature falls within 1,900°K ~ 11,000°K.• PUSH :Push mode is used if “AUTO” or “ATW” cannot produce the proper white balance.Place a white paper in front of the camera when using the “PUSH” mode to self-adopt.• MANUAL : Manual mode has “COLOR TEMP”, “RED GAIN”, and “BLUE GAIN” options for user preferred settings.* Adjust white balance using “AUTO” and “ATW” modes before using “PUSH” or “MANUAL” modes. White balance may not work properly if the camera is facing toward a light source.MENU*LENS MANUAL IRISWB CONTROL ATWEXPOSURE AUTOBACKLIGHTDAY/NIGHT COLOREXPOSURE Camera exposure level can be adjusted using four different modes.: 0~20 : 0~20: OUTDOOR, INDOOR, DE-BLUR Shutter speed is automatically: OFF, x2, x4, x8, x16, x32, x64AUTO Auto mode will adjust the exposure level automatically.Detailed fine tuning options are available under this menu.MENULENS MANUAL IRISWB CONTROL ATW*EXPOSURE AUTOBACKLIGHTDAY/NIGHT COLOREXPOSURESHUTTER PRI.Shutter priority mode provides more detailed shutter speed option. All other controls are tuned for the selected shutter speed.: 0~20: 0~20: 1/2 ~ 1/40,000 MENULENS MANUAL IRISWB CONTROL ATW*EXPOSURE SHUTTER PRIBACKLIGHTDAY/NIGHT COLOREXPOSURE FLICKER-LESS Flicker-less mode provides a proper image sensor frequency to match the power frequency in order to minimize video flicker. • EXP. COMPENSATION : 0~20 ( Exposure level can be adjusted by the light meter ): 0~20: AUTO ( Shutter speed is automatically controlled by the camera )MENULENS MANUAL IRISWB CONTROL ATW*EXPOSURE FLICKERBACKLIGHTDAY/NIGHT COLOREXPOSUREMANUALFlicker-less mode provides a proper image sensor frequency to match the power frequency in order to minimize video flicker. • GAIN : AUTO, -3dB ~ +30dB: 1/2 ~ 1/40,000MENULENS MANUAL IRIS WB CONTROL ATW *EXPOSURE MANUAL BACKLIGHTDAY/NIGHT COLORSPOTBACK-LIGHTCamera provides multiple options for BACK-LIGHT requirements.MENULENS MANUAL IRIS WB CONTROL ATWMIC: Camera will receive MIC level audio input by selecting “MIC” mode.• AUDIO LEVEL : -12dB ~ +59dBAudio level can be manually adjusted from this menu.• MIC ATTENUATION : ON, OFFAudio input attenuation can be controlled from this menu to minimize the audio noise level.• SAMPLE RATE : 16, 20, 24, 32: -12dB ~ +59dB: ON, OFF: 16, 20, 24, 32AUDIOCamera supports external analog audio input (3.5mm). Audio will be embedded to both SDI and HDMI outputs.MENULENS MANUAL IRIS WB CONTROL ATW EXPOSURE MANUAL BACKLIGHTDAY/NIGHT COLOR *AUDIO MIC GENLOCK IMAGE CONTROL SETTING RESET EXITGEN-LOCKCamera is equipped with an external Tri-Level reference signal input for seamless switching. Up to 3G-SDI reference signal can be accepted and camera will self-adjust to both resolution and frame rate based on the reference signal.• MODEEnable or Disable the external reference signal.• OUTPUT ENEnable or Disable the reference signal loop out.• H-SYNC PHASEAdjust H-Sync pixel offset for a fine tuning.MENULENS MANUAL IRIS WB CONTROL ATW EXPOSURE MANUAL BACKLIGHTDAY/NIGHT COLOR AUDIO MIC *GENLOCK IMAGE CONTROL SETTING RESET EXITIMAGE CONTROLCamera provides multiple options to adjust image quality.• CONTRAST : 0 ~ 64“CONTRAST” controls the range between dark and bright areas.• SATURATION : 0 ~ 20“SATURATION” sets the level of color vividness.• SHARPNESS : 0 ~ 20Image outline or edges will be clearer and pronounced.• MIRROR : ON, OFF Image is rotated horizontally.• FLIP : ON, OFF: 1.0X ~ 16.0X: OFF, LOW, MIDDLE, HIGH : LOW, MIDDLE, HIGH, STANDARD, STRAIGHT/ 29.97 / 30 / 50 / 59.94 / 60 1080i50 / 59.94 / 60 720p25 / 30 / 50 / 59.94 / 60MENULENS MANUAL IRIS WB CONTROL ATW EXPOSURE MANUAL BACKLIGHTDAY/NIGHT COLOR AUDIO MIC GENLOCK *IMAGE CONTROL SETTING RESET EXITSETTINGCamera software and remote control information is under this menu. You can remotely access the features via RS485. • SOFTWARE VERSION Camera software information.• CAM ID : 0~255Set camera ID for remote camera control access. Camera supports SONY VISCA and PELCO protocols.• BAUDRATE : 2,400 ~ 115,200Set baud rate for remote camera control access.• LANGUAGE :Camera provides an auto pixel correction.MENULENS MANUAL IRIS WB CONTROL ATW EXPOSURE MANUAL BACKLIGHTDAY/NIGHT COLOR AUDIO MIC GENLOCK IMAGE CONTROL *SETTING RESET EXITRESETCamera setting can be defaulted to the “FACTORY” er can also save the desired setting as the “USER” setting.CHANGEBefore defaulting the camera setting, make sure to select the desired setting. • FACTORYSelect “FACTORY” if factory default setting is needed. • USER : Select “USER” if user saved setting is needed.• SAVE : To save a user desired setting, Select “USER” from above menu and “SAVE”.* “FRAME RATE”, “CAM ID”, “BAUDRATE” will not change.MENULENS MANUAL IRIS WB CONTROL ATW EXPOSURE MANUAL BACKLIGHTDAY/NIGHT COLOR AUDIO MIC GENLOCK IMAGE CONTROL SETTING *RESET EXITVIDEOImage Sensor 1/3” inch Progressive CMOS Sensor Size 5.346mm x 3.003mm (16:9) Effective Pixels Horizontal: 1920, Vertical: 1080 Pixel Size 2.75 µm x 2.75 µmResolution 1080p & 1080i: 1920 x 1080720p & 720i: 1280 x 720 Resolution Rate 1080 60p/59.94p/50p/30p/29.97p/ 25p 1080 60i/59.94i/50i720 60p/59.94p/50p/30p/25p Output HD-SDI/3G-SDI (1 BNC) / HDMI 1.3a Color Space 4:2:2 (YCbCr) 10bitMin. Illumination 0.2Lux (Day), 0.1Lux (Night),0.005Lux (Slow Shutter ON)White Balance Auto & Manual (9,000 K - 11,000 K) LENSLens CS Mount ( Default 4mm HD Lens )AUDIO INPUTInput 3.5mm Analog Audio Input through I/O Cable Sample Rate 16/24/32 BitsSTANDARDSMPTE SMPTE 292M, SMPTE 424M SYNCHRONIZATIONGen-lock External Tri-Level InputPHYSICALCamera Control RS-485 VISCA, OSD ButtonOperation Temp 32° F - 104° FDimension 49mm x 49m x 71mm / 1.92” x 1.92” x 2.79”(With default 4mm Lens)Weight 180g / 0.39lbs (With default 4mm Lens) Power 6W at 12VDC (+9 - +15VDC)*Specification are subject to change without notice.Visit us:/supportE-mail us:***********************Give us a Call:Toll Free: 844.631.8367 |Tel: 909.333.7421 Operating Hours: Mon-Fri | 8:00am – 5:00pm PST。
产品应用-SDI to HDMI+VGA+AV 转换盒 MDIN380

MDIN165
MDIN165
MDIN27 0
方案应用
■ 产品简介
) 视频转换盒 (HD-SDI HD-SDI)
视频转换盒(converter Box) 是视频接口转换的设 备,在家庭应用上 DVD,DV,PSP,Wii,PS3,PC 等 设备,视频接口都不是统一的标准,那就需要用转换 盒来连接到格式各样接口的显示屏上,在视频监控和 广播应用上各种视频源设备亦不是统一的接口标准, 也需要通过转换盒来转换输出接口。 通用视频接口主要有:AV,YPbPr,HDMI,VGA,DVI, DisplayPort,MHL,BNC,HD-SDI 等。任何有视频接 口转换的场合,都需要用到视频转换盒。 本方案基于韩国 MIT 公司的系列芯片可覆盖大部分主 流的接口转换盒应用。
■ 图解
深圳市友邦兴业科技有限公司 / ShenZhen Boomtek Technology Ltd.
地址:深圳市福田区彩田南路 3002 号彩虹大厦 23BC 室 梁生 Mob:13480612865 Tel: 0755-83751315 Fax: 0755-83751715
■ 功能特点
接口高度集成,降低系统方案成本 独到的 iMarv 技术,顶级的图像品质 支持任意分辨率的互转,支持任意尺寸的显示器 业内最好的 3D 降噪和 3D 去隔行技术 单芯片设计,内嵌 DDR 软件开发包架构统一,一代产品,多颗芯片通用 双视频输入,画中画变得简单 强大的 OSD,UI 界面美观时尚 芯片选型表:
MiniConverter广播级转换器技术资料
Mini Converte系列广播级转换器技术资料1产品简介科利通Mini Converte是业内领先的广播级转换器,可用于各种信号格式之间的转换,产品可自动检测输入信号,内置时钟恢复机制,配备环出接口,还内嵌了视分功能,甚至还可以进行广播级质量的去交织处理。
Mini Converte系列广播级转换器可实现SDI、HDMI等信号格式之间的0延迟转换,还可实现模拟音频、数字音频的嵌入与解嵌。
产品采用小型化设计、被动散热、低功耗、低噪音,基于纯硬件平台,可保证7×24小时运行的稳定性2SDI To HDMI Duo2.1功能亮点☐双通道、0延迟SDI To HDMI转换器☐可将独立的两路SDI信号分别转换成HDMI输出☐内置Reclocker,保证长距离稳定传输☐12bit精度RGB-YUV转换,确保色彩精准还原☐带有SDI环出和AES音频解嵌监听输出☐对隔行输入可做广播级质量去交织处理2.2产品规格☐SDI输入SD/HD/3G-SDI 自适应数量:2接口:BNC制式:525, 625,1080/50i, 1080/59.94i, 1080/60i, 720/50p, 720/59.94p, 720/60p, 1080/50p, 1080/59.94p, 1080/60p反射损耗:SD: >15dB up to 270MHz, HD: >15dB up to 1.485 GHz, 3Gbps: >10dB up to 2.97 GHz☐HDMI输出数量:2信号标准:HDMI 1.4 (RGB/YUV)接口:HDMI Type ASDI环出数量:2接口:BNC反射损耗:>10 dB up to 2.97 GHz抖动:<0.2 UI传输距离:SD: 400 m, HD: 200 m, 3G: 100 m (Beledn 1694A)☐AES输出数量:2(每路2声道)接口:BNC☐DC 12V电源输入数量:1☐配置拨码Mini USB☐功耗5W☐物理尺寸23mm × 123mm × 92mm☐工作环境温度:0~35℃相对湿度:0%~90%3HDMI To SDI Duo3.1功能亮点☐双通道、0延迟HDMI To SDI转换器☐可将独立的两路HDMI信号分别转换成SDI输出☐内置超稳定的时钟恢复机制,确保SDI指标达广播级☐12bit精度RGB-YUV转换,确保色彩精准还原☐内置SDI输出一分二,减少SDI视分成本☐SDI输出可强制为1080i,以更广泛适配监视设备3.2产品规格☐HDMI输入数量:2接口:HDMI Type A制式:525, 625,1080/50i, 1080/59.94i, 1080/60i, 720/50p, 720/59.94p, 720/60p, 1080/50p, 1080/59.94p, 1080/60p☐SDI输出数量:4接口:BNC反射损耗:>15 dB up to 1.5 GHz, >10 dB form 1.5 GHz to 3 GHz抖动:<0.2 UI传输距离:SD: 400 m, HD: 200 m3G: 100 m (Beledn 1694A)☐DC 12V电源输入数量:1☐配置拨码Mini USB☐功耗5W☐物理尺寸23mm × 123mm × 92mm☐工作环境温度:0~35℃相对湿度:0%~90%4HDMI To SDI Solo4.1功能亮点☐0延迟HDMI到SDI转换器☐可将HDMI信号转换成2路相同的SDI输出☐支持HDMI环出监看,减少HDMI视分成本☐支持模拟和AES音频加嵌,减少外部加嵌器成本☐内置超稳定的时钟恢复机制,确保SDI指标达广播级☐12bit精度RGB-YUV转换,确保色彩精准还原☐SDI输出可强制为1080i,以更广泛适配监视设备4.2产品规格☐HDMI输入数量:1接口:HDMI Type A制式:525, 625,1080/50i, 1080/59.94i, 1080/60i, 720/50p, 720/59.94p, 720/60p, 1080/50p, 1080/59.94p, 1080/60p☐AES 输入声道:2信号标准:AES3接口:BNC,非平衡☐模拟音频输入声道:2接口:3.5mm接口,非平衡☐HDMI环出数量:1信号标准:HDMI 1.4接口:HDMI Type A☐SDI输出数量:2接口:BNC反射损耗:>15 dB up to 1.5 GHz,>10 dB form 1.5 GHz to 3 GHz抖动:<0.2 UI传输距离:SD: 400 m, HD: 200 m, 3G: 100 m (Beledn 1694A) ☐DC 12V电源输入数量:1☐配置拨码Mini USB☐功耗3W☐物理尺寸23mm × 123mm × 92mm☐工作环境温度:0~35℃相对湿度:0%~90%5SDI Distribution5.1功能亮点☐1入8出SDI信号0延迟分配器☐3G/HD/SD-SDI自适应☐内置Reclocker,保证长距离稳定传输☐SDI输出指标达广播级5.2产品规格☐SDI输入SD/HD/3G-SDI 自适应数量:1接口:BNC制式:525, 625,1080/50i, 1080/59.94i, 1080/60i, 720/50p, 720/59.94p, 720/60p, 1080/23.98p, 1080/24p, 1080/25p, 1080/29.97p, 1080/30p,1080/50p, 1080/59.94p, 1080/60p反射损耗:SD: >15dB up to 270MHz, HD: >15dB up to 1.485 GHz, 3Gbps: >10dB up to 2.97 GHz☐SDI输出数量:8接口:BNC反射损耗:>15 dB up to 1.5 GHz,>10 dB form 1.5 GHz to 3 GHz抖动:<0.2 UI传输距离:SD: 400 m, HD: 200 m,3G: 100 m (Beledn 1694A)☐DC 12V 电源输入数量:1☐配置拨码Mini USB☐功耗3W☐物理尺寸23mm × 123mm × 92mm☐工作环境温度:0~35℃相对湿度:0%~90%。
SDI、HD-SDI和3G-SDI 转 HDMI和VGA和AV 转换器
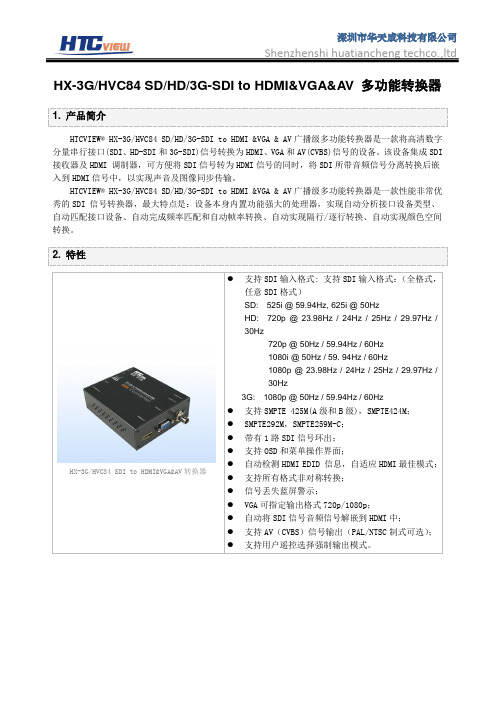
HX-3G/HVC84 SD/HD/3G-SDI to HDMI&VGA&AV 多功能转换器1. 产品简介HTCVIEW® HX-3G/HVC84 SD/HD/3G-SDI to HDMI &VGA & AV广播级多功能转换器是一款将高清数字分量串行接口(SDI、HD-SDI和3G-SDI)信号转换为HDMI、VGA和AV(CVBS)信号的设备。
该设备集成SDI 接收器及HDMI 调制器,可方便将SDI信号转为HDMI信号的同时,将SDI所带音频信号分离转换后嵌入到HDMI信号中,以实现声音及图像同步传输。
HTCVIEW® HX-3G/HVC84 SD/HD/3G-SDI to HDMI &VGA & AV广播级多功能转换器是一款性能非常优秀的SDI 信号转换器,最大特点是:设备本身内置功能强大的处理器,实现自动分析接口设备类型、自动匹配接口设备、自动完成频率匹配和自动帧率转换、自动实现隔行/逐行转换、自动实现颜色空间转换。
2. 特性HX-3G/HVC84 SDI to HDMI&VGA&AV转换器●支持SDI输入格式: 支持SDI输入格式:(全格式,任意SDI格式)SD: 525i @ 59.94Hz, 625i @ 50HzHD: 720p @ 23.98Hz / 24Hz / 25Hz / 29.97Hz / 30Hz720p @ 50Hz / 59.94Hz / 60Hz1080i @ 50Hz / 59. 94Hz / 60Hz1080p @ 23.98Hz / 24Hz / 25Hz / 29.97Hz /30Hz3G: 1080p @ 50Hz / 59.94Hz / 60Hz●支持SMPTE 425M(A级和B级),SMPTE424M;●SMPTE292M,SMPTE259M-C;●带有1路SDI信号环出;●支持OSD和菜单操作界面;●自动检测HDMI EDID 信息,自适应HDMI最佳模式;●支持所有格式非对称转换;●信号丢失蓝屏警示;●VGA可指定输出格式720p/1080p;●自动将SDI信号音频信号解嵌到HDMI中;●支持AV(CVBS)信号输出(PAL/NTSC制式可选);●支持用户遥控选择强制输出模式。
SDI使用说明范文
SDI使用说明范文SDI(Serial Digital Interface)是一种数字传输接口标准,常用于将数字视频信号从一设备发送到另一设备,如从摄像机到监视器、从播放器到电视等。
本文将详细介绍SDI的使用说明,并提供相关技术细节,以帮助读者更好地理解和应用SDI接口。
1.SDI接口概述SDI接口是一种串行数字接口,采用同轴电缆传输数字信号。
它不仅可以传输视频信号,还可以传输音频和其他数据。
SDI接口有多种版本,包括SD-SDI、HD-SDI和3G-SDI,每个版本都有不同的最大传输速率和支持的分辨率。
2.SDI接口特点SDI接口具有以下特点:(1)高质量传输:SDI接口传输的是数字信号,不会因传输距离或信号质量变化而产生丢失或模糊等问题,保证了高质量的视频和音频传输。
(2)长距离传输:SDI接口可以在可接受的传输距离范围内传输信号,通常可以达到几百米甚至上千米。
(3)稳定性强:SDI接口在传输过程中稳定性较高,对于其他设备的电磁干扰和噪声具有较强的免疫能力。
(4)插拔方便:SDI接口采用BNC连接器,插拔方便,接触可靠。
3.SDI接口应用场景SDI接口被广泛应用于专业广播、制作和视频监控等领域。
以下是一些常见的SDI接口应用场景:(1)电视广播:SDI接口可用于将摄像机拍摄的画面传输到广播台,同时也可用于将广播信号传输到电视台进行播放。
(2)视频监控:SDI接口可用于将监控摄像机拍摄的画面传输到监视器,以便实时观察监控区域。
(4)医疗影像:SDI接口可用于将医疗设备拍摄的影像传输到显示器,以便医生进行诊断和分析。
(5)演出现场:SDI接口可用于将舞台上的视频画面传输到大屏幕上,以便观众观看。
4.SDI接口连接方法SDI接口连接通常使用BNC连接器,下面介绍几种常见的连接方法:(1)点对点连接:将一端的SDI输出端口与另一端的SDI输入端口连接,用于将视频信号从一设备传输到另一设备。
(2)多路复用器连接:多个SDI信号可以通过多路复用器合并为一个信号,然后通过一个SDI输出端口传输到另一设备。
时代奥视
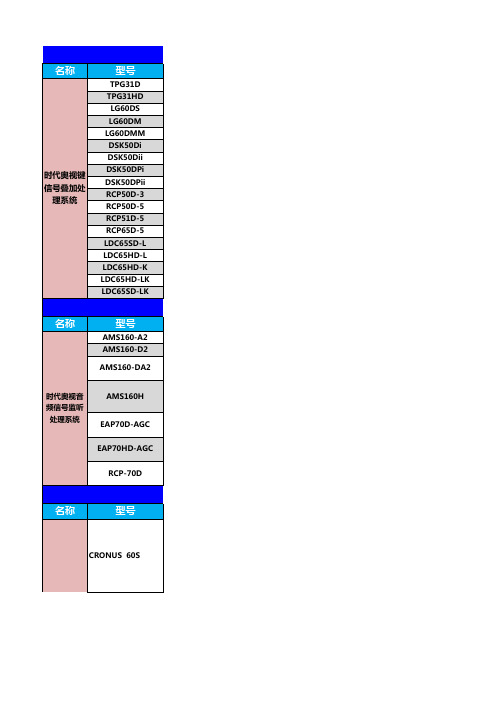
SD-SDI和模拟黑场/测试信号发生器,带外同步功能,行/场/副载波相位锁定,相位可调,9路SD-SDI输出,13路模拟输 出,一路DARS输出,OSD菜单,双电源 6800N-C1+P1*2/SRG6850N/SDA6801N/VDA6801N
¥5,800.00 音频处理遥控面板
报价
备注
¥118,000.00 高清延时器
高清延时器 ¥168,000.00
¥6,800.00 ¥52,800.00 ¥55,800.00 ¥64,800.00 ¥4,500.00
高清延时器遥控面板 标清延时器
标清延时遥控面器板
报价
¥13,600.00 ¥17,600.00 ¥8,000.00
名称
型号
AMS160-A2 AMS160-D2
AMS160-DA2
时代奥视音 频信号监听
处理系统
AMS160H EAP70D-AGC
EAP70HD-AGC
RCP-70D
名称
型号
CRONUS 60S
时代奥视信 号延时处理
系统
台标机及键控器 音频监听
固态延时器
时代奥视信 号延时处理
系统 CRONUS 180S
备注
主备同步倒换 主备同步倒换
模拟同步
¥11,000.00
数字同步
报价
备注
¥4,200.00 HDMI 转 SDI
¥4,200.00 SDI 转 HDMI
固态延时器
技术参数
minihdmi转标准hdmi
minihdmi转标准hdmiMini HDMI转标准HDMI。
在现代科技发展迅速的时代,我们经常会遇到各种不同规格的接口,而这些接口之间的转换成为了我们日常生活中不可或缺的一部分。
今天,我们将要讨论的是mini HDMI转标准HDMI的相关知识,希望通过本文的介绍,能够帮助大家更好地了解和使用这一类接口转换设备。
首先,让我们来了解一下mini HDMI和标准HDMI的区别。
Mini HDMI接口是一种小型的高清多媒体接口,通常用于连接相机、手机、平板电脑等设备与显示屏或电视。
而标准HDMI接口则是一种更为常见的接口,用于连接电视、显示器、投影仪等设备。
由于设备的差异,有时我们需要将mini HDMI接口转换为标准HDMI接口,这时就需要使用mini HDMI转标准HDMI的转换器。
接下来,我们将介绍一些使用mini HDMI转标准HDMI转换器的注意事项。
首先,选择适合自己设备的转换器非常重要。
由于市面上有多种不同规格和品牌的转换器,我们需要根据自己的设备型号和需求来选择合适的转换器。
其次,使用转换器时要注意接口的对应,确保连接稳固可靠。
另外,转换器的质量也是需要考虑的因素,优质的转换器能够更好地保护设备和传输信号,避免出现不必要的问题。
除了注意事项,我们还需要了解一些关于mini HDMI转标准HDMI转换器的使用技巧。
首先,正确连接转换器是非常重要的。
在连接时,要确保接口对应正确,插拔要轻柔,避免造成接口损坏。
其次,使用转换器时要注意信号传输的稳定性,避免出现画面闪烁、断屏等情况。
另外,及时清洁和保养转换器也是非常重要的,保持接口的清洁和整洁可以延长转换器的使用寿命。
最后,我们还需要了解一些关于mini HDMI转标准HDMI转换器的维护知识。
首先,定期清洁转换器是非常重要的,尤其是接口部分,要保持干净和整洁。
其次,使用转换器时要避免受到外界撞击和挤压,以免造成内部零部件损坏。
另外,转换器在长时间不使用时,要注意存放环境和方式,避免受潮、受热等影响。
hdmi转光纤方案
hdmi转光纤方案HDMI转光纤方案。
随着高清视频技术的不断发展,HDMI接口已经成为了连接高清电视、投影仪、显示器等设备的主流接口之一。
然而,随着高清视频的传输距离不断增加,传统的铜质HDMI线缆在长距离传输时会出现信号衰减、干扰等问题,为了解决这一难题,HDMI转光纤方案应运而生。
HDMI转光纤方案是指利用光纤传输技术来代替传统的铜质HDMI线缆,通过将HDMI信号转换成光信号,再通过光纤进行传输,最后再将光信号转换回HDMI信号,从而实现长距离高清视频传输的方案。
这种方案不仅可以有效地解决传统HDMI线缆在长距离传输时出现的问题,还可以提供更稳定、清晰的视频传输效果。
在实际应用中,HDMI转光纤方案通常包括HDMI到光纤发送器和光纤到HDMI接收器两部分。
HDMI到光纤发送器负责将HDMI信号转换成光信号,并通过光纤进行传输;而光纤到HDMI接收器则负责将光信号转换回HDMI信号,并输出到显示设备上。
这种方案不仅可以实现长距离高清视频传输,还可以避免受到外界干扰的影响,提供更稳定、清晰的视频效果。
除了解决传输距离的问题外,HDMI转光纤方案还可以应用在一些特殊环境中,比如工业控制、医疗影像、航空航天等领域。
在这些领域中,对视频传输的稳定性和可靠性要求非常高,传统的铜质HDMI线缆往往无法满足需求,而HDMI转光纤方案则可以提供更为可靠的视频传输解决方案。
总的来说,HDMI转光纤方案是一种应用广泛、效果显著的高清视频传输方案。
它不仅可以解决传统HDMI线缆在长距离传输时出现的问题,还可以应用在一些特殊环境中,提供更为稳定、可靠的视频传输解决方案。
随着技术的不断发展,相信HDMI转光纤方案将会在高清视频传输领域发挥越来越重要的作用。
- 1、下载文档前请自行甄别文档内容的完整性,平台不提供额外的编辑、内容补充、找答案等附加服务。
- 2、"仅部分预览"的文档,不可在线预览部分如存在完整性等问题,可反馈申请退款(可完整预览的文档不适用该条件!)。
- 3、如文档侵犯您的权益,请联系客服反馈,我们会尽快为您处理(人工客服工作时间:9:00-18:30)。
HDMI 转3G_SDI 高清转换盒
一、产品介绍:
HDMI 转3G_SDI 高清转换盒支持1路HDMI 1.3a/DVI 1.0版本信号输入,2路3G_SDI 输出。
3G_SDI 信号支持SD-DSI 、HD-SDI 、3G_SDI 格式。
2路SDI 输出,输入输出支持各种信号格式、分辨率。
最高分辨率支持1920*1200@60Hz 。
HOSHI 品牌高清转换盒系列是一款各种信号相互转换器,高清转换盒转换后实现模拟转数字、数字转模拟、并行数字信号转串行数字信号或串行数字信号转并行数字信号等转换。
HOSHI ,设计产品注重可靠性和出色的高清信号性能表现,产品使用独特的全数字、非压缩技术对视频信号(包括AV 视频、YPBPR 分量、VGA 电脑、HDMI 高清数字信号、DVI 高清数字信号、3G/HD/SD-SDI 高清串行数字信号)进行完美的像素对像素(点对点)的转换。
二、产品特点:
1、支持SDI 串行数字信号标准,最高支持3G SDI 、兼容HD SDI 、SD SDI ;
2、2*BNG 端口,2路SDI 信号输出;
3、覆盖更多的分辨率480i ,576i ;(SD-SDI )20p 25/29.9450/59.94/60;1080i 50/59.94/60;23.98/24/25/29.9/30;
(HD-SDI )1080p 50/59.94/60(3G-SDI )支持SMPTE259M ,SMPTE297M ,SMPTE310 SMPTE305(SDTI )、SMPTE344标准;
4、SDI 输出均具有电缆均衡,可补偿电缆传输的损耗;
5、SDI 输出均具有减小信号抖动电路,可以很好地处理畸变信号;
6、输入HDMI V1.3a 信号标准和DVI V1.0信号标准;
7、3D comband 、3D de-interlace ,提高图像边缘效果,提高画面层次。
8、3D Noise Reduction,降低画面噪点,提高画面品质。
9、定制各格式场频倍频成60Hz 输出功能。
10、支持多种分辨率,最高分辩率为1920x1200@60Hz 。
11、内置陪频、降频、缩放等功能。
12、信号自动锁定功能,无信号20s 后进入standby ,有信号自动打开功能,符合国家节能减排标准。
13、内置ESD 静电保护电路,有效保护设备不受外围设备静电干扰。
14、DVI 输入/
输出内置EQ(信号放大功能),使用常规线材有效传输距离20米,使用特制的22号线材,有效传输距离30米。
15、分辨率可根据显示设备情况,通过内置拨码设置,现实直通输出、1080p/60Hz 输出、720p60Hz 输出、720p/60Hz 或1080p60Hz 输出
16、信号输出格式可根据现实设备情况,通过内置拨码设置,实现HDMI 格式信号输出、DVI 格式信号输出。
