TSXCUSB485 Download cable Troubleshooting
刷机提示的错误代码以及解决方案

IPHONE刷机ITUNES提示的错误代码以及解决方案解决错误或警告信息解决方法“发生未知错误 (-39)”iTunes for Windows:尝试下载购买的音乐时出现错误-39iTunes 再三提示授权电脑播放 iTunes Store 已购项目。
iTunes 再三提示授权电脑播放 iTunes Store 已购项目iTunes for Windows:访问 iTunes Store 时显示 -3221 错误iTunes for Windows:访问 iTunes Store 时显示 -3221 错误iTunes Store 报告错误 -3259iTunes Store 报告错误 -3259“下载您购买的音乐时出错。
发生未知错误 (-50)。
”iTunes Store:下载购买的内容时出现错误 (-50)下载租借的影片时出现错误 3001、-42110、5103iTunes Store:下载租借的影片时出现错误 3001、-42110、51039 未进入FDU模式10 TUNES版本太低20 没进入UFS模式1015 误升3.1无法降级,其实已经刷好固件。
可通过(D:\刷机专用包\3G苹果\3G IPHONE 3.1 降级至 3.0 越狱)解决23一般这是在恢复的时候发生的.这是因为你恢复的机器版本不对.不是所有版本机器误升后会在2.2版本的.确认你升的那个版本是多少就恢复那个版本的机器.5这是因为没有进对dfu模式.先按menu和电源键,然后等5秒松开power键,只按menu键,过个8秒啥的,进到dfu模式后,等机器黑了再操作吧\1061 没有越狱1063 操作方面错误1064 电脑用户名是中文以下为官方公布错误名单错误代码解决办法未知错误1 未进入降级模式更换USB插口,最好是机箱后面的;重启电脑未知错误6 未进入降级模式更换USB插口,最好是机箱后面的;重启电脑未知错误1013 重启电脑;更换电脑;重装系统若一直停在恢复模式:XP用户可以用ibrickr让iphone跳出恢复模式MAC用户则使用iNdependence未知错误1015 重启电脑;更换电脑;重装系统若一直停在恢复模式:XP用户可以用ibrickr让iphone跳出恢复模式MAC用户则使用iNdependence未知错误1417 更换使用机箱后面的USB插口未知错误1602 重启电脑;更换电脑;重装系统未知错误1603 重启电脑;更换电脑;重装系统未知错误1604 重启电脑;更换电脑;重装系统未知错误-35 未知错误–50 删除暴风影视,quicktime,itunes,然后重装itunes未知错误-9800, -9815, or -9814 设置正确的日期,重启电脑未知错误1413 重启电脑;更换USB插口;重装系统未知错误1415 重启电脑;更换USB插口;重装系统未知错误1417 重启电脑;更换USB插口;重装系统未知错误1418 重启电脑;更换USB插口;重装系统未知错误1428 重启电脑;更换USB插口;重装系统未知錯誤(0x666D743F)方法一 1.按下“開始”按鈕並選擇“控制台”。
USB Type-C 规范1.2(中文版)
知识产权声明
THIS SPECIFICATION IS PROVIDED TO YOU “AS IS” WITH NO WARRANTIES WHATSOEVER, INCLUDING ANY WARRANTY OF MERCHANTABILITY, NON-INFRINGEMENT, OR FITNESS FOR ANY PARTICULAR PURPOSE. THE AUTHORS OF THIS SPECIFICATION DISCLAIM ALL LIABILITY, INCLUDING LIABILITY FOR INFRINGEMENT OF ANY PROPRIETARY RIGHTS, RELATING TO USE OR IMPLEMENTATION OF INFORMATION IN THIS SPECIFICATION. THE PROVISION OF THIS SPECIFICATION TO YOU DOES NOT PROVIDE YOU WITH ANY LICENSE, EXPRESS OR IMPLIED, BY ESTOPPEL OR OTHERWISE, TO ANY INTELLECTUAL PROPERTY RIGHTS.
预发行行业审查公司提供反馈
Revision History.......................................................................................................................14
LIMITED COPYRIGHT LICENSE: The USB 3.0 Promoters grant a conditional copyright license under the copyrights embodied in the USB Type-C Cable and Connector Specification to use and reproduce the Specification for the sole purpose of, and solely to the extent necessary for, evaluating whether to implement the Specification in products that would comply with the specification.
TH2515 仪器说明书
Ver 2.1目录Ver 2.0 (2)第1章仪器简介与开箱安装 (8)1.1仪器简介 (8)1.2开箱检查 (8)1.3电源连接 (8)1.4保险丝 (8)1.5环境 (8)1.6使用测试夹具 (9)1.7预热 (9)1.8仪器的其它特性 (9)第2章前面板说明及入门操作 (10)2.1前面板说明 (10)2.2后面板说明 (11)2.3显示区域的定义 (12)2.4按键及其相应的显示页面 (13)2.4.1测量主菜单按键【DISP】 (13)2.4.2系统设置主菜单按键【SETUP】 (13)2.5基本操作 (13)2.6开机 (14)第3章基本操作 (15)3.1<测量显示>页面 (15)3.1.1测试功能 (15)3.1.2测试量程 (16)3.1.3测试速度 (17)3.1.4文件管理 (17)3.1.5其他工具 (17)3.2<比较显示>页面 (18)3.2.1文件管理 (19)3.2.2工具 (19)3.2.3比较 (19)3.2.4比较模式和上下限、百分比误差设置 (19)3.3<档显示>页面 (19)3.4<统计显示>页面 (21)3.4.1边界模式和其相应值的设定 (21)3.4.2统计状态 (21)3.4.3统计分析参数说明 (21)3.4.4工具 (22)3.4.5文件 (22)3.5<测量设置>页面 (22)3.6<TC/Δt设置>页面 (24)3.6.1温度校正(Temperature Correction 简称TC) (25)3.6.2温度转换(temperature conversion 简称t ) (25)3.6.3温度传感器的类型 (26)3.6.4参数设定 (27)3.6.5文件 (27)3.7<档设置>页面 (27)3.7.1文件 (29)3.7.2工具 (29)第4章系统设置和文件管理 (30)4.1系统设置 (30)4.1.1触摸音 (30)4.1.2语言 (30)4.1.3口令 (31)4.1.4总线模式 (31)4.1.5波特率 (32)4.1.6总线地址 (32)4.1.7EOC信号 (32)4.1.8Err.OUT信号 (33)4.1.9电源频率 (34)4.1.10时间和日期设定 (34)4.2<文件管理>功能页面 (34)4.2.1存储/调用功能简介 (34)4.2.2U盘上的文件夹/文件结构 (35)4.2.3DHCP (39)4.2.4IP地址 (40)4.2.5子网掩码 (40)4.2.6网关 (40)4.2.7首选DNS、备用DNS (40)第5章性能指标 (41)5.1测量功能 (41)5.1.1测量参数及符号 (41)5.1.2测量组合 (41)5.1.3等效方式 (41)5.1.4量程 (41)5.1.5触发 (41)5.1.6测试端方式 (41)5.1.7测量中的各种时间的开销 (41)5.1.8平均 (42)5.1.9显示的位数 (42)5.2测试信号 (42)5.2.1量程电流 (42)5.2.2开路输出电压 (42)5.2.3测量显示最大范围 (42)5.3测量准确度 (43)5.3.2温度测量的准确度(Pt500) (44)5.3.3温度测量的准确度(模拟输入) (45)5.3.4温度修正系数K (45)第6章远程控制 (46)6.1RS232C接口说明 (46)6.2GPIB接口说明(选购件) (47)6.2.1GPIB接口功能 (49)6.2.2GPIB 地址 (49)6.2.3GPIB总线功能 (49)6.2.4可编程仪器命令标准(SCPI) (50)6.3LAN远程控制系统 (50)6.3.1通过浏览器访问TH2515 (52)6.3.2通过上位机软件访问TH2515 (52)6.4USBTMC远程控制系统 (53)6.4.1系统配置 (53)6.4.2安装驱动 (53)6.5USBVCOM虚拟串口 (54)6.5.1系统配置 (54)6.5.2安装驱动 (54)第7章RS232命令参考 (55)7.1SCPI系统命令 (55)7.1.1DISPlay子系统命令集 (55)7.1.2FUNCtion 子系统命令集 (56)7.1.3APERture子系统命令集 (61)7.1.4TRIGer子系统命令集 (61)7.1.5FETCh?子系统命令集 (63)7.1.6TEMPerature子系统命令集 (64)7.1.7COMParator子系统命令集 (66)7.1.8BIN子系统命令集 (69)7.1.9STA Tistics子系统命令集 (73)7.1.10IO子系统命令集 (76)7.1.11MEMory子系统命令集 (77)7.1.12SYSTem 子系统命令集 (78)7.1.13SCPI公用命令 (81)7.2MODBUS系统命令 (83)7.2.1MODBUS协议说明 (84)7.2.2公用指令操作说明 (85)7.2.3DISP指令操作说明 (86)7.2.4FUNC指令操作说明 (86)7.2.5APER指令操作说明 (87)7.2.6TRIG指令操作说明 (87)7.2.7FETC指令操作说明 (88)7.2.8TEMP指令操作说明 (88)7.2.10BIN指令操作说明 (90)7.2.11STA T指令操作说明 (93)7.2.12IO指令操作说明 (94)7.2.13SYST指令操作说明 (94)第8章Handler接口使用说明及程序升级方法 (99)第9章包装及保修 (103)9.1标志 (103)9.2包装 (103)9.3运输 (103)9.4贮存 (103)9.5保修 (103)本说明书所描述的可能并非仪器所有内容,同惠公司有权对本产品的性能、功能、内部结构、外观、附件、包装物等进行改进和提高而不作另行说明!由此引起的说明书与仪器不一致的困惑,可通过封面的地址与我公司进行联系。
TSXPCX3030驱动程序安装说明书
USB编程电缆TSXPCX3030驱动程序安装说明概述TSXPCX3030是通过USB接口提供串行连接及RS485信号转换的多功能编程电缆。
TSXPCX3030可用于Modicon TSX系列PLC与PC的USB口或其它不提供传统串口的设备进行通信。
TSXPCX3030可与TSX Premium(57)、TSX Micro(37)、TSX Nano(07)、TSX Naza(08)及Twido PLC的TER口相连。
功能●支持的操作系统Windows2000/Windows XP●完全兼容USB V1.1和USB CDC V1.1规范●USB总线供电(非隔离电缆)、或USB总线供电与PLC的TER端口同时供电(隔离型电缆)●波特率:300bps~1Mbps自动适应●每台PC只支持一根TSXPCX3030电缆系统要求请在使用TSXPCX3030编程电缆之前确认你的电脑是IBM PC兼容型并具备以下最低系统要求:●Intel兼容486DX4-100MHz中央处理器或更高●一个标准的USB接口(4-pin A型插座)●运行操作系统为Windows2000或Windows XPTSXPCX3030驱动程序的安装1、打开将要连接TSXPCX3030的电脑的电源,并确定将要连接的USB口已经启动并正常工作。
2、将TSXPCX3030电缆插入USB接口,Windows将检测到设备并运行添加新硬件向导帮助你设置新设备,插入驱动程序光盘并单击下一步继续。
3、选择为硬件搜索最新的驱动程序然后单击下一步,选择从光盘安装,然后单击OK。
4、Windows将检测到安装信息(FTDIBUS.INF)并显示Serial Port,Neza USBMulti-function Cable 设备,单击下一步继续安装。
5、单击下一步继续,让Windows拷贝必要的文件到你的硬盘。
6、当Windows显示安装了新设备Serial Port,Neza USB Multi-function Cable所必需的软件,单击完成。
LTE系统消息翻译
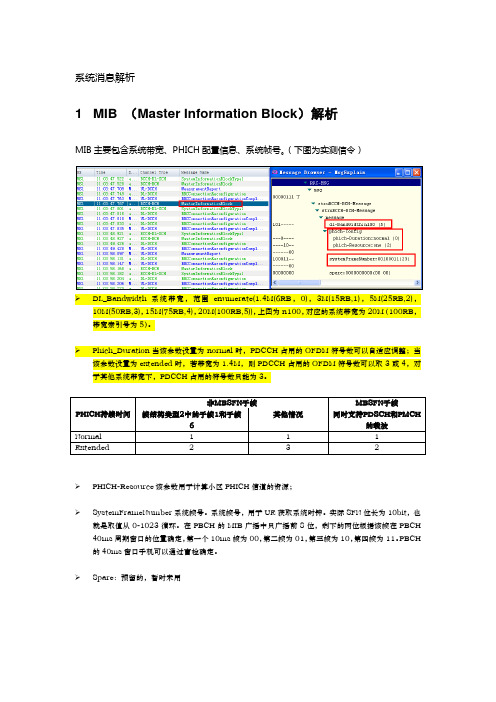
系统消息解析1 MIB (Master Information Block)解析MIB主要包含系统带宽、PHICH配置信息、系统帧号。
(下图为实测信令)➢DL_Bandwidth系统带宽,范围enumerate(1.4M(6RB,0),3M(15RB,1),5M(25RB,2),10M(50RB,3),15M(75RB,4),20M(100RB,5)),上图为n100,对应的系统带宽为20M(100RB,带宽索引号为5)。
➢Phich_Duration当该参数设置为normal时,PDCCH占用的OFDM符号数可以自适应调整;当该参数设置为extended时,若带宽为1.4M,则PDCCH占用的OFDM符号数可以取3或4,对于其他系统带宽下,PDCCH占用的符号数只能为3。
➢PHICH-Resource该参数用于计算小区PHICH信道的资源;➢SystemFrameNumber系统帧号。
系统帧号,用于UE获取系统时钟。
实际SFN位长为10bit,也就是取值从0-1023循环。
在PBCH的MIB广播中只广播前8位,剩下的两位根据该帧在PBCH 40ms周期窗口的位置确定,第一个10ms帧为00,第二帧为01,第三帧为10,第四帧为11。
PBCH 的40ms窗口手机可以通过盲检确定。
➢Spare:预留的,暂时未用2 SIB1 (System Information Block Type1)解析SIB1上主要传输评估UE能否接入小区的相关信息及其他系统消息的调度信息。
主要包括4部分:➢小区接入相关信息(cell Access Related Info)➢小区选择信息(cell Selection Info)➢调度信息(scheduling Info List)➢TDD配置信息(tdd-Config)SIB1消息解析(UE侧):RRC-MSG..msg....struBCCH-DL-SCH-Message......struBCCH-DL-SCH-Message........message..........c1............systemInformationBlockType1..............cellAccessRelatedInfo//小区接入相关信息................plmn-IdentityList//PLMN标识列表..................PLMN-IdentityInfo....................plmn-Identity ......................mcc//460 ........................MCC-MNC-Digit:0x4 (4) ........................MCC-MNC-Digit:0x6 (6) ........................MCC-MNC-Digit:0x0 (0) ......................mnc//00 ........................MCC-MNC-Digit:0x0 (0) ........................MCC-MNC-Digit:0x0 (0) ....................cellReservedForOperatorUse:notReserved (1) ................trackingAreaCode:11100(890C)//TAC跟踪区(890C)为16进制数,转换成十进制为35084,查TAC在该消息中可以查到,此条信元重要。
2010 Honda TSX Multi-Information Display用户指南说明书
• Display (or hide): - ATM - gas station - Mexican restaurant - post office
• Display north up/ heading up
• Zoom in/out • Go home • Display current
location
3 Say “City” (or “Change state” if
necessary).
8 Say the entire street address number.
For example, “1-2-5-0.”
4 Say the name of the city you want, or
say “Current city” to select the city currently shown.
Display Commands (Accepted on map screen)
• Find nearest: - ATM - gas station - Mexican restaurant - post office
- bank - Acura dealer - airport - hospital
Press and release the NAVI Talk button before you give a command.
General Commands (Accepted on most screens)
Navigation Commands (Accepted on map screen after a destination is entered)
phone.
Was pairing successful? NO Repeat step 5.
PC Adapter USB无法连接-PC Adapter A2无法连接- 以太网无法连接
PC Adapter USB无法连接-PC Adapter A2无法连接-以太网无法连接1、PC Adapter USB无法连接确认型号:确认PC Adapter USB型号(6ES7 972-0CB20-0XA0)。
第三方连接电缆无法保证连接可靠性,须咨询设备厂家。
线缆连接确认:检查电缆连接的是否牢靠。
将PC Adapter USB的485口连接到CPU的MPI或DP接口;电缆的USB口连接到计算机的USB口。
指示灯:检查指示灯是否正常。
PC Adapter USB由PLC的MPI/DP口供电。
因此,CPU上电后,PC Adapter USB的MPI/POWER/USB灯常亮;与Step7建立通信后,Power灯常亮,MPI灯快闪,USB灯慢闪。
PG/PC接口设置:PG/PC接口所选接口与实际所接接口是否一致,可尝试选择Auto连接。
系统识别:查看系统的设备管理器中(我的电脑---右键属性----设备管理器)能否识别到PC Adapter USB如无法识别到设备更换电脑的另一个USB接口连接(USB2.0),如为台式机建议使用机箱后侧的USB接口,前面板接口有时会供电不足。
更换接口仍无法识别,即为驱动问题导致:•对于软件非V5.5 或TIA Portal V1x的,尝试重新下载安装驱动。
•对于软件为V5.5 或TIA Portal V1x的,参看下一步。
兼容性:以上都确认ok仍无法连接时,则通常为软件安装或杀毒软件等导致。
请确认如下信息:•国产杀毒软件均不兼容Step7,TIA Portal软件;包括xxx毒霸,x管家,360等优化软件。
•系统要确保使用纯净版未修改过的系统。
GHOST系统无法确保软件及编程电缆的正常使用。
解决方案(仅针对win7 64位系统):附件为pc adapter USB和pc adapter A2 驱动,将其解压后拷贝至电脑路径如下:(programData为隐藏文件夹,设置为可见。
USB2.0与OTG规范及开发指南(全中文)(1)
施耐德TSXCUSB485 USB至RS485转换器 快速参考指南说明书

TLX CDDRV20M. The driver installation procedure is either described in the software documentation or supplied in the CD Driver.Presentation: The TSXCUSB485 converter is a multifunction communication device that converts serial signals, via a USB connection, into RS485 signals. It provides the link between a PC equipped with a type A USB port and various other devices.When using this interface with XBT, refer to the quick reference guide provided with this equipment.Remark: Each converter has an unique serial number that enables the driver to manage up to 4 interfaces. So when a converter TSX CUSB485 is replaced by another one, the driver detects a new serial number and resets itself automatically.Diese typischen Anwendungen verwenden die standardmäßigen Schneider Uni-Telway/Modbus-Tgestellt werden oder auf der Treiber-CD TLX CDDRV20M enthalten sind. Das Installationsverfahren für den Treiber ist entweder in der Softwaredokumen-tation oder auf der T reiber-CD beschreiben.Beschreibung: Der Konverter des Typs TSXCUSB485 ist ein Multifunktions-Kommunikationsgerät, das serielle Signale über eine USB-Verbindung in RS485-Signale umwandelt. Er stellt die Verbindung zwischen einem mit einem USB-Port des Typs A ausgestattetem PC und verschiedenen anderen Geräten bereit. Bei Verwendung dieser Schnittstelle mit dem XBT ziehen Sie bitte die mit diesem Gerät mitgelieferte Kurzanleitung zu Rate.Hinweis: Jeder Konverter verfügt über eine eindeutige Seriennummer, die dem Treiber die Verwaltung von bis zu 4 Schnittstellen ermöglicht. Wenn ein Konverter des Typs TSX CUSB485 durch einen anderen Konverter ersetzt wird, erkennt der Treiber eine neue Seriennummer und setzt sich selbst automatisch zurück.Die verschiedenen Funktionen des seriellen Modus sind von der Position des Polarisierung: Dieser Konverter kann eine LeitungspolarisierungCes applications types utilisent les drivers Schneider Uni-Telway/Modbus fournis par des logiciels (Unity, PL7-Pro, ...) ou par le CD de drivers TLX CDDRV20M. La procédure d'installation des drivers est indiquée dans la documentation de ces lociciels ou celle fournie dans le CD driver.Présentation : Le convertisseur TSXCUSB485 est un produit de communication multifonction qui convertit les signaux série, via une connexion USB, en signaux RS485. Il fournit une liaison entre un PC équipé d’un port USB type A et différents équipements.Pour l’utilisation de cette interface avec XBT, se référer à l’instruction de service fournie avec cet équipement.Remarque : Chaque convertisseur dispose d’un numéro de série unique permettant au driver de gérer jusqu’à 4 interfaces. De ce fait, lorsqu’un convertisseur TSX CUSB485 est remplacé par un autre, le driver détecte un nouveau numéro de série et se réinitialise automatiquement.Ne pas utiliser le convertisseur TSXEsas aplicaciones típicas utilizan los controladores Schneider Uni-Telway/Modbus estándar proporcionados por el software (Unity, PL7-Pro...) o por el con-trolador de CD TLX CDDRV20M. El procedimiento de instalación del controlador se describe en la documentación del software o se suministra en el con-trolador de CD.Presentación: El convertidor TSXCUSB485 es un dispositivo de comunicación multifunción que convierte señales serie, a través de una conexión USB, en señales RS485. Proporciona la conexión entre un PC equipado con un puerto USB de tipo A y varios dispositivos distintos.Al utilizar esta interfaz con XBT, consulte la guía de referencia rápida que se incluye con este equipo.Nota: Cada convertidor tiene un único número de serie que activa el controlador para gestionar hasta cuatro interfaces. Así que cuando se sustituye un convertidor TSX CUSB485 por otro, el controlador detecta un nuevo número de serie y se restablece automáticamente.Las distintas funciones del modo serie se definen según la posición del Polarización: Este convertidor puede proporcionar unaNo utilice el convertidor TSX CUSB485 con dispositivos del rango Altivar y Altistart.Per le applicazioni tipiche che utilizzano i drive standard Schneider Uni-TTLX CDDRV20M. La procedura di installazione del driver è descritta nella documentazione software o fornita con il CD Driver.Presentazione: il convertitore TSXTSXCUSB485 è un dispositivo di comunicazione multifunzione che converte i segnali seriali, via una connessione USB, in segnali RS485. Esso permette di collegare un PC predisposto con una porta di tipo USB A con vari altri dispositivi.Quando si utilizza l'interfaccia con l'XBT, riferirsi alla guida di riferimento rapida fornita con questa apparecchiatura.Nota: ogni convertitore ha un numero di serie univoco che abilita il driver a gestire fino a 4 interfacce. In questo modo quando un convertitoreTSX CUSB485 viene sostituito da un altro, il driver rileva un nuovo numero di serie e reimposta automaticamente i propri parametri.Le varie funzioni della modalità seriale sono definite in base alla posizione Polarizzazione: questo convertitore può fornire unaNon usare il convertitore TSX CUSB485 con le apparecchiature della serie Altivar e Altistart.这些典型的应用程序使用软件装过程可能在软件文档中进行说明,也可能在 CD 驱动程序中提供。
星辰(StarTech)USB 3.0到2.5英寸SATA硬盘 SSD电缆(带UASP)说明书

DE: Bedienungsanleitung - FR: Guide de l'utilisateur - ES: Guía del usuario - IT: Guida per l'uso - NL: Gebruiksaanwijzing - PT: Guia do usuário - USB3S2SAT3CBUSB 3.0 to 2.5” SATA HDD/SSD Cable w/UASP*actual product may vary from photosFCC Compliance StatementThis equipment has been tested and found to comply with the limits for a Class B digital device, pursuant to part 15 of the FCC Rules. These limits are designed to provide reasonable protection against harmful interference in a residential installation. This equipment generates, uses and can radiate radio frequency energy and, if not installed and used in accordance with the instructions, may cause harmful interference to radio communications. However, there is no guarantee that interference will not occur in a particular installation. If this equipment does cause harmful interference to radio or television reception, which can be determined by turning the equipment off and on, the user is encouraged to try to correct the interference by one or more of the following measures:• Reorient or relocate the receiving antenna.• Increase the separation between the equipment and receiver.• Connect the equipment into an outlet on a circuit different from that to which the receiver is connected.• Consult the dealer or an experienced radio/TV technician for help.Use of Trademarks, Registered Trademarks, and other Protected Names and Symbols This manual may make reference to trademarks, registered trademarks, and other protected names and/or symbols of third-party companies not related in any way to . Where they occur these references are for illustrative purposes only and do not represent an endorsement of a product or service by , or an endorsement of the product(s) to which this manual applies by the third-party company in question. Regardless of any direct acknowledgement elsewhere in the body of this document, hereby acknowledges that all trademarks, registered trademarks, service marks, and other protected names and/or symbols contained in this manual and related documents are the property of their respective holders.Table of ContentsProduct Overview (1)Introduction (2)Packaging Contents (2)System Requirements (2)Installation (3)Hardware Installation (3)Operation (3)Connecting the Hard Drive (3)Powering the Drive Enclosure (3)Disconnecting the Hard Drive (4)Initializing the Hard Drive (4)Specifications (6)Technical Support (7)Warranty Information (7)Product Overview2.5” HDD/SSDIntroductionPackaging Contents• 1x USB 3.0 to SATA 2.5” HDD Adapter Cable• 1x Instruction ManualSystem Requirements• Computer system with available USB 3.0 (5 Gbit/s) port or USB 2.0 port (480Mbps) • 2.5” SATA hard drive or solid state drive• Microsoft® Windows® 2000/XP/Server 2003/Vista/Server 2008 R2/7/8 (32/64-bit), or Apple® Mac® OS 9.x/10, or Linux®InstallationHardware InstallationWARNING! Hard drives and storage enclosures require careful handling, especially when being transported. If you are not careful with your hard disk, lost data may result. Always handle your hard drive and storage device with caution. Be sure that you are properly grounded by wearing an anti-static strap when handling computer components or discharge yourself of any static electricity build-up by touching a large grounded metal surface (such as the computer case) for several seconds.Note: This adapter cable will only work with 2.5” hard drives, and solid state drives. 3.5” Hard drives and optical drives require a high power load than can be provided via the USB bus.1. Connect the SATA Connector to the SATA reciprocal on your2.5” SATA hard drive/ solid state drive.2. Connect the USB connector from the cable to a USB port on the host computer system (optimal perfomance with USB3.0, backward compatibile with USB 2.0/1.1).OperationConnecting the Hard DriveOnce the cable has been attached to a computer, and the necessary software will automatically install, and the drive will be accessible as though it were installed within the system.Prior to using the drive, it will need to be formatted according to your operating system requirements. To format your newly attached hard drive, or create partitions, please consult the documentation that accompanied your operating system at the time of purchase.Powering the DriveThe hard drive adapter requires no external power supply, as it is capable of receiving enough power from the USB Bus to which it is connectedDisconnecting the Hard DriveWindows1. Select the “Safely remove Hardware and Eject Media” icon, located in the task bar.2. Select the USB Storage Device from the list that appears.3. Wait for the message indicating that it is now safe to remove the device.Note: Removing the connected drive prior to receiving notification that it is safe to do so, could result in losing or corrupting data stored on the drive. Once the Safeto Remove Hardware message appears, please disconnect the enclosure from the computer by removing the USB connection.Mac OS XTo safely disconnect the attached drive from the host computer, close any windows listing the contents of the removable drive. Once all windows are closed, click on the USB storage icon on the desktop, and drag it to the Trash Can icon on the desktop. Allow 5 seconds before physically removing the enclosure/drive from the computer.Initializing the Hard Drive1. If the SATA Hard Drive is blank it may need to be initialized and formatted before use. From the main Windows desktop, right-click on “My Computer” (“Computer” in Vista/ 7 / 8), then select Manage. In the new Computer Management window, select Disk Management from the left window panel.2. A dialog window should automatically appear, asking you to initialize the drive. Depending on the version of Windows, it will give you the option of either creating an “MBR” or “GPT” disk. GPT (GUID partition) is not compatible with some older operating systems, while MBR is supported by newer and older operating systems.3. Once initialized, locate the Disk that says it is “Unallocated” (check the listed hard drive capacity to confirm it’s the correct hard drive) and then right-click in the section that says “Unallocated” and select “New Partition”.4. Follow the on screen prompts to initialize the drive in the format of your choice.SpecificationsTechnical Support’s lifetime technical support is an integral part of our commitment to provide industry-leading solutions. If you ever need help with your product, visit /support and access our comprehensive selection of online tools, documentation, and downloads.For the latest drivers/software, please visit /downloads Warranty InformationThis product is backed by a two year warranty.In addition, warrants its products against defects in materials and workmanship for the periods noted, following the initial date of purchase. During this period, the products may be returned for repair, or replacement with equivalent products at our discretion. The warranty covers parts and labor costs only. does not warrant its products from defects or damages arising from misuse, abuse, alteration, or normal wear and tear.Limitation of LiabilityIn no event shall the liability of Ltd. and USA LLP (or their officers, directors, employees or agents) for any damages (whether direct or indirect, special, punitive, incidental, consequential, or otherwise), loss of profits, loss of business, or any pecuniary loss, arising out of or related to the use of the product exceed the actual price paid for the product. Some states do not allow the exclusion or limitation of incidental or consequential damages. If such laws apply, the limitations or exclusions contained in this statement may not apply to you.Hard-to-find made easy. At , that isn’t a slogan. It’s a promise. is your one-stop source for every connectivity part you need. From the latest technology to legacy products — and all the parts that bridge the old and new — we can help you find the parts that connect your solutions.We make it easy to locate the parts, and we quickly deliver them wherever they need to go. Just talk to one of our tech advisors or visit our website. You’ll be connected to the products you need in no time.Visit for complete information on all products and to access exclusive resources and time-saving tools. is an ISO 9001 Registered manufacturer of connectivity and technology parts. was founded in 1985 and has operations in the United States, Canada, the United Kingdom and Taiwan servicing a worldwide market.。
三菱PLC通讯手册

3. Specifications .......................................................................................... 3-1
思南工控网的宗旨是为广大业内人士提供一个良好的交流场所同时使大家多多少少有些收获因为我们大多经历了没有互联网时开发项目的艰难资料难找交流困难
USER’S MANUAL
FX COMMUNICATION (RS-232C, RS485)
思南工控网
希望该资料对您的开发有益处.
2.2 Using RS232C Interface ........................................................................................2-3
2.2.1 Using RS Instruction or Computer Link..................................................................................... 2-3 2.2.2 Using FX2N-232IF ..................................................................................................................... 2-4
2.1 Caution ..................................................................................................................2-1
OTP6126用户手册V1.00 101126
4.3 电气安全信息...............ቤተ መጻሕፍቲ ባይዱ............................................................................. 7
5 设备安装............................................................................................ 7
3 规格特性............................................................................................ 6
3.1 环境要求..................................................................................................... 6 3.2 电源和电池................................................................................................. 6 3.2.1 交流/直流适配器............................................................................ 6 3.2.2 锂离子充电电池............................................................................. 6 3.3 功耗.............................................................................................................6 3.4 尺寸和重量................................................................................................. 6
有关“安装程序启动安装引擎失败:不支持此接口”错误的解决方法
有关“安装程序启动安装引擎失败:不支持此接口”错误的解决方法1、在NT平台下(包括Win NT,Win 2000,Win XP),请使用管理员身份登陆后运行安装程序,请确认身份,否则不能进行安装;2、如果您刚运行完一个安装程序,请稍等几秒再启动下一个安装程序,因为安装程序表面上已经完毕,实际上程序还在进行后期清理,内存中还有 Ikernel.exe(安装程序引擎)驻留,所以如果您此时启动另一个安装程序,将出现错误。
3、如果您安装的过程中出现错误,请使用“任务管理器”察看是否有 Ikernel.exe 这个进程存在,如果存在而且此时您确认没有安装程序在运行,您可以结束这个进程后再进行安装。
4、因为NORDON杀毒软件会把INSTALL SHIELD 那个ikernel.exe文件误认为病毒。
退出防火墙,重新启动,就好了。
5、清理干净系统和您系统账户下的 Temp 目录。
例如:您系统安装在C盘,windows目录是 winnt ,那么您的系统 Temp 目录是:c:\winnt\temp ,如果您是以“test-user”的账户登陆的,您的个人 Temp 目录是:C:\Documents and Settings\test-user\Local Settings\Temp请您清理完以上2个目录(删除所有目录内文件)再进安装。
6、删除目录: Program Files\Common Files\InstallShield 重新启动以后再进行安装7、删除目录: Program Files\Common Files\InstallShield\Engine 重新启动以后再进行安装8、安装NORTON SYTEMWORKS 2003,用它的WINDOCTOR自动修复,然后用了NORTON SYTEMWORKS的ONE BUTTON CHECKUP,重起,一切OK。
9、现在的好多的软件的安装程序都不是exe的而是msi,而msi是一种新的安装程序的脚本文件。
全方位的USB设备及DirectShow设备的插拔响应解决方案
==========================================
(六)下面是一些常用的设备的class的GUID举例:
第1页
USB设备及DirectShow设备的插拔响应解决方案.txt
// 65E8773D-8F56-11D0-A3B9-00A0C9223196 OUR_GUID_ENTRY(AM_KSCATEGORY_CAPTURE, // 摄像头捕捉的class GUID 0x65E8773DL, 0x8F56, 0x11D0, 0xA3, 0xB9, 0x00, 0xA0, 0xC9, 0x22, 0x31, 0x96)
dbi.dbcc_size
= sizeof(dbi);
dbi.dbcc_devicetype = DBT_DEVTYP_DEVICEINTERFACE;
dbi.dbcc_reserved = 0;
dbi.dbcc_classguid = hid_guid;
HDEVNOTIFY hDevNotify;
USB Raw Device/USB设备 {a5dcbf10-6530-11d2-901f-00c04fb951ed}
Disk Device/磁盘设备 {53f56307-b6bf-11d0-94f2-00a0c91efb8b}
Network Card/网卡 {ad498944-762f-11d0-8dcb-00c04fc3358c}
typedef struct _DEV_BROADCAST_DEVICEINTERFACE_A {
DWORD
dbcc_size;
DWORD
dbcc_devicetype;
DWORD
dbcc_reserved;
施耐德自动化产品介绍

ሏႜ ᆫࣅ
ፌׂิࢅీׂࣅٷၳ୲ ॔੦߾ሏႜጒLjۨᆫ ံपਦ֧փీࠕेᅜํแԍኤ߾ڟڥᆶၳڦ੦
具有规模可延展性、灵活性、集成性、协同性四大特性 规模可延展性 协同性
适应系统改造和升级需求
灵活性
您的系统对于我们来说 都是独一无二的 支持各种客户需要的系统 构架,可以实现从单站点 控制,多站点控制,分布 式控制,集中式控制,离 散控制,过程控制,安全 控制到批量控制的多种控 制方式。
3
Modicon Quantum-性能卓越的高端 自动化平台
概述
Unity Pro
a Socollaborative software
Modicon Quantum 是 PLC 的发明者 Modicon 推出的高端自动化平 台,一经推出,就以其无与伦比的可靠性和稳定性,在全球范围内, 特别是中国市场上取得了巨大的成功。2005 年初施耐德电气推出全 新的 Unity 自动化平台,作为该平台的重要组成部分之一,Modicon Quantum 获得了全面的升级。 作为工厂自动化和过程自动化领域最理想的高端自动化平台, Modicon Quantum 广泛应用于以下领域:
海事组织的认证:
■ 美国 ABS 认证 ■ 法国 BV 认证 ■ 挪威 DNV 认证 ■ 德国 GL 认证 ■ CEI GOST 认证 ■ 英国 LR 认证 ■ CIS 的 RRS 认证
等
4
全面升级的 CPU 的技术特征
随着 Unity 自动化平台的发布, Modicon Quantum 推出 6 款基于 Unity 平台的 CPU。这些 CPU 在指令执行速度,内存容量,通讯性能 和热备性能等方面获得了巨大的突破:
考证题库10.15(原表)

shiti a( )用于与CPU、内存及AGP联系。
南桥芯片( )故障会引起软件故障。
程序故障软件分为系统软件和 。
应用软件( )不可以作为鼠标接口USB内部总线( )是CPU与存储器、输入/输出接口之间的总引导型病毒( )是脚本病毒的一种,主要是感染Office系断电后无论RAM还是ROM中的信息都不会丢失正确“产品加密钥“一般可以在( ) 软件包装用户购买的实际为 14 寸显示器15寸CRT显示器,但在测量屏幕的对角线时只有13.8英北桥芯片1999 年 4 月 26 日爆发的“ CIH ”病毒破坏的是主1KB等于1000个字节正确48 倍速的 CD-ROM 光驱的数据传输率为 ( )。
2.4Mbit/s内存条AGP ( Accelerated Graphics Port )插槽插的组件是。AGP标准分为 。
AGP 1X对AGP插槽只能用来接显示卡,PCI插槽可以接PCI接口的对AGP接口是一种专用的显示接口,具有独占总线的特点AGP英文全称是 :( )Accelerated Graphics Processing ATA100硬盘接口插座是 ( ) 芯。
34没有什么区别AT电源和ATX电源的本质区别有哪些:( )BIOS的主要功能是:( )中断服务程序L oad Optimized DefaultsBIOS设置后,如果系统出现兼容性问题或其他严重错C MOS放电法BIOS设置了密码后,如果以后忘记了密码不可以使用BIOS是一段程序。
正确对BIOS系统设置程序保存在主板中的一块可读写RAM芯片对BIOS芯片是一块可读写的RAM芯片,由主板上的电池供。 ( )正确BIOS芯片由主板上的电池供电,关机后其中的信息不bit 的意思是 ( ) 字Cache的设置影响机器运行的速率。
( )正确Cache的设置影响机器运行的稳定性。
( )对CD-ROM的标准数据传输速率为( ) KB/S。
150CMOS 是一种( ) 软件系统日期和时间CMOS中存储了电脑中的重要信息,以下是其存储内容COM口可以接的设备有:( )鼠标CPU 运行的时钟频率称为 ( )。
- 1、下载文档前请自行甄别文档内容的完整性,平台不提供额外的编辑、内容补充、找答案等附加服务。
- 2、"仅部分预览"的文档,不可在线预览部分如存在完整性等问题,可反馈申请退款(可完整预览的文档不适用该条件!)。
- 3、如文档侵犯您的权益,请联系客服反馈,我们会尽快为您处理(人工客服工作时间:9:00-18:30)。
1.TSXCUSB485 Download cable Troubleshooting
Symptoms:
While trying to proceed an application Upload or Downloads, Vijeo-Designer Lite does not detect any connected terminal, where your terminal is connected by using a TSXCUSB485 cable on one of your computer USB port.
1 -First, make sure the Uni-Telway Driver is correctly configured:
∙Open the Schneider-Electric Driver Manager (From the Windows Control Panel)
∙Select UNITELWAY Driver
∙Click on Configuration button, this open following window
∙Click on Edit button, this open the following window:
∙Check that the selected com port is the one assigned to the TSXCUSB485. If it's not the case, select the COM port associated to the TSXCUSB and try again to
Upload/Download
2 -Make sure you are using the correct download cable for the terminal
3 -Try to reinstall the TSXCUSB485 driver
On the Vijeo-Designer Lite CDROM in the folder Drivers\USB, you will find the full installation software for the TSXCUSB485 driver.
Install it an see if it fixes the issue.
4 -The Upload/Download still does not work:
On some computer, the IRQs usually used to manage the COM3 (or COM4) are already used for some other device. You must then change the COM port associated to the USB cable TSXCUSB485.
Proceed as following:
∙Select COM1 in the UNITELWAY driver configuration dialog (for making COM3 free)
∙
∙From the Control Panel, Select System icon (This display the system
configuration dialog)
∙Select the Hardware Tab then Device Manager
Select the Ports node
Right click on the TSXCUSB485 node; Select Properties contextual menu;
Following dialog will display
Click on the Advanced Button and select the COM port to USE (probably COM5 or more)
∙Re open the Unitelway driver settings (see step 1) and assign the COM port to the one you just configured
∙Close all dialogs by OK then on Vijeo-Designer Lite a new Upload or Download. Note: If the Upload or Download still not woks, repeat previous steps for selecting an other COM port. As the COM port configuration depends of the computer, there's no rule to know which COM port must be used. Just try different COM port until it works. If you have no success, contact your Computer vendor.。