长沙悦城说明书
售楼处说明书

售楼处说明书尊敬的购房者:欢迎您光临本楼盘售楼处!为了让您更好地了解本项目的相关信息,我们特别为您准备了本售楼处说明书。
在这份说明书中,您将能够详细了解本楼盘的基本情况、户型设计、配套设施以及购房流程等内容。
请您仔细阅读以下内容,如有任何疑问,请随时咨询我们的销售人员。
一、项目概况本楼盘位于市中心繁华地段,占地面积约XXX平方米,总建筑面积约XXX平方米。
整个项目由多栋高层住宅楼组成,共计XX栋,每栋楼共有XX层。
本楼盘采用现代化建筑设计,外观简约大方,内部空间布局合理,为您提供舒适宜居的居住环境。
二、户型设计本楼盘提供多种户型供您选择,包括一居室、两居室、三居室以及复式等。
每个户型均经过精心设计,充分考虑了居住者的不同需求。
每个房间都配备了独立卫生间和宽敞的储物空间,让您的生活更加便利和舒适。
三、配套设施为了给您提供全面的生活便利,本楼盘配备了一系列高品质的配套设施。
首先,我们拥有大型停车场,为您提供充足的停车位。
其次,楼盘内设有24小时安保系统,确保您和您的家人的安全。
此外,我们还为居民提供了健身房、游泳池、儿童乐园等休闲娱乐设施,让您的生活更加丰富多彩。
四、购房流程1. 咨询与预约:您可以通过电话、在线咨询或亲临售楼处的方式与我们取得联系,并预约参观。
2. 参观售楼处:我们的销售人员将会向您介绍本楼盘的详细情况,并带您参观样板房和小区周边环境。
3. 签订购房意向书:如果您对本楼盘感兴趣,您可以填写购房意向书,表明您对某一套房源的购买意向。
4. 缴纳定金:在签订购房意向书后,您需要缴纳一定的定金作为认购款项。
5. 签订正式合同:在开发商确认您的购房资格后,您将与开发商签订正式的购房合同。
6. 缴纳首付款:根据合同约定,您需要在一定时间内缴纳购房总价的一定比例作为首付款。
7. 办理贷款手续:如果您需要贷款购房,您可以根据合同约定的时间办理相关贷款手续。
8. 签订交房合同:在楼盘竣工并通过验收后,您将与开发商签订交房合同。
MGate 5119系列产品说明书

P/N: 1802051190010 *1802051190010*MGate 5119 Series Quick Installation GuideVersion 1.0, December 2021Technical Support Contact Information/support2021 Moxa Inc. All rights reserved.OverviewThe MGate 5119 Series is an Ethernet gateway designed for the power industry to integrate Modbus, DNP3, IEC 60870-5-101/104 devices to an IEC 61850 MMS network.Package ChecklistBefore installing the MGate 5119, verify that the package contains the following items:• 1 MGate 5119 gateway• 1 serial cable: CBL-RJ45F9-150•Quick installation guide (printed)•Warranty cardPlease notify your sales representative if any of the above items is missing or damaged.Optional Accessories (can be purchased separately)•CBL-F9M9-150: DB9-female-to-DB9-male serial cable, 150 cm •CBL-F9M9-20: DB9-female-to-DB9-male serial cable, 20 cm •CBL-RJ45F9-150: RJ45-to-DB9-female serial cable, 150 cm •CBL-RJ45SF9-150: RJ45-to-DB9-female serial shielded cable, 150 cm•Mini DB9F-to-TB DB9: Female-to-terminal-block connector •WK-36-02: Wall-mounting kit, 2 plates with 6 screws•CBL-PJTB-10: Non-locking barrel plug to bare-wire cable Hardware IntroductionLED IndicatorsLED Color DescriptionReady Off Power is off or a fault condition existsGreen Steady: Power is on, and the MGate is functioningnormallyRed Steady: Power is on, and the MGate is booting upBlinking slowly: Indicates an IP conflict, or theDHCP or BOOTP server is not responding properlyFlashing quickly: the microSD card failedMB/101/ 104/DNP3 Off No communication with a Modbus/101/104/DNP3 deviceGreen Normal Modbus/101/104/DNP3 communication in progressRed When the MGate 5119 acts as a Modbus master:1.Received an exception code from the slavedevice2.Received a framing error (parity error,checksum error)3.Timeout (the master sent a request but noresponse was received)When the MGate 5119 acts as an IEC 60870-5-101/104/ DNP3 master:LEDColor Description1. Received an outstation exception (formaterror, checksum error, invalid data, outstation responds are not supported)2. Timeout (the master sent a command, but noresponse was received)850Off No communication with the IEC 61850 system Green Normal IEC 61850 communication in progress Red When the MGate 5119 acts as an IEC 61850server:1. Received an abnormal package (wrongformat, unsupported function code)2. Failed to establish an IEC 61850 connection3. Disconnected the IEC 61850 connectionDimensionsUnit: mm (inch)Reset ButtonRestore the MGate to factory default settings by using a pointed object (such as a straightened paper clip) to hold the reset button down until the Ready LED stops blinking (approximately five seconds).Pull-high, Pull-low, and Terminator for RS-485Beneath the MGate 5119’s top cover, you will find DIP switches to adjust each serial port’s pull-high resistor, pull-low resistor, and terminator.SW1 2 3 Pull-high resistor Pull-low resistor Terminator ON 1 k Ω 1 k Ω 120 Ω OFF 150 k Ω*150 k Ω*–**DefaultHardware Installation Procedure1.Connect the MGate 5119's terminal block to the power supply,which could provide 12 to 48 VDC.e a serial or Ethernet cable to connect the MGate to the ModbusRTU/ASCII/TCP, DNP3 Serial/TCP, IEC60870-5-101/104 device. e an Ethernet cable to connect the MGate to the IEC 61850 MMSsystem.4.The MGate 5119 is designed to be attached to a DIN rail ormounted on a wall. For DIN-rail mounting, push down the spring and properly attach it to the DIN rail until it “snaps” into place. For wall mounting, install the wall-mount kit (optional) first and then screw the device onto the wall. An M3 screw is suggested, and the minimum length of the screw should be 10 mm.The following figure illustrates the two suggested mounting options:The following figure illustrates how to attach screws to the mounting kits:DIN Rail:Wall-mount:NOTE The equipment is intended to be supplied by the external power source (UL listed/ IEC 60950-1/ IEC 62368-1), which outputcomplies with ES1/SELV, PS2/LPS, output rating is 12 to 48VDC, 0.455 A min., an ambient temperature 75°C minimum.NOTE Before connecting the Equipment to DC power inputs, make sure DC power source voltage is stable•The wiring of input terminal block shall be installed by skilled person.•Wire type: Cu•Only use 28-18 AWG wire size, torque value 0.5 N-m.•One individual conductor in a clamping point.NOTE If you are using a Class I adapter, the power cord should beconnected to an outlet with an earthing connection Software Installation InformationYou can download the User's Manual and Device Search Utility (DSU) from Moxa's website: . Please refer to the User’s Manual for additional details on using the DSU.The MGate 5119 also supports login via a web browser.Default IP address: 192.168.127.254Default account: adminDefault password: moxaPin AssignmentsSerial Port (Male DB9) PinRS-232RS-422/ RS-485 (4W)RS-485 (2W) 1 DCD TxD-(A) – 2 RXD TxD+(B) –3 TXD RxD+(B)Data+(B) 4 DTR RxD-(A) Data-(A) 5* GND GND GND 6 DSR – – 7 RTS – – 8 CTS – – 9 – ––*Signal groundEthernet Port (RJ45) Pin Signal 1 Tx+ 2 Tx- 3 Rx+ 6Rx-Power Input and Relay Output PinoutsV2+V2-V1+V1-ShieldedGroundDC Power Input 2 DCPowerInput 2 N.O.CommonN.C.DCPower Input 1 DC Power Input 1SpecificationsPower Requirements Power Input 12 to 48 VDC Input Current 455 mA max. Operating Temperature -40 to 75°C (-40 to 167°F) Ambient Relative Humidity 5 to 95% (non-condensing) Dimensions 36 x 120 x 150 mm (1.42 x 4.72 x 5.91 in) Reliability Alert Tools Built-in buzzer and RTC MTBF 1,180,203 hrs.Moxa Inc.No. 1111, Heping Rd., Bade Dist., Taoyuan City 334004, Taiwan。
使用说明书+保证书(共五篇)

使用说明书+保证书(共五篇)第一篇:使用说明书+保证书商品房使用手册项目名称开发企业商品房使用说明书尊敬的业主(住户):为了使您更好地了解和使用我公司开发建设的商品房及室内、外设施,我们根据有关规定,制定了此《商品住宅使用说明书》。
入住前,请您首先仔细阅读此说明书,并真诚地欢迎您给我们包括您对住宅的使用情况提出宝贵意见和建议,以便不断改进我们的工作,更好地为您服务。
一、工程名称:区#楼单元号房二、建设该住宅楼的有关单位建设单位:设计单位:施工单位:监理单位:物业管理单位:三、本商品住宅结构类型为结构。
抗震设防基本烈度为六度。
四、本商品住宅各部位类型、使用材料、性能、标准及使用须知:1、地基基础:不要在地基周边取土挖坑,防止地表水浸渗后影响地基基础正常便用;2、墙体:本住宅使用结构,并设钢筋砼圈梁,在转角部设有抗震构造柱,注意保护;3、墙面:外墙为苯板保温外刷防水弹性涂料,请勿凸出外墙面安装防盗网等,不准在墙面任意打洞,请勿重物撞击,以免损坏墙面,影响保温效果及造成渗漏;4、门窗:本住宅楼分户门采用钢制防盗门;窗采用塑钢窗;门窗在使用时请勿随意拆装,应轻开轻关,以免损坏零部件。
该单元门采用钢制防盗对讲门,请随手关闭,勿长时间处于开启状态,以防自动闭门器损坏而失去防范作用。
5、顶层屋面:本住宅采用现浇钢筋砼屋面结构层并设有保温层,防水卷材防水面、瓦屋面。
在屋面上安装太阳能热水器及其它设施须经物业管理部门同意,缴纳维修保证金并签定有关协议。
6、室内楼地面:本住宅楼板采用现浇砼,楼板荷载不得超过300公斤/平方米,切勿重物撞击地面或在地面上打洞。
除卫生间、厨房、阳台地面外,其他室内楼地面一律不得直接用水冲刷。
阳台不宜集中堆放过重物品。
五、室内主要设施、使用材料、性能、标准及使用须知:1、室内给水:上水管采用PPR管材,户设水表一只,不要自行拆换。
水嘴宜轻开、轻关。
2、室内排水:下水管采用PVC材料。
水管应防止外力撞击;地漏及便器内不得投放或倾倒垃圾等易堵杂物;地漏口篦子的污染应定期清除,以免造成堵塞,影响您的正常使用。
格力空调使用说明书

使用安装说明书使用前请仔细阅读本说明书本说明书包含服务指南,请务必妥善保管安全警示提示、注意、禁止、强制01部件名称配件清单使用条件产品简介03040205显示面板使用05遥控器使用08线控器(选配)使用使用说明滤尘网清洁长期未使用再次使用时清洁保养0909环保清单故障或保护核查 安装注意事项安装简图安装说明10111214室内机安装室外机安装检验运行152123技术参数安装服务售后服务常见现象安装监督卡服务指南242626维修服务262830目录长时间不使用时09适用机型GRD35T2W/BN1-CFB(3)GRD51T2W/BN1-CFB(3)GRD72T2W/BN1-CFB(3)01安全警示禁止用电源开关直接关闭空调器。
请勿用湿手操作空调器。
禁止用水直接冲淋空调器。
卸下或打开面板时,切勿触碰空调器的金属部位。
不得让身体长时间直接接触冷风或制冷过度。
不得踩踏在室内机、室外机上,或在其上放置物品,避免遮挡进、出风口。
切勿用于食品、精密仪器、贵重美术品的保存,切勿安装在船舶、车辆等特殊场所。
切勿在空调风直接吹到的地方使用燃烧器具,在密闭的房间内使用或与燃烧器具同时使用时,请经常打开窗户通风。
切勿在室内机下面放置其它电气产品、家具、贵重物品等。
禁止擅自更换电源线,或将电源线中途驳接,或与其它电器并联使用;如果电源软线损坏,为了避免危险,必须由制造商、其维修部或类似部门的专业人员更换。
表示【禁止】的内容禁止在空调器使用场所存放易燃易爆气体;不得使用与空调器本身所配制冷剂不同的其它制冷剂。
装卸、清洁时,切勿踩踏在不稳定的台面上。
表示【强制】的内容提示本节记载了安全事项的重要内容,以防止对使用者及他人造成人身伤害或财产损失。
请在充分理解下面内容(标志、图标)的基础上阅读正文,并请务必遵守所记载的安全事项。
对于电辅热型空调器,空调器与可燃表面的最小间隙为1米;电辅热部件装配在室内机蒸发器内,装配方法是固定在蒸发器边板上,其输入功率见技术参数页的“电辅热输入功率”。
寿臣山 15 号售楼说明书

新闻稿【实时发布】英皇国际、中渝置地、明发集团及尚家生活携手发展寿臣山洋房项目正式命名为“寿臣山15号”料短期内瞩目登场耸立南区尊贵清幽地段缔造显赫矜贵大宅典范[香港,2022 年5月16日] 由英皇集团(国际)有限公司(0163)、中渝置地控股有限公司(01224)、明发集团(国际)有限公司(0846)、资本策略地产有限公司(0497)旗下尚家生活合作发展的寿臣山洋房项目,今日正式命名为“寿臣山15号”(No.15 Shouson),发展商亦同步公布有关之售楼说明书。
项目集结尊尚优越地段及区内供应矜罕两大优势,将计划于短期内以招标形式推出市场。
项目位处港岛南区超级传统豪宅地段之寿臣山道西15号,设有15幢低密度豪华独立洋房,实用面积由3,727 至12,073平方呎,4房4套至6房6套间隔,属全港极少供应万呎豪宅的矜罕洋房项目。
每幢洋房尊设私人花园、私人车位以及内置升降机;其中13幢独立洋房更拥有私人游泳池,尽显超级豪宅气派。
“寿臣山15号”先天条件优越,环抱连绵翠绿山峦,气势磅礡,全方位被金马伦山、班纳山、南朗山、紫罗兰山及聂歌信山环抱,绿意盎然,满目青葱,私隐度极高,尊贵气度浑然天成。
寿臣山向来是全港最显赫的豪宅地段之一,长久以来汇聚贤能之士,是香港政商领袖、显赫家族、演艺名人以及文人雅士的聚居地,并邻近香港乡村俱乐部、香港高尔夫球会及深湾游艇会等豪华会所,奢华娱乐触手可及。
而周边生活配套同样齐全,完善的交通网络与香港都会核心一脉相连,达致繁华与恬静同时兼备。
英皇国际副主席杨政龙表示: “寿臣山15号集多项罕有优点于一身,弥足珍贵。
英皇国际一向重视发展香港尊贵豪宅,三方合作伙伴在大中华房地产市场甚具经验,透过携手合作,能有效发挥协同效应,共同打造出这个气派非凡、境界超然的超级豪宅洋房项目。
寿臣山15号一直备受实力买家关注垂询,发展商将会共享资源积极准备宣传及销售安排。
随着疫情放缓,香港经济逐渐重回正轨,集团预料豪宅市场会愈渐活跃,凭着项目矜贵不凡的地理优势及精致细心设计,相信届时一推出定必会成为市场瞩目焦点。
iHome iP4 Boombox 用户指南说明书

Play/pause Button: Press to play or pause iPod
amount
of each frequency.
Turn SRS TruBass audio enhancement on/off
Volume knob: Turn to adjust
5
THE REMOTE CONTROL
The unit comes with a magnetized remote control which fits into a slot on the top of the unit. The remote comes with one CR2032 battery already installed. Remove the battery tab to use the remote.
4
USING LINE-IN
LINE-IN JACK Connect one end of a standard stereo 3.5mm audio cable (not included) into the line-in jack on the back of the unit and the other into the headphone or output jack of your audio device. Press the Power Button on the unit to turn it on. Press and release the Mode Button as needed to access iPod mode. Turn the aux device on and press play. Adjust volume on your audio device and the unit as needed. Do not play a line-in audio device and a docked iPhone or iPod at the same time or you will hear both sources.
住宅使用说明书B面
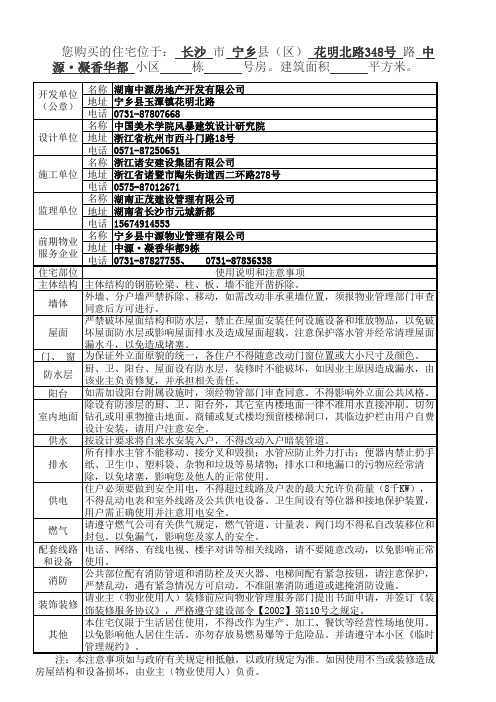
您购买的住宅位于: 长沙 市 宁乡县(区) 花明北路348号 路 中源·凝香华都 小区 栋 号房。建筑面积 平方米。
名称 湖南中源房地产开发有限公司 开发单位 地址 宁乡县玉潭镇花明北路 (公章) 电话 0731-87807668 名称 中国美术学院风暴建筑设计研究院 设计单位 地址 浙江省杭州市西斗门路18号 电话 0571-87250651 名称 浙江诸安建设集团有限公司 施工单位 地址 浙江省诸暨市陶朱街道西二环路278号 电话 0575-87012671 名称 湖南正茂建设管理有限公司 监理单位 地址 湖南省长沙市元城新都 电话 15674914553 名称 宁乡县中源物业管理有限公司 前期物业 地址 中源·凝香华都9栋 服务企业 电话 0731-87827755、 0731-87836338 使用说明和注意事项 住宅部位 主体结构 主体结构的钢筋砼梁、柱、板、墙不能开凿拆除。 外墙、分户墙严禁拆除、移动,如需改动非承重墙位置,须报物业管理部门审查 墙体 同意后方可进行。 严禁破坏屋面结构和防水层,禁止在屋面安装任何设施设备和堆放物品,以免破 屋面 坏屋面防水层或影响屋面排水及造成屋面超载。注意保护落水管并经常清理屋面 漏水斗,以免造成堵塞。 门、 窗 为保证外立面原貌的统一,各住户不得随意改动门窗位置或大小尺寸及颜色。 厨、卫、阳台、屋面设有防水层,装修时不能破坏,如因业主原因造成漏水,由 防水层 该业主负责修复,并承担相关责任。 阳台 如需加设阳台附属设施时,须经物管部门审查同意。不得影响外立面公共风格。 除设有防渗层的厨、卫、阳台外,其它室内楼地面一律不准用水直接冲刷。切勿 室内地面 钻孔或用重物撞击地面。商铺或复式楼均预留楼梯洞口,其临边护栏由用户自费 设计安装,请用户注意安全。 供水 按设计要求将自来水安装入户,不得改动入户暗装管道。 所有排水主管不能移动、接分叉和毁损;水管应防止外力打击;便器内禁止扔手 排水 纸、卫生巾、塑料袋、杂物和垃圾等易堵物;排水口和地漏口的污物应经常清 除,以免堵塞,影响您及他人的正常使用。 住户必须要做到安全用电,不得超过线路及户表的最大允许负荷量(8千KW), 供电 不得乱动电表和室外线路及公共供电设备。卫生间设有等位器和接地保护装置, 用户需正确使用并注意用电安全。 请遵守燃气公司有关供气规定,燃气管道、计量表、阀门均不得私自改装移位和 燃气 封包。以免漏气,影响您及家人的安全。 配套线路 电话、网络、有线电视、楼宇对讲等相关线路,请不要随意改动,以免影响正常 和设备 使用。 公共部位配有消防管道和消防栓及灭火器、电梯间配有紧急按钮,请注意保护, 消防 严禁乱动,遇有紧急情况方可启动。不准阻塞消防通道或遮掩消防设施。 请业主(物业使用人)装修前应向物业管理服务部门提出书面申请,并签订《装 装饰装修 饰装修服务协议》,严格遵守建设部令【2002】第110号之规定。 本住宅仅限于生活居住使用,不得改作为生产、加工、餐饮等经营性场地使用。 以免影响他人居住生活。亦勿存放易燃易爆等于危险品。并请遵守本小区《临时 其他 管理规约》。 注:本注意事项如与政府有关规定相抵触,以政府规定为准。如因使用不当或装修造成 房屋结构和设备损坏,由业主(物业使用人)负责。
DXZ多功能行程限位器使用说明书

DXZ多功能行程限位器使用说明书湖南实锐欣智能科技有限责任公司地址:湖南长沙浏阳高新技术开发区永泰路创新创业园A1栋304 1.用途DXZ系列行程限位器(简称限位器)引进法国波坦(POTAIN)公司技术国产化设计生产的一种新型安全保护装置。
适用于空间三坐标的双向控制、任意位置、转角、行程控制及模拟传感控制,广泛用于塔式起重机、港口起重机、各类卷扬机等建筑机械以及类似机械的控制电路中。
2.型号意义DXZ□□F为非标传动比:W为带电位器标准传动比序号:1~8(见表2-1)限位器代号表2-1传动比序号所对应的传动比传动比序号12345678传动比1:131:171:461:601:781:2101:2741:960注:1.非标的控制回路可增至5~6个。
2.用户所需的非标传动比注于“F”后。
3.主要技术参数限位器适用于下列环境中:环境温度:-40℃~55℃相对温度:≤90%海拔高度:≤2500M传动比:1:13~1:960共9页第2页2共9页第3页3重复定位精度:记忆凸轮的转角≤0.005rad (0.3°) 额定电压:AC:380V 额定电流6~10A传感电位器V 连标准阻阻值5KΩ独立线性度0.1%机械转角360°(连续)4.结构特征级工作原理4.1结构限位器由高精度的大传动比减速器与其输出轴同步的机械记忆控制机构、传感器等组成.4.2工作原理与被控制机构同步位移信号经外接挂轮变速后与限位器的输入轴联接,经减速器变速转换成输出轴的角位移信号而实现(见图4-1)a 带动与输出同步的机械记忆机构可分别将人为调整的4个凸轮先后使微动开关瞬时切换,实现行程限控制及极限限位.b 带动与输出同步的传感器,输出相应讯号给显示仪,实现行程瞬时位置显示.BU-1B 限位器图4-15.安装和调整5.1限位器的安装外形尺寸(见图5-1);安装用固定螺栓(见图5-2)用户可根据所配外接传动中心距自配。
5.2限位器的调整:(图5-3;图5-4)机构的位移信记忆凸轮机构的控制电路减速器微动开关传动器位置显示仪调整轴对应的记忆凸轮及微动开关分别为:1Z-1T-1WK;2Z-2T-2WK;3Z-3T-3WK;4Z-4T-4WK;5.2.1调整程序a拆开上罩壳,检查并拧紧2-M3×55螺钉。
网上购物商城需求规格说明书

中南林业科技大学《软件工程课程设计》报告设计名称:网上购物商城姓名:王旭琴学号: 20134703 专业班级: 13级软件工程2班系(院):计算机与信息工程学院指导老师:辛动军签名:2015-6-30网上购物商城需求规格说明1、绪论1.1课题意义自我国加入WTO后,越来越多的传统企业进一步认识到企业经济发展的必然趋势是以网络化、全球化为主要特征。
而企业实行电子商务则成为企业发展与国际接轨的必要条件。
多年来国家十分重视企业的信息化建设,并做了大量工作,但目前企业开始实施信息化的比例还不够高,所以电子购物网站的实现是一个仍然是非常迫切的需求。
1.2网上购物商城可以实现提高经营决策和计划预见能力通过电子商务对各类客户的需求可以超前做到全面地了解使企业有针对性地提前安排生产经营计划,占得市场先机。
1.3加强与客户的沟通促进产品销售根据网上购物商城信息库中保存的大量客户资料,通过快速的信息沟通,为客户及时提供所需的产品和服务。
1.4降低交易和售后服务成本网上购物商城使得企业能直接面向最终客户,从而降低交易成本和客户售后咨询等服务费用,尤其是对无形产品的服务。
2、面向对象分析2.1功能模型2.1.3用例要点表网上购物商城用例要点表用例要点说明注册结果账户状态为“会员”重要步骤1、填写个人信息2、会员审核通过议题需验证和绑定手机号,绑定支付宝订购商品结果订购状态为“已结账”重要步骤1、提交订单2、确认付款3、确认收货议题保持“订购状态”,或是拆成“加入购物车”和“结账”2.1.4用例图表1-1顾客用例图表1-2管理员用例图表1-3商户用例图表1-4游客用例图2.1.5用例描述表1-1注册的用例描述用例名称:注册参与者:游客前置条件:游客进入网上购物商城界面用例描述:游客进入网上购物商城界面后,点击注册可以进入到注册界面,填写基本信息,注册成为会员后置条件:注册成功,成为会员表1-2查询商品信息的用例描述用例名称:查询商品信息参与者:游客前置条件:游客进入网上购物商城界面用例描述:游客进入网上购物商城界面后,通过筛选、搜索查询出相应的商品信息,并进行浏览说明:游客只能浏览信息,只有通过注册以后才能够购买相应的商品。
CLUBZ MINI 迪士尼移动蓝牙音箱用户手册说明书

We recommend that you register your Product via the relevant country speci c website for your Product. Y our registration will allow us to inform you about updates for certain products, possible new o ers and new Products and/or applications. Registering is easy; just follow the instructions on the relevant country speci c website for your Product.HARMAN International Industries, Incorporated (“HARMAN”) is the manufacturer and through its local subsidiary, warrants to you that the Product (including components provided in/with the Product) will be free from defects in workmanship and materials for a period of ONE year from the date of retail purchase by you (the “Warranty Period”). During the Warranty Period, the Product (including components), will be repaired or replaced at HARMAN’s option, without charge for either parts or labor OR at HARMAN’s sole option, the price of the Product may be refunded, subject to depreciation based on your purchase price for the Product pro-rated over the remaining balance of the Warranty Period. Any warranty service or replacement of parts will not extend the Warranty Period. This Limited Warranty does not cover defects which are a result of: (1) damage caused by accident, unreasonable use or neglect (including the lack of reasonable and necessary maintenance); (2) damage during shipment (claims must be presented to the carrier);NOTE: IF YOU PURCHASED PRODUCTS IN INDIA, PLEASE VISIT WWW .HARMANWARRANTY .IN TO REGISTER FOR WARRANTYThis limited warranty (the “Limited Warranty”) protects only the original end-user (“you” or “your”), and is not transferable and is applicable only in the country (excluding EEA member states and the Russian Federation) in which you originally purchased your INFINITY Product (the “Product”). Any attempt to transfer this warranty shall immediately make this warranty void. WHO IS PROTECTED BY THE WARRANTYLIMITED WARRANTY08 EN(3) damage to, or deterioration of, any accessory or decorative surface; (4) damage resulting from failure to follow instructions contained in your owner’s manual;(5) damage resulting from the performance of repairs by someone other than HARMAN authorized service center; (6) deterioration of component parts, the nature of which is to become worn or depleted with use, such as batteries.Furthermore, this Limited Warranty covers only actual defects within the Product itself, and does not cover the cost of installation or removal from a xed installation, setup or adjustments, claims based on misrepresentation by the seller, performance variations resulting from installation-related circumstances such as source quality or AC power or Product modi cations, any unit on which the serial number has been e aced, modi ed or removed, or units used for other than home use. This Limited Warranty is valid only for INFINITY products purchased from an authorized dealer.Except to the extent expressly prohibited in your jurisdiction by applicable law, all implied warranties, including tness for a particular purpose and merchantability are hereby excluded and in no event shall HARMAN or any HARMAN subsidiary be liable for any indirect, direct, incidental, special or consequential loss or damages whatsoever (including, without limitation, other pecuniary loss) arising out of the use of or inability to use the Product, even if HARMAN and/or a HARMAN subsidiary have been advised of the possibility of such damages. To any extent that HARMAN cannot lawfully disclaim implied warranties under this Limited Warranty, all such implied warranties are limited in duration to the duration of this warranty. Some jurisdictions do not allow the exclusion or limitation of incidental or consequential damages or exclusions or limitations on the duration of implied warranties or conditions, so the above limitations or exclusions may not apply to you. This warranty gives you speci c legal rights, and you may also have other rights that vary by jurisdiction.09 ENThis Limited Warranty covers all expenses for labor and materials required for the repair OR replacement of the Product that is found to be defective, and a reasonable return shipping charge within the country of repair. Please be sure to save the original shipping carton(s), because a charge will be made for additional cartons/packaging. Y ou will be charged for the cost of examining a unit that is not in need of repair (including resulting shipping costs), or for necessary repairs not covered by this Limited Warranty . We sincerely thank you for your expression of con dence in INFINITY. We wish you many years of listening pleasure.For a seamless experience please register your product at www .HarmanWarranty .in.(if you purchased products in I ndia) nformation on service centers can be found on the registration page. Contact the dealer who sold you this Product, or contact HARMAN customer support using the contact information on the relevant country speci c support website for your Product to request warranty service. To validate your right to this Limited Warranty, you must provide the original sales invoice or other proof of ownership and date of purchase. Do not return your Product without prior authorization from the corresponding dealer or HARMAN. Warranty repair of the HARMAN Product must be carried out by Harman authorized service center . Unauthorized warranty repair will void the warranty and is performed at your sole risk.Y ou are also welcome to consult the relevant country speci c HARMAN support website for your Product for helpful hints. HOW TO OBTAIN WARRANTY SERVICEWHO PAYS FOR WHAT10 ENTo register for warranty in India, scan QRwww.HarmanWarranty.inHARMAN International Industries, Incorporated8500 Balboa Boulevard, Northridge, CA 91329 USA。
润和星城住宅区规划设计说明排版

润和星城详细规划设计说明书一、规划设计概况二、规划依据及参考资料三、规划设计原则四、规划设计整体框架五、公共建筑规划六、道路系统规划七、绿化环境景观规划八、建筑设计九、主要技术经济指标1一、规划设计概况该项目的地块位于长沙市望城镇经济开发区。
基地位于望城县星城镇中华岭村,北侧为普瑞大道,东侧为黄金大道,西侧紧邻环境优美的长沙市公安局驾考中心,南侧邻月亮岛路,交通便捷。
地块到望城、新市政府车程仅10分钟,到五一广场约20分钟。
正在兴建中的长沙火车西站与该地块仅几步之遥,交通十分便捷。
润和星城将建设成为环境优美,设施完备,独具特色的现代化新型居住小区。
整个地块南高北低,南侧为原秀龙米厂用地,北侧为未开发的现状用地,场地高差较大。
地块总用地面积195525.97平方米(合293.58亩),道路代征面积9347.13平方米(合14.02亩),净用地面积189177.66平方米(合284.05亩),其中包括公共绿地控制用地4000.02平方米(合6.00亩)。
用地北侧为正在开发的“世纪公园”和“恒大名都”两个楼盘。
驾考中心风景优美、树木葱郁、视野开阔,是本项目可利用的自然景观资源。
二、规划依据及参考资料(一)《中华人民共和国城市规划法》(1990.4.1);(二)建设部《城市规划编制办法》(1991.9.3);(三)建设部《城市规划编制办法实施细则》(1995.6.8);(四)《城市居住区规划设计规范》(GB50180-93);(五)国家、湖南省及望城县相关法律、法规、标准、规范;(六)《望城县城市总体规划》(七)1:1000现状地形图;(八)《望城县规划设计任务书》三、规划设计原则与理念(一)原则1、和谐原则:实现人与环境的和谐对话,加强住户行为与自然景观的亲密融合,使住区在成为可游可居的惬意生活场所。
利用并强化场址的自然生态特色,寻求与周围环境协同发展的途径。
2、人本原则:强调以人为本,充分考虑住户对舒适、安全、方便、私密等方面的各种需求,以营造一个高度完善的人居空间;充分考虑人的需要,创造适于人生活、工作、交往的场所,使人愉悦,获得精神享受的城市空间环境。
SVG中文说明书

危险!
在一次系统带电运行时,绝对不允许将与装置连接的电流互感器二次开路。该回路开路可能会 产生极端危险的高压。
警告!
z 曝露端子 在装置带电时不要触碰曝露的端子等,因为可能会产生危险的高电压。
z 残余电压 在装置电源关闭后,直流回路中仍然可能存在危险的电压。这些电压需在数秒钟后才会消失。
购买产品,请联系: 电话:025-87178911,传真: 025-52100511、025-52100512 电子信箱:market@
技术支持,请联系: 电话:025-52107703、8008289967、4008289967 传真:025-52100770 或登陆网站:/ser_sup
本手册中将会用到以下指示标记和标准定义:
危险! 意味着如果安全预防措施被忽视,则会导致人员死亡,严重的人身伤害,或 严重的设备损坏。
警告! 意味着如果安全预防措施被忽视,则可能导致人员死亡,严重的人身伤害, 或严重的设备损坏。
警示! 意味着如果安全预防措施被忽视,则可能导致轻微的人身伤害或设备损坏。 本条特别适用于对装置的损坏及可能对被保护设备的损坏。
151标准配置151标准配置表组件名称配置数量备注启动装置连接电抗器连接变压器连接电抗器每相1台连接变压器1台技术资料见装箱清单用户手册及必要的图纸资料152可选配置152可选配置表组件名称配置数量备注概述南京南瑞继保电气有限公司作为固定补偿用保护柜作为连接变压器或固定电容器补偿的保护开关柜备用功率单元用户自选方便维护连接电缆用户自选视柜外连接需要时选用后台系统需要远程操作控制时选用用户的其他特殊要求可进行协商技术参数南京南瑞继保电气有限公司技术参数21电气参数额定工作电压6kv10kv35kv额定容量50mvar50mvar输出无功范围从感性额定无功到容性额定无功范围内连续变化响应时间10ms输出电压总谐波畸变率3输出电流总谐波畸变率3输出电压不对称度3效率9922环境条件温度2040保证正常工作贮存环境温度2040湿度最湿月的月平均最大相对湿度小于95大气压力80kpa110kpa相对于海拔高度为2km及以下抗地震能力地面水平加速度
5070管理员说明书

2 纸张和其他介质 ...........................................................33 纸张类型 ................................................................. 34 所支持纸张的可放置数量和重量 .......................................... 34 支持的纸张类型 ............................. 36 放置纸张 ................................................................. 40 在纸盘1-4 (纸盘3和4(双纸盘模块))(选装)中放置纸张 ................... 40 在纸盘3(复合纸盘模块) (选装)中放置纸张............................... 41 在纸盘4(复合纸盘模块) (选装)中放置纸张............................... 42 在纸盘5(手送纸盘)中放置纸张 ........................................... 42 在纸盘6(大容量纸盘) (选装)中放置纸张................................. 44 更改纸张尺寸 ............................................................. 45 更改纸盘1-4 (纸盘3和4(双纸盘模块))(选装)的纸张尺寸 ................. 45 更改纸盘3(复合纸盘模块) (选装)的纸张尺寸............................. 46 更改纸盘4(复合纸盘模块) (选装)的纸张尺寸............................. 47 更改纸盘6(大容量纸盘) (选装)的纸张尺寸............................... 48 更改纸张设定 ............................................................. 50
LS变频器说明书iS5-中文说明书
除 谢谢
试运行
0.0 在运行前检查所有参数,根据负载类型修改参数值。 1.0 始终在本说明书标定的电压范围内使用,否则,可能导致变频器损坏。
操作防范
当选择自动重启动功能时,由于电机会在故障停止后突然再启动,所以应远离设备。 操作面板上的“STOP”键仅在相应功能设置已经被设定时才有效,特殊情况应准备紧急停止开关。 如果故障复位是使用外部端子进行设定,将会发生突然启动。请预先检查外部端子信号是否处于关断
资料收集于网络 如有侵权请联系网站 删除 谢谢
感谢您选购 LG 变频调速器!
安全注意事项
始终遵守安全注意事项可以防止意外事故及潜在危险的发生。
在本使用手册中,安全等级分类如下:
危险 注意
不正确的操作可能导致严重的人身伤害或死亡。 不正确的操作可能导致轻微的人身伤害或物体硬件的损坏。
在本说明书中,全篇使用以下两个图标以使你能明白安全注意事项。
操作防范
维护与安装
按照产品的重量处理。 堆放变频器包装箱数量不要超过规定数目。 按照本手册的指令规范安装。 交货期间不要打开外壳。 不要放置重物在变频器上。 检查变频器的装箱方向是否正确。 不要使变频器受到摔跌或挤压。 对于 200V 级变频器,使用 3 类接地方式(接地电阻<100Ω)400V 的变频器(接地电阻
器变热与损坏。
参数初始化后,在运行前需要再次设定参数。当参数被初始化后,参数值又重新回到出厂设置。 变频器可以容易地设定为高速运行,在运行前先检查一下电机或机械设备的容量。 使用直流制动功能时,不会产生停止力矩。当需要停止力矩时,安装单独设备。 当驱动 400V 变频器和电机时,用绝缘整流器和采取措施抑制浪涌电压。由于在电机接线端子配线常数
第一章 安装 .....................................................................................................................................10 1.1 检查 ..................................................................................................................................................... 10 1.2 环境条件 ............................................................................................................................................. 10 1.3 安装 ..................................................................................................................................................... 10 1.4 其它注意事项 ..................................................................................................................................... 11 1.5 尺寸 ..................................................................................................................................................... 12 1.6 基本配线 ............................................................................................................................................. 17 1.7 电源端子 ............................................................................................................................................. 18 1.7.1 类型 A 构造 ............................................................................................................................... 19 1.7.2 类型B 构造 ................................................................................................................................. 19 1.7.3 类型C 构造 ................................................................................................................................. 20 1.7.4 电源端子配线 ............................................................................................................................. 21 1.8 控制端子 ............................................................................................................................................. 23 1.8.1 控制端子配线 ............................................................................................................................. 24 1.8.2 键盘和 RS485电路连接配线 ..................................................................................................... 25
需求规格说明书内部确认表(我的长沙)
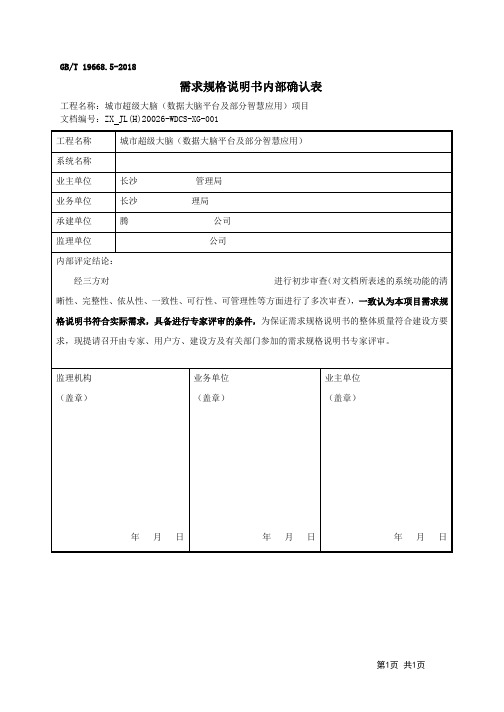
工程名称:城市超级大脑(数据大脑平台及部分智慧应用)项目
文档编号:ZXJL(H)20026-WDCS-XG-001
工程名称
城市超级大脑(数据大脑平台及部分智慧应用)
系统名称
业主单位
长沙管理局
业务单位
长沙理局
承建单位
腾公司
监理Байду номын сангаас位
公司
内部评定结论:
经三方对进行初步审查(对文档所表述的系统功能的清晰性、完整性、依从性、一致性、可行性、可管理性等方面进行了多次审查),一致认为本项目需求规格说明书符合实际需求,具备进行专家评审的条件,为保证需求规格说明书的整体质量符合建设方要求,现提请召开由专家、用户方、建设方及有关部门参加的需求规格说明书专家评审。
监理机构
(盖章)
年月日
业务单位
(盖章)
年月日
业主单位
(盖章)
年月日
橙色电钢音箱 100BXT 产品说明书

THANK YOU!‘Legendary British Guitar Amplifier’ owners club!Since 1968 when the company was founded, Orange has been apioneering force in the guitar amplification industry. Today, witha tea m of the world’s finest amplifier engineers, Orangecontinues to push back the boundaries of conventional amplifierdesign.Our commitment to craftsmanship and quality control hasallowed our amplifiers to stand the test of time, giving theirowners as much pleasure now, as the day they were bought. Tomaintain this level of excellence, each Orange amplifier is put through many rigorous test procedures before leaving the factory.This booklet contains valuable technical and safety information Please take the time to read this manual as the information may enhance the sound and performance of your amplifier. We are confident thatyou will be delighted with your new purchase and that it will provide you with many years of enjoyment.CONTENTSCONTENTS (3)CONTACT DETAILS (4)IMPORTANT SAFETY INFORMATION (5)EMI (8)USING YOUR AMPLIFIER (10)FRONT PANEL FEATURES (11)REAR PANEL FEATURES (13)SPECIFICATIONS (14)FREE EXTENDED WARRANTY OFFER (15)The contents of this manual may be subject to change without notice. The latest version is available for download on the official Orange Amplification website:/support/downloads/CONTACT DETAILS Global HeadquartersOrange AmplificationOMEC House108 Ripon WayBorehamwoodHertfordshireWD6 2JAENGLANDTel: +44 20 8905 2828Fax: +44 20 8905 2868*************Orange USA1741 Wilwat DriveSuite A1NorcrossGA 30093USATel: 1-404-303-8196Fax: 1-404-303-7176******************IMPORTANT SAFETY INFORMATIONThe lightning flash with arrowhead symbol, within an equilateral triangle, isintended to alert the user to the presence of un-insulated ‘dangerousvoltage’ within the product’s enclosure that may be of sufficient magnitudeto constitute a risk of electric shock to persons. Terminals labelled as“Speaker Outputs” must be connected to a speaker cabinet of thedesignated load rating using an un-shielded two conductor cable for speaker use at all times during operationThe exclamation point within an equilateral triangle and "WARNING" areintended to alert the user to the presence of important operatinginstructions. Failure to heed the instructions will result in severe injury ordeath.• Keep these instructions.• Heed all warnings.• Follow all instructions.• Do not use this apparatus near liquid.• Clean only with dry cloth.• Do not block any ventilation openings. Install in accordance with the manufacturer’s instructions.• Do not install near any heat sources such as radiators, heat registers, stoves, or other apparatus (including amplifiers) that produce heat.• Do not defeat the safety purpose of the polarized or grounding-type plug. A polarized plug has two blades, one wider than the other. A grounding type plug has two blades and a third grounding prong. The wide blade or the third prong is provided for your safety. If the provided plug does not fit into your outlet, consult an electrician for replacement of the obsolete outlet.• Servicing: Do not attempt to service this product yourself as opening or removing covers may expose you to dangerous voltage or other hazards.• Refer all servicing to qualified service personnel.• Damage Requiring Service: Unplug this product from the wall outlet and refer servicing to qualified service personnel under the following conditions: (a) When the power-supply cord or plug is damaged; (b) If liquid has been spilled, or objects have fallen into the product; (c) If the product has been exposed to rain or water; (d) If the product does not operate normally by following the operating instructions. Adjust only those controls that are covered by the operating instructions. Improper adjustment of other controls may result in damage and will often require extensive work by a qualified technician to restore the product to its normal operation; (e) if the product has been dropped or damaged in any way; (f) when the product exhibits a distinct change in performance - this indicates a need for service.• Replacement Parts: When replacement parts are required, be sure the servic e technician has used replacement parts specified by the manufacturer or have the same characteristics as the original part. Unauthorized substitutions may result in fire, electric shock, or other hazards.The voltage selector switch and mains fuse are factory set for theregion in which your amplifier is intended to be sold. Do nottamper with this switch without express permission fromOrange Music Electronic Company Ltd.Connect the supplied mains cord to the AC Mains Input on the amplifier to yourAC mains wall outlet. This Class I electrical equipment must be earthed. Thecorrect mains fuse value for your region are displayed on the unit, close tothe AC Mains Input. Replace only with the same type and value. If the mainsfuse repeatedly blows, contact your Orange dealer.EMITo reduce the possibility of outside electrical interference during performance, operate your amplifier and instrument away from appliances/equipment that generate high levels of electronic/electromagnetic noise. This may include, but is not limited to: fluorescent lighting, refrigerators, motors, mobile phones, radios, computers etc.This device complies with Part 15 of the FCC rules. Operation is subject to the following two conditions:1)This device may not cause harmful interference.2)This device must accept any interference received, including interference that maycause undesired operation.Note: This equipment has been tested and found to comply with the limits for Class B digital device, pursuant to Part 15 of the FCC Rules. These limits are designed to provide reasonable protection against harmful interference in a residential installation. This equipment generates, uses and can radiate radio frequency energy and if not installed and used in accordance with the instructions, may cause harmful interference to radio communications.However, there is no guarantee that interference will not occur in a particular installation. If this equipment does cause harmful interference to radio or television reception, which can be determined by turning the equipment off and on, the user is encouraged to try and correct the interference by one or more of the following measures.∙Reorient or relocate the receiving antenna.∙Increase the separation between the equipment and receiver.∙Connect the equipment into an outlet on a circuit different from that to which the receiver is connected.∙Consult the dealer or an experienced radio/TV technician for help.Note: Changes or modifications to this equipment not expressly approved by Orange Amplification may void the user’s authority to operate this equipment.This Class B digital apparatus complies with Canadian Interference Regulations CAN ICES-3(B)/NMB-3(B). Cet appareil numérique de classe B est conforme aux règlements CAN ICES-3(B)/NMB-3(B).USING YOUR AMPLIFIER Array FUSES:100V/120V – T4A230V/240V – T2AFRONT PANEL FEATURESEngage the ‘Ground Lift’ button if ground hum is experienced when the‘Direct Out’ is in useREAR PANEL FEATURESSPECIFICATIONS ArraySpecifications may be subject to change without notice.FREE EXTENDED WARRANTY OFFEROrange amplifiers are under warranty for one year subject to consumer protection laws in the country of purchase and dis tributor’s terms and conditions. A n additional year can be added byregistering online.Valves and speakers supplied with an Orange amp or purchased separately at our online store arecovered for 90 days from the date of purchase.The warranty status of any Orange product is subject to its being used for its intended purpose in suitable conditions. As the manufacturer we reserve the right to refuse to warranty any Orange product which has been misused in any way whatsoever.REGISTER RIGHT NOW AT 。
Wattbricks MP330 MP500 MP1000 可移动电源用户手册说明书
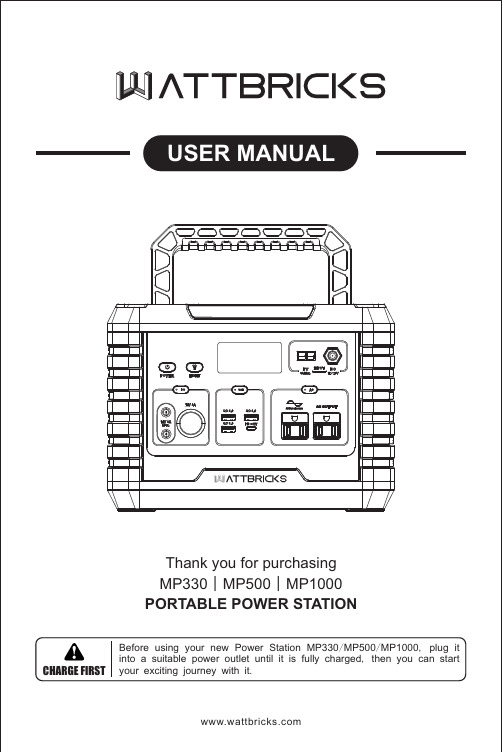
Wattbricks is an American Brand with US Based Customer Service. Please reach out to us at ********************** so we can answer any questions or resolve any issues. We stand behind our products!GENERAL SAFETY RULES SPECIFICATIONS WHAT'S IN THE BOX?INPUTS AND OUTLETS BUTTON CONTROLS LCD DISPLAY OPERATION HOW TO POWER DC DEVICES COLD WEATHER USE POWER STATION OUTPUT CAPACITY VEHICLE CHARGING SOLAR CHARGING CLEANING TRANSPORTATION AND STORAGE RECYCLING 1.2.3.4.5.6.7.8.9.10.11.12.13.14.15.--------------------------------- P02----------------------------------------------- P03----------------------------------------- P04 ------------------------------------- P07----------------------------------------- P08---------------------------------------------------- P09------------------------------------------------------ P10------------------------- P10--------------------------------------- P10---------------- P10----------------------------------------- P12------------------------------------------- P13-------------------------------------------------------- P15-------------------- P15------------------------------------------------------ P15Product Maintenance:1) Battery life may be reduced or become nonfunctional if not properly maintained.2) Fully charge and discharge the battery at least once every 3 months to maintain battery health.3) Do not store battery with less than 50% charge.Model Name:Battery Cell Chemistry: Capacity:Running Watts:Peak Watts:Total Power:AC Output Voltage: Frequency:Waves Type:Life Cycle:Charge Time:Charging Temperature Range: Operational Temperature Range: Warranty:Certifications:Mp330Lithium Ion (Li-ion) NMC 288.6Wh 11.1V 26Ah330W600W564W (330WAC / 234W DC) 120V60HzPure Sine Waves800 Cycles to 60% Capacity32° – 104°F (0° – 40°C) 14° – 113°F (-10° – 45°C)1 YearFCC, RoHS, UN38.3With Adapter charger:0-100% charge 6-8 hours; With car charger:0-100% charge 6-8 hours; With solar charger:0-100% charge 6-8 hoursINTENDED USEThe Wattbricks Power Station is intended as a power supply for electronic devices with a maximum power consumption of continuous wattage. Our product is not suitable to be used with equipment that relates to one's own personal safety and relies heavily on electricity, such as medical devices, equipment for nuclear facilities, the manufacture of air and spacecraft, etc. We therefore assume no liability for accidents involving personal safety, fires, or machine failures caused by using our product with the aforementioned devices.Model Name:Battery Cell Chemistry: Capacity:Running Watts:Peak Watts:Total Power:AC Output Voltage: Frequency:Waves Type:Life Cycle:Charge Time:Charging Temperature Range: Operational Temperature Range: Warranty:Certifications:Mp500Lithium Ion (Li-ion) NMC 519.48Wh (22.2V, 23.4Ah) 500W1000W834W (500WAC / 234W DC) 120V60HzPure Sine Waves800 Cycles to 60% Capacity32° – 104°F (0° – 40°C) 14° – 113°F (-10° – 45°C)1 YearFCC, RoHS, UN38.3With Adapter charger:0-100% charge 6-8 hours; With car charger:0-100% charge 6-8 hours; With solar charger:0-100% charge 6-8 hoursINTENDED USEThe Wattbricks Power Station is intended as a power supply for electronic devices with a maximum power consumption of continuous wattage. Our product is not suitable to be used with equipment that relates to one's own personal safety and relies heavily on electricity, such as medical devices, equipment for nuclear facilities, the manufacture of air and spacecraft, etc. We therefore assume no liability for accidents involving personal safety, fires, or machine failures caused by using our product with the aforementioned devices.Model Name:Battery Cell Chemistry: Capacity:Running Watts:Peak Watts:Total Power:AC Output Voltage: Frequency:Waves Type:Life Cycle:Charge Time:Charging Temperature Range: Operational Temperature Range: Warranty:Certifications:Mp1000Lithium Ion (Li-ion) NMC999Wh (22.2V, 45Ah)1000W2000W1234W (1000WAC / 234W DC) 120V60HzPure Sine Waves800 Cycles to 60% Capacity32° – 104°F (0° – 40°C)14° – 113°F (-10° – 45°C)1 YearFCC, RoHS, UN38.3With Adapter charger:0-100% charge 6-8 hours; With car charger:0-100% charge 6-8 hours; With solar charger:0-100% charge 6-8 hoursINTENDED USEThe Wattbricks Power Station is intended as a power supply for electronic devices with a maximum power consumption of continuous wattage. Our product is not suitable to be used with equipment that relates to one's own personal safety and relies heavily on electricity, such as medical devices, equipment for nuclear facilities, the manufacture of air and spacecraft, etc. We therefore assume no liability for accidents involving personal safety, fires, or machine failures caused by using our product with the aforementioned devices.1. LCD DisplayDisplays the various conditions of the product. The screen will turn of after 5 mins. You can turn it on by pressing ON/OFF button.2. USB-A Output PortsCharge a wide array of devices such as your iPhone, tablet, GoPro, speakers, or anything that needs to be charged through a USB-A Port. The USB-A Output Indicator Light will automatically light up when a USB-A port is in use.3. USB-C Output PortsDevices that charge through a USB-C port, such as a MacBook Pro, Android phone, or other devices can be charged by the MP500 USB-C port. The USB-C Output icon will appear on LCD Display when a USB port is in use.4. DC inputCharging the unit by the DC input ,there are three ways for charging : solar PV input ar charger input and the adapter input .5. PV inputit is an anderson port , the unit can be charged by the solar PV panel with anderson plugCigarette Lighter Output LCD Screen Display DC 5525 Output USB-A Output1234USB-C Output AC Output Anti-collision Strip DC Input5678SOS MODE & LED light Wireless ChargerPV Input91011A: MAIN POWERB: LED LIGHT ON/OFF C: DC ON/OFF Button D: USB ON/OFF Button E: AC ON/OFF ButtonButton A: MAIN POWERButton A is the main power switch. Press Button A to turn on or off Button B: LED LIGHT ON/OFF Activates:Single Press - Turn on/off LED light on back of unitDouble Tap - Activate SOS Mode, LED light visual distress signal.Button C: DC OUT ON/OFFPlease Button C to activate the DC out plug(s) after turning on the Main Power (A). Button D: USB OUT ON/OFFButton D to activate the USB out plug(s) after turning on the Main Power (A). The USB-C cable of different devices need different endorsements of corresponding protocols, if the USB-C port doesn't work, try to use the AC adapter to charge .Button E: AC OUT ON/OFFPress Button E to Activate the AC out plug(s) after turning on the Main Power (A). Please turn off the AC Out Plug(s) when not in use.Note: The Fan may turn on intermittently during high output loads or temperatures.Wattage Limit Please observe the wattage limit on the AC OUT.Wireless chargerMP330/MP500: Press Main Power (A) to turn on or off the wireless charger.MP1000: Press Button D to Activate the Wireless charger after turning on the Main Power (A). Cooling fanProduct utilizes an internal cooling fan to ensure the product is operating within the appropriate temperature range. MP500,when it experiences a higher output load, will automatically turn on the fan during discharge or recharging , the fan may operate intermittently to keep internal temperature within operating range.The fan will likely start when the AC circuit is activated to ensure proper operation.Press Please PressH: Battery Level IndicatorI: Input StatusJ:DC Outputs StatusK:AC Outputs StatusL:USB Outputs StatusBattery level indicatorThe battery level is provided by percentage of battery charge corresponding to the number of bars and percentage displayed. The segments in the battery level correspond to the current state of charge, 0-5% empty, 6-20% one segment, 21-40% two segments, 41-60% three segments, 61-80% four segments, and all five are lit when charge level is above 81%.Provides the user live telemetry data on time to completely charge, or deplete the battery based upon the energy entering or leaving the battery.Highly recommend to fully charge product when first use. Higher battery level indicator show, more precise the data will indicate.Please be aware that this value can adjust multiple times as the energy draw changes from the connected devices. This is evident during initial activation of ports with a connected device. Recommended back to charge the product when battery indicate less than 20%. Note that when you first plug in a power source, whether it's a solar panel or a wall charger, the product may take a minute to detect and adjust its charge circuitry before it starts drawing power from the source.Input status : The product is capable of providing input energy in watts.DC output status : The display will provide output watts of the DC port.AC output status : The display will provide output watts of the AC port.USB output status : The display will provide output watts of the USB port.Power-saving mode:when the device enters the input or output state, it will enter the screen-off mode after more than 20 seconds, which does not affect the normal operation of the device. When the output power of the device is less than 5W, the device will go into hibernation after more than 3 hours, and the input can be "awakened" when the input is charged or any button is pressed. When not in use, press the switch button to turn off the output.Only operate the Power Station within the recommended temperature range 14°–113°F (-10° –45°C). Do not move the unit if it is charging or in use.How to power AC devicesMake sure the devices you are plugging in are turned off. Connect the power cable plug of the electrical device into an AC outlet on the Power Station. Push the AC ON/OFF button to turn on AC power. The button will illuminate when it is turned on. Turn ON the AC device. The LED Display will show the real-time wattage use of the device. When finished, turn off all attached devices, remove the power cable, then push the AC ON/OFF button to turn OFF AC power. (If you leave the AC ON/OFF button ON it will deplete the battery.)NOTICE: If the total output exceeds running power, the power station will automatically shut off. Make sure the Power Station can supply enough continuous (running) and peak (starting) watts for the items you will power at the same time.How to power DC or USB devicesConnect the power cable plug of the electrical device to a USB outlet or DC outlet. Push the DC ON/OFF or USB ON/OFF button to turn on. The button will illuminate when it is on. The LCD Display will display real-time wattage of the device. When finished, push the DC ON/OFF or USB ON/OFF button to turn offNOTICE:If the total output exceeds the wattage output of the DC outlet, the power station will automatically shut off. Ensure the power consumption is less than what the ports are rated before connecting them to the Power Station.Laptops (41.4Wh)32" TV(60W)CPAP without heated Gopro (5.9Wh)Floodlight(40W)Mini Fridge(40W)DJ Drone(89.2Wh)Smartphone(10Wh)+MORE Switch(16Wh)CHARGINGOnly charge the Power Station within the safe charging temperature range (32°–104°F (0°–40°C). It is recommended to fully charge product every 3 months to maintain the health of the battery pack.From Solar Charger100W 7-9 hoursdepending on solar conditionsFrom Car Port 12V7-8 hours when car runningFrom Wall Charger 110V6-7 hoursAC Adapter ChargingIt will take 6-7 hours to charge fully by using the AC adapter we provided.AC OutletPlugCar ChargerSolar Panel Charging2. Place Solar Panels in direct sunlight as much as possible.3. Support 60W/80W/100W/120W Max Solar Panels (Not included),the charging time is determined by the solar light intensity.1. DO NOT charge the unit via solar panel that operate voltage outside of DC12-26V12V Car Charger ChargingUse the Car Charger we provided to charge this unit. The full charge time takes 7-8 hours. When the LCD display shows the battery power of 100%, it indicates that this unit is fully charged.Caution: Do not charge the product with solar PV input and car port at the same time!Can MP330/ MP500 power my AC devices while it's charging?NO, the advanced battery management system of the Mp330 and Mp500 allows it to charge a connected device via DC output & USB output while charge the product. Do not connected device via AC output while charging the Mp330 and Mp500 .FAQsQ: What devices can I charge and power with the product?A: The AC output port is designed to charge/power devices that operate at less than continuous/running watts total. Devices drawing more than it cumulatively will not function. Q: Can the product be charged during use?A: While pass-through charging is supported, we do not suggest it. as it will diminish the long term battery life.Q: Does the product MP1000 work as a UPS?A: No, the product requires manual activation with the power button to turn on, so it will never turn on or off automatically.Q: For how many hours will MP500 power my device?A: To calculate the working time use this formula: 500Wh×0.82/Watts of your device.Example: 40 watt mini fridge: 500Wh×0.82/40=approx. ID hoursQ: Is there a built-in MPPT controller?A: Yes, all MPXXX portable power stations include a built-in MPPT controller.Q: How do I check the current charge?A: Turn the product on and refer to the Battery Level Status on the LCD Display.Q: Why does charging From 99% to 100% take so long?A: This is normal. To optimize battery life and charging speed, the battery charges faster when it is low, and as it approaches the maximum charge (100%), the unit will automatically limit the charging speed to avoid damage to the battery.Q: Can I leave the product plugged in and charging all the time?A: No, Once the unit is fully charged, unplug the adapter or charger.Q: Are the output ports regulated?A: Yes all outputs are regulated to minimize voltage change as the battery power decreases. Q: Can I replace the internal battery?A: No, never disassemble or modify the product. Always follow your local laws for proper battery disposal and/or recycling.Q: My AC device is rated for less than the rated wattage of the product, but my device won't turn on when plugged into the AC port.A: Certain devices require more wattage upon startup than may be listed on the device .If the startup wattage of the device exceeds the rated /continuous wattage of the product, the device will not turn on, even if the wattage listed on the device is less than listed on the product. In this case, verify the AC port is working by trying a lower wattage device The device does not discharge:(1) Check whether the output buttons are activated ;(2) Check whether the total output power exceeds the rated output power;(3) Check whether the temperature of the equipment is too high.The device can not be charged:3) If the device cannot be charged immediately after it is discharged, please wait for an hourand try again, it may enter the over-temperature protection.1)Confirm that the wall plug power adapter's cord is inserted fully into the DC Input.2)Confirm that the AC wall plug power adapter is the charger provided with MP500.If the inputdoes not comply with the requirements located in the general specifications section, the low watt range 0 % to 10 %may be displayed on the LCD.In the event that the unit catches fire:Never attempt to extinguish a fire if it is unsafe to do so. Contact your local fire department. If it is safe to do so use an electronic safe fire extinguisher or fire blanket. Do not touch any hot or burnt components. Dispose of the unit only when safe to do so after the unit is extinguished and fully cooled.Getting the Battery Pack Wet .Warning: Getting your battery pack wet could cause electric shock or other bodily harm . Never attempt to power on a wet battery pack .Surface Water: IF your battery pack was lightly splashed with water , wipe the unit dry and allow it to fully dry For several hours before powering on .Water got inside: IF water entered the battery pack , do not touch the battery pack and place it in a safe area until Fully dry . Do not attempt to power the battery pack on and dispose of the battery pack in accordance with local laws .Battery fell into water:Do not attempt to retrieve the battery back ,and contact your local fire department forguidance . If unit is retrieved from the water ,do not touch the battery pack and place it ina safe area until fully dry and dispose of itproperly in accordance with proper batterydisposal .•Only clean the surface of the unit using a dry, non-abrasive cloth. You can use cleaners designed for mobile phones or computer screens. To ensure adequate cooling, vacuum the fan vents to remove dust and debris.• Battery life may be reduced if not used for an extended period of time. Discharge the Power Station to 30% battery life, then charge to 85% every 3 month to prolong battery life.• DO NOT place the product near a heat source, such as a car in direct sunlight, a fire source, or a heating stove.• Store the product in a dry environment. DO NOT place the product where it may contact water or high humidity.• Make sure no small metal objects can fall on or around the product while in storage.• Never transport a product with a battery power level higher than 30%.• Never store the product in environments below -4°F (-20°C) or above 113°F (45°C).Dispose of the unit in hazardous material-specific recycling locations only after acomplete discharge (if possible). Batteries are hazardous chemicals. Strictly followyour local regulations regarding battery disposal and recycling. Dispose of the unitimmediately if it cannot be powered on after over-discharging.Always return your used electronic products, batteries, and packaging materials todedicated collection points to prevent uncontrolled waste disposal and promote therecycling of materials.All information, illustrations, and specifications in this manual were in effect at the time of publishing. The illustrations used in this manual are intended as representative reference views only. We reserve the right to make any specification or design change without notice.All rights reserved. No reproduction allowed in any form without written permission from WattbricksACCESSORY LISTRecommend to use 120W Solar panel (not included).MC4-7909connector cable 12V Car Charger cable User ManualAC 100-240V wall plug power adapter This device complies with Part 15 of the FCC Rules. Operation is subject to the following two conditions:(1) This device may not cause harmful interference, and (2) This device must accept any interference received, including interference that may cause undesired operation.Transportation: The power station meets all legal requirements for the transportation of dangerous goods. The capacity of the lithium battery pack exceeds 100Wh. According to international standards Standard, if the power station is transported by air, it must be transported in accordance with IATA standard packaging. The instructions and labeling requirements of the International Air Transport Association and related declarations must be completed.。
南湖新城控制性详细规划说明书

第一章概况一、规划背景南湖新城范围内涉及《坡子街周边地区控制性详细规划》、《仰天湖片控制性详细规划》和《南郊公园周边地区控制性详细规划》,这三个规划已于2005年审批完成。
随着城市建设的日新月异,长沙市城市面貌发生了天翻地覆的变化。
“十一五”期间,为了进一步加强基础设施建设和生态环境建设,提升城市整体功能与品位,使长沙区域性中心城市地位更加凸显,市委市政府适时提出了城市建设目标——重点建设好“一洲两岸”的“三个入城口”、“四个新区”和“十八项目”等重点工程,而南湖新城既是“一洲两岸”的范畴,又属于“十大项目”重点打造的片区,市委市政府非常重视南湖新城的建设,于2007年4月率先启动了“滨江南湖新城”和“岳麓滨江新城”的大型方案征集活动,本规划便是在方案征集的基础上,由天心区委托我院对原控规进行整合和深化。
二、现状概况1、规划范围南湖新城地处湘江东岸的长沙主城核心南郊,属天心区管辖,其范围西滨湘江,东抵书院路,北起城南西路,南至南环线,临江面长约5.3公里,总用地面积357.11公顷。
2、地形地貌区内南湖路以北地势平坦,地坪标高在34-46米之间,其中大部分用地标高在35-39米之间。
棚户区较多,拆迁量大,尤其是南湖路以北,已建和正建的小区有创远景园、书院观邸和枣子园小区;区内南湖路以南有大量植被较好的山体,它们包括南郊公园、南郊公墓、革命烈士陵园和部分零星的山体,山脚和山顶的高差在30-50米之间,在山间不规则平地上分布有大量仓库用地(物资储运公司等),其中还有部分危险品仓库用地(长沙市液化石油气公司)。
另外,在山体之间和山腰也分布大量住宅,质量较好和规模成片的小区有都江新城、广厦新村、富绿新村、南国新城和华新小区等,基本集中于南郊公园东北侧;火车南站正在搬迁。
表1 现状用地汇总表表2 现状建设用地一览表3、人口本区现状总人口45377人,其中常住人口40923人,暂住人口4454人,人口密度1.27万人/km2。
长沙市商品住宅实行质量保证书和住宅使用

长沙市商品住宅实行质量保证书和住宅使用说明书制度的办法长建发(1998)101号1998年8月12日第一条为加强商品住宅质量管理,确保商品住宅售后服务质量和水平,维护商品住宅消费者的合法权益,根据中国人民共和国国务院《城市房地产开发经营管理条例》和建设部《商品住宅实行住宅质量保证书和住宅使用说明书制度的规定》等法规、文件精神,结合我市实际情况,制定本办法。
第二条本办法使用于本市行政区域内房地产开发企业出售的商品住宅。
第三条房地产开发企业向用户交付销售的新建商品住宅时,必须提供《住宅质量保证书》和《住宅使用说明书》,《住宅质量保证书》作为商品房购销合同的补充规定。
第四条《住宅质量保证书》是房地产开发企业对销售的商品住宅承担质量责任的法律文件,房地产开发企业必须按《住宅质量保证书》的约定,承担质量责任。
第五条《住宅质量保证书》必须使用长沙市建设行政主管部门统一监制的规范文本。
《住宅质量保证书》包括以下内容:(一)工程质量监督部门检验的质量等级;(二)地基基础和主体结构在合理使用寿命年限内承担保修;(三)正常使用情况下各部位、部件保修内容与保修期:地基基础、主体结构50年;屋面防水3年;墙面、厨房和卫生间地面、地下室、管道渗漏1年;墙面、顶棚抹灰层脱落1年;地面空鼓开裂、大面积起砂1年;门窗翘裂、五金件损坏1年;管道堵塞2个月;供热、供冷系统和设备1个采暖期或供冷期;卫生洁具1年;灯具、电器开关6个月;其他需保修的部位和部件,由房地产开发企业与用户自行约定保修期限;第六条住宅保修期从开发企业将竣工验收的住宅交付用户之日起计算,保修期限不应低于本规定第五条确定的期限。
国家对住宅工程质量保修期另有规定的,保修期限按照国家规定执行。
第七条房地产开发企业向用户交付商品住宅时,应当有交付验收手续,并由用户对住宅设备、设施的正常运转签字认可,用户验收后自行添置、改动的设备、设施,由用户自行承担维修责任。
第八条在保修期限内,除人力不可抗拒的自然灾害和用户自身造成的原因外,房地产开发企业必须无偿承担维修责任。
- 1、下载文档前请自行甄别文档内容的完整性,平台不提供额外的编辑、内容补充、找答案等附加服务。
- 2、"仅部分预览"的文档,不可在线预览部分如存在完整性等问题,可反馈申请退款(可完整预览的文档不适用该条件!)。
- 3、如文档侵犯您的权益,请联系客服反馈,我们会尽快为您处理(人工客服工作时间:9:00-18:30)。
长沙悦城轨道精调小车操作
一、精调小车组成部分:
共由小车、计算机、天线、数据连接线(3根)、通讯模块(2个)、数据线(2条)、棱镜头、棱镜连接杆,CPIII圆棱镜。
小车分为左右轮,拉杆,棱镜、电池组装及一根天线组装。
全站仪由主机、通讯模块和数据线连接。
操作系统由计算机、通讯模块和数据线连接并组成。
二、操作步骤
1、全站仪设置:
全站仪一般架设在已打混凝土与未铺之间,仪器尽量架低,电子水泡居中后用数据线连接通讯模块。
全站仪连接完成后,进入主菜单界面,
F6进入测量界面,F2进行测量参数设置界面,设置温度,大气压和湿度,设置后CONT保存。
F6进入测量界面,F2进行棱镜参数设置。
小车为徕卡圆棱镜,进行精调时采用默认值(0),CPIII点配套为小棱镜,对点时棱镜参数应设置为0。
2、全站仪自由设站:
F5进入测量
3、操作系统设置
1)新建工程
打开软件后,进入主界面,界面如图所示,点击“项目文件”对应的按钮,点击选择按钮,选择所在作业区域时的项目文件。
图1
图2
2)选择线路文件
点击线路信息一列的选择按钮,选择所在作业区域的线路信息。
图1
新建测量数据文件
点击测量数据文件一列的选择按钮,进入选择文件界面,在页面空白区域,点击右键→新建→新建即时测量作业的文件名。
图2
3 轨道测量
小车安放在轨道时,两个轮子一侧均安放于轨道内侧,如左线放
于右轨上,右线放于左轨上。
1)测量设置与标定
①测量设置
选定工程、确定好线路参数和测量数据文件后,需要正确配置线路测量信息,如图1.1.19所示,选中“系统”—“测量设置”菜单,进入如图所示界面,根据现场测量情况配置好各项参数。
图1
图2
在此设置框中,需要经常对其中一些项进行设定,其中各项参数具体含义如下:
“全站仪测量范围”:当轨检小车距离全站仪位置很近或者很远后,对轨道测量的精度影响很大,需要合理控制测量距离,该项设置确定小车的测量距离,若超出测量距离,则小车无法完成测量操作。
“全站仪测量模式”:全站仪测量安装在轨检小车上的棱镜时,按照测量模式的不同,对轨道测量精度有很大的影响,并且精度越高,单次测量棱镜的时间也会变长,其中精确模式精度最好,也耗时最长,其次是快速,最快时跟踪,精度也最低。
实际作业过程中,请根据实际情况进行选择。
②轨向、高低和轨距标定
轨距、轨向和高低的标定要在标定台上完成,具体标定方法:
点击系统标定→分别依次选择(轨向和高低标定、轨距标定、水平标定)在依次→开始测试
图1
图2
一般不进行轨向和高低标定,轨距标定,因为这两项必须在标准的标定台进行标定,所以一般不进行标定。
水平标定
水平的标定,只能在线路通过掉头测量的方式进行标定,不需要标定台,但是必须保证轨向、高低、轨距标定正确。
每次上线精调或仪器有拆分情况下都需要对水平进行标定,具体标定方法如下:将精测小车放至轨道上的,并标记好位置,进入图所示标定界面,仪器放好稳定后,点击“水平标定”按钮,并按提示完成后述操作,标定完后,点击“开始测试”,记下水平值,然后再将仪器调头并放在同一位置上,再次记下此时所测得的水平值,如果两值的绝对值之差在0.2mm以内,说明标定成功。
(注解:如果在现场能找到一个绝对的水平地方,就可以不
用掉头,直接标定就行了!)
4 绝对测量
1)连接全站仪
在主界面下选择“数据采集”,点击“全站仪面板”按钮,进入全站仪操作面板。
图1
图2
点击“锁定棱镜”
图3
该界面下,各项操作解释如下:
“锁定棱镜”:全站仪完成自由设站后,将全站仪照准轨检小车上的棱镜,并检查无线通讯盒是否打开,保证无线通讯正常,该操作便会锁定轨检小车棱镜,并获得全站仪的站点信息和气象信息。
“解锁并保存”:该操作会对找准的轨检小车解除强制锁定,并保存测量数据。
“查看气泡”:读取全站仪的水平气泡信息,方便判断是否需要重新对全站仪进行整平。
“测量棱镜”:对当前照准的棱镜进行角度和斜距的测量,可以用来判断无线连接是否正常(不正常会提示无法完成测量)。
“更换盘面”:更换全站仪的盘面,全站仪会进行“翻跟头”动作。
“激光切换”:打开或者关闭全站仪的导航激光。
锁定轨检小车上的棱镜后,便可以进行轨道测量,界面上的“定
点采集”测量当前小车所放置位置轨道参数并保存测量数据;“定点测量”操作仅测量轨道参数,不进行保存操作;“动态测量”会连续测量轨道参数,数据一直刷新显示,根据测量模式的不同,测量精度会变化,该操作可用于轨道的绝对位置的调整。
2)轨道测量
在锁定棱镜后,进入该界面
图1
根据界面显示的左右高程,中心线的数值进行调整,它的界面比较直观,就是按箭头的方向进行升高、降低或拉顶。
精调时,直线段一般进行2遍精调,第一遍粗调,将中线偏差值,左右轨高程调整值调至1MM以内。
第二遍再进行调整,在限差均在0.5以下时保存数据。
曲线段一般进行3遍精调,第一遍粗调,将中线偏差值,左右轨高程调整值调至1MM以内。
第二遍再进行调整,在限差均在0.9以下,第三遍调整,限差在0.5以下时保存观测数据。
工作时,操作人员应不定时的查看全站仪气泡的偏差值。
轨道未打混凝土前,由拉杆和调节器固定,拉杆调节轨道平面位置,调节器调节左右轨高程。
精调时通过这两部分上面的螺丝来改变轨道。
通常拉杆半径较大,转一圈约为4MM,调节器中螺丝转一圈约为1.5MM,由此可以指挥工人更加精确的调节。
调整时,拉杆和调节器3个螺丝如同基座的三个气泡,三者配合,如超限差过大时,可先将中线调整一半,再调整调节器,不断观测检查。
3)测量作业完成之后,应及时保存数据。
点击“全站仪面板”按钮,再点击解锁并保存。
如图所示:
图2
由于仪器内部软件设置,每十个点会保存一次数据,所以在作业过程中为防止数据丢失,应及时的保存数据。
4)测量数据查看和编辑
按图1所示,进入数据视图,该视图下可以查看各项轨道参数,其效果如图2所示。
若要编辑已测数据,鼠标左键单击选中要编辑的数据项,单击鼠标右键,弹出图2所示的菜单。
图1
图2
“删除”:将该条测量数据从原始数据中删除。
“修改”:修改该测量数据的各项参数,其具体内容如图所示
图3这样就完成整个作业过程。