u-center简单使用手册
U-EDIT用户使用手册12
●滚动时间也会自动改变。
可以通过左键上下拖动修改数值,也可手动输入数值。
●循环次数:设置滚屏播出的次数。
●淡入宽/淡出宽:为滚屏文件设置边界的淡入淡出效果。
输入数字的单位为像素数。
●滚动时间:滚屏文件播出总的时间,滚动速度与滚动时间是联动的,如果滚动时间改变,滚动速度也会随之改变。
●首屏停留:滚屏在播出前等待的时间。
在编辑框中按住鼠标左键上下拖动可以改变停留时间;或者直接在编辑框中输入数据也可。
与滚动时间联动;与时码轨联动。
●末屏停留:滚屏的末屏停留的时间. 在编辑框中按住鼠标左键上下拖动可以改变停留时间;或者直接在编辑框中输入数据也可。
与滚动时间联动;与时码轨联动。
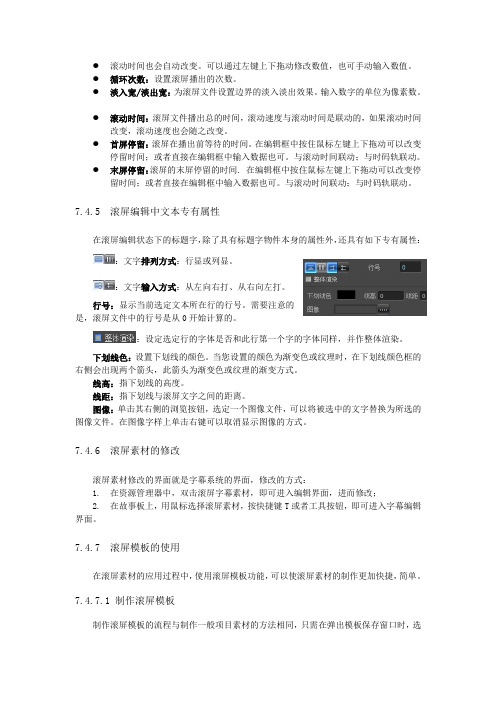
7.4.5 滚屏编辑中文本专有属性在滚屏编辑状态下的标题字,除了具有标题字物件本身的属性外,还具有如下专有属性::文字排列方式:行显或列显。
:文字输入方式:从左向右打、从右向左打。
行号:显示当前选定文本所在行的行号。
需要注意的是,滚屏文件中的行号是从0开始计算的。
:设定选定行的字体是否和此行第一个字的字体同样,并作整体渲染。
下划线色:设置下划线的颜色。
当您设置的颜色为渐变色或纹理时,在下划线颜色框的右侧会出现两个箭头,此箭头为渐变色或纹理的渐变方式。
线高:指下划线的高度。
线距:指下划线与滚屏文字之间的距离。
图像:单击其右侧的浏览按钮,选定一个图像文件,可以将被选中的文字替换为所选的图像文件。
在图像字样上单击右键可以取消显示图像的方式。
7.4.6 滚屏素材的修改滚屏素材修改的界面就是字幕系统的界面,修改的方式:1.在资源管理器中,双击滚屏字幕素材,即可进入编辑界面,进而修改;2.在故事板上,用鼠标选择滚屏素材,按快捷键T或者工具按钮,即可进入字幕编辑界面。
7.4.7 滚屏模板的使用在滚屏素材的应用过程中,使用滚屏模板功能,可以使滚屏素材的制作更加快捷,简单。
7.4.7.1 制作滚屏模板制作滚屏模板的流程与制作一般项目素材的方法相同,只需在弹出模板保存窗口时,选择滚屏模板类型。
u-center2 用法

u-center2 用法
u-center2是u-blox公司开发的一款专为u-blox GNSS接收器设计的软件工具,主要用于配置和监控接收器的工作状态以及进行位置解算。
u-center2的主要用法包括:
1. 连接接收器:在u-center2中,可以通过串口、USB或者无
线方式与GNSS接收器进行连接。
连接成功后,u-center2将显示接收器的详细信息,包括型号、固件版本等。
2. 配置接收器:通过u-center2,可以配置接收器的工作模式、输出数据格式、波特率等参数。
可以根据具体需求,自定义接收器的工作方式。
3. 监控接收器状态:u-center2提供了丰富的状态监控功能,可以实时显示接收器的信号质量、卫星信号图、接收器的位置解算精度等信息。
可以通过这些信息,评估接收器的工作状况。
4. 数据记录和回放:u-center2支持将接收器接收到的原始数据进行记录和回放。
可以用于故障排查、性能评估等。
5. 卫星信号分析:u-center2提供了卫星信号分析工具,可以实时显示接收器所接收到的卫星信号质量。
可以用于选择合适的卫星以提高接收器的定位性能。
以上只是u-center2的一些常用用法,其功能非常丰富。
用户
可以根据具体需求,灵活使用u-center2来设置、监控和优化GNSS接收器的工作。
H3C U-Center智能运维平台IOM用户手册
H3C U-Center 智能运维平台IOM 用户手册前言H3C U-Center IOM 用户手册包含10 个章节,用于引导用户了解并使用U-Center IOM 模块以及帮助用户解决使用过程中遇到的问题。
前言部分包含如下内容:•读者对象•本书约定•资料获取方式•技术支持•资料意见反馈读者对象本手册主要适用于如下工程师:•网络规划人员•现场技术支持与维护人员•负责网络配置和维护的网络管理员本书约定图形界面格式约定各类标志本书还采用各种醒目标志来表示在操作过程中应该特别注意的地方,这些标志的意义如下:目录1 U-Center 概述····································1-11.1 U-Center 解决方案简介································1-11.2 U-Center 功能结构··································1-11.3 基础架构运行监控管理(IOM)····························1-22 U-Center 系统快速入门································2-32.1 访问U-Center 系统·································2-32.2 认识U-Center 系统管理界面·····························2-32.2.1 U-Center 界面介绍·······························2-32.2.2 定制首页···································2-52.3 U-Center 系统操作员管理·······························2-62.3.1 修改缺省操作员初始密码····························2-62.3.2 增加操作员··································2-7 3资源纳管······································3-83.1 增加资源······································3-83.1.1 增加设备···································3-83.1.2 增加服务器··································3-83.1.3 增加虚拟资源·································3-93.1.4 增加应用···································3-93.2 自动发现······································3-93.2.1 简易模式自动发现·······························3-93.2.2 高级模式自动发现······························3-10 4设备监控及管理··································4-114.1 查看设备及接口信息································4-114.1.1 通过设备列表查看设备详细信息························4-114.1.2 自定义设备视图·······························4-114.1.3 接口视图管理································4-124.2 监控及管理设备状态································4-124.2.1 管理/取消管理设备······························4-124.2.2 定制设备服务监视······························4-124.3 远程登录设备···································4-134.3.1 Telnet 登录设备·······························4-134.3.2 SSH 登录设备································4-134.3.3 打开设备Web 网管·····························4-134.4 查看设备Syslog ······································································································ 4-144.4.1 浏览Syslog ··································································································· 4-144.4.2 Syslog 日志过滤规则·····························4-144.4.3 Syslog 解析模板库······························4-164.4.4 Syslog 升级告警规则·····························4-17 5服务器自动化管理·································5-195.1 服务器部署前准备·································5-195.1.1 配置服务器参数·······························5-195.1.2 服务器配置模板管理·····························5-205.1.3 配置服务器DCU ····························································································· 5-215.1.4 创建自动部署计划······························5-215.2 服务器部署阶段··································5-225.3 服务器资源管理··································5-225.3.1 仪表盘···································5-225.3.2 服务器拓扑·································5-235.3.3 服务器资源·································5-235.3.4 服务器状态一览·······························5-235.4 服务器事件管理··································5-235.4.1 集成管理日志································5-235.4.2 系统事件··································5-235.4.3 创建告警升级规则······························5-24 6存储自动化管理··································6-256.1 存储设备管理···································6-256.2 存储池管理····································6-266.3 存储卷管理····································6-26 7虚拟资源管理···································7-277.1 虚拟资源列表···································7-277.1.1 新建虚拟机·································7-277.1.2 部署OVF 模板·······························7-277.1.3 手工迁移虚拟机·······························7-287.2 数据存储·····································7-287.2.1 查看数据存储································7-287.2.2 上传文件··································7-287.2.3 下载文件··································7-287.3 虚拟机模板····································7-297.3.1 虚拟机转化为模板······························7-297.3.3 克隆现有模板································7-307.4 虚拟机事件记录··································7-308 应用管理·····································8-318.1 应用监视·····································8-328.1.1 查看应用监视列表······························8-328.1.2 增加应用监视································8-338.2 主机监视·····································8-338.2.1 概览模式··································8-338.2.2 列表模式··································8-348.3 分类监视·····································8-348.4 应用分组管理···································8-358.4.1 查看应用分组列表······························8-358.4.2 增加应用分组/子分组·····························8-358.5 Agent 管理····································8-368.6 安装Agent ············································································································· 8-368.6.1 手工安装Agent ······························································································· 8-368.6.2 推送安装Agent ······························································································· 8-368.6.3 查看Agent 列表·······························8-378.6.4 启动/停止Agent ······························································································ 8-388.6.5 查看Agent 自动发现结果···························8-388.6.6 通过Agent 监视应用·····························8-388.7 配置管理·····································8-398.7.1 阈值配置··································8-398.7.2 基线配置··································8-418.7.3 端口配置··································8-418.7.4 采集器配置·································8-428.7.5 参数配置··································8-438.7.6 模板配置··································8-448.7.7 分级采集配置································8-459 IP 地址管理····································9-479.1 IP 管理······································9-479.1.1 查看IP 地址段·······························9-479.1.2 增加IP 地址段·······························9-479.1.3 自动扫描··································9-479.1.4 分配IP 地址································9-489.2 DHCP 管理····································9-489.2.1 增加子网··································9-489.2.2 增加地址池记录·······························9-499.2.3 增加保留IP ···································································································· 9-4910 性能管理·····································10-5010.1 监视列表····································10-5010.1.1 查看监视列表·······························10-5010.1.2 增加监视·································10-5010.2 性能视图管理··································10-5110.2.1 查看性能视图·······························10-5110.2.2 增加性能视图·······························10-5110.3 指标设置····································10-5210.3.1 查看和修改全局指标····························10-5210.3.2 增加自定义性能指标····························10-5210.4 性能选项····································10-5210.4.1 设置显示选项·······························10-5310.4.2 设置监视选项·······························10-5310.4.3 首页Widget ································································································10-5310.4.4 常用指标·································10-5310.4.5 TopN 指标·································10-5410.4.6 显示指标·································10-54。
omnitrend center 安装和启用说明书
OMNITREND®Center安装和启用版本:2.7.1版的:2022/8/24文件编号:LIT82.201.ZH翻译手册翻译本文档的信息可能在无事先告知的情况下发生更改。
本文档中介绍的软件在提供时附有许可证协议。
只有在符合本协议中包含的条件时,才允许复制软件。
本文档或其片段未经PRÜFTECHNIK批准,不得印刷或以其他方式复制。
Fluke.OMNITREND是PRÜFTECHNIK AG的注册商标。
©Fluke.保留所有权利Fluke Deutschland GmbH85737Ismaning(德国)目录1引言51.1欢迎使用OMNITREND Center51.2开始前61.3安全81.4售后服务地址91.5系统条件102安装112.1安装服务器112.2配置服务器122.3准备服务器模块152.4启动/停止服务器162.5安装客户端182.6安装单机版192.7更新203启用213.1启动客户端/单用户应用213.2与服务器建立连接223.3中断/断开与服务器的连接233.4激活OMNITREND Center244索引27 OMNITREND Center│安装和启用3空白页1引言1.1欢迎使用OMNITREND CenterOMNITREND Center是一款新开发的状态监测软件,用于监测和诊断旋转设备的运行状态。
OMNITREND Center可对用普卢福公司(PRÜFTECHNIK AG)推出的便携式状态监测系统(如测量数据采集系统)或固定安装式状态监测系统(如在线设备)记录的设备园区的状态数据进行处理。
OMNITREND Center拥有丰富的实用分析功能,可帮助分析测量数据。
所有结果均以报告和调查结果形式进行记录和存档,令人一目了然。
在软件内,可借助测量模板和设备模板对状态监测系统进行配置,以便采集测量数据。
OMNITREND Center│安装和启用5安装和启用1.2开始前检查供货范围到货时请检查货物是否有受损件或缺失件。
U-EDIT用户使用手册2.
2.设置素材名和存储路径。
3.选择采集的视、音频信道,输入端口,并设置采集格式。
4.在开始采集前,遥控录像机到选定的画面处,通过界面按钮设置入点(快捷键I,
结果位置设置出点(快捷键O。
5.点击开始采集按钮,弹出如下所示对话框,确认插入的磁带后点击确定。
1.启动1394设备后,可进入VTR状态,VTR状态可实现遥控采集磁带上的素材到本
地的功能。
2.选择主菜单“采集/1394采集”,进入1394采集界面,此时磁带上的内容会出现
在预览窗口中。
3.在基本信息页签中输入素材名称和选择素材的存储路径,也可以使用系统默认值。
4.如果摄像机为VTR状态,点击按钮呈灰色无效状态,此时可通过播放、快进、
变形1-0000
3.采集工具区:“批采集”、“生成元数据”、“开始采集”、“取消采集”等按钮。
⏹:点击该按钮,可展开批采集列表,以实现批量采集功能。
⏹:用于在设定时段内的视音频信号的自动采集和收录。
⏹直接采集素材元数据,采用此种方式采集的素材仅记录相关的素材属性
信息,没有实体文件对应。资源管理器中素材图标为小写va,待日后重采集实体
3.为确保采集的实时性,不建议转码采集,也不建议双路采集,直接采集磁带上的默
认格式(打开1394采集界面,系统自识别。
2.2.1摄像机CAMERA采集
做好上述的准备工作后,我们以1394的HDV采集为例,首先介绍摄像机CAMERA采集的基本操作方法,CAMERA状态可以实现边拍摄边采集的功能。
1.打开摄像机电源开关,系统自动识别到新加的DV设备,我们进入ME软件。
4.设置信号输入端口和视音频格式。
5.播放信号源,通过回放窗、音频表和外围监看监听设备,搜索需要采集的素材段。
u-center 使用手册

u-center 使用手册u-center是一种高度人工集成导航解决方案,用于管理和控制全球卫星导航系统(GNSS)接收器。
这个软件是由瑞士的Swiss company u-blox开发的,它被广泛应用于自动驾驶、航空航天、汽车导航、无人机和移动设备等领域。
首先,u-center提供了一个直观易用的用户界面。
它的主要功能包括接收器的配置、实时数据显示、数据记录和导航解决方案的评估。
通过图形化界面,用户可以轻松地进行各种设置和操作。
这使得即使对于没有技术背景的用户来说,也能够快速上手和使用这个软件。
其次,u-center支持多种卫星导航系统,包括GPS、GLONASS、Galileo和BeiDou等。
用户可以选择合适的导航系统来获取位置、速度和时间等信息。
同时,u-center还提供了对导航消息的解码和显示功能,使用户能够实时监控和分析卫星导航数据。
此外,u-center内置了一套强大的调试工具和仿真器。
用户可以模拟不同的接收器配置和环境条件,以便对导航解决方案进行测试和验证。
这个功能对于开发和调试导航应用程序非常有帮助,可以提高应用程序的准确性和性能。
另外,u-center还提供了数据记录和回放功能。
用户可以将接收器的原始数据记录下来,以便离线分析和验证导航算法。
同时,用户还可以通过回放功能重现真实的导航场景,以便进行虚拟测试和性能评估。
在使用过程中,u-center还提供了丰富的帮助文档和培训资料。
用户可以通过在线文档、视频教程和示例代码来学习和使用这个软件。
此外,u-center的开发者社区也提供了大量的技术博客和讨论区,用户可以在这里分享和获取相关的经验和知识。
总结起来,u-center是一款强大的导航解决方案管理软件。
它具有直观易用的用户界面、多样化的导航系统支持以及强大的调试和测试功能。
无论是专业的导航工程师还是普通用户,都可以通过u-center的帮助,更好地管理和控制GNSS接收器,并提高导航解决方案的准确性和性能。
u-center简单使用手册

u-center使用手册
1、u-center每次打开都比较慢,要有点耐心
2、打开后,可以看到如图1的界面
图1
3、左边有如图2的图标
图2
第一个图标是选择串口,第二个是选择波特率,第三个是自动传输按钮
先选择串口(图标变绿,表示串口了解成功),然后选择波特率,最后点自动传输,如果GPS 有数据传输进来,界面就有变化了(如图3)。
这些功能也可以在菜单栏“receiver”中找到。
图3
4、收星情况说明如表1
表1
绿色是卫星可用于导航,
青色是卫星信号有效,可用于导航,
蓝色是信号有效,不可用于导航
红色是卫星信号无效
5、菜单栏中“view” “test console”,用于显示GPS收到的详细信息,如图4
图4
Test console界面按钮功能,如表2
表2
锁:用于锁定界面
叉叉:清除界面
过滤开关:可输入“RMC”,只显示GPRMC信息,如图5
图5
6、菜单栏中“view” “table view”,用于显示GPS收到的各个单独信息,如图6所示
图6
通过窗口下面的选项,再点击“+”就可以单独显示编号、时间、经纬度等等
7、菜单栏中“view”→“chart view”,用于显示GPS收到信息的图表形式,如图7所示
图7
点击上面那个图标,下面的图标就会变成可选的,然后自己选择需要的坐标参数8、菜单栏中“view”→“historgram view”,用于显示GPS收到信息的直方图形式,如图8所示
图8
概率直方图
Welcome To Download !!!
欢迎您的下载,资料仅供参考!。
u-center2 用法 -回复

u-center2 用法-回复Ucenter2 用法Ucenter2 是一种功能强大的用户中心系统,通过它可以实现用户的注册、登录、资料管理等功能。
在本文中,我们将详细介绍Ucenter2 的使用方法,并逐步回答与之相关的问题。
第一步:安装Ucenter2首先,我们需要从官方网站下载Ucenter2 的安装包,并将其解压到服务器的指定目录下。
接下来,我们需要创建一个新的数据库,并导入Ucenter2 的安装表结构。
最后,我们修改Ucenter2 的配置文件,包括数据库连接信息和数据表前缀等。
完成这些步骤后,我们就成功地安装了Ucenter2。
第二步:配置Ucenter2在成功安装Ucenter2 后,我们需要进行一些配置操作。
首先,我们登录Ucenter2 的管理后台,配置站点名称、站点URL、站点LOGO 等基本信息。
接着,我们需要设置用户注册选项,包括开启注册、启用验证码等。
同时,我们还可以配置邮件发送、短信发送、RSS 订阅等功能。
完成这些配置后,我们就可以开始使用Ucenter2 的各项功能了。
第三步:用户注册使用Ucenter2,我们可以提供用户注册功能。
用户可以填写必填项,如用户名、密码、电子邮箱等,也可以填写选填项,如性别、出生日期等。
在注册时,如果开启了验证码功能,用户需要输入正确的验证码才能继续注册。
注册完成后,用户的信息将存储在Ucenter2 的数据库中,并可以通过Ucenter2 的相关函数进行管理。
第四步:用户登录用户可以使用他们在注册时创建的用户名和密码登录Ucenter2。
在登录前,我们可以提供一个记住登录状态的选项,方便用户下次登录时免输入用户名和密码。
登录成功后,用户将获得一个SessionID,以及一个临时的Cookie。
用户可以通过这些信息使用Ucenter2 的各项功能。
第五步:资料管理Ucenter2 提供了用户资料管理功能,用户可以在登录后自行修改自己的资料。
u-center的使用方法
u-center的使用方法u-center是一款用于GPS定位和导航的软件,它提供了丰富的功能和工具,可以帮助用户实现精准的定位和导航。
本文将介绍u-center的使用方法,帮助读者更好地使用该软件。
要使用u-center,首先需要将GPS接收器与计算机连接。
可以通过USB线或者串口线将GPS接收器与计算机进行连接。
连接完成后,打开u-center软件。
打开u-center后,可以看到主界面的各个功能模块。
首先是“View”模块,该模块用于查看GPS接收器的信息。
点击“View”按钮,可以看到接收器的信息,包括接收器的型号、固件版本、卫星信号强度等。
接下来是“Configuration”模块,该模块用于配置GPS接收器的参数。
点击“Configuration”按钮,可以进入配置界面。
在配置界面中,可以设置接收器的工作模式、波特率、坐标系统等。
可以根据自己的需求进行设置,并点击“Apply”按钮保存设置。
除了基本的配置,u-center还提供了一些高级功能,如卫星查看、数据记录和地图显示等。
点击“Satellite View”按钮,可以查看接收器接收到的卫星信息。
可以看到卫星的编号、信号强度和位置等信息。
通过观察卫星的位置和信号强度,可以判断接收器的定位质量。
点击“Data Logging”按钮,可以开启数据记录功能。
u-center可以将接收到的GPS数据保存到本地文件中,方便后续的数据分析和处理。
点击“Map”按钮,可以在地图上显示接收器的位置。
可以通过地图来观察接收器的定位情况,以及周围的地理环境。
u-center还提供了一些其他的功能,如数据转换、数据发送和仿真等。
点击“Tools”按钮,可以进入工具界面。
在工具界面中,可以进行数据的转换和发送,还可以进行GPS的仿真和测试。
总结一下,u-center是一款功能强大的GPS定位和导航软件,可以帮助用户实现精准的定位和导航。
通过u-center,用户可以查看接收器的信息、配置接收器的参数、查看卫星信息、记录数据和显示地图等。
优格科技项目器用户指南说明书

Quick SetupBefore using the projector, make sure you read the safety instructions in the online User’s Guide .Note: Your product may differ from the illustrations on this sheet, but the instructions are the same.Connect the projectorChoose from the following connections. See the sections below or the online User’s Guide for details.ComputerComputer portComputer port, and the sheet). You can also connect an audio cable.HDMI portConnect one end of an HDMI cable to the projector’s HDMI (EX3260) or HDMI/MHL (Pro EX7260) port and the other end to an HDMI port on your computer.USB portConnect the square end of a USB cable to the projector’s USB-B (square) port. Connect the flat end of the cable to any USB port on your computer.Windows Vista ® or later: After turning on the projector, follow the on-screen instructions to install the Epson ® USB Display software (EMP_UDSE.EXE ; only on first connection). If the software screen does not display automatically, open My Computer or Computer , then double-click EPSON_PJ_UD .OS X 10.7.x or higher: After turning on the projector, the setup folder for USB Display appears in the Finder. Double-click USB Display Installer and follow the on-screen instructions to install the Epson USB Display software (only on first connection).Video deviceConnect multiple video devices and use the Source Search button on theprojector or remote control to switch between them.(composite video)Mobile media device (Pro EX7260)Connect tablets, smartphones, and other devices that support the MHL™ standard to the HDMI /MHLport.Streaming deviceSome devices may require an adapter or may not require an MHL cable. Not all features or functions may be supported. Check your device’s documentation for more information.USB deviceConnect a digital camera, USB flash drive, or USB storage device to the projector’s USB-A(flat) port.If you connect a digital camera, USB flash drive, or USB storage device, you can use the projector’s PC Free feature. See the online User’s Guide for details.Turn on your equipment1 Turn on your computer or video source.2Plug in the projector. Thepower light on the projector turns blue.3Open the A/V Mute slide all the way.4 P ress thepower button on the projector or remote control. Theprojector beeps, the Status light flashes blue, and then stays on.Note: To shut down the projector, press the power button twice.5 Use the arrow buttons on the remote control to highlight any of theoptions on the Home screen that appears, then press to select it.You can switch between projection sources and quickly access variousadjustment options from this screen.6 T he default language of the menu system is English. To select anotherlanguage, press the Menu button on the projector or remote control.Select Extended and press . Select Language and press . Selectyour language and press . Press the Menu button to exit the menusystem.Adjust the image1 I f you don’t see an image, press the Source Search button on theprojector or remote control to select the image source.Note: If you still see a blank screen or have other display problems, seethe troubleshooting tips on the back of this sheet.2 T3 E X3260:W (enlarge) buttons on the projector.P ro EX7260: To reduce or enlarge the image, turn the zoom ring.4 To sharpen the image, turn the focus ring.5 I f your image looks like or , you may have placed the projectoroff to one side of the screen at an angle. Place the projector directly infront of the center of the screen, facing the screen squarely. If you can’tmove the projector, use the horizontal keystone slider on the projector tocorrect the image shape.6 Y or ,Using the remote controlInstall the batteries as shown (two AA batteries).Choose which sourceto displayon and offmenusdisplay Access the HomescreenNavigate projectormenusFor more information on using the remote control, see the online User’s Guide.Setting up a wirelessconnectionFollow the steps here to set up the projector for a wireless connection.Note: To project wirelessly with the EX3260, you need the optional wirelessLAN module (part number V12H731P02). You do not need the wireless LANmodule for the Pro EX7260 since the wireless functionality is built-in.Install the optional LAN module (EX3260)1Remove the wireless LAN module cover screw.2 Insert the wireless LAN module into the USB-Aport.3Attach the included wireless LAN module cover and secure it using thescrew you removed.Note: The light on the wireless LAN module turns on when the module is installed and operating. The light flashes when the module is communicating over the network.Select wireless network settings1 Press the Menu button on the remote control.2 Select the Network menu and press.3Select Wireless LAN On as the Wireless Modesetting.4 Select Network Configuration and press .5Select the Wireless LAN menu and press.6Select one of the following as the Connection Mode setting:•Q uick for a direct connection to a computer, tablet, or smartphone. •Advanced to connect your projector to a router or access point.7 Select any other settings on the Wireless LAN menu as necessary. See the online User’s Guide for details.8When you finish selecting settings, select Complete and follow the on-screen instructions to save your settings and exit the menus.Install the optional softwareIf you connected a computer to the projector, you can download and installoptional software to perform various tasks wirelessly, such as monitoring or controlling your projector and projecting from multiple computers.You can download the optional software and its manuals from the Epsonwebsite, as described in “Where to get help” or by installing the projector CD. Note: The projector CD links you to the product’s support page and gives you the option to install links on your desktop to the software manuals. An Internet connection is required.Projecting from a mobile deviceYou can project wirelessly from a mobile device (iOS, Android™, or Chromebook™) using the Epson iProjection™ app and a QR code.1U se the following QR code to download and install the Epson iProjectionapp.2 If you connected the projector to a network wirelessly, make sure to connect your mobile device to the same network.3 P ress the LAN button on the remote control to display a QR code on the projector screen.4 Start Epson iProjection on your mobile device.5Use the QR code reader feature to read the QR code displayed.6Follow the app instructions to connect your device to the projector.For more information on setting up and using this app, visit/projectorapp (U.S.) or www.epson.ca/projectorapp (Canada).TroubleshootingIf you see a blank screen or the No signal message after turning on your computer or video device, check the following:• M ake sure the Status light on the projector is blue and not flashing, andthe A/V Mute slide is open.•P ress the Source Search button on the projector or remote control to switch to the correct image source, if necessary.•P ress the Home button on the projector or remote control to verify the source input and settings.• O n Windows ®7 or later, hold down the Windows key and press P at thesame time, then click Duplicate .• If you’re using a Windows laptop, press the function key on your keyboard that lets you display on an external monitor. It may be labeled CRT/LCD or have an icon such as . You may have to hold down the Fn key while pressing it (such as Fn + F7). Wait a moment for the display to appear.• I f you’re using a Mac laptop, open System Preferences and selectDisplays . Click the Arrangement tab and select the Mirror Displays checkbox.Where to get helpManualsFor more information about using the projector, click the icons on your desktopto access the online manuals (requires an Internet connection). If you don’t seeicons to the manuals, you can install them from the projector CD or go to theEpson website, as described below.Telephone support servicesTo use the Epson PrivateLine® Support service, call (800) 637-7661. This serviceis available for the duration of your warranty period. You may also speak witha support specialist by calling (562) 276-4394 (U.S.) or (905) 709-3839 (Canada).Support hours are 6 AM to 8 PM, Pacific Time, Monday through Friday, and7 AM to 4 PM, Pacific Time, Saturday. Days and hours of support are subject tochange without notice. Toll or long distance charges may apply.Internet supportVisit /support (U.S.) or www.epson.ca/support(Canada) for solutions to common problems. You can download utilities anddocumentation, get FAQs and troubleshooting advice, or e-mail Epson.RegistrationRegister today to get product updates and exclusive offers. You can use the CDincluded with your projector or register online at /webreg.Optional accessoriesFor a list of optional accessories, see the online User’s Guide.You can purchase screens or other accessories from an Epson authorizedreseller. To find the nearest reseller, call 800-GO-EPSON (800-463-7766).Or you can purchase online at (U.S. sales) orwww.epsonstore.ca (Canadian sales).EPSON is a registered trademark, Epson iProjection is a trademark, and EPSON Exceed Your Vision is a registeredlogomark of Seiko Epson Corporation. PrivateLine is a registered trademark of Epson America, Inc.Mac and OS X are trademarks of Apple Inc., registered in the U.S. and other countries.Android and Chromebook are trademarks of Google Inc.General Notice: Other product names used herein are for identification purposes only and may be trademarksof their respective owners. Epson disclaims any and all rights in those marks.This information is subject to change without notice.© 2017 Epson America, Inc., 6/17CPD-53644。
U-Path简单操作指南讲解
U-Path 企业通信助理简明操作指南华为技术有限公司目录1 操作界面介绍1.1 主界面1.1.1 单话务台主界面1.1.2 多话务台主界面1.2 话机面板1.3 呼叫队列和保持队列1.4 电话本窗口2 U-Path话单结算2.1 概述2.2 操作步骤2.2.1 U-Path取话单2.2.2 CBS话单结算3 U-Path基本操作3.1 基本操作3.1.1 登录U-Path3.1.2 锁定U-Path3.1.3 设置U-Path电脑值班3.1.4 设置U-Path夜服功能3.1.5 设置U-Path备用号码3.1.6 设置U-Path置忙3.1.7 设置U-Path快捷键3.1.8 浏览U-Path操作日志3.2 话机面板操作3.2.1 应答3.2.2 发送号码3.2.3 连接呼叫3.2.4 单侧拆除呼叫3.2.5 保持3.2.6 恢复3.2.7 重拨3.2.8 强插3.2.9 强拆3.2.10 监听3.2.11 转接来话呼叫3.2.12 快速转接来话呼叫3.3 电话本操作3.3.1 搜索电话本用户3.3.2 增加电话本用户3.3.3 编辑电话本用户3.3.4 删除电话本用户3.3.5 下载群内用户号码4 U-Path业务数据管理4.1 修改用户呼入权限4.1.1 功能介绍4.1.2 参数说明4.1.3 操作步骤4.2 修改用户呼出权限4.2.1 功能介绍4.2.2 参数说明4.2.3 操作步骤4.3 设置定时叫醒业务4.3.1 功能介绍4.3.2 参数说明4.3.3 操作步骤4.4 取消定时叫醒业务4.4.1 功能介绍4.4.2 参数说明4.4.3 操作步骤4.5 设置免打扰业务4.5.1 功能介绍4.5.2 参数说明4.5.3 操作步骤4.6 取消免打扰业务4.6.1 功能介绍4.6.2 参数说明4.6.3 操作步骤4.7 用户数据维护4.7.1 功能介绍4.7.2 参数说明4.7.3 操作步骤4.8 新业务管理4.8.1 功能介绍4.8.2 参数说明4.8.3 操作步骤4.9 修改用户新业务权限4.9.1 功能介绍4.9.2 参数说明4.9.3 操作步骤4.10 设置三方通话业务4.10.1 功能介绍4.10.2 参数说明4.10.3 操作步骤插图目录图1-1 单话务台主界面图1-2 多话务台主界面图1-3 话机面板图1-4 单话务台方式呼叫队列和保持队列图1-5 多话务台方式呼叫队列和保持队列图1-6 单话务台电话本窗口图1-7 多话务台电话本窗口图2-1 话单图2-2 话单页面图2-3 导入长短号对照表图2-4 系统参数图2-5 结算图2-6 选择结算话单目录图2-7 详细话单清单图2-8 结算图3-1 系统登录界面图3-2 输入密码图3-3 切换用户图3-4 设置话务台自动锁定图3-5 解锁图3-6 关闭系统对话框图3-7 系统登录图3-8 功能按钮页面图3-9 功能按钮修改对话框图3-10 日志记录窗口图3-11 日志记录(详细描述)窗口图3-12 单话务台电话本增加用户对话框图3-13 多话务台电话本增加用户对话框图3-14 单话务台电话本编辑用户对话框图3-15 多话务台电话本编辑用户对话框图4-1 用户数据维护图4-2 用户数据维护图4-3 定时叫醒设置图4-4 定时叫醒设置图4-5 撤销唤醒对话框图4-6 撤销唤醒对话框图4-7 设置免打扰图4-8 取消免打扰图4-9 用户数据维护图4-10 用户数据浏览图4-11 新业务管理图4-12 用户数据维护图4-13 呼叫话务台图4-14 话务台转话图4-15 三方通话1 操作界面介绍关于本章本章描述内容如下表所示。
U操作说明

ห้องสมุดไป่ตู้解决方案二
在选择功能前,先确认自 己的需求和目标,避免选
择错误的功能。
解决方案三
如果不确定如何选择功能 ,可以咨询专业人士或寻
求帮助。
问题三:参数输入错误
解决方案一
在输入参数前,先确认每个参数的含义和 取值范围。
解决方案二
仔细核对输入的参数,确保没有遗漏或错 误。
解决方案三
如果参数输入错误导致问题,可以尝试重 置参数或重新输入。
定期对U设备进行病毒查杀和数据 备份,确保数据安全。
03
注意保持U设备的干燥和清洁,避 免潮湿和污染。
04
如果遇到U设备无法识别或数据丢 失等问题,及时联系专业人员进 行维修和数据恢复。
03
U操作关键步骤详解
步骤一:打开U操作界面
打开电脑,确保网络连接正常。
在浏览器地址栏输入U操作的网 址。 点击回车键,进入U操作登录界 面。
U操作说明
汇报人:XX
20XX-01-27
CONTENTS
• U操作概述 • U操作基本流程 • U操作关键步骤详解 • U操作常见问题及解决方案 • U操作注意事项 • U操作实践案例
01
U操作概述
U操作的定义与背景
U操作是一种特定的操作技术,用于解决 特定问题或实现特定目标。
它起源于XX领域,并随着技术的发展逐 渐应用于其他领域。
U操作的背景与XX技术、XX理论和XX实 践密切相关。
U操作的目的和意义
01
U操作的主要目的是提高XX效率、优化XX性能和增
强XX稳定性。
02
通过U操作,可以实现更快速、更准确的XX处理,提
高工作效率。
U-EDIT用户使用手册 6.
阴影类型可选择“无阴影”、“图片阴影”、“掩膜阴影”、“单色阴影”阴影调节阴影中心点X、Y轴坐标,可通过联动按钮控制联动关系。
透明度控制阴影透明度
阴影柔化控制阴影边缘柔化程度
阴影变焦控制阴影画面模糊程度
点击“自定义阴影光效”后:
功能备注
勾选后可控制阴影的光源位置、阴影距离、光照角度等参数自定义
选中“FX ”按钮后弹出特技列表
未选中“FX ”按钮时左侧无显右键单击
禁用窗口调节无选中后可关闭在故事板回放窗上调整
素材功能,实现完整监看
小提示
放大镜和移动工具主要应用于特技调整过程中,显示图像局部细节时使用,视频图像本身的大小或位移没有产生变化。如果需要恢复到默认的大小或位置,在调整窗中双击鼠标右键即可。
粘贴Ctrl+V粘贴特技有两种模式:
1.在特技窗口中选中特技进行复制,则粘贴特
技,图标变为
2.在时间轨道上选中关键帧进行复制,则粘贴
关键帧,图标变为
剪切Ctrl+X剪切特技
特技存盘S保存当前编辑特技
B首尾自动加关键帧
首尾关键点添
加
按钮调整Q控制时间轨下方的功能按钮是否显示
图形界面Ctrl+1以图形界面方式显示特技调整窗口
参数界面Ctrl+2以参数界面方式显示特技调整窗口
曲线界面Ctrl+3以关键帧参数显示特技调整窗口
关键帧独显K只显示当前特技的关键帧
参数预制E显示预存的特技参数
7.时码提示框,提示当前时间轴所在位置和特技所处时间区段。
6.1.5特技添加次序调整
在U-EDIT中,可以对素材同时添加多个特技,这就涉及到优先级的问题,按照排列顺
U Genius3 用户手册说明书

Contents Page Contents PageChapter One-Introduction.......................................................................................1.1Applications supported....................................................................................1.2Hardware.........................................................................................................1.2.1Specification..........................................................................................1.2.2System Components............................................................................1.2.2.1UV transilluminator........................................................................1.2.2.2Filter draw......................................................................................1.2.2.3LCD Touch screen.........................................................................1.2.2.4USB Flash Drive............................................................................1.2.3Accessories...............................................................................................1.2.3.1Visible Light converter....................................................................1.2.3.2Blue LED transilluminator...............................................................1.2.3.3Thermal Printer...............................................................................1.2.3.4Analysis software..........................................................................1.2.4Set-up....................................................................................................... Chapter Two-Image Acquisition............................................................................2.1Capturing an image of an agarose EtBr or similar gel...................................2.2Capturing an image of a protein gel(coomassie,silver stained)or otherwhite light image(colony plate,autorad,microtitre plate etc)...................... Chapter Three-Saving/Opening and Printing Images..................................3.1Saving Images.............................................................................................3.2Opening Images...........................................................................................3.3Printing Images............................................................................................ Chapter Four-Image Enhancement................................................................4.1Image Enhancement...................................................................................4.2Annotate......................................................................................................4.3Digital Zoom................................................................................................ Chapter Five-User Preferences.......................................................................5.1Neutral Fielding...........................................................................................5.2Extended Dynamic Range(EDR).................................................................5.3External Keyboard........................................................................................5.4Regional Power Frequency Settings............................................................ Chapter Six-Troubleshooting and Contact Information..............................6.1Troubleshooting..........................................................................................6.2Contact Syngene........................................................................................1 1 1 1 2 3 3 3 3 3 3 3 4 4 4 5 5 7 9 9 9 9 10 11 12 13 14 14 15 15 16 16 16Chapter One-IntroductionThe U:Genius3system has been designed to make your gel imaging simple,quick and easy.This system is the perfect choice for a low budget gel imaging system and features a compact darkroom which has a sliding front door and internal LED white light.The U:Genius3system supports multiple applications including DNA/RNA gel imaging such as EtBr,SYBR Green and visible stained gels i.e.coomassie blue and silver stain.1.1Applications supportedTransilluminatorUV Visible LightConverterBlue LEDTransilluminatorEthidium Bromide SYBR Green SYBR Gold SYBR SafeGel GreenGel RedSYPRO Ruby Coomassie blue stainCopper stainZinc stainSilver stainSYBR GoldSYBR GreenSYBR SafeUltraSafe blue1.2Hardware1.2.1SpecificationCamera12/16bitCCD1/3inchZoom Manual zoom6.5-39,F1.4,aperture andfocusDisplay8”colour touch screenFilter Draw Yes UV filter as standardMax gel size20x20cmData types TIFF and JPEGCCD resolution3M pixelsImage storage USBImage enhancements Rotation and inversion,sharpen,smoothand many moreIllumination Slide in and out UV transilluminator,visiblelight converter and blue LED transilluminator(Ultra-Slim),Epi white LED1.2.2System Components1.2.2.1DarkroomThe darkroom has a sliding door.The darkroom features:∙Slide out mid wave302nm UV transilluminator∙Internal white light LED∙Safety switch to protect from accidental UV exposure1.2.2.3UV TransilluminatorThe UV transilluminator will excite many fluorescent stains such as Ethidium bromide,SYBR™stains,Gel Red™.The standard wavelength is302nm.To protect users from accidental exposure,the UV light is automatically shut off if the door is opened.The transilluminator can be slid easily in and out of the cabinet.1.2.2.4Filter DrawerInterchange a range of filters for extensive choice of fluorescent applications.1.2.2.5LCD Touch ScreenA built-in8inch VGA colour LCD touch-screen allows users to preview, capture,print and save images,as well as to select various processing functions,without the connection of an external keyboard or mouse.1.2.2.6USB Flash DriveThe USB flash drive on the front of the U:Genius3for the easy storage of images.1.2.3Accessories1.2.3.1Visible light converterSyngene offers a visible light converter that can beplaced on top of the UV transilluminator for imagingcoomassie and silver stained gels.1.2.3.2Blue LED transilluminatorThe UltraSlim blue LED transilluminator is ideal for safelyimaging gels stained with SYBR Safe,Gold and Green,GelGreen and UltraSafe blue.1.2.3.3Thermal printerYou may attach a thermal printer,either Mitsubishi P93D or Sony UPD897. When you first attach the printer you will see the following windowSelect‘No,not this time’and press Next buttonThe drivers will automatically install.1.2.3.4Analysis softwareThe U:Genius3system is supplied with a copy of GeneTools analysis software from Syngene.This may be loaded on a PC of your choice.Please see the loading instructions within the CD cover.1.2.4Set-upPlease refer to the Installation quick guide on how to set up the camera and darkroom.Chapter Two-Image Acquisition2.1Capturing an image of an agarose EtBr or similar gel(For rapid capture see Quick Guide-Capture)Step OnePosition the sample on the centre of the transilluminator,close the door, ensure the UV filter has been placed in the filter draw and then manually turn UV on by pressing the‘UV On’switch on the front of the unit.Then press the ‘Live’button icon.Figure1-LIVE view iconStep TwoManually adjust the camera settings such as the aperture,zoom and focus. Adjust the aperture,zoom and focus settings until a suitable image is displayed,preferably with the sample filling the screen for maximum resolution.Please note that opening the aperture too far may result in areas of the sample being saturated.Figure2-Lens controlStep ThreeThe exposure time can either be set manually or automatically.Adjusting the exposure time will alter the brightness of the image.To manually increase or decrease the exposure time use the following icons.Figure3-Manual Exposure controlsThe auto-exposure function sets the exposure time to a level that ensures no saturation of the image occurs.To use the auto-exposure function select the following icon.Figure4-Auto Expose iconStep FourTo capture the image press the Capture button.If you have selected auto-expose then you will not need to press the Capture button..Figure5-Capture button2.2Capturing an image of a protein gel(coomassie,silver stained)orother white light image(Colony plate,autorad,microtitre plate etc) Step OneMake sure that you place the visible light converter on top of the transilluminator.Position your sample on the centre of the visible light converter and close the door.Manually turn on UV by pressing the‘UV On’switch.Step TwoManually adjust the camera settings such as the aperture,zoom and focus. Adjust the aperture,zoom and focus settings until a suitable image is displayed,preferably with the sample filling the screen for maximum resolution.Please note that opening the aperture too far may result in areas of the sample being saturated.Figure6-Lens controlStep ThreeThe exposure time can either be set manually or automatically.Adjusting the exposure time will alter the brightness of the image.To manually increase or decrease the exposure time use the following icons.Figure7-Manual Exposure controlsThe auto-exposure function sets the exposure time to a level that ensures no saturation of the image occurs.To use the auto-exposure function select the following icon.Figure8-Auto Expose iconStep FourTo capture the image press the Capture button.If you have selected auto expose then you will not need to press the Capture button..Figure9-Capture button3.Saving/Opening and Printing Images Chapter Three-Saving/Opening and Printing Images3.1Saving imagesTo save a captured image press the‘Save’button.N.B.You can only save an image to a USB device or your local area network(LAN).Images can be saved in the following formats TIFF and JPEG.Figure10-Save Button3.2Opening ImagesFrom the front screen select‘Open Image’to browse captured images.Figure11-Open Images Icon3.3Printing ImagesIf you have a thermal printer attached to your U:Genius3press the following button.Figure12-Print buttonChapter Four-Image EnhancementThe U:Genius3system offers a variety of functions ranging from image enhancement to annotation.4.1Image enhancementTo access the enhance functions select the Enhance button via the Edit Menu button.From this menu you can select to smooth,sharpen,invert or rotate your image.Figure13-Enhance iconClick on this icon to apply a smoothing filter.This is usefulwhen the image has specks of dust or bubbles present.However,this will make bands appear less sharp.Click on this icon to apply a sharpening filter to yourimage.When this filter has been applied band edgesshould become more pronounced but you may alsoobserve an increase in the graininess of the image.The Invert icon will reverse the image to give black bandson a white background or vice versa.This icon isparticularly useful when trying to see faint bands.To freely rotate your images press the Rotate icon.Press the Undo button to remove any enhancement thatyou may have performed.Use the Back button to navigate between the menus.4.2AnnotateTo access the annotation functions select the Annotate button via the Edit Menu button.From this menu you can add text,change the font,select to have your text horizontal or vertical or remove text.Figure14-Annotate buttonUse this icon to add text to your image.Press or placethe mouse cursor on your image and type your text.To change the font style press this icon.If you wish to have your text displayed horizontally selectthis button.If you wish to have your text displayed vertically selectthis button.To remove any annotation select this button.Use the Back button to navigate between menus.4.3Digital ZoomTo zoom in or out on your image select the Zoom button from the screen once you have captured your image.Figure15-Zoom buttonDigitally zoom in on your image to see faint bands.Digitally zoom out on your sample.Zoom settings can reset at any time.Use the Back button to navigate between the menus.Chapter Five-User PreferencesTo access U:Genius3settings and set user preferences for neutral fielding, EDR,to view external keyboard and to set regional power frequency settings.Figure16-Preferences iconYou will be directed to a new screen(Figure17).Figure17-Preferences screen5.1Neutral fieldingThe neutral field function is based on powerful algorithms which corrects for uneven illumination.This results in an image with a flat,even background whilst maintaining GLP compliance.To neutral field check the box(Figure18) then follow the on-screen instructions(Figure19)Figure18-Neutral fielding buttonFigure19-Neutral fielding on-screen instructions5.2Extended Dynamic Range(EDR)Many gels contain areas that are too bright or too dark to be successfully captured.Closing the iris to cut down the light may prevent the viewing of dark or faint bands,whilst opening it may lead to saturation.EDR solves this problem by automatically capturing a series of images of different exposure times.The content of each image is assessed and those areas that are within the dynamic range of the camera are combined.The result is an image with a large dynamic range(up to65536grey levels)that encompasses all the brightness ranges existing within the sample without saturation.Figure20-EDR button5.3External KeyboardIf you wish to connect an external keyboard to the U:Genius3system select this button.Figure21-External Keyboard button5.4Regional Power Frequency SettingsSelect your regional power frequency settings-choose between50Hz or 60Hz.Figure22-Regional Power Frequency Settings buttons6.Troubleshooting and Contact Information Chapter Six-Troubleshooting and Contact Information6.1TroubleshootingNo power to the darkroom∙Check connection of main power cord to main power port on the rear of the U:Genius3.∙Try another power socket within lab.Transilluminator will not turn on∙Check power cord by sliding transilluminator fully out from cabinet.If loose push back in.∙If still not on,remove power cord and attach another one plugged in elsewhere.If transilluminator comes on there is an electrical supply problem within the U:Genius3.If it still does not come on it is likely the transilluminator has failed.Contact Syngene.6.2Contact SyngeneEUROPE:USA:BEACON HOUSE5108PEGASUS COURT,SUITE M NUFFIELD ROAD FREDERICKCAMBRIDGE MD21704CB41TFTel:+441223727123Tel:8006864407/130******** Fax:+441223727101Fax:3016313977Email:*****************Email:*******************。
u-center 使用手册

u-center是一款功能强大的网络管理软件,使用手册如下:
一、安装与启动
1.下载u-center安装包,并解压到指定目录。
2.打开u-center安装程序,按照提示进行安装。
3.安装完成后,启动u-center程序。
二、基本配置
1.登录u-center:在浏览器中输入u-center的IP地址,进入登录界面。
2.设置网络接口:在u-center的Web界面中,配置网络接口参数,包括IP地
址、子网掩码等。
3.配置路由器和防火墙:根据需要配置路由器和防火墙规则,实现不同网络之
间的通信。
4.配置DNS服务器:在u-center中配置DNS服务器,解析域名和IP地址之间
的映射关系。
5.配置DHCP服务器:为客户端分配IP地址,实现动态IP地址分配。
三、高级配置
1.配置VPN连接:在u-center中配置VPN连接,实现远程访问。
2.配置文件服务器和邮件服务器:根据需要配置文件服务器和邮件服务器,提
供相应的服务。
3.配置网络时间服务器:同步网络时间,保证系统时间的准确性。
4.配置自定义脚本:根据需要配置自定义脚本,实现自动化管理。
H3C U-Center智能运维平台IOM用户手册

H3C U-Center 智能运维平台IOM 用户手册前言H3C U-Center IOM 用户手册包含10 个章节,用于引导用户了解并使用U-Center IOM 模块以及帮助用户解决使用过程中遇到的问题。
前言部分包含如下内容:•读者对象•本书约定•资料获取方式•技术支持•资料意见反馈读者对象本手册主要适用于如下工程师:•网络规划人员•现场技术支持与维护人员•负责网络配置和维护的网络管理员本书约定图形界面格式约定各类标志本书还采用各种醒目标志来表示在操作过程中应该特别注意的地方,这些标志的意义如下:目录1 U-Center 概述····································1-11.1 U-Center 解决方案简介································1-11.2 U-Center 功能结构··································1-11.3 基础架构运行监控管理(IOM)····························1-22 U-Center 系统快速入门································2-32.1 访问U-Center 系统·································2-32.2 认识U-Center 系统管理界面·····························2-32.2.1 U-Center 界面介绍·······························2-32.2.2 定制首页···································2-52.3 U-Center 系统操作员管理·······························2-62.3.1 修改缺省操作员初始密码····························2-62.3.2 增加操作员··································2-7 3资源纳管······································3-83.1 增加资源······································3-83.1.1 增加设备···································3-83.1.2 增加服务器··································3-83.1.3 增加虚拟资源·································3-93.1.4 增加应用···································3-93.2 自动发现······································3-93.2.1 简易模式自动发现·······························3-93.2.2 高级模式自动发现······························3-10 4设备监控及管理··································4-114.1 查看设备及接口信息································4-114.1.1 通过设备列表查看设备详细信息························4-114.1.2 自定义设备视图·······························4-114.1.3 接口视图管理································4-124.2 监控及管理设备状态································4-124.2.1 管理/取消管理设备······························4-124.2.2 定制设备服务监视······························4-124.3 远程登录设备···································4-134.3.1 Telnet 登录设备·······························4-134.3.2 SSH 登录设备································4-134.3.3 打开设备Web 网管·····························4-134.4 查看设备Syslog ······································································································ 4-144.4.1 浏览Syslog ··································································································· 4-144.4.2 Syslog 日志过滤规则·····························4-144.4.3 Syslog 解析模板库······························4-164.4.4 Syslog 升级告警规则·····························4-17 5服务器自动化管理·································5-195.1 服务器部署前准备·································5-195.1.1 配置服务器参数·······························5-195.1.2 服务器配置模板管理·····························5-205.1.3 配置服务器DCU ····························································································· 5-215.1.4 创建自动部署计划······························5-215.2 服务器部署阶段··································5-225.3 服务器资源管理··································5-225.3.1 仪表盘···································5-225.3.2 服务器拓扑·································5-235.3.3 服务器资源·································5-235.3.4 服务器状态一览·······························5-235.4 服务器事件管理··································5-235.4.1 集成管理日志································5-235.4.2 系统事件··································5-235.4.3 创建告警升级规则······························5-24 6存储自动化管理··································6-256.1 存储设备管理···································6-256.2 存储池管理····································6-266.3 存储卷管理····································6-26 7虚拟资源管理···································7-277.1 虚拟资源列表···································7-277.1.1 新建虚拟机·································7-277.1.2 部署OVF 模板·······························7-277.1.3 手工迁移虚拟机·······························7-287.2 数据存储·····································7-287.2.1 查看数据存储································7-287.2.2 上传文件··································7-287.2.3 下载文件··································7-287.3 虚拟机模板····································7-297.3.1 虚拟机转化为模板······························7-297.3.3 克隆现有模板································7-307.4 虚拟机事件记录··································7-308 应用管理·····································8-318.1 应用监视·····································8-328.1.1 查看应用监视列表······························8-328.1.2 增加应用监视································8-338.2 主机监视·····································8-338.2.1 概览模式··································8-338.2.2 列表模式··································8-348.3 分类监视·····································8-348.4 应用分组管理···································8-358.4.1 查看应用分组列表······························8-358.4.2 增加应用分组/子分组·····························8-358.5 Agent 管理····································8-368.6 安装Agent ············································································································· 8-368.6.1 手工安装Agent ······························································································· 8-368.6.2 推送安装Agent ······························································································· 8-368.6.3 查看Agent 列表·······························8-378.6.4 启动/停止Agent ······························································································ 8-388.6.5 查看Agent 自动发现结果···························8-388.6.6 通过Agent 监视应用·····························8-388.7 配置管理·····································8-398.7.1 阈值配置··································8-398.7.2 基线配置··································8-418.7.3 端口配置··································8-418.7.4 采集器配置·································8-428.7.5 参数配置··································8-438.7.6 模板配置··································8-448.7.7 分级采集配置································8-459 IP 地址管理····································9-479.1 IP 管理······································9-479.1.1 查看IP 地址段·······························9-479.1.2 增加IP 地址段·······························9-479.1.3 自动扫描··································9-479.1.4 分配IP 地址································9-489.2 DHCP 管理····································9-489.2.1 增加子网··································9-489.2.2 增加地址池记录·······························9-499.2.3 增加保留IP ···································································································· 9-4910 性能管理·····································10-5010.1 监视列表····································10-5010.1.1 查看监视列表·······························10-5010.1.2 增加监视·································10-5010.2 性能视图管理··································10-5110.2.1 查看性能视图·······························10-5110.2.2 增加性能视图·······························10-5110.3 指标设置····································10-5210.3.1 查看和修改全局指标····························10-5210.3.2 增加自定义性能指标····························10-5210.4 性能选项····································10-5210.4.1 设置显示选项·······························10-5310.4.2 设置监视选项·······························10-5310.4.3 首页Widget ································································································10-5310.4.4 常用指标·································10-5310.4.5 TopN 指标·································10-5410.4.6 显示指标·································10-54。
广东省有线U互动快速使用手册
U互动快速使用手册1.遥控器介绍1.1遥控器具体使用2.U互动使用2.1主页界面认识2.2主页界面菜单使用2.3看电视2.4时移、回看功能2.5互动点播2.6机顶盒设置与帮助3.移动U宽频使用及管理3.1移动U宽频(家庭宽带上网)使用步骤3.2移动U宽频CMCC上网3.3Wi-Fi名称修改和密码管理4.多屏互动使用4.1支持系统4.2安装方法4.3多屏软件使用5.简单故障与处理5.1新装U宽频48小时后任未收到中国移动发送的认证短信5.2上网登陆过程中出现“页面信息不存在或已丢失”等提示,不能正常上网5.3上网登陆过程中提示“登陆账号不符”,不能正常上网5.4电视显示蓝屏、雪花、保护画面、只能看到模拟频道等5.5上网不正常5.6体验专区个别节目有图像没声音5.7电视显示蓝屏、雪花、保护画面、只能看到模拟频道等5.8直播电视频道列表中没有频道、频道表错误、没有电视节目单信息5.9遥控器不能控制机顶盒5.10全部或部分直播节目出现黑屏、提示“信号中断,请检查网络信号”、全部或部分直播节目出现马赛克5.11电视画面只有声音没有图像5.12电视画面只有图像没声音1.1遥控器具体使用回到目录○红色键:查看当前所观看的频道信息;设置喜爱频道时使用。
○绿色键:设置喜爱频道时使用,喜爱频道编辑。
○黄色键:进入所观看电视节目的时移功能;设置喜爱频道时使用。
○蓝色键:设置喜爱频道时使用,频道隐藏。
点播时用于搜索功能启动。
#号键:16︰9与4︰3图像显示切换。
输入法下起中/英切换使用。
*号键:声道切换,立体声/混合声/左声道/右声道电视机控制区:供将电视机遥控器对应按键功能复制过来,实现机顶盒遥控器与电视机遥控器的二合一功能。
遥控器复制(学习)步骤:1、按本机“设置”键3秒后松开,红灯长亮。
2、10秒内按下本机电视机“电源”键,红灯闪烁一下。
2.1主页界面认识回到目录正常开机需要约45-60秒时间。
开机默认进入主页界面,见图2.2主页界面菜单使用回到目录使用遥控的方向键可选择不同的主菜单及下拉菜单,按确认键进入。
u-center的使用方法
u-center的使用方法u-center是一款由瑞士公司u-blox开发的用于GNSS(全球导航卫星系统)应用开发的软件工具。
它提供了丰富的功能和易于使用的界面,可以帮助用户进行GNSS设备的配置、监测和调试。
我们需要下载并安装u-center软件。
在u-blox官网上可以找到最新版本的软件,并提供了详细的安装步骤。
安装完成后,打开软件,我们将看到一个主界面,包含了各种功能和选项。
第一步是连接GNSS设备。
在主界面的左上角,有一个“端口”按钮,点击后会出现一个对话框,列出了所有可用的串口和网络端口。
选择正确的端口,并设置好波特率等参数,点击“打开”按钮即可建立与设备的连接。
一旦成功连接到设备,u-center将显示设备的基本信息,如设备型号、固件版本等。
此时,我们可以通过主界面上的各种选项卡来进行各种操作。
在“配置”选项卡中,我们可以对设备进行各种配置。
例如,我们可以设置设备的工作模式(如只接收GPS信号或同时接收GPS和GLONASS信号)、更新速率等。
通过这些配置,我们可以根据具体需求来优化设备的性能和功耗。
在“监测”选项卡中,我们可以实时监测设备接收到的卫星信号。
u-center会显示每颗卫星的信号质量、信噪比等信息,并以图形方式展示。
通过观察这些信息,我们可以判断设备的接收情况,优化设备的放置位置和姿态,以获得更好的信号质量。
在“日志记录”选项卡中,我们可以将设备接收到的数据记录下来,以便后续分析和处理。
u-center支持多种数据格式,包括文本文件、KML文件和RINEX文件等。
通过记录数据,我们可以进行离线分析,或与其他软件进行数据交换。
在“卫星地图”选项卡中,我们可以查看卫星的分布情况。
u-center会显示卫星的轨道和位置,以及其它相关信息。
通过观察卫星分布情况,我们可以判断设备所处的位置和环境,进一步优化设备的使用效果。
u-center还提供了一些高级功能,如差分定位、RTK(实时运动定位)等。
用友U操作手册

数据加密与安全存储
数据加密:用友U采 用先进的加密技术, 确保数据传输和存 储的安全性。
安全存储:用友U采 用多级安全存储机 制,确保数据不被 非法访问和篡改。
身份认证:用友U支 持多种身份认证方式 ,确保只有经过授权 的用户才能访问系统 。
访问控制:用友U采用 灵活的访问控制机制, 对不同用户设定不同的 权限等级,防止数据被 非法获取或滥用。
录入基础档案
打开用友U软件, 进入主界面
在主界面中选择 “基础档案”选项
按照需求录入相关 的基础档案信息, 如企业名称、组织 结构等
确认录入无误后, 点击保存按钮
初始化设置
输入用户名和密码,登录系 统
配置系统参数,包括账套设 置、用户权限等
打开用友U软件,进入系统 管理界面
初始化数据录入,包括科目 设置、凭证录入等
日常业务处理
录入凭证:根据实际业务情况, 准确录入各类凭证
审核凭证:对录入凭证进行审 核,确保凭证正确无误
记账:根据凭证信息,完成记 账工作
结账:在规定时间内完成结账 工作,确保账务数据准确无误
结账:核对本期所有经济业务,确 保账目准确无误
期末处理
数据备份:对本期账目数据进行备 份,以防数据丢失
率分析等
报表输出:支 持多种输出方 式,如打印、 导出为Excel等
文件格式
自动识别:快速准确地识别各类凭 证
智能凭证处理
自动编号:自动为凭证生成唯一的 编号
添加标题
添加标题
添加标题
添加标题
智能分类:按照凭,方 便用户快速录入
自动化报表生成
简介:用友U的 特色功能之一, 能够自动化生成 各类财务报表, 提高工作效率。
- 1、下载文档前请自行甄别文档内容的完整性,平台不提供额外的编辑、内容补充、找答案等附加服务。
- 2、"仅部分预览"的文档,不可在线预览部分如存在完整性等问题,可反馈申请退款(可完整预览的文档不适用该条件!)。
- 3、如文档侵犯您的权益,请联系客服反馈,我们会尽快为您处理(人工客服工作时间:9:00-18:30)。
u-center使用手册
1、u-center每次打开都比较慢,要有点耐心
2、打开后,可以看到如图1的界面
图1
3、左边有如图2的图标
图2
第一个图标是选择串口,第二个是选择波特率,第三个是自动传输按钮
先选择串口(图标变绿,表示串口了解成功),然后选择波特率,最后点自动传输,如果GPS 有数据传输进来,界面就有变化了(如图3)。
这些功能也可以在菜单栏“receiver”中找到。
图3
4、收星情况说明如表1
表1
绿色是卫星可用于导航,
青色是卫星信号有效,可用于导航,
蓝色是信号有效,不可用于导航
红色是卫星信号无效
5、菜单栏中“view” “test console”,用于显示GPS收到的详细信息,如图4
图4
Test console界面按钮功能,如表2
表2
锁:用于锁定界面
叉叉:清除界面
过滤开关:可输入“RMC”,只显示GPRMC信息,如图5
图5
6、菜单栏中“view”→“table view”,用于显示GPS收到的各个单独信息,如图6所示
图6
通过窗口下面的选项,再点击“+”就可以单独显示编号、时间、经纬度等等
7、菜单栏中“view”→“chart view”,用于显示GPS收到信息的图表形式,如图7所示
图7
点击上面那个图标,下面的图标就会变成可选的,然后自己选择需要的坐标参数
8、菜单栏中“view”→“historgram view”,用于显示GPS收到信息的直方图形式,如图8所示
图8
概率直方图。
