个人云再升级 WDMyCloudMirrorGen2
海康威视简易说明书

海康威视简易说明书海康威视iVMS-4200操作说明书前言非常感谢您购买我公司的产品,如果您有什么疑问或需要请随时联系我们。
适用型号本手册适用于网络视频监控软件iVMS-4200。
声明本手册可能包含技术上不准确的地方,或与产品功能及操作不相符的地方,或印刷错误。
我司将根据产品功能的增强或变化而更新本手册的内容,并将定期改进及更新本手册中描述的软硬件产品。
更新的内容将会在本手册的新版本中加入,恕不另行通知。
本手册中内容仅为用户提供参考指导作用,不保证与实物完全一致,请以实物为准。
约定在本手册中为了简化描述,做以下约定:网络视频监控软件iVMS-4200简称为软件。
网络硬盘录像机、、视频服务器、NVR、IP Camera和IP Dome等统一称为设备。
. iVMS-4200 简介. 功能概述软件iVMS-4200是为嵌入式网络监控设备开发的软件应用程序,适用于嵌入式网络硬盘录像机、混合型网络硬盘录像机、网络视频服务器、NVR、IP Camera、IP Dome、PCNVR和解码设备以及视音频编解码卡,支持实时预览、远程配置设备参数、录像存储、远程回放和下载等多种功能。
iVMS-4200具有以下特点:界面容器化处理模式:在客户端组件的界面设计上,精心采用容器化处理,简化了多屏和单屏切换的处理方式,大幅改善多屏操作感受,适应了一机多屏的PC发展趋势。
通道化管理模式:在客户端组件设计中,加入了通道化管理模式,抛开了以设备为核心主体的传统设计方式,更加适应于IP监控的发展方向。
用户体验为重心的界面设计:提供图片式可视化控制面板,以用户体验为重心,颠覆式的采用所需即可用的模式,提供一个功能的多个入口,以期达到最大限度减少用户操作步骤的目标。
需要才可见的显示方式:在客户端组件的界面元素上,加入了需要才可见的显示方式,在日历,时间条,工具栏,系统信息栏等多处,加入该设计模式,最大限度的节省有限的屏幕显示空间。
. 运行环境操作系统:Microsoft Windows 7/Windows 2008(支持32/64位系统)Windows 2003/Windows XP(均只支持32位系统)CPU:Intel Pentium IV GHz或以上目录前言 ............................................................................................ .. (1)iVMS-4200 简介 ............................................................................................ .. (1)功能概述 ............................................................................................ (1)运行环境 ............................................................................................ ............................................................... . (1)目录 ............................................................................................ .. (2)用户登录 ............................................................................................ (3)设备管理 ............................................................................................ (3)编码设备添加 ............................................................................................ . (3)分组 ............................................................................................ .. (5)分组添加 ............................................................................................ (6)预览 ............................................................................................ .. (7)录像配置及回放 ............................................................................................ (7)录像回放 ............................................................................................ (7)存储服务器 ............................................................................................ .. (9)存储服务器添加 ............................................................................................ (9)存储服务器配置 ............................................................................................ .. (10). 用户登录首次运行软件需要创建一个超级用户。
戴尔OpenManage服务器更新实用程序2.0.0自述文件说明书

######################################################################DELL(TM) OPENMANAGE(TM) SERVER UPDATE UTILITY 2.0.0 README######################################################################This readme provides information for Dell OpenManage ServerUpdate Utility version 2.0.0.Release Date: December 2009This file also contains updated information for your "Dell OpenManageServer Update Utility User's Guide" and any other technicaldocumentation that is included with Server Update Utility (SUU).See the Dell Support website located at "" for moreinformation and to download the latest version of SUU.Note: For information on Dell Update Packages (DUP), see the DUPReadme files present on the SUU DVD.This file contains the following sections:* Criticality* Compatibility/Minimum Requirements* Release Highlights* Installation* User Notes* Known Issues###################################################################### CRITICALITY######################################################################3 - OptionalIt is recommended that you review the update procedure to determine ifit applies to your system. The update contains changes that may impactonly certain configurations, or provides new features that may/may notapply to your environment.###################################################################### COMPATIBILITY/MINIMUM REQUIREMENTS######################################################################This section provides information about the minimum requirements forSUU 2.0.0.====================================================================== SUPPORTED OPERATING SYSTEMS====================================================================== The following operating systems are supported by SUU 2.0.0:Microsoft Windows Operating Systems* Microsoft Windows Server(TM) 2003 R2 Web, Standard and EnterpriseEditions with SP2 (32-bit x86)* Microsoft(R) Windows(R) Server 2003 R2 Standard, Enterprise, and Datacenterx64 Editions with SP2* Microsoft Windows Small Business Server 2003 Standard and PremiumEditions with SP2* Microsoft Windows Server 2008 Core Web, Standard, and EnterpriseEditions (32-bit x86) with SP2* Microsoft Windows Server 2008 Core Standard, Enterprise, and DatacenterEditions (x64) with SP2* Microsoft Windows Essential Business Server 2008 Standard and PremiumEditions* Microsoft Windows Small Business Server 2008 Standard and PremiumEditions* Microsoft Windows Storage Server 2008 R2 Express, Workgroup, Standard,and Enterprise Editions* Microsoft Windows Unified Data Storage Server 2008 Workgroup, Standard,and Enterprise Editions* Microsoft Windows Server 2003 Compute Cluster Edition and MicrosoftWindows Server 2008 HPC Edition* Microsoft Windows Server™ 2008 R2 Standard, Enterprise, and Datacenter EditionsLinux Operating Systems* SUSE(R) Linux Enterprise Server 11* SUSE Linux Enterprise Server 10 SP3* Red Hat(R) Enterprise Linux(R) 5 server (Update 3) (x86_32)* Red Hat Enterprise Linux 5 server (Update 3) (x86_64)* Red Hat Enterprise Linux 4.8 server (x86_32)* Red Hat Enterprise Linux 4.8 server (x86_64)Virtualization Operating Systems* VMware(R) ESX Version 4.0 U1* VMware ESX Version 3.5 Update 5* Microsoft Hyper-V Server 2008 R2See the 'Dell Systems Software Support Matrix' for the latest list ofsupported Dell PowerEdge(TM) systems and operating systems. The 'Dell SystemsSoftware Support Matrix' is available on the Dell Support website at"/manuals."====================================================================== SUPPORTED WEB BROWSERS====================================================================== SUU 2.0.0 supports the following Web browsers:* Internet Explorer 8.0, Internet Explorer 7.0,Internet Explorer 6.0 with SP2, and Mozilla(R)Firefox(R) 3.0 for Windows 2003 Professional* Internet Explorer 8.0, Internet Explorer 7.0,Mozilla Firefox 3.0 for Windows® 7 Professional Edition* Internet Explorer 6.0 with SP2* Internet Explorer 7.0* Internet Explorer 8.0* Mozilla Firefox 3.0 and Mozilla Firefox 2.0 for :- SUSE Linux Enterprise Server 10 SP3- SUSE Linux Enterprise Server 11* Mozilla Firefox 3.0- Red Hat Enterprise Linux Version 4.8- Red Hat Enterprise Linux Version 5.3====================================================================== SUPPORTED SYSTEMS====================================================================== SUU 2.0.0 supports the following PowerEdge systems runningthe Windows operating systems listed in the "Supported OperatingSystems" section:PE T410, PE R410, PE T710, PE T310, PE R610, PE R710, PE T610, PE M610,PE M710,PE T110, PE R210, PE R510PE T100, PE 105, PE M600, PE R805, PE R900, PE T605, PE M605, PE R905v,PE T300, PE R300, PE R200,PE M805, PE 905,NX 1950, NX 3000,PE 1950, PE 2900, PE 2950, PE 1955, PE 1900, PE 840, PE 860, PE 6950,PE 2970,PE 1800, PE 1850, PE 2800, PE 2850, PE 1855, PE 800, PE 6800, PE 6850,PE 830, PE 850PE SC1425, PE SC1435SUU 2.0.0 supports the following PowerEdge systems running the supportedRed Hat Enterprise Linux and SUSE Linux operating systems:PE T410, PE R410, PE T710, PE T310, PE R610, PE R710, PE T610, PE M610,PE M710,PE T110, PE R210, PE R510PE M710,PE T110, PE R210, PE R510PE T100, PE 105, PE M600, PE R805, PE R900, PE T605, PE M605, PE R905v,PE T300, PE R300, PE R200,PE M805, PE 905,PE1950, PE2900, PE2950, PE1955, PE1900, PE840, PE860, PE6950, PE2970,PE 1800, PE 1850, PE 2800, PE 2850, PE 1855, PE 800, PE 6800, PE 6850,PE 830, PE 850PE SC1425, PE SC1435SUU 2.0.0 supports the following Dell PowerVault(TM) systems runningon the Windows operating system:PV500, PV 600, PV/NF/DP 100, DL2000SUU 2.0.0 supports the following Dell PowerVault systems runningon the Linux operating system:PV500, PV600, PV/NF/DP 100, DL2000Note: Other systems and operating systems may be supported in thisrelease. See the 'Dell Systems Software Support Matrix' for thelatest list of supported PowerEdge systems and operatingsystems. The 'Dell Systems Software Support Matrix' is availableon the Dell Support website at "/manuals."Note: Running SUU 2.0.0 on an unsupported system may produce unexpectedresults.###################################################################### RELEASE HIGHLIGHTS######################################################################Added support to the following systems:PE T110, PE R210, PE R510, PE T310Note: For a detailed table of supported Dell systems and operatingsystems, see the 'Dell Systems Software Support Matrix' availableon the Dell Support website at "/manuals."###################################################################### INSTALLATION###################################################################### SUU is a stand-alone application that runs directly from a DVD. Formore information on installing SUU, see the "Dell OpenManageServer Update Utility User's Guide."Note: Only users with administrator (Microsoft Windows) or root (Linux) privileges can perform updates with SUU.###################################################################### USER NOTES###################################################################### This section provides information to help enhance your experience withSUU in specific implementations and environments.* If you launch SUU from a command shell and then press <Ctrl><c>, theSUU procedure, as well as any running updates, will terminate.(137862)* When you launch SUU, the utility inventories the targeted system.Depending on the system configuration, this process may take severalminutes to complete. (138439)* The figures and examples in the "Dell OpenManage Server UpdateUtility User's Guide" are used as examples only and may not beidentical to the SUU GUI. (137294, 136624)* When you verify the SUU return codes, use the operating system-specific commands to view the exit codes. (137296)For example:Microsoft Windows: echo %ERRORLEVEL%Red Hat Enterprise Linux: echo $?###################################################################### KNOWN ISSUES###################################################################### This section provides information about known issues with this releaseof SUU.* If you have multiple PowerEdge Expandable RAID Controller (PERC)cards installed on a system, you may be required to run the SUUupdate procedure several times to update the firmware on all theinstalled cards.* If your CERC ATA RAID controllers are configured with the H661firmware, SUU cannot update the firmware to the latest version.To update the firmware, use the "-force" option to manually applythe DUP with the latest firmware version. (134775)* When updating multiple, identical devices on the same system, SUUapplies the latest update to all instances of all devices. Forexample, if your system is configured with three controllersconfigured with firmware/driver versions 1.2, 1.3, and 1.4,and the repository version is 1.4, SUU applies version 1.4 to allinstances of all devices. (136620)* When you run SUU using the "-p" option, SUU reports the currentinstance log location ("suu -p") instead of the SUU instance loglocation ("suu -u") that is performing the update. (135925)* SUU uses DUPs to update various system components. During a Red Hat Enterprise Linux update, the DUPs create a "/var/lock/.spsetup"file using the Linux lockfile utility during the initial executionprocedure. Kernel panics or sudden reboots during DUP execution(reboots where TERM signals are not sent to running processes orwhere running processes do not have time to catch these signals)can generate a "/var/lock/.spsetup" lock file that cannot bedeleted. SUU reports the update as successful and prompts youto reboot the system. When you run SUU again on the same system,the comparison reports no change in device status. If thissituation occurs and no update is in progress, remove"/var/lock/.spsetup" before running another update on the system.(137287)* If a NIC teaming application is installed on the system, SUU updatesthe NIC base driver only if the driver is compatible with theteaming application. To verify driver compatibility, run DUP on thesystem to update the driver and read the generated messages.(138648)* Devices that are disabled in the operating system are notinventoried or updated by SUU. To update or inventory these devices,enable the devices in the operating system and then relaunch SUU.(142111)* Do not use the RAC virtual media to run SUU remotely on a system.This procedure breaks the virtual media connection, causing the SUUupdate procedure to fail. (144487)* SUU fails if it is run from a pathname that contains specialcharacters. For example, ",:,/,\,$, etc. It is recommended to usea directory name without any special characters for runningSUU. As an example, a case where you can get directory namewith special characters is:In the SUSE Linux Enterprise Server operating system, when aUSB DVD-ROM or USB disk is attached, it may by default, mountto a directory name that contains special characters. Forexample, /media/USB:1:2/ (42279)* If a RAC DUP package (RAC 4/P or RAC 4/i) is running and SUU isstarted, the RAC package may fail. To resolve this issue, run SUUonly after the RAC package has completed execution. (23184)* In Linux, if there is not enough space in the var partition or tmpfolder, SUU displays the following error message:"Not enough space available in the /var or /tmp folder. Please makesure you have at least x MB." The value ‘x’ is the minimum amountof space required to apply the selected updates.This value varies according to the selected updates. Ensure thatyou have sufficient space in the var partition or tmp folder andrestart SUU to start the system inventory. (66118).* In some cases where the latest Intel NIC driver (Intel(R) PROPCIE Gigabit Family of Adapters 9.5, base driver version 9.6.31.0)is installed as part of Dell Systems Build and Update Utility(SBUU) install, SUU may not be able to inventory the respectiveNIC. This may happen because SBUU would not have installed theumbrella software. In these cases, install the umbrella with theumbrella installer (available at or in the SERVICEdirectory on the Dell Systems Management Tools and DocumentationDVD) to get the Intel NIC inventoried by SUU (DF130363).##################################################################### THIRD PARTY DISCLAIMER#####################################################################The following disclaimer applies to the "TreeTable" control code inIT Assistant:Copyright 1997, 1998 Sun Microsystems, Inc. All Rights Reserved.Redistribution and use in source and binary forms, with orwithout modification, are permitted provided that the followingconditions are met:- Redistributions of source code must retain the above copyrightnotice, this list of conditions and the following disclaimer.- Redistribution in binary form must reproduce the abovecopyright notice, this list of conditions, and the followingdisclaimer in the documentation and/or other materialsprovided with the distribution.Neither the name of Sun Microsystems, Inc. or the names ofcontributors may be used to endorse or promote products derivedfrom this software without specific prior written permission.This software is provided "AS IS," without a warranty of anykind. ALL EXPRESS OR IMPLIED CONDITIONS, REPRESENTATIONS ANDWARRANTIES, INCLUDING ANY IMPLIED WARRANTY OF MERCHANTABILITY, FITNESS FOR A PARTICULAR PURPOSE OR NON-INFRINGEMENT, ARE HEREBY EXCLUDED. SUN AND ITS LICENSORS SHALL NOT BE LIABLE FOR ANYDAMAGES OR LIABILITIES SUFFERED BY LICENSEE AS A RESULT OF ORRELATING TO USE, MODIFICATION OR DISTRIBUTION OF THIS SOFTWARE ORITS DERIVATIVES. IN NO EVENT WILL SUN OR ITS LICENSORS BE LIABLEFOR ANY LOST REVENUE, PROFIT OR DATA, OR FOR DIRECT, INDIRECT,SPECIAL, CONSEQUENTIAL, INCIDENTAL OR PUNITIVE DAMAGES, HOWEVER CAUSED AND REGARDLESS OF THE THEORY OF LIABILITY, ARISING OUT OF THE USE OF OR INABILITY TO USE THIS SOFTWARE, EVEN IF SUN HASBEEN ADVISED OF THE POSSIBILITY OF SUCH DAMAGES.You acknowledge that this software is not designed, licensed orintended for use in the design, construction, operation ormaintenance of any nuclear facility.###################################################################### Information in this document is subject to change without notice.(C) 2004-2009 Dell Inc. All rights reserved.Reproduction in any manner whatsoever without the written permissionof Dell is strictly forbidden.Trademarks used in this text: "Dell", "PowerEdge", "PowerVault", and"Dell OpenManage" are trademarks of Dell Inc.; "Microsoft","Windows", "Windows Server", and "Internet Explorer" are eithertrademarks or registered trademarks of Microsoft Corporation in theUnited States and/or other countries; "Red Hat" and "Red Hat EnterpriseLinux" are registered trademark of Red Hat Linux, Inc.; "SUSE" is aregistered trademark of Novell, Inc. in the United States and othercountries; "Intel" is a registered trademark of Intel Corporation.;"Mozilla" and "Firefox" are registered trademarks of Mozilla.Other trademarks and trade names may be used in this document to referto either the entities claiming the marks and names or their products.Dell Inc. disclaims any proprietary interest in trademarks and tradenames other than its own.The utilities provided with the Dell OpenManage Server Update Utilityare provided "as is". Dell disclaims any and all warranties, express,implied or statutory, with respect to the utilities, including, butnot limited to, the implied warranties of merchantability, fitness fora particular purpose, title and any warranty of non-infringement. Usethe Server Update Utility at your own risk. Dell shall not be liablefor any direct or indirect damages incurred in using the Server UpdateUtility. In no event shall Dell or its suppliers be responsible forany direct or indirect damages whatsoever (including, withoutlimitation, damages for loss of profits, loss of use, loss of data,business interruption, or other pecuniary loss, nor for punitive,incidental, consequential, or special damages of any kind, under anypart of this agreement, even if advised or aware of the possibility ofsuch damage).October 2009。
天玥网络安全审计系统V6.0-运维安全管控系统-管理员使用手册-357系列-v1.0-20150512更新
本文档于2014年7月由北京启明星辰信息安全技术有限公司编写。
客户服务与技术支持
如果您在使用产品时遇到了问题,可以通过以下方式反馈给我司的客户服务部,我们将竭诚为您提供技术支持。
启明星辰公司客户服务部的联系方式如下:
地址:北京市海淀区东北旺西路8号中关村软件园21号楼启明星辰大厦
电话:
传真:
2.1
首次登录后,系统自动进入初始化的配置向导界面。当天玥OSM版本为V6.0.2.xxxx时,无初始化过程,默认超级管理员账号/密码admin/password$123,默认试用授权可管理资源数3台,授权截止时间2019年12月31日。
全过程操作说明:
1、密码策略的配置;
2、超级管理员账号及密码的配置;
3、启用有效期:修改账号有效期,不启用则为永久账号;
4、在强认证中,配置USB令牌认证的相关信息;
5、在应用工具限制中,对运维用户可使用的运维工具进行限制。
3.3
选择导航条上【用户管理】,查看当前用户列表;如图3.6所示:
图3.6用户列表
删除:从用户列表中勾选需要删除的用户,点击【删除】可从系统中删除该运维用户
高级属性:可勾选不能修改密码、密码永不过期、密码已过期
备注:可在此对该用户进行描述;此项为可选择输入项
3、强认证
USB令牌认证:根据需要选择运维用户登录时是否使用USB令牌认证(需要插上已通过令牌重置工具初始化的USB令牌),如图3.2所示
令牌状态:显示令牌状态
令牌密码:用于此运维用户登录进行令牌认证时
2、点击【添加】进入用户属性编辑界面,输入用户基础信息
名称;用户名支持英文字母、数字、下划线、小数点输入;此项为必填项
启用/禁用:更改用户账号的启停状态;新账号默认状态为启用
阳光电源 Insight 监控系统用户手册说明书

注意 为了不断提高客户满意度,本产品及产品手册均处于持续改进与升级中。如果已收到的手册 与产品存在差异,有可能是产品版本升级所致,请以实物为准。 本手册中所述图片仅供参考,以实物为准。
III
目录
版权所有 .....................................................................................................................I 关于本手册 ................................................................................................................. II
用户手册
监控系统
Insight
Insight监控系统 用户手册Insight-V511–UCN-
Ver23-202306
Insight-V511–UCN-Ver23-202306
பைடு நூலகம்
版权所有
版权所有©阳光电源股份有限公司 2023。保留所有权利。 本手册相关内容未经阳光电源股份有限公司(简称“阳光电源”)授权,不得私自扩散、复 制或转发给第三方,不得上传至公共网络等第三方平台。 商标
4.3.1 电站概览 ............................................................................................. 8 4.3.2 光伏方阵视图....................................................................................... 9 4.3.3 储能单元视图..................................................................................... 10 4.3.4 设备监控 ........................................................................................... 10 4.4 事件管理..................................................................................................... 11 4.5 远程控制..................................................................................................... 12
北信源内网安全管理系统用户使用手册

北信源内网安全管理系统用户使用手册北京北信源软件股份有限公司二〇一一年支持信息在北信源内网安全管理系统使用过程中,如您有任何疑问都可以通过访问我公司网站http://www.vrv。
com。
cn或者致电我司客服中心获得帮助和支持!热线支持:400—8188—110客户服务电话:010—62140485/86/87在您使用该产品过程中,如果有好的意见或建议的话也请联系我们的客服中心,感谢您对我公司产品的信任和支持!正文目录第一章概述 (1)特别说明 (1)产品构架 (1)应用构架 (3)第二章北信源内网安全管理系统 (5)策略中心 (5)策略管理中心 (5)网关接入认证配置 (26)阻断违规接入管理 (26)补丁分发 (26)数据查询 (26)本地注册情况统计 (27)本地设备资源统计 (27)本地设备类型统计 (27)USB标签信息查询 (27)设备信息查询 (28)审计数据查询 (29)分发数据查询 (29)非Windows操作系统设备 (30)终端管理 (30)终端管理 (30)行为控制 (30)远程协助 (31)运维监控 (31)报表管理 (32)报警管理 (32)报警数据查询 (33)本地区域报警数据统计 (33)本地报警数据汇总 (33)级联总控 (33)级联注册情况统计 (33)级联设备资源统计 (33)级联设备类型统计 (34)级联管理控制 (34)区域管理器状态查询 (35)区域扫描器状态查询 (35)级联上报数据 (36)级联报警数据 (36)系统维护 (36)系统用户分配与管理 (36)用户设置 (39)数据重整 (39)审计用户 (40)第三章北信源补丁及文件分发管理系统 (42)区域管理器补丁管理设置 (42)补丁下载配置 (42)文件分发策略配置 (43)策略中心 (43)软件分发策略 (46)其他策略 (47)补丁分发 (47)补丁自动下载分发 (48)补丁下载服务器 (48)补丁库分类 (49)补丁下载转发代理 (49)客户端补丁检测(一) (50)客户端补丁检测(二) (52)第四章北信源主机监控审计系统 (53)策略中心 (53)行为管理及审计 (53)涉密检查策略 (55)其他策略 (55)数据查询 (55)第五章北信源移动存储介质使用管理系统 (57)策略中心 (57)可移动存储管理 (57)其他策略 (57)数据查询 (57)第六章北信源网络接入控制管理系统 (59)网关接入配置认证 (59)策略中心 (60)接入认证策略 (60)其他策略 (64)环境准备方法 (64)安装RADIUS (windows IAS) (64)各厂商交换机配置 (83)Cisco2950配置方法 (83)华为3COM 3628配置 (84)锐捷RGS21配置 (87)第七章北信源接入认证网关 (89)网关接入配置认证 (89)策略中心 (90)第八章系统备份及系统升级 (92)系统数据库数据备份及还原 (92)系统组件升级 (92)区域管理器、扫描器模块升级 (92)升级网页管理平台 (93)客户端注册程序升级 (93)检查系统是否升级成功 (93)级联管理模式升级及配置 (93)附录 (95)附录(一)北信源内网安全管理系统名词注释 (95)附录(二)移动存储设备认证工具操作说明 (95)USB标签制作 (95)USB标签制作工具 (97)移动存储审计策略 (109)移动存储审计数据 (110)附录(三)主机保护工具操作说明 (110)附录(四)组态报表管理系统操作说明 (111)模版制定 (111)报表输出 (117)附录(五)报警平台操作说明 (120)设置 (120)日志查询 (123)窗口 (123)更换界面 (124)帮助 (124)附录(六)漫游功能说明 (124)漫游功能介绍 (124)漫游功能配置 (126)附录(七)IIS服务器配置说明 (130)WIN2003—32位IIS配置说明 (130)WIN2003—64位IIS配置说明 (132)WIN2008-64位IIS配置说明 (134)图目录图1—1北信源终端安全管理应用拓扑 (4)图2—1创建新策略 (5)图2—2下发策略 (6)图2—3策略控制 (6)图2-4硬件设备控制 (8)图2-5软件安装监控策略 (10)图2—6进程执行监控策略 (11)图2-7进程保护策略 (12)图2-8协议防火墙策略 (15)图2—9注册表 (16)图2-10IP与MAC绑定策略 (17)图2—11防违规外联策略 (19)图2—12违规提示 (19)图2-13文件备份路径设置 (23)图2—14注册码配置 (25)图2-15阻断违规接入控制设置 (26)图2-16本地注册情况信息 (27)图2—17本地设备资源信息 (27)图2-18本地设备类型统计 (27)图2—19软件变化信息 (29)图2—20注册日志信息 (29)图2-21交换机扫描管理配置 (32)图2—22设备信息统计图表 (33)图2—23级联设备信息 (34)图2—24级联设备系统类型统计 (34)图2-25级联管理控制 (35)图2—26下级级联区域管理器信息 (35)图2-27区域管理器状态信息 (35)图2—28区域扫描器状态信息 (35)图2—29级联上报数据 (36)图2—30系统用户列表 (36)图2-31添加系统用户界面 (37)图2—32用户管理列表 (37)图2-33终端控制权限 (38)图2-34屏幕监控权限 (38)图2—35密码初始化提示框 (39)图2—36密码初始化完成提示框 (39)图2-37修改ADMIN用户密码 (39)图2—38数据重整信息表 (40)图2-39审计用户登录 (40)图3-1区域管理器补丁管理设置 (42)图3—2分发参数设置 (43)图3-3补丁自动分发 (45)图3-4补丁下载服务器界面 (48)图3-5补丁下载服务器设置 (49)图3-6补丁代理传发支持 (50)图3-7补丁下载设置 (50)图3—8登录页面 (51)图3—9工具下载页面 (51)图3-10补丁检测中心 (52)图3—11客户端补丁漏打检测 (52)图6—2重定向配置 (60)图6—3用户添加 (60)图6—4补丁与杀毒软件认证策略 (61)图6—5接入认证策略 (62)图6—6802.1X认证界面 (63)图6-7802.1X认证界面 (63)图6-8安全检查没有通过,802。
综合视频管理系统客户端操作手册

搜索服务器 IP 地址 ........................................................................................................ 7 修改服务器 IP 地址 ........................................................................................................ 8 远程重启/关闭服务器.................................................................................................... 8 远程升级服务器 ............................................................................................................. 8 备份/恢复数据库 ........................................................................................................... 9 服务器激活 ................................................................................................................... 10 更改电视墙背景图片 ................................................................................................... 10 获取服务器系统信息 ................................................................................................... 11 同步服务器系统时间 ................................................................................................... 11 一键还原服务器设置 ................................................................................................... 12 设置服务器定时重启时间 ........................................................................................... 12 初始化存储 ................................................................................................................... 12 登录/退出 Manager...................................................................................................... 13 Manager 设置录像 ........................................................................................................... 13 Manager 设置电子地图 ................................................................................................... 14
Sirv CDN 与图像优化器 Magento 2 说明书

Sirv CDN, Image Optimizer &Product GalleryMagento 2Including Community, Enterprise and Cloud editionsWhat is Sirv?1How Sirv CDN works1 Technical explanation1How Sirv Media Viewer works2 Benefits2 Features2 Configuration2 Requirements3 Screenshots3 Installation5 Synchronization6 Flush image cache7Serve JS/CSS from Sirv CDN7 Magento 27 Magento 19Command line installation10 Magento 210Upgrade to latest version11 Pricing11 Support11What is Sirv?Sirv is the new dynamic CDN for hosting and serving images faster than ever. Sirv automatically synchronizes your original Magento images and serves them instantly at any size, in the most optimal format, typically50% smaller and 70% faster.It accelerates your website, reduces your server load, saves development time and ensures your images are always the most optimal possible.It also provides an outstanding media viewer, to increase conversion on your product pages, with image zoom, product videos and 360-degree spins.How Sirv CDN worksSirv generates optimized and resized images on-the-fly within 150 milliseconds, at any size, format or resolution. This incredible speed means you never again need to manually export multiple versions of the same image.Every image delivered is optimized for the users screen and browser. It takes care of all the important image requirements:●Optimal format- delivered in the most optimal format the browser supports(often WebP)●Responsive- always sized to the perfect dimensions●Retina- served in hi-res to retina screens●Stripped- unnessaccary meta bloat removed.By delivering images from Sirv’s global CDN with HTTP/2 multiplexing and TLS1.3, Sirv delivers the fastest possible images, using today’s most secure technology.Technical explanationThe Sirv extension overrides Magento's image class, using the same image from your Sirv account. If the image has been synced previously, it is served from Sirv. If it hasn't been synced, it is copied to Sirv, then served. If copying takes more than a few seconds, Sirv serves the image from your Magento server, so the user doesn't wait. Once copied, the Sirv extension updates its database and serves optimized images in future.Product Gallery - Sirv Media ViewerSirv can also replace your PDP (product detail page) image viewer with Sirv’s advanced media viewer. It supports all types of asset:●Images - choice of 8 zoom effects●360 spin●VideosYour product pages will feel fast and natural on mobiles and desktops, ensuring an organized and effortless experience for your customers.BenefitsDelivering the most optimal enterprise imaging service, you get valuable gains:●Faster page loading●Higher conversions●Lower bounce rates●Richer user experience●Dramatically fewer requests on your web server so it can react fasterFeaturesSirv is the complete solution for managing your images and serving them as fast as possible to your customers;●Image hosting●Image resizing●Image optimization●Image processing (crop, watermark, colour etc)●Optimal format, automatically reducing size by ~50% (WebP, JPEG, PNG, GIF)●Retina images automatically served to hi-res screens●Full control over image quality and format●Fast, image CDN●Easy, fast setupConfigurationSirv will automatically work on your Magento store, without any effort from you. The Sirv addon will copy your original Magento product images to your Sirv account and optionally delete the images on Magento, saving space on your server.All image processing is done on the powerful Sirv network, then rapidly delivered from the Sirv CDN. Your images will load faster for users all over the world.Always up-to-date, Sirv fetches all new images that you upload to Magento.RequirementsTo use the Sirv image CDN Magento extension, you must create a free login for Sirv via the Sirv website. Sign up:https:///#/signupScreenshotsMagento 2 Sirv extension settings:InstallationFollow the easy installation of the Sirv image CDN extension for Magento:1.Install the Sirv extension for Magento 2 from the official Magento Marketplace:https:///sirv-magento2.html2.Go to System > Web Setup Wizard in your Magento admin and click theComponent Manager link.3.Find the Sirv component in the list and click “Enable”.4.Go to the Configuration page of the Sirv extension and either create an accountor login:SynchronizationSirv will automatically copy images from your server to Sirv, the first time they’re requested. This takes a few seconds, depending on the number of images, their file size and the speed/responsiveness of your server.To avoid any delay, you can trigger a one-time sync by clicking the button “Sync Media Gallery”:The sync progress will show:Flush image cacheIf images on your Magento site ever become out of sync, you can click the "Flush Synchronized Images" button. Images will synchronise again on demand (or if you click the “Sync Media Gallery” button).Serve JS/CSS from Sirv CDNYou can also serve your theme files, including CSS, JavaScript and static theme images from Sirv CDN.Set the following option on the CDN settings tab:We also recommend enabling the 3 settings below, to reduce the total size of your JavaScript and the number of separate requests (which can be excessive on Magento sites). These are located on the Stores > Configuration > Developer page:●Merge JavaScript Files●Enable JavaScript Bundling●Minify JavaScript FilesCommand line installationIf you would prefer to install the extension from the command line, follow these steps:1.Download the extension:https:///download/magento/sirv-magento-2.zip2.Unzip the file to your computer and upload the 'app' folder by FTP to yourMagento directory on your server, keeping the file and folder structure intact.3.Activate the module from the command line:php -f bin/magento module:statusphp -f bin/magento module:enable MagicToolbox_Sirv--clear-static-contentphp -f bin/magento setup:upgraderm -rf var/generationphp -f bin/magento setup:di:compilephp -f bin/magento setup:static-content:deployUpgrade to latest versionAll updates are reported in the changelog. See what’s new and download the latest extension version here:https:///help/resources/magento-cdn-sirv-extension/1.Download the latest version of the extension.2.Unzip the extension and upload the files by FTP to your server (overwriting the oldextension files).3.Check that your images are working as normal.PricingA 30-day free trial gives you access to all features. Choose to upgrade to a free plan to suit your usage. Light users can stay on a free plan.Plan Storage Data transfer (month)Price (month) Enterprise Custom Custom From $999 Business 350350 GB1,400 GB$599 Business 200200 GB800 GB$359 Business 100100 GB400 GB$199 Business 6060 GB240 GB$119 Business 4040 GB160 GB$89 Business 2020 GB80 GB$59 Business 1212 GB48 GB$39 Business 5 5 GB20 GB$19 Free0.5 GB 2 GB$0FAQCan the Sirv extension work on localhost?Yes, the extension can be used on localhost, with some limitations. Images will be synced to Sirv using our S3 API (not our REST API) and the option to servemedia files (JS/CSS/etc.) won't work.SupportGet fast support from the Sirv team - send a message from your Sirv account:https:///#/contactThanks for using Sirv!11。
镁光M500_MU03_SSD升级指南_WIN7系统

固态硬盘固件升级工具使用指南C rucial® M500 固态硬盘固件修订版本MU03 在Windows 7下的固件升级指南 (从修订版本MU02 升级到修订版本MU03)简介本文描述的是使用Windows升级工具升级Crucial M500固态硬盘固件的过程。
该工具是单独的可执行文件,包含该升级所需的所有必要代码。
没有必要创建单独的启动设备。
该程序用于将固件从修订版本MU02升级到修订版本MU03。
请注意:该固件升级不适用于任何单独购买或作为电脑系统初始配置的Micron固态硬盘。
如果需要升级这种硬盘,请联系电脑制造商或访问。
该固件升级不适用于任何其他Micron或Crucial固态硬盘。
警告:强烈推荐在升级各种固件以前备份或复制所有重要文件。
使用者自行承担该固件升级过程中的全部风险。
如果正确执行升级,那么存储在硬盘上的系统或用户数据不会丢失。
但是,如果由于任何原因中断该固件升级过程,那么可能导致使用者的固态硬盘不能正常工作。
如果是在笔记本电脑上执行该升级,强烈建议使用外接电源。
概述开始固件升级前请先完成以下步骤:1. 备份固态硬盘强烈建议执行该固件升级前完整备份系统。
如果升级过程被中断(因断电或某种硬件故障),那么固态硬盘有可能无法正常工作。
2. 使用交流电源确保升级过程中笔记本或台式电脑使用的是交流电源。
不推荐在升级过程中只使用电池供电。
固件升级过程中绝对不要断开电源,因为这会导致升级不完整并且使固态硬盘无法使用。
3. 禁用/取消硬盘密码密码保护,例如系统盘加密或BIOS级的密码会阻止固件升级。
可以在操作系统中或用加密时使用的软件禁用硬盘加密。
而禁用BIOS密码需要修改电脑的BIOS配置。
修改配置的详细方法请查阅电脑所附的用户手册。
进入BIOS (通常是在启动时按下“Delete”、“F2”或“F12”键)并取消曾经设置的任何固态硬盘密码。
下载固件升级1. 下载固件升级前关闭除浏览器(IE)之外的所有应用程序。
西数My-Cloud体验-针对入门用户操作简单

西数My Cloud体验针对入门用户操作简单分享[导读]功能以最基本的存储为主,大家不要奢望它能有其他太高深的功能。
腾讯数码讯(流星)目前市场中主要的家用NAS品牌主要包括群晖、威联通、西部数据、D-Link、巴法洛等。
作为存储行业的知名品牌之一,西部数据在近两年的家用级NAS市场中的表现也比较积极,针对家庭用户先后推出了My Book Live、My Book Live Duo等产品。
虽然因为定位的因素和群晖、威联通的产品相比在可玩性方面有所欠缺,不过实用性并不弱,而且不那么夸张的价格更是有效的降低了人们的使用门槛。
因此在市场里的占有率也是颇为可观。
去年年底,西部数据在北京召开了发布会,在发布会上不仅宣布将于国内云商百度云进行战略合作,而且还推出了旗下的最新个人云存储解决方案My Could系列产品及针对工作室的四盘位存储器My Could EX4。
My Cloud系列产品和之前的My Book Live定位近似,外观设计上也是小巧可人,其采用单盘设计,提供了2TB-4TB容量的选择,可通过背部的USB 3.0接口进行扩容,并且融入西部数据旗下的诸多技术,是一款较为灵活的个人云存储解决方案。
通过这款产品,用户们可以轻松的分享文件、流媒体,可以在任何时间、任何地点对数据进行远程访问,可以和朋友、亲人们分享照片、视频及办公文档等文件,更可以轻松的和DropBox、百度云等云平台进行数据交换,实用性非常不错。
好了,废话不多说,今天我们就一起来看看这款西部数据My Could产品的评测吧。
白色圆润的时尚造型西部数据旗下针对家庭用户的NAS产品一直坚持采用单盘位设计,因此虽然名字已经不带有Book,但西部数据My Could仍然在身材上设计上较为轻巧,体积同一本书没有太大差别,三围分别是139.3x170.6x49mm,重量则为0.96kg,比My Book Live系列产品更轻一些。
西部数据My Could的机身前端的银灰色方框中设置了电源指示灯,除此之外机身外壳部分再无任何点缀,看上去简约而舒适,而产品的接口通通被抛到了机身背面。
微云云桌面平台使用手册V3.19.2说明书
微云桌面云管理平台使用手册V3.19.2版本文档说明本文旨在介绍使用微云管理平台快速使用的详细步骤。
阅读者在参阅完本文之后将能依据文档中的提示步骤正确的使用微云系统,并能对微云系统进行统一的规划。
本文档不包含排错内容。
若使用过程中出现错误,请与经销商联系以获取帮助。
注意事项请仔细阅读本文档。
云服务器需要与云终端、w i n d o w s客户端搭配使用。
对管理平台进行快速配置时请随时参阅本文,并按照本文提示操作。
获取帮助若有任何疑问或需要得到帮助,请与经销商联系。
微云科技网站还提供最近的产品更新信息。
广东微云科技股份有限公司版权所有C o p y r i g h t©2019A l l R i g h t s R e s e r v e d目录1.配置服务器网络 (1)2.登录云桌面管理平台 (2)2.1.WEB访问 (2)2.2.登录管理平台 (2)3.上传license文件 (3)4.导入母盘 (3)5.制作模版 (4)6.创建用户 (6)6.1.创建部门 (6)6.2.创建用户 (7)7.创建虚拟机 (8)8.配置云电脑模式 (9)8.1.运行模式 (9)8.2.VDI模式 (9)8.3.PCV (12)8.4.RVM (14)B管控 (16)8.6.文件拖拽管控 (17)8.7.详细管控配置 (17)9.登录虚拟机 (17)9.1.安装使用windows终端 (17)9.2.安装使用云终端 (19)10.结束语 (20)1.配置服务器网络(1)当服务器启动后,使用系统默认管理员登录,账号为admin,初始密码为Admin@123,进入系统:(2)输入命令修改服务器ip:lanctl mgt0192.168.37.210255.255.255.0(3)输入命令修改服务器网关:lanctl gw192.168.37.254(4)输入命令保存设置:lanctl save,操作见下图:(5)保存后输入:lanctl show可以检查设置是否成功,接着输入:reboot命令重启服务器。
clouddrive2 参数
一、概述在今天的数字化时代,云存储服务成为了人们存储和共享文档、照片、视频等大量数据的重要方式之一。
而clouddrive2作为一款备受关注的云存储服务,备受用户和企业的青睐。
本文将深入探讨clouddrive2的参数设置,为用户提供详细的使用指南。
二、参数的重要性1. 参数设置对于用户体验至关重要,不同的参数会直接影响到clouddrive2的性能和功能;2. 正确的参数设置能够提升系统的稳定性和安全性,避免数据丢失和泄露的风险;3. 了解参数设置可以帮助用户更好地利用clouddrive2提供的功能,提高工作效率和数据管理能力。
三、常见参数设置及其影响1. 存储空间- 设置存储空间的大小可以直接影响用户可以上传和存储的文件数量和大小;- 合理设置存储空间可以提高工作效率,避免频繁清理和转移文件的困扰。
2. 安全性设置- 设置口令、权限和加密等安全参数可以有效保护用户的数据不受恶意攻击和泄露;- 安全性设置对于企业用户来说尤为重要,可以避免机密信息的泄露和公司数据的损失。
3. 同步模式- 不同的同步模式可以影响用户在多台设备之间同步数据的速度和实时性;- 根据个人需求和工作环境,选择合适的同步模式可以提高工作效率,也可以避免因数据同步延迟引发的问题。
4. 文件共享设置- 设置文件共享的权限和信息有效期可以控制其他用户对于自己数据的访问和使用权限;- 在多人协作或需要共享文件时,合理设置文件共享参数可以保护个人隐私,同时确保工作的顺利进行。
四、如何进行参数设置1. 登录clouddrive2账号,进入设置页面,找到“参数设置”选项;2. 依次浏览各个参数设置选项,根据个人需求和使用习惯,灵活调整参数值;3. 注意保存设置后的参数,确认设置生效,避免出现设置错误导致的问题。
五、经验与建议1. 在设置存储空间时,建议根据个人或企业的实际需求,适当预留一定的空间,避免因容量不足而影响正常使用;2. 安全性设置是保护数据的第一道防线,建议使用强密码、多重认证等安全手段,提高数据安全性;3. 同步模式的选择应该结合自己的使用场景,如需要在多个设备之间实时同步数据的用户,可以选择较为实时的同步模式;4. 在设置文件共享时,务必注意设置访问权限和有效期,避免因不当的文件共享而导致隐私泄露或数据被滥用。
wd说明书

乌拉圭 根廷 巴
000 413 598 3787 0800 4440839 0800 7704932 0021 800 83247788
*
参
/contact/contact.asp?lang=cn
取 WD 支持号
列
注册您
WD 产品
更新内容并享受优惠。您可以 。 或使 My Passport
注册 WD 产品以便 得最新 Wireless Pro 件 松注册
录
_________
WD 服务与支持................................................................................................ ii
WD 技术支持
当
北 国
800.ASK.4WDC (800.275.4932) 800.832.4778
WD
取支持时,
提供您
WD 产品序列号、
欧洲(免 欧洲 中东地区 洲 俄 斯
件和
)*
件
本。
00800 ASK4 WDEU (00800 27549338) +31 880062100 +31 880062100 +31 880062100 8 10 8002 335 5011
操作 ............................................................................................................................ 2 Web 浏 器....................................................................................................................... 2
上海迅时智能电话系统OM系列IPPBX管理员手册 V104

复位按键,用于恢复出厂设置。
PWR
电源接口,用于连接电源。
注:请使用随设备配套提供的电源适配器。
接地端
用于连接接地线。
2.2.3
表2-1OM80产品型号
型号
接口卡名称
接口卡数量
模拟外线接口数
模拟分机接口数
OM80
OM80-16S
16FXS
1
0
16
OM80-20S/4
16FXS
1
4
20
4FXS/4
图2-3OM20后面板
表2-1OM20接口说明
接口
说明
FXS
模拟分机接口(RJ11),用于连接模拟话机、传真机、POS机。
FXO
模拟外线接口(RJ11),用于连接公共交换电话网络(PSTN)。
PC/WAN
PC口用于连接电脑。
WAN口用于连接上联网络。
两个百兆以太网交换口(RJ45),共用一个IP地址。IP地址默认通过DHCP获取,获取失败时使用默认地址192.168.2.218。地址可在基本配置>网络中修改。
注:OM不会自动为电脑分配地址,必须手动配置电脑的IP地址与OM同一网段。
USB
USB接口,用于连接USB存储设备。
注:设备另含有16GB内置存储。
CON
串口,用于连接串口终端进行后台调试。
注:一般不使用。使用时需使用专用的RJ45-RS232串口连接电缆连接PC端的RS232端口。此连接电缆需自行制作或购买。若与无RS232端口的笔记本电脑连接,则还需使用USB转RS232串口连接电缆。电缆示意图如图1-3和图1-4所示。
401A-4S
3
0
12
OM50-10S/2
WKC 称重模块安装手册说明书
2.2 配置备忘录 ............................................................................................................... 8
2.3 PC 配置 ..................................................................................................................... 9
称重模块的预载荷范围是有限的(请参阅特定于产品的数据表以了解具体值)。 秤盘适配器顶部的定制称重平台将利用其自身的重量减小称重模块的称重范围。
WKC
安装 3
偏心率
定制称重平台的设计必须使得称重平台的重心位
1
于或尽可能接近主承载轴。
主承载轴穿过秤盘适配器(1)的中点。
过载保护极限 B
AD
CD B
E
1.2.3 电缆和接线
梅特勒-托利多建议使用标准电缆,而非定制电缆以扩展电缆范围。电磁性和数据通信可靠性仅测 试用于标准电缆。因此,无法保证更长的定制型电缆。 然而,如果不可避免要使用特制电缆,必须使用屏蔽电缆,防止数据传输和/或称重结果出现故 障。屏蔽电缆的一端必须连接至连接器护套,另一端连接至系统接地端,以避免形成接地回路。 只能通过现场反复实验来确定最佳的接地方案。 观察最大物理传输介质的最大允许电缆长度很重要。应当使用屏蔽电缆和双绞电缆将长的传输电 缆与电磁干扰分离。数据线应当与电源线分离和隔离。 在称重传感器通电之前,接线必须正确。将电源引脚与数据引脚混淆会损坏称重传感器。称重传 感器接电时,不应插入或拔出电线。
WDMyCloudEX4.doc
WD My Cloud EX4在WD的官网上,My Cloud EX4也被标为个人云存储设备。
与我们前面介绍的My Cloud相比,这款My Cloud EX4称得上是较为大型的家用NAS 产品了。
我们收到的这台My Cloud EX4配备了4块WD专为NAS设计的红盘,总存储空间达到了16TB。
也许有些人觉得这种四盘位的NAS并不适合家用,但是对于很多SOHO一族或者高清影音爱好者来说,数据存储空间没有过剩的时候,而且对于一些自由摄影师、撰稿人来说,数据的重要性是不言而喻的。
My Cloud EX4有多种数据保护方法供用户选择,防止数据丢失。
选择 RAID 0、1、5、10 或从跨越和 JBOD 模式选择,让用户在管理数据时有更多方式,更为从容。
RAID 0和RAID 1是比较常见的RAID模式,很多主板现在都可以提供这两种RAID规格。
RAID 0 模式对 RAID 硬盘组中的所有硬盘进行磁盘分条。
RAID 0 不支持数据冗余备份,但在所有 RAID 级别中具有最佳的性能。
RAID 0 将数据分成小段,然后将数据段按带状分布到硬盘组的每块硬盘中。
将系统设为数据保护模式(又称为镜像模式或 RAID 1),空间分成两半。
一半空间用于存储数据,另一半空间用于存储副本。
由于拥有副本,即使一块硬盘失效,您的数据也会安全无忧。
但是这两种RAID的缺陷也是非常明显的,RAID 0模式性能不错但是对数据没有任何保护措施,RAID 1模式虽然以镜像模式提供了数据保护功能,但是对NAS存储空间的浪费较多。
如果不需要对数据进行冗余保护,JBOD模式也是个选择。
JBOD并非以 RAID 配置使用一块或者多块硬盘,而是当作独立的逻辑卷加以管理。
跨盘便是以线性方式合并硬盘,创建一个超大逻辑卷。
这种模式的优势在于,您可以添加更多硬盘,而不必对系统格式化。
对于My Cloud EX4这种配备了四个硬盘仓位的NAS,RAID 5是比较适合的。
秒搭家庭数据中心体验联想个人云存储T1

秒搭家庭数据中心体验联想个人云存储T1作者:***来源:《微型计算机》2020年第06期生活在如今这个信息化的时代,每一个人都被各种电子设备所围绕——手机、平板、笔记本电脑、PC……随之而来的是它们在工作、生活中产生的大量数据:文件、照片、视频等等。
在免费网盘市场已经萎缩到可以忽略不计的今天,不少人都在为这些数据寻找一个能方便存储,集中管理,并可以跨平台、跨设备随时随地共享的地方。
对于公有云在隐私性、访问速度等方面的疑虑让很多人偏向搭建属于自己的私有云。
但对于这类设备不那么熟悉的消费者而言,要在传统NAS中选择一款产品并完成相应配置不是一件容易的事儿。
联想个人云存储T1的出现,就给了消费者轻松拥有一个家庭数据中心,并构建起连接数字生活和工作的存储服务空间的新选择。
家居化设计小巧随心放初见联想个人云存储T1,相信大多数人都很难将它和造型方正、专业化的传统NAS产品联系在一起。
作为一台偏向大众的智能存储设备,联想个人云存储T1拥有了符合如今智能设备设计潮流的时尚风格。
联想个人云存储T1的设计灵感源于古希腊帕特农神庙的多立克柱式,白色为主体,机身顶盖与底座则是金色,结合整体造型有一种典雅大气之美。
光是放在家中,它就能成为一件不错的装饰品。
它的接口都位于背部,除了电源接口和重置按键之外,另外还有一个干兆网络接口以及两个USB 3.0接口,足够满足大多数用户对接口的需要。
如果只看联想个人云存储T1的体积,你很可能认为它就是一台造型时尚的无线路由器,但它却在不大的体积中提供了两个硬盘扩展位,这主要得益于它所采用的2.5英寸硬盘。
在顶部Lenovo Logo附近按—下顶盖会弹开,我们就能看到里面的两个硬盘位。
金属硬盘托架采用免工具抽拉式设计,用食指扣住顶部的金属把手用力一提就能取出来。
硬盘通过4颗螺丝固定在硬盘托架上,联想还贴心地在附件中提供了一把适配的螺丝刀方便用户使用。
联想个人云存储T1提供了无盘版、4TB(单盘)、8TB(双盘)三种版本供消费者选择,MC拿到的样机是4TB的单盘版,标配西部数据4TB蓝盘,我查了—下在电商上单独购买这块硬盘价格在八九百元不等,算起来买单盘的联想个人云存储T1还是比较划算的。
雷蛇幻影战狼 V2 专业版 高级用户指南说明书
V2 专业版高级用户指南将下一代系统的强大功能与下一代专业无线手柄的优秀性能相融合。
Razer Wolverine V2 Pro 雷蛇幻影战狼 V2 专业版获得 PlayStation™官方授权,采用 Razer™ HyperSpeed Wireless 无线技术并提供一整套优秀的功能,可在 PS5™游戏主机和电脑上提供高性能、低延迟的游戏体验。
目录1.内含物品 (3)2.要求 (4)3.简要介绍 (5)4.技术规格 (5)5.设置 RAZER WOLVERINE V2 PRO 雷蛇幻影战狼 V2 专业版 (6)6.个性化你的体验 (11)7.使用手柄 (11)8.安全与维护 (16)9.法律声明 (17)1.内含物品▪ Razer Wolverine V2 Pro 雷蛇幻影战狼 V2 专业版A. 创建键B. 选项键C. 触摸板/触摸板键D. LED 状态指示灯*E. 标准拇指控制杆模块(L3/R3)F. Razer ™ 雷蛇机械触感操作键G. 采用 Razer Chroma ™ 雷蛇幻彩 RGB 技术的手柄灯光效果H. 8 向微动开关方向键I. PS 键J. 多功能键K. 3.5 毫米麦克风静音键(针对 3.5 毫米端口)L. 3.5 毫米模拟音频端口**M. 肩键 (L1/R1)N. Razer HyperTrigger (L2/R2) O. 多功能肩键 (M1 – M2) P. USB Type C 端口 Q. 扳机键停止开关R. 连接模式切换开关(无线/有线) S. 手柄模式切换开关(PS5/电脑) T. 多功能扳机键 (M3 – M6)▪ Razer ™ HyperSpeed Wireless 无线技术 2.4 GHz USB Type A 接收器▪ USB Type A 转 USB Type C 线缆*将手柄搭配 PS5™ 游戏主机一起使用时,手柄会通过 LED 状态指示灯显示你当前的玩家编号。
同成数字硬盘录象主机操作手册

数字视频监控系统使用说明书深圳同成视频技术有限公司使用须知欢迎你使用本产品,真诚感谢您成为我们的用户。
在打开本机的包装后,请仔细阅读用户使用说明书,并遵从所有操作及其说明事项。
一、电源在您打开监控主机的面盖进行硬件安装时,请关闭监控主机的电源,不要带电操作。
请将所有的设备连接到一个适当的电源插座上,尽量避免与经常开关的设备(如:复印机、空调)等使用同一电源插座。
插座上的电源不可过载;使用延长线时,要注意其电流的负荷程度,插在同一延长线上的电器总电流不能超过延长线的电流负荷。
二、热源本机放置场所必须远离热源,如暖气机、热调整器、加热炉以及其它发热产品(包括放大器等),也不要靠近辐射源。
三、水分及潮气使用本机时,请尽量远离有水分的地方,如浴盆、脸盆、厨房洗碗槽、洗衣槽等;也应避免在潮湿的地下室、游泳池附近以及类似场所中使用。
四、通风防尘主机的外壳上、后面板、侧面留有开口作为通风散热用,为确保机器的运转正常,避免机身过热,因而不可使其被填塞或遮挡。
五、清洁维护主机运行一定时间后应进行必要的清洁维护,清洁时应从电源插座上拔下插头。
不可使用液体洗涤剂以及喷雾清洁剂。
请使用湿润的布匹擦拭。
您不要自行检修监控主机六、放置搬移请不要将本机放置于诸如书架、框架等场所之内,也不要将主机放在不固定的桌面上,主机运行时请不要移动,以免造成硬件损坏。
七、电源线的保护电源线应设置在踩不到的地方,也不可将其它物品置于电源线之上。
对于插头、插座以及从机器中引出的电源线都要特别注意。
不要使主机的电源线磨损。
八、雷电为了防止雷电引起的损坏或当长时间不使用本机器时,应将其从电源插座上拔下这样可以有效地防止雷电或电网波动造成的损害。
九、异物及液体的进入不要从机器的开口或缝隙处将异物插人机内,因为这样可能会接触到危险的高电压或使部件间短路,从而导致触电或引起火灾。
十、不可垂直放置本机请勿以直立放置主机,因为这可能会使机器倒下而发生危险。
D系列云镜升级翼卡操作流程
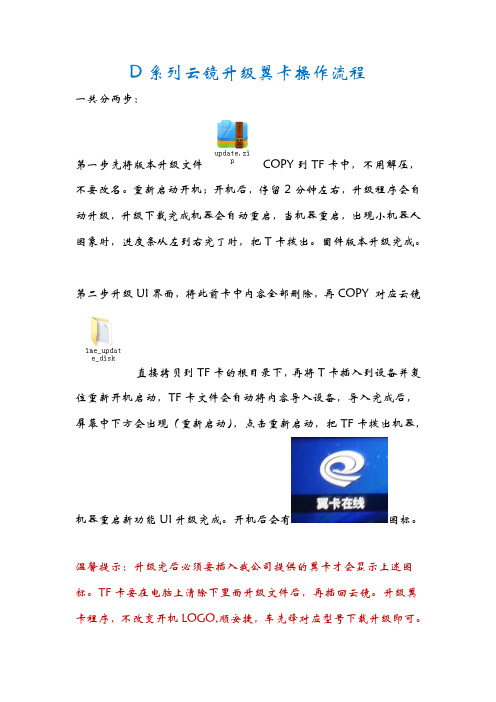
D系列云镜升级翼卡操作流程
一共分两步:
第一步先将版本升级文件COPY到TF卡中,不用解压,不要改名。
重新启动开机;开机后,停留2分钟左右,升级程序会自动升级,升级下载完成机器会自动重启,当机器重启,出现小机器人图象时,进度条从左到右完了时,把T卡拨出。
固件版本升级完成。
第二步升级UI界面,将此前卡中内容全部删除,再COPY 对应云镜
直接拷贝到TF卡的根目录下,再将T卡插入到设备并复位重新开机启动,TF卡文件会自动将内容导入设备,导入完成后,屏幕中下方会出现(重新启动),点击重新启动,把TF卡拨出机器,
机器重启新功能UI升级完成。
开机后会有图标。
温馨提示:升级完后必须要插入我公司提供的翼卡才会显示上述图标。
TF卡要在电脑上清除下里面升级文件后,再插回云镜。
升级翼卡程序,不改变开机LOGO,顺安捷,车先锋对应型号下载升级即可。