Submachine-Gun-Designer-s-Handbook
BarTender 2022版本Starter Professional版本对比说明书
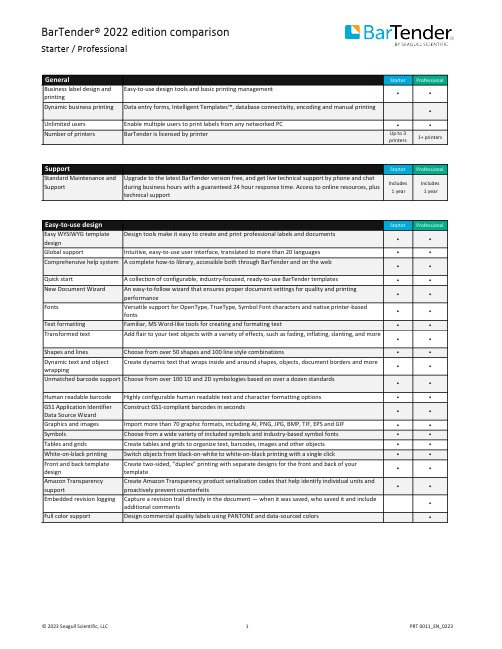
--Starter ProfessionalBusiness label design and printing Easy-to-use design tools and basic printing management••Dynamic business printing Data entry forms, Intelligent Templates™, database connectivity, encoding and manual printing•Unlimited users Enable multiple users to print labels from any networked PC••Number of printers BarTender is licensed by printer Up to 3printers1+ printers----Starter ProfessionalStandard Maintenance and Support Upgrade to the latest BarTender version free, and get live technical support by phone and chatduring business hours with a guaranteed 24 hour response time. Access to online resources, plustechnical supportIncludes1 yearIncludes1 year----Starter ProfessionalEasy WYSIWYG template design Design tools make it easy to create and print professional labels and documents••Global support Intuitive, easy-to-use user interface, translated to more than 20 languages••Comprehensive help system A complete how-to library, accessible both through BarTender and on the web••Quick start A collection of configurable, industry-focused, ready-to-use BarTender templates••New Document Wizard An easy-to-follow wizard that ensures proper document settings for quality and printingperformance••Fonts Versatile support for OpenType, TrueType, Symbol Font characters and native printer-basedfonts••Text formatting Familiar, MS Word-like tools for creating and formating text••Transformed text Add flair to your text objects with a variety of effects, such as fading, inflating, slanting, and more••Shapes and lines Choose from over 50 shapes and 100 line style combinations••Dynamic text and object wrapping Create dynamic text that wraps inside and around shapes, objects, document borders and more••Unmatched barcode support Choose from over 100 1D and 2D symbologies based on over a dozen standards••Human readable barcode Highly configurable human readable text and character formatting options••GS1 Application Identifier Data Source Wizard Construct GS1-compliant barcodes in seconds••Graphics and images Import more than 70 graphic formats, including AI, PNG, JPG, BMP, TIF, EPS and GIF••Symbols Choose from a wide variety of included symbols and industry-based symbol fonts••Tables and grids Create tables and grids to organize text, barcodes, images and other objects••White-on-black printing Switch objects from black-on-white to white-on-black printing with a single click••Front and back template design Create two-sided, “duplex” printing with separate designs for the front and back of yourtemplate••Amazon Transparency support Create Amazon Transparency product serialization codes that help identify individual units andproactively prevent counterfeits••Embedded revision logging Capture a revision trail directly in the document — when it was saved, who saved it and includeadditional comments•Full color support Design commercial quality labels using PANTONE and data-sourced colors•----Starter Professional Suppression Ignore the content of a data source under certain conditions••Label templates Design and automation tools that leverage data to reduce the number of label files you manage•Conditional printing Create data-driven automation rules that specify when different objects, layers or templates inyour document will visibly print or become hidden•Template selector Conditionally print one specific template when multiple templates are available in a document•Layers Template objects may be stacked, hidden and reordered when created on uniquely identifiablelayers•Automatic face detection and cropping Automated image capture creates perfectly cropped photos for ID badges and card printing•Scriptable object properties Modify the look and feel of template objects by using Visual Basic (VB) scripts•----Starter Professional Date and time Dynamically source dates and times from Windows or clock-enabled printers••Data validation and processing Specify data validation rules and automatically correct data or issue warnings••Concatenate data Create text and barcode objects that combine information from multiple data sources••Basic database connectivity Import variable data from Excel or a RFC 4180 standard CSV files into your template••Simple serialization Increase or decrease your serial string data by increments of one (1)••Named database connections Name commonly used database connections to quickly add them to new document designs••Database filters Print select database records using convenient query and filter options#•Database sourced tables Easily create tables using data from a database or external file#•Dynamic data preview See how your document handles real dynamic data during the design process#•Dynamic graphics and images Automatically source images for printing based on selected database records or queries#•Embedded database tables Create your own database tables that travel with your BarTender document designs•Enhanced database connectivity Connect document designs to over 20 data sources such as SAP, Oracle, MS SQL, Azure SQL, XML,Excel, text files and more to print dynamically•Advanced serialization Create serial numbers that support alphanumeric, hexadecimal and custom sequencing patterns•Create a database Build your own database from scratch using intuitive tools included with BarTender•Write back to databases Write back to SQL-based databases to keep track of printed records, serial numbers and muchmore•Visual Basic (VB) scripting Create scripts for custom data processing•Global database field Centralize a data field and share it between BarTender documents•----Starter Professional Database record selection Select or query the correct database records at print time using helpful form controls•Powerful form controls Make data input and selection easy by leveraging over 15 highly configurable form controls•Keyboard and mouse input Use keyboard and mouse commands to select or enter data into forms at print time•Scanner input Use a barcode scanner to input information to data entry forms at print time•Weighing scale input Populate the weight of an item at print time by connecting your weighing scale to BarTender•Image capture Capture images at print time for ID cards or event badge printing•Data validation Reduce user input errors by introducing data validation and error checking•----Starter Professional Drivers by Seagull™More than 7,000 printers and output devices supported to enable high-performance printing••Print optimizations Improve print speed by taking full advantage of printer-based features such as serialization,barcodes, real-time clock, static data and graphic caching••Windows printer drivers Print to any printer that has a Windows-based driver••Printer configuration and diagnostics Perform printer management functions in BarTender, bypassing the printer front panel••On-demand and batch printing Print labels and documents on-demand or batch together using one or more BarTendertemplates••Print preview Review your dynamic print jobs before printing••Image exporting Export entire template images or specific objects in 35+ formats••RFID, smartcard and magnetic stripe encoding Encode RFID tags, smartcards and magnetic stripe cards as easily as adding barcodes to yourtemplate design•Native PDF generation Generate PDFs without installing third-party PDF drivers•----Starter Professional Status monitoring Reports information back to Windows regarding printer/print job status and error conditions••Email alerts Automatically notify IT managers or other operational team members if labeling problems occur••----# Basic databases only (Excel or RFC 4180 standard CSV file)BarTender Release 11.3 R5 and later versions。
SubCreator 基础教程
SubCreator 基础教程一、简介subcreator是由Radoslaw Strugalski编写的强大好用的创建时间轴程序。
目前最新版1.1.程序本身可以打开divx影片和其他格式媒体文件,然后把各种文本字幕转换为基于时间的各种格式.各位学会使用subcreator后就能方便的制作各种影片的外挂字幕了二、SUBCREA TOR主要功能介绍!(一些不常用到的功能将会略过) file-->new 新建时间轴文件open 打开含有时间轴的文件(目前支持srt,smi,ssa,txt格式)open most recent ...reload 从新读取save 储存save as 另存为export 输出(生成外挂字幕文件,里面还含有设置外挂字幕的颜色和出现位置等功能)processing 处理exit 退出edit-->undo xxx 撤销上一步行为redo 回复所撤销行为cut 剪切copy 复制past 粘帖delete 删除select all 选择全部find 查找find next 查找下一个replace 取代timing-->set timestamp 设置时间点(可以用来设置字幕的开始点和结束点) increase timestamp 时间点提前decrease timestamp 时间点滞后increase duration 结束点提前decrease duration 结束点滞后delete timestamp 删除时间点enable smart timestamp adding 开启智能时间点添加movie-->open 打开avi文件(注:和file中的open不要搞混,不然可能非法x作) close 关闭play 播放stop 停止small step forward 小幅前进large step forward 大small step backword 小幅后退large step backword 大jump to start 跳至片头jump to end 跳至片尾sync to text 与文档同步(视频跳至当前编辑字幕文档段落处)sync to movie 与视频同步(文档跳至当前播放视频处)注意:快键可能和输入法所设置的快键有冲突,所以请先关闭输入法的快键或改成其它的与其不冲突的.option-->change editor font 变更编辑文档字体change subtitle font 变更屏显字幕字体general setting 设置video engine setting 视频引擎设置(有时播放不流畅可以通过这个来换一个引擎来播放,或许会有意想不到的惊喜)OPTIONS--->general setting里的设置default subtitle是默认显示字幕时间,设的大点可以保证字幕不会过早消失(推荐设置为30)MAX SUBTITLE LINE是一屏最大显示字幕行数,设置2已经足够了SMALL STEP :是用于设置视频步进幅度。
奥佳华 按摩小件产品OG-2620天鹅棒 使用说明书

㝉㨶㝠╻User ManualOG-2620 Magic Swan 天鹅棒 手持按摩器感谢您购买奥佳华天鹅棒手持按摩器,使用前请仔细阅读操作手册,并特别注意安全事项,以便正确操作和使用本产品。
本手册提供使用者安全及有效的操作方式,请在阅毕后妥为收藏,以便日后参考查询。
安全指引保修权限产品零件及配件产品特性及使用示意操作方式及功能说明产品规格故障排除产品保养奥佳华中国官网:目录 CONTENTS2678991011安全指引a)重要安全事项说明●为确保安全及正确使用产品,使用前请务必详细参阅操作 手册。
●请务必依照本操作手册内的产品用途使用本产品。
●使用完毕后或清洁产品前,请将电源插头从插座中拔除。
●为避免因过热而导致走火、触电或造成伤害,请勿将产品置于枕头或毯子等不易散热的环境下操作。
●请勿覆盖使用,以免造成马达温度过高而导致故障或损坏。
●请勿让儿童自行操作本产品。
●身心功能障碍与伤残者请谨慎使用,如需使用务必有旁人的指导且能负责其安全。
●如在按摩进行中感到不适,请立即停止按摩。
●下列状况发生时,切勿使用本产品:电源线或电源插头损坏;操作不正常;曾掉落地面或者损伤;曾浸入水或者其它液体中。
请联系维修服务中心进行检查和维修。
●请勿使用非制造商所推荐的零配件。
●请勿将物品插入或者掉落产品的任何开口中。
●切断电源前,请先将所有的操作控制关闭,然后将电源插头由插座中拔除。
b)使用环境●请勿在潮湿或过多灰尘的环境下使用产品,以免产品发生故障。
●请勿在室温高于40℃的环境下使用本产品。
●请勿将产品放置户外。
●请勿将产品置放于电热器旁、炉具附近或者阳光直射处。
c)不适宜使用本产品的人士如果您有以下任何情形之一,使用前请先咨询医生。
●正在接受医生治疗者或身体感觉不适者●高血压、心脏病、脑动脉硬化、脑血栓患者●患有恶性肿瘤者●孕妇及月经期妇女●患有骨骼疏松症●正在使用心脏起搏器或者植入医疗器者●患有急性疾病者●未成年人23d)开关注意事项●请勿用湿手操作控制开关。
Submachine4攻略
Submachine4 攻略*游戏包含21个蓝色小球作为隐藏关卡.初始阶段(实验室顶棚)1.按提示向右走,找到锤子.2.向左2次,向下,向右.用锤子砸开门上的锁.进入阁楼.3.向下,在挂着的衣服口袋里找到萘(像药丸一样的东西).4.向右,在梁上取得橡皮管.5.向右,在墙角处取得烟囱刷,在椅子上取得小球1.6.走出阁楼.将烟囱刷伸入烟囱里.7.返回阁楼,找到烟囱底部,取得灰堆上的淡蓝色钥匙.8.向左走,在挂钩上取得黄色钥匙.9.向左,在桌子左下角取得黄色把手.10.用淡蓝色钥匙开门,进入.11.向下,在画面右下角取得小球2.12.向下,进入Laboratory.Laboratory(实验室)1.向左,点电脑.点右下方的键,不停点,与电脑进行对话.直到听到打印声.(或者点到只出现(@lab):root.ping//144.235.182.100为止,这条信息没什么用.)2.退出电脑界面.取得打印机上的纸条.可以看到是一份提示(提示1里包含了几个空间的坐标,之后有用).3.在桌脚废纸箱边取得小球3.4.走到右边,在窗台上取得打火机.5.返回,向下走.在画面左下角取得烧杯.6.向下,在倒下的椅子上取得小球4,收集桌上的2张纸.7.去左边的浴室,将烧杯放在地上的排水口处,用锤子敲掉上方管道的铁盖子.8.在左边水管下方取得小球5,在洗脸台上取得肥皂.9.退出浴室.向右走,在桌上拿到CD.10.上梯子,在试管架上取左数第二支试管.11.向右,在实验台上取得螺丝刀,在管道右下方取得小球6.12.用橡皮管连接煤气灯和煤气管道,将黄色把手安装在管道上.转动把手和煤气灯开关,用打火机点燃煤气灯.13.快速返回直至室外.在最左边找到一个阀门.用螺丝刀拧下螺丝,取得阀门.14.回到浴室,将阀门装在左边管道上.转动阀门,让烧杯盛满水.15.走到煤气灯处,将盛水的烧杯放在煤气灯上,依次放入肥皂,试管中液体和萘.16.取烧杯和空试管回到浴室.用同样的方法在试管里盛满水.17.向右到底,用黄色钥匙打开门.点钟.18.将烧杯内液体倒入控制板,破坏它.可看到右边的铁栅栏上升.19.向右,取地上的纸片.看提示1,得知当前所在空间为Laboratory,坐标为0,0,1.而下一步应进入坐标为1,0,4的Ancient Section.20.把时空机上数字点成1,0,4.点开关,转换空间进入Ancient Section.Ancient Section(古老的部分)1.向右,观察所有的石板图案.参考下方的"/","|","-","\"4个开关可知,开关组合出相应图形即能打开对应石板下的门.由此可以取得2块三角板,一个圆形石块和一个方形石块.*注意在右边某石板处取得一把黄色的小刀,在其左边有钟,点一下.而在图形为"+"的石板界面内,左下角可取得小球7.2.向上走,将圆形和方形石块插入对应的缺口处,可使新的阶梯出现.3.向上,用锤子打破马雕像下方已有裂缝的石板,取得小球8.4.向上,看到新的石板图案.用同样的方法取得该石板门下的三角板3.5.向上,用小刀割断绳子,走到下面拿到三角板4.6.向下,在狗雕像的眼睛处取得小球9.7.将4块三角板插到墙上对应的洞口里.可以看到中间出现一个按钮,点它.8.回到时空机界面,可以看到出现了新的石梯,上梯子.取得机器上像罩子一样的能量装置.9.向左走,捡起地上的纸片.10.回到时空机,根据提示1,输入6,9,0.点开关,进入Looping Traps.Looping Traps(循环陷阱)1.向右,向下,拿到地上的纸片.2.向左,在地板上拿到小球10.3.向左,向上,可以看到坐标器.推理可知时空机坐标为(0,0).左右分别是横坐标和纵坐标.则其他几个封闭的机器坐标分别为(0,1),(1,1),(-1,-1),(1,0).4.点坐标器,调成相应坐标后点按钮,去到对应的机器处.点机器,使灯变绿.5.将4个机器全部调整完毕后,进到坐标器的上方.点开机器的罩子,取得蓝色的碟片.6.回到时空机,根据提示1,输入5,2,9.点开关,进入Basement SectionBasement Section(地下室部分)1.向右2次,将能量装置置于充电装置上充电.在右边插头下方取得小球11.2.取充好电的能量装置.向左,向下,向左.插入机器,点拉杆,给机器供电.取空了的能量装置和画面右下角的纸片.3.向右,在主机器的右下角(电线下)取得小球12.4.用同样的方法在能量装置充电后给右边的机器供电.退出后点击主机器,看到有激光射出.5.向上,把CD放在钩子上,使激光弯折.6.向右,把蓝色碟片放在柱子上,用激光击碎它.得到银色钥匙.房间左下角拿纸片7.再给能量装置充一次电后,回到时光机界面.8.根据提示7,输入5,5,1.(此时不能根据提示1直接进入4,6,2.否则进去后除了捡小球什么事也干不了.)5,5,1 空间(水管控制室)1.捡右边地上的小球13.2.向左,捡起地上的纸片.把水的开关关掉.3.回时光机,现在可以根据提示1输入4,6,2.点开关,进入Lighthouse Digouts.Lighthouse Digouts(灯塔地下掩体)1. 向右,取得地上小球14.2. 向右,用锤子敲击锁4下.打开门,取得涡轮。
斑马技术公司DS8108数字扫描仪产品参考指南说明书

NORMA 4000 5000 Power Analyzer 用户说明手册说明书
Since some countries or states do not allow limitation of the term of an implied warranty, or exclusion or limitation of incidental or consequential damages, the limitations and exclusions of this warranty may not apply to every buyer. If any provision of this Warranty is held invalid or unenforceable by a court or other decision-maker of competent jurisdiction, such holding will not affect the validity or enforceability of any other provision.
BEGRENZTE GEWÄHRLEISTUNG UND HAFTUNGSBESCHRÄNKUNG
Fluke gewährleistet, daß jedes Fluke-Produkt unter normalem Gebrauch und Service frei von Material- und Fertigungsdefekten ist. Die Garantiedauer beträgt 2 Jahre ab Versanddatum. Die Garantiedauer für Teile, Produktreparaturen und Service beträgt 90 Tage. Diese Garantie wird ausschließlich dem Erster
三自由度机械手毕业设计

摘要机械手是在自动化生产过程中使用的一种具有抓取和移动工件功能的自动化装置,由其控制系统执行预定的程序实现对工件的定位夹持。
完全取代了人力,节省了劳动资源,提高了生产效率。
本设计以实现铣床自动上下料为目的,设计了个水平伸缩距为200mm,垂直伸缩距为200mm具有三个自由度的铣床上下料机械手。
机械手三个自由度分别是机身的旋转,手臂的升降,以及机身的升降。
在设计过程中,确定了铣床上下料机械手的总体方案,并对铣床上下料机械手的总体结构进行了设计,对一些部件进行了参数确定以及对主要的零部件进行了计算和校核。
以单片机为控制手段,设计了机械手的自动控制系统,实现了对铣床上下料机械手的准确控制。
关键词:机械手;三自由度;上下料;单片机AbstractManipulator , an automation equipment with function of grabbing and moving the workpiece ,is used in an automated production process.It perform scheduled program by the control system to realize the function of the positioning of the workpiece clamping. It completely replace the human, saving labor resources, and improve production efficiency.This design is to achieve milling automatic loading and unloading .Design a manipulator with three degrees of freedom and 200mm horizontal stretching distance, 120mm vertical telescopic distance. Three degrees of freedom of the manipulator is body rotation, arm movements, as well as the movements of the body. In the design process, determine the overall scheme of the milling machine loading and unloading manipulator and milling machine loading and unloading manipulator, the overall structure of the design parameters of some components as well as the main components of the calculation and verification. In the means of Single-chip microcomputer for controlling, design the automatic control system of the manipulator and achieve accurate control of the milling machine loading and unloading.Key words: Manipulator; Three Degrees of Freedom; Loading and unloading; single chip microcomputer目录摘要.........................................................................I第1章绪论.............................................................11.1选题背景................................................... (1)1.2设计目的.........................................................11.3国内外研究现状和趋势............................................21.4设计原则.........................................................2第2章设计方案的论证..................................................32.1 机械手的总体设计...............................................32.1.1机械手总体结构的类型....................................32.1.2 设计具体采用方案........................................42.2 机械手腰座结构设计.............................................52.2.1 机械手腰座结构设计要求.................................52.2.2 具体设计采用方案........................................52.3 机械手手臂的结构设计...........................................62.3.1机械手手臂的设计要求....................................62.3.2 设计具体采用方案........................................72.4 设计机械手手部连接方式.........................................72.5 机械手末端执行器(手部)的结构设计...........................82.5.1 机械手末端执行器的设计要求.............................82.5.2 机械手夹持器的运动和驱动方式..........................92.5.3 机械手夹持器的典型结构.................................92.6 机械手的机械传动机构的设计..................................102.6.1 工业机械手传动机构设计应注意的问题...................102.6.2 工业机械手传动机构常用的机构形式.....................102.6.3 设计具体采用方案.......................................122.7 机械手驱动系统的设计.........................................122.7.1 机械手各类驱动系统的特点..............................122.7.2 机械手液压驱动系统.....................................132.7.3机身摆动驱动元件的选取................................132.7.4 设计具体采用方案.......................................142.8 机械手手臂的平衡机构设计.....................................14第3章理论分析和设计计算............................................163.1 液压传动系统设计计算..........................................163.1.1 确定液压传动系统基本方案...............................163.1.2 拟定液压执行元件运动控制回路...........................173.1.3 液压源系统的设计........................................173.1.4 确定液压系统的主要参数.................................173.1.5 计算和选择液压元件......................................243.1.6机械手爪各结构尺寸的计算...................................26 第4章机械手控制系统的设计..........................................284.1 系统总体方案..................................................284.2 各芯片工作原理................................................284.2.1 串口转换芯片............................................284.2.2 单片机...................................................294.2.3 8279芯片...............................................304.2.4 译码器...................................................314.2.5 放大芯片................................................324.3 电路设计..................................................334.3.1 显示电路设计............................................334.3.2 键盘电路设计............................................334.4 复位电路设计..................................................334.5 晶体振荡电路设计.............................................344.6 传感器的选择..................................................34结论.....................................................................36致谢.....................................................................37参考文献................................................................38CONTENTS Abstract (I)Chapter 1 Introduction (1)1.1 background (1)1.2 design purpose (1)1.3 domestic and foreign research present situation and trends (2)1.4 design principles (2)Chapter 2 Design of the demonstration (3)2.1manipulator overall design (3)2.1.1 manipulator overall structure type (3)2.1.2 design adopts the scheme (4)2.2 lumbar base structure design of mechanical hand (5)2.2.1 manipulator lumbar base structure design requirements (5)2.2.2specific design schemes (5)2.3mechanical arm structure design (6)2.3.1 manipulator arm design requirements (6)2.3.2 design adopts the scheme (7)2.4 design of mechanical hand connection mode (7)2.5 the manipulator end-effector structure design (8)2.5.1 manipulator end-effector design requirements (8)2.5.2 manipulator gripper motion and driving method (9)2.5.3 manipulator gripper structure (9)2.6 robot mechanical transmission design (10)2.6.1 industry for transmission mechanism of manipulator design shouldpay attention question (10)2.6.2 industrial machinery hand transmission mechanism commonlyused form of institution (10)2.6.3 design adopts the scheme (12)2.7 mechanical arm drive system design (12)2.7.1 manipulator of various characteristics of the drive system (12)2.7.2 hydraulic drive system for a manipulator (13)2.7.3 Body swing the selection of drive components (13)2.7.4 Design the specific use of the program (14)2.8 mechanical arm balance mechanism design (14)Chapter 3 Theoretical analysis and design calculation (16)3.1 hydraulic system design and calculation (16)3.1.1 the basic scheme of hydrauic transmission system (16)3.1.2 formulation of the hydraulic actuator control circuit (17)3.1.3 hydraulic source system design (17)3.1.4 determine the main parameters of the hydraulic system (17)3.1.5 calculation and selection of hydraulic components (24)3.1.6 Manipulator calculation of the structural dimensions (26)Chapter 4 The robot control system design (28)4.1 Overall scheme (28)4.2 Chip works (28)4.2.1 serial conversion chip (28)4.2.2 MCU (29)4.2.3 8279 chip (30)4.2 .4 decoder (31)4.2.5 amplifier chip (32)4.3 Circuit design (33)4.3.1 show the circuit design (33)4.3.2 The keyboard circuit design (33)4.4 Reset circuit design (33)4.5 crystal oscillation circuit design (34)4.6 sensor selection (34)Conclusion (36)Acknowledgements (37)References (38)第1章绪论1.1选题背景机械手是在自动化生产过程中使用的一种具有抓取和移动工件功能的自动化装置,它是在机械化、自动化生产过程中发展起来的一种新型装置。
BDS Start to End Simulation说明书
BDS, Start to End Simulation, BDS Start to End Simulation Simulation Codes Summary yD. SchulteD SchultePresentations•Deepa Angal-Kalinin: Beam dynamics issues in BDSg p •Peter Tenenbaum: Possible migration to Accelerator Makeup Language•Glen White: BDS tuning simulation•Andrea Latina:Static and Dynamic Alignment of the CLIC BDS Andrea Latina: Static and Dynamic Alignment of the CLIC BDS •Javier Resta Lopez: Start to End simulations with intra-train feedbackTony Hartin:Luminosity performance with multiple feedbacks •Tony Hartin: Luminosity performance with multiple feedbacks •Peter Tenenbaum: Lucretia status and plans•Andrea Latina: PLACET : New features and plans•Paul Lebrun: CHEF status and plan•Roger Barlow: Issues in Simulating the Effects of Wakefields •Steve Malton: Interfacing BDSIM with PLACET, wakefield Steve Malton:Interfacing BDSIM with PLACET wakefieldcalculations of collimator•Isabell Melzer-Pellmann: Lumi scans with wakefields in MerlinBDS tasks related to LET (1)()•BDS has the most different styles of magnets;BDS has the most different styles of magnets;standardize the magnets and reduce the styles •Magnets on strings–Additional correctors/PSs–How will it affect the tuning + beam basedalignment–How will it affect the performance after push-pull •Temperature requirements in the tunnel and its effect on beam stabilityb bili•Stability requirements for push-pull•Angle feedback and integration of other feedbacks?Angle feedback and integration of other feedbacks?•Effect of wakes from pumping ports, vacuum chamber misalignments, resistive wall, IR wakes, HOM heating, wake fields from crab, spoilers, other transitions….k fi ld f b il th t itiBDS tasks related to LET (2) Laser wire•Define requirements on emittance measurement (absolute/relative) of train (or bunch) every ? second? Æbeam tuning procedureof train(or bunch)every?second?beam tuning procedure •The present design of laser wire assumes 300 scans per train, which drives the requirements of the laserD d b t i di ti b t lli ti•Do we need any beam spotsize diagnostics between collimation region and IP (somewhere in the final focus?)yCrab system–To understand and verify requirements on the crab cavity mode damping from beam dynamics point of view. e.g.g,y 10E+4 for SOM is difficult from RF design, but may berelaxed with intra-train feedback?–The alignment of crab cavity and effects of the orbit offset in sextupoles may be perhaps fixed with some smallin sextupoles may be perhaps fixed with some smallvertical crab cavity nearby the main one.•Low energy parameters•Work plan is being developed•Lattices to be frozen in autumBDS AlignmentBDS Ali t100nm BPM resolution needed in sextupoles•100nm BPM resolution needed in sextupoles•Quad shunting+DFSy p–Is the systematic error important?•Multi-knobs, also high order needed•Studies using one beam and it’s mirror yield 90% at better than 110%l i it110% luminosity–Independent beams yield 90% at better than75%slower convergence–slower convergence•1e-3 magnet error significantly impacts convergence•Intra-pulse beam-beam offset feedback kick limited by sextupole •200nm stability requirement for quadrupoles•Main goal is to have a verification by another studyATF2•ATF2 is an important test•Can take advantage of flight simulators•Need to fully study alignment and tuning Need to fully study alignment and tuning –E.g. losses can be a problem•Simulation of ATF2Simulation of ATF2–Spot size measurement is slow (1 minute)–Convergence speed crucial–Spot size growth 1nm/hourCLIC BDS Alignment •Few-to-few and DFS used•DFS problematic since response to energy deviation not linear•Collimations system alignment works •FFS alone does not workFull optimisation (brute force) with simplex •Full optimisation(brute force)with simplex works on 50% of the casesy–No solution yet•Could still be starting point for ILC second BDS alignment studyg yCLIC BDS Dynamic Effects•Choice of orbit feedback gain–Ground motion requires yields gain>0.01 tocorrect orbit–BPM resolution requires gain<0.3BPM l ti i i03•Very tight quadrupole stability requirements –Fractions of nm for final doublet–Nanometer for other magnets–Need to use stabilisation•Should also run this for ILCI t t d F db k St di Integrated Feedback Studies Continuation of studies started by Glen •Continuation of studies started by Glen•From linac to IP–Including fast IP feedbackIncluding fast IP feedback–Bunch compressor should come soonMulti bunch tracking•Multi-bunch tracking–Realistic main linac, undulator not usedy g y •Ground motion C or K yield 85% of target luminosity •Smoother luminosity increase during feedback than before–Banana effect is less important•Crab cavities and collimator wakefields to be includedFeedback Optimisation •Basic idea is to exploit luminosityinformation to speed up beam-beam i f ti t d b boffset feedback convergence•Based on Javier’s integrated simulation •Luminosity based on pair signal Luminosity based on pair signal•Optimise gain for minimum luminosity loss•Looks an interesting approachBeam-Beam Scans •Translate emittance growth intoluminosity lossTry to optimise collision in presence of •Try to optimise collision in presence of imperfection along the machine •Banana effect is reduced compared to B ff t i d d d t TESLAWakefield Models •Linear wakefields seem OK for main studiest di•Need something better for loss studiesg•Uncertainties still exist–Comparison between formulaeComparison between formulae•Check proper implementationBenchmarking with experiments–Benchmarking with experiments•Experiments are not easyBDSIM-PLACET Interface•BDSIM is a vital code for BDS studies –Halo and background studies–But not aimed at alignment and tuning studies •Geometry information–Currently: Halo tracking in BDSIM, core inPLACET–General lattice information–ImperfectionsDeck Format•Current deck format is based on XSIF –Parser is available and can be added to programs P i il bl d b dd d t•Slow transition to AML is planned–Until 2010 both formats (XSIF+AML) will beU til2010b th f t(XSIF AML)ill bsupportedAML is similar to XML–AML is similar to XML–An AML parser is available and can be used •Can also read and write SIF•Has been tied to PLACET•Plans exist to tie it to SAD, LUCRETIA and MERLINLUCRETIA •MATLAB based toolkit–Performs tracking–Correction and tuning is user supplied •LIAR and DIMAD are no longer supported •Mass production runs using MATLAB compiler •Used for ATF2•To be included–UndulatorU d l t–IR solenoid–Better cavity wakesBetter cavity wakes•Reference documentation availableTutorial to come–Tutorial to come•Way cool with it’s own cultPLACET•tcl/tk and OCTAVE interfacey–Dynamic libraries•AML interface+some more available •Coherent/incoherent synchrotron radiation •Collimator wakes, also from GdfidL •Misalignment, correction and tuning routines are includedi l d d–Can use your own ones, if you like •Preliminary MPI version existsPreliminary MPI version exists•Halo and tail generation module•Some reference manual availableSome reference manual available–Tutorials on the webOnline help–Online help•Used for ATF2CHEF•A libraryA library–Contains tracking–Correction and tuning left to the userp •Wakefields are to be improved •Significant modifications•XSIF interface rewrittenSome concerns about status of AML •Some concerns about status of AMLConclusion•Integrated simulations move forward •Confirmation of BDS alignment is neededg p •Interesting ideas on feedback improvements •Several codes are being developed–Way cool, way hot...Way cool way hot•More work to be done。
Adobe Acrobat SDK 开发者指南说明书

This guide is governed by the Adobe Acrobat SDK License Agreement and may be used or copied only in accordance with the terms of this agreement. Except as permitted by any such agreement, no part of this guide may be reproduced, stored in a retrieval system, or transmitted, in any form or by any means, electronic, mechanical, recording, or otherwise, without the prior written permission of Adobe. Please note that the content in this guide is protected under copyright law.
Native Instruments MASCHINE MIKRO MK3用户手册说明书
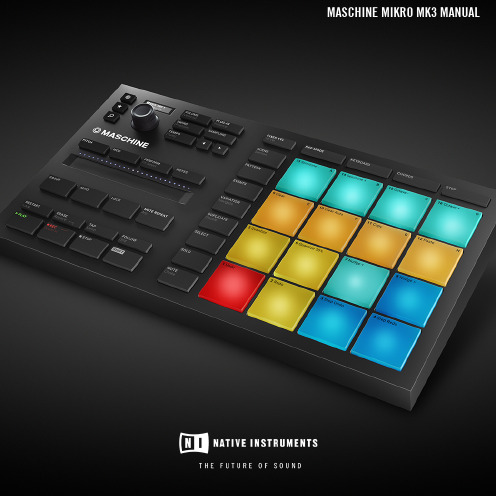
The information in this document is subject to change without notice and does not represent a commitment on the part of Native Instruments GmbH. The software described by this docu-ment is subject to a License Agreement and may not be copied to other media. No part of this publication may be copied, reproduced or otherwise transmitted or recorded, for any purpose, without prior written permission by Native Instruments GmbH, hereinafter referred to as Native Instruments.“Native Instruments”, “NI” and associated logos are (registered) trademarks of Native Instru-ments GmbH.ASIO, VST, HALion and Cubase are registered trademarks of Steinberg Media Technologies GmbH.All other product and company names are trademarks™ or registered® trademarks of their re-spective holders. Use of them does not imply any affiliation with or endorsement by them.Document authored by: David Gover and Nico Sidi.Software version: 2.8 (02/2019)Hardware version: MASCHINE MIKRO MK3Special thanks to the Beta Test Team, who were invaluable not just in tracking down bugs, but in making this a better product.NATIVE INSTRUMENTS GmbH Schlesische Str. 29-30D-10997 Berlin Germanywww.native-instruments.de NATIVE INSTRUMENTS North America, Inc. 6725 Sunset Boulevard5th FloorLos Angeles, CA 90028USANATIVE INSTRUMENTS K.K.YO Building 3FJingumae 6-7-15, Shibuya-ku, Tokyo 150-0001Japanwww.native-instruments.co.jp NATIVE INSTRUMENTS UK Limited 18 Phipp StreetLondon EC2A 4NUUKNATIVE INSTRUMENTS FRANCE SARL 113 Rue Saint-Maur75011 ParisFrance SHENZHEN NATIVE INSTRUMENTS COMPANY Limited 5F, Shenzhen Zimao Center111 Taizi Road, Nanshan District, Shenzhen, GuangdongChina© NATIVE INSTRUMENTS GmbH, 2019. All rights reserved.Table of Contents1Welcome to MASCHINE (23)1.1MASCHINE Documentation (24)1.2Document Conventions (25)1.3New Features in MASCHINE 2.8 (26)1.4New Features in MASCHINE 2.7.10 (28)1.5New Features in MASCHINE 2.7.8 (29)1.6New Features in MASCHINE 2.7.7 (29)1.7New Features in MASCHINE 2.7.4 (31)1.8New Features in MASCHINE 2.7.3 (33)2Quick Reference (35)2.1MASCHINE Project Overview (35)2.1.1Sound Content (35)2.1.2Arrangement (37)2.2MASCHINE Hardware Overview (40)2.2.1MASCHINE MIKRO Hardware Overview (40)2.2.1.1Browser Section (41)2.2.1.2Edit Section (42)2.2.1.3Performance Section (43)2.2.1.4Transport Section (45)2.2.1.5Pad Section (46)2.2.1.6Rear Panel (50)2.3MASCHINE Software Overview (51)2.3.1Header (52)2.3.2Browser (54)2.3.3Arranger (56)2.3.4Control Area (59)2.3.5Pattern Editor (60)3Basic Concepts (62)3.1Important Names and Concepts (62)3.2Adjusting the MASCHINE User Interface (65)3.2.1Adjusting the Size of the Interface (65)3.2.2Switching between Ideas View and Song View (66)3.2.3Showing/Hiding the Browser (67)3.2.4Showing/Hiding the Control Lane (67)3.3Common Operations (68)3.3.1Adjusting Volume, Swing, and Tempo (68)3.3.2Undo/Redo (71)3.3.3Focusing on a Group or a Sound (73)3.3.4Switching Between the Master, Group, and Sound Level (77)3.3.5Navigating Channel Properties, Plug-ins, and Parameter Pages in the Control Area.773.3.6Navigating the Software Using the Controller (82)3.3.7Using Two or More Hardware Controllers (82)3.3.8Loading a Recent Project from the Controller (84)3.4Native Kontrol Standard (85)3.5Stand-Alone and Plug-in Mode (86)3.5.1Differences between Stand-Alone and Plug-in Mode (86)3.5.2Switching Instances (88)3.6Preferences (88)3.6.1Preferences – General Page (89)3.6.2Preferences – Audio Page (93)3.6.3Preferences – MIDI Page (95)3.6.4Preferences – Default Page (97)3.6.5Preferences – Library Page (101)3.6.6Preferences – Plug-ins Page (109)3.6.7Preferences – Hardware Page (114)3.6.8Preferences – Colors Page (114)3.7Integrating MASCHINE into a MIDI Setup (117)3.7.1Connecting External MIDI Equipment (117)3.7.2Sync to External MIDI Clock (117)3.7.3Send MIDI Clock (118)3.7.4Using MIDI Mode (119)3.8Syncing MASCHINE using Ableton Link (120)3.8.1Connecting to a Network (121)3.8.2Joining and Leaving a Link Session (121)4Browser (123)4.1Browser Basics (123)4.1.1The MASCHINE Library (123)4.1.2Browsing the Library vs. Browsing Your Hard Disks (124)4.2Searching and Loading Files from the Library (125)4.2.1Overview of the Library Pane (125)4.2.2Selecting or Loading a Product and Selecting a Bank from the Browser (128)4.2.3Selecting a Product Category, a Product, a Bank, and a Sub-Bank (133)4.2.3.1Selecting a Product Category, a Product, a Bank, and a Sub-Bank on theController (137)4.2.4Selecting a File Type (137)4.2.5Choosing Between Factory and User Content (138)4.2.6Selecting Type and Character Tags (138)4.2.7Performing a Text Search (142)4.2.8Loading a File from the Result List (143)4.3Additional Browsing Tools (148)4.3.1Loading the Selected Files Automatically (148)4.3.2Auditioning Instrument Presets (149)4.3.3Auditioning Samples (150)4.3.4Loading Groups with Patterns (150)4.3.5Loading Groups with Routing (151)4.3.6Displaying File Information (151)4.4Using Favorites in the Browser (152)4.5Editing the Files’ Tags and Properties (155)4.5.1Attribute Editor Basics (155)4.5.2The Bank Page (157)4.5.3The Types and Characters Pages (157)4.5.4The Properties Page (160)4.6Loading and Importing Files from Your File System (161)4.6.1Overview of the FILES Pane (161)4.6.2Using Favorites (163)4.6.3Using the Location Bar (164)4.6.4Navigating to Recent Locations (165)4.6.5Using the Result List (166)4.6.6Importing Files to the MASCHINE Library (169)4.7Locating Missing Samples (171)4.8Using Quick Browse (173)5Managing Sounds, Groups, and Your Project (175)5.1Overview of the Sounds, Groups, and Master (175)5.1.1The Sound, Group, and Master Channels (176)5.1.2Similarities and Differences in Handling Sounds and Groups (177)5.1.3Selecting Multiple Sounds or Groups (178)5.2Managing Sounds (181)5.2.1Loading Sounds (183)5.2.2Pre-listening to Sounds (184)5.2.3Renaming Sound Slots (185)5.2.4Changing the Sound’s Color (186)5.2.5Saving Sounds (187)5.2.6Copying and Pasting Sounds (189)5.2.7Moving Sounds (192)5.2.8Resetting Sound Slots (193)5.3Managing Groups (194)5.3.1Creating Groups (196)5.3.2Loading Groups (197)5.3.3Renaming Groups (198)5.3.4Changing the Group’s Color (199)5.3.5Saving Groups (200)5.3.6Copying and Pasting Groups (202)5.3.7Reordering Groups (206)5.3.8Deleting Groups (207)5.4Exporting MASCHINE Objects and Audio (208)5.4.1Saving a Group with its Samples (208)5.4.2Saving a Project with its Samples (210)5.4.3Exporting Audio (212)5.5Importing Third-Party File Formats (218)5.5.1Loading REX Files into Sound Slots (218)5.5.2Importing MPC Programs to Groups (219)6Playing on the Controller (223)6.1Adjusting the Pads (223)6.1.1The Pad View in the Software (223)6.1.2Choosing a Pad Input Mode (225)6.1.3Adjusting the Base Key (226)6.2Adjusting the Key, Choke, and Link Parameters for Multiple Sounds (227)6.3Playing Tools (229)6.3.1Mute and Solo (229)6.3.2Choke All Notes (233)6.3.3Groove (233)6.3.4Level, Tempo, Tune, and Groove Shortcuts on Your Controller (235)6.3.5Tap Tempo (235)6.4Performance Features (236)6.4.1Overview of the Perform Features (236)6.4.2Selecting a Scale and Creating Chords (239)6.4.3Scale and Chord Parameters (240)6.4.4Creating Arpeggios and Repeated Notes (253)6.4.5Swing on Note Repeat / Arp Output (257)6.5Using Lock Snapshots (257)6.5.1Creating a Lock Snapshot (257)7Working with Plug-ins (259)7.1Plug-in Overview (259)7.1.1Plug-in Basics (259)7.1.2First Plug-in Slot of Sounds: Choosing the Sound’s Role (263)7.1.3Loading, Removing, and Replacing a Plug-in (264)7.1.4Adjusting the Plug-in Parameters (270)7.1.5Bypassing Plug-in Slots (270)7.1.6Using Side-Chain (272)7.1.7Moving Plug-ins (272)7.1.8Alternative: the Plug-in Strip (273)7.1.9Saving and Recalling Plug-in Presets (273)7.1.9.1Saving Plug-in Presets (274)7.1.9.2Recalling Plug-in Presets (275)7.1.9.3Removing a Default Plug-in Preset (276)7.2The Sampler Plug-in (277)7.2.1Page 1: Voice Settings / Engine (279)7.2.2Page 2: Pitch / Envelope (281)7.2.3Page 3: FX / Filter (283)7.2.4Page 4: Modulation (285)7.2.5Page 5: LFO (286)7.2.6Page 6: Velocity / Modwheel (288)7.3Using Native Instruments and External Plug-ins (289)7.3.1Opening/Closing Plug-in Windows (289)7.3.2Using the VST/AU Plug-in Parameters (292)7.3.3Setting Up Your Own Parameter Pages (293)7.3.4Using VST/AU Plug-in Presets (298)7.3.5Multiple-Output Plug-ins and Multitimbral Plug-ins (300)8Using the Audio Plug-in (302)8.1Loading a Loop into the Audio Plug-in (306)8.2Editing Audio in the Audio Plug-in (307)8.3Using Loop Mode (308)8.4Using Gate Mode (310)9Using the Drumsynths (312)9.1Drumsynths – General Handling (313)9.1.1Engines: Many Different Drums per Drumsynth (313)9.1.2Common Parameter Organization (313)9.1.3Shared Parameters (316)9.1.4Various Velocity Responses (316)9.1.5Pitch Range, Tuning, and MIDI Notes (316)9.2The Kicks (317)9.2.1Kick – Sub (319)9.2.2Kick – Tronic (321)9.2.3Kick – Dusty (324)9.2.4Kick – Grit (325)9.2.5Kick – Rasper (328)9.2.6Kick – Snappy (329)9.2.7Kick – Bold (331)9.2.8Kick – Maple (333)9.2.9Kick – Push (334)9.3The Snares (336)9.3.1Snare – Volt (338)9.3.2Snare – Bit (340)9.3.3Snare – Pow (342)9.3.4Snare – Sharp (343)9.3.5Snare – Airy (345)9.3.6Snare – Vintage (347)9.3.7Snare – Chrome (349)9.3.8Snare – Iron (351)9.3.9Snare – Clap (353)9.3.10Snare – Breaker (355)9.4The Hi-hats (357)9.4.1Hi-hat – Silver (358)9.4.2Hi-hat – Circuit (360)9.4.3Hi-hat – Memory (362)9.4.4Hi-hat – Hybrid (364)9.4.5Creating a Pattern with Closed and Open Hi-hats (366)9.5The Toms (367)9.5.1Tom – Tronic (369)9.5.2Tom – Fractal (371)9.5.3Tom – Floor (375)9.5.4Tom – High (377)9.6The Percussions (378)9.6.1Percussion – Fractal (380)9.6.2Percussion – Kettle (383)9.6.3Percussion – Shaker (385)9.7The Cymbals (389)9.7.1Cymbal – Crash (391)9.7.2Cymbal – Ride (393)10Using the Bass Synth (396)10.1Bass Synth – General Handling (397)10.1.1Parameter Organization (397)10.1.2Bass Synth Parameters (399)11Working with Patterns (401)11.1Pattern Basics (401)11.1.1Pattern Editor Overview (402)11.1.2Navigating the Event Area (404)11.1.3Following the Playback Position in the Pattern (406)11.1.4Jumping to Another Playback Position in the Pattern (407)11.1.5Group View and Keyboard View (408)11.1.6Adjusting the Arrange Grid and the Pattern Length (410)11.1.7Adjusting the Step Grid and the Nudge Grid (413)11.2Recording Patterns in Real Time (416)11.2.1Recording Your Patterns Live (417)11.2.2Using the Metronome (419)11.2.3Recording with Count-in (420)11.3Recording Patterns with the Step Sequencer (422)11.3.1Step Mode Basics (422)11.3.2Editing Events in Step Mode (424)11.4Editing Events (425)11.4.1Editing Events with the Mouse: an Overview (425)11.4.2Creating Events/Notes (428)11.4.3Selecting Events/Notes (429)11.4.4Editing Selected Events/Notes (431)11.4.5Deleting Events/Notes (434)11.4.6Cut, Copy, and Paste Events/Notes (436)11.4.7Quantizing Events/Notes (439)11.4.8Quantization While Playing (441)11.4.9Doubling a Pattern (442)11.4.10Adding Variation to Patterns (442)11.5Recording and Editing Modulation (443)11.5.1Which Parameters Are Modulatable? (444)11.5.2Recording Modulation (446)11.5.3Creating and Editing Modulation in the Control Lane (447)11.6Creating MIDI Tracks from Scratch in MASCHINE (452)11.7Managing Patterns (454)11.7.1The Pattern Manager and Pattern Mode (455)11.7.2Selecting Patterns and Pattern Banks (456)11.7.3Creating Patterns (459)11.7.4Deleting Patterns (460)11.7.5Creating and Deleting Pattern Banks (461)11.7.6Naming Patterns (463)11.7.7Changing the Pattern’s Color (465)11.7.8Duplicating, Copying, and Pasting Patterns (466)11.7.9Moving Patterns (469)11.8Importing/Exporting Audio and MIDI to/from Patterns (470)11.8.1Exporting Audio from Patterns (470)11.8.2Exporting MIDI from Patterns (472)11.8.3Importing MIDI to Patterns (474)12Audio Routing, Remote Control, and Macro Controls (483)12.1Audio Routing in MASCHINE (484)12.1.1Sending External Audio to Sounds (485)12.1.2Configuring the Main Output of Sounds and Groups (489)12.1.3Setting Up Auxiliary Outputs for Sounds and Groups (494)12.1.4Configuring the Master and Cue Outputs of MASCHINE (497)12.1.5Mono Audio Inputs (502)12.1.5.1Configuring External Inputs for Sounds in Mix View (503)12.2Using MIDI Control and Host Automation (506)12.2.1Triggering Sounds via MIDI Notes (507)12.2.2Triggering Scenes via MIDI (513)12.2.3Controlling Parameters via MIDI and Host Automation (514)12.2.4Selecting VST/AU Plug-in Presets via MIDI Program Change (522)12.2.5Sending MIDI from Sounds (523)12.3Creating Custom Sets of Parameters with the Macro Controls (527)12.3.1Macro Control Overview (527)12.3.2Assigning Macro Controls Using the Software (528)13Controlling Your Mix (535)13.1Mix View Basics (535)13.1.1Switching between Arrange View and Mix View (535)13.1.2Mix View Elements (536)13.2The Mixer (537)13.2.1Displaying Groups vs. Displaying Sounds (539)13.2.2Adjusting the Mixer Layout (541)13.2.3Selecting Channel Strips (542)13.2.4Managing Your Channels in the Mixer (543)13.2.5Adjusting Settings in the Channel Strips (545)13.2.6Using the Cue Bus (549)13.3The Plug-in Chain (551)13.4The Plug-in Strip (552)13.4.1The Plug-in Header (554)13.4.2Panels for Drumsynths and Internal Effects (556)13.4.3Panel for the Sampler (557)13.4.4Custom Panels for Native Instruments Plug-ins (560)13.4.5Undocking a Plug-in Panel (Native Instruments and External Plug-ins Only) (564)14Using Effects (567)14.1Applying Effects to a Sound, a Group or the Master (567)14.1.1Adding an Effect (567)14.1.2Other Operations on Effects (574)14.1.3Using the Side-Chain Input (575)14.2Applying Effects to External Audio (578)14.2.1Step 1: Configure MASCHINE Audio Inputs (578)14.2.2Step 2: Set up a Sound to Receive the External Input (579)14.2.3Step 3: Load an Effect to Process an Input (579)14.3Creating a Send Effect (580)14.3.1Step 1: Set Up a Sound or Group as Send Effect (581)14.3.2Step 2: Route Audio to the Send Effect (583)14.3.3 A Few Notes on Send Effects (583)14.4Creating Multi-Effects (584)15Effect Reference (587)15.1Dynamics (588)15.1.1Compressor (588)15.1.2Gate (591)15.1.3Transient Master (594)15.1.4Limiter (596)15.1.5Maximizer (600)15.2Filtering Effects (603)15.2.1EQ (603)15.2.2Filter (605)15.2.3Cabinet (609)15.3Modulation Effects (611)15.3.1Chorus (611)15.3.2Flanger (612)15.3.3FM (613)15.3.4Freq Shifter (615)15.3.5Phaser (616)15.4Spatial and Reverb Effects (617)15.4.1Ice (617)15.4.2Metaverb (619)15.4.3Reflex (620)15.4.4Reverb (Legacy) (621)15.4.5Reverb (623)15.4.5.1Reverb Room (623)15.4.5.2Reverb Hall (626)15.4.5.3Plate Reverb (629)15.5Delays (630)15.5.1Beat Delay (630)15.5.2Grain Delay (632)15.5.3Grain Stretch (634)15.5.4Resochord (636)15.6Distortion Effects (638)15.6.1Distortion (638)15.6.2Lofi (640)15.6.3Saturator (641)15.7Perform FX (645)15.7.1Filter (646)15.7.2Flanger (648)15.7.3Burst Echo (650)15.7.4Reso Echo (653)15.7.5Ring (656)15.7.6Stutter (658)15.7.7Tremolo (661)15.7.8Scratcher (664)16Working with the Arranger (667)16.1Arranger Basics (667)16.1.1Navigating Song View (670)16.1.2Following the Playback Position in Your Project (672)16.1.3Performing with Scenes and Sections using the Pads (673)16.2Using Ideas View (677)16.2.1Scene Overview (677)16.2.2Creating Scenes (679)16.2.3Assigning and Removing Patterns (679)16.2.4Selecting Scenes (682)16.2.5Deleting Scenes (684)16.2.6Creating and Deleting Scene Banks (685)16.2.7Clearing Scenes (685)16.2.8Duplicating Scenes (685)16.2.9Reordering Scenes (687)16.2.10Making Scenes Unique (688)16.2.11Appending Scenes to Arrangement (689)16.2.12Naming Scenes (689)16.2.13Changing the Color of a Scene (690)16.3Using Song View (692)16.3.1Section Management Overview (692)16.3.2Creating Sections (694)16.3.3Assigning a Scene to a Section (695)16.3.4Selecting Sections and Section Banks (696)16.3.5Reorganizing Sections (700)16.3.6Adjusting the Length of a Section (702)16.3.6.1Adjusting the Length of a Section Using the Software (703)16.3.6.2Adjusting the Length of a Section Using the Controller (705)16.3.7Clearing a Pattern in Song View (705)16.3.8Duplicating Sections (705)16.3.8.1Making Sections Unique (707)16.3.9Removing Sections (707)16.3.10Renaming Scenes (708)16.3.11Clearing Sections (710)16.3.12Creating and Deleting Section Banks (710)16.3.13Working with Patterns in Song view (710)16.3.13.1Creating a Pattern in Song View (711)16.3.13.2Selecting a Pattern in Song View (711)16.3.13.3Clearing a Pattern in Song View (711)16.3.13.4Renaming a Pattern in Song View (711)16.3.13.5Coloring a Pattern in Song View (712)16.3.13.6Removing a Pattern in Song View (712)16.3.13.7Duplicating a Pattern in Song View (712)16.3.14Enabling Auto Length (713)16.3.15Looping (714)16.3.15.1Setting the Loop Range in the Software (714)16.3.15.2Activating or Deactivating a Loop Using the Controller (715)16.4Playing with Sections (715)16.4.1Jumping to another Playback Position in Your Project (716)16.5Triggering Sections or Scenes via MIDI (717)16.6The Arrange Grid (719)16.7Quick Grid (720)17Sampling and Sample Mapping (722)17.1Opening the Sample Editor (722)17.2Recording Audio (724)17.2.1Opening the Record Page (724)17.2.2Selecting the Source and the Recording Mode (725)17.2.3Arming, Starting, and Stopping the Recording (729)17.2.5Checking Your Recordings (731)17.2.6Location and Name of Your Recorded Samples (734)17.3Editing a Sample (735)17.3.1Using the Edit Page (735)17.3.2Audio Editing Functions (739)17.4Slicing a Sample (743)17.4.1Opening the Slice Page (743)17.4.2Adjusting the Slicing Settings (744)17.4.3Manually Adjusting Your Slices (746)17.4.4Applying the Slicing (750)17.5Mapping Samples to Zones (754)17.5.1Opening the Zone Page (754)17.5.2Zone Page Overview (755)17.5.3Selecting and Managing Zones in the Zone List (756)17.5.4Selecting and Editing Zones in the Map View (761)17.5.5Editing Zones in the Sample View (765)17.5.6Adjusting the Zone Settings (767)17.5.7Adding Samples to the Sample Map (770)18Appendix: Tips for Playing Live (772)18.1Preparations (772)18.1.1Focus on the Hardware (772)18.1.2Customize the Pads of the Hardware (772)18.1.3Check Your CPU Power Before Playing (772)18.1.4Name and Color Your Groups, Patterns, Sounds and Scenes (773)18.1.5Consider Using a Limiter on Your Master (773)18.1.6Hook Up Your Other Gear and Sync It with MIDI Clock (773)18.1.7Improvise (773)18.2Basic Techniques (773)18.2.1Use Mute and Solo (773)18.2.2Create Variations of Your Drum Patterns in the Step Sequencer (774)18.2.3Use Note Repeat (774)18.2.4Set Up Your Own Multi-effect Groups and Automate Them (774)18.3Special Tricks (774)18.3.1Changing Pattern Length for Variation (774)18.3.2Using Loops to Cycle Through Samples (775)18.3.3Load Long Audio Files and Play with the Start Point (775)19Troubleshooting (776)19.1Knowledge Base (776)19.2Technical Support (776)19.3Registration Support (777)19.4User Forum (777)20Glossary (778)Index (786)1Welcome to MASCHINEThank you for buying MASCHINE!MASCHINE is a groove production studio that implements the familiar working style of classi-cal groove boxes along with the advantages of a computer based system. MASCHINE is ideal for making music live, as well as in the studio. It’s the hands-on aspect of a dedicated instru-ment, the MASCHINE hardware controller, united with the advanced editing features of the MASCHINE software.Creating beats is often not very intuitive with a computer, but using the MASCHINE hardware controller to do it makes it easy and fun. You can tap in freely with the pads or use Note Re-peat to jam along. Alternatively, build your beats using the step sequencer just as in classic drum machines.Patterns can be intuitively combined and rearranged on the fly to form larger ideas. You can try out several different versions of a song without ever having to stop the music.Since you can integrate it into any sequencer that supports VST, AU, or AAX plug-ins, you can reap the benefits in almost any software setup, or use it as a stand-alone application. You can sample your own material, slice loops and rearrange them easily.However, MASCHINE is a lot more than an ordinary groovebox or sampler: it comes with an inspiring 7-gigabyte library, and a sophisticated, yet easy to use tag-based Browser to give you instant access to the sounds you are looking for.What’s more, MASCHINE provides lots of options for manipulating your sounds via internal ef-fects and other sound-shaping possibilities. You can also control external MIDI hardware and 3rd-party software with the MASCHINE hardware controller, while customizing the functions of the pads, knobs and buttons according to your needs utilizing the included Controller Editor application. We hope you enjoy this fantastic instrument as much as we do. Now let’s get go-ing!—The MASCHINE team at Native Instruments.MASCHINE Documentation1.1MASCHINE DocumentationNative Instruments provide many information sources regarding MASCHINE. The main docu-ments should be read in the following sequence:1.MASCHINE MIKRO Quick Start Guide: This animated online guide provides a practical ap-proach to help you learn the basic of MASCHINE MIKRO. The guide is available from theNative Instruments website: https:///maschine-mikro-quick-start/2.MASCHINE Manual (this document): The MASCHINE Manual provides you with a compre-hensive description of all MASCHINE software and hardware features.Additional documentation sources provide you with details on more specific topics:►Online Support Videos: You can find a number of support videos on The Official Native In-struments Support Channel under the following URL: https:///NIsupport-EN. We recommend that you follow along with these instructions while the respective ap-plication is running on your computer.Other Online Resources:If you are experiencing problems related to your Native Instruments product that the supplied documentation does not cover, there are several ways of getting help:▪Knowledge Base▪User Forum▪Technical Support▪Registration SupportYou will find more information on these subjects in the chapter Troubleshooting.Document Conventions1.2Document ConventionsThis section introduces you to the signage and text highlighting used in this manual. This man-ual uses particular formatting to point out special facts and to warn you of potential issues.The icons introducing these notes let you see what kind of information is to be expected:This document uses particular formatting to point out special facts and to warn you of poten-tial issues. The icons introducing the following notes let you see what kind of information canbe expected:Furthermore, the following formatting is used:▪Text appearing in (drop-down) menus (such as Open…, Save as… etc.) in the software andpaths to locations on your hard disk or other storage devices is printed in italics.▪Text appearing elsewhere (labels of buttons, controls, text next to checkboxes etc.) in thesoftware is printed in blue. Whenever you see this formatting applied, you will find thesame text appearing somewhere on the screen.▪Text appearing on the displays of the controller is printed in light grey. Whenever you seethis formatting applied, you will find the same text on a controller display.▪Text appearing on labels of the hardware controller is printed in orange. Whenever you seethis formatting applied, you will find the same text on the controller.▪Important names and concepts are printed in bold.▪References to keys on your computer’s keyboard you’ll find put in square brackets (e.g.,“Press [Shift] + [Enter]”).►Single instructions are introduced by this play button type arrow.→Results of actions are introduced by this smaller arrow.Naming ConventionThroughout the documentation we will refer to MASCHINE controller (or just controller) as the hardware controller and MASCHINE software as the software installed on your computer.The term “effect” will sometimes be abbreviated as “FX” when referring to elements in the MA-SCHINE software and hardware. These terms have the same meaning.Button Combinations and Shortcuts on Your ControllerMost instructions will use the “+” sign to indicate buttons (or buttons and pads) that must be pressed simultaneously, starting with the button indicated first. E.g., an instruction such as:“Press SHIFT + PLAY”means:1.Press and hold SHIFT.2.While holding SHIFT, press PLAY and release it.3.Release SHIFT.1.3New Features in MASCHINE2.8The following new features have been added to MASCHINE: Integration▪Browse on , create your own collections of loops and one-shots and send them directly to the MASCHINE browser.Improvements to the Browser▪Samples are now cataloged in separate Loops and One-shots tabs in the Browser.▪Previews of loops selected in the Browser will be played in sync with the current project.When a loop is selected with Prehear turned on, it will begin playing immediately in-sync with the project if transport is running. If a loop preview starts part-way through the loop, the loop will play once more for its full length to ensure you get to hear the entire loop once in context with your project.▪Filters and product selections will be remembered when switching between content types and Factory/User Libraries in the Browser.▪Browser content synchronization between multiple running instances. When running multi-ple instances of MASCHINE, either as Standalone and/or as a plug-in, updates to the Li-brary will be synced across the instances. For example, if you delete a sample from your User Library in one instance, the sample will no longer be present in the other instances.Similarly, if you save a preset in one instance, that preset will then be available in the oth-er instances, too.▪Edits made to samples in the Factory Libraries will be saved to the Standard User Directo-ry.For more information on these new features, refer to the following chapter ↑4, Browser. Improvements to the MASCHINE MIKRO MK3 Controller▪You can now set sample Start and End points using the controller. For more information refer to ↑17.3.1, Using the Edit Page.Improved Support for A-Series Keyboards▪When Browsing with A-Series keyboards, you can now jump quickly to the results list by holding SHIFT and pushing right on the 4D Encoder.▪When Browsing with A-Series keyboards, you can fast scroll through the Browser results list by holding SHIFT and twisting the 4D Encoder.▪Mute and Solo Sounds and Groups from A-Series keyboards. Sounds are muted in TRACK mode while Groups are muted in IDEAS.。
submachine1攻略
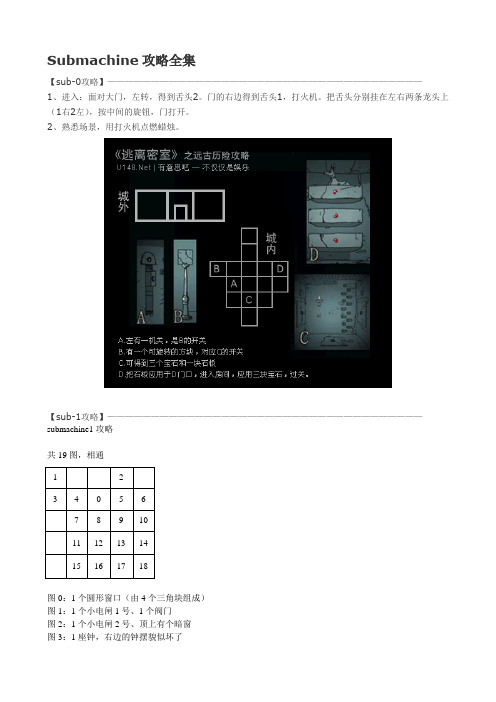
Submachine攻略全集【sub-0攻略】————————————————————————————————————1、进入:面对大门,左转,得到舌头2。
门的右边得到舌头1,打火机。
把舌头分别挂在左右两条龙头上(1右2左),按中间的旋钮,门打开。
2、熟悉场景,用打火机点燃蜡烛。
【sub-1攻略】————————————————————————————————————submachine1攻略共19图,相通1 23 4 0 5 67 8 9 1011 12 13 1415 16 17 18图0:1个圆形窗口(由4个三角块组成)图1:1个小电闸1号、1个阀门图2:1个小电闸2号、顶上有个暗窗图3:1座钟,右边的钟摆貌似坏了图4:1个管道(中间有个按阀门的位置)图6:1个大电闸图7:3个水表,水表下有3个可调动的圆形螺帽图8:墙上一幅画,是个三层高的灯塔图9:上空三根管道图10:1个方形柜台,柜台正面有3个红色小灯横排并列,柜台上有个环形座子图11:1个金币,一个带2灯泡的灯座图12:1个小电闸3号、1张纸(XX的日记)图13:左上有个灰色板,上有4个红白棒,第3个缺了图14:1个古老收音机,带2个抽屉图15:右边有个带4按钮的电盒子,左边1个箱子图16:左上有个灰色板,上有3个圆形螺帽图17:正上方4个大铃铛,下面1个柜子,柜子上横排并列4个方块图18:是1根正在渗漏紫色液体的折形管道第一步:从图0出发←←↑到图1,拿阀门,拉小电闸1号,再↓→→→↑到图2,拉小电闸2号,再↓←↓↓到图12,拉小电闸3号,拿1份日记,再↑→↓→↑到图10,发现3个小红灯都变绿,点取环形内的三角块(瓷片C)第二步:接着从图10↓←↑←←↓到图11,拿金币,金币上会随机出现4位数字,再↑→↓↓←到图15,点右边的电盒子,把金币上的数字输入进去,听见咔嗒响声,在左边箱子里拿到1个红白棒(保险丝),再→↑↑→↓图13,把保险丝安好,听见电流响声,向右到图14,点收音机按钮听到音乐,拿抽屉里的灰色勺子,回图13,再↑←↑→→到图6,拉下大电闸,把勺子放在电流上短路,下面柜子开,点取瓷片A第三步:接着从图6←←↓↓↓到图16,看清楚灰色板上的螺帽方向,再↑↑←到图7,把水表下的3个螺帽调成一样,再→↑←到图4,把阀门安在中间,转动一下,听见水流声和啪的一声…再→↓→↓→↓到图18,发现水管炸开了,旁边留下了一颗白色圆球(珍珠),再↑←↑←↑←←到图3,把珍珠安在钟摆上,座钟上的盒子开,点取瓷片B第四步:接着从图3→→↓↓↓→到图17,把4个方块都调到空中(大铃铛1、4、2各敲1下),点柜台下的方形裂口,点取瓷片D最后:从图17←↑↑↑回到图0,把ABCD瓷片按形状安到中间的圆盘上,圆盘转动,出现一个门,点进去发现是个电梯,点右边的白色按钮,电梯上升,再点白色按钮,就到户外了(过关)。
btpiggames系列汇总清单[新版]
![btpiggames系列汇总清单[新版]](https://img.taocdn.com/s3/m/4deeb46600f69e3143323968011ca300a7c3f650.png)
BTpigGames系列汇总清单BTpigGames系列汇总(2010-10-12更新)※※※本列表仅供参考,不作为发布依据※※※A《A列车8》v1.0简体中文硬盘版《爱丽丝奏鸣曲1:命运之轮》v1.4繁体中文硬盘版《爱丽丝奏鸣曲2:冲击代码》v1.2繁体中文硬盘版《暗黑魔法师:崛起》v1.04繁体中文硬盘版B《八年抗战》v1.06繁体中文硬盘版《白色魔法石》繁体中文硬盘版《百合二重奏》繁体中文硬盘版《北非战场1943》v1.3.0繁体中文硬盘版《便利商店4:超市霸主》简体中文硬盘版《波斯王子4:重生》简体中文硬盘版C《沉默的舰队2》繁体中文硬盘版《城市梦想家:纽约》v1.1.0.6繁体中文硬盘版《楚留香新传:桃花传奇》v1.2简体中文硬盘版《刺客教条1》v1.02繁体中文硬盘版《刺客教条2》v1.01简体中文硬盘版D《大航海家3》v1.12繁体中文硬盘版《堕落天使》v1.04简体中文硬盘版F《发明工坊2外传:天空之城的冒险之旅》简体中文硬盘版《发明工坊3:苍之巨神》简体中文硬盘版《反恐重击:隐秘行动》v1.0简体中文硬盘版《绯雪千夜~之后…千夜一夜~》v1.53d繁体中文硬盘版《翡翠帝国特别版》简体中文硬盘版G《公主奇缘》v1.03繁体中文硬盘版H《海盗王:双重秘宝》简体中文硬盘版《海底两万里》繁体中文硬盘版《海底两万里:鹦鹉螺号选美大赛》繁体中文硬盘版《海商王1》v1.4.0.3繁体中文硬盘版《海商王2》v1.1.1.8繁体中文硬盘版《红楼梦》繁体中文硬盘版《幻想三国志1:凤凰誓》v1.1.0繁体中文硬盘版J《交错的视线》v1.02繁体中文硬盘版《救世英豪3加强版》v1.73繁体中文硬盘版《救世英豪3:遗弃之神》v1.08繁体中文硬盘版《狙击手:胜利的艺术》v1.0简体中文硬盘版L《林海雪原》简体中文硬盘版M《萌萌2次大战略1:最燃战场》繁体中文硬盘版《梦幻奇缘2》繁体中文硬盘版《迷你忍者》v1.0简体中文硬盘版《灭国英雄》v1.1简体中文硬盘版《明星餐厅》v1.06繁体中文硬盘版《模拟饭店2》繁体中文硬盘版《魔法风云会:天命战场》v1.01简体中文硬盘版《魔法黎明》v1.11简繁中文硬盘版《魔法使与主人》繁体中文硬盘版Q《七大王朝:征服》v1.04繁体中文硬盘版《奇迹餐厅1》v1.21繁体中文硬盘版《奇迹餐厅2》v1.00繁体中文硬盘版《秋之回忆6:T-wave》繁体中文硬盘版《秋之回忆6:T-wave》简体中文硬盘版R《如来神掌:宇宙争雄》简体中文硬盘版S《神镖闯江湖》v1.02繁体中文硬盘版《生化危机4》v1.1繁体中文硬盘版《时空悍将》v1.02繁体中文硬盘版《双星物语2》v1.01简体中文硬盘版《双星物语2加强版》v1.0繁体中文硬盘版《双星物语2加强版》v1.0简体中文硬盘版《水之旋律1》繁体中文硬盘版《水之旋律2:绯之记忆》繁体中文硬盘版T《天使计划》繁体中文硬盘版《天下霸图1》v1.09简体中文硬盘版《天下无缺》v1.1.0.0.0简体中文硬盘版《天下无缺》v1.0.0.0.0繁体中文硬盘版《天之劫》简体中文硬盘版W《武林立志传:龙吟剑》v1.067繁体中文硬盘版X《席德梅尔之铁路》v1.1.0.10简体中文硬盘版《夏梦夜话》简体中文硬盘版《新绝代双骄3:明月孤星》v1.3.2繁体中文硬盘版《新月剑痕》简体中文硬盘版《星际争霸1:母巢之战》v1.15.2简体中文硬盘版《轩辕剑叁:云和山的彼端》v1.03繁体中文硬盘版《轩辕剑叁外传:天之痕》v2.03繁体中文硬盘版《轩辕剑肆:黑龙舞兮云飞扬》v1.04b繁体中文硬盘版《轩辕剑肆:黑龙舞兮云飞扬》v1.04b简体中文硬盘版《轩辕剑外传:苍之涛》v1.04a简体中文硬盘版《轩辕剑伍:一剑凌云山海情》v1.03简体中文硬盘版《轩辕剑外传:汉之云》v1.02简体中文硬盘版Y《炎舞:真战略》v1.5简体中文猪猪复刻版《英雄大帝:女王之刃》v1.2繁体中文硬盘版《英雄无敌3:死亡阴影》v3.1简体中文硬盘版《鱼戏江湖》v1.0.0.0.2繁体中文硬盘版《鱼戏江湖》v1.1.0.0.2简体中文硬盘版Z《征天风舞传:三国志异》v1.03简体中文硬盘版《正宗台湾十六张麻将3》繁体v1.02繁体中文硬盘版《制霸英雄》v1.1繁体中文硬盘版《终极生化少女》繁体中文硬盘版《诸神黄昏》v1.0.8.3繁体中文硬盘版更多资源不断更新中。
Comic Studio入门教程

Comic Studio入门教程第一讲CS的版本与特色作者:青春森林策划:肖寅爽助理:万芳软件:Comic Studio EX Demo 使用设备:友基漫影1000L数位板作者简介:青春森林自由漫画人,主要从事漫画创作,善于编写漫画制作类教程。
开源软件爱好者、使用者。
Comic Studio的发行版本ic Studio是日本Celsys公司出品的专业漫画制作软件。
它的中文意思是“漫画工作室”,漫画素材一应俱全。
Comic Studio软件与数位板配合,在制作漫画上完全可以实现无纸化作业,达到方便又环保的目的!软件在绘制操作上也完全符合传统纸绘漫画的习惯。
Comic Studio的日文版共有以下3个版本:Comic Studio EX旗舰版、Comic Studio PRO 专业版、Comic Studio Debut入门版。
其中Comic Studio EX旗舰版的功能与漫画素材是最丰富的!目前软件的版本号已发布到了Comic Studio 4.0版与4.5.4的升级补丁。
图1 Comic Studio日文版ic Studio在欧美地区也发行了英文版,软件的名字为Manga Studio。
其中manga是日文“漫畫”的音标字母。
Comic Studio英文版分为两个版本,分别是:Manga Studio EX旗舰版和Manga Studio Debut入门版。
所以Comic Studio与Manga Studio是同一个软件,而且值得一提的是Manga Studio的软件发行包装设计得非常精美 ^_^图2 Comic Studio英文版ic Studio的中文版在2009年才发行,是各版本中发行最迟的。
中文版分为:Comic Studio4.0 EX旗舰版和Comic Studio 4.0 Pro专业版两个版本。
从中文版的文字上又分为两个版本:简体中文版与繁体中文版。
图3 Comic Studio中文版Comic Studio的安装ic Studio使用目前常见的电脑配置就可很流畅地运行了。
NB-Designer软件操作手册(中文NB5和7适用).

Cat.No.NB 系列V106-CN5-01PNSPO!可编程终端NB-Designer用户手册1前言承蒙您惠购可编程终端NB 系列,谨致谢意。
NB 系列是指在FA 生产现场等地所产生的各种信息的可编程终端(PT)。
请在充分理解可编程终端的功能和性能等的基础上正确使用。
●读者对象本手册以下述人员为对象而编写。
具备电气知识(电气工程师或具备同等知识),且 y 负责引进FA 设备的人员; y 设计FA 系统的人员;y 安装、连接FA 设备的人员; y 管理FA 生产现场的人员。
●使用须知y 本手册除了对NB 系列的连接和设定进行说明之外,还介绍了其它必要的信息。
使用前请仔细阅读本手册,充分理解说明内容。
阅读后请妥善保管本手册,以便随时取阅。
●关于“使用时的承诺事项”1. 保修内容①保修期本公司产品的保修期为自购买之日或交付至指定场所之日起1年。
②保修范围在上述保修期内因本公司的责任而发生产品故障时,本公司将在产品购买地点免费予以更换或维修。
但当故障原因符合下列情况之一时,则不属于保修范围。
a)未按照产品目录或使用说明书等资料中说明的条件、环境、操作方法使用时; b)非本公司产品自身的原因时; c)未经本公司授权而改造或维修时; d)未按照本公司产品应有的方法使用时;e)以本公司产品出厂时的科技水平无法对故障进行预测时; f)因自然灾害等其它非本公司责任的不可抗力而导致故障时。
此外,以上的保修是指对本公司产品单件的保修,因本公司产品故障而造成的损失不属于保修对象。
2. 责任限制①因本公司产品而引起的特别损失、间接损失或消极损失,本公司概不负责。
②对于本公司的可编程产品,因非本公司人员编写的程序或由此而产生的后果,本公司概不负责。
23. 适用条件①将本公司产品与其它产品组合使用时,请确认适用的标准、法规或限制。
此外,请用户自行确认本公司的产品是否与您所使用的系统、机械和装置相兼容。
否则,本公司对自身产品的兼容性概不负责。
热值仪中文说明

List of Illustrations------------------------------------------------------------- v
Chapter 1-------------------------------------------------------------------------- 1
符号
文件符号定义
标签
说明
WARNING
包括条件、惯例和步骤必须谨慎执行, 以防人员伤害和设备损坏。
CAUTION
包括条件、惯例和步骤必须谨慎执行, 以防人员伤害和设备损坏
CAUTION
电击或高温部分危险,如不采取适当的 警告,可导致人员伤害。
CAUTION
静电感应元件,要求正确地触摸,以防 损坏。
Flo-Cal 用户手册
ii 索引
Chapter 4 --------------------------------------------------------------------------17
Installation ....................................................................................................... 17 System Mounting .............................................................................................. 17 Unpacking and Inspection .................................................................... 17 Wall Mount Preparation and Procedure ............................................... 18 Free Standing Mount Instructions ........................................................ 20 Electrical Installation......................................................................................... 21 Gas & Air Supply Installation ........................................................................... 22
金钱制造者软件安装指南说明书
Installation Guide for Money Maker Software:Terms Used:∙CTCL Users: The Users who do not trade for their own but trades for their Clients i.e. Sub Brokers/ Authorised Persons/Branches etc. (Franchisee is the well known word for Sub brokers)∙Solo Users: The users who trade for their own. Internet based clients.Get installed the following:(Take help of your Hardware vendor)∙Operating System: Windows XP:1.Windows XP Service Pack 32.Install .Net Frameworks (Dotnetframeworks)3.5 SP1 (Available free on MicrosoftWebsite)∙Operating System Windows Vista:1.Install .Net Frameworks (Dotnetframeworks) 3.5 SP1 (Available free on MicrosoftWebsite)2.Go to Control Penal>User Accounts> Select your User and turn Off User AccessControl∙Operating System Windows7 (32 Bit)1.Activate .Net Frameworks 3.5 SP 1 already installed with OS from Add/ RemovePrograms.2.Go to Control Penal>User Accounts> Select your User and turn Off User AccessControlYou can install Money Maker only after installation of above programs.3.Go to www.goldmine.co.in4.Select ‘Downloads’ from the menu5.Select Program /Files6.From the list given for downloads, Click on ‘Money Maker Chart Setups’7.Click on Run> Run (Twice as asked by the systems) and follow online Instruction8.If you are going to connect to Goldmine Server via Leased Line or Dial Upconnection (Other than Internet Connection), select ‘Host Modifier’ from the listof download items > Run>Run>Start>Close.∙CTCL Users:9.On the Goldmine Web site go to ‘Money Maker’ Se ction10.Select ‘CTCL’ and the select ‘Money Maker’11.Select ‘Install’ > ‘Install’12.Wait till the installation completes. It may take 2-10 minutes depending uponyour internet Speed.13.After completion of installation the program will start automatically and will askfor login.14.Cancel the login screen and go to Tools> Preferences > Connection15.Click on the Drop down box given which says “None”16.Select as per following:a.If you have Reliance internet Connection Select “Reliance”b.If you have any other internet Connection select “BSNL”c.If you are connecting via Leased Line or Dial-up select “Dial-up”∙Solo Users:17.On the Goldmine Web site go to ‘Money Maker’ Section18.Select ‘Solo’ and then select ‘Solo Install (Money Maker Solo For Internet Users)’19.Select ‘Install’ > ‘Install’20.Wait for till the installation completes. It may take 2-10 minutes depending uponyour internet Speed.21.After completion of installation the program will start automatically and will askfor login.22.Cancel the login screen and go to Tools> Preferences > Connection23.Click on the Drop down box given wh ich says “None”24.Select as per following:a.If you have Reliance internet Connection Select “SoloReliance”b.If you have any other internet Connection select “SoloBSNL”c.If you are connecting via Leased Line or Dial-up select “SoloDial-up”∙Common for all:25.After selecting above options, press on “Set” and then click on ‘Ok’26.Now go to file > Login27.Give the username and password given by the goldmine.28.Default password will be ‘ABCD1234’. Make sure to change the password whilelogging in for the first time.29.After login is completed go to file > new30.New blank price view will open. From the filter bar select the scrip you want andpress enter. The scrip will be listed in the price view.31.Now right click on the price view and select “save price view”32.Save the view in c:\Program Files\MoneyMaker // c:\ProgramFiles\MoneyMakerSoloYour software is now ready to tradeIn case of any problem contact Goldmine Technical Team.Happy Trading。
SubEclipse入门学习指南

SubEclipse入门学习指南(转自)前言我使用subclipse过程中出现了很多问题,查找google之后,发现网上根本就没有对Subclipse插件进行很详细的讲解,有的也只是提供简单的安装和使用教程,或者也是一些英文教程拿来整我们这些不愿意老看E文的人,所以我决定把Subclipse的相关文档中文化,以帮助那些不愿意看因为英文文档的朋友和同仁,当然还有自己备查。
错误和不足之处望多多指正。
下面是相关软件的版本:TortoiseSVN Subversion及以上(在线安装地址: Subversion Client Adapter 及以上Subversion Native Library Adapter (JavaHL) 及以上一、入门章节将告诉您关于SVN插件的基本操作,诸如...•创建一个版本控制仓库•连接到一个仓库地址•把新项目导入到仓库•从仓库中导出一个项目到你的工作区二、每日作业部分主要致力于维护日常的工作周期:•编辑•更新•提交作业•同步仓库(使用Synchronize视图)三、参考部分将详细讲解插件中的每个功能。
四、FAQ部分将对一些常见问题提供快速解答。
不管怎样您是新手,还是熟练使用SVN的熟手,在使用该插件操作SVN,再对照基于命令行方式的操作SVN,您会发现这可能是您学习和使用SVN的最佳起点。
入门主要内容•创建一个存放位置•把一个新项目导入到存储库•连接一个存在SVN的项目•检出项目创建一个存放位置概述毋庸置疑,在您开始使用一个SVN存储库工作之前,您必须在Eclipse IDE中定义这个存放位置。
步骤一般是通过SVN Repository视图中创建和运用您的存储库地址,它属于SVN Repository Exploring Perspective(SVN存储库扫描透视图)的一部分。
当你需要创建一个新的存储库地址时,点击Add SVN Repository按钮或者在右击透视图,选择New > Repository Location...添加SVN存储库对话框会提示您的存放位置的URL 。
Autodesk Shotgun软件高级车辆工作流解析说明书

TR467908Advanced Automotive Workflows with ShotgunBrandon TaskerAutodeskDescriptionLearn about all the possibilities that Shotgun software can unlock within the design studio workflow. In this session, we will dive into deeper technical applications of Shotgun, and how to configure Shotgun Toolkit to automate routine tasks and customize data hand-offs.Speaker(s)Brandon Tasker is a Toronto based Product Manager on the Autodesk Automotive team. With years in feature film and television production, he understands the value of a well defined workflow and an efficient production management system. Today he is focusing on bringing theShotgun solution into the Design Studio space.1. Learn how to make your everyday workflows more efficient withShotgun.When looking to implement advanced workflows in Shotgun, you first need to build a good foundation of organizing all project data in the software. Once you have begun standardizing and tracking the basics of everday workflows (project tracking, creative reviews, file & data management) you can start finding new processes and techniques to improve your workflow. See our Before Getting Started document to help.2. Learn about the different frameworks and components of Shotgun andhow to use them.Shotgun has many features that enable our customers to connect it to 3’rd party tools or services. One of the most popular ways to do this is to write event triggers based on event happening in Shotgun. Find more about Event Triggers here. You can also add your own right click options called Action Menu Items or if you are using the Integrations, you can also leverage the Toolkit Actions to run similar requests. Finally, learn about all of the Shotgun Toolkit ecosystem and how these integrations can be used, modified and extended for all of your needs.3. Learn how to use pipeline configurations to iterate and improve yourShotgun usage in an agile way.Although we didn’t touch on this topic in the talk, learn more about how Shotgun’s Pipeline Configurations work and how to manage them to customize and extend in an agile workflow.4. Learn how to use some basic Python to configure Shotgun Publishes. You can learn all about Shotgun’s Python & REST API’s. But to specifically extend Shotgun’s Publishing workflows, follow this guide here.ResourcesLearn more about Shotgun use in Automotive:Shotgun Solutions | AutomotiveShotgun in Automotive - Autodesk Virtual Launch 2020 Shotgun | Design Studio WorkflowShotgun Support | Getting Started in AutomotiveShotgun Developer Material:Developer | Shotgun SoftwareShotgun SIGGRAPH Developer DayAdministering Toolkit | HooksShotgun Toolkit WebinarsShotgun General Links:Shotgun SoftwareShotgun CommunityShotgun SupportShotgun DeveloperShotgun YoutubeCustomer Stories:Shotgun Behind the Wheel at Renaults Automotive Design Studio Honda RND Americas Shotgun Enabled WorkflowShotgun Production Management LAIKAs Animated Features。
