UITabBarController自定义
自定义tabbar的实现方式简单总结
自定义tabbar的实现方式简单总结
自定义TabBar是iOS开发中常见的需求之一,可以通过以下几种方式实现:
1. 使用UITabBarController的原生方法:UITabBarController是UIKit框
架提供的专门用于展示带有多个选项卡的界面控制器。
使用UITabBarController,我们可以轻松地实现自定义TabBar。
首先,我们需要
创建一个UITabBarController的实例,并将所有的视图控制器添加到TabBar 中。
然后,我们可以通过设置UITabBarItem来自定义每个选项卡的图标和
标题。
2. 自定义UIView作为TabBar的容器:我们可以创建一个自定义的UIView,作为TabBar的容器,并将其添加到界面中。
通过设置该容器视图
的frame、背景颜色和布局,我们可以自由地定制TabBar的外观。
然后,我
们可以在该容器视图中添加按钮或其他自定义控件,以实现各个选项卡的点
击事件和状态变化。
3. 使用第三方库:有许多第三方库可以帮助我们快速实现自定义TabBar,如RDVTabBarController、Tabman等。
这些库提供了丰富的功能和样式,可
以大大简化自定义TabBar的实现过程。
我们只需通过几行代码就可以创建
和配置自定义TabBar,而不必从头开始开发。
总之,自定义TabBar的实现方式有多种选择,我们可以根据项目需求和
个人喜好来选择适合的方法。
无论选择哪种方式,都需要注意尽量遵循苹果
的设计规范,以确保用户的使用体验。
WPF自定义ItemsControl控件
该控件叫 Sum m ar y, 主要是一些汇总信息的显示,有几个地方用,之前都是分散到各个XA ML 文件里,不统一。
本人WPF新手,对XAML了解不多,做这个软件基本上都是用CM,界面布局用Avalon Dock。
由于缺乏相关经验,又没有一个能问得上的人指导,写这个控件费了我很长时间(啥时有空啥时动动)。
之前主要做一些功能方面的,没有心思美化界面,现在虽然还有很多功能没写,但是基本上够自己用了,放下心思来做一些界面上的东西,要不然何苦选择WPF?先看一下图:该Custo m Cont rol 由4部分组成:大标题,小标题,值及Detail。
虽然细分这么多,但实质上还是一个列表类的控件,所以选择继承自 Item sC ontro l.做这个控件的时候,遇到了一些详细的问题不知道怎么解决,Google/Bing 都没有找到我要了解的,Baidu更不用提了,漫天的转载,Copy.1, 类似 Com boB ox 的 Displa yMemb erPat h 如何弄?既然都自定控件了,当然是想让它适用不同场景,不能局限于某一个实体类,最好是能像Displa yMemb erPat h ValueM em ber Path这样的属性。
这里,我定义了:Item Ti tlePa thPro perty及 Item Va luePa thPro perty来处理。
2,有了上面两个依赖属性,但是还不足以处理更多的场景,最好是能有不同的 Tem pla te 。
这里我定义了:TitleT em pla te / ValueT em pla te及De tailT em pla te.第一个问题,只需定义一个简单的 DataTe m plat e ,然后用 Tem pla teBin ding即可做到。
ViewController详解
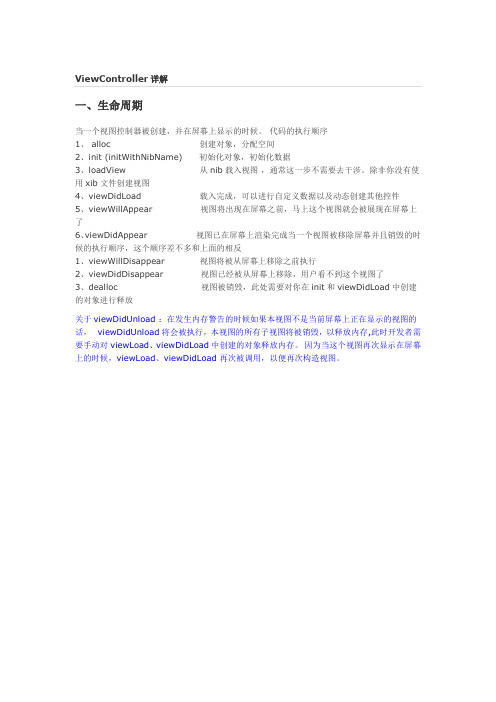
ViewController详解一、生命周期当一个视图控制器被创建,并在屏幕上显示的时候。
代码的执行顺序1、 alloc 创建对象,分配空间2、init (initWithNibName)初始化对象,初始化数据3、loadView从nib载入视图,通常这一步不需要去干涉。
除非你没有使用xib文件创建视图4、viewDidLoad载入完成,可以进行自定义数据以及动态创建其他控件5、viewWillAppear 视图将出现在屏幕之前,马上这个视图就会被展现在屏幕上了6、viewDidAppear视图已在屏幕上渲染完成当一个视图被移除屏幕并且销毁的时候的执行顺序,这个顺序差不多和上面的相反1、viewWillDisappear 视图将被从屏幕上移除之前执行2、viewDidDisappear视图已经被从屏幕上移除,用户看不到这个视图了3、dealloc 视图被销毁,此处需要对你在init和viewDidLoad中创建的对象进行释放关于viewDidUnload :在发生内存警告的时候如果本视图不是当前屏幕上正在显示的视图的话,viewDidUnload将会被执行,本视图的所有子视图将被销毁,以释放内存,此时开发者需要手动对viewLoad、viewDidLoad中创建的对象释放内存。
因为当这个视图再次显示在屏幕上的时候,viewLoad、viewDidLoad 再次被调用,以便再次构造视图。
二、view的加载过程文字说明在表述流程的时候总是很费力的,我又找到了如下的两张图跟随如下文字理解viewController对view加载过程:1 先判断子类是否重写了loadView,如果有直接调用。
之后调viewDidLoad完成View的加载。
2 如果是外部通过调用initWithNibName:bundle指定nib文件名的话,ViewController记载此nib来创建View。
3 如果initWithNibName:bundle的name参数为nil,则ViewController会通过以下两个步骤找到与其关联的nib。
十分钟学会搭建微信和微博两种主流框架(纯代码)

精讲系列之—十分钟学会搭建微信和微博两种主流框架(纯代码)目录:1、两种框架的介绍2、微信主流框架的实现思路3、微信主流框架的代码实现4、微博主流框架的实现思路5、微博主流框架的代码实现6、总结7、Demo下载介绍实际开发中,我们常会见到两种主流框架,一种类似于微信,UIWindow的根rootViewController为UITabBarController,然后调用addChildViewController(继承自UIViewController)添加子控制器。
然后实现控制器的跳转。
简述下点击UITabBarController的UITabBar切换控制器的原理:点击UITabBarController上的UITabBar跳转控制器的原理是:很多人未曾注意到UIViewController有个容器属性,可以添加一组子控制器。
@property(nonatomic,readonly) NSArray<__kindof UIViewController *> *childViewControllers NS_AVAILABLE_IOS(5_0);当然也可以通过如下方法添加子控制器- (void)addChildViewController:(UIViewController *)childController NS_AVAILABLE_IOS(5_0);UITabBarController继承自UIViewController,当然也会继承这个属性和方法。
UITabBarController的代理协议UITabBarControllerDelegate中有- (void)tabBarController:(UITabBarController *)tabBarController didSelectViewController:(UIViewController *)viewController;这个方法,点击UITabBar时,会将数组中的对应的UIViewController取出放在当前界面并显示。
WPF如何自定义TabControl控件样式示例详解

WPF如何⾃定义TabControl控件样式⽰例详解⼀、前⾔程序中经常会⽤到TabControl控件,默认的控件样式很普通。
⽽且样式或功能不⼀定符合我们的要求。
⽐如:我们需要TabControl的标题能够居中、或平均分布;或者我们希望TabControl的标题能够进⾏关闭。
要实现这些功能我们需要对TabControl的样式进⾏定义。
⼆、实现TabControl的标题平均分布默认的TabControl标题是使⽤TabPanel容器包含的。
要想实现TabControl标题头平均分布,需要把TabPanel替换成UniformGrid;替换后的TabControl样式如下:<Style x:Key="TabControlStyle" TargetType="{x:Type TabControl}"><Setter Property="Padding" Value="2"/><Setter Property="HorizontalContentAlignment" Value="Center"/><Setter Property="VerticalContentAlignment" Value="Center"/><Setter Property="Background" Value="White"/><Setter Property="BorderBrush" Value="#FFACACAC"/><Setter Property="BorderThickness" Value="1"/><Setter Property="Foreground" Value="{DynamicResource {x:Static SystemColors.ControlTextBrushKey}}"/><Setter Property="Template"><Setter.Value><ControlTemplate TargetType="{x:Type TabControl}"><Grid x:Name="templateRoot" ClipToBounds="True" SnapsToDevicePixels="True" KeyboardNavigation.TabNavigation="Local"><Grid.ColumnDefinitions><ColumnDefinition x:Name="ColumnDefinition0"/><ColumnDefinition x:Name="ColumnDefinition1" Width="0"/></Grid.ColumnDefinitions><Grid.RowDefinitions><RowDefinition x:Name="RowDefinition0" Height="Auto"/><RowDefinition x:Name="RowDefinition1" Height="*"/></Grid.RowDefinitions><UniformGrid x:Name="HeaderPanel" Rows="1" Background="Transparent" Grid.Column="0" IsItemsHost="True" Margin="0" Grid.Row="0" KeyboardNavigation.TabIndex="1" Panel.ZIndex="1"/><Line X1="0" X2="{Binding ActualWidth, RelativeSource={RelativeSource Self}}" Stroke="White" StrokeThickness="0.1" VerticalAlignment="Bottom" Margin="0 0 0 1" SnapsToDevicePixels="True"/><Border x:Name="ContentPanel" BorderBrush="{TemplateBinding BorderBrush}" BorderThickness="{TemplateBinding BorderThickness}" Background="{TemplateBinding Background}" Grid.Column="0" KeyboardNavigation.DirectionalNavigation="Contained" <ContentPresenter x:Name="PART_SelectedContentHost" ContentTemplate="{TemplateBinding SelectedContentTemplate}" Content="{TemplateBinding SelectedContent}" ContentStringFormat="{TemplateBinding SelectedContentStringFormat}" ContentSou </Border></Grid><ControlTemplate.Triggers><Trigger Property="TabStripPlacement" Value="Bottom"><Setter Property="Grid.Row" TargetName="HeaderPanel" Value="1"/><Setter Property="Grid.Row" TargetName="ContentPanel" Value="0"/><Setter Property="Height" TargetName="RowDefinition0" Value="*"/><Setter Property="Height" TargetName="RowDefinition1" Value="Auto"/></Trigger><Trigger Property="TabStripPlacement" Value="Left"><Setter Property="Grid.Row" TargetName="HeaderPanel" Value="0"/><Setter Property="Grid.Row" TargetName="ContentPanel" Value="0"/><Setter Property="Grid.Column" TargetName="HeaderPanel" Value="0"/><Setter Property="Grid.Column" TargetName="ContentPanel" Value="1"/><Setter Property="Width" TargetName="ColumnDefinition0" Value="Auto"/><Setter Property="Width" TargetName="ColumnDefinition1" Value="*"/><Setter Property="Height" TargetName="RowDefinition0" Value="*"/><Setter Property="Height" TargetName="RowDefinition1" Value="0"/></Trigger><Trigger Property="TabStripPlacement" Value="Right"><Setter Property="Grid.Row" TargetName="HeaderPanel" Value="0"/><Setter Property="Grid.Row" TargetName="ContentPanel" Value="0"/><Setter Property="Grid.Column" TargetName="HeaderPanel" Value="1"/><Setter Property="Grid.Column" TargetName="ContentPanel" Value="0"/><Setter Property="Width" TargetName="ColumnDefinition0" Value="*"/><Setter Property="Width" TargetName="ColumnDefinition1" Value="Auto"/><Setter Property="Height" TargetName="RowDefinition0" Value="*"/><Setter Property="Height" TargetName="RowDefinition1" Value="0"/></Trigger><Trigger Property="IsEnabled" Value="False"><Setter Property="TextElement.Foreground" TargetName="templateRoot" Value="{DynamicResource {x:Static SystemColors.GrayTextBrushKey}}"/></Trigger></ControlTemplate.Triggers></ControlTemplate></Setter.Value></Setter></Style>即使这样设置了,TabControl的标题还是很丑,这个时候就需要通过设置TabItem来更改标题样式了。
蓝鸥iOS培训课程表新版(含 AppleWatch)

19、 SQL语句,数据库 实战技术
第2页,共5页
北京蓝鸥科技有限公司
实战技术 20、综合讲解练习
21、集合视图UICollectionView
22、多线程(NSThread、NSOperationQueue、GCD)
23、UIView动画(基于Block的动画),CAAnimation动画(CAPropertyAnimation、 CATransition)
北京蓝鸥科技有限公司
蓝鸥科技-iOS课程表
简介 结合iOS 8推出的全新课程。课程优势:使用OS X 10.10操作系统,Xcode 6.x开发环境,采用FCBS教学模式,在原有 课程基础上,增添iOS 8教学(swift),(含 AppleWatch技术新课程)并且再次优化课程设置,增强学员综合能力。
课程内容
课程阶段 课程模 块 课时 模块介绍
测试学员是否适 入学考试、入学面谈。 Mac系统认知。 合学习 1、进制;C数据类型、常量变量、运算符、表达式、格式化输入输出 2、关系运算符、逻辑运算符、if、条件运算符、switch..case.. 3、while循环、do..while循环、for循环 4、一维数组、数组排序、字符数组 C语言是iOS开发 的入门基础语 5、二维数组、字符串数组、多维数组 言,本部分主要 88课 介绍C语言的基 6、函数分类、函数声明和定义、函数调用,形参实参、函数嵌套调用 时(11 本语法,C企业 天) 编程基本概念, 7、结构体、结构体数组 数据结构与精典 算法。 8、指针 9、高级指针 10、程序存储区划分、动态申请内存、内存操作函数 11、函数指针、回调函数、动态调用 iOS开发 基础 C语言考 8课时 试 笔试+机试 笔试及答案讲解 1、面向对象概念、类和对象、类的定义、对象创建 2、实例变量可见度、方法、setter、getter Objective-C是 iOS与Mac OS开 发的主要语言, 它是对C语言的 扩展,并融入了 面向对象的特点 80课 Objectiv 。包含封装、继 时(10 e-C语言 承、多态三大特 天) 性,本部分主要 介绍OC的基本语 法,新的特性, 内存管理,基础 类的使用等内容 。 3、继承、初始化方法、便利构造器 4、字符串的基本使用、数组的基本使用、学习查阅API文档 5、数组排序、block语法、基于block数组排序 6、 字典、集合、for..in、NSNumber、NSValue 7、NSDate、NSDateFormatter、类目、延展、协议、代理 8、属性、点语法、KVC 9、内存管理、NSCopying协议、属性内存管理 10、便利构造器内存管理、集合内存管理、复习 Objectiv e-C语言 8课时 考试 笔试+机试 笔试及答案讲解
自定义UITabBarController的TabBar视图
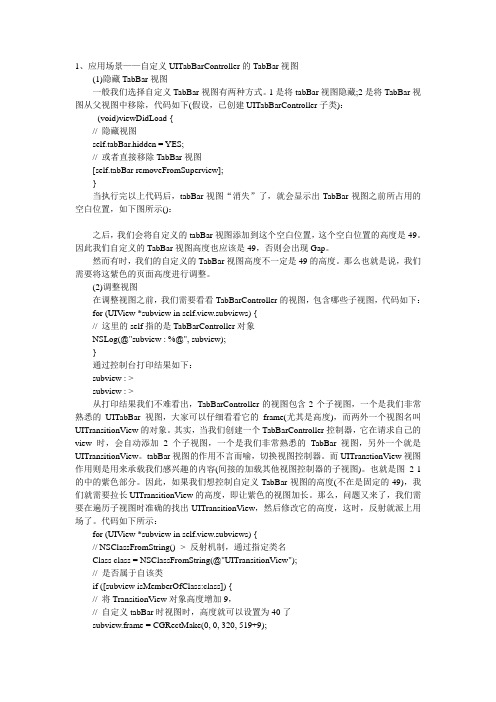
1、应用场景——自定义UITabBarController的TabBar视图(1)隐藏TabBar视图一般我们选择自定义TabBar视图有两种方式。
1是将tabBar视图隐藏;2是将TabBar视图从父视图中移除,代码如下(假设,已创建UITabBarController子类):- (void)viewDidLoad {// 隐藏视图self.tabBar.hidden = YES;// 或者直接移除TabBar视图[self.tabBar removeFromSuperview];}当执行完以上代码后,tabBar视图“消失”了,就会显示出TabBar视图之前所占用的空白位置,如下图所示():之后,我们会将自定义的tabBar视图添加到这个空白位置,这个空白位置的高度是49。
因此我们自定义的TabBar视图高度也应该是49,否则会出现Gap。
然而有时,我们的自定义的TabBar视图高度不一定是49的高度。
那么也就是说,我们需要将这紫色的页面高度进行调整。
(2)调整视图在调整视图之前,我们需要看看TabBarController的视图,包含哪些子视图,代码如下:for (UIView *subview in self.view.subviews) {// 这里的self指的是TabBarController对象NSLog(@"subview : %@", subview);}通过控制台打印结果如下:subview : >subview : >从打印结果我们不难看出,TabBarController的视图包含2个子视图,一个是我们非常熟悉的UITabBar视图,大家可以仔细看看它的frame(尤其是高度),而两外一个视图名叫UITransitionView的对象。
其实,当我们创建一个TabBarController控制器,它在请求自己的view时,会自动添加2个子视图,一个是我们非常熟悉的TabBar视图,另外一个就是UITransitionView。
uitabbarcontroller用法
uitabbarcontroller用法UITabBarController是iOS开发中常用的控制器,用于实现多个页面之间的切换。
下面来介绍一下UITabBarController的用法。
UITabBarController是一个容器控制器,可以在底部或顶部显示多个Tab选项卡。
每个选项卡对应一个独立的UIViewController,通过点击不同的选项卡可以实现页面之间的切换。
使用UITabBarController的步骤如下:1. 创建UITabBarController对象,并设置其代理。
2. 创建多个UIViewController作为各个选项卡的内容。
3. 将UIViewController添加到UITabBarController中。
4. 设置UITabBarController的选项卡的标题和图标。
5. 设置UITabBarController的其他属性,如选中的选项卡颜色、未选中的选项卡颜色等。
6. 将UITabBarController设置为窗口的根视图控制器。
通过以上步骤,可以实现一个简单的UITabBarController。
当用户点击不同的选项卡时,系统会自动切换到对应的UIViewController,并显示其内容。
除了基本的用法之外,UITabBarController还提供了一些其他功能,如通过设置代理可以在切换选项卡时执行一些自定义操作;也可以通过代码控制选中的选项卡等。
UITabBarController是iOS开发中实现多页面切换的重要工具,它可以方便地创建和管理多个UIViewController,并提供良好的用户交互体验。
开发者可以根据项目需求,灵活运用UITabBarController的各种属性和方法,实现不同的功能和效果。
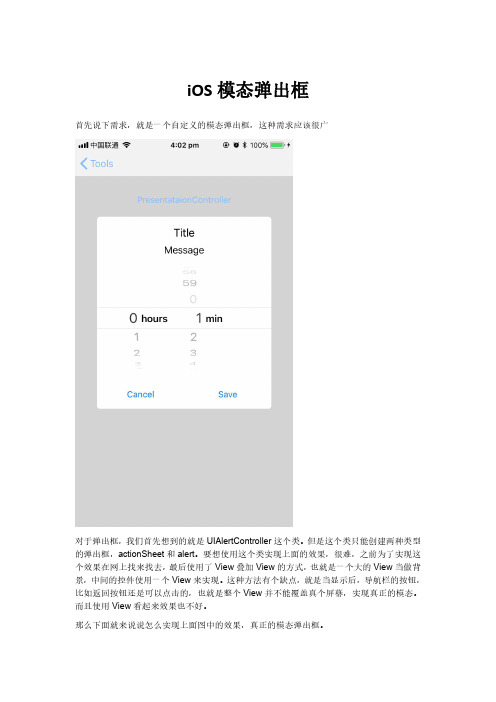
UIPresentationController - iOS自定义模态弹出框
var dimmingView: UIView?
override init(presentedViewController: UIViewController, presenting pres entingViewController: UIViewController?) {
super.init(presentedViewController: presentedViewController, present ing: presentingViewController)
转场动画包含主要的一个,由动画对象创建。还有任意你配置的动画,伴随主要动画。 在动画的处理过程中,UIKit 将会调用 containerViewWillLayoutSubviews 和 containerViewDidLayoutSubviews,在这两个方法中,你可以根据你的需要调整自定义 视图。 6) 最后当转场动画结束的时候调用 presentationTranistionDidEnd
override func presentationTransitionWillBegin() { let containerView = self.containerView // 设置背景透明度 // containerView?.backgroundColor = UIColor.lightGray.withAlphaCompo
你可以修改 presented 控制器的 frame 来实现只占用可用空间的部分空间。 presented 控制器默认占用整个 container 视图。为了改变这个 frame 占用的空间,可以 重写 presentation 控制器的 frameOfPresentedViewInContainerView。代码可以如下:
ios cyltabbarcontroller 基础用法

ios cyltabbarcontroller 基础用法UITabBarController是iOS开发中常用的控件之一,用于管理多个视图控制器的切换和显示。
在iOS中,UITabBarController通常用来实现底部Tab栏,让用户可以方便地切换不同模块或页面。
在本文中,将介绍UITabBarController的基础用法,包括创建、配置和管理TabBarController。
首先,要使用UITabBarController,需要在AppDelegate中创建一个UITabBarController的实例,并将其设置为根视图控制器。
可以通过如下代码来创建和配置UITabBarController:```objcUITabBarController *tabBarController = [[UITabBarController alloc] init];// 创建多个视图控制器UIViewController *firstViewController = [[FirstViewController alloc] init];UIViewController *secondViewController = [[SecondViewController alloc] init];// 可以继续创建其他的视图控制器// 将视图控制器添加到UITabBarController中tabBarController.viewControllers = @[firstViewController, secondViewController];// 设置UITabBarController的tabBar的样式tabBarController.tabBar.barTintColor = [UIColor whiteColor]; // 设置TabBar的背景颜色tabBarController.tabBar.tintColor = [UIColor blueColor]; // 设置TabBar的选中颜色// 将UITabBarController设置为根视图控制器self.window.rootViewController = tabBarController;```在上述代码中,首先创建了一个UITabBarController的实例,然后创建了多个视图控制器,并将它们添加到UITabBarController的viewControllers数组中。
关于UITabBar各部分自定义的代码片段
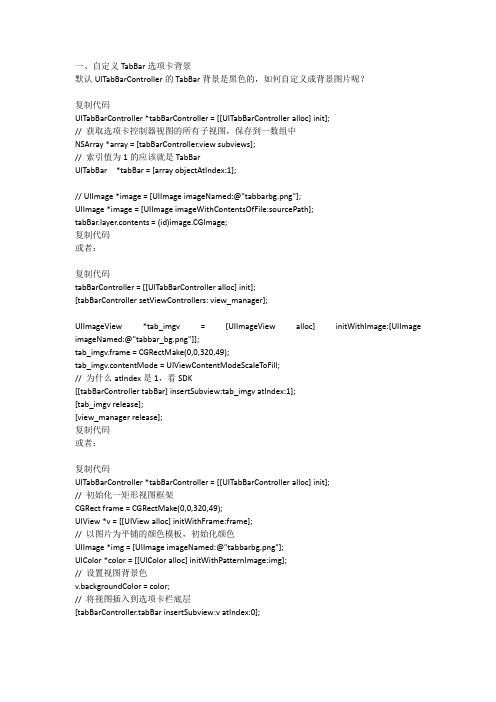
一、自定义TabBar选项卡背景默认UITabBarController的TabBar背景是黑色的,如何自定义成背景图片呢?复制代码UITabBarController *tabBarController = [[UITabBarController alloc] init];// 获取选项卡控制器视图的所有子视图,保存到一数组中NSArray *array = [tabBarController.view subviews];// 索引值为1的应该就是TabBarUITabBar *tabBar = [array objectAtIndex:1];// UIImage *image = [UIImage imageNamed:@"tabbarbg.png"];UIImage *image = [UIImage imageWithContentsOfFile:sourcePath];yer.contents = (id)image.CGImage;复制代码或者:复制代码tabBarController = [[UITabBarController alloc] init];[tabBarController setViewControllers: view_manager];UIImageView *tab_imgv = [UIImageView alloc] initWithImage:[UIImage imageNamed:@"tabbar_bg.png"]];tab_imgv.frame = CGRectMake(0,0,320,49);tab_imgv.contentMode = UIViewContentModeScaleToFill;// 为什么atIndex是1,看SDK[[tabBarController tabBar] insertSubview:tab_imgv atIndex:1];[tab_imgv release];[view_manager release];复制代码或者:复制代码UITabBarController *tabBarController = [[UITabBarController alloc] init];// 初始化一矩形视图框架CGRect frame = CGRectMake(0,0,320,49);UIView *v = [[UIView alloc] initWithFrame:frame];// 以图片为平铺的颜色模板,初始化颜色UIImage *img = [UIImage imageNamed:@"tabbarbg.png"];UIColor *color = [[UIColor alloc] initWithPatternImage:img];// 设置视图背景色v.backgroundColor = color;// 将视图插入到选项卡栏底层[tabBarController.tabBar insertSubview:v atIndex:0];tabBarController.tabBar.opaque = YES;[color release];[v release];复制代码或者:在UITabBarController子类中重写init方法来初始化复制代码- (id)init {if(self=[super init]){//方法一UIImageView *imgv = [[UIImageView alloc] initWithImage:[UIImage imageNamed:@"tabbarbg.png"]];imgv.frame = CGRectMake(0,0,self.tabBar.frame.size.width,self.tabBar.frame.size.height);imgv.contentMode = UIViewContentModeScaleToFill;// imgv.frame = CGRectOffset(imgv.frame,0,1);[[self tabBar] insertSubview:imgv atIndex:0];[imgv release];// 方法二CGRect frame = CGRectMake(0,0,self.view.bounds.size.width,49);UIView *view = [[UIView alloc] initWithFrame:frame];UIImage *tabImage = [UIImage imageNamed:@"tabbg.png"];UIColor *color = [[UIColor alloc] initWithPatternImage:tabImage];[view setBackgroundColor:color];[color release];[[self tabBar] insertSubview:view atIndex:0];[view release];}}复制代码当然在iOS5开始就最方便了,在iOS5中提供了一个API来设置UITabBar的背景图片,以及表示选中的图片。
uitabbar的使用

uitabbar的使用
UITabBar是UIKit框架中的一个类,用于在iOS应用程序中创建和管理底部导航栏。
通过UITabBar,您可以在底部显示多个选项卡,每个选项卡都与应用程序中的一个视图控制器相关联。
下面是使用UITabBar的一般步骤:
1. 创建UITabBarController实例:通过代码或者Interface Builder创建一个UITabBarController实例,并确保设置代理属性。
2. 创建和配置视图控制器:创建多个视图控制器,每个视图控制器都代表底部导航栏的一个选项卡。
为每个视图控制器设置标题和图标。
3. 设置选项卡:将视图控制器添加到UITabBarController的viewControllers数组中,按照它们在底部导航栏中出现的顺序进行排序。
4. 自定义选项卡项:如果需要自定义选项卡的外观,可以通过设置UITabBarItem的属性来修改标题、图标、背景图等。
5. 处理选项卡切换:在UITabBarController的代理方法中处理选项卡的切换事件。
可以根据需要执行一些操作,例如更新视图控制器的内容或响应用户操作。
6. 展示UITabBarController:将UITabBarController实例添加到应用程序的主窗口或其他视图中,以显示底部导航栏和相关的视图控制器。
使用UITabBar可以轻松实现底部菜单的导航,为应用程序提供更好的用户体验。
iOS系统导航栏的自定义化

本文由我司收集整编,推荐下载,如有疑问,请与我司联系iOS 系统导航栏的自定义化2015/06/20 5073 本文仅提供大家参考与交流,可能会有一些错误,欢迎大家指正。
Xcode 版本6.3.2。
大部分APP 都应用了导航控制器(UINavigationController)与标签控制器(UITableBarController),导航栏(UINavigationBar)的设定是非常重要的,系统的导航栏有很大的局限性,因此很多情况下都会使用自定义导航栏,或者修改系统导航栏。
关于导航控制器以及导航的概念,再简单提一下,一个导航控制器只有一个导航栏。
导航控制器可以有很多子视图控制器,子视图控制器上的导航栏的Item 和标题可以不同,是因为每个子视图控制器都有一个导航项(UINavigationItem)。
在任何子视图控制器上修改导航栏自身属性,会改变整个导航控制器的中的导航栏。
在上一篇博文中有提到,介绍导航控制器的概念本文主要讲解的是基于系统导航栏的自定义使用方法,就是在不隐藏系统导航栏的情况下,修改导航栏的各个属性。
1.设置背景创建导航控制器ViewController *viewCtrl = [[ViewController alloc] init];//预先创建导航控制器的根视图UINavigationController *navigationCtrl = [[UINavigationController alloc] initWithRootViewController:viewCtrl];//创建导航控制器self.window.rootViewController = navigationCtrl; 可以给导航控制器的根视图设置一个标题。
系统导航栏默认是这种颜色(跟白色有区别)的,而且带透明效果,导航栏的字体是黑色的,没有任何按钮。
在导航控制器的子视图中设置self.navigationController.navigationBar.translucent = NO;//设置导航栏透明度NO 表示不透明self.navigationController.navigationBar.tintColor = [UIColor greenColor];// 改变系统按钮的线条颜色self.navigationController.navigationBar.barTintColor = [UIColor yellowColor];//改变导航栏的背景颜色,注意使用.backgroundColor 去设置背景颜色,只会有淡淡的一层,跟没效果一样UIBarButtonItem *leftItem1 = [[UIBarButtonItemalloc]initWithBarButtonSystemItem:UIBarButtonSystemItemBookmarks target:self。
【IT专家】如何使用StoryBoard在UITabBarController中设置选定的选项卡?
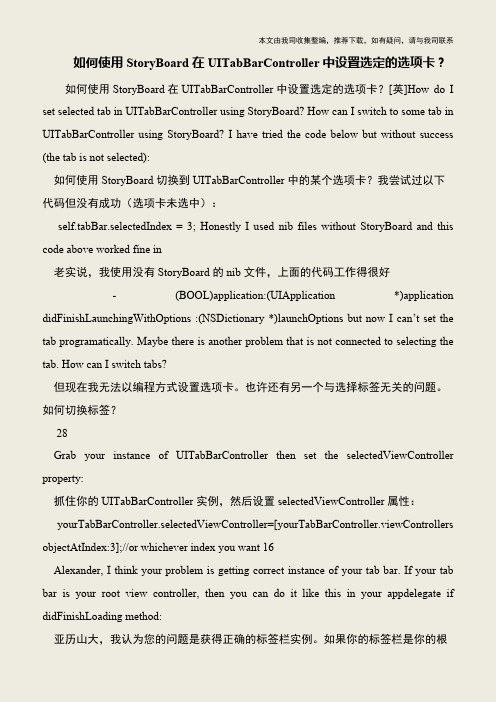
本文由我司收集整编,推荐下载,如有疑问,请与我司联系如何使用StoryBoard在UITabBarController中设置选定的选项卡?如何使用StoryBoard在UITabBarController中设置选定的选项卡?[英]How do I set selected tab in UITabBarController using StoryBoard? How can I switch to some tab in UITabBarController using StoryBoard? I have tried the code below but without success (the tab is not selected): 如何使用StoryBoard切换到UITabBarController中的某个选项卡?我尝试过以下代码但没有成功(选项卡未选中): self.tabBar.selectedIndex = 3; Honestly I used nib files without StoryBoard and this code above worked fine in 老实说,我使用没有StoryBoard的nib文件,上面的代码工作得很好 - (BOOL)application:(UIApplication *)application didFinishLaunchingWithOptions :(NSDictionary *)launchOptions but now I can’t set the tab programatically. Maybe there is another problem that is not connected to selecting the tab. How can I switch tabs? 但现在我无法以编程方式设置选项卡。
也许还有另一个与选择标签无关的问题。
UITabBarController的一些基础设置
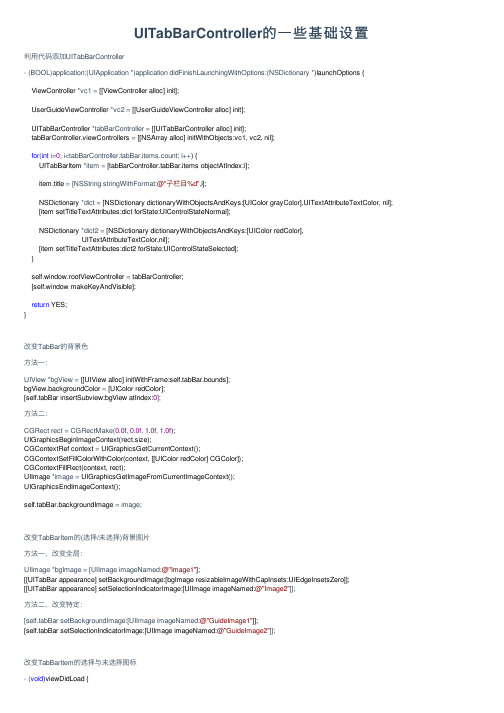
UITabBarController的⼀些基础设置利⽤代码添加UITabBarController- (BOOL)application:(UIApplication *)application didFinishLaunchingWithOptions:(NSDictionary *)launchOptions {ViewController *vc1 = [[ViewController alloc] init];UserGuideViewController *vc2 = [[UserGuideViewController alloc] init];UITabBarController *tabBarController = [[UITabBarController alloc] init];tabBarController.viewControllers = [[NSArray alloc] initWithObjects:vc1, vc2, nil];for(int i=0; i<tabBarController.tabBar.items.count; i++) {UITabBarItem *item = [tabBarController.tabBar.items objectAtIndex:i];item.title = [NSString stringWithFormat:@"⼦栏⽬%d",i];NSDictionary *dict = [NSDictionary dictionaryWithObjectsAndKeys:[UIColor grayColor],UITextAttributeTextColor, nil]; [item setTitleTextAttributes:dict forState:UIControlStateNormal];NSDictionary *dict2 = [NSDictionary dictionaryWithObjectsAndKeys:[UIColor redColor],UITextAttributeTextColor,nil];[item setTitleTextAttributes:dict2 forState:UIControlStateSelected];}self.window.rootViewController = tabBarController;[self.window makeKeyAndVisible];return YES;}改变TabBar的背景⾊⽅法⼀:UIView *bgView = [[UIView alloc] initWithFrame:self.tabBar.bounds];bgView.backgroundColor = [UIColor redColor];[self.tabBar insertSubview:bgView atIndex:0];⽅法⼆:CGRect rect = CGRectMake(0.0f, 0.0f, 1.0f, 1.0f);UIGraphicsBeginImageContext(rect.size);CGContextRef context = UIGraphicsGetCurrentContext();CGContextSetFillColorWithColor(context, [[UIColor redColor] CGColor]);CGContextFillRect(context, rect);UIImage *image = UIGraphicsGetImageFromCurrentImageContext();UIGraphicsEndImageContext();self.tabBar.backgroundImage = image;改变TabBarItem的(选择/未选择)背景图⽚⽅法⼀,改变全局:UIImage *bgImage = [UIImage imageNamed:@"Image1"];[[UITabBar appearance] setBackgroundImage:[bgImage resizableImageWithCapInsets:UIEdgeInsetsZero]]; [[UITabBar appearance] setSelectionIndicatorImage:[UIImage imageNamed:@"Image2"]];⽅法⼆,改变特定:[self.tabBar setBackgroundImage:[UIImage imageNamed:@"GuideImage1"]];[self.tabBar setSelectionIndicatorImage:[UIImage imageNamed:@"GuideImage2"]];改变TabBarItem的选择与未选择图标- (void)viewDidLoad {[super viewDidLoad];UIImage *carIcon = [UIImage imageNamed:@"CarIcon"];UIImage *grayCarIcon = [UIImage imageNamed:@"GrayCarIcon"];ViewController *vc1 = [[ViewController alloc] init];UITabBarItem *item1 = [[UITabBarItem alloc] initWithTitle:@"栏⽬A" image:carIcon tag:0];item1.selectedImage = grayCarIcon;vc1.tabBarItem = item1;UserGuideViewController *vc2 = [[UserGuideViewController alloc] init];UITabBarItem *item2 = [[UITabBarItem alloc] initWithTitle:@"栏⽬B" image:carIcon tag:0];item2.selectedImage = grayCarIcon;vc2.tabBarItem = item2;self.viewControllers = [[NSArray alloc] initWithObjects:vc1, vc2, nil];[self setSelectedViewController:vc2];}改变TabBarItem的⽂本颜⾊UITabBarItem *item = self.tabBar.items[0];NSDictionary *dict = [NSDictionary dictionaryWithObjectsAndKeys:[UIColor grayColor],UITextAttributeTextColor, nil]; [item setTitleTextAttributes:dict forState:UIControlStateNormal];NSDictionary *dict2 = [NSDictionary dictionaryWithObjectsAndKeys:[UIColor redColor],UITextAttributeTextColor,nil];[item setTitleTextAttributes:dict2 forState:UIControlStateSelected];。
iOS开发中UITabBarController的使用示例
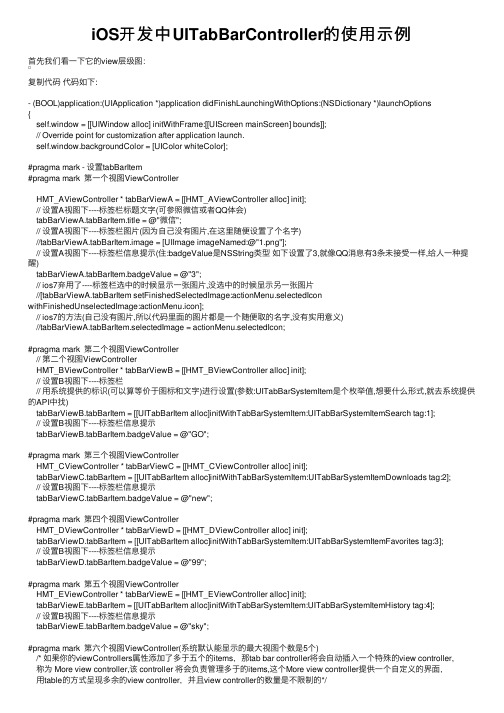
iOS开发中UITabBarController的使⽤⽰例⾸先我们看⼀下它的view层级图:复制代码代码如下:- (BOOL)application:(UIApplication *)application didFinishLaunchingWithOptions:(NSDictionary *)launchOptions{self.window = [[UIWindow alloc] initWithFrame:[[UIScreen mainScreen] bounds]];// Override point for customization after application launch.self.window.backgroundColor = [UIColor whiteColor];#pragma mark - 设置tabBarItem#pragma mark 第⼀个视图ViewControllerHMT_AViewController * tabBarViewA = [[HMT_AViewController alloc] init];// 设置A视图下----标签栏标题⽂字(可参照微信或者QQ体会)tabBarViewA.tabBarItem.title = @"微信";// 设置A视图下----标签栏图⽚(因为⾃⼰没有图⽚,在这⾥随便设置了个名字)//tabBarViewA.tabBarItem.image = [UIImage imageNamed:@"1.png"];// 设置A视图下----标签栏信息提⽰(住:badgeValue是NSString类型如下设置了3,就像QQ消息有3条未接受⼀样,给⼈⼀种提醒)tabBarViewA.tabBarItem.badgeValue = @"3";// ios7弃⽤了----标签栏选中的时候显⽰⼀张图⽚,没选中的时候显⽰另⼀张图⽚//[tabBarViewA.tabBarItem setFinishedSelectedImage:actionMenu.selectedIcon withFinishedUnselectedImage:actionMenu.icon];// ios7的⽅法(⾃⼰没有图⽚,所以代码⾥⾯的图⽚都是⼀个随便取的名字,没有实⽤意义)//tabBarViewA.tabBarItem.selectedImage = actionMenu.selectedIcon;#pragma mark 第⼆个视图ViewController// 第⼆个视图ViewControllerHMT_BViewController * tabBarViewB = [[HMT_BViewController alloc] init];// 设置B视图下----标签栏// ⽤系统提供的标识(可以算等价于图标和⽂字)进⾏设置(参数:UITabBarSystemItem是个枚举值,想要什么形式,就去系统提供的API中找)tabBarViewB.tabBarItem = [[UITabBarItem alloc]initWithTabBarSystemItem:UITabBarSystemItemSearch tag:1];// 设置B视图下----标签栏信息提⽰tabBarViewB.tabBarItem.badgeValue = @"GO";#pragma mark 第三个视图ViewControllerHMT_CViewController * tabBarViewC = [[HMT_CViewController alloc] init];tabBarViewC.tabBarItem = [[UITabBarItem alloc]initWithTabBarSystemItem:UITabBarSystemItemDownloads tag:2];// 设置B视图下----标签栏信息提⽰tabBarViewC.tabBarItem.badgeValue = @"new";#pragma mark 第四个视图ViewControllerHMT_DViewController * tabBarViewD = [[HMT_DViewController alloc] init];tabBarViewD.tabBarItem = [[UITabBarItem alloc]initWithTabBarSystemItem:UITabBarSystemItemFavorites tag:3];// 设置B视图下----标签栏信息提⽰tabBarViewD.tabBarItem.badgeValue = @"99";#pragma mark 第五个视图ViewControllerHMT_EViewController * tabBarViewE = [[HMT_EViewController alloc] init];tabBarViewE.tabBarItem = [[UITabBarItem alloc]initWithTabBarSystemItem:UITabBarSystemItemHistory tag:4];// 设置B视图下----标签栏信息提⽰tabBarViewE.tabBarItem.badgeValue = @"sky";#pragma mark 第六个视图ViewController(系统默认能显⽰的最⼤视图个数是5个)/* 如果你的viewControllers属性添加了多于五个的items,那tab bar controller将会⾃动插⼊⼀个特殊的view controller,称为 More view controller,该 controller 将会负责管理多于的items,这个More view controller提供⼀个⾃定义的界⾯,⽤table的⽅式呈现多余的view controller,并且view controller的数量是不限制的*/HMT_FViewController * tabBarViewF = [[HMT_FViewController alloc] init];tabBarViewF.tabBarItem = [[UITabBarItem alloc]initWithTabBarSystemItem:UITabBarSystemItemContacts tag:5];// 设置F视图下----标签栏信息提⽰tabBarViewF.tabBarItem.badgeValue = @"AG";#pragma mark - 设置TabBarController// 创建TabBarControllerUITabBarController * tabBarController = [[UITabBarController alloc]init];// TabBarController默认是放在最底部的,如果你想调整位置,可以进⾏下⾯2部操作(44是iPhone中TabBarController和UINavigationController标准⾼度)//CGRect frame = CGRectMake(0, 20, 320, 44);//tabBarController.tabBar.frame = frame;// 每⼀个tab都必须有⼀个content view controller------->viewControllers属性,⽤来存⼊⼀个应⽤的TabBarController有多少个界⾯切换tabBarController.viewControllers = [NSArrayarrayWithObjects:tabBarViewA,tabBarViewB,tabBarViewC,tabBarViewD,tabBarViewE,tabBarViewF, nil nil];// 设置着⾊tabBarController.tabBar.tintColor = [UIColor greenColor];// 设置选中图⽚时候tabBarController.tabBar.selectedImageTintColor = [UIColor brownColor];// 设置背景图⽚(⾃⼰没有图⽚,不进⾏设置)//tabBarController.tabBar.backgroundImage = [UIImage imageNamed:@"@@@@@"];// 设置程序启动时默认的ViewController视图(设置为3,⼀共5个ViewController,进来时候显⽰的视图就是第4个-tabBarViewD,下标从0开始)tabBarController.selectedIndex = 3;self.window.rootViewController = tabBarController;[self.window makeKeyAndVisible];return YES;}最后效果如下图:UITabBarController的代理⽅法以及模态显⽰⾸先要实现协议<UITabBarControllerDelegate>复制代码代码如下:// 设置代理tabBarController.delegate =self;//UINavigationController *nav = tabBarController.moreNavigationController;//[nav setNavigationBarHidden:YES animated:YES];// 控制哪些ViewController的标签栏能被点击- (BOOL)tabBarController:(UITabBarController *)tabBarControllershouldSelectViewController:(UIViewController*)viewController{// 代表HMT_CViewController这个View⽆法显⽰,⽆法点击到它代表的标签栏if ([viewControllerisKindOfClass:[HMT_CViewControllerclass]]) {returnNO;}returnYES;}// 选中哪个标签栏,⼀个监控作⽤吧- (void)tabBarController:(UITabBarController *)tabBarControllerdidSelectViewController:(UIViewController *)viewController{ }// More view controller将要开始编辑- (void)tabBarController:(UITabBarController *)tabBarControllerwillBeginCustomizingViewControllers:(NSArray*)viewControllers{}// More view controller将要结束编辑- (void)tabBarController:(UITabBarController *)tabBarControllerwillEndCustomizingViewControllers:(NSArray*)viewControllers changed:(BOOL)changed{}// More view controller编辑- (void)tabBarController:(UITabBarController *)tabBarControllerdidEndCustomizingViewControllers:(NSArray*)viewControllers changed:(BOOL)changed{}#import "HMT-AViewController.h"#import "HMTModalShowViewController.h"@interfaceHMT_AViewController ()@end@implementation HMT_AViewController- (void)viewDidLoad{[superviewDidLoad];self.view.backgroundColor = [UIColorredColor];// 创建⼀个按钮UIButton * button = [UIButton buttonWithType:UIButtonTypeDetailDisclosure];button.frame =CGRectMake(100,100,100, 100);[button addTarget:self action:@selector(modalShow)forControlEvents:UIControlEventTouchUpInside];[self.view addSubview:button];// Do any additional setup after loading the view.}- (void)modalShow{HMTModalShowViewController * modalShowVC = [[HMTModalShowViewController alloc]init];//模态视图控制器呈现出来时候的视觉效果modalShowVC.modalTransitionStyle =UIModalTransitionStyleCrossDissolve;/*UIModalTransitionStyleCoverVertical = 0, //默认,由下往上UIModalTransitionStyleFlipHorizontal, //⽔平转动效果UIModalTransitionStyleCrossDissolve, //渐变效果UIModalTransitionStylePartialCurl, //书页往上翻动效果*///模态视图控制器呈现⽅式,默认全屏modalShowVC.modalPresentationStyle =UIModalPresentationFullScreen;/*UIModalPresentationFullScreen = 0,UIModalPresentationPageSheet,UIModalPresentationFormSheet,UIModalPresentationCurrentContext,UIModalPresentationCustom,UIModalPresentationNone = -1,*/UINavigationController * modalShowNC = [[UINavigationController alloc] initWithRootViewController:modalShowVC]; //推出模态视图控制器[self presentViewController:modalShowNC animated:YES completion:^{NSLog(@"hello world");}];}#import "HMTModalShowViewController.h"@interfaceHMTModalShowViewController ()@end@implementation HMTModalShowViewController- (void)viewDidLoad{[superviewDidLoad];// Do any additional setup after loading the view.self.view.backgroundColor = [UIColor yellowColor];// 利⽤UINavigationController来实现退出控制器UIBarButtonItem * barButton = [[UIBarButtonItem alloc] initWithBarButtonSystemItem:UIBarButtonSystemItemAdd target:self action:@selector(modalDismiss)];self.navigationItem.leftBarButtonItem = barButton;self.navigationItem.title =@"humingtao";//创建⼀个按钮来实现退出控制器/* UIButton * button = [UIButton buttonWithType:UIButtonTypeDetailDisclosure];button.frame = CGRectMake(100, 100, 100, 100);[button addTarget:self action:@selector(modalDismiss) forControlEvents:UIControlEventTouchUpInside];[self.view addSubview:button];*/}- (void)modalDismiss{//退出模态视图控制器[self dismissViewControllerAnimated:YES completion:^{NSLog(@"退出GoodBye");}];}@end。
IOS学习之第二个View使用UITabBarViewController

IOS学习之第二个View使用UITabBarViewControllerIOS学习之第二个View使用UITabBarViewController 前面有一篇博文IOS学习之T ab Bar的使用和视图切换这是在AppDelegate里使用Tabbar,这样的程序打开就是TabbarView了,有时候我们需要给程序做一些帮助页面,或者登录页面,之后才跳转到tabbar View 里,或者后面的页面才使用Tabbar的,那这样怎么实现呢?我们建立一个视图,然后在这个视图通过[self presentModalViewController : tabBar animated:YES];跳转来实现。
当程序中需要在多个View直接切换的时候,可以使用UINavigationController,也可以用ModalViewController。
UINabigationController 是通过导航条来切换多个view。
而如果view 的数量比较少,且显示领域为全屏的时候,用ModalViewController 就比较合适(比如需要用户输入信息的view,结束后自动回复到之前的view)1、新建一个Single View app,按Command + N新建三个ViewController ,都选上.xib文件。
1.1 新建的Controller分别是:TestOneController TestTwoController TestThirdViewController ,他们都继承UIViewController。
单击xib文件,在.xib文件的属性窗口里修改View的颜色,这样好在切换页面的时候区分出来是切换了页面。
好吧,我的ThirdViewController没有xib,可能是漏了,不过也没关系,一样能用。
1.2 添加TabBarViewController最重要的是再添加一个TabBarViewController,这个需要继承的UITabBarController2、在ViewController也就是程序进来的第一个页面。
IOS-快速自定义UITabBarController内的tabbar控件-郭晓
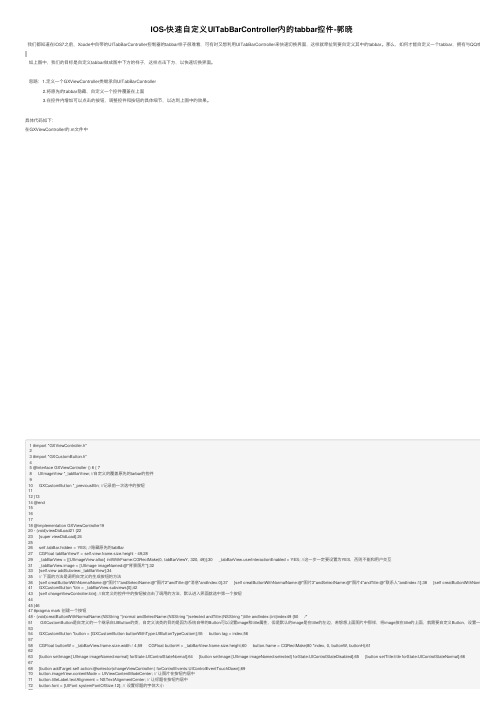
IOS-快速⾃定义UITabBarController内的tabbar控件-郭晓我们都知道在IOS7之前,Xcode中⾃带的UITabBarController控制器的tabbar样⼦很难看,可有时⼜想利⽤UITabBarController来快速切换界⾯,这样就牵扯到要⾃定义其中的tabbar。
那么,如何才能⾃定义⼀个tabbar,拥有与QQ或者新浪微博那如上图中,我们的⽬标是⾃定义tabbar做成图中下⽅的样⼦,这样点击下⽅,以快速切换界⾯。
思路:1.定义⼀个GXViewController类继承⾃UITabBarController 2.将原先的tabbar隐藏,⾃定义⼀个控件覆盖在上⾯ 3.在控件内增加可以点击的按钮,调整控件和按钮的具体细节,以达到上图中的效果。
具体代码如下:在GXViewController的.m⽂件中1 #import "GXViewController.h"23 #import "GXCustomButton.h"45 @interface GXViewController ()6 { 78 UIImageView *_tabBarView; //⾃定义的覆盖原先的tarbar的控件910 GXCustomButton *_previousBtn; //记录前⼀次选中的按钮1112 }1314 @end15161718 @implementation GXViewController1920 - (void)viewDidLoad21 {2223 [super viewDidLoad];242526 self.tabBar.hidden = YES; //隐藏原先的tabBar27 CGFloat tabBarViewY = self.view.frame.size.height - 49;2829 _tabBarView = [[UIImageView alloc] initWithFrame:CGRectMake(0, tabBarViewY, 320, 49)];30 _erInteractionEnabled = YES; //这⼀步⼀定要设置为YES,否则不能和⽤户交互31 _tabBarView.image = [UIImage imageNamed:@"背景图⽚"];3233 [self.view addSubview:_tabBarView];3435 // 下⾯的⽅法是调⽤⾃定义的⽣成按钮的⽅法36 [self creatButtonWithNormalName:@"图⽚1"andSelectName:@"图⽚2"andTitle:@"消息"andIndex:0];37 [self creatButtonWithNormalName:@"图⽚3"andSelectName:@"图⽚4"andTitle:@"联系⼈"andIndex:1];38 [self creatButtonWithNormalName:@"图41 GXCustomButton *btn = _tabBarView.subviews[0];4243 [self changeViewController:btn]; //⾃定义的控件中的按钮被点击了调⽤的⽅法,默认进⼊界⾯就选中第⼀个按钮4445 }4647 #pragma mark 创建⼀个按钮48 - (void)creatButtonWithNormalName:(NSString *)normal andSelectName:(NSString *)selected andTitle:(NSString *)title andIndex:(int)index49 {50 /*51 GXCustomButton是⾃定义的⼀个继承⾃UIButton的类,⾃定义该类的⽬的是因为系统⾃带的Button可以设置image和title属性,但是默认的image是在title的左边,若想想上⾯图⽚中那样,将image放在title的上⾯,就需要⾃定义Button,设置⼀些东西。
iOS应用开发中导航栏按钮UIBarButtonItem的添加教程

iOS应用开发中导航栏按钮UIBarButtonItem的添加教程iOS应用开发中导航栏按钮UIBarButtonItem的添加教程这篇文章主要介绍了iOS应用开发中导航栏按钮UIBarButtonItem的添加教程,文中详细介绍了使用UINavigationController导航控制器添加的过程,需要的朋友可以参考下1、UINavigationController导航控制器如何使用UINavigationController可以翻译为导航控制器,在iOS里经常用到。
我们看看它的如何使用:下面的图显示了导航控制器的流程。
最左侧是根视图,当用户点击其中的General项时,General视图会滑入屏幕;当用户继续点击Auto-Lock项时,Auto-Lock视图将滑入屏幕。
相应地,在对象管理上,导航控制器使用了导航堆栈。
根视图控制器在堆栈最底层,接下来入栈的是General视图控制器和Auto-Lock视图控制器。
可以调用pushViewControllerAnimated:方法将视图控制器推入栈顶,也可以调用popViewControllerAnimated:方法将视图控制2、UINavigationController的结构组成看下图,UINavigationController有Navigationbar,NavigationView,Navigationtoobar等组成。
现在我们建立一个例子,看看如何使用UINavigationController3、新建一个项目命名为UINavigationControllerDemo,为了更好理解UINavigationController,我们选择EmptyApplication模板4、创建一个ViewController,命名为RootViewController:依次选择File——New——NewFile,默认勾上WithXIBforuserinterface.选择正确位置创建完成,这时项目里多了三个文件,分别是RootViewController.hRootViewController.mRootViewController.x ib文件。
UITabBarController的使用总结
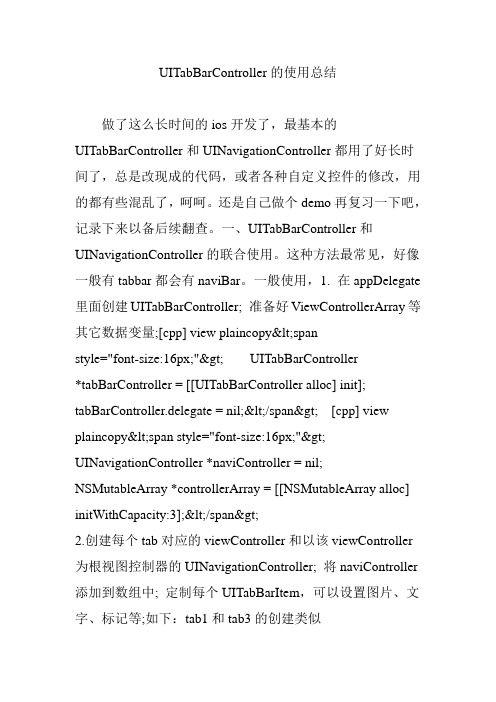
UITabBarController的使用总结做了这么长时间的ios开发了,最基本的UITabBarController和UINavigationController都用了好长时间了,总是改现成的代码,或者各种自定义控件的修改,用的都有些混乱了,呵呵。
还是自己做个demo再复习一下吧,记录下来以备后续翻查。
一、UITabBarController和UINavigationController的联合使用。
这种方法最常见,好像一般有tabbar都会有naviBar。
一般使用,1. 在appDelegate 里面创建UITabBarController; 准备好ViewControllerArray等其它数据变量;[cpp] view plaincopy<spanstyle="font-size:16px;"> UITabBarController*tabBarController = [[UITabBarController alloc] init]; tabBarController.delegate = nil;</span> [cpp] view plaincopy<span style="font-size:16px;"> UINavigationController *naviController = nil; NSMutableArray *controllerArray = [[NSMutableArray alloc] initWithCapacity:3];</span>2.创建每个tab对应的viewController和以该viewController 为根视图控制器的UINavigationController; 将naviController 添加到数组中; 定制每个UITabBarItem,可以设置图片、文字、标记等;如下:tab1和tab3的创建类似[cpp] view plaincopy<span style="font-size:16px;"> SecondTabViewController *secondController = [[SecondTabViewController alloc]initWithStyle:UITableViewStylePlain]; naviController = [[UINavigationController alloc] initWithRootViewController:secondController]; // UITabBarItem *secondTab = [[UITabBarItem alloc] initWithTitle:nil image:[UIImage imageNamed:@"tab2.png"] tag:2]; UITabBarItem *secondTab = [[UITabBarItem alloc]initWithTabBarSystemItem:UITabBarSystemItemFeatured tag:2]; naviController.tabBarItem = secondTab; secondController.navigationItem.title = @"second tab"; [secondTab release]; [controllerArrayaddObject:naviController]; [naviController release]; [secondController release];</span>3. 将viewController数组设置给tabBarController,tabBarController添加到窗口显示。
- 1、下载文档前请自行甄别文档内容的完整性,平台不提供额外的编辑、内容补充、找答案等附加服务。
- 2、"仅部分预览"的文档,不可在线预览部分如存在完整性等问题,可反馈申请退款(可完整预览的文档不适用该条件!)。
- 3、如文档侵犯您的权益,请联系客服反馈,我们会尽快为您处理(人工客服工作时间:9:00-18:30)。
整个效果图如下:这里默认读者是具备一定的xcode基础知识,并且熟悉obj-c开发语言,如是不具备这些知识,请读者自己加强自身的学习。
创建一个基于window的应用,命名为customTab,点击完成,界面如下:完成后如下:找到MainWindow.xib,双击打开,这里不要乱改什么东西,提供界面截图进行对照:可以看到所有的内容是框架自动添加的,包括它的一些属性,都是默认的,我们这里不需要改动任何东西、我们现在要做的就是加入UITabBarController,打开库,向其添加控件!可以看到,框架已经默认的添加了二个tabbar在程序中,如下图所示:这里不要改动什么属性,继续学着往下做,当你领悟后可以随便修改!这样做我们并没有将UITabBarController,加入到window中,所以下面需要通过代码来实现!在customTabAppDelegate.h文件中添加ib属性的UITabBarController,如下图所示:然后在相应的.m文件中添加@synthesize tab_bar;如何添加,这里不做任何多余的介绍,不要忘记在释放实例,这是内存管理方面的知识,这里只给出代码:- (void)dealloc {[tab_bar release];//释放实例[window release];[super dealloc];}现在就是连线的问题,专业的叫什么我不知道了,现在就这样来称呼,打开MainWindow.xib文件,选中如下图高亮的项目,在属性设置中可以看到tab_bar,拖住右边的圆圈到左边的Tab Bar Controller 上,连线成功后如下图所示:通过上述操作后运行模拟器看不到任何效果,这是为什么!!!继续,我们需要用代码来解决这一个问题,看到代码后就知道问题出在哪里了!在.m 文件中的如下方法添加[window addSubview:tab_bar.view];方法,再运行模拟器就可以看到两个框架生成的tabbar了。
- (BOOL)application:(UIApplication *)application didFinishLaunchingWithOptions:(NSDictionary *)launchOptions {// Override point for customization after application launch.[window addSubview:tab_bar.view];[self.window makeKeyAndVisible];returnYES;}接着修改部分属性!这就是我们主要做的事情。
如下图所示,选中Tab Bar Controller,再点击“Inspector”出现下图所示的右图所示的界面,点击+号,会加入一个tabbar,这里再加入二个tabbar,共四个!双击title修改其名称如下图,主要是用来区别,可以不修改。
所有完成后,运行模拟器可以看到四个tabbar,这里就不再给出参考图!下面就需要将每一个tab bar item 分配给其他的视图控制器来控制,新建一个基于类UIViewController的文件如下图:添加好后,注意不要弄错了。
下面再打开MainWindow.xib来设置title为“first”的tab bar item的类型,个人理解为交由主动权由别的视图来控制它!修改NIB Name为firstViewController,如下:再修改其父类如下:通过上述方法便把第一个tab bar item交由firstViewController这个视图控制器来管理,这样你可以在firstViewController.xib中放置某些控件就可以看到效果。
这里不给出参考图。
同理其它的三个tab bar item这里不再进行方法介绍,与这个操作完全一致,如果读者没有得到相应的效果就请再来一次。
下面我们要把重点放在UITabBarController的自定义上来。
新建基于UITabBarController文件,这里不需要xib文件,注意它的父类!建好之后将现在给出的.h文件中的内容复制到你的.h文件中,将.m文件复制到你的.m文件中,上述做好后,我们再来做最后一项工作。
视图控制器的管理。
同样打开MainWindow.xib文件,注意没有修改前如下,注意高亮:此时的UITabBarController是由自己来管理的,我们的目的是自定义,由我们来控制,现在我们就把它的主动权进行剥夺!修改它的Type,如下所示:保存完成,运行看模拟器,呼呼,一切成功…代码如下:头文件//// custom_tabbar.h// customTab//// Created by zhaoxiaopeng on 11-6-24.// QQ:251792377// Copyright All rights reserved.#import <UIKit/UIKit.h>@interface custom_tabbar : UITabBarController{//button背景图片UIImageView *backgroud_image;//选中时的图片UIImageView *select_image;//背景图片UIImageView *tab_bar_bg;//button上的textNSMutableArray *tab_text;NSMutableArray *tab_btn;UIButton *btn;}- (void) init_tab;- (void) when_tabbar_is_unselected;- (void) add_custom_tabbar_elements;- (void) when_tabbar_is_selected:(int)tabID;@end实现文件://// custom_tabbar.m// customTab//// Created by zhaoxiaopeng on 11-6-24.// QQ:251792377// Copyright All rights reserved.#import "custom_tabbar.h"@implementation custom_tabbar- (void)init_tab{backgroud_image = [[UIImageView alloc]initWithImage:[UIImage imageNamed:@"NavBar_01.png"]];select_image = [[UIImageView alloc]initWithImage:[UIImage imageNamed:@"NavBar_01_s.png"]];tab_bar_bg = [[UIImageView alloc]initWithImage:[UIImage imageNamed:@"tools_bar_bg.png"]];tab_text = [[NSMutableArray alloc] initWithObjects:@"选手",@"背景",@"总决赛",@"星途",nil];}- (void)viewDidAppear:(BOOL)animated {[super viewWillAppear:animated];[self init_tab];[self when_tabbar_is_unselected];[self add_custom_tabbar_elements];}- (void)when_tabbar_is_unselected{for(UIView *view inself.view.subviews){if([view isKindOfClass:[UITabBar class]]){view.hidden = YES;break;}}}-(void)add_custom_tabbar_elements{int tab_num = 4;int i = 0;UIImageView *tabbar_bg = [[UIImageView alloc]initWithFrame:CGRectMake(0, 430, 320, 50)];[tabbar_bg setImage:tab_bar_bg.image];[self.view addSubview:tabbar_bg];tab_btn = [[NSMutableArray alloc] initWithCapacity:0];for (i; i < tab_num; i++){btn = [UIButton buttonWithType:UIButtonTypeCustom];[btn setFrame:CGRectMake(10 + i*75, 430, 75, 50)];[btn setBackgroundImage:backgroud_image.image forState:UIControlStat eNormal];[btn setBackgroundImage:select_image.image forState:UIControlStateSel ected];[btn setTitle:[tab_text objectAtIndex:i] forState:UIControlStateNormal];[btn.titleLabel setFont:[UIFont boldSystemFontOfSize:15.0]];if (i == 0){[btn setSelected:YES];}[btn setTag:i];[tab_btn addObject:btn];[self.view addSubview:btn];[btn addTarget:self action:@selector(button_clicked_tag:)forControlEvents:UIControlEventTouchUpInside];[btn release];}}- (void)button_clicked_tag:(id)sender{int tagNum = [sender tag];[self when_tabbar_is_selected:tagNum];}- (void)when_tabbar_is_selected:(int)tabID{switch(tabID){case0:[[tab_btn objectAtIndex:0] setSelected:true];[[tab_btn objectAtIndex:1] setSelected:false];[[tab_btn objectAtIndex:2] setSelected:false];[[tab_btn objectAtIndex:3] setSelected:false];break;case1:[[tab_btn objectAtIndex:0] setSelected:false];[[tab_btn objectAtIndex:1] setSelected:true];[[tab_btn objectAtIndex:2] setSelected:false];[[tab_btn objectAtIndex:3] setSelected:false];break;case2:[[tab_btn objectAtIndex:0] setSelected:false];[[tab_btn objectAtIndex:1] setSelected:false];[[tab_btn objectAtIndex:2] setSelected:true];[[tab_btn objectAtIndex:3] setSelected:false];break;case3:[[tab_btn objectAtIndex:0] setSelected:false];[[tab_btn objectAtIndex:1] setSelected:false];[[tab_btn objectAtIndex:2] setSelected:false];[[tab_btn objectAtIndex:3] setSelected:true];break;}self.selectedIndex = tabID;}- (void)dealloc {[backgroud_image release];[select_image release];[tab_bar_bg release];[tab_text release];[tab_btn release];[super dealloc]; }@end资源文件:NavBar_01_s.pngNavBar_01.pngtools_bar_bg.png。