ARTES20_Workshop_Prague_2010_Presentation_GNSS Dependability
Roboguide软件:机器人固定喷涂仿真

Roboguide软件:机器人固定喷涂仿真Roboguide软件中有众多的机器人仿真模块,其中PaintPRO是专门用于机器人喷涂工艺的模块。
本期,就来为大家介绍一下如何使用PaintPRO模块进行机器人固定喷涂仿真。
一、喷涂工作站创建1.在开始菜单或桌面上点击“PaintPRO”图标,打开Roboguide 软件的喷涂应用模块。
2.软件工具栏中点击“New Cell ”命令按钮或者点击“File” ->“New Cell”,弹出New Workcell窗口。
3.在Workcell Name后设置工作站名称,如PaintPRO1。
Booth 区域下勾选“Build from Scratch”(自定义配置),Style Processing区域下勾选“Stop Sation”(固定喷涂),其他保持默认,点击“OK”按钮。
4.弹出虚拟机器人编辑向导对话框,Step1选择机器人创建方法,勾选“Create a new robot with the default PaintPRO config”,即使用默认的喷涂模块配置创建新机器人,点击“Next”按钮。
5.Step2选择机器人软件版本,这里选择最高版本,即V8.3-R-30iB,点击“Next”按钮。
6.Step3选择机器人系统工艺软件包,这里选择“PaintTool(N.A)(H596)”,点击“Next”按钮。
7.Step4选择机器人模型,这里选择“P-250iB/15(H679)”,点击“Next”按钮。
8.Step5选择机器人外部轴,本项目无外部轴,因此这里保持默认,点击“Next”按钮。
9.Step6选择机器人软件可选项,这里勾选“J567(DCS Pos./Speed check)”,点击“Next”按钮。
10.Step7在此对话框中确认之前所选的配置信息,确认无误后点击“Finish”按钮。
11.此时,弹出虚拟示教器对话框,机器人控制器开始初始化配置,等待初始化配置完成。
ArenaMatch Utility 小前景 补声扬声器 AMU105 AMU108 AMU206

规范信息
本产品符合所有适用的欧盟指令要求。您可以从网站 /compliance 找到完整的符合性声明。
此符号表示不得将此产品作为生活垃圾丢弃,应将其送到合适的 回收站点进行回收。正确处理和回收有助于保护自然资源、人类 健康和环境。想要获得更多关于此产品的处理和回收的信息,请 联系当地市政当局、垃圾处理服务部门或您购买此产品的商店。
中国危险物质限用表
有毒或有害物质或元素名称及成分
有毒或有害物质和元素
零件名称
铅
汞
(Pb) (Hg)
镉 ()
六价铬 (CR(VI))
多溴化 联苯 (PBB)
印刷电路板 X
O
O
O
O
金属零件
X
O
O
O
O
塑料零件
O
O
O
O
O
扬声器
X
O
O
O
O
线缆
X
O
O
O
O
此表格依据 SJ/T 11364 的要求制定。
O:表示此零件中所有均质材料所包含的此类有毒或有害物质均低于 GB/T 26572 中的限定要求。
6. 只能使用制造商指定的附件/配件。
7.
只能使用制造商指定或随本设备一起销售的推车、支架、
三角架、托架或工作台。如果使用推车,则在移动推车/设
备时应格外小心,以免因倾倒而造成伤害。
警告/小心:
包含可能导致窒息危险的小部件。不适合 3 岁以下的儿童使用。
本产品含有磁性材料。有关这是否会影响到您的植入式医疗器 械,请咨询您的医生。
包装清单................................................................................................................................................................................................... 5 可选配件................................................................................................................................................................................................... 5 检查和维护....................................................................................................................................................................................................... 6 保持防风雨性........................................................................................................................................................................................... 6 推荐使用的工具.............................................................................................................................................................................................. 6 产品尺寸........................................................................................................................................................................................................... 7 ArenaMatch Utility AMU105........................................................................................................................................................... 7 ArenaMatch Utility AMU108........................................................................................................................................................... 8 ArenaMatch Utility AMU206.......................................................................................................................................................... 9 ArenaMatch Utility AMU208........................................................................................................................................................ 10
Synopsys OptoDesigner 2020.09安装指南说明书
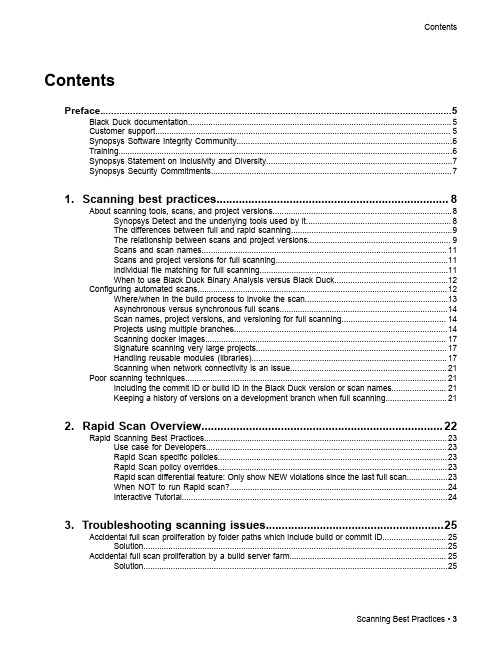
3. Troubleshooting scanning issues........................................................25
Accidental full scan proliferation by folder paths which include build or commit ID............................ 25 Solution......................................................................................................................................25
Contents
Contents
Preface....................................................................................................5
1. Scanning best practices......................................................................... 8
Clonezilla Basics for Windows Embedded说明书

Clonezilla Basics for Windows EmbeddedBy Sean D. Liming and John R. MalinAnnabooks –August 22, 2014Cloning a master image for mass production is an important step for Windows Embedded Standard and Windows Embedded Industry. First, the image must be rolled back to create the master, which is accomplished using sysprep. Here is an example command:Sysprep /generalize /oobe /shutdown /unattend:c:\myunattend.xmlThe unattended XML file is a small answer file that handles several of the Out-of-Box Experience (OOBE) screens as well as accounts, run–time key, computer names, etc. There are those that say you don’t need sysprep, but failure to run sysprep and just copy the image can run into technical consequences. In short, one must run sysprep to duplicate the image.Once the image has been rolled back, the next step is to capture the master image for deployment to other systems. The books: Starter Guide for Windows® System Image Manager, Professional's Guide To Windows® Embedded 8 Standard, and Professional's Guide To Windows® Embedded Standard 7 - 2nd Edition cover creating the unattended file and running sysprep, but what is not covered is an actual full disk capture utility. There are several hardware disk duplication solutions for hard drive and compact flash cards. International Microsystems I nc. and Logicube are two companies that offer hardware duplication products. . There are also software solutions, but some of the most popular like Norton Ghost are going end-of-life in favor of licensed server-based solutions. Microsoft has solutions to capture partitions into WIM files, but when multiple partitions need to be captured, the WIM file solution is very cumbersome. Simple and inexpensive software image capture solutions are becoming hard to find. Luckily, the Linux community has developed a solution called Clonezilla that captures full disk images; and best of all, it is a free solution that can be used to capture a Windows Embedded master image.This paper walks through the steps to create a Clonezilla disk to capture and deploy a Windows Embedded master disk image. You will need two USB flash disks. One will hold the Clonezilla boot disk image (USB disk size 8 GB), and the other will hold the captured image (USB flash disk size 32 GB or greater recommended).Note: This paper is based on Clonezilla 2.2.3-25 live image. The steps and pictures will be different for later versions.Generate Clonezilla boot diskWe start on the development machine, and download a utility to help create the Clonezilla boot disk.1. Download Tuxboot from . The actual download comes from SourceForge.2. Format the smaller USB flash disk as FAT 32. Format the larger flash disk as exFAT.3. Plug the smaller USB flash disk into the development machine and run Tuxboot.4. The Tuxboot application will start. Make sure that clonezilla_live_stable is selected forthe On-Line Distribution. Also, point to the correct USB flash drive.5. Click OK to start the process. The Clonezilla ISO will be downloaded, mounted locally,and then copied over to the flash disk.6. Do not reboot when asked. Just Exit Tuxboot.7. Safely eject the USB flash drive.Capture Disk ImageNow, we move to the target system that holds the master image.1. Plug the Clonezilla boot disk that we just created into the target system.2. Boot the target and make sure the BIOS is set up to boot from the USB flash disk.3. The Clonezilla boot screen appears. Select Clonezilla Live (Default settings, VGAXXXxYYY) and hit Enter.4. The OS will load. Select English as the language to use and hit Enter.5. Keep the default Don’t touch keymap and hit Enter.6. The default Start_Clonezilla Start Clonezilla should be selected, hit Enter.7. In the next menu, select device-image work with disks or partitions using images asthe operation mode and hit Enter.8. The next menu is for the image directory. Keep the default, local_dev, and hit Enter.9. Insert the larger USB flash disk when prompted, wait about 5 seconds, and then hitEnter.10. The system will mount and prepare the UBS flash disk for the image. You will be askedfor the home directory to store the image. Select the USB flash disk image (sdx1) and hit Enter.11. The top directory is the default, hit Enter.12. A summary will appear, hit Enter.13. The clone wizard starts. Select Beginner and hit Enter.14. The Select Mode screen appears. Select save disk, and hit Enter.15. An image name with date has been started. Rename the image as you like. For example“Annabooks-2014-08-18-19-img”, hit Enter.16. The hard disk will be selected as the default source. Hit Enter.17. Select Skip checking/repairing source file system, hit Enter.18. Check save disk image option appears, the default is Yes, check the saved image. HitEnter.19. Hit Enter to continue.20. Click y at the prompt and hit Enter to begin the backup process.21. The capture and check process takes several minutes depending on image size. HitEnter when completed22. Select Poweroff to Power down the system, and hit Enter.23. Remove both flash disks after the target powers down.Deploy the Captured Disk ImageThe two USB disks to capture the image can now be used to deploy the image to other systems.1. Plug the Clonezilla boot disk into the target system.2. Boot the target and make sure the BIOS is setup to boot from the USB flash disk.3. The Clonezilla boot screen appears. Select Clonezilla Live (Default settings, VGAXXXxYYY) and hit Enter.4. The OS will load. Select English as the language to use and hit Enter.5. Keep the default Don’t touch keymap and hit Enter.6. The default Start_Clonezilla Start Clonezilla should be selected, hit Enter.7. In the next menu, select device-image work with disks or partitions using images asthe operation mode and hit Enter8. The next menu is for the image directory. The default is for local_dev, hit Enter.9. Insert the larger USB flash disk when prompted, wait about 5 seconds, and then hitEnter.10. The system will mount and prepare the UBS flash disk for the image. You will be askedfor the home directory to store the image. Select the USB flash disk image (sdx1) and hit Enter.11. The top directory is the default, hit Enter.12. A summary will appear, hit Enter.13. The clone wizard starts. Select Beginner and hit Enter.14. The Select Mode screen appears. Select restoredisk and hit Enter.15. The system will search the disk for an image. Since there is only one image on the disk, itis already select, so hit Enter.16. Select the hard drive and hit Enter.17. Hit Enter again.19. One more time, enter y at the prompt and hit Enter.20. The process can take several minutes. Hit Enter when completed.21. Select to Poweroff to power down the system, and hit Enter.22. Remove both flash disks after the target powers down.23. Boot the system again and let the Windows cloning process run on the system.Once the master Clonezilla image has been created, it can be deployed any number of times to identical target hardware systems. This could easily be incorporated as part of the manufacturing process for an embedded system product.。
艺术师控制器公司时间capsule设备说明书
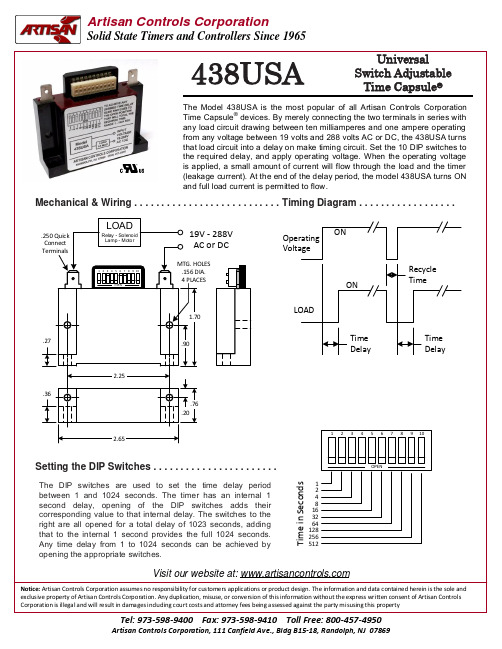
Mechanical & Wiring . . . . . . . . . . . . . . . . . . . . . . . . . . . Timing Diagram . . . . . . . . . . . . . . . . . ..250 Quick Connect TerminalsLOAD Relay - SolenoidLamp - MotorO PEN 12345678910Notice: Artisan Controls Corporation assumes no responsibility for customers applications or product design. The information and data contained herein is the sole andVisit our website at: Specifications . . . . . . . . . . . . . . . . . . . . . . . . . . . . . . . . . . . . . . . . . . . . . . . . . . . . . . . . . . . .Operating Voltage:Timing Mode:Timing Range:Timing Adjustment:Programmable Timing Tolerance:Timing Variation:Repeatability Of Timing Period:Recycle Time:Output Rating:Output Voltage Drop in "ON" State:Leakage Current in "OFF" State:Transient Protection:Operating Temperature:Humidity:Terminations:Agency Certifications:National Stock Number:Data Sheet © and Revision Date:19 to 288 Volts AC 50/60 Hz or DC.Delay-On-Make, External load energizes after preset timing periodas set by the 10 DIP switches.Digital timing is DIP switch programmable from 1 to 1024 seconds.From 1 second (All Closed) to 1024 seconds (All Open) in 1 secondincrements.±10%±15% worst case at any combination of operating voltage andtemperature.±1% nominal.50 milliseconds if output is ON, 200 milliseconds during a timingcycle while output is OFF.10 milliamperes to 1 ampere inductive with inrush current to 25amperes for 8 milliseconds.4 volts maximum.0.6 mA @ 24V, 1.8 mA @48V, 5.4 mA @120V, 11.4 mA @ 240V.Maximum transient voltage protection is 6000 volts as deliveredthrough a source resistance of 30 ohms with a maximum durationof 8.3 milliseconds.-20°C to +85°C95% condensingTwo (2) .25 Faston type.UL File E47858, Appliance Controls - Component ATNZ2 (US) &ATNZ8 (Can), Auxiliary Devices - Component NKCR2 (US) &NKCR8 (Can).NSN 5999-01-113-0824March 27, 2017。
DIgSILENT Simulation Language DSL Workshop presentatio教程
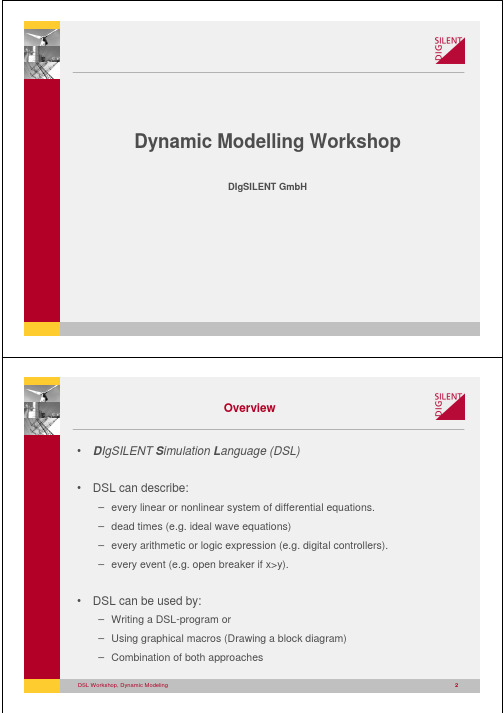
DIgSILENT GmbH
Overview
• DIgSILENT Simulation Language (DSL)
• DSL can describe:
– every linear or nonlinear system of differential equations. – dead times (e.g. ideal wave equations) – every arithmetic or logic expression (e.g. digital controllers). – every event (e.g. open breaker if x>y).
dx1 dt
=
x1
+
x2
+
dx2 dt
=
x1
− x2
+
yi
• General, Explicit System of Differential Equations:
xyrr&o==frgr((xrxr,,yryri i))
DSL Workshop, Dynamic Modeling
6
Example of a system / process: Steam Turbine
• A DSL model can be represented graphically.
• Macros are used to define: algebraic equations, basic control elements like PID, PTn or even complete physical subsystems like valve groups or excitation systems.
纹理物体缺陷的视觉检测算法研究--优秀毕业论文
摘 要
在竞争激烈的工业自动化生产过程中,机器视觉对产品质量的把关起着举足 轻重的作用,机器视觉在缺陷检测技术方面的应用也逐渐普遍起来。与常规的检 测技术相比,自动化的视觉检测系统更加经济、快捷、高效与 安全。纹理物体在 工业生产中广泛存在,像用于半导体装配和封装底板和发光二极管,现代 化电子 系统中的印制电路板,以及纺织行业中的布匹和织物等都可认为是含有纹理特征 的物体。本论文主要致力于纹理物体的缺陷检测技术研究,为纹理物体的自动化 检测提供高效而可靠的检测算法。 纹理是描述图像内容的重要特征,纹理分析也已经被成功的应用与纹理分割 和纹理分类当中。本研究提出了一种基于纹理分析技术和参考比较方式的缺陷检 测算法。这种算法能容忍物体变形引起的图像配准误差,对纹理的影响也具有鲁 棒性。本算法旨在为检测出的缺陷区域提供丰富而重要的物理意义,如缺陷区域 的大小、形状、亮度对比度及空间分布等。同时,在参考图像可行的情况下,本 算法可用于同质纹理物体和非同质纹理物体的检测,对非纹理物体 的检测也可取 得不错的效果。 在整个检测过程中,我们采用了可调控金字塔的纹理分析和重构技术。与传 统的小波纹理分析技术不同,我们在小波域中加入处理物体变形和纹理影响的容 忍度控制算法,来实现容忍物体变形和对纹理影响鲁棒的目的。最后可调控金字 塔的重构保证了缺陷区域物理意义恢复的准确性。实验阶段,我们检测了一系列 具有实际应用价值的图像。实验结果表明 本文提出的纹理物体缺陷检测算法具有 高效性和易于实现性。 关键字: 缺陷检测;纹理;物体变形;可调控金字塔;重构
Keywords: defect detection, texture, object distortion, steerable pyramid, reconstruction
II
art教程命令

进入全局设置状态 config terminal
退出全局设置状态 end
进入端口设置状态 interface type slot/number
退出局部设置状态 exit
设置交换机名 hostname name
show ip route igrp ┃ 查看IGRP协议路由信息
━━━━━━━━━━━━━━━━┻━━━━━━━━━━━━━━━
2、进入全局配置与返回模式
Switch>enable
Switch#config terminal (进入全局配置模式)
Switch(config)#exit(退回上一级模式)
Switch #
(cisco)路由器动态路由协议命令
1.RIP协议
━━━━━━━━━┳━━━━━━━━━━━━━━━
命令 ┃ 功能
━━━━━━━━━╋━━━━━━━━━━━━━━━
router ┃ 指定使用RIP协议
━━━━━━━━━╋━━━━━━━━━━━━━━━
命令 ┃ 功能
━━━━━━━━━━━━━━━━━━━━━━━╋━━━━━━━━━━━━━━━
int s0
ip add 192.168.2.254 255.255.255.64
route ospf 100
network 192.168.1.0 0.0.0.2 area 0
R1:int eth0
ip add 192.168.1.254 255.255.255.128
R1:router eigrp 200
network 192.168.1.254 0.0.0.1
allegro使用汇总

1.如何在allegro中取消花焊盘(十字焊盘)set up->design parameter ->shape->edit global dynamic shape parameters->Thermal relief connects ->Thru pins ,Smd pins -> full contact2.allegro 中如何设置等长setup -> constraints->electrical->net->routing->Min Max Propagation delays选择要等长的net->右击->create->pin pair->选择pin修改prop daly 的min 和max项3.如何设置allegro的快捷键修改文件$inst_dir\share\pcb\text\env 或$inst_dir\pcbevn\env快捷键定义如下:alias F12 zoom outalias ~R angle 90 (旋转90 度)alias ~F mirror (激活镜相命令)alias ~Z next (执行下一步命令)alias End redisplay(刷新屏幕)alias Del Delete(激活删除命令)alias Home Zoom fit(全屏显示)alias Insert Define grid(设置栅格)alias End redisplayalias Pgdown zoom outalias Pgup zoom inalias F12 custom smoothalias Pgup slidealias Pgdown donealias Home hilightalias End dehilightalias Insert add connectalias Del Delete4.如何在allegro中删除有过孔或布线的层时不影响其他层1.输出specctra的dsn文件allegro->file->export->router->demo.dsn->run2.产生session文件specctra(pcb router)->file->write->session->demo.ses->ok3.删除某一层中的布线和过孔delete(ctrl+D)->..4.删除allegro中的板层setup->cross section->鼠标右键->delete5.导入session文件allegro->file->import->router->demo.ses->run也可先将通过该层的过孔先替换成顶层焊盘,删除该层以后再替换回来5.如何在Allegro中同时旋转多个零件1.Edit->Move 在Options中Rotation的Point选User Pick2 再右键选Term Group 按住鼠标左键不放并拉一个框选中器件多余的可用Ctrl+鼠标左键点击去掉.3. 选好需整体旋转的器件后右键complete.4. 提示你Pick orgion 鼠标左键选旋转中心.5 下面右键选rotate 即可旋转了.6.allegro 16.0 透明度设置display->colour/visibility->display->OpenGL->Global transparency->transparent7.allegro Drill hole size is equal or larger than smallest pad size.Pad will be drilled away.提示Drill hole size is equal or larger than smallest pad size.Pad will be drilled away.不用理睬这一提示8.ALLEGRO 如何生成钻孔文件Manufacture -> NC -> Drill Customization->auto generate symbolsManufacture -> NC -> Drill LegendManufacture -> NC ->NC parameters->enhanced excellon format->closeManufacture -> NC -> NC Drill->auto tool select->optimize drill head travel9.CAM350如何正确导入钻带文件导进去后MACRO->PLAY->选择(CAM350--SCRIPTS)PADS_DRILL->选择钻带的REP文件还没测试过,rep文件从哪儿来的呢10.allegro 如何设置route keepin,package keepin1.setup->area->route keepin,package keepin ->画框2.edit ->z-copy->options->package keepin,route keepin->offset->50->点击外框11.allegro 中如何禁止显示shape完全禁止的方法没找到setup->user preference editor->display->display_shapefill->输入一个较大的数shape在显示时就不是那么显眼了set-user preference editor-shape-no shape fill(v)12.如何在allegro设置自定义元件库路径在下面两个位置添加自定义元件的路径Setup->User Preferences Editor->Design_paths->padpathSetup->User Preferences Editor->Design_paths->psmpath1.在allegro中如何修改线宽在Allegro的Setup->constraints里的set standard values中可定义每一层走线的宽度,比如,可以定义VCC和GND的线宽为10 Mil。
ART动作捕捉系统中文安装手册

西安现代控制技术研究所视景仿真软件系统安装手册目录虚拟交互系统ART (2)一.系统简介 (2)二.系统组成及工作原理 (3)1.ARTtrack /TP Camera,高速位置跟踪捕捉摄像机 (3)2.ATC/TP with DTrack2 Full-featured,预装位置跟踪处理软件的跟踪服务器 (3)3.Flystick2,专用6自由度漫游交互手柄 (4)4.Eye Glasses tracking target,头部眼点跟踪目标刚体 (5)5.Dtrack2,位置跟踪系统软件 (5)6.其他相关附件: (5)7.系统工作原理 (6)三.系统安装手册 (7)1.摄像头安装 (7)2.连线,主机与摄像头连线 (10)3.安装主机 (11)4.Flystick交互手柄的安装 (12)5.Dtrack2软件安装 (14)图形管理及可视化软件Techviz XL (14)1.检查网络环境: (14)2.检查显卡的驱动版本: (15)3.显卡驱动的设置: (16)4.Techviz软件的安装步骤 (18)虚拟交互系统ART一.系统简介虚拟交互系统ART位置跟踪系统是一款近红外光学跟踪系统,结合了专业级的光学跟踪技术,价格合理,性能卓越,用于为标准AR/VR应用领域提供最佳的跟踪性能,专用于演示系统提供专业级的高精确度、坚固耐用的虚拟交互产品。
本系统型号:A.R.T.TrackPack 4,规格参数:1)实现头部的漫游跟踪,与视景仿真显示系统兼容;2)支持ART Flystic2光学动作追踪设备以及交互应用;3)与Techviz紧密集成,可实现与UG NX7.5、Mechanical、Fluent 12.0软件中模型的交互操作;ART交互系统性能参数:1、解决四个刚体6DOF实时追踪,延时小于2ms,精度1mm;2、追踪捕捉频率60HZ,实现高速率的追踪频率。
3、摄像头焦距=2.6m米,完全符合仿真系统系统要求;4、低噪音,可连接外部同步信号;可在中型投影墙(4.50米*2.60米)前使用,也可在洞穴式虚拟空间(3.00米*3.00米*2.40米)中配合无线无源或有源目标使用。
Artioscad操作说明
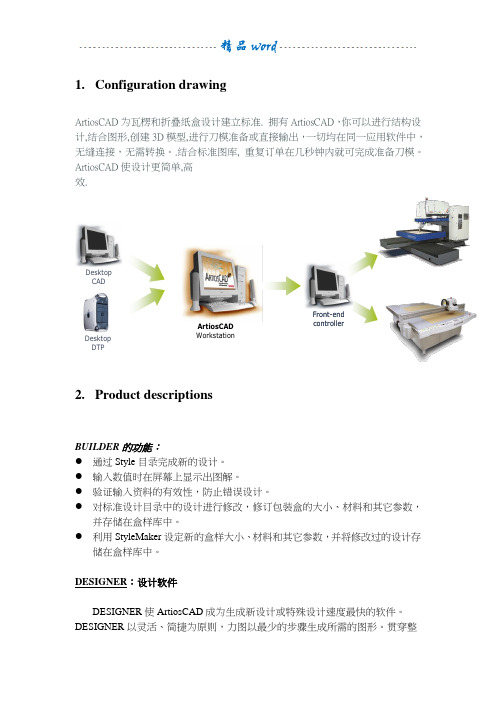
1. Configuration drawingArtiosCAD 为瓦楞和折叠纸盒设计建立标准. 拥有ArtiosCAD ,你可以进行结构设计,结合图形,创建3D 模型,进行刀模准备或直接输出,一切均在同一应用软件中,无缝连接,无需转换。
.结合标准图库, 重复订单在几秒钟内就可完成准备刀模。
ArtiosCAD 使设计更简单,高效.DesktopCADDesktopDTPFront-endcontrollerArtiosCAD Workstation2. Product descriptionsBUILDER 的功能:● 通过Style 目录完成新的设计。
● 输入数值时在屏幕上显示出图解。
● 验证输入资料的有效性,防止错误设计。
● 对标准设计目录中的设计进行修改,修订包装盒的大小、材料和其它参数,并存储在盒样库中。
● 利用StyleMaker 设定新的盒样大小、材料和其它参数,并将修改过的设计存储在盒样库中。
DESIGNER :设计软件DESIGNER 使ArtiosCAD 成为生成新设计或特殊设计速度最快的软件。
DESIGNER 以灵活、简捷为原则,力图以最少的步骤生成所需的图形。
贯穿整个系统的图像回馈功能使得ArtiosCAD易学易用,用户可以根据自己的需求和个人风格选择不同的工作方式,不仅可以生成新的设计,也可以打开并修改现有的设计。
和Builder组合作用,用户可以从Style菜单中选择盒样,增加并更改有关资料。
所有生成的设计都已包括所有尺寸数值,只数通过少数几个步骤,即可方便地生成详细的生产文件,包括出血位、定义上光区域等,既可以和图像生成系统沟通,也可以和DieMaker一起完成上光橡胶布。
DESINGER的功能:●利用多种强大的工具可以生成几何图形。
●有多个工具用于完成复制、移动、修整、分离、调节、拉伸图形。
●辅助线可以帮助完成复杂的工作和图形的拉伸。
●利用屏幕上的小键盘可以建立公式,支持距离和角度的复制。
DAVE代码自动生成软件操作指南(8

Infineon DAVE代码自动生成软件操作指南(8 bit MCU 部分)注意。
声明:由于本公司人力有限,发生错误在所难免,一切以Infineon公司提供的相关IC datasheet等资料为准,欢迎目录前言 (1)1 Project Settings:工程设置 (2)2 T0/T1:定时器0/1 (5)3 UART:串行通信接口 (11)4 Interrupt Unit:中断管理单元 (17)5 UART1:串行通信接口1 (23)6 T2:定时器T2 (29)7 T21:定时器T21 (34)8 ADC:模数转换单元 (40)9 CCU6:捕获比较单元6 (55)10 Multi CAN (74)11 SSC:高速串行接口 (90)12 Watch Dog Timer:看门狗定时器 (97)13 Power Saving Mode:省电模式 (100)14 Port:设置I/O口属性 (104)前言Infineon DAVE是Infineon MCU一个非常好的Infineon MCU软件设计助手,它可以在设计者对Infineon MCU的寄存器了解不是很深入的情况下,编写出准确的软件驱动代码。
比如说CCU6的驱动等。
DAVE软件的安装。
请参考相关屏幕录象MCU驱动的安装请参考相关的屏幕录象打开后的主界面如图0-1:图0-1工具条如图0-2图0-2从左向右分别主要为。
1.相关资料关联控件2.新建项目3.打开项目4.保存5.生成代码1 Project Settings:工程设置概述:XC800 MCU的总体设置。
该窗口主要是用来设置MCU的总体参数。
打开菜单的方法:File -> Project Settings1.1 General:总体设置界面如图1-1图1-1Controller Details:控制器详细Device:在该菜单中选择器件。
选择好后会在右边显示出该MCU的一些主要参数,主要是最高频率,Flash的大小等Main Source File:主源文件File name:主源文件名。
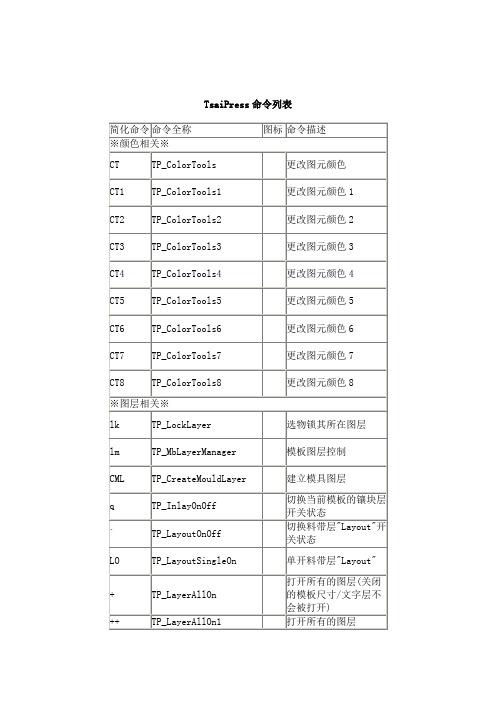
TsaiPress命令列表
SB
TP_StripperBolt
等高螺丝
LP
TP_LifterPin
浮升销
AP
TP_ShoulderPunch
A冲
APP
TP_ShoulderPunch1
异形A冲
BP
TP_StraightPunch
T冲
REF
TP_Benchmark
基准孔
Gu
TP_GuidePlate
导料板绘制
※TsaiPress模具设计命令※
CC2
TP_LeaderC2
标注倒角C2.1
CC3
TP_LeaderC3
标注倒角C3.1
Q`
TP_Dimdec0
改变标注的小数点为0数
Q1
TP_Dimdec1
改变标注的小数点为1数
Q2
TP_Dimdec2
改变标注的小数点为2数
Q3
TP_Dimdec3
改变标注的小数点为3数
TP_Dimdec
批量改变标注的小数点位数
tl
TP_SelectEntryToLayer
图元换层
lc
TP_LayerCorrect
根据图元的不同属性将其更改到指定的图层
cl
TP_CurrentlyLayer
选实体定当前层
pe
TP_PlineEdit
合并为多段线
aj
TP_AutoJoin
快速串接
ajj
TP_AutoJoin1
单一串接
EE
TP_EraseDimText
模板材料表
b2e
TP_Bom2Excel
发送模板材料表到Excel
BUILT TO PERFORM 项目器 移动 BUILT TO PERFORM 项目器 移动

PowerLite 3LCD ProjectorsBright projector solutions for smaller venues.XGA Resolution PowerLite 1940W shownKeep presentations shining bright, even in ambient light, with the PowerLite 1930, 1940W, 1950 and 1960. Offering 3x Brighter Colors 1 than competitive models, Epson 3LCD projectors ensure bright, vivid presentations. Designed for corporate, education and house of worship use, this family of bright, feature-packed solutions projects vibrant images in virtually any setting. These sleek projectors can be easily carried between meeting rooms and classrooms or can be installed in small- to medium-size venues. Need widescreen, larger-than-life images? Select the PowerLite 1940W with WXGA resolution. Award-winning Faroudja ® DCDi ® technology, featured on all these models, reduces noise and enhances sharpness, creating smooth video images. And, Split Screen 3 enables you to conveniently display content from two different sources simultaneously. This family of PowerLite projectors truly is a bright solution for your presentation needs.Projectors at a glanceBright projector solutions forsmaller venues.Model:PowerLite 1930PowerLite 1940W PowerLite 1950PowerLite 1960Color Brightness:4200 lumens 24200 lumens 24500 lumens 25000 lumens 2White Brightness:4200 lumens 24200 lumens 24500 lumens 25000 lumens 2Resolution:XGAWXGAXGAXGAProjected screen image is simulated.Amazing image quality3x Brighter Colors with Epson 1Brilliant image quality requires high color brightness (color light output), and Epson 3LCD projectors have 3x Brighter Colors than leading competitive projectors 1.One brightness measurement (lumens) is not enough. A projector’s specification needs to show both high color brightness and high white brightness. If color brightness is lower than white brightness, images may be dark, dull and lose detail. If not provided, be sure to ask for a projector’s color brightness specification.3LCD, the #1 projection technology in the world, has:• B oth high color brightness and high white brightness• 3 chips for up to 3x Brighter Colors 1 than 1-chip DLP projectors• 25% lower power consumption for lower energy costs 5 • 25 years of road-tested reliability• A nationwide study reveals that 9 out of 10 people prefer images from 3LCD projectors 6Award-winning Faroudja DCDi Cinema for advanced video qualityFaroudja DCDi Cinema is a video enhancement technology, used primarily for filmviewing, that produces exceptional image quality without introducing artifacts. Faroudja developed DCDi (Directional Correlational Deinterlacing) to reduce jagged images by using a unique algorithm. This algorithm, in combination with the technology’s decoding, deinterlacing and enhancement features, won an Emmy ® Award from the National Academy of Television Arts & Sciences.Advanced color adjustmentsFor special projection material such as high-quality photographs or artwork, users can adjust the hue, saturation and brightness for six colors, RGBCMY(Red, Green, Blue, Cyan, Magenta and Yellow).Actual photographs of projected images from an identical signal source. Price, resolution and white brightness are similar for both projectors (Epson 3LCD and 1-chip DLP competitor). Both projectors are set to their brightest mode.COMPETITORColor brightness significantly lower than white brightnessEPSONHigh color brightness andhigh white brightnessCOLOR BRIGHTNESS 2WHITE BRIGHTNESS DcDi onDcDi offAward-winning Faroudja DcDi CinemaDICOM Simulation Mode 4DICOM (Digital Imaging and Communication in Medicine) is a standard for handling, storing, printing and transmitting medical imaginginformation. The projector’s DICOM Simulation Mode enables users to reproduce images with an advanced grayscale level that simulates DICOM Part 14. This mode is ideal for viewing grayscale medical images, such as X-rays, for training andSplit Screen 3 featureProject two images (video or still) side-by-side from two different sourcessimultaneously. You can choose from three layout options, swap the images/display sizes, choose the source for the audio and even display closed captioning if the source signal includes it.Convenientpresentation toolsAdvanced network toolsNormal ModeDICOMSimulation ModeLayout Option 1: 50-50% Split Screen Main image on the left Layout Option 3: Main image on the rightkeystonekeystoneMonitor/control projectors remotelyEasily monitor and control networked Epson projectors using the included EasyMP ® software.• Schedule remote power on/off functionality; saves energy, money and time • Check the status of each projector as part of your maintenance routine • Access maintenance alerts for connected projectors, right from your office • C restron RoomView ® enabled — monitor and control your projector with your existing RoomView softwareMessage Broadcasting 7• B roadcast customized images/alerts over the network for announcements or instructions• S end messages to up to 1024 projectors simultaneously (message will overwrite the current screen content if the projector is being used, unless this function is disabled by the presenter)• If the projector is off, Message Broadcasting will turn it on and display the messageEasy to useEpson simple setup• U SB Plug ‘n Play — simply connect your PC to the projector and start presenting • 1.6x optical zoom — offers great positioning flexibility to fit large or small rooms • A /V Mute Slide — control your presentation; it’s right at your fingertips• S leep Mode — set from 1 to 30 minutes to save energy when the A/V Mute Slide is closed or no signal is detected• D irect Power On/Off — power the projector on and off with the flip of a wall switch • I nstant Off ® — no cool down time required, so it is ready to shut down when you areDigital DisplayPort and HDMI connectivityDisplayPort and an HDMI digital display interface enable the projector to easily project digital content including video and audio. Both are compatible with the latest laptops, Blu-ray Disc ®, DVD and other media players. Future-proof your digital content.1 Compared to leading 1-chip DLP business and education projectors based on NPD data, July 2011 through June 2012. Color brightness (color light output) measured in accordance with IDMS 15.4. Color brightness willvary depending on usage conditions.2 Color brightness (color light output) and white brightness (white light output) will vary depending on usage conditions. Color light output measured in accordance with IDMS 15.4; white light output measured in accordancewith ISO 21118.3 Consult your user manual for input combinations.4 This projector does not meet the DICOM standard Part 14 and should not be used as a medical diagnostic device.5 Data source: , Jan. 2014. Average of 1243 shipping models for which the manufacturers provided lumens and total power data, all resolutions and brightness levels. Energy efficiency was measured aswattage per lumen. It was measured for both 3LCD and 1-chip projectors in each of six brightness segments. 3LCD projectors averaged less required electricity per lumen in each of the six segments.6 9 out of 10 people preferred images from leading 3LCD projectors over leading 1-chip DLP business and education projectors. Leading projectors selected according to NPD data as of July 2013. Based on independentU.S. research conducted by Radius Research (July 2013).7 Works only with Epson projectors that support presentation over the network capability.8 Lamp life will vary depending upon mode selected, environmental conditions and usage. Lamp brightness decreases over time. 9 See our website for convenient and reasonable recycling options at /recycle10SmartWay is an innovative partnership of the U.S. Environmental Protection Agency that reduces greenhouse gases and other air pollutants and improves fuel efficiency.PC-free presentations, including PDFsJust plug your USB hard drive into the USB port, and you are ready to displaydocuments and images stored on your USB drive. Present a slideshow without having to connect to a PC. Compatible with the following file formats: PDF , JPEG, BMP , GIFand PNG.Contrast Ratio (Normal, Dynamic Mode) Up to 3000:1Color Reproduction Up to 1 billion colors Lamp Type 245 W UHE Lamp Life 8Up to 4000 hours (ECO Mode) Up to 2500 hours (Normal Mode)Brightness Uniformity (typical) 89%Pixel Arrangement Cross stripeProjection LensScreen Throw Ratio Range 1.38 – 2.24Size (projected distance) 1930: 30" – 300" 1940W: 29" – 280" 1950: 30" – 300" 1960: 30" – 300"TypeManual zoom/focus F-number: 1.51 – 1.99Focal Length 18.2 mm – 29.2 mm Zoom Ratio Optical zoom 1.0 – 1.6Keystone CorrectionVertical: -30 degrees to +30 degrees Horizontal: -30 degrees to +30 degreesVideoVideo StandardsAnalog: NTSC/NTSC4.43/PAL/M-PAL/N-PAL/ PAL60/SECAM HDMI: 480i/576i/480p/576p/720p/1080i/1080p Video Processing3D Y/C separation, 3D noise reduction, mosquito noise reduction DCDi – Directional Correlational Deinterlacing Motion-compensated Interlace-Progressive conversion (2:2, 3:2 film detection) Closed captioningNetworkingConnectivityWired: Integrated 10/100 MbpsRemote Control and Management EasyMP MonitorDuet and Device DiscoveryCrestron Integrated Partner and RoomView PJLinkOtherSpeaker: 10 W monoAudio Output: 3.5 mm jackOperating Temperature 41 ° to 95 °F (5 ° to 35 °C)Power Supply Voltage 100 – 240 V ±10%, 50/60 Hz AC Power Consumption 1930 – 298 W 1940W – 311 W 1950 – 353 W 1960 – 353 W3.8 W standby (Network on) 0.5 W standby (Network off)Fan Noise29 dB (ECO Mode) 37 dB (Normal Mode)SecurityKensington-style lock provision, anchor (metal) bar for security lock or cableDimensions (W x D x H)Excluding feet14.8" x 10.7" x 3.6" (377 x 271 x 93 mm)Weight8.5 lb (3.9 kg)Remote ControlFeaturesColor mode, brightness, contrast, tint, color saturation, sharpness, input signal, sync, source search, Split Screen 3Operating AngleFront: Upper/lower 0 to +16 degrees Left/Right: N/A Rear: N/AOperating Distance 39" – 138"Specifications and terms subject to change without notice. EPSON, EasyMP , Instant Off and PowerLite are registered trademarks, EPSON Exceed Your Vision is a registered logomark and Better Products for a Better Future is a trademark of Seiko Epson Corporation. PrivateLine is a registered trademark, Built to Perform is a trademark and Epson Connection is a service mark of Epson America, Inc. SmartWay is a service mark of the U.S. Environmental Protection Agency. All other product and brand names are trademarks and/or registered trademarks of their respective companies. Epson disclaims any and all rights in these marks. Copyright 2014 Epson America, Inc. CPD-40827 03/14SupportThe Epson Connection SMPre-sales supportU.S. and Canada 800-463-7766 Internet website Service ProgramsTwo-year projector limited warranty, 90-day limited lamp warranty, Epson Road Service program and PrivateLine ® dedicated toll-free support (U.S. and Canada only)What’s in the BoxA PowerLite projector, power cable, computer cable, projector remote control, batteries, user manual CD, Quick Setup Sheet, monitor and control CDEco FeaturesEnergy-efficient 3LCD light engine RoHS compliant Recyclable product 9Epson America, Inc. is a SmartWay SM Transport Partner 10Ordering Information Product NamePowerLite 1930 V11H506020 PowerLite 1940W V11H474020 PowerLite 1950 V11H491020 PowerLite 1960V11H473020AccessoriesGenuine Epson lamp (1930)V13H010L74 Genuine Epson lamp (1940W, 1950, 1960) V13H010L75 Replacement air filterV13H134A41 Replacement remote control 1566064 Universal projector ceiling mountELPMBPJF Adjustable suspended ceiling channel kit ELPMBP01 False ceiling plate kit ELPMBP02 Kensington security lock ELPSL01 Carrying caseV12H001K65PowerLite 1940W shownComposite Video Computer 1Monitor OutComputer 2HDMI Display P ort 10 W SpeakerRS-232cLANUSB (Type A)USB (Type B)Audio 2Audio R & L Audio 1 Audio Out PowerKensington ® Security Lock Port。
ArtiosCAD 7.6安装说明
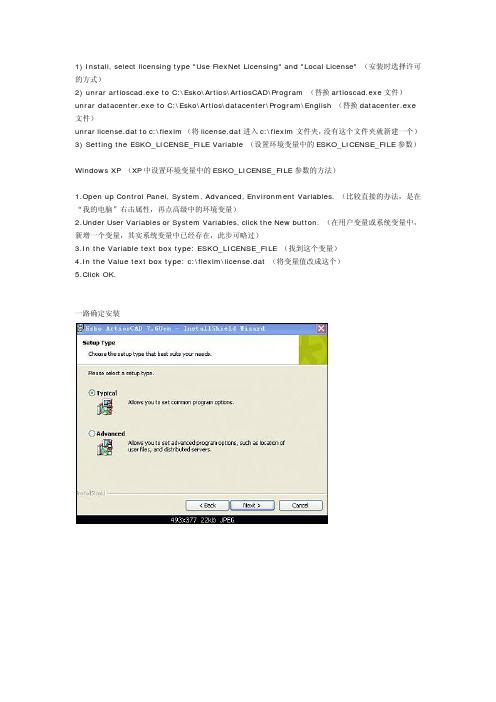
1) Install, select licensing type "Use FlexNet Licensing" and "Local License" (安装时选择许可的方式)2) unrar artioscad.exe to C:\Esko\Artios\ArtiosCAD\Program (替换artioscad.exe文件)unrar datacenter.exe to C:\Esko\Artios\datacenter\Program\English (替换datacenter.exe 文件)unrar license.dat to c:\flexlm (将license.dat进入c:\flexlm文件夹,没有这个文件夹就新建一个)3) Setting the ESKO_LICENSE_FILE Variable (设置环境变量中的ESKO_LICENSE_FILE参数)Windows XP (XP中设置环境变量中的ESKO_LICENSE_FILE参数的方法)1.Open up Control Panel, System, Advanced, Environment Variables. (比较直接的办法,是在“我的电脑”右击属性,再点高级中的环境变量)2.Under User Variables or System Variables, click the New button. (在用户变量或系统变量中,新增一个变量,其实系统变量中已经存在,此步可略过)3.In the Variable text box type: ESKO_LICENSE_FILE (找到这个变量)4.In the Value text box type: c:\flexlm\license.dat (将变量值改成这个)5.Click OK.一路确定安装“我的电脑”右击属性,再点高级中的环境变量,新建变量名为:ESKO_LICENSE_FILE,变量值为:c:\flexlm\license.dat(要先license.dat文件复制到C盘目录下,新建的flexlm文件夹中)。
numeca基本操作教程(2)
2-5 FINE求解2-5.1 工程控制台Project Management78. In the FINE interface project parameters, select the item Project Management/Project Settings (default). 在Import a grid file 中输入刚刚保存过的*.igg格式的文件。
79.在主菜单Mesh中选择Properties.设定度量单位。
80.In the Project units section, choose meters as the rotor37.geomTurbo file contained the geometryin meters (default)81.In the Computations area, rename "computation_1" in "coarse_choked"yh-1在左边列表框中,选择/Parameters/Configuration//Fluid Model选取流体类型,如:理想气体,真实气体,水,等!/Flow Model选择流动模型,定常或非定常流动,1)欧拉方程或NS 方程2;2)湍流模型(NS);3)是否考虑重力作用。
/Rotating Machinery 设置旋转参数,如转速等!2-5.2 步长和时间步设置82.时间步长设置。
选择Configuration / space & time83.时间选取定常解模式。
84.选择3D流动85.定义这个例子为内流,采用圆柱坐标系统。
86.激活IGG/Autogrid网格87.设置旋转速度。
-17188RPM80-87这几步在6.0以上版本中方法不同,不必激活IGG。
参考上面yh-12-5.3 在FINE查看网格88.单击Mesh图标在6.0以上版本中选择菜单Mesh/View On/Off89.单击图形查看按扭,如图2.5.3-1中下侧的图标2-5.4 物理模型2-5.4.1 概要(以下内容与6.0以上版本中的位置不同)90.打开对模型话框,Physical Model/General physics,如图2.5.4-191.选取Fluid model这个标签,92.弹出是否创建新流体的对话框,选择No.93.选取AIR(Perfect Gas)空气,理想气体.在这个列表框中。
ADOBE 认证 Illustrator 试题

ADOBE 认证 Illustrator 试题Illustrator 部份考题1.下列关于 TYPE(文字)菜单命令的使用,哪些是正确的?多选(ACD)A.通过定位标尺(Tab Ruler)的使用,可以快速对文字缩排定位B.Fing/Change(查找/替换)命令适用于中文,但不适用于英文C.Adobe Illustrator 中可以通过 Find Font(查找字体)命令来替换字体D.Illustrator 可以对文字分栏和分排.2 下列有关路径寻找器(Path Finder)的描述正确的是:多选(ACD)A.Path Finder 命令执行后产生的路径可能是复合路径B.对于包含有渐变网格的物体不能执行 Path Finder 命令C.所谓 path Finder 就是用来寻找已经绘制的各种性质的路径D.在 PathFinder 中命令中可以对图形进行补漏白操作3.在 Illustrator 文件中置入的图象,有 link(链接)和 Embed(嵌入)之分,他们的区别在于:单选(C)A.嵌入的图象色彩逼真B.置入的图象 link(链接)到文件中,文件就会变大C.置入的图象 Embed(嵌入)到文件中,文件就会变大D.link(链接)的图象会以灰阶形式显示-试题编号: 46 试题题型:单选试题分数: 1 分试题内容:下列关于 Adobe Illustrator 图表工具的描述不正确的是:A. 选中任何一个图表工具,在页面上拖拉矩形框,就会弹出输入数据对话框B. 能输入或拷贝其它软件的数据C. 你可以自己进行图表的设计D. 图表中的数据可以随时修改-试题编号: 47 试题题型:单选试题分数: 1 分试题内容:改变图表的单个元素,不能使用下面哪种选择工具:A. 组选择工具B. 直接选择工具C. 直接选择套索工具D. 选择工具试题编号: 48 试题题型:单选试题分数: 1 分试题内容:在下列有关颜色调整的叙述中,哪些是正确的:A. 在 Illustrator 中,颜色一旦确定,只能通过颜色面板调整B. 如果图形的填充色是专色,不能执行 Filter>Color>Adjust Color 命令C. 在 Illustrator 中,如果图形的填充色是专色,通过 Filter>Color>Convert to CMYK 命令,可以很方便地将专色转换成印刷四色D. 在 Illustrator 中,如果将填充色是印刷四色的图形转换成灰阶图,只能依次点选组成图形的单个物件,然后将其填充色由印刷四色改为灰阶色试题编号: 49 试题题型:复选试题分数: 1 分试题内容:下面有关 Illustrator 滤镜变形命令描述正确的是:A. 执行 Roughen(粗糙化)命令可使图形的边缘变得粗糙,同时图形的节点减少B. Free Distort(自由变形)命令可对图形进行自由变形C. Punk&Bloat(尖角和圆角变形)可以改变图形的形状,但是不改变图形的节点数量D. Twirl(涡形旋转)命令可通过围绕中心旋转来改变物体外形试题编号: 50 试题题型:单选试题分数: 1 分试题内容:下列有关滤镜的描述正确的是:A. Adobe Illustrator 9.0 不能使用 Adobe Photoshop 的滤镜B. Adobe Illustrator 9.0 可使用 Adobe Photoshop 的滤镜C. 将第三方的滤镜模块放在 Adobe Illustrator 9.0“帮助”文件夹中,就可供 Illustrator 的文件使用D. 将第三方的滤镜模块放在 Adobe Illustrator 9.0“插件”文件夹中,不用重新启动软件就可供 Illustrator 的文件使用-试题编号: 51 试题题型:单选试题分数: 1 分试题内容:下列有关 PNG-24 格式描述不正确的是:A. PNG-24 支持 24 位元色彩B. PNG-24 支持具有连续调的图片C. 大部分浏览器都支持 PNG-24 文件格式D. PNG-24 格式支持不同程度的透明-试题编号: 52 试题题型:复选试题分数: 1 分试题内容:下列那种格式为 Illustrator 的有效输出格式:A. BMPB. JPEGC. PNG-24D. Photoshop5试题编号: 53 试题题型:复选试题分数: 1 分试题内容:下列有关文件的打印描述正确的是:A. 图像细节的打印结果,由解析度和显示屏的质量来决定B. 打印纸张的大小可以设定,但其方向不能改变C. 可以将文件打印在纸上、传送到数位印刷机上,或是转变为胶片的正片或负片D. 含有透明区域的文件在打印时,其打印质量及速度都可以人为控制试题编号: 54 试题题型:单选试题分数: 1 分试题内容:在 Illustrator 文件中置入的图像,有 Link(链接)和嵌入之分,它们的区别在于A. 嵌入的图像色彩逼真B. 置入的图像 Link(链接)到文件中,文件就会变大C. 置入的图像是嵌入到文件中,文件就会变大D. Link(链接)的图像会以灰阶形式显示试题编号: 55 试题题型:复选试题分数: 1 分试题内容:文件存储成 PDF 格式好处在于:A. PDF 支持大部分 Illustrator 产生的元素B. 大多数的排版软件和文字处理软件都可识别 PDF 格式C. 可以跨平台浏览D. 许多文件特征并不会丢失-试题编号: 56 试题题型:复选试题分数: 1 分试题内容:下面关于 Adobe Illustrator 9.0 的描述正确的是A. Adobe Illustrator 9.0 可以制作 Flash(SWF)和 SVG 图形B. Adobe Illustrator 9.0 可以打开 Photoshop 文件,但是不能保留 Photoshop 文件的图层、蒙板、透明和可编辑的文字C. 在 Adobe Illustrator 9.0 中可以指定专色和原色,但不可以指定 Web 颜色D. 无限制的透明特性可将透明特性赋予任何物体或组试题编号: 57 试题题型:单选试题分数: 1 分试题内容: Adobe Illustrator 9.0 和 Photoshop 6.0 之间可互相交流,但两个软件有本质的不同,下列哪种叙述是正确的A. Adobe Illustrator 9.0 是以处理矢量图形为主的图形绘制软件,而 Adobe Photoshop是以处理像素图为主的图像处理软件B. Adobe Illustrator 9.0 可存储为 EPS 格式,而 Adobe Photoshop 不可以C. Adobe Illustrator 9.0 可打开 Adobe PDF 格式的文件,而 Adobe Photoshop 不可以D. Adobe Illustrator 9.0 和 Adobe Photoshop 都是图像处理软件,只是描述的方式不同而已-试题编号: 58 试题题型:复选试题分数: 1 分试题内容:下面的快捷键的使用哪些是有效的A. 选择多边形工具后,直接用鼠标在页面上拖拉,在按住鼠标进行拖拉的过程中,敲击键盘上向上的箭头键可增加多边形的边数,每敲击一次,可增加多边形的边数B. 选中星形工具后在工作页面上拖拉来绘制星形,在按住鼠标进行拖拉的过程中,按住键盘上的 tab 键保持星形的内部半径C. 选择涡形工具后,直接用鼠标在页面上拖拉,在按住鼠标进行拖拉的过程中,按住键盘上的空格键,就可随鼠标拖拉移动涡形的位置D. 选择多边形工具后,直接用鼠标在页面上拖拉,在拖拉旋转鼠标的过程中,可按住Shift 键,此时,可移动多边形,多边形的移动方向为水平、垂直或者 45°的倍数试题编号: 59 试题题型:单选试题分数: 1 分试题内容:下列有关文本编辑描述正确的是A. 当在文字框的右下角出现带加号的方块时,表示有些文字被隐含了B. 如果要拷贝文字段中的一部分,可直接使用选择工具在文字段中的拖拉,选中欲拷贝的文字C. 文字块的形状只能是矩形D. 文字可以围绕图形排列,但不可以围绕路径进行排列-试题编号: 60 试题题型:单选试题分数: 1 分试题内容:下面有关将矢量图光栅化的叙述正确的是A. 如果 Adobe Illustrator 中绘制的矢量图转化为光栅图,在 Adobe Photoshop 打开该AI 文件时就不需要再将其转化为光栅图了B. 在 Adobe Illustrator 中可以将矢量图光栅化,但是分辨率只能设定为 72dpiC. 在 Adobe Illustrator 中可以将矢量图光栅化,但是色彩模式必须为 RGBD. 在 Adobe Illustrator 中可以将矢量图光栅化,并且可以根据发布媒体的不同,设定不同的分辨率和不同的色彩模式二、Illustrator 试题问题:下列是 Illustrator 中关于颜色定义的描述,其中正确的是:1: HSB 颜色模型用色相(Hue)、饱和度(Saturation)和亮度(Bright)三个特征来描述颜色2: Color(颜色)调板中可通过 Grayscale(灰度)、HSB、RGB、CMYK、Web safe RGB(网络安全 RGB)等不同的色彩模型来定义颜色3: Grayscale(灰度)模型就是采用不同浓淡的黑色来表现层次4:专色是预先混合好的油墨,由印刷业使用一个标准的颜色匹配系统配置,如印刷中常用的烫金就是专色应用的例子正确答案: 1,2,3,4问题:下面关于 Adobe Illustrator 的描述正确的是:1:可以制作 Flash(SWF)和 SVG 图形2:可以打开 Photoshop 文件,但是不能保留 Photoshop 文件的图层、蒙板、透明和可编辑的文字3:可以指定专色和原色,但不可以指定 Web 颜色4:可将透明特性赋予任何物体正确答案: 1,4问题: Adobe Illustrator 和 Photoshop 之间可互相交流,但两个软件有本质的不同,下列哪种叙述是正确的?1: Illustrator 是以处理矢量图形为主的图形绘制软件,而 Photoshop 是以处理像素图为主的图像处理软件2: Illustrator 可存储为 EPS 格式,而 Photoshop 不可以3: Illustrator 可打开 PDF 格式的文件,而 Photoshop 不可以4:Illustrator 也可以对图形进行像素化处理,但同样的文件均存储为 EPS 格式后,Photoshop 存储的文件要小很多,原因是它们描述信息的方式不同正确答案: 1,4问题:在 Adobe Illustrator 中,若当前文件中的图形复杂,为了加快屏幕刷新速度,最直接快速并且简单的方式是:1:增加运行所需的内存2:增加运行所需的显示内存3:将当前不编辑的部分隐藏4:通过 View>Outline(视野>轮廓)命令使图形只显示线条部分正确答案: 4问题:在 Edit>Preference>General(编辑>预置>一般)对话框中可设定 Constrain Angle(角度限制)的数值,其默认的内定角度值是:1: 0 度2: 10 度3: 15 度4: 45 度正确答案: 1问题:在 Edit>Preference>General(编辑>预置>一般)对话框中可设定 Constrain Angle(角度限制)的数值,它是用来:1:设定旋转工具的角度2:设定坐标轴的角度3:设定缩放工具的角度4:设定移动工具的角度正确答案: 2问题:在 Edit>Preference>Units & Undos(编辑>预置>单位和还原)对话框中可设定还原操作的次数,下列叙述正确的是:1: Adobe Illustrator 最多可设定 50 步还原操作2: Adobe Illustrator 最多可设定 200 步还原操作3: Adobe Illustrator 最多可设定 99 步还原操作4:只要你有足够的内存,可设定无限多步还原操作正确答案: 2问题:在图形文件中进行颜色设定时应以?1:显示器为准2:感觉为准3:颜色数值为准4:打样为准正确答案: 3问题:在执行滤镜命令的过程中,中途取消操作的快捷键是?1: Shift2: Esc(Windows)/Command+.(Mac OS)3: Alt(Windows)/Option(Mac OS)4: Return正确答案: 2问题:对页面显示进行缩放的方法有下列哪几种?1:使用放大镜工具2:使用 View(视野)菜单下的 Zoom In(放大)、Zoom Out(缩小)命令3:使用 Navigator(浏览器)调板4:使用 Info(信息)调板正确答案: 1,2,3问题:下列关于标尺和参考线描述正确的是:1:将光标放到水平或垂直标尺上,按下鼠标,从标尺上拖出参考线到页面上,一旦将参考线放到某个位置,就再也不能移动2:参考线的颜色可以任意更改3:路径和参考线之间可以任意转化4:在缺省状态下,参考线是被锁定的,可以通过菜单命令解除参考线的锁定状态,解除锁定后的参考线可以通过 Release Guide(释放参考线)命令将参考线转化为路径正确答案: 2,3,4问题:不论你当前正在使用何种工具,当按下列哪一个键就可切换到上次使用过的选择工具?1: Shift 键2: Command(Mac OS)/Ctrl(Windows)键3:空格键4: Tab 键正确答案: 2问题:按住下列哪个键的同时,单击工具箱中的工具图标可切换隐含的工具?1: Tab 键2: Shift 键3: Esc 键4: Option(Mac OS)/Alt(Windows)键正确答案: 4问题:按下列哪个键可将桌面上所有的浮动调板全部隐藏?1: Shift 键2: Option(Mac OS)/Alt(Windows)键3: Return 键4: Tab 键正确答案: 4问题:在 Illustrator 工具箱的最底部可设定三种不同的窗口显示模式:标准模式、带菜单栏的全屏显示模式和不带菜单栏的全屏显示模式,请问在英文状态下,按下列哪个键可在三种模式之间进行切换?1: Tab 键2:字母 F 键3:字母 S 键4: Shift 键正确答案: 2问题:下列关于图形复制的描述哪个是正确的?1:执行 Copy(拷贝)命令后的图形,通过 Paste(粘贴)命令可将图形粘贴到原图形的上面,和原图形完全重叠2:执行 Copy(拷贝)命令后的图形,通过 Paste(粘贴)命令可将图形粘贴到当前窗口的中间3:执行 Copy(拷贝)命令后的图形,通过 Paste In Front(粘贴到前面)命令可将图形粘贴到原图形的上面,和原图形完全重叠4:按住 Option(Mac OS)/Alt(Windows)键的同时用鼠标拖拉图形可将其复制到任何位置正确答案: 2,3,4问题:当敲击下列哪一个键就可将工具箱隐藏?1: Shift 键2: Command(Mac)/Ctrl(Win)键3:空格键4: Tab 键正确答案: 4问题:下面关于 Adobe Illustrator 的界面描述正确的是:1:启动 Adobe Illustrator 9.0 后,软件就会自动建立一个大小为 A4,色彩模式为 RGB 的新文件2:创建新文件时,在 New Document(新文件)对话框中只有 RGB 和 CMYK 两种色彩模式可以设定3:创建新文件时,在 New Document(新文件)对话框中可任意设定文件的大小,并且输入的时候数字及度量单位可以同时输入,如可直接输入 12cm4:如果工具箱中某工具图标的右下角有黑色小三角,表示还有隐含的工具正确答案: 2,3,4问题:下列有关图形复制操作的描述哪些是正确的?1: Paste In Front(粘贴在前面)命令可以原位复制物体2:系统的剪贴板(Clipboard)所能存储的拷贝内容和内存没有关系3:系统的剪贴板(Clipboard)可以同时保留两次不同的复制信息4:选中物体后,按住 Option(Mac OS)/Alt(Windows)键的同时拖拉物体,可将该物体复制,通过 Object>Transform>Transform again(物体>变换>再次变换)命令可重复上次的复制操作正确答案: 1,4问题:下列描述正确的是:1:如果要观察图形的线条状态,可选择 View > Outline(视野>线条)命令。
artoolkit中文教程
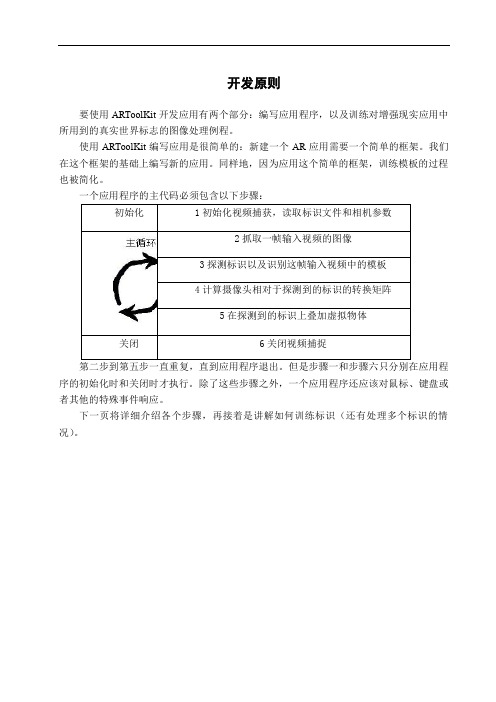
开发原则要使用ARToolKit开发应用有两个部分:编写应用程序,以及训练对增强现实应用中所用到的真实世界标志的图像处理例程。
使用ARToolKit编写应用是很简单的:新建一个AR应用需要一个简单的框架。
我们在这个框架的基础上编写新的应用。
同样地,因为应用这个简单的框架,训练模板的过程也被简化。
一个应用程序的主代码必须包含以下步骤:第二步到第五步一直重复,直到应用程序退出。
但是步骤一和步骤六只分别在应用程序的初始化时和关闭时才执行。
除了这些步骤之外,一个应用程序还应该对鼠标、键盘或者其他的特殊事件响应。
下一页将详细介绍各个步骤,再接着是讲解如何训练标识(还有处理多个标识的情况)。
开发你的第一个程序:第一部分IntroductionmaininitmainLoopdrawcleanup介绍为了详细地示范怎么样开发一个ARToolKit的应用,我们将一步步地介绍一个现有的例程的源代码:simpleTest(或者在有的版本里是simple)。
可以在目录examples/simple/里找到这个程序。
程序simpleTest我们要找的文件名字是simpleTest.c (或者simple.c )。
这个程序仅仅包含了一个主函数和几个绘制图像的函数。
相应于上节介绍的六个应用步骤的函数列出在表1中。
相应于步骤二到步骤五的函数在mainLoop 函数(主循环)中被调用。
表格1:相应于ARToolKit应用程序步骤的函数调用和代码在这个程序中,最重要的函数是main ,init , mainloop ,draw和cleanup。
在本节的其他部分我们将详细地解释这些函数调用。
mainSimple例程中main函数的流程如下所示:其中的初始化例程init包含的代码可以初始化视频捕捉,读取标识卡信息和摄像机参数信息,以及设置图像窗口。
这相对于《开发原则》中的第一步。
接下来,我们通过调用视频开始函数arVideoCapStart输入实时状态。
- 1、下载文档前请自行甄别文档内容的完整性,平台不提供额外的编辑、内容补充、找答案等附加服务。
- 2、"仅部分预览"的文档,不可在线预览部分如存在完整性等问题,可反馈申请退款(可完整预览的文档不适用该条件!)。
- 3、如文档侵犯您的权益,请联系客服反馈,我们会尽快为您处理(人工客服工作时间:9:00-18:30)。
4Determination of GNSS dependability -for design and approval of safety -related systems
◆Experience with EGNOS will be used later for Galileo dependability
assessment for land safety -related systems
◆EGNOS / Galileo dependability attributes are needed for design, validation and certification of safe train position locator
5
Translation of GNSS quality measures into RAM attributes (railway standard EN 50126 -RAMS)
◆A methodology for conversion of GNSS quality measures into RAM attributes was done in the period 2007-2008
◆Further information on this topics available on web site www.tudc.cz/lis …
Which of EGNOS Navigation Modes for railway? Control panel of SBAS/EGNOS PolaRx3receiver
6
7
Precision Approach: Rationale of IR derivation
◆Most of fault -free Integrity Risk (IR)is allocated to Vertical Protection Level ◆Railways/ automotive applications are interested in Horizontal Position determination & its guarantee (quality)
◆It is assumed that only one independent sample (measurement) is needed during the exposure interval (150 s)
8
◆In NPA mode, the total fault -free Integrity Risk is allocated to the Horizontal Protection Level.◆Then P md = 5x10⁻⁸/10 = 5x10⁻⁹/ independent sample
Question: Is this assumption truth in case of EGNOS …?
◆It is assumed that 10 independent samples exist per 1 hour , i.e. decorrelation time for SBAS errors is 360 s Non Precision Approach: Rationale of IR derivation
SBAS receivers used for experiments at SŽDC
◆Receivers: PolaRx3(Septentrio), GG-12W (Magellan)
◆Both designed according to RTCA DO-229 D and intended for
safety applications
◆PEGASUS Software Receiver (EUROCONTROL)
GG-12W
9
10
Static Measurements: Sensor Data Validation
◆Purpose of HW/SW redundancy: Exclude errors in user receivers ◆Methods: Use of diverse redundant HW and SW receivers
The purpose of static experiments is to determine decorrelation time in measurements, critical effects and dependability a ttributes
Horizontal Protection Levels –HPL(t)
(t) by receivers
Estimated σ
H
11
The purpose of static experiments is to determine decorrelation time in measurements, critical effects and dependability a ttributes
Horizontal Position Error (HPE)
Horizontal Dilution of Precision (HDOP)
12
13
Spectral EGNOS error analysis
◆PolaRx3receiver
Periodogram for HPE(t ) –
averaged Power Spectrum
Centred Horizontal Position Error (HPE )
◆Minimal significant frequency: f = 8x10⁻⁵Hz (T=12 500 s = 3.47 hour)
◆GG-12W receiver –Autocorrelation function R
xx [ HPE(t) ]
Correlation EGNOS error analysis
Autocorrelation function
of Horizontal Position Error
Centred Horizontal Position Error (HPE)
◆Decorrelation time: 12 500 s (c. 3.5hour)
14
15
Convergence of Horizontal Position Error
Convergence of the averaged horizontal position error (HPE) in
time.Data was measured by the PolaRx3receiver in the GPS mode. GPS HPE Convergence time > 104s econds . It supports
conclusions resulting from spectral and correlation analysis.
Dependability assessment of real EGNOS
16
Conclusions:
◆It is necessary to determine GNSS dependability attributes -they
are needed for design and certification of Safe Train Locator.
◆Existing EGNOS system can be used to demonstrate assessment
of dependability attributes for land safety related systems. The experimental methodology will be used for Galileo SoL assessment.
◆Evolution of quantitative methods for safety assessment of rea l-
time systems requires new approaches …use stochastic systems theory, …time series and spectral analysis …
17
Acknowledgement
The work presented was supported by the Ministry of Transport of Czech Republic under contract No. CG743-037-520.
Title of project: …Certification of the Satellite Navigation System Galileo for Railway Telematic Applications“.
Duration: 1/4/2007 –31/12/2010.
Contact: ales.filip@tudc.cz
www.tudc.cz/lis
18。