海波龙系统使用手册
海波龙Planning_功能介绍

• 全公司使用标准的计划方法,保证数据 的同一性
• 容易使用和创建。图形化的创建界面
• 有效的计算方法,只对部分需要进行 计算的数据库进行计算
• 各分支机构/部门也可根据自己的需求 创建新的业务规则
• 减少手工的数据输入,提高效率和正确 度
用户管理 权限管理 应用架构维护
数据表格的 创建与管理 业务规则维护
算的编制,如单元格文本、 通预预直EP“O可能的的ox过算算r接Saw以在预预ccem离表的ell在通算算Eer、ap线格的xrPMo过表数tc调助则WVlie的下编anSil格据Son整详等et中上rm功载制nOwd直并i预细功选fan”、输能到,fr,gi接提t算预能c择有V入将本可e既输交i的、算Pe机所地以w可l入。a预、连的n需进极与相n算启接功i的行大n关说动g,明业、务辅规 的读满取足或网写络入条数件据不佳的用 户及时编制预算的需要。
报表创建
数据上载
数据输入和 修改
计划审批 流程管理
业务规则 计算运行
报表和分析
OLAP 数据平台管理
22
业务规则和建模
业务规则与建模
▪ 多种货币输入、转换和多种 货币报表
▪ 多种自动计算方式 ▪ 图形化创建业务规则 ▪ 自动产生业务规则维护文档 ▪ 多种预制分摊模板 ▪ 内置超过350个财务计算函数,
Oracle 计划预算解决方案
多维度架构下的预算体系
财务人员可以直接在Web维护预 算模型
多维的预算模型 指标、组织结构、产品、 渠道、场景、版本、时 间…
财务智能 支持6种科目类型
时间智能 自动计算DTS
定义科目属性,方便归类和查询
12
业务情景的多样化,多版本管理
PA8000操作手册

P A8000C N C系统操作手册(第一版)声明操作手册所包含的内容均受到版权法的保护,未经深圳大族彼岸数字控制软件技术有限公司的批准,任何组织和个人不得以任何手段和形式对其进行复制、存于数据库或检索系统。
是深圳大族彼岸数字控制软件技术有限公司的注册商标并对其享有独占使用、许可使用、转让、续展等各项法定权利,未经深圳大族彼岸数字控制软件技术有限公司书面许可,任何组织或个人不得在商品上使用相同或类似的商标。
HAN’S PA不承担由于没有正确使用本手册和本产品的情况下,所造成的一切间接、直接或附带的损失或人身伤害。
在未经许可的情况下,不得擅自更改本产品的硬件、软件,或者进行二次开发。
由此造成的法律纠纷,本公司概不负责。
本技术数据由 HAN’S PA 编制。
公司有权力在事先不通知客户的情况下,修改本手册。
客户如有疑问的地方请直接联系客户服务热线:9或查询公司网站上技术资料公司网址:服务邮箱:pa service@公司地址:深圳市南山区高新技术产业园北区北环大道大族激光大厦目录1 操作人员参考概要 (3)1.1 预览 (3)1.2 开机 (3)2.入门 (4)2.1综述 (4)2.2漫游(手动模式) (4)2.3 手动数据输入(MDI模式) (5)2.4运行程序段(自动模式) (7)3 HMI的概况 (8)3.1综述 (8)3.2 手动菜单 (10)3.3自动菜单 (11)3.4 数据菜单 (12)3.5信息菜单 (13)3.6系统菜单 (14)3.7 设置菜单 (15)4手动 (16)4.1初始画面 (16)4.2连续进给 (17)4.3增量进给 (18)5 自动 (18)5.1初始界面 (18)5.2选择工件程序 (19)5.3 选择程序号 (20)5.4程序块的选择 (20)5.5程序执行1 (21)5.6 手动数据输入 (22)5.7程序执行2 (22)6.数据 (23)6.1初始界面 (23)6.2跳转 (24)6.3 菜单 (25)6.4查看 (26)6.5 修改 (26)7. 附加功能 (27)7.1 信息菜单 (27)7.2设置菜单 (28)1 操作人员参考概要1.1 预览本手册集中讲述PA 8000系统的操作与功能(PA8000系统是一个开放式系统),手册的目的是为了让操作者更熟悉本CNC系统。
SHURflo 2088 系列产业级泵安装和运行手册说明书

2088 INDUSTRIAL SERIES PUMPSInstallation and Operation ManualSHURflo offers various pumps models for different applications. The information outlined by this manual is general, and not specific to all 2088 series pumps. Be certain the pumps' materials will be compatible with the fluid being pumped. 2088 series pumps are intended for intermittent or continuous duty when the proper operating criteria is met. Product Data Sheets outlining specific thermal limits, load, flow curves, and other technical information for a particular model are available. If unsure of the chemical compatibility with a given elastomer or the motors intended design, please call SHURflo for assistance.CAUTION:"Intermittent Duty" is defined as; operated and/or frequently started within a period of time that would cause the motor to reach its maximum thermal limits. Once the maximum thermal limit isobtained, the motor must be allowed to return to ambient temperature before resuming operation. CAUTION:DO NOT use to pump flammable liquids. Never operate the pump in an explosive environment.Arcing from the motor brushes, switch or excessive heat from an improperly cycled motor may causean explosion.CAUTION:DO NOT assume fluid compatibility. If the fluid is improperly matched to the pumps' elastomers, a leak may occur. Pumps used to transfer hazardous or hot (max. temperature 170°F [76°C] vitononly) chemicals must be in a vented area to guard against the possibility of injury due to harmful orexplosive liquid/vapors.CAUTION:DO NOT operate the pump at pressures which cause the motor to exceed the amperes rating indicated on the name plate. Various pump models are equipped with thermal breakers to interruptoperation due to excessive heat. Once the temperature of the motor is within proper limits it willautomatically reset, and the pump will start operation without warning.CAUTION:To prevent electrical shock, disconnect power before initiating any work. In the case of pump failure, the motor housing and/or the pumped fluid may carry high voltage to components normallyconsidered safe.PRESSURE SWITCH OPERATIONThe pressure switch reacts to outlet pressure, and interrupts power at the preset shut-off pressure indicated on the pump label. When outlet pressure drops below a predetermined limit (typically 15-20 psi.[1-1.4 bar] less than the shut-off pressure), the switch will close and the pump wil operate until the shut-off (high) pressure is achieved. The shut-off pressure is set to factory calibrated standards. See the motor label and Product Data Sheet for specific pump specifications.CAUTION:Improper adjustment of the pressure switch, may cause severe overload or premature failure. Refer to SHURflo Service Bulletin #1031 for the adjustment procedure. Failures due to improperadjustment of the pressure switch will not be covered under the limited warranty.If the plumbing is restrictive or the flow rate is very low, the pump may re-pressurize the outlet faster than the fluid is being released causing rapid cycling (ON/OFF within 2 seconds). If the pump is subjected to rapid cycling during normal operation, or for infrequent periods, damage may occur. Applications which exhibit rapid cycling should have restrictions in the outlet minimized. If not feasible considered a SHURflo Accumalator or a SHURflo "bypass" model pump.BYPASS OPERATIONA bypass pump may be used for applications that normally induce frequent start/stop of the motor, and thereby create a potential for overheating. Models equipped with an internal bypass are designed to pump at high pressure while at low flow rates. Bypass models equipped with a switch may operate for several seconds even though the outlet side has been closed off. Contact SHURflo for information regarding bypass pumps.MOUNTING•The 2088 series pumps are self priming. Horizontal and vertical prime vary depending on the fluid viscosity and pump configuration. Refer to the pumps Product Data Sheet.•The pump should be located in an area that is dry and provides adequate ventilation. If mounted within an enclosure, provisions to cool the motor may be necessary. Heat sinks which attach to the motor are available from SHURflo if increased heat dissipation is necessary.CAUTION:DO NOT locate the motor near low temperature plastics or combustible materials. The surface temperature of the motor may exceed 250°F [120°C]. Refer to the pumps Product Data Sheet.•The pump may be mounted in any position. However, if mounting the pump vertically the pump head should be in the down position so that in the event of a leak, fluid will not enter the motor.•Secure the rubber feet with #8 hardware. DO NOT compress the feet, doing so will reduce their ability to isolate vibration/noise.PLUMBING•Flexible high pressure tubing compatible with the fluid should be used to connect the inlet/outlet ports. Tubing should be either 3/8" or 1/2" [10 or 13 mm] I.D., and at least 18 in. [46 cm] length is suggested to minimize stress on the fitting/ports and reduce noise. Allow for the shortest possible tubing route and avoid sharp bends that may kink over time.NOTE:Restrictions on the inlet may cause vacuum levels to reach the fluid vapor pressure, causing cavitation, degassing, vapor lock and a loss in performance. Inlet pressure must not exceed 30 psi.[2.1 bar] maximum.•1/2" Male threaded models: Are intended to be used with SHURflo Swivel Barb Fittings which seal with an internal taper when hand tightened. Standard 1/2" NPT fittings may be used when tightened to a maximum torque of 3.7 ft\Lb (45 in\Lb) [5 Nm].NOTE:SHURflo does not recommend the use of metal fittings or rigid pipe to plumb the inlet/outlet ports. Standard plastic male and female threaded fittings can be acquired at commercial plumbing supply stores. SHURflo also distributes Swivel Barb Fittings, and special fitting through it's dealers (Form #07-010-0011).CAUTION:Sealers and Teflon tape may act as lubricant causing cracked housings or stripped threads due to over-tightening. Care should be used when applying sealers. Sealers may enter the pump inhibiting valveaction, causing no prime or no shut-off. Failures due to foreign debris is not covered under warranty.•Installation of a 50 mesh strainer is recommended to prevent foreign debris from entering the pump.•If a check valve is installed in the plumbing, it must have a cracking pressure of no more than 2 psi [.14 bar]. ELECTRICALCAUTION:Electrical wiring should be performed by a qualified electrician, in accordance with all local electrical codes.•The pump should be on a dedicated (individual) circuit, controlled with a double pole switch (U.L./C-UL certified) rated at or above the fuse ampere indicated by the pump motor label. Depending on distance of the power source from the pump and ampere load on the circuit, wire may need to be heavier than indicated by the chart.CAUTION:All 115 VAC and 230 VAC pump motors and systems, MUST be ground per local and state electrical codes.•Improper duty cycle and/or rapid start & stop conditons may cause the internal thermal breaker (if equipped) to trip, or can result in premature motor failure due to excessive heat. Refer to the pumps Product Data Sheet.•For the pump to meet U.L./C-UL requirements the circuit MUST be protected with a slow-blow fuse (U.L./C-UL certified) or equivalent circuit breaker as indicated on the motor label. Use an approved wire of the size specified or heavier.VOLTAGE WIRE LEADS WIRE SIZE FUSE RATING12 DC24 DC RED (positive +)BLACK (negative -)#14 AWG [2.5 Mm2] (or heavier)36 DC SEE PUMP MOTOR115 AC BLACK (common)WHITE(neutral)GREEN (ground)#16 AWGC-UL - TEW / UL 1015LABEL230 AC BROWN (common)BLUE (neutral)GRN/YELL (ground)(or heavier)[1 Mm2 ]Q VDE requires a fuse (slow blow) or equivalent circuit breaker.CAUTION:Circuit protection is dependent on the individual application requirements. Failure to provide proper overload / thermal devices may result in a motor failure, which will not be covered under warranty. TROUBLESHOOTINGPUMP WILL NOT START:üFuse or breakerüFor correct voltage (±10%) and electrical connectionsüPressure switch operation and correct voltage at switch or motor wires (as equipped).üRectifier or motor for open or grounded circuitüFor locked drive assemblyWILL NOT PRIME: (No discharge/Motor runs)üOut of productüStrainer for debrisüInlet tubing/plumbing for severe vacuum leaküInlet/Outlet tubing severely restricted (kinked)üDebris in pump inlet/outlet valvesüProper voltage with the pump operating (±10%)üPump housing for cracksLEAKS FROM PUMP HEAD OR SWITCH:üFor loose screws at switch or pump head.üSwitch diaphragm ruptured or pinchedüFor punctured diaphragm if fluid is present at bottom drain PUMP WILL NOT SHUT-OFF: (Pressure switch equipped)üOutput line closed and no leaksüFor air trapped in outlet line or pump headüFor correct voltage to pump(±10%)üInlet/Outlet valves for debris or swellingüFor loose drive assembly or pump head screwsüPressure switch operation/adjustment incorrect refer to S/B #1031 for differential and pressure adjustment procedureNOISY / ROUGH OPERATION:üMounting feet that are compressed to tightüDoes the mounting surface multiply noise (flexible)üFor loose pump head or drive screwsüIs the pump plumbed with rigid pipe causing noise to transmitSERVICE KITSKits are readily available to repair standard 2088 series pumps. Repair kits include simple illustrated instructions allowing easy installation. To insure that the correct kit is received the model numbered and all name plate data must be included with the order. Contact a SHURflo distributor or SHURflo directly toorder the necessary repair kit.1Switch / Check valve and Upper Housing Kit(Replaces all previous switch designs)2Valve plate assembly3Diaphragm / Drive assembly4Motor5Complete Pump Head assembly (includes parts # 1,2,3) (Replaces all previous switch designs)RETURN POLICYAll Industrial pumps/products must be flushed of any chemical (ref. OSHA Section 1910.1200 (d)(e)(f)(g)(h)) and hazardous chemicals must be labeled/tagged before being *shipped to SHURflo for service or warranty consideration. SHURflo reserves the right to request a Material Safety Data Sheet from the returnee for any pump/product it deems necessary. SHURflo reserves the right to "disposition as scrap" pumps/products returned which contain unknown fluids. SHURflo reserves the right to charge the returnee for any and all costs incurred for chemical testing, and proper disposal of components containing unknown fluids. SHURflo request this in order to protect the environment and personnel from the hazards of handling unknown fluids.LIMITED WARRANTY PROCEDURESHURflo warrants Industrial 2088 series pumps to be free from material and workmanship defects (under normal use and service) for a period of one (1) year from the date of manufacture. or (1) one year use with proof of purchase, not to exceed (2) two years in any event.The limited warranty will not apply to pumps that were improperly installed, misapplied, or incompatible with fluids or components not manufactured by SHURflo. SHURflo will not warrant any pump which is damaged or modified outside the SHURflo factory.All Industrial pumps/products must be flush of any chemicals before *shipping. All warranty considerations are governed by SHURflo's written Return Policy.Returns are to be shipped postage prepaid to either service center; SHURflo Garden Grove, CA or Elkhart, IN. SHURflo shall not be liable for freight damage incurred during shipping. Package returns carefully.Upon receiving a pump, it will be tested per SHURflo's test criteria. SHURflo's obligation under this warranty policy is limited to the repair or replacement of the unit. Pumps found not defective (under the terms of this limited warranty) are subject to charges to be paid by the returnee for the testing and packaging of "tested good" units.No credit or labor allowances will be given to the returnee for pumps returned as defective. Warranty replacements will be shipped on a freight allowed basis. SHURflo reserves the right to choose the method of transportation. This limited warranty is in lieu of all other warranties, expressed or implied, and no other person is authorized to give any other warranty or assume obligation or liability on SHURflo's behalf. SHURflo shall not be liable for any labor, damage or other expense, nor shall SHURflo be liable for any indirect, incidental or consequential damages of any kind incurred by the reason of the use or sale of any defective product or part. This limited warranty covers pumps distributed within the United States of America. Other world market areas should consult with the distributor for any deviation from this document.* Carriers, including U.S.P.S., airlines, UPS, ground freight, etc., require specific identification of any hazardous materials being shipped. Check with your shipping company for specific instructions. Failure to do so may result in a substantial penalties.«ISO Certified FacilityRa WICOR CompanySHURflo reserves the right to update specifications, prices, or make substitutions. SHURflo «12650 Westminster Ave.Santa Ana, CA 92706-2100(800) 854-3218 (714) 554-7709FAX (714) 554-4721 Shipping/UPS: 12650 Westminster Ave.Garden Grove, CA 92843SHURflo East52748 Park Six CourtElkhart, IN 46514-5427((800) 762-8094(219) 262-0478FAX (219) 264-2169© 1998 Printed in USASHURflo Ltd.Unit 5 Sterling ParkGatwick Road, CrawleyWest Sussex, RH10 2QTUnited Kingdom+44 1293 424000FAX +44 1293 421880。
PLN-海波龙预算编制系统概念培训教材

Hyperion维度的划分
维度
Account(科目)
Currency(货币) Year(年度) Period(期间) Entity(实体) Scenario(场景) Version(版本) Customer(用户自定 义维) Attribute(属性维)
主要含义
• 主要参考现行财务系统中的Account成员,但根据预算及管理需求进 行了精简,同时也增加了部分用于计算的科目和管理数据科目
一季度
175 75
75
50
三月份
150
75
二月份
一季度现金余额 资产 100
50
一月份
一季度收入汇总 收入
期间汇总计算
©2005 HAND Enterprise Solutions Co., Ltd. Confidential Not For Public.
数据计算 ➢ 维层次计算(其他维与科目维一致) ➢ 维公式计算 ➢ 业务规则计算
Parent
6.67
Member 1 (+) 10
30
Member 2 (+) 20
5
Member 3 (-) 25
25
200
Member 4 (*) 40
40
©2005 HAND Enterprise Solutions Co., Ltd. Confidential Not For Public.
父辈(Parent) 同辈(Siblings)
子辈(Child)
年度 第一季度 第二季度 4月
祖辈(Ancestors) 后辈(Descendants)
科目类型与期间汇总计算
产品
54565 35709
海波龙解决方案

Hyperion Planning 系统能够根据前期项目所形成的责任预算的需求快捷、方便的生成 各种责任预算编制表格。
¾ 统一预算规则
Hyperion Planning 系统能够建立统一的预算规则,保证预算数据的口径一致,提高预 算的编制效率和正确度。针对预算目标的下达等复杂的运算,通过业务规则——系统所 特有的图形化计算编写工具来编写计算,无需学习任何编程语言。
• 预算编制-财务建模阶段 报表展示
Hyperion Planning 系统解决方案在出具报表时提供 3 种工具:Hyperion Report 、Hyperion SmartView 和 Hyperion Analyzer。在**公司具体采用哪类工具出报表要根据**公司的具体 报表需求和数量具体确定,无论采用哪种工具都会为**公司提供各种管理报表。 ¾ 利用 Hyperion Report,能够完成**公司的各种标准格式的法定报表和管理报表提供报
¾ 统一预算管理权限
Hyperion Planning 系统能够明确**公司不同预算责任人的责任,统一建立和分配预算 责任人的权限,能够对不同预算责任人的预算管理权限给予控制,采用动态菜单的方式 赋予不同权限的预算责任人以不同的菜单,不同权限的预算责任人只能执行自身所具备 的功能(如计划分析部是**公司的预算牵头人,负责汇总、审批整体预算,资金部负责 编制**公司的资金预算,各分、子公司及业务系统负责其收入和费用预算等)。
在编制预算/计划的过程中,目标设定一般是自上而下进行的,它和自下而上不同预算层次 的数据累加一样都是非常重要的环节。
Hyperion Planning 应用的目标类型版本由管理员负责设定。用户对目标数据的访问由他们的 安全性权限所决定。一般情况下,目标数据存储在较高层元数据中,如经营单位、业务系列 或者地区。管理员需要配置好 Hyperion Essbase XTD 数据库,确保目标数据不会被较低层数 值所代替。
HLPlot使用说明

HLPlot 使用说明书北京海蓝科技开发有限公司目录第一章 简介 (1)1.1系统需求 (1)1.2综述 (1)1.3使用 (1)第二章 安装和卸载 (3)2.1安装 (3)2.2卸载 (3)第三章 连接 (4)第四章 处理表格 (4)4.1表格涵盖的范围 (4)4.2对表格的操作 (5)第五章 绘制曲线 (6)5.1曲线输出设置 (6)5.2单位转换 (11)第六章 数据编辑 (12)第七章 打印输出 (15)附录A 注意事项 (16)附录B 关于图像文件 (16)第一章简介本章提供简要的软件使用介绍,以方便用户快速掌握使用方法。
具体的使用细节请参考本说明书的后续章节。
1.1 系统需求硬件需求:与IBM PC兼容的个人计算机一台,最少10MB左右的空闲硬盘空间。
若需要通过网络与其它软件(如无线随钻软件)交换数据,还需要配备网络适配器。
若只在单机上运行,不必考虑此项。
支持卷纸连续输出的打印机一台。
软件需求:Windows 2000及之后的Windows系列操作系统,并安装TCP/IP协议、Windows 套接字及相关的数据库访问接口。
相关的打印机驱动程序。
1.2 综述HLPlot是一款配合随钻等仪器使用的绘图软件。
它可以支持表格和曲线的卷纸连续打印,并具有丰富的用户选项以供灵活控制打印输出。
该软件通过网络接口与其它软件交换数据,既可以与提供数据的软件在同一台计算机上运行,也可以在同一网络中的不同计算机上运行。
在两台计算机上分别运行仪器软件和绘图软件时,不仅可以避免在一台计算机上运行多个软件时出现的运行速度、存储器容量方面的矛盾,以及操作中需要频繁切换窗口等诸多方面的问题,还可以方便现场操作人员分工合作,使现场出图和操作仪器可以同时进行。
软件的界面是“所见即所得”风格的,屏幕上显示的内容与最终在打印机上的输出十分相似。
通过软件提供的缩放和滚动功能,现场技术人员可以通过简单的拖拉/点击鼠标键或滚动鼠标滚轮等动作查看图表中的每一处细节,或总览其全貌。
PLN_海波龙预算编制系统概念培训

维公式计算
维层次顺序与维层次计算
科目 11 利润 (+) 7 毛利 (+) Level 2 3 收入 (+) 成本 (-) 费用 (-) 6 管理费用 (+) 财务费用 (+) 4 5
©2005 HAND Enterprise Solutions Co., Ltd. Confidential Not For Public.
175
一季度
50
三月份
75
二月份
50
一月份
期间汇总计算
一季度收入汇总
收入
一季度现金余额
资产
100
150
75
75
©2005 HAND Enterprise Solutions Co., Ltd. Confidential Not For Public.
维层次计算(其他维与科目维一致)
数据计算
业务规则计算
年度 父辈(Parent) 父辈 祖辈(Ancestors) 祖辈 第一季度
©2005 HAND Enterprise Solutions Co., Ltd. Confidential Not For Public.
同辈(Siblings) 同辈 第二季度 后辈(Descendants) 后辈
子辈(Child) 子辈
Hyperion 的维
54565
产品
35709
4680
月份
Hyperion的维与COA的段 Hyperion的维与COA的段 的维与COA
共同点: 描述数据的含义
3689.00
销售收入
数据
不同点:
预算
数据存储方式不一样
销售部 一月份 2008 板材
brother MFC-8880DN使用说明书

2 装入纸张和原稿
11
装入纸张和打印介质 .......................................................................................................... 11 将纸张装入标准纸盒 ................................................................................................... 11 将纸张装入多功能纸盒 (MP 纸盒 ) .............................................................................................................. 12 非打印区域.................................................................................................................. 14
获取 Brother 技术支持 ( 适用于 Windows®)......................................................................... 5 操作面板概述 ....................................................................................................................... 6
Smartview安装及操作简要说明
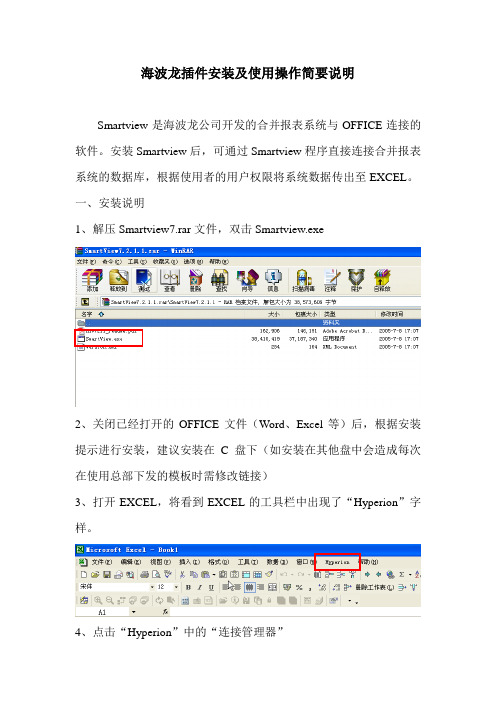
海波龙插件安装及使用操作简要说明Smartview是海波龙公司开发的合并报表系统与OFFICE连接的软件。
安装Smartview后,可通过Smartview程序直接连接合并报表系统的数据库,根据使用者的用户权限将系统数据传出至EXCEL。
一、安装说明1、解压Smartview7.rar文件,双击Smartview.exe2、关闭已经打开的OFFICE文件(Word、Excel等)后,根据安装提示进行安装,建议安装在C盘下(如安装在其他盘中会造成每次在使用总部下发的模板时需修改链接)3、打开EXCEL,将看到EXCEL的工具栏中出现了“Hyperion”字样。
4、点击“Hyperion”中的“连接管理器”5、点击“添加”,点击“URL 提供者”6、在“位置(L)”中输入http://10.192.137.19/hfmofficeprovider/hfmofficeprovider. aspx后点击“下一步”7、点击“Servers”,点击“Unicom”8、输入用户名及密码(请注意密码的大小写)后点击“连接”9、点击“Unicom/ Unicom”(注意一定要选择最末级的Unicom),点击“下一步”10、在名称栏中输入“UNICOM”后,点击“完成”二、操作说明1、总部根据目前合并报表系统的设置,利用Smartview编辑了整套报表的取数公式(合并报表系统取数0410)。
2、打开“合并报表系统取数0410”中的EXCEL文件,点击“Hyperion”,点击“连接管理器”后,输入用户名及密码。
3、选择工作表“封面”,修改“年”、“月”、“实体编号”、“专业”等。
4、选择写有公式的工作表,点击“Hyperion”,点击“函数”,点击“运行函数(活动页面)”或“运行函数(全部)”。
“运行函数(活动页面)”与“运行函数(全部)”的区别是:“运行函数(活动页面)”将只运行当前选中的工作表中的取数公式;“运行函数(全部)”将运行当前打开的所有文件中的所有取数公式。
VIPROS-2510C-(操作手册)

D)遵守下述冲切规章。如果你不确定将要冲切的板材能否冲切,请咨询AMADA 工程师。
不要冲切超过机床压力允许范围的板材。
不要冲切超过最大允许厚度的板材。 不要冲切如玻璃、石块或其它易碎材质。 不要冲切木头、塑料或其它在冲切过程中容易产生碎末的材质。 不要冲切超过模具使用条件和冲切条件的板材。
在如下操作期间板材会向外猛推:在自动再定位后回原点期间机床的前方、板材过 大机床的前后方。 建议安装可选附件安全装置-压力探测片和光感装置。它们能在探测到有物品进入 到危险区域,并立即停机。
B)操作者必须为一个读过本操作手册、熟悉机床的知识和操作的受过培训的专 业人员。如果有多于一个的专业人员必须协调好他们的工作以确保最大可能 的安全。
Ⅰ-2 Ⅰ-2 Ⅰ-3 Ⅰ-3 Ⅰ-4 Ⅰ-5 Ⅰ-6 Ⅰ-7 Ⅰ-8 Ⅰ-10
场所&地基
安装的场所应充分考虑到机器及材料的移动、材料的搬进及搬出、 以及机器及其它装置的保养检查等之作业,同时在机器及其它的装 置之周围应预留充分的空间。 空气压缩装置应放置在离机床不超过 5米远的地方。安装的场所应远离易产生灰尘或粉末的机器。虽然机 床具有防电磁干扰的功能,但是也应该离开焊接机、钻床、喷砂机、 以及研磨机等易于产生电源噪音的机器3米以上的距离。需要提供坚
关机
程序管理
程序管理 登记 显示登记在CNC内存中的程序 显示软盘中的程序 设置程序管理 从软盘中读取程序 从输入设备中读取程序 将程序存入软盘 从输出设备中输出程序 直接调用、登记程序 查找 核对 删除
程序编辑 准备工作 在页之间滚动和移动光标 返回光标至程序开始位置 查找字符 替换字符 插入字符 删除字符 复制程序 移动程序 插入程序 替换地址或程序 背景编辑
AHL-FB10使用说明书

扫描头: 正确设置后,您可以同时控制6路激光/扫描振镜组合。在此您可以对每一个头进行单独的系统设置。 透镜: 这一组数值能够定义出使用镜头的种类。 保存/浏览: 选择“浏览”可以导入与所使用场镜相对应的修正文件。选择UCF文件夹中相应的场镜文件。
尺寸: 修正文件会自动确定此数值。 X/Y中心: 在此您可以定义中心点相应的数值,将此值设为0会将120mm场的两端设为–60mm和60mm。 XY 反向: 这些参数的组合会改变打标头的XY方向。 XY增益: 此数值可以对比例进行精调。比如:画一个10mm 的正方形并进行打标。然后将每个轴10mm 数 值除以相应的实际测量值,便可以得到相应的应当填入的数。 XY偏移: 此数值可以进行场的位移。 我们建议您使用机械方法调整,而不要依赖此调整。 原点使能: 此值定义每一次打标完成后,振镜返回的位置。将此位置设为场的中心很重要。因为在此系统 耗电量最小。可以延长系统地寿命。 外触发: 使能此项目可以将要打标的文件预存在控制卡上而缩短外触发与打标的时间差。 “超时”值设置 了控制卡缓存重新存储的时间段(如果一段时间内没有打标的话)。比如在自动时间打标的过程中,您每 次需要打上最新的时间。此设置可以让系统自动更新时间。 Z-轴范围: 拥有 Z-轴的系统可以定义DAC全程的范围。 最小/最大 : 这会打开一个窗口让您调整速度、频率及受脉冲抑制等参数。
系统: 打开系统对话框,设置项: a.观察 b.光学 c.快捷键 d.一般
a.观察
栅格: ⑴、对齐栅格:选中,新建对象对齐到栅格 ⑵、显示:选中,栅格显示;否则,不显示 ⑶、X,Y:定义栅格大小,数字为栅格横向/纵向尺寸(单位:毫米) 背景颜色按钮:
打开“颜色对话框”,定义工作区背景颜色 工具条按钮:
(V3.0)H.264硬盘录像机中文说明书

安装操作手册注意事项:请勿将重物至于本设备上;请勿让任何固体或液体,掉入或渗入设备内;请定期用刷子对电路板、接插件、机箱风机、机箱等进行除尘,在进行机体清洁工作前,请关闭电源并拔掉电源;请勿自行对本设备进行拆卸、维修或更换零件。
使用环境:请在0℃~40℃的温度下放置和使用本产品,避免阳光直射,或靠近热源;请勿将本设备安装在潮湿的环境;请勿将本设备暴露在多烟、多尘的环境;避免强烈的碰撞,请勿摔落机器;请保持本产品的水平安装,安装在稳定的场所,注意防止本产品坠落;请安装在通风良好的场所,切勿堵塞本产品的通风口;仅可在额定输入输出范围内使用。
目录第一章产品介绍 (4)1.1产品概述 (4)1.2产品主要功能 (4)第二章开箱检查和线缆连接 (6)2.1开箱检查 (6)2.2硬盘安装 (6)2.3在机架中安装 (7)2.4音视频输入输出连接 (7)2.4.1视频输入的连接 (7)2.4.2视频输出设备的选择和连接 (8)2.4.3音频信号的输入 (8)2.4.4音频输出 (8)2.5报警输入输出连接 (9)2.5.1报警输入端口说明 (10)2.5.2报警输出端口说明 (10)2.5.3报警输出端继电器参数 (11)2.6球机连接 (11)第三章基本操作 (12)3.1开机 (12)3.2关机 (12)3.3登录 (12)3.4预览 (13)3.5桌面快捷菜单 (13)3.5.1主菜单 (14)3.5.2录像回放 (15)3.5.3云台控制 (18)3.5.4图像颜色 (20)3.5.5输出调节 (21)3.5.6关闭系统 (21)3.5.7页面切换 (22)第四章主菜单 (23)4.1主菜单导航 (23)4.2录像功能 (25)4.2.1录像设置 (25)4.2.2录像回放 (26)4.2.3录像备份 (26)4.3报警功能 (27)4.3.1移动侦测 (27)4.3.2视频遮挡 (30)4.3.3视频丢失 (30)4.3.4报警输入 (31)4.3.5异常处理 (32)4.4系统设置 (32)4.4.1普通设置 (33)4.4.2编码设置 (33)4.4.3网络设置 (35)4.4.4网络服务 (36)4.4.5输出模式 (41)4.4.6云台设置 (43)4.4.7IP通道配置 (43)4.4.8轮巡设置 (43)4.4.9系统时间 (44)4.4.10视频制式 (44)4.4.11分辨率 (44)4.4.12无线拨号 (44)4.4.13图像颜色 (45)4.4.14云台控制 (45)4.5管理工具 (45)4.5.1硬盘管理 (45)4.5.2用户管理 (45)4.5.3在线用户 (47)4.5.4输出调节 (48)4.5.5自动维护 (48)4.5.6恢复默认 (49)4.5.7系统升级 (49)4.5.8设备信息 (49)4.6系统信息 (50)4.6.1日志信息 (50)4.6.2版本信息 (51)4.7娱乐功能 (51)4.8关闭系统 (51)第五章常见问题解答及使用维护 (52)5.1常见问题解答 (52)5.2使用维护 (57)附录1.遥控器操作 (58)附录2.鼠标操作 (59)附录3.硬盘的容量计算 (60)第一章产品介绍1.1产品概述本设备是专为安防领域设计的一款优秀的数字监控产品。
海波龙系统使用手册

ANINTRODUCTIONTOHYPERIONDATABASE Controller's Department3607 Administrative Services BuildingDesktop ScreenHyperion Enterprise is a database that contains data that can be used to develop and print reports. Hyperion Retrieve is an Excel interface that provides a method to pull numbers from the Hyperion database into Excel. The accounting information is entered into the Hyperion database at the central location (the Controller's Department) and then used by the branches (departments, colleges, reporting units) to manage their accounts. Hyperion allows users the flexibility to view financial information in different formats and groupings. The Enterprise Desktop serves as the starting point for all operations performed in the Hyperion Enterprise system. The eleven large icons in the lower three-fourths of the screen are Desktop icons. Actual Hyperion Database data is seen in only the Data Entry and the Reports modules. The modules that are gray are used by the database administrators.Data is loaded from the central accounting system, which is similar to information on thedepartmental class reports. The data is loaded into Hyperion at the class code level; so, not every transaction is shown. It is also at the fund group or fund account level; project-section level breakdown is not available. In the Data Entry module, it is possible to view databasecontents. In the Reports module, reports that have been created at ISU can be viewed, printed, and downloaded to Excel. Hyperion Retrieve is also available to create Excel spreadsheets that pull information from the Hyperion Database in an updateable format.Data Elements There are five data elements that can be set in Hyperion. These will determine how theinformation is selected and arranged. The data elements are Category, Period, Organization, Entity and Account.. Different combinations of data elements are used to retrieve specific data for viewing or reporting.Period Organization Entity AccountThe choices for each of these buttons can be viewed by clicking on the appropriate button on the Point of View bar.The Category designates the set of data to work with. The choices are based on the state or federal fiscal year, the current year or one of the two previous years and receipts and expenses, allocations or encumbrances.The Period designates a month and is limited to the months within the Category that is chosen. The Organization refers to the grouping of accounts. To look at one single account, the selection of the Organization will not matter. However, to look at a group or summarized information, choose Fund, Unit or Dept.The Entity refers to an ISU account number or an org code, department or unit.The data element Account corresponds to the ISU class codes. A specific class code, the class code rollup, or summary totals can be viewed.Organization and EntitiesTo see how the Organizations and Entities are organized, click on the Entities icon on the Desktop Screen. The Entities module displays the groupings that areavailable. Click on the third box on the point of view bar to see thedifferent Organizations. The choices are Consolid, Fund, Unit and Dept. Select Unit and click ok. The screen will first show an expanded list forthe Organization “Unit.”Organization Options. This box will be displayed:Select Description to see the number and description in the label field. The font type and size To collapse the list, click on the minus sign next to "Total ISU by Unit." Then click on the plus sign that appears.The plus sign indicates that a list can be expanded. Try changing the Organization to Department.Then change the Organization to Fund and look at the subaccounts. This will show how the database is organized.Setting the Data ElementsThe data elements can be set from the Desktop Screen or from any of the modules by clicking on the Point of View bar or by selecting Edit – Point of View from the menu.CategoryWhen preparing to look at the Data Entry module or a report, the Category to look at will need to be considered. The decision will be based on:- which fiscal year - state fiscal year (7/1-6/30) or federal fiscal year (10/1-9/30);- the current fiscal year (CYR) or one of the two previous fiscal years (PY1, PY2);- and the receipts and expenses (ISU or FISU), allocations(ALO or FALO) or encumbrances (ENC or FENC).Click the Category box on the point of view bar to see the options that are available.PeriodThe Period is dependent on the Category that is choosen. For example, if it is November 2001 and the Category ISU_CYR is selected, the Period that could be selected would be a month between July 2001 and June 2002.OrganizationThe Organization determines how the ISU accounts will be grouped. The choices are Unit, Department, or Fund. Refer to the Entities module, as described on pages 3-5, to see what groups are available.EntityThe Entity can be a single ISU account number or a unit, department or org code. The groups that are available will be determined by the Organization that has been selected. After clicking the Entity box on the point of view bar, a box with a list of choices will be displayed. When the Entity box is open, if both the parent and base boxes along the bottom are checked, all of the possible choices will be listed. It is possible to type the entity in the box at the top.If the check next to Base is removed and only the "Parent" box is checked, only the highest level entities (org codes, departments and units) will be displayed.Notice that the org code entity labels include the letter "D." This is necessary so that Hyperion can distinguish between similar 5-character numbers.To find an org code for a fund account, look in the Financial Management System (FM). Use option LB - Lists/Browses and type in the fund-account number. The org code will be displayed on the screen.AccountWhen in the Data Entry module, all of the Accounts (class codes) are listed. However, some reports require the selection of a specific Account.SummaryUser PreferencesTo define user preferences in Hyperion, from the Desktop select File – Preferences – User.In the box that is shown, specify preferences to control how the Enter key operates, if changes will be saved when exiting Hyperion, and how data will be displayed when using Retrieve. It is also possible to select colors.Change PasswordFrom the Desktop, select File – Change Password.Type the old password and new password in the appropriate boxes. Click ok to save the changes.Data Entry and Reports ModulesIn Hyperion Enterprise, only two modules, Data Entry and Reports, show actual data from the Hyperion Database. The Data Entry module displays a table of data for a particular Name and Category. The data is view-only.Data Entry ModuleSelect the Data Entry module by clicking the Data Entry icon on the main menu screenor by selecting the menu bar items File – Desktop – Data Entry. On the Data Entry screen below, the Category “ISU_CYR” and Entity “D013” are shown in Periodic(Monthly) view. Category, Organization, and Entity can be changed by clicking the point of view bar buttons. Since all of the Periods and Accounts are shown in Data Entry, these boxes are grayed out in the Data Entry module.In the Show Account box, if Label is selected only the class code number will be displayed. ToThe View can be designated as Periodic (Monthly) or Category(Year)-to-Date by clicking the appropriate icon on the Tool Bar. Another button that is useful is the Frequency icon; data can be viewed on a monthly, quarterly, semi-annual or annual basis.The Reports ModuleThe Reports require specification of the Category, Period, Organization, Entity and/or Account . The current settings for these data elements are visible on the Point of View bar along the top of the screen.To preview a report, specify the data elements (Category, Period, Organization, Entity and Account) and double click the report name or highlight the report name in the list and click the print preview icon. To print from the Reports main screen, highlight the report and click the print icon. It is also possible to print the report from the print preview screen, by clicking the print button. It is possible to save a report to an excel spreadsheet. To do this, from theReports main screen, select File – Export to Excel.Hyperion defaults to saving the file to the Hyperion network drive. It is best not to save files to the this drive. To designate where the file should be saved, click on the drop down arrow next to “Save in" and select which drive to save the file to. Then, specify a name for the file. When the selections have been made, click on Save. After the file has been saved, start excel and open the report.Standard ReportsReport 01 - Cash Balance Status ReportListing by ISU account number (Entity) of Allocations, Receipts, Expenditures and Cash Balances. This report is based on the parent entity; however, it will print for a single account also.Report 02 - Free Balance Status ReportListing by ISU account number of Allocations, Receipts, Expenditures, Free Balance and the percentage of the allocation that is remaining. This report is also based on the parent entity and will print for a single account.Report 03 - Dependents Class SummaryListing by ISU account number of a class code or class total (Account) for a particular month (specified by the Period) and year to date. Need to specify which Account you would like the report to be based on. This report is also based on the parent name. It will not print when a single account is specified.Report 04 - Comparative of Total ExpendituresListing by major expenditure categories of a comparison of a point in time this fiscal year to a point in time in the prior fiscal year. Based on the percentage that was expended at this same given point in time last year, a projection is made for the expected expenditure this fiscal year. This report is useful for one particular account or for a group of accounts.Report 05 - Dependents Total Expenditures SummarySimilar to Report 04, with the listing being by ISU account number. This report is useful for one particular account or for a group of accounts.Report 06 - Expenditure AnalysisListing by major expenditure categories of specified month and year to date expenditures. This report is useful for one particular account or for a group of accounts.Report 07 - Budget Status ReportListing by major expenditure categories of current allocations and expenditures and compares them to the same point in time in the previous fiscal year. This report is useful for one particular account or for a group of accounts.Report 10 - Comparative and Projected ReceiptsReceipts by class code that compares receipts this year with receipts in the previous year, projects receipts for the remainder of the current year. This report is useful for one particular account or for a group of accounts.Report 11 - Base Level Dependents Class SummaryListing by ISU account number for expenditure class (Account) specified by users selection. Need to specify which Account you would like the report to be based on. This report is based on the parent entity; it will not print when a single entity is specified.Report 12 - Budget Status Report - DetailListing by ISU account number that shows the budget and expenditures and compares them to the same point in time in the previous year. This report is also based on the parent entity. It will not print when a single entity is specified.Report 16 - Dependents Total Receipts SummaryListing by ISU account number of year to date and projected total receipts and compares them to the prior year. This report is also based on the parent entity and will print for a single entity. Report 20 - Sources and Uses ReportListing by ISU account number of expenditures, receipts and allocations. This report is also based on the parent entity and will print for a single entity.Hyperion Retrieve for ExcelHyperion Retrieve allows retrieval of data from the Hyperion Database within an Excel spreadsheet environment.Working with Hyperion Retrieve is similar to working with Excel. There are two added features: the addition of the RHXL menu bar item; and the addition of Retrieve-Enterprise functions. These features allow building various templates and worksheets using different data elements as arguments.Starting Hyperion Retrieve:- Click the Hyperion Retrieve for Excel shortcut.- A Microsoft macros box appears, warning that a file is being opened that contains macros. Click Enable Macros.- A box appears prompting for a User Name and Password.- After login, a standard Excel screen appears with RHXL added to the Menu Bar.RHXLThe RHXL menu bar item is used to select and change the data elements Entity, Category, Account, Period, and Frequency. The data element Organization is not used in Retrieve-Hyperion because all of the Entities are available. To change the data elements, click RHXL on the Menu bar. A drop-down list will appear. The Change Application option is available; however, there is currently only one application. The values set here for the data elements are used as arguments in Retrieve-Enterprise Functions (as described later).Hyperion Retrieve FunctionsRetrieve functions are used to retrieve and manipulate different types of Hyperion Database data. Retrieve functions are similar to standard Excel functions except their arguments relate specifically to Hyperion Data Elements.Every Retrieve function is followed by a list of arguments that identifies the data needed from the Hyperion Database. Some of the functions currently available are listed in the following table. In Excel an equal sign (=) must precede each function. The function’s arguments are enclosed in parentheses. The arguments may be either text that is enclosed in double quotation marks (e.g. “7011215”), or a cell reference that is not enclosed in double quotation marks (e.g. B4).Some of the Retrieve functions that are useful are outlined below.Function Purpose SyntaxHPCDE Category Description - Displays the description for aspecified Category.=HPCDE("Category")HPFNA First Entity Description - Displays the first Entitydescription for a specified Entity.=HPFNA("Entity")HPFUL Entity Description- Displays the description for aspecified Entity.=HPFUL("Entity”)HPHEA Account Description- Displays the description for aspecified Account.=HPHEA("Account")HPHMJ Major Account Description- Displays the description ofthe major Account for a specified Account.=HPHMJ(“Account”)HPVAL Data Value- Displays the latest Hyperion data for a specified Entity, Category, Account, Period, andFrequency. =HPVAL("Entity","Category", "Account","Date","Frequency")A Sample WorksheetThis section shows how to build a sample Hyperion Retrieve worksheet to get the year-to-date total expenditure on August 31, 2001 for Entity "7011215".First, open Hyperion Retrieve and set up a worksheet similar to the one below.Move the cursor to cell B3 and select the Change Category RHXL menu bar item.Next a dialog box appears. The selectable Categories are shown.Highlight ISU_CYR (June 30 fiscal year) and click OK. ISU_CYR is copied to cell B3.- Change Frequency to "M.YTD" in cell B4.- Change Entity to "7011215" in cell B2.- Change Account to "TotExp" in cell A8.- Change Period to "8/31/2001" in cell C7(use the RHXL menu bar similar to changing Category).All of these items can be typed directly into the appropriate cells if you know the exact format used in Hyperion. However, the RHXL menu bar can be used to provide a list of available items. One reminder is that when Entities or Accounts start with zero (i.e, 0010001, 001, 010, etc) a '(single quote) must be typed before the 0’s. Otherwise the leading 0’s are removed. - The necessary data elements have now been entered.- Now use the Retrieve functions to get the needed information.In this example, the Entity description should appear in cell C2, the Account's description in cell B8, and the Year-To-Date Total Expenditures amount in cell C8.Move the cursor to cell C2 and select Menu Bar item Insert/Function to get the Entity description.Highlight Hyperion Retrieve in the Function Category list (it's at the end of the list).The right side of the dialog box shows all available functions for Retrieve. Descriptions for some of these functions are shown in an earlier section.Highlight HPFUL to find an Entity's description, and click the Next button.Another box appears.Position the cursor in the Entity field. To move the formula box out of the way, position the mouse pointer anywhere in the gray area of the box, click and drag the box. Next highlight cell B2 in the worksheet. Click the OK button.The description of Entity "7011215" appears in cell C2.Perform similar actions to get the Account description in cell B8. Use function HPHEA instead of HPFUL. The result is shown.Use function HPVAL to get the Year-To-date Total Expenditures on 8/31/2001 for Entity "7011215". The figure below shows the required arguments for function HPVAL. Cell references (ex. B2, B3, A8, etc) can be used instead of actual values (7011215, ISU_CYR, TotExp, etc). Using cell references is usually faster but actual values can be entered instead if they are enclosed in quotation marks.The figure below shows the results of the sample.SAVING HYPERION RETRIEVE SPREADSHEETSThe "File/Save As" Menu Bar option must be used the first time a spreadsheet is saved. Save the Hyperion Retrieve spreadsheets in drives and directories where your work is normally saved.。
IONPURE LX系列操作手册

IONPURE
IP-LXX 膜堆 (-3 版本) 中文初版 安装前的要求
2-2
2.3.1
运行环境 IP-LX 膜堆需要在室内安装,并避免被阳光直接照射。 最高室 温不能超过 45°C (113°F)。只要不发生凝结,膜堆能够在高达 90%的湿度环境下运行。
IONPURE
IP-LXX 膜堆 (-3 版) 中文初版 简介
1-3
不得在膜堆上方放置任何工具,螺丝帽,螺丝钉等物品,以防止 上述物品对膜堆造成损害。
注意: 必须依照本手册规定的步骤完成 IP-LX 膜堆的安装。如果认为要达到理 想的性能须遵循与本手册规定不同的步骤,请咨询当地的服务提供商。
1.4 操作时的注意事项
1/4” SS 接地螺杆,IONPURE 零件号码为 ZIVC00160。
2.2 膜堆检查 在将膜堆运送到最终的位置前不要拆开膜堆的包装。 拆开后,检查膜堆有何
破损。 如有明显的损坏,请立刻联络当地的服务提供商和承运商。
2.3 操作要求 为了根据要求操作,IP-LX 膜堆必须在下述条件下运行。 如果任何一种条件
“警告”,“小心”,及“注意”等字眼在本手册中被用来引起您对一些重要或关 键信息的注意。 “警告”和“小心”仅会在相关文字的前面出现,而“注意” 则可以在相关文字的前面或后面出现。
警告 _____ 小心
注意:
“警告”用来指出必须遵循的条件、操作规程或步骤,以避免造 成人员的伤亡。
“小心”用来指出可能会对设备造成损害或破坏,以及可能会构 成长期健康危害的情形。
会造成永久性损害。 因此,在向膜堆中注水前,必须按照要求
HEssbase_海波龙预算培训资料
Hyperion公司简介
Hyperion为美国NASDAQ上市公司,成立于1981,是全球领先的企业绩效管理 (BPM, Business Performance Management)解决方案提供商,同时也是计划软件 领域中的领头羊。它所提供的解决方案可以有效地帮助企业评价绩效并提高盈利 能力。可以帮助企业分析出推动企业成长的主要动力,可以预测核心业务的前景。
以清晰地了解企业的战略和经营责任,同时还能主动监控其行为和业绩是否符合企 业的目标。 Hyperion Business Modeling : 通过建立和使用不同的业务模型,经理和分析人员可以对运营和财务计划进行测试, 以便进行战略决策。有助于企业优化资源并实现高效运作。 Hyperion Planning : 是基于 Web 的预算、规划和预测的解决方案。它可以将财务和运营规划同战略计 划与目标相互结合。该解决方案能够在整个组织内推动协作式的、基于业务活动的 运营规划流程,为实现完整、闭环的规划提供一种综合的方案。 Hyperion Financial Management : 是基于 Web 的企业级财务管理和报表解决方案,可以提供功能强大的多维分析能力。 通过提供一个可以管理全部企业财务信息并在整个企业范围内实施部署的全面财务 报表和分析系统,为企业带来非凡的投资回报率。通过这种集中、全面的财务管理 方法,企业中的所有决策者可以通力协作,既缩短了业务周期,又提高了决策能力 和企业灵活性,从而实现企业利润最大化。
8/3/2020
Analytic services 术语
1.Outline: 架构.代表数据库中成员间的相互关系 .
2.Dimension: 纬度.被分析数据的透视图,是分析服务架构的元素组合.
预算管控系统操作手册

非0级数据,父项Βιβλιοθήκη 最底层成员,又称 “0级数据”
维度成员:11个维 度下的所有组成成
员
© 2017 毕马威企业咨询(中国)有限公司 — 中国外商独资企业, 是与瑞士实体 — 毕马威国际合作组织 ( "毕马威国际" ) 相关联的独立成员所网络中的成员。版权所有,不得转载。中国印刷。
7
文档分类: 保密
系统操作指引
密码更改
说明
1 点击“工具” 2 选择“更改密码” 3 进行密码设置后,点击“保存”
图例
1
2
3
© 2017 毕马威企业咨询(中国)有限公司 — 中国外商独资企业, 是与瑞士实体 — 毕马威国际合作组织 ( "毕马威国际" ) 相关联的独立成员所网络中的成员。版权所有,不得转载。中国印刷。
4
文档分类: 保密
预算管控系统简介
维度展现形式
在所有预算表单中均会出现上述11个维度,维度可在视点,页面或者表单的行列中出现。 在预算管控系统中用户可进行多维度的预算编制、查看及分析。
表单文件夹: 表单存放的位置
视点:每个放入视点的维度只能有唯一的、事先确定的值,且视点栏一般会被隐 藏。
页面:在页面中
12
文档分类: 保密
说明
打开浏览器,在网址栏输入 测试环境网址 http://128.9.100.121:190 00/workspace/index.jsp
1 输入用户名、密码
2 点击“登录”,登录系统
图例
1 2
备注说明: 用户名为姓名拼音(全拼) 初始密码为12345 首次登录后,请及时修改密码
© 2017 毕马威企业咨询(中国)有限公司 — 中国外商独资企业, 是与瑞士实体 — 毕马威国际合作组织 ( "毕马威国际" ) 相关联的独立成员所网络中的成员。版权所有,不得转载。中国印刷。
- 1、下载文档前请自行甄别文档内容的完整性,平台不提供额外的编辑、内容补充、找答案等附加服务。
- 2、"仅部分预览"的文档,不可在线预览部分如存在完整性等问题,可反馈申请退款(可完整预览的文档不适用该条件!)。
- 3、如文档侵犯您的权益,请联系客服反馈,我们会尽快为您处理(人工客服工作时间:9:00-18:30)。
ANINTRODUCTIONTOHYPERIONDATABASE Controller's Department3607 Administrative Services BuildingDesktop ScreenHyperion Enterprise is a database that contains data that can be used to develop and print reports. Hyperion Retrieve is an Excel interface that provides a method to pull numbers from the Hyperion database into Excel. The accounting information is entered into the Hyperion database at the central location (the Controller's Department) and then used by the branches (departments, colleges, reporting units) to manage their accounts. Hyperion allows users the flexibility to view financial information in different formats and groupings. The Enterprise Desktop serves as the starting point for all operations performed in the Hyperion Enterprise system. The eleven large icons in the lower three-fourths of the screen are Desktop icons. Actual Hyperion Database data is seen in only the Data Entry and the Reports modules. The modules that are gray are used by the database administrators.Data is loaded from the central accounting system, which is similar to information on thedepartmental class reports. The data is loaded into Hyperion at the class code level; so, not every transaction is shown. It is also at the fund group or fund account level; project-section level breakdown is not available. In the Data Entry module, it is possible to view databasecontents. In the Reports module, reports that have been created at ISU can be viewed, printed, and downloaded to Excel. Hyperion Retrieve is also available to create Excel spreadsheets that pull information from the Hyperion Database in an updateable format.Data Elements There are five data elements that can be set in Hyperion. These will determine how theinformation is selected and arranged. The data elements are Category, Period, Organization, Entity and Account.. Different combinations of data elements are used to retrieve specific data for viewing or reporting.Period Organization Entity AccountThe choices for each of these buttons can be viewed by clicking on the appropriate button on the Point of View bar.The Category designates the set of data to work with. The choices are based on the state or federal fiscal year, the current year or one of the two previous years and receipts and expenses, allocations or encumbrances.The Period designates a month and is limited to the months within the Category that is chosen. The Organization refers to the grouping of accounts. To look at one single account, the selection of the Organization will not matter. However, to look at a group or summarized information, choose Fund, Unit or Dept.The Entity refers to an ISU account number or an org code, department or unit.The data element Account corresponds to the ISU class codes. A specific class code, the class code rollup, or summary totals can be viewed.Organization and EntitiesTo see how the Organizations and Entities are organized, click on the Entities icon on the Desktop Screen. The Entities module displays the groupings that areavailable. Click on the third box on the point of view bar to see thedifferent Organizations. The choices are Consolid, Fund, Unit and Dept. Select Unit and click ok. The screen will first show an expanded list forthe Organization “Unit.”Organization Options. This box will be displayed:Select Description to see the number and description in the label field. The font type and size To collapse the list, click on the minus sign next to "Total ISU by Unit." Then click on the plus sign that appears.The plus sign indicates that a list can be expanded. Try changing the Organization to Department.Then change the Organization to Fund and look at the subaccounts. This will show how the database is organized.Setting the Data ElementsThe data elements can be set from the Desktop Screen or from any of the modules by clicking on the Point of View bar or by selecting Edit – Point of View from the menu.CategoryWhen preparing to look at the Data Entry module or a report, the Category to look at will need to be considered. The decision will be based on:- which fiscal year - state fiscal year (7/1-6/30) or federal fiscal year (10/1-9/30);- the current fiscal year (CYR) or one of the two previous fiscal years (PY1, PY2);- and the receipts and expenses (ISU or FISU), allocations(ALO or FALO) or encumbrances (ENC or FENC).Click the Category box on the point of view bar to see the options that are available.PeriodThe Period is dependent on the Category that is choosen. For example, if it is November 2001 and the Category ISU_CYR is selected, the Period that could be selected would be a month between July 2001 and June 2002.OrganizationThe Organization determines how the ISU accounts will be grouped. The choices are Unit, Department, or Fund. Refer to the Entities module, as described on pages 3-5, to see what groups are available.EntityThe Entity can be a single ISU account number or a unit, department or org code. The groups that are available will be determined by the Organization that has been selected. After clicking the Entity box on the point of view bar, a box with a list of choices will be displayed. When the Entity box is open, if both the parent and base boxes along the bottom are checked, all of the possible choices will be listed. It is possible to type the entity in the box at the top.If the check next to Base is removed and only the "Parent" box is checked, only the highest level entities (org codes, departments and units) will be displayed.Notice that the org code entity labels include the letter "D." This is necessary so that Hyperion can distinguish between similar 5-character numbers.To find an org code for a fund account, look in the Financial Management System (FM). Use option LB - Lists/Browses and type in the fund-account number. The org code will be displayed on the screen.AccountWhen in the Data Entry module, all of the Accounts (class codes) are listed. However, some reports require the selection of a specific Account.SummaryUser PreferencesTo define user preferences in Hyperion, from the Desktop select File – Preferences – User.In the box that is shown, specify preferences to control how the Enter key operates, if changes will be saved when exiting Hyperion, and how data will be displayed when using Retrieve. It is also possible to select colors.Change PasswordFrom the Desktop, select File – Change Password.Type the old password and new password in the appropriate boxes. Click ok to save the changes.Data Entry and Reports ModulesIn Hyperion Enterprise, only two modules, Data Entry and Reports, show actual data from the Hyperion Database. The Data Entry module displays a table of data for a particular Name and Category. The data is view-only.Data Entry ModuleSelect the Data Entry module by clicking the Data Entry icon on the main menu screenor by selecting the menu bar items File – Desktop – Data Entry. On the Data Entry screen below, the Category “ISU_CYR” and Entity “D013” are shown in Periodic(Monthly) view. Category, Organization, and Entity can be changed by clicking the point of view bar buttons. Since all of the Periods and Accounts are shown in Data Entry, these boxes are grayed out in the Data Entry module.In the Show Account box, if Label is selected only the class code number will be displayed. ToThe View can be designated as Periodic (Monthly) or Category(Year)-to-Date by clicking the appropriate icon on the Tool Bar. Another button that is useful is the Frequency icon; data can be viewed on a monthly, quarterly, semi-annual or annual basis.The Reports ModuleThe Reports require specification of the Category, Period, Organization, Entity and/or Account . The current settings for these data elements are visible on the Point of View bar along the top of the screen.To preview a report, specify the data elements (Category, Period, Organization, Entity and Account) and double click the report name or highlight the report name in the list and click the print preview icon. To print from the Reports main screen, highlight the report and click the print icon. It is also possible to print the report from the print preview screen, by clicking the print button. It is possible to save a report to an excel spreadsheet. To do this, from theReports main screen, select File – Export to Excel.Hyperion defaults to saving the file to the Hyperion network drive. It is best not to save files to the this drive. To designate where the file should be saved, click on the drop down arrow next to “Save in" and select which drive to save the file to. Then, specify a name for the file. When the selections have been made, click on Save. After the file has been saved, start excel and open the report.Standard ReportsReport 01 - Cash Balance Status ReportListing by ISU account number (Entity) of Allocations, Receipts, Expenditures and Cash Balances. This report is based on the parent entity; however, it will print for a single account also.Report 02 - Free Balance Status ReportListing by ISU account number of Allocations, Receipts, Expenditures, Free Balance and the percentage of the allocation that is remaining. This report is also based on the parent entity and will print for a single account.Report 03 - Dependents Class SummaryListing by ISU account number of a class code or class total (Account) for a particular month (specified by the Period) and year to date. Need to specify which Account you would like the report to be based on. This report is also based on the parent name. It will not print when a single account is specified.Report 04 - Comparative of Total ExpendituresListing by major expenditure categories of a comparison of a point in time this fiscal year to a point in time in the prior fiscal year. Based on the percentage that was expended at this same given point in time last year, a projection is made for the expected expenditure this fiscal year. This report is useful for one particular account or for a group of accounts.Report 05 - Dependents Total Expenditures SummarySimilar to Report 04, with the listing being by ISU account number. This report is useful for one particular account or for a group of accounts.Report 06 - Expenditure AnalysisListing by major expenditure categories of specified month and year to date expenditures. This report is useful for one particular account or for a group of accounts.Report 07 - Budget Status ReportListing by major expenditure categories of current allocations and expenditures and compares them to the same point in time in the previous fiscal year. This report is useful for one particular account or for a group of accounts.Report 10 - Comparative and Projected ReceiptsReceipts by class code that compares receipts this year with receipts in the previous year, projects receipts for the remainder of the current year. This report is useful for one particular account or for a group of accounts.Report 11 - Base Level Dependents Class SummaryListing by ISU account number for expenditure class (Account) specified by users selection. Need to specify which Account you would like the report to be based on. This report is based on the parent entity; it will not print when a single entity is specified.Report 12 - Budget Status Report - DetailListing by ISU account number that shows the budget and expenditures and compares them to the same point in time in the previous year. This report is also based on the parent entity. It will not print when a single entity is specified.Report 16 - Dependents Total Receipts SummaryListing by ISU account number of year to date and projected total receipts and compares them to the prior year. This report is also based on the parent entity and will print for a single entity. Report 20 - Sources and Uses ReportListing by ISU account number of expenditures, receipts and allocations. This report is also based on the parent entity and will print for a single entity.Hyperion Retrieve for ExcelHyperion Retrieve allows retrieval of data from the Hyperion Database within an Excel spreadsheet environment.Working with Hyperion Retrieve is similar to working with Excel. There are two added features: the addition of the RHXL menu bar item; and the addition of Retrieve-Enterprise functions. These features allow building various templates and worksheets using different data elements as arguments.Starting Hyperion Retrieve:- Click the Hyperion Retrieve for Excel shortcut.- A Microsoft macros box appears, warning that a file is being opened that contains macros. Click Enable Macros.- A box appears prompting for a User Name and Password.- After login, a standard Excel screen appears with RHXL added to the Menu Bar.RHXLThe RHXL menu bar item is used to select and change the data elements Entity, Category, Account, Period, and Frequency. The data element Organization is not used in Retrieve-Hyperion because all of the Entities are available. To change the data elements, click RHXL on the Menu bar. A drop-down list will appear. The Change Application option is available; however, there is currently only one application. The values set here for the data elements are used as arguments in Retrieve-Enterprise Functions (as described later).Hyperion Retrieve FunctionsRetrieve functions are used to retrieve and manipulate different types of Hyperion Database data. Retrieve functions are similar to standard Excel functions except their arguments relate specifically to Hyperion Data Elements.Every Retrieve function is followed by a list of arguments that identifies the data needed from the Hyperion Database. Some of the functions currently available are listed in the following table. In Excel an equal sign (=) must precede each function. The function’s arguments are enclosed in parentheses. The arguments may be either text that is enclosed in double quotation marks (e.g. “7011215”), or a cell reference that is not enclosed in double quotation marks (e.g. B4).Some of the Retrieve functions that are useful are outlined below.Function Purpose SyntaxHPCDE Category Description - Displays the description for aspecified Category.=HPCDE("Category")HPFNA First Entity Description - Displays the first Entitydescription for a specified Entity.=HPFNA("Entity")HPFUL Entity Description- Displays the description for aspecified Entity.=HPFUL("Entity”)HPHEA Account Description- Displays the description for aspecified Account.=HPHEA("Account")HPHMJ Major Account Description- Displays the description ofthe major Account for a specified Account.=HPHMJ(“Account”)HPVAL Data Value- Displays the latest Hyperion data for a specified Entity, Category, Account, Period, andFrequency. =HPVAL("Entity","Category", "Account","Date","Frequency")A Sample WorksheetThis section shows how to build a sample Hyperion Retrieve worksheet to get the year-to-date total expenditure on August 31, 2001 for Entity "7011215".First, open Hyperion Retrieve and set up a worksheet similar to the one below.Move the cursor to cell B3 and select the Change Category RHXL menu bar item.Next a dialog box appears. The selectable Categories are shown.Highlight ISU_CYR (June 30 fiscal year) and click OK. ISU_CYR is copied to cell B3.- Change Frequency to "M.YTD" in cell B4.- Change Entity to "7011215" in cell B2.- Change Account to "TotExp" in cell A8.- Change Period to "8/31/2001" in cell C7(use the RHXL menu bar similar to changing Category).All of these items can be typed directly into the appropriate cells if you know the exact format used in Hyperion. However, the RHXL menu bar can be used to provide a list of available items. One reminder is that when Entities or Accounts start with zero (i.e, 0010001, 001, 010, etc) a '(single quote) must be typed before the 0’s. Otherwise the leading 0’s are removed. - The necessary data elements have now been entered.- Now use the Retrieve functions to get the needed information.In this example, the Entity description should appear in cell C2, the Account's description in cell B8, and the Year-To-Date Total Expenditures amount in cell C8.Move the cursor to cell C2 and select Menu Bar item Insert/Function to get the Entity description.Highlight Hyperion Retrieve in the Function Category list (it's at the end of the list).The right side of the dialog box shows all available functions for Retrieve. Descriptions for some of these functions are shown in an earlier section.Highlight HPFUL to find an Entity's description, and click the Next button.Another box appears.Position the cursor in the Entity field. To move the formula box out of the way, position the mouse pointer anywhere in the gray area of the box, click and drag the box. Next highlight cell B2 in the worksheet. Click the OK button.The description of Entity "7011215" appears in cell C2.Perform similar actions to get the Account description in cell B8. Use function HPHEA instead of HPFUL. The result is shown.Use function HPVAL to get the Year-To-date Total Expenditures on 8/31/2001 for Entity "7011215". The figure below shows the required arguments for function HPVAL. Cell references (ex. B2, B3, A8, etc) can be used instead of actual values (7011215, ISU_CYR, TotExp, etc). Using cell references is usually faster but actual values can be entered instead if they are enclosed in quotation marks.The figure below shows the results of the sample.SAVING HYPERION RETRIEVE SPREADSHEETSThe "File/Save As" Menu Bar option must be used the first time a spreadsheet is saved. Save the Hyperion Retrieve spreadsheets in drives and directories where your work is normally saved.。