EH_skinarchitecture_mh
Philips 电动刮胡子系列9000说明书

Shaver series 9000 V-Track Precision Blades8-direction ContourDetectHeadsSmartClean System Plus SmartClick beard stylerS9171/23Perfection in every passCuts up to 20% more hair* in a single passThe Shaver 9000 is our most advanced shaver yet. The unique contour detect technology offers exceptional coverage over every contour of your face, and the V-Track system guides hairs into the best cutting position for the closest results.Designed for perfectionBlades perfectly guide hairs into position for a close shaveHeads flex in 8 different directions for a superb resultA comfortable shaveGet a comfortable dry or refreshing wet shave with AquatecEasy to useIntuitive icons make the functions easy to use50 minutes cordless shaving after a one-hour chargeShaver can be rinsed clean under the tapWith 2 year guaranteeGet the most of your shaverKeep your shaver like new with SmartCleanClick-on beard styler with 5 length settingsHighlightsV-Track precision blade systemGet the prefect close shave. The V-TrackPrecision Blades gently positions each hair in the best cutting position, even the flat laying and different length of hairs. Cuts 30% closer in less strokes leaving your skin in great condition.8-direction ContourDetectHeadsFollow every contour of your face and neck with 8-directional ContourDetect heads. You'll catch 20% more hairs with every pass.Resulting in an extremely close, smooth shave.Aquatec Wet & DryChoose how you prefer to shave. With the Aquatec Wet & Dry seal, you can opt for a quick yet comfortable dry shave. Or you can shave wet – with gel or foam – even under the shower.SmartClean System PLUSAt the touch of a button SmartClean PLUS cleans, lubricates, dries and charges your shaver, so it’ll perform at its best every day.SmartClick beard stylerChange your look with the SmartClick Beard Styler attachment. Choose from 5 length settings to create anything from a perfectstubble look to a short, neatly trimmed beard.Rounded tips and combs are designed to prevent skin irritation.3 level LED displayThe intuitive display shows relevantinformation, enabling you to get the best performance out of your shaver: - 3-level battery and travel lock indicators - Cleaning Indicator - Battery Low Indicator -Replacement Head Indicator50 minutes of cordless shavingOur advanced charging system gives you two convenient options: charge for one hour and you’ll get 50 minutes of running time, or do a quick charge for one full shave. All 9000Series Shavers contain a powerful energy-efficient, long-lasting lithium-ion battery. They are designed to operate only in cordless mode,to ensure you’ll always be safe when shavingwith water, even under the shower.iF DESIGN AWARD 2015Shaver series 9000Precision, control and maneuverability are the defining features of the 9000 shaver. The V-Track system guides hairs into the best cutting position for the closest result, while fully flexible eightdirectional heads catch more hairs for a clean shave in fewer strokes. The “AquaTec Wet &Dry” seal of this shaver allows for acomfortable dry shave or a refreshing wet shave, using a shaving gel or foam for extraskin comfort.Philips Green LogoPhilips Green Products can reduce costs,energy consumption and CO2 emissions. How?They offer a significant environmentalimprovement in one or more of the Philips Green Focal Areas – Energy efficiency,Packaging, Hazardous substances, Weight,Recycling and disposal and Lifetime reliability.SpecificationsShaving PerformanceSkinComfort: AquaTec Wet & Dry Contour following: 8-direction ContourDetectHeadsShaving system: V-Track Precision Blade System, Super Lift & Cut Action AccessoriesSmartClean PLUS: Cleans, Dries, Charges, Lubricates, Cleaning cartridge (included) SmartClick: Beard stylerPouch: Travel pouch Ease of useDisplay: 3 level battery indicator, Cleaningindicator, Battery low indicator, Replaceshaving heads indicator, Travel lock indicatorCleaning: Fully washableDesignColor: AltumHandle: Ergonomic grip & handlingPowerBattery Type: Lithium-ionRun time: 50 min / 17 shavesCharging: 1 hour full charge, Quick charge for 1shaveAutomatic voltage: 100-240 VMax power consumption: 9 WStand-by power: 0.1 WService2-year guaranteeReplacement head: Replace every 2 yrs withSH90* Cuts up to 20% more hair - versus SensoTouch© 2019 Koninklijke Philips N.V.All Rights reserved.Specifications are subject to change without notice. Trademarks are the property of Koninklijke Philips N.V. or their respective owners.Issue date 2019‑08‑01 Version: 5.0.1EAN: 08 71010 37023 06 。
打造真实感人物角色 Blender皮肤材质制作

打造真实感人物角色:Blender皮肤材质制作Blender是一款强大的三维建模和渲染软件,能够创建出逼真的人物角色。
在打造真实感人物角色中,皮肤材质是至关重要的一部分。
本篇文章将介绍如何使用Blender软件制作逼真的皮肤材质。
首先,打开Blender软件并选择一个空的场景。
在顶部选择“渲染”选项,并将渲染引擎设置为“Cycles”。
Cycles渲染引擎能够提供更真实的光照效果,使角色的皮肤看起来更加逼真。
接下来,点击右侧的“默认布局”以获得一个干净的界面。
然后,点击左上角的“图标”按钮,在下拉菜单中选择“Shader Editor”。
Shader Editor是创建和编辑材质节点的地方。
现在,在3D视图中创建一个人物角色。
你可以使用Blender软件内置的人体模型或者自己创建一个。
确保你的角色的UV映射已经完成,这将确保材质正确地应用在模型上。
在Shader Editor中,点击左下角的“新建”按钮来创建一个新的材质节点。
然后,点击右侧的“材质”按钮,并选择“Principled BSDF”。
这是一个基本材质节点,能够模拟各种材质,包括皮肤。
在Principled BSDF节点中,你可以调整不同的参数来创建逼真的皮肤材质。
首先,调整“Base Color”参数来设置皮肤的颜色。
你可以通过选择适当的肤色调整RGB值来达到你想要的效果。
接下来,调整“Subsurface”参数。
这个参数控制光线在物体内部反射和散射的方式,模拟人体皮肤的光照特性。
增加Subsurface值会使皮肤看起来更加柔和和透明。
然后,调整“Roughness”参数。
这个参数控制皮肤的光滑度。
一般来说,人体皮肤并不是完全光滑的,所以适当调整Roughness值可以使皮肤看起来更加真实。
此外,你还可以调整其他参数,如“Normal”和“Specular”来增加细节和光亮度。
通过不断调整这些参数,你将能够实现一个接近真实的皮肤材质效果。
Sm_artskin_to_healitself_能自愈的智能电子皮肤

疯狂英语(新悦读)A new s m ar t m anm ade s ki n t hat can r epai r i t s el f i n l es s t han a s econd l i ke t he cybor g (半人半机器的生物)i n t he f i l m Ter m i nat or has been devel oped.The el ect r oni c s ki n,or e ⁃s ki n,i s j us t as s t r ong and s ens i t i ve as hum an s ki n and coul d be us ed t o m oni t or a per s on ’s heal t h or t he s t r uct ur al condi t i on of an ai r pl ane,s ay s ci ent i s t s .W hi l e i t i s not t he f i r st t i m e sci ent i s t s have t r i ed t o “el ect r oni cal l y ”copy hum an s ki n,pr evi ous at t em pt s have f al l en s hor t .Thi s e ⁃ski n pr ot ot ype (原型)can sens e obj ect s f r om up t o ei ght i nches away,r eact t o t hi ngs i n under one t ent h ofa second and r epai r i t s el f m or e t han 5,000t i m es ,accor di ng t o t he r es ear cher s.St udy aut hor D r Y i chen Cai ,of K i ng A bdul l ah U ni ver si t y of Sci ence and Technol ogy i n Saudi A r abi a,s ai d,“The i deal e ⁃s ki n wi l l i m i t at e t he m any nat ur al f unct i ons of hum an s ki n,s uch as s ens i ng t em per at ur e and t ouch,accur at el y and i n r eal t i m e.H ow ever,m aki ng s ui t abl y f l exi bl e el ect roni cs t hat can per f or m such del i cat e t as ks i n everyday l i f e i s chal l engi ng,and each m at er i al i nvol ved m us tbe caref ul l y engi neered.”A t t he s am e t i m e,i t i s hi ghl y sens i t i ve,t o t he poi nt wher e i t can di s t i ngui s h handwr i t i ng w r i t t en on i t s s ur f ace and wi t hs t and 5,000def or m at i ons (变形),r ecover i ng i n abouta quar t er of a s econd.你有没有想过,如果有一天,你的皮肤受到伤害了,比如被刀划伤了,或者被烫伤了,它会自动修复?你肯定会觉得这不可思议。
SkinSharp皮肤控件易语言API调用方法
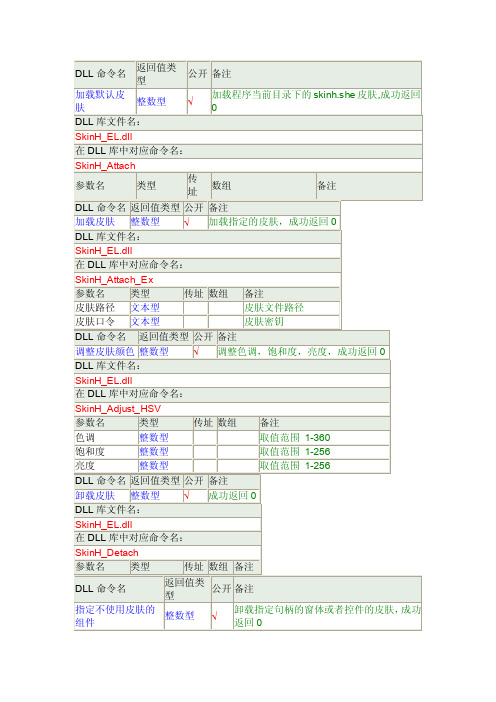
是否锁定。1 为锁定,0 为解锁
DLL 命令名 返回值类型 公开 备注 置菜单透明度 整数型 √ 设置菜单的透明度,成功返回 0 DLL 库文件名:
SkinH_EL.dll 在 DLL 库中对应命令名:
SkinH_Alpha_Menu
参数名
类型
传址 数组 备注
透明度
整数型
取值范围 0-255
DLL 命令 返回值类 公
SkinH_Detach 参数名 类型
传址 数组 备注
DLL 命令名
指定不使用皮肤的 组件
返回值类 型
公开 备注
整数型
√
卸载指定句柄的窗体或者控件的皮肤,成功 返回 0
DLL 库文件名:
SkinH_EL.dll 在 DLL 库中对应命令名:
SkinH_Detach_E x
参数名
类型
传 址
数组
备注
句柄
返回值类 型
公开 备注
置控件的背 景色
整数型
√
DLL 库文件名:
目前仅对单选框,复选框,分组框有效。成功返回 0, 失败返回非 0
SkinH_EL.dll 在 DLL 库中对应命令名:
SkinH_BGColor
参数名
类型
传 址
数组
备注
句柄
整数型
控件句柄
红色分量 绿色分量 蓝色分量
整数型 整数型 整数型
SkinH_EL.dll 在 DLL 库中对应命令名:
SkinH_Alpha
参数名
类型
传址 数组
备注
句柄
整数型
指定窗体句柄
透明度
整数型
取值范围 0-255
DLL 命令名
Belimo 空气控制系统技术文档说明书
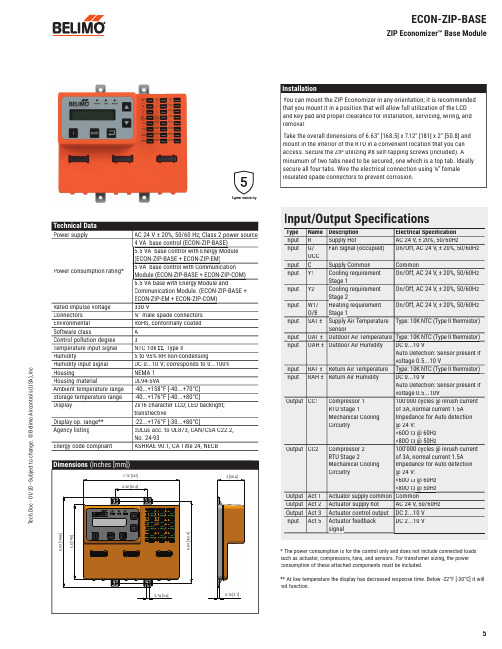
T e c h .D o c - 01/20 - S u b j e c t t o c h a n g e . © B e l i m o A i r c o n t r o l s (U S A ), I n c .Input/Output SpecificationsType Name Description Electrical Specifi cation Input RSupply HotAC 24 V, ± 20%, 50/60HzInputG/OCCFan Signal (occupied)On/Off, AC 24 V, ± 20%, 50/60Hz Input C Supply Common CommonInput Y1Cooling requirement Stage 1On/Off, AC 24 V, ± 20%, 50/60Hz Input Y2Cooling requirementStage 2On/Off, AC 24 V, ± 20%, 50/60Hz Input W1/O/B Heating requirement Stage 1On/Off, AC 24 V, ± 20%, 50/60Hz Input SAT ±Supply Air TemperatureSensorType: 10K NTC (Type II thermistor)Input OAT ±Outdoor Air Temperature Type: 10K NTC (Type II thermistor)InputOAH ±Outdoor Air HumidityDC 0...10 VAuto Detection: Sensor present if voltage 0.5...10 VInput RAT ±Return Air Temperature Type: 10K NTC (Type II thermistor)Input RAH ±Return Air Humidity DC 0...10 VAuto Detection: Sensor present if voltage 0.5 (10V)Output CC1Compressor 1RTU Stage 1Mechanical Cooling Circuitry 100'000 cycles @ inrush currentof 3A, normal current 1.5A Impedance for Auto detection @ 24 V:<60O Ω @ 60Hz <80O Ω @ 50HzOutputCC2Compressor 2RTU Stage 2Mechanical CoolingCircuitry100'000 cycles @ inrush currentof 3A, normal current 1.5A Impedance for Auto detection @ 24 V:<60O Ω @ 60Hz <80O Ω @ 50HzOutput Act 1Actuator supply common Common Output Act 2Actuator supply hot AC 24 V, 50/60Hz Output Act 3Actuator control output DC 2...10 V Input Act 5Actuator feedback signalDC 2...10 VInstallationYou can mount the ZIP Economizer in any orientation; it is recommended that you mount it in a position that will allow full utilization of the LCD and key pad and proper clearance for installation, servicing, wiring, and removal.Take the overall dimensions of 6.63" [168.5] x 7.12" [181] x 2" [50.8] and mount in the interior of the RTU in a convenient location that you can access. Secure the ZIP utilizing #8 self-tapping screws (included). A minumum of two tabs need to be secured, one which is a top tab. Ideally secure all four tabs. Wire the electrical connection using ¼” female insulated spade connectors to prevent corrosion.Technical DataPower supplyAC 24 V ± 20%, 50/60 Hz; Class 2 power source Power consumption rating*4 VA base control (ECON-ZIP-BASE)5.5 VA base control with Energy Module (ECON-ZIP-BASE + ECON-ZIP-EM)5 VA base control with Communication Module (ECON-ZIP-BASE + ECON-ZIP-COM)6.5 VA base with Energy Module andCommunication Module. (ECON-ZIP-BASE + ECON-ZIP-EM + ECON-ZIP-COM)Rated impulse voltage 330 VConnectors ¼” male spade connectors Environmental RoHS, conformally coated Software classA Control pollution degree 3Temperature input signal NTC 10k Ω, Type IIHumidity5 to 95% RH non-condensingHumidity input signal DC 0...10 V; corresponds to 0...100%HousingNEMA 1Housing materialUL94-5VAAmbient temperature range -40...+158°F [-40...+70°C]Storage temperature range -40...+176°F [-40...+80°C]Display2x16 character LCD; LED backlight; transflectiveDisplay op. range**-22...+176°F [-30...+80°C]Agency listing cULus acc. to UL873, CAN/CSA C22.2, No. 24-93Energy code compliantASHRAE 90.1, CA Title 24, NECBDimensions (Inches [mm])7.12 [181]2.42 [61.6]0.18 [4.6]6.04 [153.4]5.5 [140]6.63 [168.5]2 [50.8]0.16 [4.1]ECON-ZIP-BASEZIP Economizer™ Base Module* The power consumption is for the control only and does not include connected loads such as actuator, compressors, fans, and sensors. For transfomer sizing, the power consumption of these attached components must be included.** At low temperature the display has decreased response time. Below -22°F [-30°C] it will not function.T e c h .D o c - 01/20 - S u b j e c t t o c h a n g e . © B e l i m o A i r c o n t r o l s (U S A ), I n c .ECON-ZIP-BASEZIP Economizer™ Base Module Wiring DiagramsR CG OCC W1O/B Y1Y2ACT1ACT2ACT3ACT5R C R CG/OCC W1/O/B Y1Y2CC1CC2OAT+OAT-OAH+OAH-SAT+SAT-RAT+RAT-RAH+RAH--SR1 -Common2 + Hot3 Y Input, 2 to 10V 5 U Output, 2 to 10VACT 1ACT 2ACT 3ACT 5R CY1Y2ECON-ZIP-10K Supply Air TempSAT +SAT -OAT + OAT -CC1CC2OCC W1RTU Stage 1 Mechanical CoolingCircuitryRTU Stage 2 Mechanical CoolingCircuitryECON-ZIP-10K Outside Air TempTHERMOSTATRTU TERMINALECON-ZIP-BASE575251535659R CG OCCW1O/B Y1Y2ACT1ACT2ACT3ACT5R C R CG/OCC W1/O/B Y1Y2CC1CC2OAT+OAT-OAH+OAH-SAT+SAT-RAT+RAT-RAH+RAH--SR1 -Common2 + Hot3 Y Input, 2 to 10V 5 U Output, 2 to 10VACT 1ACT 2ACT 3ACT 5R CY1Y2ECON-ZIP-10K Supply Air Temp SAT +SAT -CC1CC2OCC W1RTU Stage 1 Mechanical CoolingCircuitry RTU Stage 2 Mechanical CoolingCircuitryECON-ZIP-TH Outside Air EnthalpyT (+)T (-)24 V (R)RH (+)RH (-)OAT + OAT -OAH + OAH - RECON-ZIP-BASETHERMOSTATRTU TERMINAL57505251535659When the thermostat is not equipped with occupancy control, "Fan On" output "G" shall be wired to the ECON-ZIP-BASE.W1 must be wired for Heat Pump operation if conventional thermostat is used in conjunction with Defrost Board. If Thermostat and RTU use O/B control reversing valve position, O/B must be wired to W1 on ECON-ZIP-BASE.Existing refrigeration safety devices may exist, consult RTU wiring diagram515253If RTU is not a Heat Pump using a conventional thermostat and it is desired to record heating operation hours, connect W1 to ECON-ZIP-BASE.56Actuators can be mounted in parallel with the ACT3 output from the ZIP Economizer. The ACT5 feedback input should be wired to the Outside Air damper actuator feedback wire.57Iso relay may be required with certain RTU manufacturers.59Power source should be the same as ECON-ZIP-BASE.50When the thermostat is not equipped with occupancy control, "Fan On" output "G" shall be wired to the ECON-ZIP-BASE.Existing refrigeration safety devices may exist, consult RTU wiring diagram5153If RTU is not a Heat Pump using a conventional thermostat and it is desired to record heating operation hours, connect W1 to ECON-ZIP-BASE.56W1 must be wired for Heat Pump operation if conventional thermostat is used in conjunction with Defrost Board. If Thermostat and RTU use O/B control reversing valve position, O/B must be wired to W1 on ECON-ZIP-BASE.52Actuators can be mounted in parallel with the ACT3 output from the ZIP Economizer. The ACT5 feedback input should be wired to the Outside Air damper actuator feedback wire.57Thermostat with two (2) stages of cooling required. Thermostats with mercury switches are not compatible with the ZIP Economizer.58Iso relay may be required with certain RTU manufacturers.59T e c h .D o c - 01/20 - S u b j e c t t o c h a n g e . © B e l i m o A i r c o n t r o l s (U S A ), I n c .R CG/OCCW1/O/BY1Y2ACT1ACT2ACT3ACT5R C R CG/OCC W1/O/B Y1Y2CC1CC2OAT+OAT-OAH+OAH-SAT+SAT-RAT+RAT-RAH+RAH--SR1 -Common2 + Hot3 Y Input, 2 to 10V 5 U Output, 2 to 10VACT 1ACT 2ACT 3ACT 5R CY1Y2ECON-ZIP-10K Supply Air Temp SAT +SAT -OAT + OAT -CC1CC2G/OCC W1/O/BRTU Stage 1 Mechanical CoolingCircuitry RTU Stage 2 Mechanical CoolingCircuitryECON-ZIP-TH Outside Air EnthalpyECON-ZIP-THRAT+T (+)T (-)24 V (R)RH (+)RH (-)RAT-RAH+RAH-RT (+)T (-)24 V (R)RH (+)RH (-)OAH + OAH - RECON-ZIP-BASETHERMOSTATRTU TERMINAL5859R CG/OCC W1/O/BY1Y2ACT1ACT2ACT3ACT5R C R CG/OCC W1/O/B Y1Y2CC1CC2OAT+OAT-OAH+OAH-SAT+SAT-RAT+RAT-RAH+RAH--SR1 -Common2 + Hot3 Y Input, 2 to 10V 5 U Output, 2 to 10VACT 1ACT 2ACT 3ACT 5R CY1Y2ECON-ZIP-10K Supply Air TempSAT +SAT -OAT + OAT -THERMOSTATRTU TERMINALCC1CC2G/OCC W1/O/BRTU Stage 1 Mechanical CoolingCircuitry RTU Stage 2 Mechanical CoolingCircuitryECON-ZIP-10K Outside Air TempECON-ZIP-10K Return Air TempRAT+ECON-ZIP-BASE57RAT-59Power source should be the same as ECON-ZIP-BASE.50When the thermostat is not equipped with occupancy control, "Fan On" output "G" shall be wired to the ECON-ZIP-BASE.Existing refrigeration safety devices may exist, consult RTU wiring diagram5153If RTU is not a Heat Pump using a conventional thermostat and it is desired to record heating operation hours, connect W1 to ECON-ZIP-BASE.56W1 must be wired for Heat Pump operation if conventional thermostat is used in conjunction with Defrost Board. If Thermostat and RTU use O/B control reversing valve position, O/B must be wired to W1 on ECON-ZIP-BASE.52Actuators can be mounted in parallel with the ACT3 output from the ZIP Economizer. The ACT5 feedback input should be wired to the Outside Air damper actuator feedback wire.57Thermostat with two (2) stages of cooling required. Thermostats with mercury switches are not compatible with the ZIP Economizer.58Iso relay may be required with certain RTU manufacturers.59Power source should be the same as ECON-ZIP-BASE.50When the thermostat is not equipped with occupancy control, "Fan On" output "G" shall be wired to the ECON-ZIP-BASE.Existing refrigeration safety devices may exist, consult RTU wiring diagram5153If RTU is not a Heat Pump using a conventional thermostat and it is desired to record heating operation hours, connect W1 to ECON-ZIP-BASE.56W1 must be wired for Heat Pump operation if conventional thermostat is used in conjunction with Defrost Board. If Thermostat and RTU use O/B control reversing valve position, O/B must be wired to W1 on ECON-ZIP-BASE.52Actuators can be mounted in parallel with the ACT3 output from the ZIP Economizer. The ACT5 feedback input should be wired to the Outside Air damper actuator feedback wire.57Thermostat with two (2) stages of cooling required. Thermostats with mercury switches are not compatible with the ZIP Economizer.58Iso relay may be required with certain RTU manufacturers.59ECON-ZIP-BASEZIP Economizer™ Base Module Wiring DiagramsT e c h .D o c - 01/20 - S u b j e c t t o c h a n g e . © B e l i m o A i r c o n t r o l s (U S A ), I n c .ZIP EconomizerQuick SetupMoves up through the menu on the same level. Will increase values by one increment at a time. When setting values holding key down willfast scrollMoves down through the menu on the same level. Will decrease values by one increment at a time. When setting values holding key down will fast scroll. Enter sub menu level. Start editing a setting. Store an entered value. esc Escape sub menu tonext higher level.Cancel current actions.iShow additional information on thecurrent menu Itemwhen “i” appears inlower right of display.Moves down through the menu on the same level.Will decrease values by one increment at a time. When setting values holding key down will fast scroll.Enter sub menu level.Start editing a setting. Store an entered value. esc Escape sub menu to next higher level.Cancel current actions.iShow additional information on the current menu Item when “i” appears in lower right of display.Functions1. “Monitor Live Conditions” is used to display settings and live values.2. “Settings” is used to parameterize the ZIP Economizer. (Note: Devices 1 is for CC1, CC2, EF, IF; Devices 2 is for OAH, RAH)3. “Present Devices” is used to verify that the ZIP Economizer's Auto Detected connections are terminated properly. If connected device is not shown, verify wiring. If wiring has continuity and device is verifi ed operational re-enter “Settings” and enable missing device by changing from “Auto” to “Available” or “Installed”.4. “Alarms” is used to view current and historical alarms and delete inadvertently caused alarms.5. “Service and Commissioning” submenu is used to operate the RTU in “Manual Mode” or to perform “Acceptance Test”. “Settings” must to be completed to access.6. “Status” is a display of the current operating mode. It can beaccessed by pressing ”esc”. The action of pressing any key will drop the user down from Status to the next level, so repeatedly pressing “esc” will toggle the display between Status and Monitor Live Conditions. (Note: If status “Setup incomplete” is displayed the RTU cooling operation will be disabled and additional parameters must be set to achieve “Setup complete”.)1. Shut off power to RTU before beginning installation.2. Note orientation, opening rotation, and spring return rotation of damper assembly. Mount Actuator to Outside Air and Return Damper assembly. To ensure tight outside air shutoff; while tightening actuator clamp push damper closed.3. Terminate required Inputs and Outputs(I/O): For the ZIPEconomizer to function correctly, the following I/O, at a minimum, are required to be terminated, wired, and functioning (R, C, Y1, Y2, G, CC1, OAT, SAT, ACT1, ACT2, ACT3, ACT5). See wiring diagrams.4. Sensor confi guation: The ZIP Economizer automatically detects sensors attached and automatically confi gures for single dry bulb, single enthalpy, differential dry bulb and differential enthalpy.“Settings” is the menu displayed when the ZIP Economizer is fi rstpowered. Press “OK” to parameterize required settings. Reference above Keypad Key defi nition instructions and navigate as needed.WARNING Live Electrical Components!During installation, testing, servicing and troubleshooting of this product, it may be necessary to work with live electrical components. H ave a qualifi ed licensed electrician or other individual who has been properly trained in handling live electrical components perform these t asks. Failure to follow all electrical safety precautions when exposed to live electrical components could result in death or serious injury.T e c h .D o c - 01/20 - S u b j e c t t o c h a n g e . © B e l i m o A i r c o n t r o l s (U S A ), I n c .1. ZIP Code US or Canada (sets the free cooling changeover high limit and temperature units F/C)a. When the Zip Code submenu is displayed enter “OK” to begin “US” Zip Code parameterization. If “Canada” Postal Code is desired press the up/down arrow to access.i. Press OK to access digit 1 (flashing) then use the up/down arrow to parameterize; enter OK when complete. Repeat until all digits are complete. If a mistake is made press “esc” andrepeat from beginning.ii. When all Zip Code or Postal Code digits are entered press “esc” to move up a level then press the up/down arrow to access next settings parameter.2. Vent Min Pos (Outdoor Air Damper Ventilation Minimum Position)a. When the “Vent Min Pos” submenu is displayed press “OK” toparameterize (flashing).b. Use the up/down arrow to parameterize, press “OK” whencomplete. The actuator will immediately drive the damper to the minimum position.3. Additional Parameters may require setting. The ZIP Economizer will auto-detect added Devices such as a CO2 sensor etc. When the ZIP Economizer detects a new device, it will prompt the user in the Status level; navigate to Settings and parameterize blank fi elds. If the devices are connected upon fi rst start up their settings will require parameterization then.4. When all parameters have been set, the ZIP Economizer will show “Setup Complete” if there are still parameters to set, there will be no action. You can verify by pushing esc until status level is reached and it will display “Setup Incomplete”. If this is the case, re-enter settings menu and use up down arrows to fi nd the parameter with blank fi elds and parameterize as described above. Note: you may enter parameters in any order - eg: Vent min Pos before ZIP Code - If the RTU is a heat pump or uses a 2 speed indoor fan, these paramaters should be enabled fi rst, otherwise the logic may go to Setup Complete prematurely.The ZIP Economizer has built in commissioning processes found in Acceptance Test.1. Economizer Test. Use “Economizer Test” to verify RTU Integrated Economizer operation. Navigate to the “Service and Commissioning” menu, press “OK”; press the down arrow to access “Acceptance Test”. Press OK again when “Economizer Test” appears. Press “OK” again to confi rm running test. Follow prompts during test. This test will open damper to 100%, enable power exhaust fan (if connected), enable 1st stage of Mechanical Cooling, reverse this process and then drive to Vent Min Position. When used with a Belimo actuator, the actuator will speed up to reduce test time.2. Manual Mode is used to override outputs after entering a “Timeout” duration.3. Damper Scaling. The test will re-scale the control signal range to maximum resolution (0...100%) over the calibrated (reduced) angle. When using a Belimo actuator, the actuator will speed up to reduce test time.Note: Failure to identify obstructions or improper setup of damper assembly may result in an improper scaling and operation of the damper.)Additional testing can be found later in this document.1. When all entries have been completed, the ZIP Economizer will switch to Status display and show “Setup Complete”, and will immediately show a “Damper scaling starts in 10secs” and will countdown to 0 (be aware, at 0 the damper will start to move at high speed ). A message will scroll saying “Damper scaling for better operation if obstruction is present rescale damper in commissioning menu”. (For detailed instructions on this – please see the section “Service and Commissioning” below. This will open damper to 100% (re-scale control signal if needed). (Note: failure to identify obstructions or improper setup of damper assembly may result in an improper scaling and operation of the damper.)Once scaling is complete, a message will appear saying “Damper scaling successful”. The ZIP will then show “maximum at80° = 100%” That message will show maximum rotation of the damper. This process ensures the damper is always operating and displayed from 0...100%.2. Once the message has appeared, the actuator immediately closes the damper and a countdown begins, until the unit starts to operate in Automatic Mode (be aware, when countdown complete, the RTU will respond to thermostat calls which may enable mechanical cooling).ZIP EconomizerQuick Setup。
skinengine delphi示例 -回复

skinengine delphi示例-回复皮肤引擎是一种在Delphi开发中常用的工具,能够方便地实现界面的定制化和个性化。
本文将介绍皮肤引擎的基本概念,并以中括号内的内容为主题,逐步详细解答。
1. 什么是皮肤引擎?皮肤引擎是一种用于定制化界面的技术工具,它允许开发人员通过切换不同的皮肤来改变应用程序的外观。
通过皮肤引擎,开发者可以将应用程序与特定的视觉设计风格相匹配,使应用程序具有更好的用户体验。
在Delphi中,很多皮肤引擎可供选择。
2. 如何使用皮肤引擎?为了使用皮肤引擎,首先需要将皮肤引擎的相关文件添加到Delphi项目中。
通常,皮肤引擎提供了一个运行时库,以及一些皮肤文件(通常是XML格式的配置文件和图像文件)。
在Delphi的设计器中,可以将皮肤引擎的运行时库添加到项目中的组件库中,然后在设计时或运行时使用这些组件。
3. 如何获得不同的皮肤?一般来说,皮肤引擎提供了一些默认的皮肤选择,开发者可以从中直接选择或自定义。
某些皮肤引擎还提供了在线皮肤库,开发者可以在其中下载其他开发者分享的皮肤。
此外,开发者也可以通过自己的设计或外包设计来创建自定义皮肤。
4. 如何切换不同的皮肤?皮肤引擎通常提供一个属性或方法来切换不同的皮肤。
在Delphi中,开发者可以通过在代码中设置一个皮肤引擎的属性,或者在设计器中选择皮肤引擎的属性来切换皮肤。
当切换皮肤时,皮肤引擎会自动根据皮肤配置文件中的信息来重新绘制界面。
5. 如何自定义皮肤?除了使用皮肤引擎默认提供的皮肤外,开发者还可以自定义皮肤以满足特定需求。
通常,自定义皮肤需要进行一些界面元素的设计,比如按钮、标签、文本框等。
开发者可以使用图像编辑软件创建自己的皮肤图像,并将其与皮肤引擎的配置文件进行关联。
6. 皮肤引擎的优缺点是什么?皮肤引擎的优点是可以轻松地实现界面的个性化和定制化,提高应用程序的用户体验。
通过切换不同的皮肤,开发者可以让应用程序适应不同的用户群体和场景。
高级渲染技巧 在Blender中实现真实的皮肤质感

高级渲染技巧:在Blender中实现真实的皮肤质感Blender是一款强大的开源三维建模和渲染软件,它为我们提供了广泛的工具和功能,可以实现逼真的渲染效果。
在Blender中,实现真实的皮肤质感是很重要的,因为皮肤是一个非常复杂的材质,包含大量的细节和纹理。
在本教程中,我们将介绍一些高级渲染技巧,以实现逼真的皮肤效果。
首先,要实现真实的皮肤质感,我们需要使用适当的材质。
在Blender中,我们可以使用节点编辑器创建复杂的材质。
打开节点编辑器,选择“材质”选项卡,并点击“新建材质”。
在节点编辑器中,我们可以看到一个默认的“Diffuse”节点,它用于设置材质的颜色。
我们需要将其替换为适合皮肤的材质节点。
在节点编辑器中,点击“添加”按钮,选择“材质”>“皮肤”。
这将添加一个皮肤材质节点。
我们可以在节点属性面板中调整皮肤材质的参数,如颜色、透明度、粗糙度等。
此外,我们还可以添加其他节点,如“散射”和“反射”,以增加材质的逼真度。
接下来,我们需要为皮肤添加纹理。
纹理是实现真实皮肤效果的关键。
在节点编辑器中,点击“添加”按钮,选择“纹理”>“图像纹理”。
这将添加一个图像纹理节点。
在节点属性面板中,点击“打开”按钮,选择适合的皮肤纹理图像。
确保图像的分辨率足够高,以保证细节的准确性。
将图像纹理节点连接到皮肤材质节点的“Color”输入端口。
这将使纹理应用于材质的颜色。
通过调整“强度”参数,我们可以控制纹理的影响程度。
此外,我们还可以使用“映射”节点来调整纹理的位置、旋转和缩放。
要增加皮肤的逼真度,我们还可以添加其他纹理节点,如“法线”和“置换”。
法线纹理用于模拟皮肤上的凹凸细节,而置换纹理可以让表面看起来更加真实和立体。
通过将这些纹理节点连接到皮肤材质节点的适当输入端口,我们可以实现更真实的皮肤效果。
此外,我们还可以使用环境光遮蔽(AO)和全局光照(GI)来增强皮肤的渲染效果。
环境光遮蔽可以模拟物体之间的遮挡效果,使渲染结果更加真实。
人体皮肤真实感实时渲染研究

摘
要: 人体 皮肤是一种高度散射的半透明材质 , 与光线之间的交 互过程很 难建模和模 拟 , 因此 皮肤的真 实感实c e i s d i s c u s s e d .Al s o ,t h e p a p e r d e s c i r b e s t h e a d v a n t a g e s a n d d i s a d v a n t a g e s o f v a r i o u s me t h o d s ,a n d c o mp a r e s d i f - f e r e n t a p p l i c a t i o n s c o p e .A t l a s t ,t h e p a p e r g i v e s t h e r e s e a r c h d i r e c t i o n i n t h e f u t u r e . Ke y wo r d s : Hu ma n S k i n;B l u r P r o c e s s i n g ;T e x t u r e S p a c e ;S c r e e n S p a c e
YANG Me n g z h a o .W ANG Ku a n q u a n
( 1 S c h o o l o f Co mp u t e r a n d I n f o r ma t i o n E n g i n e e r i n g ,He i l o n g j i a n g U n i v e r s i t y o f S c i e n c e a n d T e c h n o l o g y ,Ha r b i n 1 5 0 0 2 1 , C h i n a ;
自动磨皮 Photoshop美肤插件推荐

自动磨皮:Photoshop美肤插件推荐美容磨皮是一种常见的图像处理技术,在摄影和广告行业中起着重要的作用。
它可以通过去除皮肤瑕疵并增强细节,使人物肤色看起来更加平滑和完美,让照片变得更具吸引力。
而Adobe的PhotoShop软件则是这一领域中最受欢迎和常用的工具之一。
在本文中,将介绍几个在Photoshop中使用的自动磨皮插件,帮助您快速达到理想的美肤效果。
1. PortraiturePortraiture是一款非常流行的自动磨皮插件,广泛应用于商业摄影和人像摄影中。
它提供了一系列的滤镜和工具,让您能够精确控制磨皮的效果。
该插件能够智能地检测和平滑肌肤,并自动保留人物的自然肤色和细节。
通过使用Portraiture插件,您可以在保持真实感的同时,轻松地去除痘痘、皱纹等皮肤瑕疵。
2. Beauty BoxBeauty Box是一个专门为视频制作设计的磨皮插件,也可在Photoshop中使用。
它具有快速、准确和自然的美肤效果。
该插件提供了自动检测肌肤区域的功能,并能智能地分析皮肤的纹理和色调,以达到最佳的磨皮效果。
不仅如此,Beauty Box还提供了精细的控制选项,使用户能够根据需要调整肤色、纹理和曝光等参数,使照片达到理想的效果。
3. ImagenomicImagenomic是另一个在Photoshop中广受欢迎的自动磨皮插件系列。
其中最著名的是Noiseware、Portraiture和Realgrain。
Noiseware可以帮助您快速去除照片中的噪点,提高图像的清晰度。
Portraiture可以智能地检测和平滑肌肤,提供了多种参数和滤镜选项,使用户能够全面地调整磨皮效果。
Realgrain则是一款模拟胶卷颗粒的插件,可以给照片增加一种纹理和艺术效果。
这些插件的组合使用将为您带来强大的磨皮和图像增强能力。
尽管这些自动磨皮插件在照片处理中非常强大,但使用时也需要注意一些事项。
首先,要避免过度使用磨皮效果,以免使照片看起来过于人工和不真实。
清新明朗绿色PTT模板1

Click to edit title style
Text in here
Text in here
Text in here
Text in here
Title ThemeGallery is a Design Digital Content & Contents mall developed by Guild Design Inc.
• Description of the contents
Add Title • Description of the contents
• Description of the contents
Add Title • Description of the contents
• Description of the contents
Click to edit title style
ThemeGallery is a Design Digital Content & Contents mall developed by Guild Design Inc.
Text in here
▪ Description of the business ▪ Description of the business ▪ Description of the business • Description of the contents • Description of the contents
Click to edit title style
Please write down of a slogan for a vision of a Vision 01
skinsharp

skinsharp2篇Skinsharp是一款颇受欢迎的美容工具,其独特的技术使得我们可以在家中轻松地进行专业级别的护肤护理。
Skinsharp尤其适合那些无暇前往美容院或皮肤专家处进行护理的人士。
在本文中,我们将探讨Skinsharp的工作原理以及它对我们皮肤的益处。
Skinsharp通过采用超声波技术和微电流技术,以及经过精心设计的美容仪器,在家中为我们提供了一种高效、安全的护肤方案。
超声波技术可以渗透皮肤深层,将护肤产品中的有效成分输送给肌肤,从而增强了护肤的效果。
而微电流技术则能够促进肌肤的新陈代谢,提高皮肤的弹性和紧致度。
使用Skinsharp时,我们只需要先净化皮肤,然后将仪器使用在脸部或身体需要护理的部位上。
根据需要,我们可以选择不同的程序和模式,以满足我们的个人需求。
Skinsharp的仪器不仅小巧轻便,而且操作简单,不需要额外的专业知识或技能。
Skinsharp的益处是显而易见的。
首先,它可以提供定制化的护肤方案。
通过不同的程序和模式,我们可以根据自己的皮肤需求进行护理。
无论是保湿、深层清洁还是紧致抗衰老,我们都可以找到适合自己的护理方式。
其次,Skinsharp在护肤品的吸收方面有着明显的优势。
由于超声波技术的应用,护肤产品的有效成分可以更好地被皮肤吸收,从而发挥更好的效果。
此外,微电流技术的运用也可以促进血液循环和新陈代谢,使皮肤保持健康有光泽。
最后,Skinsharp的使用非常方便。
我们不再需要花费时间和金钱去专业的美容院,只需在家中就能享受到专业级别的护肤体验。
然而,我们也需要注意使用Skinsharp的一些注意事项。
首先,我们应该遵循仪器的说明书进行正确的使用。
在使用过程中,我们要避免长时间在同一部位停留,以免对皮肤造成伤害。
另外,由于Skinsharp使用了超声波和微电流技术,所以怀孕期间、心脏病或皮肤受伤的人应该避免使用。
最后,虽然Skinsharp可以在家中进行护肤,但仍然建议我们定期去专业的皮肤专家处进行皮肤检查和护理,以确保我们的皮肤健康。
AE中如何制作皮肤状效果
AE中如何制作皮肤状效果Adobe After Effects(简称AE)是一款常用的视频编辑和特效制作软件,广泛应用于电影、电视制作、广告等领域。
在AE中,我们可以利用其强大的功能和特效库,制作出各种精彩的视觉效果。
本文将介绍如何在AE中制作出皮肤状效果,帮助你提升视频制作的质量。
首先,我们需要准备一张素材或者从AE的库中选取一张皮肤纹理图片。
这张图片将作为我们制作皮肤状效果的基础。
步骤一:导入素材在AE中打开一个新项目,然后将素材图片拖拽到项目资源管理器中,或者通过“文件-导入-文件”选项来导入素材。
步骤二:新建合成点击右键,在项目资源管理器中选择“新建合成”,设置合成的大小和时长,可以根据需求调整参数。
步骤三:将素材图片放置在合成中在合成中,通过拖拽的方式将素材图片拖放到时间轴上。
确保图片文件在最下层,以便后续操作。
步骤四:添加调整层点击“新建”菜单,选择“调整层”,在时间轴中插入调整层。
调整层将用来添加各种效果和特效。
步骤五:制作颜色校正效果选中调整层,点击“效果”菜单,选择“颜色校正”,然后选择“色彩平衡”或者其他合适的颜色校正效果。
根据实际需求,调整颜色平衡的参数,增强或减弱图片的色调、饱和度和亮度,使皮肤效果更加逼真。
步骤六:添加纹理效果选中调整层,在“效果”菜单中选择“噪点和颜色”下的“噪点”效果,将噪点效果拖放到调整层上。
在噪点效果的参数中,可以调整噪点的亮度、尺寸和密度等参数,以达到更加逼真的纹理效果。
步骤七:添加模糊效果选中调整层,在“效果”菜单中选择“模糊和清晰”,然后选择“高斯模糊”或其他适合的模糊效果。
在高斯模糊的参数中,可以调整模糊的强度和半径,使皮肤状效果更加柔和。
步骤八:制作皮肤质感选中调整层,在“效果”菜单中选择“风格化”,然后选择“粒子系统II”效果。
将粒子系统II效果拖放到调整层上。
在粒子系统II效果的参数中,可以调整粒子的数量、速度和大小等参数,以制作出皮肤质感。
制作真实的皮肤材质效果
制作真实的皮肤材质效果皮肤是人物模型渲染中非常重要的一个元素,真实的皮肤材质效果可以大大提升人物模型的逼真程度。
在Blender软件中,我们可以使用一些技巧来制作出非常真实的皮肤材质效果。
下面将介绍一些常用的方法。
1. 使用高质量纹理图像在制作真实的皮肤材质效果时,一个非常重要的因素是使用高质量的皮肤纹理图像。
你可以在互联网上搜索高质量的皮肤纹理图像,并将其导入到Blender软件中。
确保图像分辨率足够高,并且皮肤细节清晰。
2. 设置材质节点在Blender的节点编辑器中,我们可以使用不同的节点来构建皮肤材质。
首先,创建一个Principled BSDF节点,并将其链接到输出。
然后,使用一个Image Texture节点来导入皮肤纹理图像,并将其链接到Principled BSDF节点的Base Color输入。
这样可以将纹理应用到模型的表面。
3. 调整材质属性为了使皮肤看起来更真实,我们可以调整材质属性。
在Principled BSDF节点中,有许多属性可以调整,如反射率、粗糙度、透明度等。
通过调整这些属性,我们可以模拟出皮肤的光泽、光滑度和透明度。
4. 添加次表面散射次表面散射是模拟皮肤内部光线的散射效果。
在Blender中,我们可以使用一个叠加的SSS(subsurface scattering)节点来实现。
将SSS节点链接到Principled BSDF节点,并调整其属性,如颜色、半径和强度。
通过调整这些属性,我们可以模拟出皮肤不同部位的次表面散射效果。
5. 添加细节为了增加皮肤的真实感,我们可以添加一些细节。
在Blender中,可以使用纹理贴图和法线贴图来添加皮肤上的斑点、纹理和皱纹等细节。
将这些贴图导入到Blender中,然后将其链接到适当的节点中,如Principled BSDF节点的Displacement输入。
通过调整这些贴图的属性,我们可以控制细节的强度和分布。
6. 调整光照光照是影响皮肤外观的重要因素。
建立逼真人物皮肤材质的技巧
建立逼真人物皮肤材质的技巧在使用3D建模软件Blender时,创建逼真的人物皮肤材质是一个非常重要的技巧。
通过有效使用材质和纹理的组合,我们可以赋予角色真实感和更高的观赏价值。
下面我将分享一些建立逼真人物皮肤材质的技巧。
1. 收集高质量的纹理素材在开始之前,确保你有高质量的皮肤纹理素材。
你可以在互联网上搜索并下载免费或付费的纹理资源。
寻找具有高分辨率和真实细节的纹理图像,这样你可以更好地运用到你的人物模型中。
2. 创建皮肤材质节点打开Blender软件并选择你的人物模型。
进入“节点编辑器”,我们将构建一系列节点来创建人物皮肤材质。
首先,添加一个“Diffuse BSDF”节点,这将成为我们的皮肤基本层。
将其连接到材质输出节点。
3. 添加纹理贴图在“节点编辑器”中,通过“输入”菜单添加一个“Image Texture”节点。
打开你收集到的皮肤纹理图像,并将其链接到“Diffuse BSDF”的“Color”输入。
这将把纹理贴图应用到皮肤上。
4. 添加细节纹理一个逼真的皮肤材质通常需要一些细节纹理来增加更多层次感。
你可以选取一些皮肤瑕疵、皱纹、毛孔等的纹理图像,并将其添加到你的节点编辑器中。
在Blend的“输入”菜单下找到并添加一个“Image Texture”节点,将纹理连接到之前添加的“Diffuse BSDF”的“Normal”输入。
确保将节点的颜色空间设置为“非颜色”。
5. 调整皮肤颜色和光照为了使皮肤看起来更加真实,你可以通过调整材质节点来改变皮肤的颜色和光照。
为了改变皮肤的颜色,你可以使用HSV节点来调整纹理的色调、饱和度和值。
为了改变光照效果,你可以添加一个“Glossy BSDF”节点并连接到“Diffuse BSDF”的“Mix Shader”。
通过调整节点的参数,你可以模拟皮肤的反射和高光效果。
6. 添加微小细节为了增加更多的细节,你可以在皮肤材质上添加一些微小的颗粒和毛发效果。
墙壁的皮肤Modular Magic
墙壁的皮肤Modular Magic佚名【期刊名称】《《数码设计.CG WORLD》》【年(卷),期】2012(000)011【摘要】爱马仕在今年米兰设计周上隆重推出的是日本建筑大师坂茂设计的一套“H”形墙壁基架。
类似瓷砖的爱马仕“皮砖”,可以在基架上自由组合,悬挂与拆卸都极其方便。
类似一块块方形瓷砖,上面包裹的却是HERM主S爱马仕的皮料。
这些“皮砖”像画框一样,可以非常容易地挂在紧贴墙壁预先安好的“H”形框架上,也可以自由组合成不同的颜色、图案,这是名符其实的墙壁的“皮肤”,“换肤”更是出奇地方便。
【总页数】1页(P92-92)【正文语种】中文【中图分类】TP333.7【相关文献】1.Magic Blue-MODULAR DENIM Wet-Finishing Concepts Developed by Goller Textilmaschinen GmbH [J],2.Magic Blue-MODULAR DENIM Wet-Finishing Concepts Developed by Goller Textilmaschinen GmbH [J],3.Two Magical Failures and Two failing Magicians: Comparative Analysis of the Representation of Magic in Doctor Faustus & The Tempest [J], Dai Dan-hi4.Magics在汽车制造中的应用——Magics确保卡特比勒(Caterpillar)公司在引擎样机制作中节省了大量的时间 [J], 无5.班级墙壁育人的力量来源——S市3所小学班级墙壁文化的质性研究 [J], 张释元; 江仁因版权原因,仅展示原文概要,查看原文内容请购买。
- 1、下载文档前请自行甄别文档内容的完整性,平台不提供额外的编辑、内容补充、找答案等附加服务。
- 2、"仅部分预览"的文档,不可在线预览部分如存在完整性等问题,可反馈申请退款(可完整预览的文档不适用该条件!)。
- 3、如文档侵犯您的权益,请联系客服反馈,我们会尽快为您处理(人工客服工作时间:9:00-18:30)。
Skin Architecture:Michele HanThe SkinThe first line of defense, skin protects against infec-tion, abrasion, and water loss. It contains nerveendings vital for sensation, such as touch, pain, heat, and cold. It produces vitamin D on exposure to UV rays in sunlight, monitors the body’s salt balance, and regulates body temperature. Skin is the body’s largest organ.It is a boundary, separating man from environment. Adapting and responding, it maintains a constant equilibrium; it creates homeostasis.The term homeostasis is referred to by Flood and Carson (1993) as a process by which a system preserves its existence through the maintenance of its dynamic equilibrium.dermal papillaeillustrations from THE PEOPLE’S COMMON SENSE MEDICAL ADVISER IN PLAIN ENGLISH, FIFTY-FOURTH EDITION. R.V. Pierce, MD, 1895 </files/18467/18467-h/advise.html>Thermoregulation Blood is shunted around the body to create a different heat distribution depending on the external climate, internal heat genera-tion and heat loss mechanisms.Despite the extreme variance of environ-mental temperatures, the body restricts its core to a very narrow thermal range, the extremes of either of which is death.The skin provides the interface by which the body controls this internal thermal environment. Embedded with sensors and equipped with an array of mechanistic re-sponses, the skin acts as a surface through which to radiate or absorb heat.RISE IN CORE BODY TEMPReceptors in hypothalamus detect increase in core temp/temp of bloodVASODILATION of arteriolesSHUNT VESSELS CONSTRICT increased blood flow to skin surface; heat loss by RADIATIONHeat loss by EVAPORATION of sweat; sweating leads to a lower skin tempVOLUNTARY ACTION - remove clothing; seek cooler area; or cold drink86939698101011February, South Pole Station -403268July, Yuma Arizona 86104July , Death Valley 122 140Hot desert sand 176Very hot sauna212Environmental Temperatures°F°FHuman Co Temperatu86 Decreased shivering, erratic movements, incoherent93 Violent shivering; speech and thought impaired 96 Intense shivering and Impaired coordination98 Normal Range100 Extreme physical exercise and fever107 Heat stroke, brain damage111Upper limit for survival, impaired thermal regulation403268860422407612Thermal Ranges, adapted from “The Skin’s Role in Human Ther-moregulation and Comfort” (Edward A. Arens_ H. Zhang).DROP IN CORE BODY TEMPReceptors in hypothalamus detect increase in core temp/temp of blood.VASOCONSTRICTION of capillaries in the skin narrow SHUNT VESSELS DILATE Less blood flows to skin surface = less heat is lost by RADIATION Hair raising - greater insulationShivering - rapid contraction and relaxation of muscles produces heat by RESPIRATIONAdrenaline INCREASES METABOLIC RATE of cells VOLUNTARY ACTION - put on clothes; seek warmer areas or warm drink30’10° F 0° F20° F 30° F 40° F 50° F 60° F 70° F 80° F 90° F 100° F110° FThe problemUnfortunately, the NYC subway is not as efficient in its thermoregulation.In the summer, when an underground tunnel would seem a refuge, temperatures commonly register 110 degrees on popular platforms – the human body, subjected to prolonged exposure to such heat risks heatstroke and brain damage.“Sometimes it’s so hot on the platform that I can’t breathe. I would think the MTA would want to do something about the temperature on the platforms so they don’t have people passin’ out all over the place.” Victoria Jeter, Second Ave Sagas Blogger < http:///2007/07/11/key-temperature-question-conspicuously-absent-from-summer-subway-reports-cards/#comment-905>“The Metropolitan Transportation Authority has tried to calculate the sources of this seasonal discomfort. It found that brakes produced 60 percent of the heat, air-conditioning provided 20 percent and accelera-tion 13 percent -- a total of 93 percent of the heat from the trains. Humans and electrical equipment (they are lumped into one category by the M.T.A. for the purposes of assessing heat, it seems) added only 7 percent to the mix.” “The City Life; Summer’s InfernalSubway, ELEANOR RANDOLPH. August 9, 1998. NEW YORK TIMES </gst/fullpage.html?res=9C04E4D6103BF93AA3575BC0A96E958260>.Air-conditioning - meant to temper the environment - only adds to the discomfort, producing 20% of platform heat gain.The thermal mass of the ground acts as an insula-tor, preventing the dissipation of accumulated heat.Ventilation draws air in from the street, and vents it back; hot air produced within the subway tunnels is vented out onto the streets and sidewalks. Dur-ing the winter this might seem like a good thing, but during the summers it makes the city heat even more unbearable.The proposalThis project looks at an alternate means of ventila-tion, using the regulatory properties of human skin as precedent to create a homeostatic environment within the new subway extension.OFF-ISLAND TRANSFER STATIONSESTIMATED HEAT GAIN2ND AVE TUNNEL EXTENSIONThe site:providing a new line of running N-S.The modelA performative model was designed to explore ameans of taping these pressure differentials.A series of clear chambers equipped with permeable deformable membranes that animate the creation of pressure differentials and the direction of air flow.A 2” pvc pipe was used to simulate a subway tunnel, with a 2” plastic plunger pump to simulate the pass-ing train.Check valves direct and control the inlet and outlet of air. A check valve allows fluid (liquid or gas) to flow through it in only one direction. When the pump is set in motion, a high pressure compression wave pushes air out of the outlet valves in front of the plunger, while a low pressure wake behind the plunger draws air in through inlet valves.DIRECTIONAs the pump passes, depending on the direction of the valve, air is pushed either in or out of the cham-bers. With each pass, the membrane separating the chambers deflects towards the side of lower pres-sure. When the pump ceases, air is diffused through the membranes. The result is a choreographed diffu-sion of air from high to low pressure, animated by the slowly deforming shapes of the membranes.The systemApplying this logic to the site, a network of check valves embedded throughout the Second Avenue tun-nel is used to channel air through a vascular system that uses the thermal mass of the earth to create a temperate subway environment.As the train passes, tunnel inlet valves draw surfaceair in from the street level. The air is passed through filters to sift out particulates, and long pipes that use the constant temperature of the earth (approximately 50 degrees Fahrenheit) to temper the air.This cleaned and tempered air is drawn through the stations into the tunnel, and expelled by outlet valves onto the sidewalks.heatNO 14th Street2nd Aveheat sensitive inlet valve supply pipeInlet ValvesONOFFONAir Pressure, bladderintakeAB!4th Street Station SectionsReferencesSkinillustrations from THE PEOPLE’S COMMON SENSE MEDICALADVISER IN PLAIN ENGLISH, FIFTY-FOURTH EDITION. R.V. Pierce,MD, 1895 </files/18467/18467-h/advise.html>“Modelling and Simplification of a Human Thermoregulation Modelfor thermal comfort regulation in a car interior” Lakhdar Benasser,Genevieve Dauphin-Tanguy, & Jean-Christophe kat. Proceedings ofthe 1999 EEUASME International Conference on Advanced Intel-ligent Mechatronics September 19-23, 1999 Atlanta, USA.“The Skin’s Role in Human Thermoregulation and Comfort” (Ed-ward A. Arens_ H. Zhang).“Skin Blood Flow in Adult Human Thermoregulation: How It Works,When It Does Not, and Why” Nisha Charkoudian, PHD. Mayo ClinicProceedings. 2003;78:603-612“Thermal sensation and Thermoregulation” Professor Alan Hedge,Cornell University, January 2007Histologic Diagnosis of Inflammatory Skin Diseases, A. BernardAckerman, Almut Böer, Bruce Bennin, and Geoffrey J. Gottlieb.2002–2006 Ardor Scribendi, Ltd. </public/freesamples/inflam001.html>Subway“Design of a modern subway ventilation system.” Tunnels & Tun-neling International NOVEMBER 2004. (pg 48-50)MTA Capital Construction - Second Avenue Subway Planning Study.</capconstr/sas/sas_documents.htm>“Fainting dieters a top cause of NYC subway delays”PostedBy Gina Pellrine, 9 January 2007. <http://www.thefinalsprint.com/2007/01/fainting-dieters-a-top-cause-of-nyc-subway-de-lays/>Arup Capability Statement, Consultancy Services for Ventila-tion, Aerodynamics, Fire Smoke Control and MEP Systems inTunnels.</industrial>“Analysis of Flow and Transport in Subway Systems”, W. E. Dunn,*B. R. Green U.S. Army, DOE ANL 980072401“Manhattan East Side Transit Alternatives (MESA)/Second AvenueSubway Summary Report”, MTA New York City Transit, VollmerAssociates, LLP SYSTRA Consulting, Inc. Allee King Rosen & Flem-ing, Inc. October 2001“The City Life; Summer's Infernal Subway, ELEANOR RANDOLPH.August 9, 1998. NEW YORK TIMES </gst/fullpage.html?res=9C04E4D6103BF93AA3575BC0A96E958260>.Skin Architecture20Michele Han21。
