WindML Driver for Mesa 4.0
驷惠WIN系列汽车管理系统说明书

精心打造驷惠软件培训教材驷惠Win 系列驷惠软件驷惠WIN系列汽车管理系统目录第一章软件安装 (2)第一节软硬件要求 (2)第二节软件安装 (3)第三节帐套配置 (5)第二章系统期初录入 (8)第一节进入帐套 (8)第二节配件信息的录入 (10)第三节往来单位信息的录入 (12)第四节其它基础信息录入与设置 (14)第五节系统参数设置 (17)第六节操作员维护与权限设置 (19)第七节开帐 (22)第三章配件业务篇 (24)第一节进货管理 (25)第二节销售管理 (33)第三节库存管理 (36)第四章维修业务篇 (41)第一节美容管理 (41)第二节大维修流程 (45)第三节维修索赔流程 (51)第四节会员管理 (55)第五节短信管理 (60)第六节帐务管理 (60)第七节决策分析和客户关系 (68)第五章整车部分 (70)第一节信息定义 (70)第二节业务模块 (72)第六章综合部分 (94)第一节快捷键 (94)第二节日常操作注意事项 (95)第三节打印格式设置 (96)第四节Win远程域名管理 (98)第五节业务提成操作 (103)第六节WIN客户端自动升级 (112)第七节财务接口 (115)第八节自定义界面功能 (123)第一章软件安装敬的驷惠软件合作伙伴、驷惠软件用户:首先感谢您选择和使用驷惠软件!驷惠软件是充分从用户实际的需求、管理与使用的角度;溶入国外的先进管理经验与国内的行业数据研发的一套汽车行业的应用管理软件。
“稳定、简捷、易学、实用”是驷惠软件核心内涵。
驷惠软件功能主要函盖配件、维修、美容、洗车、客户关系与会员管理、智能提醒、整车贸易的各个细节管理。
“驷惠软件因专注而专业”是其核心竞争力所在。
“诚信服务、满意100”是其核心的服务理念。
驷惠软件特点:专业、简便易用,使用见效快;模块化组合管理,业务衔接紧密,可以无缝升级到各个更高版本的信息化产品;硬件投入低,并可以利用集中部署,实现异地同步办公与业务管理。
Leaper-48设备软件和驱动程序安装指南说明书
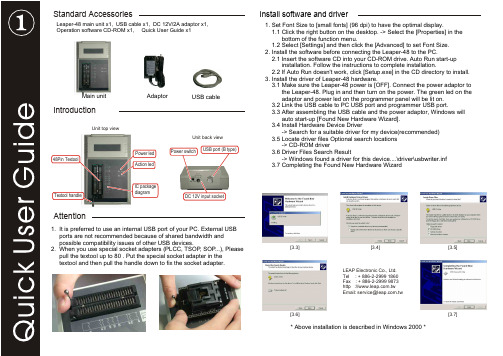
Install software and driver1. Set Font Size to [small fonts] (96 dpi) to have the optimal display.1.1 Click the right button on the desktop. -> Select the [Properties] in the bottom of the function menu.1.2 Select [Settings] and then click the [Advanced] to set Font Size.2. Install the software before connecting the Leaper-48 to the PC.2.1 Insert the software CD into your CD-ROM drive. Auto Run start-up installation. Follow the instructions to complete installation.2.2 If Auto Run doesn't work, click [Setup.exe] in the CD directory to install.3. Install the driver of Leaper-48 hardware.3.1 Make sure the Leaper-48 power is [OFF]. Connect the power adaptor to the Leaper-48. Plug in and then turn on the power. The green led on the adaptor and power led on the programmer panel will be lit on. 3.2 Link the USB cable to PC USB port and programmer USB port.3.3 After assembling the USB cable and the power adaptor, Windows will auto start-up [Found New Hardware Wizard]. 3.4 Install Hardware Device Driver-> Search for a suitable driver for my device(recommended) 3.5 Locate driver files Optional search locations -> CD-ROM driver3.6 Driver Files Search Result-> Windows found a driver for this device....\driver\usbwriter.inf 3.7 Completing the Found New Hardware Wizard* Above installation is described in Windows 2000 *[3.3][3.4][3.5][3.7][3.6]Leaper-48 main unit x1, USB cable x1, DC 12V/2A adaptor x1,Operation software CD-ROM x1, Quick User Guide x1IntroductionStandard AccessoriesMain unit USB cableAdaptor Power ledAction ledIC package diagramUSB port (B type)DC 12V input socketPower switchUnit top viewUnit back view48Pin TextoolTextool handleAttention1. It is preferred to use an internal USB port of your PC. External USB ports are not recommended because of shared bandwidth and possible compatibility issues of other USB devices.2. When you use special socket adapters (PLCC, TSOP , SOP ...), Please pull the textool up to 80 . Put the special socket adapter in the textool and then pull the handle down to fix the socket adapter.LEAP Electronic Co., Ltd.Tel : + 886-2-2999 1860Fax : + 886-2-2999 9873http :// Email:****************.twDevice pin check1.Memory device split function2.High-low voltage verify3.Pre-check on device( i.e. pin scan, IC identify... )Clear counterIC manufacturer, type number and package Auto loopStopDevice verify Check SUMSource filenameCounter EraseBlank checkProgramVerifyProtect /securityProcess optionProgress percentageExit programIC typeLoad from PCRead from source ICVerify source ICEdit fileProgramming sourceProgram process & optionsSelect IC numberDevice settings*only enabled when programmer is turned on and connected to the PCDevice DC/AC parameter settingsOptions1.Programmer information*only enabled when programmer is turned on and connected to the PC2. Sound settingsProgrammer self-test*only enabled when programmer is turned on and connected to the PC*Remove any device from the ZIF socket, if present.Load fileSave fileGet data block checksum*When a MicrochipPIC device is selected, IC checksum will be shown directly.Data block - FillASCII code Display Click to enter text.Data block -Move/Copy/Swap8bits HEX display16bits HEX displayBuffer & file informationConfirm changes Cancel changes Set data block range by load file sizeSet data block range by maximum size of bufferSet data block range byselected IC sizeHEX code Display Click to enter hexadecimal data.Address of data Click and enternew address.Source file editingExit edit window Delete projectCreate new projectCreate new project with present settings. Only reserve for 10 records. Or the project keeper will delete the un-protect and former file (on the top row).Execute ProjectProjectSelect projectDouble click to run the project.Click right button to display properties of the project. Double click blank row to create a new project.Single click to select the project. IC number,manufacturer & packageProtect lock:UndeletableAuto Run:Once: Single program Multi: Loop program NO: Manual programDescription of ProjectClick [Space] bar in the main operation screen to pop Hot Key menu.Hot KeyReplace target ICCheck IC locationand pin statusPlace target IC4.Click [Load] button to read data.Mode 1:Program single IC Process optionRunAuto LoopHow to create a project5.Select [Project Protect] Project created date and time Programming ProcessIC number,manufacturer & packageAuto Run:Loop programProtect lock:Auto Run:Single programHow to program an ICProgram ICPlace target ICMethod1: One time auto-program >Process IC with project options.Method 2: Loop auto-program >Process IC with project options.4.Click [Cancel] botton to stop programming.Method 3: Manual program 1.Place target 2.Click [Run]IC icon.>Process IC with project options.3.Check process status.RunReplace target ICCheck IC pins and locationPlace Target IC Click to ignore the IC check and process。
PC3000 for windows UDMA详细说明
PC3000 for windows UDMA详细说明PC-3000PC-3000不止是一种工具,更是一种技术,当硬盘驱动器为物理损坏时,可以让数据恢复公司在典型数据恢复环境中修复硬盘访问用户的数据。
此项技术适用于涉密政府机关、军队、大中型企业、数据恢复公司。
什么是PC-3000 for windows(UDMA)?这是一款新的软件,它结合了我们的第一代产品功能和特点:PC-2000 MFM/RLL, PC-3000 DOS (ISA), 和PC-3000 for Windows PCI的优点。
这些软件都是为世界范围的数据恢复专家所认可的。
目前国内很多数据恢复公司,国家机关都在用这种数据恢复设备。
基本操作原理.PC-3000 for windows(UDMA)是基于以下原理:1.这款产品由通用程序和专用程序组成.通用程序可以很快速地诊断硬盘,给客户对下一步硬盘修复的方法提供有效的信息。
支持任何3.5" . 2.5",1.8" 串口或PATA 硬盘或1.0"闪存接口硬盘。
专业程序提供在专业的工厂模式下诊断和恢复硬盘的功能。
该模式是不能通用,它对每一个硬盘系列都是唯一的。
这就是为什么该工具要为每个硬盘系列准备单独的工厂模式程序的原因。
专业程序提供更深层次的驱动器故障检测以及功能修复。
另外,如果硬盘不能被修复,这个套装也可以获取到用户数据。
2.对硬盘的操作都可通过PC-3000 for windows UDMA的专门双端口测试卡来实现.3.所有切换硬盘至工厂模式的专业接口和适配器均包含在此套装中.4.这个套装同样也包含工厂硬盘资源的数据库:闪存硬盘ROM内容,服务区模块和轨道,等。
所有的资源都根据系列,型号和固件版本来分组。
你可以在数据库中搜索特定资源,也可从最新型号硬盘中增加新对象.PC-3000 for windows(UDMA)可解决什么问题?专家们在使用这个工具时会有不同的熟练程度。
晨枫40 oem diy教程
晨枫4.0 OEM DIY教程晨枫电脑店。
老毛桃都是一样的。
会改一个,其他就会改了。
下面以晨枫4.0为例。
解剖一下4.0的OEM信息。
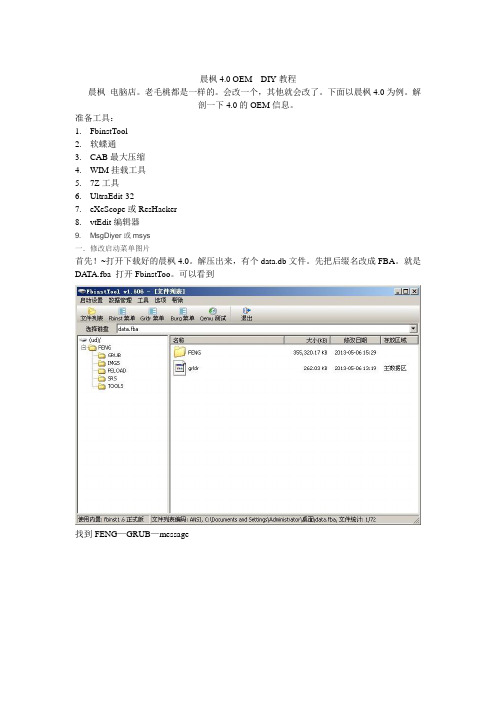
准备工具:1.FbinstTool2.软蝶通3.CAB最大压缩4.WIM挂载工具5.7Z工具6.UltraEdit-327.eXeScope或ResHacker8.vtEdit编辑器9. MsgDiyer或msys一.修改启动菜单图片首先!~打开下载好的晨枫4.0。
解压出来,有个data.db文件。
先把后缀名改成FBA。
就是DA TA.fba 打开FbinstToo。
可以看到找到FENG—GRUB—message这个地方是晨枫的Pe主菜单图片这个地方自己选择喜欢的图片。
替换掉,有些人用的是百草霜的的工具,我这电脑上没有。
所以我用msys修改自己要的图片。
首先复制msys到C盘根目录下找一张800X600的图片。
用XP自带的画图工具,另存为一下,(这是为了防止启动菜单黑屏)。
把图片命名为back.jpg.复制图片到masy—aaa里。
打开C盘msys—console双击打开输入命令:cd /aaa 注意cd后面有个空格的。
回车,再输入make等待命令执行结束。
关闭console2.然后到C:\msys\aaa里把message拷贝出来。
你可用先用7Z打开看看,是不是图片已修改成你的图片。
再把message复制出来。
打开晨枫的data.fba. FENG—GRUB目录。
把图片替换掉。
这样。
菜单图片就改好了,除了用这反编绎软件。
也能用MsgDiyer修改。
这里就不详说了。
MsgDiyer修改比用这个方便。
下载看看摸索一下就会了。
二,修改菜单上的文字。
菜单上的文字都在FENG—GRUB里。
MENUXX .把所有的晨枫字眼。
全改成你要的就可以了,主菜单的文字在GRLDR菜单。
打开修改好保存UTF-8.就可以了。
,三.修改03pe.03PE在FENG根目录下。
打开FENG目录。
德国Q8布鲁克光谱仪用户手册!!DIA2000使用帮助道

User’s Guide 目录吧吧Installing DIA 2000安装.......................................................................................................................... 3 做好DIA 2000安装准备条件................................................................................................................... 4 系统要求.......................................................................................................................................... .. 4 以往DIA产品说明............................................................................................................................ 4 安装提示.......................................................................................................................................... .. 4 安装DIA 2000单用户............................................................................................................................... 5 安装DIA 2000网络版............................................................................................................................... 5 安装DIA 200之后的一些问题......................................................................................................... 6 第一步.......................................................................................................................................... ...................... 6 开始DIA 2000SE (7)登录.......................................................................................................................................... .................. 7 工作表.......................................................................................................................................... .............. 8 DIA 2000界面 (8)编辑数据文件 (12)删除记录..........................................................................................................................................12 自动定位查询 (12)输出选定分析结果.......................................................................................................................... 12 DIA 2000参考.......................................................................................................................................... ........ 13 文件.......................................................................................................................................... ................ 13 文件存档..........................................................................................................................................13 新建.......................................................................................................................................... ........ 14 删除.......................................................................................................................................... ........ 15 打印.......................................................................................................................................... ........ 16 关闭.......................................................................................................................................... ........ 16 证书.......................................................................................................................................... ........ 16 细节.......................................................................................................................................... ........ 16 预览.......................................................................................................................................... ........ 16 打印.......................................................................................................................................... ........ 17 删除.......................................................................................................................................... ........ 17 关闭.......................................................................................................................................... ........ 17 打印.......................................................................................................................................... ........ 17 输入.......................................................................................................................................... ........ 18 输出.......................................................................................................................................... ........ 18 新用户登录......................................................................................................................................19 推出程序..........................................................................................................................................20 编辑.......................................................................................................................................... ................ 20 分析细节..........................................................................................................................................20 删除分析结果 (22)复制分析结果 (22)分类.......................................................................................................................................... ........ 23 视图.......................................................................................................................................... ................ 23 编辑筛选器......................................................................................................................................24 视图审计跟踪 (27)格式.......................................................................................................................................... ................ 28 分析表视图.............................................................................................................................. 28 分析细节..........................................................................................................................................30 打印报告..........................................................................................................................................32 宏指令.......................................................................................................................................... .... 42 其他.......................................................................................................................................... ................ 49 创建证书..........................................................................................................................................49 SPC 表.......................................................................................................................................... ..... 51 统计.......................................................................................................................................... ........ 52 基本文件..........................................................................................................................................53 元素.......................................................................................................................................... ........ 54 单位.......................................................................................................................................... ........ 56 重新计算因数. (57)牌号控制..........................................................................................................................................58 结构.......................................................................................................................................... ................ 64 系统设置..........................................................................................................................................64 终端设置..........................................................................................................................................65 样品编号..........................................................................................................................................68 设置分析结果合并.......................................................................................................................... 70 牌号参数..........................................................................................................................................71 Installing DIA 2000安装本章包括如何运行DIA 2000软件的安装。
基于WindML环境下的显卡驱动设计
基于WindML环境下的显卡驱动设计作者:张继伟来源:《现代电子技术》2010年第14期摘要:目前VxWorks操作系统及其图形支持库WindML已经在很多领域得到了广泛的应用。
但由于WindML本身支持的硬件少,提供的分辨率低等因素,往往不能满足在实际运用的要求,使得自行开发显卡驱动越来越有必要。
但缺少相应的文档,显卡驱动程序的开发是比较困难的。
在此以Intel855GME芯片组为例,介绍了基于VxWorks操作系统图形支持库WindML基础上的显卡驱动程序开发,对其整个流程进行描述。
一方面通过调用一些WindML标准API函数,另一方面对显示芯片的相关寄存器进行设置。
实现了高分辨率图像在WindML环境下的显示,讨论了在开发中需要注意的问题。
关键词:WindML; 显卡驱动程序设计; 高分辨率图像; 寄存器中图分类号:TN911; TP311 文献标识码:A文章编号:1004-373X(2010)14-0078-03Graphics Device Driver Development Based on WindMLZHANG Ji-wei(Chongqing Chang’an Industrial Group Co. Ltd., Chongqing 401120, China)Abstract:VxWorks operation system and WindML have been widely used in many fields. The graphics device driver developed autonomously for solving the unappeasable requirement in practical application of less hardware and low resolution provided by WindML. The development of graphics device driver on VxWorks is difficult in defect of relevant document. The circuit of graphics device driver development on WindML of VxWorks was designed. The high resolution image displayed in WindML is realized by transfering standard API function and setting associate registers.Keywords: WindML;design of graphics device driver program; high resolution image; registerVxWorks操作系统以其良好的可靠性和卓越的实时性被广泛应用在通信、军事、航空和航天等高尖技术及实时性要求极高的领域中。
winams测试原理
WinAMS测试原理主要包括以下几点:1.基于脚本命令或GUI图形界面执行测试:WinAMS提供自动化的测试环境,允许用户通过脚本命令或GUI图形界面来执行测试用例。
用户可以根据需求自定义测试用例,实现灵活的测试场景。
2.集成测试需求管理系统和静态分析工具:WinAMS集成了最佳的测试需求管理系统和静态分析工具,帮助用户更好地管理和跟踪测试需求,以及进行代码静态分析,确保代码质量。
3.自动生成测试驱动和桩函数:WinAMS能够自动生成完整的测试驱动和桩函数,无需编写测试代码,显著降低了测试的复杂度和工作量。
4.支持复杂测试场景:WinAMS的测试驱动支持复杂测试场景,包括同一测试用例中连续调用不同函数。
这使得测试更加全面和细致。
5.自动打桩获取输入控制输出:WinAMS的自动打桩功能能够获取输入、控制任何预定义或者用户定义类型的输出,帮助用户准确控制测试过程和验证结果。
6.捕捉和报告不期望的输出和信号:WinAMS能够捕捉并报告不期望的输出和信号,帮助用户发现潜在的问题和错误。
7.支持敏捷开发和测试驱动开发(TDD):WinAMS的产品特点之一是支持敏捷开发和TDD,使开发人员能够快速迭代和验证代码,提高开发效率和代码质量。
8.直接使用目标机代码进行单元测试:WinAMS是业界唯一能够直接使用通过交叉编译生成的目标机代码进行单元测试的工具,确保了测试的准确性和可靠性。
9.实现C语言程序的逻辑上的单元验证:WinAMS能够对嵌入式微机组装为产品后可能发生的问题等进行具有高信赖度的白盒(white box)测试,实现C语言程序的逻辑上的单元验证。
综上所述,WinAMS通过集成化的测试解决方案和自动化功能,显著降低了C/C++测试过程中的工作量和成本,提高了测试效率和代码质量。
windapi手册
windapi手册【最新版】目录1.Windapi 手册概述2.Windapi 的功能3.Windapi 的使用方法4.Windapi 的优点与不足5.总结正文1.Windapi 手册概述Windapi 是一款由微软公司开发的 Windows API 编写助手,适用于Windows 应用程序开发者。
该手册主要介绍了如何使用 Windapi 创建、编写和调试 Windows API 代码,帮助开发者更高效地完成 Windows 应用程序的开发。
2.Windapi 的功能Windapi 具有以下主要功能:(1) 代码生成:Windapi 可以根据开发者的需求自动生成相应的 API 代码,大大提高了开发效率。
(2) 代码调试:Windapi 提供了强大的调试功能,可以帮助开发者找到代码中的错误并及时修复。
(3) 代码分析:Windapi 可以对 API 代码进行分析,提供代码性能、安全性等方面的建议。
(4) 兼容性检测:Windapi 可以检测 API 代码的兼容性,确保代码在各个版本的 Windows 系统中都能正常运行。
3.Windapi 的使用方法(1) 安装 Windapi:在安装 Windows SDK 后,Windapi 会自动安装并集成到 Visual Studio 中。
(2) 创建 API 代码:在 Visual Studio 中,开发者可以选择Windapi 模板创建 API 代码。
(3) 编写 API 代码:在创建的 API 代码中,开发者可以编写 API 函数、方法等代码。
(4) 调试 API 代码:在 Visual Studio 中,开发者可以使用Windapi 的调试功能调试 API 代码。
(5) 分析 API 代码:在 Visual Studio 中,开发者可以使用Windapi 的分析功能对 API 代码进行分析。
4.Windapi 的优点与不足(1) 优点:Windapi 可以大大提高开发者的工作效率,降低开发难度,提高代码质量。
SESAM Sima 4.0.2 用户指南说明书
SESAM RELEASE NOTESIMASima is a simulation and analysis tool for marine operations and floating systems — from modelling to post-processing of results.Valid from program version 4.0.2SAFER, SMARTER, GREENERSesam Release NoteSimaDate: 07 Dec 2020Valid from Sima version 4.0.2Prepared by DNV GL – Digital SolutionsE-mail sales: *****************© DNV GL AS. All rights reservedThis publication or parts thereof may not be reproduced or transmitted in any form or by any means, including copying or recording, without the prior written consent of DNV GL AS.DOCUMENTATIONInstallation instructionsRequired:•64 bit Windows 7/8/10•4 GB RAM available for SIMA (e.g. 8 GB RAM total in total on the computer)•1 GB free disk space•Updated drivers for graphics cardNote that Windows Server (all versions), Windows XP, Windows Vista, and any 32-bit Windows are not supported.Recommended:•64-bit Windows 10•16 GB RAM•Fast quad core processor (e.g. Intel i7)•High-resolution screen (1920 × 1200 / 1080p)•Graphics card: DirectX 10.1 or 11.X compatible; 512 MB or higher•Fast SSD disk, as large as possible (capacity requirements depends heavily on simulation settings, e.g. 500 GB is a good start)•3-button mouseHigh disk speed is important if running more than 2 simultaneous simulations in parallel.E xample: If the user has enough SIMO-licenses and has configured SIMA to run 4 SIMO-calculations in parallel, then the simulations will probably be disk-speed-bound, and not CPU bound (with the above recommended hardware). Note that this is heavily dependent on the simulation parameters, so the result may vary. The default license type should now allow for unlimited parallel runs on one PC, workstation of cluster.Updated Drivers for Graphics CardThe driver of the graphics card should be upgraded to the latest version. This is especially important if you experience problems with the 3D graphics. Note that the version provided by Windows update is not necessarily up to date – download directly from your hardware vendors web-site.Installing graphics drivers may require elevated access privileges. Your IT support staff should be able to help you with this.SIMA should work with at least one graphics-mode (OpenGL, OpenGL2, DirectX 9 or DirectX 11) for all graphics cards that can run Windows 7 or 8. However, graphics cards can contain defects in their lower-level drivers, firmware and/or hardware. SIMA use the software “HOOPS” from the vendor “Tech Soft 3D” to draw 3D-graphics. For advanced users that would like more information on what graphics cards and drivers that does not work with SIMA (and an indication on what probably will work), please see the web page /hoops/hoops-visualize/graphics- cards/ .Before reading the compatibility table you may want to figure out which version of HOOPS SIMAis using. To do this open Help > About > Installation Details, locate the Plug-ins tab and look for the plug-in provider TechSoft 3D (click the Provider column title twice for a more suitable sort order). The version number is listed in the Version column. Also remember that all modes (OpenGL, OpenGL2, DirectX 9, DirextX 11) are available in SIMA.Upgrading from Earlier VersionsAfter upgrading to a newer version of SIMA, your workspaces may also require an update. This will be done automatically as soon as you open a workspace not created with the new version. You may not be able to open this workspace again using an older version of SIMA.Preference settings should normally be retained after upgrading, however you may want to open the preference dialog ( Window > Preferences ) in order to verify this.Verify Correct InstallationTo verify a correct installation of SIMA, perform the following steps:1.Start SIMA (by the shortcut created when installing, or by running the SIMA executable)a.If you are prompted for a valid license, specify a license file or license server. (If you needadvanced information on license options, see “License configuration”).b.SIMA auto-validates upon startup: A successful installation should not display any errorsor warnings when SIMA is started.2.Create a new, empty workspace:a.You will be prompted to Open SIMA Workspace: Create a new workspace by clicking New,select a different folder/filename if you wish, and click Finish.3.Import a SIMO example, run a SIMO simulation, and show 3D graphics:a.Click the menu Help > Examples > SIMO > Heavy lifting operationb.Expand the node Condition in the Navigator in the upper left cornerc.Right-click Initial, and select Run dynamic analysis. After a few seconds, you will see themessage Dynamic calculation done. No errors should occur.d.Right-click HeavyLifting in the Navigator in the upper left corner, and select Open 3DView. 3D-graphics should be displayed, showing a platform and a crane.4.If there were no errors when doing the above steps, then SIMA can be assumed to becorrectly installed.Changing Default Workspace Path ConfigurationWhen creating a new workspace SIMA will normally propose a folder named Workspace_xx where xx is an incrementing number; placed in the users home directory under SIMA Workspaces.The proposed root folder can be changed by creating a file named .simarc and place it in the users home directory or in the application installation directory (next to the SIMA executable). The file must contain a property sima.workspace.root and a value. For example:sima.workspace.root=c:/SIMA Workspaces/A special case is when you want the workspace root folder to be sibling of the SIMA executable. This can be achieved by setting the property as follows:sima.workspace.root=.License ConfigurationSIMA will attempt to automatically use the license files it finds in this order:e path specified in the file “.simarc” if present. See details below.e the path specified in the license wizard.e the system property SIMA_LICENSE_FILE.e the environment variable SIMA_LICENSE_FILE.e all “*.lic” files found in C:/flexlm/ if on Windows.e all “*.lic” files found in the user home directory.If any of the above matches, the search for more license files will not continue. If there are no matches, SIMA will present a license configuration dialog.The license path can consist of several segments separated by an ampersand character. Note that a license segment value does not have to point to a particular file – it could also point to a license server. For example:c:/licenses/sima.lic&1234@my.license.server&@another.license.serverIn this case the path is composed on one absolute reference to a file. Followed by the license server at port 1234 and another license server using the default port number.RIFLEX and SIMO LicenseWhen starting SIMO and RIFL E X from SIMA the environment variable MARINTE K_LICE NSE_FILE will be set to the home directory of the user. This means that a license file can be placed in this directory and automatically picked up.Specifying a License pathWhen starting SIMA without a license the dialog below will pop up before the workbench is shown. If you have a license file; you can simply drag an drop it into the dialog and the path to this file will be used. You may also use the browse button if you want to locate the file by means of the file navigator. If you want to use a license server; use the radio button and select License server then continue to fill in the details. The port number is optional. A host must be specified, however. Note that the host name must be in the form of a DNS or IP-address.You can now press Finish or if you want to add more path segments; you can press Next, this will bring up the second page of the license specification wizard. The page will allow you to add and remove licence path segments and rearrange their individual order.Modifying a License PathIf the license path must be modified it can be done using the dialog found in the main menu; Window >Preferences > License. This preference page works the same as the second page of the wizard.Specifying License Path in .simarcThe mechanism described here works much like specifying the environment variable, however it will also lock down the SIMA license configuration pages, thus denying the user the ability to change the license path. This is often the better choice when installing SIMA in an environment where the IT-department handles both installation and license configuration.The license path can be forced by creating a file named .simarc and place it in the users home directory or in the application installation directory (next to sima.exe). The latter is probably the better choice as the file can be owned by the system and the user can be denied write access. The license path must be specified using the sima.license.path key and a path in the FLE Xlm Java format. The license path can consist of several segments separated by an ampersand character. For instance:sima.license.path=c:/licenses/sima.lic&1234@my.license.server&@another.license.serverNote that the version of FLEXlm used in SIMA does not support using Windows registry variables. It also requires the path to be entered in the FLE Xlm Java format which is different from the normal FLE Xlm format. Using this mechanism one can also specify the license path for physics engines such as SIMO and RIFLE X started from SIMA. This is done by specifying the key marintek.license.path followed by the path in normal FLEXlm format. For example:marintek.license.path=c:/licenses/ sima.lic:1234@my.license.server:@another.license.server Viewing License DetailsIf you would like to view license details, such as expiration dates and locations you will find this in the main menu Help > License.NEW FEATURESNew Features - SIMONew Features - RIFLEXNew Features - OtherFixed bugs - SIMOFixed bugs - RIFLEXFixed bugs - OtherUnresolved Issues - SIMOUnresolved Issues - RIFLEXUnresolved Issues - OtherABOUT DNV GLDriven by our purpose of safeguarding life, property and the environment, DNV GL enables organizations to advance the safety and sustainability of their business. We provide classification and technical assurance along with software and independent expert advisory services to the maritime, oil and gas, and energy industries. We also provide certification services to customers across a wide range of industries. Operating in more than 100 countries, our 16,000 professionals are dedicated to helping our customers make the world safer, smarter and greener. DIGITAL SOLUTIONSDNV GL is a world-leading provider of digital solutions for managing risk and improving safety and asset performance for ships, pipelines, processing plants, offshore structures, electric grids, smart cities and more. Our open industry platform Veracity, cyber security and software solutions support business-critical activities across many industries, including maritime, energy and healthcare.。
VxWorks下进行OpenGL
在VxWorks下进行OpenGL编程的环境搭建教学在vxworks下进行OpenGL编程的环境搭建一、前言OpenGL 著名的API,其主要作用是依据照相机的设置,将指定图元绘制到帧缓冲中去。
Mesa 是OpenGL的一个具体实现,目前版本是7.0.2DRI 是直接渲染架构(Direct Render Infrustructure)。
包含了诸如ATI r300显卡的子项目Mesa原先是为UNIX/X11设计的,Mesa对于OpenGL的实现是纯软件的,不含硬件加速,所以跑3D图形时帧率低。
DRI提供了一个安全的接口,让Mesa(以及其他OpenGL实现)可以安全的使用显卡提供的硬件加速功能。
风河对于Mesa的支持貌似在5.0就停止更新了,现在Mesa7.0.2中关于windml中跑3D的代码还是N年以前的但对于入门OPENGL,学习空间、投影变换,光照,纹理,显示列表等概念这已经足够了所以写这个帖子只是让大家知道如何在vxworks下开始步入OPENGL世界,学习OPENGL基本概念而要真正开发应用程序,就一定要用DRI了,这就不在本文范围内了二、准备工作我的开发环境是Tornado 2.2VxWorks 5.5WindML 3.0Mesa 4.0(后面提供下载)三、编译Mesa for WindML 3D图形库下载MESA 4.0后,解压到c:\Tornado 2.2\target\src下目录结构如图所示[img]/attachments/month_0801/20080119_7c87d fdc8b8f7d900fafJNecXwLl2yoF.jpg[/img]在Tornado下,建立一个可下载工程,基于SIMNTgnu的然后添加以下所有的源文件到你的工程,不要漏哦#### GL #####(最主要的图形库)GL_SOURCES = \api_arrayelt.c \(在C:\Tornado2.2\target\src\Mesa\src下)api_loopback.c \api_noop.c \api_validate.c \accum.c \attrib.c \blend.c \buffers.c \clip.c \colortab.c \config.c \context.c \convolve.c \debug.c \depth.c \dispatch.c \dlist.c \drawpix.c \enable.c \enums.c \eval.c \extensions.c \feedback.c \fog.c \get.c \glapi.c \glthread.c \hash.c \hint.c \histogram.c \image.c \imports.c \light.c \lines.c \matrix.c \mem.c \mmath.c \pixel.c \points.c \polygon.c \rastpos.c \state.c \stencil.c \texformat.c \teximage.c \texobj.c \texstate.c \texstore.c \texutil.c \varray.c \vtxfmt.c \X86/x86.c \(C:\Tornado2.2\target\src\Mesa\src\X86下)X86/common_x86.c \X86/3dnow.c \X86/sse.c \math/m_debug_clip.c \(C:\Tornado2.2\target\src\Mesa\src\math下)math/m_debug_norm.c \math/m_debug_vertex.c \math/m_debug_xform.c \math/m_eval.c \math/m_matrix.c \math/m_translate.c \math/m_vector.c \math/m_vertices.c \math/m_xform.c \array_cache/ac_context.c \(C:\Tornado2.2\target\src\Mesa\src\array_cache下)array_cache/ac_import.c \swrast/s_aaline.c \(C:\Tornado2.2\target\src\Mesa\src\swrast下)swrast/s_aatriangle.c \swrast/s_accum.c \swrast/s_alpha.c \swrast/s_alphabuf.c \swrast/s_bitmap.c \swrast/s_blend.c \swrast/s_buffers.c \swrast/s_copypix.c \swrast/s_context.c \swrast/s_depth.c \swrast/s_drawpix.c \swrast/s_feedback.c \swrast/s_fog.c \swrast/s_histogram.c \swrast/s_imaging.c \swrast/s_lines.c \swrast/s_logic.c \swrast/s_masking.c \swrast/s_pb.c \swrast/s_pixeltex.c \swrast/s_points.c \swrast/s_readpix.c \swrast/s_scissor.c \swrast/s_span.c \swrast/s_stencil.c \swrast/s_texture.c \swrast/s_texstore.c \swrast/s_triangle.c \swrast/s_zoom.c \swrast_setup/ss_context.c \swrast_setup/ss_triangle.c \swrast_setup/ss_vb.c \tnl/t_array_api.c \(C:\Tornado2.2\target\src\Mesa\src\tnl下)tnl/t_array_import.c \tnl/t_context.c \tnl/t_eval_api.c \tnl/t_imm_alloc.c \tnl/t_imm_api.c \tnl/t_imm_debug.c \tnl/t_imm_dlist.c \tnl/t_imm_elt.c \tnl/t_imm_eval.c \tnl/t_imm_exec.c \tnl/t_imm_fixup.c \tnl/t_pipeline.c \tnl/t_vb_fog.c \tnl/t_vb_light.c \tnl/t_vb_normals.c \tnl/t_vb_points.c \tnl/t_vb_render.c \tnl/t_vb_texgen.c \tnl/t_vb_texmat.c \tnl/t_vb_vertex.c##### UGL #####UGL_SOURCES = \windml/ugl_api.c \(C:\Tornado2.2\target\src\Mesa\src\windml下)windml/ugl_dd.c \windml/ugl_span.c \windml/ugl_line.c \windml/ugl_tri.c \windml/tornado/torMesaUGLInit.c(C:\Tornado2.2\target\src\Mesa\src\windml\tornado下)##### OS #####OS_SOURCES = \OSmesa/osmesa.c \(C:\Tornado2.2\target\src\Mesa\src\OSmesa下) windml/tornado/torMesaOSInit.c(C:\Tornado2.2\target\src\Mesa\src\windml\tornado下)##### GLUTSHAPES #####GLUTSHAPES_SOURCES = \windml/ugl_glutshapes.c \(C:\Tornado2.2\target\src\Mesa\src\windml下)windml/tornado/torGLUTShapesInit.c(C:\Tornado2.2\target\src\Mesa\src\windml\tornado下)##### GLU #####GLU_SOURCES = \glu.c \(在C:\Tornado2.2\target\src\Mesa\src-glu下)mipmap.c \nurbs.c \nurbscrv.c \nurbssrf.c \nurbsutl.c \polytest.c \project.c \quadric.c \tess.c \tesselat.c \../src/windml/tornado/torMesaGLUInit.c(在C:\Tornado2.2\target\src\Mesa\src\windml\tornado下)[img]/attachments/month_0801/20080119_4f89d ed2de2ca3a42b2e6jZKz6cTra3L.jpg[/img]然后在C:\Tornado2.2\target\h下建立GL文件夹(存放OPENGL头文件的) 把C:\Tornado2.2\target\src\Mesa\include\下的gl.h、glext.h、glu.h、osmesa.h、uglglutshapes.h、uglmesa.h拷贝到刚建立的GL文件夹下做完以上工作后更改Tornado工程Builds选项卡中的c/c++ compiler选项,添加include path...添加以下路径C:\Tornado2.2\target\src\Mesa\includeC:\Tornado2.2\target\src\Mesa\src[img]/attachments/month_0801/20080119_3cfef5e6a6483303f483jiWIw5ZuhmiA.bmp[/img]再更改Rules选项卡,改为archive,即生成.a文件然后可以编译了,编译成功后会在你工程目录下生成.a四、建立一个vxworks的工程新建一个基于simpc BSP的vxworks工程把windml的complete 2D图形库和simulator host devices,Simulator graphics组件包含到vxworks编译你的vxworks如果不清楚这一步的,论坛里可以搜关于WINDML的安装及编译,这里就不多说了[img]/attachments/month_0801/20080119_6b074 85e5f36f8e340ba5p1CLOKEQLCf.jpg[/img]五、运行DEMO程序建立一个可下载的工程,基于SIMNTgnu工具链的以uglteapot为例将C:\Tornado2.2\target\src\Mesa\windmldemos下的uglteapot.c添加到工程把taskSpawn中的UGL_FALSE修改为UGL_TRUE,如下void uglteapot (void){taskSpawn ("tTeapot", 210, VX_FP_TASK, 100000,(FUNCPTR)windMLTeapot,UGL_TRUE,1,2,3,4,5,6,7,8,9);}更改Tornado工程Builds选项卡中Marcos选项在PRJ_LIBS中把生成的.a路径添加进去我的是C:/Tornado2.2/target/proj/MesaLib/SIMNTgnu/MesaLib.a然后编译工程,生成.out运行刚才生成的vxworks开启一个shell下载.out在shell下输入命令uglteapot以下是运行结果[img]/attachments/month_0801/20080119_b333a 0f7437ad7f53214UettZjm1vnnF.jpg[/img]可以按左右键旋转茶壶,按K键打开关闭光照1等按ESC是退出再帖几张运行的DEMO截图[img]/attachments/month_0801/20080119_a4184 2d31a1c7d58517dv0WCVxA8Wqkt.jpg[/img][img]/attachments/month_0801/20080119_424be e15071b789a6b26cvHcg9S4Nkv0.jpg[/img][img]/attachments/month_0801/20080119_6091d 74391b39d9838216qorhArldGlE.jpg[/img]六、总结也可以在vmware下的vxworks下测试你的DEMO不过由于不支持双缓,图形显示时有点问题在simpc下显示倒是很正常,不过速度很慢就是环境搭建好了大家可以参考DEMO里的流程来写自己的demo学习OPENGL了文中错误地方欢迎大家指正!!![upload=rar,mesa.part01.rar]viewFile.asp?ID=3020[/upload] [upload=rar,mesa.part02.rar]viewFile.asp?ID=3021[/upload] [align=right][color=#000066][此贴子已经被作者于2008-1-2012:38:14编辑过][/color][/align]-------------------------------------------------------------------------------------------------------------------------。
win下虚拟机安装android4.0(附截图)
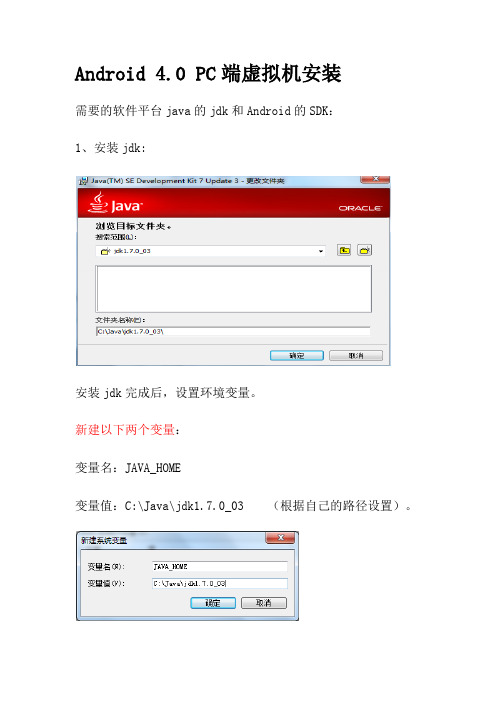
Android 4.0 PC端虚拟机安装
需要的软件平台java的jdk和Android的SDK:
1、安装jdk:
安装jdk完成后,设置环境变量。
新建以下两个变量:
变量名:JAVA_HOME
变量值:C:\Java\jdk1.7.0_03 (根据自己的路径设置)。
变量名:CLASSPATH
变量值:.;%JAVA_HOME%\lib;
在PATH变量中添加:
C:\Java\jdk1.6.0_10\bin; (根据自己的路径设置)。
查看安装是否成功:CMD下执行 java –version 查看
2、安装SDK
安装完成后:
打开SDK Manager.exe 加载过程中程序会连接Google服务器更新Android各版本资源
在需要安装的版本前面打勾,我们就只勾选Android 4.0了。
点击: install , 选择accept all
……等待中……
下载,安装完成。
创建虚拟机。
启动另一个程序“AVD Manager.exe”了。
我们选择New按钮。
Name一栏任意键入一个名字,最好为英文。
Target一栏选择我们安装的Android 4.0,点击Create AVD。
选中创建的虚拟机,点击start
接下来就享受吧。
驱动总裁静默参数
驱动总裁静默参数
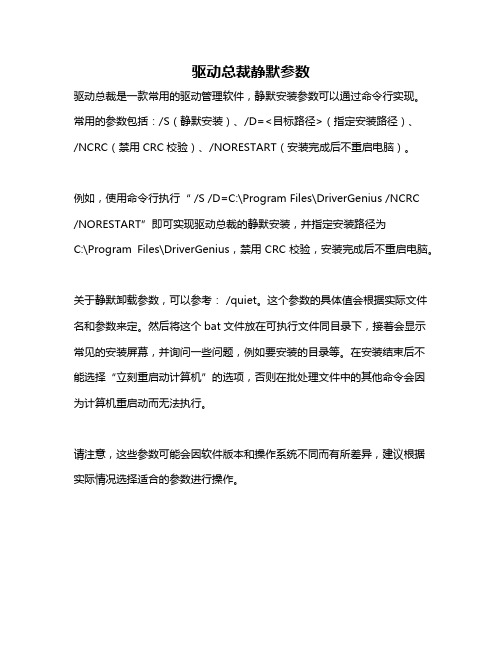
驱动总裁是一款常用的驱动管理软件,静默安装参数可以通过命令行实现。
常用的参数包括:/S(静默安装)、/D=<目标路径>(指定安装路径)、
/NCRC(禁用CRC校验)、/NORESTART(安装完成后不重启电脑)。
例如,使用命令行执行“ /S /D=C:\Program Files\DriverGenius /NCRC /NORESTART”即可实现驱动总裁的静默安装,并指定安装路径为
C:\Program Files\DriverGenius,禁用CRC校验,安装完成后不重启电脑。
关于静默卸载参数,可以参考: /quiet。
这个参数的具体值会根据实际文件名和参数来定。
然后将这个bat文件放在可执行文件同目录下,接着会显示常见的安装屏幕,并询问一些问题,例如要安装的目录等。
在安装结束后不能选择“立刻重启动计算机”的选项,否则在批处理文件中的其他命令会因为计算机重启动而无法执行。
请注意,这些参数可能会因软件版本和操作系统不同而有所差异,建议根据实际情况选择适合的参数进行操作。
Fluid Components FLSW Series Flow Alarm说明书

U HIGH or LOW Alarms U Compact DesignU Liquid or Gas ApplicationsU High or Low Flow Cutoff Applications UD ip Switch Configurable Buzzer, Relay, and LEDThe 150 mm high/low alarm flow meter with optical sensor switch is a noninvasive means for detection of a HI or LOW flow. This sensor is ideal for signaling an alarm, cutoff valve, or other device when the float passes the detector (alarm, valve, etc. not included).The FLSW Series helps protect your processes and equipment from damage caused by extreme flow rates. Its compact design and ease of operation make it a unobtrusive, simple-to-use addition to your flow meter.This meter is perfect for OEM TMapplications. Use whenever maximum or minimum flow levels need to be monitored automatically.The FLSW Series also can be used in conjunction with a control relay to power alternate equipment or monitoring devices.Principle of OperationA small, LED sensor and receiver are mounted on one side of the flow meter. The float inside the flow tube is detected as it passes across the beam of light. Sensor can be used to detect float passage beyond the setpoint of the sensor. It can also be set to monitor float position at a specific level, signalling when float is outside of the range of the sensor light beam.DIP Switches are located next the the 9-pin Dconnector. In order to activate the alarm sensors the corresponding switch has to be in the “ON” position on the DIP switch. The relay output or the buzzer or the green LED can be separately set for momentary or latch operation. If for example DIP Switch SW1 is set to “ON”, when the left sensor is active, the relay and the green LED will be energized in the latch mode. It will remain latched until the RESET button is pressed or external RESET TTL signal is applied.FLSW SeriesWITH ALARM1VARIABLE AREA FLOW METER FLSW3405ST variable area flow meter and FLTR-1 tripod, shown smaller than actual size.2For NIST calibration, add suffix “-NIST AIR ” to model number or suffix “-NIST WATER ” to model number for additional cost. For oxygen cleaning add suffix “-02CLEAN” to model number for additional cost.Ordering Examples: FLSW3405ST , aluminum variable area flow meter , maximum air flow 814 ml/min and maximum water 20.4 ml/min. FLSW3413T , aluminum variable area flow meter , maximum air flow 69940ml/min and maximum water 2000 ml/min.SPECIFICATIONSAccuracy: ±2% of full scale Repeatability: 0.5% of full scale Ambient Temperature: 0 to 70°C (32 to 158°F)Maximum Pressure: 200 psig Connections: ¹⁄₈ FNPT End Blocks: Aluminum or 316 Stainless SteelElastomers: Buna and FKM (Aluminum), FKM (316SS)Tube: BorosilicateFloat Materials: “G” for Glass or “ST” for 316 SS or “T” for Tantalum (noted in model number)Input Power: 12 Vdc, 15 Vdc maximum, 250 mA regulated, peak to peak maximum 100 mV Power Consumption: Less than 200 mAResponse Time: 500 milliseconds Source of Light: 65 mm, red LED Light Immunity: Pulse modulated Dry Contact Closures: 2 normally open, and normally closed relays 91A, 30 Vdc maximum)Alarm Options: High, Low or High/Low Buzzer: User configurable, momentary or latch through DIP switch setting Reset: Reset button or remote through “D”-connector, todisable relay or buzzerInterface: 9-pin“D”-connectorOptional: 12 Vdc power supply, tripod baseDimensions: A larm Electronics Enclosure : 51.1 x 76.2 mm (2.01 x 3.00") Enclosure #2 with Phone Plug : 30.5 x 14.2 mm (1.2 x 0.6")N.O.N.C.。
WindML相关知识和图形设备驱动程序开发
WindML相关知识和图形设备驱动程序开发[原创]WindML相关知识和图形设备驱动程序开发1、介绍WindML即Wind Media Library(媒体库),它支持多媒体程序运行于嵌入式操作系统,风河公司设计它主要是用来提供基本的图形、视频和声频技术以及提供一个设计标准设备驱动程序框架。
WindML API库提供了一个统一的图形硬件接口以及处理输入设备和输入设备事件的能力。
WindML有一下几个设计目的:●简单。
WindML提供一个灵活的图形源语集、基本的视频和声频功能;●硬件便宜。
可以在多种CPU体系结构上使用;●操作系统便宜。
可以在多种RTOS系统上使用;●驱动程序开发的容易。
提供给开发者一个定制设备驱动程序的机理。
2、WindML结构WindML包括两个组件――软件开发包(SDK)和驱动程序开发包(DDK)。
SDK组件用来开发应用程序,它提供了一个全面的API集,包括图形、输入处理、多媒体、字体和内存管理。
DDK组件是用来实现驱动程序的,它提供了一个完整的驱动程序参考集,包括硬件配置和API集,以使得开发者能够迅速的引导和使用自己的驱动程序。
WindML可以概括为如图1-1所示的结构:图1-1 WindML结构2.1 SDK这一层定义了应用程序代码和硬件驱动程序的接口,因此应用程序可以独立于硬件进行开发。
SDK提供了下列API集:●图形芯片的初始化程序●多媒体API,包括-2D图形-区域管理-窗口-颜色管理-视频支持-JPEG支持-声频●事件服务●内存管理●扩展API●设备管理2.2 DDKDDK是处于SDK和硬件之间的中间层,它直接与应用程序目标硬件设备接口,包括监视器、视频、声频、键盘和指示等设备。
对于大多SDK APIs都有相关的驱动程序级结构和API,比如,SDK原语uglRectangle( )就是用来划矩形给显示设备,它访问一个包含rectangle域的驱动程序结构,这个域就是执行划矩形操作的函数指针。
VWorks下WindML和Zinc的使用分析和总结
VxWorks 下 WindML 和 Zinc 的使用,Tornado2. 2 + WindML3. 0(2)2008-05-11 11:22以上谈到了安装完Tornado2. 2和BSP,本局部主要介绍在VmWare5. 5上下载并运行一个简单的helloWorld程序。
首先:VmWare5. 5虚拟机中虚拟的网卡为AMD的Pc-Net网卡,而Tornado2.2所带的PCNet网卡驱动在实际使用过程中并不好用,因此需要重新编译网卡驱动。
下面单独介绍如何编译网卡驱动。
编译网卡驱动准备工作:在Arnd的官方网站上下载PCNet网卡驱动,是一个99年的很老的压缩包,名为ln97xEnd. tarl. gz,解压缩后在对应文件夹下找到target 文件夹,将此文件夹拷贝到Tornado2. 2的安装目录下target文件夹所在的位置并覆盖。
编译:在开始->运行->cmd,进入..\tornado2. 2\host\x86~win32\bin 目录,运行torVars. bat,此批处理文件主要是设置Tornado的环境变量,为了方便起见,你也可以将其设置在Window XP系统的环境变量中。
设置的环境变量如下:set WIND_H0ST_TYPE=x86-win32set WIND_BASE=D:\Tornado2. 2set PATH=%WIND_BASE%\host\%WIND_HOST_TYPE%\bin;%PATH%进入到・. \tornado2. 2\target\src\drv\end 目录,运行 make CPU=PENTIUMtool=gnu ln97xEnd. o注意大小写和空格。
完成后将此目录下生成的ln97Xend. o拷贝到・. \tornado2.2\target\lib\pentium\PENTIUM\common 目录下,在 cmd 窗口中重新定位到..\tornado2. 2\target\lib\pentium\PENTIUM\common 目录,运行arpentium -d libdrv. a ln97xEnd. o完成后再运行arpentium -ra iOlicomEnd. o libdrv. a ln97xEnd. o成功后驱动编译就完成了。
WindML入门教程—在vxsim中调试WindML
WindML入门教程—在vxsim中调试WindML前言:最近要在WindML上作一些应用,所以就想从最简单的vxsim入手,熟悉一下WindML 的流程。
前两天一直在网上搜索相关内容,大致了解了在vxsim上调试WindML的步骤,自己动手试了试,遇到了不少问题,不过今天总算是成功了。
在调试的过程中,发现WindML这方面的资料比较少,基本上只能参考WindML安装之后的手册,而对于大多数初学者来说,怎样尽快入门才是最重要的。
现把我的整个调试过程给大家展示一下,希望能对初学者有所帮助。
一、准备工作开发环境:Tornado2.2+WindML3.0首先当然是安装Tornado和WindML了。
我是先安装Tornado2.2,再安装WindML3.0。
在安装的时候选择Tornado2.2就可以了。
在网上看到有人说好像有安装顺序以及补丁的问题,不过我倒是没遇到这个问题,至少在vxsim中试验没有这个问题。
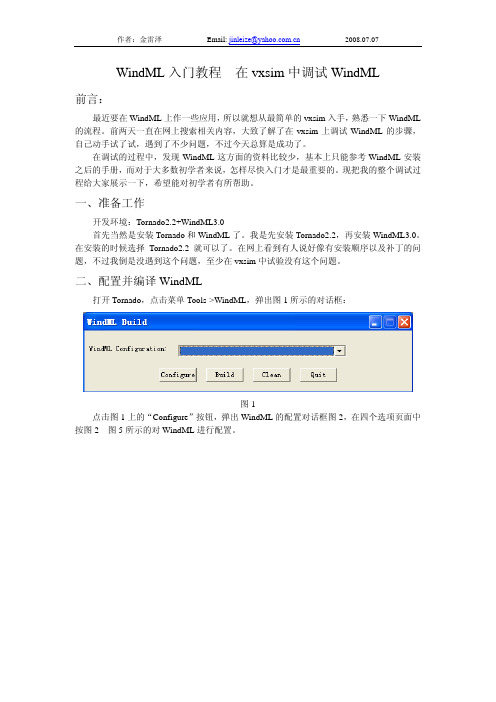
二、配置并编译WindML打开Tornado,点击菜单Tools->WindML,弹出图1所示的对话框:图1点击图1上的“Configure”按钮,弹出WindML的配置对话框图2,在四个选项页面中按图2—图5所示的对WindML进行配置。
图2图3图4图5配置好后,关闭对话框,会弹出图6所示的保存配置文件对话框,把该配置文件保存为WindML_vxsim_test。
图6在图1所示对话框的下拉列表中选择刚才保存的配置文件:WIndML_vxsim_test,如图7所示。
图7点击图7上的“Build”按钮进行编译。
编译过程比较慢,需要十分钟左右。
三、建立一个bootable image工程点击菜单File->New Project,弹出图8所示的创建工程对话框。
图8选择“Creat a bootable VxWorks image”,点击“OK”按钮图9点击“Next”按钮图10选中图10中的单选框“An existing project”,在下拉列表中选择“simpc_gnu_wpj”,点击“Next”按钮。
MS-9A95 WindBOX IV Advanced Slim Fanless Box PC用户手
Slim Fanless Box PCi1Thank you for choosing the WindBOX IV Advanced, an excellentindustrial computer system from MSI.The WindBOX IV Advanced eliminates the noise and the risk of fan’sfailure by wide heatsink as fanless solution. Furthermore, it supportsVESA wall-mount interface for various scenarios like digital signage, thinclient, and POS with affordable expenditure, which not only meets thedemand of Industrial applications but also fulfills the needs of companies,governments, and institutes for general applications.1-1-1System I/O & Controls133467810192512111314115 6915 69JATX8JCMOS1JME1 Clear CMOS Jumper: JCMOS1Normal (Default)Clear CMOS1 1AT/ATX Select Jumper: JATX811ATX (Default)AT ME Jumper: JME111Normal ME disable(Default)2This chapter provides you with the information on hardware setupprocedures. While doing the installation, be careful in holdingthe components and follow the installation procedures. For somecomponents, if you install in the wrong orientation, the components willnot work properly.Use a grounded wrist strap before handling computer components. Staticelectricity may damage the components.Always unplug the power cord before installing any components.1-2-1Align the notch on the DIMM withthe key on the slot and insert theDIMM into the slot at a 45-degreePush the DIMM gently downwardsuntil the slot levers click and lock2-3You can barely see the golden finger if the DIMM is properly inserted in thelevers outwards and the DIMM will beLocate the Mini-PCIe slot.Remove the Mini-PCIe card screwInsert the mSATA card into the slotPush the card gently downwards2-5Locate the M.2 slot. Remove the M.2 card screw preinstalled on the Insert the WiFi card into the slot atPush the card gently downwards Connect the WiFi antennas to theLocate the Mini-PCIe slot.Remove the Mini-PCIe card screwInsert the WiFi card into the slot atPush the card gently downwardsConnect the WiFi antennas to the2-7sure the HDD/SSD is compatiblePlease make sure the HDD is properlyAlign the SATA data & power connectors and connect the HDD to theLocate the VESA mount screw holes on the back of the monitor.Fasten the VESA mount plate to the monitor with the supplied screws.Mount the system onto the VESA mount plate.Tighten the thumbscrew at the bottom of the VESA mount plate to secure the system.Locate the wireless LAN antenna connector and install the antenna.Connect the signal cable from the monitor to the system.Connect the monitor power cord.Assemble the system power adapter and the power cord. Connect the power adapter to the system and then connect the power cord to the electrical outlet. We suggest that you connect the power adapter to your system first and then connect the power cord to the socket-outlet for safety concerns.Turn on the monitor and power on the system.Mount the VESA mount plate onto the system and tighten the thumbscrew at the bottom of the VESA mount plate.3This chapter provides information on the BIOS Setup program and allowsusers to configure the system for optimal use.Users may need to run the Setup program when:■An error message appears on the screen at system startup and re-quests users to run SETUP.■Users want to change the default settings for customized features.• Please note that BIOS update assumes technician-level experience.• As the system BIOS is under continuous update for better system performance, the illustrations in this chapter should be held forreference only.2-3-13-2MS-9A95MainUse this menu for basic system configurations, such as time, date, etc.AdvancedUse this menu to set up the items of special enhanced features.BootUse this menu to specify the priority of boot devices.SecurityUse this menu to set supervisor and user passwords.ChipsetThis menu controls the advanced features of the onboard chipsets.PowerUse this menu to specify your settings for power management.Save & ExitThis menu allows you to load the BIOS default values or factory default settings into the BIOS and exit the BIOS setup utility with or without changes.3-4System DateThis setting allows you to set the system date. The date format is <Day>, <Month> <Date> <Year>.System Timesetting allows you to set the system time. The time format is <Hour> <Minute> <Second>.SATA Mode SelectionThis setting specifies the SATA controller mode.Full Screen Logo DisplayThis BIOS feature determines if the BIOS should hide the normal POST messages with the motherboard or system manufacturer’s full-screen logo.When it is enabled, the BIOS will display the full-screen logo during the boot-up sequence, hiding normal POST messages.When it is disabled, the BIOS will display the normal POST messages, instead of the full-screen logo.Please note that enabling this BIOS feature often adds 2-3 seconds of delay to the booting sequence. This delay ensures that the logo is displayed for a sufficient amount of time. Therefore, it is recommended that you disable this BIOS feature for a faster boot-up time.Bootup NumLock StateThis setting is to set the Num Lock status when the system is powered on. Setting to [On] will turn on the Num Lock key when the system is powered on. Setting to [Off] will allow users to use the arrow keys on the numeric keypad.Option ROM Messagesitem is used to determine the display mode when an optional ROM initialized during POST. When set to [Force BIOS], the display mode used AMI BIOS is used. Select [Keep Current] if you want to use the display mode ofIntel Virtualization TechnologyVirtualization enhanced by Intel Virtualization Technology will allow a platform to run multiple operating systems and applications in independent partitions.virtualization, one computer system can function as multipleActive Processor CoresThis setting specifies the number of active processor cores.Execute Disable BitIntel’s Execute Disable Bit functionality can prevent certain classes of malicious “buffer overflow” attacks when combined with a supporting operating system. This functionality allows the processor to classify areas in memory by where application code can execute and where it cannot. When a malicious worm attempts to insert code in the buffer, the processor disables code execution, preventing damage or worm propagation.Hyper-ThreadingThe processor uses Hyper-Threading technology to increase transaction rates and reduces end-user response times. The technology treats the two coresSerial Port 1, Serial Port 2This setting enables/disables the specified serial port.Change SettingsThis setting is used to change the address & IRQ settings of the specified serial port.Mode SelectSelect an operation mode for the serial port 1.Power VoltageSelect the power voltage for the serial port 1.Watch Dog TimerYou can enable the system watch-dog timer, a hardware timer that generates a reset when the software that it monitors does not respond as expected each time the watch dog polls it.FIFO ModeThis setting controls the FIFO data transfer mode.Thermal Shutdownsetting enables/disables the thermal shutdown function thermal protection.Legacy USB SupportSet to [Enabled] if you need to use any USB 1.1/2.0 device in the operating system that does not support or have any USB 1.1/2.0 driver installed, such as DOS and SCO Unix.Audio ControllerThis setting enables/disables the onboard audio controller.Launch OnBoard LAN OpROMsettings enable/disable the initialization of the onboard/onchip Boot ROM during bootup. Selecting [Disabled] will speed up the boot process.CSM Supportsetting enables/disables the support for Compatibility Support Module, part of the Intel Platform Innovation Framework for EFI providing the capability to support legacy BIOS interfaces.ImportantIf the Operating System is going to boot in UEFI mode, disable CSM Support to speed up the boot process.VideoThis setting controls the execution of UEFI and Legacy Video OpROM.Boot Option Prioritiessetting allows users to set the sequence of boot devices where attempts to load the disk operating system.Hard Drive BBS PrioritiesThis setting allows users to set the priority of the specified devices. First press <Enter> to enter the sub-menu. Then you may use the arrow keys ( ↑↓ ) to select the desired device, then press <+>, <-> or <PageUp>, <PageDown> key to move it up/down in the priority list.Administrator PasswordAdministrator Password controls access to the BIOS Setup utility.User PasswordPassword controls access to the system at boot and to the BIOSIntel Trusted Execution TechnologyIntel Trusted Execution Technology provides highly scalable platform security in physical and virtual infrastructures.This setting enables/disables ME State.Manageability Features StateThis setting enables/disables Manageability Features State.AMT BIOS FeaturesThis setting enables/disables AMT BIOS Feature.AMT ConfigurationIntel Active Management Technology (AMT) is hardware-based technology for remotely managing and securing PCs out-of-band.ME FW Image Re-FlashThis setting enables/disables the ME FW image reflash.MS-9A95 ME Debug ConfigurationThis menu offers ME Debug settings for testing purposes.Security Device SupportThis setting enables/disables BIOS support for security device. When set to [Disable], the OS will not show security device. TCG EFI protocol and INT1A interface will not be available.SHA-1 PCR Bank, SHA256 PCR BankThese settings enable/disable the SHA-1 PCR Bank and SHA256 PCR Bank.Pending OperationSecurity Device Support is set to [Enable], Pending Operationthis item to [TPM Clear] to clear all data secured [None] to discard the selection. It is advised that users should routinely back up their TPM secured data.Platform Hierarchy, Storage Hierarchy, Endorsement HierarchyThese settings enable/disable the Platform Hierarchy, Storage Hierarchy and Endorsement Hierarchy.TPM2 0 UEFI Spec Version, Physical Presence Spec VersionThis settings show the TPM2.0 UEFI Spec Version and Physical Presence 3-16MS-9A95 Console RedirectionRedirection operates in host systems that do notand keyboard attached. This setting enables/disables the operation of console redirection. When set to [Enabled], BIOS redirects and sends all contents that should be displayed on the screen to the serial COM port for display on the terminal screen. Besides, all data received from the serial port is interpretedas keystrokes from a local keyboard.Console Redirection Settings3-18MS-9A95 DVMT Pre-AllocatedThis setting defines the DVMT pre-allocated memory. Pre-allocated memory isthe small amount of system memory made available at boot time by the system BIOS for video. Pre-allocated memory is also known as locked memory. This is because it is "locked" for video use only and as such, is invisible and unable to be used by the operating system.DVMT Total Gfx MemThis setting specifies the memory size for DVMT.Primary IGFX Boot DisplayUse the field to select the type of device you want to use as the display(s)of the system.Restore AC Power Losssetting specifies whether your system will reboot after a power failure interrupt occurs. Available settings are:[Power Off]Leaves the computer in the power off state.[Power On]Leaves the computer in the power on state.[Last State]Restores the system to the previous statusbefore power failure or interrupt occurred.Deep Sleep ModeThe setting specifies the Deep Sleep power saving mode. S5 is almost the same as G3 Mechanical Off, except that the PSU still supplies power, at a minimum, to the power button to allow return to S0. A full reboot is required. No previous content is retained. Other components may remain powered so the computer can “wake” on input from the keyboard, clock, modem, LAN, or USB device.** Advanced Resume Events Control **OnChip GbE/USBfield specifies whether the system will be awakened from power saving 3-20MS-9A95Save Changes and ResetSave changes to CMOS and reset the system.Discard Changes and ExitAbandon all changes and exit the Setup Utility.Discard ChangesAbandon all changes.Load Optimized DefaultsUse this menu to load the default values set by the motherboard manufacturer specifically for optimal performance of the motherboard.Save as User DefaultsSave changes as the user’s default profile.Restore User DefaultsRestore the user’s default profile.Launch EFI Shell from filesystem deviceThis setting helps to launch the EFI Shell application from one of the available file system devices.3-22This appendix provides the sample codes of WDT (Watch Dog Timer).2-A-1A-2。
- 1、下载文档前请自行甄别文档内容的完整性,平台不提供额外的编辑、内容补充、找答案等附加服务。
- 2、"仅部分预览"的文档,不可在线预览部分如存在完整性等问题,可反馈申请退款(可完整预览的文档不适用该条件!)。
- 3、如文档侵犯您的权益,请联系客服反馈,我们会尽快为您处理(人工客服工作时间:9:00-18:30)。
For example via the WindShell:
ld < c:\Tornado\target\lib\objMesaGL.o
ld < c:\Tornado\target\lib\objMesaUGL.o
ld < c:\Tornado\target\lib\objMesaGLU.o
5. Before the UGL is destroyed, call MesaDestroyContext().
6. Before exiting, call if required uglEventQDestroy and then
uglDeinitialize();
Limitations
WindML Driver for Mesa 4.0
Requirements
------------
Tornado 2 + WindML, Cumulative Patchs are recommended.
I suppose you have a valid WindML installation. Double buffer hardware
- c:\Tornado\target\config\comps\VxWorks\01uglmesa.cdf
- c:\Tornado\target\h\GL\*
Todo
----
- GCC 2.96, ASM co
Precision Insight team for their great job around Mesa, XFree, and DRI.
rem Command line build environments
set WIND_HOST_TYPE=x86-win32
set WIND_BASE=C:\Tornado
set MESA_BASE=C:\Mesa
set PATH=%WIND_BASE%\host\%WIND_HOST_TYPE%\bin;%PATH%
Tested on
---------
During the development, my main target was a CoolMonster:
- Video card: CT69000
- CPU: PENTIUM 266MHz
and my host a Windows NT + Tornado 2.
c:/Mesa/src/ugl/tornado/torVars.sample ->
/mnt/nt/Tornado/host/x86-win32/bin/torVars (for example)
3. In a command prompt:
$ torVars
$ cd c:\Mesa
$ make -f Makefile.ugl CPU=PENTIUM
Installation
------------
1. Mesa sources must be in root directory (C:\)
2. Add the following line to your torVars.bat:
set MESA_BASE=C:\Mesa
OR copy the new torVars.bat in your bin path:
Take a long while...
5. Include all the files from ugldemos folder to build some downloadable
application modules
4. Download UGL/Mesa object files on target
Wind River Systems to take me as an intern.
Stephane Raimbault
<stephane.raimbault@>
<stephane.raimbault@deesse.univ-lemans.fr>
July 24, 2001
7. In WindShell, run:
-> uglalldemos
During the show some messages will appear, it provides some useful
information on key management.
Coding
------
Sample Usage:
In addition to the usual ugl calls to initialize UGL, (may be find an
input driver), you must do the following to use the UGL/Mesa interface:
ld < c:\Tornado\target\lib\objGLUTshapes.o
ld < c:\Tornado\target\lib\objMesaOS.o
You can put the previous lines in a file and use:
< filename
6. Download the application modules.
-----------
I found the following limitations in my driver :
- Color Indexed management is only in 8 bits
- It's possible to mix UGL/OpenGL application with a software
UGL/Mesa Context and to make the context the current one.
3. Make gl* calls to render your graphics.
4. Use uglMesaSwapBuffers() when double buffering to swap front/back buffers.
- src/ugl/ugl_span.c
- src/ugl/ugl_tri.c
- src/ugl/uglmesaP.h
- ugldemos/*
Modified files in Tornado 2.0:
- c:\Tornado\host\x86-win32\bin\torVars.bat
double buffer
Modifications
------------
New files in Mesa:
- Makefile.ugl
- rules.windmlmesa
- docs/README.UGL
- include/GL/uglmesa.h
- si-glu/Makefile.ugl
1. Call uglMesaCreateContext() to create a UGL/Mesa rendering context,
given the display format.
2. Call uglMesaMakeCurrent() to bind the UGL/Mesa buffers to an
gives better performance than double buffer software so if you can
compile your WindML driver with this option, just do it. I/O
redirection is adviced in target server.
- src/Makefile.ugl
- src/ugl/torGLUTShapesInit.c
- src/ugl/torMesaUGLInit.c
- src/ugl/ugl_api.c
- src/ugl/ugl_dd.c
- src/ugl/ugl_glutshapes.c
- src/ugl/ugl_line.c
